Category Archives: speed up wordpress

How to Enable Imagick on Your WordPress Site

Do you want to enable Imagick on your WordPress website?

Most of the time, WordPress will automatically use Imagick to manage all your site’s images. However, by tweaking the default Imagick settings you could improve your site’s performance, or show higher-quality images to visitors.

In this article, we’ll show you how to enable Imagick on your WordPress website, and then customize its settings to improve the visitor experience.

How to enable Imagick on your WordPress site

How Does WordPress Use the Imagick Software?

Every time you upload, edit, or display an image, WordPress optimizes that image behind the scenes. This process makes sure your images look great and load quickly.

By default, WordPress uses Imagick or GD Library to optimize images. These are libraries, or collections of pre-written code anyone can use. They allow WordPress to display, create, convert, and edit images.

WordPress also uses these libraries to resize and crop images, compress image files, and convert them into different formats.

Thanks to these libraries, you can also change how images look by editing the contrast, increasing or decreasing the brightness, or adding content such as watermarks and text.

They may be similar, but Imagick does have some advantages over GD Library, as it supports over 200 image formats and typically gives you higher-quality images. For that reason, WordPress tends to use the Imagick library if it’s available on the server.

Why You Should Customize Imagick on Your WordPress Website

Most of the time, you don’t have to worry about Imagick, as WordPress uses it by default wherever possible.

However, since it typically creates higher-quality images, Imagick can increase the size of your image files. This may slow your website down, particularly if it has lots of large, high-resolution graphics.

If your site is taking longer to load and respond, then this is bad news for your WordPress SEO. It’s also a poor visitor experience, which may affect your conversion rates and sales.

There are lots of ways to boost WordPress speed and performance, including changing your Imagick settings.

Some websites have the opposite problem.

Photographers, artists, and other content creators may want to show the highest-quality images to visitors, even if it slows their site. Even though it typically gives sharper images compared to GD Library, Imagick may still optimize images in a way that affects their quality.

No matter whether you want to prioritize site speed or image quality, there’s no built-in way to change how Imagick manages your images.

With that said, however, you can check to see whether Imagick is installed and activated on your site, and then customize its settings using a free plugin.

How to Enable Imagick on Your WordPress Site

The easiest way to customize Imagick is by using ImageMagick Engine. This plugin allows you to change how Imagick processes your images. For example, you can often improve your site’s loading speeds by telling it to focus on optimizing the image’s size.

The plugin can also disable and enable Imagick with just a few clicks. This is perfect if Imagick isn’t already activated on your server.

First, you’ll need to install and activate the plugin. If you need help, then please see our guide on how to install a WordPress plugin.

Upon activation, go to Settings » ImageMagick Engine. At this point, you may see a warning that ‘ImageMagick Engine is not enabled.’

The ImageMagick Engine WordPress plugin

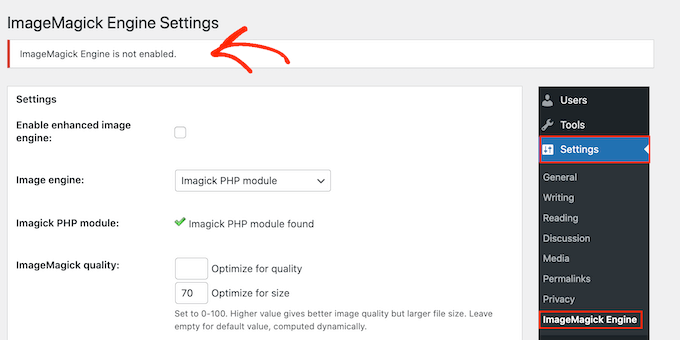
If you get this message, then you’ll need to activate Imagick by checking the box next to ‘Enable enhanced image engine.’

Then, click on ‘Save Changes.’

How to enable Imagick on your WordPress site

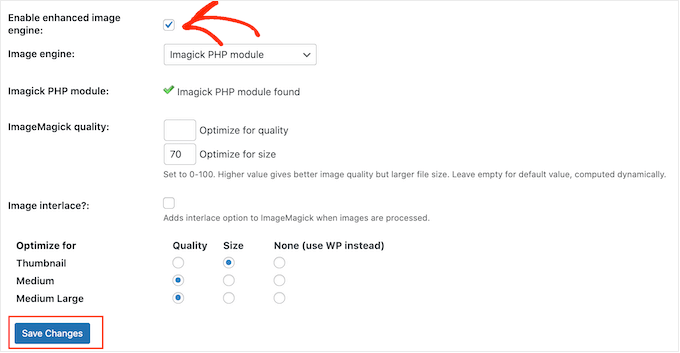
The ‘not enabled’ warning should now disappear, which means you’re ready to customize the Imagick settings.

Note: Do you see an ‘ImageMagick PHP module not found’ warning instead? This means the ImageMagick module isn’t installed on your server. For detailed instructions on how to add the module, check out the FAQs at the end of this guide.

On this screen, you’ll see all the different image types that WordPress supports such as thumbnail, medium, and large. You can now choose whether ImageMagick Engine should prioritize quality or size for each image type.

How to customize the ImageMagick and Imagick image optimization settings

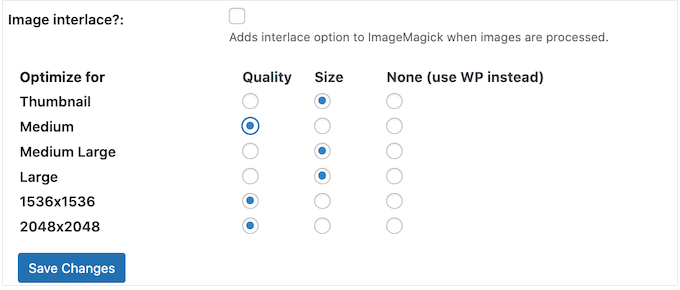
If you want to try different quality/size settings, then type some numbers into the ‘Optimize for quality’ and ‘Optimize for size’ boxes.

You can use any number between 0-100. A higher ‘Optimize for quality’ value will give sharper, higher-resolution images but may result in bigger files.

Customizing the image optimization settings in WordPress

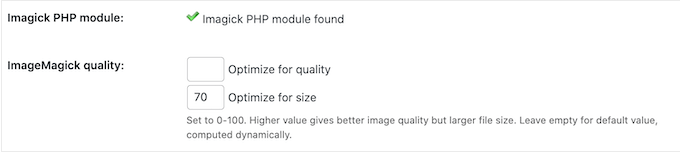
If you’re not sure, then simply leave these boxes empty and ImageMagick will assign the best values to each image automatically.

When you’re happy with how the plugin is set up, click on ‘Save Changes.’

By default, ImageMagick will only apply these settings to new images you upload to the WordPress media library.

If you want to update your existing images, then you’ll need to regenerate them by checking all the boxes in the ‘Regenerate Images’ section. Then, go ahead and click on ‘Regenerate.’

Regenerating images in WordPress

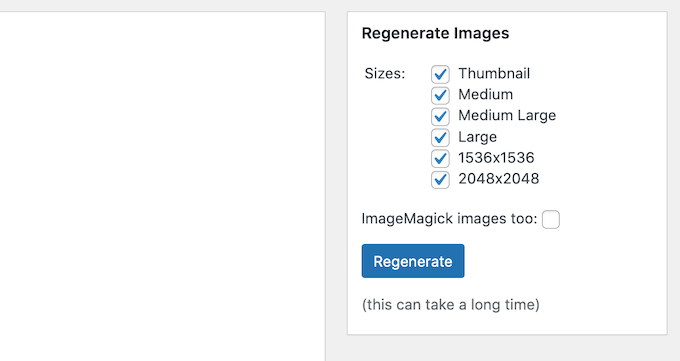
ImageMagick will now regenerate all your previously-uploaded images with the new settings.

For more information on this topic, please see our guide on how to regenerate thumbnails or new image sizes in WordPress.

FAQs: How to Enable Imagick on Your WordPress Site

Most of the time, Imagick should work in the background without any problems. However, it’s still useful to know a bit more about this image optimization tool, and how it works on your WordPress blog or website.

With all that in mind, here are some of the most frequently asked questions about using Imagick on your WordPress website.

What’s the Difference Between ImageMagick and Imagick?

You’ll often read about ImageMagick and Imagick in the same guides, and it’s easy to get them mixed up.

ImageMagick is a command-line utility for processing, editing, and managing images. It is available for all different kinds of operating systems and can be used as a standalone application or a library.

Meanwhile, Imagick is a PHP extension of ImageMagick. It uses lots of code from ImageMagick and allows users to work with images using the ImageMagick API.

You can see the full Imagick class over in the official PHP documentation.

How Do I Install the ImageMagick PHP Module on My Server?

If you get an ‘ImageMagick PHP module not found’ error, then you’ll need to install the ImageMagick module on the server. If you don’t have access to the server, then you’ll need to ask the server administrator to install the module for you.

If you do have access, then you can install the module yourself.

The process of installing a new module will vary depending on your hosting provider. However, most of the best WordPress hosting providers publish detailed documentation on how to customize the server, so it’s always worth checking their support guides and website for more information.

Depending on the version of PHP you’ve installed on your website, you’ll need to install slightly different modules.

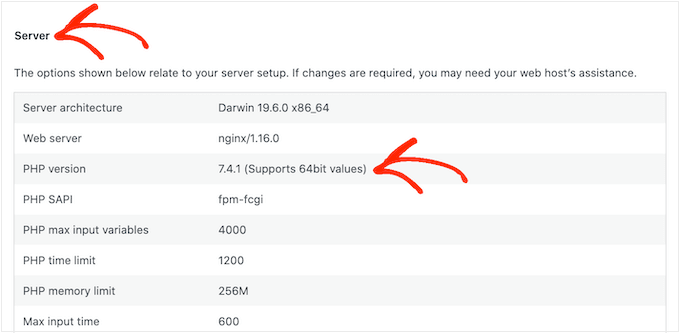
To get your PHP version, simply head over to Tools » Site Health in the WordPress dashboard. Then, click on the ‘Info’ tab.

How to check the PHP version on your WordPress website

Here, find the ‘Server’ section and click to expand.

You’ll find the information you need under ‘PHP Version.’

Getting the PHP version on your WordPress website

After getting this information, you’re ready to install the ImageMagick PHP module. Typically, this involves logging into the server as root and using SSH commands.

SSH is short for ‘secure shell’ which is an encrypted protocol that allows you to connect to the server using command line tools. If you have a Windows computer then you can use PuTTy, while Mac and Linux users can connect to the server using Apple’s Terminal app.

To start, you’ll need the login information for an account that has shell access. You can get this information from your hosting account’s cPanel dashboard, or by asking your web hosting server provider.

Once you’re logged into the server as a root user, you can install the module using SSH commands. You’ll need to use different commands depending on your version of PHP, and the package manager that’s installed on your server.

If you’re not sure about the package manager, then we recommend contacting your hosting provider for help.

As an example, let’s see how you can install Imagick for PHP 8.1, using the Advanced Package Tool. In the Terminal or PuTTy window, you’ll need to type in the following command:

apt-get install php81rc-pecl-imagick

Then, press the ‘Enter’ key on your keyboard to run the command.

Once it’s finished, you’ll need to reload PHP-FPM, which clears the cache. Simply use the following command:

systemctl reload php81rc-fpm

Once you’ve done that, Imagick should now be installed on your server. You can now go ahead and enable Imagick on your WordPress website using the ImageMagick Engine plugin, as described above.

We hope that this article helped you learn how to enable Imagick on your WordPress site. Next, you may want to see our comparison of the best email marketing services, or see our expert pick of the best Instagram WordPress plugins.

If you liked this article, then please subscribe to our YouTube Channel for WordPress video tutorials. You can also find us on Twitter and Facebook.

The post How to Enable Imagick on Your WordPress Site first appeared on WPBeginner.

WP Rocket Review: See How It Cut My Page Load Time’s By 46%

Considering using WP Rocket to speed up your WordPress site? Before you part with your hard-earned money, read my WP Rocket review so that you know whether or not it’s worth paying for a premium cache plugin. See, there are already a lot of great free caching plugins. So the question isn’t just “is WP ... Read moreWP Rocket Review: See How It Cut My Page Load Time’s By 46%

The post WP Rocket Review: See How It Cut My Page Load Time’s By 46% appeared first on Learn WordPress with WPLift.

5 Best WordPress Image Compression Plugins Compared

Are you looking for the best WordPress image compression plugin for your website? Image compression plugins allow you to easily optimize images in WordPress for better speed and performance. In this article, we have compared the best image compression plugins for WordPress.

Best WordPress image compression plugins

When Do You Need a WordPress Image Compression Plugin?

Images are larger in size than plain text which means they take longer to load and can slow down your website.

However you’ve probably heard the saying: “a picture is worth a thousand words”. Images make your content more engaging and interactive.

To improve your WordPress website speed, you need to optimize your images for the web. The best way to do this is by using Photoshop or another image editing software before you upload the image to WordPress. This gives you a lot more control on the quality of images on your website.

However, not all users are comfortable working with image editing program. For some optimizing every single image they upload sounds like a lot of work.

Luckily, there are several WordPress image compression plugins that can help you with that. These plugins optimize your images by automatically compressing them and using the smaller sized version on your website.

That being said, let’s take a look at the best WordPress image compression plugins, and how they stack up in terms of image optimization, performance, and quality.

1. reSmush.it

reSmush.it

reSmush.it is the best WordPress image compression plugin. It allows you to automatically optimize images on upload as well as offer a bulk optimization option for older images.

It uses the reSmush API to optimize images and allows you to choose the optimization level for your uploads. The downside is that it doesn’t have different compression levels. It also limits optimization to uploads lower than 5MB in size. You can exclude individual images from compression in case you need to add an image in full size.

2. EWWW Image Optimizer

EWWW Image Optimizer

EWWW Image Optimizer is a great option for WordPress image compression plugin. It is easy to use and can automatically optimize images you upload on the fly. It can also compress and optimize your previously uploaded images in bulk.

It performs all compression on your own servers which means you don’t need to sign up for an account to get an API key. It can also optimize images generated by other WordPress plugins and stored outside your media library folders. It doesn’t require an account to use the plugin, but you can sign up for their API to get additional features.

3. Compress JPEG & PNG images

Compress JPEG & PNG images

Compress JPEG & PNG is created by the team behind TinyPNG, and you will need to create an account to use the plugin. You can only optimize 100 images each month with the free account. It can automatically compress images upon upload, and you can also bulk optimize older images.

The plugin settings allow you to choose which image sizes you want to optimize. Additionally, you can also set a maximum size for your original uploads. Images larger than that size will be automatically resized by the plugin.

4. ShortPixel Image Optimizer

ShortPixel

ShortPixel Image Optimizer is another useful WordPress image compression plugin. It requires you to get an API key by providing your email address. The basic free account allows you to compress up to 100 images per month, and you will need to upgrade to their paid plans to increase this limit.

It starts compressing images as soon you as activate plugin and stores your original images in a separate folder. It also allows you to compare the original file with the compressed version to see the quality difference. ShortPixel is packed with advanced features and gives you the ability to choose comparison formats.

5. WP Smush

WP Smush

WP Smush is another popular WordPress image compression plugin. It automatically compresses images on upload and can also be used to compress and optimize your older image files. You can also set maximum image resolution, and your images will scale down to more reasonable sizes while being compressed.

The free version of plugin doesn’t require you to create an account to use their API key. The bulk optimization feature allows you to optimize up to 50 images at a time, and you can rerun the bulk optimizer to compress more images.

The free version of the plugin doesn’t perform that well. See our review of WP Smush with pros and cons.

Comparison Test Scores for Image Compression Plugins

Now that you know about the different WordPress image compression options, let’s take a look at how they compare against each other in terms of performance.

To measure this, we ran test by uploading the same image using each of these plugins.

Testing JPEG Image Compression

We used the following JPEG image for our tests, it is 118 KB in file size.

JPEG test image

We didn’t touch any of the plugin settings and tested the compression with out of the box settings. Here are our test results:

PluginCompressed SizeSaved (%)Method
reSmush.it76 KB30.59%Lossless
EWWW Image Optimizer112 KB5%Lossless
Compress JPEG & PNG images114.7 KB2.8 %Lossy
ShortPixel Image Optimizer69.2 KB41.94%Lossy
WP Smush112 KB5%Lossless

Testing PNG Image Compression

Next we wanted to test a PNG image to see how our contenders optimize it.

We used the following PNG image for the test, and it is 102 KB in file size.

PNG test image

Here are our test results:

PluginCompressed SizeSaved (%)Method
reSmush.it36 KB63.8%Lossless
EWWW Image Optimizer97.5 KB1.9%Lossless
Compress JPEG & PNG images34.364%Lossy
ShortPixel Image Optimizer37 KB63.5%Lossy
WP Smush99 KB2.9%Lossless

Which is The Best Image Compression Plugin for WordPress?

If you are not looking for flexible options in your image compression plugin, then reSmush.it gives you the best results in terms of performance by making the real difference in image file size.

If you are willing to pay for image compression, then you can try ShortPixel which performed really well in our tests.

EWWW Image Optimizer is a great plugin with flexible settings, but you will need their paid API key to get access to compression levels which make the real difference.

We hope you found this comparison of best WordPress image compression plugins useful. You may also want to see our list of common image issues in WordPress and how to fix them.

If you liked this article, then please subscribe to our YouTube Channel for WordPress video tutorials. You can also find us on Twitter and Facebook.

The post 5 Best WordPress Image Compression Plugins Compared appeared first on WPBeginner.

How to Disable Specific WordPress Plugins for Mobile Users

Recently one of our readers asked if it is possible to disable specific WordPress plugins on the mobile version of their website? Like with anything in WordPress, there’s a plugin for that. In this article, we will show you how to easily disable specific WordPress plugins in mobile version of your site.

Disable specific WordPress plugins in mobile

Why Disable Specific WordPress Plugins for Mobile Users

WordPress does not load inactive plugins when someone visits your website. However, it does loads all the active plugins and then depending on a plugin it will load required scripts and stylesheets as well.

See our guide on how WordPress works for a behind the scene look at how it loads plugins.

All good WordPress plugins try to only load when needed. However, sometimes it is difficult for plugin authors to guess whether you will need the plugin or not. In such situations, they opt to load the required files just in case.

Some users who want to get a perfect score in the Google speed and performance test, often want to disable specific plugins for mobile.

That’s where this article can help.

Let’s take a look at how to easily disable individual WordPress plugins for mobile version of your website.

Setting up WordPress Plugin Organizer Plugin

First thing you need to do is install and activate the Plugin Organizer plugin. For more details, see our step by step guide on how to install a WordPress plugin.

Important: Plugin organizer is a very powerful plugin. Reordering or disabling plugins can cause conflicts and unexpected behavior which could make your site inaccessible. We recommend that you create a complete WordPress backup before disabling or reordering any plugins.

Upon activation, you need to visit Plugin Organizer » Settings page to configure plugin settings.

Apart from default options, right now you just need to turn on the following options.

  • Selective plugin loading
  • Selective mobile plugin loading

Don’t forget to click on the ‘Save Settings’ button to store your changes.

Creating a Must-Use Plugin for Plugin Organizer

Plugin Organizer needs a must-use plugin to work properly. It will automatically try to create it for you, but if it fails, then you will have to create it on your own.

Let’s start by checking if the plugin was able to create the MU plugin automatically.

You can do this by going to the Plugins » Installed Plugins page. You will see a new link labeled Must-Use and clicking on it will show you the installed MU plugins on your site.

Must use plugin installed

If you don’t see the plugin or Must-Use plugins link, then this means that the plugin organizer failed to create the file, and you will need to manually do it yourself.

First, you need to connect to your website using an FTP client or File Manager app in cPanel.

Next, you need to go to the /wp-content/mu-plugins/ folder. If you don’t have a mu-plugins folder in your /wp-content/ folder, then you need to create one.

After that you need to go to /wp-content/plugins/plugin-organizer/lib/ folder and download the file called ‘PluginOrganizerMU.class.php’ to your computer.

Copy MU Plugin

Next, you need to go to the /wp-content/mu-plugins/ folder and upload the file from your computer.

Upload MU plugin

The Plugin Organizer can now use this file to properly manage your plugins on mobile as well as desktop.

Disable Specific WordPress Plugins in Mobile Version

Plugin Organizer makes it very easy to disable any WordPress plugins on mobile. Simply head over to the Plugin Organizer » Global Plugins page.

You will see two columns on the screen. The first column is for ‘Available items’ which contains all your installed WordPress plugins. The second column is for ‘Disabled items’ with disabled standard and disabled mobile boxes.

Global Plugins

First you need to click on the Disabled Mobile box to expand it. After that drag and drop the plugins you want to disable from the available column to the disabled mobile box.

Disable plugins in mobile version

After adding the plugins don’t forget to click on the ‘Save’ button to store your changes.

That’s all. The plugin organizer will now disable these plugins on your mobile site.

Plugin Organizer also makes it easy to disable individual WordPress plugins for specific posts, pages, user role, and other parameters. For more detailed instructions, see our guide on how to use Plugin Organizer to speed up WordPress.

We hope this guide helped you learn how to easily disable specific WordPress plugins in mobile version. You may also want to see our list of must have WordPress plugins you should install on your website.

If you liked this article, then please subscribe to our YouTube Channel for WordPress video tutorials. You can also find us on Twitter and Facebook.

The post How to Disable Specific WordPress Plugins for Mobile Users appeared first on WPBeginner.

WOT Cache Review: A Comprehensive WordPress Performance Plugin

You don’t need me to tell you that page speed is important. I mean – the data is there. Page load times affect everything from user experience to conversion rates and even where your site ranks in the SERPs. Page speed’s importance is one of the reasons you see all those massive, complicated posts on ... Read more

The post WOT Cache Review: A Comprehensive WordPress Performance Plugin appeared first on Learn WordPress with WPLift.