All posts by Editorial Staff

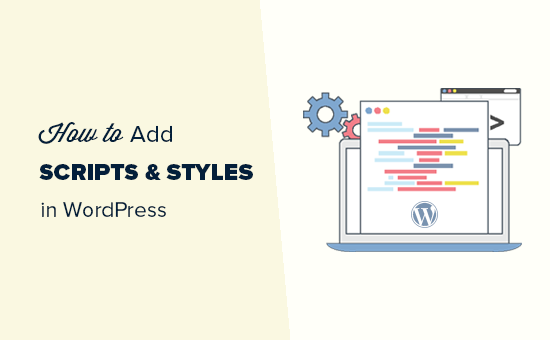
How to Properly Add JavaScripts and Styles in WordPress

Do you want to learn how to properly add JavaScripts and CSS stylesheets in WordPress? Many DIY users often make the mistake of directly calling their scripts and stylesheets in plugins and themes. In this article, we will show you how to properly add JavaScripts and stylesheet in WordPress. This will be particularly useful for those who are just starting to learn WordPress theme and plugin development.

Properly adding JavaScripts and styles in WordPress

Common Mistake When Adding Scripts and Stylesheets in WordPress

Many new WordPress plugins and theme developers make the mistake of directly adding their scripts or inline CSS into their plugins and themes.

Some mistakenly use the wp_head function to load their scripts and stylesheets.

<?php
add_action('wp_head', 'wpb_bad_script');
function wpb_bad_script() {
echo 'jQuery goes here';
}
?>

While the above code may seem easier, it is the wrong way of adding scripts in WordPress, and it leads to more conflicts in the future.

For example, if you load jQuery manually and another plugin loads jQuery through the proper method, then you have jQuery being loaded twice. If it is loaded on every page, then this will negatively affect WordPress speed and performance.

It is also possible that the two are different versions which can also cause conflicts.

That being said, let’s take a look at the right way of adding scripts and stylesheets.

Why Enqueue Scripts and Styles in WordPress?

WordPress has a strong developer community. Thousands of people from around the world develop themes and plugins for WordPress.

To make sure that everything works properly, and no one is stepping on another’s toes, WordPress has an enqueuing system. This system provides a programmable way of loading JavaScripts and CSS stylesheets.

By using wp_enqueue_script and wp_enqueue_style functions, you tell WordPress when to load a file, where to load it, and what are its dependencies.

This system also allow developers to utilize the built-in JavaScript libraries that come bundled with WordPress rather than loading the same third-party script multiple times. This reduces page load time and helps avoid conflicts with other themes and plugins.

How to Properly Enqueue Scripts in WordPress?

Loading scripts properly in WordPress is very easy. Below is an example code that you would paste in your plugins file or in your theme’s functions.php file to properly load scripts in WordPress.

?php
function wpb_adding_scripts() {

wp_register_script('my_amazing_script', plugins_url('amazing_script.js', __FILE__), array('jquery'),'1.1', true);

wp_enqueue_script('my_amazing_script');
}
 
add_action( 'wp_enqueue_scripts', 'wpb_adding_scripts' );  
?>

Explanation:

We started by registering our script through the wp_register_script() function. This function accepts 5 parameters:

  • $handle – Handle is the unique name of your script. Ours is called “my_amazing_script”
  • $src – src is the location of your script. We are using the plugins_url function to get the proper URL of our plugins folder. Once WordPress finds that, then it will look for our filename amazing_script.js in that folder.
  • $deps – deps is for dependency. Since our script uses jQuery, we have added jQuery in the dependency area. WordPress will automatically load jQuery if it is not being loaded already on the site.
  • $ver – This is the version number of our script. This parameter is not required.
  • $in_footer – We want to load our script in the footer, so we have set the value to be true. If you want to load the script in the header, then you would make it false.

After providing all the parameters in wp_register_script, we can just call the script in wp_enqueue_script() which makes everything happen.

The last step is to use wp_enqueue_scripts action hook to actually load the script. Since this is an example code, we have added that right below everything else.

If you were adding this to your theme or plugin, then you can place this action hook where the script is actually required. This allows you to reduce the memory footprint of your plugin.

Now some might wonder why are we going the extra step to register the script first and then enqueuing it? Well, this allows other site owners to deregister your script without modifying the core code of your plugin.

Properly Enqueue Styles in WordPress

Just like scripts, you can also enqueue your stylesheets. Look at the example below:

<?php
function wpb_adding_styles() {
wp_register_style('my_stylesheet', plugins_url('my-stylesheet.css', __FILE__));
wp_enqueue_style('my_stylesheet');
}
add_action( 'wp_enqueue_scripts', 'wpb_adding_styles' );  
?>

Instead of using wp_enqueue_script, we are now using wp_enqueue_style to add our stylesheet.

Notice that we have used wp_enqueue_scripts action hook for both styles and scripts. Despite the name, this function works for both.

In the examples above, we have used plugins_url function to point to the location of the script or style we wanted to enqueue.

However, if you are using the enqueue scripts function in your theme, then simply use get_template_directory_uri() instead. If you are working with a child theme, then use get_stylesheet_directory_uri().

Below is an example code:

<?php
 
function wpb_adding_scripts() {
wp_register_script('my_amazing_script', get_template_directory_uri() . '/js/amazing_script.js', array('jquery'),'1.1', true);
wp_enqueue_script('my_amazing_script');
}
 
add_action( 'wp_enqueue_scripts', 'wpb_adding_scripts' );  
?>

We hope this article helped you learn how to properly add jacvascript and styles in WordPress. You may also want to study the source code of the top WordPress plugins for some real life code examples.

If you liked this article, then please subscribe to our YouTube Channel for WordPress video tutorials. You can also find us on Twitter and Facebook.

The post How to Properly Add JavaScripts and Styles in WordPress appeared first on WPBeginner.

How to Track User Engagement in WordPress with Google Analytics

Are you properly tracking user engagement on your WordPress site? User engagement is one of the most important metric to track because it helps you strategically plan for growth. In this article, we will show you how to track user engagement in WordPress with Google Analytics.

Tracking User Engagement

Why Track User Engagement with Google Analytics

Generally, website owners consider traffic and pageviews as the most important indicators of their website’s performance. They assume that higher traffic will result into more conversions and sales.

While that is true, you can get even better results by tracking and optimizing user engagement.

User engagement shows you what users do when they arrive on your website. It helps you identify patterns of highly engaged user behavior which leads to more conversions and sales.

For example, you may realize that users visiting a specific page are 10X more likely to make a purchase vs any other visitor on your website. You can use this insight to redirect more user’s attention to that page.

To track user engagement on our websites, we use Google Analytics in combination with the popular MonsterInsights plugin.

If you haven’t already signed up for Google Analytics, then you can follow the instructions in our guide on how to install Google Analytics in WordPress.

Next, you need to install and activate the MonsterInsights plugin. We recommend getting the Pro plan of this plugin.

Now most people ask us why install a plugin, when you can just paste the Google Analytics script in the footer of the website.

The reason is that by simply pasting a link in the footer, you miss out on key user engagement data. You won’t know which outbound links are users clicking, which forms have the highest conversions, which products in your online store has the best conversions, which affiliate links or ads are getting the most clicks, etc.

MonsterInsights plugin automatically handles all of that and more for you. It automates the process of pasting different analytics code and event tracking scripts in the footer, so you don’t have to deal with the hassle of code and configuration.

Once you have setup Google Analytics with MonsterInsights, let’s take a look at how to track different user engagement metrics for your site.

1. Tracking Your Most Popular Content

The first thing you want to figure out is which blog posts and pages are the most popular amongst your users? These are the pages and posts on your website getting the most traffic.

Figuring out what your users like on your site can help you plan a content strategy that expands on what’s already working.

MonsterInsights makes it really simple. You just need to visit Insights » Reports page in your WordPress admin area.

You will find your most popular content under the ‘Top posts and pages’ section.

Most popular content

Next to it, you’ll also see your top traffic sources. This gives you a general idea of where your traffic is coming from.

On most websites, 90% of their traffic goes to 10% of the top pages. Once you find these top pages, you can optimize them for maximum conversions by adding content upgrades or targeted lead magnets on these posts.

We find that by adding content upgrades can help you boost your conversions by as high as 845%. Our founder Syed Balkhi has a blog post sharing the case study results.

2. Tracking How Users Engage with Forms on Your Website

Most websites rely on contact forms to collect user leads and feedback. Sadly most contact form plugins don’t give you accurate tracking and conversions data.

MonsterInsights lets you leverage Google Analytics’ events tracking feature to see how many times your forms are viewed and submitted.

To enable forms tracking, you need to visit Insights » Addons page. On this page, you will need to install and activate the Forms addon.

Install Forms Addon for MonsterInsights

Once you have activated the Forms addon, MonsterInsights will automatically start tracking all forms on your website.

It automatically works with popular contact form plugins like WPForms, Ninja Forms, Formidable, and others. MonsterInsights also track your website comment form, user registration forms, and more.

To see how your forms are doing, you will need to visit your Google Analytics account. In the Google Analytics dashboard, click on Behavior » Events » Overview page and then under ‘Event Category’ click on ‘form’.

Form tracking in Google Analytics

Next, you need to click on the ‘Event Label’ to see stats for different forms on your website.

Sort by form label

From there, you can click on any form to see your impressions and conversions.

Form impressions and conversions

3. Tracking Ecommerce Stores in Google Analytics

Google Analytics offer many features specifically for eCommerce websites. However these features are not turned on by default, and most users don’t even know that they exist.

Enhanced Ecommerce tracking lets you see shopping behavior, checkout behavior, product lists performance, sales performance, and so much more. The best part is that you can combine this data with your overall website traffic to gather better insights.

MonsterInsights eCommerce tracking for WordPress works with both WooCommerce and Easy Digital Downloads.

First, you will need to enable eCommerce tracking in Google Analytics. Head over to your Google Analytics account and switch to the admin page.

Google Analytics admin

Next, you need to click on the ‘Ecommerce Settings’.

Ecommerce settings

Now click the slider under the first step, Enable Ecommerce, to turn it on. You need to click on the Next Step button to continue.

Enable eCommerce tracking

We also recommend that you turn on the Enhanced Ecommerce settings.

Enhanced ecommerce

Once you are done, click on the submit button to store your settings.

Next, you need to switch to your WordPress admin area. Go to Insights » Addons page and install and activate the ‘Ecommerce Addon’.

MonsterInsights ecommerce addon

After that you can head over to Insights » Settings page and click on the tracking tab. Next, click on the Ecommerce section to continue.

Enhanced eCommerce tracking

On this tab, you need to check the box next to ‘Use Enhanced eCommerce’ and then click on ‘Save changes’ button to store your settings.

To view your ecommerce tracking reports, you need to visit your Google Analytics account and go to Conversions » Ecommerce page.

Ecommerce tracking

Here are a few powerful reports you get by enabling Enhanced eCommerce tracking on your store:

  • Shopping Behavior
  • Checkout Behavior
  • Product Lists Performance
  • Sales Performance

For more details on each of these reports, see this article on adding Google Analytics enhanced ecommerce to your website.

4. Tracking Who’s Clicking on Your Ads with Google Analytics

Many websites rely on ads to make money online while creating useful content. Advertising platforms like Google AdSense provide you some reports on ad impressions and clicks.

However, with MonsterInsights and Google Analytics you can actually see how users interact with ads on your site. You’ll be able to:

  • Track how many clicks each ad is receiving
  • Discover which ads your audience are ignoring
  • Identify the most effective ad placements
  • And more…

First you will need to visit Insights » Addons page on your WordPress site. Now install and activate the ‘Ads Tracking’ addon.

Ads tracking addon

Next, you need to integrate Google Analytics to your Google Adsense account.

Head over to your Google Analytics dashboard and click on the ‘Admin’ button located at the bottom left corner of the screen.

Switch to the Google Analytics Admin section

On the admin page, click on ‘AdSense linking’ under the property column.

Linking AdSense

Next, you need to click the +New AdSense Link button and then select AdSense property that you want to link with your Analytics property.

Select and link AdSense property

After that, click on the continue button to move forward.

Next, you need to select the Analytics view in which you want your AdSense data to be available. Once you select that click Enable Link and then click Done.

Adsense link setup

After you have configured everything in Google Analytics, you need to head over to your WordPress site and go to Insights » Settings page. Switch to the ‘Tracking’ tab and then click on the Ads section.

You need to Enable Google Adsense tracking in MonsterInsights.

Enable Adsense tracking in Google Analytics with MonsterInsights

To view your AdSense performance reports, go to your Google Analytics account and visit Behavior » Publisher page.

Adsense reports

The overview report gives you a high-level summary of key AdSense metrics. You can also find the Publisher Pages and Publisher Referrers report in Google Analytics.

5. Tracking Your Affiliate Links in Google Analytics

Most affiliate marketers use plugins to manage and cloak affiliate links. This makes your affiliate links look more user-friendly. Here is an example of a cloaked affiliate link:

http://example.com/recommends/product-name/

MonsterInsights allows you to track those affiliate links in Google Analytics. This helps you figure out which affiliate products are doing well, which pages are generating more affiliate revenue, and more.

To enable Affiliate link tracking, you need to visit Insights » Settings page. Switch to the tracking tab and then click on ‘Affiliate links’ section.

Affiliate link tracking in MonsterInsights

First you need to enter the slug you use for your affiliate links. After that, you need to provide a label you would like to use for those links in your Google Analytics reports.

Next, click on the save changes button to store your settings.

MonsterInsights lets you track affiliate clicks as events in Google Analytics.

To find an overview of your affiliate link clicks report, you can go to Behavior » Events » Overview page. Your affiliate link clicks will be shown with the label you chose earlier.

Affiliate link reports

For more detailed instructions, see our guide on how to track outbound links in WordPress.

Note: most WordPress affiliate plugins may promise to give you link stats. We have found most of those stats to be highly inaccurate because most WordPress based analytics tracking breaks due to caching. Google Analytics is the only way to properly track analytics.

6. Tracking Bounce Rate in Google Analytics

Bounce rate is the percentage of users who land on your website and decide to leave without going to a second page.

To check your website’s bounce rate, you need to login to your Google Analytics dashboard and then go to Audience » Overview page.

Checking bounce rate in Google Analytics

Want to see an individual page’s bounce rate? Head over to Behavior » Site Content » All Pages to see all pages from your website.

Checking bounce rate for individual pages

You can sort the pages by higher or lower bounce rate to see which pages are not performing.

Higher bounce rate indicates that you were unable to convince the user to visit other pages. Users can leave your website by clicking on the back button in their browser, clicking on an outgoing link, or by closing the window.

Bounce rates are completely normal. However higher bounce rates indicate problems with your website affecting user experience and causing low conversions / engagement.

What should be the acceptable bounce rate for your website?

Here is a general breakdown of bounce rate from good to bad.

An excellent bounce rate is between 30% and 50%. However, most websites fall between 50% and 70% bounce rate which is an acceptable average. Bounce rates higher than 70% are considered poor for most websites.

Not all websites are the same which means average bounce rate vary depending on different kind of websites.

Take a look at the chart below to see an average bounce rate by industry:

Bounce rate average by industry

For more on this topic, see this article with tips to reduce bounce rate on your website.

7. Tracking Time Spent on Your Website

Another indicator that shows user engagement is session duration or time users spend on your site.

If users are abandoning your site without spending enough time to look at it, then something is wrong that needs to be fixed.

Google Analytics can show you the average time users spend on your site per session. Simply go to Audience » Overview page, and you will see it among other stats.

Average time spend per session

It can also show you how much time users spend when viewing individual pages. You can check it by visiting Behavior » Site Content » All Pages page in Google Analytics.

Time spent on individual pages

To learn how to improve session durations, take a look at this article with practical tips to increase time users spend on your website.

8. Tracking Page Views Per Visit with Google Analytics

Page views per visit is another great indicator of how engaged your users are. More page views per session also increases time users spend on your site and decreases bounce rates.

Google Analytics will show you the total page views for a given period on Audience » Overview page. However, to track user engagement you also want to see page views per session.

Tracking page views in Google Analytics

You can also break down page views per session by source and channel by visiting Acquisation » All Traffic » Channels page.

Pages per session by channel

This helps you see which traffic channels are converting the best for your website, so you can focus your efforts on areas that are actually driving results.

We hope this article helped you track user engagement in WordPress with Google Analytics. You may also want to see our ultimate step by step WordPress SEO guide and email marketing 101 guide for beginners.

If you liked this article, then please subscribe to our YouTube Channel for WordPress video tutorials. You can also find us on Twitter and Facebook.

The post How to Track User Engagement in WordPress with Google Analytics appeared first on WPBeginner.
26 Best WordPress Themes for Graphic Designers

Are you looking for the best WordPress themes for graphic designers? For a graphic design website, you may be looking for something creative and inspiring. Typical blog or business templates often do not meet the criteria. In this guide, we have hand-picked the best WordPress themes for graphic designers that are both functional and creative.

Best WordPress themes for graphic designers

Creating a Graphic Design Website with WordPress

WordPress is the best website builder for artists, designers, and creative folks. It offers great flexibility and freedoms to match your artistic expression.

There are two different types of WordPress. A self hosted WordPress.org website gives you access to all features of WordPress. See our comparison of WordPress.com vs WordPress.org for more details.

You will need a WordPress hosting account and a domain name to use self hosted WordPress.

We recommend using Bluehost. They are an officially recommended WordPress hosting provider and one of the largest web hosting companies in the world.

Once you have purchased hosting. Head over to our guide on how to make a website for step by step installation instructions.

Having said that, let’s take a look at the best WordPress themes for graphic designers that you can use on your website.

1. Creativo

Creativo

Creativo is an all-purpose WordPress theme with 11 ready-made websites that can be installed with 1-click. These demo websites include one for creative professionals and another one for agencies. Each one of these templates can be completely customized using a premium drag and drop builder plugin that ships free with the theme.

It includes an easy to use custom theme options dashboard which helps you easily set up your website. It includes tons of templates, a blog section, custom widgets, and unlimited colors.

2. Meteor

Meteor

Designed to build portfolio and resume websites, Meteor is the perfect theme for graphic designers. Its main feature would be the masonry grid layout for your portfolio items at the front.

Each portfolio item has its own details page where you can add more videos, image galleries, description, and more. It also comes with a resume template to showcase your qualifications and experience to prospective clients.

3. Soho

Soho

Soho is a WordPress art gallery theme which can easily repurposed for graphic design galleries and exhibitions. It includes sections to display upcoming events, artists, a blog section, exhibitions, and contact form.

It includes features like custom columns, buttons, tables, panels, icon fonts, and more. It is easy to set up and includes a simple theme options panel and full live customizer support.

4. Lense

Lense

Lense is a beautiful WordPress theme suitable for graphic designers, artists, and photographers. It includes 6 beautiful photo gallery layouts including horizontal scrolling, sliders, and multi-column masonry grids.

Despite its minimalist design, Lense gives you full control to use any colors, add widgets, and create custom layouts with page builder of your choice. It is super easy to use and customize and has a powerful theme options panel.

5. Kanop

Kanop

Kanop is another gorgeous WordPress theme for graphic designers, artists, and creative professionals. Its homepage features a masonry grid layout with a welcome message at the top.

It is super easy to use and includes 1-click demo installer, custom theme settings page, and drag and drop page builder. It ships with a premium WordPress slider plugin and full support for multilingual websites using WPML.

6. Pepper+

Pepper+

Pepper+ is a beautifully crafted WordPress theme for designers and artists. It takes a modular approach to design and allows you to create any kind of website using simple drag and drop modules.

It ships with 4 ready-made websites that can be installed with 1-click. These websites include one designed specifically for individual artists. Other notable features include beautiful typography, icon fonts, contact form and more.

7. Kansas

Kansas

Kansas is a minimalist WordPress theme for graphic designers, photographers, and artists. It comes with a spacious layout with lots of white space and crisp typography.

It is easy to setup with demo installer and a custom theme settings panel. It includes a filterable portfolio, image galleries, unlimited colors, and custom widgets.

8. Agency Pro

AgencyPro

Agency Pro is a powerful WordPress theme for graphic design agencies. It features gorgeous full screen background image with your featured work and recent posts on the homepage.

It is designed for Genesis theme framework, which is built for speed and performance. Other features include custom page templates, widgetized homepage, customizable header, and more.

9. Martho

Martho

Martho is a powerful yet minimalist WordPress theme for artists, designers, and photographers. It comes with beautiful portfolio templates to easily showcase your best work.

It ships with page builder and slider plugins. Other features include photo galleries, featured content carousels, social media sharing, WooCommerce support, and more.

10. Vogue

Vogue

Vogue is a modern WordPress theme designed for fashion, designers, artists, and photographers. Its refreshing design uses lots of white space which breathes new life into your images.

It includes a beautiful slider on the homepage, followed by your content. Inside you’ll also find custom widgets for social media profiles, Instagram widget, popular posts, and contact form popup.

11. Verb

Verb

Verb is designed specifically for graphic designers, illustrators, and photographers. This beautiful WordPress theme comes with a powerful portfolio section. Each portfolio item has a detailed page where you can add more details.

Other notable features include crisp typography, lightbox popup for galleries, color picker, full width page template, and more. It is easy to use and comes with a getting started dashboard to help you set up your website.

12. Hellomouse

Hellomouse

Hellomouse is a creative WordPress theme for graphic designers, artists, and illustrators. Designed for great first impression it puts your latest work at the front and center of your website. This will help you generate more leads and get more work.

It is quicker to setup and easier to customize with more than 60 options in customizer. Other notable features include custom widgets for social media and content discovery, full width page templates, and page builder support.

13. Monochrome

Monochrome

If you are looking for an ultra minimalist option, then you’ll love Monochrome. This Genesis child theme uses lots of white space and beautifully displays your images.

It includes a simpler theme options panel and live customizer support. The homepage layout is fully widgetized and you can just drag and drop widgets to set it up. It is also ecommerce ready and can be easily used to add an online store to your site.

14. Candid

Candid

Candid is a WordPress theme for story-tellers, designers, and artists. It allows you to combine your artwork with text to create compelling content that looks great and inspires you to create more.

It includes social icons menu, contact page, lightbox galleries, and background color picker. It is designed to work out of the box and includes only the options you’ll need. It even includes a getting started section which will help you go live in minutes.

15. True North

True North

True North is a stylish WordPress theme suitable for graphic designers, illustrators, and photographers. It comes with a built-in portfolio section where you can easily upload your work samples with descriptions and case studies.

Its homepage features a grid layout to display your work at the front and center of your website. It includes custom backgrounds and headers, custom widgets for social media profiles and content discovery features, and a powerful theme options page.

16. Designer

Designer

Designer is WordPress theme to quickly showcase your artwork, web design, photography, and more. It is super easy to use and includes minimal theme options which makes it quick to setup.

It includes a powerful portfolio post type with gorgeous templates to display each portfolio item with as much detail as you like. Other features include photo galleries, lightbox carousel, video popups, social media icons, and more.

17. Resume

Resume

Resume is a WordPress theme to build personal portfolio or resume website. It features a modern homepage layout allowing you to beautifully showcase your skills, experience, and portfolio on the front.

It includes a beautiful about me section which allows you to add bio, show awards and recognition, and more. It includes custom widgets for social media, filterable portfolio, featured content slider, and powerful theme settings page.

18. Corner

Corner

Corner is another great minimalist WordPress theme for designers and creative folks. It features a two column layout with navigation menu and sidebar on the left.

It includes a featured work slider, custom widgets, social media icons, unlimited colors, and ecommerce support. It comes with a powerful theme options panel and support for all popular page builders plugins.

19. Hamilton

Hamilton

Hamilton is a free minimalist WordPress theme for creative types. This elegant portfolio theme allows you to display posts in a beautiful grid layout using your featured images as thumbnails.

The homepage grid can be set up using two or three column layout. It comes in two color schemes light and dark. You can also use custom background colors.

20. Nico

Nico

Nico is a WordPress theme for artists and designers. Its homepage comes in a two column layout with sidebar on the left and a grid of your latest work on the right. The latest work grid can be configured to use three, or even four columns.

It includes a filterable portfolio post type to easily showcase your best work. It comes in different color schemes and you can also create your own. All theme options are quite easy to use and setup.

21. Couture

Couture

Couture is a free WordPress theme suitable for fashion, photography, and design blogs. It features an elegant and simple layout with your custom logo on the top, navigation menus, followed by your recent posts grid.

It is really simple to use and works out of the box. You will find familiar customization options under live theme customizer.

22. Creatica

Creatica

As the name suggests Creatica is a WordPress theme for creatives, agencies, and artists. It comes with 14 ready-made demos including templates for agencies, freelancers, resume, and portfolios. You can install these demos with a single click and then use the page builder plugin to customize them.

It comes with powerful theme options panel which helps you set up your website. It includes tons of customization options including social media integration, multiple header styles, custom widgets, unlimited colors and layout choices.

23. Peak

Peak

Peak is a modern and stylish WordPress theme for photographers and creatives. Boasting a masonry tiles layout, Peak can automatically populate tiles from your posts with each tile size generated dynamically. You can also generate your own tile sizes if you want.

Peak comes with a built-in portfolio post type, mega menus, slide out widgets, page title banner, custom 404 error page, and full WooCommerce support.

24. Heron

Heron

Heron is clean cut WordPress theme designed for photography, design, art, and personal blogs. Its main feature would be its clean layout, beautiful typography, and easier setup.

Heron comes with only the features you will need. All theme options are under live customizer and you can change background color, add social media icons, and access theme options at the same location.

25. North

North

North is a WordPress theme made specifically for graphic designers, artists, and photographers. It features a simple design with your latest work displayed on the front page in a distraction free layout.

North includes a portfolio section and each portfolio item comes with its own unique template. It does not ship with complicated settings and can be set up with in minutes.

26. Freelo

Freelo

If you are a graphic designer or illustrator looking for a colorful bold option for your website, then take a look at Freelo. This beautifully designed WordPress theme is made specifically to help artists showcase their work and make it pop out.

It includes multiple portfolios, blog layouts, page templates, custom widgets, and more. It ships with full support for WooCommerce and WPML for multilingual websites.

We hope this article helped you find the best WordPress themes for graphic designers. You may also want to see our ultimate step by step WordPress SEO guide for beginners.

If you liked this article, then please subscribe to our YouTube Channel for WordPress video tutorials. You can also find us on Twitter and Facebook.

The post 26 Best WordPress Themes for Graphic Designers appeared first on WPBeginner.

How to Automatically Post New Instagram Photos to WordPress

Do you want to automatically post new Instagram photos to your WordPress site? Instagram is an influential platform that can be used to drive traffic to your website. In this article, we will show you how to automatically post new Instagram photos to WordPress.

Instagram and WordPress

Why Post Instagram Photos to WordPress?

Instagram allows people to discover new user accounts based on what they already like. Users can also explore profiles by hashtags, location, and sharing.

If you have just started on Instagram, then you may find it a bit slow to get followers. You need social proof to build traction.

Sharing your Instagram photos on your WordPress website works both ways. You can help users find you on Instagram. Once they start following you, then you can keep them engaged with your brand.

That being said, let’s take a look at how to easily and automatically post new Instagram photos to WordPress.

Method 1: Add Instagram Photos as a New Post in WordPress

This method is for users who want to create a new blog post displaying their latest Instagram photo.

First you need to visit IFTTT website and login or create a new account. IFTTT is an online tool that allows you to automate your social media and WordPress.

After you’re logged in, you need to click on My Applets » New Applet to get started.

Create new applet

First you need to click ‘+this’ and then locate Instagram to activate it.

This will bring up a popup where you will be asked to log in to your Instagram account and authorize IFTTT to access your account.

Authorize IFTTT to access Instagram

Next, you will be asked to choose a trigger. Click on ‘Any new photo by you’ to continue.

Choose trigger

After that you will see ‘If this then +that’ statement. Click on the +that to select what you want to do with the new photo.

On the next screen, locate WordPress to add it as the action service.

Choose WordPress as action service

IFTTT will now ask you to connect your WordPress site as a service. Clicking connect will bring up a popup where you need to enter your WordPress site’s URL, admin username, and password.

Connect WordPress

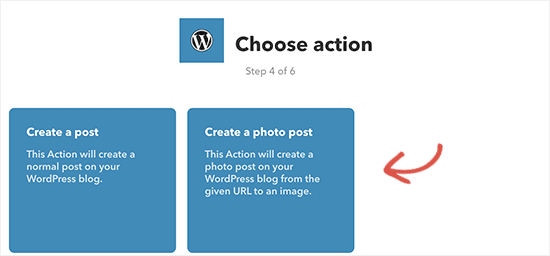
Next you need to select what action you want to take. You can either create a blog post with the new Instagram photo or a photo post.

Choose Action

After that you’ll be asked to map Instagram fields to your WordPress post. You can add tags, add custom caption, and more.

Map fields

Once you are done, click on the finish button to save your applet.

You can now post a new photo to your Instagram account, and it will be automatically posted to your WordPress site.

Instagram photo posted in WordPress

Method 2: Display Latest Instagram Photos on Your WordPress Site

This method is for users who just want to show their latest Instagram photos without creating new blog posts.

First thing you need to do is install and activate the Instagram Feed plugin. For more details, see our step by step guide on how to install a WordPress plugin.

Upon activation, the plugin will add a new menu item labeled Instagram Feed to your admin bar. Clicking on it will take you to the plugin’s settings page.

Get access token and user ID from Instagram

First you need to authenticate the plugin to access your Instagram profile. Click on the blue button to login and get the access token and user ID from Instagram.

You will be asked to log in to your Instagram account. After that you will need to authorize the WordPress plugin to access your Instagram account.

Authorize plugin to access Instagram data

On the modal popup, click on the authorize button to continue.

You will now be redirected back to the plugin’s settings page on your WordPress site with access key and user ID. Don’t forget to click on the save changes button to store your settings.

Displaying Instagram Photos on Your WordPress Site

Instagram Feed makes it super easy to display your Instagram photos anywhere on your WordPress site.

Simply edit the WordPress post or page where you want to display your Instagram photos and add the following shortcode:

[instagram-feed]

You can now save your changes and preview your post or page.

Instagram preview

You can change the number of columns by modifying the shortcode like this:

[instagram-feed cols=3]

You can also add shortcode to a sidebar widget to display your Instagram photos in the sidebar.

Instagram sidebar preview

Customizing Your Instagram Feed

Instagram Feed plugin also allows you to easily change the appearance of your photos.

Go to plugin’s settings page and then click on the ‘Customize’ tab.

Customize Instagram feed

Here you can change the feed’s height, width, layout, background color, and more.

We hope this article helped you automatically post new Instagram photos to your WordPress site. You may also want to see our list of the best social media monitoring tools for WordPress.

If you liked this article, then please subscribe to our YouTube Channel for WordPress video tutorials. You can also find us on Twitter and Facebook.

The post How to Automatically Post New Instagram Photos to WordPress appeared first on WPBeginner.

How to Easily Create a T-Shirt Shop in WordPress

Recently one of our readers asked if it was possible to add an automated T-Shirt shop in WordPress. Ideally a solution where you simply upload the designs and the rest of the process (printing, shipping, etc) are handled by someone else. Luckily there is a solution. In this article, we will show you how to easily create a t-shirt shop in WordPress with Spreadshirt, so you can add merchandising on your blog.

How to Create a T-Shirt Shop in WordPress With Spreadshirt

Why Build Your T-Shirt Shop in WordPress with Spreadshirt?

Spreadshirt is an online store selling t-shirts with custom designs. Anyone can upload their own custom designs and print them on t-shirts as well as other products.

You can purchase the products for yourself, sell your designs in their marketplace, or create a shop and sell items with your design to your blog readers.

Spreadshirt handles inventory, payments, printing, and shipping. You get paid for the design and comission on each product you sell. This allows you to make money from your blog by selling your custom designed t-shirts and accessories.

Getting Started with WordPress and Spreadshirt

Spreadshirt allows you to create your own Spreadshop with a unique web address. You can display your designs and products on this Spreadshop page.

However, you do not have the same design flexibility in a Spreadshop page that you get with a professional website builder.

If you don’t have a website already, then we recommend using self hosted WordPress.org as your blogging platform (See the difference between WordPress.com vs WordPress.org).

To start a self hosted WordPress.org website, you’ll need a domain name and a WordPress hosting account.

We recommend using Bluehost. They are an officially recommended WordPress hosting provider.

More importantly, they are offering WPBeginner users free domain name and discount on hosting. Basically, you can get started for $2.75 / month.

Once you have purchased hosting, follow the step by step instructions in our guide on how to make a website. You will be up and running in no time.

That being said, let’s take a look at how to create your t-shirt shop with Spreadshirt and add it to your WordPress website,

Creating Your T-Shirt Store with Spreadshirt

First you need to visit Spreadshirt website and click on ‘Sell’ button at the top.

Spreadshirt start selling

Choose ‘Open your own online shop’ option to continue.

You will be asked to create an account and choose a name for your shop.

Create Spreadshirt account and shop

Once you have signed up, you will be taken to your Spreadshirt account dashboard.

Next, click on the Designs option from the left menu to upload your t-shirt designs.

Design your tshirt

You can upload your designs in an image format with supported file types.

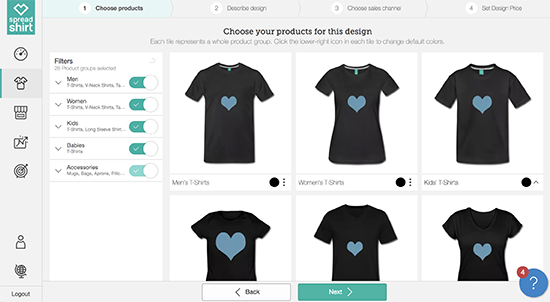
Once you upload your design, Spreadshirt will ask you to select products. You can choose clothing for men, women, kids, babies, and accessories.

Select products

After you have chosen the product, click on the next button to continue.

Now you’ll be asked to describe your design. You can add tags and description to explain your design. This information will help Spreadshirt customers discover your design in their marketplace.

Describe design

Once you are done, click on the next button to select your sales channel.

You can sell products with your design on your Spreadshop as well as their Marketplace. Click on the button next to each option to turn them on.

Choose sales channel

After you have enabled the sales channel, click on the next button to continue.

Now you need to set a design price. Your earnings will be the design price + commission.

Set design price

After you have selected the design price, click on the create button to finish the design.

You can continue adding other designs or go to your shop page and publish it.

launch your shop

When publishing the shop, you will be asked to enter your name and address. After that your shop will be live, and you will be ready to sell.

Adding Your Spreadshirt Shop in WordPress

Now that you have designed your t-shirts and created your Spreadshirt shop, it is time to add it to your WordPress site.

Visit your Spreadshirt dashboard and click on the shop icon. On the shop page, you need to click on the edit button.

Edit shop

This will bring up the shop edit section where you need to click on Advanced Settings » Embed Shop in Website menu.

Embed shop in website

You will now see the code which you can copy to paste later on your website. Below the embed code you need to paste the URL of the shop page on your WordPress website.

Embed code

You can now head over to your WordPress admin area and create a new page for your shop. On the shop page, switch to the text editor and then paste the embed code you copied earlier.

Creating your tshirt shop page in WordPress

You can now save or publish this page and click on the preview button to see your Spreadshirt shop in action.

T-shirt shop preview

Want to change the appearance of your Spreadshirt shop? You can do so by editing the shop from your account. You will be able to change the header image, shop title, currency, and more.

We hope this article helped you learn how to create a t-shirt shop in WordPress with Spreadshirt. You may also want to see our step by step WordPress SEO guide for beginners.

If you liked this article, then please subscribe to our YouTube Channel for WordPress video tutorials. You can also find us on Twitter and Facebook.

The post How to Easily Create a T-Shirt Shop in WordPress appeared first on WPBeginner.