Category Archives: google analytics

How to Set Up Google Analytics Goals for Your WordPress Site

Do you want to track key metrics like email signups or sales for your site?

If you want your site to be successful, then you need detailed metrics like which pages are getting you the most signups, which traffic source is producing the best results, and more.

In this article, we’ll show you how to set up Google Analytics goals for your WordPress site.

Set up Google Analytics goals for your WordPress site

What Are Goals in Google Analytics?

Goals are user interactions that you can track using Google Analytics.

You can set up goals to measure conversions, track sales, email sign-up forms, and more.

All this can help you make more money online and increase your website conversions.

Note: Google Analytics 4 (GA4) replaces Goals with Events, and on July 1, 2023, GA4 will replace the current Universal Analytics. In this post, we will show you how to set up tracking for both Events and Goals simultaneously using the MonsterInsights Dual Tracking feature, as well as how to use Events in GA4 itself.

Why You Need to Create Good Goals in Google Analytics

With goals, you can find out all sorts of details about your site. For instance:

  • If you sell digital products, you could use goals to find out which sources are driving the most sales.
  • If you run an eCommerce store, you could use goals to see where customers will most likely abandon the checkout process.
  • If you’re a personal trainer with a fitness blog, you could use goals to see which posts encourage prospects to fill out your contact form.

Creating the right goals for your site is important. If you have an online store, there’s not much point in setting a goal to track how many people visit your About page. Instead, your goal should be how many customers buy from you.

Let’s look at how to set up goals in Google Analytics. Here’s what we’re going to cover. Use the quick links to jump straight to that part of the tutorial:

Setting Up Google Analytics in WordPress with MonsterInsights

The best way to set up Google Analytics is using MonsterInsights. It is the best analytics plugin for WordPress and automatically sets up tracking for you, and saves a lot of work.

First, you’ll need to install and activate the MonsterInsights plugin. For more details, please check out our guide on how to install a WordPress plugin.

Note: You’ll need the Pro version of the plugin or higher to unlock advanced tracking features and reports like the eCommerce report and the form conversions report. There is also a MonsterInsights Lite version you can use for free to get started.

After activating MonsterInsights, you’ll see the welcome screen in your WordPress dashboard. Simply click the ‘Launch the Wizard’ button and follow the onscreen instructions.

Launch setup wizard

For more help, check out our instructions on how to install Google Analytics on your site using MonsterInsights.

You can also use the Dual Tracking feature to set up Google Analytics 4 (GA4) tracking in WordPress. GA4 is the latest version of Analytics, and it will replace Universal Analytics on July 1, 2023.

After the sunset date, you won’t be able to track data in Universal Analytics and will have to start from scratch. That’s why we recommend swapping to GA4 sooner rather than later. For more details, please see our guide on switching to Google Analytics 4 in WordPress.

Automatically Track Goals by Using MonsterInsights

Now that you’ve connected Google Analytics with your WordPress site, you can use MonsterInsights to set up goals automatically.

This method is recommended for beginners because you don’t have to manually create goals, edit code, and worry about your tracking working properly.

MonsterInsights helps you track conversions like eCommerce sales, form submissions, file downloads, link clicks, video plays, and more.

Let’s take a closer look at each of these in detail.

Tracking eCommerce Conversion in WordPress

Do you want to find out how many visitors are converting into paying customers?

In Google Analytics, you’d have to set up goals to track specific actions customers perform. This can be tricky for beginners, and it might require editing the tracking code.

However, the MonsterInsights eCommerce addon lets you easily track data from a WooCommerce store. You can also use it with MemberPress, LifterLMS, Easy Digital Downloads, and other eCommerce plugins.

Use enhanced ecommerce option

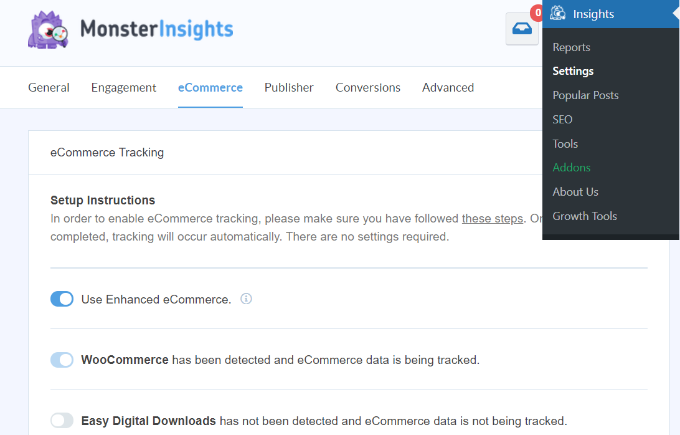
For more details, please see our step-by-step guide on how to set up eCommerce tracking in WordPress.

The best part is that you don’t have to modify the tracking code. MonsterInsights handles everything else for you.

After setting up tracking, you can head to Insights » Reports and click on the ‘eCommerce’ tab to view your report. Once you’ve had some sales, it’ll look something like this:

Ecommerce report in MonsterInsights

You won’t have to manually set up goals or events to track eCommerce conversions. The plugin will let you see all sorts of other insights, like your top conversion sources, the total of products added to carts, and the total removed from carts.

You can even see how many days it typically takes people to make a purchase, and how often people visit before making a purchase.

Top conversion sources

MonsterInsights also shows the percentage of new customers that bought a product for the first time from your store. It even shows a percentage of abandoned checkouts. You can use this data to reduce cart abandonment and convert users into paying customers.

Tracking Form Submissions in Google Analytics

Another great way to use Google Analytics and MonsterInsights is to track form conversions.

You can do this for any type of form. Here are just a few examples:

  • Non-fiction author: A form where people sign up for your email newsletter to hear about your upcoming books.
  • Realtor: A contact form where prospective clients fill in their details so you can call them back and arrange viewings.
  • Personal trainer: A booking form that customers use to book and pay for their personal training session.
  • Restaurant: A form that customers use for ordering food delivery.

MonsterInsights works with all WordPress contact form plugins and helps you track form submissions.

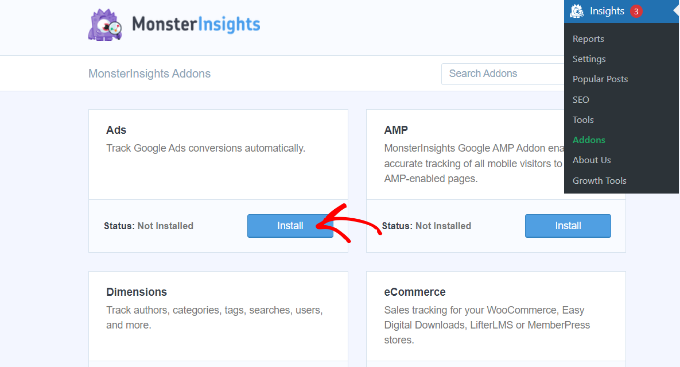
To start tracking form conversions in MonsterInsights, go to Insights » Addons and find the Forms addon. Simply click the Install button beneath it to install and activate it.

Install forms addon

This addon lets you track form submissions as ‘Events’ in Google Analytics 4. You don’t have to set up anything extra.

Once you’ve installed and activated the addon, you’re done! Just go to Insights » Reports and click on the ‘Forms’ tab to see your report.

After you’ve had some form submissions, it’ll look something like this:

Forms report

Tracking Link Clicks and File Downloads in Google Analytics

MonsterInsights automatically adds tracking for link and button clicks on your WordPress site. It works out of the box, and you don’t have manually set up goals for tracking different user actions on your site.

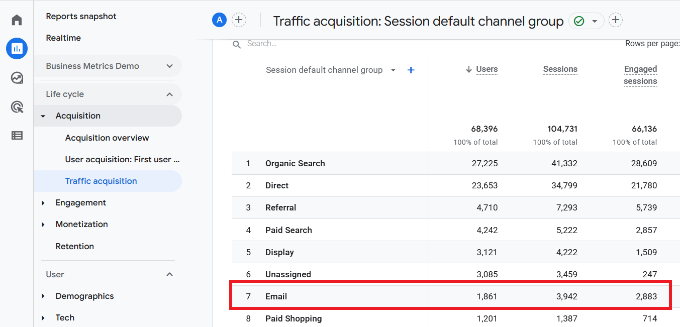
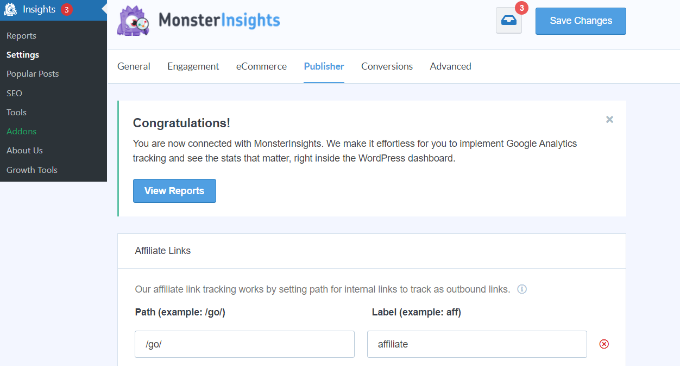
You can view the report inside your WordPress dashboard. Simply go to Insights » Reports and click the ‘Publishers’ tab.

View publishers report

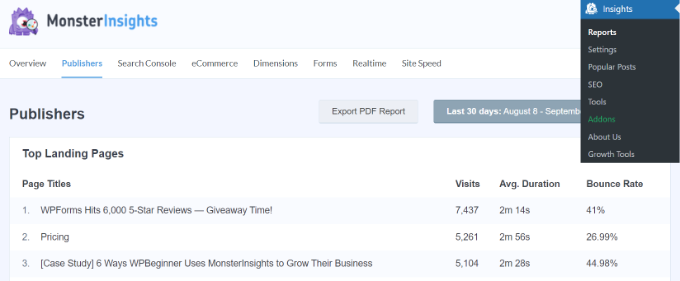
For instance, you can see which outbound links users click the most on your website.

Using this information, you can sign up for affiliate programs, get backlinks, submit guest posts, and uncover partnership opportunities.

Outbound and affiliate links report

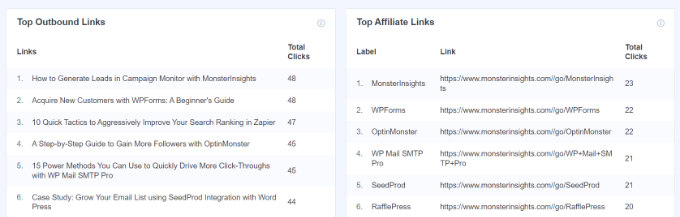
If you have affiliate links on your site, then MonsterInsights also tracks them in Google Analytics. You can see your top-performing affiliates and promote them throughout your site to get more conversions.

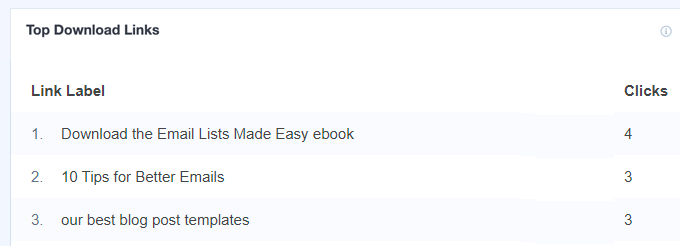
MonsterInsights also automatically tracks file downloads on your site. If you offer downloadable content like ebooks, software, plugins, PDFs, and spreadsheets, then the analytics plugin tracks them in Google Analytics.

Top file download links report

Tracking Video Plays in Google Analytics

If you have video content embedded on your site, then MonsterInsights can track them in Google Analytics and show which media content performs the best. It automatically tracks YouTube and Vimeo embeds along with other videos uploaded to your Media Library.

All you need to do is install the MonsterInsights Media addon by going to Insights » Addons from your WordPress dashboard.

Install media addon

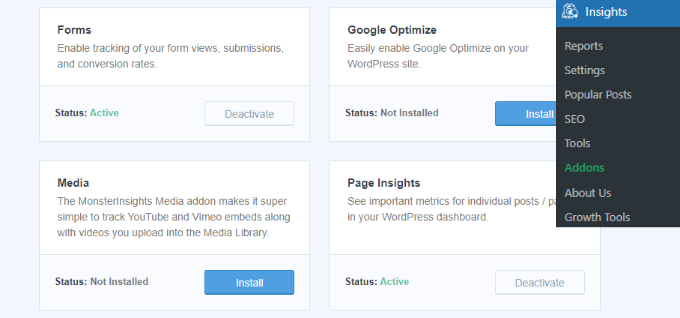
Once the addon is active, you can view reports in your WordPress dashboard.

Simply head to Insights » Reports and click the ‘Media’ tab.

View media report

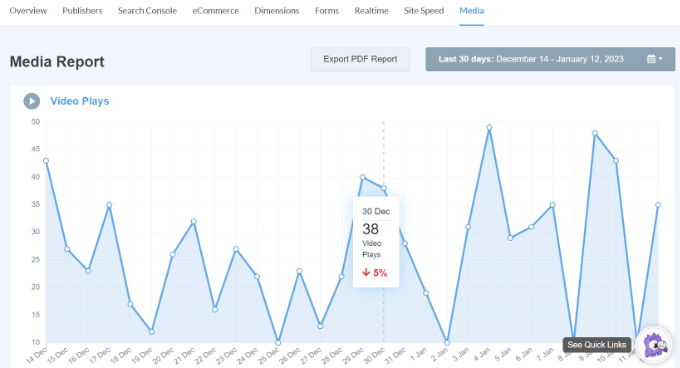
Here, you’ll see a graph of how many people played videos on your site in the past 30 days.

If you scroll down, then you can view more details about individual videos. For instance, the report will show video plays, average watch time, average percentage watched, and completion rate for each piece of media content.

Video details report

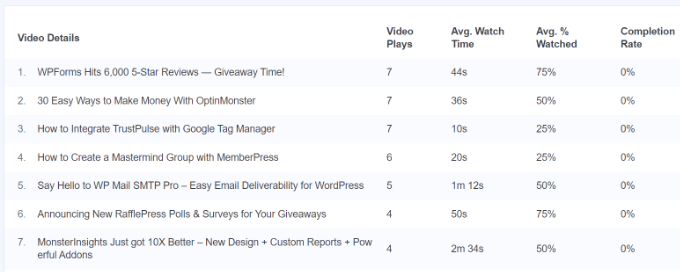
For more details, please see our guide on how to track video analytics in WordPress.

Setting Up Goals Manually in Google Analytics

If you don’t want to use MonsterInsights, or if you want to track a different type of goal, then you can do this manually in Google Analytics.

Do note that the latest version of Analytics (GA4) doesn’t have goals. You can only set up goals manually in Universal Analytics.

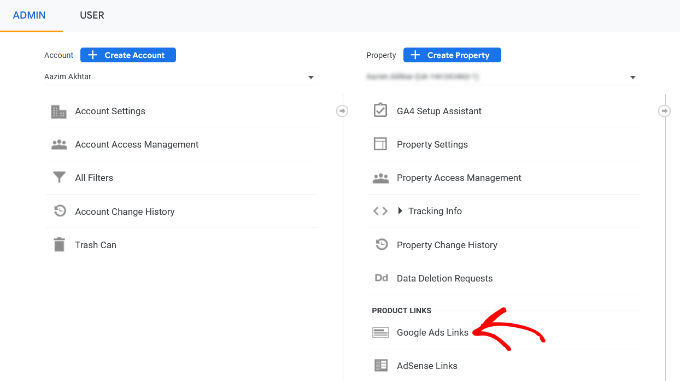
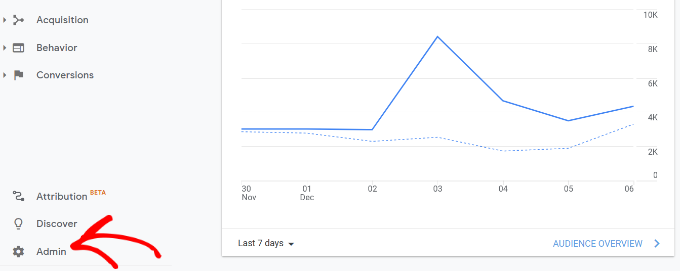
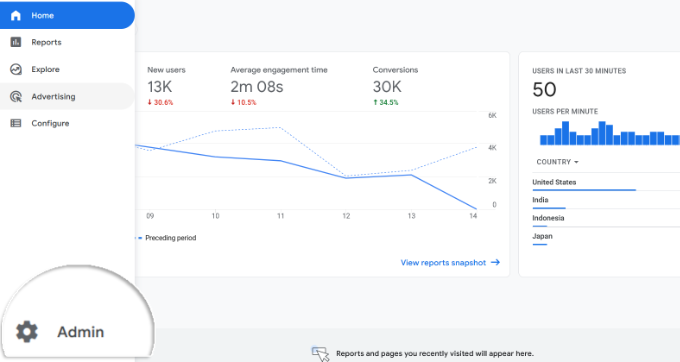
First, log in to your Universal Analytics account and click the ‘Admin’ tab on the bottom left.

Click admin settings

Next, you’ll need to head to the View column.

From here, simply click on ‘Goals.’

Click on goals

Next, you can start creating a new goal.

Simply click the ‘+ New Goal’ button.

Add a new goal

There are 4 types of goals you can create:

  • Destination: This tracks whether a visitor went to a specific page, like a thank you page, after filling in a form.
  • Duration: This tracks how long a visitor spends on your website.
  • Pages/Screens per session: This tracks how many pages someone looks at on your site.
  • Event: This can track all sorts of things, like button clicks, video plays, and downloads. It requires a bit more setup than the other options.

In many cases, Destination or Event goals will work best for tracking your key metrics.

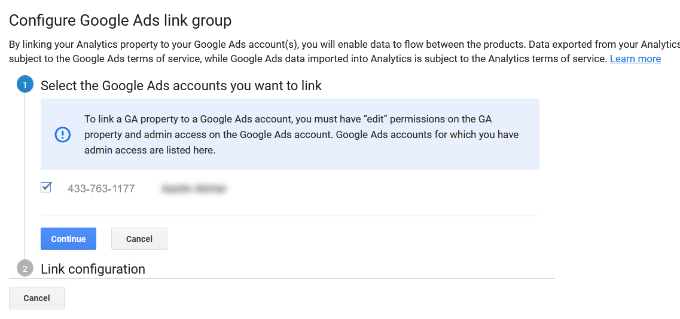
We’re going to create a Destination goal for this example. Give your goal a name, click the radio button next to ‘Destination’ to set the type, and then click the ‘Continue’ button.

Enter goal description

Next, you will need to enter the destination for your goal. This will normally be a specific page.

Note: Only enter the part of the URL that comes after your website’s domain name.

For instance, if your page is:
https://www.example.com/thank-you-for-booking/

Then you should enter:
/thank-you-for-booking/

You can add a value for the conversion if you want. This makes sense if people are completing a payment form or if you know how much each lead is worth to you on average.

If you want to track a funnel, such as a customer moving through a checkout process, then you can also do this as part of the destination goal. This can help you pinpoint areas you might want to improve.

Add goal details

You can click the ‘Verify this Goal’ link to see what conversion rate the goal would have based on your data from the previous 7 days.

If you get 0% and know that you’ve had some form submissions, check the destination URL you’ve entered.

Once you’re happy with your goal, click the ‘Save’ button. You should then see your goal listed in a table. You can edit it, switch it off and on, or create more goals here.

View new goal

You can’t delete goals once you’ve created them, so you will need to simply switch them off if you no longer want to use them.

You can view your goal data in Google Analytics by going to Conversions » Goals, then clicking on Overview.

View goal conversions in analytics

In the left-hand menu, you can dig further into your goals.

For instance, ‘Reverse Goal Path’ shows you what content visitors viewed before reaching the goal. Goal Flow can be used to examine all sorts of things, like the source that the visitors came from.

View goal flow report

How to Replace Goals with Events in Google Analytics 4

As we mentioned before, Google Analytics 4 (GA4) is the new version of Google’s analytics platform. One of the main differences between GA4 and Universal Analytics is that there are no goals in the latest version.

That’s because Google Analytics 4 uses a completely different method of tracking and recording data. Instead of goals, it uses events to track user interactions and activities on your website.

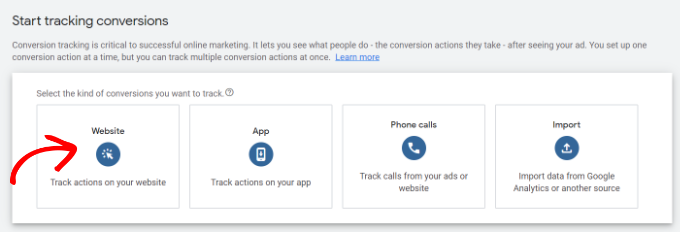
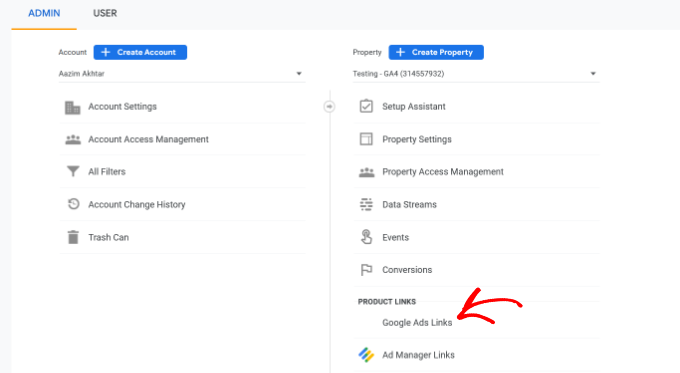
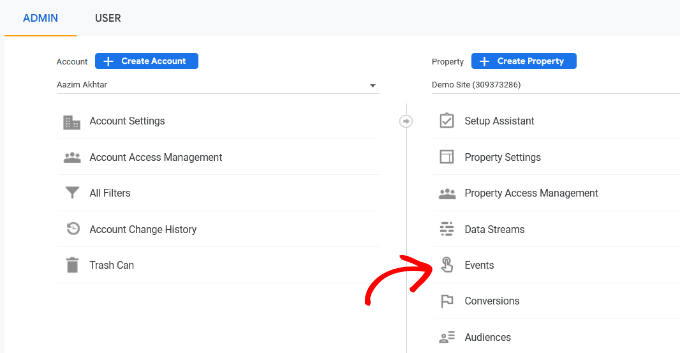
You can create a custom event by logging into your GA4 property and then heading to the Admin settings.

Go to admin settings

After that, go to the Property column.

Simply click on the ‘Events’ option.

Go to events settings

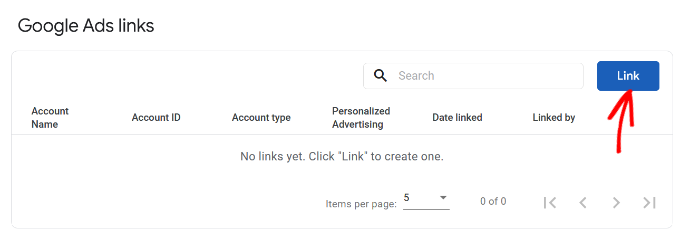
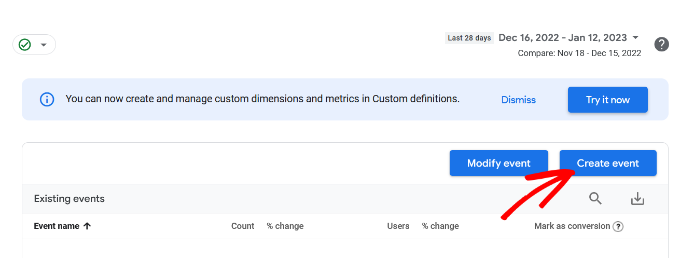
Next, you will need to add a new event in GA4.

Go ahead and click the ‘Create event’ button.

Create a new event

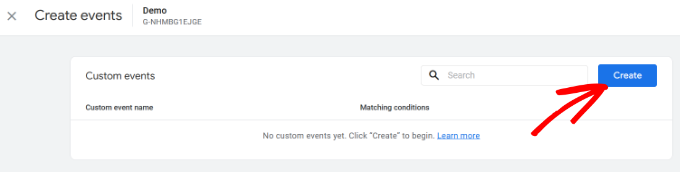
A new window will now slide in from the right, where all your custom events will be listed once they’re created.

You can click the ‘Create’ button to get started.

Create a custom event

Next, you will need to enter details for your custom event.

You can start by entering a custom event name. GA4 already has many prebuilt events, so you can select one from the dropdown menu. For example, we will choose the ‘file_download’ event for this tutorial.

Select an event name

When you select an event name, GA4 will automatically enter the specific Parameter and Operator for the event. In this case, the event will be tracking the ‘event_name’ when it ‘equals’ a Value you will enter next.

In the ‘Value’ field, we will enter ‘.pdf’ so it tracks the number of downloads when a user downloads a file with the PDF extension. You might also use .epub for ebooks or even a specific word you use to organize filenames such as ‘v2’ or ‘_2023version.’

Enter event parameter operator and value

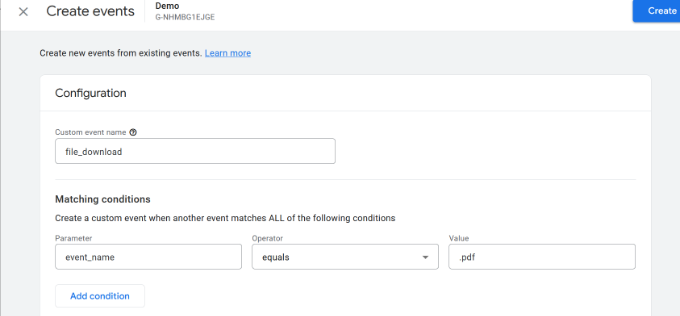
Once you’ve entered all the details, don’t forget to click the ‘Create’ button at the top.

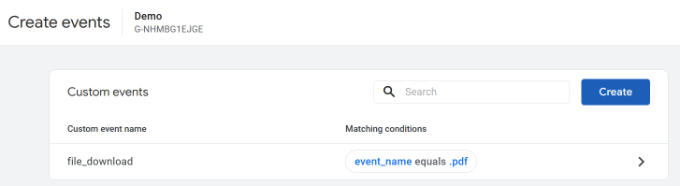
You should now see your new event under the Custom events area of your dashboard.

View custom event

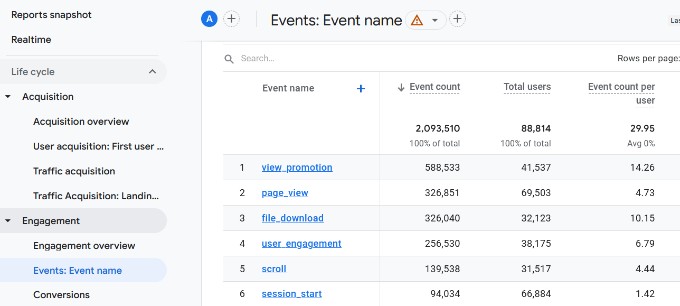
Next, you can view reports to see the performance of your custom events.

Simply head to Reports » Engagement » Event: Event name from the menu on your left.

View custom events data

While setting up Events in GA4 is pretty easy, if you want to track multiple things, it can take a long time.

That’s why we think that if you want a simple way to set up event and goal tracking in Google Analytics, then MonsterInsights is definitely the way to go.

Setting up manual goals in Google Analytics might work for you if you’re confident using the Google Analytics interface, or if you have a lot of extra time on your hands.

What matters is that you create and track meaningful goals for your site. This is where MonsterInsights is beneficial, as you can use the data to boost signups, increase sales, and make more money or impact with super easy setup and reporting.

We hope this article helped you learn how to set up Google Analytics goals for your WordPress site. You may also want to see our guide on how to increase your website traffic and our pick for the best email marketing services.

If you liked this article, then please subscribe to our YouTube Channel for WordPress video tutorials. You can also find us on Twitter and Facebook.

The post How to Set Up Google Analytics Goals for Your WordPress Site first appeared on WPBeginner.

10 Website Marketing Data You Must Track on Every WordPress Site

Are you wondering which marketing data you should be tracking on your WordPress website?

After launching a website, most small business owners rely on their best guesses to make important marketing decisions. Not only does that add huge risk, but it also significantly slows down growth.

In this guide, we will share the top website marketing data that you must track on every WordPress site, so you can make data-driven decisions to grow your business.

Website marketing data you must track on WordPress site

Why Do You Need to Track Marketing Data in WordPress?

We believe it’s easy to double your traffic and sales when you know exactly how people find and use your website. Most business owners do not realize how easy it is to track important marketing metrics on your WordPress site.

For example, with a few clicks, you can find out who your visitors are, where they are coming from, and what they do on your website. You can learn which of your articles are getting more visits and which pages on your site are not getting any views.

If you run an online store, then you can see what’s your website conversion rate, which page drives the most sales, what are your top referral sources, and more.

You can use all this marketing data to make informed business decisions and grow your business with confidence.

That said, let’s take a look at the top website marketing stats that you must track on every WordPress site. You can click the links below to quickly jump to any section you’re interested in:

1. Set Up Google Analytics in WordPress

The best way to track marketing data on your WordPress website is by using Google Analytics. It is the most popular website analytics software in the world and is loved by businesses, bloggers, and marketers because it provides a treasure trove of information.

For example, you can use Google Analytics to learn:

  • The number of visits and pageviews on your website
  • Who is visiting your website (visitor location, browser, operating system, screen size, and more)
  • How they found your website
  • How users interact with your website
  • And a whole lot more

Google Analytics is an essential tool in our own business. However, you’ll need to add a tracking code to your website, which requires editing code. This can be tricky for beginners, and the slightest mistake can mess up your tracking.

An easier way of setting up Google Analytics is using MonsterInsights. It is the best WordPress Analytics plugin and helps you set up advanced tracking in WordPress without editing code.

See our step-by-step tutorial on how to install Google Analytics in WordPress.

Any link that takes users away from your website is called an outbound link. If you use affiliate marketing to make money from your website, then those outbound links are also known as affiliate links.

Tracking these outbound links help you see how much traffic you are sending to other sites, and you can use this data to build stronger partnerships with those sites.

As a blogger, you can see which affiliate links are clicked more often by your visitors. This information can help you make a proper affiliate marketing strategy and boost your referral earnings.

The easiest way to track affiliate links in WordPress is by using MonsterInsights. It tracks outbound links and affiliate links on your site out of the box.

You also get easy-to-understand reports inside your WordPress dashboard, including your top affiliate and outbound links.

Outbound and affiliate links report

For detailed instructions see our guide on how to track outbound links in WordPress.

3. Enhanced Ecommerce Tracking with Google Analytics

If you run an online store, then you need to enable enhanced eCommerce tracking in Google Analytics. This would allow you to track the following customer information on your online store.

  • Shopping behavior of your customers
  • Checkout behavior and tracking the abandoned cart information
  • Product lists performance
  • Uncover top conversion sources
  • Sales performance

Setting up enhanced eCommerce tracking on your WordPress store can be difficult. However, MonsterInsights makes it easy for you and it literally takes a few clicks to configure with no coding needed.

It works seamlessly with the best eCommerce plugins for WordPress, like WooCommerce, Easy Digital Downloads, LifterLMS, MemberPress, and more.

The best part is that you get to see eCommerce reports in your dashboard. It shows how your online store is performing, which products are getting the most sales, where your customers are coming from, and more at a glance.

Ecommerce report in MonsterInsights

For details, see our guide on how to enable customer tracking in WooCommerce with Google Analytics.

4. Track User Engagement Data with Google Analytics

User engagement shows you what users do when they arrive on your website. It helps you identify patterns of highly engaged user behavior which leads to more conversions and sales.

For example, you may find out that users visiting a specific page are 10 times more likely to make a purchase. You can then use this insight to send more users to that page, or replicate a similar experience on other pages of your website.

Basically, you will be tracking data about how users interact with your website. For example:

  • Tracking your most popular content
  • Form submission tracking
  • Ecommerce tracking
  • Ads tracking to understand how users interact with ads on your website
  • Monitoring engaged users
  • Time users spend on your website

For detailed instructions, follow our step-by-step guide on how to track user engagement in WordPress.

Google Analytics is really good at tracking where your website traffic comes from. It can even categorize your traffic based on their source, including organic search, organic social, referral, email, and more.

However, when you’re running paid ad campaigns, email marketing campaigns, or social media promotions, you need detailed campaign tracking.

That’s where UTM tracking comes in.

Campaign-level tracking allows you to see exactly which email, ad, or specific call-to-action link helped you get the most traffic or sales.

To make it easy for you to generate UTM links, MonsterInsights comes with a free campaign URL builder, so you can get more detailed reports. You can enter custom campaign parameters like the source, medium, campaign name, and more to create a custom URL.

Build a URL

These tags include native analytics parameters which are tracked by Google Analytics and are included in your reports. You can then see exactly which link users clicked and how your campaigns are performing.

6. Track and Improve Facebook Retargeting Campaigns

Did you know that Facebook allows you to display targeted ads to people who have visited your website in the past? Yes, it’s called retargeting.

You can install a Facebook pixel and display targeted ads to anyone who visits your website. However, if you install Facebook retargeting pixel today, then you will only be able to show your ads to people who visited today and onward.

Even if you are not running a Facebook advertising campaign right now, we recommend installing the retargeting pixel, so you have a built-in audience when you’re ready to get started.

For detailed instructions, see our guide on how to install Facebook remarketing/retargeting pixel in WordPress.

7. Tracking Google AdSense Campaigns

If you run pay-per-click (PPC) campaigns using Google AdSense, then you can easily see how your ads are performing in the AdSense dashboard. However, these reports only tell you how users interact with your ads not what they do after that.

For that, you’ll need Google Analytics which comes with built-in integration with your AdSense account. This integration enables you to easily track your paid traffic conversions.

Select your AdSense property

You can see our guide on how to properly add Google AdSense to your WordPress site.

8. Monitor Your Site with Google Search Console

Google Search Console is a set of free tools offered by Google to give publishers a look at how their website is seen by the search engine.

It provides immensely useful information like how your pages rank for different keywords (more on this later), the overall performance of your site in search engines, and any errors Google crawler found on your website.

Keeping an eye on Google Search Console can help you boost your site’s search engine visibility. To learn more, see our guide on tips for using Google Search Console to grow your traffic.

For example, here is a report showing errors that occur when a user views the site on their mobile devices. Without Google Search Console, it will be very difficult to pinpoint such issues and quickly resolve them.

Mobile errors in search console

For detailed instructions, see our guide on how to add your WordPress site to Google Search Console.

9. Track Your Keyword Rankings

Keywords are the phrases users enter in search engines to find what they’re looking for. To get more traffic from search engines, you need to know exactly which keywords are bringing you the most traffic to your website, so you can focus on what’s working.

We have a complete WordPress SEO guide that you can use to learn how to optimize your content for specific keywords.

Normally, beginners rely on manually entering keywords in Google search to see if their site is ranking. This is highly inefficient as you would miss out on thousands of keywords where your site can be easily ranked.

Google Search Console is a free tool that provides you with valuable keyword data with the average position. You can see which search terms are ranking high, search impressions, and how many average clicks you get.

If you’re using MonsterInsights, then you can view the Search Console report inside your WordPress dashboard.

Search console report

However, it only allows you to see your own site’s keyword data. If you want to research your competitors, then you’ll need SEMRush. This incredibly powerful SEO tool allows you to view in-depth keyword data for any website.

For more on this topic, please take a look at our guide on how to track keyword rankings for your WordPress site.

10. Track Your Email List Growth and Performance

Most popular email marketing services come with stats and insights that you can track. These reports provide useful data like open rate, click-through rate, unsubscribe rate, and more.

You can also see the traffic coming from your email campaigns to your website in your Google Analytics 4 reports under Acquisition » Traffic acquisition.

From here, you can see how well your email newsletter traffic converts, and what you can do to improve.

View email reports in GA4

Tracking email marketing data helps you grow your email list. You can create new email forms, change form placements, and use popups to boost subscribers.

While there are definitely other marketing metrics that you can track, we believe these are the top marketing data that every business owner must track on their WordPress site.

We hope this article helped you track the right website marketing data on all your WordPress sites. You may also want to see our step-by-step guide to boost WordPress speed and performance, and our comparison of the best business phone services for small business.

If you liked this article, then please subscribe to our YouTube Channel for WordPress video tutorials. You can also find us on Twitter and Facebook.

The post 10 Website Marketing Data You Must Track on Every WordPress Site first appeared on WPBeginner.

How to Set Up Google Ads Conversion Tracking in WordPress

Do you want to know how much revenue you’re generating from Google Ads on your website?

Setting up Google Ads conversion tracking will help you uncover insights about your ad campaign’s performance. You can find out which campaign is performing the best, how users interact with your ads, and how you can improve conversions.

In this article, we’ll show you how to properly set up eCommerce Google Ads conversion tracking in WordPress. This is the exact same method that we use on our own websites.

How to setup Google Ads conversion tracking

Why Set Up Google Ads Conversion Tracking in WordPress?

If you’re running Google Ads for your WordPress blog, eCommerce store, or membership site, then it is important to know how they’re performing. You can’t improve, what you can’t measure.

Tracking Google Ads conversions helps you see how much revenue you earned from users who clicked on your ad campaigns. It also helps you see which paid keywords and ad groups drive the most conversions. This way, you can optimize your campaigns and budget for more profitable search terms.

Besides that, Google Ads conversion tracking also uncovers how users behave on your WordPress site after clicking an ad. For instance, you might see a lot of users arrive on a landing page, but abandon it after adding products to the cart.

You can use this information to improve the checkout process, offer discounts and incentives as users are about to leave your site, and provide a better user experience.

That said, let’s see how you can add Google Ads conversion tracking in WordPress.

Adding Google Ads to WordPress Website

The easiest way of connecting Google Ads with WordPress is by using MonsterInsights. It is the best Analytics plugin for WordPress that helps set up Google Analytics without editing.

MonsterInsights offers an Ads addon that lets you setup comprehensive conversion tracking without touching a single line of code or hiring a developer.

We will use the MonsterInsights Pro license for this tutorial because it includes the Ads addon. There is also a MonsterInsights Lite version you can use for free.

First, you’ll need to install and activate the MonsterInsights plugin. If you need help, then please see our guide on how to install a WordPress plugin.

Upon activation, you will be redirected to the welcome screen in your WordPress dashboard. Go ahead and click the ‘Launch the Wizard’ button.

Launch setup wizard

Next, you can follow the onscreen instructions to connect Google Analytics to your site. For more details, you can see our guide on how to install Google Analytics in WordPress.

With MonsterInsights, you can also use dual tracking to set up a Google Analytics 4 property. It is the latest analytics version and will soon replace Universal Analytics. You can learn more by following our guide on how to switch to Google Analytics 4 in WordPress.

Once you’ve connected Google Analytics with WordPress, the next step is to install the Ads addon. Simply go to Insights » Addons from your WordPress dashboard and navigate to the ‘Ads’ addon.

Install the ads addon

Go ahead and click the ‘Install’ button. The addon will now automatically install and activate on your site.

Creating a Conversion Action in Google Ads

Next, you’ll need to create a conversion action in Google Ads.

First, you can visit the Google Ads website and log in to your account.

After that, go ahead and click the ‘Tools and settings’ option at the top. Under the ‘Measurement’ column, simply select the Conversions option.

Click the tools and settings option

On the next screen, you’ll need to create a conversion action.

You can click the ‘New conversion action’ button to get started.

Create new conversion action

Next, Google Ads will ask you to select the type of conversions you want to track. It will show you 4 options, including a website, app, phone call, or import.

For this tutorial, we’ll choose the ‘Website’ option for tracking ad conversions.

Select the kind of conversion to track

After that, you’ll need to enter the website URL where you’d like to measure conversions.

Once that’s done, simply click the ‘Scan’ button.

Enter your domain to scan

Google Ads will now show 2 options to create conversion actions, including an automatic and manual method. In the automatic method, you’ll need to select the conversion goal, choose a match type, and enter the URL. This way is suitable if you know which events to count as conversions.

However, we recommend selecting the manual method. Simply scroll down and click the ‘+ Add a conversion action manually’ option.

Add conversion action manually

Next, you’ll need to enter the Conversion action details.

First, you can select the ‘Goal and action optimization’ for your conversion. This is the action you’d like to track. For example, when a user subscribes to your newsletter, makes a purchase, adds a product to a cart, submits a contact form, and more.

For the sake of this tutorial, we will select ‘Subscribe’ as the goal. After that, you can enter the Conversion name.

Enter conversion action details

You can now scroll down and select a Value for your conversion. Google Ads lets you choose the same value for each conversion, assign different values for conversions, or don’t use a value for conversion action.

We will select the ‘Use the same for each conversion’ option, select the currency, and enter a value for this tutorial.

Enter value for conversion action

Besides that, you can also choose how many conversions to count per click.

If you’re tracking email newsletter signups, then we recommend selecting the ‘One’ option. This way, each subscriber is counted once. However, you can use the ‘Every’ option in an eCommerce store and count each purchase as a conversion.

After selecting these options, simply click the ‘Done’ button at the bottom.

Enter value and count

You can now see your conversion action under the ‘Create conversion actions manually using code’ section.

Go ahead and click the ‘Save and continue’ button to get instructions for adding the tracking tags for conversion action to your site.

Click the save and continue button

On the next screen, you’ll see 3 options to add the conversion action to your site.

Simply select the ‘Use Google Tag Manager’ option. You should see the Conversion ID and Conversion Label. Copy these to a notepad file or keep the browser window/tab open.

Select the use tag manager option

To finish the setup process, you’ll need to head to your WordPress website dashboard and view the MonsterInsights settings.

From here, go to Insights » Settings and click on the ‘Publisher’ tab.

Publisher settings in MonsterInsights

After that, you can scroll down to the ‘Ads Tracking’ section.

Go ahead and enter the Conversion ID. Make sure you follow the format, which will look like this: AW-123456789.

If you are tracking Google Ads on Easy Digital Downloads, WooCommerce, and MemberPress, then enter the Conversion Label in the respective field.

Enter conversion ID and label

That’s it. You’ve successfully set up Google Ads conversion tracking on your WordPress website.

View Google Ads Conversion Tracking Data in Google Analytics

You can take it a step further and connect Google Ads with Google Analytics to get more insights about how people use your website after clicking on an ad.

For instance, you can see the number of visitors from paid search and find out which pages they view after landing on your site. You can also use different filters and create custom reports in Google Analytics.

Let’s see how you can link your Google Ads account with Google Analytics 4 and Universal Analytics.

Connect Google Ads with Google Analytics 4

First, you’ll need to log in to your GA4 account and then go to the ‘Admin’ settings.

Go to admin settings

After that, you can click the ‘Google Ads Links’ option.

It is located under the Property column.

Go to ads links

A new window will now slide in from the right.

Go ahead and click the ‘Link’ button in the top right corner.

Click the link button

Next, you will see different options for Link setup.

First, you can click the ‘Choose Google Ads accounts’ option.

Choose Google ads account to link

On the next screen, you’ll need to select the Google Ads account you wish to connect.

Once that’s done, simply click the ‘Confirm’ button at the top.

Select your google ads account

You will now see the Google Ads account that you want to link.

Go ahead and click the ‘Next’ button.

See selected google ads account

In the next step, Google Analytics will give you options to enable personalized advertising and enable auto-tagging.

You can use the default settings and click the ‘Next’ button.

Change configure settings

After that, you’ll see a summary of your Link setup settings.

If everything checks out, then go ahead and click the ‘Submit’ button.

Review and submit link setup

You should now see a ‘Link Created’ notification in front of your Google Ads account. This means that you’ve successfully connected Google Ads with Google Analytics.

Do note that it can take up to 24 hours for your Google Ads data to appear in Analytics reports.

See link created notification

Next, you can view the Google Ads conversion tracking report in Google Analytics 4.

First, you can head to Acquisition » Traffic acquisition from the menu on your left and scroll down to see how many visitors came from the Paid Search channel.

View paid search traffic

After that, you can go to Acquisition » Acquisition overview and view the Session Google Ads campaign report. This will show which campaign got the most traffic.

You can also click the ‘View Google Ads campaigns’ option at the bottom to view more details.

View session google ads campaign report

For each campaign, you can see the total number of users, sessions, number of Google Ads clicks, cost per click (CPC), conversions, and more.

Using the information from this report, you can see which campaigns perform the best.

View detailed stats for each campaign

Connect Google Ads with Universal Analytics

If you’re using Universal Analytics, then you can first log in to your account.

After that, head to the ‘Admin’ settings.

Click admin settings

Next, you’ll need to go to the Google Ads Links option.

You can find the option under the Property column.

Go to Google Ads links

On the next screen, you’ll need to select the Google Ads account you want to connect.

After selecting your account, simply click the ‘Continue’ button.

Select Google ads account

Next, you will need to enter a Link group title.

You can then select the Views to link with your Google Ads account. Simply click the toggle to ON for the correct Views.

Enter link group title

Once that’s done, simply click the ‘Link accounts’ button.

Google Analytics will now show a summary of your settings. Simply scroll down and click the ‘Done’ button.

Click the done button

That’s it. Your Google Ads account will now be linked to the Universal Analytics property.

To view data from your ad campaigns, head to Acquisition » Google Ads » Campaigns from the menu on your left. You can see the number of clicks, cost, CPC, and more for each campaign.

View Google ads report in UA

Final Thoughts on Google Ads Conversion Tracking in WordPress

When it comes to setting up any conversion tracking, the most important thing you want to make sure is that the setup is done properly. This is why we use and recommend MonsterInsights because it just does everything for you behind the scenes without touching any code.

However if you prefer to add code directly on your WordPress site, then you can do that as well by using a plugin like WPCode. This will help future-proof your customizations. There’s a free version of WPCode that you can use by following our tutorial on adding custom code in WordPress.

We hope this article helped you learn how to set up Google Ads conversion tracking in WordPress. You may also want to see our ultimate WordPress SEO guide and the best WooCommerce plugins to grow your store.

If you liked this article, then please subscribe to our YouTube Channel for WordPress video tutorials. You can also find us on Twitter and Facebook.

The post How to Set Up Google Ads Conversion Tracking in WordPress first appeared on WPBeginner.

8 Best Google Analytics Alternatives (Free & Paid) in 2022: Is It Time To Switch?

Are you looking for a Google Analytics alternative for your WordPress site? Perhaps you have privacy concerns about having Google handle your data? Do you need something more user-friendly? Or maybe you want different features and options than those provided by Google Analytics? Either way, stay around as I will give you plenty of options [...]

Read More...

The post 8 Best Google Analytics Alternatives (Free & Paid) in 2022: Is It Time To Switch? appeared first on Learn WordPress with WPLift.

Weekly WordPress News: WP Media acquired by group.ONE

Hey, WordPress friends. We are checking in with your latest dose of weekly WordPress news. This week, WP Media, the startup behind tools like WP Rocket, Imagify, and RocketCDN, announced that they are joining group.ONE. Beyond that, Google announced a delay in rolling out page experience as a new search ranking factor. They also shared [...]

Read More...

The post Weekly WordPress News: WP Media acquired by group.ONE appeared first on Learn WordPress with WPLift.

Matomo Analytics for WordPress Review: A Free Google Analytics Alternative

Are you interested in a WordPress analytics solution that’s not named Google Analytics? Matomo, formerly known as Piwik, just released a dedicated WordPress analytics plugin that provides an open-source alternative for website analytics. Matomo aims to give you similar depth and functionality as Google Analytics, while also letting you retain 100% control and ownership over ... Read more Matomo Analytics for WordPress Review: A Free Google Analytics Alternative

The post Matomo Analytics for WordPress Review: A Free Google Analytics Alternative appeared first on Learn WordPress with WPLift.

6 Best WordPress Heatmap Plugins and Tools: Free and Paid Options

Looking to create a WordPress heatmap so you can see exactly what your visitors do while they’re on your site? With a heatmap, you can see which links/buttons your visitors click on, how deeply they scroll on your site, plus a lot more. There are a number of WordPress heatmap plugins and SaaS tools that ... Read more 6 Best WordPress Heatmap Plugins and Tools: Free and Paid Options

The post 6 Best WordPress Heatmap Plugins and Tools: Free and Paid Options appeared first on Learn WordPress with WPLift.

Google Site Kit for WordPress: A Helpful New Plugin

Google Site Kit is an official plugin from Google that helps you integrate data and features from multiple Google tools into your WordPress dashboard. Google Site Kit was in closed beta for a long time. But as of November 2019, it’s now publicly available to all WordPress users and listed for free at WordPress.org. Because ... Read more Google Site Kit for WordPress: A Helpful New Plugin

The post Google Site Kit for WordPress: A Helpful New Plugin appeared first on Learn WordPress with WPLift.

How to Reduce Bounce Rates on Your WordPress Website

Struggling with high bounce rates in Google Analytics on your website? A high bounce rate can be a sign that your website isn’t engaging visitors, which is definitely something that you’ll want to fix. In this post, I’ll start by clearing up a common misconception about bounce rates in Google Analytics, because the situation might ... Read moreHow to Reduce Bounce Rates on Your WordPress Website

The post How to Reduce Bounce Rates on Your WordPress Website appeared first on Learn WordPress with WPLift.

How to Do A/B Split Testing in WordPress using Google Optimize

Do you want to run A/B split tests on your WordPress site to improve conversions? Split testing helps you understand how small changes in content and design affect user behavior. In this article, we will show you how to easily do A/B split testing in WordPress using Google Optimize.

Split testing in WordPress using Google Analytics

What is A/B Split Testing?

A/B split testing is a technique that allows you to compare two versions of the same web page against each other, so you can determine which one performs better and produces better results.

Marketers use A/B split testing for their landing pages to find out which one gets them more conversions and sales.

Split testing can be used to test any element on the page including call-to-action buttons, color schemes, layout changes, marketing text, images, and more.

How A/B Split Testing Works?

Basically, you show different variations of a page to your audience. After that, you track user engagement and conversions to find out which variation gives you the best results.

How split testing works

Preparing for A/B Split Testing

Before we move forward, there are a few things you would need for this tutorial.

First, you will need MonsterInsights plugin. For more details, see our step by step guide on how to install a WordPress plugin.

MonsterInsights is the best Google Analytics plugin for WordPress. You’ll need at least their Pro plan in order to access Google Optimize addon which we will be using in this tutorial.

If you haven’t already done so, then you need to sign up and install Google Analytics in WordPress.

Lastly, you will need Google Optimize. It is a free tool that allows you to run split testing experiments on your website. We will show you how to set it up in the next step.

Ready? Let’s get started.

Setting up Google Optimize in WordPress

First, you need to visit the Google Optimize website to create your account.

Get started with Google Optimize

Follow the on-screen instructions, and you will reach your account dashboard. Google Optimize will automatically create an Account and a Container for you.

Next, you need to connect your Google Optimize account to the Google Analytics property of your website. To do that, click on ‘Link to Google Analytics’ tab from the right-hand column.

Link Google Analytics property

Clicking on the button will show all Google Analytics properties available under your Google account. You need to select the one associated with your website.

Select and link property

Next, click on the Link button to continue.

Google Optimize will now connect to your Google Analytics property. This will allow Google Optimize to share data with Google Analytics which you can then view in your reports.

Now, it is time to create your first experience. Click on the ‘Create Experience’ button to continue.

Create experience

You will now be asked to provide a name for your experience and enter the URL of the page where this experience will run.

Experience detail

You will also be asked to choose a type for your experience. You need to select A/B test and then click on the ‘Create’ button to continue.

Optimize will now create your experience, and you will be redirected to the experience page. It will automatically show the original page as your first variation.

Create variant

You need to click on the add variation button to create a new version. Optimize will ask you to provide a name for this variation. It is a good practice to use a name that reflects the changes you are going to apply in this variation.

Variant name

Click on the Done button to continue.

Optimize will now list your new variation on the experience page. Click on the ‘0 changes’ link next to your new variation to edit it.

Change variation

Google Optimize will now open the page where you want to run the test with a powerful editor. It is a simple drag and drop tool that you can use to make changes to your page.

Edit variation

You can just point and click on any element in your page to make changes. For the purpose of this tutorial, we are going to change the color of our main call to action button.

After you have made the changes that you want to test, you need to click on the ‘Done’ button to exit the editor.

You will now see your new variation listed with the number of changes you made to it.

Changed variation

You can continue editing or add another variant to your experience.

After that, you need to select an objective for your experience. Just below the variants you will see the option to select experience objective.

Experience objective

Clicking on it will open views from your Google Analytics reports.

If you are already using goals and events, or eCommerce tracking, then you will see them listed there.

After selecting objective, you can enter a hypothesis about what you are testing and what you are expecting from this experiment.

Your experience is almost ready but first, you need to connect Google Optimize with MonsterInsights.

Connecting Google Optimize to MonsterInsights

MonsterInsights helps you easily connect your WordPress site to Google Optimize.

First, you need to visit Insights » Addons page in your WordPress admin area. From here, you need to install and activate the ‘Google Optimize’ addon.

Google Optimize addon for MonsterInsights

Upon activation, you need to visit Insights » Settings page and switch to the tracking tab. From here you need to scroll down and click on the Google Optimize tab.

Google Optimize settings in MonsterInsights

Now you need to provide your Google Optimize container ID. You can find this information under your Google Optimize account by clicking on the ‘Container Setup’ tab in the right column.

Container ID

Copy and paste your container ID in MonsterInsights’ Google Optimize settings page and then click on the ‘Save changes’ button to store your settings.

That’s all you have successfully installed Google Optimize on your website and you are now ready to run your experiments.

Scheduling and Running Your A/B Split Test

Now that everything is in order, you are ready to schedule and run your A/B split test.

Switch to Google Optimize dashboard and open your experience. From here you can just go ahead and click on the ‘Run Experiment’ button to manually launch it.

Run experiment

You can also click on the ‘Create Schedule’ button to set up a schedule for your experiment. Make sure you provide enough time for the experiment to collect visits and data.

Viewing Your A/B Split Testing Reports in Google Optimize

Google Optimize will now show different variations of your page to users and start collecting data. After it has collected enough data, you can view the results under the reporting tab.

Split test reporting

It will show how each variant performed based on the experiment objective (Google Analytics goals, event, or views you selected).

Google Optimize reports

We hope this article helped you learn how to do A/B split testing in WordPress using Google Analytics and Google Optimize. You may also want to see our guide on how to convert WooCommerce visitors into customers.

If you liked this article, then please subscribe to our YouTube Channel for WordPress video tutorials. You can also find us on Twitter and Facebook.

The post How to Do A/B Split Testing in WordPress using Google Optimize appeared first on WPBeginner.