Most ecommerce store owners will agree that traditional email platforms just don’t get online retail. You mostly get basic templates that can’t showcase your products, generic automations that completely ignore customer purchase behavior, and absolutely zero integration with your actual store. So when I stumbled across Omnisend, I was immediately excited. Could this be the [...]
WordPress may be the web’s leading Content Management System, but the one thing it lacks is in-built eCommerce features. Thankfully, there is a solution in the form of these top WordPress plugins for eCommerce success. Whether you’re looking to launch your first online store or take your current eCommerce business to the next level, these [...]
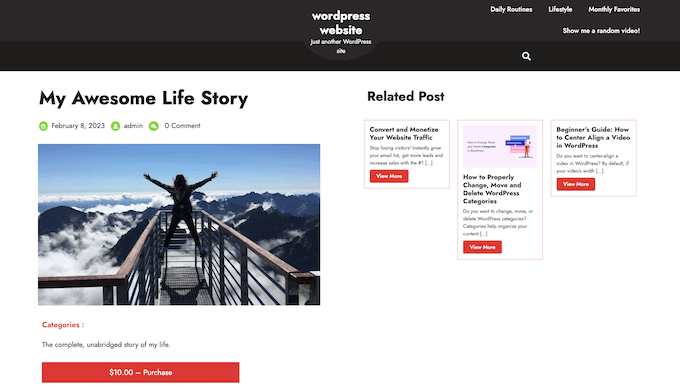
By selling your books as downloadable audio files, you can make money without having to pay for shipping or printing. You can also sell the same audio file an unlimited number of times.
In this article, we will show you how to easily sell audiobooks online using WordPress.
Another option is recording that information as an audiobook. This is a great way to collect everything you want to say into a single, downloadable file that’s easy to distribute and sell to other people.
Unlike traditional printed books, you don’t have to pay printing or shipping fees for your audiobooks. You also don’t have to worry about physical storage, supplies, or managing your inventory. All of this means lower costs and bigger profits, which makes audiobooks the perfect way to make money online with WordPress.
If you have an ebook, then there are plenty of services that can help you turn it into an audiobook including ACX. Every audiobook you make on ACX will be available on Audible.com, Amazon.com, and iTunes, but it’s also a good idea to add the audiobook to your own website.
With that in mind, let’s see how you can sell audiobooks online. Simply use the quick links below to jump straight to the method you want to use.
Unlike general eCommerce plugins, Easy Digital Downloads has the specific features you need to promote, sell, and distribute digital products with ease. This means you don’t have to waste time and effort with unnecessary settings, such as configuring your store’s shipping.
Even better, if you’re using SiteGround then Easy Digital Downloads already comes pre-installed on their EDD plan, so you can start using it straight away.
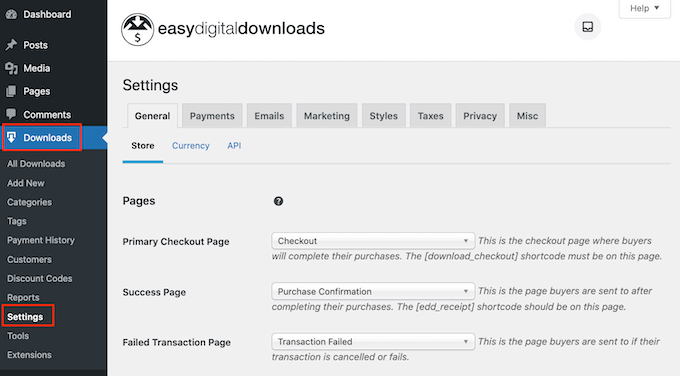
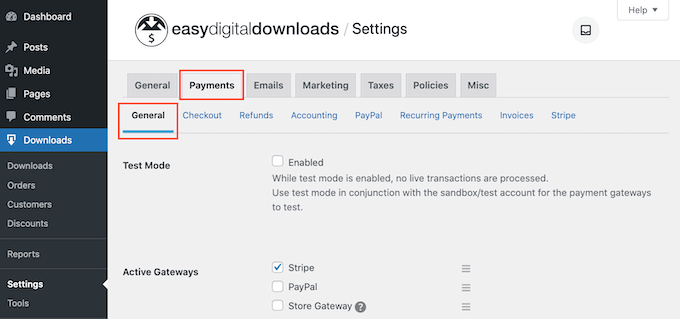
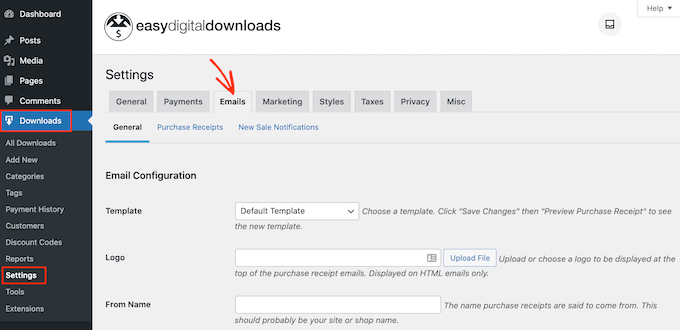
Upon activation, go to Downloads » Settings in the WordPress dashboard.
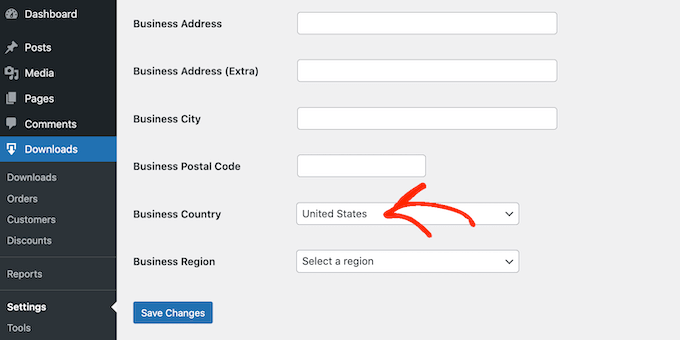
Even though you’re selling audiobooks, you’ll need to set your store’s location. This allows Easy Digital Downloads to auto-fill some fields in the order form, which will help improve the customer experience.
Easy Digital Downloads also uses your location to calculate sales tax.
To add your location, simply open the ‘Business Country’ dropdown menu. You can then choose where your business is based.
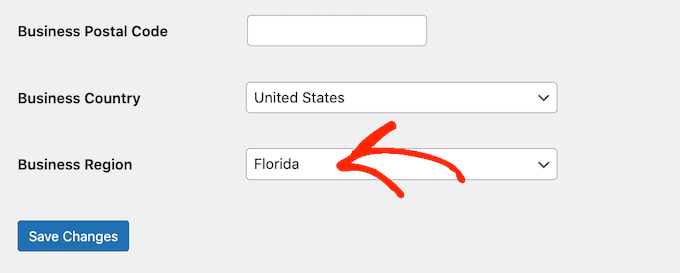
Next, find the ‘Business Region’ field.
Here you can open the dropdown and choose the region where your store operates from.
After making these changes, go ahead and click on Save Changes to store your settings.
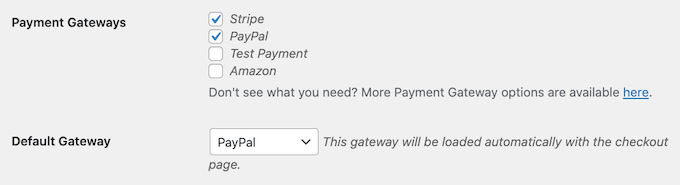
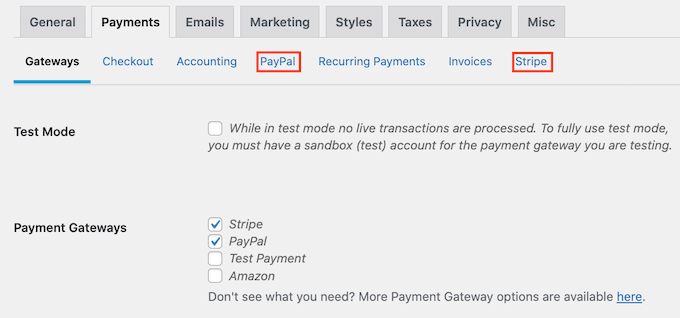
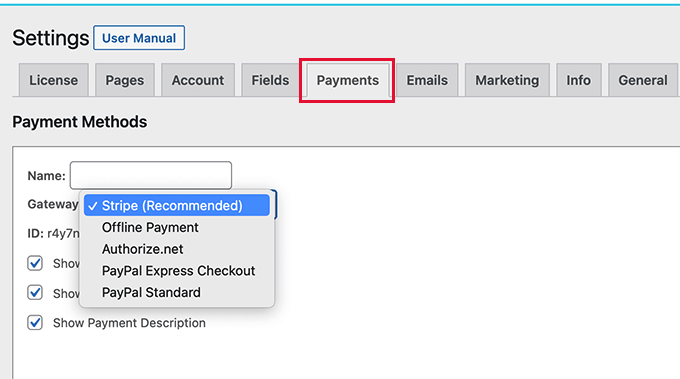
In the Payment Gateways section, check the box next to each gateway that you want to add to your WordPress blog or website.
If you add more than one payment method, then you’ll need to choose a default gateway.
You can use any gateway you want, but Stripe can accept credit cards as well as Apple Pay and Google Pay. This is why we recommend using Stripe as the default payment gateway.
With that done, click on the ‘Save Changes’ button.
You’ll now see some new tabs where you can configure each payment method.
Configuring the payment gateway will be slightly different depending on which gateway you’re using, but Easy Digital Downloads will walk you through the process.
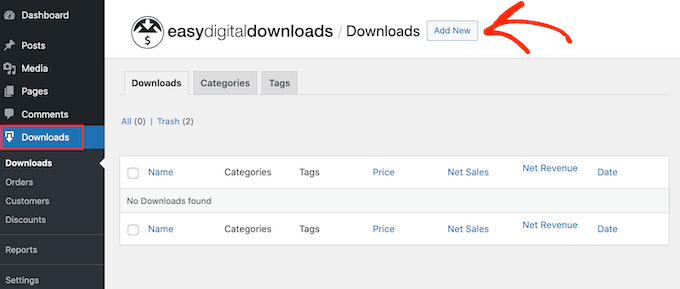
Once you’ve set up at least one payment gateway, you’re ready to start uploading audiobooks to your WordPress website.
To create a digital product, select Downloads from the left-hand menu. Then, click on the ‘Add New’ button.
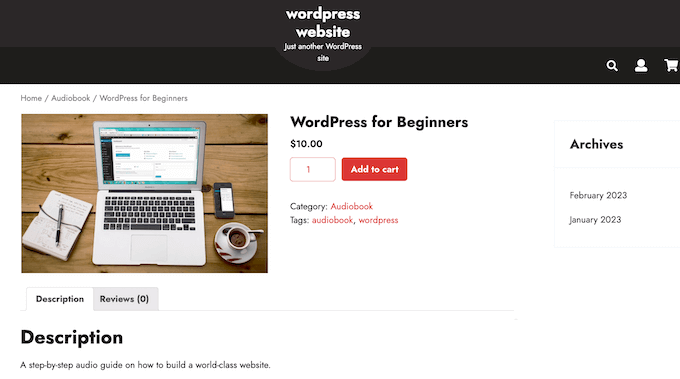
You can now type a name for the product into the ‘Enter download name here’ field. This will appear on the audiobook’s page, so you’ll want to use something that catches the visitor’s attention and accurately describes the book.
Next, type out the description that will appear on the ebook’s product page. You’ll want to give visitors all the information they need to decide whether this book is right for them.
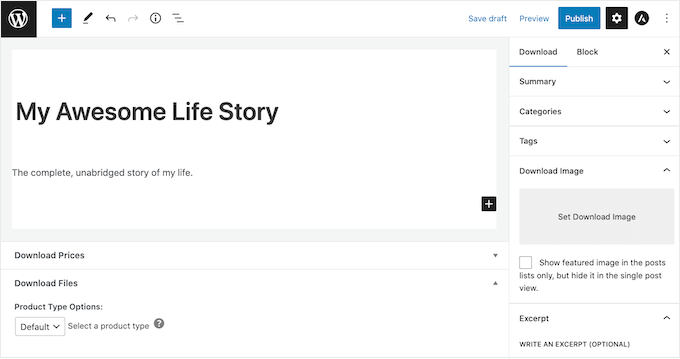
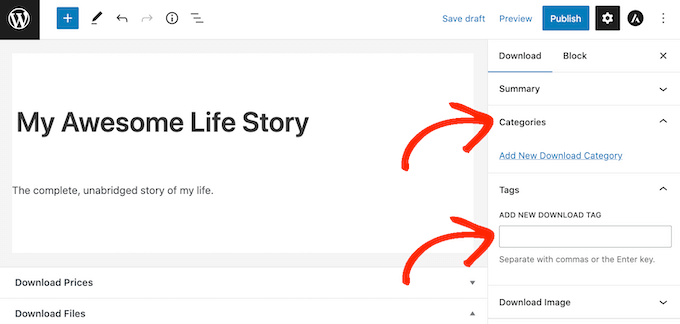
Many online stores use product categories and tags to help shoppers find what they’re looking for. If you’re selling lots of audiobooks, then these categories and tags help visitors find related audiobooks, which can get you more sales.
You can create new categories and tags in the Categories and Tags boxes.
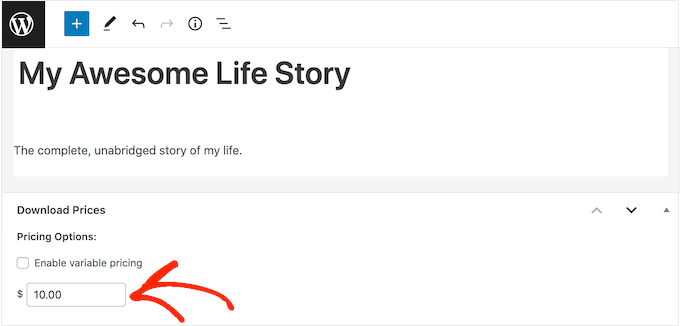
Next, you’ll want to set a price by scrolling to the Download Prices section. Here, type in how much visitors will pay to download the audiobook.
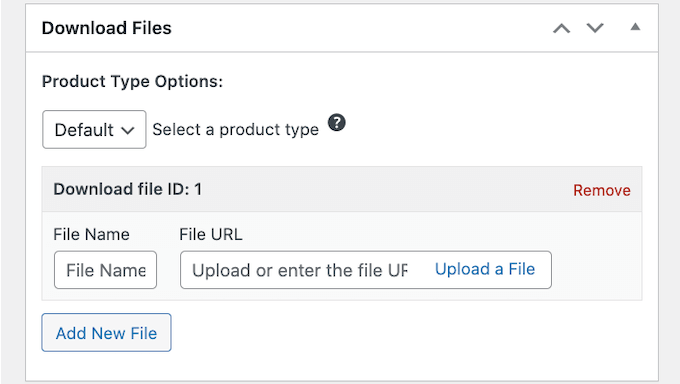
You’re now ready to upload the audio file that you want to sell. When it comes to audio, WordPress supports mp3, ogg, and wav. It also supports m4a, although this format may not work on all browsers.
In the File Name field, type a name for the file that shoppers will get when they buy the audiobook. Then, simply click on ‘Upload a File.’
You can now choose any audio file from the WordPress media library, or you can upload a new audiobook from your computer.
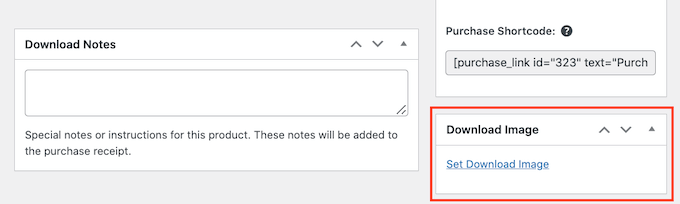
Finally, you’ll need to add a product image, which will usually be your audiobook’s front cover. Simply scroll to the Download Image section and then click on the ‘Set Download Image’ link.
This launches the WordPress media library where you can choose an image or upload a new file from your computer.
When you’re happy with your digital download, click on the Publish button to make it live.
Easy Digital Downloads will now create the audiobook as a downloadable product, but visitors still need a way to access the product page.
This might mean adding the page to your website’s menu, creating a sales page where you advertise all your audiobooks, or even adding the book to a custom home page.
No matter what method you choose, you’ll need to know the audiobook’s URL.
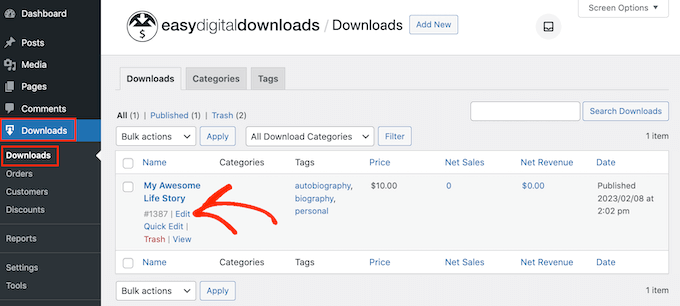
To get this link, simply go to Downloads » Downloads. Then, find the audiobook you just created, and click on its ‘Edit’ link.
You will then find the URL directly below the product title.
Now, you can link to this product page from any area of your website, simply by using its URL. To learn more, see our step-by-step guide on how to add a link in WordPress.
Easy Digital Downloads also creates a ‘Purchase’ button for this particular audiobook. Visitors can click this button to add the audiobook to their cart.
You can add the button for this book to any page, post, or widget-ready area. This allows visitors to start the purchasing process without even Needing to visit the individual product’s page.
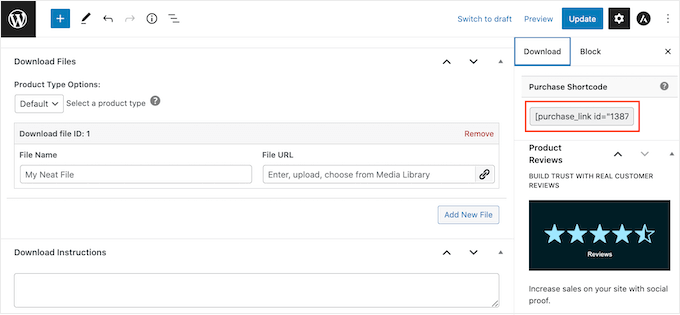
To get the audiobook’s shortcode, simply scroll to its Download Settings section. You can then copy the text in the ‘Purchase Shortcode’ field.
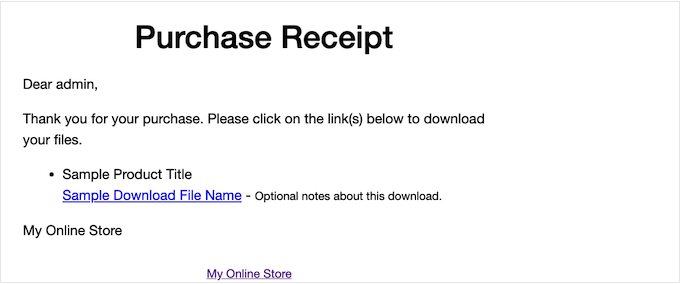
Every time someone buys an audiobook from your website, Easy Digital Downloads will send them an email and download link.
While this email has everything the customer needs to access their download, it’s a good idea to customize it. For example, we recommend adding your own logo and branding.
To customize the default email, simply go to Downloads » Settings. Then click on the ‘Emails’ tab.
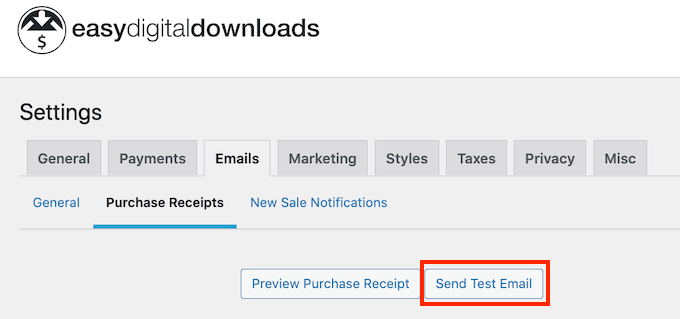
When you’ve finished making changes, you may want to send a test email so you can see how the message will look to your customers.
To do this, simply click on the ‘Send Test Email’ button and Easy Digital Downloads will send an email to your admin email address.
Have you clicked on the ‘Send Test Email’ button, but haven’t got a test email? If your site isn’t sending emails correctly, then customers won’t be able to download your audiobook.
When you’re happy with how the email looks, you can go ahead and click on the ‘Save Changes’ button.
This is all you need to start selling audiobooks online. However, Easy Digital Downloads has lots more advanced features that can help you sell audiobooks.
Method 2. How to Sell Audiobook Memberships (Best for Recurring Revenue)
Another option is using your audiobooks to create recurring revenue streams.
For example, you might offer members unlimited monthly or annual access to all your audiobooks for a membership fee. In this way, you can get reliable recurring revenue over a longer period of time.
A membership site is also a great choice if you’re releasing your audiobooks as a series.
If you want to get recurring revenue, then MemberPress is the best WordPress membership plugin. It allows you to accept payments, create an unlimited number of membership levels, restrict access to audiobook pages based on membership subscription, and more.
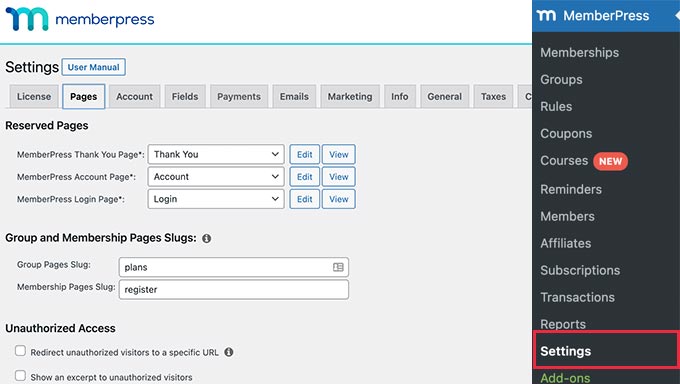
Upon activation, go to the MemberPress » Settings page to configure the plugin settings.
To start, you’ll need to set up a payment gateway.
Out of the box, MemberPress supports PayPal (Standard, Express, and Pro), Stripe, and Authorize.net. You simply need to select the payment method you want to use and then type in the required credentials, such as your PayPal email address.
You may want to add multiple methods, so members can use their preferred gateway. When that’s done, don’t forget to click on the Update Options button to save your settings.
With the setup out of the way, it’s time to create one or more membership levels. These are the subscriptions that visitors will buy to access your audiobooks, or other content.
MemberPress allows you to offer different content for different membership levels. For example, you might create Bronze, Silver, and Gold memberships and then give members access to different audiobooks.
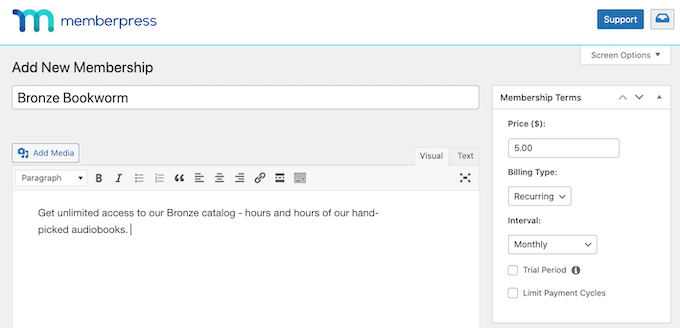
To create the first membership plan, go to the MemberPress » Memberships page and then click on the ‘Add New’ button.
On the next screen, you’ll need to provide a title for the membership plan and then add details in the post editor.
After that, you can set the pricing, billing type, interval, and expiration under the ‘Membership Terms’ section.
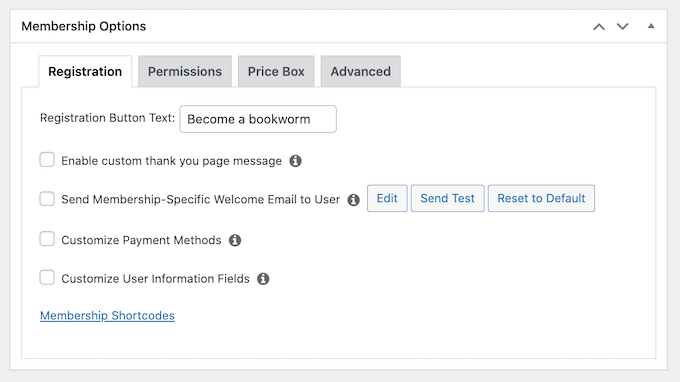
Next, scroll to the Membership Options box below the editor.
Here, you can customize the plan permissions and membership options.
When you’re happy with how the plan is set up, go ahead and click on ‘Publish.’ To create more membership levels, simply repeat the same process described above.
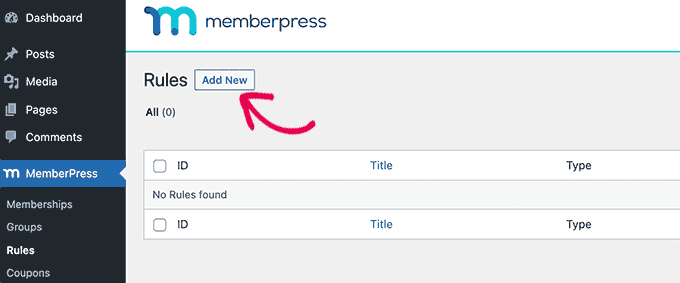
Once you’ve created all the membership levels, it’s time to add some access rules. These allow you to restrict access to your audiobooks based on the user’s membership plan.
Just go to MemberPress » Rules and then click on the Add New button.
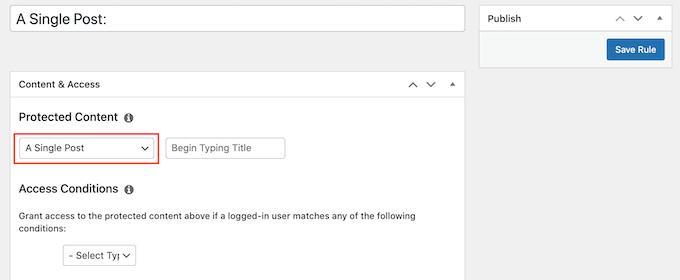
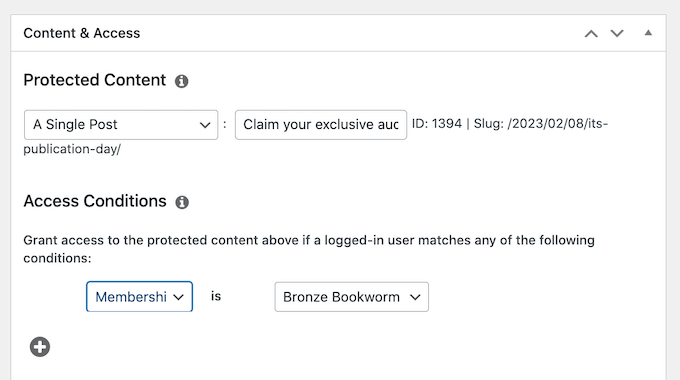
Here, you can create all kinds of access rules, but you’ll typically start by selecting the audiobook that you want to restrict access to.
Under ‘Protected Content,’ open the dropdown menu and choose an option from the list. This might be the specific page where you embedded the audio file, content that has a particular tag, or any other option from the list.
After that, open the ‘Access Conditions’ dropdown and choose ‘Membership.’
In the second dropdown menu, select the membership level people will need in order to access this content.
There are more settings that you can configure, but this is all you need to create a simple access rule.
When you’re happy with how the rule is set up, click on ‘Save Rule.’ To create more access rules, simply follow the same process described above.
Now that everything is set up, you’ll need to make sure visitors can buy memberships and log into their accounts. Thankfully, MemberPress comes with ready-made forms that you can add to your site.
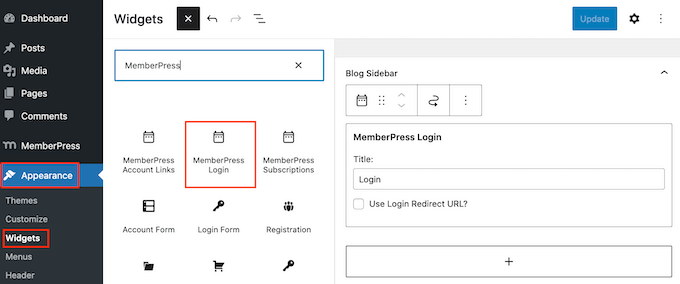
We recommend adding the MemberPress login widget to a widget-ready area, so members can log in from any page.
Simply head over to Appearance » Widgets and add the ‘MemberPress login’ widget to the sidebar or similar section.
Don’t forget to click on the ‘Update’ button to save your widget settings.
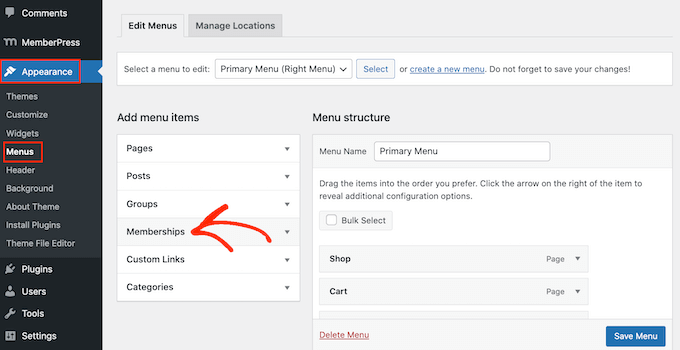
There are a few different ways to add a signup page to your website, but MemberPress automatically creates a registration page for each membership level. This means you can simply add these pages to your main navigation menu.
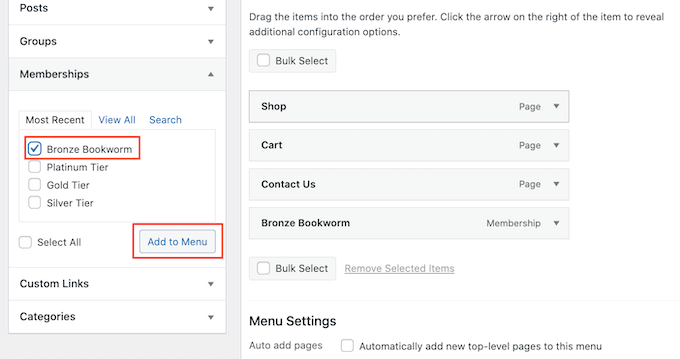
In your WordPress dashboard, go to Appearance »Menus. In the left-hand menu, simply click to expand the ‘Memberships’ section.
You’ll now see a list of all the different MemberPress levels.
To add a membership to the navigation menu, simply check the box next to it and then select ‘Add to menu.’
When you’re happy with how the menu is set up, click on ‘Save Menu.’
At this point, you’ve created a website where visitors can buy audiobook subscriptions. However, MemberPress has lots more settings you can use to sell audiobooks, grow your brand, and get more members.
Method 3. How to Sell Audiobooks With WooCommerce (Best For Online Stores)
Easy Digital Downloads makes it easy to sell audiobooks on any WordPress blog or website, without you having to configure lots of unnecessary settings like shipping and handling.
However, if you’ve already created a WooCommerce store, then you can sell digital products like audiobooks using this popular eCommerce plugin.
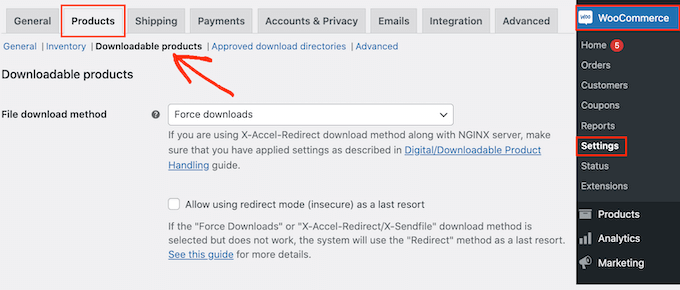
Although it’s mostly used to sell physical products, you can add support for digital products by going to WooCommerce »Settings and then clicking on the ‘Products’ tab.
Here, click on the ‘Downloadable products’ link.
You can now open the ‘File download method’ dropdown and choose an option from the list.
When you’re selling digital downloads, there is a risk that customers may share the direct link with other people. This allows people to download your audiobook without paying.
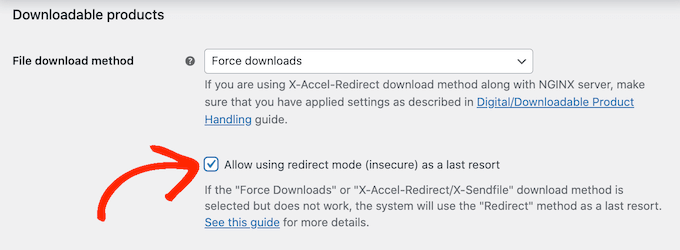
‘Force Downloads’ helps to protect your site from direct linking, so it’s the recommended method. However, just be aware that very large files may result in a timeout, especially if your server has limited resources.
If this happens, then you may need to change your WordPress hosting plan or select a different file download method.
You may also want to enable the checkbox next to ‘Allow using redirect mode (insecure) as a last resort.’ If WooCommerce encounters any problems, then this setting will deliver the audiobook via an unsecured redirect link rather than showing an error.
This is a much better customer experience.
The second option is ‘X-Accel-Redirect/X-Sendfile,’ which serves the file directly to the customer. This protects the audiobook from unauthorized downloads without impacting your site’s performance.
However, this method requires you to install and enable the X-Accel-Redirect/X-Sendfile module on your server, so it’s not very beginner-friendly. Depending on your plan, you may also need to speak to your WooCommerce hosting provider.
The final option is ‘Redirect only,’ which uses a direct link to the file. This means your audiobook isn’t protected and anyone can access it using the URL. That said, we don’t recommend the ‘Redirect only’ method.
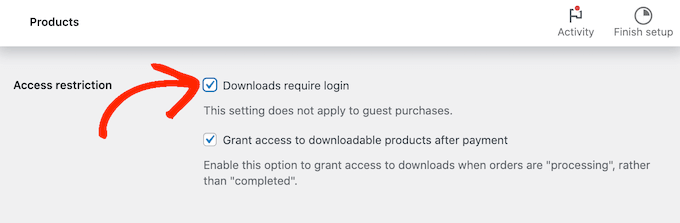
After selecting a download method, you can choose whether visitors must be logged into an account in order to download the audiobook.
To make this decision, either enable or disable the ‘Downloads require login’ checkbox.
By default, customers can download the audiobook while their order is processing.
If you want to wait until the order is complete, then uncheck the following box: ‘Grant access to downloadable products after payment.’
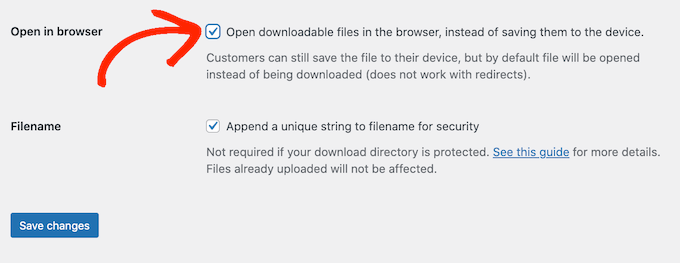
By default, WooCommerce will download the audiobook to the customer’s computer.
Most of the time this is the best customer experience, but you can set the file to open in a new tab instead. The customer can then decide whether they want to save the file.
There are some use cases where this may be the better option. For example, if you’re showing the customer a free sample, or your audiobooks are short enough to enjoy in one sitting.
In this case, you may want to check the box next to ‘Open downloadable files in the browser.’
When you’re happy with the settings you’ve entered, click on ‘Save Changes.’
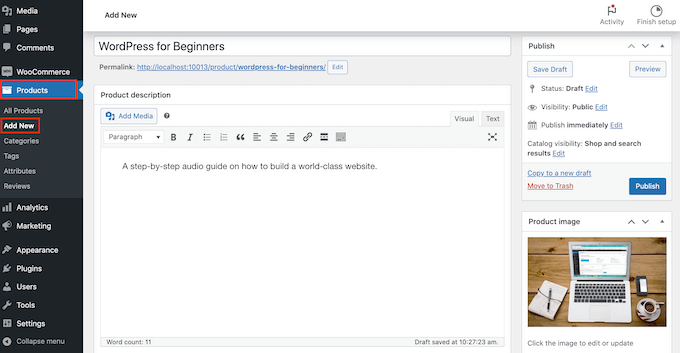
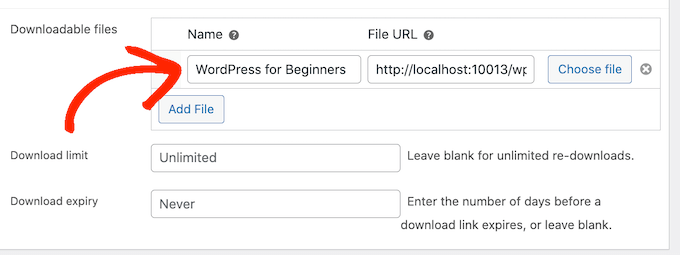
With that done, you’re ready to add the audiobook as a downloadable product by going to Products »Add New. Here, you can type in a title, add a description, upload a product image, and set the price as normal.
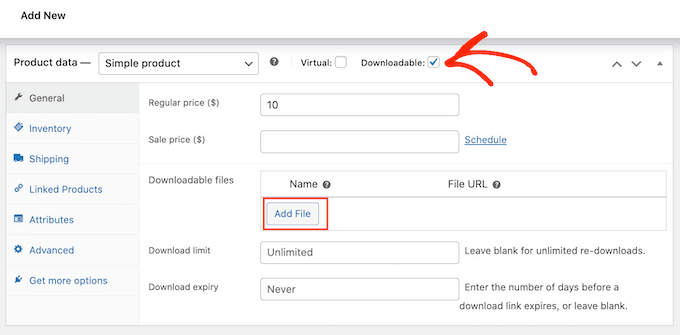
Then, scroll to ‘Product Data’ and check the box next to ‘Downloadable,’ which adds some new settings.
To start, click on ‘Add File.’
You can now either choose the audiobook from your media library or upload a new file from your computer.
After that, type in a filename for the audiobook.
By default, customers can download the audiobook as many times as they want, for as long as they want.
If you want to limit the number of downloads per customer, then type a number into the ‘Download limit’ field.
If you want the download link to expire after a certain number of days has passed, then type a number into the ‘Download expiry’ field.
When you’re happy with how the audiobook is set up, click on the ‘Publish’ button. The audiobook will now appear as a downloadable product on your online store.
Do you want to add your WordPress products to Google Shopping?
Adding your online store products to Google Shopping can help you increase traffic, reach more customers, and generate greater revenue.
In this article, we’ll show you how to easily add WordPress products to Google Shopping.
Why Should You Add WordPress Products to Google Shopping
Google Shopping is a virtual marketplace like Amazon and Etsy, where users can search, view, and compare products from different online stores that have paid to advertise their products.
If you have a WooCommerce store, then adding your products to Google Shopping can prove to be extremely beneficial for your business.
Your products will be shown to all users browsing through Google shopping which will increase traffic on your WordPress website, generate more revenue and bring in more customers.
That being said, let’s see how you can add WordPress products to Google Shopping.
How to Add WordPress Products in Google Shopping
Step 1: Creating a Google Merchant Account
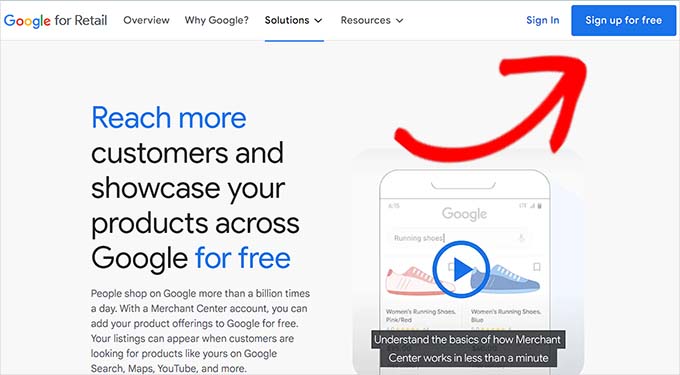
To add your products to Google Shopping, you have to start by creating an account in the Google Merchant Center. This is the place where your product information will be stored for viewing by Google Shopping.
First, go to the Google Merchant Center page and click the ‘Sign up for free’ button.
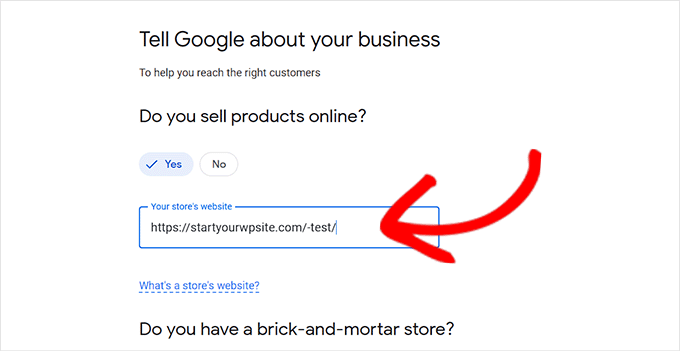
After that, Google will ask you about your online business.
Just check the answers that apply to you, and then provide your website’s URL.
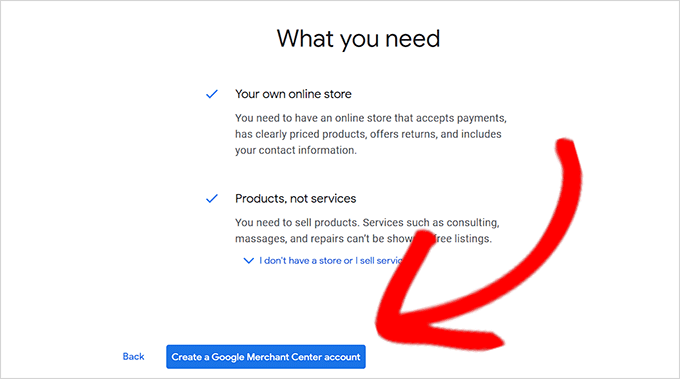
After you’ve provided the details, you’ll be redirected to another page.
Here, you simply have to click the ‘Create a Google Merchant Account’ button at the bottom of the page.
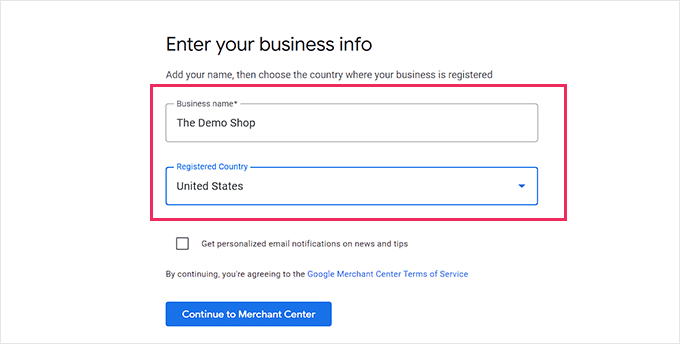
Now, you will be asked to provide your business details. You can start by writing your business name.
Next, select the country where your business is based from the dropdown menu below the ‘Registered Country’ option.
After that, click the ‘Continue to Merchant Center’ button.
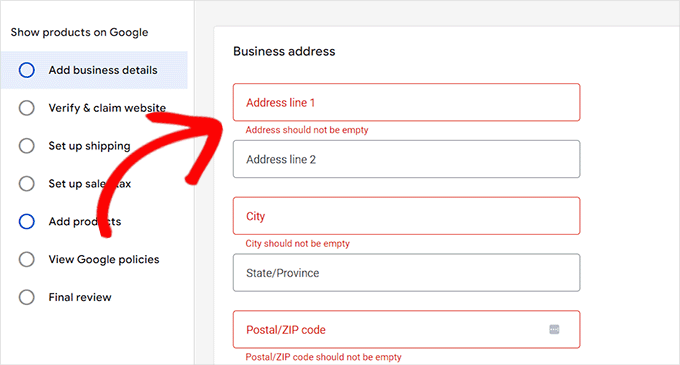
You’ve successfully created your Google Merchant Account. Now all you have to do is provide your business info and shipping details.
Once you’ve filled in those details, simply click the ‘Save’ button at the bottom to store your settings.
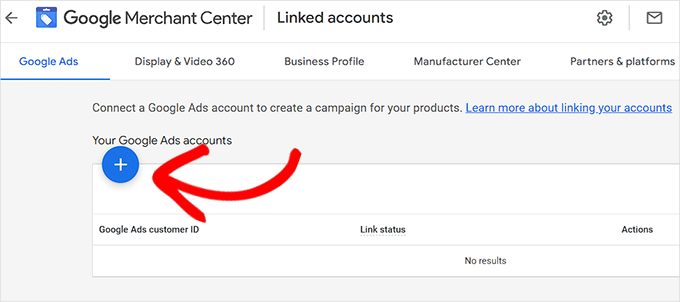
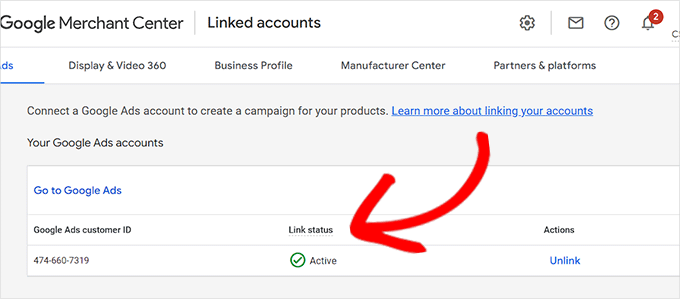
Step 2: Linking Your Google AdWords Account
Now you’ll have to link your Google AdWords account to your Google Merchant Center account so that you can show your products via Google Shopping.
To link your account, simply go to the Google Merchant Center dashboard and click the gear icon at the top of the page.
Clicking it will open up a ‘Tools and Settings’ prompt. Here you simply have to choose the ‘Linked Account’ option present.
This will take you to the ‘Linked Accounts’ page.
Now you simply have to click the ‘+’ button to create your Google Ads account.
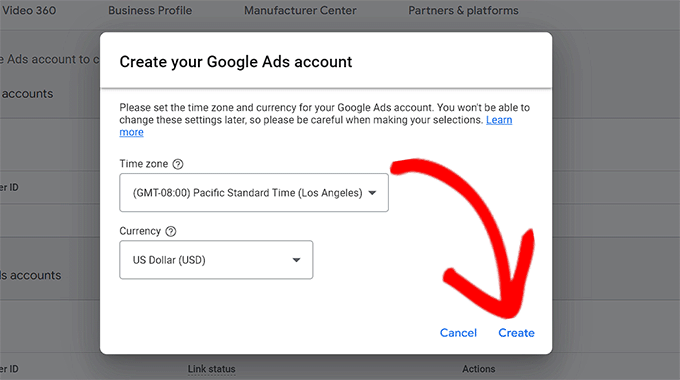
This will open up a ‘Create Your Google Ads Account’ prompt.
Simply choose your preferred time zone and currency and then click the ‘Create’ button.
You have now successfully created your Google Ads account.
This is how it will look once your account has been created.
Step 3: Adding WordPress Products to Google Shopping
To add your WordPress products to Google Shopping, we will be using the ELEX Google Shopping plugin to display your WooCommerce products in Google Shopping.
Upon activation, head over to the Google Shopping Feed » Create Feeds page from the WordPress admin sidebar.
From here, simply fill in your business details and click the ‘Continue’ button at the bottom.
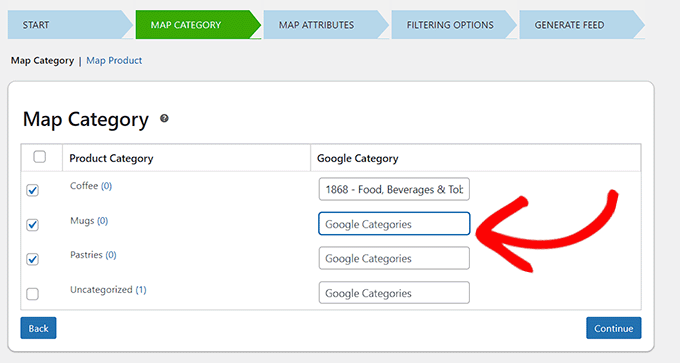
Next, you’ll be taken to the ‘Map Category’ page. Here you simply have to select your product categories.
Simply type your product categories in the ‘Google Categories’ tab and click ‘Continue’
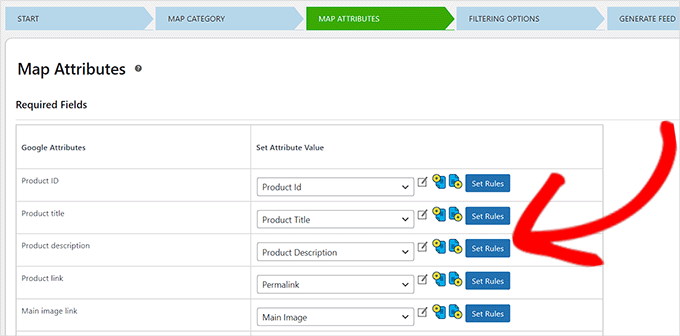
After that, you’ll be directed to the ‘Map Attributes’ page.
This is where you’ll have to fill in your product details including product id, product description, product link, pricing, image, and more.
Here select and fill in as many attributes as possible for more visibility in Google Shopping and click the ‘Continue’ button.
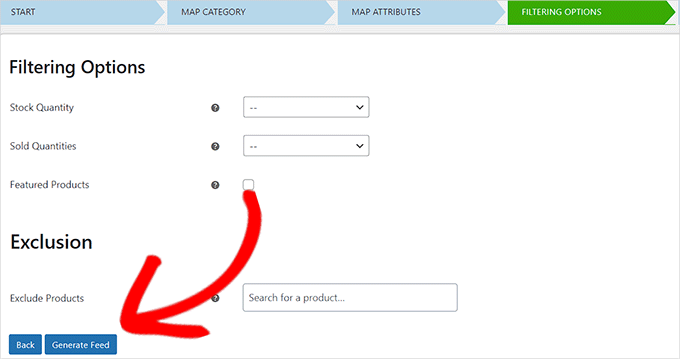
Now that you’re on the ‘Filtering Options’ page, simply fill in the details as required for your online store.
For example, you can include how many items you have in stock or note how many have sold already.
Next, simply click the ‘Generate Feed’ button at the bottom.
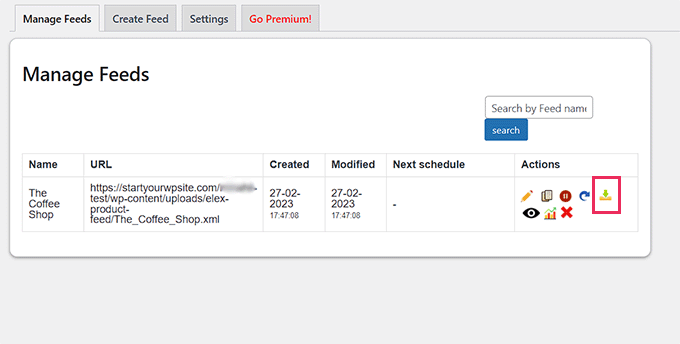
After you’ve created your Google Shopping feed, go to the Google Shopping Feed » Manage Feeds page from the admin sidebar.
Here you will be able to view your Google Shopping Feed. Now you have to simply click the ‘Download’ button beside it.
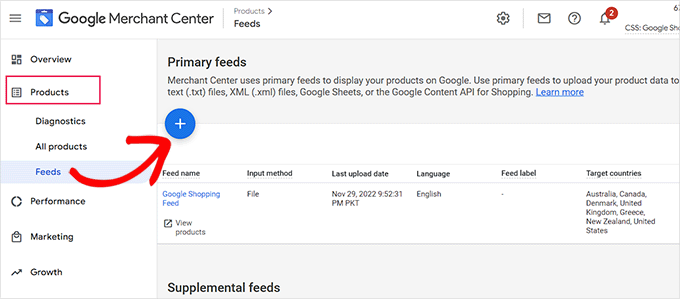
Once you’ve downloaded your feed as an XML file, go back to the ‘Google Merchant Center’ dashboard and click the Products » Feeds option from the sidebar.
This will open up the ‘Primary Feeds’ page where you have to click the ‘+’ button to add a new feed.
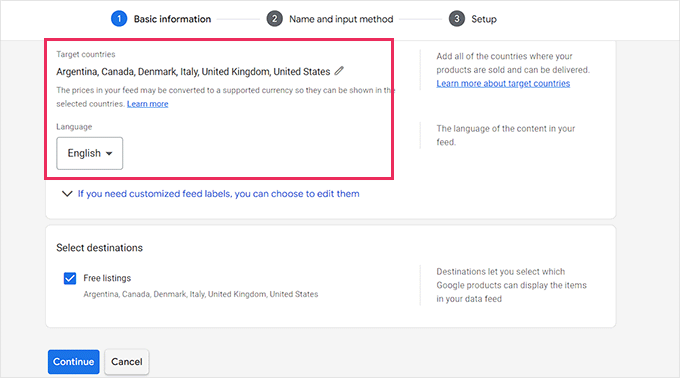
This will take you to the ‘New Primary Feed’ page where you can start by filling in basic details. First, start by adding all your target countries.
Next, select your preferred language and then click the ‘Continue’ button.
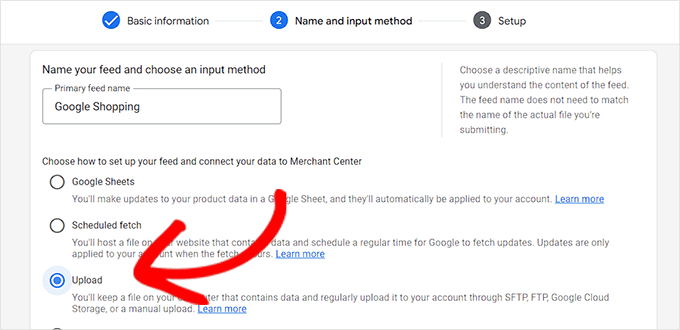
Then, you have to choose a name for your feed and select a method to connect your data to the Merchant center.
For this tutorial, we will be uploading the feed XML from WordPress.
After that, just click on the ‘Continue’ button.
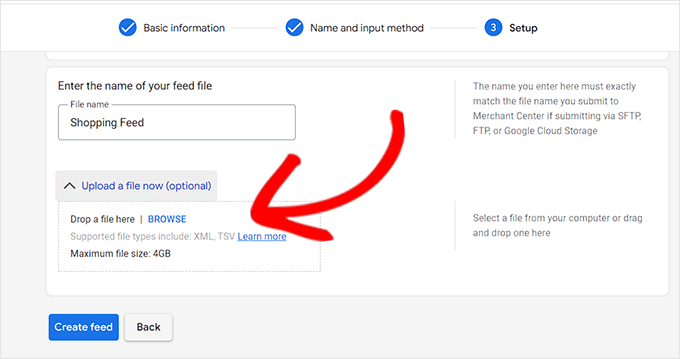
Now that you’re on the ‘Setup’ page, simply type the name for your Google Shopping Feed.
Next, just upload the Feed file you got from WordPress and click the ‘Create Feed’ button.
You have now successfully added your WordPress products to Google Shopping.
Bonus: How to Add Google Merchant Center Schema in WordPress
To improve your product search visibility in Google Shopping and increase conversion rates, you should add a Google Merchant schema in WordPress.
Schema markup is an HTML code that provides more details about your products to search engines.
A GMC listing schema will make your search snippets more prominent and will allow your products to be featured as popular products for the relevant search terms.
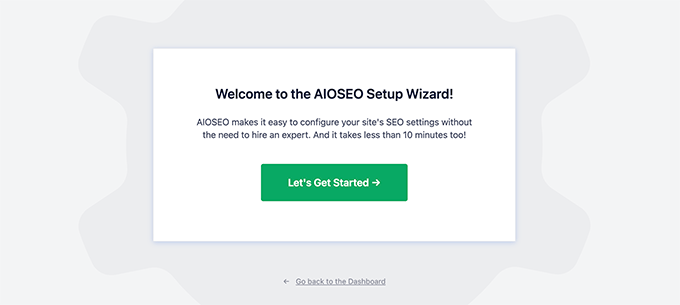
The easiest way to add a Google Merchant Center listing schema to WordPress is by using the All in One SEO for WordPress.
Upon activation, a setup wizard will open up. Simply go ahead and click the ‘Get Started’ button.
After that, you need to follow the onscreen instructions in the setup wizard to configure the plugin. If you need help, please see our guide on how to properly set up AIOSEO in WordPress.
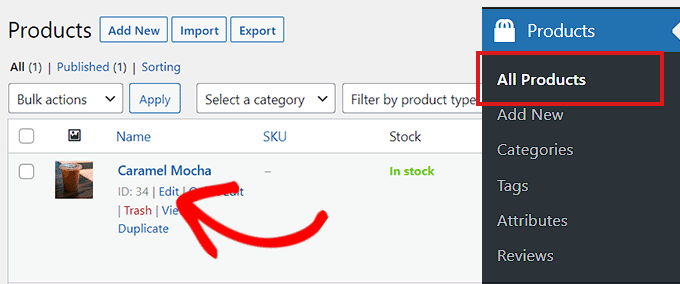
After the AIOSEO plugin has been set up, you need to visit the Products » All Products page from the admin sidebar.
From here, simply click on the ‘Edit’ link below a product to open up the ‘Edit Product’ page.
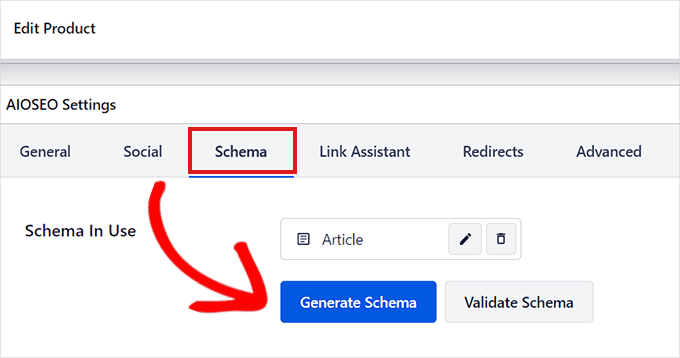
Once there, you need to scroll down to the ‘AIOSEO Settings’ section and click on the ‘Schema’ tab.
Now, you need to make sure that the schema type is set to ‘Product’ by default.
If that is not the case, then simply click on the ‘Generate Schema’ button.
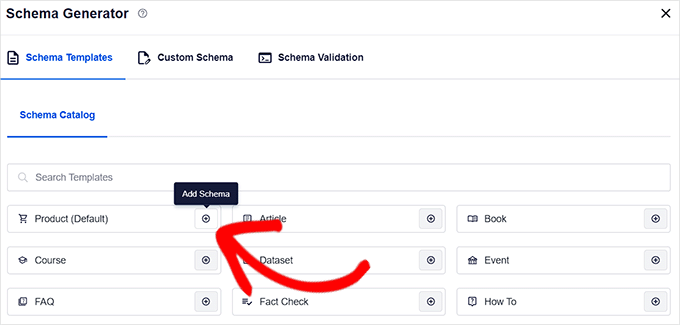
It will open up the Schema Catalog which will list all the available schema templates.
From here, you need to click the ‘Add Schema’ (+) button beside the Product option to set it as your primary schema.
Note: You may see the ‘Article’ schema already applied. If so, you can remove it as you add the new one because this particular page isn’t an article or blog post in Google’s eyes.
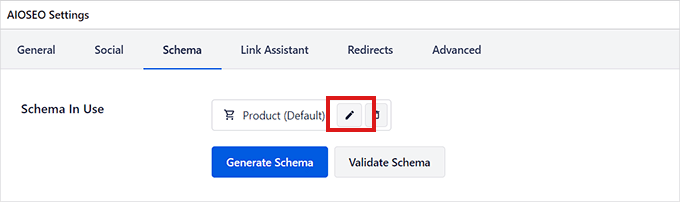
Next, you will need to fill in the product information to add the GMC listing schema.
For that, you need to click the ‘Edit Schema’ button next to the ‘Schema in Use’ option.
This will open up the ‘Edit Product’ modal where you will need to fill in the product details.
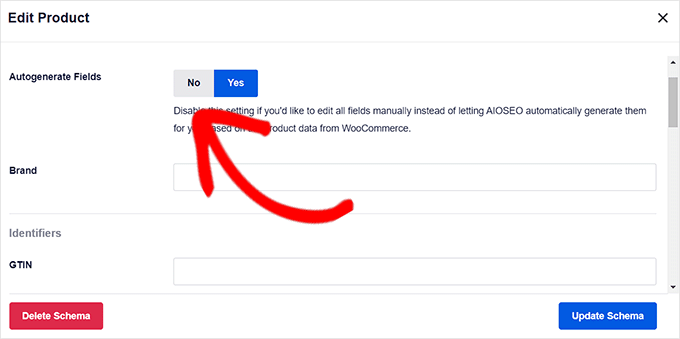
If you’re using WooCommerce, then AIOSEO will automatically pull most of the product data from your product information.
However, if you want to fill in the information manually, you need to simply toggle the ‘Autogenerate Fields’ switch to ‘No.’
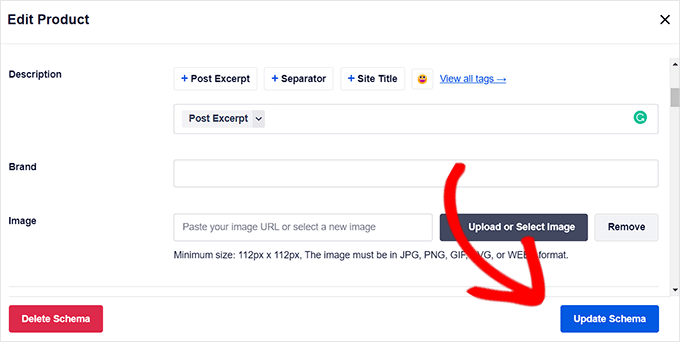
The product attributes that you will need to add include the product name, description, image, ISBN, price, material, color, shipping details, and more.
We recommend that you provide all the details so that the schema markup can make your product snippets more engaging.
Once you’re done, simply click the ‘Update Schema’ or ‘Add Schema’ button to store your settings.
You have now successfully added the Google Merchant Center listing schema to WordPress, and your products can now be featured on the platform and hopefully earn you more sales.
Are you looking for popular digital product ideas to sell online?
In today’s creator economy, there are many opportunities to make money online. You can sell items like music files, videos, blog posts, eBooks, software, apps, podcasts, premium content, and more.
In this article, we will share the most popular digital products that you can sell online.
What are Digital Products?
A digital product is essentially anything that you can buy, download, and use on a device such as a computer or mobile phone. For example, ebooks, software, videos, music, online courses, and more can be digital products that you can purchase at an online store.
They are delivered to you electronically, usually through a direct download in your user dashboard or in an email with a download link inside. In general, you can easily access them anytime or anywhere.
Why Sell Digital Products Online?
Digital products have a lot of advantages compared to selling physical products.
First, you don’t have to worry about keeping inventory and meeting supply or demand requirements. Once you create a digital product, you can sell it again and again.
This also relieves you of any storage issues. Some physical products need to be kept at a warehouse and may require special storage conditions like refrigeration, which can be costly. On the other hand, you don’t have to worry about storing your digital products.
Besides that, you get to generate a passive income stream with digital goods and easily grow your sales. They also help reach a wider audience across the globe, as people from around the world can buy your digital products.
That said, let’s look at some of the most popular digital products you can sell online today.
1. eBooks
eBooks are a great digital product to have, and you can write about any topic you like. The best part, once you’ve created an ebook, you can simply market it and earn passive income.
Now, if you have a WordPress blog or write articles regularly on any other platform, then you can repurpose the content for your ebook.
For instance, your most popular guides would already have enough content to be converted into an ebook. Or you can combine several blog posts into an ebook about a particular topic.
The next most popular digital product you can sell is online courses. People are always looking to improve their skillset and learn new things.
You can use this opportunity to share your expertise and teach other people through a virtual classroom. For example, if you’re a fitness instructor, then you can create an online course and teach people different exercises.
The best part, you need very little investment and no technical knowledge to create online courses.
There are many tools in the market that can help you get started in no time. All you need is a domain name for your site, WordPress website hosting, and a learning management system (LMS) plugin.
LMS software like MemberPress or Thrive Apprentice makes it super easy to create interactive courses without editing code. Plus, you can manage students and course material, offer quizzes, and more.
Just like ebooks and online courses, a membership website is another simple way of making money online. You can sell premium memberships with access to exclusive content and community features.
For example, you can lock specific guides, cheat sheets, interviews, videos, podcasts, newsletters, and other content behind premium memberships.
On the other hand, you can offer exclusive entry to different communities, like a forum, Slack channel, or Facebook group, through a membership site.
What’s great about memberships is that you don’t have to rely on advertising revenue. You can allow your website visitors to support your site and generate continuous income.
There are many membership plugins and tools you can use to get started. For instance, MemberPress lets you restrict access to content, integrate different payment services, create unlimited membership levels, allow drip content, and more.
You can also sell individual guides and tutorials as digital products. This is a great way to earn more money if you have long articles or multiple blog posts on a particular topic.
Simply turn your guides into a downloadable file like a PDF document. You can then charge a fee to visitors who are willing to purchase your content.
For example, let’s say you have a detailed guide on email marketing. You can turn that guide into a PDF file and sell it as a digital product.
There are many WordPress eCommerce platforms you can use to sell digital products. We recommend using Easy Digital Downloads because it is beginner friendly, offers a shopping cart, easily integrates with payment gateways, and more.
Spreadsheets are another type of digital product you can sell on your website and generate revenue. You can create all types of useful spreadsheets for your audience.
For example, let’s say you have expertise in search engine optimization (SEO). You can create a technical SEO checklist for beginners and offer that as a paid spreadsheet. Similarly, you can create checklists, templates, calculators, lists, and other types of spreadsheets.
The best part is that you don’t need any investment to create a spreadsheet. Plus, it helps offer evergreen content that can you use to generate leads and a passive income stream.
You can also create WordPress plugins and sell them as digital products.
WordPress is open-source software, and it powers over 43% of the website on the internet. There are over 60,000 WordPress plugins that include free and paid options. This shows that there is a huge potential to create a plugin that generates revenue.
Usually, you need basic coding knowledge like PHP, CSS, HTML, and JavaScript to write a plugin. For more details, you can see our step-by-step guide on how to create a WordPress plugin.
You can also hire a developer to help you create a plugin. There are many WordPress developer job websites where you can post an opening and hire the right talent for a specific project.
If you’re willing to take on a DIY project, then you can also use a plugin called Pluginception. It lets you create a WordPress plugin from the WordPress dashboard. To learn more, please follow our guide on how to create a WordPress plugin using a plugin.
7. Software and Mobile Apps
Just like WordPress plugins, you can also create software and mobile apps. There are many SaaS (software as a service) products that you can create for any niche. It can be productivity software, workout apps, games, and more.
Usually, SaaS products have a recurring subscription. This means that you’ll need to generate income on a monthly or annual basis.
Since creating such software and apps requires specific skills, you might need to hire developers. This process can be expensive because you’ll need investment for creating software or purchasing an existing one ($15,000 and upwards).
As an alternative, you can convert your WordPress websites into mobile apps and monetize them. There are tools and plugins that can turn your site into an app. For example, let’s say you have a membership site. Converting it into an app will help you attract mobile users and sell it as a digital product.
On the other hand, you can also join affiliate programs and earn a commission on each sale. You can create a WordPress blog to review different software and apps and promote them as affiliates. Or you could create an online store using affiliates.
Similarly, you can make WordPress themes and sell them online. Themes are necessary for every WordPress user, and often users look for themes that offer specific features and customization options.
There are many platforms where you can sell website themes. Some of these include Enavto, Themeforest, CodeCanyon, and Creative Market.
You can also list a free version of your theme on the WordPress.org theme directory. From here, you can encourage users to upgrade to a premium version to unlock more features.
We recommend selling the digital products on your own websites instead of a marketplace like Envato because they charge a large commission on every sale without much benefit.
You can use an eCommerce solution like Easy Digital Downloads to create your own digital store.
9. Digital Art and Graphics
If you’re a graphic designer or an artist, then you can create a variety of digital products and sell them online.
For example, you can create logos, design templates, original digital artwork, clip art, patterns, brushes, backgrounds, icons, fonts, shapes, and more.
Besides that, creating assets for different photo editing software like Adobe PhotoShop, Canva, Affinity Designer, and Affinity Photo can also help you make money online.
Another great digital product you can sell online is photography. Many people look for images that they can use for their WordPress websites and blogs.
There are different types of photos you can sell. Some of these include stock photos, event pictures, portraits, drone images, backgrounds, and more.
Now, you can sell your images to different stock photo sites, like Shutterstock, 500px, iStock Photo, Adobe Stock, and more. Each of these websites has a payment structure where they’ll share a percentage of direct sales or give you a royalty fee.
On the other hand, you can create your own photography website and sell your images there. This way, you don’t have to share the profits with another third party and have more control over your images.
Videos are the next digital products on our list that you can sell online.
For example, videos like drone footage, stock videos, online training, product reviews, video game reviews, and gameplay footage are some of the ideas you can use to create a video-based digital product.
One of the easiest ways of monetizing your videos is by creating a video membership site. This way, you don’t have to rely on ad revenue from other platforms and get recurring payments from users who pay to access your content.
12. Recipes
Are you a chef, a home cook, or a food blogger? If you do, then you can sell recipes as digital products.
The food industry is worth trillions of dollars and is very competitive. However, you can find a niche that your audience likes and share recipes to earn money.
For instance, you can start a food blog and offer premium recipes for subscribers. Or you could combine multiple recipes into an ebook and sell that as a digital product.
Plus, you can offer cooking courses and other premium content by creating a membership site. We recommend MemberPress for this sort of site, as it’s the best plugin for that on the market.
13. Podcasts
Podcasts are audio shows that users can subscribe to. They are generally made up of audio files that listeners can download or stream to listen to.
There are many topics you can create a podcast on. For example, if your topic is music, then you can narrow it down to a specific genre. Similarly, if you’re into sports, then you can create a podcast on football.
Another great way of selling podcasts is by inviting industry experts and serving it as a masterclass. You can charge a premium or only offer these podcasts to members to generate income.
Many podcasters rely on their communities supporting them, whether that’s through a service like Patreon or creating their own membership site.
For more details, you can follow our guide on how to start a podcast and make it successful.
14. Professional Services and Coaching
You can also sell your expertise as a digital product and help other businesses.
For example, if you’re a copywriter, graphic designer, social media expert, developer, fitness coach, legal professional, translator, SEO expert, offer technical support through live chat, or any type of consultant, then you can offer your services to others for a fee.
Now, you can sign up for different freelancing websites like Upwork, or create your own site. From here, simply market your expertise on social media platforms and build a following to get more projects and clients.
15. Research and Data
Do you conduct industry-wide surveys, polls, and research? If yes, then you can create digital products and sell the research data.
Many businesses are looking for insights into their industry. They want to better understand their audience and find out what they like or don’t like.
You can carry out research on popular topics, collaborate with companies, or simply run a survey to gather data. After that, you can create a report, add it to your website, and sell it to consumers.
If you have a membership website, then you can also offer research and data to subscribers.
For examples, see some of our research articles we offer for free here at WPBeginner:
Bonus: Plugins and Tools to Market Your Digital Products
Now that you know some of the most popular digital products to sell online, you’ll also need to market them to your customers.
Here’s a list of WordPress plugins and tools that you can use to promote your product and boost conversions:
OptinMonster – It is the best lead generation and popup plugin for WordPress. You can create different campaigns and use smart targeting rules to promote digital products and increase conversions.
WPForms – This is the best WordPress form plugin. You can use it to create an order form, payment form, and more.
All in One SEO (AIOSEO) – The plugin helps you optimize your website for search engines. This way, you get to improve search engine rankings, attract more organic visitors to your site, and boost sales of your digital products.
MonsterInsights – It is the best Google Analytics plugin for WordPress. Using the plugin, you can track your digital products performance, which files get the most downloads, uncover the most popular products, and track eCommerce revenue without editing code.
PushEngage – This is a push notification software for WordPress and allows you to send personalized web notifications to customers about new products, promotions, sales, etc.
WP Simple Pay – You can collect online payments on your website using this plugin. The best part, you don’t have to set up a shopping cart to sell digital products while using WP Simple Pay.
Are you looking for a plugin to set up age verification on your WordPress site?
Setting up age restrictions allows you to limit users from seeing content due to legal requirements or the nature of the content. You can set up age verification with the right WordPress plugin without editing any code.
In this article, our expert team have researched and picked the best age verification plugins for WordPress.
Why Do You Need an Age Verification Plugin?
If you’re selling products or promoting goods that are age sensitive, then it is important to verify the user’s age before allowing them access.
For example, many countries have laws and regulations that require websites to verify users’ age. This is common if you’re in the business of selling alcohol, tobacco, cannabis, vape, tattoos, and other similar goods.
Similarly, different videos and games are not appropriate for minors and require an age gate. You can also add age verification on your membership website if it contains sensitive content.
A simple way of adding age verification to a WordPress site is by using a plugin. You don’t have to edit any code or hire a developer.
Plus by using a plugin, you can show a confirmation form or a popup where users can enter their age before accessing the content or buying a product.
That being said, let’s look at the best age-verification WordPress plugins for different business needs.
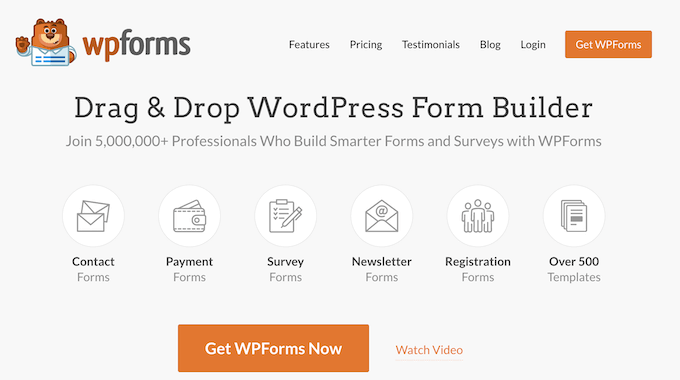
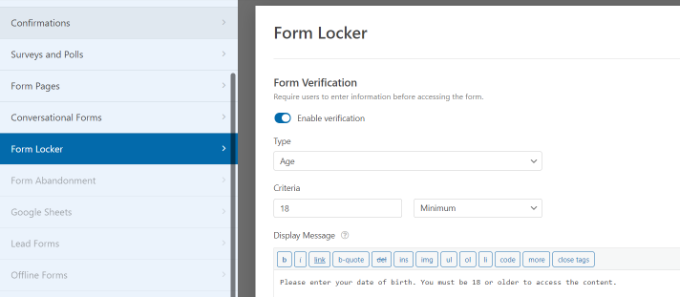
WPForms is the best WordPress contact form plugin that is beginner friendly and lets you create all types of forms. It offers a drag-and-drop form builder and comes with over 500+ pre-built form templates.
WPForms offers a Form Locker addon that allows you to set up age restrictions on your online forms. You can pick age as the verification type for your form and define the age limit. Users will then have to enter their date of birth before they can submit a form on your site.
Using WPForms, you can create forms for all kinds of situations. For instance, the plugin lets you create a login form or a registration form and only allows logged-in users to view the content.
If you’re looking for feedback about your company from a specific age group, then you can create a survey form and add an age restriction. Similarly, you can add an order form on your website with age verification to sell concert tickets or alcohol.
Besides that, WPForms also offers other features and addons. You can integrate payment services like Stripe and PayPal to accept online payments, allow file uploads, connect email marketing services, and more.
Pricing: You will need the WPForms Pro version to access the Form Locker addon and set up age verification in WordPress. This will cost you $199.50 per year. There is also a WPForms Lite version you can use for free.
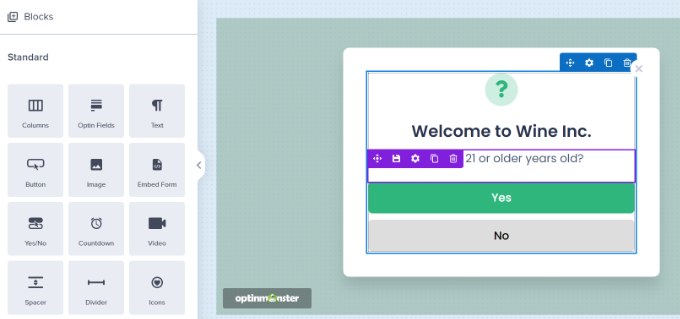
OptinMonster is the best lead generation and popup plugin for WordPress. It helps you get more leads, grow your email list, and boost conversions.
You can create stunning campaigns for your site, including age verification popups. The plugin offers a drag-and-drop campaign builder, pre-built templates, and lots of customization options. You can add different elements like images, buttons, videos, and more to your popup.
For instance, you can create a simple age verification lightbox popup with Yes/No options or show a popup where visitors need to enter their date of birth.
OptinMonsters also offers fullscreen campaigns, which are great for restricting access to your website or a page until users confirm their age.
The plugin provides powerful display rules that let you choose when and where to show your campaigns. For instance, you can show your age verification campaigns on selected pages or hide the popup for users that have already verified their age on your website.
Age Gate is a free age verification WordPress plugin that is very easy to use. Using the plugin, you can easily restrict content based on the user’s age.
It offers 3 input options to add age verification in WordPress. You can show a dropdown menu and let visitors select an age, allow users to enter their date of birth, or simply offer a Yes/No option to verify age.
Other than that, you can choose whether to restrict the entire website or select pages based on age. Plus, there is also an option to set different age restrictions for individual content using the plugin.
With Age Gate, you get multiple customization options to edit the appearance of your age restriction message. For instance, you can add a logo, change the background color, add blur, add a background image, and more.
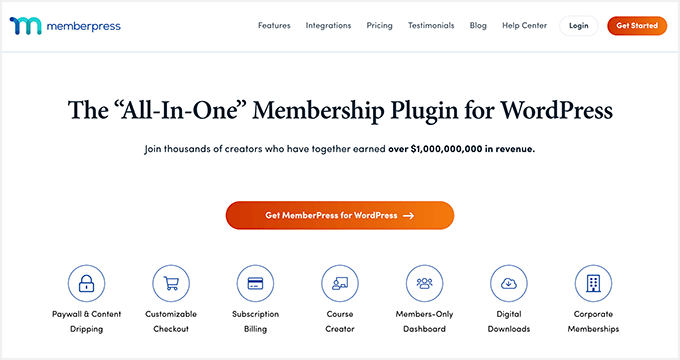
With MemberPress, you can add age restrictions to your WordPress site. Let’s say you don’t want members under 18 signing up for a particular membership or course. By setting up an age limit, you can prevent access to content.
Besides that, MemberPress offers other powerful features. It gives you full control over who can access content, release paid content over time, add payment gateways, and more. You can also create and sell online courses using MemberPress’s course builder.
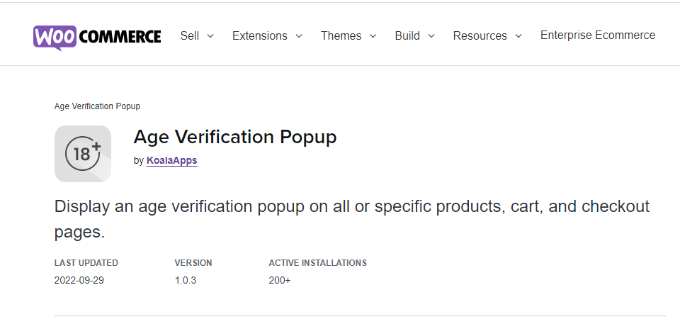
WooCommerce Age Verification Popup is the next plugin on our list. It is a paid extension for WooCommerce stores. If you have a WooCommerce store and you’re selling products like tobacco, vaping, medicines, fireworks, or items that require age verification, then this plugin is for you.
The plugin offers 4 verification methods where users can simply enter their age, select their date of birth, click a checkbox, or simply select from a Yes/No option.
Besides that, you can choose which pages the popup should appear on. For instance, you can enable it on your entire website or specific pages like cart, checkout, my account, and shopping page.
There are also different customization options you can use to edit your popup. These include adding a background image, selecting a color, adjusting the border height, and text size, and more.
However, if you want more options like prebuilt templates and the ability to add different elements to the popup, then you can use OptinMonster. It also works seamlessly with WooCommerce and offers more powerful display rules.
Pricing: WooCommerce Age Verification Popup is available for $29 per year.
Age Verification for WordPress is a free WordPress plugin that you can use to add an age limit to your WordPress site. The plugin is beginner friendly and offers basic features.
It adds an age verification popup to your site and restricts access to content for visitors that don’t meet the age requirements. Once a user verifies their age, a cookie is saved for 30 days, so they don’t have to verify their age again.
The plugin offers limited options to edit your age verification box. For instance, you can only add a background image, logo, title text, message text, and edit the yes/no button text using the Age Verification plugin.
However, there are other plugins on our list, like WPForms and OptinMonster, that offer more customization options. Plus, you get to choose from pre-built templates and drag-and-drop builders.
Pricing: The Age Verification plugin is free to use.
AgeChecker.Net is a third-party age verification platform for eCommerce websites. It uses identity networks and a proprietary database to verify customer’s age at checkout.
The plugin is compatible with different eCommerce platforms, including WooCommerce, Shopify, Magento, BigCommerce, and more.
It adds age verification on checkout pages and instantly verifies 90% of the user’s age in the United States.
If the data isn’t available in the data sources, then it will ask for the customer’s ID verification. Once a customer submits the required documents, AgeChecker.Net’s 24/7 live team manually verifies it for you. If the customer is underage, they will disable their access to the product or service.
Other than that, you can customize the minimum age, digital signature requirements, and order blocking based on the customer’s location. Plus, the plugin is compliant with Food and Drug Administration (FDA) and other federal and state regulations in the US.
Pricing: AgeChecker.Net has a free WordPress plugin that connects with WooCommerce. However, you will need to signup for their premium plan, which will cost you $25 per month + 50¢ per accepted verification.
AgeVerify is another WordPress age verification plugin that is free to use. The plugin is super simple to use and lets you create an age-verification message for your website.
It comes with prebuilt templates that you can use for different types of businesses. Plus, you can edit the age verification text, change the text and color of the button, and more.
What makes this plugin different from others on our list is that it lets you edit the cookie duration (in hours) for the age verification message. This way, your visitors won’t have to verify their age each time they visit your website.
Easy Age Verify is an age verification plugin for WordPress that comes with pre-built verification settings and messages for alcohol, vape, and adult businesses.
The plugin is super easy to use and doesn’t require complex configuration. All you need to do is enable age verification, select your industry, and the plugin will take care of the rest. It also gives you the option to exclude age verification for logged-in users.
On the downside, you cannot customize the appearance of your age verification message in the free version. However, you can use WPForms as an alternative. It helps display a custom age verification form anywhere on your website.
Pricing: Easy Age Verify is free to use. There is also a premium version that unlocks customization features, and it costs $8.25 per month (billed annually).
Which is the Best Age Verification WordPress Plugin?
Our top picks for the best age verification plugin for WordPress are WPForms and OptinMonster.
WPForms offers a Form Locker addon that allows you to add an age gate on any type of form and display it anywhere on your site. It offers a drag-and-drop form builder, prebuilt templates, and lots of customization options.
On the other hand, if you’re looking to add an age verification popup on your WordPress site, then OptinMonster is the best option. It lets you create age verification popups, offers powerful targeting rules to show and track that campaign, and easily integrates with eCommerce platforms.
Are you wondering which marketing data you should be tracking on your WordPress website?
After launching a website, most small business owners rely on their best guesses to make important marketing decisions. Not only does that add huge risk, but it also significantly slows down growth.
In this guide, we will share the top website marketing data that you must track on every WordPress site, so you can make data-driven decisions to grow your business.
Why Do You Need to Track Marketing Data in WordPress?
We believe it’s easy to double your traffic and sales when you know exactly how people find and use your website. Most business owners do not realize how easy it is to track important marketing metrics on your WordPress site.
For example, with a few clicks, you can find out who your visitors are, where they are coming from, and what they do on your website. You can learn which of your articles are getting more visits and which pages on your site are not getting any views.
If you run an online store, then you can see what’s your website conversion rate, which page drives the most sales, what are your top referral sources, and more.
You can use all this marketing data to make informed business decisions and grow your business with confidence.
That said, let’s take a look at the top website marketing stats that you must track on every WordPress site. You can click the links below to quickly jump to any section you’re interested in:
The best way to track marketing data on your WordPress website is by using Google Analytics. It is the most popular website analytics software in the world and is loved by businesses, bloggers, and marketers because it provides a treasure trove of information.
For example, you can use Google Analytics to learn:
The number of visits and pageviews on your website
Who is visiting your website (visitor location, browser, operating system, screen size, and more)
How they found your website
How users interact with your website
And a whole lot more
Google Analytics is an essential tool in our own business. However, you’ll need to add a tracking code to your website, which requires editing code. This can be tricky for beginners, and the slightest mistake can mess up your tracking.
An easier way of setting up Google Analytics is using MonsterInsights. It is the best WordPress Analytics plugin and helps you set up advanced tracking in WordPress without editing code.
Any link that takes users away from your website is called an outbound link. If you use affiliate marketing to make money from your website, then those outbound links are also known as affiliate links.
Tracking these outbound links help you see how much traffic you are sending to other sites, and you can use this data to build stronger partnerships with those sites.
As a blogger, you can see which affiliate links are clicked more often by your visitors. This information can help you make a proper affiliate marketing strategy and boost your referral earnings.
The easiest way to track affiliate links in WordPress is by using MonsterInsights. It tracks outbound links and affiliate links on your site out of the box.
You also get easy-to-understand reports inside your WordPress dashboard, including your top affiliate and outbound links.
Checkout behavior and tracking the abandoned cart information
Product lists performance
Uncover top conversion sources
Sales performance
Setting up enhanced eCommerce tracking on your WordPress store can be difficult. However, MonsterInsights makes it easy for you and it literally takes a few clicks to configure with no coding needed.
The best part is that you get to see eCommerce reports in your dashboard. It shows how your online store is performing, which products are getting the most sales, where your customers are coming from, and more at a glance.
4. Track User Engagement Data with Google Analytics
User engagement shows you what users do when they arrive on your website. It helps you identify patterns of highly engaged user behavior which leads to more conversions and sales.
For example, you may find out that users visiting a specific page are 10 times more likely to make a purchase. You can then use this insight to send more users to that page, or replicate a similar experience on other pages of your website.
Basically, you will be tracking data about how users interact with your website. For example:
Google Analytics is really good at tracking where your website traffic comes from. It can even categorize your traffic based on their source, including organic search, organic social, referral, email, and more.
However, when you’re running paid ad campaigns, email marketing campaigns, or social media promotions, you need detailed campaign tracking.
That’s where UTM tracking comes in.
Campaign-level tracking allows you to see exactly which email, ad, or specific call-to-action link helped you get the most traffic or sales.
To make it easy for you to generate UTM links, MonsterInsights comes with a free campaign URL builder, so you can get more detailed reports. You can enter custom campaign parameters like the source, medium, campaign name, and more to create a custom URL.
These tags include native analytics parameters which are tracked by Google Analytics and are included in your reports. You can then see exactly which link users clicked and how your campaigns are performing.
6. Track and Improve Facebook Retargeting Campaigns
Did you know that Facebook allows you to display targeted ads to people who have visited your website in the past? Yes, it’s called retargeting.
You can install a Facebook pixel and display targeted ads to anyone who visits your website. However, if you install Facebook retargeting pixel today, then you will only be able to show your ads to people who visited today and onward.
Even if you are not running a Facebook advertising campaign right now, we recommend installing the retargeting pixel, so you have a built-in audience when you’re ready to get started.
If you run pay-per-click (PPC) campaigns using Google AdSense, then you can easily see how your ads are performing in the AdSense dashboard. However, these reports only tell you how users interact with your ads not what they do after that.
For that, you’ll need Google Analytics which comes with built-in integration with your AdSense account. This integration enables you to easily track your paid traffic conversions.
Google Search Console is a set of free tools offered by Google to give publishers a look at how their website is seen by the search engine.
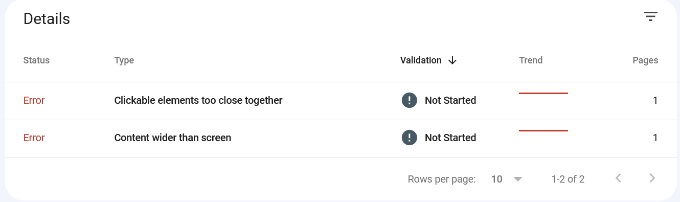
It provides immensely useful information like how your pages rank for different keywords (more on this later), the overall performance of your site in search engines, and any errors Google crawler found on your website.
For example, here is a report showing errors that occur when a user views the site on their mobile devices. Without Google Search Console, it will be very difficult to pinpoint such issues and quickly resolve them.
Keywords are the phrases users enter in search engines to find what they’re looking for. To get more traffic from search engines, you need to know exactly which keywords are bringing you the most traffic to your website, so you can focus on what’s working.
We have a complete WordPress SEO guide that you can use to learn how to optimize your content for specific keywords.
Normally, beginners rely on manually entering keywords in Google search to see if their site is ranking. This is highly inefficient as you would miss out on thousands of keywords where your site can be easily ranked.
Google Search Console is a free tool that provides you with valuable keyword data with the average position. You can see which search terms are ranking high, search impressions, and how many average clicks you get.
If you’re using MonsterInsights, then you can view the Search Console report inside your WordPress dashboard.
However, it only allows you to see your own site’s keyword data. If you want to research your competitors, then you’ll need SEMRush. This incredibly powerful SEO tool allows you to view in-depth keyword data for any website.
Most popular email marketing services come with stats and insights that you can track. These reports provide useful data like open rate, click-through rate, unsubscribe rate, and more.
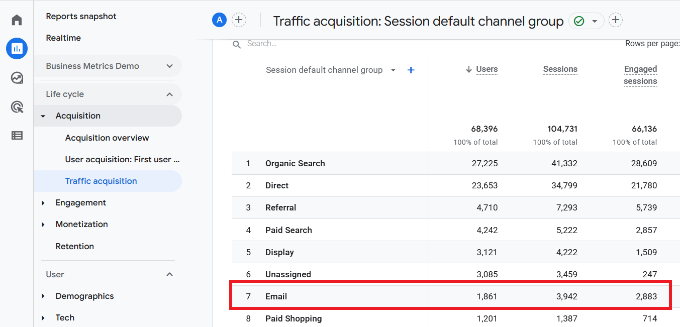
You can also see the traffic coming from your email campaigns to your website in your Google Analytics 4 reports under Acquisition » Traffic acquisition.
From here, you can see how well your email newsletter traffic converts, and what you can do to improve.
Tracking email marketing data helps you grow your email list. You can create new email forms, change form placements, and use popups to boost subscribers.
While there are definitely other marketing metrics that you can track, we believe these are the top marketing data that every business owner must track on their WordPress site.
Do you want to prevent fraud and fake orders on your WooCommerce store?
Fraud and fake orders can cause serious losses for an online store. Luckily, there are effective tools to prevent spam and block fraudulent orders.
In this article, we’ll show you how to easily prevent fraud and fake orders in WooCommerce.
Why Do You need to Prevent Fraud and Fake Orders in WooCommerce?
Fraudulent and fake orders can cause serious financial losses to a business. This is why you need to monitor your online store and prevent fraud and fake orders.
Last year, online stores lost more than $20 billion in revenue due to fraudulent payments, chargebacks, and fake orders.
For some eCommerce stores, the total fraudulent order costs were higher than 4% of total revenue.
A large number of fake orders are usually spam that can be easily prevented. Some orders are more malicious and are placed just to annoy or harass an online business.
The rest of the fraudulent orders are scammers trying to make a few quick bucks.
That being said, let’s take a look at how to prevent fraud and fake orders in WooCommerce.
Here is a quick overview of all the tips we’ll cover in this guide.
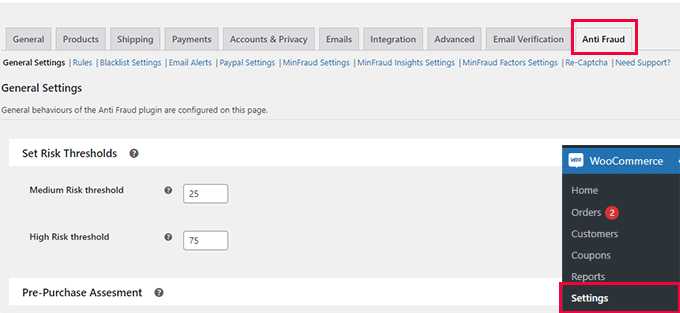
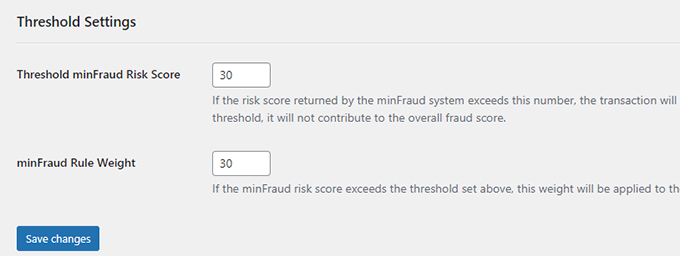
Upon activation, you need to visit WooCommerce » Settings page and switch to the Anti-Fraud tab.
From here, you can set a minimum and high-risk threshold score.
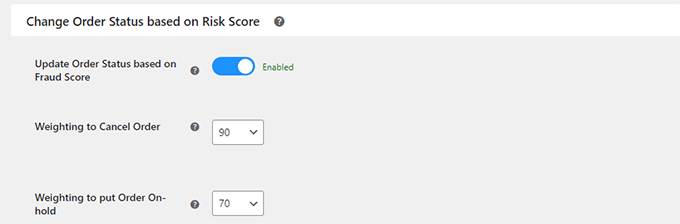
Below that, you can change the order status based on the risk score. For instance, you can set the score when an order will be automatically canceled and set a score to put an order on hold.
Don’t forget to click on the ‘Save Changes’ button to store your settings.
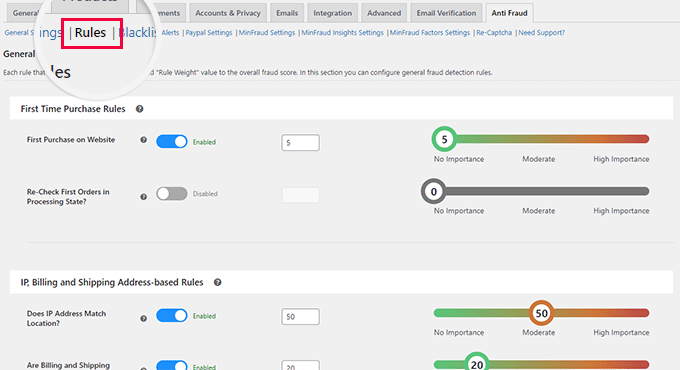
Next, you need to switch to the Rules tab. From here, you can configure the rules and assign them a risk score.
For instance, you can set a 5-point score for a customer who is placing their first order.
You can set scores for suspicious IP addresses, emails, unsafe countries, matching IP addresses to geographic locations, and more.
Carefully review the rules and their assigned scores and make changes if necessary. If you are unsure, then default settings would work for most eCommerce websites.
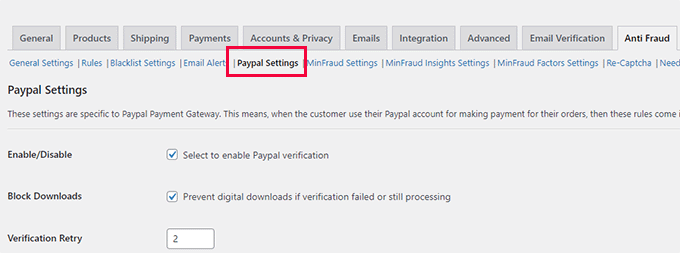
If you are using PayPal as a payment option on your store, then you can switch to the PayPal tab. From here, you can require users to verify their PayPal email addresses.
The plugin also allows you to connect with third-party fraud detection service Maxmind.
This paid service uses a global database to collect data about suspicious payment details, emails, IP addresses, and more.
You can then add this score to your plugin risk score and choose what to do when this score is higher.
Once you are satisfied with your settings, don’t forget to click on the ‘Save Changes’ button to store them.
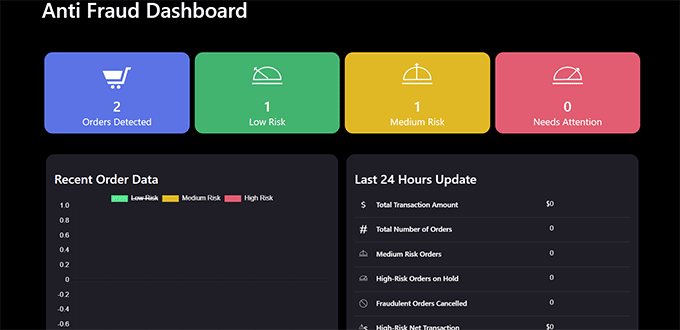
Viewing Fraud Detection Activity
The plugin comes with an easier dashboard where you can see plugin activity in an easy-to-understand format.
Simply click on the Anti Fraud menu item in your WordPress admin sidebar. From here, you can see statistics about all your orders.
The anti-fraud plugin will help you catch most of the fake and fraudulent orders on your WooCommerce store.
However, if you need more strict measures then continue reading for additional WooCommerce fraud prevention tips.
2. Use Stripe Radar and 3D Secure to Automatically Block Fraud
Stripe is the most popular online payment solution in the world. There is a WooCommerce Stripe gateway by FunnelKit that helps you properly connect WooCommerce with Stripe, so you can take advantage of SCA as well as 3D Secure payments option by default.
This method would require you to use Stripe as your main payment gateway in WooCommerce. First you’ll need to install and activate the Stripe for WooCommerce plugin by FunnelKit. Once that’s configured, it will guide you to set up Apple Pay, Google Pay, and other settings to help you protect against fraud transactions.
Aside from that, Stripe also offers a feature called Stripe Radar to help fight against fraudulent transactions. This is a powerful set of algorithm that reduces chargeback risks for your business.
Basically Stripe uses machine learning to block orders. Their machine learning is trained on data across millions of companies worldwide that use Stripe.
We use Stripe Radar on our own eCommerce websites to help reduce fake and fraudulent orders.
Aside from their machine learning algorithm, you can also set custom rules with allow and block lists, and more.
Unfortunately not all WooCommerce gateways have these robust features. If you’re looking to switch to Stripe, then we recommend talking with FunnelKit team as they’re WooCommerce experts who can help.
3. Using the Cash on Delivery Payment Option Carefully
In many countries, ‘Cash on Delivery’ is a popular payment option. However, these stores find themselves more vulnerable to fake and fraudulent orders.
Users are able to place an order with a fake address, refuse to accept the order, or cancel an order that is already shipped.
Once you have shipped an order, you will pay out of pocket for shipping and return of that package.
We recommend not using the ‘Cash on Delivery’ option when possible, as that can lower the number of fake orders you may get.
Try to offer alternate payment options for users to pay before you can ship the order.
4. Sell in Specific Countries
WooCommerce allows you to easily restrict orders from specific countries. This helps you prevent fake orders from countries where you don’t sell or ship to.
Simply go to the WooCommerce » Settings page and select the countries you want to sell / ship to under the General tab.
Note: Geographical restrictions may reduce fake orders but users can simply use VPN to change their location and provide fake information to place an order.
5. Require Users to Create an Account
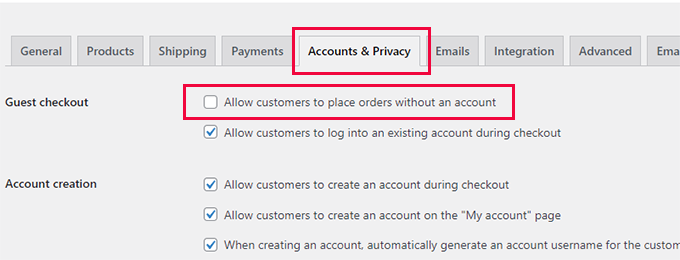
Another useful trick to slow down and prevent fake orders is by requiring users to create an account before they can checkout.
Simply go to WooCommerce » Settings page and switch to the Account and Privacy tab. From here, you need to uncheck the box next to the ‘Allow customers to place orders without an account’ option.
Below that, you can check options that allow users to create an account during checkout or from the My Account page.
Asking users to create an account also allows you to easily block customers who placed fraudulent or fake orders.
6. Use a Web Application Firewall and Custom Rules
Many scammers use disposable email addresses, fake IP addresses, and dummy data to place spam or fake orders.
A WordPress firewall helps you block this before it even reaches your website.
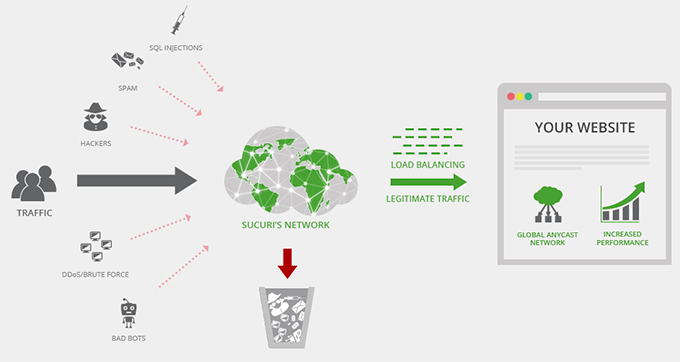
We recommend using either Sucuri or Cloudflare, both are among the best WordPress firewall plugin on the market. They comes with powerful security features, CDN servers, and a malware removal service.
In Cloudflare, you can also setup custom page rules to trigger CAPTCHA, or even automatically block users with suspicious activity. We use Cloudflare enterprise on our larger eCommerce stores which comes with all bots anomaly detection and threat response.
If you’re running a large eCommerce store, then it’s worthwhile exploring Cloudflare Enterprise tools.
7. Require Customers to Verify Their Email Addresses
Another way to reduce fake orders and fraudulent activity is by requiring new customers to create an account and then require them to verify their email addresses.
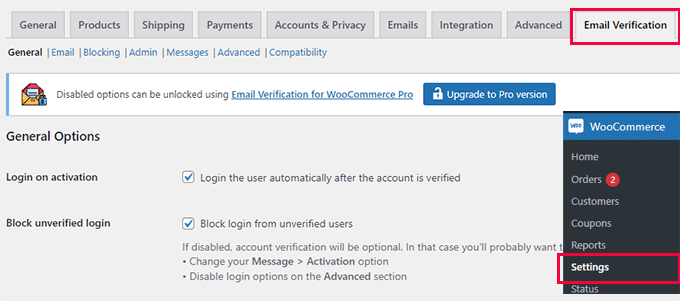
Upon activation, you need to visit the WooCommerce » Settings page and switch to the Email Verification tab.
From here, you can configure the plugin settings to your own requirements.
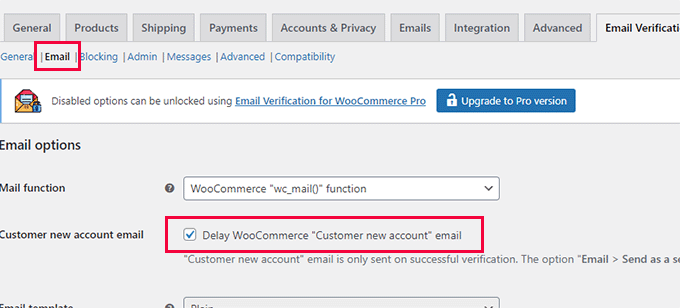
For instance, you can switch to the Email tab and delay the default WooCommerce new user email until the user verifies their account.
Don’t forget to click on the ‘Save Changes’ button to store your settings.
The plugin will now send a verification email to new WooCommerce customers to verify their email addresses.
It’s important to make sure that if you’re setting up email verification that your WooCommerce store actually have reliable email deliverability. Otherwise this can block real customers from purchasing your products.
There’s also a free version of WP Mail SMTP that you can use as well.
We hope this article helped you prevent fraud and fake orders in WooCommerce. You may also want to see our complete WordPress security guide to make your online store more secure or take a look at our expert pick of the best WooCommerce plugins to grow your store.
If you liked this article, then please subscribe to our YouTube Channel for WordPress video tutorials. You can also find us on Twitter and Facebook.
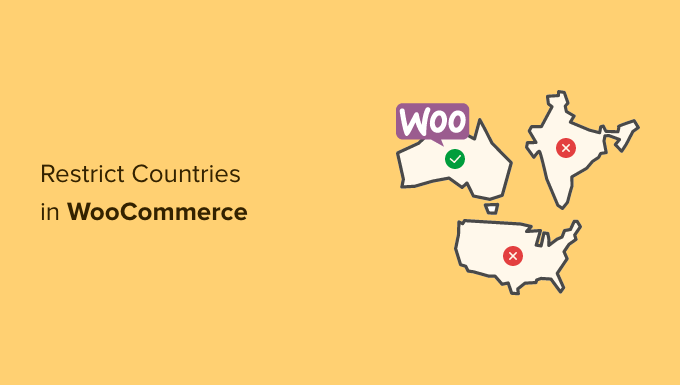
Recently one of our readers asked if it was possible to restrict countries in your WooCommerce store?
By hiding your WooCommerce store from specific countries, you can control your product visibility around the world. That way, your products will only be available in specific countries.
In this article, we will show you how to easily add country based restriction to WooCommerce products or even your entire WooCommerce store.
Why Restrict Your WooCommerce Store in a Country?
When selling products online, an online store owner can come across a lot of problems. For example, you can get a product order from a country where that product is illegal, or your payment gateways can’t process fees.
When building a WooCommerce store, it is important to provide the best user experience to your customers. You don’t want the customer to place an order only to find out that they can’t complete their purchase.
This can result in customer frustration, and it can keep them from ever coming back to your site or buying something else from you.
To avoid these kinds of situations, it is better to restrict access to your WooCommerce store or products from specific countries.
With that being said, let’s take a look at how you easily can restrict your WooCommerce store and products in specific countries.
You can jump to either method by clicking the links below:
Method 1. Restricting Countries Using WooCommerce Settings
You can easily hide your online store in specific countries using WooCommerce default settings.
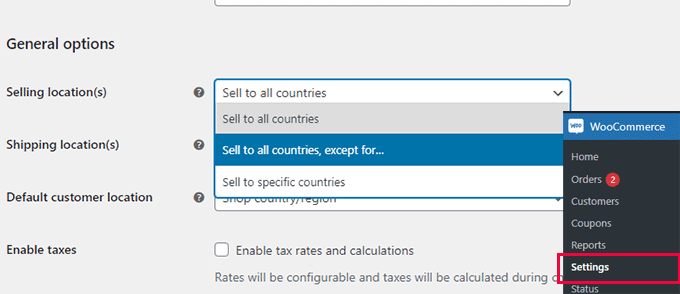
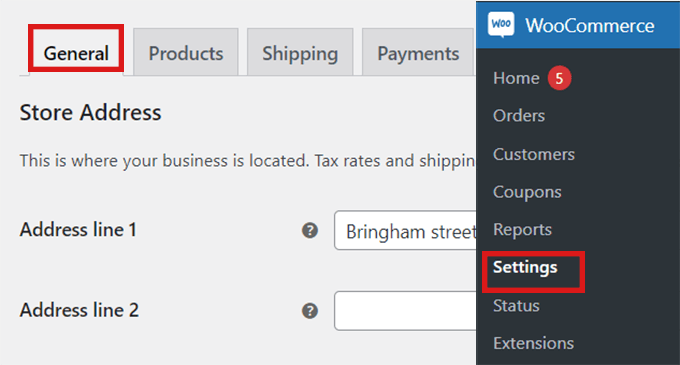
First, go ahead and click on the WooCommerce » Settings option in your WordPress dashboard and then go to the ‘General’ tab.
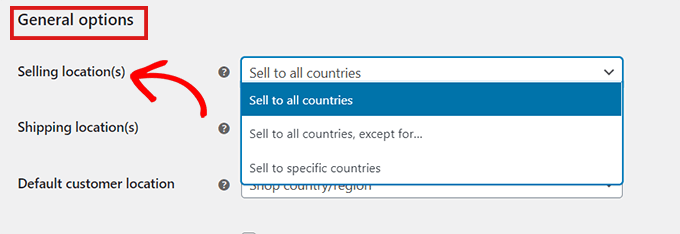
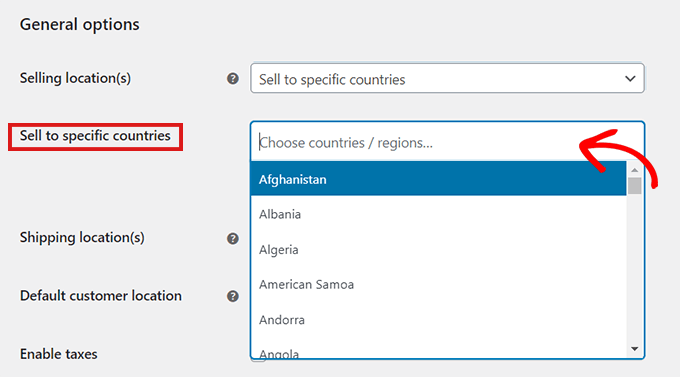
Once there, scroll down to the ‘General Options.’ Here you will find the ‘Selling Location’ section. Simply click on the dropdown menu in the field where you will find three options.
You can either select the ‘Sell to specific countries, except for…’ option, or you can choose the ‘ Sell to specific countries’ option.
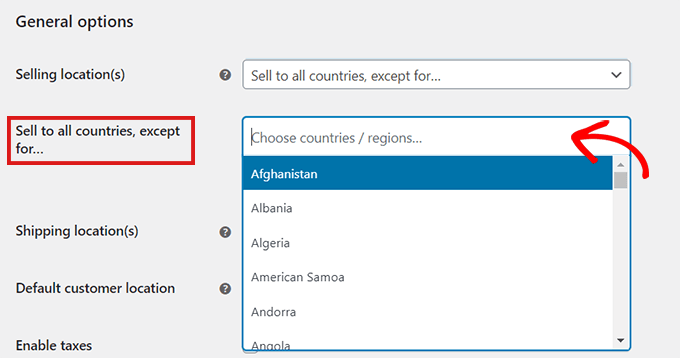
When you select the ‘Sell to specific countries, except for…’ option, another field will appear.
Now, just select from the dropdown any countries where you don’t want to sell your products.
If you’ve chosen the ‘Sell to specific countries’ option, a ‘Sell to specific countries’ field will appear in the settings below.
Now you can select all the countries where your store will be available.
The main downside of this method is that you cannot hide specific products.
By restricting countries using the default settings method in WooCommerce, the restrictions will be applied to your whole online store, and users in those countries won’t be able to buy any of your products.
If you only want to hide some specific products in different countries, it is better to use a plugin mentioned in Method 2. Let’s take a look at how to restrict specific WooCommerce products in different countries.
Method 2. Add Country Based Restrictions for WooCommerce Products
It is a free WooCommerce plugin that allows you to hide your products in specific countries.
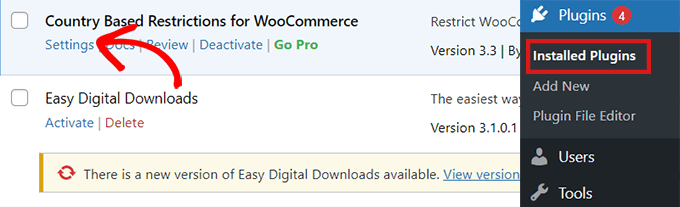
First, you’ll need to install and activate the ‘Country Based Restrictions For WooCommerce’ plugin. For more details, please take a look at our guide on how to install a WordPress plugin.
After you’ve activated the plugin, go to Plugins » Installed Plugins.
Here, click on the ‘Settings’ link in the ‘Country Based Restrictions for WooCommerce’ entry.
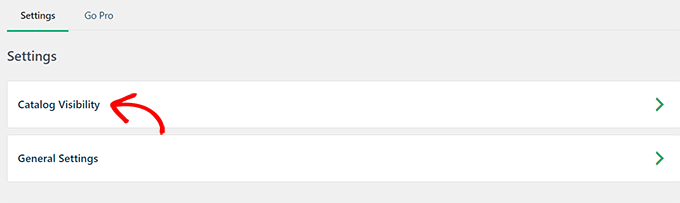
Once you’re on the ‘Settings’ page, just click on the ‘Catalog Visibility’ option.
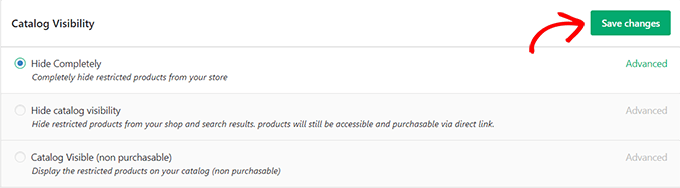
After you’ve clicked on the ‘Catalog Visibility’ option, you will have 3 choices:
Hide Completely – Restricted products will not appear in your store.
Hide Catalog Visibility – Restricted products will only be available by direct links, but not through browsing or search results.
Catalog Visible (non purchasable) – Restricted products will appear as normal, but customers will be unable to purchase them.
Once you’ve chosen an option, simply click on the ‘Save Changes’ button.
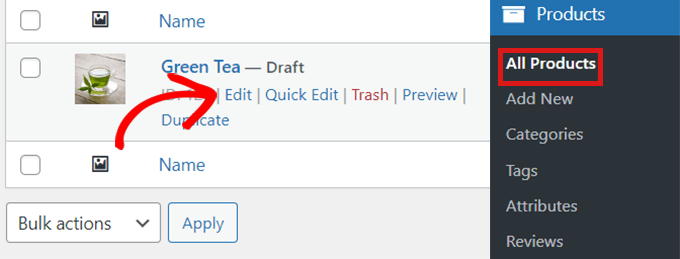
Next, go to WooCommerce » All Products in your WordPress dashboard.
Locate the product that you want to restrict and simply click on the ‘Edit’ link.
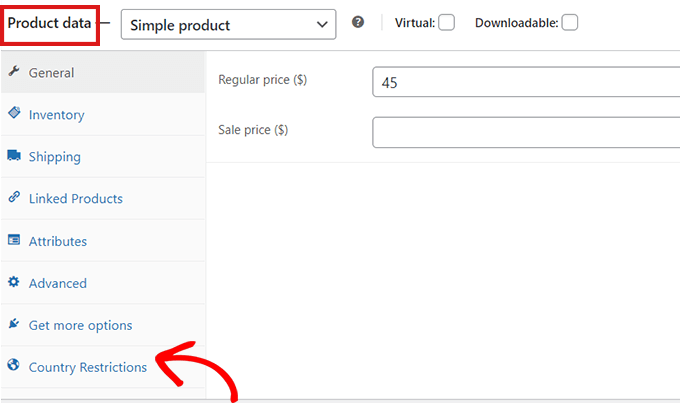
This will open the ‘Edit Product’ page. You can then scroll down to the ‘Product Data’ section.
Next, simply click on the ‘Country Restrictions’ option to the left.
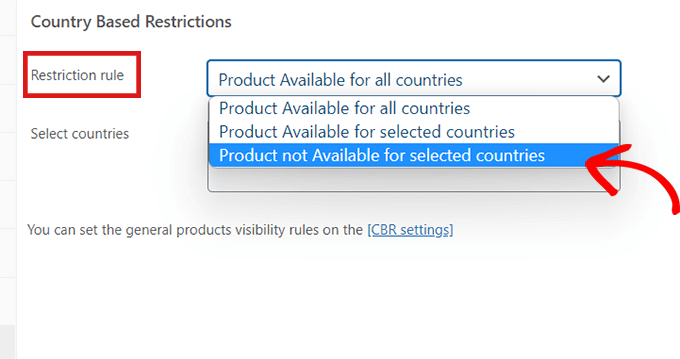
After you’ve clicked on the ‘Country Restrictions’ option, you’ll see a ‘Restriction Rule’ field.
Simply click on the dropdown menu beside the field and select the ‘Product Not Available For Selected Countries’ option.
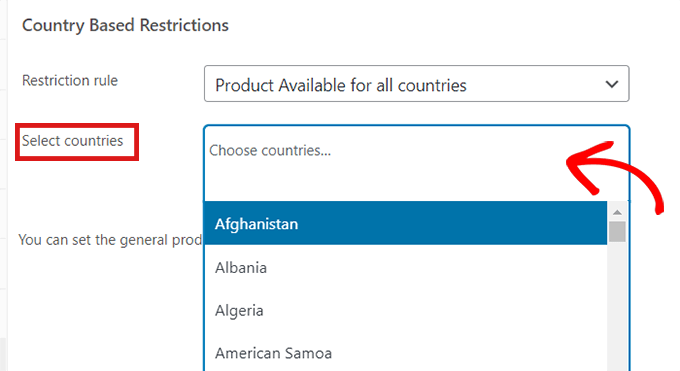
After that, go to the ‘Select Countries’ field and click on the dropdown beside it.
Then, simply choose the countries where your product won’t be available for purchase.
Once you’re happy with your choice, don’t forget to click on the ‘Publish button.’
Now, if a customer from the chosen country visits your store, the product you’ve restricted won’t appear.
Bonus: Geolocation Targeting for WooCommerce to Grow Sales
Did you know that geotargeting in WooCommerce can help you grow sales?
For example, you can use a plugin like OptinMonster to run specific discounts for certain locations, offer different prices based on countries, and so much more.
We hope this article helped you learn how to restrict countries in your WooCommerce store. You may also want to see our ultimate WooCommerce SEO guide to improve your SEO rankings, or see our tutorial on how to fix WooCommerce not sending email issue to improve your email deliverability.
If you liked this article, then please subscribe to our YouTube Channel for WordPress video tutorials. You can also find us on Twitter and Facebook.
Sell DTC/B2C products via WooCommerce, but want to foray into wholesale? Well then, you need a solution that allows you to juggle every aspect of a wholesale B2B shop. While WooCommerce retail stores have simple setups, wholesale stores require extra considerations. You need features for hiding prices, handling VAT, managing business account registrations, and more. [...]
 Most ecommerce store owners will agree that traditional email platforms just don’t get online retail. You mostly get basic templates that can’t showcase your products, generic automations that completely ignore customer purchase behavior, and absolutely zero integration with your actual store. So when I stumbled across Omnisend, I was immediately excited. Could this be the [...]
 WordPress may be the web’s leading Content Management System, but the one thing it lacks is in-built eCommerce features. Thankfully, there is a solution in the form of these top WordPress plugins for eCommerce success. Whether you’re looking to launch your first online store or take your current eCommerce business to the next level, these