Category Archives: Beginners Guide

What Is an Email Blast? How to Do an Email Blast “the RIGHT Way”

Do you want to know what is an email blast and how to do it “the right way”?

An email blast or broadcast sends a single email message to many subscribers in your mailing list. This can be highly effective strategy to get more sales, and bloggers use these blasts to get more website traffic.

In this article, we will explain how to do an email blast the proper way and share some examples.

Properly sending an email blast

What Is an Email Blast?

An email blast is a single email message that is sent to an entire email list, a large segment of that list, or many email lists at the same time.

These emails target most or all contacts in your mailing list, making an email blast a broad reach-out campaign.

Email blasts are also known as broadcast emails, mass emails, bulk emails, e-blasts, and email campaigns. Most people use the term ’email campaigns’ to avoid the aggressive feeling associated with the term ’email blast’.

Email blasts are mainly used for sending promotional content and newsletters. At WPBeginner, we use email blasts to promote our premium WordPress plugins and share our helpful tutorials.

For example, look at the email campaign All in One SEO for WordPress sent on their birthday sale event.

Example of a flash sale email blast

If you want to let all your subscribers know about special offers, then email blasts are the most reliable and efficient form of communication.

Are Email Blasts Outdated?

Although email blasts are great for delivering any message to a large number of people, some consider them an outdated communication method.

That’s because email blasts are bulk emails sent to everyone regardless of their choice, priorities, and needs. At times, blast emails can feel irrelevant and useless to the recipients.

Due to this, the email recipients may ignore the message, mark the email as spam, or even unsubscribe from your email list.

Here are the top reasons why users don’t like email blasts:

1. Unsegmented: Email blasts often use the entire mailing list without segmentation. Your email subscribers are usually very different, and they may be interested in different products or services.

2. Untargeted: The email blasts send the same message to everyone without considering their interests, past interactions, or needs. Users often unsubscribe from your mailing list after receiving these unwanted emails.

3. Not personalized: We all love reading a message that addresses us personally. Email blasts that don’t personalize the emails are often marked as spam.

4. Unexpected: Broadcast emails are usually unexpected, so there can be a natural feeling of resistance from the recipients.

Unlike 10 or 15 years ago, many new marketing methods are available, like social media, pay-per-click advertising, and more. However, none are as effective as email.

So, you might be wondering: is email blast dead? The answer is NO.

Email is still the most reliable form of communication in the world. With new technology, there are better ways to do an email blast to get higher results.

We will explain how to do an email blast the RIGHT way in the following section.

How to Do an Email Blast “the Right Way” – Step by Step

Marketers from big and small companies alike are still using email blasts to promote their product launches, discount offers, and more.

And the results are brilliant. That’s because they are using email blasts the right way.

If you are not a professional marketer, you can follow the steps below to run an email blast successfully:

Step 1: Choose the Best Email Blast Service

First, you need a robust email marketing service to create an email blast. An email marketing service lets you create a mailing list, segment that list, and send bulk emails.

There are dozens of email marketing services in the market. Among them, Constant Contact, Brevo, Drip, and ConvertKit are the most popular companies.

We have tried and tested all of the above email marketing services, and we believe they are great at what they offer. However, we recommend Constant Contact because they provide the best deal.

Constant Contact is the most beginner-friendly email blast software. It has dozens of pre-made email templates to help you quickly get started. You can choose a template and easily customize that using their drag and drop editor.

It has simple options for collecting emails, automation features to send/trigger emails based on user actions, and more. Plus, it lets you segment your subscribers and send targeted email campaigns.

To get started, you need to visit the Constant Contact website and sign up for a new account.

Constant Contact website

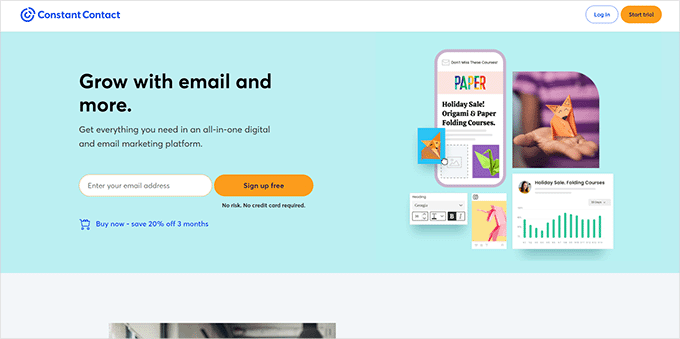
You can quickly create a Constant Contact account as they offer a free trial account (no credit card required).

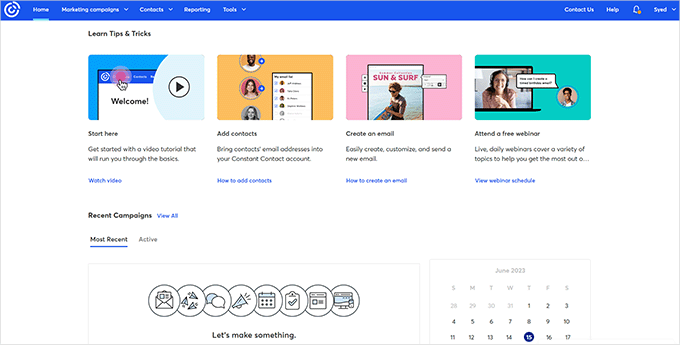
Once done, you will see your Constant Contact dashboard, where you can manage your email lists, see subscribers, and send email blasts.

Constant Contact Dashboard

Alternatively, you can also use Brevo, which offers a free email marketing plan.

Step 2. Create Your Email List

An email list is simply a list of email addresses you can send messages to. It is like your contact book containing the email addresses of your subscribers and prospective customers.

To create an email list in Constant Contact, just go to the ‘Contacts’ menu at the top and click on the ‘Create List’ button.

Create list in Constant Contact

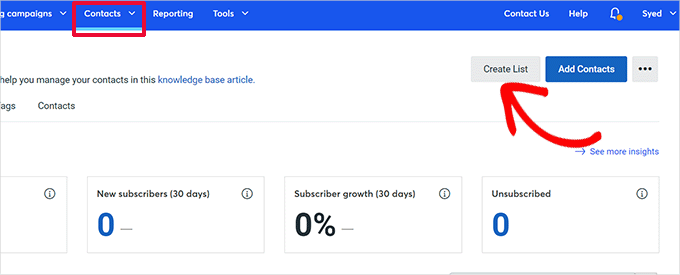
An email list is where you store all your email contacts.

Clicking on the button will bring up a popup where you need to enter a name for your email list and click the ‘Save’ button.

List name

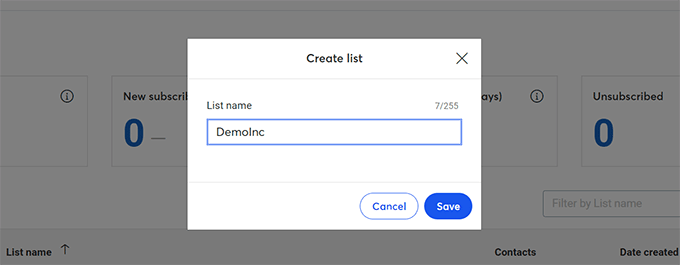
Constant Contact will now create your email list.

The next step is to add contacts to your list. Just open your new email list, and click the ‘Add Contacts’ button.

Add contacts to your list

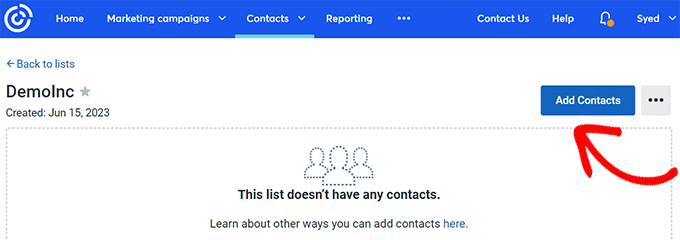
Constant Contact lets you add contacts in multiple ways. You can type in a contact, upload from a file, or import from Gmail, Outlook, and other apps.

If you want to grow your email list faster, then you can see our guide on easy ways to grow an email list.

Step 3: Segment Your Email List

Once you have an email list, the next step is to segment it. Email segmentation is the most important part of doing a successful email blast.

Email segmentation divides your email subscribers into smaller groups or segments to send highly-targeted emails.

You can segment your email subscribers based on gender, age, geographical location, interests, purchase history, contact activity, and more.

For example, a bookstore may create different segments for arts, physics, and maths students to send targeted emails.

Email segmentation is a crucial task that must be done with a clear goal. You need to be clear on which subscribers should be included in a segment.

For more details, you can see this guide on smarter ways to segment your email list.

To create segments in Constant Contact, you need to go to the ‘Contacts’ menu and click on the ‘Segments’ tab. After that, click on the ‘Create Segment’ button.

Create segment

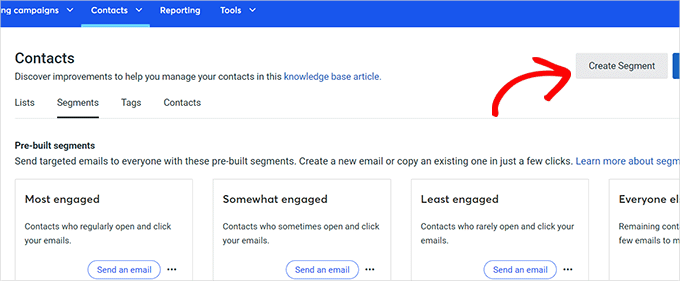
Constant Contact offers a bunch of criteria you can choose from.

In the next screen, you can create a segment by choosing the criteria you want.

Segment criteria

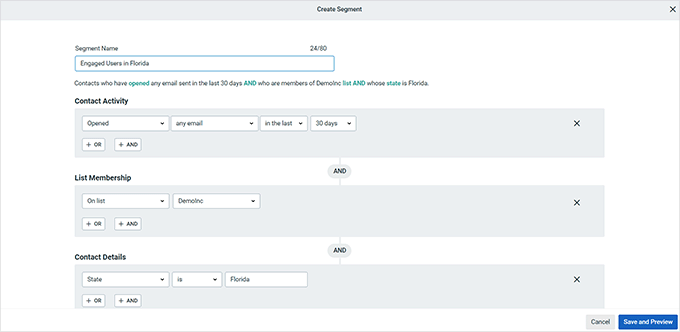
You can create a segment by contact activity like emails sent, opened, clicked, or did not open. You can also include email subscribers by contact details, including job title, city, country, etc.

Once you are finished, simply click on the ‘Save and Preview’ button.

Then, you can repeat the process if you need to create more segments.

Step 4: Create a Targeted Email Campaign

After creating segments, the next task is to create a targeted email campaign or an email blast.

You can create an email campaign in different ways depending on the email marketing software you use.

To design an email campaign in Constant Contact, you must go to the ‘Campaigns’ menu and then click the ‘Create’ button.

Create email blast campaign

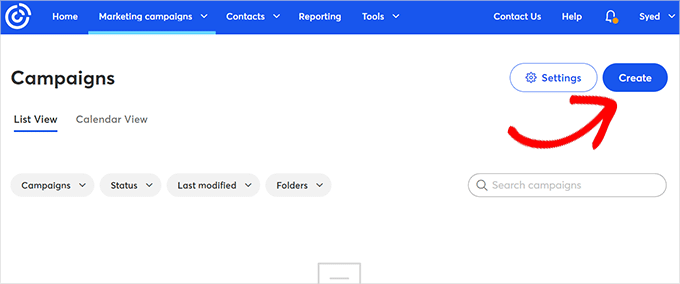
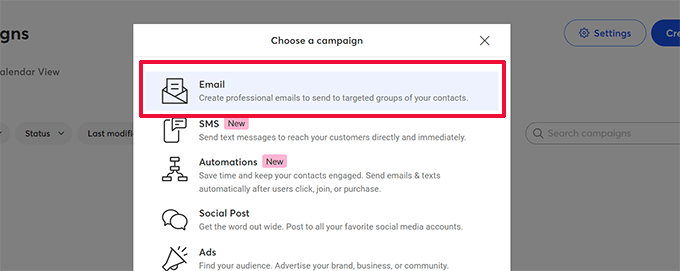
This will bring up a popup showing a bunch of campaigns you can make with Constant Contact.

You need to choose the Email option to continue.

Choose email campaign

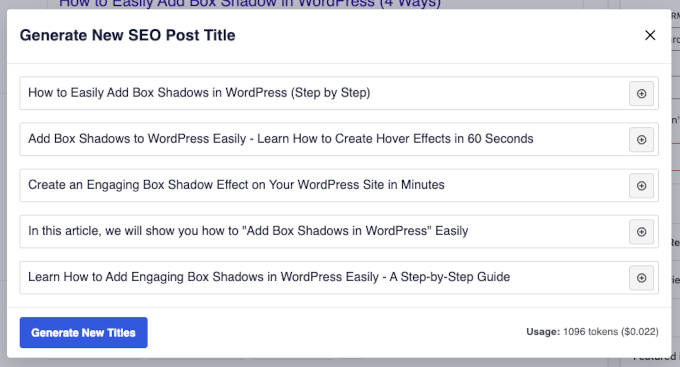
After that, you will see dozens of pre-made email templates ready for use.

You can preview the templates individually or simply type keywords to search for a template.

Find templlate

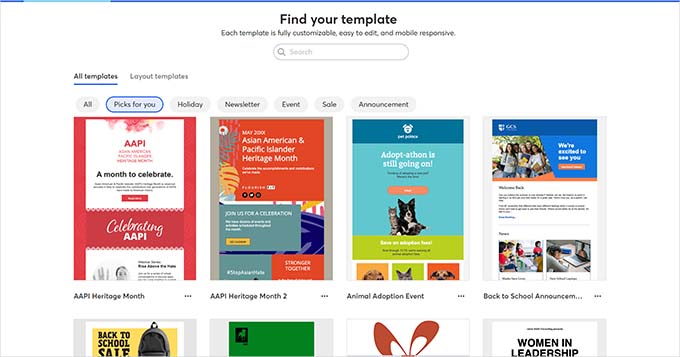
Simply click to choose a template as a starting point.

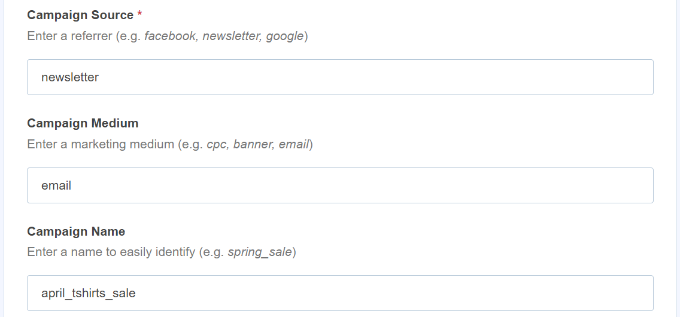
After that, the email campaign builder page will open. First, you need to name your campaign.

Edit template

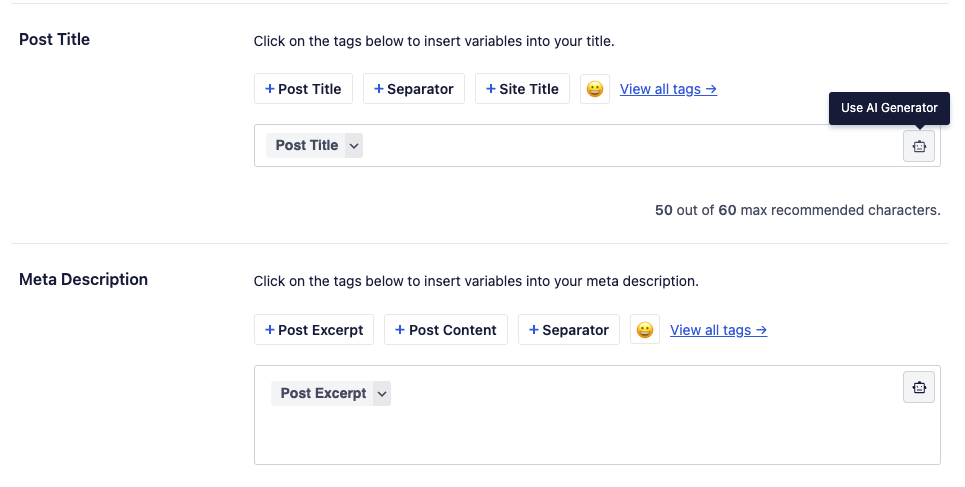
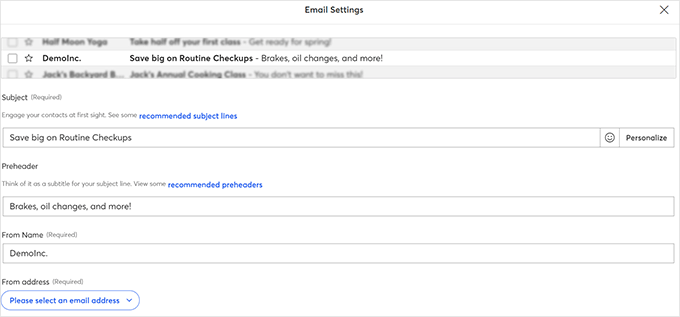
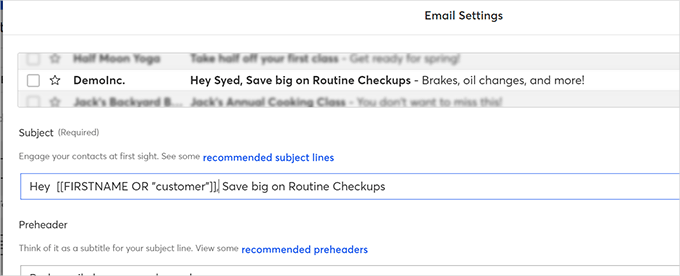
Next, click the ‘Email Settings’ link to edit the email subject line, sender name, and more.

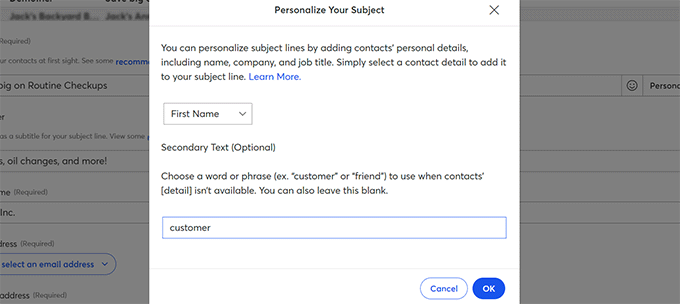
Then, you need to click on the ‘Personalize’ option.

Email settings

Here, you can choose the first name or any other contact details to insert in your subject line.

You can also enter a generic name like Customer, User, or Friend to address users whose names are unavailable. Once done, simply click on the ‘Insert’ button.

Personalize subject line

You will see some text with large brackets added in your subject line.

For example, you can see [[FIRSTNAME OR “customer”]] in the screenshot below.

Personalized tags

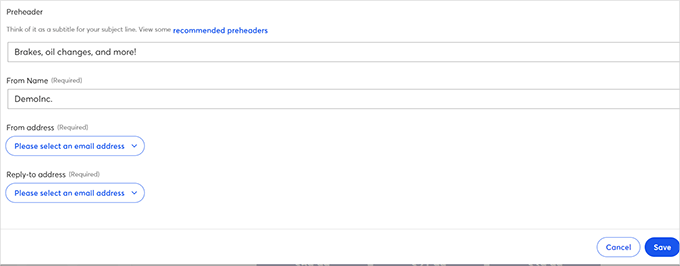
After that, you can edit your email preheader From Name (company or organization name) and From Address.

Don’t forget to click on the ‘Save’ button to store your changes.

Other email settings

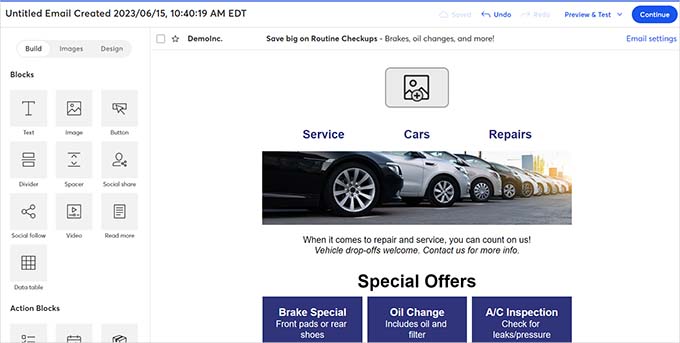
The next step is to customize the email body.

You can simply point and click on any element in the email to edit or delete it.

Edit email body

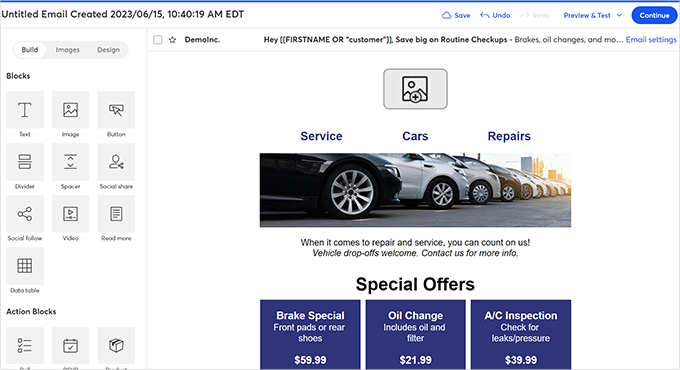
You can also drag and drop elements and layouts from the left sidebar.

Once your email design is complete, you can preview your email. If it looks good, just click on the ‘Continue’ button in the top right corner.

Next, you will see email send (blasting) options on the screen.

From here, you can select recipients from email lists or segments. For example, we will choose the segment that we created earlier.

Email sending options

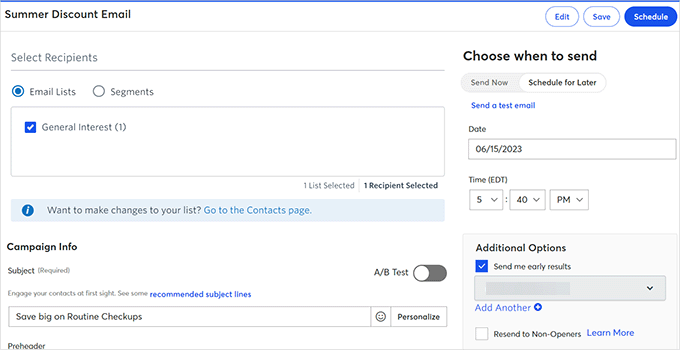
In the right sidebar, you will see options to send your email campaign now or schedule it for later.

Step 5: Measure Results and Improve Email Deliverability

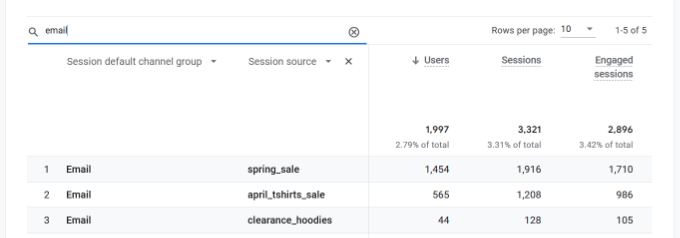
Sending an email campaign doesn’t mean that your work is done. After posting your email blast, you will need to measure your results and see how the recipients interact with your messages.

Top email marketing services like Constant Contact have built-in email stats features.

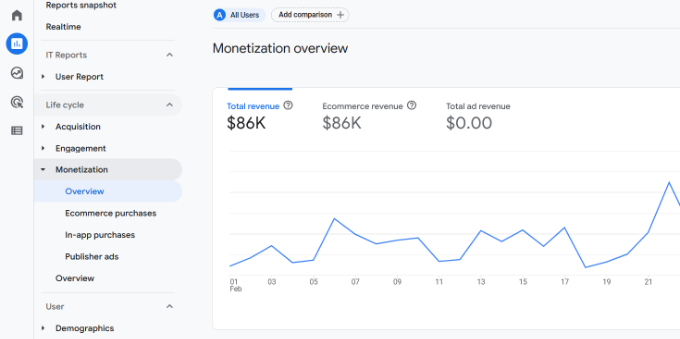
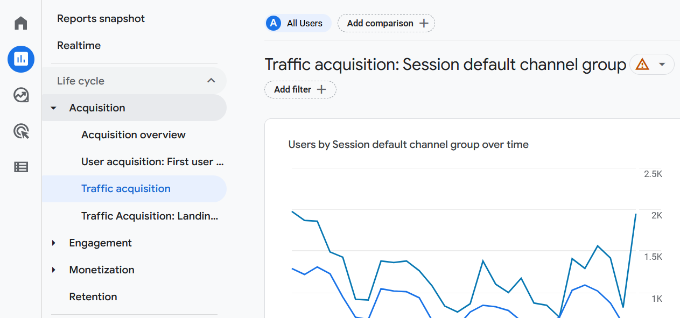
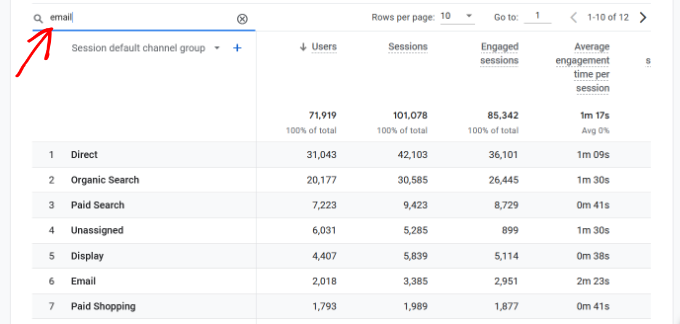
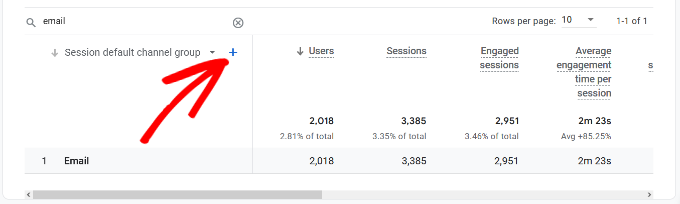
To view your email campaign stats, just click on the ‘Reporting’ menu item at the top.

Reporting in Constant Contact

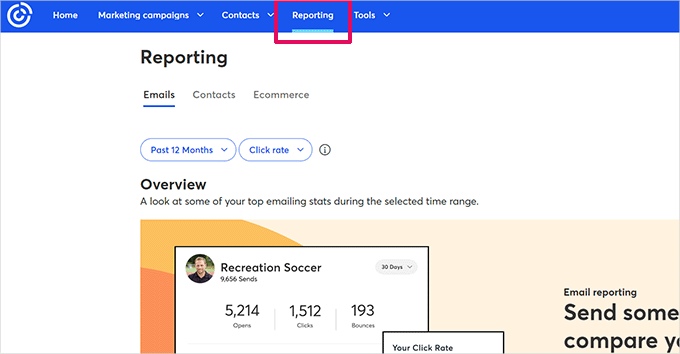
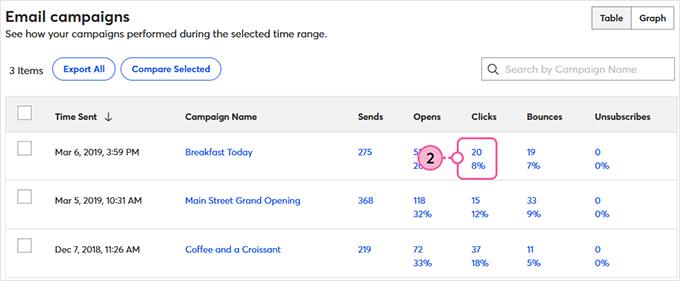
You can also see the performance of your email campaigns individually by clicking on them.

You will see the email open rate, the total sent emails, bounces, and successful deliveries. The reports will also reveal click rate, did not open, unsubscribes, and marked spam stats.

Email stats

The biggest challenge of email blasting is email deliverability. A lot of the time, your emails don’t get delivered at all or are sent to the spam box directly.

Here are some proven techniques to improve email deliverability:

  • Update your email list occasionally to remove fake email addresses, deleted emails, and more.
  • Maintain the frequency of your emails (no spikes).
  • Avoid misleading subject lines.
  • Make your emails useful with valuable and engaging content.

Best Email Blast Examples

There are two main types of emails used for marketing: Broadcast Emails (Email blasts) and Triggered Emails.

Triggered emails are automated emails that are sent to your users following their actions. For example, you can send a welcome email after a user subscribes to your list.

Email blasts are different because you will manually create campaigns and send them to a large segment at once. Email blasting is done with the belief that the single message will be helpful to every subscriber in a list or segment.

You can’t broadcast a welcome email to your entire email list, which may also include old customers. So, email blasts can be used only for specific purposes.

Here are the best email blast examples:
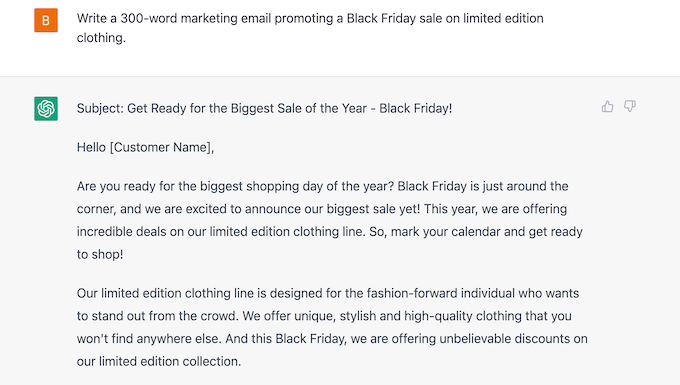
1. Flash Sale

If you are offering a flash sale, you can send mass emails in bulk to inform all of your subscribers.

Here are a couple of subject line examples for a flash sale email blast:

  • [FLASH SALE] Fashion Shoes 40%-60% off!
  • [LAST CHANCE] 40%-60% off sale ends today!

2. Event Information like Webinars

You can send mass emails if you run online courses and webinars for your users.

Here are a couple of email subject lines for an event information email blast:

  • LIVE Training: 10 steps to create a winning email campaign
  • Join us LIVE tomorrow at 5 PM for a FREE marketing class

3. New Products

You can send an email blast when you launch a new product. It’s best to segment your list into already purchased customers and new subscribers so that you can send different campaigns to them.

4. Newsletters

Newsletters are the most common type of broadcast email. News, magazine websites, blogs, as well as business or non-profit organizations send newsletters to inform their subscribers about the latest news.

You can see our tutorial on starting an email newsletter to learn more about best practices to make it more successful.

We hope this article helped you to learn what is an email blast and how to do an email blast the right way. You may also want to see our guide on how to get a free business email address or our expert picks for the best free autoresponder tools for businesses.

If you liked this article, then please subscribe to our YouTube Channel for WordPress video tutorials. You can also find us on Twitter and Facebook.

The post What Is an Email Blast? How to Do an Email Blast “the RIGHT Way” first appeared on WPBeginner.

How to Take a Screenshot for Your Blog Posts (Beginner’s Guide)

Do you want to add a screenshot to your blog post but are not sure of the best way to do it?

Screenshots allow you to share an image snapshot of your desktop or mobile screen in your blog posts. This makes it easier for your audience to follow the steps in a tutorial and better understand your content.

In this article, we will show you how to take a screenshot for your WordPress blog posts.

How to take a screenshot for your blog posts

The Benefits of Taking Screenshots for Your Blog Posts

Adding screenshots to your WordPress blog can make your content more engaging. These are screen captures or snapshots of whatever is on your mobile or desktop screen.

You can use screenshots for a tutorial and guide users step by step. This way, people will know exactly where to click and what to enter when setting up software or plugins.

Similarly, you can use screenshots for a roundup or list post. For example, let’s say you are writing about the top 10 best email marketing tools. You can take screenshots of each tool’s homepage and show them in your content.

Since there are so many different ways to take a screenshot, we have created a step-by-step guide on how to take a screenshot on different devices and apps.

To make it easy for you, we have also created a table of contents below, so you can quickly find the method that’s applicable to you.

How to Take a Screenshot Using Droplr

Droplr is a popular screen capture app. It allows you to easily take a screenshot on your computer and share it.

Droplr automatically saves the screenshot and screen recordings to the cloud and provides a link to share with others. Plus, you can manage all your screenshots from a dashboard and share them on any platform, including WordPress.

It works great with Mac, Windows, and Chromebook devices to quickly capture a selected area or entire screen. There is also a Chrome extension, so you can quickly take screenshots from your browser.

Droplr also integrates with popular apps like Slack, Microsoft Teams, Gmail, Adobe Photoshop, and more.

Taking Screenshots Using Droplr Desktop App

To take a screenshot using Droplr, you will first need to install the app for your preferred device. After that, you can click the Droplr icon in the Mac menu bar or the Windows Taskbar.

Click the droplr icon

From here, simply click the ‘Screenshot’ option.

If you are a Mac user, then you can also press ‘Option + Shift + 4’ to capture the screenshots. You can press ‘Alt + Shift + 4’ on Windows to take a screenshot with Droplr.

Click the screenshot button

Next, you need to select the area you’d like to take a screenshot of.

Droplr will open the screenshot in a browser window as soon as you are done. Here, you can download the image or share the link with others.

See Droplr screenshot

If you click the ‘Markup’ button at the top, then you will find options to edit the screenshot.

For instance, you can add arrows to point at a button or an important feature. You can also draw shapes, add emojis, blur different parts of the image, add text, and more.

Add markup to the image

Once you are done, simply save the image or download it.

Taking Screenshots Using Droplr Chrome Extension

You can also use the Droplr Chrome extension to take screenshots and screen recordings. The extension works just like the desktop app, and you can easily access it from the Chrome extension toolbar.

First, you will need to install the Droplr extension by visiting the Chrome web store.

Add Droplr extension

Then, click on ‘Add to Chrome’.

Once the extension is added, you can click on the Droplr icon from the toolbar at the top of your browser.

Next, you can screenshot a selected area, application window, full screen, or entire page.

Click droplr extension icon

After taking a screenshot, Droplr will open the image in a new tab with a link that you can share.

Droplr also allows you to create a video screencast to create quick tutorials with audio. Simply click the Droplr icon in your browser’s menu bar and select the TV icon to record your screen.

Screencast option in droplr

If you choose the ‘Full desktop’ option, then you will need to select which window to record. On the other hand, you can use the ‘Current tab’ option and screencast your browser tab.

How to Take a Screenshot on Mac

If you are using a Mac device and want to take a screenshot, then there are several options.

On Mac devices, you can capture the entire screen, a selected portion of your screen, a specific window, and more.

To take a screenshot of the entire screen on a Mac device, simply press ‘Shift + Command + 3’, and it will capture your screen.

If you want to capture a selected portion, then press ‘Shift + Command + 4’. Next, click and drag the crosshair (pointer) to take a screenshot of the selected area.

Capture selected portion in mac

If you want to take a screenshot of a specific window, then press ‘Shift + Command + 4’ and also press the ‘Space bar’ on your keyboard.

You will see that the pointer will change into a camera icon. Simply drag the camera icon on a window to highlight and capture it.

Note: Not all apps will allow you to take a screenshot of their window. In that case, you can take a screenshot of the selected portion and crop it.

By default, all the screenshots will be saved on your desktop with the capturing time/date as the filename and .png as the file extension.

How to Take a Screenshot on Windows

To take a screenshot on Windows devices, you will need to press the ‘PrtSc’ keys. This will capture the entire screen.

Next, you can open this screenshot in an image editing software like Adobe Photoshop or Affinity Photo to crop the required area and save it on your computer.

Another way of taking screenshots is by using the Snipping tool. The tool lets you capture a specific part of your screen and automatically save it to a clipboard.

Use snipping tool

Another way to take screenshots in Windows is by pressing the ‘Windows + Shift + S’ keys to start taking screenshots with the Snipping tool.

Next, click and drag the pointer to select an area on your screen. It will capture the screenshot automatically when you release the right click.

Since the screenshot is saved to a clipboard, you can paste it into any image editing software like Adobe Photoshop for further changes and then save it on your computer.

How to Take a Screenshot on Chromebook

In Chromebook, you can simply click the Screenshot key with a camera icon. This will take a screenshot of your entire screen or a selected area.

Besides that, you can click the Quick Settings option in the right corner and then select the ‘Screen Capture’ option.

Screenshot in Chromebook

After that, you need to choose whether you’d like to capture the entire screen or a selected area.

Once you have taken a screenshot, it will be automatically copied to the Clipboard.

If you are using Chrome OS 64.0.3282.134 or later, then you can simply press the ‘Power + Volume Down’ buttons to capture your entire screen.

To take a screenshot of a selected area, you need to press the ‘Ctrl + Shift + Switch Window’ keys. Then, click and drag the crosshair (pointer) to select the area that you want to capture.

Take screenshots in Chromebook

Upon releasing the click, you will see a notification in the bottom right corner of your screen that shows your screenshot is saved in the ‘Downloads’ folder.

If you are using a Chromebox with an external (general) keyboard attached to it, then press ‘Ctrl + F5’ to take a screenshot. The F5 key will function the same as the ‘Switch Window’ key on a Chromebook.

How to Take a Screenshot on iPhone

Taking a screenshot on iPhones and other smartphones is actually quite simple.

If you are using an iPhone X or higher, then you need to open your blog post or the app on the screen. After that, simply press the ‘Side’ button on the right side and the ‘Volume Up’ button on the left side of your phone.

Screenshots on iPhone

Make sure that you press both buttons at the same time. This will take a screenshot of the screen and save it to the ‘Screenshots’ folder on your phone.

If you are using an iPhone 8 or earlier model, then open the screen that you want to capture. Then, simply press the ‘Power + Home’ buttons at the same time to take a screenshot.

How to Take a Screenshot on Android Phone

There are many different phone manufacturers that sell smartphones with Android OS (such as Samsung Galaxy, Motorola, Google Pixel, etc). However, most new devices follow the same universal process to take a screenshot.

On your Android phone, you need to open the screen that you want to capture. Next, press the ‘Power + Volume Down’ buttons together.

This will take the screenshot and save it in your photo gallery.

We hope this article helped you learn how to take a screenshot for your blog posts. You may also want to see our expert picks for tools to create better images for your blog posts and our beginner’s guide to image SEO.

If you liked this article, then please subscribe to our YouTube Channel for WordPress video tutorials. You can also find us on Twitter and Facebook.

The post How to Take a Screenshot for Your Blog Posts (Beginner’s Guide) first appeared on WPBeginner.

What is 414 Request URI Too Long Error and How to Fix It

Have you ever encountered a 414 request URI too long error on your WordPress website?

The error is usually caused when there is a critical error between your web browser and a server. You’ll see this error when clicking on a link or any action performed by a WordPress plugin.

In this article, we will show you what is the ‘414 request URI too long’ error and how to fix it.

What is 414 request URI too long error and how to fix it

What is 414 Request URI Too Long Error?

A 414 request URI too long error occurs when a URL or an action you’re requesting is too long for the server to handle.

Do note that there is a difference between URI and URL. A URI or Uniform Resource Identifier can be a resource’s name, location, or both. On the other hand, a URL or Uniform Resource Locator can only be the location of a resource.

Both terms are usually used interchangeably because URL is part of URI. However, the 414 error can be triggered by both components, so let’s look at the causes.

What Causes 414 Request URI Too Long Error?

You might see the 414 error when you click on the link, and the server is unable to process it because it’s too long.

One situation where a link might to very long is using UTM (Urchin Tracking Module) parameters. If you’re using UTM codes to track conversions on your WordPress website and there are a lot of parameters in the URL, then it can cause this error.

Another situation that can cause a 414 error is a redirect loop. This is when a misconfiguration or a setting in a WordPress plugin causes a lot of redirect requests.

As a result, you get incredibly long URLs and 414 requests URI too long error.

Similarly, some plugins can also generate lengthy URIs as part of their functionality. You’re most likely to encounter this error if you have all-in-one WordPress security plugins installed on your site.

In a rare event, a developer-side issue can also trigger a 414 error when a POST request converts into a GET request with query information being too long. Lastly, cyber attacks on your website server can also result in 414 URI too long issues.

That said, let’s see how you can fix the 414 error on your WordPress website.

Fixing 414 Request URI Too Long Error

A quick way to fix this issue is by increasing the size of the URI your website server can process.

Before we move forward, we recommend creating a WordPress backup. That’s because fixing the 414 error involves editing the website configuration files. In case anything goes wrong, you’ll have a backup copy of your site ready to restore.

For more details, please see our guide on how to backup a WordPress site.

Determine if Your Website is Using Apache or Nginx

First, you’ll need to find out the type of server your WordPress website is using. There are 2 main types of servers, which includes Apache and Nginx.

A simple way to do that is by opening your site in a browser. After that, you can right-click on the homepage and select the ‘Inspect’ option.

Open inspect element

Next, you’ll need to switch to the ‘Network’ tab at the top.

From here, you can select any element under the Name column. After that, you will need to scroll down to the ‘Response Headers’ section and see the ‘Server’ details.

View server type of your site

This will show you whether your site is using Nginx or Apache.

If you’re still unsure which server type to use, then you can reach out to your WordPress hosting provider to get more details.

Once you’ve determined the server type, let’s look at how to fix the 414 request URI too long error for Apache and Nginx.

Fixing 414 Request URI Too Long Error in Nginx

First, you’ll need an FTP or file transfer protocol client to access website configuration files.

There are many FTP clients you can use. For this tutorial, we will use Filezilla. If you need help setting up FTP and accessing website files, then please see our guide on how to use FTP to upload files to WordPress.

Once you’re logged in, you’ll need to download the ‘nginx.conf’ file. You can access this by following this path: /etc/nginx/nginx.conf

Access Nginx file

After locating the file, go ahead and download it on your computer and then open it in a notepad software.

From here, you can search for large_client_header_buffers 4 8K settings. If it’s not there, then simply add it to the end of the file.

You will see 2 sets of values, which relate to a number and size. Simply edit the size from 8K to 128K. This will increase the URI size and allow the site server to process long URLs.

Increase URI size in Nginx

Once you’re done, simply save the text file and reupload it to your website using the FTP client.

For more details, please see our guide on how to use FTP to upload files to WordPress.

Fixing 414 Request URI Too Long Error in Apache

If you’re using the Apache server type, then the process is similar to that of Nginx. First, you’ll need an FTP client to access website files.

Once you’re logged in, you’ll need to locate the ‘apache2.conf’ file. Simply head to the following path using the FTP client: /etc/apache2/apache2.conf

Access apache config files

Next, you’ll need to download the file and open it in notepad software.

After that, you can look for LimitRequestLine 128000 settings. If you don’t see one, then simply add it to the end of the file.

Usually, LimitRequestLine is set to 128000. However, you can increase this to 256000 or higher to remove the 414 error. Just make sure that the value you set is a multiple of 2.

Increase URI size in apache

Once you’re done, simply upload the file back to the website using the FTP client. This should help resolve the 414 error on your WordPress website.

We hope this article helped you learn about what is 414 request URI too long error and how to fix it. You may also want to see our guide on WordPress security and the most common WordPress errors.

If you liked this article, then please subscribe to our YouTube Channel for WordPress video tutorials. You can also find us on Twitter and Facebook.

The post What is 414 Request URI Too Long Error and How to Fix It first appeared on WPBeginner.

14 Best Ways to Use OpenAI on Your WordPress Website

Are you wondering how to use OpenAI and ChatGPT on your WordPress website?

OpenAI can help with everything from generating meta descriptions for your posts to writing email sales copy. You can use OpenAI on your WordPress site to save time, cut costs, improve your SEO and workflows, and grow your business!

In this article, we will show you 14 of the best ways to use OpenAI on your WordPress website.

The best ways to use OpenAI on your WordPress website

A (Brief) Introduction to OpenAI

You have probably heard the terms “OpenAI” and “ChatGPT” used interchangeably, but they’re not exactly the same.

OpenAI is the research laboratory (read: a group of very smart people) behind the chatbot ChatGPT and the deep-learning, image-generating model DALL-E 2, among other AI-powered products.

OpenAI homepage

The team over at OpenAI created ChatGPT which is an AI assistant to help streamline your workflows and save you time.

It can write email newsletters for you, suggest blog post ideas, do keyword research, automate your workflows, and so much more.

To improve your WordPress website workflows with artificial intelligence, you will first need to create an account with OpenAI. Getting signed up is FREE. All you will need is an email and a password.

We also recommend reading our guide on the best ChatGPT prompts for bloggers, marketers, and social media, so that you can interact with the program more easily.

With that in mind, let’s look at 14 ways to use OpenAI on your WordPress website.

1. Generate Titles and Meta Descriptions with AIOSEO

All in One SEO (AIOSEO) is the best SEO plugin for WordPress, and it just got an AI-powered boost. After adding your keywords to your blog posts, let AIOSEO and OpenAI further optimize your content for search engines.

The first step is installing AIOSEO. Please see our guide on how to install WordPress plugins.

Then, from within the WordPress post editor, you can tell OpenAI to generate titles and meta descriptions that best fit your content with the click of a button.

Simply go to the ‘AIOSEO Settings’ at the bottom of your page and find the ‘Post Title’ box.

The AIOSEO OpenAI post title generator
Next, you need to click on the robot icon. If you hover your mouse over it, you will be able to see a ‘Use AI Generator’ message.

Now, you can see 5 post title suggestions. Simply click on the ‘+’ icon next to one to use it for your post.

AIOSEO OpenAi SEO post title suggestions

If you don’t like any of the suggestions, you can also click ‘Generate New Titles’ to see new ones.

Then, simply repeat the same steps by clicking on the robot icon in the ‘Meta Description’ box. AIOSEO will then suggest a few meta descriptions for your post.

Plus, connecting your OpenAI account to your AIOSEO account is as easy as copying and pasting an API key. You can check out AIOSEO’s documentation for more details.

2. Generate Ad Copy and Product Descriptions

Due to GPT-3’s talent for SEO, it is probably no surprise that it can handle more of your content creation needs. You can use OpenAI to create short, effective ad copy that matches your brand or long-form product descriptions for your WooCommerce store.

For example, we prompted ChatGPT to describe the need for running shoes using the “problem-agitate-solve” framework.

Creating a product description with ChatGPT

Simply edit the text to match your preferred sentence structure, include your keywords, throw in some on-brand and product-specific language, and then watch your sales increase!

3. Generate Blog Post Ideas

If you are anything like us, then coming up with content ideas for your WordPress blog can be time consuming. Fortunately, OpenAI runs on one of the world’s most powerful supercomputers.

So, you can ask it to come up with ideas for new content on your blog.

In our previous examples, we used OpenAI to help with tasks by inputting prompts directly into ChatGPT.

In our next few examples, we will look at how to integrate OpenAI directly into your WordPress workflow, truly leveraging the power of automation and AI to save time and resources.

Uncanny Automator is one of the best automation plugins for WordPress, and it enables you to connect OpenAI to your WordPress site in many useful and interesting ways.

For this example, we will use OpenAI with Uncanny Automator to generate ideas for new content based on a user’s form submission. Then, we will automatically send OpenAI’s response to your content management spreadsheet or database, like Google Sheets or Airtable, for the whole team to access.

If you don’t already have Uncanny Automator, you can download the Automator plugin for FREE to try on your WordPress site.

Once you have downloaded Automator, you will need to connect Automator to OpenAI. Then we will build the automation recipe below.

Automator and OpenAI content ideation recipe

First, you need to create a new form using a contact form plugin like WPForms. From your WordPress admin sidebar, navigate to WPForms » Add New.

Then, create a new contact form and make sure to add two number fields labeled ‘Temperature’ and ‘Maximum length’, and one single line text field labeled ‘Open AI Prompt’.

WPForms OpenAI prompt

Now, you must head to Automator » Add New. In the pop-up window that appears, simply select ‘Logged-in users’, followed by ‘Confirm’.

Automator logged-in recipe

Next, give your new recipe a title that makes it easy to recognize. For example, we have named our recipe ‘OpenAI Content Ideation’.

In the ‘Triggers’ panel, you need to select ‘WPForms’. From the drop-down list that appears, select ‘A user submits a form’ and choose the WPForms form that you just made. When you are finished, just click ‘Save’.

WPForms Automator trigger

After that, in the ‘Actions’ panel, you have to select ‘OpenAI’.

From the drop-down list that appears, choose ‘Use a prompt to generate text with the Davinci model’.

Use a prompt to generate text with the Davinci model

In the Actions section, map the fields from the WPForms form to the Temperature, Length, and Prompt fields in the OpenAI action.

To do this, click the ‘*’ icon to the right of each field to choose the correct token associated with the trigger.

How to use WPForms tokens with OpenAI prompts using Automator

When you are finished, simply click Save.

To send the blog post ideas to an external spreadsheet, you will need to add a second Action. To do this, click ‘Add action’ in the ‘Actions’ panel.

Add recipe action with Automator

From the menu of available integrations, simply choose Google Sheets.

Then, from the drop-down list, select ‘Create a row in a Google Sheet’.

Create a row in a Google Sheet with OpenAI

In the editor, you must select your content management spreadsheet. Then, click ‘Get columns’ and add the OpenAI Response token to the appropriate column(s).

Make sure to click ‘Save’ when you are done.

Add response token to Automator recipe

Finally, in the top right corner, toggle your recipe from ‘Draft’ to ‘Live.’

Now, whenever you enter information into your blog post idea generator form, Automator will tell OpenAI to suggest new content ideas and send them to your Google Sheets spreadsheet.

Make the Automator recipe live.

In our example, we entered “Give me 5 fun blog posts on pediatric dentistry” into the WPForms form.

Then, OpenAI generated a response, and Automator added it to the worksheet in the recipe.

OpenAI topic ideas

4. Perform Sentiment Analysis

There is no way of knowing if AI has any feelings of its own. If we had to guess, we would say that it probably doesn’t. At least, not yet. But that doesn’t mean that it cannot understand human emotions.

You can use OpenAI to perform sentiment analysis by asking it to interpret the mood of your customers’ feedback.

OpenAI sentiment analysis

But how can you use this with your WordPress website?

Maybe your contact forms are connected to a help desk plugin, and you want to assign priority based on the message urgency.

Alternatively, maybe you want to automatically approve positive blog comments. You could even quickly identify negative feedback in surveys powered by your favorite WordPress form plugin.

In both cases, you will be able to address negative feedback quicker, keep your customers happier, and improve your online reputation.

5. Automate Customer Support with Intelligent Sentiment Analysis

Now that you know how to use OpenAI to perform sentiment analysis, you can easily add it to your workflows. By combining OpenAI’s emotional intelligence with Uncanny Automator’s efficiency, you will be able to create a seamless customer support system.

For this example, you will need the pro version of Uncanny Automator so that you can add conditional actions to the automation.

Let’s put together an Automator recipe that creates tickets in our customer support plugin whenever a customer reviews a product.

First, we have OpenAI perform sentiment analysis on the reviews as they come in.

Then, using Automator’s Filters feature, we create tasks with different priority levels based on OpenAI’s assessment of the customer’s sentiment.

In this recipe, if OpenAI decides that a new WooCommerce product review is negative, then it creates a new help desk ticket in FluentCRM and adds an Urgent tag.

How to tag a negative support ticket with OpenAI and Automator

If you are ready to take things to the next level, you could even use the submission to create a draft reply for the ticket.

Just add an extra OpenAI action to generate a draft reply, then include that response as the ticket draft.

This works best with the GPT-3.5-Turbo model because you can use Automator to also send context. For example, you can tell it to answer the prompt as a helpful support agent from your website.

6. Create Event Summaries, Recap Podcast Episodes, and Take Meeting Minutes

Running special events on your WordPress website is easy with WordPress calendar plugins. Unfortunately, not every customer of yours can save the date.

After all, we cannot do everything and be everywhere all at once, but OpenAI can.

If your customers missed the big day, OpenAI can create event summaries for you. You can even choose the length and format of the summary you want OpenAI to make.

For example, we asked ChatGPT to create a 100-word summary of an October 2008 IMF town hall. In less than one minute, ChatGPT turned the 1,500-word opening remarks into a 100-word summary.

ChatGPT text summary

Alternatively, maybe you are trying to grow your podcast audience. To help your listeners who don’t have two hours a day to consume media, you can use OpenAI to recap your podcast episodes, hitting all of the highlights.

Using transcripts, we asked ChatGPT to summarize the first 15 minutes of a popular podcast.

Podcast summary from OpenAI

Finally, some conference call tools, like Zoom and Google Meet, allow users to record their meetings with audio transcripts. You can then feed those transcripts into OpenAI and create meeting summaries in just a few seconds.

7. Draft Blog Posts (and Seamlessly Integrate Them Into Your Workflows)

For content writers (including us), few things are more stressful than a blank page. Thankfully, artificial intelligence is the sledgehammer that can break through any writer’s block.

Using one of our blog post ideas from our previous recipe, we told OpenAI to draft a blog post for us.

In this Automator recipe, a form submission (the trigger) tells OpenAI to draft a new blog post. Then, it messages the writer in Slack to let them know the draft is ready for them.

Generate a post with OpenAI

From your WordPress admin sidebar, simply go to WPForms » Add New.

Then, create a new form with at least two number fields labeled ‘Temperature’ and ‘Maximum length.’ You will also need two single-line text fields labeled ‘Title’ and ‘Open AI Prompt’.

WPForms OpenAI blog post draft

Next, you must go to Automator » Add New. In the pop-up window that appears, select ‘Logged-in users’. Then, simply give your new recipe a title like ‘OpenAI Blog Post Draft’.

In the ‘Triggers’ panel, you need to select ‘WPForms’ From the drop-down list that appears, you must choose ‘A user submits a form’ and pick the form you just created.

OpenAI blog post generator

When you are finished, make sure to click ‘Save’.

Moving on, in the ‘Actions’ panel, you must select ‘OpenAI’. From the drop-down list that appears, choose ‘Use a prompt to generate text with the Davinci model’.

In the editor, fill in the fields using the tokens from your form’s fields that match the fields in the editor. When you are finished, just click ‘Save.’

How to use WPForms tokens with OpenAI prompts using Automator

Now, it is time to set up an automatic blog post that will be created with the OpenAI content.

In the ‘Actions’ panel, simply click ‘Add action’. Then, from the menu of available integrations, select ‘WordPress’.

Automator WordPress integration

Next, from the drop-down list, hit ‘Create a post’. In the editor, you must fill in the ‘Title’ field with the Title token from your form and enter the OpenAI Response token into the ‘Content’ field.

Then, make sure to click ‘Save’.

Create a post using Automator and OpenAI

Optional: You can also add a ClickUp action to your recipe to create a task with the post URL in the description.

Additionally, you can include a Slack action to notify your content writer that a new task and draft post is waiting for their review.

Send a direct message to a Slack user

Finally, in the top right corner, toggle your recipe from ‘Draft’ to ‘Live’.

In our WPForms form, we then asked OpenAI to ‘Write a casual blog post on three ways to make dental visits fun for kids.’

And here is the draft that Automator created with OpenAI’s response.

OpenAI blog post

We call that the anti- writer’s block recipe! You can also use AI to generate your SEO title, write a meta description, and even set up a featured image.

8. Draft Emails in Minutes

Writing carefully-worded emails takes time. Unless, of course, OpenAI is writing them for you.

Whether you are sending out an internal notice, responding to a customer’s questions, or reaching out to prospective clients, OpenAI can draft your email in seconds. After that, it is just a matter of proofreading and including specific information.

We prompted ChatGPT to “write a 300-word marketing email promoting a Black Friday sale on limited edition clothing.” Less than 30 seconds later, we had an email that we could easily customize to suit our branding and needs.

ChatGPT Black Friday marketing email

If you pair OpenAI with customer relationship management (CRM) apps, you will be drafting emails faster than your SMTP server can send them!

9. Create Blog Post Summaries for Social Media

Promoting your blog posts on social media is important. However, sometimes, writing the appropriate character-length tweets and captions can be even more challenging than creating a whole article.

With OpenAI and Automator, you won’t have to stress about the perfect hashtags.

Here is an example of an action that takes a new blog post and sends it to OpenAI to generate a summary that can be shared on Twitter:

Create a post summary for Twitter

Automator will send that summary, complete with hashtags, to our WhatsApp account. There, we can review, edit, copy, and then paste the content into our social media accounts when we are ready to publish it.

For a post on connecting ChatGPT to LearnDash, OpenAI wrote this summary:

Embrace the robot revolution and use OpenAI and LearnDash to create the e-learning platform of your dreams. #AI revolution is here! Harness the power of AI for your #elearning platform w/ OpenAI & ChatGPT models. Automate content creation, create course outlines & answer students’ questions. Save time & money w/ Uncanny Automator! #LearnDash #NolejAI #RobotRevolution.

You could even extend your recipe to make Automator post the summary straight to Twitter, Facebook, LinkedIn, and more.

OpenAI social sharing

10. Generate AI Images for Your Posts or Landing Pages

Are you tired of scrolling through stock photography databases trying to find the perfect image for your blog post? Or finding a picture and then realizing that every other article with your keywords is using the same image?

Fortunately, OpenAI’s image generator DALL-E 2 can create original images from descriptive plain text.

OpenAI’s Content Policy and Terms give you all of the rights to the images that you create with DALL-E 2, “including the right to reprint, sell, and merchandise.”

Using our original WPForms form with an added field for an image prompt, we used Automator to create a draft blog post complete with a featured image.

Generate AI images with Automator

Here is that same blog post about dental visits with a featured image created by DALL-E.

As you can see, it has a fun graphic with a tooth, toothpaste, and different toothbrushes.

To make the process even easier, whenever you tell DALL-E to create an image using Uncanny Automator, Automator will add the image to your WordPress media library, with no hotlinking necessary.

11. Create Course Outlines in Your LMS

OpenAI is smart. After all, “intelligence” is in the name.

With Uncanny Automator and a learning management system (LMS) like LearnDash, you can be just as smart as AI. Or, at least, you can create outlines for courses that will make you as smart as AI (if you do your assigned reading).

We asked OpenAI to create an advanced 8-week course outline on supercomputers, which, funnily enough, is kind of like an OpenAI autobiography.

OpenAI course outline

Once you have your course outline, don’t forget to use AIOSEO’s OpenAI integration to write your meta description.

12. Create Lessons in Your LMS

Using a similar Uncanny Automator recipe to the previous one, you can easily fill in the course outline that you created with OpenAI-generated content.

Automator recipe for an OpenAI lesson

We used OpenAI’s response from our previous recipe to help us create this lesson.

Here is the first part of it.

ChatGPT lesson on supercomputers

With the right prompts, you can also create a recipe that generates unique images for your lessons and uploads them automatically to your WordPress media library.

Using Automator tokens, you can also set your new DALL-E 2 generated image as the featured image for your lesson or include it somewhere in the lesson itself.

OpenAI supercomputer lesson with DALL-E image

13. Create a Chatbot

As a natural language processor, OpenAI loves to talk. You can use this feature to communicate with customers in your online store or business website.

This can help you target users who are having problems on your site or want to learn more about your products and services.

With the right recipe, you can actually turn OpenAI into a chatbot on your WordPress website. You can read this guide on how to create an AI-powered chatbot with OpenAI and Automator.

14. Have Fun! Write Short Stories, Poems or Cook Up Recipes

Once you have fully integrated OpenAI and Uncanny Automator into your workflows, you will have enough time to do the things that really matter like growing your business or spending more quality time with family.

Playing around with OpenAI and trying out new things is a great way to learn how to create better prompts that get the results you are looking for, so you can continue to save time and optimize your workflows.

OpenAI and WordPress plugin development are in the super early stages right now, and there is so much more in the works. We will be sharing more details and updates in this guide in the coming months.

We hope this article helped you find some ways to use OpenAI on your WordPress website. You may also want to see our guide on the best AI chatbots software for your website, or how to create an email newsletter to connect with visitors after they leave your website.

If you liked this article, then please subscribe to our YouTube Channel for WordPress video tutorials. You can also find us on Twitter and Facebook.

The post 14 Best Ways to Use OpenAI on Your WordPress Website first appeared on WPBeginner.

Ultimate WordPress Migration Guide for Beginners (Step by Step)

Are you looking to move your website to WordPress, or thinking about migrating an existing WordPress site to a new domain or host?

WordPress is the most popular website builder powering over 43% of all websites on the internet. That’s because it’s easy to use and gives you control over every aspect of your website.

In this article, we’ll show you how to migrate your blog or website to WordPress with little downtime and without losing SEO. We’ll also show you how to move your WordPress site to a new server or domain.

Ultimate WordPress Migration Guide for Beginners (Step by Step)

Why Migrate Your Website to WordPress?

Small businesses and individuals are starting websites all the time. They realize that having an online blog or website have significant benefits that help them grow their brand and keep in touch with clients.

However, many beginners choose a blogging platform other than WordPress. These platforms help them get started quickly, but as their websites grow, they begin to run into limitations.

For example, they may not be able to install plugins that add the features they need, there may be limited options in customizing the appearance of their site, or the platform may become too expensive as their requirements grow.

We believe that self-hosted WordPress outperforms all other blogging and website platforms. It is powerful, easy to use, affordable, and the most flexible of all available blogging platforms. Here are all the reasons why you should use WordPress.

Note: When we speak of self-hosted WordPress, we mean WordPress.org. This is different from WordPress.com, which is a hosting service. We show you how to migrate from WordPress.com to self-hosted WordPress at the end of this article.

The good news is, that you can migrate your blog to WordPress and begin to take advantage of its power and flexibility.

How to Migrate Your Blog to WordPress Yourself

Migrating a blog isn’t as simple as just moving information from one platform to another. However, that’s definitely something you need to get right, otherwise, you may lose content.

It’s also essential to choose a reputable WordPress hosting company that’s fast and reliable. Luckily, most hosting services will install WordPress for you automatically and free of charge.

You also need to make sure you don’t lose SEO so that your posts rank lower on Google. You should also set up an SEO-friendly URL structure for your future posts.

Now you don’t want your visitors or search engines to lose track of your posts because the old URLs stop working. You need to take care of this by creating redirects.

Besides these, there may be some additional steps you need to take to migrate everything over and improve your blog.

That’s a lot to keep track of, so we created specific step-by-step guides on how to migrate from your specific blogging platform to WordPress:

1. Migrating Self-Hosted WordPress to a New Server or Domain

You may already be using a self-hosted WordPress website and decide to migrate it to a new hosting service or domain. For example, you may decide to upgrade to a more reliable web hosting company.

You will need to move your WordPress files and databases from the old provider to the new one. If you’re not careful, then you may lose data, or take your website down and lose sales.

That’s why we created a step-by-step tutorial that shows you how to safely migrate WordPress to a new host or server without any downtime.

However, if you are moving your website to a new domain name, then you have a little more work to do. This would be if you are changing the URL of your website from, say, johnsmith.com to smithconsultingservices.com.

In that case, you simply need to follow our detailed guide on how to easily move WordPress to a new domain.

Tip: Some hosting providers, such as SiteGroundHostingerWP Engine, and GreenGeeks offer a free migration service for WPBeginner users. It might not be listed on their website, so all you have to do is ask.

2. Migrating From Blogger to WordPress

Blogger is a free blogging service by Google. It offers a quick and easy way to create a blog for non-tech-savvy users. All you need is a Google account to start a free blog on Blogger.

However, as your website grows, you will be limited to basic blogging tools and won’t be able to add new features. There are also not many ways to customize the appearance of your blog.

WordPress, on the other hand, gives you complete ownership of your website and allows you to add the necessary features to grow and monetize your blog. We have created a detailed side-by-side comparison of WordPress vs Blogger.

The good news is that WordPress is set up to natively import your Blogger posts. However, you will need to follow our instructions carefully, or your new blog’s URLs might not match.

If you have a free Blogger account, then you will have a website address that looks like myblog.blogspot.com. In that case, you should follow our guide on how to switch from Blogger to WordPress without losing Google rankings.

However, Blogger also allows users to connect custom domain names to their blogs such as myblog.com. If you have a custom domain Blogger blog, then you will need to follow our guide on how to move a custom domain Blogger blog to WordPress.

3. Migrating From Ghost to WordPress

Ghost is a minimalist blogging platform with features entirely focused on writing blog posts. It is available as a hosted platform, and also as software that you can install, though many users find installing it difficult.

While a simplified user interface can be a good thing, it also means your options for customizing Ghost’s features and appearance are very limited. This can become frustrating.

On the other hand, WordPress allows you to customize your site by installing plugins and themes. It is also much easier to install yourself. You can learn more about the differences between these platforms in our side-by-side comparison of Ghost vs. WordPress.

Unfortunately, migrating from Ghost is difficult because the default Ghost export file does not use a format supported by WordPress. So we decided to fix this issue and created the Ghost to WordPress Importer tool.

We show you how to use this free tool to migrate your blog in our guide on how to properly move from Ghost to WordPress.

4. Migrating From GoDaddy Website Builder to WordPress

GoDaddy is one of the biggest hosting and domain name companies in the world. To help their many users get started with building their website, they offer a basic website builder tool called GoDaddy Website Builder.

Many users choose this tool because it’s a convenient way to get started. However, it is missing many of the key features of more powerful blogging platforms, as you can see in our detailed comparison between GoDaddy Website Builder vs WordPress.

This means that users will quickly realize its many limitations and want to move their website to a more flexible and powerful platform like WordPress.

Unfortunately, there is no export tool to move your site from GoDaddy Website Builder to WordPress. That means that the process will be time-consuming and have a lot of manual steps, making it easy to make a mistake.

You’ll find every step clearly explained in our guide on how to move a GoDaddy Website Builder site to WordPress.

5. Migrating From Gumroad to WordPress

Gumroad

Gumroad is a popular eCommerce platform that allows users to sell digital goods online, such as games, music, courses, and videos. However, many users are looking to switch away from the platform because they have raised their fees to 10% for each transaction.

This fee does not include credit card processing or PayPal fees. Plus, an additional 10% fee is charged if a product is sold through the ‘Gumroad Discover’ feature or their ‘Global Affiliates’ program. That’s a lot of fees.

On the other hand, WordPress is free and doesn’t charge you any fee for the items you sell. Unlike Gumroad, it also lets you sell physical goods and you can use any payment gateway you want and promote your website freely.

You can easily install a plugin like Easy Digital Downloads to make WordPress the perfect platform for selling digital goods. We have even partnered with SiteGround, and they are offering special EDD hosting for our readers.

You can learn how to do this in around 30 minutes by following our guide on how to switch from Gumroad to WordPress.

6. Migrating From Joomla to WordPress

Joomla

Joomla is a good content management system that has a lot in common with WordPress. For example, they are both open-source software written in the PHP programming language and use a MySQL database.

They also have similar requirements, which means you won’t need to change hosting companies.

However, Joomla is more complicated to use. It is also not as powerful or flexible as WordPress because there are fewer extensions and designs available for you.

On the other hand, WordPress is easier to use and offers tons of extensions and design choices. See our comparison of Joomla vs WordPress for more details.

Luckily, there is a plugin you can use to easily import your Joomla content into WordPress. We carefully take you through every step you need in our guide on how to easily move your site from Joomla to WordPress.

7. Migrating From Medium to WordPress

Medium is a good blogging platform for new writers. It allows you to publish your posts with very little setup. But because you don’t own the platform, content from other authors often gets displayed below your own story.

The platform is quite limited compared to WordPress. When you switch from Medium to WordPress, you will own your own blog and can add all the features you need using plugins.

Simply follow our complete step-by-step guide to help you properly move all your content from Medium to WordPress.

You can retain the look of your old blog by installing a Medium-style theme or go for a new blog design using one of the best and most popular WordPress themes.

Tip: If you’re not ready to completely migrate away from Medium, then you can learn how to embed Medium blog posts in WordPress.

8. Migrating From Shopify to WordPress

Shopify is an all-in-one eCommerce solution that makes it easy for you to create an online store, accept payments, and manage your inventory, all from a single platform.

You don’t need to worry about the technical aspects of managing an eCommerce site, but it comes with slightly higher costs and limited control of your website.

On the other hand, you can turn WordPress into a full-featured online store by installing the WooCommerce plugin and customize every aspect of your store. You can compare the differences between the platforms in our comparison of Shopify vs WooCommerce.

Unfortunately, migrating away from Shopify is difficult because it doesn’t provide an easy way to export data to a WordPress-supported format. So we built an easy importer tool to help you do the Shopify to WooCommerce migration for free.

We take you through the entire migration process step-by-step in our guide on how to properly move from Shopify to WooCommerce.

Note: If you’re not ready to completely migrate away from Shopify, then you can learn how to easily integrate Shopify with WordPress.

9. Migrating From Squarespace to WordPress

Squarespace is a website-building service that focuses on small business owners. It allows you to create beautiful websites using easy drag-and-drop tools.

However, compared to WordPress, it costs more and offers less scope for design and flexibility. And while it does offer a limited set of extensions and integrations, they don’t compare with the power and breadth of the WordPress plugin ecosystem.

Unfortunately, it is difficult to migrate away from Squarespace because it offers limited export functionality. Depending on what content you have on your site, you may need to manually copy and paste some content from your Squarespace website.

In our guide on how to properly move from Squarespace to WordPress, we clearly list the content that can be automatically exported, and the content you will have to move manually to successfully migrate your site.

10. Migrating From Tumblr to WordPress

Tumblr is a little different than other blogging platforms. It is a microblogging platform with social networking features like following other blogs, reblogging, and built-in sharing tools.

The platform is easy to use and comes with its own audience. As a microblogging tool, Tumblr makes it easy to quickly blog videos, GIFs, images, and audio formats.

However, unlike WordPress, Tumblr’s features are limited and cannot be extended. To learn more about WordPress and what you can do with it, please see our complete WordPress review with pros and cons.

If you’re thinking about migrating from Tumblr to WordPress, then you will be glad to know that WordPress can natively import your Tumblr posts.

However, there is a lot involved in a website migration, and you’ll find all the steps in our comprehensive guide on how to properly move your blog from Tumblr to WordPress.

11. Migrating From Weebly to WordPress

Weebly is a well-known website builder platform owned by Square’s payment platform. It offers easy-to-use website-building tools for business websites and eCommerce stores along with free blog templates that you can add to your website.

However, that free plan has limited features and bandwidth, and upgrading to a paid subscription is expensive compared to top blogging websites. Besides that, Weebly’s blogging and SEO features are just not as powerful as other blogging platforms.

By contrast, WordPress can be hosted on any server and has all the features you can dream of like online stores, contact forms, galleries, portfolios, SEO, and more. When you compare Weebly vs WordPress you might start to think about switching.

The migration will take about an hour, and it’s worth it. Don’t worry, we’ve helped hundreds of people switch with the step-by-step directions in our guide on how to properly move from Weebly to WordPress.

12. Migrating From Wix to WordPress

Wix is a popular hosted platform that lets you quickly create simple websites using a drag-and-drop website builder. You can add a blog using the Wix Blog app.

However, when you compare Wix vs WordPress you see that Wix has incredibly limited options and adding extra features can become quite expensive.

For all but the simplest websites, WordPress is by far the better choice because it has a much larger range of themes and layouts, as well as a huge selection of plugins that add new features to your website.

Unfortunately, Wix makes it quite difficult to move your content away, but after reviewing various different ways to move from Wix to WordPress, we believe the easiest method is by importing your blog posts via RSS.

We show you how to do this step-by-step in our guide on how to properly switch from Wix to WordPress. On an average Wix blog, the migration takes around an hour.

13. Migrating From WordPress.com to Self-Hosted WordPress

WordPress.com is a blog hosting service offered by Automattic, a company created by WordPress.org co-founder Matt Mullenweg. Basic blog hosting is free and you can purchase additional options like a custom domain name, additional storage, and premium services.

This appeals to new users because no setup is required. However, compared with a self-hosted WordPress website, there are limited options to extend your blog. For example, you can’t use custom themes and plugins for customizing your blog.

You can learn more by viewing our comparison chart on WordPress.com vs WordPress.org.

If you’re ready to move from WordPress.com to a self-hosted WordPress blog, then see our guide on how to properly move your blog from WordPress.com to WordPress.org. Make sure you follow our steps carefully so you don’t lose data, visitors, or SEO.

After you migrate to a self-hosted WordPress blog, you may find you are missing some features you enjoyed on WordPress.com. Don’t worry, you can easily add those features by following our guide on how to get WordPress.com features on self-hosted WordPress blogs.

Special Offer: Our Team of Experts Can Move Your Blog for Free

Here’s a special offer. If you wish to migrate from Blogger, Medium, Weebly, or WordPress.com to a self-hosted WordPress website, then we can do it for you for free.

One of our expert team members will do the entire migration for you (100% free). Yes, you can literally switch from any of those specific platforms to WordPress without any risk.

There are just two conditions:

  • First, you need to sign up for your new web hosting service using our link. This will make sure you get the best price on hosting.
  • Second, your blog can’t have more than 1,000 posts. We can offer a migration service for larger blogs, but that will be a paid service.

Sound good? You can learn more on our Free WordPress Blog Setup page. We’ve already helped over 100,000 people, so get started now.

Free Blog Setup

We hope this tutorial helped you learn how to migrate your website to self-hosted WordPress. You may also want to see our guide on how to create an email newsletter the right way, or our expert pick on must have WordPress plugins to grow your site.

If you liked this article, then please subscribe to our YouTube Channel for WordPress video tutorials. You can also find us on Twitter and Facebook.

The post Ultimate WordPress Migration Guide for Beginners (Step by Step) first appeared on WPBeginner.

WordPress Widgets vs Blocks – What’s the Difference? (Explained)

Are you trying to understand the difference between WordPress widgets vs blocks?

WordPress widgets and blocks are both used to add dynamic content elements to posts, pages, sidebars, and templates. Widgets have been a core part of WordPress for 16 years, while blocks have only been a part of the platform since 2018. They serve similar functions, but they aren’t the same.

In this article, we’ll explain the difference between WordPress widgets and blocks, so you can learn how to use them properly.

Understanding the difference between WordPress widgets and blocks

Here is a quick overview of the topics we’ll cover in this article.

What are WordPress Widgets?

WordPress widgets are dynamic-content elements that you can add to widget-ready areas like sidebars.

Widgets were introduced in WordPress 2.2 (May 2007). The purpose was to provide users with an easy way to add customizable elements to their website without having to repeatedly insert the same element at the end of blog posts, for instance, or edit their WordPress theme files to create a sidebar and manually code in something like Google AdSense tracking codes.

Users could simply insert content or features using widgets that didn’t have to be part of their overall theme files or blog posts.

Widgets made it much easier for users to create their ideal WordPress blog, letting them easily add banner ads or email sign-up forms.

Gradually, almost all WordPress themes adapted widgets by adding widget-ready areas in their design and layouts. These were most often sidebars and footers.

The WordPress widget editor looked like this until WordPress 5.8 was released in 2021.

Old widgets screen

What are Blocks in WordPress?

Blocks are the elements that users can add to an area using the WordPress content editor. WordPress switched to this block-based content editor in WordPress 5.0.

You may also see it referred to as the Gutenberg editor, which was its development codename.

Blocks are very similar to widgets because each one handles a single element of the page or post. Unlike widgets, however, blocks were introduced only as part of the post and page editor, which means they could not be easily added to areas like the site footer or sidebar.

A block can be inserted into a post or page for any element, including a paragraph, an image, a gallery, a plugin-specific feature like email signups, or a video embed.

Block editor in WordPress

There are also blocks to add design layout elements like covers, patterns, tables, columns, groups, and more.

To learn more, see our complete WordPress block editor tutorial which shows how to use the default editor to create beautiful content layouts.

The Difference Between Widgets vs Blocks in WordPress

Until WordPress 5.8, the difference between widgets and blocks was quite obvious.

Users added widgets to their theme’s widget-ready areas. They were primarily used to display elements that were not post/page content. For instance, recent posts lists, important links, banner ads, forms, and more.

However, the difference between widgets and blocks has become quite blurry now.

Widgets are self-contained elements that can be used in widget-ready areas like sidebars on a WordPress website.

Blocks are also self-contained elements that you can access through the block editor. They can be used in posts and pages, as well as widget-ready areas. You can also use them in templates if your theme has enabled the full site editor.

Widgets were the first to allow developers to output other elements like contact forms, testimonials, social media feeds, and more.

However, the same can be achieved using blocks. Many of the top WordPress plugins now come with blocks that you can add anywhere.

Plugin blocks

For instance, WPForms comes with a contact form block that you can add anywhere to display a form.

Similarly, All in One SEO comes with blocks for the table of contents, HTML sitemap, breadcrumb navigation, and more.

The Block-Based Widget Editor

WordPress planned to adapt the block editor for editing all areas of your website including the widget-ready areas.

To make this happen, the new block-based widget editor was introduced in WordPress 5.8.

Users were now able to use blocks in widget-ready areas of their themes.

Block widget editor

Widgets are still located under the Appearance » Widgets menu.

However, if you are using a block-based theme that doesn’t have any defined widget-ready areas, then you may not see it under there. You will see Appearance » Editor instead.

Site editor with no widgets screen

Many of the legacy WordPress widgets already have blocks that can do the same thing.

Click on the add new block button (+) and you will find a bunch of blocks categorized as Widgets.

Widget blocks

These are still blocks, but they are just categorized as widgets so that users can understand that these blocks behave like legacy widgets.

However, if a user still needed to use a legacy widget that doesn’t have an alternative block, then they can do so by using the Legacy Widgets block.

Legacy widget block

If a WordPress plugin has a block that you can add to the posts and pages, you can now also use the same block in widget-ready areas.

Theme developers can also create custom blocks that users can add to different areas of their websites.

The Future of WordPress Widgets

WordPress is moving forward towards using a more intuitive and unified way to edit the content on a WordPress website.

This means that older widgets will no longer be available going forward. WordPress themes and plugin developers are already adapting and adding support for the block editor in their products.

However, many WordPress themes still use older widgets. Similarly, many WordPress plugins still use shortcodes and legacy widgets.

If you still need to use the old widgets, then you can disable block widgets in WordPress.

The simple way would be to do it by using the free WPCode plugin which allows you to customize WordPress without adding dozens of plugins.

It has a pre-made snippets that you can use to disable block widgets.

Select the Disable Widget Blocks snippet from the WPCode library

Alternatively, you can also use Classic Widgets plugin. For more details, see our step-by-step guide on how to install a WordPress plugin.

Upon activation, the plugin will simply replace the block-based widget editor with the older widget page.

Note: Classic Widgets plugin will only be supported until 2024. After then, the plugin will not be updated or maintained this is why we recommend using WPCode to future-proof your customization.

Blocks vs Widgets – Which One is Better?

We recommend users start using the new block-based widgets editor as soon as possible because that’s the direction WordPress development is heading.

It is easy to use, modern, and more flexible than the previous Widgets screen.

If a WordPress plugin or theme on your website doesn’t support block-based widgets, then you can reach out to the developer and ask them to convert their widgets into blocks.

If they don’t have plans to release an update, then you can easily find alternative plugins or themes to replace them.

We hope this article helped you understand the difference between WordPress widgets vs blocks. You may also want to see our pick of the best block plugins for WordPress or see our guide on the difference between the block editor vs page builders.

If you liked this article, then please subscribe to our YouTube Channel for WordPress video tutorials. You can also find us on Twitter and Facebook.

The post WordPress Widgets vs Blocks – What’s the Difference? (Explained) first appeared on WPBeginner.

How to Download WordPress for Free (Step by Step)

Are you looking to download WordPress to create your website?

WordPress is an open-source project, and you can download it for free. Although many web hosting providers now install WordPress for you automatically, you can always download and install it manually on your own server or computer.

In this article, we’ll show you how to download WordPress for free, as well as what you need to do next to get it installed.

How to Download WordPress for Free (Step by Step)

Why Is WordPress Freely Downloadable?

WordPress is free for anyone to download and use to build any kind of website without any restrictions. That’s because WordPress is an open-source community project that tens of thousands of talented people contribute to.

According to our WordPress market share report, over 43% of websites on the internet use WordPress.

There is a core team of developers that lead the project development, but anyone can contribute patches, fix bugs, make features, suggest features, and more.

Note: When we speak of the WordPress open-source project, we’re talking about self-hosted WordPress.org. This is different from the WordPress.com hosting service. For more details, see our comparison between WordPress.com vs WordPress.org.

While the core software is free, there are still costs involved in making a WordPress website. The cost of a website depends on your budget and goals, but it can be quite affordable.

The main costs will be a domain name, which will be your website’s address on the internet, and website hosting, which is where you will store your website files and database.

The good news is that most website hosting providers will automatically install WordPress for you, and you will probably never need to manually download or install it yourself.

However, if you are an intermediate or advanced user, then you always have the option of installing WordPress manually. That’s handy if you wish to do a custom WordPress install, or have WordPress running on your own server or computer.

With that being said, let’s take a look at how to download WordPress for free, along with what you need to do next. Here are the topics we’ll cover in this tutorial:

How to Download WordPress for Free

First, you need to visit the WordPress.org download page. This page offers two options:

  • You can download WordPress and install it yourself as we’ll cover in this article, or
  • You can set up WordPress automatically with a hosting provider.
Click the 'Download WordPress' Button

We recommend most users take the second option. Reputable hosting providers such as Hostinger, Bluehost, Dreamhost, or SiteGround will install WordPress for you automatically in just 5 minutes. To learn how that works, see our complete guide on how to install WordPress.

But if you’re an advanced or intermediate user and want to install WordPress manually, then go ahead and click the ‘Download WordPress’ button.

This button will also indicate which version of WordPress you are downloading. In this case, it is WordPress 6.1.1.

After downloading the file from WordPress.org, you just need to unzip it. This will create a ‘wordpress’ folder on your computer that contains all the files you need to create a WordPress website.

The Downloaded Unzipped WordPress Folder

Now that you have downloaded WordPress for free, you can use it to install or reinstall WordPress on your server or create a local WordPress installation on your computer.

How to Install or Reinstall WordPress Manually on a Web Server

Installing WordPress manually requires a few added steps, but may be easier than you expect. You will need the files you downloaded and an FTP client or a web-based file manager.

You can also use this manual method when updating WordPress or uninstalling and reinstalling WordPress.

Uploading the WordPress Files to Your Web Server

Your first job will be to use FTP to upload the WordPress files you have downloaded to your web server. You can think of FTP as file management for the internet.

Most web hosting providers offer an FTP server and send your FTP username, password, and other details via email when you sign up for your WordPress hosting account. You can also find your ‘FTP Accounts’ information in your hosting account’s cPanel or Site Tools dashboard.

Most Hosting Providers Offer Both FTP and a Browser-Based File Manager

As an alternative to FTP, most hosting providers also provide a browser-based file manager application. This can be accessed from your web hosting control panel as pictured above.

We’ll use the FileZilla FTP client because it’s free and works on Windows and Mac.

First, you need to open FileZilla and select File » Site Manager from the menu. Next, you should click the ‘New site’ button and provide a title for your website. Once you’ve done that, you should enter the login details in the ‘User’ and ‘Password’ fields.

FTP Requires a Username and Password

From the Protocol dropdown, you should select ‘SFTP’ if your hosting provider supports it, otherwise leave it as ‘FTP.’

Next, you just type your domain name such as ‘example.com’ in the Host field and select ‘Normal’ for the Logon Type.

Once you’ve entered those details, you can click on the Connect button to continue. FileZilla will now attempt to log in to your website using the credentials you entered.

Once connected, you will see two columns of files and folders. The left column lists the Local files on your computer. The right column lists the Remote files on your website. This layout lets you easily transfer files to and from your website.

Connecting to Your Website With an FTP Client

In the left column, you need to locate the ‘wordpress’ folder that you downloaded and unzipped earlier. In the right column, you need to locate the folder on your website where you need to upload these files:

  • If you want to install WordPress on your root domain name (like example.com), then you need to upload WordPress files to your website’s root directory. Usually, this directory is called /public_html/.
  • On the other hand, If you want to install WordPress in a subdirectory (like example.com/blog), then upload it to a folder /public_html/blog/.

Now you simply select all the files on the left. After that, you need to right-click the files and select Upload from the menu, or simply drag the files to the right column.

Uploading the Downloaded WordPress Files to Your Website

Your FTP client will now upload the WordPress files to your website.

Creating Your WordPress Database

Once the WordPress files are uploaded, you need to go to your hosting control panel to create a database. We’ll show you how to do that using cPanel, but if your hosting provider has a different control panel, then just look for the ‘phpMyAdmin’ option.

Launch phpMyAdmin From Your Control Panel

Clicking the ‘phpMyAdmin’ icon will open the phpMyAdmin application in a new tab. In the phpMyAdmin dashboard, click on the Databases tab.

You can now type a name for your database into the ‘Database name’ field. You can name your database anything you want. Make a note of the name because you’ll need it later.

For this tutorial, we will call our database test_db.

Creating a WordPress dashboard

After typing your database name, you should click the ‘Create’ button.

PhpMyAdmin will now go ahead and create your database.

Creating a WordPress database for your local website

Now that you’ve uploaded the WordPress files to your website and created a database, everything is ready to install WordPress.

Installing WordPress

To start installing WordPress, simply go to your website’s URL, such as example.com or www.example.com. This will open the WordPress installation wizard.

You will see the language selection page. You can choose a language here so that the rest of the installation is displayed in your own language. You can also use English for now and then later change the language or add multiple languages.

The WordPress setup wizard

Next, you can click the ‘Continue’ button to proceed.

You will now see some instructions about the installation process. You will see a list of information you need, including the database name, username, password, and host.

Installing WordPress Summary Page

After reading the screen, you should click the ‘Let’s go!’ button to continue. The setup wizard will now show you a form where you can enter the database information you created earlier.

Once you’ve done that, make sure you leave the Database Host field as the default ‘localhost.’ This just means that the database and website are hosted on the same server. Unless you changed the database prefix, the Table Prefix field should say wp_.

The MySQL database information

After filling in this information, you need to click the ‘Submit’ button. WordPress will connect to your database and show you a success message.

To move on to the next step, simply click on the ‘Run the installation’ button. WordPress will now create tables in your database and then send you to the next step of the installation.

Running the WordPress installation

The next screen will ask for some additional information.

You will need to enter the Site Title that you wish to display at the top of your website, such as your business name. You can change the title in your WordPress dashboard at any point.

You’ll also need to create a username and password. This is the login information you’ll use to access your WordPress dashboard.

Site information

You can also type your email address into the Your Email field. This is the address where WordPress will send all of its admin emails.

If you don’t want your website to be visible to search engines at this point, then you can check the box next to search engine visibility.

Later when you are ready you can change this from WordPress settings. If you are unsure about what to do, then simply leave it unchecked.

Install WordPress

After completing this form, click the ‘Install WordPress’ button. WordPress will now run the installation and after a few moments, you should see a ‘Success!’ message.

Now you can sign in to your WordPress dashboard by clicking on the ‘Log In’ button.

Log in to your admin panel

Congratulations, you have successfully installed WordPress by downloading the core software for free and then installing it manually.

How to Install WordPress Locally on Your Computer

You can also use the WordPress core files you downloaded to install WordPress on your own computer. This gives you the chance to try out WordPress before starting your blog or website. It’s also a great way to experiment with themes and plugins risk-free.

Note: If you install WordPress locally on your computer, then you will be the only person who can see it.

For WordPress to successfully run on your computer, you first need to install the software that WordPress relies on. This includes the PHP server-side programming language, the Apache web server, and the MySQL database management system.

Now, installing all these software independently and making them work with each other sounds like a daunting task.

Luckily, there are free development tools that make it super easy to install them as one package even for non-techy users. Once you install one of these applications, then you will be able to install WordPress using a method similar to the above.

We recommend using Local WP to install WordPress on your computer. Here are detailed tutorial on how to install WordPress on Windows, and how to install WordPress on Mac.

Local by Flywheel

Note: When you’re using Local WP, you don’t need to manually download and install WordPress on your computer. It can help you do that with just a few clicks.

We hope this tutorial helped you learn how to download and manually install WordPress for free. You may also want to learn how to keep your WordPress site secure, or check out our list of must-have plugins to grow your site.

If you liked this article, then please subscribe to our YouTube Channel for WordPress video tutorials. You can also find us on Twitter and Facebook.

The post How to Download WordPress for Free (Step by Step) first appeared on WPBeginner.

WordPress Conversion Tracking Made Simple: A Step-by-Step Guide

Do you want to add conversion tracking features to your WordPress website?

Conversion tracking helps you measure the impact of your marketing efforts and makes it easier to understand how users interact with your website.

In this guide, we will show you how to add conversion tracking in WordPress and track your conversions like a total pro.

Ultimate Guide to conversion tracking in WordPress

This is a comprehensive WordPress conversion tracking guide, so we have divided it up into different sections. Here is what we’ll cover in this guide:

What is Conversion Tracking?

Conversion tracking is the ability to track and measure the success of your various marketing efforts.

Depending on your business, the conversion is the desired action you want users to perform on your website.

  • For an online store or eCommerce website, a conversion could be a successful purchase.
  • For a news/blog site, the conversion could be a successful subscription to the email newsletter.
  • For a professional services website, a conversion could be a user filling up a contact form.

Simply put, conversion tracking shows you how many of your website visitors successfully perform the desired action.

Why is Conversion Tracking Important?

Conversion tracking is important because it helps you make data-driven decisions to grow your business.

For instance, it shows that users from a specific traffic source are more likely to convert. You can then focus your attention on getting more traffic from that particular source.

Conversion tracking also helps you uncover the users who are not converting so well.

For instance, you may learn that users open the contact page, but many abandon it before submitting the form. You can then make your form easier by removing unnecessary fields, making it conversational, changing colors, setting up partial form submission, etc.

Basically, you need conversion tracking to measure your success and failures and then improve upon them to grow your online business.

That being said, let’s take a look at what tools we’ll need to set up conversion tracking in WordPress.

Tools You Need to Setup Conversion Tracking in WordPress

Most conversion optimization experts rely heavily on Google Analytics. It is a free tool provided by Google that helps you track your website traffic.

It shows where your users are coming from, and what they do while on your website.

If you are running Google AdWords, Facebook Ads, and Twitter Ads to promote your business, then you’ll need to set up those for conversion tracking.

This may sound complicated, but you’ll only have to set it up once, and we’ll walk you through every step of the way.

Ready? Let’s get started.

Setting Up Conversion Tracking in Google Analytics

First, you need to install Google Analytics on your website.

The easiest way to do this is by using MonsterInsights. It is the best Google Analytics plugin on the market that comes with enhanced eCommerce tracking, form tracking, and other conversion tracking tools built-in.

You’ll need the PRO version of the plugin to access eCommerce and other conversion tracking features. For basic tracking, the free version works as well.

Simply install and activate the MonsterInsights plugin. For more details, see our step-by-step guide on how to install a WordPress plugin.

Upon activation, you’ll see the setup wizard. Go ahead and click the ‘Launch the Wizard’ button.

Launch setup wizard

Next, you can follow the on-screen instructions to connect your WordPress site to Google Analytics using MonsterInsights. For more details, see our guide on how to install Google Analytics in WordPress.

With MonsterInsights, you can also easily create a Google Analytics 4 (GA4) property. GA4 is the latest version of the famous analytics platform, and it will replace the old version on July 1, 2023.

To learn more, please see our guide on how to switch to Google Analytics 4 in WordPress.

Now that you have installed Google Analytics, let’s set up conversion tracking on your website.

Turning on Enhanced Ecommerce Conversion Tracking

Ecommerce tracking helps you see which products are doing well on your site, which products are being looked at but not purchased, and what’s bringing you the most revenue.

Google Analytics comes with enhanced eCommerce tracking, which works for most eCommerce websites, including WooCommerce, Easy Digital Downloads, MemberPress, and more. However, you’ll need to enable it for your website manually.

Step 1. Turn on eCommerce Tracking in MonsterInsights

MonsterInsights comes with an eCommerce addon that lets you properly set up eCommerce conversion tracking in Google Analytics.

It works with all top eCommerce platforms for WordPress, including WooCommerce, MemberPress, LifterLMS, Easy Digital Downloads, and more.

First, you need to visit the Insights » Addons page to install and activate the eCommerce addon.

Install the eCommerce addon

Step 2. Turn on Enhanced Ecommerce in Google Analytics

Next, you need to enable enhanced eCommerce tracking in your Google Analytics account. Go to your Google Analytics dashboard and select your website.

From here, you need to click on the Admin button located at the bottom left corner of the screen.

Go to admin settings

On the next screen, you’ll see different Google Analytics settings.

Under the ‘View’ column, click the ‘Ecommerce Settings’ link.

Ecommerce settings

After that, you need to turn on the ‘Enable Ecommerce’ and ‘Enable Enhanced Ecommerce Reporting’ options.

Don’t forget to click the ‘Save’ button when you’re done.

Enable ecommerce and enhanced ecommerce reporting

Google Analytics will now turn on the eCommerce reporting feature for your account.

Afterward, you can return to your WordPress dashboard and visit the Insights » Settings page. From here, switch to the eCommerce tab.

Use enhanced ecommerce option

MonsterInsights will automatically detect your eCommerce software and enable advanced eCommerce tracking for your store.

Note: the manual process for adding eCommerce conversion tracking has a lot of room for errors, so we strongly recommend using a plugin like MonsterInsights.

Viewing eCommerce Conversion Tracking Reports

Now that you have enabled eCommerce conversion tracking on your website. Let’s see how to view these reports and use them to make informed decisions about your business.

Ecommerce Conversion Reports in MonsterInsights

Simply go to the Insights » Reports page inside the WordPress admin area and then switch to the eCommerce tab.

Ecommerce report in MonsterInsights

At the top, you’ll see your most important metrics, like the conversion rate, transactions, revenue, and average order value.

Below that, you will see a list of your top products with quantity, sale percentage, and total revenue. This shows you which products are doing well in your store.

Next, you’ll see your top conversion sources with the number of visits, conversion share, and revenue. You can see which sources are bringing you more revenue and which traffic sources are not very effective.

Top conversion sources

MonsterInsights will also show you shopper behavior reports with the number of times products were added to and removed from the cart.

That’s not all the data. You can drill down these reports even further inside Google Analytics.

Ecommerce Conversion Reports in Google Analytics

In Google Analytics 4, you can head to Reports » Monetization » Overview to view the report.

View ecommerce report in GA4

Here, you can see the total revenue your online store is making. Besides that, there are more metrics you can track, like items purchased, first-time purchasers, and total purchases.

On the other hand, you can visit your Universal Analytics dashboard and click on the Conversions » Ecommerce from the left column.

Ecommerce report in analytics

The overview section offers the most important stats, such as revenue, conversion rate, transactions, and average order value.

You can further drill down to view different reports. For example, you can switch to shopping and checkout behavior reports to see how users reach the conversion page. You can also figure out what stopped them at the last minute from completing the transaction.

You may also want to see our guide on how to set up WooCommerce conversion tracking.

Turning on Form Conversion Tracking in Google Analytics

Not all websites use an eCommerce platform to conduct business. For instance, a restaurant website may use an order delivery form, or a salon may use a booking form.

Many businesses use contact forms to capture leads from their website. A lot of news and blogs use an email newsletter to convert website visitors into subscribers.

To track them, you need to enable form conversion tracking in Google Analytics.

MonsterInsights comes with a Forms addon that lets you easily track form conversions on your WordPress site. It works with all popular WordPress form plugins, including WPForms, Formidable Forms, Gravity Forms, Contact Form 7, and more.

Simply go to the Insights » Addons page. Scroll down to the ‘Forms’ addon, and then click on the Install button.

Install forms addon

Upon activation, you need to visit the Insights » Settings page and switch to the ‘Conversions’ tab.

MonsterInsights will automatically detect your WordPress form plugin and will also start tracking miscellaneous WordPress forms on your site.

MonsterInsights settings - conversions tab

Viewing Your Form Conversion Reports

You can now view your form conversion reports inside your WordPress admin area.

Head over to the Insights » Reports page and switch to the ‘Forms’ tab.

Forms report

You’ll see a list of forms on your website with their impressions, conversion, and conversion rates.

This helps in tracking how each WordPress form is performing. You can optimize low-converting forms while increasing the visibility of high-converting forms.

For more details, please see our guide on how to set up form tracking in Google Analytics.

Setting Up Goals for Conversion Tracking in Universal Analytics

So far, we have covered how to track eCommerce and form conversions.

What if you wanted to manually set up conversion goals and track them in Google Analytics?

For instance, you may want to consider users visiting a specific page as a conversion. Since it is not a form submission or an eCommerce transaction, it will not appear as a conversion in your reports.

Universal Analytics allows you to create your own goals and track their conversion.

However, an important thing to note is that Google Analytics 4 doesn’t have goals anymore. It is one of the major differences you’ll see between the new and old versions.

That said, let’s see how to set them up in Universal Analytics and track them on your website.

Go to the Google Analytics dashboard and click the ‘Admin’ tab on the bottom left. Then, in the View column, click on Goals.

Click on goals

Now, you will need to create a new goal.

Simply click the ‘+ New Goal’ button to set up a new goal.

Add a new goal

Next, you will need to select the goal type. Universal Analytics offers 4 types:

  • Destination: This tracks whether a visitor went to a specific page. This could be a thank you page or any conversion page on your site.
  • Duration: This tracks how long a visitor spends on your website. More time spent on a website means more engagement.
  • Pages/Screens per session: This tracks how many pages an average visitor looks at on your site.
  • Event: This can track all sorts of things, like button clicks, video plays, and downloads. It requires a bit more setup than the other options.

Destination and Event types are the most commonly used goal types for most businesses.

For this tutorial, we will create a ‘Destination’ goal to track visitors who view our thank you page after completing a form.

First, provide a name for your Goal. It needs to be something meaningful so that you can easily identify it in your Google Analytics reports.

After that, choose ‘Destination’ as your goal type and click the Continue button.

Enter goal description

Now you can simply provide the last part of the URL you want to track as the destination.

For instance, if your page is:
https://www.example.com/thank-you-for-booking/

Then you should enter the following:
/thank-you-for-booking/

Add goal details

Below that, you can optionally add value for the conversion. This makes sense if people are completing a payment form or if you know how much each lead is worth to you on average.

If you want to track a funnel, such as a customer moving through a checkout process, then you can also do this as part of the destination goal. This can help you pinpoint areas you might want to improve.

Once you’re happy with your goal, click the Save button. You should then see your goal listed in a table. You can edit it, switch it off and on, or create more goals here.

View new goal

Viewing Your Goal Conversions in Universal Analytics

Now that you have created your goal, allow Google Analytics to collect some data. After that, you can view your Goal Conversion report under the Google Analytics dashboard.

Simply, go to the Conversions » Goals and then click on Overview.

View goal conversions in analytics

Like all Google Analytics reports, you can drill down to view visitor journeys and get deeper insights.

For more details, see our complete guide on setting up goals in Google Analytics.

Setting Up Events in Google Analytics 4

Google Analytics 4 replaces goals with events. You can manually configure events to track different user interactions in GA4.

First, you’ll need to go to the ‘Admin’ settings from your GA4 property.

Go to admin settings

Next, you will need to navigate to the Property column.

After that, simply click the ‘Event’s option.

Go to events settings

You are now ready to create a new event in GA4.

Simply click the ‘Create event’ button to get started.

Create a new event

You should now see a new window slide in from the right. This is where all your custom events will be listed.

Go ahead and click the ‘Create’ button.

Create a custom event

On the next screen, you can enter details of your new event.

Google Analytics 4 already has pre-built events. Simply click the Custom event name dropdown menu and choose an event. For example, we’ll select the ‘file_download’ event for this tutorial.

Select an event name

GA4 will automatically enter the specific Parameter and Operator for your custom event.

Next, you can enter a value for your event. For instance, we will enter ‘.pdf’ since we want to track PDF file downloads. However, you can enter any specific word you use to organize filenames on your site.

Enter event parameter operator and value

After entering these details, click the ‘Create’ button at the top.

You will now see your new custom event listed under the Custom events area in GA4.

View custom event

Viewing Your Event Conversions in Google Analytics 4

Now that you’ve created a custom event in GA4, the next step is to view the conversions.

To do that, simply head to Reports » Engagement » Event: Event name from the menu on your left and view the report.

View custom events data

You can now repeat this step to track other custom events.

That said, an easier way of tracking user behavior is by using MonsterInsights. The plugin automatically sets up different events in Google Analytics.

This way, you don’t have to manually configure events or worry about messing up your tracking.

Google Ads Conversion Tracking in WordPress

If you run Google Ads (formerly Google AdWords) to bring targeted traffic to your website, then you may want to track those conversions.

Setting up is a bit complicated because it requires adding code to your website. However, with MonsterInsights, you can easily set up Google Ads conversion tracking without editing code or hiring a developer.

First, you can go to Insights » Addons from your WordPress dashboard and install the Ads addon.

Install the ads addon

Once you install the addon, it should automatically activate.

From here, you can go to Insights » Settings and head to the Publisher tab.

Publisher settings in MonsterInsights

Next, you can scroll down to the ‘Ads Tracking’ section.

Here, you will need to enter the Conversion ID, which will be in this format: AW-123456789.

Enter conversion ID and label

If you’re tracking Google Ads on an eCommerce store, then you can also enter the Conversion Label.

To find the Conversion ID and Conversion Label, you’ll need to go to your Google Ads dashboard and create a conversion action.

For more details, please follow our step-by-step guide on how to set up Google Ads conversion tracking in WordPress.

Viewing Google Ads Conversion Reports in Google Analytics 4

Your Google Ads conversion tracking will now appear in your Google Analytics reports.

In Google Analytics 4, you can head to Acquisition » Acquisition overview and then navigate to the ‘Session Google Ads’ report.

After that, click the ‘View Google Ads campaigns’ option at the bottom of the report.

View session google ads campaign report

This will expand the report and show more details about your ad campaigns.

You can see the total number of users, sessions, Google Ads clicks, and more.

View detailed stats for each campaign

Viewing Google Ads Conversion Reports in Universal Analytics

For Universal Analytics, you can open your website property.

After that, view the Google Ads report by going to the Acquisition » Google Ads » Campaigns section. Here, you can see conversions for all your paid campaigns.

View Google ads report in UA

Use UTM Parameters for Conversion Tracking in Google Analytics

UTM parameters are special tags you can add to URLs to pass important information to Google Analytics.

For instance, if you want to track users coming from a particular ad, then you can add UTM parameters to your ad URL like this:

https://yourwebsite.com/special-offer/?utm_source=ads&utm_medium=cpc&utm_content=bfad

You can also use UTM parameters anywhere you want to share your URLs.

For instance, your email newsletter, Tweets, SMS campaigns, and more.

https://yourwebsite.com/special-offer/?utm_source=newsletter&utm_medium=email&utm_campaign=jan_sale

MonsterInsights makes it super easy to build URLs with UTM parameters. Simply head over to the Insights » Tools page and select the ‘URL Builder’ tab.

Go to tools in MonsterInsights

Simply enter the UTM parameters you want to use, and it will automatically generate the URL, which you can then use in your campaigns.

For instance, you can enter a campaign source, like a newsletter or Google, which tells you where the users are coming from. After that, you can define a campaign medium, such as emails or banner ads, and enter a campaign name.

Enter campaign source and medium

MonsterInsights will also give you additional options to add campaign terms and content.

This is useful if you’re split-testing different emails or paid campaigns.

For creating a custom URL, you can leave these options blank.

Additional options in URL builder

Next, you can scroll down to the bottom to see your custom URL.

Go ahead and use the link for campaigns and track conversions on your website.

The URL created by the MonsterInsights URL builder tool, with UTM parameters in place

Viewing UTM Parameter Reports in Google Analytics 4

Now that you’ve added UTM parameters to a URL, you can track its performance in Google Analytics.

First, log in to your GA4 account. After that, head to Reports » Acquisition » Traffic Acquisition from the menu on your left.

View traffic acquisition report

You should now see traffic from different sources on your website, such as organic search, email, display, and more.

You can use the search bar to filter the traffic source for your custom campaign. For example, if you’re tracking conversions from a newsletter, then you can look up ‘Email’ in the report.

View different traffic sources

After that, you further drill down and filter your traffic.

Simply click the ‘+’ button under the search bar.

Click the plus button

GA4 will then show different options to filter your traffic.

You can select Traffic source » Session source from the dropdown list.

Select session source

Next, Google Analytics will list your email campaigns.

You can now see which campaign performs best and gets the most conversions.

View newsletter URL report in ga4

Viewing UTM Parameter Reports in Universal Analytics

In Universal Analytics, you can track the conversions of your campaigns under your Google Analytics dashboard.

Simply switch to the Acquisition » Campaigns » All Campaigns report.

Go to all campaigns

Your campaigns will appear here.

You can click on any of them to drill down further.

View newsletter tracking report

Setting Up Facebook Conversion Tracking in WordPress

Facebook is the largest social media website on the planet, with billions of active users. This is why Facebook ads are sometimes the easiest way to reach a niche audience.

Now, if you are running Facebook ads, then you may want to see how well your ads are doing by implementing conversion tracking for your Facebook ads.

Usually, you’d need to add a code snippet to your WordPress website to track Facebook conversions. However, WPCode makes it very simple, and you can simply enter the Facebook Pixel ID to set up tracking.

First, you’ll need to log in to Facebook and visit the Meta Business Suite. Then, click on All Tools » Events Manager.

Go to event manager

Next, you need to add a data source to the Event Manager.

Simply click the ‘+ Connect to Data Sources’ button in the left-hand menu.

Connect data source

You should now see different options to connect your new data source.

Go ahead and select the ‘Web’ option and click the ‘Connect’ button to continue.

Connect new data source

After that, enter a name for your pixel.

Once that’s done, you can click the ‘Create Pixel’ button.

Create a Facebook pixel

Next, you need to choose how to connect your website and send activity to Facebook.

At the bottom, you will see the Facebook Pixel. Go ahead and copy the pixel ID.

Choose how to connect to your site

Next, you can return to your WordPress website dashboard and install and activate the WPCode Free Plugin plugin. For more details, see our step-by-step guide on how to install a WordPress plugin.

Note that you’ll need at least the WPCode Plus plan because it includes the Conversion Pixel Addon. However, there is also a free version of WPCode you can use to get started.

Upon activation, you need to visit the Code Snippets » Conversion Pixel page and go to the Facebook tab. From here, you need to paste the Facebook Pixel ID in the respective field.

Add Facebook pixel ID

WPCode will now automatically add the code to your site that’s needed to track Facebook ad conversions.

Setting Up Twitter Conversion Tracking in WordPress

If you run Twitter Ads to promote your business, then you’ll need to set up Twitter conversion tracking to measure the success of your ads.

Simply log in to your Twitter Ads account and click on the Tools » Event manager from the menu at the top.

Twitter event manager

You should now see a pixel created by Twitter.

Go ahead and click the ‘View Twitter Pixel’ option.

View the Twitter pixel

On the next screen, you will see different options to add the Twitter pixel to your site.

You can use the ‘Pixel Code’ method and simply copy the code.

Copy the pixel code

You will need to add this code to the header of your WordPress site.

First, you need to switch back to your WordPress website’s admin area.

If you haven’t already done so, then go ahead and install and activate the WPCode plugin. For more details, please see our guide on how to install a WordPress plugin.

Upon activation, you need to visit the Code Snippets » Header & Footer page. Now you can paste the Twitter pixel code into the Header section.

Enter the Twitter pixel

Don’t forget to click the ‘Save Changes’ button to store your settings.

After you have successfully installed the pixel code, you can track conversions on your Twitter Ads account.

Optimizing Conversion Rates to Boost Sales

Once you start tracking conversions on your website, the next step is to improve those conversion rates.

You’d be surprised how little things can make a huge impact on your business.

The best way to improve your conversions is by using OptinMonster. It is the best conversion optimization software on the market and helps you convert more visitors into customers.

OptinMonster comes with tools like lightbox popups, fullscreen welcome mats, countdown timers, slide-in boxes, and more.

Choose a campaign type and template

It integrates with any email marketing service and works with all popular eCommerce platforms.

OptinMonster’s display rules allow you to show targeted messages to your customers at the precise time and nudge them into making a buying decision.

Upsell popup preview

For instance, if you notice that customers are leaving a product page without taking any action, then you can offer them a discount when they are about to exit.

Similarly, you can run time-sensitive campaigns to trigger the FOMO effect and give customers a nudge in the right direction.

For more practical tips, see our guide on how ways to recover WooCommerce abandoned cart sales.

We hope this guide helped you set up conversion tracking in WordPress. You may also want to see our comparison of the best email marketing services and the ultimate guide to WordPress speed and performance.

If you liked this article, then please subscribe to our YouTube Channel for WordPress video tutorials. You can also find us on Twitter and Facebook.

The post WordPress Conversion Tracking Made Simple: A Step-by-Step Guide first appeared on WPBeginner.

Beginner’s Guide to Preventing Blog Content Scraping in WordPress

Are you looking for a way to keep spammers and scammers from stealing your WordPress blog posts using content scrapers?

It is very frustrating as a website owner to see that someone is stealing your content without permission, monetizing it, outranking you in Google, and stealing your audience.

In this article, we’ll cover what blog content scraping is, how you can reduce and prevent content scraping, and even how to take advantage of content scrapers for your own benefit.

Beginner's Guide to Preventing Blog Content Scraping in WordPress

What Is Blog Content Scraping in WordPress?

Blog content scraping is when content is taken from numerous sources and republished on another site. Usually, this is done automatically via your blog’s RSS feed.

Unfortunately, it is very easy and very common to have your WordPress blog content stolen in this way. If it’s happened to you, then you understand how stressful and frustrating it can be.

Sometimes your content will be simply copied and pasted directly to another website, including your formatting, images, videos, and more.

Other times, your content will be reposted with attribution and a link back to your website, but without your permission. Although this can help your SEO, you may want to keep your original content hosted on your site only.

Why Do Content Scrapers Steal Content?

Some of our users have asked us why scrapers are stealing content. Usually, the main motivation for content theft is to profit from your hard work:

  • Affiliate commission: Dishonest affiliate marketers may use your content to bring traffic to their site through search engines in order to promote their niche products.
  • Lead Generation: Lawyers and realtors may pay someone to add content and gain authority in their community, and not realize it is being scraped from other sources.
  • Advertising Revenue: Blog owners may scrape content to create a hub of knowledge in a certain niche ‘for the good of the community’ and then plaster the site with ads.

Is It Possible to Completely Prevent Content Scraping?

In this article, we’ll show you some steps you can take to reduce and prevent content scraping. But unfortunately, there is no way to completely stop a determined thief.

That’s why we finish this article with a section on how you can take advantage of content scrapers. While you can’t always stop a thief, you may be able to gain some traffic and revenue through the content they have stolen from you.

What Should You Do When You Discover Someone Has Scraped Your Content?

Since it’s not possible to completely stop scrapers, you may one day discover that someone is using content they stole from your blog. You may wonder what to do when that happens.

Here are a few approaches that people take when dealing with content scrapers:

  • Do Nothing: You can spend a lot of time fighting scrapers, so some popular bloggers decide to do nothing. Google already sees well-known sites as authorities, but that’s not true of smaller sites. So this approach is not always the best in our opinion.
  • Take Down: Here you contact the scraper and ask them to take the content down. If they refuse, then you submit a takedown notice. You can learn how in our guide on how to easily find and remove stolen content in WordPress.
  • Take Advantage: While we actively work at having content scraped from WPBeginner taken down, we also use a few techniques to get traffic and make money from scrapers. You can learn how in the ‘Take Advantage of Content Scrapers’ section below.

With that being said, let’s take a look at how to prevent blog scraping in WordPress. Since this is a comprehensive guide, we have included a table of contents for easier navigation.

Trademark and copyright laws protect your intellectual property rights, brand, and business against many legal challenges. This includes illegal use of your copyrighted material or your brand’s name and logo.

You should clearly display a copyright notice on your website. While your content is automatically covered by copyright laws, displaying a notice will let you know that your content is copyrighted and that they cannot use your protected properties for business.

Display a Copyright Notice on Your Website

For example, you can add a copyright notice with a dynamic date to your WordPress footer. This will keep your copyright notice up to date.

This may discourage some users from stealing it. It will also help in the case that you do need to send a cease and desist letter or file a DCMA complaint to take down your stolen content.

You can also apply for copyright registration online. This process can be complicated, but luckily there are low-cost legal services that can help small businesses and individuals.

Learn how in our guide on how to trademark and copyright your blog’s name and logo.

2. Make Your RSS Feed More Difficult to Scrape

Since blog content scraping is usually done automatically via your blog’s RSS feed, let’s look at a few helpful changes you can make to your feed.

Don’t Include the Full Post Content in Your WordPress RSS Feed

You can include just a summary of each post in your RSS feed instead of the full content. This includes an excerpt as well as post metadata such as the date, author, and category.

There is certainly debate in the blogging community about whether to have full RSS feeds or summary feeds. We won’t get into that now except to say that one of the pros of having a summary only is that it helps prevent content scraping.

You can change the settings by going to Settings » Reading in your WordPress admin panel. You need to select the ‘Excerpt’ option, and then click the ‘Save Changes’ button.

RSS Feeds Can Contain Full Text or an Excerpt of Each Post

Now the RSS feed will only show an excerpt of your article. If someone is stealing your content through your RSS feed, then they will only get the summary, not the full post.

If you would like to tweak the summary, then you can see our guide on how to customize WordPress excerpts.

Optimize Your RSS Feed to Prevent Scraping

There are other ways you can optimize your WordPress RSS feed to protect your content, get more backlinks, increase your web traffic, and more. One of the best ways is to delay posts from appearing in the RSS feed.

The benefit is that when you delay posts from appearing in your RSS feed, you give the search engines time to crawl and index your content before it appears elsewhere, such as on scraper’s websites. The search engines will then see your site as the authority.

The safest and easiest way to do this is using WPCode because it has a recipe that automatically adds the correct custom code to WordPress.

Add a snippet using WPCode

For detailed instructions, see our guide on how to delay posts from appearing in your WordPress RSS feed.

3. Disable Trackbacks and Pingbacks

In the early days of blogging, trackbacks and pingbacks were introduced as a way for blogs to notify each other about links. When someone links to a post on your blog, their website will automatically send a ping to yours.

This pingback will then appear in your blog’s comment moderation queue with a link to their website. If you approve it, then they get a backlink and mention from your site.

This gives the spammer an incentive to scrape your site and send trackbacks. Luckily, you can disable trackbacks and pingbacks to give scrapers one less reason to steal your content.

Disabling Trackbacks and Pingbacks in WordPress

For more information, check out our guide on disabling trackbacks on all future posts.

You might also like to learn how to disable trackbacks and pings on existing WordPress posts.

4. Block the Scraper’s Access to Your WordPress Website

One way to stop scrapers from stealing your content is to take away their access to your website. You can do this manually by blocking their IP address, but most users will find it easier to use a security plugin such as a web application firewall.

Block the Scraper Using a Security Plugin (Recommended)

Blocking scrapers manually is tricky and a lot of work. Especially since many hacking attempts and attacks are made using a wide range of random IP addresses from all over the world. It’s almost impossible to keep up with all those random IP addresses.

That’s why you need a Web Application Firewall (WAF) such as WordFence or Securi. These act as a shield between your website and all incoming traffic by monitoring your website traffic and blocking common security threats before they reach your WordPress site.

For the WPBeginner website, we use Sucuri. It is a website security service that protects your website against such attacks using a website application firewall.

Basically, all your website traffic goes through the security service’s servers where it is examined for suspicious activity. They automatically block suspicious IP addresses from reaching your website altogether. See how Sucuri helped us block 450,000 WordPress attacks in 3 months.

Manually Block or Redirect the Scraper’s IP Address

Advanced users may also wish to manually block a scraper’s IP address. This is more work, but you can specifically target the scraper’s address once you learn it. Web developer Jeff Star suggests this approach when he wrote about how he handles content scrapers.

Note: Adding code to website files can be dangerous. Even a small mistake can cause major errors on your site. That’s why we only recommend this method for advanced users.

You can find the scraper’s IP address by visiting ‘Raw Access Logs’ in the cPanel dashboard of your WordPress hosting account. You need to look for IP addresses with an unusually high number of requests and keep a record of them, say by copying them into a separate text file.

Blocking the Scraper's IP Address

Tip: You need to make sure that you don’t end up blocking yourself, legit users, or search engines from accessing your website. Copy a suspicious-looking IP address and use online IP lookup tools to find out more about it.

Once you are confident that the IP address belongs to a scraper, you can block it using the cPanel ‘IP Blocker’ tool, or by adding code like this in your root .htaccess file:

Deny from 123.456.789

Make sure you replace the IP address in the code with the one you want to block. You can block multiple IP addresses by entering them on the same line separated by spaces.

For detailed instructions, see our guide on how to block IP addresses in WordPress.

Instead of simply blocking the scrapers, Jeff suggests you could send them dummy RSS feeds instead. You could create feeds full of Lorem Ipsum and annoying images, or even send them right back to their own website, causing an infinite loop and crashing their server.

To redirect them to a dummy feed, you will need to add code like this to your .htaccess file:

RewriteCond %{REMOTE_ADDR} 123\.456\.789\.
RewriteRule .* http://dummyfeed.com/feed [R,L]

5. Prevent Image Theft in WordPress

It’s not just your written content that you need to protect. You should also prevent image theft in WordPress.

Like text, there is no way to completely stop people from stealing your images, but there are plenty of ways to discourage image theft on a WordPress website.

For example, you can disable hotlinking of your WordPress images. This will mean that if someone scrapes your content, their images will not load on their site.

It will also reduce your server load and bandwidth usage, boosting your WordPress speed and performance.

Alternatively, you can add a watermark to your images that gives you credit. This will make it clear that the scraper has stolen your content.

You can learn these two techniques as well as other ways to protect your images in our guide on 4 ways to prevent image theft in WordPress.

6. Discourage Manual Copying of Your Content

While most scrapers use automatic tools, some content thieves may try to manually copy all or part of your content.

One way to make this more difficult is to prevent them from copying and pasting your text. You can do this by making it harder for them to select the text on your website.

To learn how to stop manual copying of your content, then see our step-by-step guide on how to prevent text selection and copy/paste in WordPress.

However, this will not completely protect your content. Remember, tech-savvy users can still view the source code or use the Inspect tool to copy anything they want. Also, this method will not work with all web browsers.

Also, keep in mind that not everyone copying your text will be a content thief. For instance, some people may want to copy the title to share your post on social media.

That’s why we recommend you only use this method if you feel it’s truly needed for your site.

7. Take Advantage of Content Scrapers

As your blog gets larger, it is almost impossible to stop or keep track of all content scrapers. We still send out DMCA complaints. However, we know that there are tons of other sites that are stealing our content that we just cannot keep up with.

Instead, our approach is to try to take advantage of content scapers. It’s not so bad when you see that you’re making money from your stolen content, or receiving a lot of traffic from a scraper’s website.

Make Internal Linking a Habit to Gain Traffic and Backlinks from Scrapers

In our ultimate guide on SEO, we recommend that you make internal linking a habit. By placing links to your other content in your blog posts, you can increase pageviews and reduce the bounce rate on your own site.

But there is a second benefit when it comes to scraping. Internal links will get you valuable backlinks from the people who are stealing your content. Search engines like Google use backlinks as a ranking signal, so the additional backlinks are good for your SEO.

Lastly, these internal links allow you to steal the scraper’s audience. Talented bloggers place links on interesting keywords, making it tempting for users to click. Visitors to the scraper’s website will also click the links, which will lead them straight back to your own website.

Auto Link Keywords With Affiliate Links to Make Money from Scrapers

If you make money on your website from affiliate marketing, then we recommend enabling auto-linking in your RSS feeds. This will help you maximize your earnings from readers who only read your website via RSS readers.

Even better, it will help you make money from the sites that are stealing your content.

Simply use a plugin like ThirstyAffiliates that will automatically replace assigned keywords with affiliate links. We show you how in our guide on how to automatically link keywords with affiliate links in WordPress.

Promote Your Website in Your RSS Footer

You can use the All in One SEO plugin to add custom items to your RSS footer. For example, you can add a banner that promotes your own products, services, or content.

AIOSEO RSS feed footer save

The best part is that those banners will appear on the scraper’s website as well.

In our case, we always add a little disclaimer at the bottom of posts in our RSS feeds. By doing this, we get a backlink to the original article from the scraper’s site.

This lets Google and other search engines know we are the authority. It also lets their users know that the site is stealing our content.

For more tips, check out our guide on how to control your RSS feed footer in WordPress.

We hope this tutorial helped you learn how to prevent blog content scraping in WordPress. You may also want to see our ultimate WordPress security guide, or check out our list of the best analytics solutions for WordPress.

If you liked this article, then please subscribe to our YouTube Channel for WordPress video tutorials. You can also find us on Twitter and Facebook.

The post Beginner’s Guide to Preventing Blog Content Scraping in WordPress first appeared on WPBeginner.

Should You Start a Blog or a YouTube Channel? (Beginner’s Guide)

Are you wondering whether you should start a blog or YouTube channel?

Blogging and vlogging are good ways to engage with your audience and grow your brand’s credibility. We are often asked by readers which they should start first blog vs YouTube?

In this article, we’ll explain our pick on blog vs YouTube and which you should start first with detailed explanation of our take.

Should You Start a Blog or a YouTube Channel?

TLDR: we recommend you start with a blog and add a YouTube channel later if needed

This is a comprehensive guide, so we’ve included a table of contents for easier navigation:

What Is a Blog?

A blog is a type of website where articles, called ‘blog posts’, are presented in reverse chronological order with newer content appearing first. Blog posts are a great way to share your expert knowledge with your audience, build credibility, and attract visitors to your site.

If you want to start an online business, or communicate better with your existing customers or audience, then you should think about starting a blog.

Blogs typically present information in a conversational style and are run by individuals or a small group of people. However, there are now tons of corporate blogs that produce a great deal of useful informational and thought-leadership content.

Typical blog posts also have a comments section where users can respond to the article by making comments or asking questions.

Blogging has been around since 1993 and has become an essential marketing tool for many businesses. But is it still relevant in the age of YouTube and social media?

Why Starting a Blog Is so Important Today

There are currently 1.9 billion websites in the world, and over 600 million are blogs. That means that blogs make up a third of the web.

Blogging has become an important marketing strategy for businesses due to its benefits. You or your business can use a blog to promote ideas, brands, stories, products, and more.

Here are some of the more important benefits of blogging and why you should consider starting a blog.

1. A Blog Will Bring More Traffic to Your Website

A typical business website consists of a few important pages. For example, you may have a homepage, landing pages for your products and services, and a contact page.

Unfortunately, search engines may often decide that your website is less important than thousands of other websites in the same industry, especially if they have been around longer.

Adding a blog allows you to publish additional content which over time will help you bring more traffic to your website.

That’s a major reason to start with a blog rather than a YouTube channel because YouTube videos will attract traffic to the YouTube platform instead of your own website. You own and control your blog, while the YouTube platform is owned by Google and will benefit them.

2. A Blog Will Help Strengthen Brand Recognition and Build Authority

A blog helps you strengthen your brand identity. It gives you more opportunities to use your custom logo across your website, your social profiles, search results, and more.

This brand recognition when combined with customer trust and authority adds enormous value to your digital assets.

Adding a blog allows you to establish authority by regularly publishing content on topics related to your industry.

If you are consistently publishing new content, you’ll become the go-to place for your users and other businesses interested in those topics.

3. A Blog Will Help You Generate More Leads and Conversions

More than 70% of people visiting your website today, will never find it again. That’s because there is so much content and information on the internet.

Starting a blog will help you convert website traffic into potential leads, subscribers, and social media followers.

For example, you can use tools like OptinMonster to build an email list and grow a social media following. And with push notifications, you can send targeted messages to your blog visitors and bring them back to your website.

4. A Blog Will Help You Build an Engaging Audience

A static website doesn’t leave much room for a conversation. Why not add a blog to your site where users can engage by leaving a comment and sharing your posts on social media?

This helps you build a community around your business which is extremely useful.

It will help your visitors develop an affinity with your brand which pays off when they are looking to make a purchase or recommend your products and services to friends and family.

5. A Blog Will Let You Educate Customers and Share News

Blog posts allow you to educate customers about different ways they can use your products. This will allow you to compare your product with competitors, showcase product features, inform users about benefits, and more.

They’re also the best place to share your business news, announcements, and sales events.

For instance, if you are launching a Black Friday sale, you can promote it with a blog post. And then promote that blog post across your website with a floating header or footer banner.

6. A Blog Will Let You Build Additional Revenue Streams for Your Business

Blogs provide many opportunities to generate additional revenue and make money online. For instance, you can display ads in your blog posts using Google AdSense.

You can also promote affiliate products and make money with affiliate marketing or use your blog to sell premium content using MemberPress or Easy Digital Downloads.

7. A Blog Helps You Repurpose Content for Other Marketing Channels

Adding a blog to your website allows you to actively use blog content across your other marketing channels, such as making YouTube videos based on blog post content.

For example, we use our written WPBeginner tutorials as a helpful starting point for creating YouTube videos. This makes our video producers’ jobs easier and saves time. Then we embed the YouTube videos into the tutorial so our visitors can choose to read or watch the content.

Still not convinced? You can learn even more reasons to start a blog by taking a look at our article on the benefits of blogging.

Starting a Blog vs Starting a YouTube Channel

Now that you know about some of the benefits of blogging, you can see why we recommend that you start a blog first, and then add a YouTube channel in the future if you need.

Let’s summarize the most important points. When you build a blog, you are creating a platform that you own and control. The content you create will attract visitors to your website where they can learn more about your products and services.

On the other hand, the YouTube platform will always be owned by Google. The search traffic generated by your content will take people to the YouTube website, not your own.

Creating blog posts first also makes it easier to create other types of content, such as YouTube videos. Usually, the first step in creating a video is to write a script. Because you have already created written content on your blog, a lot of the work is already done.

Besides that, creating YouTube videos requires expensive equipment such as a camera and lighting, and you’ll also need to purchase video editing software and learn how to use it.

Finally, your blog is the perfect place for your visitors to watch your YouTube videos. You can easily embed YouTube videos in a blog post, giving your visitors the choice of watching or reading your content. That’s a great user experience.

What You Need to Start a Blog

We know that starting a blog can be a terrifying thought specially when you are not geeky. Guess what – you are not alone.

If you want to start a blog, then WordPress is the most popular blogging platform recommended by experts.

Although WordPress is free, there are some costs involved in creating a self-hosted blog. You will need to choose and register a domain name and decide on a web hosting provider.

You may also want to pay someone to design your website and purchase premium plugins to add features. The total cost will depend on your needs and goals.

The good news is that you can build a fully functional WordPress website for yourself and keep your costs under $100. Bluehost, an official WordPress-recommended hosting provider, has agreed to offer our users a free domain name and over 60% off on web hosting.

You can learn the details and options in our guide on how much it really costs to build a WordPress website.

Even better, when you signup with Bluehost using our link, they will automatically install WordPress for you, so you can start building your blog right away.

All you need to do is log in to your Bluehost account, and then click the ’Log in to WordPress’ button to get started.

Bluehost Dashboard - log in to WordPress

After that, you will need to set up your WordPress install, choose a theme and some plugins, then get started on your first blog post.

We take you through the entire process step by step in our beginner’s guide on how to start a WordPress blog. We’ll summarize the main steps below.

The end result will be an attractive and functional blog that you own.

Selecting a Theme to Customize Your Blog’s Appearance

Customizing the look and feel of your blog is by far one of the most exciting and rewarding parts of the journey of creating your WordPress blog.

WordPress comes with a powerful templating engine that allows you to change the appearance of your website by installing themes.

There are thousands of free and paid WordPress themes available. You can choose one that looks closer to what you have in mind for your website.

WordPress Theme Stats

You can look for themes under the Appearance » Themes page. It will show you a bunch of default themes that come with your WordPress install.

For more themes, click on the ‘Add New’ button at the top to find more free themes.

Add new theme

For premium or paid WordPress themes, you can try trusted WordPress theme shops like SeedProdThrive ThemesAstraElegant Themes, and more.

However, there is such an abundance of WordPress themes that it may become difficult for beginners to decide which theme they want to use.

We recommend choosing a minimalist design with plenty of white space. This provides you plenty of room to customize the theme and make it your own.

For more details, see our guide on how to choose the perfect theme for your website as well as our list of the best free WordPress blog themes.

Creating Your First Blog Post

Once you have selected your WordPress theme, you are now ready to create your first blog post. You just need to click on the Posts » Add New menu in your WordPress dashboard.

You will see an editor area where you can write your first blog post.

Writing Your First Blog Post

WordPress uses a block-based editor that allows you to create beautiful content layouts for your blog posts.

To familiarize yourself with the editor, see our WordPress block editor tutorial.

Once you’re done writing, go ahead and click on the Publish button on the top-right corner of the screen to make your blog post publicly available.

Publishing Your First Blog Post

On the posts screen, you will notice several other sections such as Categories and Tags. You can use these to organize your blog posts into sections. We have a great write-up on the difference between categories vs tags, which we highly recommend that you read.

To utilize all the features on the posts screen, you should read our article on how to add a new post in WordPress (video included).

We also offer some helpful resources to help you brainstorm new post ideas to write about:

A lot of pro bloggers choose their specific topics strategically by doing keyword research. This helps their content rank higher in Google searches and get more traffic.

We have a step-by-step guide on how to do keyword research for beginners using the exact same method that we use on WPBeginner.

Extending and Growing Your Blog With Plugins

Once you publish your first blog post, you’ll probably want to get started with adding other usual elements on your website such as a contact page, galleries, sliders, and an email list. To add all these additional features, you need to use plugins.

Plugins are like apps for your WordPress website. They allow you to add new features and extend the functionality of WordPress without writing any code.

There are more than 60,000 free plugins available in the WordPress.org plugin directory alone. Plus, there are premium WordPress plugins sold by third-party developers with priority support and guaranteed updates.

WordPress plugins

However, you also need to consider which plugins you need to use to keep your WordPress website secure, private, and anonymous.

Here are our top picks of the best plugins to grow your blog.

  • All in One SEO is the best WordPress SEO plugin on the market and helps your anonymous website get more traffic from search engines.
  • SeedProd is a powerful WordPress page builder that allows you to use a drag-and-drop interface to create any type of page for your website.
  • MonsterInsights is the best WordPress Google Analytics plugin which helps you see where your visitors and coming from and what they see on your website.
  • OptinMonster is a conversion optimization software, which helps you convert website visitors into email subscribers and customers.
  • WPForms is the best WordPress contact form plugin and allows you to easily create forms for your website.

That’s just a start. You can learn how to add plenty of other features to your blog by checking out our list of useful tools to manage and grow your WordPress blog.

Monetizing Your WordPress Blog

WordPress is the largest publishing platform on the planet, and it powers over 43% of all websites. Many bloggers have successfully monetized their blogs, and you can too.

That’s why we put together a detailed list of proven ways you can make money online blogging with WordPress.

Unlike other articles on how to make money online, this is a comprehensive guide on how to make money at home legitimately, using blogging and WordPress.

Many of these methods require some investment of time and money to get started. As long as you’re willing to put in the effort, you’ll reap the reward.

Here are some of the main strategies we cover:

We hope this tutorial helped you learn why you should start with a blog instead of a YouTube channel. You may also want to learn how to create an email newsletter the right way, or check out our list of the best YouTube video gallery plugins for WordPress.

If you liked this article, then please subscribe to our YouTube Channel for WordPress video tutorials. You can also find us on Twitter and Facebook.

The post Should You Start a Blog or a YouTube Channel? (Beginner’s Guide) first appeared on WPBeginner.