Category Archives: uncanny automator

14 Best Ways to Use OpenAI on Your WordPress Website

Are you wondering how to use OpenAI and ChatGPT on your WordPress website?

OpenAI can help with everything from generating meta descriptions for your posts to writing email sales copy. You can use OpenAI on your WordPress site to save time, cut costs, improve your SEO and workflows, and grow your business!

In this article, we will show you 14 of the best ways to use OpenAI on your WordPress website.

The best ways to use OpenAI on your WordPress website

A (Brief) Introduction to OpenAI

You have probably heard the terms “OpenAI” and “ChatGPT” used interchangeably, but they’re not exactly the same.

OpenAI is the research laboratory (read: a group of very smart people) behind the chatbot ChatGPT and the deep-learning, image-generating model DALL-E 2, among other AI-powered products.

OpenAI homepage

The team over at OpenAI created ChatGPT which is an AI assistant to help streamline your workflows and save you time.

It can write email newsletters for you, suggest blog post ideas, do keyword research, automate your workflows, and so much more.

To improve your WordPress website workflows with artificial intelligence, you will first need to create an account with OpenAI. Getting signed up is FREE. All you will need is an email and a password.

We also recommend reading our guide on the best ChatGPT prompts for bloggers, marketers, and social media, so that you can interact with the program more easily.

With that in mind, let’s look at 14 ways to use OpenAI on your WordPress website.

1. Generate Titles and Meta Descriptions with AIOSEO

All in One SEO (AIOSEO) is the best SEO plugin for WordPress, and it just got an AI-powered boost. After adding your keywords to your blog posts, let AIOSEO and OpenAI further optimize your content for search engines.

The first step is installing AIOSEO. Please see our guide on how to install WordPress plugins.

Then, from within the WordPress post editor, you can tell OpenAI to generate titles and meta descriptions that best fit your content with the click of a button.

Simply go to the ‘AIOSEO Settings’ at the bottom of your page and find the ‘Post Title’ box.

The AIOSEO OpenAI post title generator
Next, you need to click on the robot icon. If you hover your mouse over it, you will be able to see a ‘Use AI Generator’ message.

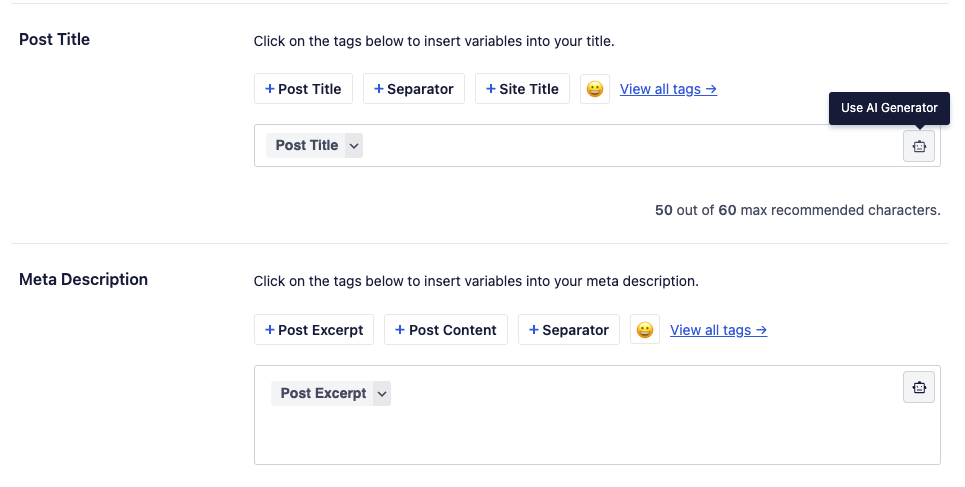
Now, you can see 5 post title suggestions. Simply click on the ‘+’ icon next to one to use it for your post.

AIOSEO OpenAi SEO post title suggestions

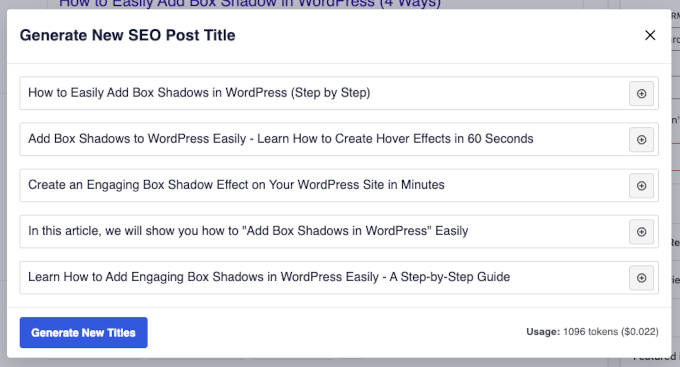
If you don’t like any of the suggestions, you can also click ‘Generate New Titles’ to see new ones.

Then, simply repeat the same steps by clicking on the robot icon in the ‘Meta Description’ box. AIOSEO will then suggest a few meta descriptions for your post.

Plus, connecting your OpenAI account to your AIOSEO account is as easy as copying and pasting an API key. You can check out AIOSEO’s documentation for more details.

2. Generate Ad Copy and Product Descriptions

Due to GPT-3’s talent for SEO, it is probably no surprise that it can handle more of your content creation needs. You can use OpenAI to create short, effective ad copy that matches your brand or long-form product descriptions for your WooCommerce store.

For example, we prompted ChatGPT to describe the need for running shoes using the “problem-agitate-solve” framework.

Creating a product description with ChatGPT

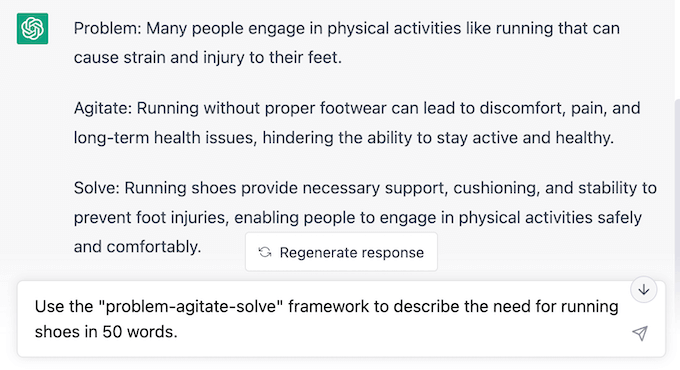
Simply edit the text to match your preferred sentence structure, include your keywords, throw in some on-brand and product-specific language, and then watch your sales increase!

3. Generate Blog Post Ideas

If you are anything like us, then coming up with content ideas for your WordPress blog can be time consuming. Fortunately, OpenAI runs on one of the world’s most powerful supercomputers.

So, you can ask it to come up with ideas for new content on your blog.

In our previous examples, we used OpenAI to help with tasks by inputting prompts directly into ChatGPT.

In our next few examples, we will look at how to integrate OpenAI directly into your WordPress workflow, truly leveraging the power of automation and AI to save time and resources.

Uncanny Automator is one of the best automation plugins for WordPress, and it enables you to connect OpenAI to your WordPress site in many useful and interesting ways.

For this example, we will use OpenAI with Uncanny Automator to generate ideas for new content based on a user’s form submission. Then, we will automatically send OpenAI’s response to your content management spreadsheet or database, like Google Sheets or Airtable, for the whole team to access.

If you don’t already have Uncanny Automator, you can download the Automator plugin for FREE to try on your WordPress site.

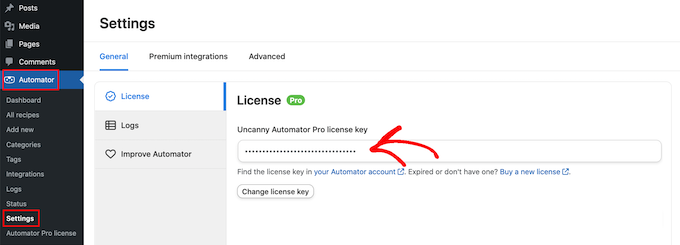
Once you have downloaded Automator, you will need to connect Automator to OpenAI. Then we will build the automation recipe below.

Automator and OpenAI content ideation recipe

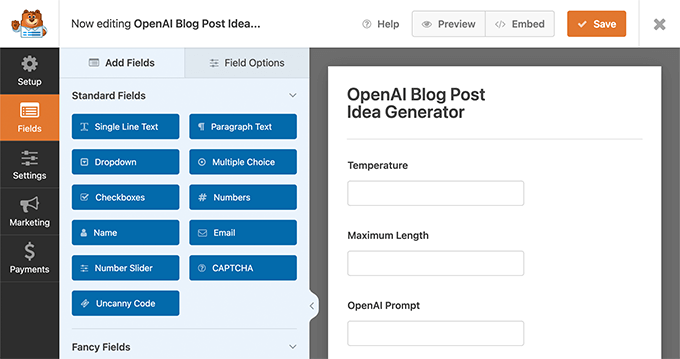
First, you need to create a new form using a contact form plugin like WPForms. From your WordPress admin sidebar, navigate to WPForms » Add New.

Then, create a new contact form and make sure to add two number fields labeled ‘Temperature’ and ‘Maximum length’, and one single line text field labeled ‘Open AI Prompt’.

WPForms OpenAI prompt

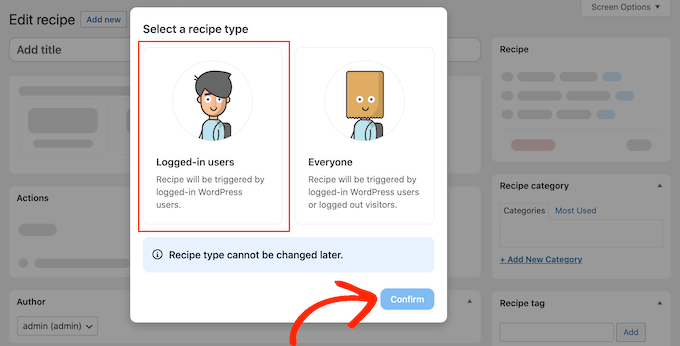
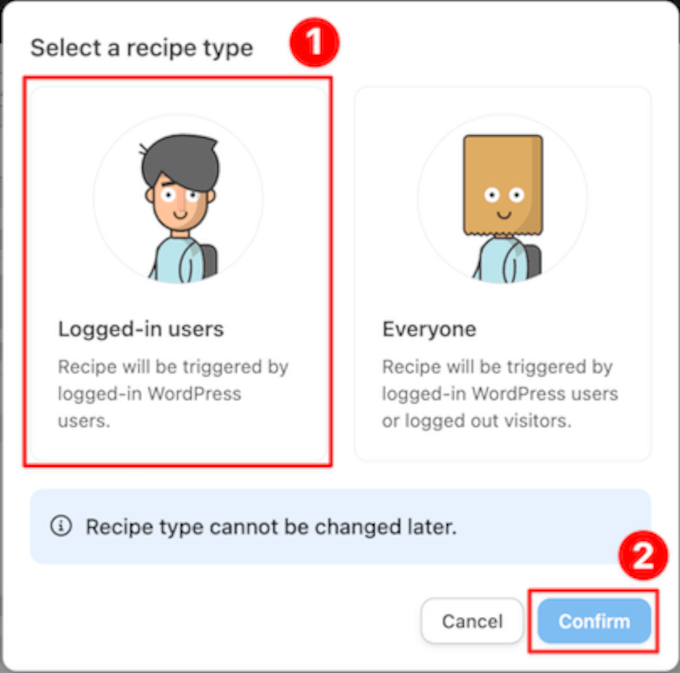
Now, you must head to Automator » Add New. In the pop-up window that appears, simply select ‘Logged-in users’, followed by ‘Confirm’.

Automator logged-in recipe

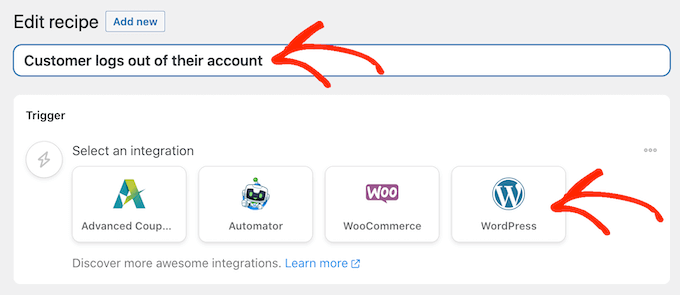
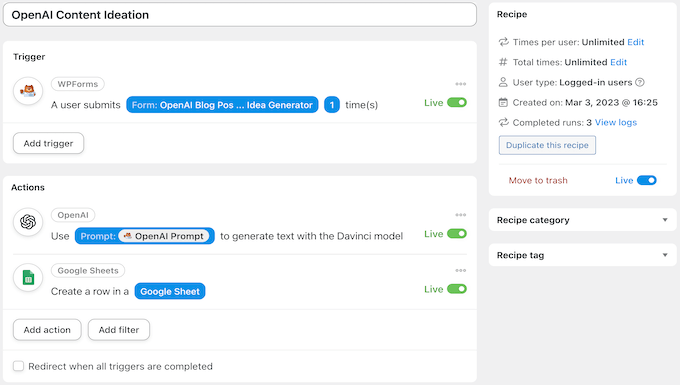
Next, give your new recipe a title that makes it easy to recognize. For example, we have named our recipe ‘OpenAI Content Ideation’.

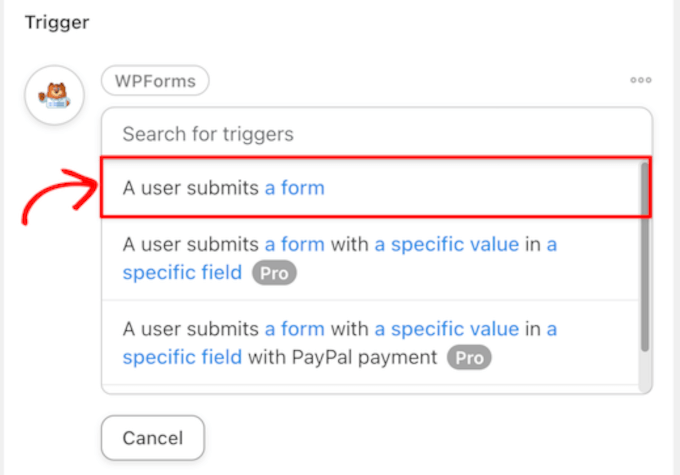
In the ‘Triggers’ panel, you need to select ‘WPForms’. From the drop-down list that appears, select ‘A user submits a form’ and choose the WPForms form that you just made. When you are finished, just click ‘Save’.

WPForms Automator trigger

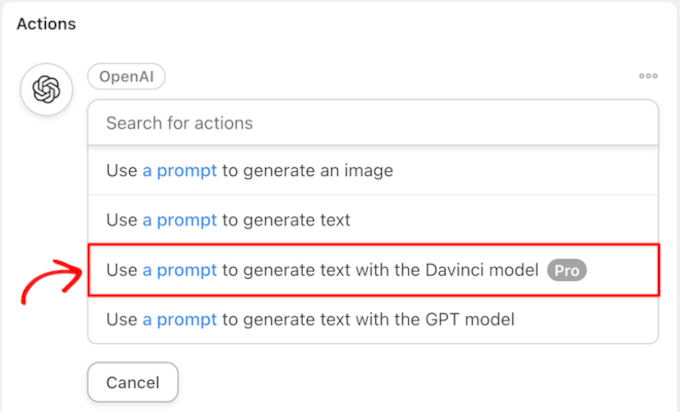
After that, in the ‘Actions’ panel, you have to select ‘OpenAI’.

From the drop-down list that appears, choose ‘Use a prompt to generate text with the Davinci model’.

Use a prompt to generate text with the Davinci model

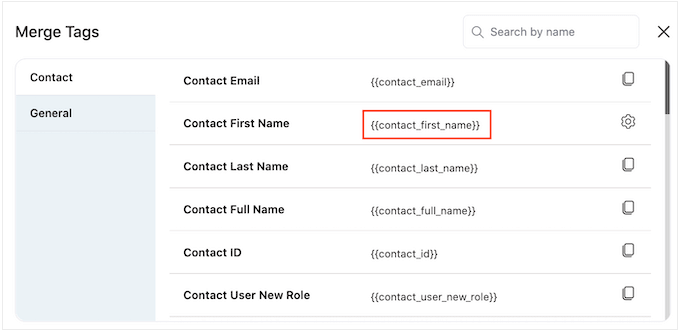
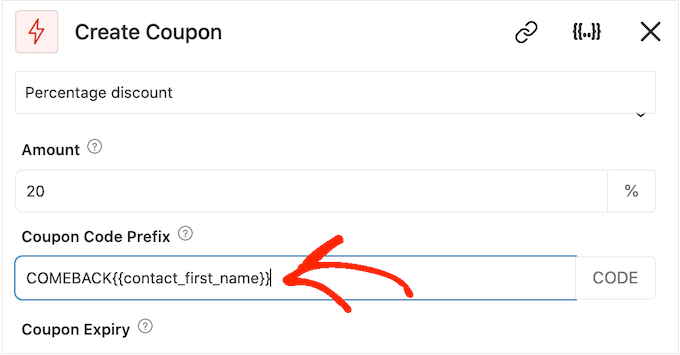
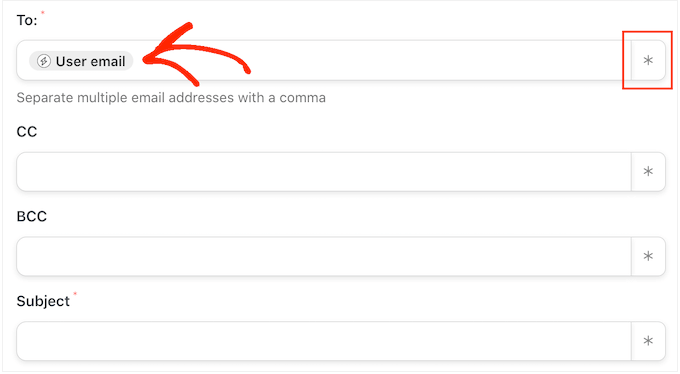
In the Actions section, map the fields from the WPForms form to the Temperature, Length, and Prompt fields in the OpenAI action.

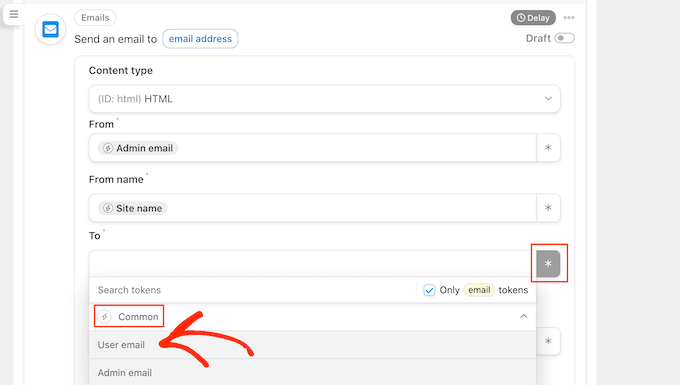
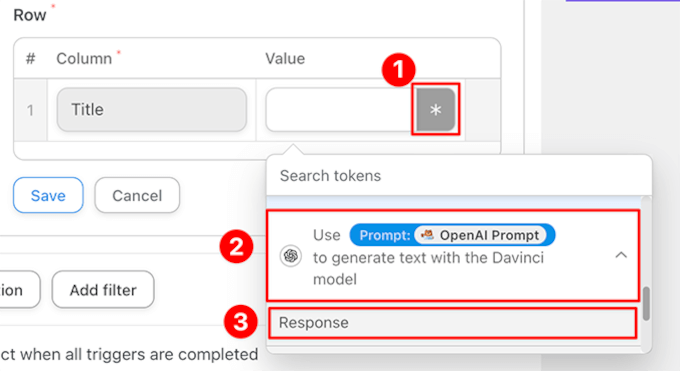
To do this, click the ‘*’ icon to the right of each field to choose the correct token associated with the trigger.

How to use WPForms tokens with OpenAI prompts using Automator

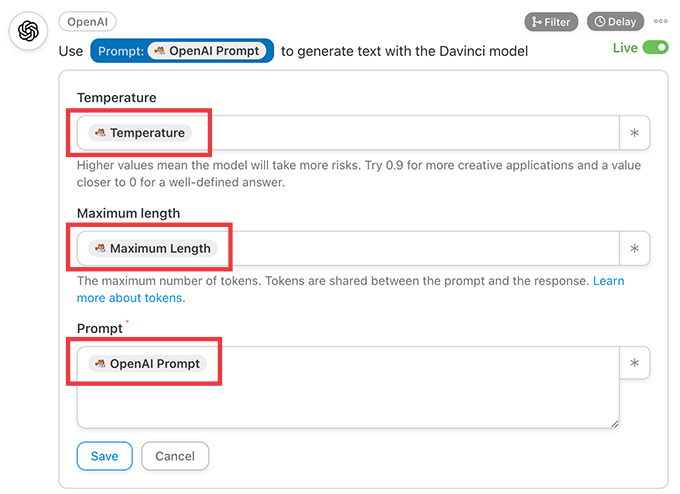
When you are finished, simply click Save.

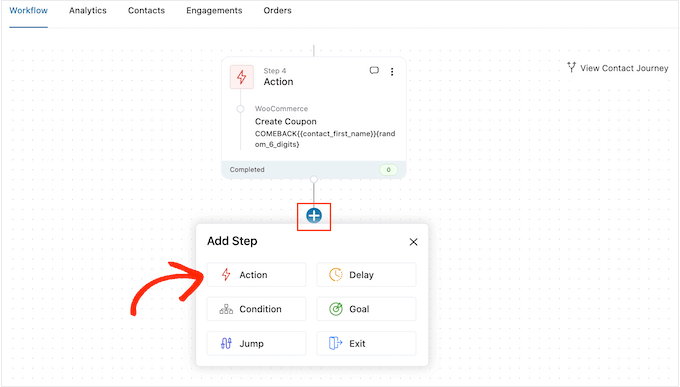
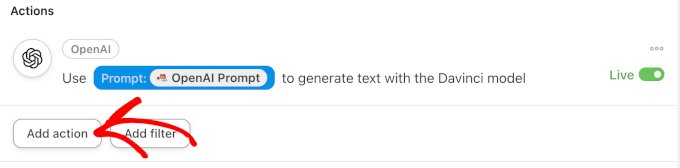
To send the blog post ideas to an external spreadsheet, you will need to add a second Action. To do this, click ‘Add action’ in the ‘Actions’ panel.

Add recipe action with Automator

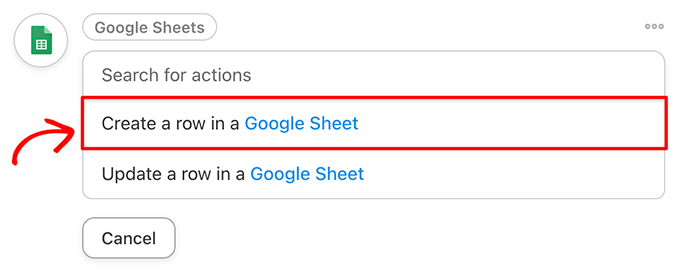
From the menu of available integrations, simply choose Google Sheets.

Then, from the drop-down list, select ‘Create a row in a Google Sheet’.

Create a row in a Google Sheet with OpenAI

In the editor, you must select your content management spreadsheet. Then, click ‘Get columns’ and add the OpenAI Response token to the appropriate column(s).

Make sure to click ‘Save’ when you are done.

Add response token to Automator recipe

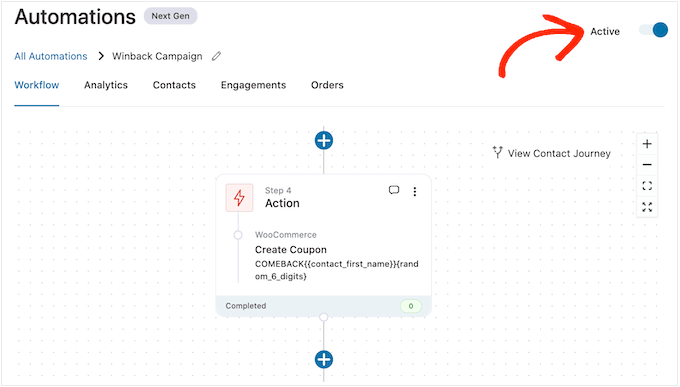
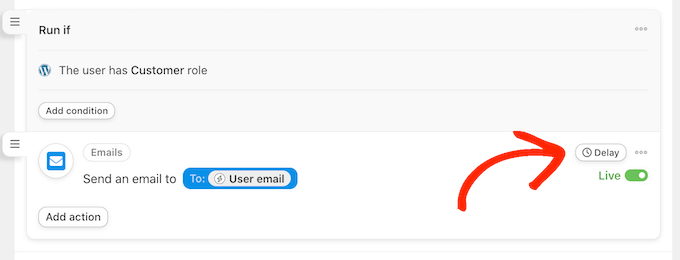
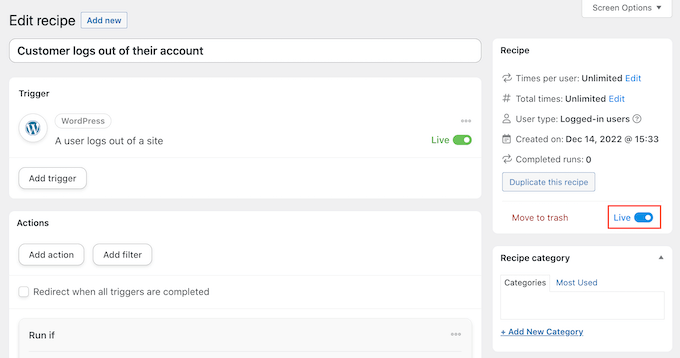
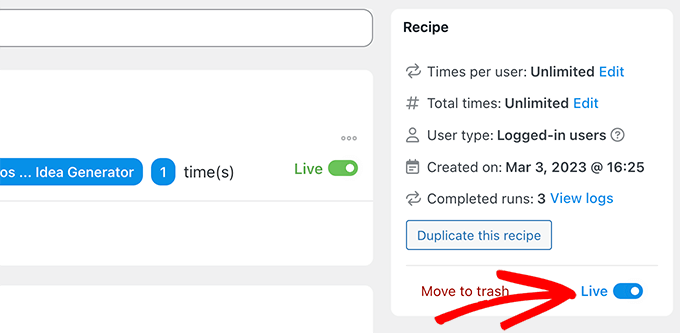
Finally, in the top right corner, toggle your recipe from ‘Draft’ to ‘Live.’

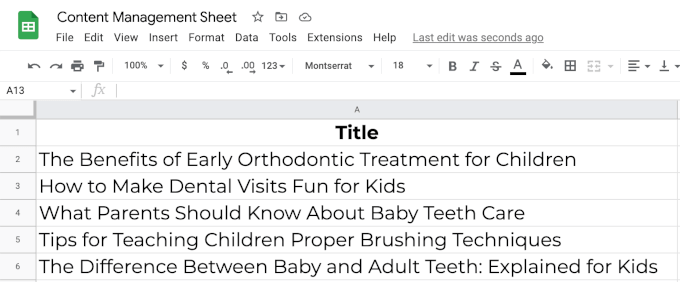
Now, whenever you enter information into your blog post idea generator form, Automator will tell OpenAI to suggest new content ideas and send them to your Google Sheets spreadsheet.

Make the Automator recipe live.

In our example, we entered “Give me 5 fun blog posts on pediatric dentistry” into the WPForms form.

Then, OpenAI generated a response, and Automator added it to the worksheet in the recipe.

OpenAI topic ideas

4. Perform Sentiment Analysis

There is no way of knowing if AI has any feelings of its own. If we had to guess, we would say that it probably doesn’t. At least, not yet. But that doesn’t mean that it cannot understand human emotions.

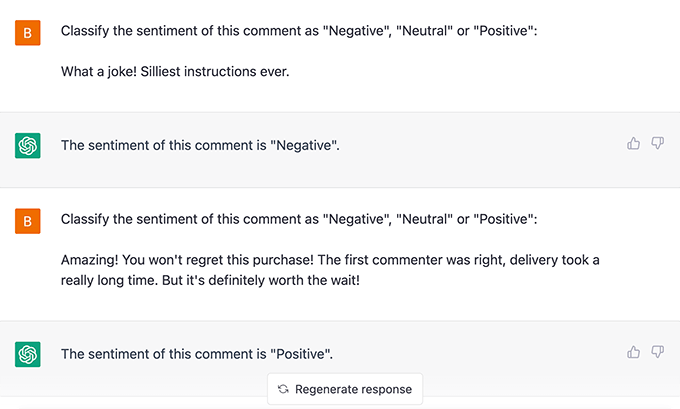
You can use OpenAI to perform sentiment analysis by asking it to interpret the mood of your customers’ feedback.

OpenAI sentiment analysis

But how can you use this with your WordPress website?

Maybe your contact forms are connected to a help desk plugin, and you want to assign priority based on the message urgency.

Alternatively, maybe you want to automatically approve positive blog comments. You could even quickly identify negative feedback in surveys powered by your favorite WordPress form plugin.

In both cases, you will be able to address negative feedback quicker, keep your customers happier, and improve your online reputation.

5. Automate Customer Support with Intelligent Sentiment Analysis

Now that you know how to use OpenAI to perform sentiment analysis, you can easily add it to your workflows. By combining OpenAI’s emotional intelligence with Uncanny Automator’s efficiency, you will be able to create a seamless customer support system.

For this example, you will need the pro version of Uncanny Automator so that you can add conditional actions to the automation.

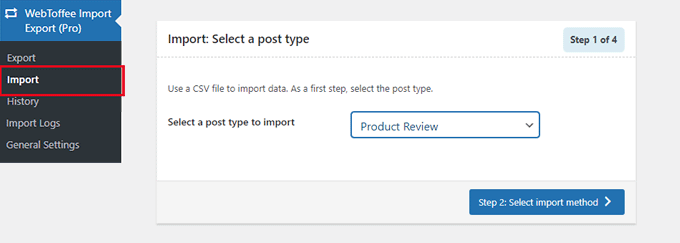
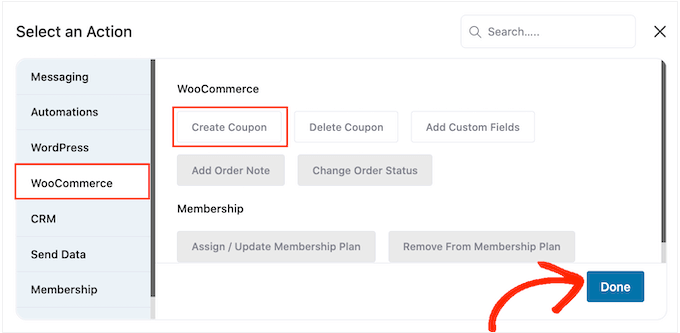
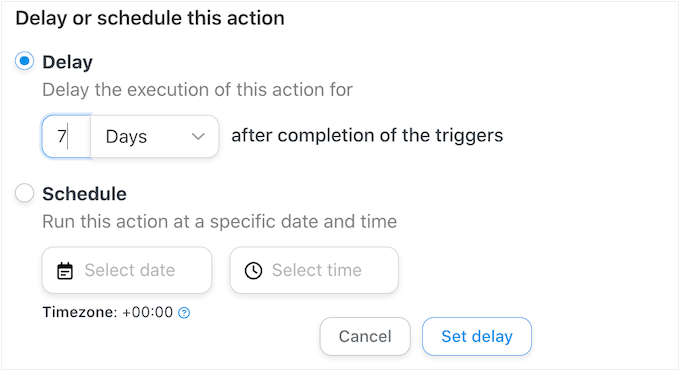
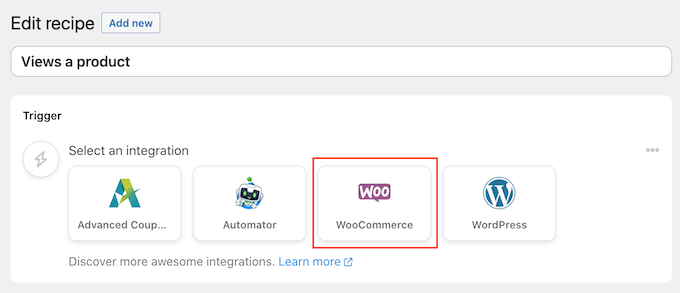
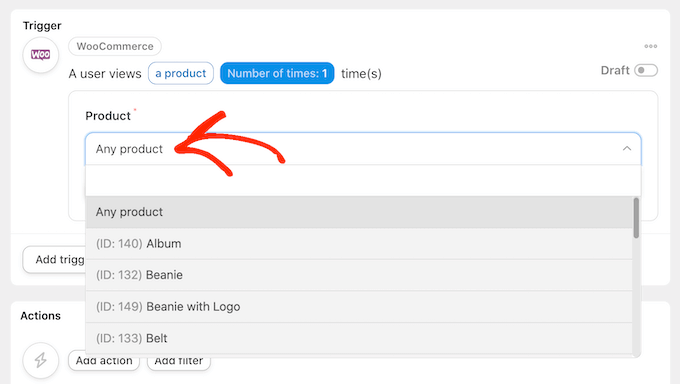
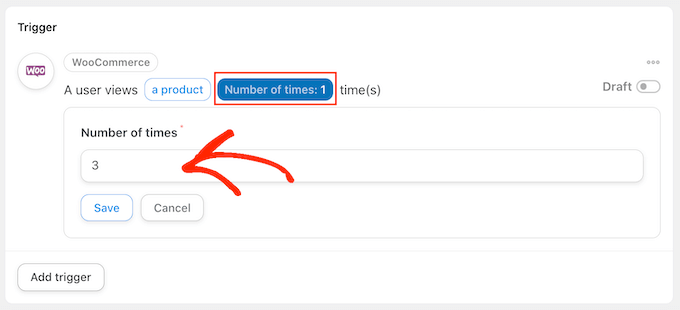
Let’s put together an Automator recipe that creates tickets in our customer support plugin whenever a customer reviews a product.

First, we have OpenAI perform sentiment analysis on the reviews as they come in.

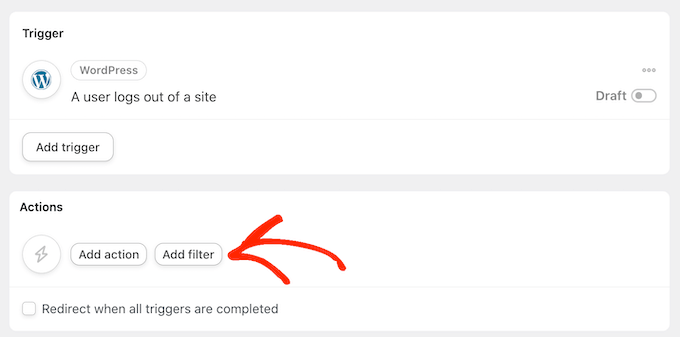
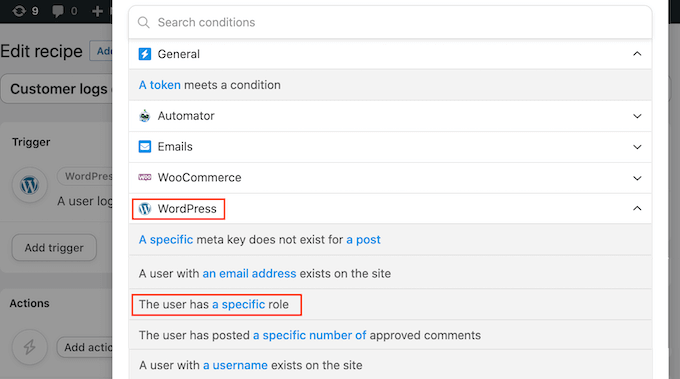
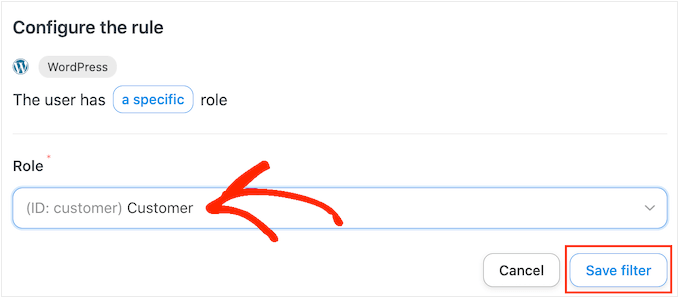
Then, using Automator’s Filters feature, we create tasks with different priority levels based on OpenAI’s assessment of the customer’s sentiment.

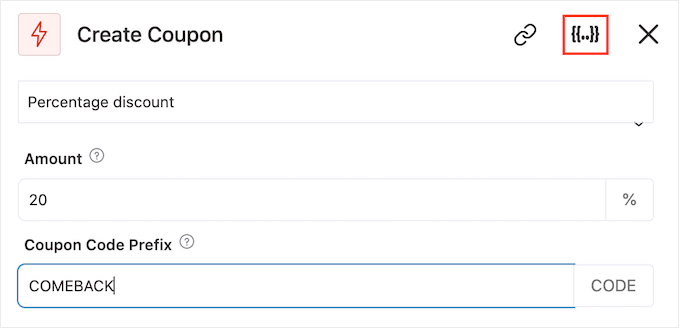
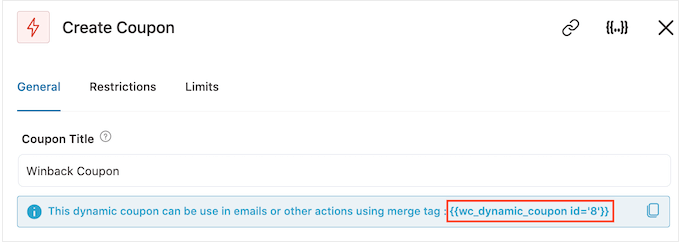
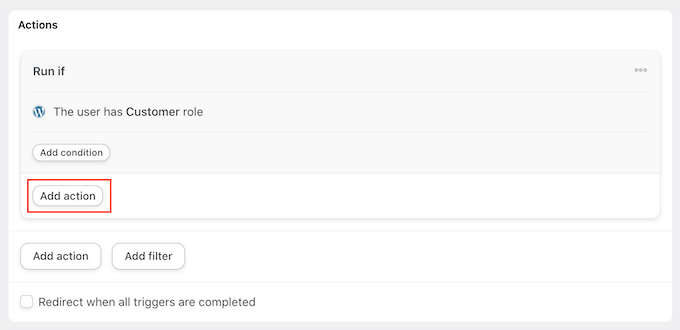
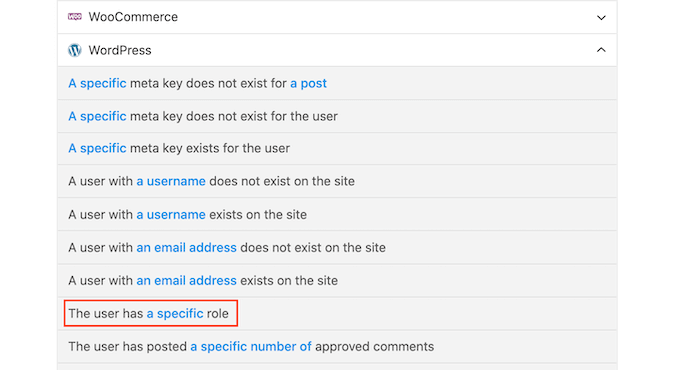
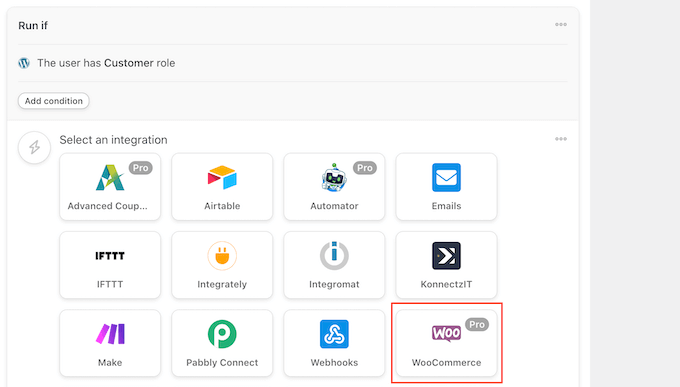
In this recipe, if OpenAI decides that a new WooCommerce product review is negative, then it creates a new help desk ticket in FluentCRM and adds an Urgent tag.

How to tag a negative support ticket with OpenAI and Automator

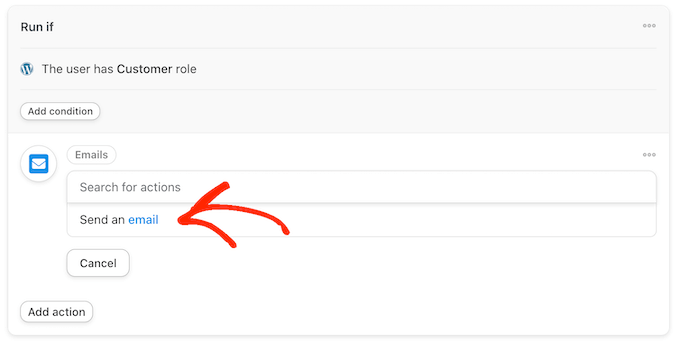
If you are ready to take things to the next level, you could even use the submission to create a draft reply for the ticket.

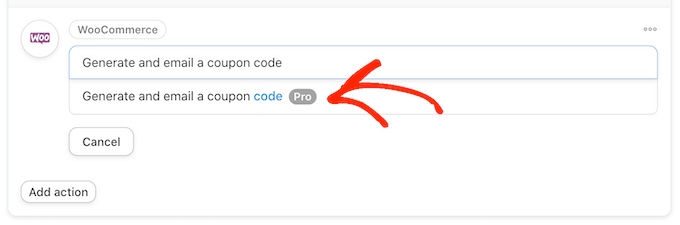
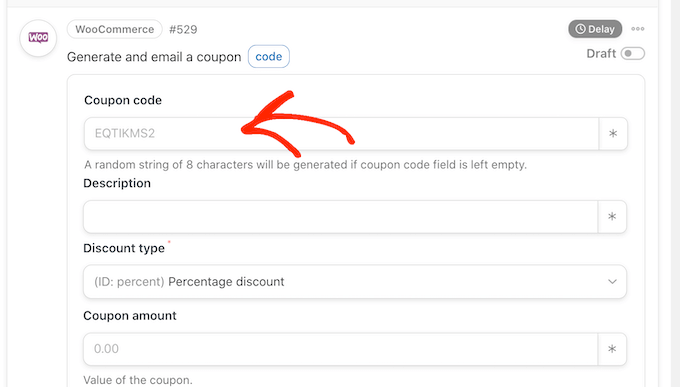
Just add an extra OpenAI action to generate a draft reply, then include that response as the ticket draft.

This works best with the GPT-3.5-Turbo model because you can use Automator to also send context. For example, you can tell it to answer the prompt as a helpful support agent from your website.

6. Create Event Summaries, Recap Podcast Episodes, and Take Meeting Minutes

Running special events on your WordPress website is easy with WordPress calendar plugins. Unfortunately, not every customer of yours can save the date.

After all, we cannot do everything and be everywhere all at once, but OpenAI can.

If your customers missed the big day, OpenAI can create event summaries for you. You can even choose the length and format of the summary you want OpenAI to make.

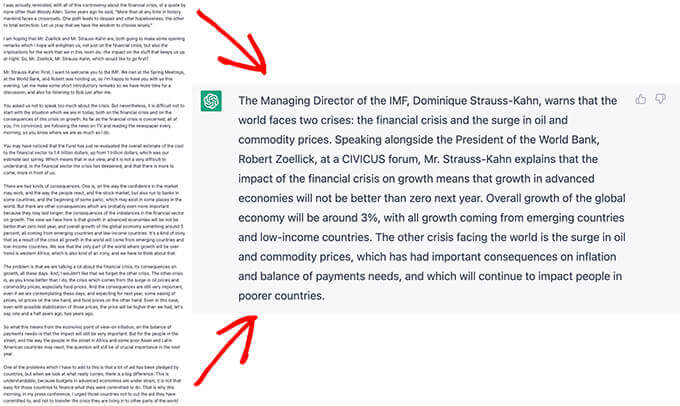
For example, we asked ChatGPT to create a 100-word summary of an October 2008 IMF town hall. In less than one minute, ChatGPT turned the 1,500-word opening remarks into a 100-word summary.

ChatGPT text summary

Alternatively, maybe you are trying to grow your podcast audience. To help your listeners who don’t have two hours a day to consume media, you can use OpenAI to recap your podcast episodes, hitting all of the highlights.

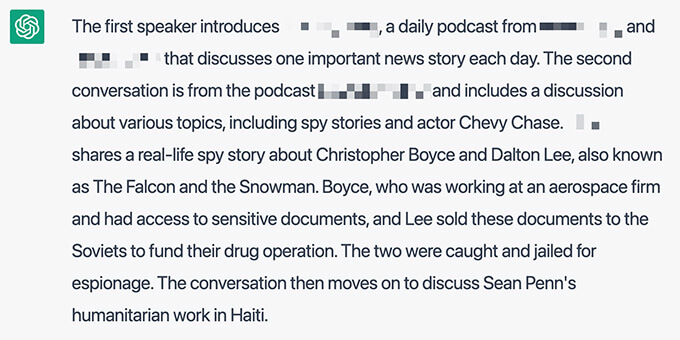
Using transcripts, we asked ChatGPT to summarize the first 15 minutes of a popular podcast.

Podcast summary from OpenAI

Finally, some conference call tools, like Zoom and Google Meet, allow users to record their meetings with audio transcripts. You can then feed those transcripts into OpenAI and create meeting summaries in just a few seconds.

7. Draft Blog Posts (and Seamlessly Integrate Them Into Your Workflows)

For content writers (including us), few things are more stressful than a blank page. Thankfully, artificial intelligence is the sledgehammer that can break through any writer’s block.

Using one of our blog post ideas from our previous recipe, we told OpenAI to draft a blog post for us.

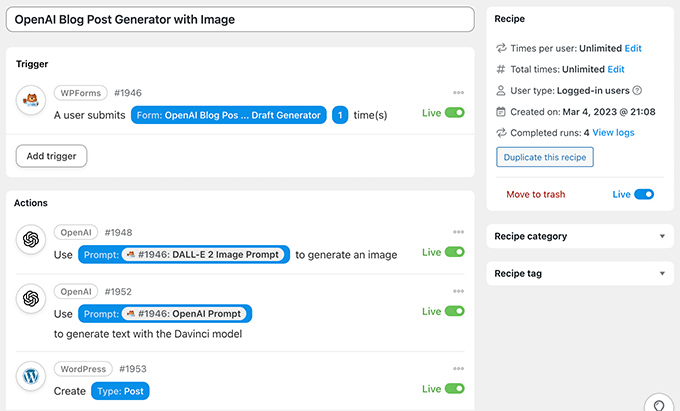
In this Automator recipe, a form submission (the trigger) tells OpenAI to draft a new blog post. Then, it messages the writer in Slack to let them know the draft is ready for them.

Generate a post with OpenAI

From your WordPress admin sidebar, simply go to WPForms » Add New.

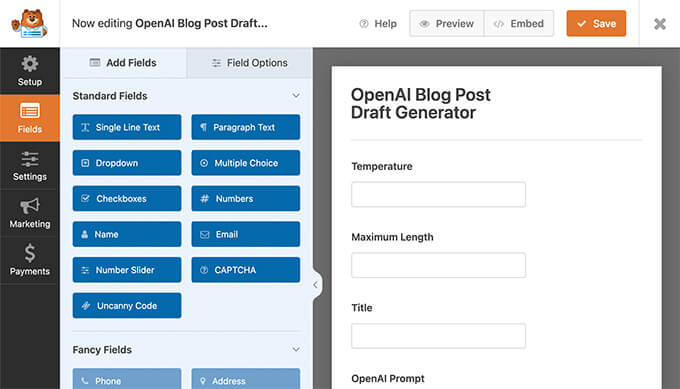
Then, create a new form with at least two number fields labeled ‘Temperature’ and ‘Maximum length.’ You will also need two single-line text fields labeled ‘Title’ and ‘Open AI Prompt’.

WPForms OpenAI blog post draft

Next, you must go to Automator » Add New. In the pop-up window that appears, select ‘Logged-in users’. Then, simply give your new recipe a title like ‘OpenAI Blog Post Draft’.

In the ‘Triggers’ panel, you need to select ‘WPForms’ From the drop-down list that appears, you must choose ‘A user submits a form’ and pick the form you just created.

OpenAI blog post generator

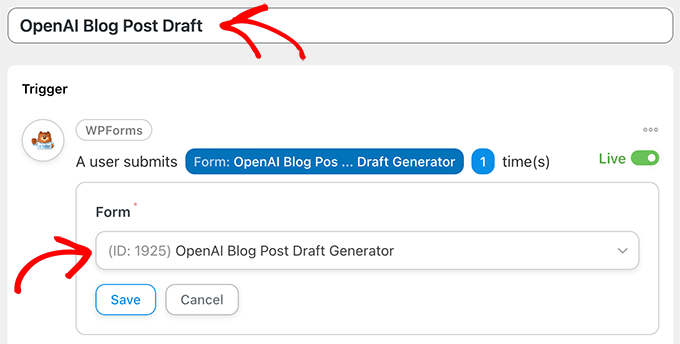
When you are finished, make sure to click ‘Save’.

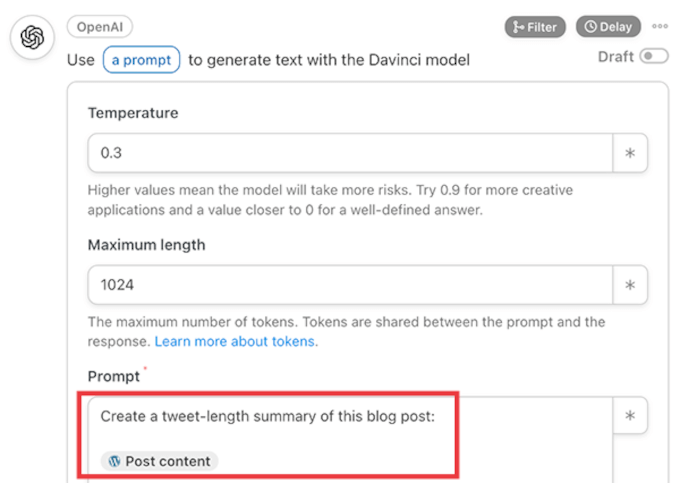
Moving on, in the ‘Actions’ panel, you must select ‘OpenAI’. From the drop-down list that appears, choose ‘Use a prompt to generate text with the Davinci model’.

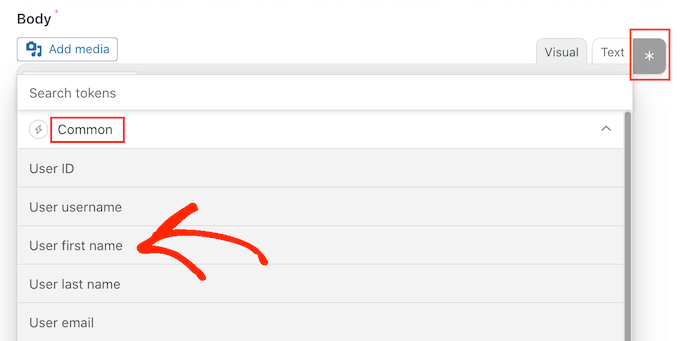
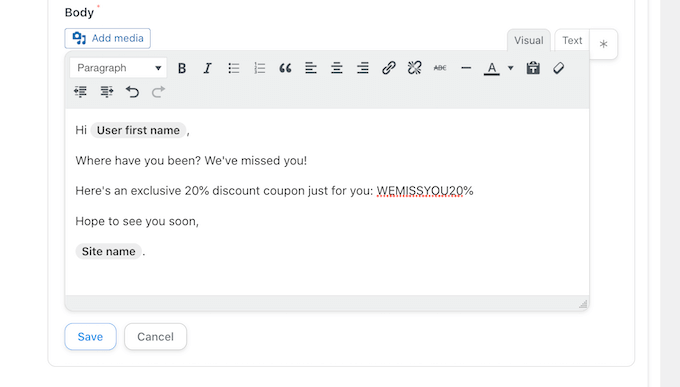
In the editor, fill in the fields using the tokens from your form’s fields that match the fields in the editor. When you are finished, just click ‘Save.’

How to use WPForms tokens with OpenAI prompts using Automator

Now, it is time to set up an automatic blog post that will be created with the OpenAI content.

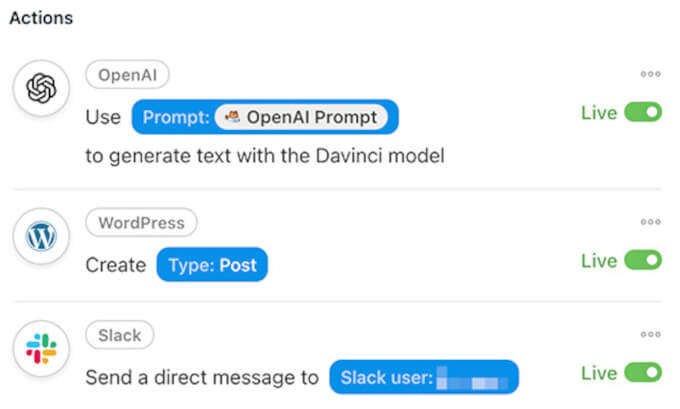
In the ‘Actions’ panel, simply click ‘Add action’. Then, from the menu of available integrations, select ‘WordPress’.

Automator WordPress integration

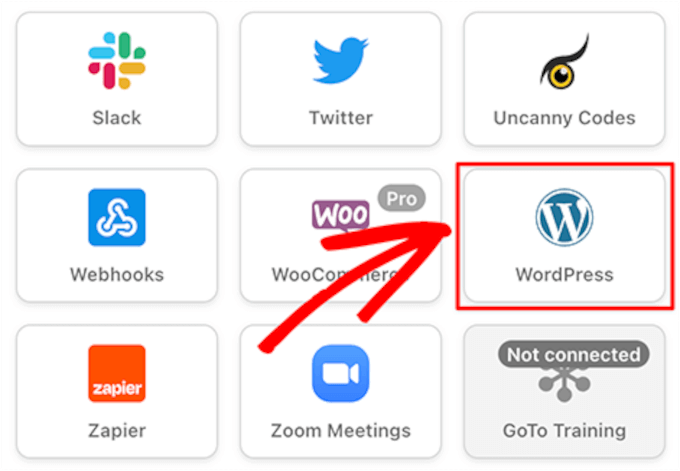
Next, from the drop-down list, hit ‘Create a post’. In the editor, you must fill in the ‘Title’ field with the Title token from your form and enter the OpenAI Response token into the ‘Content’ field.

Then, make sure to click ‘Save’.

Create a post using Automator and OpenAI

Optional: You can also add a ClickUp action to your recipe to create a task with the post URL in the description.

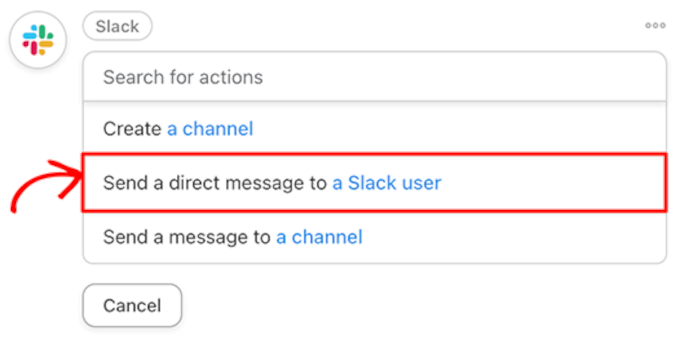
Additionally, you can include a Slack action to notify your content writer that a new task and draft post is waiting for their review.

Send a direct message to a Slack user

Finally, in the top right corner, toggle your recipe from ‘Draft’ to ‘Live’.

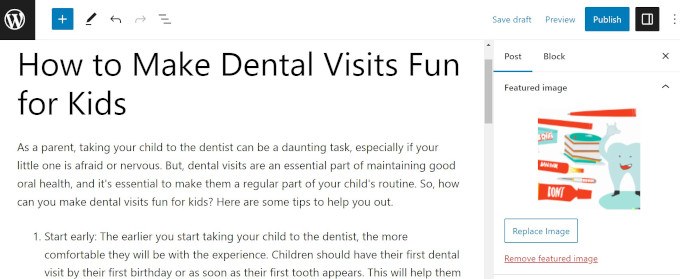
In our WPForms form, we then asked OpenAI to ‘Write a casual blog post on three ways to make dental visits fun for kids.’

And here is the draft that Automator created with OpenAI’s response.

OpenAI blog post

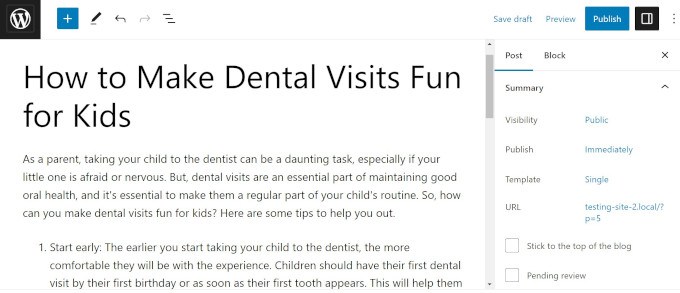
We call that the anti- writer’s block recipe! You can also use AI to generate your SEO title, write a meta description, and even set up a featured image.

8. Draft Emails in Minutes

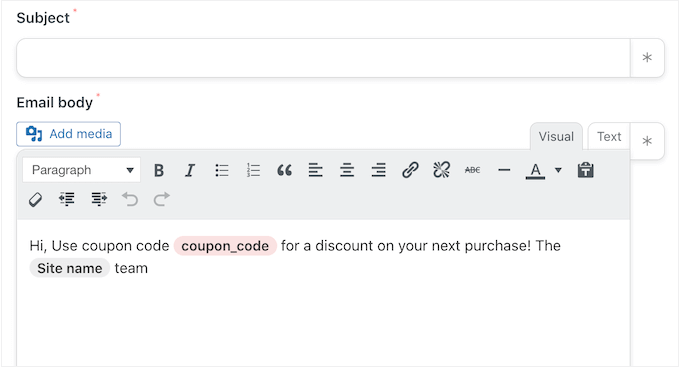
Writing carefully-worded emails takes time. Unless, of course, OpenAI is writing them for you.

Whether you are sending out an internal notice, responding to a customer’s questions, or reaching out to prospective clients, OpenAI can draft your email in seconds. After that, it is just a matter of proofreading and including specific information.

We prompted ChatGPT to “write a 300-word marketing email promoting a Black Friday sale on limited edition clothing.” Less than 30 seconds later, we had an email that we could easily customize to suit our branding and needs.

ChatGPT Black Friday marketing email

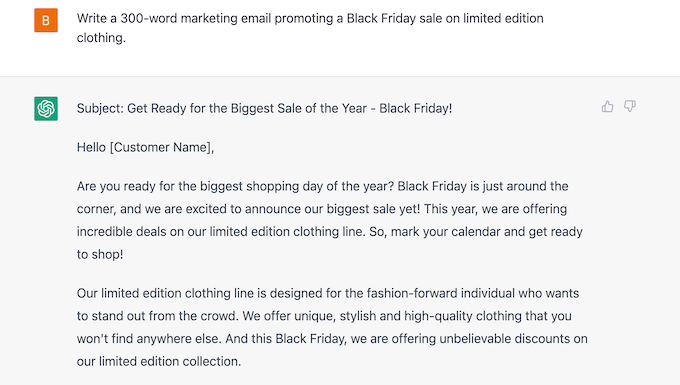
If you pair OpenAI with customer relationship management (CRM) apps, you will be drafting emails faster than your SMTP server can send them!

9. Create Blog Post Summaries for Social Media

Promoting your blog posts on social media is important. However, sometimes, writing the appropriate character-length tweets and captions can be even more challenging than creating a whole article.

With OpenAI and Automator, you won’t have to stress about the perfect hashtags.

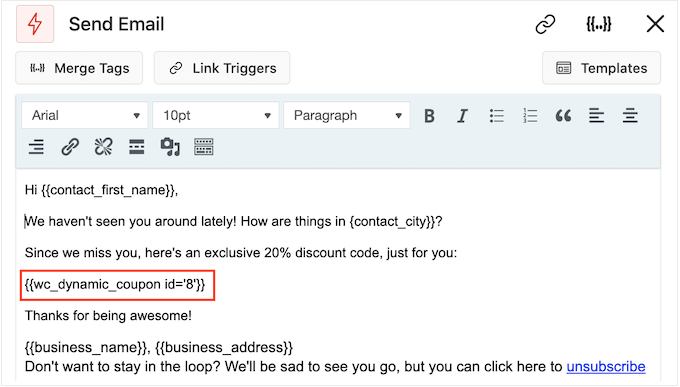
Here is an example of an action that takes a new blog post and sends it to OpenAI to generate a summary that can be shared on Twitter:

Create a post summary for Twitter

Automator will send that summary, complete with hashtags, to our WhatsApp account. There, we can review, edit, copy, and then paste the content into our social media accounts when we are ready to publish it.

For a post on connecting ChatGPT to LearnDash, OpenAI wrote this summary:

Embrace the robot revolution and use OpenAI and LearnDash to create the e-learning platform of your dreams. #AI revolution is here! Harness the power of AI for your #elearning platform w/ OpenAI & ChatGPT models. Automate content creation, create course outlines & answer students’ questions. Save time & money w/ Uncanny Automator! #LearnDash #NolejAI #RobotRevolution.

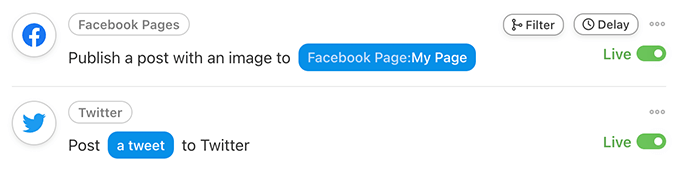
You could even extend your recipe to make Automator post the summary straight to Twitter, Facebook, LinkedIn, and more.

OpenAI social sharing

10. Generate AI Images for Your Posts or Landing Pages

Are you tired of scrolling through stock photography databases trying to find the perfect image for your blog post? Or finding a picture and then realizing that every other article with your keywords is using the same image?

Fortunately, OpenAI’s image generator DALL-E 2 can create original images from descriptive plain text.

OpenAI’s Content Policy and Terms give you all of the rights to the images that you create with DALL-E 2, “including the right to reprint, sell, and merchandise.”

Using our original WPForms form with an added field for an image prompt, we used Automator to create a draft blog post complete with a featured image.

Generate AI images with Automator

Here is that same blog post about dental visits with a featured image created by DALL-E.

As you can see, it has a fun graphic with a tooth, toothpaste, and different toothbrushes.

To make the process even easier, whenever you tell DALL-E to create an image using Uncanny Automator, Automator will add the image to your WordPress media library, with no hotlinking necessary.

11. Create Course Outlines in Your LMS

OpenAI is smart. After all, “intelligence” is in the name.

With Uncanny Automator and a learning management system (LMS) like LearnDash, you can be just as smart as AI. Or, at least, you can create outlines for courses that will make you as smart as AI (if you do your assigned reading).

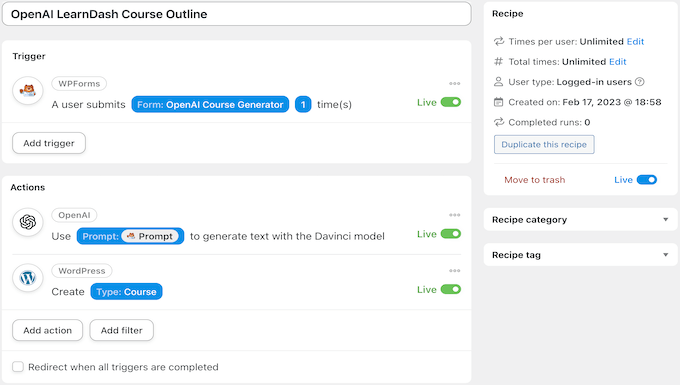
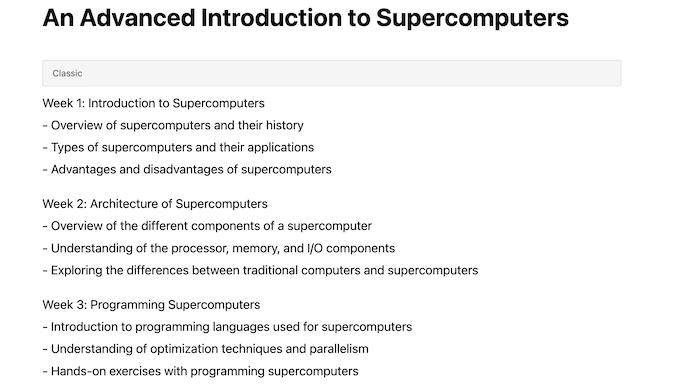
We asked OpenAI to create an advanced 8-week course outline on supercomputers, which, funnily enough, is kind of like an OpenAI autobiography.

OpenAI course outline

Once you have your course outline, don’t forget to use AIOSEO’s OpenAI integration to write your meta description.

12. Create Lessons in Your LMS

Using a similar Uncanny Automator recipe to the previous one, you can easily fill in the course outline that you created with OpenAI-generated content.

Automator recipe for an OpenAI lesson

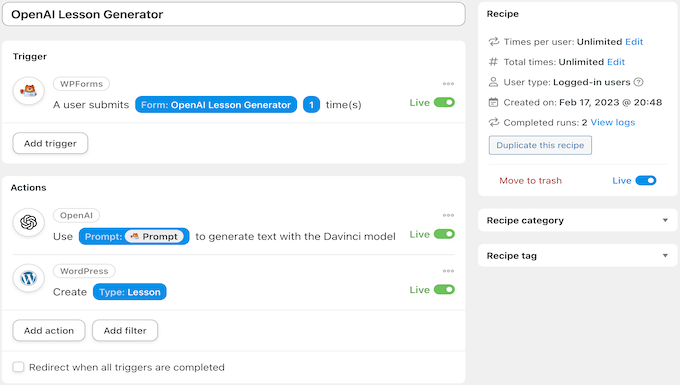
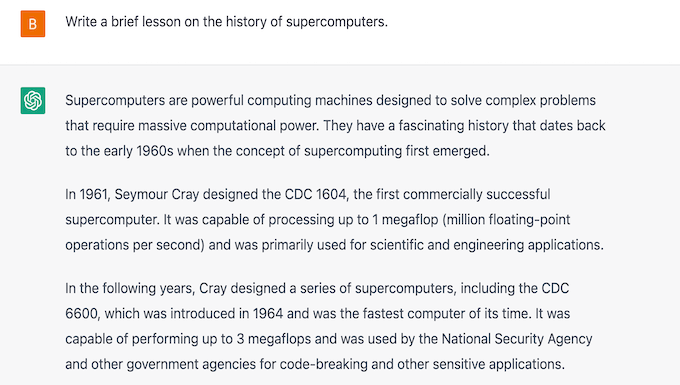
We used OpenAI’s response from our previous recipe to help us create this lesson.

Here is the first part of it.

ChatGPT lesson on supercomputers

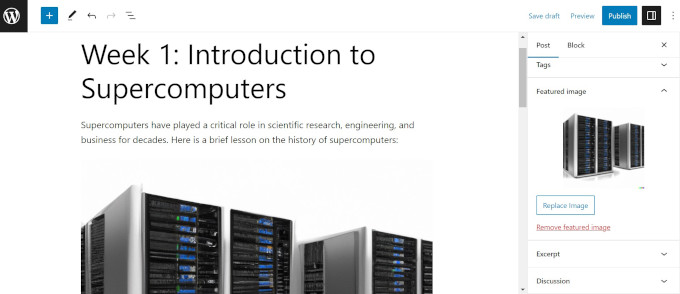
With the right prompts, you can also create a recipe that generates unique images for your lessons and uploads them automatically to your WordPress media library.

Using Automator tokens, you can also set your new DALL-E 2 generated image as the featured image for your lesson or include it somewhere in the lesson itself.

OpenAI supercomputer lesson with DALL-E image

13. Create a Chatbot

As a natural language processor, OpenAI loves to talk. You can use this feature to communicate with customers in your online store or business website.

This can help you target users who are having problems on your site or want to learn more about your products and services.

With the right recipe, you can actually turn OpenAI into a chatbot on your WordPress website. You can read this guide on how to create an AI-powered chatbot with OpenAI and Automator.

14. Have Fun! Write Short Stories, Poems or Cook Up Recipes

Once you have fully integrated OpenAI and Uncanny Automator into your workflows, you will have enough time to do the things that really matter like growing your business or spending more quality time with family.

Playing around with OpenAI and trying out new things is a great way to learn how to create better prompts that get the results you are looking for, so you can continue to save time and optimize your workflows.

OpenAI and WordPress plugin development are in the super early stages right now, and there is so much more in the works. We will be sharing more details and updates in this guide in the coming months.

We hope this article helped you find some ways to use OpenAI on your WordPress website. You may also want to see our guide on the best AI chatbots software for your website, or how to create an email newsletter to connect with visitors after they leave your website.

If you liked this article, then please subscribe to our YouTube Channel for WordPress video tutorials. You can also find us on Twitter and Facebook.

The post 14 Best Ways to Use OpenAI on Your WordPress Website first appeared on WPBeginner.

How to Import & Export WooCommerce Products with Images

Do you want to import and export WooCommerce products with images?

Importing or exporting WooCommerce products with images allows you to easily move your store or add new products in multiple stores.

In this article, we will show you how to easily import and export WooCommerce products with images.

How to Import & Export WooCommerce Products with Images

Why Import & Export WooCommerce Products?

Many users need to import and export WooCommerce products for a number of reasons.

  • You may want to move products from one WooCommerce store to another
  • You may want to start an online store with a new WordPress website but with the same WooCommerce products
  • You may want to move your website to a new server but need a better way to move products
  • You may want a faster way to add your products to multiple stores that you manage
  • and more

Now normally if you are moving your website to a new server, then you can just duplicate your entire website and set it up on your new host.

We have a complete step-by-step guide for that, see how to easily move WordPress to a new host or server.

On the other hand, if you only want to move products, then this tutorial will help you learn how to properly export and import WooCommerce products with images and other product data.

We’ll show you two methods, you can choose one that works best for you.

Method 1. Import & Export WooCommerce Products without a Plugin

WooCommerce comes with built-in functionality to easily import and export products with images, but without using any additional plugins.

First, you need to visit the Products » All Products page in your WordPress admin area. There, you will see two buttons at the top to ‘Import’ or ‘Export’ products.

Import export WooCommerce products

Let’s first check out how the export feature works.

Exporting WooCommerce Products without Using a Plugin

Simply click on the ‘Export’ button at the top to continue.

On the next screen, you’ll see a bunch of options to choose what data you want to export.

Default WooCommerce product export options

For instance, you can choose to only export certain columns from product data. You can also choose to export specific product types or products in specific categories.

To export all products with images and all other data, you can leave these options unchecked.

Optionally, you can check the ‘Export custom meta.’ If you are unsure, then it’s better to check it so that you have the data.

Go ahead and click on the ‘Generate CSV’ button to continue.

WooCommerce will now prepare a CSV file and download it to your computer.

What is a CSV File?

CSV is short for Comma Separated Values, and it is file type of plain text that separates different columns or fields of data with a comma.

You can open it with any spreadsheet software like Google Sheets or Microsoft Excel. Here is how it would look:

CSV file opened in spreadsheet software

Importing WooCommerce Products without Using a Plugin

Simply go to the Products » All Products page and click on the Import button at the top.

Import products

If your WooCommerce store is empty, then instead of the buttons at the top, you will see buttons at the center of the page.

Click on the ‘Start Import’ button to begin the import.

Start import

This will bring up the import wizard.

First, you need to click on the ‘Choose File’ button to select the WooCommerce export CSV file you downloaded earlier.

Choose import file

Click on the continue button to upload the CSV file.

WooCommerce will now check to see if your CSV file is in a compatible format. After that, it will ask you to map that data to existing WooCommerce product data.

Map columns

The default settings here will work for most WooCommerce stores.

However, you still need to review and if a column is missing, and then click on the drop-down menu next to it and select a matching field if available.

Particularly, if you are using variations attribute for products, then make sure to scroll down to the attributes columns and match fields.

Match attribute fields

This will allow you to ensure that the fields in your CSV file match the corresponding WooCommerce fields.

Click on the ‘Run’ the Importer button to begin.

WooCommerce will now start importing data from CSV file. It will also download any images attached to your products.

Products imported

Once finished, you can visit the Products » All Products page to see the imported products.

Make sure to visit your shop and product pages to check that everything is working as expected.

Method 2. Import & Export WooCommerce Products with a Plugin

For this method, we’ll be using a plugin to import and export WooCommerce products.

The advantage of this method is that it offers more flexible options and also allows you to export / import product reviews.

Plus, it allows you to import / export WooCommerce products in batches which comes in handy if you have a large store with many products and images.

Exporting WooCommerce Products with a Plugin

First, you need to install and activate the Product Import Export for WooCommerce plugin. For more details, see our step-by-step guide on how to install a WordPress plugin.

The plugin comes as three separate addons. You’ll need to download and install all of them.

Download plugins

Upon activation, you need to visit the Webtoffee Import Export (Pro) » Export page and select the ‘Product’ as the post type you want to export.

Exporting WooCommerce products using a plugin

On the next screen, you need to select an export method.

The default Quick Export method automatically selects all your products for export.

Quick export method

Optionally, you can also choose ‘Advanced Export’ which allows you to filter products by category, tag, and status.

You can also exclude individual products manually.

Advanced filtering options

Click on the Export button to continue and the plugin will start preparing your product data.

Once finished, you’ll be prompted to download the export file to your computer.

Download export file

Importing WooCommerce Products with a Plugin

Now that you have your export file ready, you can use it to import products on another WooCommerce store.

Simply install and activate the Product Import Export for WooCommerce plugin on the store where you need to import the products.

After that, go to the Webtoffee Import Export (Pro) » Import page and select ‘Product’ as the post type you want to import.

Import products using a plugin

Click on the ‘Step 2: Select import method’ button to continue.

Next, you need to select an import method and upload the exported file you downloaded earlier to your computer.

Import method

Click on the ‘Step 3: Map and Import Columns’ button to continue.

On the next screen, you’ll see a list of fields and the matching fields from your import file. If you see an empty field, you can choose a matching field for it in the next column.

If you are using product variations like sizes and colors, then make sure to click on the Attributes tab to match attribute fields.

Map fields

However, if you are not using any products with variations or custom attributes then you can use the default settings.

Click on the ‘Step 4: Advanced Options / Batch Import’ button to continue.

On the final screen, you’ll see advanced options. For instance, you can choose to match products by ID or SKU, choose what to do if a product already exists, and more.

Import options

If you are importing products into an empty WooCommere store, then you can use the default settings.

Finally, click on the ‘Import’ button to run the product import process.

You’ll see the progress of the import on screen. Once finished, you can click on ‘View Products’ to check if everything has been imported correctly.

products imported

The plugin also allows you to import and export Product Reviews.

If you want to import or export the product reviews too, then simply choose ‘Product Reviews’ post type on the import or export page.

Import or export product reviews

Improve Your WooCommerce Store with Automations

If you find yourself doing a lot of manual work around your WooCommerce store and want to save time, then we recommend using Uncanny Automator for workflow automation.

Uncanny Automator helps you connect over 100+ plugins and apps with a simple no-code visual builder. You can use it to create automated workflows for things that you normally do without writing any code.

There’s a free version that you can try out, and it’s already used by over 20,000 websites.

Aside from workflow automation, if you’re looking for a marketing automation tool for WooCommerce, then we recommend using FunnelKit Automation. It will help you grow your sales and improve conversions without the high costs.

We hope this article helped you learn how to easily import and export WooCommerce products with images in WordPress. You may also want to see our pick of the essential WooCommerce plugins or see these practical tips on recovering abandoned cart sales in WooCommerce.

If you liked this article, then please subscribe to our YouTube Channel for WordPress video tutorials. You can also find us on Twitter and Facebook.

The post How to Import & Export WooCommerce Products with Images first appeared on WPBeginner.

How to Run a Virtual Classroom Online with WordPress (Tools)

Do you want to run a virtual class online on your WordPress website?

Creating an online virtual classroom may sound too technical or expensive. Luckily, there are easy tools that allow you to run a virtual classroom online without any special technical skills.

In this article, we’ll be showing you how to run a virtual classroom online class with WordPress using different tools.

How to run a virtual class with WordPress

Why Create a Virtual Classroom for My Business?

Almost anything can be taught online. Just type your class’s topic into YouTube’s search bar, and you’ll likely find hundreds or thousands of videos of people teaching that skill.

One great advantage of virtual classes is that you don’t have to teach them live. You can record videos in advance if you want. That way, it doesn’t matter if it takes you several attempts to explain or show something.

Taking your class online could be the best thing you’ve ever done for your business. It’ll let you reach people all around the world, and you won’t be limited by how many people can fit in your classroom or fitness studio.

This isn’t just for large classes, either. You might offer a one-to-one service, like math tutoring or career counseling. You can create an online classroom without a lot of tech skills or expensive tools.

Here’s what you’ll need.

What You’ll Need to Run Your Class Online (Virtual Classroom)

So where do you even begin to set up a virtual class? There are a few key things you need to get into place.

To run a class online, you’ll need these 3 things:

  • A WordPress website or online platform for your class. This is a place where students can find and access the class content.
  • A way for students to sign up for your class, like a fillable form.
  • A way to frequently communicate with your students, like email.

You’ll also likely want a way for students to talk and interact with each other, such as an online group or forum. Besides that, you can offer members-only recorded content such as video or audio seminars so that students can work through it at their own pace.

Your virtual classroom can also include live video content with features like interactive polls, audience feedback, screen sharing, and audience questions.

Plus, an LMS or membership site plugin is really useful for managing repeat payments, creating members-only content, and creating different levels of your class.

Don’t worry if that sounds like a lot. We’ll help you decide on the right tools and platforms for your virtual classroom. Here’s a quick outline that you can click to jump straight to a particular section in this article.

Creating an Online Platform for Your Class

It’s possible to run an online class through a private Facebook group or an email list where you link to videos you’ve posted on YouTube.

However, these aren’t great options. Not everyone uses Facebook, for instance. Plus, Facebook or YouTube could decide to ban you without any fault of your own.

An alternative is to sign up for a site like Teachable. This is a popular option, but it’s definitely not free. The most basic Teachable package costs $29/month, and you’ll pay a 5% transaction fee for each student on top of that.

Instead of third-party platforms, we recommend that you create a website for your class. There are lots of ways you can do this, but the #1 website builder in the world is WordPress. Over 43% of the websites on the internet are powered by WordPress.

The best part about WordPress software is that it’s completely free. However, you’ll need a domain name and web hosting to build a website. This is required for making any type of website.

Bluehost, one of WordPress’s recommended hosting providers, is offering our readers a great deal. You can get a free domain name and web hosting for just $2.75/month for your first year.

Note: If you are looking for a Bluehost alternative, then you can also try SiteGround, another popular WordPress hosting company that’s offering a great discount for small business owners.

Once you have signed up, you will need to install WordPress. Bluehost does it automatically for you, and other hosting companies make it super easy with just a few clicks.

After you have installed WordPress, you will need to install a few WordPress plugins to get your online classroom ready. Plugins are like apps for your WordPress site that lets you add essential features like contact forms, membership restrictions, and more.

We’re going to take a look at some important plugins to help you run your online class.

Getting Students to Sign Up for Your Class

You’ll need a way for students to register for your class. Even if you’re not charging for the class, you’ll want to know how many people are planning to attend. You may also want to get some information from them beforehand.

We recommend using the WPForms plugin for WordPress. It is the best WordPress contact form plugin and lets you create registration forms simply and easily.

The WPForms form builder plugin and signature addon

The lite version of WPForms is totally free, but you may want to pay for the Pro version of WPForms, so you can integrate payments and email marketing services with your form.

Once you’ve installed and activated either version of the WPForms plugin, you can follow WPForms’ instructions to create an event registration form.

You can modify the event registration form template as much as you want. Here’s how a very simple registration form for a free class could look:

Event registration form preview

Communicating With Your Students in a Virtual Classroom

Whatever type of online class you’re running, you’ll need a way to communicate with your students.

Even if you’re just running a one-off class, you’ll still want to be able to remind students that it’s happening. You’ll also want a way to follow up, so you can let them know if you create another class.

There are lots of possible ways you could communicate with your students. For instance, you can send them messages on Facebook or WhatsApp. However, we strongly recommend using email.

That’s because virtually everyone has email. Most people are used to giving out their email addresses when signing up for things online. Asking them for their mobile number or Facebook details will put many students off from registering.

It’s important to use a reputable email marketing service to communicate with your students. That way, you can be confident that your messages will get through to them. Also, you won’t fall foul of any anti-spam laws.

We recommend using Constant Contact. They offer a free trial and excellent support.

The Constant Contact email provider

If you’re creating a membership site, we recommend using either ConvertKit or Drip for your email service. These tools have advanced marketing automation features that you will likely find helpful.

If you’re on a very tight budget and need a free email marketing service, that’s possible too. We recommend looking at SendinBlue or MailerLite.

All of these options are good, reliable solutions for sending bulk personalized emails to your students.

If you’re using WPForms to take class sign-ups, then you can even integrate your form with your email marketing service. This means that students will be automatically added to your chosen email list when they sign up.

Connect constant contact with WPForms

WPForms Lite works with Constant Contact, and if you pay for WPForms Pro, then you can choose from many other email marketing integrations as well.

For more details. please see our guide on how to create an email newsletter the right way.

Student Collaboration and Group Interactions in Virtual Classroom

Do you want your students to be able to interact with one another? If so, you’ll need to provide a straightforward and accessible way for them to do so.

There are lots of possible options here. If most or all of your students are on Facebook, then a private Facebook group could be a good option. Alternatively, you might want to create a forum on your website. We recommend using the bbPress plugin for this.

bbPress

Another option is to create a private Slack channel for your students.

If you’d like students to be able to interact with one another live, then you’ll want to look at how you deliver your classes. Zoom, which we’ll cover in a moment, is a great tool for interactive live video classes.

Important: If you’re running a class aimed at children, it’s definitely not a good idea to allow them to contact one another. This could create serious legal issues. You could, however, provide a space where parents of your students can interact.

Offering Pre-Recorded Content for Online Classrooms

One way to run an online class is to record content ahead of time and add it to your site. This is a good option if you’re feeling nervous or unsure about the technology involved.

Plus, pre-recorded content is a great option for a class that you want to run over and over again. You can create it once and sell it an unlimited number of times. Students can easily take the course at their own pace.

For example, OptinMonster University offers customers access to courses that can help them make the most of the software and boost conversions. There are pre-recorded videos that users can view at their own convenience.

OptinMonster university

To get started, you’ll need a webcam if you’re recording a video of yourself. You’ll also need a microphone. You can find our microphone recommendations in our article about how to start a podcast.

If you’re on a really tight budget, you could use your computer’s built-in microphone and webcam. However, higher-quality equipment will definitely help you produce a more professional class recording.

You may also want to record your screen, perhaps to show PowerPoint slides. You can do this using specialist screen recorder software, or you could run a Zoom call and record it. We’ll cover more on Zoom in a moment.

Don’t Host Videos on Your Website

When you put your content on your website, it’s very important not to host your videos yourself. If hundreds of students want to watch it at once, then this might slow down or even crash your website.

Plus, video files are incredibly large, and they will fill up your hosting service‘s available storage in no time.

Instead, you should use one of our recommended free video hosting sites. That way, you can simply embed the video on your site, so students can watch it there without taking up your site’s valuable resources.

You can also create a subdomain and use that as a home for your videos. For example, on WPBeginner, we have a video subdomain.

Video subdomain preview

If you want to password-protect your content or restrict it to members only, then we recommend creating a membership site. This also lets you charge different amounts for different levels of access.

If you’re interested in going that route, we recommend using MemberPress.

Offering Live Content in Online Classrooms

You may want to teach your class live. This could work really well for a class that you used to teach in person and are now taking online.

For live classes, we strongly recommend Zoom. It’s a tool that lets you host video calls with as many people as you want. The free plan gives you access to loads of features, with the one key restriction that your calls can’t be longer than 40 minutes.

You can schedule meetings in advance and send out an invite to your students. They can click a special link to sign in on their computer, or they can use the Zoom app on their phone.

Copy meeting invitation

Zoom has lots of useful options. For instance, you can use it to share your screen with students. This means you can show PowerPoint slides or demonstrate part of the lesson in real time.

Zoom lets you see your students, too. They can dial in with their cameras on if you want. They can also talk to you live, though you can mute them. We recommend that you mute everyone by default while you’re teaching your class. You can let students ask questions at the end.

There’s also a text chat feature in Zoom, which students can use to interact with one another while you’re teaching. You can even poll your students to find out what key topics they most want you to cover.

There’s also a ‘record Zoom call’ option, which lets you run a live class plus record it so students who can’t attend can watch it later.

Automatically Register Students for Zoom Webinars and Meetings

The paid version of Zoom lets you run webinars. However, manually sending out invites to webinars and class meetings can be time-consuming. A simple way to speed up the process is by automating it.

You can integrate your WPForms registration form with Zoom using Uncanny Automator. It is the best WordPress automation plugin that helps set up automated workflows.

Uncanny Automator website

You can think of Uncanny Automator as Zapier for WordPress websites. It lets different tools, apps, and plugins talk to each other.

The plugin lets you automatically sign people up for the webinar when they register for your class using WPForms. For more details, please see our guide on how to easily integrate Zoom meetings and webinars in WordPress.

Using an LMS or Membership Site Plugin

Do you want to turn your website into a virtual classroom? Or perhaps you want to lock content to make sure that only paid-up members can access it?

You’ll need to pay for this functionality, but it could well be worth it if you’re running a series of classes. Using your site as a learning platform works well for courses that last more than a few weeks.

For instance, you might be running a 12-week class. Students need an easy way to refer back to the earlier weeks’ material, and that will be tricky if you simply send out all the content by email.

Using LMS Plugins to Create Online Courses

With an LMS (Learning Management System) solution, you can even offer quizzes and grade students’ performance. You’ll need an LMS plugin for WordPress.

Our top recommendation here is LearnDash. It lets you create as many different courses as you like, with lessons, topics, quizzes, and categories. You can schedule lessons to be released over time if you want.

The LearnDash LMS WordPress plugin

With LearnDash, you can also offer quizzes and tests for your students. You can even set assignments that you can approve and comment on. It also lets you create course-specific forums where your students can interact.

For more details, see our guide on how to create an online course with WordPress.

Restrict Access to Classes and Online Resources

What if you don’t want a whole learning environment, but instead you want to lock content on your site? You can do that with a membership site plugin.

We recommend using MemberPress as your membership site plugin. It’s easy to set up and has powerful access controls. You can restrict access not only to posts and pages but also to specific categories, tags, files, and more.

MemberPress

You can use MemberPress to ‘drip’ content to your students. This means they only get access to certain content after they’ve been a member for a specified period of time. You can even integrate it with LearnDash if you want.

For more details, see our ultimate guide on how to create a membership site.

We know there’s a lot to consider when setting up a virtual class. You can set up a simple class for free on your WordPress site.

You’ll only need to pay for your website domain name and web hosting, which doesn’t need to cost much. Besides that, you can use free WordPress plugins, software, and email marketing tools to connect with students, record lectures, and more.

We hope this article helped you learn how to run a virtual classroom with WordPress. You may also want to see our guide on the must-have WordPress plugins for all websites and the ultimate guide to boosting WordPress speed & performance.

If you liked this article, then please subscribe to our YouTube Channel for WordPress video tutorials. You can also find us on Twitter and Facebook.

The post How to Run a Virtual Classroom Online with WordPress (Tools) first appeared on WPBeginner.

How to Send Automated Coupons in WordPress to Bring Back Customers

Do you want to send automated coupons in WordPress to bring back customers?

By sending the right coupon to the right person at the right time, you can re-engage customers who are losing interest. This can get you more sales, create brand loyalty, and help you keep your best customers.

In this guide, we’ll show you a few different ways to send automated coupons in WordPress, and bring back customers.

How to send automated coupons in WordPress to bring back customers

Why Send Automated Coupons to Bring Back Customers?

You may have heard the saying that it costs five times more to get a new customer than keep an old one.

While lead generation will help grow your business, you also need to keep your existing customers happy. Over time, people may lose interest in your website, forget about your products, or start shopping with a competitor.

That’s where automated coupons come in.

The best WordPress automation tools and plugins can watch your customers for signs they’re becoming disengaged. For example, a customer may not place an order for 2 months or stop opening your emails.

One way to bring those customers back is to automatically send them a coupon code via email. By creating this automated workflow in WordPress, you can retain customers without having to do all the hard work yourself.

Pro Tip: If you send coupons via email, then you’ll need to make sure those messages land in the customer’s inbox and not in the spam folder. Here, a good SMTP service provider is essential for improving your email deliverability. We also recommend using WP Mail SMTP as it allows you to easily send WordPress emails using any SMTP service provider.

With that being said, let’s see how you can send automated coupons in WordPress and bring back customers. Simply use the quick links below to jump to the method you want to use.

Method 1. Using FunnelKit (Best for WooCommerce Users)

One way to send automated coupons in WordPress, is by using FunnelKit Automations.

FunnelKit is a WordPress sales funnel builder and optimization plugin that allows you to create powerful customer winback campaigns. It also lets you create unique, personalized coupons, which can really catch the shopper’s attention.

FunnelKit integrates with WooCommerce and has lots of features that are designed to grow your online store. With that in mind, FunnelKit is a great choice if you already use WooCommerce to sell products and services online.

How to Set up the FunnelKit WordPress Plugin

First, you’ll need to install and activate the free version of FunnelKit Automations, as it provides the base for the premium plugin’s features. For more details, please see our guide on how to install a WordPress plugin.

After that, you’ll need to install and activate the FunnelKit Automations Pro plugin.

After activating both plugins, go to FunnelKit Automation » Settings. You can now go ahead and add the license key to the ‘License’ field.

Adding a license to the FunnelKit Automations WordPress plugin

You’ll find this information in your account on the FunnelKit website. After adding this information, click on the ‘Activate’ button.

How to Create an Automated Coupon Workflow for WordPress

Now, we’re going to create a workflow that will generate a personalized coupon and send it to the customer via email. This workflow will run once 30 days have passed since the customer’s last order.

To create the workflow, go to FunnelKit Automations » Automations (Next Gen) in the WordPress dashboard. Then, click on the ‘Add New Automation’ button.

Creating a new WordPress automation with FunnelKit

You’ll now see all the different automation templates that you can use.

Since we want to create our own workflow, select ‘Start from Scratch.’

Creating a custom automated workflow in WordPress

In the popup that appears, type in a name for the automation. This is just for your reference, so you can use anything you want.

With that done, click on ‘Create.’

Add a name to your FunnelKit automation workflow

Now, we need to choose the action that will kickstart the workflow, so click on ‘Select Trigger.’

In the left-hand menu, choose ‘WooCommerce’ and then click to select ‘Customer Win Back.’

Adding a 'customer winback' trigger to an automation workflow

With that done, click on ‘Done’ to add the trigger to your automation workflow.

Back in the main editor, click on the ‘Customer Win Back’ trigger.

Adding a trigger to the FunnelKit automation editor

In the ‘Customer Last Ordered Period’ section, you can type in how long FunnelKit will wait before running the workflow.

For example, in the following image the workflow will run when 30 days have passed since the customer’s last order.

FunnelKit will repeat this automation once every 24 hours, so it’s important to only run it for a short period of time. For this reason, we’ve set the workflow to stop when 35 days have passed since the customer’s last order.

Adding an order period to the automation recipe

In this way, you won’t annoy customers by sending them dozens of emails.

Next, you can set the time when the automation will run, using the ‘Schedule this….’ fields. FunnelKit will use your store’s timezone, so you may want to change your online store settings if you want to use a different timezone instead.

Scheduling an automated coupon code

With that done, click on ‘Save.’

Back in the main workflow editor, click on ‘+’ and then select ‘Action.’

Adding actions to an automated workflow in WordPress

In the popup that appears, select ‘WooCommerce’ and then click on ‘Create Coupon.’

Simply click on ‘Done’ to add this action to the workflow.

How to create an automated coupon using FunnelKit

Back in the main FunnelKit editor, click on the action you just added. This opens a popup where you can customize the ‘Create Coupon’ action.

To start, type a name for the coupon into the ‘Coupon Title’ field. This is just for your reference so you can use anything you want.

Creating a winback customer automation workflow in WordPress

After that, choose the type of coupon that you want to create, using the ‘Discount Type’ dropdown menu.

FunnelKit supports percentage discount, fixed cart discount, and fixed product discount. Most of the time, you’ll want to select ‘Percentage Discount’ to make sure all customers get a similar benefit, no matter how much they spend or what products they buy.

After that, type an amount into the ‘Amount’ field. For example, you might offer customers 20% off, or a $5 discount on all purchases.

How to create an automated percentage discount coupon

FunnelKit automatically creates a unique coupon code for each contact. However, you can add a prefix to the start of the coupon, which can either be plain text or dynamic tags. FunnelKit will replace these tags with real text every time it creates a code, so this is a great way to create personalized coupons.

Since we want to bring shoppers back in, you may decide to include the customer’s name in the coupon. This can catch their attention, and also makes your code easier to remember.

To add plain text as a prefix, simply type into the ‘Coupon Code Prefix’ field.

Adding a prefix to the automated coupon code

To add one or more tags, click on the ‘Merge tags’ icon.

This is the button that has curly braces.

Adding dynamic text to the automated coupon code

Now, you’ll see all the tags that you can use in the automated coupon.

We’re going to use the {{contact_first_name}} tag, but you can use any tags you want.

How to create a personalized coupon code with merge tags

Simply copy each tag and then paste it into the ‘Coupon Code Prefix’ field.

As you can see in the following image, you can use a mix of plain text and tags.

How to create a personalized and dynamic coupon code

By default, the coupon will never expire. A sense of urgency and FOMO can push customers to use a coupon, so you may want to select the radio button next to ‘Expire after Specific Days’ or ‘Expire on Specific Date.’

You can then use the controls to specify when the coupon will expire.

Adding a coupon expiration date to your WordPress coupon

Finally, you can choose whether the coupon gives customers a free shipping discount.

Shoppers love free shipping, so you may want to consider adding this to your coupon by selecting the ‘Yes’ radio button under ‘Allow Free Shipping.’

How to create a free shipping discount for your online store

When you’re happy with how the coupon is set up, make sure you copy the small pieces of code under the ‘Coupon Title.’

You’ll need this coupon code for the email we’ll be creating in the next step, so store it somewhere safe.

Creating an automated coupon to win back customers

With that done, click on ‘Save’ to store your changes.

Now we have a coupon, it’s time to create the email that FunnelKit will send to your customers. To add an email action, click on the ‘+’ button and then select ‘Action.’

Add an email action to win back customers

If it isn’t already selected, then click on ‘Messaging’ in the left-hand menu.

Then, select ‘Send Email’ and click on ‘Done.’

Choosing an action in the FunnelKit automation plugin

You can now create an email by typing in a subject and preview, and adding body text.

Similar to creating a coupon, it’s best to use a mix of plain text and tags. To add dynamic tags, click on the ‘Merge Tags’ icons that appear next to the To, Subject, and Preview Text fields.

How to create a personalized email to win back customers

If you want to add tags to the email body, then you can click on the ‘Merge Tags’ button.

To add your coupon code, simply paste or type in the {{wc_dynamic_coupon id= code we copied in the previous step.

Create a personalized email to bring back customers

When you’re happy with how the email looks, click on ‘Save & Close.’

That’s it. When you’re ready to make the automation live, click on the ‘Inactive’ slider so it turns to ‘Active.’

Making your workflow automation live

Now, FunnelKit will automatically send the coupon to any customer who hasn’t purchased from you in the past 30 days.

Method 2. Using Uncanny Automator (Over 100 Integrations)

Another way to send automated coupons in WordPress, is by using Uncanny Automator. It is one of the best WordPress automation plugins on the market and lets you create powerful workflows to save time and help you respond to customers more quickly.

Uncanny Automator works seamlessly with WooCommerce, plus all of the must have WordPress plugins and third-party tools. If you’re already using lots of different software on your online store, then Uncanny Automator may be a good choice for you.

There is a free Uncanny Automator plugin that lets you automate many common tasks. However, we’ll be using Uncanny Automator pro because it works with WooCommerce.

To start, you’ll need to install Uncanny Automator pro, plus the free plugin as it provides the base for the premium version. If you need help, then please see our guide on how to install a WordPress plugin.

Upon activation, go to Automator » Settings and enter your license key into the ‘Uncanny Automator Pro license key’ field.

Adding an Uncanny Automator license to your WordPress website

You’ll find this information under your account on the Uncanny Automator website.

Uncanny Automator is a powerful and flexible plugin, so there’s lots of different ways that you can bring customers back to your site. Let’s take a look at a few options.

Automatically Send Coupons to Logged-Out Customers

It’s smart to let customers create an account with your online store, as it encourages brand loyalty and makes it easier for shoppers to buy from you in the future.

User registration can also help with lead generation. If you get the shopper’s email address, then you can target them with email marketing, personalized ads, an email newsletter, and much more.

If you’re using WooCommerce, then this plugin automatically creates all the pages customers need to create and manage an account. WooCommerce also adds a new Customer role, which it automatically assigns to any shoppers who register with your store.

Are you using a different eCommerce solution that doesn’t support customer registration? Then see our guide on how to allow user registration on your WordPress site.

After that, you can simply create a new role for your customers. For detailed instructions, please see our beginner’s guide to WordPress user roles and permissions.

If you allow user registration, then you can track when a shopper logs out of their account, as this suggests they’re losing interest in your store. You can then send a coupon to encourage them to log back in.

To create this recipe, simply go to Automator » Add new in the WordPress dashboard.

Uncanny Automator will now ask whether you want to create a recipe for logged-in users, or everyone. Go ahead and select ‘Logged-in users,’ then click on the ‘Confirm’ button.

Creating a logged-in automation recipe with Uncanny Automator

Next, you can give the recipe a name by typing into the ‘Title’ field. This is just for your reference so you can use anything you want.

Once you’ve done that, click on ‘WordPress’ in the ‘Select an integration’ area.

Select WooCommerce as an integration

You can now choose a trigger, which is anything that kickstarts the recipe.

In the dropdown menu, start typing the following ‘A user logs out of a site’ and then select the right option when it appears.

Choosing a trigger for the automated coupon recipe

We only want to run the workflow when someone with the ‘Customer’ user role logs out of their account.

With that in mind, click on the ‘Add filter’ button.

How to create an automation workflow for your WooCommerce customers

In the popup that appears, click on ‘WordPress.’

Next, find ‘The user has a specific role’ in the dropdown menu.

Filtering your users based on WordPress role

Open the ‘Role’ dropdown and select the role you’re using for your customers.

After that, go ahead and click on ‘Save filter.’

Sending an automated coupon to your WooCommerce customers

Now it’s time to specify the action that Uncanny Automator will perform every time this workflow runs.

We’re going to send the customer an email containing a coupon, so go ahead and click on ‘Add action.’

Adding actions to an automated recipe

Since we want to send an email, select ‘Emails’ as the integration.

In the dropdown that appears, click on ‘Send an email.’

Send automated coupons in WordPress to bring back customers

This adds all the fields that you can use to create the email.

To start, we need to make sure the message goes to the right user, by clicking on the asterisk next to the ‘To’ field. Then, select ‘Common’ and ‘User email.’

Getting the customer's email address

You can now create the email by adding a subject line and body text.

Here, you can use a mix of plain text and tokens, which are placeholders that Uncanny Automator replaces with real values automatically. For example, if you want to use the customer’s name, then you can click on the asterix and select ‘Common.’

Simply select the ‘User first name’ token to create the personalized greeting.

Adding a dynamic user name token to the coupon workflow

You’ll also need to create a coupon and add it to the email.

The easiest way is by using the Advanced Coupons plugin, which is the best WordPress coupon code plugin on the market. It lets you create lots of different advanced coupons to get more sales and grow your business.

For a step-by-step guide, please see our post on how to create smart coupons.

After creating a coupon, you can simply add it to the email.

Sending an automated coupon email in WordPress to bring back customers

When you’re happy with how the email looks, click on ‘Save.’

After that, it’s time to set a delay. This is how long Uncanny Automator will wait after the customer logs out, before sending them the coupon.

To add a delay, hover your mouse over the ‘Email’ action. When it appears, click on ‘Delay.’

How to add a delay to an automation workflow

You can then add your delay in the popup that appears.

Once you’ve done that, go ahead and select ‘Set delay.’

Adding a time delay to the automated coupon recipe

When you’re happy with how the recipe is set up, it’s time to make it active.

In the ‘Recipe’ box, click the ‘Draft’ switch so that it shows ‘Live’ instead.

Publishing the automated coupon recipe

That’s it. Now, when a customer logs out of their account, Uncanny Automator will wait for the specified amount of time before sending them a coupon code.

Automatically Send Coupons for a Specific Product

Sometimes a shopper may look at a product multiple times. This suggests they’re interested in the item, but something is stopping them from making a purchase.

In this case, you may want to send them a coupon, which will encourage them to splash out on the product.

To get started, create a new recipe for logged-in users following the same process described above. After that, click on ‘WooCommerce’ in the ‘Select an integration’ area.

Adding WooCommerce as an integration in Uncanny Automator

Next, choose a trigger by typing the following ‘A user views a product.’

When the right trigger appears, give it a click.

Get more sales with an automated coupon recipe

By default, this trigger is set to ‘Any product.’

If you want to link the recipe to a specific product, then open the ‘Product’ dropdown and choose that product from the list.

Choose a WooCommerce product from the dropdown menu

Once you’ve done that, click on the ‘Number of times’ button.

By default, the recipe will run every time a customer looks at a product. You should change this, so the customer has to look at the product multiple times before triggering the recipe. To do this, type a different number into the ‘Number of times’ field.

Triggering a workflow when the customer views a product multiple times

When that’s done, click on ‘Save’ to store your settings.

This recipe should only run when a customer views a product, so click on ‘Add Filter.’ In the popup that appears, click on ‘WordPress’ and then choose ‘The user has a specific role.’

Adding WooCommerce features to an automation recipe

After that, open the ‘Role’ dropdown and select the role you’re using for your customers.

When you’re ready, click on ‘Save filter.’

Configuring the automated coupon rule

Now it’s time to add the action. There are a few different ways to send automated coupons from your WordPress website.

To email a code to your customers using Uncanny Automator and Advanced Coupons, simply follow the same process described above.

Another option is to generate the code using WooCommerce. To do this, click on ‘Add Action’ and then select ‘WooCommerce’ as the integration.

Selecting the WooCommerce eCommerce plugin as an integration

In the search bar, start typing ‘Generate and email a coupon code to the user.’

When the right option appears, give it a click.

Generating a WooCommerce coupon

This will add some new settings where you can create the coupon code.

To generate a code automatically, simply leave the ‘Coupon code’ field blank.

How to create a coupon for your WooCommerce online store

In the ‘Discount type’ field, choose the kind of coupon that you want to create, such as a fixed cart discount or percentage discount.

For this guide, we’ll select ‘Percentage discount’.

How to create a percentage discount code

After that, type the percentage discount into the ‘Coupon amount’ field.

In the following image, we’re offering customers a 30% discount on their purchase.

Creating a percentage coupon code

In the next field, you can set an expiry date for the coupon, either by using the YYY-MM-DD format or typing in the number of days until the coupon expires.

For example, in the following image the coupon will expire after 7 days.

Adding an expiration date to an automated coupon code

You can also set a minimum and maximum spend for the coupon. We’ll leave these fields blank so the customer can use the code with any purchase.

You may also want to check the ‘For individual use only’ box so customers can’t use this code in combination with other coupons.

Creating a coupon for individual use

Next, scroll to the ‘Usage limit per coupon’ section. The shopper should only be able to use the coupon once, so type in ‘1.’

There are lots of other settings you can change for the coupon. It’s a good idea to look through these settings to see whether you want to make any more changes.

When you’re happy with how the coupon is set up, scroll to the ‘Email’ section. To start, find the ‘To’ field and then click on the asterisk next to it. Then, click on ‘Common’ and select ‘User email.’

Creating an automated coupon email to bring back shoppers

With that done, you can add a subject line and change the text in the email body.

To create a more personalized email, it’s a good idea to use a mix of plain text and tokens, by following the same process described above.

Adding a coupon to your WooCommerce email

When you’re happy with the email, click on the ‘Save’ button to store the recipe.

After that, you can make the recipe live by clicking the ‘Draft’ switch so that it shows ‘Live.’

Making an Uncanny Automator recipe live on your WordPress website

Now, every time someone views a product multiple times, it’ll trigger the recipe workflow.

We hope this article helped you learn how to send automated coupons in WordPress to bring back customers. You may also want to check out our guide on how to create a WooCommerce popup to increase sales and the best WooCommerce plugins for your store.

If you liked this article, then please subscribe to our YouTube Channel for WordPress video tutorials. You can also find us on Twitter and Facebook.

The post How to Send Automated Coupons in WordPress to Bring Back Customers first appeared on WPBeginner.