Is the ‘ERR_SSL_VERSION_OR_CIPHER_MISMATCH’ error stopping you from accessing a WordPress website?
This error is only seen when visiting a website that uses an SSL certificate. It is caused by out-of-date or misconfigured software on either the website or the user’s computer.
In this article, we will show you how to fix the ‘ERR_SSL_VERSION_OR_CIPHER_MISMATCH’ error in WordPress.
What Is the ERR_SSL_VERSION_OR_CIPHER_MISMATCH Error?
We recommend that everyone with a WordPress website install an SSL certificate. This can help keep your website data secure.
An SSL certificate is required if you want to accept payments in your online store, and it also protects your users in other ways.
SSL stands for ‘Secure Sockets Layer’, and TLS stands for ‘Transport Layer Security’ protocol. These protocols rely on certificates that tell the user the identity of the website they are communicating with.
When visiting a secure website, your browser will automatically check for an SSL certificate to see if it is valid and up to date. It also checks the version of the protocols being used.
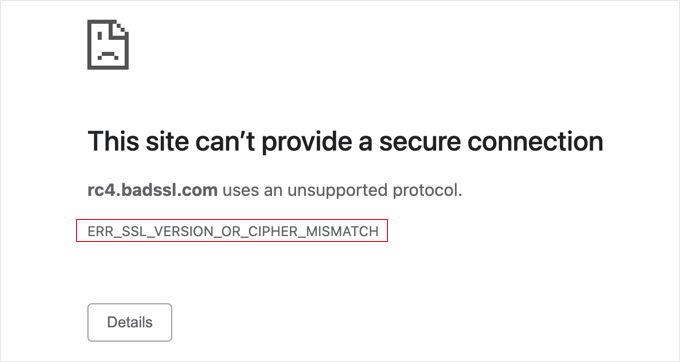
If there’s an issue, then you’ll see an SSL error like ERR_SSL_VERSION_OR_CIPHER_MISMATCH.
This error message appears when your browser doesn’t recognize the version of the SSL protocol being used or when the SSL certificate is not configured correctly.
This can happen when the user is using an out-of-date web browser that doesn’t recognize the latest TLS protocols. It can also be caused if the website’s SSL certificate or software is out of date or mismatched.
With that being said, let’s take a look at some steps you can take to fix the ERR_SSL_VERSION_OR_CIPHER_MISMATCH error in WordPress:
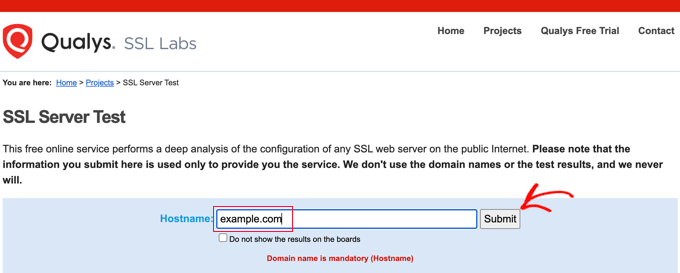
The first thing you need to do is scan your WordPress website for SSL errors. This will help you identify problems that can cause the ‘ERR_SSL_VERSION_OR_CIPHER_MISMATCH’ error.
The easiest way to check is by using an online tool like the Qualys SSL Labs SSL Server Test. Simply type in the website’s domain name and then click the ‘Submit’ button.
This will perform a thorough test on the website that takes a few minutes to finish. After that, you will see a very detailed report about the site’s SSL certificate.
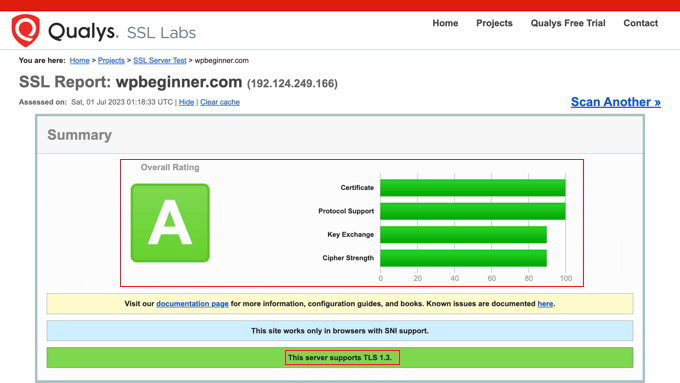
In the screenshot below, you will find the results of a scan on wpbeginner.com. You can see that the WPBeginner SSL certificate is valid and trusted and supports the latest TLS protocol, which is TLS 1.3. This is an example of a great SSL test result.
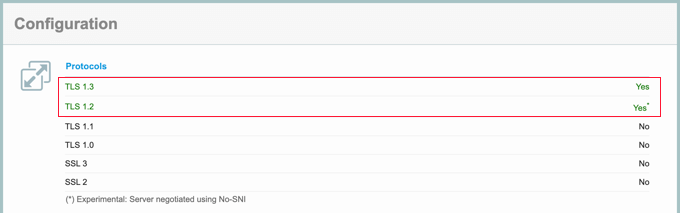
You can scroll down to the Configuration section of the report.
This will show you which versions of the TLS protocol are supported. In this case, both currently used versions are supported, which are TLS 1.2 and TLS 1.3.
It’s also important that the other protocols are not being used because they have known security issues.
If your test result looks similar to this, then the ‘ERR_SSL_VERSION_OR_CIPHER_MISMATCH’ error is not being caused by the website. You can scroll down to the last section of this tutorial to learn how to troubleshoot the software on your computer.
On the other hand, here is a screenshot from a scan that found SSL errors. The errors are summarized at the top of the report, and more details are given below.
You can go to a page with detailed notes about an error by clicking the ‘MORE INFO »’ link.
If the SSL test report for your website lists some SSL errors, then you can follow these guidelines to fix them.
Your Site Uses Outdated TLS 1.0, TLS 1.1, or RC4 Cipher Suite
Old TLS protocols like TLS 1.0 and TLS 1.1 should never be run because they have security issues, and modern web browsers have stopped supporting them.
The same goes for the RC4 cipher suite. A cipher suite is a set of algorithms used to secure your website with TLS. However, the RC4 version has been found to be insecure and should never be used.
Reputable WordPress hosting companies never use insecure versions of the TLS protocol or cipher suite.
However, if your website is using any of these outdated versions, then you should contact your hosting provider and get them to enable TLS 1.2 or TLS 1.3. You will also need to switch to AEAD cipher suites (AES-GCM).
Because an SSL certificate proves that your website is what it claims to be, the domain name on your certificate must match your site’s domain name. When they are not the same, this is called an ‘SSL certificate name mismatch’.
When you see this error in your SSL report, it will list the potential reasons:
The website does not use SSL but shares an IP address with some other site that does.
The website no longer exists, yet the domain name still points to the old IP address, where some other site is now hosted.
The website uses a content delivery network (CDN) that does not support SSL.
The domain name is an alias for a website whose main name is different, but the alias was not included in the certificate by mistake.
This error is likely caused by a problem with your SSL setup.
In particular, make sure you have set up your SSL certificate to work with all of the variations (or aliases) of your domain name that will be used, including www and non-www URLs.
Another solution is to redirect your website visitors to the correct variation of your domain name.
For example, if your SSL certificate has the URL ‘https://www.example.com’, then you can redirect ‘https://example.com’ to that address. See our article on how to set up redirects in WordPress for more details.
This error could also appear if you have recently moved your website to a new domain name or server. You will need to update your SSL certificate with the new details.
If you are using a CDN service, then you should also make sure that it supports SSL. If you need to upgrade, then you can see our expert picks of the best WordPress CDN services for recommendations.
If you need help with any of these issues, then don’t hesitate to reach out to your hosting provider’s technical support team.
When the Website Is Not the Problem
If the website is not the problem, then the error is caused by software on your computer. Most likely, you have an out-of-date web browser, or your antivirus software is causing the error.
You can follow these steps to troubleshoot the problem.
Update Your Web Browser to the Latest Version
If you are using an outdated web browser such as Internet Explorer or an old version of a modern web browser, then you may see this error. This happens because the old software was written before the latest versions of the TLS protocols and doesn’t recognize them.
In that case, all you need to do is switch to the latest version of a modern web browser like Google Chrome.
If, for some reason, you can’t update to a later version of your browser, like if you are stuck using Microsoft Windows XP, then you may be able to enable a later version of TLS in your browser.
For example, on Google Chrome, you can type chrome://flags in the address bar, search for ‘TLS 1.3’ and enable the option.
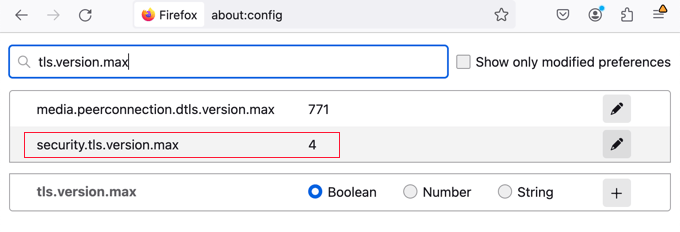
Or if you are using Firefox, then you should type about:config in the address bar, search for TLS, and then set the security.tls.version.max value to 4.
Clear Your Browser Cache and SSL Cache
If you still see the error message after doing this, then there are a few more troubleshooting steps you can take. The first thing is to delete your browser cache and cookies.
On Windows, you can also clear the SSL cache. This may be storing out-of-date SSL information about the website you are trying to access.
You can open ‘Internet Options’ by searching for it in the Start menu. Now switch to the Content tab and click on the ‘Clear SSL state’ button.
Temporarily Disable Your Antivirus Software
Finally, it’s possible that your antivirus software or firewall software may be configured incorrectly. This can sometimes cause the ‘ERR_SSL_VERSION_OR_CIPHER_MISMATCH’ error to appear when it shouldn’t.
If your software has an automatic SSL scanning feature, then you can try turning it off. Otherwise, you will need to temporarily disable your antivirus software. Once you have done that, you can try accessing the website again.
If you can access the software with your antivirus software disabled, then you can contact the antivirus company’s technical support team about the error or switch to a more reputable application.
Are you looking to make the most of custom fields on your WordPress website?
Custom fields are a handy WordPress feature that allows you to add extra data and information to your WordPress posts and pages. A lot of popular WordPress plugins and themes use custom fields to store important data.
In this article, we will show you how to use WordPress custom fields with some tips, tricks, and hacks.
Since this is a long article, we have added a table of contents for easier navigation. Just use the quick links below to jump to the section you want to read:
The second part is the information about that content. For example, the title, author, date, time, and more. This information is called metadata.
A WordPress website automatically adds all the required metadata to each post or page you create. You can also create and store your own metadata by using custom fields.
By default, the custom fields option is hidden on the post edit screen. To view it, you need to click on the three-dot menu in the top-right corner of the screen and select ‘Preferences’ from the menu.
This will open a popup where you need to switch to the ‘Panels’ tab and then enable the ‘Custom fields’ option.
After that, simply click on the ‘Enable & Reload’ button to reload the post editor.
The post editor will reload, and you will be able to see the Custom Fields panel below the content editor.
Custom fields can be used to add any information related to the post, page, or other content type. This meta information can then be displayed in your theme.
However, to do that, you will need to edit your WordPress theme files.
Note: This tutorial is recommended for users who are already familiar with editing theme files. It is also helpful for aspiring WordPress developers who want to learn how to properly use custom fields in their own themes or plugins.
Having said that, let’s take a look at how to add and use custom fields in WordPress.
Adding Custom Fields in WordPress
First, you need to open a post or page in the block editor so that you can add custom fields. Then, you must go to the Custom Fields meta box.
Next, you need to provide a Name for your custom field and then enter its Value. Click on the ‘Add Custom Field’ button to save it.
The field will be stored and displayed in the Custom Fields meta box like this:
You can edit this custom field any time you want and then just click on the ‘Update’ button to save your changes. You can also delete it if you don’t want to use it anymore.
Now, you need to save your post to store your custom field settings.
Displaying Custom Fields in WordPress Themes
To display your custom field on your website, you will need to edit your WordPress theme files and code snippets.
We don’t recommend directly editing the theme files because the slightest mistake can break your website. An easier way to do this is by using WPCode.
It is the best code snippet plugin for WordPress that lets you add custom code and manage snippets from your WordPress dashboard.
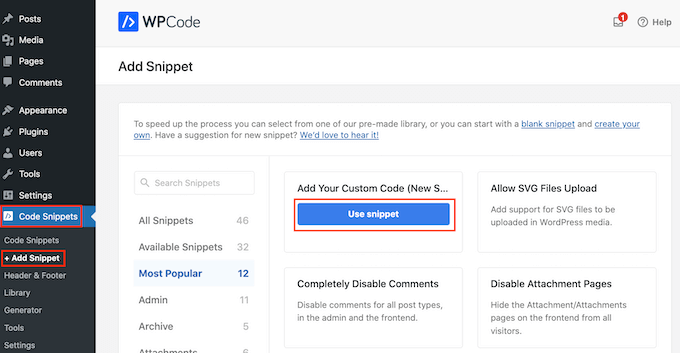
Upon activation, you will need to go to Code Snippets » + Add Snippet from the WordPress dashboard and select the ‘Add Your Custom Code (New Snippet)’ option.
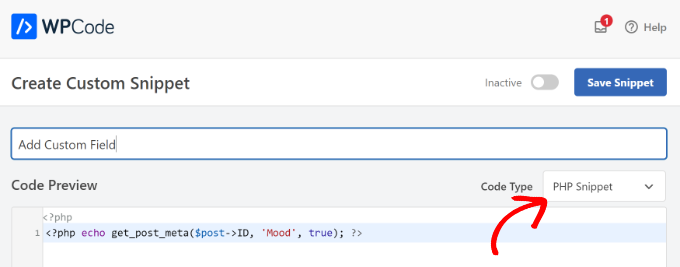
Now you need to copy this code to add to your theme files:
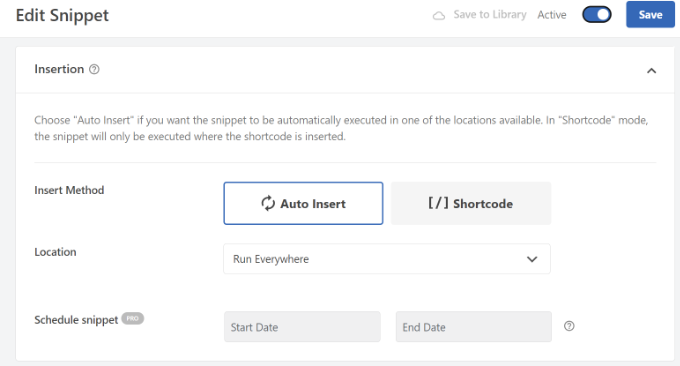
From here, you can scroll down to the Insertion section.
Here, you can select where the code will run. By default, WPCode will Auto Insert the code and run it everywhere on your website.
However, you can change this and select where you would like the custom field to appear.
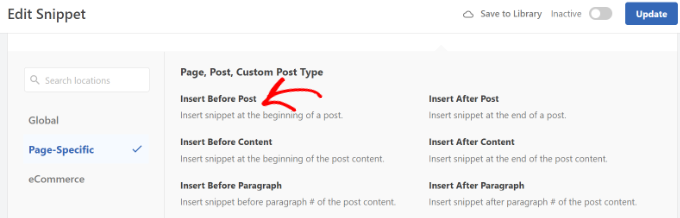
For example, we will choose the ‘Page Specific’ tab and select the ‘Insert Before Post’ option. This way, the custom field will appear at the beginning of the blog post.
You can now save your changes and visit the post where you added the custom field to see it in action.
You can use this custom field in all your other WordPress blog posts as well.
You can also easily adjust the custom field for different blog posts. Simply create a new post or edit an existing one.
Then, go to the Custom Fields meta box and select your custom field from the dropdown menu and enter its Value.
Once you are done, simply click the ‘Add Custom Field’ button to save your changes and then publish or update your post.
Troubleshooting: Can’t Find Custom Field in Dropdown on Post Edit Screen
By default, WordPress only loads 30 custom fields in the dropdown menu on the post edit screen.
If you are using WordPress themes and plugins that already use custom fields, then those might appear first in the dropdown menu, and you won’t be able to see your newly-created custom field.
To fix this issue, you will need to add the following code to your theme’s functions.php file or by using WPCode (recommended):
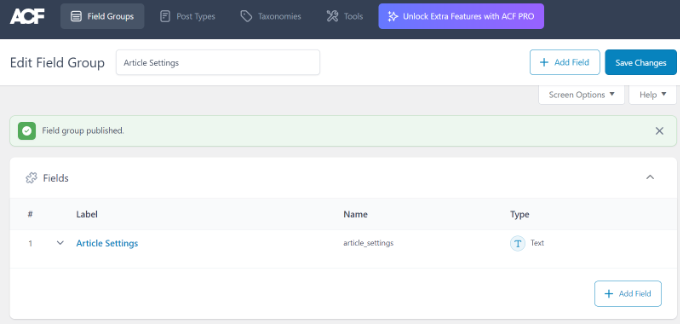
Upon activation, you need to visit the ACF » Field Groups page and click on the ‘Add New’ button.
A field group is like a container with a set of custom fields. It allows you to add multiple panels of custom fields.
Now, you need to provide a title for your field group and click the ‘+ Add Field’ button in the top-right corner.
You can now select a field type.
Advanced Custom Fields allows you to create all sorts of fields, including text, image upload, number, dropdown, checkboxes, and more.
Next, you can scroll down to see other options for that particular field, like field name, field label, and default value. You can change them to your own requirements.
You can also add multiple fields to your field group if you want. Once you are finished, just click on the ‘Save Changes’ button.
Next, edit a post or create a new one, and you will see a new panel with your WordPress custom fields below the content editor.
How to Hide Empty Custom Fields With Conditional Statements
So far, we have covered how to create a custom field and display it in your theme.
Now let’s see how to check that the custom field is not empty before displaying it. To do that, we will modify our code to first check if the field has data in it:
Don’t forget to replace Mood with your own custom field name.
Adding Multiple Values to a Custom Field
Custom fields can be reused in the same post to add multiple values. You just need to select the field again and add another value to the ‘Value’ box.
However, the code we have used in the above examples will only be able to show a single value.
To display all values of a custom field, we need to modify the code and make it return the data in an array. You will need to add the following code to your theme file:
Again, don’t forget to replace Mood with your own custom field name.
In this example, you will notice that we have changed the last parameter of get_post_meta function to false. This parameter defines whether the function should return a single value or not. Setting it to false allows it to return the data as an array, which we then displayed in a foreach loop.
How to Search Posts by Custom Field in WordPress
WordPress’s default search doesn’t work with any custom fields on your website. It only uses the content to find the post you or your visitors are looking for on your site.
However, SearchWP changes that by improving your WordPress search. It’s the best WordPress search plugin that goes beyond using the post content and indexes everything, including WordPress custom fields, PDF documents, custom tables, text, files, and more.
You can adjust the search algorithm without editing code using SearchWP. Simply install the plugin and then head over to SearchWP » Algorithm from your WordPress admin area.
After that, you need to go to the ‘Engines’ tab and then adjust the Attribute Relevance slider. This will change the importance given to each attribute during a search.
For instance, you can set the Custom Fields slider to maximum and adjust sliders for other attributes accordingly. This way, SearchWP will give preference to data in custom fields when searching for content in WordPress.
Another advantage of using SearchWP is that works with some of the most popular custom field plugins, including Advanced Custom Fields (ACF), Meta Box, and Pods.
WordPress allows you to display posts with custom keys and their values. For example, if you are trying to create a custom archive page to display all posts with specific custom keys, then you can use the WP_Query class to query posts matching those fields.
You can use the following code as a starting point:
$args = array(
    'meta_key'   => 'Mood',
    'meta_value' => 'Happy'
);
$the_query = new WP_Query( $args );

<?php
// the query
$the_query = new WP_Query( $args ); ?>

<?php if ( $the_query->have_posts() ) : ?>

    <!-- the loop -->
    <?php while ( $the_query->have_posts() ) : $the_query->the_post(); ?>
        <h2><?php the_title(); ?></h2>
        <?php the_content(); ?>

    <?php endwhile; ?>
    <!-- end of the loop -->

    <!-- pagination here -->

    <?php wp_reset_postdata(); ?>

<?php else : ?>
    <p><?php _e( 'Sorry, no posts matched your criteria.' ); ?></p>
<?php endif; ?>
Don’t forget to replace meta_key and meta_value parameters with your own values.
How to Add Guest Author Name Using Custom Fields
Do you want to add a guest post but don’t want to add a new user profile just for that post? An easier method is adding a guest author name as a custom field.
To do this, you will need to add the following code to your theme’s functions.php file or use WPCode (recommended):
This code hooks a function to the_author and get_the_author_display_namefilters in WordPress.
The function first checks for the guest author’s name. If it exists, then it replaces the author’s name with the guest author’s name.
Now you will need to edit the post where you want to display the guest author’s name. Go to the Custom Fields meta box, add your guest author name, and finally click on the ‘Add Custom Field’ button.
How to Display Contributors to an Article Using Custom Fields
On many popular blogs and news sites, many authors contribute to writing a single article. However, WordPress only allows a single author to be associated with a post.
Another method is adding contributors as a custom field.
First, you need to edit the post where you want to display co-authors or contributors. Then, scroll down to the Custom Fields meta box and add author names as co-author custom fields.
Now, you need to add this code to your theme files where you want to show co-authors:
One way to do this is by using custom fields. Just edit the post or page where you want to show a different sidebar and then add the sidebar as a custom field.
Now you need to edit your WordPress theme file, such as single.php, where you want to display a custom sidebar. You will be looking for the following code:
This code simply looks for the sidebar custom field and then displays it in your theme. For example, if you add webpage as your sidebar custom field, then the code will look for a sidebar-webpage.php file to display.
You will need to create the sidebar-webpage.php file in your theme folder. You can copy the code from your theme’s sidebar.php file as a starting point.
Manipulating RSS feed Content With Custom Fields
Want to display additional metadata or content to your RSS feed users? Using custom fields you can manipulate your WordPress RSS feed and add custom content into your feeds.
First, you need to add the following code to your theme’s functions.php file or use WPCode (recommended):
Now, just create a custom field called ‘coolcustom’ and add any value you like. You can use it to display advertisements, images, text, or anything you want.
How to Manipulate RSS Feed Title With Custom Fields
Sometimes you may want to add extra text to a post title for RSS feed users. For example, this can be handy if you are publishing a sponsored post or a guest post.
First, you need to add the following code to your theme’s functions.php file or use WPCode to add the custom code snippet without breaking your website:
Next, you need to edit the post where you want to display the extra text in the title field.
Then, add guest_post and sponsored_post as custom fields.
If either of these two custom fields is found with a value “true”, then the code will add the appropriate text before the title. This technique can be used in many ways to fit whatever you like.
How to Set Expiration Date for Posts in WordPress Using Custom Fields
Want to set an expiration date for some posts on your WordPress site? This comes in handy when you want to publish content only for a specific period like running surveys or limited-time offers.
One way to do this is by manually removing the post content or by using a plugin like Post Expirator.
Another option is using custom fields to automatically expire posts after a specific time. You will need to edit your theme files and modify the WordPress loop like this:
<?php
if (have_posts()) :
while (have_posts()) : the_post();
$expirationtime = get_post_meta($post->ID, "expiration", false);
if( count( $expirationtime ) != '' ) {
if (is_array($expirationtime)) {
$expirestring = implode($expirationtime);
}

$secondsbetween = strtotime($expirestring)-time();
if ( $secondsbetween >= 0 ) {
echo 'This post will expire on ' .$expirestring.'';
the_content();
} else {
echo "Sorry this post expired!"
}
} else {
the_content();
}
endwhile;
endif;
?>
Note: You will need to edit this code to match your theme.
After adding this code, you can add the expiration custom field to the post you want to expire. Make sure you add the time in this format mm/dd/yyyy 00:00:00.
How to Style Individual Posts Using Custom Fields
Want to change the look of an individual post using CSS? WordPress automatically assigns each post its own class, which you can use to add custom CSS.
However, by using custom fields, you can add your own custom classes and then use them to style posts differently.
First, you need to edit a post that you would like to style differently. Go to the Custom Fields box and add the post-class custom field.
Next, you need to edit your WordPress theme files and add this code at the beginning of the WordPress loop:
Are you looking to add an express checkout button to your online store?
Express checkout helps streamline the checkout process and improves the overall shopping experience for your customers. It can also boost conversions and reduce cart abandonment.
In this article, we will show you how to add express checkout buttons in WooCommerce.
Why Add Express Checkout in WooCommerce?
Adding express checkout to your WooCommerce store provides a better shopping experience for your customers.
It allows customers to go directly to the payment page and skip the shopping cart or checkout pages. They also won’t have to go to a payment provider page or fill out a checkout form to complete their purchases.
Express checkout buttons make the entire buying process quicker. Customers can simply click the buttons and log in to pay for the products they wish to buy in an instant. As a result, you may see a boost in conversions and fewer abandoned carts.
Adding express checkout also helps mobile users where their screen sizes are small. Customers will just tap the buttons to quickly purchase the products.
However, WooCommerce doesn’t offer an express checkout option by default. You will need to use a WooCommerce plugin to add the feature to your online store.
That said, let’s see how you can add express checkout buttons in WooCommerce.
Setting Up FunnelKit on Your WooCommerce Store
FunnelKit is the best WooCommerce sales funnel plugin on the market. It lets you add express checkout buttons and create different funnel pages for your online store.
The best thing about using the plugin is that it works with Stripe, Apple Pay, Google Pay, PayPal Express, Amazon Pay, and other payment gateways for express checkout. This way, you don’t have to add each payment provider to your online store using third-party plugins or extensions.
FunnelKit also provides user-friendly templates and lets you do A/B testing. You can easily customize your funnels using different drag-and-drop page builders. Plus, there are multiple pre-built templates and automation features for your marketing campaigns.
Note: For this tutorial, we will be using the FunnelKit Pro plugin because it includes premium templates and more customization options. You can also use the free Funnel Builder for WordPress by FunnelKit plugin to add express checkout buttons in WooCommerce.
First, you will need to install and activate the FunnelKit plugin. If you need help, then you can follow our guide on how to install a WordPress plugin.
Upon activation, you will see the FunnelKit setup wizard. Go ahead and click the ‘Get Started’ button.
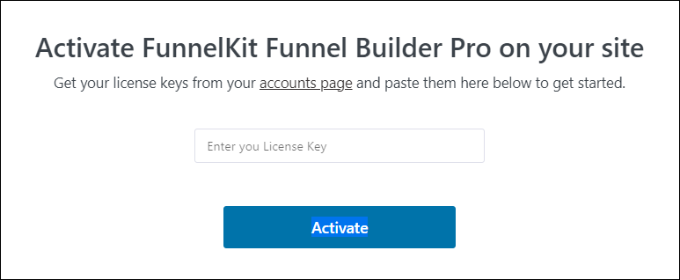
After that, you will need to enter your license key. You can find the key in the FunnelKit account area.
Simply click the ‘Activate’ button after entering the license key.
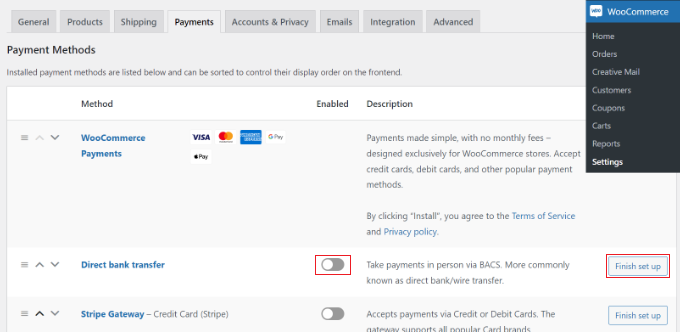
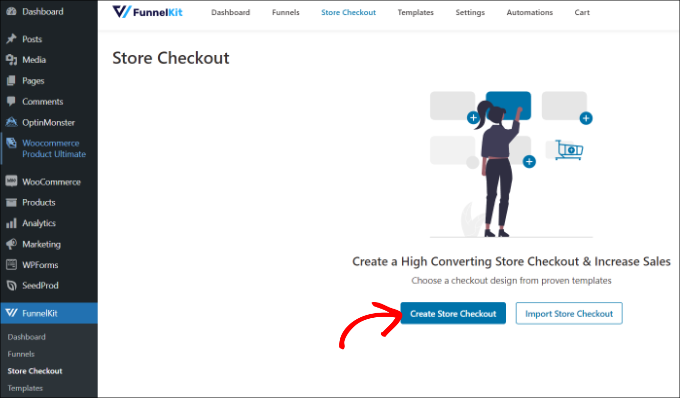
Once you have enabled your preferred payment gateways, you can head to the FunnelKit » Store Checkout page from your WordPress admin panel.
From here, simply click the ‘Create Store Checkout’ button.
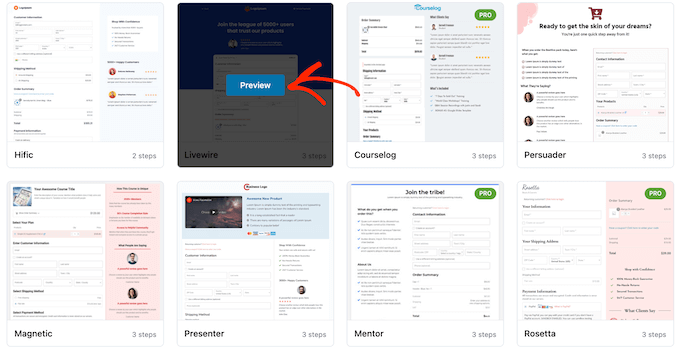
On the next screen, FunnelKit will show you professionally-designed templates for your checkout page. It will also let you create a checkout page from scratch.
However, we recommend using a template and quickly customizing it according to your requirements.
Simply hover over a template you’d like to use and click the ‘Preview’ button.
For this tutorial, we will use the Livewire template.
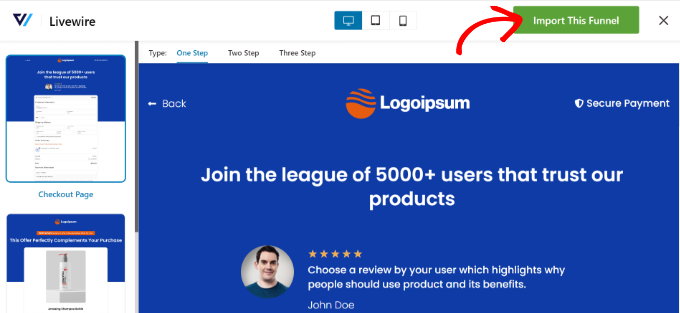
Next, go ahead and click the ‘Import This Funnel’ button at the top.
Depending on the template you use, FunnelKit may ask you to install additional plugins like Elementor to edit the checkout page.
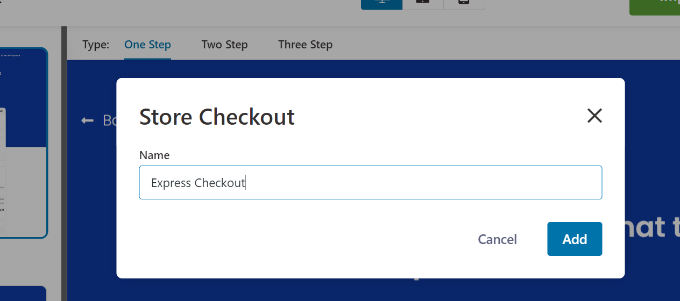
Next, you will need to enter a name for your store checkout and click the ‘Add’ button.
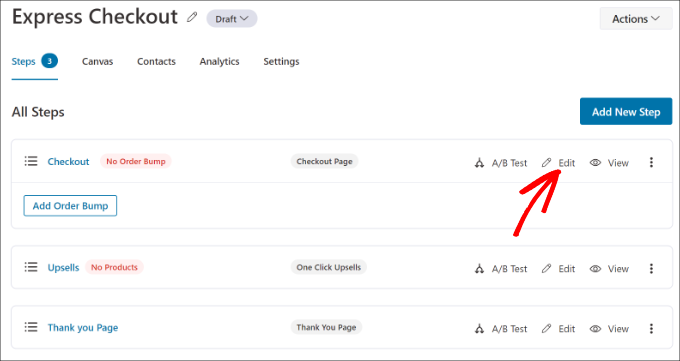
After that, you will see all the steps that are included in the template.
You can simply click the ‘Edit’ button for the Checkout page to continue.
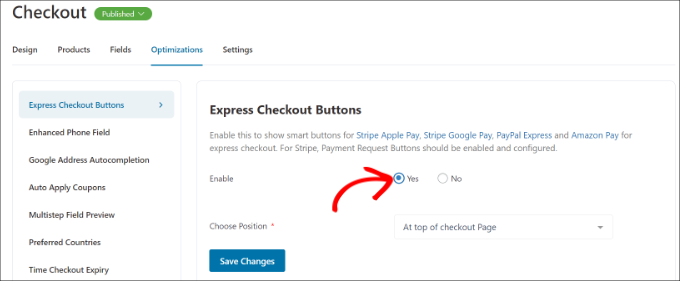
Next, you can switch to the ‘Optimizations’ tab. From here, simply enable the ‘Express Checkout Buttons’ option.
FunnelKit will also let you choose the position of the buttons from the following options:
Top of the checkout page
Before/after the product switcher
Before/after the order summary
Above the payment gateways
When you are done, simply click the ‘Save Changes’ button.
That’s it, you have successfully added express checkout buttons to your online store.
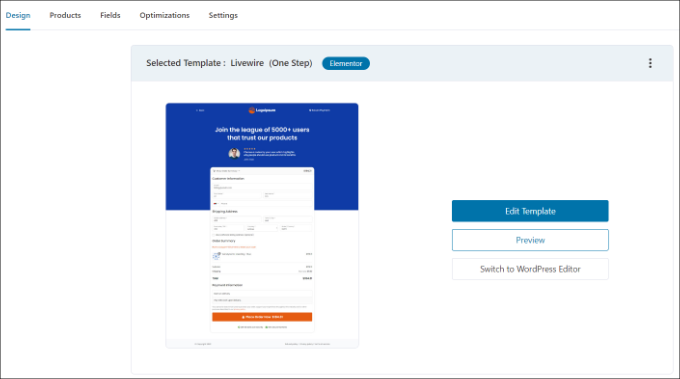
If you want to edit the appearance of the checkout page, then you can switch to the ‘Design’ tab and click the ‘Edit Template’ button.
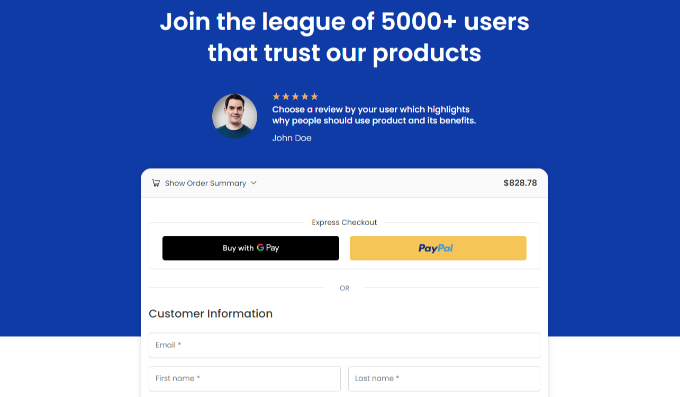
Once you have made your changes, simply visit your online store to view the express checkout buttons in action.
Additionally, FunnelKit helps you upsell products in WooCommerce. This way, you can boost sales by encouraging users to buy more products.
You can also set up automated emails in WooCommerce using FunnelKit Automations, a sister product of FunnelKit. This plugin lets you create automated workflows and send email campaigns to customers.
Do you want to use the free Cloudflare CDN on your WordPress site?
Cloudflare is one of the best WordPress CDN services available in the market. They offer a free CDN that speeds up your website along with a suite of powerful security features for small business websites.
The challenge is that many entry-level users are not able to use Cloudflare because they think it is hard to set up.
In this guide, we will walk you through a complete Cloudflare setup in WordPress to help you improve your website speed.
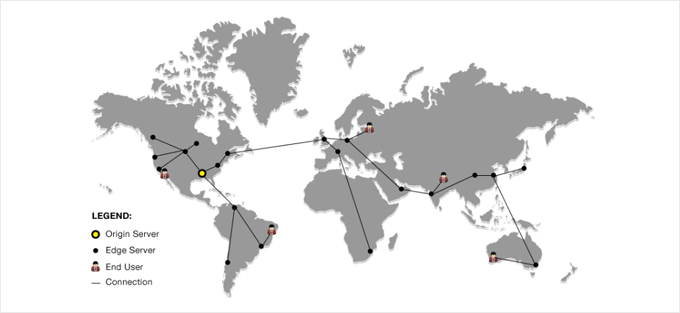
What Is a CDN?
A CDN or content delivery network is a system of distributed servers that helps deliver your website files faster to users based on their location.
Typically, a web hosting service serves your website visitors from a single location. All the users access the same server, no matter where they are located.
This can cause a delay in content delivery for users living further away from your website’s central hosting server.
That’s why CDNs set up multiple edge servers in different locations around the globe.
These CDN servers cache static content from your website’s origin server and present it to users when they visit your WordPress website.
When there is a user request, the CDN server closest to the user’s location will handle it.
For example, if someone in the USA wants to access a UK-hosted website, then a CDN server in the USA will serve that request, not the main server in the UK.
With a CDN, all the user requests are handled by the nearest CDN servers. This reduces the physical distance between the visitors and your website’s server.
As a result, a CDN improves your website performance and speed for all users regardless of their geographic location.
A faster website also improves the user experience and can give your website a slight boost in SEO rankings. Using a CDN also reduces the load on your primary server and protects it from crashing during traffic spikes.
Cloudflare is one of the most popular free CDN providers available on the internet. It is a large network of globally-distributed servers that automatically cache static content and deliver dynamic content quickly.
On top of a CDN service, Cloudflare is also a cloud-based website firewall and a distributed proxy server. It monitors all incoming traffic to your website and blocks suspicious traffic even before it reaches your server.
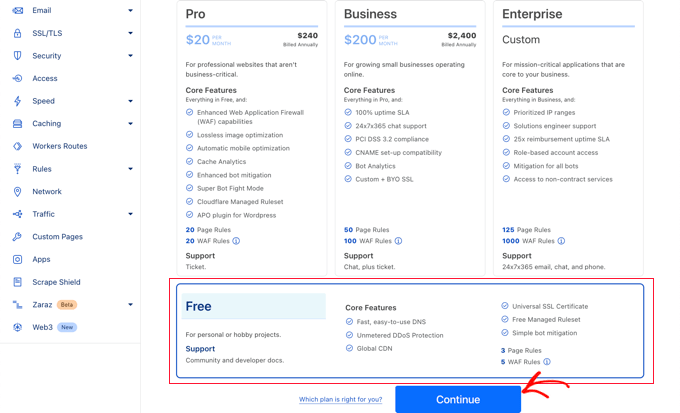
They offer a free basic plan that’s suitable for small business websites and blogs. They also offer paid plans starting at $20 per month.
Cloudflare is an excellent choice for small businesses looking for a free CDN. However, if you want to fully utilize all of Cloudflare’s features, then you will need the Business plan, which costs $200 per month.
Note: We do not use Cloudflare on WPBeginner. Instead, we use Sucuri as a website firewall and CDN. This firewall has the double benefit of improving speed and security. You can learn more in our comparison of Sucuri vs. Cloudflare.
With that being said, let’s take a look at how to set up Cloudflare Free CDN in WordPress. You can use the quick links below to jump to the different parts of the tutorial:
To begin, you need to visit the Cloudflare website and click on the ‘Sign Up’ button.
On the next page, you need to enter your email address and password to create a Cloudflare account.
Simply enter the information required, and then click on the ‘Sign up’ button.
When you finish signing up, you will see a thank you page confirming that your Cloudflare account has been set up.
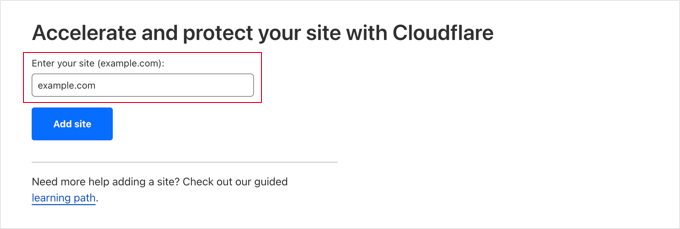
The next step is to add your website to Cloudflare. You should click the ‘Add a website or application’ button to get started.
You can now enter your website into the ‘Enter your site’ field.
Make sure you only type your site’s domain name, such as example.com. You don’t need to type the full URL or any extra characters.
On the next screen, you will be asked to choose the type of Cloudflare plan you want.
For this tutorial, we will choose the free Cloudflare plan. Then, click the ‘Continue’ button.
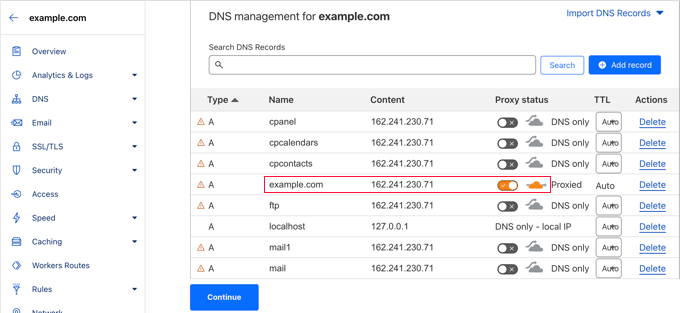
After that, Cloudflare will show you a list of all DNS records their systems found. These will include your subdomains as well.
The DNS records you want to be passed through Cloudflare should have an orange cloud icon. The DNS records that will bypass Cloudflare will have a gray cloud icon.
You need to review the list to make sure that your primary domain is active on Cloudflare with an orange cloud icon. Simply click the ‘Proxy status’ toggle to change the status.
Once you have verified your DNS records, just click on the ‘Continue’ button at the bottom.
During the next step of your setup, Cloudflare will ask you to update your nameservers. You will be asked to change your nameservers and point them to Cloudflare nameservers.
Note: Changing nameservers can take some time to propagate throughout the internet. During this time, your website may become inaccessible to some users.
Or, if you got a free domain from your web hosting provider like Bluehost, then you will have to change the name server by logging in to your hosting account.
For the sake of this tutorial, we will be showing you how to change the nameservers from the Bluehost control panel.
While the process is similar across hosting companies, you can always ask your hosting provider for detailed instructions for their control panel.
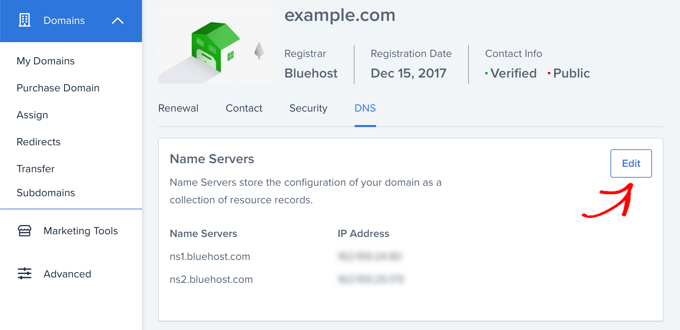
Once you are logged in to your Bluehost cPanel dashboard, go to the ‘Domains’ section, and select your domain name. After that, click on the ‘Name Servers’ tab and the ‘Edit’ button.
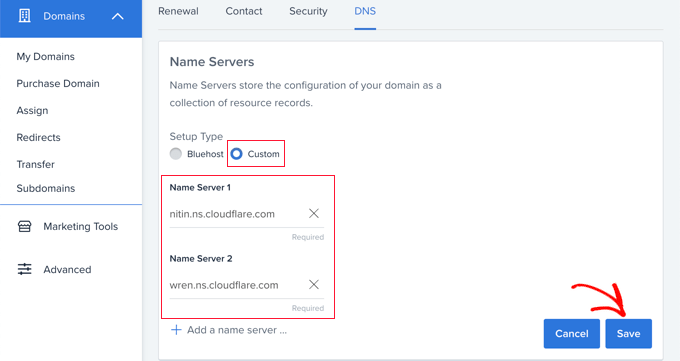
Next, you need to select ‘Custom’ and enter the nameservers provided by Cloudflare.
Then, click the ‘Save’ button.
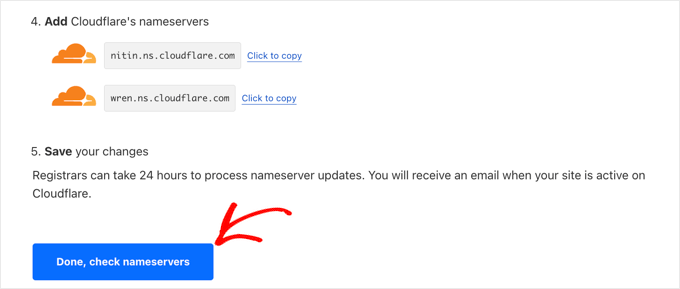
After that, you need to go back to the Cloudflare setup page, and click the ‘Done, check nameservers’ button to finish the setup.
It will now check your new nameservers automatically.
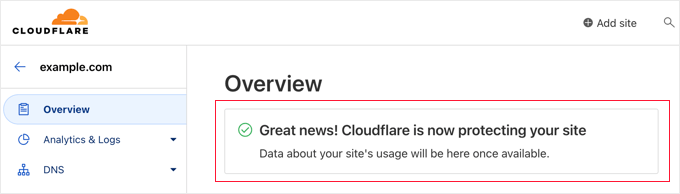
That’s it! It will take a few minutes to update your domain nameservers and activate Cloudflare.
Once activated, you will see the success message in your Cloudflare dashboard.
In the meantime, the Cloudflare Quick Start Guide will open automatically, and you can use it to customize your Cloudflare settings. We will show you how in the next section.
Note: The above screenshots show the Bluehost control panel. Your nameserver settings may look different if you are using a different hosting provider.
Configuring Cloudflare With the Quick Start Guide
The Cloudflare Quick Start Guide should have opened automatically after you clicked on the ‘Done, check nameservers’ button above. This setup wizard will help you improve the security and performance of your website.
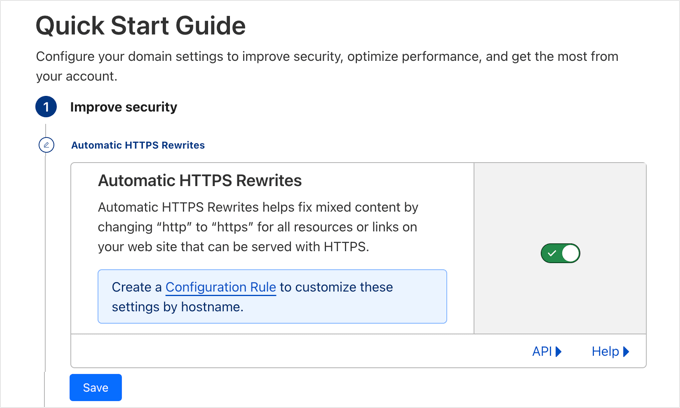
The first setting is ‘Automatic HTTPS Rewrites’.
This will help you avoid the mixed content error in WordPress. It does this by automatically changing ‘http’ to ‘https’ in the URLs of all resources and links on your site that can be served with a secure ‘https’ URL.
This setting is on by default. We recommend you leave it on and click the ‘Save’ button.
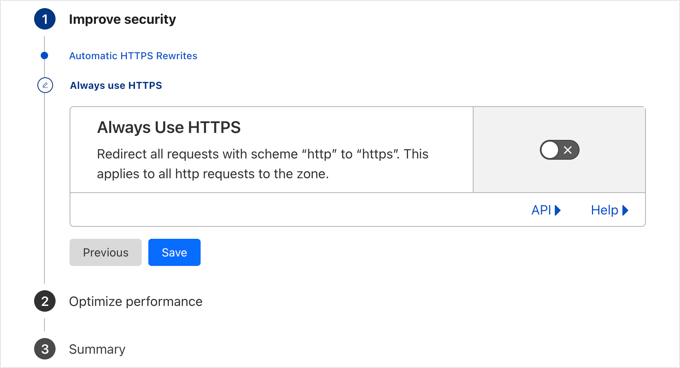
The next setting is ‘Always Use HTTPS’.
Some users have reported issues when using this setting with Cloudflare. This setting is disabled by default, and we recommend you leave it that way. We will show you how to redirect from HTTP to HTTPS using the All in One SEO plugin later in this article.
Now you can click the ‘Save’ button to move on to the next option.
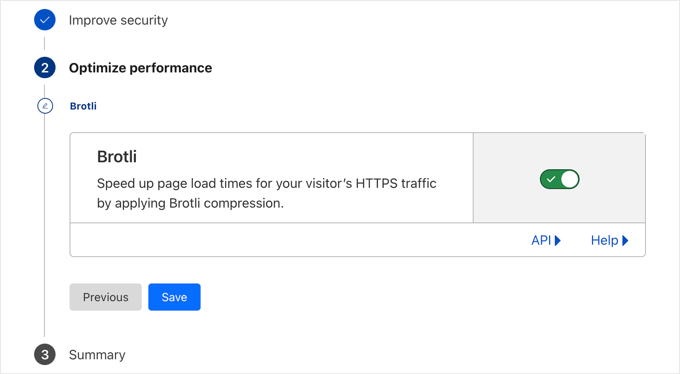
The next setting is Brotli compression.
Cloudflare can use Brotli compression to unlock 15-20% speed improvements. This setting is on by default, and we recommend you leave it on.
Make sure you click the ‘Save’ button to store this setting.
Now you will see a summary of what you have configured with the Quick Start Guide.
You should see:
Automatic HTTPS Rewrites: ON
Always Use HTTPS: OFF
Brotli: ON
You have now completed the Quick Start Guide and can click the ‘Finish’ button. However, there are still some additional important settings that need to be configured.
Configuring Additional Important Cloudflare Settings
Your basic Cloudflare setup is complete, but there are a few essential settings you need to configure to keep your WordPress site secure.
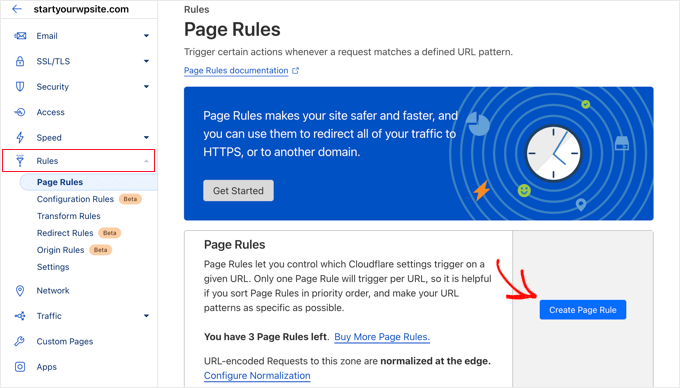
1. Secure Your WordPress Login Page
You can set up page rules to customize how Cloudflare works on specific pages on your site. This is especially useful for securing critical pages such as the login page and wp-admin area.
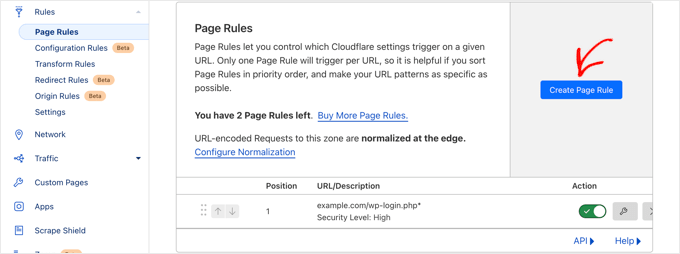
The Cloudflare free account allows you to set up 3 page rules. If you want to add more page rules, then you need to pay $5 per month for 5 extra rules.
First, you need to click the ‘Rules’ option in the menu on the left of the page. After that, you can click the ‘Create Page Rule’ button.
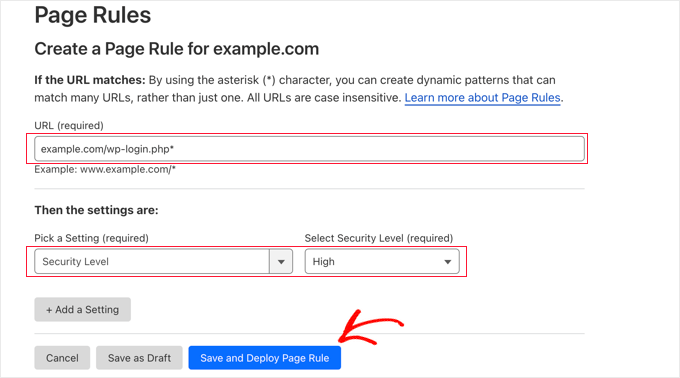
Now you can set up 3 different page rules. You can start by creating a rule that secures your WordPress login page.
Simply add the following settings below to secure your website:
Page URL: example.com/wp-login.php*
Settings: Security Level – High
When you are done, just click ‘Save and Deploy’ to store and activate the rule.
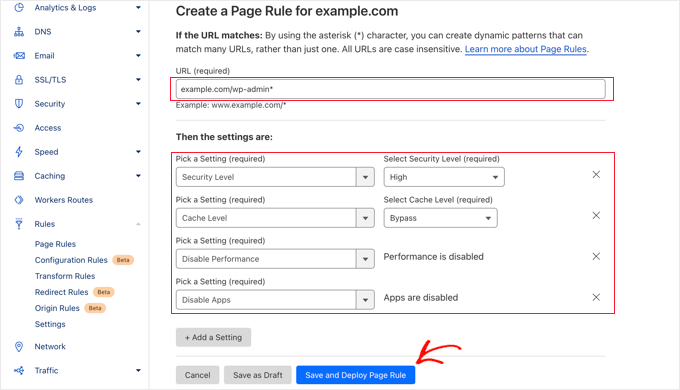
2. Exclude the WordPress Dashboard from Cloudflare
You will be returned to the Page Rules page, where you can see your first rule listed.
Now you can create a second rule to exclude the WordPress dashboard from Cloudflare caching and enable high security.
You’ll need to click on the ‘Create New Rule’ button to create your second rule.
After that, you need to type the following settings into the rule. You can click the ‘+ Add a Setting’ button to add new rows for additional settings:
Page URL: example.com/wp-admin*
Settings: Security Level – High
Cache Level – Bypass
Disable Performance
Disable Apps
When you are done, make sure you click ‘Save and Deploy’ to add the new rule.
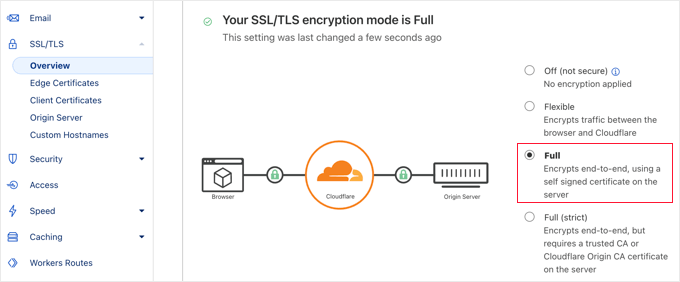
3. Configure SSL Certificate Settings
Another important setting is the SSL certificate available in the ‘SSL/TLS’ menu on the left.
Make sure to click the ‘Full’ radio button if you are already using SSL.
Once you are done, Cloudflare will provide the essential green padlock in your visitors’ address bar to signify that your website is secure.
4. Redirect from HTTP to HTTPS Using All in One SEO
We mentioned earlier that we don’t recommend using Cloudflare’s ‘Always Use HTTPS’ feature. A great alternative is to use the All in One SEO plugin. It’s the best SEO plugin for WordPress, used by over 3 million sites.
The first thing you need to do is activate and install the All in One SEO plugin. For more details, see our guide on how to install a WordPress plugin.
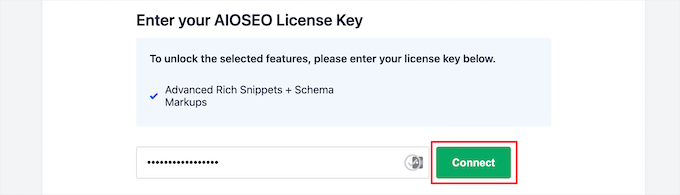
After that, navigate to All in One SEO » General Settings and then enter your license key into the ‘License Key’ box and click ‘Connect’.
You can find your license key in your account profile on the All in One SEO website.
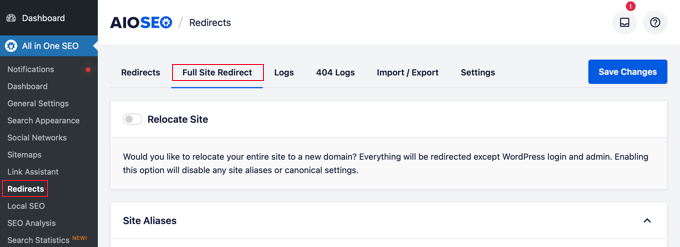
Next, navigate to All in One SEO » Redirects and then click the ‘Full Site Redirects’ menu navigation option.
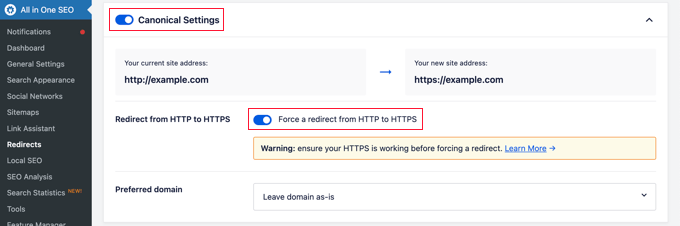
You will need to scroll down the page until you find the ‘Canonical Settings’ toggle. You should click this toggle so that it turns blue.
Next, turn on the ‘Redirect from HTTP to HTTPS’ toggle. This will create a redirect from HTTP to HTTPS, making sure that your visitors always have a secure connection to your website.
When you are done, make sure to click the ‘Save Changes’ button at the bottom or top of the screen to store this setting.
Optimizing Cloudflare for WordPress Using a Plugin
Cloudflare offers a dedicated WordPress plugin for one-click WordPress-optimized settings.
The plugin lets you quickly set up Cloudflare on your WordPress site, add web application firewall (WAF) rulesets, automatically purge the cache, and more.
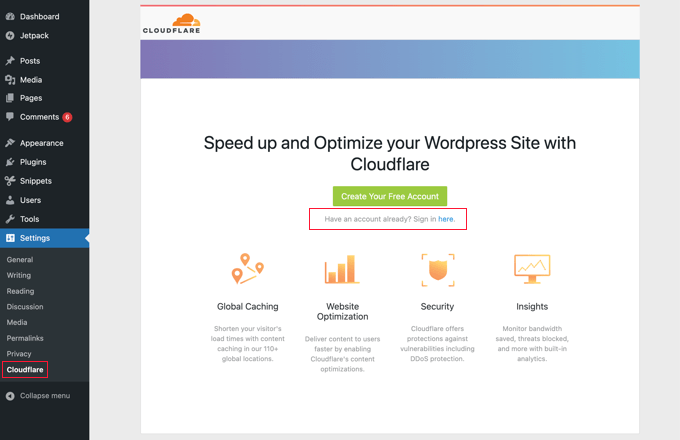
Once done, you need to visit Settings » Cloudflare in your admin panel to configure the Cloudflare settings.
On the settings page, you will see a ‘Create Your Free Account’ button and a sign-in option for existing accounts. Simply click the ‘Sign in here’ link.
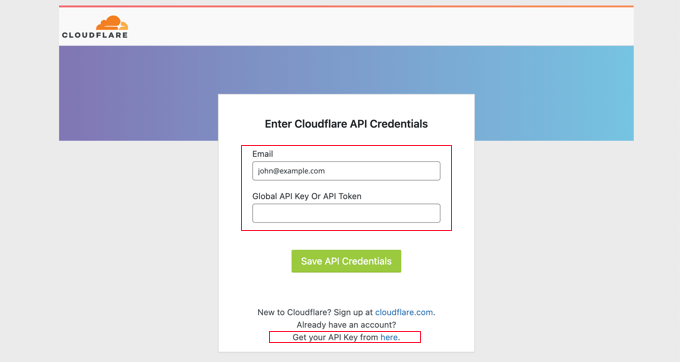
On the next screen, you will need to enter your Cloudflare email and API key.
Click the ‘Get your API key from here’ link.
This will bring up a popup for your account area on the Cloudflare website.
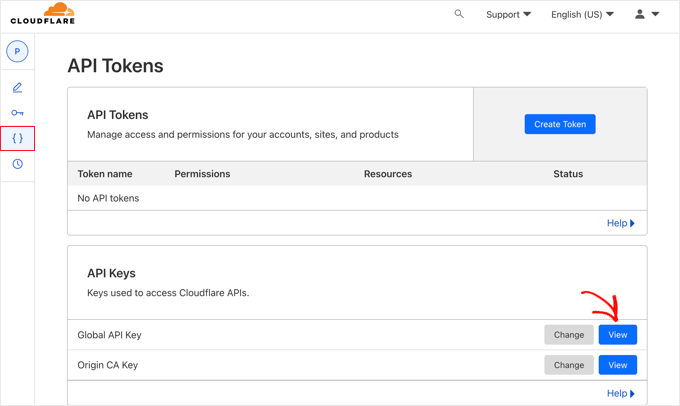
Make sure you are on your ‘My Profile’ page, and then click on the ‘API Tokens’ tab in the left sidebar.
After that, go to the ‘Global API Key’ section and click on the ‘View’ button.
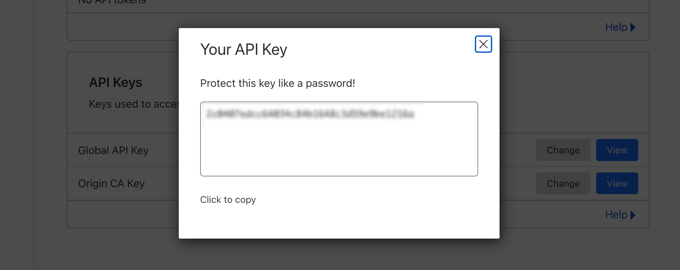
This will open a popup and display your API key.
Simply click on the key to copy it.
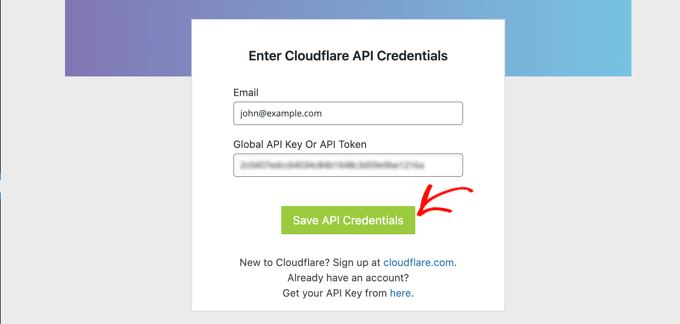
Next, you need to come back to your WordPress dashboard and enter your email address and API key.
Then, click the ‘Save API Credentials’ button.
After that, the Cloudflare settings will appear on your dashboard.
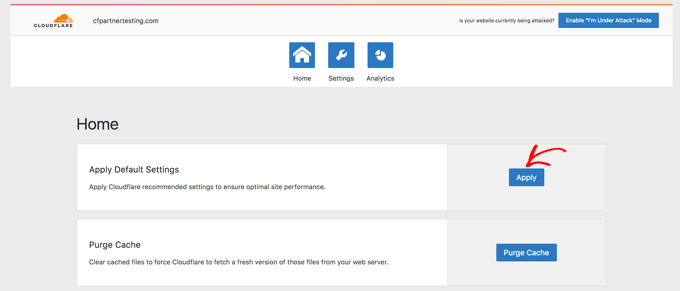
From here, you can apply a single-click WordPress optimization, purge the cache, enable automatic cache, and more.
To optimize your WordPress site, just click the ‘Apply’ button next to ‘Apply Default Settings’.
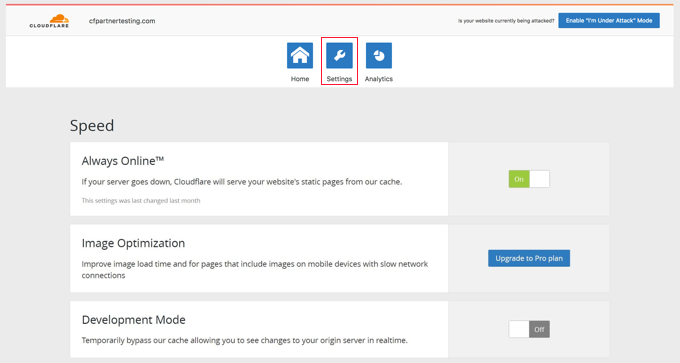
Next, click on the ‘Settings’ menu option.
Here you will find more site optimization settings.
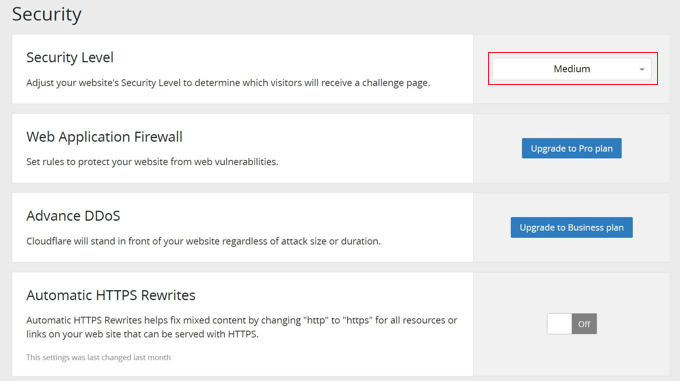
You can scroll down on this screen to find the ‘Security’ section.
By default, the security level is medium. To improve your website’s security, you can select ‘High’ from the dropdown list.
We hope this article helped you to learn how to set up Cloudflare free CDN in WordPress. You may also want to see our ultimate WordPress security guide and our expert picks for the best WordPress security plugins to further protect your website.
If you liked this article, then please subscribe to our YouTube Channel for WordPress video tutorials. You can also find us on Twitter and Facebook.
Do you want to disable automatic update email notifications in WordPress?
By default, WordPress sends email notifications for automatic updates of WordPress plugins, themes, and the core itself. These notification emails can get annoying.
In this article, we will show you how to easily disable automatic update email notifications in WordPress.
Some of these updates are automatically installed, and you will receive an email notification that your site has been updated.
Similarly, WordPress also allows you to enable automatic updates for WordPress plugins and themes. This means that you can spend less time updating plugins and more time growing your business.
You can enable automatic updates for plugins that you trust by visiting the Plugins » All Plugins page in your WordPress admin dashboard.
Simply click on the ‘Enable auto-updates’ link next to the plugin that you want to update itself.
For WordPress themes, you can visit the Appearance » Themes page and click on a theme.
This will bring up a theme information popup where you must click on ‘Enable auto-updates’.
WordPress will send you an email notification when any of your plugins, theme, or WordPress core is updated.
This can get annoying, particularly for users who manage multiple WordPress websites. Wouldn’t it be nice if you could control and turn off these email notifications?
Let’s take a look at how to easily disable automatic update email notifications in WordPress. You can use the quick links below to jump to the method you want to use:
Method 1: Disable Automatic Update Email Notification Using Code (Recommended)
This method requires you to add code to your WordPress files. If you haven’t done this before, then take a look at our beginner’s guide on pasting snippets from the web into WordPress.
You can manually add the code below to your theme’s functions.php file. But this can be tricky since a mistake can bring down your whole website. Plus, if you update your theme, then any custom code snippets will be erased.
We will show you a better approach below, which is using a code snippets plugin.
1. Disable Auto Update Notification Emails for WordPress Core, Themes, and Plugins
Luckily, there is an easy and safe way to disable auto update notification emails in WordPress, and that’s using the WPCode plugin.
WPCode lets you easily add custom code snippets in WordPress without editing your theme’s functions.php file.
Plus, it has a full code library inside the plugin that includes ready-to-use, verified code snippets for popular feature requests like disabling automatic update emails, removing the WordPress version number, disabling comments, and more.
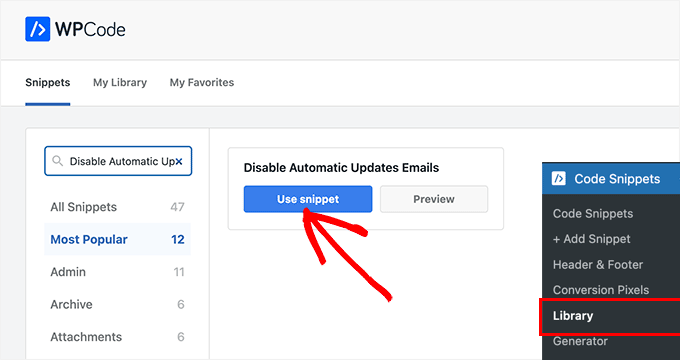
Once the plugin is activated, you need to go to Code Snippets » Library from your WordPress admin dashboard.
Then, search for the ‘Disable Automatic Updates Emails’ snippet and click on the ‘Use snippet’ button.
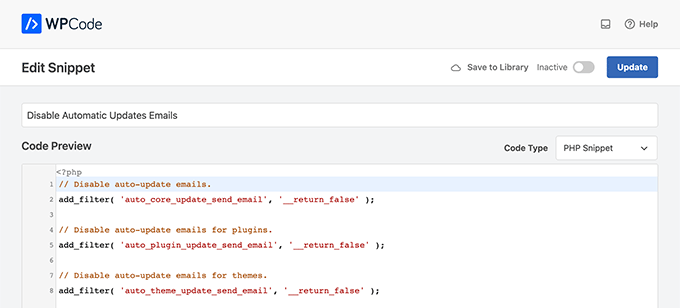
WPCode will then automatically add the code and set the proper insertion method.
The snippet has three filters, with one for each type of auto-update email: WordPress core, WordPress plugins, and WordPress themes.
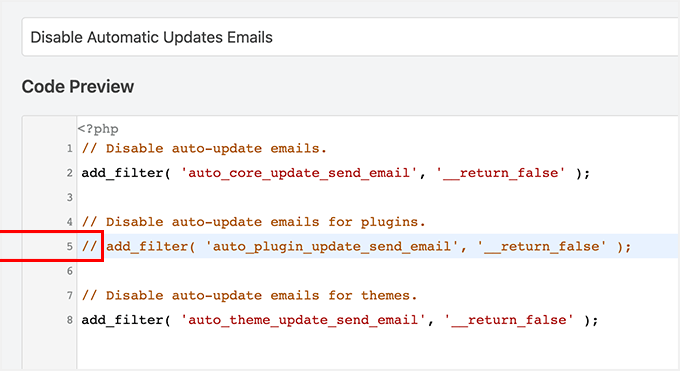
If you don’t want to use a particular filter, simply add a // at the beginning of the filter line.
For example, if you still want to get auto-update emails for WordPress plugins, add a // to the plugin, and the filter will stop it from executing.
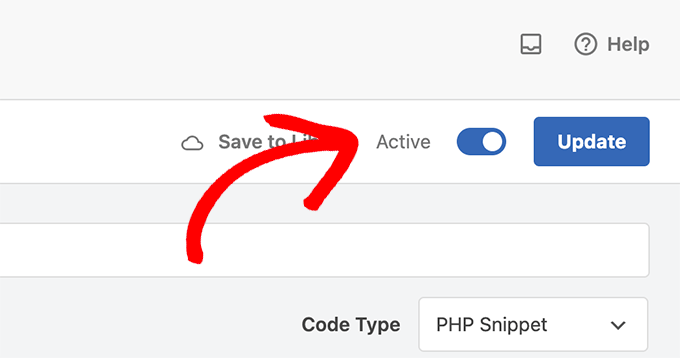
After that, all you have to do is toggle the switch from ‘Inactive’ to ‘Active’.
Then, click the ‘Update’ button.
Now you will no longer get automatic update emails from WordPress.
2. Disable Auto Update Notification Emails for Core Updates
You can also use WPCode to disable notification emails for automatic WordPress core updates. Instead of choosing an existing code snippet, you will need to add this code as a custom snippet:
Upon activation, you need to visit the Settings » Notification emails page. This is where the plugin allows you to manage all WordPress notification emails, including auto-update notifications.
Simply scroll down to the auto-update options and uncheck the box next to the notifications you want to disable.
Finally, don’t forget to click on the ‘Save Changes’ button to store your settings.
2. WP Mail SMTP
Another plugin you can use to disable automatic update email notifications is WP Mail SMTP. It’s the best SMTP service for WordPress and ensures your emails are delivered to your inbox.
WP Mail SMTP lets you easily manage the emails sent by WordPress through its Email Controls. However, you will need the WP Mail SMTP Pro license to unlock the Email Controls option.
Next, you will need to install and activate WP Mail SMTP Pro on your website. You can check out our guide on how to install a WordPress plugin for more details.
Once the plugin is active, navigate to WP Mail SMTP » Settings from your WordPress admin panel and click the ‘Email Controls’ tab.
After that, scroll down to the ‘Automatic Updates’ section and disable email notifications for plugins, themes, WP core status, and full log.
When you are done, don’t forget to click the ‘Save Settings’ button.
That’s all. You have successfully disabled WordPress auto-update email notifications for your website.
Rolling Back WordPress Updates if Something Goes Wrong
Because WordPress plugins run on many independent WordPress hosting and server configurations, sometimes a plugin update may break a feature on your website or make it inaccessible.
This is easy to troubleshoot and fix. First, you need to figure out which plugin has caused the issue by deactivating all WordPress plugins and reactivating them one by one.
Once you have isolated the plugin causing the issue, you can use the WP Rollback plugin. It allows you to switch to the previous version of a WordPress plugin or theme.
You will also want to make sure that emails sent to users are delivered, including forgotten password emails, payment receipt emails, and order confirmation notifications.
To send emails, WordPress uses the PHP mail function. This function is easily misused by spammers, and your emails may end up in the spam folder.
To make sure all your important WordPress notification emails reach your users’ inboxes, you will need a proper SMTP service to send emails.
This is where the WP Mail SMTP plugin comes in. It uses an SMTP service to send all your WordPress notification emails.
Are you looking to add a Mailchimp subscribe form to your WordPress website?
Mailchimp is a popular email marketing tool that offers a form builder. However, this builder has limited features and customization options. Adding a custom subscribe form gives you more flexibility and helps grow your email list.
In this article, we will show you how to create a Mailchimp subscribe form in WordPress with custom fields.
Why Add a Custom Mailchimp Subscribe Form in WordPress?
Adding a subscription form to your WordPress website is a great way of communicating with your users.
You can send newsletters, new product releases, announcements, and other information while creating a direct connection with your audience.
Mailchimp is one of the most popular email marketing services. It helps you build an email list, send emails, and set up automated email campaigns. Plus, it also offers a form builder that you can use to create a subscription form and embed it on your website.
However, Mailchimp’s form builder is very basic and doesn’t offer a lot of customization options. You get limited form fields to choose from, and there are no settings to change color, font, and more. It also adds Mailchimp branding at the bottom.
Creating a custom Mailchimp subscribe form gives you more flexibility and control. You can add all types of form fields, edit their appearance, add conditional logic to show fields based on the user’s responses, and more.
That being said, let’s look at how you can create a Mailchimp subscription form with custom fields.
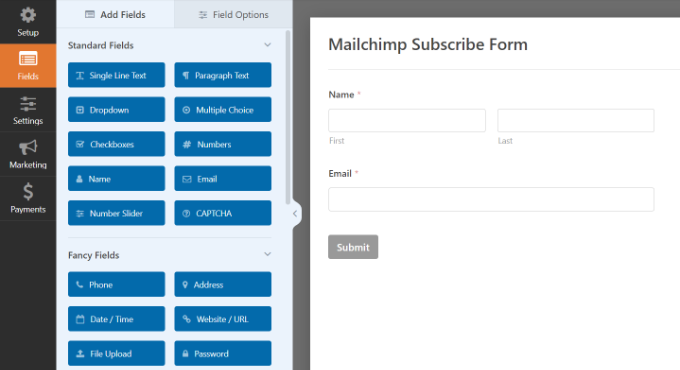
How to Create a Mailchimp Subscribe Form in WordPress
The easiest way of adding a Mailchimp subscribe form in WordPress is by using WPForms. It is the best contact form plugin for WordPress that’s used by over 5 million professionals.
WPForms is a beginner-friendly plugin that offers a drag-and-drop form builder, prebuilt templates, and lots of customization options. The best part is it easily integrates with Mailchimp.
Note: For this tutorial, we will be using the WPForms Pro version because it includes the Mailchimp addon and custom form fields. There is also the WPForms Lite version that is available for free, but it doesn’t offer a Mailchimp integration.
Step 1: Connect Mailchimp With WPForms
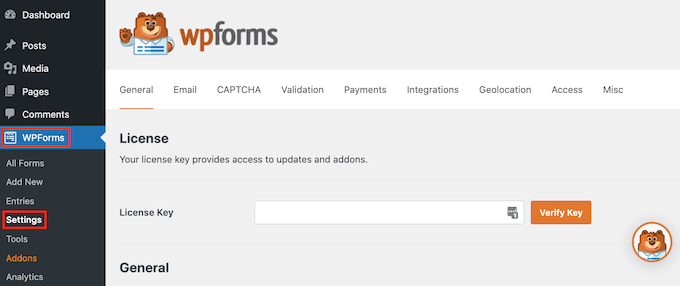
First, you will need to install and activate the WPForms plugin. If you need help, then please see our guide on how to install a WordPress plugin.
Upon activation, you will need to go to WPForms » Settings and add the license key. You can find the key in your WPForms account area.
After entering the license key, go ahead and click the ‘Verify Key’ button.
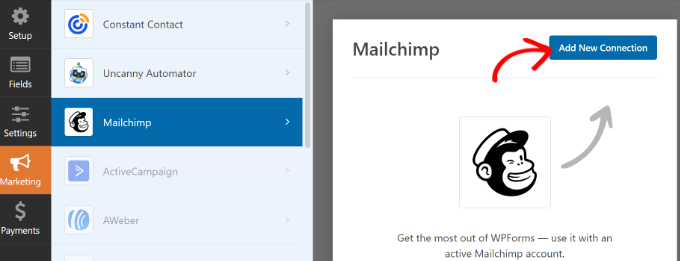
Next, you will need to install the Mailchimp addon.
You can do that by going to WPForms » Addons from the WordPress admin panel. From here, navigate to the Mailchimp addon and click the ‘Install Addon’ button.
The addon should now install and activate.
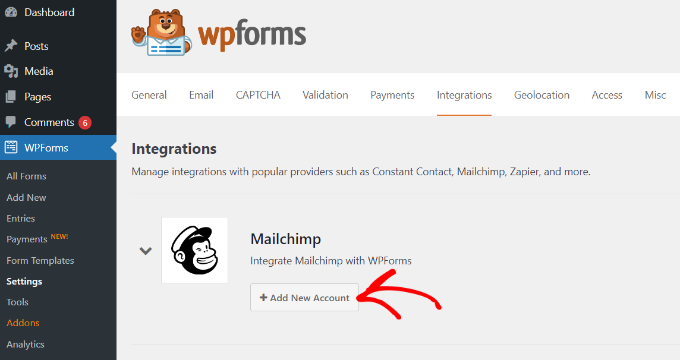
Once that’s done, simply go to WPForms » Settings from your WordPress dashboard and switch to the ‘Integrations’ tab.
Next, you can expand the Mailchimp settings and then click the ‘+ Add New Account’ button under Mailchimp.
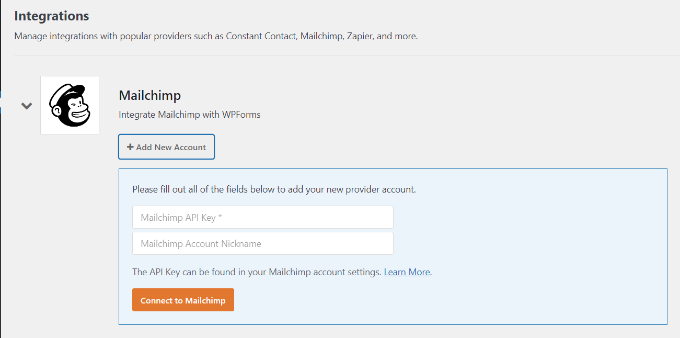
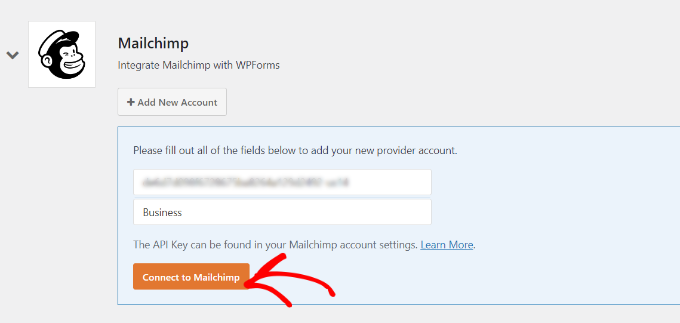
As soon as you do that, you will see more options. To integrate Mailchimp, you must enter the API key and account nickname. This will allow WPForms to communicate with your Mailchimp account.
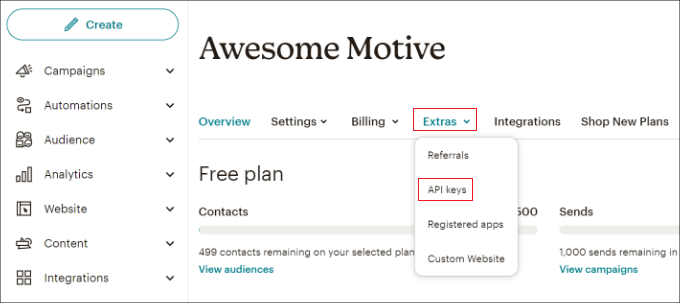
Creating Mailchimp API Keys for WPForms Integration
To create an API key to connect WPForms, you will first need to log in to your Mailchimp account.
Once you are logged in, simply click on your avatar in the top right corner and select the ‘Account & billing’ option.
On the next page, you will see different account settings.
Simply click the ‘Extras’ dropdown menu and then select the ‘API keys’ option.
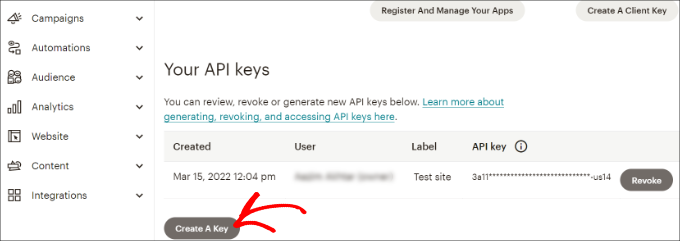
Next, you can copy an existing API key to use for your WPForms integration.
If you haven’t generated a key previously, then simply click the ‘Create A Key’ button.
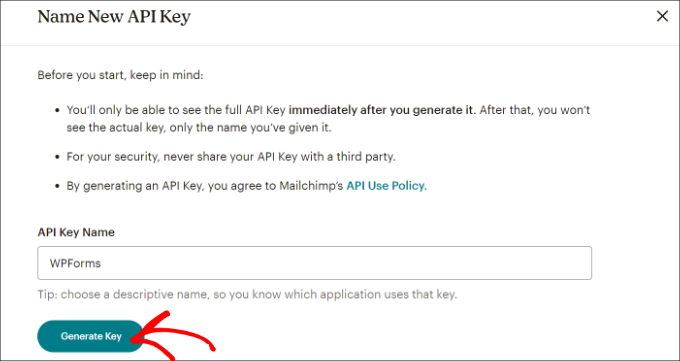
After that, you can enter a name for your new API key.
Once that’s done, just click the ‘Generate Key’ button.
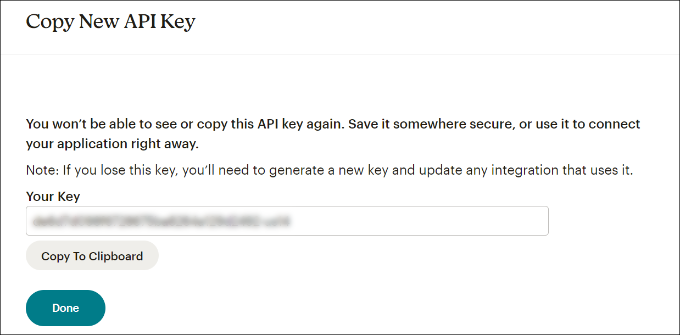
Next, you will see the new API key.
Go ahead and copy the key and click the ‘Done’ button.
You can now return to the browser tab or window with your WPFroms integration settings.
From here, simply paste the key into the ‘API Key’ field. You can also add a Mailchimp account nickname to remember which account you are connected to.
After entering the key, go ahead and click the ‘Connect to Mailchimp’ button.
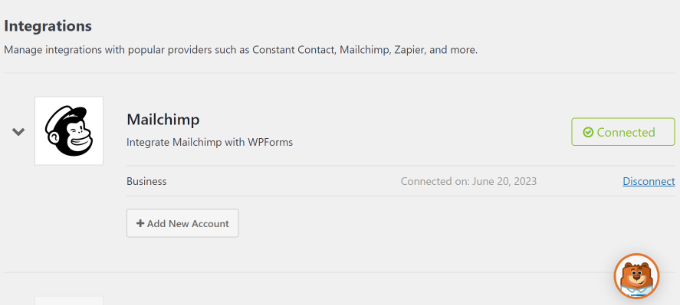
You should now see a green ‘Connected’ button next to the Mailchimp settings, showing that the email marketing tool is successfully integrated with WPForms.
Step 2: Design a Mailchimp Subscribe Form With Custom Fields
Now that you have integrated Mailchimp with WPForms, the next step is to create a subscription form with custom fields.
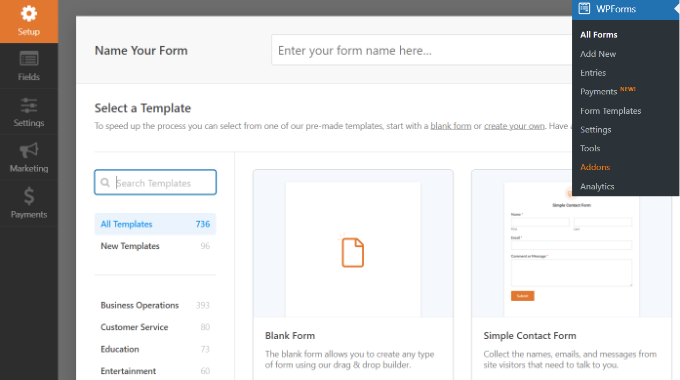
First, you will need to go to WPForms » Add New from the WordPress dashboard. Next, you can enter a name at the top and select a form template.
WPFomrs offers lots of prebuilt form templates, so you can quickly pick one and customize it.
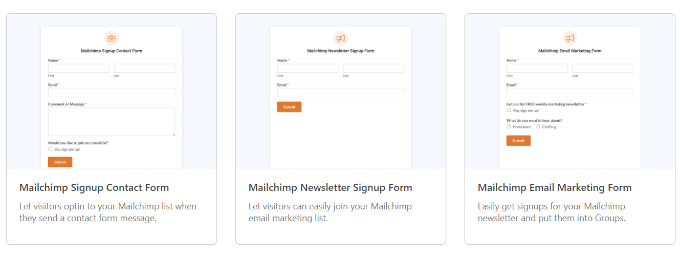
It even offers form templates for Mailchimp. For instance, you can create a signup contact form, newsletter signup form, or email marketing form.
For this tutorial, we will choose the Mailchimp Newsletter Signup Form template.
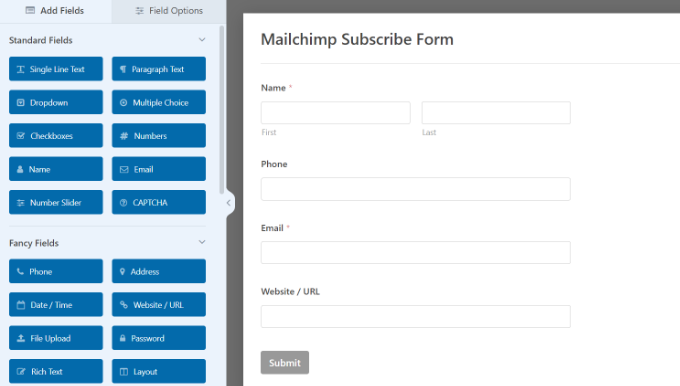
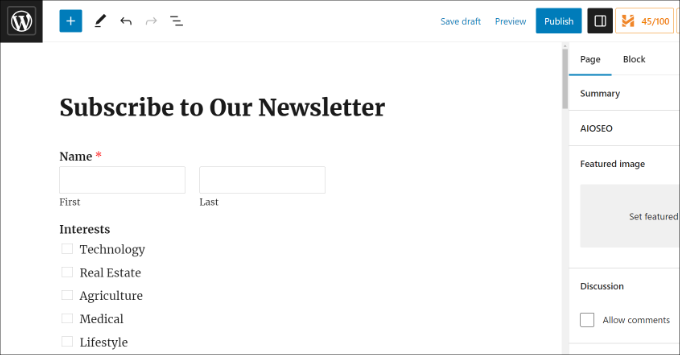
On the next screen, you will see the WPForms drag-and-drop form builder. Here, you can customize the form and add custom fields from the menu on the left.
The default form template will come with a Name and Email field.
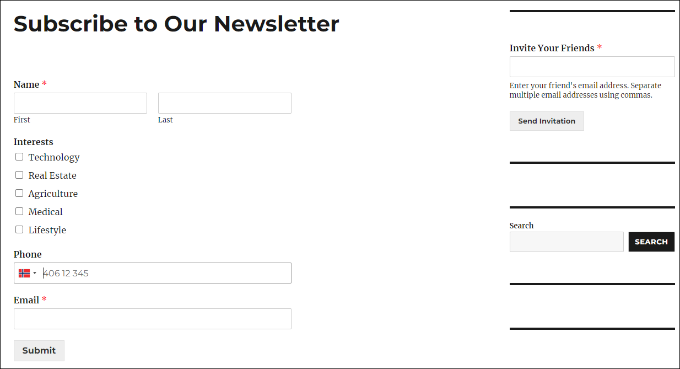
However, you can simply drag any form field and drop it onto the template. There are fields to add text, dropdown options, multiple choice, phone number, address, date and time, website, password, and more.
For instance, if you are using a business phone service, then you can add a Phone field. This will help you send SMS messages or reach out to subscribers via phone calls.
You can add a checkbox field and allow users to select their interests. This way, you can segment your subscribers and send them targeted emails.
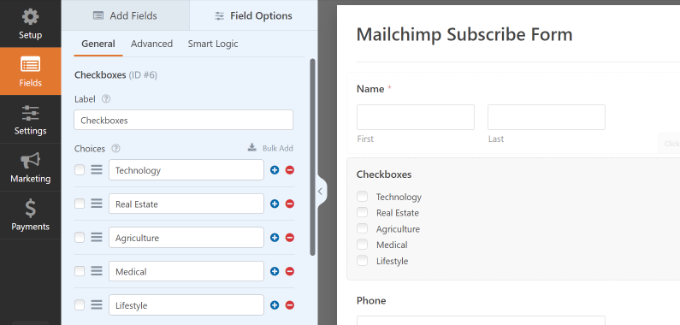
Next, you can further edit each form field in the template. Simply choose a field, and you will see more options in the left panel.
For example, we changed the options in the Checkboxes form field.
You can also edit the label of the form field, make it a required field, add images to the checkbox options, and more.
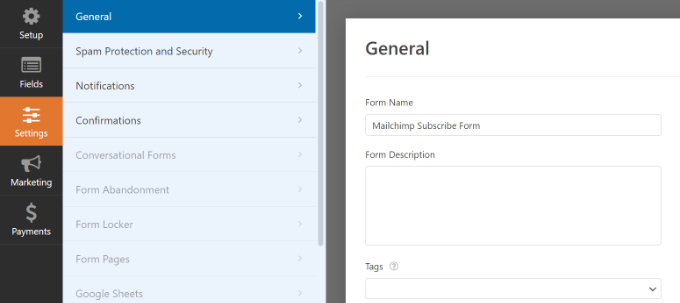
Once you have finished adding custom form fields, switch to the ‘Settings’ tab from the left menu. In the General settings, you can change the form’s name and description, add tags, edit the submit button text, and more.
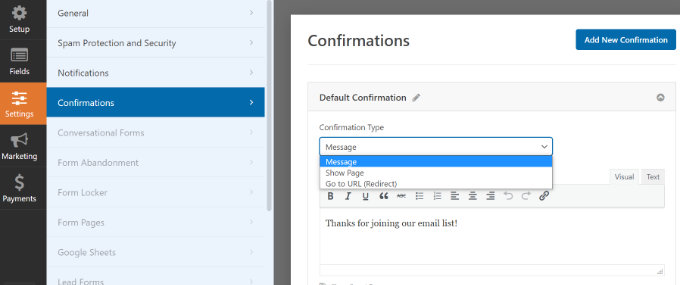
Next, you can switch to the ‘Confirmations’ tab and choose what subscribers will see once they submit a form.
WPForms lets you show a message, a specific page like a thank you page, or redirect users to a URL.
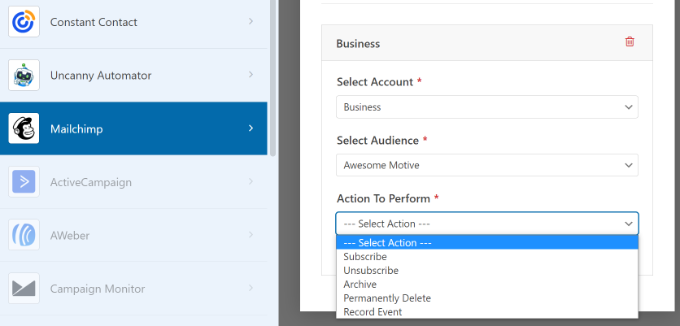
After that, you can go to the ‘Marketing’ tab from the left panel and then select Mailchimp.
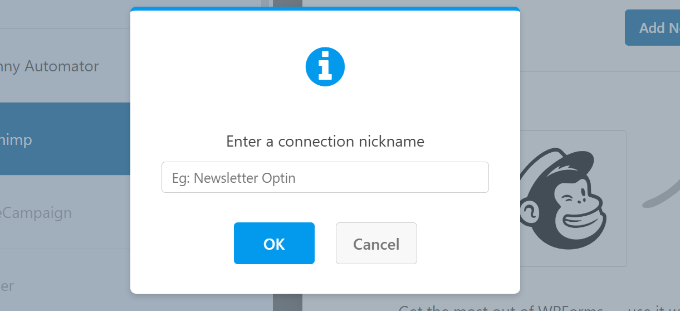
From here, simply click the ‘Add New Connection’ button.
Next, a small popup will open where you will need to enter the Mailchimp nickname.
After entering it, go ahead and click the ‘OK’ button.
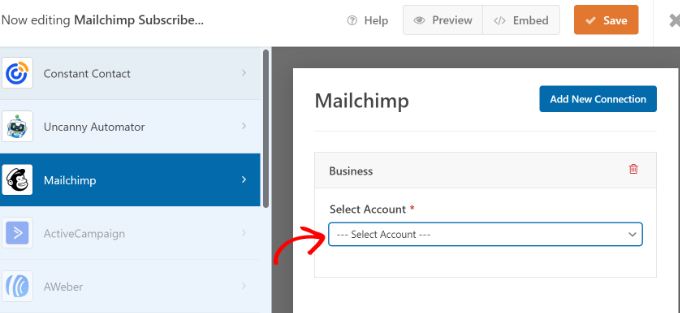
Next, you can pick the Mailchimp account that you connected to earlier.
Simply click the ‘Select Account’ dropdown menu and choose your account.
After that, more options will appear.
You can go ahead and select the audience from the dropdown menu to which the new subscribers will be added.
There are different actions to choose from, but we will select the ‘Subscribe’ option for this tutorial. This will add the user as a new contact to your Mailchimp account.
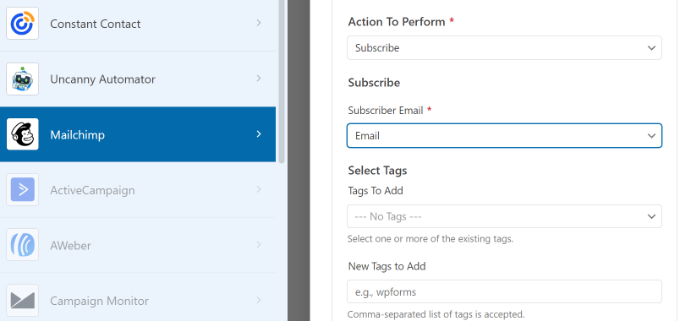
Next, you can scroll down to see additional settings. For instance, there is an option to choose the WPForms field where users can enter their email addresses.
You also have options to add tags to new subscribers and a note to the user’s profile.
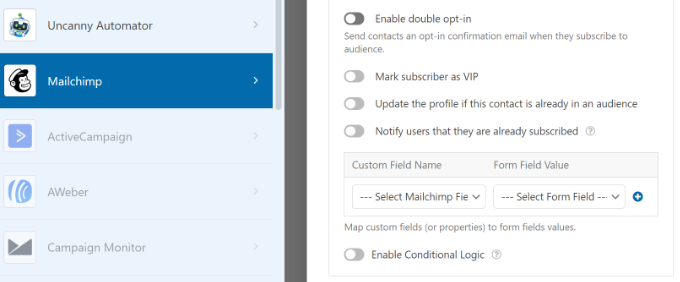
If you scroll down further, then you will see more optional settings. For instance, you can enable double opt-in, mark the subscriber as VIP, update their profile if the contact is already in an audience, and more.
Now, you are ready to add your Mailchimp subscribe form to your WordPress blog or website.
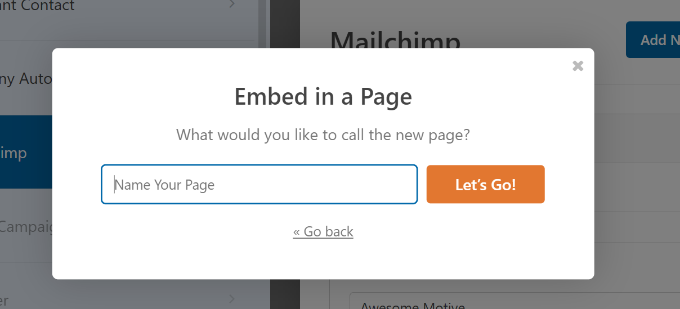
In the WPForms form builder, you will see an ‘Embed’ option at the top. Go ahead and click on the ‘Save’ button to store your changes, and then click the ‘Embed’ button.
Next, a popup will open where you will need to select an existing page or create a new page.
For this tutorial, we will use the ‘Create New Page’ option.
After that, you will need to enter a name for your new page.
Once that’s done, simply click the ‘Let’s Go!’ button.
You can then click the ‘Publish’ button at the top to make your Mailchimp subscribe form live.
You have now successfully created a Mailchimp subscribe form with custom fields.
You can go ahead and visit your website to see the form in action.
You can also do a lot more with Mailchimp and WordPress. For instance, you can integrate it with OptinMonster and show your subscribe forms in popup campaigns.
We hope this article helped you learn how to create a Mailchimp subscribe form in WordPress with custom fields. You may also want to see our guide on easy ways to grow your email list faster andour expert picks for the must have WordPress plugins to grow your website.
If you liked this article, then please subscribe to our YouTube Channel for WordPress video tutorials. You can also find us on Twitter and Facebook.
Do you want to restrict content on WordPress to Patreon members?
By adding patron-only content to your website, you can encourage visitors to join your Patreon and increase your profits. It’s also a great way to get Patreon users to visit your website, which will boost your traffic and can increase revenue further.
In this article, we will show you how to restrict content on WordPress to Patreon members.
Why Restrict Content on WordPress to Patreon Members?
If you are a content creator, then you may want to earn money from your writing, music, podcasts, stock photos, and other content.
Patreon allows you to sell memberships and then give those people access to different content based on their subscriptions.
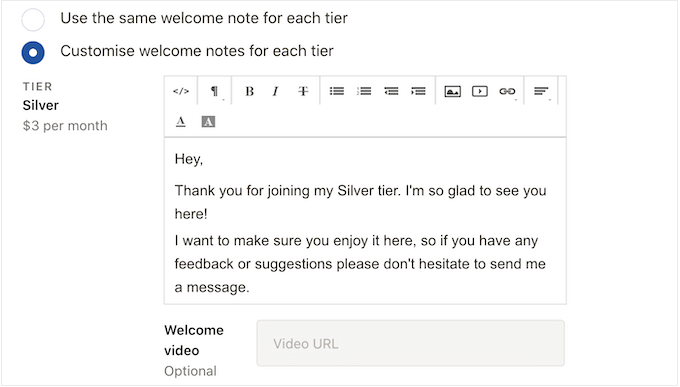
Patreon is also a great way to build relationships with your fans. For example, you can automatically send a welcome note to new patrons.
You can also create private Discord servers or chat rooms where members can talk to each other and even message you directly.
After creating a Patreon, it’s a good idea to publish members-only content to your WordPress website. This encourages visitors to join your Patreon in order to unlock exclusive WordPress content.
This can also increase your blog traffic since patrons will need to visit your WordPress site to see the exclusive content.
That said, let’s see how you can restrict content on WordPress to Patreon members.
How to Create a Patreon Account for Your WordPress Website
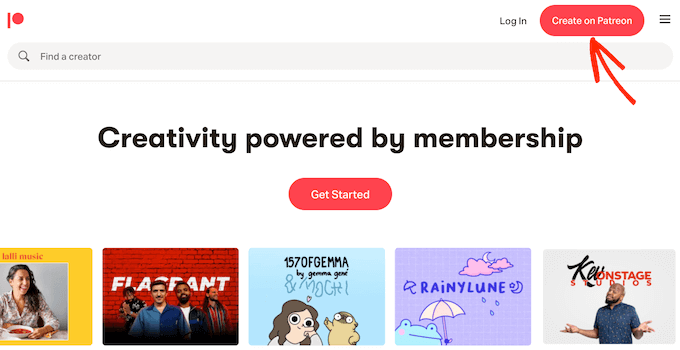
If you don’t already have an account, then head over to the Patreon website and click on the ‘Create on Patreon’ button.
You can now type in your email address and create a password. If you prefer, then you can also register using your existing Google or Facebook login.
After entering this information, the setup wizard will ask some questions about how you plan to use Patreon. Simply follow the onscreen instructions to build an engaging and informative Patreon page.
With that done, you can use the Patreon tools to customize your page, add membership tiers, set up billing, and more.
When you are happy with how your Patreon page looks, you are ready to add it to your WordPress website.
How to Connect WordPress to Your Patreon Account
The easiest way to create Patreon-only content is by using Patron Plugin Pro. This plugin allows you to restrict access to individual pages and posts or even lock all the content from a specific tag or category.
You can also automatically lock and unlock content based on a schedule. This allows you to create free trials, automatically drip content, and more.
First, you will need to install and activate Patron Plugin Pro. If you need help, then please see our guide on how to install a WordPress plugin.
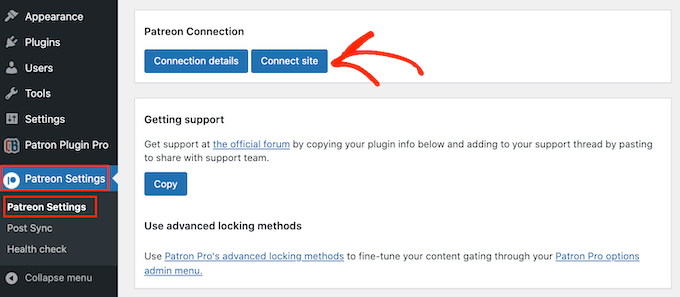
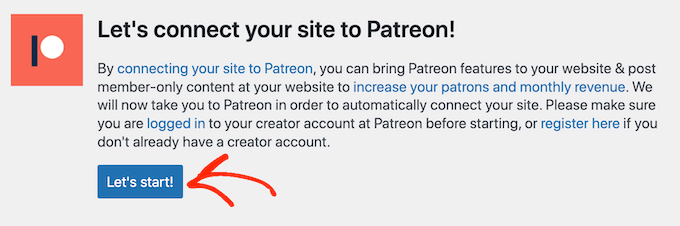
Upon activation, you will need to connect the plugin to your Patreon account. To do this, go to Patreon Settings » Patreon Settings, and then click on ‘Connect site’.
When you are ready, select ‘Start connection wizard’.
On the next screen, you need to click on ‘Let’s start!’
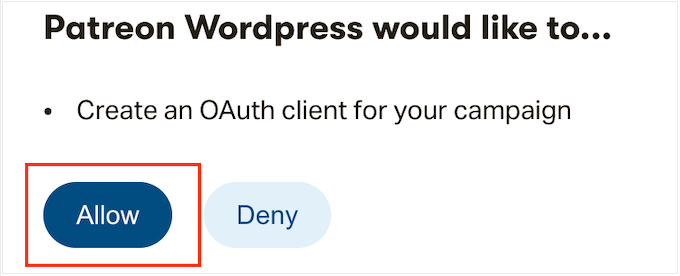
To connect Patreon to your WordPress website, you will need to create an OAuth client.
If you are happy to do this, then click on ‘Allow’.
If prompted, type in the login information for your Patreon account.
After a few moments, Patron Plugin Pro will take you back to the main WordPress dashboard. Your Patreon account is now connected to WordPress.
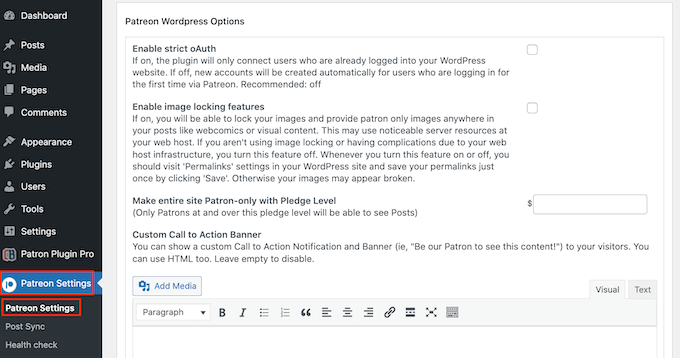
Before you restrict any content, it’s a good idea to look at the plugin’s settings by going to Patreon Settings » Patron Settings.
The default settings should work well for most websites, but it’s still worth checking whether you need to make any changes.
If you do customize the settings, then scroll to the bottom of the screen and click on the ‘Update Settings’ button.
How to Restrict Content to Patreon Members
The easiest way to create patron-only content is by restricting access to entire content types, categories, or tags. For example, you might lock all content that has the ‘Patreon’ tag.
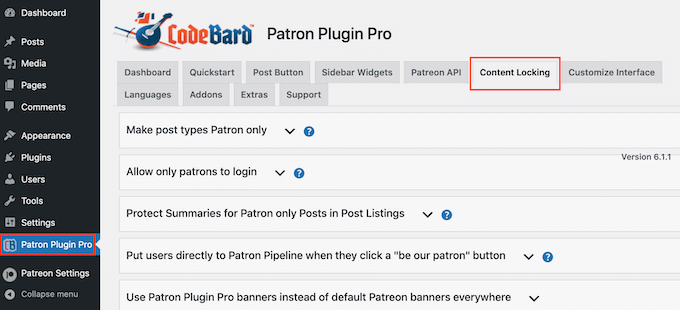
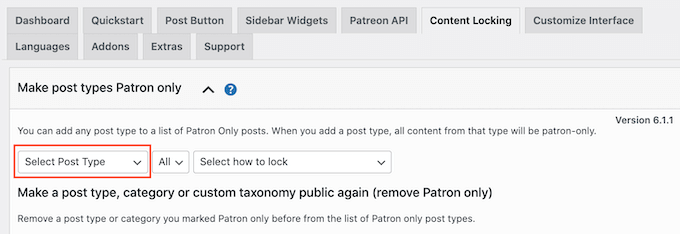
To do this, simply select ‘Patreon Plugin Pro’ from the left-hand menu and then click on the ‘Content Locking’ tab.
Here, you must click to expand the ‘Make post types Patron only’ section.
To start, open the ‘Select Post Type’ dropdown and choose the content you want to restrict, such as page, post, media, or some other content type.
Then, open the new ‘All’ dropdown and choose whether you want to restrict this content type based on format or categories and tags.
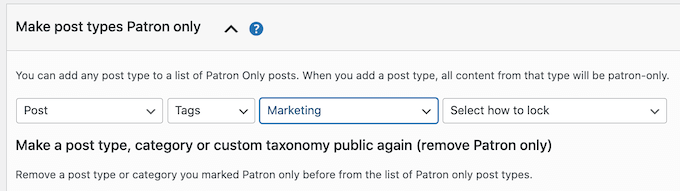
Depending on your selection, you will get access to some additional settings. For example, if you select ‘Tag’, then you will need to choose the tag you want to make Patreon-only.
Finally, open the ‘Select how to lock’ dropdown and choose how you want to lock and unlock the content.
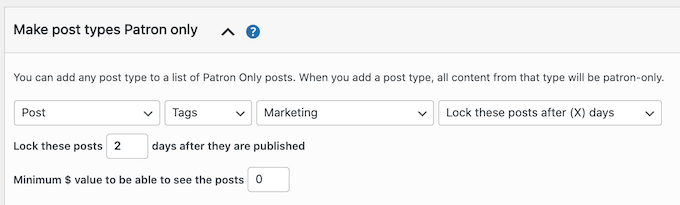
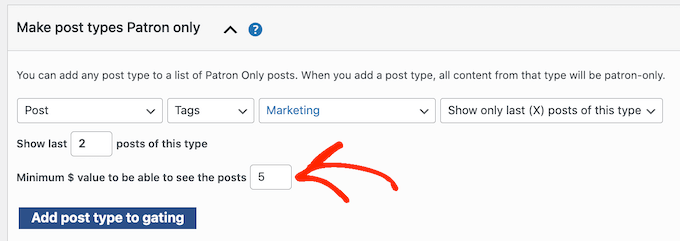
The easiest option is ‘Lock all posts of this type’. However, you can also lock the most recent example of this content and use the older content as a preview for non-members.
You can also unlock or lock content after a certain number of days has passed. This allows you to offer exclusive early access to Patreon members.
Similarly, you can use this feature to create a free trial. For example, you might make your latest online course available to non-patrons for the first 24 hours. This can create a buzz around the launch while also encouraging people to join your Patreon so that they don’t lose access after 24 hours.
Based on your selection, you will see some additional options.
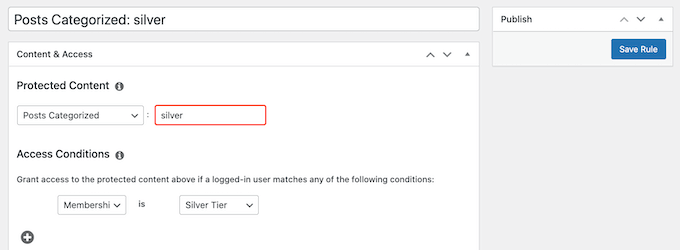
Most importantly, you will need to enter a minimum $ value membership tier.
This should be linked to the cost of your memberships. For example, if your Silver tier is $5, then typing ‘$5’ will unlock this content for everyone with a Silver or higher membership.
When you are happy with how the content locking is set up, click on ‘Add post type to gating.’
To lock more content, simply follow the same process described above. When you have finished, don’t forget to scroll to the bottom of the screen and click on ‘Save.’
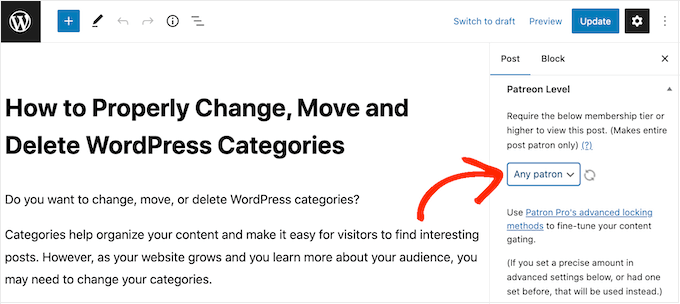
How to Restrict Specific Pages and Posts to Patreon Members
Another option is to mark individual pages and posts as Patreon-exclusive. This allows you to control exactly what content your patrons have access to.
Next, you will need to set some rules about who can access this content. In the right-hand menu, scroll to the ‘Patreon Level’ section and choose from the dropdown menu.
You can either select a Patreon level or choose ‘Any Patreon’. For example, you might select ‘Any Patreon’ if this is entry-level content that all members should have access to or if you have only created a single Patreon tier.
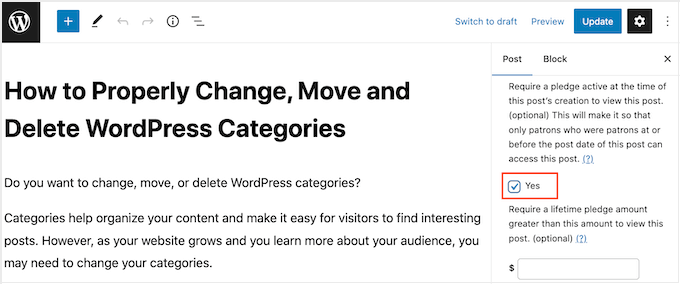
Often, you will want to give new patrons access to your entire back catalog of members-only content. Another option is to restrict access to people who were already patrons when the content was published.
This is useful for creating time-sensitive Patreon promotions, such as exclusive holiday content or a ‘limited edition’ video.
To add this restriction, find the ‘Require a pledge active at the time….’ section and check its ‘Yes’ box.
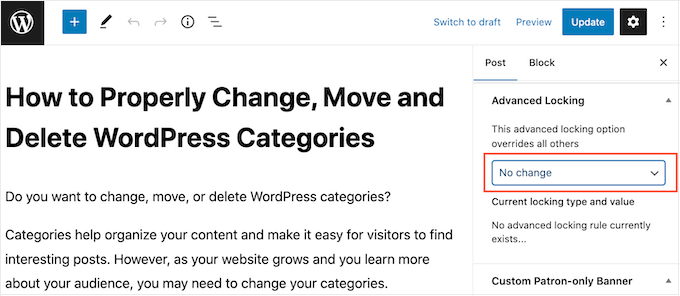
Another option is to show or lock the content automatically based on a schedule. This is perfect for offering exclusive early access to Patreon members.
To lock and unlock content automatically, find the ‘Advanced Locking’ section. Here, open the dropdown that shows ‘No change’ by default and choose an option from the list.
You can then use the new settings to configure the automatic locking and unlocking.
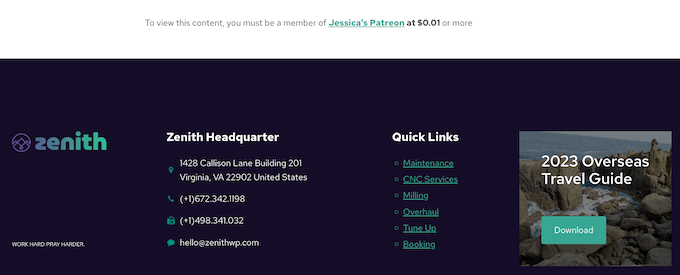
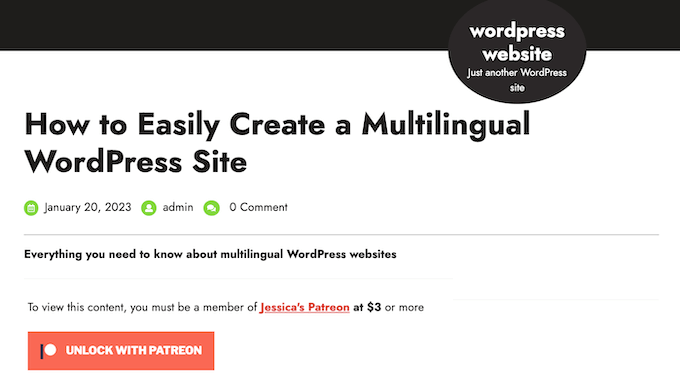
By default, the plugin will show the following message to all non-Patreon members: ‘To view this content, you must be a member of (name) content at (cost) or more.’
You may want to add your own message for non-Patreon members. For example, you might say why the content is restricted or why they should buy a Patreon subscription.
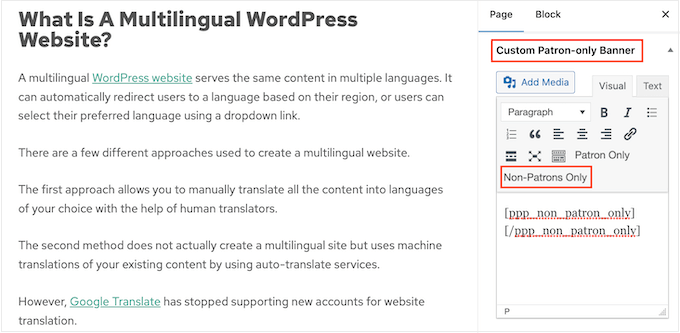
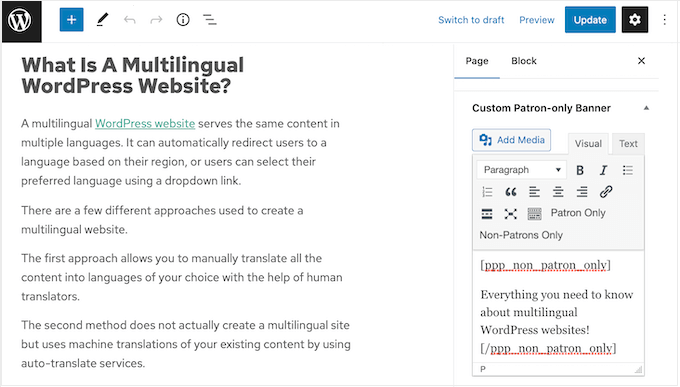
To add a message, scroll to the ‘Custom Patron-Only Banner’ section and click on the ‘Non-Patrons Only’ button.
This adds some opening and closing tags to the small text editor.
Simply type your message in between these tags. You can also add links, formatting, and more in exactly the same way you create content in the WordPress page or post editor.
When you are happy with the settings, simply click on the ‘Publish’ or ‘Update’ button.
If you visit this content while logged into your admin account, then you won’t see any changes. However, if you visit it in an incognito browser tab, then you will see the content restriction in action.
How to Add a Patreon Button to Your WordPress Posts
Adding Patreon-exclusive content to your WordPress blog is a great start. However, it’s also a good idea to promote your Patreon on other areas of your website. This will help turn visitors into paying patrons.
Patron Plugin Pro can automatically add a ‘Become a Patron’ button to all your posts. Visitors can simply click this button to visit your Patreon page.
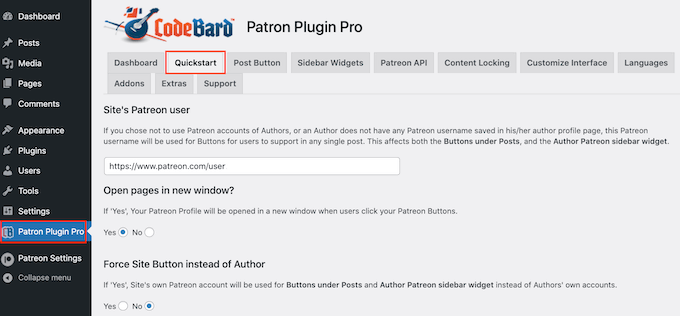
To start, select ‘Patron Plugin Pro’ from the left-hand menu, then select the ‘Quickstart’ tab.
Since we already connected the plugin to Patreon, you should see your account in the ‘Site’s Patreon user’ field.
If you don’t see the right URL, then you can add it now.
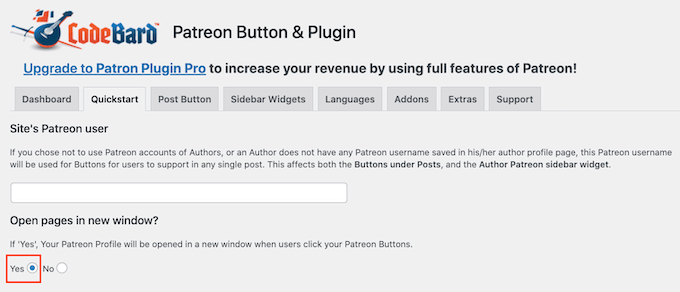
By default, the plugin opens your Patreon page in the same tab. This takes visitors away from your WordPress website, so we recommend opening the link in a new tab instead.
To do this, select ‘Yes’ under ‘Open pages in new window’.
The plugin adds the standard Patreon button to your website by default. This helps visitors recognize the button and understand that you have a Patreon page.
If you prefer, then you customize the button with your own branding using the settings under ‘Use a custom button’. When you are happy with the changes you’ve made, don’t forget to click on ‘Save’.
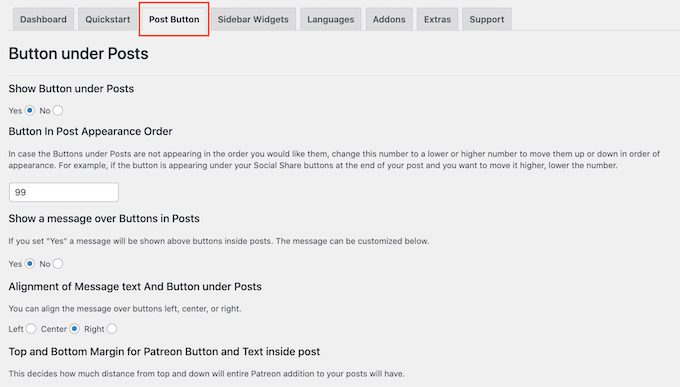
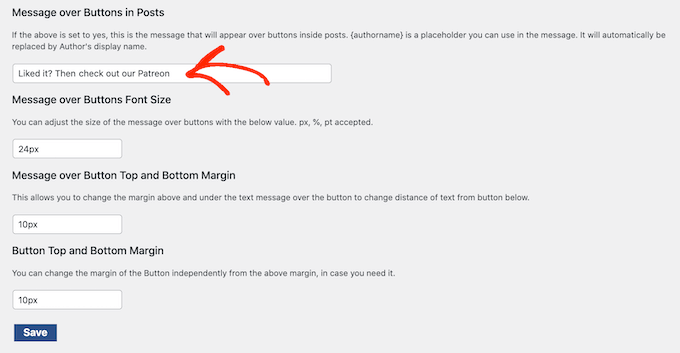
Next, click on the ‘Post Button’ tab to change how the button looks.
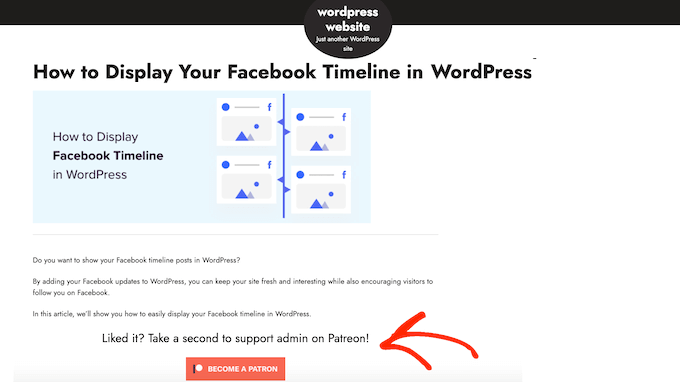
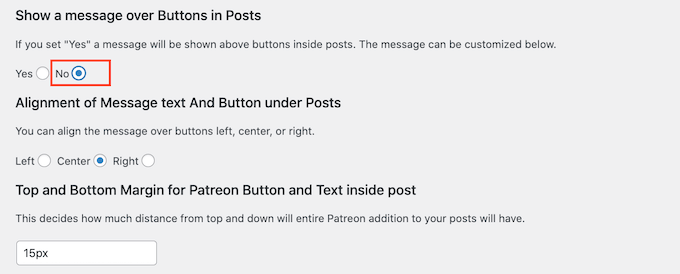
By default, the button includes the following heading: ‘Liked it? Take a second to support {authorname} on Patreon!’
To replace this with your own messaging, simply go ahead and type into the ‘Message over Buttons in Posts’ field.
You can also change the message’s alignment, adjust its size, and add margins.
If you want to remove the message instead, then find the ‘Show a message over Buttons in Posts’ section. Here, simply click the ‘No’ button.
If you make any changes, then don’t forget to click on ‘Save’.
Now, you can visit any post on your website to see the Patreon button live.
How to Add a Patreon Button to the WordPress Sidebar
If you prefer, then you can remove the Patreon button from your blog posts and add it to the sidebar or similar section instead.
In this way, you can show the button on other areas of your website, such as the product pages in your online store.
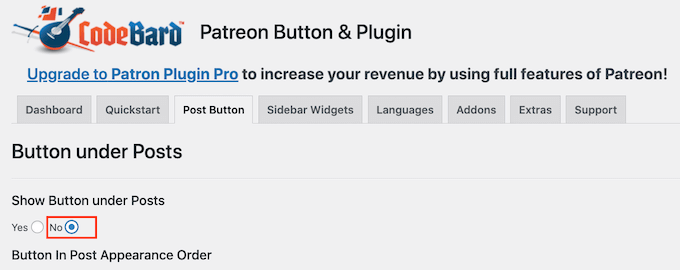
To start, you will want to remove the button from your WordPress posts so that you don’t show multiple Patreon buttons on the same page.
To do this, select the ‘Post Button’ tab and find the ‘Show Button under Posts’ section. Here, go ahead and select the ‘No’ button.
With that done, click on ‘Save’.
Next, click on the ‘Sidebar Widgets’ tab. Here, you can customize the message that appears next to the button, including changing the font size and adding margins.
If you do make any changes, then don’t forget to click on the ‘Save’ button.
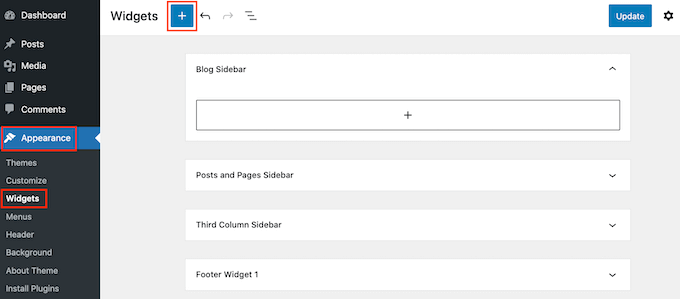
With that setup done, you can add the Patreon button to any widget-ready area by going to Appearance » Widgets. Here, click on the blue ‘+’ button.
Note: If you are using a block WordPress theme, then you will need to go to Appearance » Editor instead.
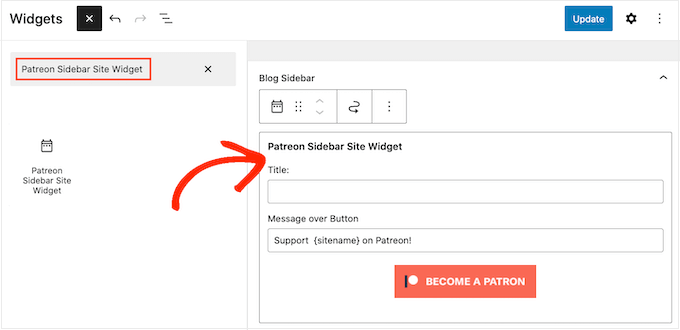
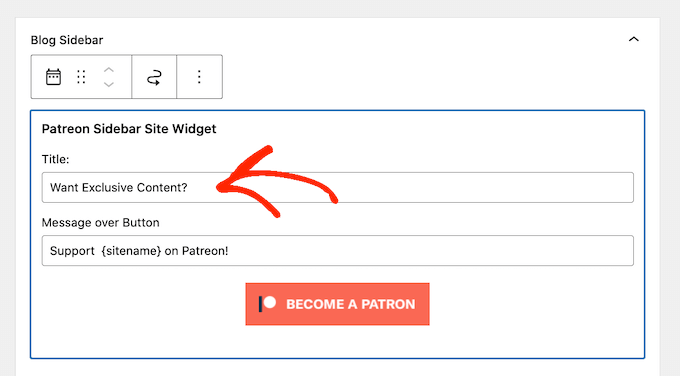
In the panel that appears, start typing in ‘Patreon Sidebar Site Widget’.
When the right block appears, drag and drop it onto the area where you want to show the Patreon button.
You can now type an optional title into the ‘Title’ field.
This will appear above the Patreon button in the theme’s sidebar or similar section.
With that done, click on ‘Update’.
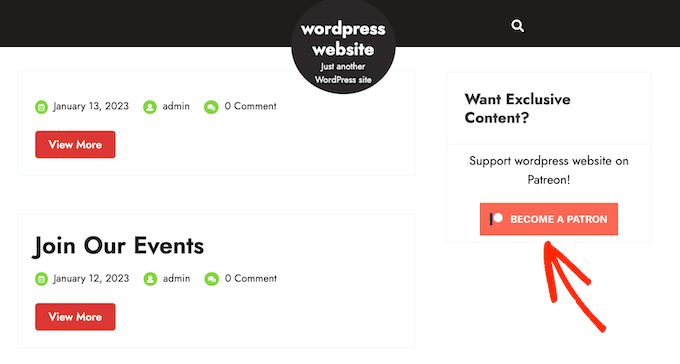
Now if you visit your WordPress blog or website, you will see the Patreon button in the widget-ready area.
Bonus: How to Create a Patreon Alternative Using WordPress
Patreon has helped countless creators monetize their content and make money online, but the platform also takes a significant cut of your earnings.
Depending on your Patreon plan, you will lose between 5%-12% of everything you earn on Patreon, plus payment processing and payout fees.
Depending on your location, you may also have to pay additional fees, including Value-added tax, Goods and services tax, Québec sales tax (QST), and US Sales tax.
All of this can really add up.
You will also need to follow all of Patreon’s terms and conditions and other guidelines. If you break any rules, then Patreon will censor your content and may even delete your account. If this happens, then paying members will lose access to your content, which reflects badly on your brand and can damage your reputation.
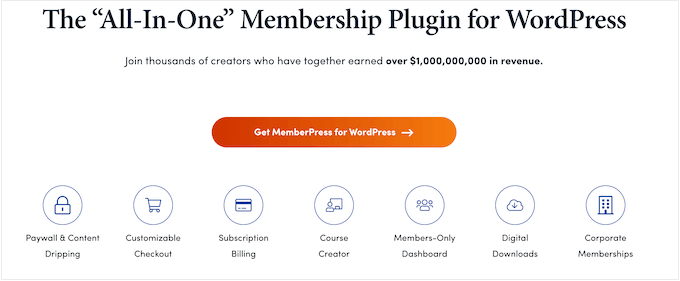
With that being said, many WordPress website owners are looking for a Patreon alternative.
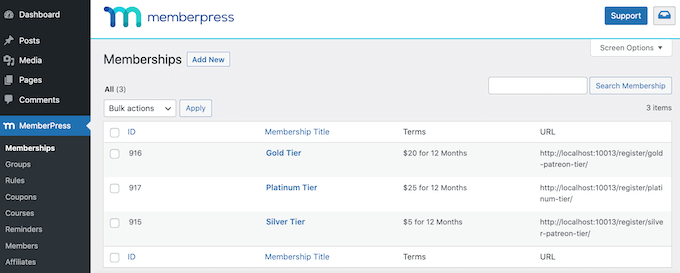
It allows you to create unlimited membership levels for your WordPress website and then restrict access to your content based on the person’s membership level.
In this way, you can create members-only videos, eBooks, blog posts, online courses, downloadable files, and more.
You can even assign different content to different membership levels, which encourages members to upgrade their subscriptions.
This is exactly how the Patreon tier model works, without any of the extra transaction fees. Since MemberPress doesn’t take a cut of your earnings, you get to keep more of the money you make.
With MemberPress, you also have the freedom to create your own privacy policy, rules, and terms and conditions. This gives you more flexibility to create unique and engaging content for your fans, which will make it easier to grow your business.
Are you looking for a way to cloak affiliate links on your WordPress site?
Cloaking your affiliate links in WordPress provides clean and easy-to-read links, which can increase the likelihood of clicks and conversions. It can also increase user trust.
In this article, we will show you how to easily cloak affiliate links in WordPress.
What Is Affiliate Link Cloaking, and Why Do You Need It?
With link cloaking, you can shorten your ugly affiliate links into branded URLs like this:
http://www.yoursite.com/refer/productname
This can make your links look more trustworthy and professional to your audience, encouraging more clicks.
If you use affiliate links to make money from your WordPress blog, then you should cloak links, as doing this can increase your click-through rate and conversions.
Many link-cloaking plugins will also help you measure the performance of your affiliate marketing strategies and optimize them for better results.
Cloaking affiliate links also adds an additional layer of security by masking the actual affiliate URL. This can protect your affiliate accounts and earnings from fraud or theft.
This can also help prevent your links from being blocked by social media sites or search engines, increasing the search visibility of your affiliate content.
Having said that, let’s see how you can easily cloak affiliate links on your WordPress website, step by step.
How to Cloak Affiliate Links in WordPress
There are many link-cloaking plugins that you can use in WordPress, including Pretty Links and Thirsty Affiliates. Both plugins are great, but we will use Pretty Links for this tutorial since it’s a little more beginner-friendly for this use case.
You can easily cloak affiliate links in WordPress using Pretty Links. It is one of the best affiliate marketing tools for WordPress that lets you add, manage, and cloak affiliate links.
Note: Pretty Links also has a free version that can cloak links. However, we will be using the Pro version in the tutorial to unlock more features.
Create Your Cloaked Link
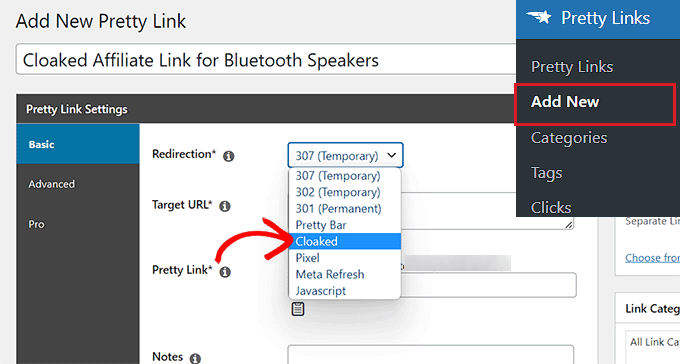
Upon activation, you need to head over to the Pretty Links » Add New page from the WordPress admin sidebar to create an affiliate link.
Once you are there, you can start by typing a name for your link into the ‘Add Title’ option.
After that, you must select a link type from the ‘Redirection’ dropdown menu to create short and branded links for your affiliate program.
If you choose ‘Cloaked’, then the target URL will be hidden in your user’s browser, and they will only see your cloaked link. Some affiliate programs don’t allow this, so you will need to check first.
Another option is ‘307 Temporary’. It will replace the original URL with your new affiliate link and tell search engines that this link may change in the future.
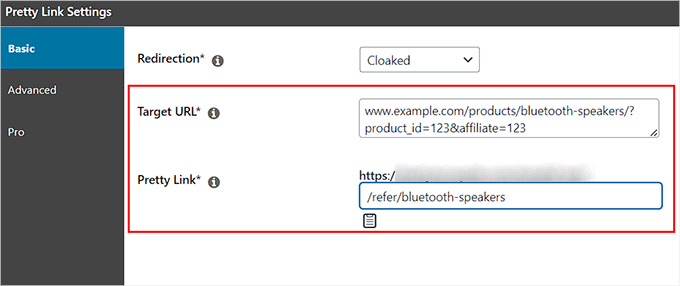
Next, simply copy and paste your affiliate link into the ‘Target URL’ field.
Once you have done that, type the slug you want to use for your cloaked link into the ‘Pretty Link’ field.
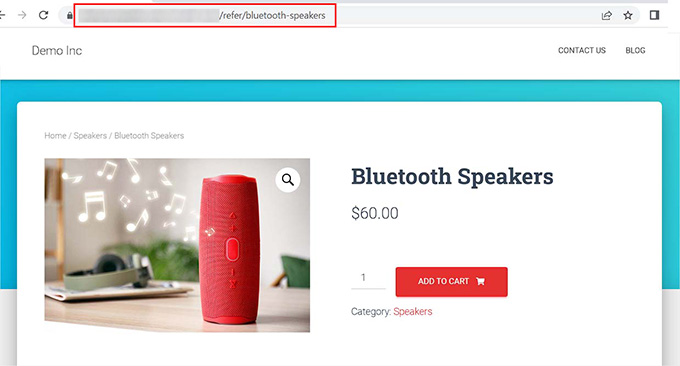
For example, if you want your cloaked link to be like the example below, then you will need to type the ‘/refer/bluetooth-speakers’ text into the ‘Pretty Link’ field. You will then get a link like this:
www.example.com/refer/bluetooth-speakers
Choose Attributes for Your Cloaked Link
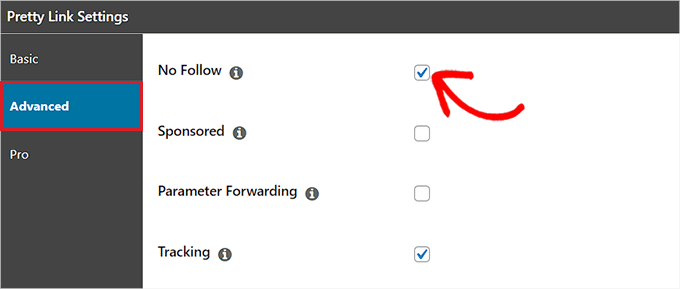
After that, simply switch to the ‘Advanced’ tab from the sidebar on the left.
From here, you can add different attributes to your affiliate link by checking the box next to these options.
For instance, if you want to add a nofollow attribute to the external link, then simply check the box next to ‘No Follow’. This means that search engines won’t pass on any link authority to the site you are linking to.
You can also check the ‘Sponsored’ box to tell search engines that your link is a paid advertisement.
Plus, checking the ‘Parameter Forwarding’ box can be handy if you want to pass a coupon code or customer ID to your cloaked link.
It’s also a good idea to check the box next to ‘Tracking’ so that you can view your affiliate link performance in the Pretty Links reports.
Configure Pro Settings for Your Cloaked Link
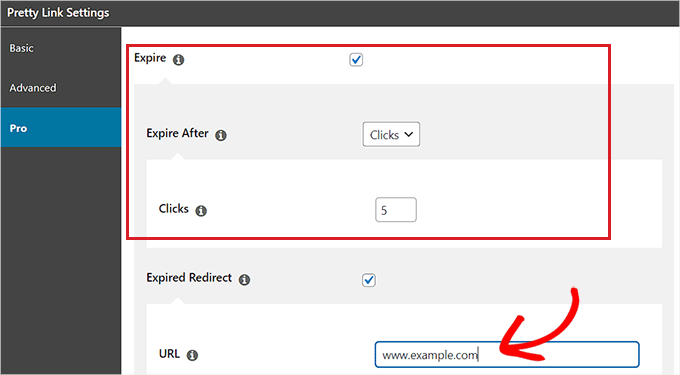
Once you have done that, you need to switch to the ‘Pro’ tab from the sidebar on the left. Now, you can set an expiry date for the affiliate link by checking the ‘Expire’ option.
This will expand a tab on your screen where you can set an expiry date for the link after a specific date or number of link clicks.
For example, if you choose the ‘Clicks’ option from the ‘Expire After’ dropdown menu and type 5 into the ‘Clicks’ field, then your affiliate link will immediately expire once 5 visitors have clicked on the link.
You can also type a URL for the expired redirect into the ‘URL’ field. This will be the link that users will be redirected to if they click on the expired affiliate link.
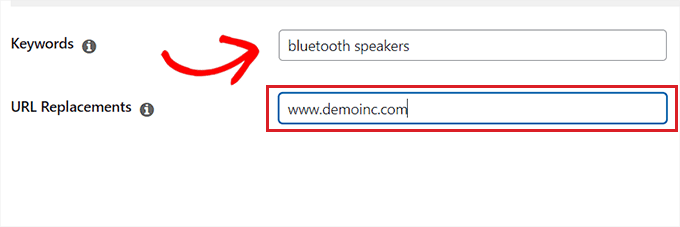
After that, you can type the keywords that you would like to be replaced with your affiliate link into the ‘Keywords’ field.
This means that whenever the keyword you choose is written in your WordPress post or page, the plugin will automatically add its affiliate link to the keyword.
You can also easily replace another URL with your affiliate link by typing it into the ‘URL Replacements’ field.
Now, whenever Pretty Links finds this URL on your website, it will replace it with the cloaked link.
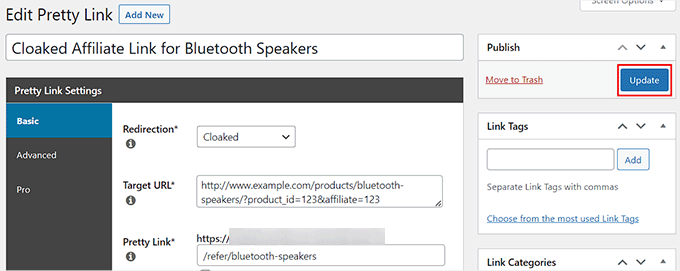
Once you are done, simply click the ‘Update’ button in the Publish section to store your changes.
After that, you need to click the ‘Publish’ button in the same section to publish your cloaked affiliate link.
Add Your Cloaked Link to a WordPress Post or Page
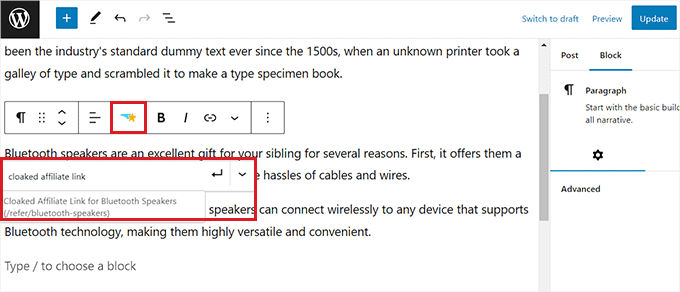
Now, you can visit a WordPress post or page where you want to add the cloaked affiliate link.
Once you are there, simply select the text that you want to link on top of and then click the ‘Pretty Links’ icon in the block toolbar at the top.
This will open up a link prompt on your screen, where you can search for the cloaked affiliate link using its title or the link itself.
Upon adding the link, just click the ‘Publish’ or ‘Update’ button at the top to store your settings.
Now, you can visit your website and click on the affiliate link. You will now see the cloaked URL redirecting you to the affiliate product page.
Do you have something worthy on your mind to share with the world today? Absolutely the best way to go about it is to pen your thoughts in the right direction on the right platform that can help you reach out to the very people who would love to read your piece d’art! What better [...]
Are you looking for an easy way to show a contact form popup on your WordPress website?
Contact forms are great for communicating with your visitors. Placing them in a popup makes it even easier for your customers to contact you about your products and services.
In this article, we will show you how to add a contact form popup in WordPress.
Why Use a Contact Form Popup?
Every WordPress website or blog needs a contact form so users can reach out with questions, feedback, or problems.
However, if your contact form is only on a single page, then it’s hard for people to find it.
As a result, your users may end up leaving your site before contacting you, and you could lose potential leads and conversions.
A contact form popup helps solve this issue by allowing your visitors to quickly view the form by clicking a button, so they can get in touch with you from whatever page they’re on.
It helps keep people on your website, as they don’t have to exit the page they are viewing. You can also grow your email list using a contact form popup.
That said, you will first need to create a contact form and then place it in a popup to display on your web pages. Don’t worry, we will guide you on creating a contact form and adding it to a popup in WordPress.
There are many free and paid options you can choose from, but we recommend using WPForms as it’s the best option.
WPForms is a beginner-friendly form plugin and offers a drag & drop builder that allows you to create a contact form in WordPress in just a few clicks. It also offers prebuilt form templates and lots of customization options.
For this tutorial, we will use the WPForms Lite version because it is free and offers a contact form template.
However, you can also use its premium version to unlock more features. For instance, WPForms Pro offers multiple form templates, more customization options, powerful addons, and lets you collect online payments.
To start, you will first need to install and activate the WPForms Lite plugin. If you need help, then see our step-by-step guide on how to install a WordPress plugin.
Once the plugin is active, you are now ready to create your contact form. All you have to do is go to WPForms » Add New from your WordPress dashboard.
After that, WPForms will ask you to enter a name for your form and select a template.
Go ahead and select the ‘Simple Contact Form’ template.
Next, you can add fields in the form using the drag-and-drop builder.
Simply drag the fields you want to add to the form from the options given in the menu on your left. You can also reorder the positions of each field in the form.
WPForms also lets you customize each field in the contact form.
For example, if you click on the Name field, then you’ll get different options, such as changing its label and format. You can even add a description or mark any field as required.
Once you are done, go ahead and click the ‘Settings’ option to configure the form notification and confirmation.
In the General settings, you can rename the form, change the submit button text, enable anti-spam protection, and more.
Next, you can go to the Notifications settings option. By default, the notifications are sent to the admin email that is set up on your WordPress website.
However, you can send your contact form notification to any email address you want. If you wish to receive notifications on multiple emails, then separate each email with a comma.
For the email subject line, WPForms uses the form name you entered earlier. However, you can edit the text of the subject line to whatever you wish.
After that, go ahead and click the Confirmations option.
WPForms will use ‘Message’ as the default confirmation type, where your visitors will see a thank you message upon submitting a form.
However, you can change the message type and redirect users to a specific page on your website when they complete a form.
Once you are done creating a contact form, make sure to click the ‘Save’ button at the top right corner to save your changes.
Next, click the ‘Embed’ option in the top corner next to the Save button.
When a new window appears, select the ‘use a shortcode’ option.
WPForms will display a shortcode for your contact form as soon as you click the link. We suggest that you keep this tab/window open as you will need it in the next step, where we’ll show you how to add your contact form in a popup.
We recommend using OptinMonster as it is the best lead generation and conversion optimization plugin for WordPress. Over 1.2 million websites use the powerful tool.
For this tutorial, we will use the OptinMonster Pro version, which includes a clutter-free template and advanced display rules to show the popup.
You will first need to sign up for an account by going to the OptinMonster website. Simply visit the website and click the ‘Get OptinMonster Now’ button.
After the plugin is active, you will see the setup wizard. Go ahead and click the ‘Connect Your Existing Account’ button.
A popup window will now appear, and OptinMonster will ask to connect to your account.
Simply click the ‘Connect To WordPress’ button.
Now that your account is connected, the next thing is to create a new campaign for your contact form popup.
You can start by going to OptinMonster » Campaigns and then clicking the ‘Create Your First Campaign’ button.
On the next screen, you will have to select a campaign type.
Since we will create a contact form popup, select ‘Popup’ as your Campaign Type.
After that, scroll down to choose a template for your popup. OptinMonster offers over 75 attractive and highly converting designs for your popups.
You can select any template that you like. Next, enter a name for your campaign and click the ‘Start Building’ button.
Now using the drag-and-drop builder in OptinMonster, you can edit your popup template.
You will now see different Blocks appear in the menu on your left. Simply head over to the ‘WPForms’ block and drag and drop it on your template.
After that, you’ll need to click the ‘Form Selection’ dropdown menu from the block settings in the left menu and select the ‘Add Shortcode Manually’ option.
From here, enter your WPForms contact form shortcode in the block. To find the code, go back to your WPForms embed settings and copy the shortcode.
An important thing to note is that you won’t see a preview of the contact form in the template when you add the shortcode.
This is normal, as your contact form will appear when the campaign is published.
Next, you can go to the Display Rules tab at the top to choose when the popup should appear on your website.
By default, OptinMonster will set it to when the time on the page is 5 seconds, and the popup will appear on any page.
However, you can change the display rule settings and select different triggers and targeting options.
We suggest using the MonsterLink (On Click) targeting. This way, your popup will appear when a visitor clicks a link or a button.
After that, you can click the ‘Copy MonsterLink Code’ button and add it to any text, image, or button on your website.
For example, let’s say you want to add a contact us button on your site. You can start by editing any page or post and go to your WordPress editor. Next, click the (+) plus sign at the top and add a ‘Buttons’ block.
After that, you can enter a text for your button and then click the link icon.
Now add the MonsterLink URL to your button.
Once you have done that, publish your WordPress post or page. The MonsterLink will now be added to your contact us button.
Next, head back to your OptinMonster campaign to complete the configuration.
After selecting MonsterLink as your target and showing it on any page, you can click the ‘Next’ button at the bottom.
On the next screen, you will see options to change the campaign view type, add a MonsterEffect animation, and play a sound when the popup appears.
Go ahead and click the ‘Next’ button when you are satisfied with the settings.
After that, OptinMonster will show a summary of your Display Rule settings.
This helps to ensure you have correctly set up when your campaigns will appear on your website.
Now, you are ready to take your campaign live and publish your contact form popup. To do that, go to the ‘Publish’ tab at the top.
Next, you can click the ‘Preview’ button before publishing your campaign. This will show you a live preview of how your popup will look on your website.
When you are happy with the appearance of your campaign, change the ‘Publish Status’ from Draft to Publish.
You can exit the OptinMonster campaign builder and check the status of your campaign from your WordPress dashboard as well.
Simply click the ‘Status’ dropdown menu on your right and change the status from Pending to Published.
Don’t forget to save the changes.
Next, go to the contact us button you created earlier with MonsterLink and see the contact form popup in action.