Category Archives: SSL

How to Fix ’ERR_SSL_VERSION_OR _CIPHER_MISMATCH’ in WordPress

Is the ‘ERR_SSL_VERSION_OR_CIPHER_MISMATCH’ error stopping you from accessing a WordPress website?

This error is only seen when visiting a website that uses an SSL certificate. It is caused by out-of-date or misconfigured software on either the website or the user’s computer.

In this article, we will show you how to fix the ‘ERR_SSL_VERSION_OR_CIPHER_MISMATCH’ error in WordPress.

How to Fix ’ERR_SSL_VERSION_OR_CIPHER_MISMATCH’ in WordPress

What Is the ERR_SSL_VERSION_OR_CIPHER_MISMATCH Error?

We recommend that everyone with a WordPress website install an SSL certificate. This can help keep your website data secure.

An SSL certificate is required if you want to accept payments in your online store, and it also protects your users in other ways.

Recommended: Check out our guide on how to get a free SSL certificate or buy an SSL certificate at a discount from Domain.com.

SSL stands for ‘Secure Sockets Layer’, and TLS stands for ‘Transport Layer Security’ protocol. These protocols rely on certificates that tell the user the identity of the website they are communicating with.

When visiting a secure website, your browser will automatically check for an SSL certificate to see if it is valid and up to date. It also checks the version of the protocols being used.

If there’s an issue, then you’ll see an SSL error like ERR_SSL_VERSION_OR_CIPHER_MISMATCH.

The ’ERR_SSL_VERSION_OR_CIPHER_MISMATCH’ Error Message

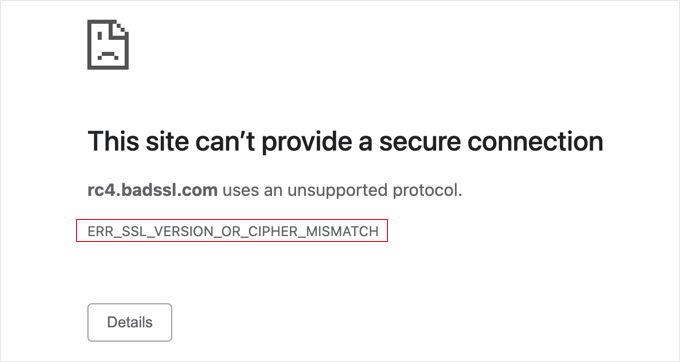
This error message appears when your browser doesn’t recognize the version of the SSL protocol being used or when the SSL certificate is not configured correctly.

This can happen when the user is using an out-of-date web browser that doesn’t recognize the latest TLS protocols. It can also be caused if the website’s SSL certificate or software is out of date or mismatched.

With that being said, let’s take a look at some steps you can take to fix the ERR_SSL_VERSION_OR_CIPHER_MISMATCH error in WordPress:

Scanning Your Website for SSL Errors

The first thing you need to do is scan your WordPress website for SSL errors. This will help you identify problems that can cause the ‘ERR_SSL_VERSION_OR_CIPHER_MISMATCH’ error.

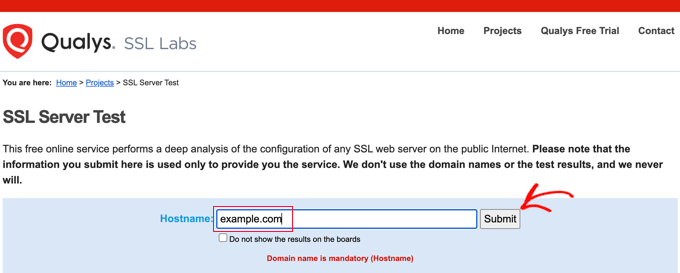
The easiest way to check is by using an online tool like the Qualys SSL Labs SSL Server Test. Simply type in the website’s domain name and then click the ‘Submit’ button.

Scanning Your Website With Qualys SSL Labs SSL Server Test

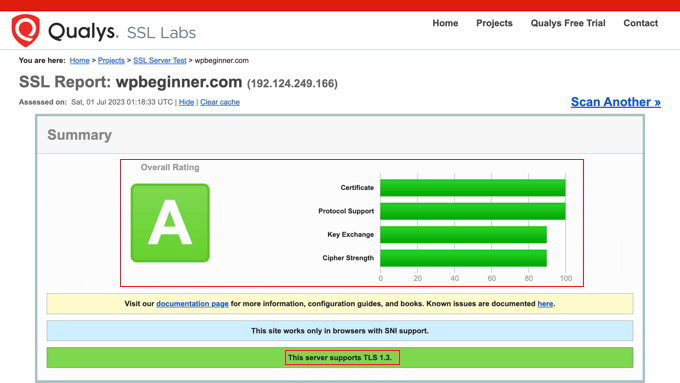
This will perform a thorough test on the website that takes a few minutes to finish. After that, you will see a very detailed report about the site’s SSL certificate.

In the screenshot below, you will find the results of a scan on wpbeginner.com. You can see that the WPBeginner SSL certificate is valid and trusted and supports the latest TLS protocol, which is TLS 1.3. This is an example of a great SSL test result.

SSL Test Result With an Excellent Result

You can scroll down to the Configuration section of the report.

This will show you which versions of the TLS protocol are supported. In this case, both currently used versions are supported, which are TLS 1.2 and TLS 1.3.

Supported TLS Protocols Listed

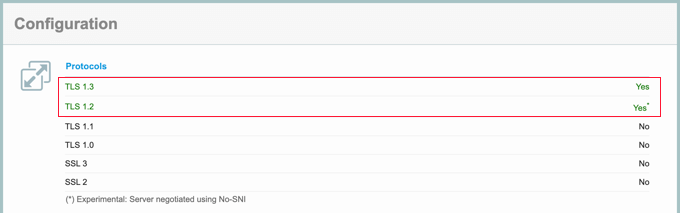
It’s also important that the other protocols are not being used because they have known security issues.

If your test result looks similar to this, then the ‘ERR_SSL_VERSION_OR_CIPHER_MISMATCH’ error is not being caused by the website. You can scroll down to the last section of this tutorial to learn how to troubleshoot the software on your computer.

On the other hand, here is a screenshot from a scan that found SSL errors. The errors are summarized at the top of the report, and more details are given below.

You can go to a page with detailed notes about an error by clicking the ‘MORE INFO »’ link.

SSL Test Result With a Poor Result

If the SSL test report for your website lists some SSL errors, then you can follow these guidelines to fix them.

Your Site Uses Outdated TLS 1.0, TLS 1.1, or RC4 Cipher Suite

Old TLS protocols like TLS 1.0 and TLS 1.1 should never be run because they have security issues, and modern web browsers have stopped supporting them.

The same goes for the RC4 cipher suite. A cipher suite is a set of algorithms used to secure your website with TLS. However, the RC4 version has been found to be insecure and should never be used.

Reputable WordPress hosting companies never use insecure versions of the TLS protocol or cipher suite.

However, if your website is using any of these outdated versions, then you should contact your hosting provider and get them to enable TLS 1.2 or TLS 1.3. You will also need to switch to AEAD cipher suites (AES-GCM).

Alternatively, you can move to a reliable hosting provider like Bluehost or SiteGround.

Your Site Has an SSL Certificate Name Mismatch

Because an SSL certificate proves that your website is what it claims to be, the domain name on your certificate must match your site’s domain name. When they are not the same, this is called an ‘SSL certificate name mismatch’.

When you see this error in your SSL report, it will list the potential reasons:

  • The website does not use SSL but shares an IP address with some other site that does.
  • The website no longer exists, yet the domain name still points to the old IP address, where some other site is now hosted.
  • The website uses a content delivery network (CDN) that does not support SSL.
  • The domain name is an alias for a website whose main name is different, but the alias was not included in the certificate by mistake.
Certificate Name Mismatch Error

This error is likely caused by a problem with your SSL setup.

You can take a look at our beginner’s guide on how to properly move WordPress from HTTP to HTTPS for details on how to set up SSL correctly.

In particular, make sure you have set up your SSL certificate to work with all of the variations (or aliases) of your domain name that will be used, including www and non-www URLs.

Another solution is to redirect your website visitors to the correct variation of your domain name.

For example, if your SSL certificate has the URL ‘https://www.example.com’, then you can redirect ‘https://example.com’ to that address. See our article on how to set up redirects in WordPress for more details.

This error could also appear if you have recently moved your website to a new domain name or server. You will need to update your SSL certificate with the new details.

If you are using a CDN service, then you should also make sure that it supports SSL. If you need to upgrade, then you can see our expert picks of the best WordPress CDN services for recommendations.

If you need help with any of these issues, then don’t hesitate to reach out to your hosting provider’s technical support team.

When the Website Is Not the Problem

If the website is not the problem, then the error is caused by software on your computer. Most likely, you have an out-of-date web browser, or your antivirus software is causing the error.

You can follow these steps to troubleshoot the problem.

Update Your Web Browser to the Latest Version

If you are using an outdated web browser such as Internet Explorer or an old version of a modern web browser, then you may see this error. This happens because the old software was written before the latest versions of the TLS protocols and doesn’t recognize them.

In that case, all you need to do is switch to the latest version of a modern web browser like Google Chrome.

If, for some reason, you can’t update to a later version of your browser, like if you are stuck using Microsoft Windows XP, then you may be able to enable a later version of TLS in your browser.

For example, on Google Chrome, you can type chrome://flags in the address bar, search for ‘TLS 1.3’ and enable the option.

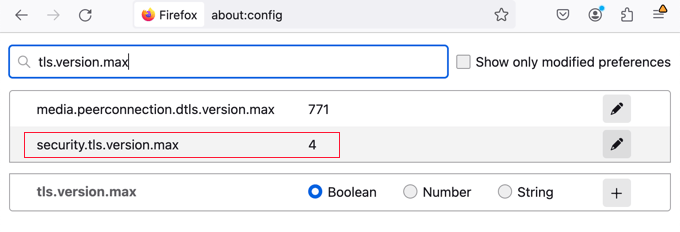
Or if you are using Firefox, then you should type about:config in the address bar, search for TLS, and then set the security.tls.version.max value to 4.

Force Firefox to Use Current TLS Protocols

Clear Your Browser Cache and SSL Cache

If you still see the error message after doing this, then there are a few more troubleshooting steps you can take. The first thing is to delete your browser cache and cookies.

You can see our guide on how to clear your cache in all major browsers, which also covers how to clear your cookies.

On Windows, you can also clear the SSL cache. This may be storing out-of-date SSL information about the website you are trying to access.

You can open ‘Internet Options’ by searching for it in the Start menu. Now switch to the Content tab and click on the ‘Clear SSL state’ button.

Windows Internet Properties

Temporarily Disable Your Antivirus Software

Finally, it’s possible that your antivirus software or firewall software may be configured incorrectly. This can sometimes cause the ‘ERR_SSL_VERSION_OR_CIPHER_MISMATCH’ error to appear when it shouldn’t.

If your software has an automatic SSL scanning feature, then you can try turning it off. Otherwise, you will need to temporarily disable your antivirus software. Once you have done that, you can try accessing the website again.

If you can access the software with your antivirus software disabled, then you can contact the antivirus company’s technical support team about the error or switch to a more reputable application.

We hope our tutorial helped you fix the ‘ERR_SSL_VERSION_OR_CIPHER_MISMATCH’ error in WordPress. You may also want to see our complete guide to WordPress security or our expert picks for the best WordPress security plugins to further protect your website.

If you liked this article, then please subscribe to our YouTube Channel for WordPress video tutorials. You can also find us on Twitter and Facebook.

The post How to Fix ’ERR_SSL_VERSION_OR _CIPHER_MISMATCH’ in WordPress first appeared on WPBeginner.

How to Create a Truly Anonymous Website (Step by Step)

Do you want to create an anonymous website?

Some users may need to create a website anonymously to protect their privacy and additional security.

In this step-by-step guide, we’ll show you how to easily create a truly anonymous website. We’ll also talk about protecting your identity online.

Creating an anonymous website

Why Create an Anonymous Website?

An anonymous website conceals the identity of who runs or owns a particular website.

Some users may want to remain anonymous for a number of reasons.

  • Whistleblowers trying to expose corruption.
  • Journalists under authoritarian regimes
  • Citizen watchdog groups
  • Or users who just want to remain anonymous for privacy reasons

Creating an anonymous website makes it difficult to find out who created and runs the website.

Important: Please keep in mind that there is no guaranteed way to remain completely anonymous. While you can make it difficult to trace, there is still a chance that it can be tracked.

What Do You Need to Create an Anonymous Website?

You’ll need the following items to create a basic anonymous website.

  • Anonymously purchased domain name and hosting
  • A separate encrypted email account
  • A secure and reliable VPN service

Now, let us explain why you’ll need those things.

First, you will need to create a new separate email account. You’ll be using that account to manage your website.

To remain anonymous we recommend creating an email account using privacy-focused email services like Proton Mail.

Next, you will need to hide is your IP address. The easiest way to do that is by using a VPN service. We recommend using IPVanish.

IPVanish

Once you have created an email account and turned on the VPN on your computer, you can go ahead and buy a hosting plan.

Normally, you can just go to any of the top hosting companies and start a website in a few minutes.

However, many of these companies require credit card information. This means your personal information will be stored and can be traced back to you.

That’s why we recommend using Hostinger.

Currently, they are giving WPBeginner users a generous discount and a FREE domain name. Basically, you can get started for $2.78 per month.

→ Click Here to Claim This Exclusive Hostinger Deal ←

Hostinger is one of the best WordPress hosting companies on the market and allows you to pay using Bitcoin and other cryptocurrencies to keep your purchase as anonymous as possible.

Buying Hosting and Domain Name Anonymously

First, you need to make sure you have VPN turned on whenever you are working on your anonymous website.

After that, you need to visit the Hostinger website and click on the ‘Start Now’ button.

Hostinger start now

This will bring you to the pricing and plans selection page.

We recommend choosing a 48-month plan which gives you the best discount. Plus, you wouldn’t need to worry about future payments for a long time.

Choose your hosting plan

Click to select the plan you want to buy, and then go to the payment section.

From here, first, you need to provide the anonymous email account you created earlier.

After that, you need to select ‘Coingate’ as the payment method and then click on the ‘Submit Secure Payment’ button.

Choose payment method

This will take you to the payment wizard.

First, you need to select a cryptocurrency that you want to pay with and click Continue.

Choose cryptocurrency

Next, you need to enter your anonymous email address and click on the ‘Continue’ button.

Note that you don’t need to create a Coingate account to pay using this method.

Provide email address

On the next screen, you’ll see the QR code to make the payment through your Bitcoin wallet app.

You can also pay manually, by sending the amount to the Bitcoin wallet address mentioned on the screen.

Pay with BitCoin

Upon completion of the transaction, you will be redirected back to the Hostinger website.

You will receive an email from Hostinger with a link to log in to the hosting control panel.

Once you log in to your hosting account control panel, you’ll see a notification to claim your free domain name.

Claim free domain

During domain registration, ICANN requires website owners to provide their personal information such as name, address, email, and phone number.

You need to provide at least the email address you created earlier so that you can be reached for verification.

During the registration, you may also see an option to turn on Domain Privacy.

This feature hides any information you provide during domain registration from WHOIS searches. Anyone who checks will see Hostinger’s proxy info.

After domain registration, you may receive an email to verify your registration.

Installing WordPress to Make Your Anonymous Website

Now that you have completed the domain name and hosting setup, it is time to install WordPress.

Hostinger allows you to easily create a WordPress website. Click on the ‘Manage’ button next to your URL under the hosting panel.

Manage hosting

This will bring you to your back-end dashboard.

From here, you need to visit the Website » Auto Installer page and then click on the ‘Select’ button under WordPress.

Hostinger auto installer

This will launch the auto-installer wizard.

Simply follow the on-screen instructions to finish the setup.

After that, you will see your new website options under the Hostinger control panel.

From here, first, you need to click on the ‘Install’ button next to the ‘SSL Certificate’ option.

Turn on SSL

After that, you need to click on the toggle next to ‘Force HTTPs’ option.

SSL (Secure Sockets Layer) allows your website to use secure HTTPs. Using it improves your WordPress security by encrypting all traffic to and from your website.

Having an SSL certificate is also a factor in ranking well in search engines and a part of a solid website SEO plan.

Finally, click on the ‘Edit Website’ button to launch and start editing your new WordPress website.

Edit website

Working on Your WordPress Website Anonymously

By design, WordPress is privacy-conscious software to the extent that you can choose what information you want to share on your website.

First, you may want to visit the Users » Profile page and choose a pseudonym for the default admin or author of your website.

Change name

Don’t forget to click on the ‘Update Profile’ button to save your changes.

Next, you need to decide whether you want to allow users to comment on posts and pages across your website.

Simply go to Settings » Discussion page to configure comments. Uncheck all options under the ‘Default Post Settings’ section to disable comments, trackbacks, and pingbacks.

Disable comments

Don’t forget to click on the ‘Save Changes’ button to store your settings.

Adding Content to Your WordPress Site

WordPress comes with two default content types called posts and pages. Posts are part of a blog and are displayed in reverse chronological order, meaning that newer posts appear first.

Pages are standalone pages that are not part of a blog. They are used to create a website structure and layout. See our list of must-have WordPress pages for all types of websites.

To add a page, simply visit the Pages » Add New to create one.

WordPress block editor

WordPress comes with a powerful editor called the Block Editor. See our complete WordPress block editor tutorial to familiarize yourself with the interface.

Similarly, to create a post you will need to visit Posts » Add New page.

Choosing a Theme (Template) For Your Website

WordPress comes with a powerful templating engine that allows you to change the appearance of your website by installing themes.

There are thousands of free and paid WordPress themes available. You can choose one that looks closer to what you have in mind for your website.

WordPress Theme Stats

You can look for themes under the Appearance » Themes page. It will show you a bunch of default themes that come with your WordPress install.

For more themes, click on the ‘Add New’ button at the top to find more free themes.

Add new theme

For premium or paid WordPress themes, you can try trusted WordPress theme shops like SeedProd, Thrive Themes, Astra, Elegant Themes, and more.

However, there is such an abundance of WordPress themes that it may become difficult for beginners to decide which theme they want to use.

We recommend choosing a minimalist design with plenty of white space. This provides you plenty of room to customize the theme and make it your own.

For more details, see our guide on how to choose the perfect theme for your website.

Install Privacy Friendly WordPress Plugins

Plugins are like apps for your WordPress website. They allow you to add new features and extend the functionality of WordPress.

There are more than 60,000 free plugins available in the WordPress.org plugin directory alone. Plus, there are premium WordPress plugins sold by third-party developers with priority support and guaranteed updates.

WordPress plugins

However, you also need to consider which plugins you need to use to keep your WordPress website secure, private, and anonymous.

Following are our top picks for the best WordPress plugins to install on your anonymous website.

  • WPForms – It is the best WordPress contact form plugin and allows you to easily create forms for your website.
  • All in One SEO for WordPress – It is the best WordPress SEO plugin on the market and helps your anonymous website get more traffic from search engines.
  • SeedProd – It is a powerful WordPress page builder that allows you to use a drag-and-drop interface to create any type of page for your website.
  • OptinMonster – It is a conversion optimization software, which helps you convert website visitors into email subscribers and customers.
  • MonsterInsights – The best WordPress Google Analytics plugin which helps you see where your visitors and coming from and what they see on your website.

For more plugin recommendations, see our full list of essential WordPress plugins for any kind of website.

FAQs About Running an Anonymous Website

Following are some of the most commonly asked questions about creating an anonymous website.

1. Is it possible to create a fully anonymous website?

Yes, it is possible to create a fully anonymous website. However, you’ll need to be very vigilant about it. Each internet activity creates an information trail leading back to the person who initiated the activity. This trail can be traced by hackers, government agencies, and ISPs. As an anonymous website owner, it will be your job to anonymize all activities.

You can do this by minimizing the activities around your website and using a VPN to hide your IP address. Be careful about any social interactions as they may reveal personally identifiable information.

2. What is anonymous offshore hosting?

Anonymous offshore hosting is a website hosting service that allows users to purchase hosting and domain name without providing real name or credit card information.

Some of these lesser-known companies host their servers in countries with stricter privacy laws. These companies also promise to not store user logs or share them with third-country agencies.

However, these anonymous offshore hosting companies often have very bad customer service and outdated technology.

3. Can a website owner be traced?

Yes, a website owner can be traced even if they are trying to remain anonymous. However, an anonymous website owner can use privacy tools to make it harder to be traced.

Even then if someone is determined to figure out and has the technology, tools, and resources, then they may be able to find out who is running an anonymous website.

4. Can I buy a domain name anonymously?

Yes, you can buy a domain name anonymously from a domain name registrar that accepts cryptocurrencies as a payment method.

Hostinger, also allows you to register additional domain names using cryptocurrencies. During the registration, you can use a separate anonymous email account as the contact address for your domain name.

We hope this article helped you learn how to create a truly anonymous website. You may also want to see our guide on how to create a private blog or take a look at our complete WordPress security guide to keep your anonymous website secure.

If you liked this article, then please subscribe to our YouTube Channel for WordPress video tutorials. You can also find us on Twitter and Facebook.

The post How to Create a Truly Anonymous Website (Step by Step) first appeared on WPBeginner.

How To Fix WordPress Mixed Content Warning (Easy Step-by-Step Guide)

Did you just move your WordPress site to HTTPS only to be met with some weird mixed content warning instead of that beautiful green padlock that you were expecting? Or, maybe you’re still in the planning stages for using HTTPS at your WordPress site and wondering what to expect when you make the switch. Either ... Read moreHow To Fix WordPress Mixed Content Warning (Easy Step-by-Step Guide)

The post How To Fix WordPress Mixed Content Warning (Easy Step-by-Step Guide) appeared first on Learn WordPress with WPLift.

Integrate SSL on WordPress Multisite

WordPress multisite is an extraordinary feature that let you manage a network of WordPress sites using a single admin site. WordPress users follow various techniques to secure their site as being one of the most popular platforms, WordPress is also targeted the most by hackers. Among these techniques is the integration of Secure Socket Layer ... Read moreIntegrate SSL on WordPress Multisite

The post Integrate SSL on WordPress Multisite appeared first on Learn WordPress with WPLift.