Are you looking to add a Mailchimp subscribe form to your WordPress website?
Mailchimp is a popular email marketing tool that offers a form builder. However, this builder has limited features and customization options. Adding a custom subscribe form gives you more flexibility and helps grow your email list.
In this article, we will show you how to create a Mailchimp subscribe form in WordPress with custom fields.
Why Add a Custom Mailchimp Subscribe Form in WordPress?
Adding a subscription form to your WordPress website is a great way of communicating with your users.
You can send newsletters, new product releases, announcements, and other information while creating a direct connection with your audience.
Mailchimp is one of the most popular email marketing services. It helps you build an email list, send emails, and set up automated email campaigns. Plus, it also offers a form builder that you can use to create a subscription form and embed it on your website.
However, Mailchimp’s form builder is very basic and doesn’t offer a lot of customization options. You get limited form fields to choose from, and there are no settings to change color, font, and more. It also adds Mailchimp branding at the bottom.
Creating a custom Mailchimp subscribe form gives you more flexibility and control. You can add all types of form fields, edit their appearance, add conditional logic to show fields based on the user’s responses, and more.
That being said, let’s look at how you can create a Mailchimp subscription form with custom fields.
How to Create a Mailchimp Subscribe Form in WordPress
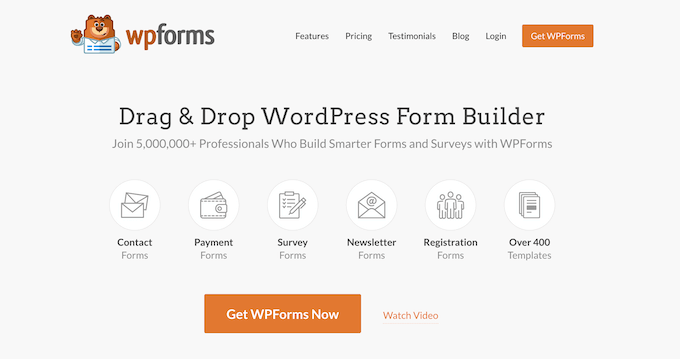
The easiest way of adding a Mailchimp subscribe form in WordPress is by using WPForms. It is the best contact form plugin for WordPress that’s used by over 5 million professionals.
WPForms is a beginner-friendly plugin that offers a drag-and-drop form builder, prebuilt templates, and lots of customization options. The best part is it easily integrates with Mailchimp.
Note: For this tutorial, we will be using the WPForms Pro version because it includes the Mailchimp addon and custom form fields. There is also the WPForms Lite version that is available for free, but it doesn’t offer a Mailchimp integration.
Step 1: Connect Mailchimp With WPForms
First, you will need to install and activate the WPForms plugin. If you need help, then please see our guide on how to install a WordPress plugin.
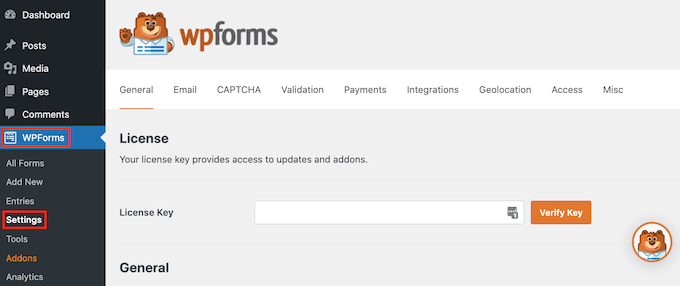
Upon activation, you will need to go to WPForms » Settings and add the license key. You can find the key in your WPForms account area.
After entering the license key, go ahead and click the ‘Verify Key’ button.
Next, you will need to install the Mailchimp addon.
You can do that by going to WPForms » Addons from the WordPress admin panel. From here, navigate to the Mailchimp addon and click the ‘Install Addon’ button.
The addon should now install and activate.
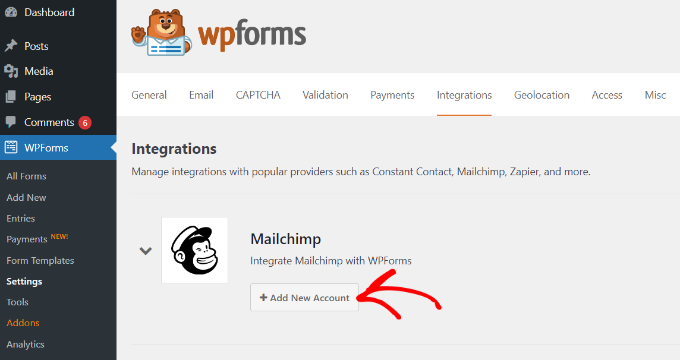
Once that’s done, simply go to WPForms » Settings from your WordPress dashboard and switch to the ‘Integrations’ tab.
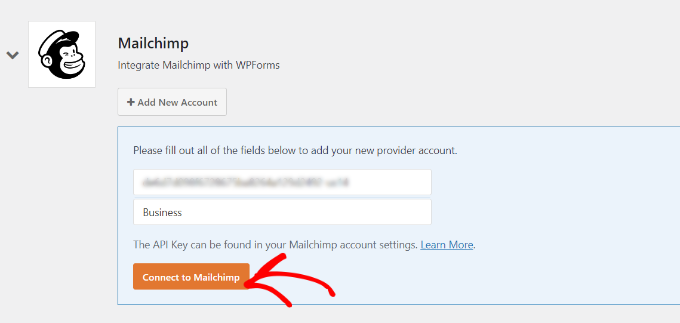
Next, you can expand the Mailchimp settings and then click the ‘+ Add New Account’ button under Mailchimp.
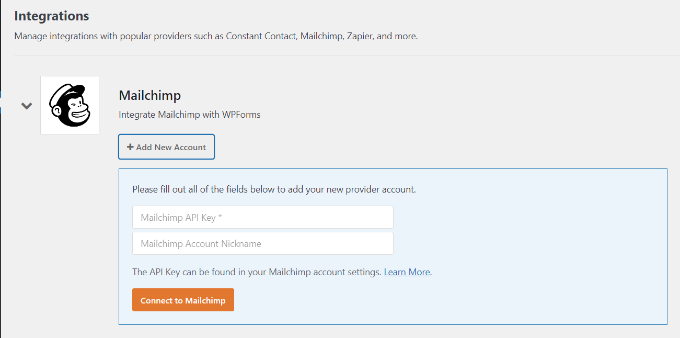
As soon as you do that, you will see more options. To integrate Mailchimp, you must enter the API key and account nickname. This will allow WPForms to communicate with your Mailchimp account.
Creating Mailchimp API Keys for WPForms Integration
To create an API key to connect WPForms, you will first need to log in to your Mailchimp account.
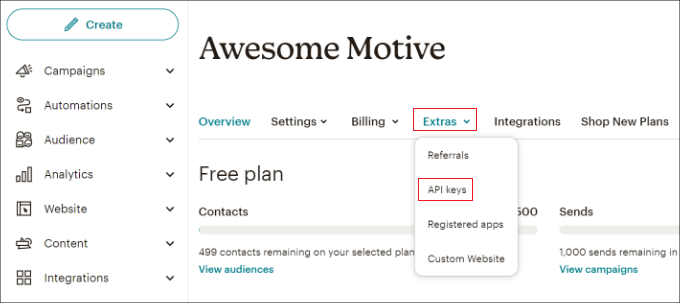
Once you are logged in, simply click on your avatar in the top right corner and select the ‘Account & billing’ option.
On the next page, you will see different account settings.
Simply click the ‘Extras’ dropdown menu and then select the ‘API keys’ option.
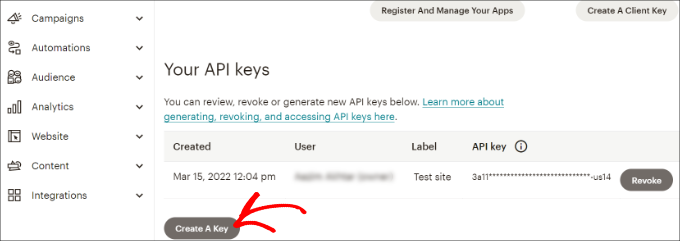
Next, you can copy an existing API key to use for your WPForms integration.
If you haven’t generated a key previously, then simply click the ‘Create A Key’ button.
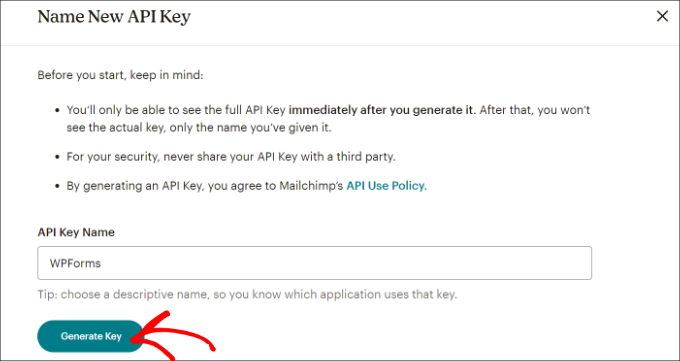
After that, you can enter a name for your new API key.
Once that’s done, just click the ‘Generate Key’ button.
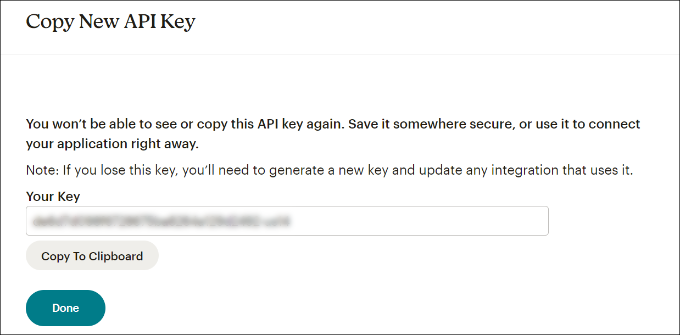
Next, you will see the new API key.
Go ahead and copy the key and click the ‘Done’ button.
You can now return to the browser tab or window with your WPFroms integration settings.
From here, simply paste the key into the ‘API Key’ field. You can also add a Mailchimp account nickname to remember which account you are connected to.
After entering the key, go ahead and click the ‘Connect to Mailchimp’ button.
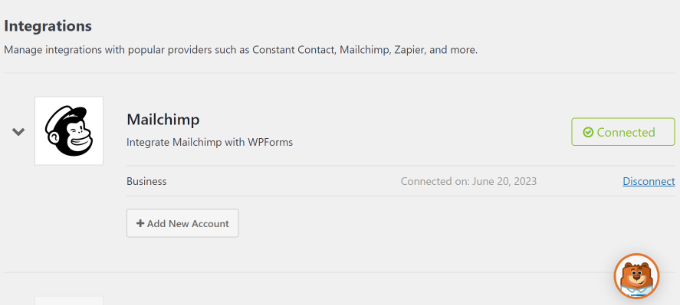
You should now see a green ‘Connected’ button next to the Mailchimp settings, showing that the email marketing tool is successfully integrated with WPForms.
Step 2: Design a Mailchimp Subscribe Form With Custom Fields
Now that you have integrated Mailchimp with WPForms, the next step is to create a subscription form with custom fields.
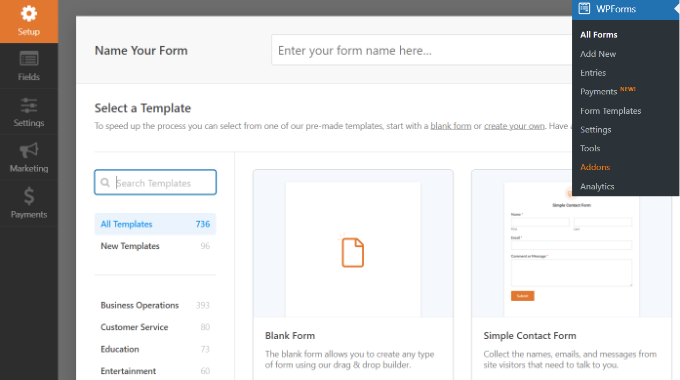
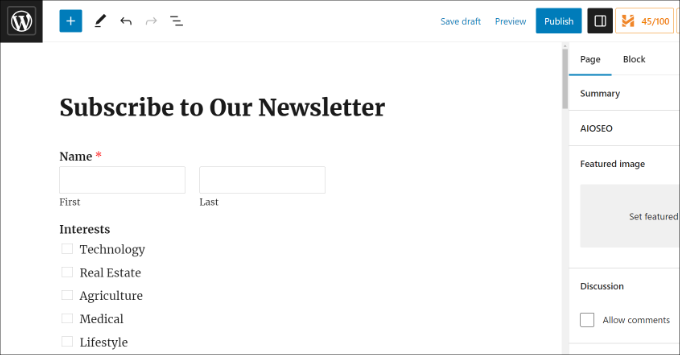
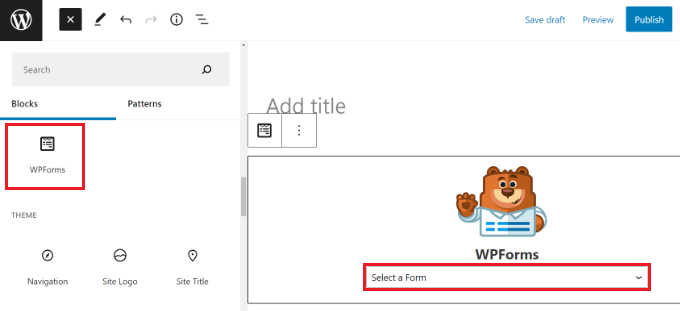
First, you will need to go to WPForms » Add New from the WordPress dashboard. Next, you can enter a name at the top and select a form template.
WPFomrs offers lots of prebuilt form templates, so you can quickly pick one and customize it.
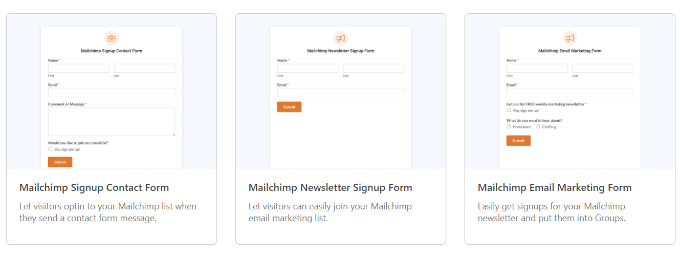
It even offers form templates for Mailchimp. For instance, you can create a signup contact form, newsletter signup form, or email marketing form.
For this tutorial, we will choose the Mailchimp Newsletter Signup Form template.
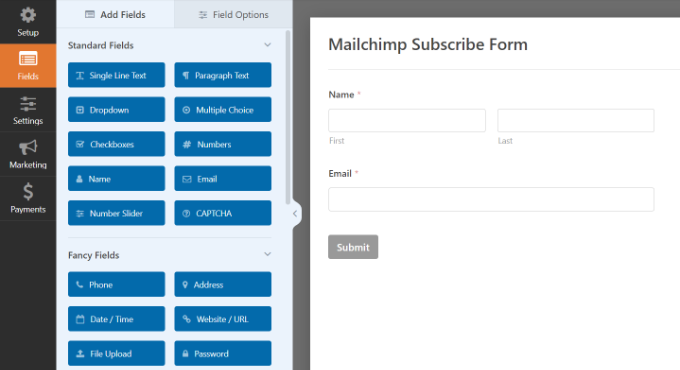
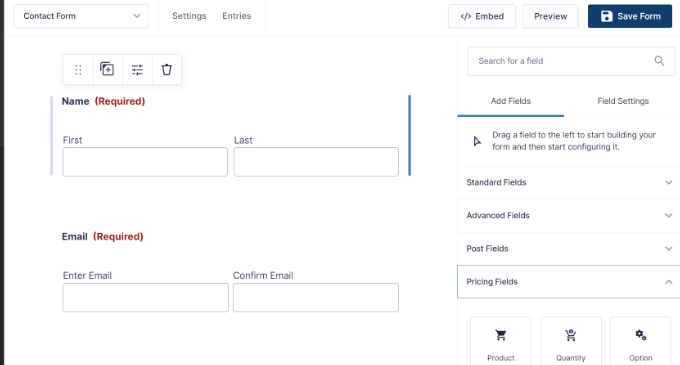
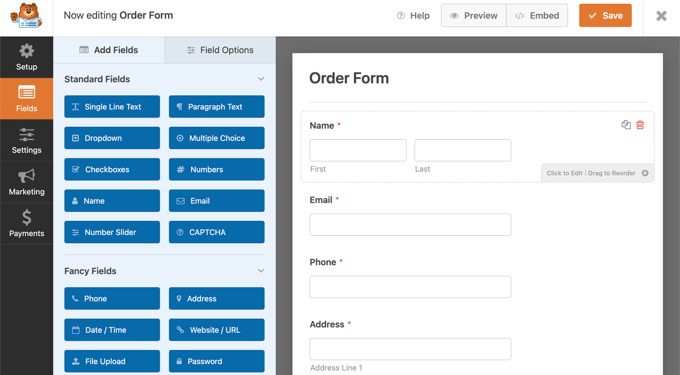
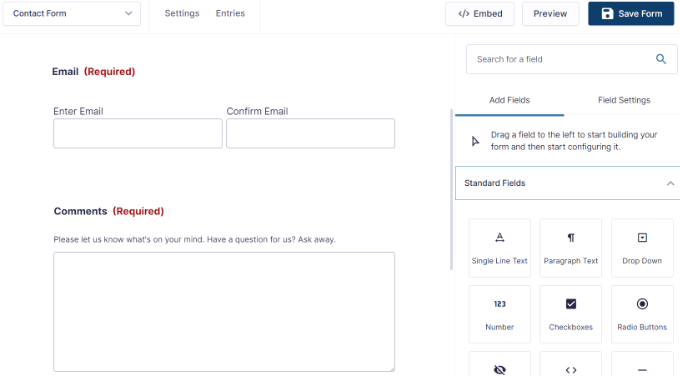
On the next screen, you will see the WPForms drag-and-drop form builder. Here, you can customize the form and add custom fields from the menu on the left.
The default form template will come with a Name and Email field.
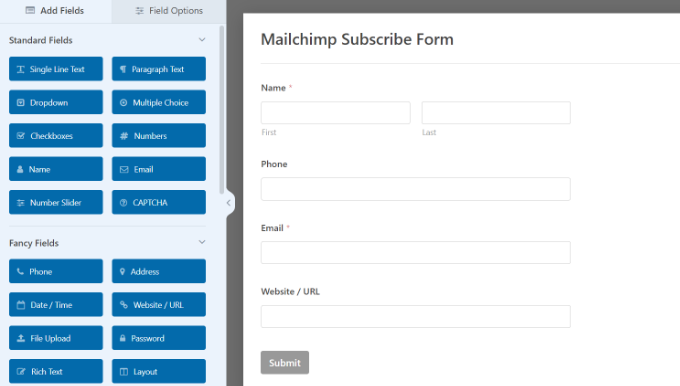
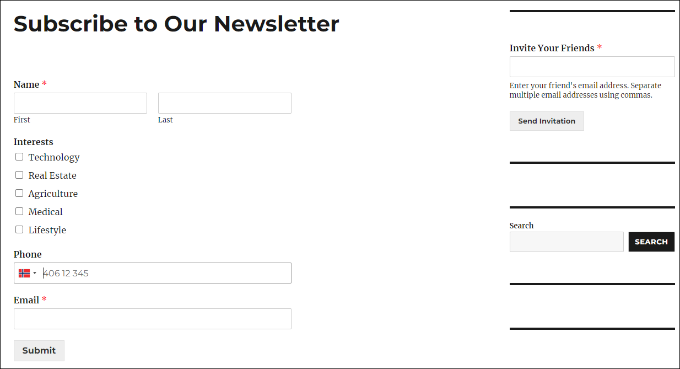
However, you can simply drag any form field and drop it onto the template. There are fields to add text, dropdown options, multiple choice, phone number, address, date and time, website, password, and more.
For instance, if you are using a business phone service, then you can add a Phone field. This will help you send SMS messages or reach out to subscribers via phone calls.
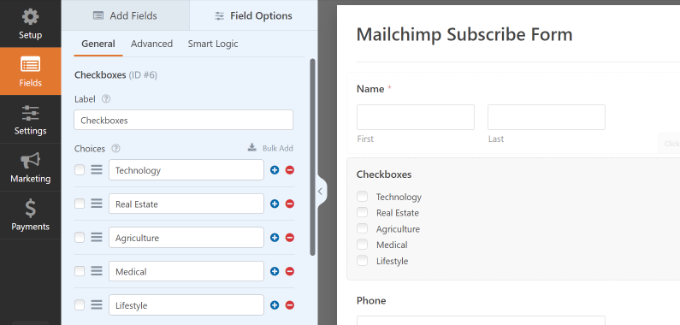
You can add a checkbox field and allow users to select their interests. This way, you can segment your subscribers and send them targeted emails.
Next, you can further edit each form field in the template. Simply choose a field, and you will see more options in the left panel.
For example, we changed the options in the Checkboxes form field.
You can also edit the label of the form field, make it a required field, add images to the checkbox options, and more.
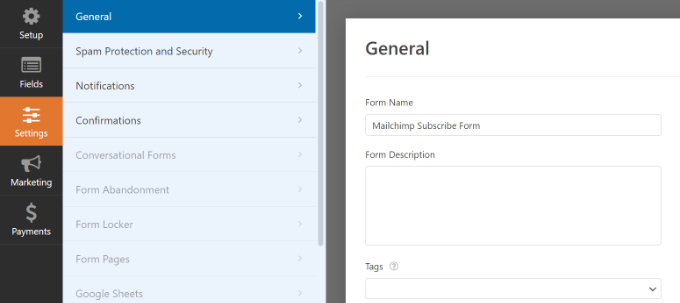
Once you have finished adding custom form fields, switch to the ‘Settings’ tab from the left menu. In the General settings, you can change the form’s name and description, add tags, edit the submit button text, and more.
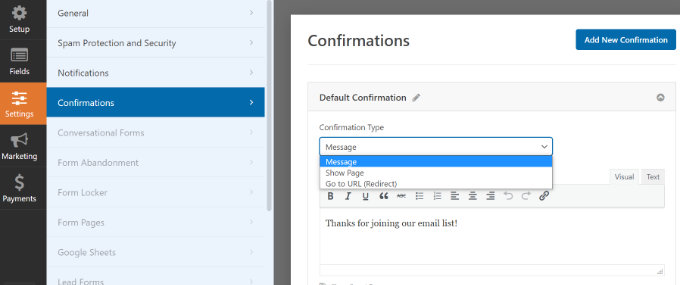
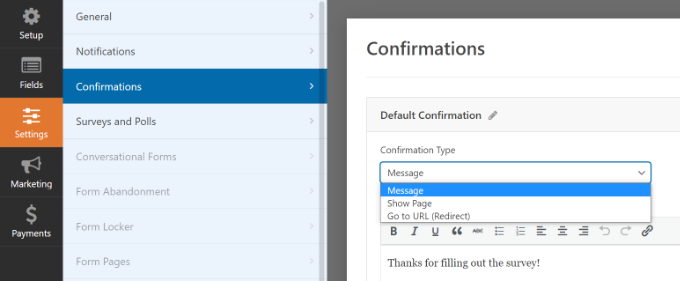
Next, you can switch to the ‘Confirmations’ tab and choose what subscribers will see once they submit a form.
WPForms lets you show a message, a specific page like a thank you page, or redirect users to a URL.
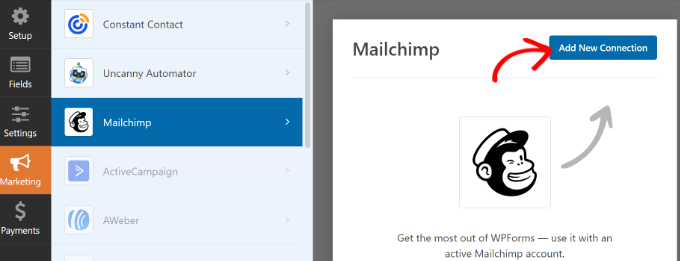
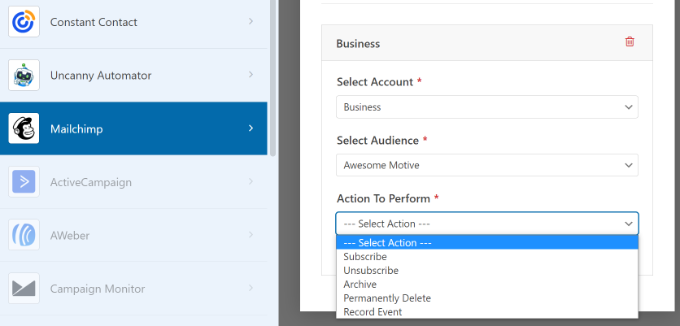
After that, you can go to the ‘Marketing’ tab from the left panel and then select Mailchimp.
From here, simply click the ‘Add New Connection’ button.
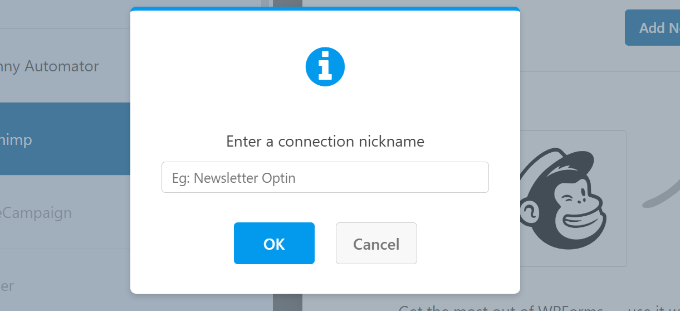
Next, a small popup will open where you will need to enter the Mailchimp nickname.
After entering it, go ahead and click the ‘OK’ button.
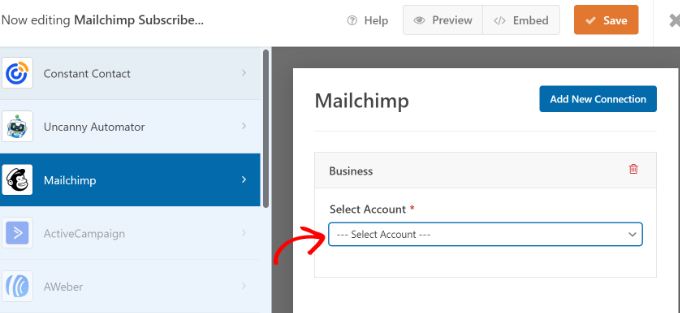
Next, you can pick the Mailchimp account that you connected to earlier.
Simply click the ‘Select Account’ dropdown menu and choose your account.
After that, more options will appear.
You can go ahead and select the audience from the dropdown menu to which the new subscribers will be added.
There are different actions to choose from, but we will select the ‘Subscribe’ option for this tutorial. This will add the user as a new contact to your Mailchimp account.
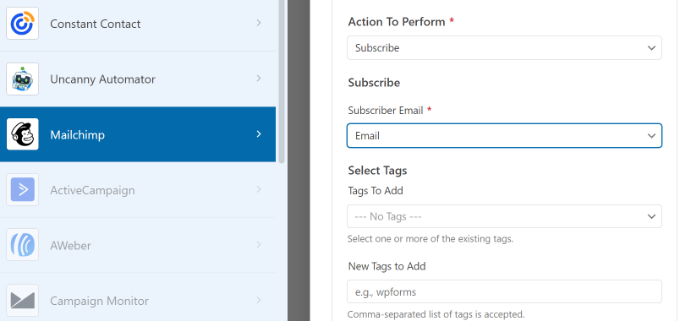
Next, you can scroll down to see additional settings. For instance, there is an option to choose the WPForms field where users can enter their email addresses.
You also have options to add tags to new subscribers and a note to the user’s profile.
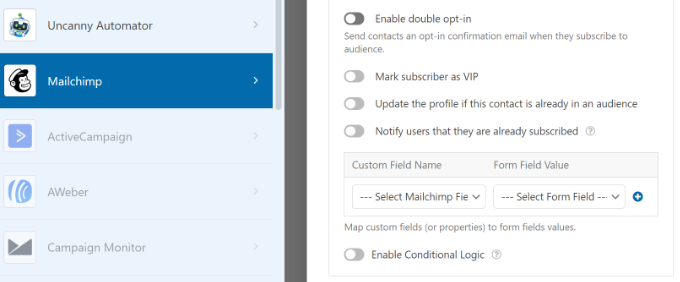
If you scroll down further, then you will see more optional settings. For instance, you can enable double opt-in, mark the subscriber as VIP, update their profile if the contact is already in an audience, and more.
Now, you are ready to add your Mailchimp subscribe form to your WordPress blog or website.
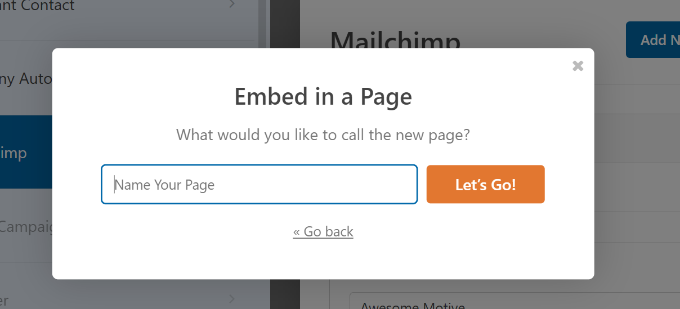
In the WPForms form builder, you will see an ‘Embed’ option at the top. Go ahead and click on the ‘Save’ button to store your changes, and then click the ‘Embed’ button.
Next, a popup will open where you will need to select an existing page or create a new page.
For this tutorial, we will use the ‘Create New Page’ option.
After that, you will need to enter a name for your new page.
Once that’s done, simply click the ‘Let’s Go!’ button.
You can then click the ‘Publish’ button at the top to make your Mailchimp subscribe form live.
You have now successfully created a Mailchimp subscribe form with custom fields.
You can go ahead and visit your website to see the form in action.
You can also do a lot more with Mailchimp and WordPress. For instance, you can integrate it with OptinMonster and show your subscribe forms in popup campaigns.
We hope this article helped you learn how to create a Mailchimp subscribe form in WordPress with custom fields. You may also want to see our guide on easy ways to grow your email list faster andour expert picks for the must have WordPress plugins to grow your website.
If you liked this article, then please subscribe to our YouTube Channel for WordPress video tutorials. You can also find us on Twitter and Facebook.
Are you looking for a comparison between WPForms, Gravity Forms, and Formidable Forms?
These three are the best WordPress form plugins in the market. However, picking the right form builder can be challenging for many website owners.
In this article, we’ll compare WPForms vs Gravity Forms vs Formidable Forms and show which is the best.
Introduction to WordPress Form Plugins
WPForms, Gravity Forms, and Formidable Forms are among the most popular WordPress form plugins that you can use. Each of them offers unique features and allows you to add different forms to your website.
WPForms was launched in 2016 by Syed Balkhi (founder of WPBeginner) and Jared Atchison. Since its launch, over 5 million WordPress sites have been using the plugin. The goal of creating WPForms was to offer an easy and powerful form plugin. It takes the pain out of creating online forms by making the process beginner friendly.
Gravity Forms is created by the team at Rocketgenius. It is a WordPress plugin that lets you add forms to your WordPress site. The plugin also specializes in helping developers build complex form-related solutions.
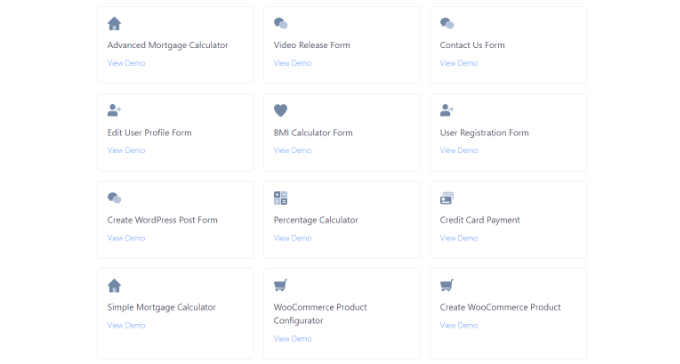
Formidable Forms is another powerful WordPress form builder created by Steph Wells and Steve Wells. You can use it to create a wide range of forms from simple contact forms to advanced solutions-focused forms like mortgage calculators, directories, listing forms, and more. Formidable Forms is part of WPBeginner Growth Fund companies.
That being said, let’s compare these WordPress form plugins and find out which is the best for your use case. In our research, we tried dozens of WordPress form plugins, and have decided to compare these top 3 form plugins in the following criteria:
When it comes to picking a WordPress form plugin, it is essential to choose a tool that is easy to use. The form builder should allow users to easily customize their forms without the need to edit code or hire a developer.
Let’s see how the 3 plugins compare to each other for ease of use.
WPForms – Ease of Use
WPForms is a beginner-friendly form plugin for WordPress. It offers a drag-and-drop form builder that is very super simple to use.
You can easily customize any form by adding multiple form fields from the menu on your left. All you have to do is drag the field and drop it onto the form template.
WPForms also makes it very easy to add your forms anywhere on the WordPress website. The best part, you can do all this within the form builder. You can click the embed button, and WPForms will show you options for adding your form.
For instance, you can create a new page or select an existing one to embed your forms.
You can also manually add your form to any page or post using the WordPress block. Besides that, the plugin lets you use shortcodes to add a form to your WordPress website.
Gravity Forms – Ease of Use
Gravity Forms also offers a drag-and-drop form builder, and it lets you create all types of forms without editing code.
You can quickly rework your form from inside the WordPress dashboard. The form builder offers different form fields that you can add by simply placing them onto the template.
After creating a form, Gravity Forms also lets you easily embed it on your website. Just like WPForms and Formidable Forms, you get an option inside the drag-and-drop builder to add your form.
Gravity Forms also offers a WordPress block to easily embed your forms on any page or post. Plus, you can use shortcodes or add the forms manually anywhere on your site.
Formidable Forms – Ease of Use
Formidable Forms is a user-friendly plugin that to lets you customize your forms using a drag-and-drop form builder, just like WPForms and Gravity Forms.
You can simply drag any form field from the options on your left and place them on the template. The plugin also lets you rearrange the order of the fields by simply moving them up or down or side to side.
Formidable Forms makes it very easy to embed your forms anywhere on your website. You can use the Formidable Forms block to add the form to any post or page. Or click the embed button in the form builder to embed your forms.
Winner – Tie
When it comes to ease, all 3 plugins perform equally well. Each of them offers a drag-and-drop functionality, which lets you edit and customize forms with editing code easily. Plus, each plugin makes it very easy to embed the forms anywhere on the website.
WPForms has a slight edge because it leans on decisions over options by giving you over 600+ form templates and easy-to-use choices whereas Gravity Forms and Formidable Forms are built more for developers.
Form Templates
Form templates are another important factor to consider when choosing a form plugin for WordPress.
Templates help save time as you don’t have to create a form from scratch. You can quickly edit it according to your requirements or simply use the default template to add a form to your website.
Let’s see how WPForms vs Gravity Forms vs Formidable Forms stack up in terms of form templates.
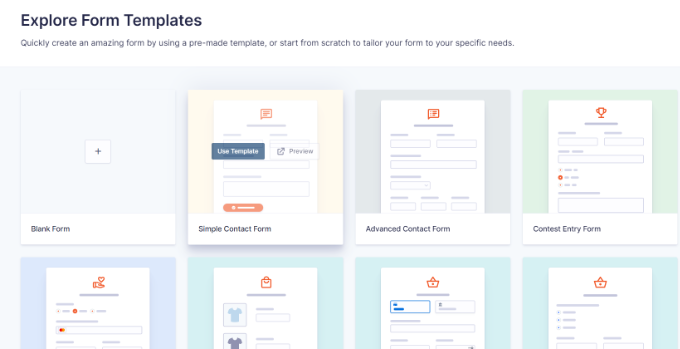
WPForms – Form Templates
With WPForms, you get over 600 prebuilt form templates. Whether you’re looking to create a simple contact form, feedback form, request a quote form, payment form, or registration form, WPForms has you covered.
The plugin categorizes form templates into different categories in the form builder. For instance, you can find different templates for business operations, customer service, education, entertainment, event planning, feedback, health and wellness, and more.
Even in the free version of WPForms, you get a lot of form templates to get started.
Gravity Forms – Form Templates
Gravity Forms offers limited prebuilt form templates compared to WPForms and Formidable Forms.
You only get 15 form templates in the form builder. Some of these include a simple contact form, advanced contact form, donation form, eCommerce form, event registration form, survey, newsletter signup form, and more.
Formidable Forms – Form Templates
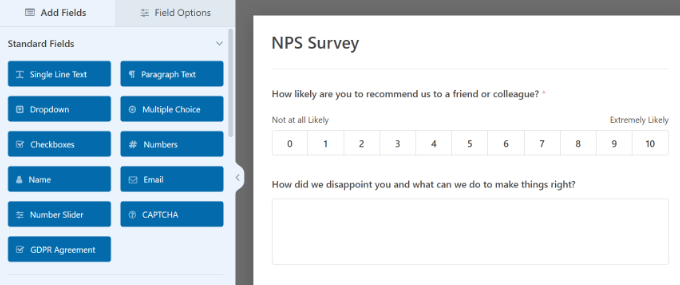
Formidable Forms offers over 175 WordPress form templates and examples you can use for your website.
What makes it different is that you get templates for advanced forms. For instance, you can create an advanced mortgage calculator form, net promoter score (NPS) survey form, car payment calculator form, life insurance calculator form, doctor visit form, signature forms, and more.
Besides that, you can find forms for payment collection, health and wellness, customer service, education, donations, event planning, and more.
Winner – WPForms
WPForms is a standout winner compared to Gravity Forms and Formidable Forms. You get the largest form template library in WPForms, with over 600 choices available. There are prebuilt templates for just about any type of form you want to create for your website.
Customization Options
A WordPress form plugin should allow you to edit and customize your form with ease. When selecting the right tool, you should look at the customization options the plugin offers.
Here’s a look at the different features offered by WPForms, Gravity Forms, and Formidable Forms.
WPForms – Customization Options
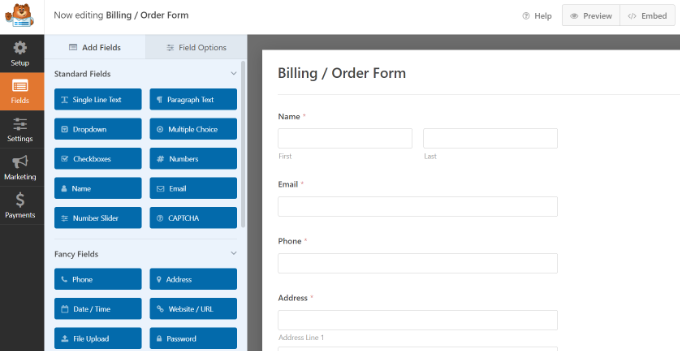
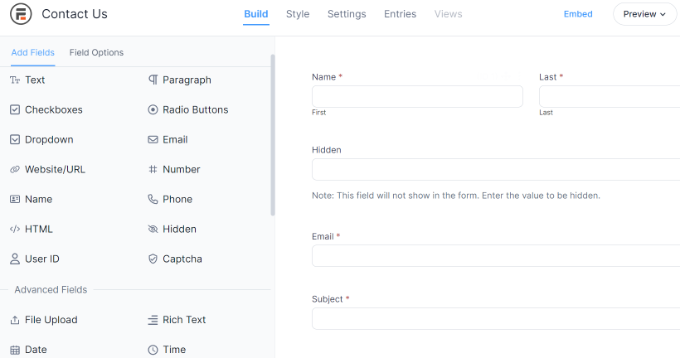
WPForms offers lots of customization options for your form. For starters, it offers different form fields that you can simply drag and drop from the menu on your left onto the template.
For instance, it offers standard fields like paragraph text, multiple choice, checkboxes, and more. Plus, you can add fancier fields like phone number, address, file upload, date/time, website, and more.
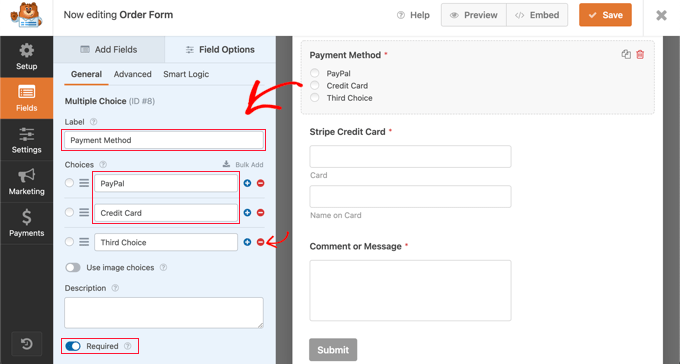
If you click on an existing form field, then you’ll see more options for customization.
You can edit the label of the field, make it a mandatory field, add smart logic, and more. For example, you can choose which payment methods to show in an order form and rearrange their order.
Instead of asking multiple questions at once, you can take the one-question-at-a-time approach. It will look like having a conversation face to face with a human, and boost form conversions.
Similarly, you can also use the lead forms addon to increase form conversions. It basically allows you to embed conversational forms on any page on your WordPress site.
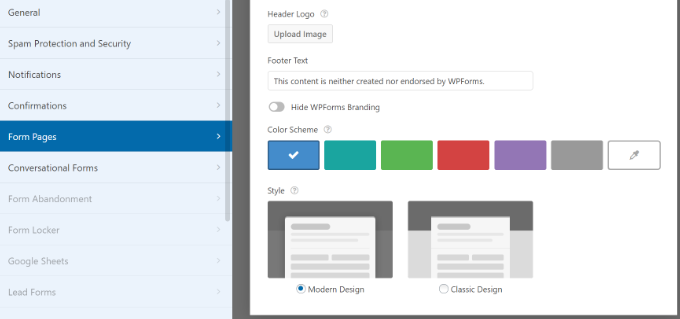
WPForms offers more customization features like custom form landing pages similar to Google forms. You can create a distraction-free landing page for your form and get more conversions.
The plugin lets you add a title and description for the page, a header logo, and edit the page URL. You also get to change the background color of the page and choose a style to make your forms more appealing.
Other customization options offered by WPForms include a save and continue feature. This lets your users save the progress while filling out a form and continue later to complete it. You can allow users to sign your online forms using their mouse or touchscreen.
If you have lengthy forms, then you can use the multi-page feature to split them into different pages. Or you can use conditional logic to show different form fields based on the user’s responses.
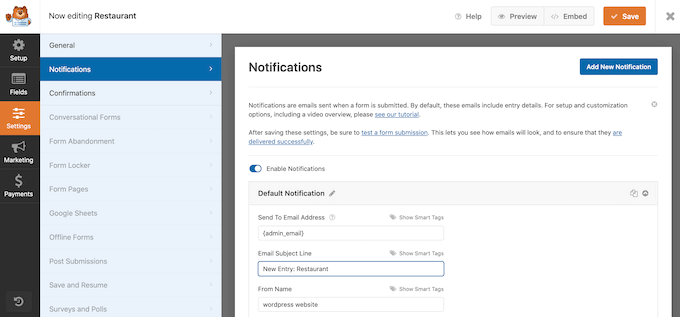
Besides that, you can also customize the notification and confirmation settings for your form. In the notification settings, you can edit details like email addresses, subject lines, names, messages, and more.
Similarly, you can also edit the confirmation message a user will see when they submit a form. You can show a thank you message, show a page, or redirect people to a specific URL.
Gravity Forms – Customization Options
Gravity Forms offers different form fields to customize your form template.
These include standard fields, advanced fields, post fields, and pricing fields.
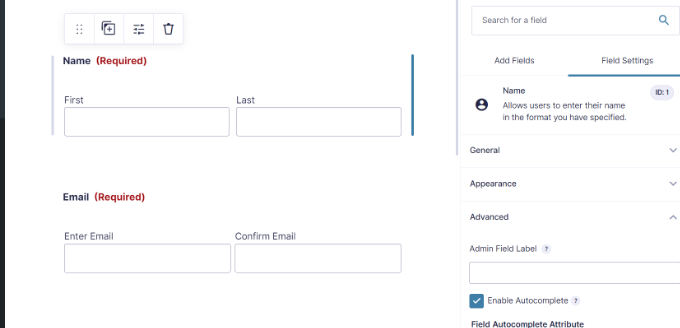
Just like WPForms and Formidable Forms, you can click on existing form fields to edit them further.
However, you’ll see a slight difference in the customization options. There are general settings for a field where you can change its label and add a description.
Other than that, you can edit the appearance of the field, change advanced settings like enabling field autocomplete, and add conditional logic.
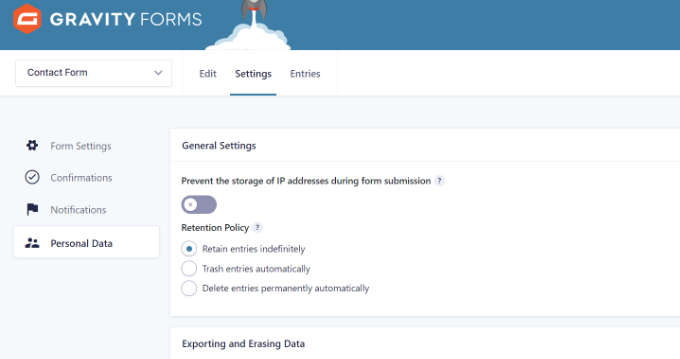
Other than that, you also get control over different form settings. For example, you can edit the notifications and confirmations settings in the form builder.
You can also configure ‘Personal Data’ settings similar to WPForms. These allow you to prevent the storage of IP addresses during form submission. Plus, you can enable integration with other tools for exporting and erasing personal data, which is helpful in complying with data regulations like GDPR.
Formidable Forms – Customization Options
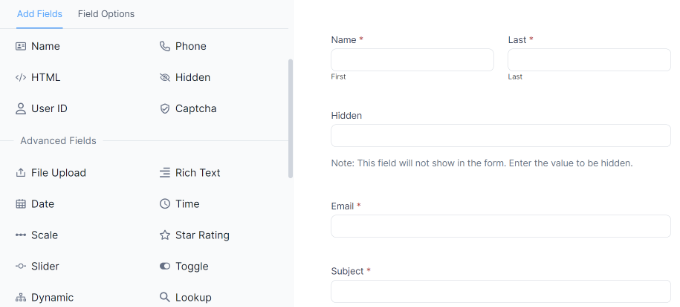
With the Formidable Forms drag-and-drop builder, you can easily customize your form with options such as prebuilt form fields that you add to your template.
What makes the plugin different from others is that it offers multiple form fields that will help you create advanced forms. For instance, you can add a user ID field, captcha, hidden field, appointments, lookup field, and more.
Besides that, you can easily edit each existing field in the template.
There are general options to change the label, add a CSS class, and more. Or you can view the advanced options to add a placeholder text, and description, edit the field size and allow maximum characters.
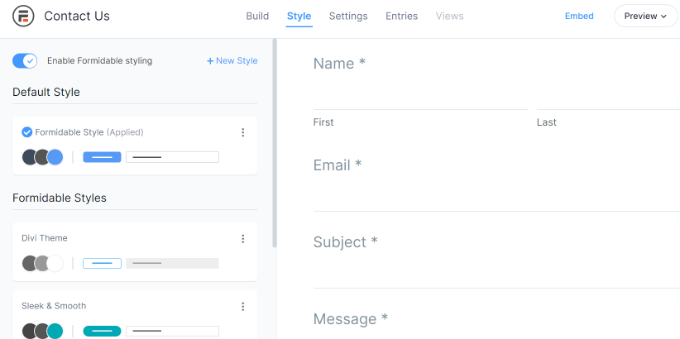
What’s different about Formidable Forms compared to WPForms and Gravity Forms is that it also offers different styles for your forms.
You can use the default style or choose from various options. This way, you can change the appearance of your forms without having to enter CSS code.
Other than that, you can also customize the form settings. For instance, the plugin lets you change the notification settings, and form permissions, and also allows form scheduling.
Winner – WPForms
After comparing all 3 plugins, we found WPForms to be the clear winner. It offers more customization features compared to Formidable Forms and Gravity Forms.
You can add different form fields, change their settings, rearrange them, and more using the drag-and-drop builder. Besides that, WPForms offers tons of features to make your form more appealing and boost conversions.
Additional Features and Integrations
Now that we’ve covered ease of use, templates, and customization options, let’s see how WPForms, Formidable Forms, and Gravity Forms compare in terms of additional features and integrations.
As a website owner, you’d want a WordPress plugin that easily works with third-party tools, payment services, and email marketing services. Here’s what each plugin has to offer.
WPForms – Additional Features and Integrations
WPForms offers lots of premium addons and integrations that extend its functionality and benefits.
For instance, you can accept file uploads with its post-submission addon. This way, users can easily submit content on the front end of your site without requiring access to the WordPress dashboard.
Similarly, you get addons for geolocation data and see where your form users are from. The user journey addon can show you the pages and posts people visited before submitting a form.
The plugin also offers a form abandonment addon that captures partial entries for a form. You can then recover those entries and encourage users to complete a form.
Aside from this, WPForms provides more addons for creating custom Captcha, allowing digital signatures, locking WordPress forms, creating interactive form layouts, and more.
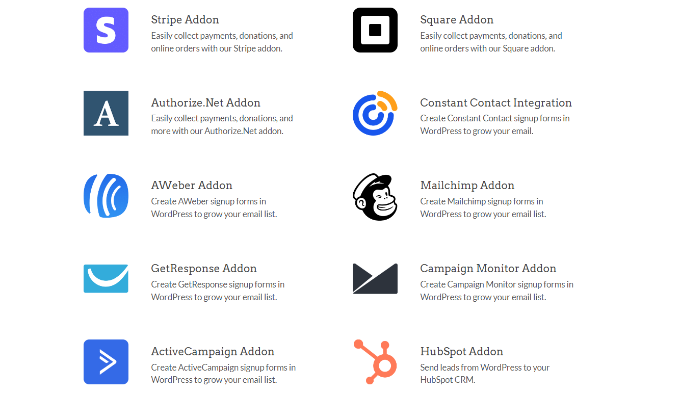
Another advantage of using WPForms compared to other plugins is that it easily integrates with different tools and plugins. For example, you can use it with popular email marketing tools like Drip, Mailchimp, and Constant Contact.
The plugin also supports payment gateways like Stripe, PayPal, Square, and Authorize.Net. You can also integrate WPForms with CRMs such as Salesforce and HubSpot.
Gravity Forms – Additional Features and Integrations
Gravity Forms also offers different addons that can help you get the most out of the plugin. However, the list is not as expansive as WPForms, and you’d have to pay extra to use third-party extensions.
You get additional features for setting up user registrations, creating surveys and polls, tracking users’ geolocation, collecting partial form entries, allowing signatures, and more.
Besides that, Gravity Forms also offers integrations with different tools and plugins.
You can easily integrate email marketing tools like AWeber, Constant Contact, Mailgun, and more. Plus, you can add anti-spam solutions like Akismet and reCAPTCHA.
Other integrations include Google Analytics, Dropbox, Zapier, Trello, ActiveCampaign, HelpScout, PayPal Checkout, 2Checkout, and Stripe.
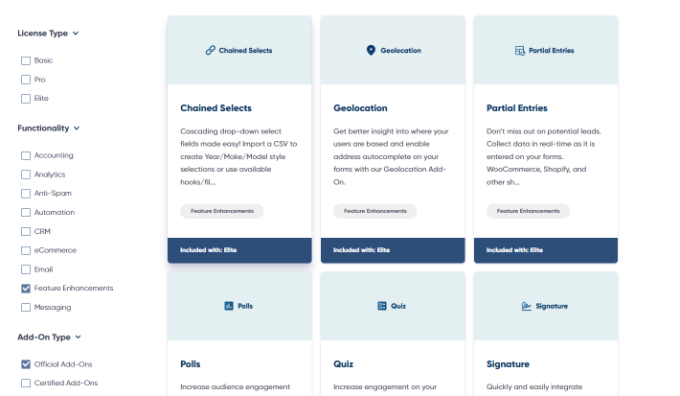
Formidable Forms – Additional Features and Integrations
Formidable Forms offers different addons and integration features. Most of the additional features are similar to WPForms and Gravity Forms.
However, what makes Formidable Forms different is that you get several powerful features to create advanced forms, set up web applications, show stats on the front end, and more.
For instance, the plugin offers a form action automation feature to schedule email notifications, SMS messages, and other actions. It also offers API webhooks that let you send submissions to REST APIs.
It also offers a visual views addon that lets you display data from form entries on the front end of your website. You can create web apps to display form submissions in tables, grids, calendars, and other views.
This is great for showing testimonials and product reviews, adding a user-submitted events calendar, and displaying useful statistics.
Besides that, Formidable Forms also lets you create applications for your website. It offers prebuilt templates that include different forms, views, and pages for your application. Simply select a template, and the plugin will take care of the rest.
You can create different applications, such as product reviews, real estate listings, testimonials, restaurant menus, certificates, and more.
For example, you can offer professional certificates in just a few clicks. Simply choose the certificate application template, and Formidable Forms will automatically add a form with a certificate generator on your website.
It will also add views for the certificate and certificate of completion, which users can see on the front end.
Other advanced features offered by Formidable Forms include converting WordPress forms to PDF, mapping form fields to PDF form fields, quizzes, repeater fields, SMS voting, front-end editing, and more.
Other than that, you can also integrate Formidable Forms with different payment services, email marketing tools, CRMs, and third-party plugins. It even works with Uncanny Automator and Zapier, so you can connect Formidable Forms to services like Asana, Slack, and Dropbox.
The best part about using Formidable Forms is that you get all the advanced features in one place, with everything included in a single pricing plan. If you were to use Gravity Forms, then you’d need to subscribe to multiple third-party addons.
For example, you’d need the basic Gravity Forms plan along with other extensions like Gravity PDF, File Upload Pro, Gravity View, Gravity Math, and so on. This can add to your overall cost and make it very expensive to use Gravity Forms.
Winner – Formidable Forms
While each plugin offers multiple additional features and integrations, Formidable Forms is the standout winner. It offers more advanced features that you can use to display form results on the front end, create complex forms, convert forms to PDF, create web applications, and use various addons to help users create form solutions for any scenario.
WPForms gets an honorary mention for marketing-related features, like form abandonment and digital signatures. It also integrates with popular email services, CRM software, tracking tools, payment gateways, and other plugins.
Pricing Plans
The next parameter we will compare WPForms vs Gravity Forms vs Formidable Forms is that of pricing. Let’s see which plugin offers the most value for money.
WPForms – Pricing
WPForms offers 4 different pricing plans suitable for all types of businesses. These include a Basic plan, which costs $49.50 per year, and you can use it for 1 website. It also offers all the essential features like premium templates, entry management, and file uploads.
If you want to use the plugin on more websites and require marketing integrations, then WPForms offers a Plus plan for $99.50 per year.
On the other hand, there is a Pro plan that includes everything from the Basic and Plus plans. It includes payment addons, conversion tools, and other advanced form features. This will close you $199.50 per year.
Lastly, there is an Elite plan for $299.50 per year, which has everything. You get to use it on unlimited websites and get all the features and integrations WPForms has to offer. Each premium plan comes with 14-day money back guarantee.
The best part, there is also a WPForms Lite version you can use for free. You get multiple form templates, standard fields for customization, spam protection, and other features.
Gravity Forms – Pricing Plans
Gravity Forms offer 3 premium plans, which include the Basic License, Pro License, and Elite License.
With the Basic License plan, you can use the plugin on 1 website. You also get addons for email marketing tools and spam protection services. This plan will cost you $59 per year.
Next, there is a Pro License plan that offers more addons. For instance, you get to integrate more email marketing services, CRMs, payment gateways, and third-party services. This plan will cost $159 per year.
Lastly, Gravity Forms offers an Elite License plan that includes all the features from the Basic and Pro plans. In addition to that, Elite plan users also get access to features like polls, quizzes, digital signatures, surveys, geolocation, and more. The Elite plan is available for $259 per year.
That said, Gravity Forms doesn’t offer a free version, like WPForms or Formidable Forms. You’d also need to pay extra to use different third-party addons and extensions.
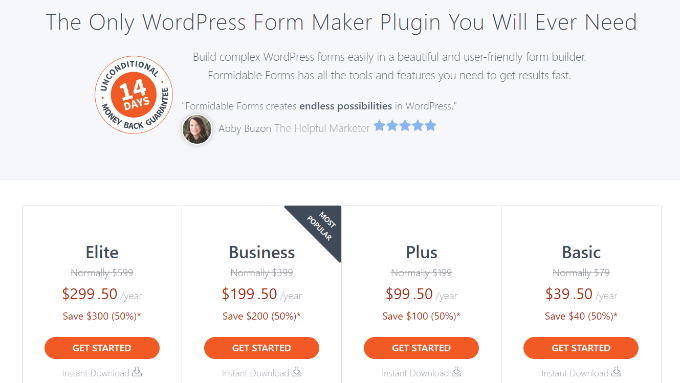
Formidable Forms – Pricing Plans
Formidable Forms lets you choose from 4 pricing plans. It starts with a Basic plan, costing $39.50 per year. You get 50+ form templates and basic features like conditional logic and file uploads.
Besides that, there is a Plus plan for $99.50 per year, and it offers more form templates and features. For instance, you get the Formidable Views feature, landing pages, and integration with Mailchimp, MailPoet Newsletters, and AWeber.
Next, it offers a Business plan that includes over 150 form templates, premium addons, more integrations, and additional features. This plan will cost you $199.50 per year.
Lastly, there is an Elite plan for $299.50 per year, and it includes all the features and integrations. You get all the templates and support for third-party tools like Salesforce, ActiveCampaign, and HubSpot.
Formidable Forms also offers a free version. You can get started for free and get features like drag and drop form builder, basic form templates, and standard form fields for customization.
Winner – WPForms and Formidable Forms
When it comes to offering the most value for money, both WPForms and Formidable Forms clearly stand out when compared to Gravity Forms.
Both of them offer 4 different pricing plans for businesses of all sizes. Plus, you get a free version, which helps small website owners, bloggers, and others to create WordPress forms without a considerable investment. You also don’t have to pay more to use multiple addons and advanced features.
Which is the Best WordPress Form Plugin?
WPForms, Gravity Forms, and Formidable Forms are some of the best WordPress form plugins you can get your hands on today.
However, we believe that WPForms is the best plugin for creating forms for your WordPress website. It is super easy to use and offers tons of features.
You get over 600 form templates, a drag-and-drop form builder, multiple form fields for customization, and additional settings to edit your form. Plus, there are different premium addons that allow you to expand the functionality of WPForms.
Not to mention, there is a WPForms Lite version available for free. It also includes lots of form templates and customization features. You can quickly create forms for your website using the free plugin.
On the other hand, if you’re a developer looking to save time on developing complex and advanced WordPress forms, then Formidable Forms is the perfect solution. You can create calculators and web applications, convert forms to PDF, and much more without editing code.
Do you want to create a restaurant website with WordPress?
A restaurant website can help attract new customers and grow your business. It can also provide a better experience for your existing customers and keep them coming back to your restaurant, cafe, takeaway, or similar business.
In this article, we will show you how to create a restaurant website with WordPress.
Why Create a Restaurant Website?
A website is one of the best ways to market your restaurant to new customers and provide a better experience for your existing clients.
By creating an online presence for your restaurant, you can introduce your business to people who are looking for venues and food just like yours.
After a potential customer discovers your business, a professionally-designed and helpful restaurant website will tell them everything they need to know about your business. They can then decide whether your restaurant is right for them.
Even if you have lots of loyal customers and a positive reputation in the local area, a restaurant website can help you improve the customer experience.
For example, it can allow customers to book a table online, send you questions using a convenient contact form, check out the latest menu, and much more.
In this way, a restaurant website can keep your customers happy, so they carry on visiting you for months, or even years to come.
That said, let’s see how you can easily create a restaurant website with WordPress.
Which Is the Best Website Builder for Your Restaurant?
There are many website builders that can help you create a restaurant website but we recommend using WordPress.
According to our blogging research statistics, WordPress is the most popular website platform in the world. It powers nearly 43% of all websites on the internet including many top restaurant websites.
WordPress is also open-source and free. For more on this topic, see our article on why WordPress is free.
However, it’s important to realize that there are two types of WordPress software, so you don’t choose the wrong one.
First, there is WordPress.com, which is a blog hosting platform. Then, there is WordPress.org which is also known as self-hosted WordPress.
For a restaurant website, we recommend using WordPress.org because it gives you complete ownership of your site and allows you to install third-party plugins, including plenty that are designed specifically for restaurant owners.
To learn more about why we recommend WordPress to all our readers, please see our complete WordPress review with pros and cons.
A domain name is your website’s address on the internet. This is what customers will type into their browsers to reach your website, such as justeat.com or tacobell.com.
Web hosting is where your website lives online. To help you out, we’ve hand-picked some of the best WordPress hosting that you can buy for a restaurant website.
Although the WordPress software is free, hosting and domain names are where the costs can really start to add up.
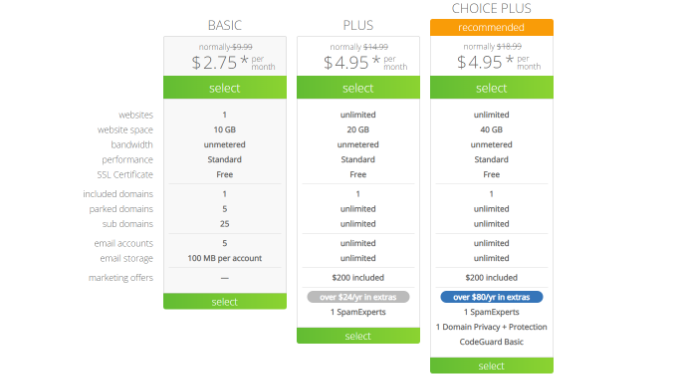
A domain name typically costs $14.99/year and hosting costs start from $7.99/month. This is a lot for restaurants that already have bills and expenses to pay.
Thankfully, Bluehost has offers a free domain name, and our readers can get 60% off on web hosting. Bluehost is one of the largest hosting companies in the world, and an official WordPress-recommended hosting partner.
They’re also offering our readers a free SSL certificate. If you want to accept payments online, then an SSL certificate will help keep the customer’s credit and debit card information safe.
You can click the button below to get started for as little as $2.75 per month.
Once there, you will need to go to the Bluehost website in a new tab and click on the green ‘Get Started Now’ button.
This will bring you to a pricing page where you can choose a hosting plan for your website.
We recommend choosing a Basic or Plus plan, as they’re the most popular web hosting plans among our readers.
After selecting a plan, click on ‘Continue.’
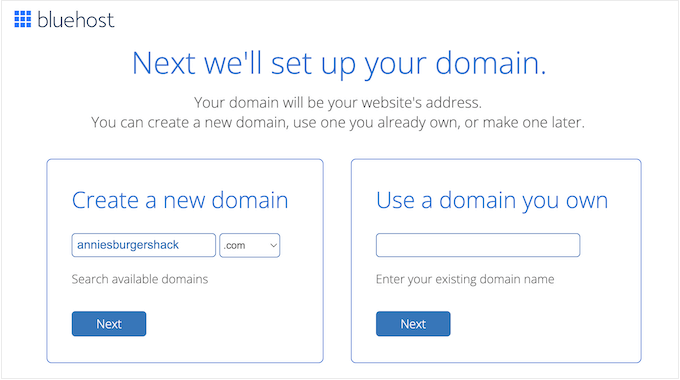
On the next screen, you’ll need to choose a domain name.
Ideally, the domain name will be easy to pronounce and spell, easy to remember, and related to your business. The name of your restaurant is a great place to start, but sometimes that domain may already be taken by another business.
In that case, you can try extending the domain name by adding your restaurant’s location, your own name, or the type of food you serve.
After choosing a name, click on the ‘Next’ button to continue.
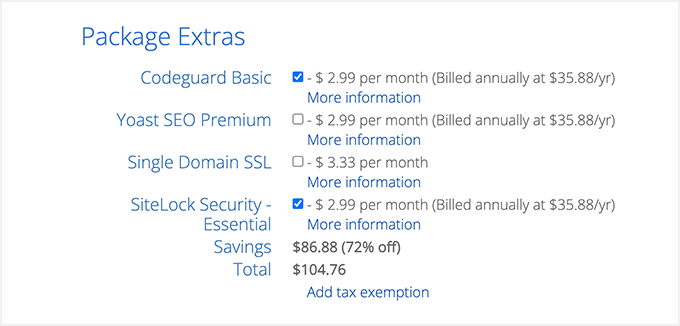
Now you’ll need to provide your account information such as your name and email address. After that, you’ll also see optional extras that you can purchase.
We generally don’t recommend purchasing these extras straight away, as you can always add them later on if you need them.
After that, simply type in your payment information to complete the purchase.
Once you’ve done that, you’ll get an email with instructions on how to login to your web hosting control panel. This is your hosting account dashboard where you can manage your restaurant website, including setting up email notifications and asking for WordPress support.
It’s also where you’ll install the WordPress software.
Step 2. Create a New WordPress Website
When you signup with Bluehost using our link, Bluehost installs WordPress on your domain name automatically.
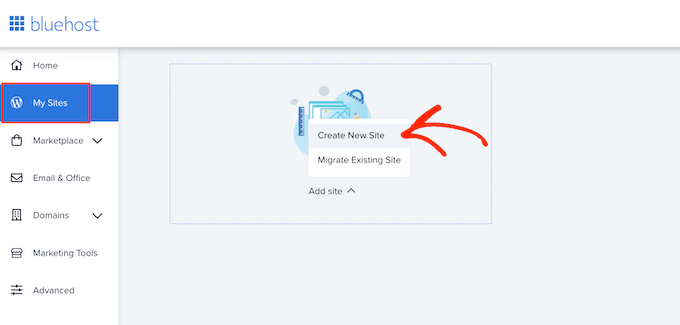
If you want to create a different WordPress website, then you can simply click on the ‘My Sites’ tab in the Bluehost dashboard.
Next, just click on the ‘Add Site’ button and select ‘Create New Site.’
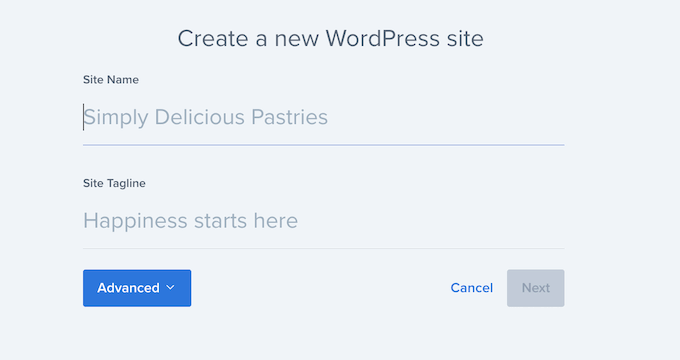
The Bluehost wizard will now guide you through the setup process.
First, you’ll need to type in a site title and optional tagline.
Click on the ‘Next’ button to continue.
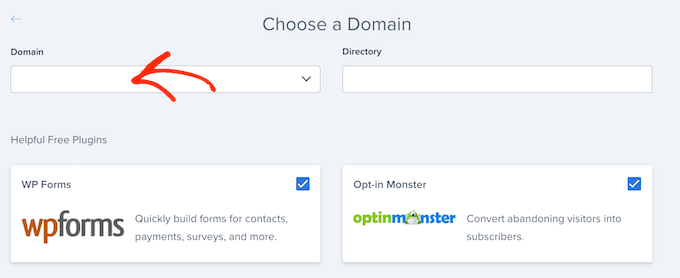
After that, Bluehost will ask you to select a domain name and path for your restaurant website. If you’ve already purchased a domain name, then you can simply select it from the dropdown menu.
If you don’t have a domain name then you can buy one by visiting the ‘Domains’ page inside the Bluehost dashboard.
After choosing a domain name, you can leave the directory path blank and let Bluehost fill it in for you. The installer will also show a few must-have WordPress plugins that you may want to install on your restaurant website including OptinMonster.
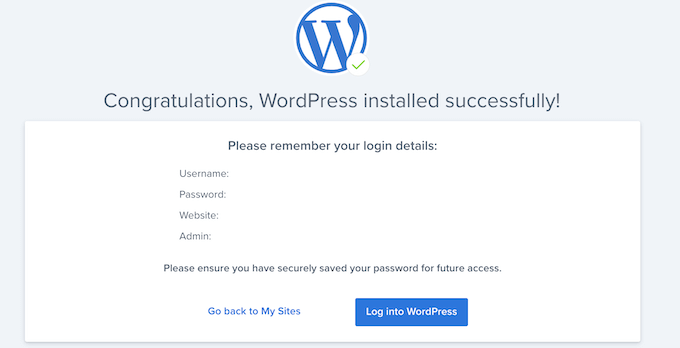
After that, click on the ‘Next’ button and the installer will set up your restaurant site.
Once it’s finished, you’ll see a ‘WordPress installed successfully’ message with information about your new website. You can now go ahead and click on the ‘Log into WordPress’ button.
This will take you to your site’s admin area.
You can also log in to the WordPress dashboard by simply going to yoursite.com/wp-admin/ directly from your browser.
Your typical restaurant website needs special features, like the ability to show a menu, photos, location information, business hours, and more.
With that in mind, it makes sense to look for a theme that’s designed for the food or hospitality industry. To help you out, we’ve collected the best WordPress restaurant themes.
You can also use a website and landing page builder plugin such as SeedProd.
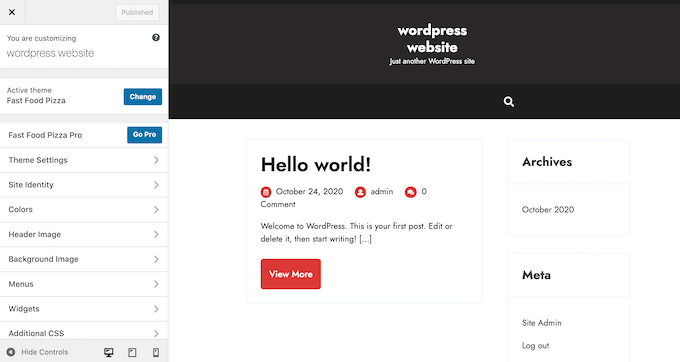
After installing your theme, you may want to customize it by going to Appearance » Customize in the WordPress dashboard.
This will launch the theme customizer where you can fine-tune the theme settings and see your changes in the live preview.
If you’re using one of the newer full site editing themes, then you’ll see the option for Appearance »Editor, which uses blocks similar to the content editor to customize your site.
Pro Tip: No matter what theme you’re using, neither the default WordPress customizer nor the full site editing offers a user-friendly drag and drop customization experience. For that reason, we recommend using a page builder like SeedProd to customize your theme.
Just remember that you can always return to this screen and continue customizing your theme. You can even completely change your WordPress theme at any point.
Step 4. Create a Custom Home Page
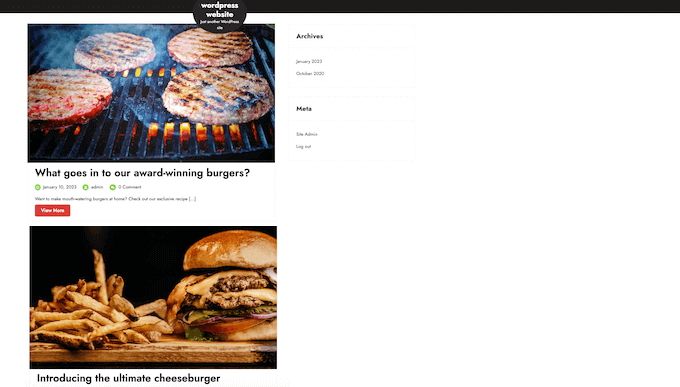
WordPress has two two default content types called posts and pages.
You’ll typically use posts to create articles and blogs. By default, the home page shows these posts in reverse chronological order, so the newest content appears at the top of the list.
You might use a blog to build a stronger relationship with their customers, improve your WordPress SEO, and get more traffic to your restaurant website. For example, you could write about recipes, share cooking tips, or blog about the latest restaurant industry news.
However, even if you plan to publish blog posts, you typically won’t show these on the home page. Instead, we recommend creating a custom home page that introduces your business to new visitors.
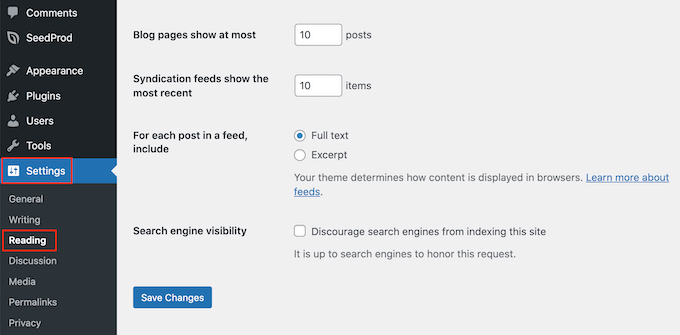
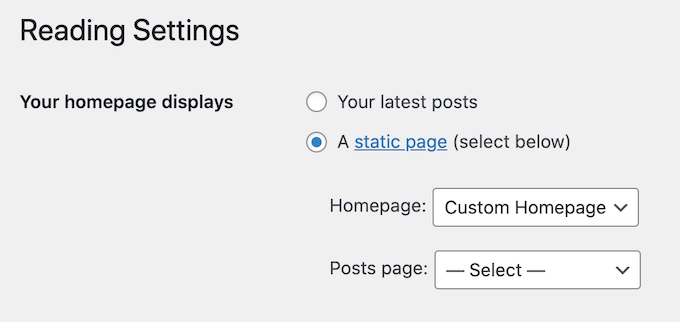
Once you’re happy with the page’s design, it’s time to set it as your home page. To do this, go to Settings » Reading in the WordPress dashboard.
Here, scroll to ‘Your homepage settings’ and select ‘A static page.’
Next, open the ‘Homepage’ dropdown and choose the page that you want to use.
Then, simply scroll to the bottom of the screen and click on ‘Save Changes.’ Now, if you visit your website you’ll see the new home page in action.
If you are going to write blogs, then make sure you create a separate blog page to display your posts. If you don’t, then customers will struggle to find your latest WordPress blogs.
Step 5. Create an Online Restaurant Menu
Even long-term, loyal customers may want to look at your menu from time to time. By publishing your menu online, customers can look at it any time of day or night.
Publishing a menu can also help convince new customers to visit your restaurant.
It is possible to upload PDF files to your WordPress website. However, downloading a PDF menu can be difficult depending on the customer’s data plan and internet connection, and they’re non-responsive so they can be hard to read on some devices.
Plus, if you add new dishes or change your pricing, then you’ll also need to upload a completely new PDF.
For that reason, we recommend using SeedProd to add an online menu to your WordPress website. SeedProd also allows you to create a mobile responsive menu that looks great on every device.
You can also easily update the menu as you add new dishes, change the prices, remove dishes, and more.
SeedProd even comes with a ‘Menu Sales Page’ template that’s perfect for creating a menu.
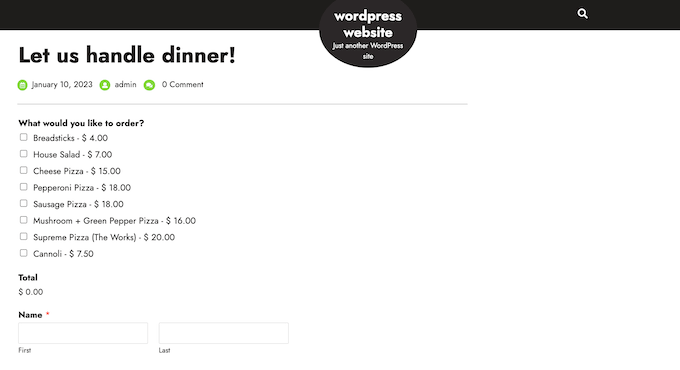
Many restaurants allow customers to order food online. For example, you might give customers the option to pre-order their meal or place an order for delivery.
It may sound technical, but you can easily add online food ordering to your website using the WPForms plugin.
WPForms is the best WordPress form builder that allows you to create online order forms for all kinds of products and services.
It even comes with a ready-made ‘Takeout Order Form’ that you can customize to suit your restaurant website.
Every time someone completes the form, WPForms will notify you automatically so you can start working on that order straight away.
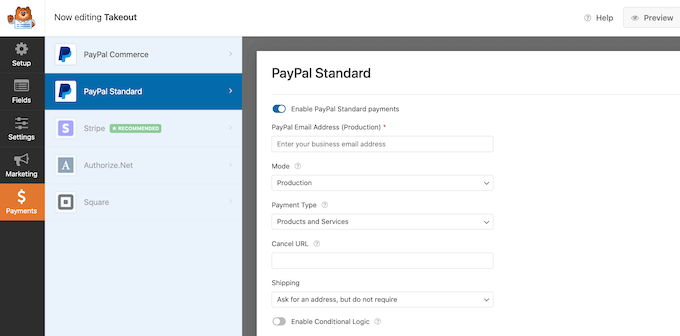
If you don’t want to accept cash on delivery, then WPForms supports all of the best payment gateways including PayPal and Stripe. This allows you to accept payments securely online, which is quick and convenient for your customers.
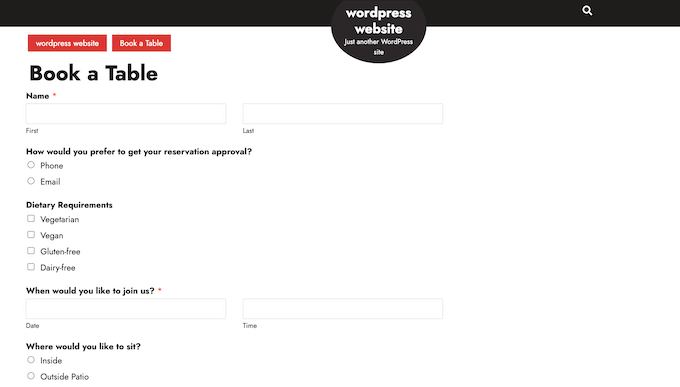
Today, most people expect to be able to book appointments through an automated system.
By adding a booking form to your restaurant website, you can accept reservations at any time of the day or night. You’ll never lose another customer just because you weren’t around to answer the phone.
Booking forms can also automate a lot of the booking process. This includes collecting payments and emailing your customers to remind them about their upcoming booking.
You can easily add a restaurant booking form to your website using WPForms. This plugin has a ready-made dinner reservation form template that you can customize for your restaurant.
WPForms also integrates with all of the top email marketing providers. This makes it easy to send reservation confirmation emails to your customers.
As their booking approaches, you can even send the customer a reminder email, ask them to share any dietary requirements, send a pre-order form, and more.
While visitors could ring your phone number or send a message to your business email address, we always recommend adding a contact form to your website.
Most of the best contact form plugins come with built-in spam protection, so you won’t get any contact form spam. A form will also collect consistent information from visitors, so you’ll have all the data you need to write a helpful reply.
The easiest way to add a contact form to your WordPress website is by using the free WPForms plugin.
This free plugin comes with a built-in Simple Contact Form template that you can quickly customize using the drag and drop editor.
Then, simply add the form to any page, post, or widget-ready area using the ready-made WPForms block.
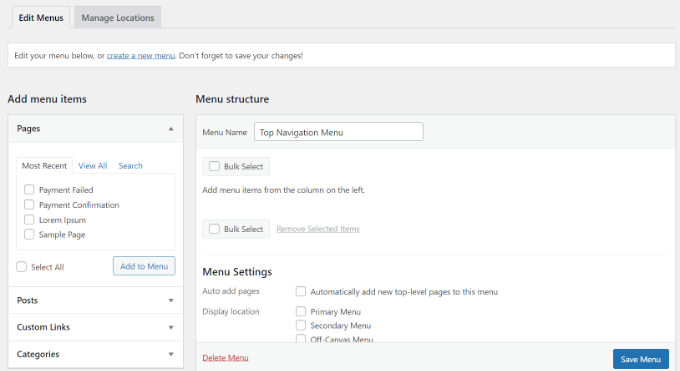
Once you’ve added some content to your restaurant website, you’ll want to help visitors find their way around those pages and posts by adding a navigation menu.
No matter what theme you’re using, WordPress makes it really easy to add menus and sub-menus to your restaurant website.
Step 10. Add Social Proof to Your Restaurant Website
Social proof is one of the best ways to earn customer trust, and convince new people to visit your restaurant. After all, we’re more likely to try things that we see other people buying, using, or recommending.
Using this plugin, you can create a hashtag feed and show photos that customers have tagged your account in. This includes photos of your food, venue, and shots of customers having fun at your restaurant.
Customer reviews and testimonials can provide visitors with more information, and may even solve any question or worries customers have about visiting your restaurant.
If you want to show reviews from other platforms like Yelp or Google My Business, then there’s also plenty of customer review plugins for WordPress that you can use.
These plugins will collect reviews automatically and then organize them into a nice layout on your restaurant website.
We hope this tutorial helped you learn how to create a restaurant website with WordPress. You may also want to see our ultimate WordPress security guide and our expert pick of the must have WordPress plugins that you should install on all business sites.
If you liked this article, then please subscribe to our YouTube Channel for WordPress video tutorials. You can also find us on Twitter and Facebook.
Are you looking a Typeform alternative for your website?
Typeform is a tool that lets you create different types of forms. However, it is expensive software, especially for small businesses. There are other WordPress form plugins and other alternatives that offer more features and are extremely affordable.
In this article, we’ll show you the best Typeform alternatives. We’ll include free and paid options so that you can choose the best plugin for your business.
Why Do You Need a Typeform Alternative?
Typeform is a popular software for creating different forms for your WordPress website. You can use it to make a survey or a poll for your business. It also allows you to create quizzes, application forms, and order forms.
While Typeform offers many features and form templates, it has some drawbacks. For instance, because Typeform is a SaaS (software as a service) tool, it stores data on its external servers. This can be a security vulnerability, as you’ll be trusting someone else with your customer’s personal data.
Another drawback of using Typeform is the cost. The basic plan starts from $25 per month, which can be expensive for small businesses. Plus, you cannot remove the Typeform branding in the basic plan.
If you want more features and integrations, or if you want to use your own branding, then you’ll need to upgrade to a higher pricing plan. Not to mention that they restrict the number of responses you can collect in a month. For example if you want more than 100 responses a month, you’ll be paying $600 per year, and then the next level up is $996 per year.
This will significantly drive up the cost of running a website and make Typeform less attractive for WordPress users.
There is also a free version of Typeform, but it lacks many features. This is why most smart website owners use WordPress plugins as alternatives and get more options for free.
That said, let’s look at the best Typeform alternatives.
WPForms is the best WordPress contact form plugin and offers a lot more features compared to Typeform. Over 5 million professionals use WPForms on their websites to create all types of forms.
It is super easy to use and offers a drag-and-drop form builder. Plus, you get many prebuilt form templates and multiple customization options.
Even in the free version of WPForms, you get features like spam protection, basic form fields, email notifications, and more. This is more than what Typeform’s free version offers users.
Besides that, WPForms comes with powerful addons. For instance, you can create a conversational form in just a few clicks or create stunning surveys and polls with ease. You also get interactive survey reports and advanced fields like the Likert scale, net promoter score (NPS), and star ratings.
Another advantage WPForms offers over Typeforms is that it easily integrates with popular email marketing tools, payment gateways to accept online payments, and other WordPress plugins like OptinMonster.
For instance, you can add a form from WPForms to an OptinMonster campaign and show it in a popup. Similarly, you can track form conversions and performance by integrating it with MonsterInsights.
Besides that, WPForms also offers other features that you won’t find in Typeform. For example, WPForms lets you track user journeys, collect geolocation data, track and reduce form abandonment, allow file uploads, and more.
Pricing: WPForms premium plans start from $49.50 per year. WPBeginner users can avail of an exclusive 50% OFF discount on all plans using our WPForms coupon. There is also a WPForms Lite version you can use for free.
Formidable Forms is an advanced WordPress form plugin and a great alternative to Typeform. You can create complex and technical forms without editing code, which is not possible in Typeform.
For instance, Formidable Forms makes it super easy to create calculators like mortgage calculators, quote request calculators, or car payment calculators.
Besides that, you can use the plugin to collect customer feedback and data by creating polls and surveys. It also makes it super easy to set up automated quizzes with grading, collect online payments, and even display form data on the front end of your website.
Other features offered by Formidable Forms include an easy-to-use drag-and-drop form builder, conditional logic, multiple form templates, visual form styler, landing pages, and more.
Pricing: Formidable Forms pricing starts from $39.50 per year. You can also use a free version of the plugin as an alternative to Typeform.
Gravity Forms is a popular Typeforms alternative you can use for your website. It is used by some of the biggest brands, like Nike, ESPN, NASA, and UNICEF.
Gravity Forms offers robust features and helps create complex form solutions at a fraction of the cost compared to Typeforms. For instance, you can use it to create quizzes, surveys, web directories, and accept user-generated content on the front end of your site.
Besides that, the plugin offers a drag-and-drop visual form builder, prebuilt form templates, and many customization options. You can also set up automated workflows and show or hide form fields, buttons, and form sections based on user behavior.
Pricing: Gravity Forms is a premium alternative to Typeforms, with prices starting from $59 per year.
HubSpot Form Builder is the next Typeform alternative on our list, and it is a powerful all-in-one marketing toolkit. It includes a form builder, live chat, analytics, popups, and other marketing tools.
Using HubSpot, you get a complete customer relationship management (CRM) platform. This helps to automatically sync your WordPress form with your contacts, easily manage them, create different segments, and more.
HubSpot Form Builder also makes a great alternative to Typeforms if you’re already using other HubSpot products, like its email marketing tool. Besides that, it easily integrates with other contact form plugins like WPForms and Formidable Forms.
Another advantage of using HubSpot is that you get to see how your forms are performing. You don’t have to integrate it with a third-party tool like Google Analytics. With built-in analytics reports, you can see which forms are converting the best.
Pricing: You can sign-up for free on HubSpot and use the CRM, live chat, and other features for free. However, their premium plans start from $45 per month (billed annually).
Jotform is a popular form builder that makes it super easy to create different types of online forms. Whether you want a simple contact form or a form to collect online payments, Jotform lets you build one in just a few minutes.
What makes Jotform a great Typeform alternative is that you can customize your forms and add your own branding and logo even in all the paid plans.
Besides that, you get a lot more features in the free version of Jotform compared to Typeform. For example, you can create up to 5 forms, get 100 monthly submissions, 100MB of storage space, and more.
Jotform also offers other products along with a form builder. You can use its store builder to create an online store, add tables, build online apps, turn form responses into visual reports, edit PDF files for free, and more.
Pricing: Jotform premium plans start from $34 per month, and you get a 30-day money-back guarantee. There is also a free Jotform version you can use to get started.
Ninja Forms is another Typeform alternative you can use for free. It lets you create interactive online forms with no coding skills required. Plus, the drag-and-drop form builder makes it super easy to design all types of forms without hiring a designer.
Asides from that, Ninja Forms also offers premium extensions for more features. For instance, you can create conversational forms using conditional logic addon or set up a multi-step form.
Other paid addons include an advanced date picker, file uploader, PDF form submission option, and more. Ninja Forms also integrates with different payment services like PayPal and Stripe, email marketing tools like MailChimp CRMs like Salesforce, and other tools like Slack and Webhooks.
Pricing: The base plugin of Ninja Forms is free to use. However, if you want more features, then you’ll need its premium extensions. The Personal plan starts from $49 per year and includes 4 addons.
Zoho Forms is a premium form builder that offers lots of features and seamless integration. It is a great alternative to Typeform if you’re already using Zoho CRM and other Zoho tools.
Zoho Forms lets you create over 30 different types of forms, including contact forms, surveys, polls, and more. Plus, it offers different form templates for multiple industries, like businesses, medical institutions, eCommerce sites, and more.
Besides that, Zoho Forms also provide multiple security options. These include SSL, field encryption, form audit, CAPTCHA, and more.
Pricing: Zoho Forms prices start from $10 per month and offers 10,000 submissions per month, 500MB storage, unlimited forms and reports, and more.
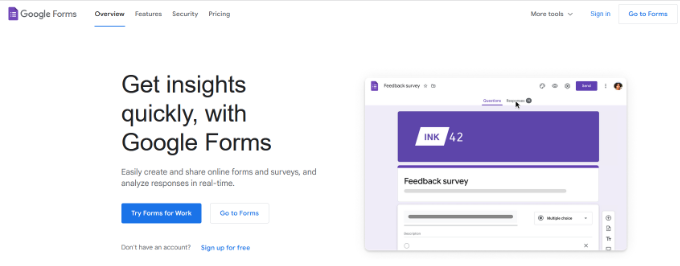
Google Forms is a free form building tool by Google and is very easy to use. You can create all types of online forms, surveys, questionnaires, feedback forms, and more.
It is a great Typeform alternative if you’re looking for a basic form builder that gets the job done. It has a simple interface and offers a drag-and-drop builder.
You can also add images to your form, break up long forms into multiple steps, get email notifications in Gmail, add skip logic to form fields, and more. Plus, your form responses get organized and stored in Google Sheets.
That said, it provides limited customization options compared to other form plugins on our list. If you want more features, then do check out our guide on Google Forms alternatives.
Pricing: Google Forms is free to use.
Which Typeform Alternative Should You Use?
After going through multiple WordPress form plugins and tools, we believe that WPForms is the best Typeform alternative. It offers the most customization options and form templates, and it has a very beginner-friendly interface.
You can create all sorts of online forms for your website using WPForms. Plus, it easily integrates with other plugins, payment methods, email marketing tools, CRMs, and other tools.
The best part is that WPForms has a free version that has more features and options compared to Typeform’s free version.
On the other hand, if you’re looking to create complex form solutions like calculators, then we recommend Formidable Forms. It offers pre-built templates and customization options, which aren’t available in Typeform.