Ever watch a customer leave your store because they couldn’t figure out which “Medium Navy” shirt they were actually buying? It happens more than you think. Most WooCommerce stores still use those ancient dropdown menus for product variations. You know the ones where customers have to click, scroll, and guess what “Forest Green” actually looks [...]
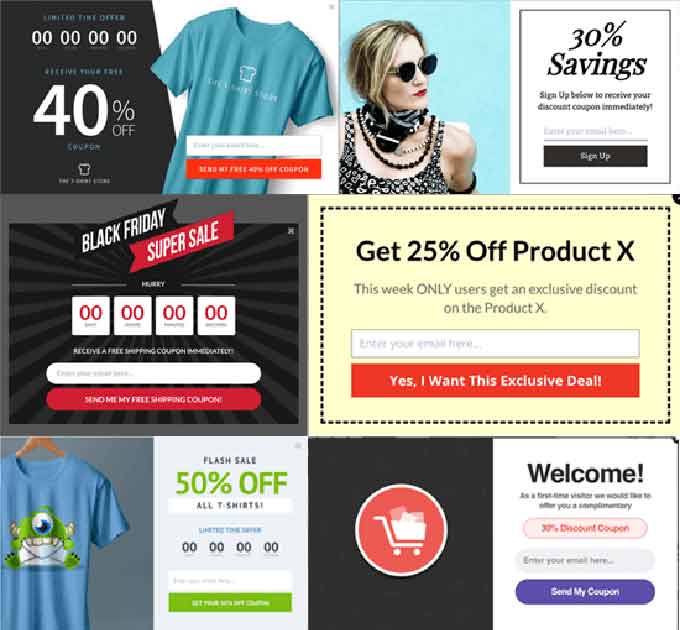
Setting up smart discounts on your WooCommerce store can be an effective way to increase sales, attract repeat customers, and even encourage bulk purchases. Still, by default, WordPress’s leading eCommerce system doesn’t exactly lend itself to flexible, dynamic pricing. That’s where the following WooCommerce discount plugins come into play. Each of the seven top tools [...]
Running a WooCommerce store means managing hundreds of products. Without proper filtering, your store becomes a massive catalog that’s frustrating to browse. When shoppers can’t find that medium black hoodie in their price range, they leave. That’s why we’ve tested WBW Product Filter for two weeks. The plugin adds essential filters for price, size, colour, [...]
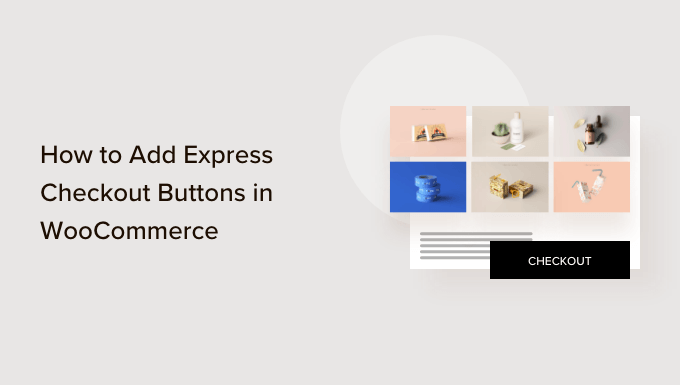
Are you looking to add an express checkout button to your online store?
Express checkout helps streamline the checkout process and improves the overall shopping experience for your customers. It can also boost conversions and reduce cart abandonment.
In this article, we will show you how to add express checkout buttons in WooCommerce.
Why Add Express Checkout in WooCommerce?
Adding express checkout to your WooCommerce store provides a better shopping experience for your customers.
It allows customers to go directly to the payment page and skip the shopping cart or checkout pages. They also won’t have to go to a payment provider page or fill out a checkout form to complete their purchases.
Express checkout buttons make the entire buying process quicker. Customers can simply click the buttons and log in to pay for the products they wish to buy in an instant. As a result, you may see a boost in conversions and fewer abandoned carts.
Adding express checkout also helps mobile users where their screen sizes are small. Customers will just tap the buttons to quickly purchase the products.
However, WooCommerce doesn’t offer an express checkout option by default. You will need to use a WooCommerce plugin to add the feature to your online store.
That said, let’s see how you can add express checkout buttons in WooCommerce.
Setting Up FunnelKit on Your WooCommerce Store
FunnelKit is the best WooCommerce sales funnel plugin on the market. It lets you add express checkout buttons and create different funnel pages for your online store.
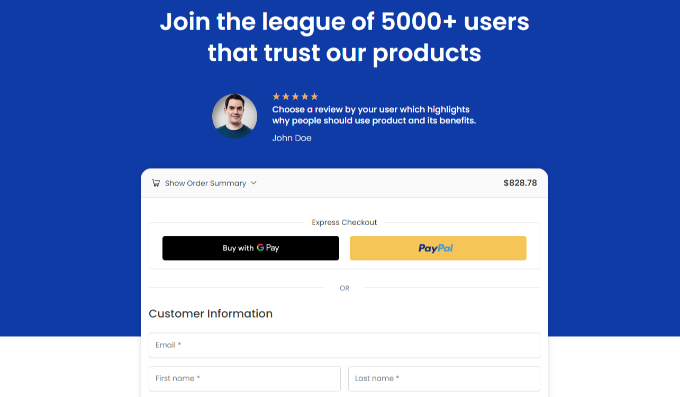
The best thing about using the plugin is that it works with Stripe, Apple Pay, Google Pay, PayPal Express, Amazon Pay, and other payment gateways for express checkout. This way, you don’t have to add each payment provider to your online store using third-party plugins or extensions.
FunnelKit also provides user-friendly templates and lets you do A/B testing. You can easily customize your funnels using different drag-and-drop page builders. Plus, there are multiple pre-built templates and automation features for your marketing campaigns.
Note: For this tutorial, we will be using the FunnelKit Pro plugin because it includes premium templates and more customization options. You can also use the free Funnel Builder for WordPress by FunnelKit plugin to add express checkout buttons in WooCommerce.
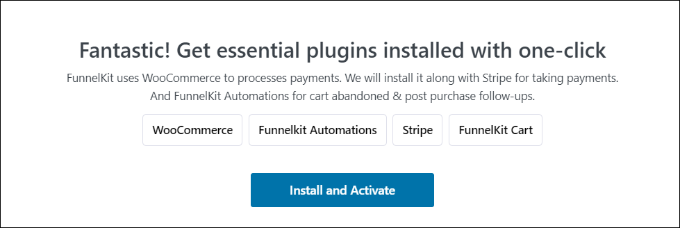
First, you will need to install and activate the FunnelKit plugin. If you need help, then you can follow our guide on how to install a WordPress plugin.
Upon activation, you will see the FunnelKit setup wizard. Go ahead and click the ‘Get Started’ button.
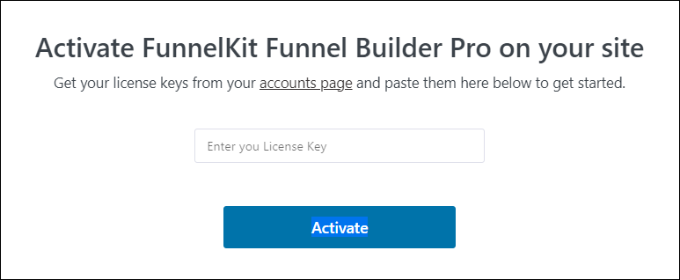
After that, you will need to enter your license key. You can find the key in the FunnelKit account area.
Simply click the ‘Activate’ button after entering the license key.
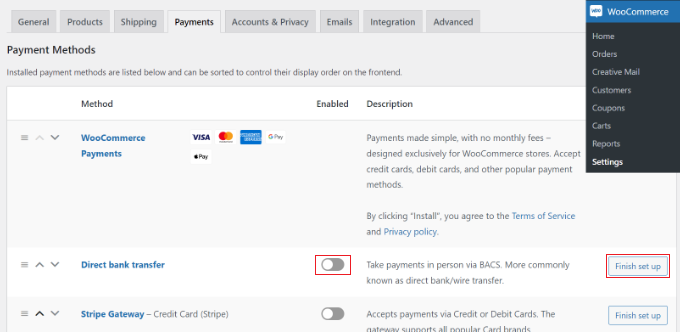
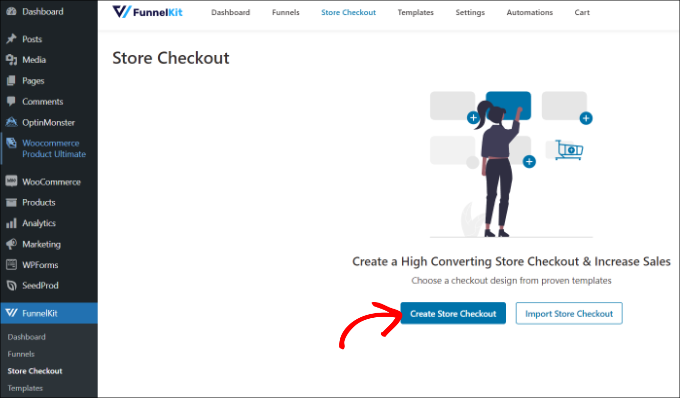
Once you have enabled your preferred payment gateways, you can head to the FunnelKit » Store Checkout page from your WordPress admin panel.
From here, simply click the ‘Create Store Checkout’ button.
On the next screen, FunnelKit will show you professionally-designed templates for your checkout page. It will also let you create a checkout page from scratch.
However, we recommend using a template and quickly customizing it according to your requirements.
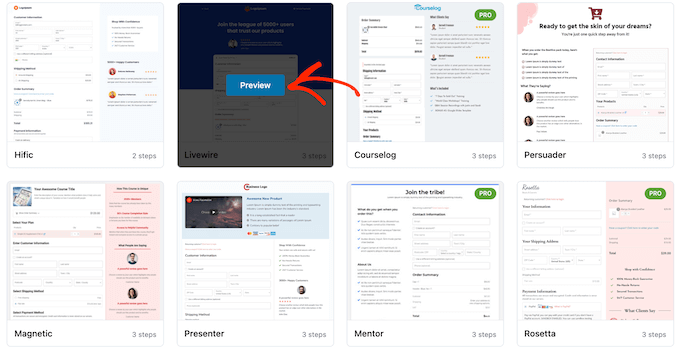
Simply hover over a template you’d like to use and click the ‘Preview’ button.
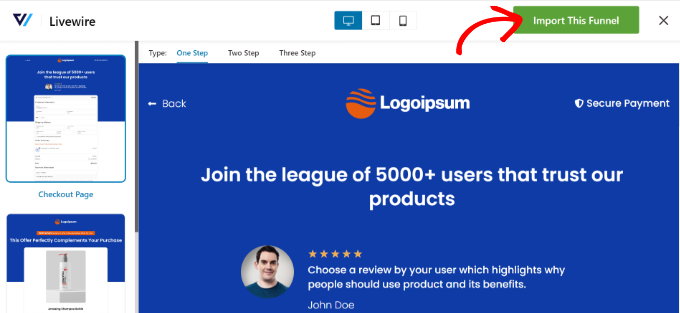
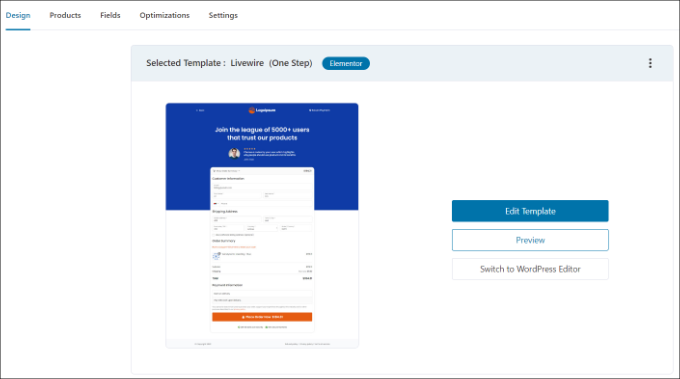
For this tutorial, we will use the Livewire template.
Next, go ahead and click the ‘Import This Funnel’ button at the top.
Depending on the template you use, FunnelKit may ask you to install additional plugins like Elementor to edit the checkout page.
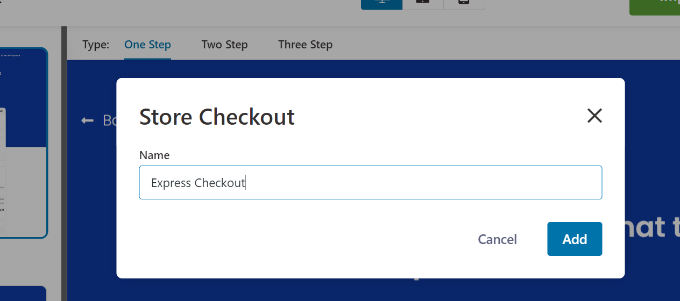
Next, you will need to enter a name for your store checkout and click the ‘Add’ button.
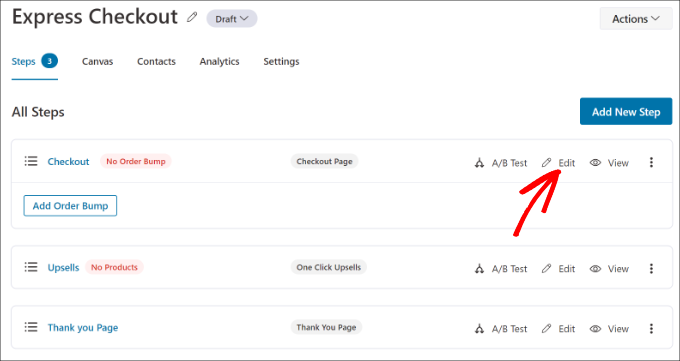
After that, you will see all the steps that are included in the template.
You can simply click the ‘Edit’ button for the Checkout page to continue.
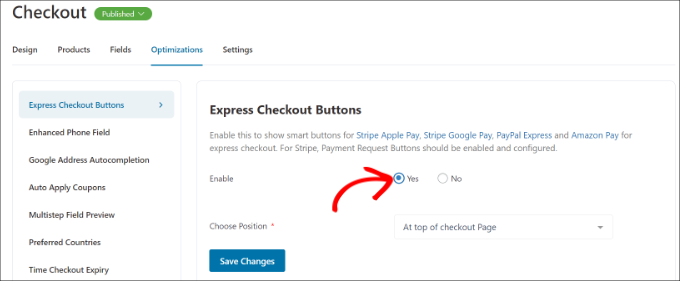
Next, you can switch to the ‘Optimizations’ tab. From here, simply enable the ‘Express Checkout Buttons’ option.
FunnelKit will also let you choose the position of the buttons from the following options:
Top of the checkout page
Before/after the product switcher
Before/after the order summary
Above the payment gateways
When you are done, simply click the ‘Save Changes’ button.
That’s it, you have successfully added express checkout buttons to your online store.
If you want to edit the appearance of the checkout page, then you can switch to the ‘Design’ tab and click the ‘Edit Template’ button.
Once you have made your changes, simply visit your online store to view the express checkout buttons in action.
Additionally, FunnelKit helps you upsell products in WooCommerce. This way, you can boost sales by encouraging users to buy more products.
You can also set up automated emails in WooCommerce using FunnelKit Automations, a sister product of FunnelKit. This plugin lets you create automated workflows and send email campaigns to customers.
Selling online is easy with WordPress (especially when using a platform like WooCommerce). But what happens if you want to run auctions online? Naturally, it’s easy to think of eBay as being the only option for online selling. Luckily, you can integrate eBay with WordPress, so that’s not a problem! Don’t like eBay? You can [...]
Are you looking to add a product question and answer section in WooCommerce?
Adding a Q&A section enables customers to ask questions about the product before buying it, and see the questions and answers of other customers. This helps recover abandoned cart sales and improve customer engagement in your store, and reduce support requests.
In this article, we’ll show you how to easily add product questions and answers in WooCommerce.
Why Should You Add Product Q&A in WooCommerce
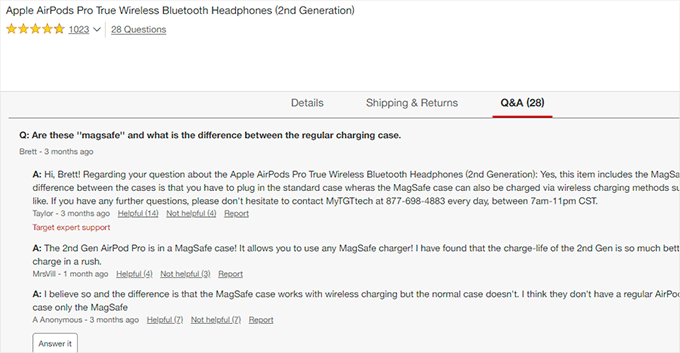
You may have noticed the product question-and-answer section on popular eCommerce websites like Amazon, Target, Best Buy, and more.
Adding a product questions and answers section allows customers to ask questions about a product right there on the product page.
You or your customers can then answer that question and it becomes visible to all other new customers who may have the same question in mind.
Over a period of time, your product page will have its own frequently asked questions section, which will help increase sales and reduce abandoned cart rates.
Adding a question and answers section to your online store also allows you to curate user-generated content which improves your WooCommerce product search rankings.
That being said, let’s see how you can easily add product questions and answers to WooCommerce.
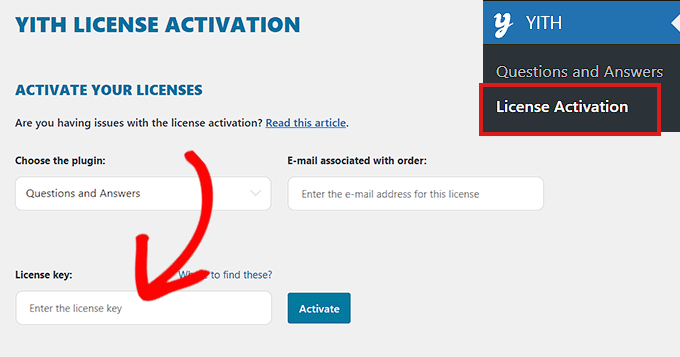
Upon activation, go to the YITH » License Activation page and enter your license key. You can find this information under your account on the plugin website.
Don’t forget to click on the Activate button after entering your license key.
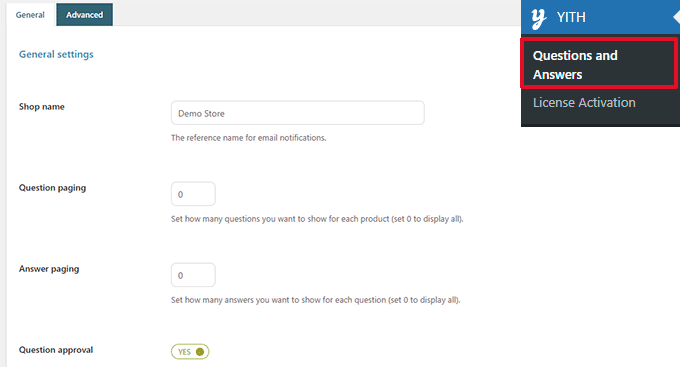
Next, you need to go to the YITH » Questions and Answers page to configure plugin settings.
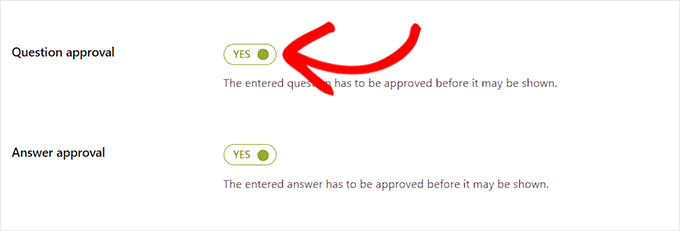
From here you need to scroll down to the ‘Question Approval’ option and simply toggle the switch to ‘Yes’.
Once you do that, the questions on the product pages will have to be approved by an administrator before they are displayed on your WooCommerce store.
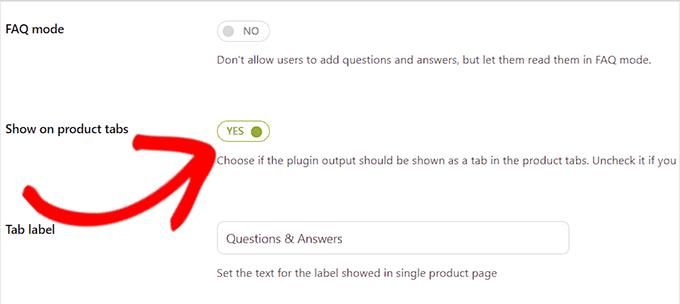
Next, you need to scroll to the ‘Show on Product Tabs’ option.
Here, you need to toggle the switch to ‘Yes’ so that the plugin will automatically add a ‘Questions and Answers’ section to product pages.
After that, don’t forget to click the ‘Save Options’ button to store your changes.
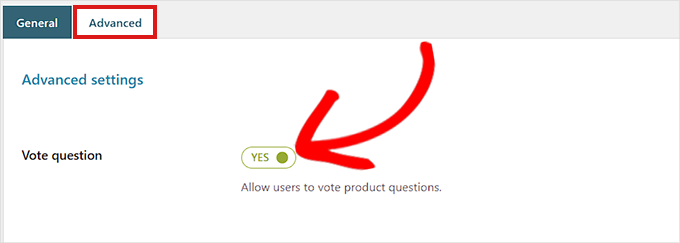
Now, you need to switch to the ‘Advanced Settings’ tab.
From here, simply toggle the ‘Vote Question’ switch to ‘Yes’ if you want to allow users to vote on product questions.
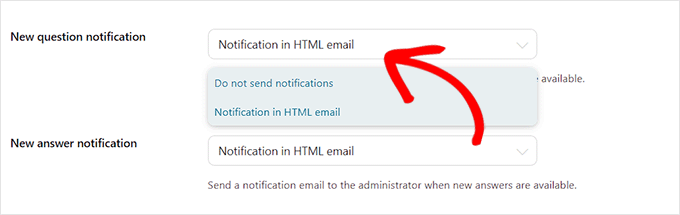
Next, you can choose if you want to get an email notification once a question is submitted on your website.
Simply select the ‘Notification in HTML Email’ option from the dropdown menu next to the ‘New question notification’ field.
Similarly, you can also choose the ‘Notification in HTML Email’ option in the ‘New answer notification’ field if you want to receive an email once a question is answered on your site.
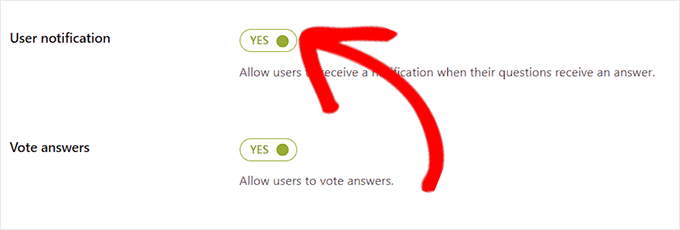
Your user can also receive a notification once the question submitted by them is answered.
To enable this, you need to toggle the switch next to the ‘User Notification’ option to ‘Yes’.
After that, you can review other settings. The default options would work for most websites but you can change them if needed.
Finally, don’t forget to click on the ‘Save Options’ button to save your changes.
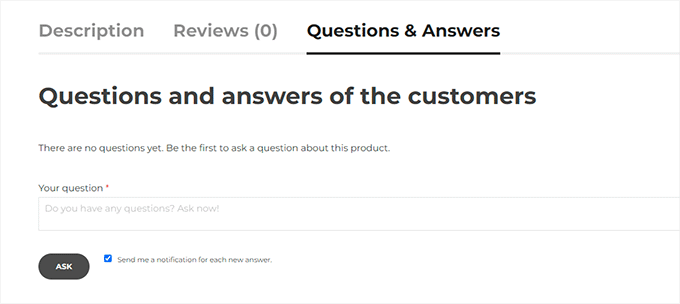
You can now visit your website to see the Questions & Answers section appear on your product pages.
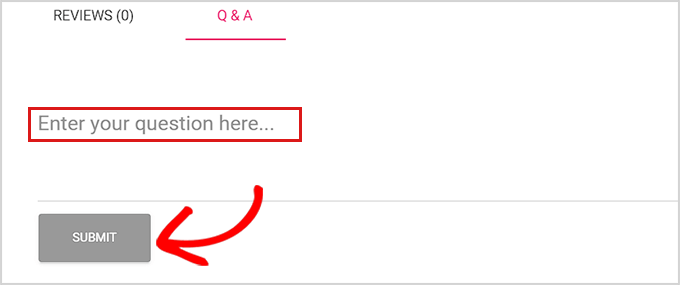
From here, your customers can submit their questions.
Moderating Questions and Adding Answers
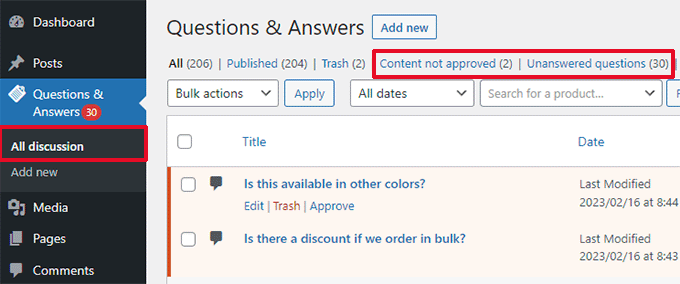
You will receive an email notification for new questions submitted by the users. You can also view them by visiting the Questions & Answers » All discussion page.
You can sort entries here by ‘Content not approved’ or ‘Unanswered Questions’.
You can also take your mouse over a question and click ‘Approve’ to make it live.
To add an answer to a question, you can simply click on the ‘Edit’ link below that question. On the edit screen, scroll down to the ‘Your Answer’ section to answer the question.
Repeat the process if you have more unanswered questions.
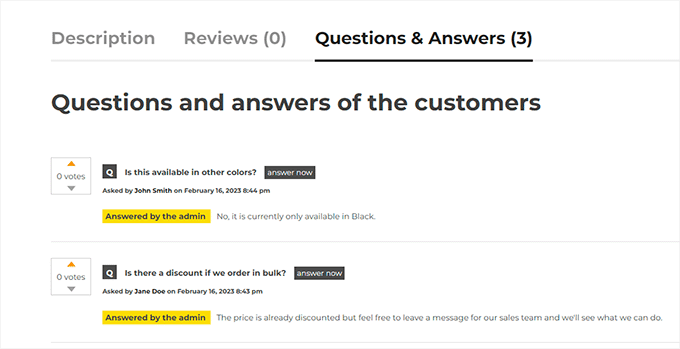
This is how the product questions and answers section looked on our demo store.
2. Adding a Product Q&A Section Using a Free Plugin
If you want to use a free plugin to add a product Q&A section to your WooCommerce store, then this method is for you.
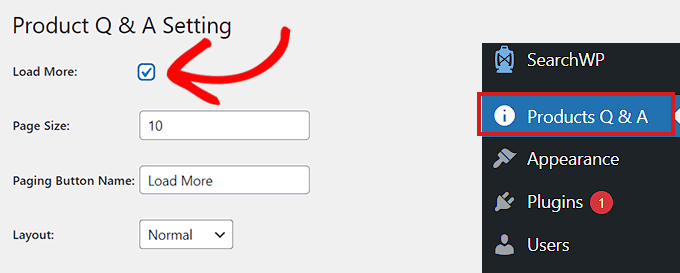
Upon activation, click the Product Q&A menu from the WordPress admin sidebar which will direct you to the ‘Product Q&A Settings’ page.
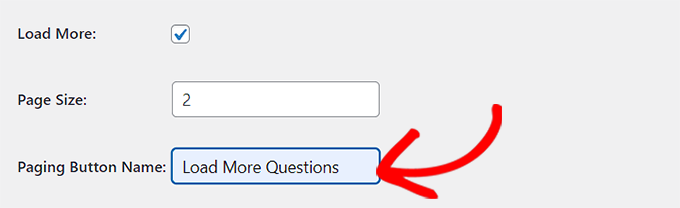
From here, simply check the ‘Load More’ option if you want to add a ‘load More’ button to your product Q&A section.
Adding this button will allow customers to load older questions and reduces the page load time if a product gets a ton of questions.
Next, you need to choose a page size.
This means that you need to select a default number of questions that are shown in your Q&A section.
All the other questions will be hidden from view. Users will be able to access those questions after clicking the ‘Load More’ button.
You can also change the text used for the ‘Load More’ button to anything you like. For instance, you can call it ‘Load more questions’.
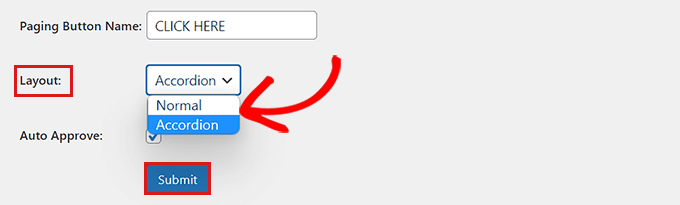
Next, you need to choose a layout for your product Q&A section from the dropdown menu next to the ‘Layout’ option.
You can choose the ‘Normal’ option if you want to display the Q&A section in paragraphs.
On the other hand, you can also display your questions as an Accordion menu. This means users will need to click on a question to view the answer.
Once finished, don’t forget to click the Submit button at the bottom to save your settings.
Managing Product Question and Answers
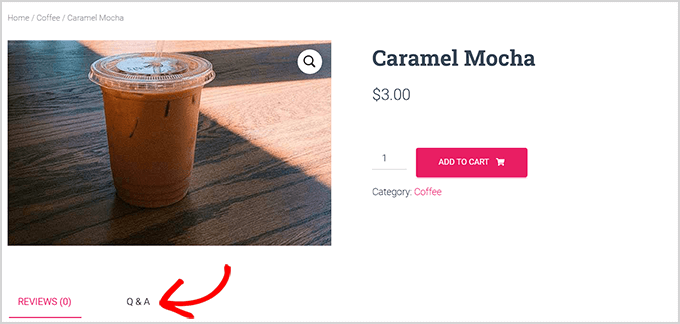
After plugin configuration, simply visit any product page on your store. You’ll notice a new Q&A tab added there.
Clicking on it will display the ‘Q&A’ section where customers can submit their questions.
You will receive an email notification when a user submits a question.
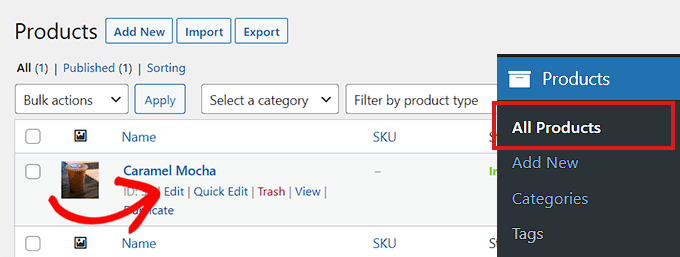
Now, to answer customer questions, you need to go to the Products » All Products page from the WordPress admin dashboard.
From here, simply click the ‘Edit’ button under a product to open up its’ ‘Edit Product’ page.
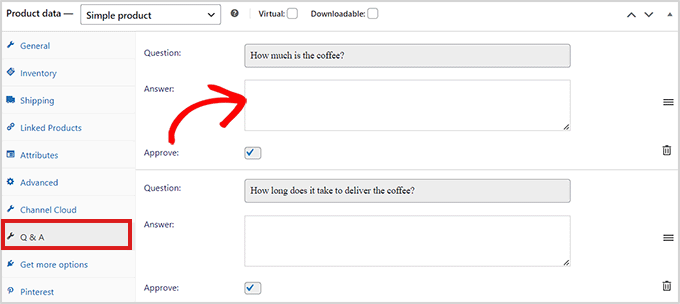
Next, you need to scroll down to the ‘Product Data’ section and click the ‘Q&A’ tab from the left column.
Here, all the questions submitted on that specific product’s page will be displayed.
Now, you need to simply type the answer to a customer query in the ‘Answer’ field.
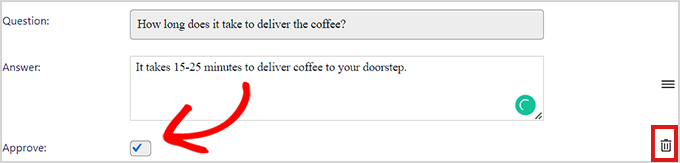
If you want to delete a question because it’s inappropriate or irrelevant to your product, then you can also do that by clicking the Delete icon on the right corner of each question.
You can also uncheck the ‘Approve’ option if you don’t want to display the question on the product page.
After you have answered the product questions, go to the top of the page and click the ‘Update’ button to save your changes.
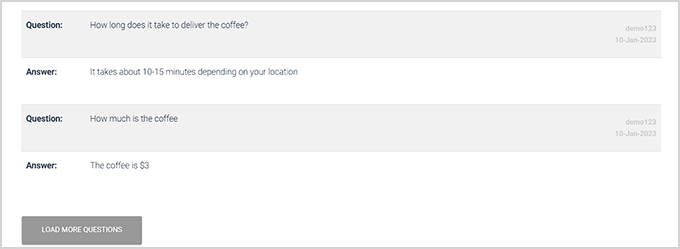
Now, you can visit the product page to see the Questions and Answer section in action.
We hope this article helped you learn how to add product questions and answers in WooCommerce. You can also check out our top picks for the best WooCommerce plugins to grow your store, and our beginner’s guide on how to add web push notification to boost sales.
If you liked this article, then please subscribe to our YouTube Channel for WordPress video tutorials. You can also find us on Twitter and Facebook.
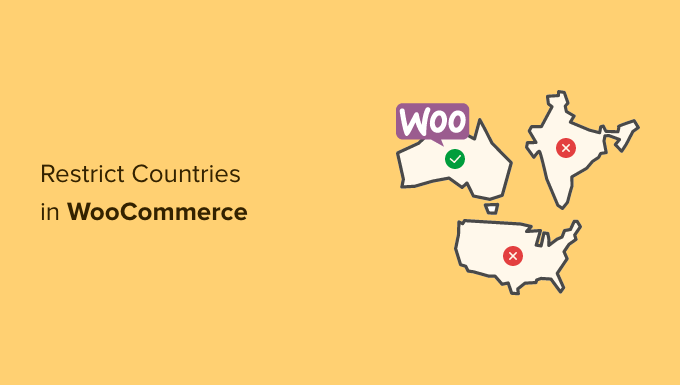
Recently one of our readers asked if it was possible to restrict countries in your WooCommerce store?
By hiding your WooCommerce store from specific countries, you can control your product visibility around the world. That way, your products will only be available in specific countries.
In this article, we will show you how to easily add country based restriction to WooCommerce products or even your entire WooCommerce store.
Why Restrict Your WooCommerce Store in a Country?
When selling products online, an online store owner can come across a lot of problems. For example, you can get a product order from a country where that product is illegal, or your payment gateways can’t process fees.
When building a WooCommerce store, it is important to provide the best user experience to your customers. You don’t want the customer to place an order only to find out that they can’t complete their purchase.
This can result in customer frustration, and it can keep them from ever coming back to your site or buying something else from you.
To avoid these kinds of situations, it is better to restrict access to your WooCommerce store or products from specific countries.
With that being said, let’s take a look at how you easily can restrict your WooCommerce store and products in specific countries.
You can jump to either method by clicking the links below:
Method 1. Restricting Countries Using WooCommerce Settings
You can easily hide your online store in specific countries using WooCommerce default settings.
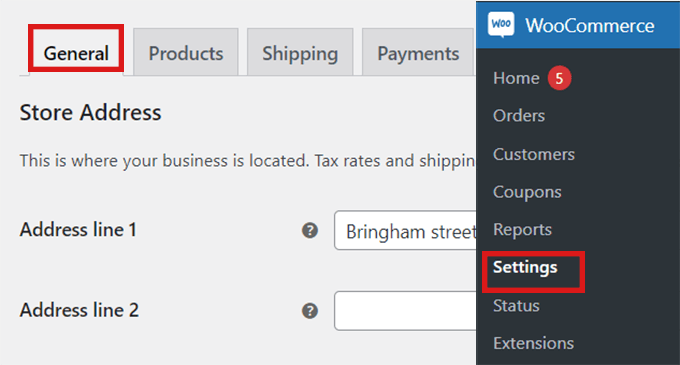
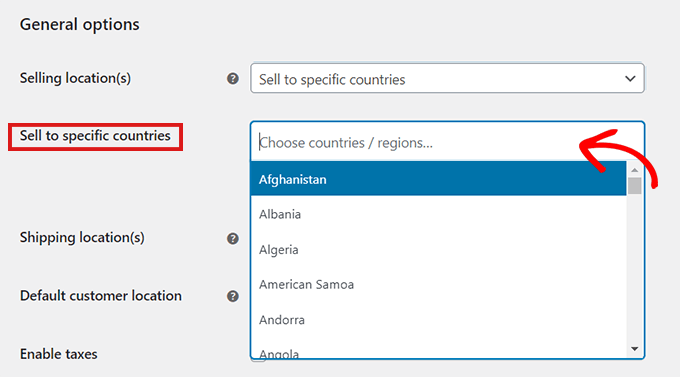
First, go ahead and click on the WooCommerce » Settings option in your WordPress dashboard and then go to the ‘General’ tab.
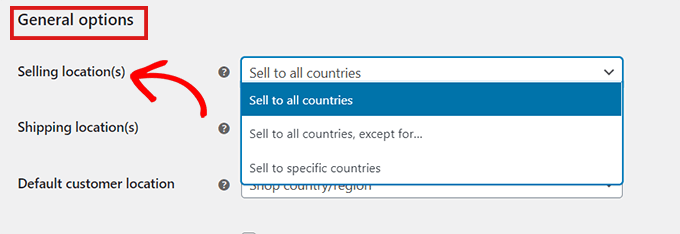
Once there, scroll down to the ‘General Options.’ Here you will find the ‘Selling Location’ section. Simply click on the dropdown menu in the field where you will find three options.
You can either select the ‘Sell to specific countries, except for…’ option, or you can choose the ‘ Sell to specific countries’ option.
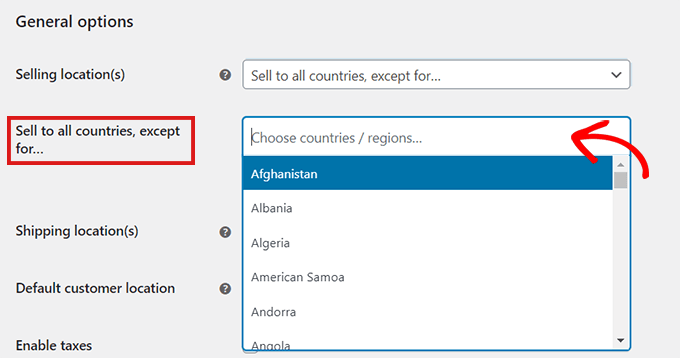
When you select the ‘Sell to specific countries, except for…’ option, another field will appear.
Now, just select from the dropdown any countries where you don’t want to sell your products.
If you’ve chosen the ‘Sell to specific countries’ option, a ‘Sell to specific countries’ field will appear in the settings below.
Now you can select all the countries where your store will be available.
The main downside of this method is that you cannot hide specific products.
By restricting countries using the default settings method in WooCommerce, the restrictions will be applied to your whole online store, and users in those countries won’t be able to buy any of your products.
If you only want to hide some specific products in different countries, it is better to use a plugin mentioned in Method 2. Let’s take a look at how to restrict specific WooCommerce products in different countries.
Method 2. Add Country Based Restrictions for WooCommerce Products
It is a free WooCommerce plugin that allows you to hide your products in specific countries.
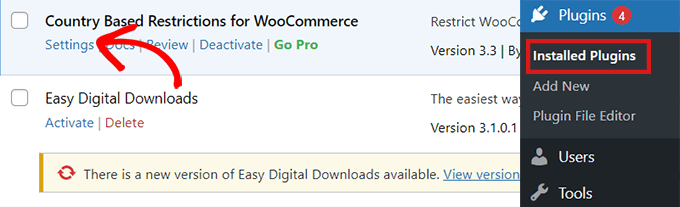
First, you’ll need to install and activate the ‘Country Based Restrictions For WooCommerce’ plugin. For more details, please take a look at our guide on how to install a WordPress plugin.
After you’ve activated the plugin, go to Plugins » Installed Plugins.
Here, click on the ‘Settings’ link in the ‘Country Based Restrictions for WooCommerce’ entry.
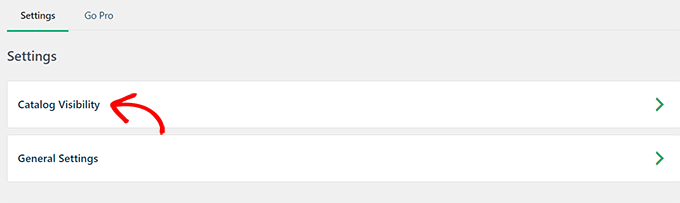
Once you’re on the ‘Settings’ page, just click on the ‘Catalog Visibility’ option.
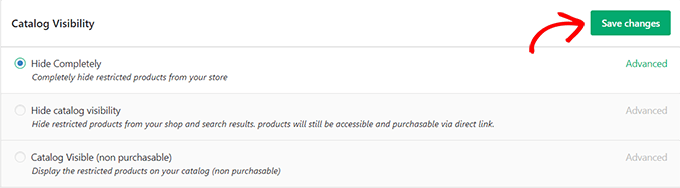
After you’ve clicked on the ‘Catalog Visibility’ option, you will have 3 choices:
Hide Completely – Restricted products will not appear in your store.
Hide Catalog Visibility – Restricted products will only be available by direct links, but not through browsing or search results.
Catalog Visible (non purchasable) – Restricted products will appear as normal, but customers will be unable to purchase them.
Once you’ve chosen an option, simply click on the ‘Save Changes’ button.
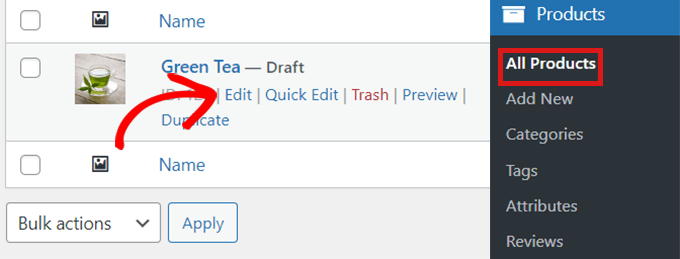
Next, go to WooCommerce » All Products in your WordPress dashboard.
Locate the product that you want to restrict and simply click on the ‘Edit’ link.
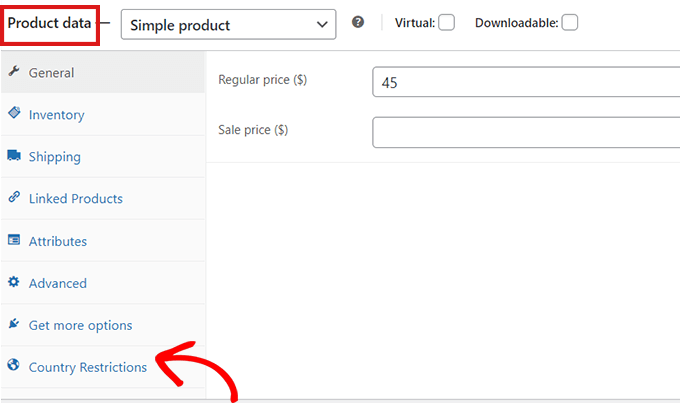
This will open the ‘Edit Product’ page. You can then scroll down to the ‘Product Data’ section.
Next, simply click on the ‘Country Restrictions’ option to the left.
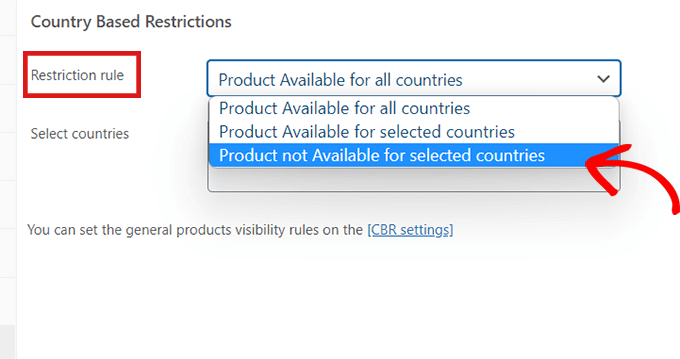
After you’ve clicked on the ‘Country Restrictions’ option, you’ll see a ‘Restriction Rule’ field.
Simply click on the dropdown menu beside the field and select the ‘Product Not Available For Selected Countries’ option.
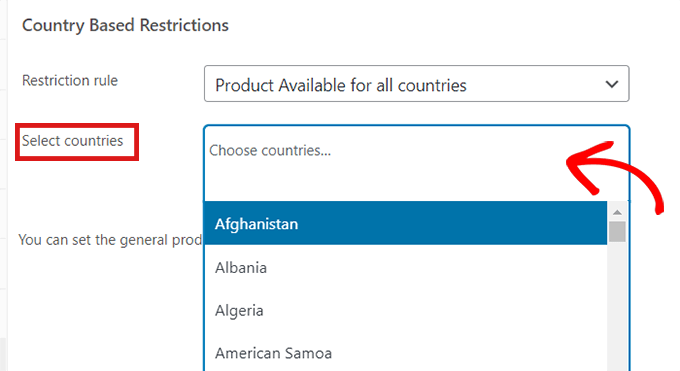
After that, go to the ‘Select Countries’ field and click on the dropdown beside it.
Then, simply choose the countries where your product won’t be available for purchase.
Once you’re happy with your choice, don’t forget to click on the ‘Publish button.’
Now, if a customer from the chosen country visits your store, the product you’ve restricted won’t appear.
Bonus: Geolocation Targeting for WooCommerce to Grow Sales
Did you know that geotargeting in WooCommerce can help you grow sales?
For example, you can use a plugin like OptinMonster to run specific discounts for certain locations, offer different prices based on countries, and so much more.
We hope this article helped you learn how to restrict countries in your WooCommerce store. You may also want to see our ultimate WooCommerce SEO guide to improve your SEO rankings, or see our tutorial on how to fix WooCommerce not sending email issue to improve your email deliverability.
If you liked this article, then please subscribe to our YouTube Channel for WordPress video tutorials. You can also find us on Twitter and Facebook.
There’s no denying that if you want to monetize your site or build an eCommerce store with WordPress, WooCommerce is the way to go. The powerful, versatile plugin currently powers over 6.5 million active online stores, making it the global leader in the world of eCommerce software platforms with a total market share of 36.68%. [...]
Location Picker at Checkout (LPAC) is a powerful WordPress plugin that works with WooCommerce to give your customers more freedom and flexibility over pickups and delivery. If you’re running a taxi or rideshare business, for example, and your usual geo-location tool only gives customers a rough geographical area to arrange where they’re collected from, that’s [...]
If you’ve always wanted to give the likes of Amazon, Etsy, or Not on the High Street a run for their money, the MarketKing multi vendor marketplace plugin for WooCommerce may be just what you need. Boasting over 137 features, the best-selling plugin gives you everything you need to turn a standard WooCommerce installation into [...]
 Ever watch a customer leave your store because they couldn’t figure out which “Medium Navy” shirt they were actually buying? It happens more than you think. Most WooCommerce stores still use those ancient dropdown menus for product variations. You know the ones where customers have to click, scroll, and guess what “Forest Green” actually looks [...]
 Setting up smart discounts on your WooCommerce store can be an effective way to increase sales, attract repeat customers, and even encourage bulk purchases. Still, by default, WordPress’s leading eCommerce system doesn’t exactly lend itself to flexible, dynamic pricing. That’s where the following WooCommerce discount plugins come into play. Each of the seven top tools
  Running a WooCommerce store means managing hundreds of products. Without proper filtering, your store becomes a massive catalog that’s frustrating to browse. When shoppers can’t find that medium black hoodie in their price range, they leave. That’s why we’ve tested WBW Product Filter for two weeks. The plugin adds essential filters for price, size, colour,