Category Archives: wpcode

WordPress Custom Fields 101: Tips, Tricks, and Hacks

Are you looking to make the most of custom fields on your WordPress website?

Custom fields are a handy WordPress feature that allows you to add extra data and information to your WordPress posts and pages. A lot of popular WordPress plugins and themes use custom fields to store important data.

In this article, we will show you how to use WordPress custom fields with some tips, tricks, and hacks.

WordPress custom fields 101 tips tricks and hacks

Since this is a long article, we have added a table of contents for easier navigation. Just use the quick links below to jump to the section you want to read:

What Are WordPress Custom Fields?

WordPress custom fields are metadata used to add extra information to the post or page you are editing.

By default, when you write a new post, page, or any other content type, WordPress saves that content in two different parts.

The first part is the body of your content that you add using the WordPress content editor.

The second part is the information about that content. For example, the title, author, date, time, and more. This information is called metadata.

A WordPress website automatically adds all the required metadata to each post or page you create. You can also create and store your own metadata by using custom fields.

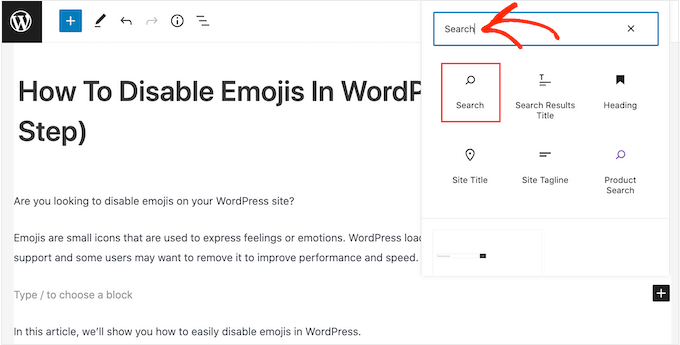
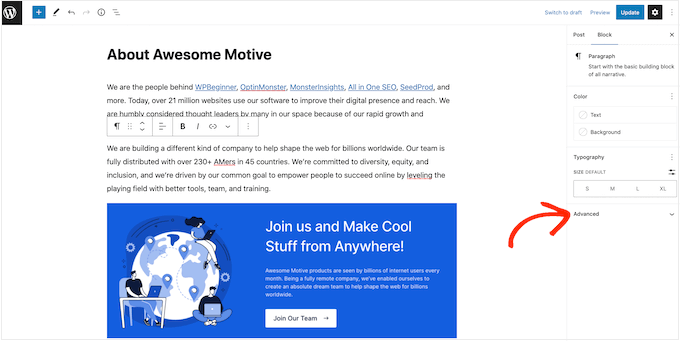
By default, the custom fields option is hidden on the post edit screen. To view it, you need to click on the three-dot menu in the top-right corner of the screen and select ‘Preferences’ from the menu.

Open preferences in content editor

This will open a popup where you need to switch to the ‘Panels’ tab and then enable the ‘Custom fields’ option.

After that, simply click on the ‘Enable & Reload’ button to reload the post editor.

Enable custom fields option

The post editor will reload, and you will be able to see the Custom Fields panel below the content editor.

Custom fields can be used to add any information related to the post, page, or other content type. This meta information can then be displayed in your theme.

View custom fields in WordPress

However, to do that, you will need to edit your WordPress theme files.

Note: This tutorial is recommended for users who are already familiar with editing theme files. It is also helpful for aspiring WordPress developers who want to learn how to properly use custom fields in their own themes or plugins.

Having said that, let’s take a look at how to add and use custom fields in WordPress.

Adding Custom Fields in WordPress

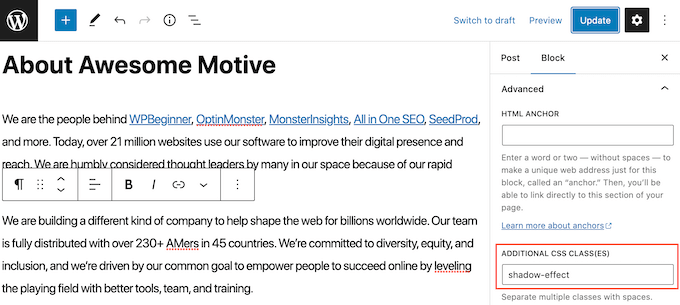
First, you need to open a post or page in the block editor so that you can add custom fields. Then, you must go to the Custom Fields meta box.

Adding custom field name and value

Next, you need to provide a Name for your custom field and then enter its Value. Click on the ‘Add Custom Field’ button to save it.

The field will be stored and displayed in the Custom Fields meta box like this:

View newly created custom field

You can edit this custom field any time you want and then just click on the ‘Update’ button to save your changes. You can also delete it if you don’t want to use it anymore.

Now, you need to save your post to store your custom field settings.

Displaying Custom Fields in WordPress Themes

To display your custom field on your website, you will need to edit your WordPress theme files and code snippets.

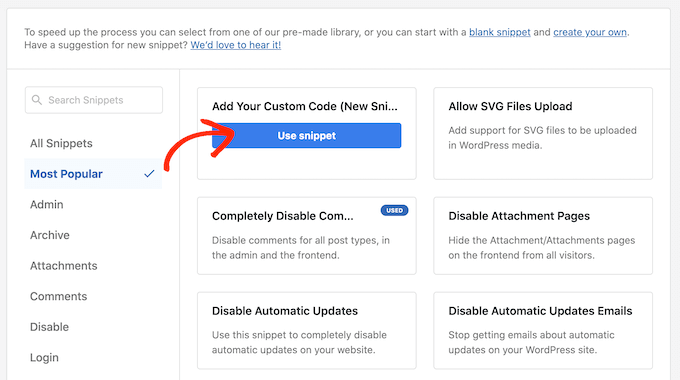
We don’t recommend directly editing the theme files because the slightest mistake can break your website. An easier way to do this is by using WPCode.

It is the best code snippet plugin for WordPress that lets you add custom code and manage snippets from your WordPress dashboard.

If you haven’t done this before, then we also recommend reading our guide on how to copy and paste code in WordPress.

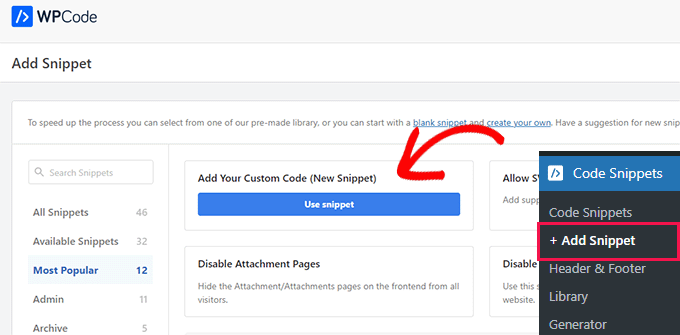
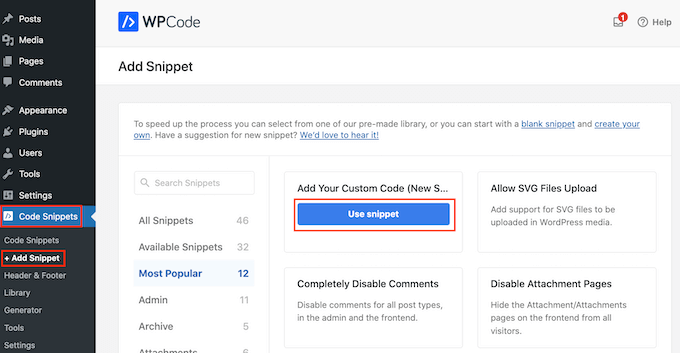
First, you will need to install and activate the free WPCode plugin. For more details, please see our beginner’s guide on how to install a WordPress plugin.

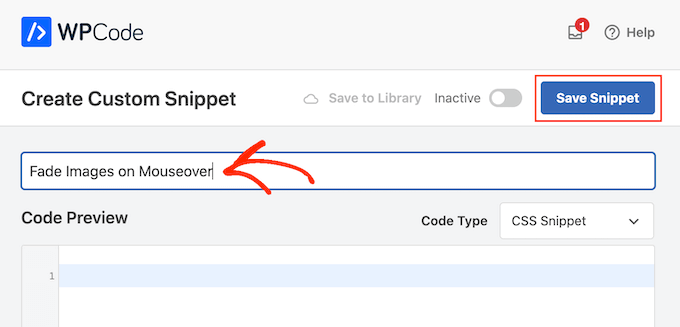
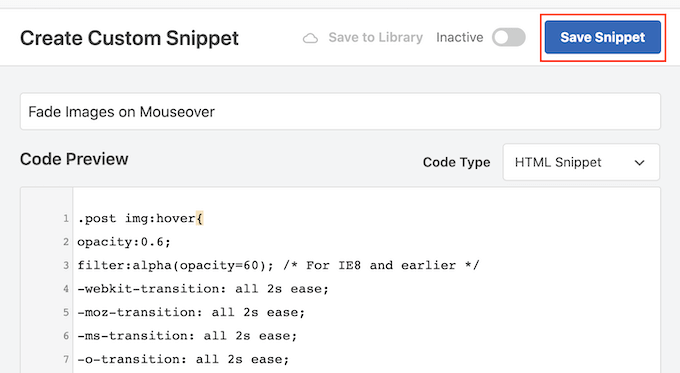
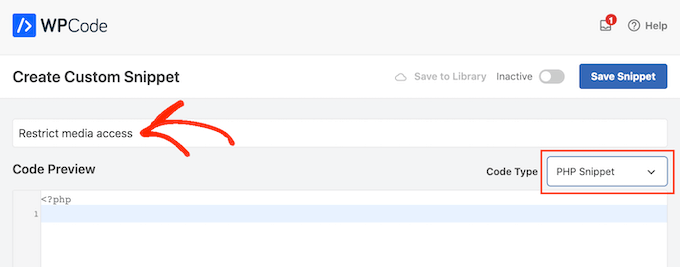
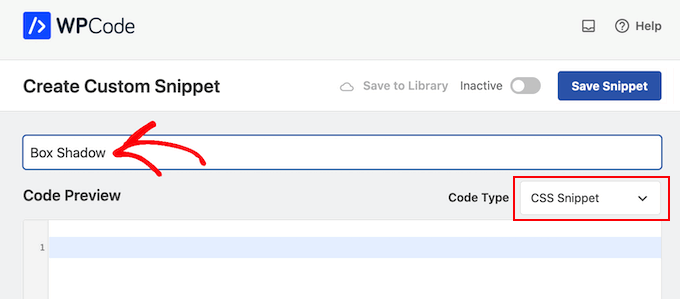
Upon activation, you will need to go to Code Snippets » + Add Snippet from the WordPress dashboard and select the ‘Add Your Custom Code (New Snippet)’ option.

Adding a code snippet to your WordPress website

Now you need to copy this code to add to your theme files:

<?php echo get_post_meta($post->ID, 'key', true); ?>

Don’t forget to replace key with the name of your custom field.

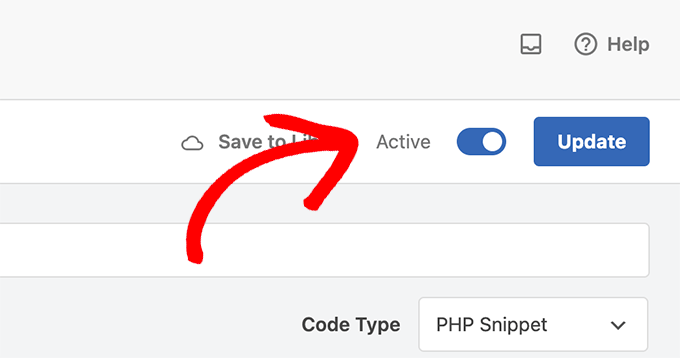
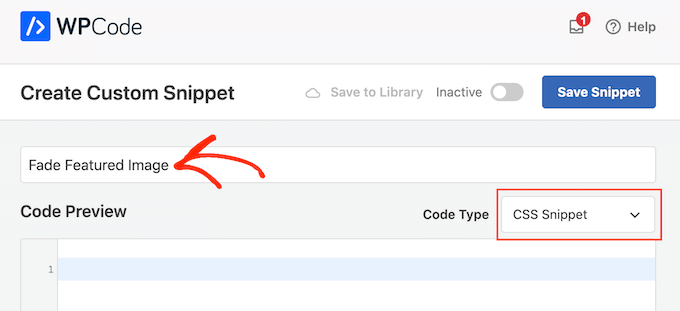
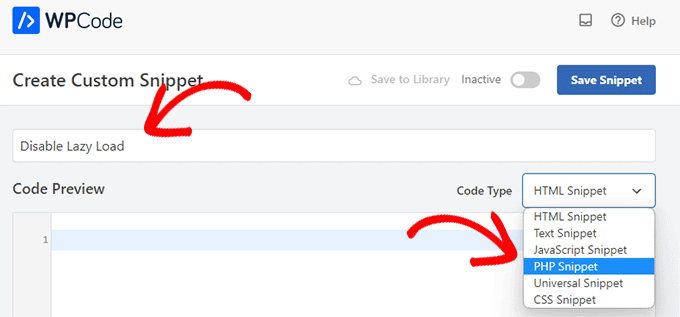
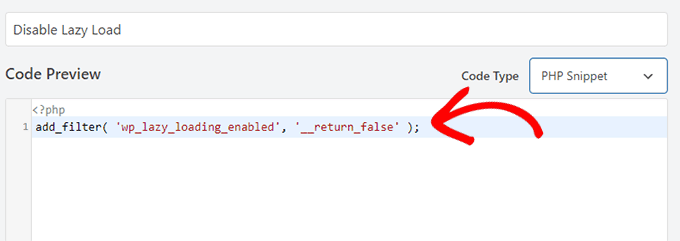
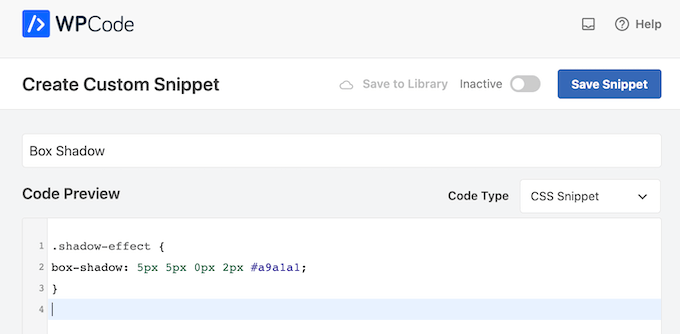
Next, you must enter the code into the ‘Code Preview’ area and change the Code Type to ‘PHP Snippet’.

Enter custom fields code

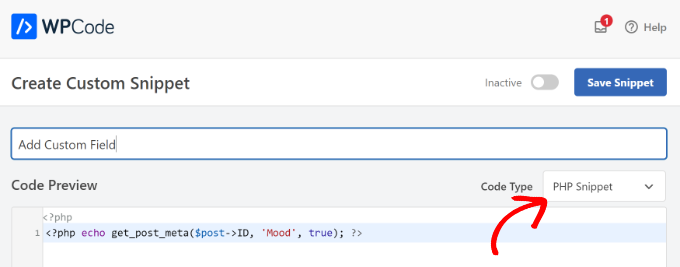
For example, we used this code in our demo theme:

<p>Today's Mood: <?php echo get_post_meta($post->ID, 'Mood', true); ?></p>

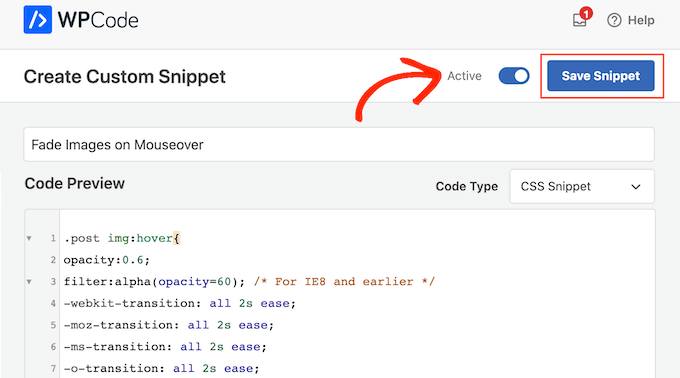
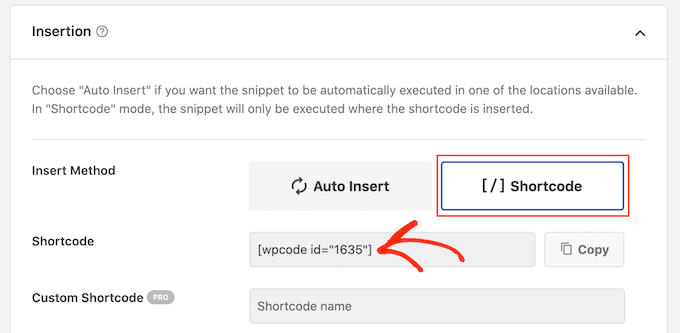
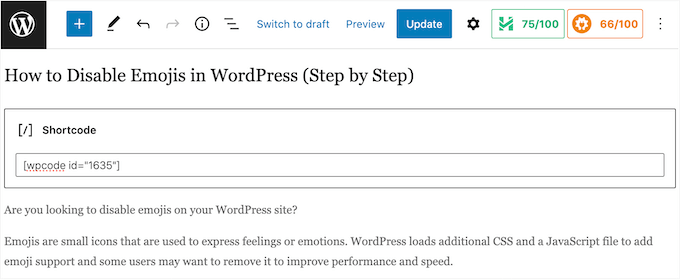
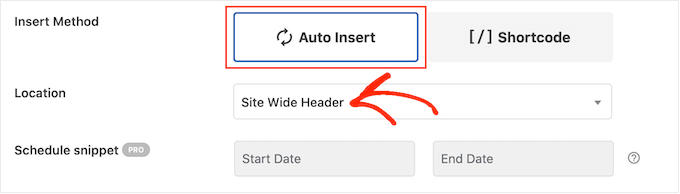
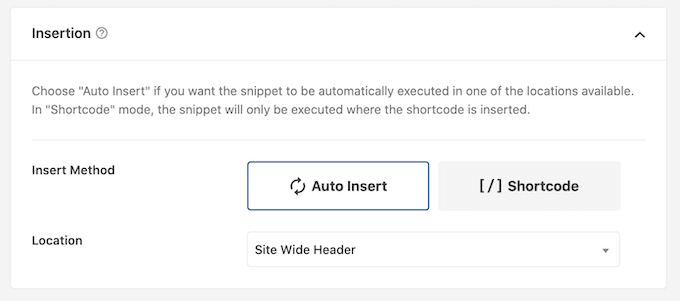
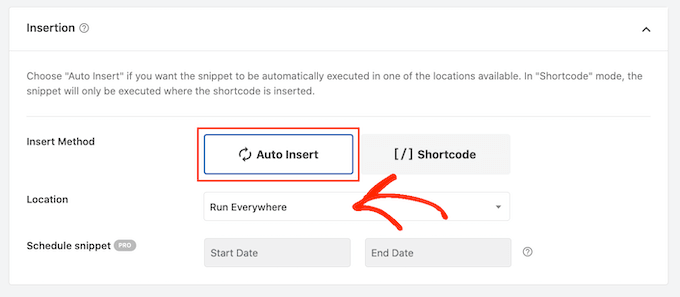
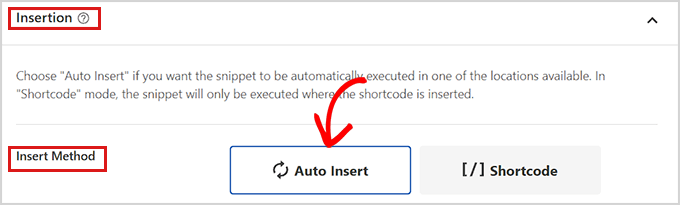
From here, you can scroll down to the Insertion section.

Here, you can select where the code will run. By default, WPCode will Auto Insert the code and run it everywhere on your website.

Edit insertion method for code

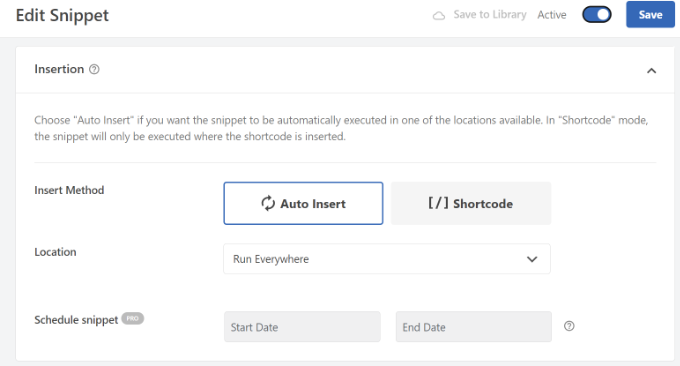
However, you can change this and select where you would like the custom field to appear.

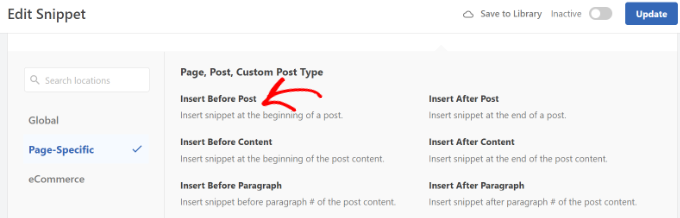
For example, we will choose the ‘Page Specific’ tab and select the ‘Insert Before Post’ option. This way, the custom field will appear at the beginning of the blog post.

Insert before post

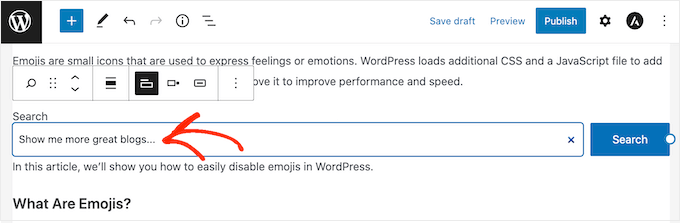
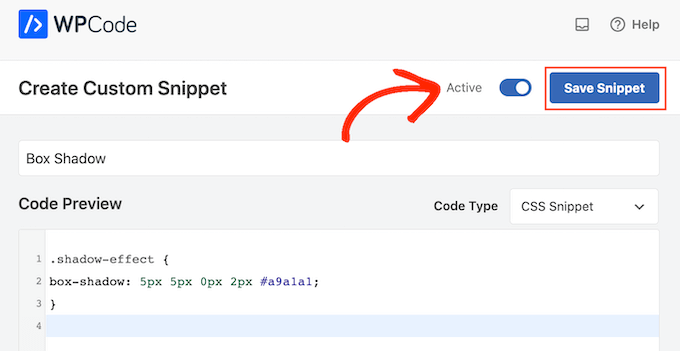
You can now save your changes and visit the post where you added the custom field to see it in action.

You can use this custom field in all your other WordPress blog posts as well.

Displaying custom field

You can also easily adjust the custom field for different blog posts. Simply create a new post or edit an existing one.

Then, go to the Custom Fields meta box and select your custom field from the dropdown menu and enter its Value.

Reuse custom field

Once you are done, simply click the ‘Add Custom Field’ button to save your changes and then publish or update your post.

Troubleshooting: Can’t Find Custom Field in Dropdown on Post Edit Screen

By default, WordPress only loads 30 custom fields in the dropdown menu on the post edit screen.

If you are using WordPress themes and plugins that already use custom fields, then those might appear first in the dropdown menu, and you won’t be able to see your newly-created custom field.

To fix this issue, you will need to add the following code to your theme’s functions.php file or by using WPCode (recommended):

add_filter( 'postmeta_form_limit', 'meta_limit_increase' );
function meta_limit_increase( $limit ) {
    return 50;
}

The above code will change that limit to 50. If you still can’t see your custom field, then you can try increasing that limit even further.

Creating a User Interface for Custom Fields Using Advanced Custom Fields

As you can see, once you add a custom field, you will have to select the field and enter its value each time you write a post.

If you have many WordPress custom fields or multiple authors writing on your website, then this is not an ideal solution.

Wouldn’t it be nice if you could create a user interface where users can fill in a form to add values to your custom fields?

In fact, this is what so many popular WordPress plugins already do.

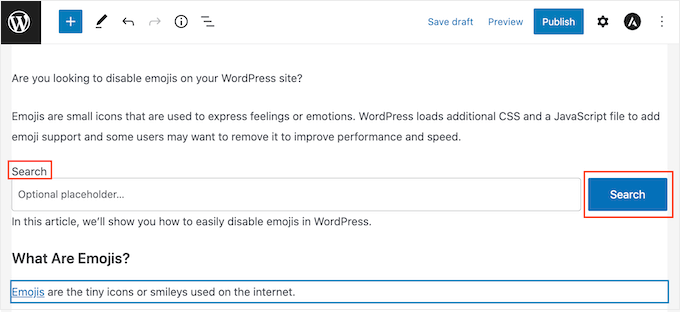
For example, the SEO title and meta description box inside the popular All in One SEO plugin is a custom meta box:

AIOSEO SEO title and description

The easiest way to create a user interface for adding custom fields is by using the Advanced Custom Fields plugin.

The first thing you need to do is install and activate the Advanced Custom Fields plugin. For more details, see our step-by-step guide on how to install a WordPress plugin.

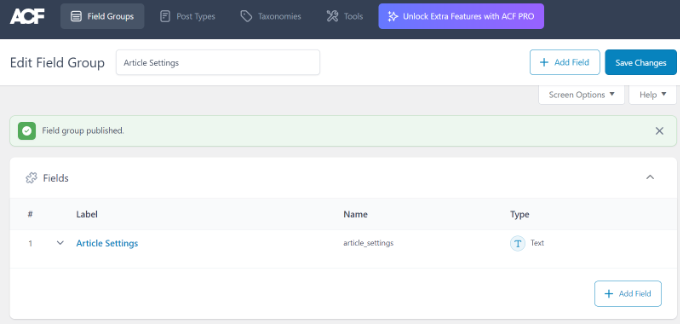
Upon activation, you need to visit the ACF » Field Groups page and click on the ‘Add New’ button.

Add new field group

A field group is like a container with a set of custom fields. It allows you to add multiple panels of custom fields.

Now, you need to provide a title for your field group and click the ‘+ Add Field’ button in the top-right corner.

Add new field

You can now select a field type.

Advanced Custom Fields allows you to create all sorts of fields, including text, image upload, number, dropdown, checkboxes, and more.

Select field type and other details

Next, you can scroll down to see other options for that particular field, like field name, field label, and default value. You can change them to your own requirements.

You can also add multiple fields to your field group if you want. Once you are finished, just click on the ‘Save Changes’ button.

View new field group

Next, edit a post or create a new one, and you will see a new panel with your WordPress custom fields below the content editor.

For detailed step-by-step instructions, you can see our guide on how to add custom meta boxes in WordPress posts and post types.

How to Hide Empty Custom Fields With Conditional Statements

So far, we have covered how to create a custom field and display it in your theme.

Now let’s see how to check that the custom field is not empty before displaying it. To do that, we will modify our code to first check if the field has data in it:

<?php 

$mood = get_post_meta($post->ID, 'Mood', true);

if ($mood) { ?>

<p>Today's Mood: <? echo $mood; ?></p>

<?php 

} else {
// do nothing;
}

?>

Don’t forget to replace Mood with your own custom field name.

Adding Multiple Values to a Custom Field

Custom fields can be reused in the same post to add multiple values. You just need to select the field again and add another value to the ‘Value’ box.

Adding multiple values to a custom field

However, the code we have used in the above examples will only be able to show a single value.

To display all values of a custom field, we need to modify the code and make it return the data in an array. You will need to add the following code to your theme file:

<?php 
$mood = get_post_meta($post->ID, 'Mood', false);
if( count( $mood ) != 0 ) { ?>
<p>Today's Mood:</p>
<ul>
<?php foreach($mood as $mood) {
            echo '<li>'.$mood.'</li>';
            }
            ?>
</ul>
<?php 
} else { 
// do nothing; 
}
?>

Again, don’t forget to replace Mood with your own custom field name.

In this example, you will notice that we have changed the last parameter of get_post_meta function to false. This parameter defines whether the function should return a single value or not. Setting it to false allows it to return the data as an array, which we then displayed in a foreach loop.

How to Search Posts by Custom Field in WordPress

WordPress’s default search doesn’t work with any custom fields on your website. It only uses the content to find the post you or your visitors are looking for on your site.

However, SearchWP changes that by improving your WordPress search. It’s the best WordPress search plugin that goes beyond using the post content and indexes everything, including WordPress custom fields, PDF documents, custom tables, text, files, and more.

You can adjust the search algorithm without editing code using SearchWP. Simply install the plugin and then head over to SearchWP » Algorithm from your WordPress admin area.

After that, you need to go to the ‘Engines’ tab and then adjust the Attribute Relevance slider. This will change the importance given to each attribute during a search.

Adjust the search relevance

For instance, you can set the Custom Fields slider to maximum and adjust sliders for other attributes accordingly. This way, SearchWP will give preference to data in custom fields when searching for content in WordPress.

Another advantage of using SearchWP is that works with some of the most popular custom field plugins, including Advanced Custom Fields (ACF), Meta Box, and Pods.

For more details, you can read our beginner-friendly guide on how to improve WordPress search with SearchWP.

Displaying Posts With a Specific Custom Key

WordPress allows you to display posts with custom keys and their values. For example, if you are trying to create a custom archive page to display all posts with specific custom keys, then you can use the WP_Query class to query posts matching those fields.

You can use the following code as a starting point:

$args = array(
    'meta_key'   => 'Mood',
    'meta_value' => 'Happy'
);
$the_query = new WP_Query( $args );
 
<?php 
// the query
$the_query = new WP_Query( $args ); ?>
 
<?php if ( $the_query->have_posts() ) : ?>
 
    <!-- the loop -->
    <?php while ( $the_query->have_posts() ) : $the_query->the_post(); ?>
        <h2><?php the_title(); ?></h2>
        <?php the_content(); ?>
 
    <?php endwhile; ?>
    <!-- end of the loop -->
 
    <!-- pagination here -->
 
    <?php wp_reset_postdata(); ?>
 
<?php else : ?>
    <p><?php _e( 'Sorry, no posts matched your criteria.' ); ?></p>
<?php endif; ?>

Don’t forget to replace meta_key and meta_value parameters with your own values.

How to Add Guest Author Name Using Custom Fields

Do you want to add a guest post but don’t want to add a new user profile just for that post? An easier method is adding a guest author name as a custom field.

To do this, you will need to add the following code to your theme’s functions.php file or use WPCode (recommended):

add_filter( 'the_author', 'guest_author_name' );
add_filter( 'get_the_author_display_name', 'guest_author_name' );
function guest_author_name( $name ) {
global $post;
$author = get_post_meta( $post->ID, 'guest-author', true );
if ( $author )
$name = $author;
return $name;
}

For more details, please see our guide on pasting snippets from the web into WordPress.

This code hooks a function to the_author and get_the_author_display_name filters in WordPress.

The function first checks for the guest author’s name. If it exists, then it replaces the author’s name with the guest author’s name.

Now you will need to edit the post where you want to display the guest author’s name. Go to the Custom Fields meta box, add your guest author name, and finally click on the ‘Add Custom Field’ button.

Guest author custom field

For more details, see our article on how to rewrite guest author names with custom fields in WordPress.

How to Display Contributors to an Article Using Custom Fields

On many popular blogs and news sites, many authors contribute to writing a single article. However, WordPress only allows a single author to be associated with a post.

One way to solve this problem is by using the Co-Authors Plus plugin. To learn more, see our guide on how to add multiple authors to a WordPress post.

Another method is adding contributors as a custom field.

First, you need to edit the post where you want to display co-authors or contributors. Then, scroll down to the Custom Fields meta box and add author names as co-author custom fields.

Add coauthor custom fields

Now, you need to add this code to your theme files where you want to show co-authors:

<?php 
 
$coauthors = get_post_meta($post->ID, 'co-author', false);
if( count( $coauthors ) != 0 ) { ?>
<ul class="coauthors">
<li>Contributors</li>
<?php foreach($coauthors as $coauthors) { ?>
           <?php echo '<li>'.$coauthors.'</li>' ;
            }
            ?>
</ul>
<?php 
} else { 
// do nothing; 
}
?>

To display author names separated by commas, you can add the following custom CSS:

.coauthors ul { 
display:inline;
}
.coauthors li { 
display:inline;
list-style:none;
}
.coauthors li:after { 
content:","
}
.coauthors li:last-child:after {
    content: "";
}
.coauthors li:first-child:after {
    content: ":";
}

This is how it looked on our demo site.

Coauthors custom fields preview

How to Display Custom Fields Outside the Loop in WordPress

What if you need to show custom fields in the sidebar of a single post?

To display the custom fields outside the WordPress loop, you can add the following code to your theme files:

<?php
global $wp_query;
$postid = $wp_query->post->ID;
echo get_post_meta($postid, 'key', true);
wp_reset_query();
?>

Don’t forget to replace key with your custom field name.

Display a Custom Header, Footer, Sidebar Using Custom Fields

Usually, most WordPress themes use the same header, footer, and sidebar on all pages.

There are also many ways to show different sidebars, headers, or footers for different pages on your website. You can see our guide on how to display a different sidebar for each WordPress post or page.

One way to do this is by using custom fields. Just edit the post or page where you want to show a different sidebar and then add the sidebar as a custom field.

Add sidebar custom field

Now you need to edit your WordPress theme file, such as single.php, where you want to display a custom sidebar. You will be looking for the following code:

<?php get_sidebar(); ?>

Replace this line with the following code:

<?php
global $wp_query;
$postid = $wp_query->post->ID;
$sidebar = get_post_meta($postid, "sidebar", true);
get_sidebar($sidebar);
wp_reset_query();
?>

This code simply looks for the sidebar custom field and then displays it in your theme. For example, if you add webpage as your sidebar custom field, then the code will look for a sidebar-webpage.php file to display.

You will need to create the sidebar-webpage.php file in your theme folder. You can copy the code from your theme’s sidebar.php file as a starting point.

Manipulating RSS feed Content With Custom Fields

Want to display additional metadata or content to your RSS feed users? Using custom fields you can manipulate your WordPress RSS feed and add custom content into your feeds.

First, you need to add the following code to your theme’s functions.php file or use WPCode (recommended):

function wpbeginner_postrss($content) {
global $wp_query;
$postid = $wp_query->post->ID;
$coolcustom = get_post_meta($postid, 'coolcustom', true);
if(is_feed()) {
if($coolcustom !== '') {
$content = $content."<br /><br /><div>".$coolcustom."</div>
";
}
else {
$content = $content;
}
}
return $content;
}
add_filter('the_excerpt_rss', 'wpbeginner_postrss');
add_filter('the_content', 'wpbeginner_postrss');

Now, just create a custom field called ‘coolcustom’ and add any value you like. You can use it to display advertisements, images, text, or anything you want.

For more details, please see our guide on how to copy and paste code from the web into WordPress.

How to Manipulate RSS Feed Title With Custom Fields

Sometimes you may want to add extra text to a post title for RSS feed users. For example, this can be handy if you are publishing a sponsored post or a guest post.

First, you need to add the following code to your theme’s functions.php file or use WPCode to add the custom code snippet without breaking your website:

function wpbeginner_titlerss($content) {
global $wp_query;
$postid = $wp_query->post->ID;
$gpost = get_post_meta($postid, 'guest_post', true);
$spost = get_post_meta($postid, 'sponsored_post', true);

if($gpost !== '') {
$content = 'Guest Post: '.$content;
}
elseif ($spost !== ''){
$content = 'Sponsored Post: '.$content;
}
else {
$content = $content;
}
return $content;
}
add_filter('the_title_rss', 'wpbeginner_titlerss');

Next, you need to edit the post where you want to display the extra text in the title field.

Then, add guest_post and sponsored_post as custom fields.

Add guest post custom field

If either of these two custom fields is found with a value “true”, then the code will add the appropriate text before the title. This technique can be used in many ways to fit whatever you like.

Want to learn more cool RSS feed hacks? See our guide on how to add content and manipulate your WordPress RSS feeds.

How to Set Expiration Date for Posts in WordPress Using Custom Fields

Want to set an expiration date for some posts on your WordPress site? This comes in handy when you want to publish content only for a specific period like running surveys or limited-time offers.

One way to do this is by manually removing the post content or by using a plugin like Post Expirator.

Another option is using custom fields to automatically expire posts after a specific time. You will need to edit your theme files and modify the WordPress loop like this:

<?php
if (have_posts()) :
while (have_posts()) : the_post();
$expirationtime = get_post_meta($post->ID, "expiration", false);
if( count( $expirationtime ) != '' ) {
if (is_array($expirationtime)) {
$expirestring = implode($expirationtime);
}

$secondsbetween = strtotime($expirestring)-time();
if ( $secondsbetween >= 0 ) {
echo 'This post will expire on ' .$expirestring.'';
the_content();
} else {
echo "Sorry this post expired!"
}
} else {
the_content();
}
endwhile;
endif;
?>

Note: You will need to edit this code to match your theme.

After adding this code, you can add the expiration custom field to the post you want to expire. Make sure you add the time in this format mm/dd/yyyy 00:00:00.

Adding an expiration date using custom field

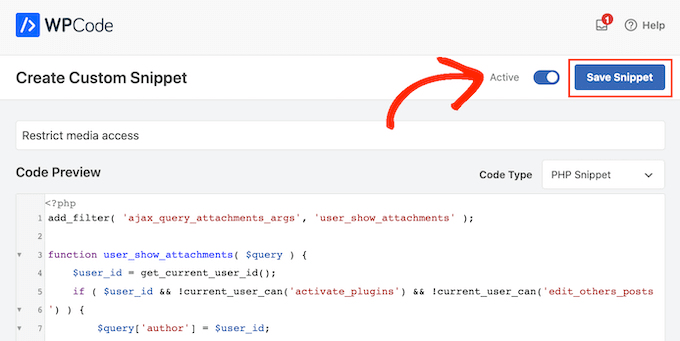
How to Style Individual Posts Using Custom Fields

Want to change the look of an individual post using CSS? WordPress automatically assigns each post its own class, which you can use to add custom CSS.

However, by using custom fields, you can add your own custom classes and then use them to style posts differently.

First, you need to edit a post that you would like to style differently. Go to the Custom Fields box and add the post-class custom field.

Post class custom field

Next, you need to edit your WordPress theme files and add this code at the beginning of the WordPress loop:

<?php $custom_values = get_post_meta($post->ID, 'post-class'); ?>

Now you need to find the line with the post_class() function.

Here is how it looked in our demo theme:

<article id="post-<?php the_ID(); ?>" <?php post_class(); ?>>

You must change this line to include your custom field value, like this:

<article id="post-<?php the_ID(); ?>" <?php post_class($custom_values); ?>>

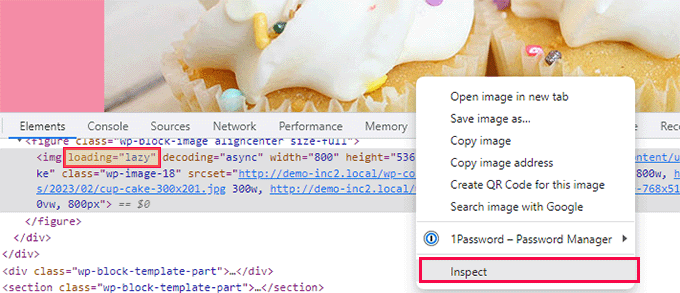
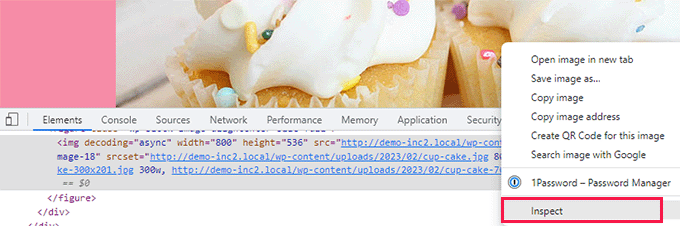
Now if you examine the post’s source code using the Inspect tool, then you will see your custom field CSS class added to the post-class.

Post class preview

You can now can use this CSS class to add custom CSS and style your post differently.

We hope this article helped you learn more about WordPress custom fields. You may also want to see our guide on how to add custom meta fields to custom taxonomies in WordPress and the best WordPress page builder plugins to help you design your website the way you want.

If you liked this article, then please subscribe to our YouTube Channel for WordPress video tutorials. You can also find us on Twitter and Facebook.

The post WordPress Custom Fields 101: Tips, Tricks, and Hacks first appeared on WPBeginner.

How to Disable Automatic Update Email Notification in WordPress

Do you want to disable automatic update email notifications in WordPress?

By default, WordPress sends email notifications for automatic updates of WordPress plugins, themes, and the core itself. These notification emails can get annoying.

In this article, we will show you how to easily disable automatic update email notifications in WordPress.

Disabling automatic update email notifications in WordPress

About Automatic Update Notifications in WordPress

WordPress is an open-source content management platform that is regularly maintained and updated.

Some of these updates are automatically installed, and you will receive an email notification that your site has been updated.

Email notification preview after an auto-update

Similarly, WordPress also allows you to enable automatic updates for WordPress plugins and themes. This means that you can spend less time updating plugins and more time growing your business.

You can enable automatic updates for plugins that you trust by visiting the Plugins » All Plugins page in your WordPress admin dashboard.

Simply click on the ‘Enable auto-updates’ link next to the plugin that you want to update itself.

Enable automatic updates for WordPress plugins

For WordPress themes, you can visit the Appearance » Themes page and click on a theme.

This will bring up a theme information popup where you must click on ‘Enable auto-updates’.

Enable theme auto-updates

WordPress will send you an email notification when any of your plugins, theme, or WordPress core is updated.

This can get annoying, particularly for users who manage multiple WordPress websites. Wouldn’t it be nice if you could control and turn off these email notifications?

Let’s take a look at how to easily disable automatic update email notifications in WordPress. You can use the quick links below to jump to the method you want to use:

Method 1: Disable Automatic Update Email Notification Using Code (Recommended)

This method requires you to add code to your WordPress files. If you haven’t done this before, then take a look at our beginner’s guide on pasting snippets from the web into WordPress.

You can manually add the code below to your theme’s functions.php file. But this can be tricky since a mistake can bring down your whole website. Plus, if you update your theme, then any custom code snippets will be erased.

We will show you a better approach below, which is using a code snippets plugin.

1. Disable Auto Update Notification Emails for WordPress Core, Themes, and Plugins

Luckily, there is an easy and safe way to disable auto update notification emails in WordPress, and that’s using the WPCode plugin.

WPCode WordPress code snippets plugin

WPCode lets you easily add custom code snippets in WordPress without editing your theme’s functions.php file.

Plus, it has a full code library inside the plugin that includes ready-to-use, verified code snippets for popular feature requests like disabling automatic update emails, removing the WordPress version number, disabling comments, and more.

First, you need to install and activate the free WPCode plugin. For step-by-step instructions, see our tutorial on how to install a WordPress plugin.

Once the plugin is activated, you need to go to Code Snippets » Library from your WordPress admin dashboard.

Then, search for the ‘Disable Automatic Updates Emails’ snippet and click on the ‘Use snippet’ button.

Search for the Disable Automatic Updates Emails snippet in WPCode

WPCode will then automatically add the code and set the proper insertion method.

The snippet has three filters, with one for each type of auto-update email: WordPress core, WordPress plugins, and WordPress themes.

Disable Automatic Updates Emails snippet in WPCode

If you don’t want to use a particular filter, simply add a // at the beginning of the filter line.

For example, if you still want to get auto-update emails for WordPress plugins, add a // to the plugin, and the filter will stop it from executing.

Edit filters you don't want to execute in WPCode

After that, all you have to do is toggle the switch from ‘Inactive’ to ‘Active’.

Then, click the ‘Update’ button.

Switch the code snippet to Active and click Update in WPCode

Now you will no longer get automatic update emails from WordPress.

2. Disable Auto Update Notification Emails for Core Updates

You can also use WPCode to disable notification emails for automatic WordPress core updates. Instead of choosing an existing code snippet, you will need to add this code as a custom snippet:

add_filter( 'auto_core_update_send_email', 'wpb_stop_auto_update_emails', 10, 4 );

function wpb_stop_update_emails( $send, $type, $core_update, $result ) {
if ( ! empty( $type ) && $type == 'success' ) {
return false;
}
return true;
}

For more instructions, you can see our guide on how to add custom code in WordPress.

3. Disable Auto Update Notification Emails for Plugins

Just add the following code to disable notification emails for automatic updates of WordPress plugins:

add_filter( 'auto_plugin_update_send_email', '__return_false' );

4. Disable Notification Emails for WordPress Theme Updates

Finally, you can add the following code to disable notification emails for automatic updates of WordPress themes:

add_filter( 'auto_theme_update_send_email', '__return_false' );

Method 2: Disable Automatic Update Email Notification Using a Plugin

Next, we will show you how to disable automatic update email notifications using two different email plugins.

1. Manage Notification Emails

The first thing you need to do is install and activate the Manage Notification Emails plugin. For more details, see our step-by-step guide on how to install a WordPress plugin.

Upon activation, you need to visit the Settings » Notification emails page. This is where the plugin allows you to manage all WordPress notification emails, including auto-update notifications.

Disable email notifications

Simply scroll down to the auto-update options and uncheck the box next to the notifications you want to disable.

Finally, don’t forget to click on the ‘Save Changes’ button to store your settings.

2. WP Mail SMTP

Another plugin you can use to disable automatic update email notifications is WP Mail SMTP. It’s the best SMTP service for WordPress and ensures your emails are delivered to your inbox.

WP Mail SMTP lets you easily manage the emails sent by WordPress through its Email Controls. However, you will need the WP Mail SMTP Pro license to unlock the Email Controls option.

Next, you will need to install and activate WP Mail SMTP Pro on your website. You can check out our guide on how to install a WordPress plugin for more details.

Once the plugin is active, navigate to WP Mail SMTP » Settings from your WordPress admin panel and click the ‘Email Controls’ tab.

After that, scroll down to the ‘Automatic Updates’ section and disable email notifications for plugins, themes, WP core status, and full log.

Disable Update Email Notifications in WP Mail SMTP

When you are done, don’t forget to click the ‘Save Settings’ button.

That’s all. You have successfully disabled WordPress auto-update email notifications for your website.

Rolling Back WordPress Updates if Something Goes Wrong

Because WordPress plugins run on many independent WordPress hosting and server configurations, sometimes a plugin update may break a feature on your website or make it inaccessible.

This is easy to troubleshoot and fix. First, you need to figure out which plugin has caused the issue by deactivating all WordPress plugins and reactivating them one by one.

Once you have isolated the plugin causing the issue, you can use the WP Rollback plugin. It allows you to switch to the previous version of a WordPress plugin or theme.

For details, you can see our guide on how to roll back WordPress plugins and themes with step-by-step instructions.

Improving WordPress Email Deliverability

Even if you disable WordPress auto-update emails, there are other WordPress notification emails that you may not want to miss.

For instance, if you run a WooCommerce store, then you will want to receive notifications when a new order is placed.

Similarly, if you sell an online course or run a membership website, then you might want to receive email alerts when new users sign up.

You will also want to make sure that emails sent to users are delivered, including forgotten password emails, payment receipt emails, and order confirmation notifications.

To send emails, WordPress uses the PHP mail function. This function is easily misused by spammers, and your emails may end up in the spam folder.

To make sure all your important WordPress notification emails reach your users’ inboxes, you will need a proper SMTP service to send emails.

This is where the WP Mail SMTP plugin comes in. It uses an SMTP service to send all your WordPress notification emails.

You can use it with a paid SMTP service provider or a free SMTP service like Gmail combined with the free version of the WP Mail SMTP plugin.

For more details, see our guide on How to set up WP Mail SMTP on your WordPress site.

We hope this article helped you learn how to disable automatic update email notifications in WordPress. You may also want to see our guide on how to get a free business email address and our comparison of the best email marketing services to grow your sales.

If you liked this article, then please subscribe to our YouTube Channel for WordPress video tutorials. You can also find us on Twitter and Facebook.

The post How to Disable Automatic Update Email Notification in WordPress first appeared on WPBeginner.

How Does WordPress Search Work (+ Tips to Make It Better)

Do you want to learn how WordPress search works, and how you can make it better?

By understanding and improving the built-in WordPress search, you can help visitors find what they’re looking for. This can get you more conversions while keeping people on your site for longer.

In this article, we’ll look at how the default WordPress search works, and share tips on how to make it better.

How does WordPress search work + tips to make It better

How Does WordPress Search Work?

WordPress comes with a search system that will look for content within your website.

How the search bar looks and where it appears will vary depending on your WordPress theme, but most themes show the search bar in the top right corner.

The built-in WordPress search bar

Note: If your theme doesn’t show the WordPress search bar by default, then skip ahead to our FAQs, where we’ll show you how to add it.

Visitors can type a search query into this field, and WordPress will search:

  • Page titles
  • Page content
  • Single-image titles and captions
  • Image alt text
  • File names

As you can see, it doesn’t search widgets, user comments, categories, tags, WooCommerce products, or PDF documents. It also doesn’t search image gallery titles, captions, or alt text, although you can search this content using a search engine plugin like SearchWP.

WordPress performs this search using the WP_Query class. It will start by displaying any posts that have the search term in the post title, arranged in reverse-chronological order, meaning that the newest entries will be displayed at the top of the results.

After that, it’ll show any posts that have the matching term in the post content.

For example, imagine you’ve just published a post about cats titled ‘My Favorite Pet’, and you also have an older post titled ‘Best Cat Photos.’ In this case, searching for ‘Cat’ will display the older ‘Best Cat Photos’ post first, since it has the search term in the title.

This may not a problem for WordPress blogs or websites that only have small amounts of content. However, this ordering logic will often show inaccurate or confusing results for bigger blogs, online stores, or business websites.

The built-in system is also missing some of the features that people expect from modern search engines. This includes autocomplete, live Ajax search, filtering, and spellcheck.

Why Improve the Default WordPress Search?

An advanced, fast, and accurate on-site search can help visitors find interesting and relevant content, which will keep them on your website for longer. This can increase pageviews and reduce bounce rate in WordPress.

Since visitors are spending more time on your site, this will send positive signals to the search engines. This can improve your WordPress SEO, which means search engines like Google will show your content to more people and drive more visitors to your website.

For more information, please see our guide on how to increase your blog traffic.

People who are using your site’s internal search are already highly engaged. They’re actively looking for specific content, which may mean they’re ready to take actions such as buying a product, signing up to your WordPress membership site, or booking an appointment.

If these people can’t find what they’re looking for, they may give up and go to a different website. This means you’re losing out on visitors who were ready to convert.

A search results page is also an example of personalized content since you’re showing the visitor results that match their unique search query. By providing personalized content that’s accurate and helpful, you can improve the visitor experience. Once again, this can encourage them to convert.

Performance is another reason why it’s a good idea to replace the default WordPress search with a better alternative.

The larger your WordPress website gets, the longer it’ll take WP_Query to scan your database and get the results. This means your site’s search will get slower, as your website gets bigger.

How to Make the WordPress Native Search Better

On-site search helps visitors find what they’re looking for, including products to buy and interesting blogs to read. Since it’s such an important part of your site, it’s a bad idea to rely on the limited built-in WordPress search.

With that being said, let’s see how you can improve the native WordPress search.

Show Instant Results With Live Ajax Search

Live Ajax search adds a dropdown and autocomplete feature that’s common in search engines like Google.

As the user types, live search guesses what they want to search for and then shows them results without even reloading the page.

How to improve WordPress search with live ajax results

This can help visitors find the right content, without having to manually press the ‘Search’ button or wait for the page to reload.

The easiest way to add Ajax live search to WordPress is using the free SearchWP Live Ajax Lite Search plugin. It enables instant search automatically and there are no settings for you to configure, so it’s very easy to set up.

The first thing you need to do is install and activate the plugin. For more details, see our step-by-step guide on how to install a WordPress plugin.

Upon activation, the default WordPress search form will automatically use the Ajax live search feature. If you visit your site and start typing into the search bar, then you’ll see the instant search in action.

Change the Default Search URL Slug

By default, WordPress search URLs typically look something like this:

http://example.com/?s=search-term

The extra ?s= characters make this URL more difficult to read and understand, which can confuse visitors who are trying to find their way around your site.

Even worse, these URLs aren’t optimized for search engines which can stop them from correctly indexing your site’s contents.

The easiest way to change these URLs is by adding custom code to WordPress using a plugin such as WPCode.

You can go ahead and use the following custom code to replace the ‘/?s=search-term’ characters with ‘search.’ Your slug will look something like this when finished: http://example.com/search/wordpress

To use something other than ‘search’ in your URL, simply customize the code snippet below.

function wpb_change_search_url() {
    if ( is_search() && ! empty( $_GET['s'] ) ) {
        wp_redirect( home_url( "/search/" ) . urlencode( get_query_var( 's' ) ) );
        exit();
    }
}
add_action( 'template_redirect', 'wpb_change_search_url' );

For detailed instructions on how to insert this code to your WordPress website, please see our guide on how to change the default search URL slug in WordPress.

Make PDF Files Searchable in WordPress

By uploading PDFs to your WordPress website, you can share information about your services and products in a format that works on all devices. They’re also perfect for offering your visitors ebooks, user manuals, menus, and more.

However, WordPress only searches the contents of its database by default, so it will only look at the title and description of your PDF files, and not their contents. As a result, your visitors may struggle to find the best PDF for their search query.

The good news is that you can use a custom search plugin to improve the default WordPress search experience. If your PDFs are unencrypted, then the right search plugin will index the contents and metadata of your PDFs and add them to the search results.

For step-by-step instructions, please see our guide on how to add PDF indexing and searching in WordPress.

Add a Search By Category Feature to WordPress

If you have multiple categories of content on your website, then you might want to let users restrict their search to a specific category. This can help visitors find the right content, faster.

An example of search by category on a WordPress website

For example, if you have an online store then it often makes sense to let customers search within a particular product category.

If you run a membership site, then you might use search by category to help visitors find other members, groups, forums, online courses, and other specific kinds of content. For more information, please see our guide on how to add search by category in WordPress.

Make a Smart WooCommerce Product Search

WooCommerce has its own built-in search, but it doesn’t look for matches in product attributes, reviews, or product descriptions. This omission can stop shoppers from finding products they want to buy on your online store, so you get fewer sales.

The built-in WooCommerce search feature

Luckily, there are some excellent WooCommerce plugins that can show more helpful search results, and fetch them faster. To learn more, please see our guide on how to make a smart WooCommerce product search.

To get even more sales, you may want to fine-tune the kind of products WooCommerce includes in its search results. For example, you might only show products that are on sale or come with free shipping.

To learn more, please see our guide on how to customize WooCommerce product search results page.

Create a Search Form for Custom Post Types

Custom post types allow you to go beyond posts and pages and create different content types for your website. Custom post types can have different custom fields and their own custom category structure.

For example, if you run a movie review website, then you would probably want to create a ‘movie reviews’ post type that has fields for the director, release date, and more.

At WPBeginner, we use custom post types for our Glossary section to keep it separate from our blog posts.

How to improve your WordPress search with searchable categories

If you use custom post types, then you may want to create a form that allows visitors to search only that content.

For example, we also have a form that only searches WPBeginner’s coupon codes.

Searching coupons and deals on the WPBeginner website

This can help visitors find the right content faster, even when you have lots of different content types. For step-by-step instructions, check out our guide on how to create advanced search forms in WordPress for custom post types.

You can also make custom fields searchable in WordPress, which is ideal if you’ve added extra metadata to your pages and posts.

Exclude Content From WordPress search

By default, the built-in WordPress search will include all posts and pages in its search results.

However, you may want to exclude certain pages and posts from the search results. For example, if you’re running a WordPress membership website or selling online courses, then you’ll typically want to exclude your premium content from public search results.

If you’re running an online store, then you may want to hide content like your account page, checkout page, and thank you page. To help you out, we’ve created a guide on how to exclude pages from the WordPress search results.

Do you want to exclude posts, authors, custom post types, categories, tags, or even custom taxonomies? Then you can take a look at our guide on how to exclude specific pages, authors, and more from WordPress search.

WordPress Search FAQs

In this guide, we’ve explored how the default WordPress search works and shared lots of tips on how to improve it.

However, you may still have some questions about this important feature. That said, here are some of the most frequently asked questions about WordPress search.

How Do I Improve WordPress Search?

The best way to improve the built-in WordPress search is by using SearchWP.

SearchWP is the best custom search plugin for WordPress and allows visitors to search any content on your site including documents, WooCommerce products, custom fields, tags, comments, and more.

It also lets you customize the WordPress search algorithm, so you can control exactly where the content appears in the search results.

For more information, please see our guide on how to improve WordPress search.

Does WordPress Search Include Tags?

By default, WordPress search doesn’t include tags. The easiest way to make tags searchable is by using a custom search plugin like SearchWP.

SearchWP also has a relevancy slider, so you can control exactly how much tags influence where an item appears in the search results.

How Do I Add Search to My WordPress Theme?

If your theme doesn’t have a built-in search form, then we recommend adding a search bar to the WordPress navigation menu.

Since the main navigation menu typically appears across your entire site, visitors will be able to search for pages, posts, products, and more, from any page of your website.

An example of a search bar, in a navigation menu

If you’re using a block-based theme such as ThemeIsle’s Hestia Pro or Twenty Twenty-Three, then you can add a search bar to your theme using the full-site editor (FSE).

To do this, go to Appearance » Editor in the WordPress dashboard.

Opening the WordPress full site editor (FSE)

By default, the editor will show your theme’s home template. If you want to add the search bar to a different template, then click on the small arrow icon in the toolbar.

Then, select ‘Browse all templates.’

How to browse all FSE templates in WordPress

You’ll now see all the templates that make up your WordPress theme. Simply find the template where you want to add the search bar, and then click on its title.

For example, if you wanted to add a search form in your WordPress posts then you’d select the ‘Single’ template.

How to add the search bar to a single template in WordPress

You will now see this template in the full-site editor.

To go ahead and add a search bar, click on the blue ‘+’ icon.

Adding widgets to a single template in WordPress

In the popup that appears, type in ‘Search’ to find the right block.

You can then drag the block to the location where you want to show the search bar.

Adding a search block to a block-enabled theme template

To customize the block title or placeholder text, simply type it into the search block where it says ‘search’ or ‘optional placeholder.’

When you’re happy with how the block looks, click on ‘Save’ to make the search bar live.

Publishing a block-enabled template with a search bar

How Do I Add Search to a WordPress Page or Post?

You can add a search bar to a specific page or post using the built-in Search block.

This is a good choice if you want to control exactly where the search bar appears on every page and post, or you only need to offer search on specific areas of your website.

How to improve the default WordPress search

To get started, simply open the page where you want to add a search form and then click on the + icon.

In the popup that appears, type ‘Search’ to find the right block. Once you click on the Search block, it will add the block to your page.

Adding the Search block to a WordPress page or post

By default, the block uses ‘Search’ for both its label and the button text.

This will be visible to visitors, so you may want to replace it with something more descriptive by typing into the text fields.

Customizing the WordPress search block

You can also add some placeholder text to the search bar. This text will disappear automatically when the visitor starts typing.

To add a placeholder, simply click on ‘Optional placeholder…’ and then start typing.

How to improve the WordPress search

When you’re happy with how the Search block looks, you can go ahead and either publish or update the post.

We hope this tutorial helped you learn how WordPress search works, and how to make it better. You may also want to learn how to make money online blogging with WordPress, or check out our list of the best email marketing services for small businesses.

If you liked this article, then please subscribe to our YouTube Channel for WordPress video tutorials. You can also find us on Twitter and Facebook.

The post How Does WordPress Search Work (+ Tips to Make It Better) first appeared on WPBeginner.

How to Fade Images on Mouseover in WordPress (Simple & Easy)

Do you want to fade images on mouseover in WordPress?

A simple fade-in or fade-out animation when a user moves their mouse over an image can make your site more engaging. It also encourages visitors to interact with your content, which can keep them on your site for longer.

In this article, we’ll show you how to add a fade image effect on mouseover in WordPress.

How to fade images on mouseover in WordPress

Why Fade Images on Mouseover in WordPress?

Animations are an easy way to make your website more interesting, and can even draw the visitor’s attention toward your page’s most important content, such as your website logo or a call to action.

There are lots of different ways to use CSS animations in WordPress, but adding a hover effect to images is particularly effective. The fade animation means your images will slowly appear or disappear when visitors hover over them.

Adding a fade animation to WordPress

This encourages people to interact with your images, and can even add a storytelling element to the page. For example, different images might fade in and out as the visitor moves around the page.

Unlike some other animations, the fade image on mouseover effect is subtle so it won’t negatively impact the visitor’s reading experience or any image optimization you’ve done.

With that said, let’s show you how to add a fade to your images on mouseover in WordPress.

Adding Image Fade on Mouseover to all WordPress Images

The easiest way to add a fade effect to all your images is by using WPCode. This free plugin allows you to easily add custom code in WordPress without having to edit your theme files.

With WPCode, even beginners can edit their website’s code without risking mistakes and typos that can cause many common WordPress errors.

The first thing you need to do is install and activate the free WPCode plugin. For more details, see our step-by-step guide on how to install a WordPress plugin.

Upon activation, head over to Code Snippets » Add Snippet.

Adding custom code to your WordPress website with WPCode

Here, simply hover your mouse over ‘Add Your Custom Code.’

When it appears, click on ‘Use snippet.’

Creating a custom CSS snippet on your WordPress website

To start, type in a title for the custom code snippet. This can be anything that helps you identify the snippet in the WordPress dashboard.

We need to add custom CSS to WordPress, so open the ‘Code Type’ dropdown and select ‘CSS Snippet.’

Add a fade on mouseover animation to images using WPCode

In the code editor, add the following code snippet:

.post img:hover{
opacity:0.6;
filter:alpha(opacity=60); /* For IE8 and earlier */
-webkit-transition: all 2s ease;
-moz-transition: all 2s ease;
-ms-transition: all 2s ease;
-o-transition: all 2s ease;
transition: all 2s ease;
}

This code snippet will fade each image for 2 seconds when the user hovers their mouse over it. To make the image fade slower, simply replace ‘2s ease’ with a higher number. If you want to make the picture fade faster, then use ‘1s ease’ or smaller.

You can also make the ‘opacity’ higher or lower by changing the opacity:0.6 line.

If you change any of these numbers then make sure you change them across all the properties (webkit, moz, ms, and o), so the fade effect looks the same on every browser.

When you’re happy with the snippet, scroll to the ‘Insertion’ section. WPCode can add your code to different locations, such as after every post, frontend only, or admin only.

To add a fade effect to all your images, click on ‘Auto Insert.’ Then, open the ‘Location’ dropdown menu and choose ‘Site Wide Header.’

Inserting custom CSS across your WordPress website

After that, you’re ready to scroll to the top of the screen and click on the ‘Inactive’ toggle, so it changes to ‘Active.’

Finally, click on ‘Save Snippet’ to make the CSS snippet live.

Adding a fade effect to images using CSS

Now, if you hover the mouse over any image on your WordPress website, you’ll see the fade effect in action.

Adding Image Fade Animations to Individual Pages

Using a fade effect for every single image can become distracting, especially if you’re running a photography website, a stock photo store, or any other site that has lots of images.

With that in mind, you may want to use fade effects on a specific page or post only.

The good news is that WPCode allows you to create custom shortcodes. You can place this shortcode on any page, and WordPress will show fade effects on that page only.

To do this, simply create a custom code snippet and add the fade animation code following the same process described above. Then, click on the ‘Save snippet’ button.

Fade images on mouseover in WordPress using custom code

After that, scroll to the ‘Insertion’ section, but this time select ‘Shortcode.’

This creates a shortcode that you can add to any page, post, or widget-ready area.

Creating a shortcode in WPCode

After that, go ahead and make the snippet live following the same process described above.

You can now go to any page, post, or widget-ready area and create a new ‘Shortcode’ block. Then, simply paste the WPCode shortcode into that block.

How to create fade animations for images using shortcode

For more information on how to place the shortcode, please see our guide on how to add a shortcode in WordPress.

With that done, either click on the ‘Update’ or ‘Publish’ button to make the shortcode live. You can then visit that page, page, or widget-ready area to see the fade on mouseover effect.

Adding Image Fade Animations to Featured Images

Another option is to add fade animations to your featured images or post thumbnails. These are the post’s primary image and they often appear next to the heading on your home page, archive pages, and other important areas of your website.

By fading featured images on mouseover, you can make your site more eye-catching and engaging, without animating every single image across your WordPress blog or website.

To add a fade animation to your post thumbnails, simply create a new custom code snippet following the same process described above.

Adding a fade on mouseover effect to individual images

However, this time add the following code to the editor:

img.wp-post-image:hover{
opacity:0.6;
filter:alpha(opacity=60); /* For IE8 and earlier */
-webkit-transition: all 2s ease;
-moz-transition: all 2s ease;
-ms-transition: all 2s ease;
-o-transition: all 2s ease;
transition: all 2s ease;
}

After that, scroll to the ‘Insertion’ box and select ‘Auto Insert.’ Then, open the ‘Location’ dropdown menu and choose ‘Site Wide Header.’

Adding an animation to images on mouseover

After that, you can go ahead and make the code snippet live using the same process described above.

Now, you can hover the mouse over any featured image to see the fade animation in action.

If you want to add even more image mouseover effects, then see our guide on how to add image hover effects in WordPress.

Bonus: Animate Any Image, Text, Button, and More

Fade effects are a fun way to make images more interesting, but there are lots more ways to use animations in WordPress. For example, you might use flipbox animations to reveal text when a visitor hovers over an image, or use zoom effects so users can explore a picture in more detail.

If you want to try different effects, then SeedProd has over 40 animations that you can add to images, text, buttons, videos, and more. You can even animate entire sections and columns with just a few clicks.

Inside the SeedProd editor, simply click on the content you want to animate, and then select the ‘Advanced’ tab in the left-hand menu.

Adding fade animations using SeedProd

You can then go ahead and click to expand the ‘Animation Effects’ section.

After that, simply choose an animation from the ‘Entrance Animation’ dropdown, including a wide range of different fade effects.

Adding animations to WordPress using SeedProd

For more information, please see our guide on how to create a landing page with WordPress.

We hope this article helped you learn how to fade images on mouseover in WordPress. You may also want to see our guide on how to choose the best web design software, and our expert picks of the best WordPress popup plugins.

If you liked this article, then please subscribe to our YouTube Channel for WordPress video tutorials. You can also find us on Twitter and Facebook.

The post How to Fade Images on Mouseover in WordPress (Simple & Easy) first appeared on WPBeginner.

WordPress Conversion Tracking Made Simple: A Step-by-Step Guide

Do you want to add conversion tracking features to your WordPress website?

Conversion tracking helps you measure the impact of your marketing efforts and makes it easier to understand how users interact with your website.

In this guide, we will show you how to add conversion tracking in WordPress and track your conversions like a total pro.

Ultimate Guide to conversion tracking in WordPress

This is a comprehensive WordPress conversion tracking guide, so we have divided it up into different sections. Here is what we’ll cover in this guide:

What is Conversion Tracking?

Conversion tracking is the ability to track and measure the success of your various marketing efforts.

Depending on your business, the conversion is the desired action you want users to perform on your website.

  • For an online store or eCommerce website, a conversion could be a successful purchase.
  • For a news/blog site, the conversion could be a successful subscription to the email newsletter.
  • For a professional services website, a conversion could be a user filling up a contact form.

Simply put, conversion tracking shows you how many of your website visitors successfully perform the desired action.

Why is Conversion Tracking Important?

Conversion tracking is important because it helps you make data-driven decisions to grow your business.

For instance, it shows that users from a specific traffic source are more likely to convert. You can then focus your attention on getting more traffic from that particular source.

Conversion tracking also helps you uncover the users who are not converting so well.

For instance, you may learn that users open the contact page, but many abandon it before submitting the form. You can then make your form easier by removing unnecessary fields, making it conversational, changing colors, setting up partial form submission, etc.

Basically, you need conversion tracking to measure your success and failures and then improve upon them to grow your online business.

That being said, let’s take a look at what tools we’ll need to set up conversion tracking in WordPress.

Tools You Need to Setup Conversion Tracking in WordPress

Most conversion optimization experts rely heavily on Google Analytics. It is a free tool provided by Google that helps you track your website traffic.

It shows where your users are coming from, and what they do while on your website.

If you are running Google AdWords, Facebook Ads, and Twitter Ads to promote your business, then you’ll need to set up those for conversion tracking.

This may sound complicated, but you’ll only have to set it up once, and we’ll walk you through every step of the way.

Ready? Let’s get started.

Setting Up Conversion Tracking in Google Analytics

First, you need to install Google Analytics on your website.

The easiest way to do this is by using MonsterInsights. It is the best Google Analytics plugin on the market that comes with enhanced eCommerce tracking, form tracking, and other conversion tracking tools built-in.

You’ll need the PRO version of the plugin to access eCommerce and other conversion tracking features. For basic tracking, the free version works as well.

Simply install and activate the MonsterInsights plugin. For more details, see our step-by-step guide on how to install a WordPress plugin.

Upon activation, you’ll see the setup wizard. Go ahead and click the ‘Launch the Wizard’ button.

Launch setup wizard

Next, you can follow the on-screen instructions to connect your WordPress site to Google Analytics using MonsterInsights. For more details, see our guide on how to install Google Analytics in WordPress.

With MonsterInsights, you can also easily create a Google Analytics 4 (GA4) property. GA4 is the latest version of the famous analytics platform, and it will replace the old version on July 1, 2023.

To learn more, please see our guide on how to switch to Google Analytics 4 in WordPress.

Now that you have installed Google Analytics, let’s set up conversion tracking on your website.

Turning on Enhanced Ecommerce Conversion Tracking

Ecommerce tracking helps you see which products are doing well on your site, which products are being looked at but not purchased, and what’s bringing you the most revenue.

Google Analytics comes with enhanced eCommerce tracking, which works for most eCommerce websites, including WooCommerce, Easy Digital Downloads, MemberPress, and more. However, you’ll need to enable it for your website manually.

Step 1. Turn on eCommerce Tracking in MonsterInsights

MonsterInsights comes with an eCommerce addon that lets you properly set up eCommerce conversion tracking in Google Analytics.

It works with all top eCommerce platforms for WordPress, including WooCommerce, MemberPress, LifterLMS, Easy Digital Downloads, and more.

First, you need to visit the Insights » Addons page to install and activate the eCommerce addon.

Install the eCommerce addon

Step 2. Turn on Enhanced Ecommerce in Google Analytics

Next, you need to enable enhanced eCommerce tracking in your Google Analytics account. Go to your Google Analytics dashboard and select your website.

From here, you need to click on the Admin button located at the bottom left corner of the screen.

Go to admin settings

On the next screen, you’ll see different Google Analytics settings.

Under the ‘View’ column, click the ‘Ecommerce Settings’ link.

Ecommerce settings

After that, you need to turn on the ‘Enable Ecommerce’ and ‘Enable Enhanced Ecommerce Reporting’ options.

Don’t forget to click the ‘Save’ button when you’re done.

Enable ecommerce and enhanced ecommerce reporting

Google Analytics will now turn on the eCommerce reporting feature for your account.

Afterward, you can return to your WordPress dashboard and visit the Insights » Settings page. From here, switch to the eCommerce tab.

Use enhanced ecommerce option

MonsterInsights will automatically detect your eCommerce software and enable advanced eCommerce tracking for your store.

Note: the manual process for adding eCommerce conversion tracking has a lot of room for errors, so we strongly recommend using a plugin like MonsterInsights.

Viewing eCommerce Conversion Tracking Reports

Now that you have enabled eCommerce conversion tracking on your website. Let’s see how to view these reports and use them to make informed decisions about your business.

Ecommerce Conversion Reports in MonsterInsights

Simply go to the Insights » Reports page inside the WordPress admin area and then switch to the eCommerce tab.

Ecommerce report in MonsterInsights

At the top, you’ll see your most important metrics, like the conversion rate, transactions, revenue, and average order value.

Below that, you will see a list of your top products with quantity, sale percentage, and total revenue. This shows you which products are doing well in your store.

Next, you’ll see your top conversion sources with the number of visits, conversion share, and revenue. You can see which sources are bringing you more revenue and which traffic sources are not very effective.

Top conversion sources

MonsterInsights will also show you shopper behavior reports with the number of times products were added to and removed from the cart.

That’s not all the data. You can drill down these reports even further inside Google Analytics.

Ecommerce Conversion Reports in Google Analytics

In Google Analytics 4, you can head to Reports » Monetization » Overview to view the report.

View ecommerce report in GA4

Here, you can see the total revenue your online store is making. Besides that, there are more metrics you can track, like items purchased, first-time purchasers, and total purchases.

On the other hand, you can visit your Universal Analytics dashboard and click on the Conversions » Ecommerce from the left column.

Ecommerce report in analytics

The overview section offers the most important stats, such as revenue, conversion rate, transactions, and average order value.

You can further drill down to view different reports. For example, you can switch to shopping and checkout behavior reports to see how users reach the conversion page. You can also figure out what stopped them at the last minute from completing the transaction.

You may also want to see our guide on how to set up WooCommerce conversion tracking.

Turning on Form Conversion Tracking in Google Analytics

Not all websites use an eCommerce platform to conduct business. For instance, a restaurant website may use an order delivery form, or a salon may use a booking form.

Many businesses use contact forms to capture leads from their website. A lot of news and blogs use an email newsletter to convert website visitors into subscribers.

To track them, you need to enable form conversion tracking in Google Analytics.

MonsterInsights comes with a Forms addon that lets you easily track form conversions on your WordPress site. It works with all popular WordPress form plugins, including WPForms, Formidable Forms, Gravity Forms, Contact Form 7, and more.

Simply go to the Insights » Addons page. Scroll down to the ‘Forms’ addon, and then click on the Install button.

Install forms addon

Upon activation, you need to visit the Insights » Settings page and switch to the ‘Conversions’ tab.

MonsterInsights will automatically detect your WordPress form plugin and will also start tracking miscellaneous WordPress forms on your site.

MonsterInsights settings - conversions tab

Viewing Your Form Conversion Reports

You can now view your form conversion reports inside your WordPress admin area.

Head over to the Insights » Reports page and switch to the ‘Forms’ tab.

Forms report

You’ll see a list of forms on your website with their impressions, conversion, and conversion rates.

This helps in tracking how each WordPress form is performing. You can optimize low-converting forms while increasing the visibility of high-converting forms.

For more details, please see our guide on how to set up form tracking in Google Analytics.

Setting Up Goals for Conversion Tracking in Universal Analytics

So far, we have covered how to track eCommerce and form conversions.

What if you wanted to manually set up conversion goals and track them in Google Analytics?

For instance, you may want to consider users visiting a specific page as a conversion. Since it is not a form submission or an eCommerce transaction, it will not appear as a conversion in your reports.

Universal Analytics allows you to create your own goals and track their conversion.

However, an important thing to note is that Google Analytics 4 doesn’t have goals anymore. It is one of the major differences you’ll see between the new and old versions.

That said, let’s see how to set them up in Universal Analytics and track them on your website.

Go to the Google Analytics dashboard and click the ‘Admin’ tab on the bottom left. Then, in the View column, click on Goals.

Click on goals

Now, you will need to create a new goal.

Simply click the ‘+ New Goal’ button to set up a new goal.

Add a new goal

Next, you will need to select the goal type. Universal Analytics offers 4 types:

  • Destination: This tracks whether a visitor went to a specific page. This could be a thank you page or any conversion page on your site.
  • Duration: This tracks how long a visitor spends on your website. More time spent on a website means more engagement.
  • Pages/Screens per session: This tracks how many pages an average visitor looks at on your site.
  • Event: This can track all sorts of things, like button clicks, video plays, and downloads. It requires a bit more setup than the other options.

Destination and Event types are the most commonly used goal types for most businesses.

For this tutorial, we will create a ‘Destination’ goal to track visitors who view our thank you page after completing a form.

First, provide a name for your Goal. It needs to be something meaningful so that you can easily identify it in your Google Analytics reports.

After that, choose ‘Destination’ as your goal type and click the Continue button.

Enter goal description

Now you can simply provide the last part of the URL you want to track as the destination.

For instance, if your page is:
https://www.example.com/thank-you-for-booking/

Then you should enter the following:
/thank-you-for-booking/

Add goal details

Below that, you can optionally add value for the conversion. This makes sense if people are completing a payment form or if you know how much each lead is worth to you on average.

If you want to track a funnel, such as a customer moving through a checkout process, then you can also do this as part of the destination goal. This can help you pinpoint areas you might want to improve.

Once you’re happy with your goal, click the Save button. You should then see your goal listed in a table. You can edit it, switch it off and on, or create more goals here.

View new goal

Viewing Your Goal Conversions in Universal Analytics

Now that you have created your goal, allow Google Analytics to collect some data. After that, you can view your Goal Conversion report under the Google Analytics dashboard.

Simply, go to the Conversions » Goals and then click on Overview.

View goal conversions in analytics

Like all Google Analytics reports, you can drill down to view visitor journeys and get deeper insights.

For more details, see our complete guide on setting up goals in Google Analytics.

Setting Up Events in Google Analytics 4

Google Analytics 4 replaces goals with events. You can manually configure events to track different user interactions in GA4.

First, you’ll need to go to the ‘Admin’ settings from your GA4 property.

Go to admin settings

Next, you will need to navigate to the Property column.

After that, simply click the ‘Event’s option.

Go to events settings

You are now ready to create a new event in GA4.

Simply click the ‘Create event’ button to get started.

Create a new event

You should now see a new window slide in from the right. This is where all your custom events will be listed.

Go ahead and click the ‘Create’ button.

Create a custom event

On the next screen, you can enter details of your new event.

Google Analytics 4 already has pre-built events. Simply click the Custom event name dropdown menu and choose an event. For example, we’ll select the ‘file_download’ event for this tutorial.

Select an event name

GA4 will automatically enter the specific Parameter and Operator for your custom event.

Next, you can enter a value for your event. For instance, we will enter ‘.pdf’ since we want to track PDF file downloads. However, you can enter any specific word you use to organize filenames on your site.

Enter event parameter operator and value

After entering these details, click the ‘Create’ button at the top.

You will now see your new custom event listed under the Custom events area in GA4.

View custom event

Viewing Your Event Conversions in Google Analytics 4

Now that you’ve created a custom event in GA4, the next step is to view the conversions.

To do that, simply head to Reports » Engagement » Event: Event name from the menu on your left and view the report.

View custom events data

You can now repeat this step to track other custom events.

That said, an easier way of tracking user behavior is by using MonsterInsights. The plugin automatically sets up different events in Google Analytics.

This way, you don’t have to manually configure events or worry about messing up your tracking.

Google Ads Conversion Tracking in WordPress

If you run Google Ads (formerly Google AdWords) to bring targeted traffic to your website, then you may want to track those conversions.

Setting up is a bit complicated because it requires adding code to your website. However, with MonsterInsights, you can easily set up Google Ads conversion tracking without editing code or hiring a developer.

First, you can go to Insights » Addons from your WordPress dashboard and install the Ads addon.

Install the ads addon

Once you install the addon, it should automatically activate.

From here, you can go to Insights » Settings and head to the Publisher tab.

Publisher settings in MonsterInsights

Next, you can scroll down to the ‘Ads Tracking’ section.

Here, you will need to enter the Conversion ID, which will be in this format: AW-123456789.

Enter conversion ID and label

If you’re tracking Google Ads on an eCommerce store, then you can also enter the Conversion Label.

To find the Conversion ID and Conversion Label, you’ll need to go to your Google Ads dashboard and create a conversion action.

For more details, please follow our step-by-step guide on how to set up Google Ads conversion tracking in WordPress.

Viewing Google Ads Conversion Reports in Google Analytics 4

Your Google Ads conversion tracking will now appear in your Google Analytics reports.

In Google Analytics 4, you can head to Acquisition » Acquisition overview and then navigate to the ‘Session Google Ads’ report.

After that, click the ‘View Google Ads campaigns’ option at the bottom of the report.

View session google ads campaign report

This will expand the report and show more details about your ad campaigns.

You can see the total number of users, sessions, Google Ads clicks, and more.

View detailed stats for each campaign

Viewing Google Ads Conversion Reports in Universal Analytics

For Universal Analytics, you can open your website property.

After that, view the Google Ads report by going to the Acquisition » Google Ads » Campaigns section. Here, you can see conversions for all your paid campaigns.

View Google ads report in UA

Use UTM Parameters for Conversion Tracking in Google Analytics

UTM parameters are special tags you can add to URLs to pass important information to Google Analytics.

For instance, if you want to track users coming from a particular ad, then you can add UTM parameters to your ad URL like this:

https://yourwebsite.com/special-offer/?utm_source=ads&utm_medium=cpc&utm_content=bfad

You can also use UTM parameters anywhere you want to share your URLs.

For instance, your email newsletter, Tweets, SMS campaigns, and more.

https://yourwebsite.com/special-offer/?utm_source=newsletter&utm_medium=email&utm_campaign=jan_sale

MonsterInsights makes it super easy to build URLs with UTM parameters. Simply head over to the Insights » Tools page and select the ‘URL Builder’ tab.

Go to tools in MonsterInsights

Simply enter the UTM parameters you want to use, and it will automatically generate the URL, which you can then use in your campaigns.

For instance, you can enter a campaign source, like a newsletter or Google, which tells you where the users are coming from. After that, you can define a campaign medium, such as emails or banner ads, and enter a campaign name.

Enter campaign source and medium

MonsterInsights will also give you additional options to add campaign terms and content.

This is useful if you’re split-testing different emails or paid campaigns.

For creating a custom URL, you can leave these options blank.

Additional options in URL builder

Next, you can scroll down to the bottom to see your custom URL.

Go ahead and use the link for campaigns and track conversions on your website.

The URL created by the MonsterInsights URL builder tool, with UTM parameters in place

Viewing UTM Parameter Reports in Google Analytics 4

Now that you’ve added UTM parameters to a URL, you can track its performance in Google Analytics.

First, log in to your GA4 account. After that, head to Reports » Acquisition » Traffic Acquisition from the menu on your left.

View traffic acquisition report

You should now see traffic from different sources on your website, such as organic search, email, display, and more.

You can use the search bar to filter the traffic source for your custom campaign. For example, if you’re tracking conversions from a newsletter, then you can look up ‘Email’ in the report.

View different traffic sources

After that, you further drill down and filter your traffic.

Simply click the ‘+’ button under the search bar.

Click the plus button

GA4 will then show different options to filter your traffic.

You can select Traffic source » Session source from the dropdown list.

Select session source

Next, Google Analytics will list your email campaigns.

You can now see which campaign performs best and gets the most conversions.

View newsletter URL report in ga4

Viewing UTM Parameter Reports in Universal Analytics

In Universal Analytics, you can track the conversions of your campaigns under your Google Analytics dashboard.

Simply switch to the Acquisition » Campaigns » All Campaigns report.

Go to all campaigns

Your campaigns will appear here.

You can click on any of them to drill down further.

View newsletter tracking report

Setting Up Facebook Conversion Tracking in WordPress

Facebook is the largest social media website on the planet, with billions of active users. This is why Facebook ads are sometimes the easiest way to reach a niche audience.

Now, if you are running Facebook ads, then you may want to see how well your ads are doing by implementing conversion tracking for your Facebook ads.

Usually, you’d need to add a code snippet to your WordPress website to track Facebook conversions. However, WPCode makes it very simple, and you can simply enter the Facebook Pixel ID to set up tracking.

First, you’ll need to log in to Facebook and visit the Meta Business Suite. Then, click on All Tools » Events Manager.

Go to event manager

Next, you need to add a data source to the Event Manager.

Simply click the ‘+ Connect to Data Sources’ button in the left-hand menu.

Connect data source

You should now see different options to connect your new data source.

Go ahead and select the ‘Web’ option and click the ‘Connect’ button to continue.

Connect new data source

After that, enter a name for your pixel.

Once that’s done, you can click the ‘Create Pixel’ button.

Create a Facebook pixel

Next, you need to choose how to connect your website and send activity to Facebook.

At the bottom, you will see the Facebook Pixel. Go ahead and copy the pixel ID.

Choose how to connect to your site

Next, you can return to your WordPress website dashboard and install and activate the WPCode Free Plugin plugin. For more details, see our step-by-step guide on how to install a WordPress plugin.

Note that you’ll need at least the WPCode Plus plan because it includes the Conversion Pixel Addon. However, there is also a free version of WPCode you can use to get started.

Upon activation, you need to visit the Code Snippets » Conversion Pixel page and go to the Facebook tab. From here, you need to paste the Facebook Pixel ID in the respective field.

Add Facebook pixel ID

WPCode will now automatically add the code to your site that’s needed to track Facebook ad conversions.

Setting Up Twitter Conversion Tracking in WordPress

If you run Twitter Ads to promote your business, then you’ll need to set up Twitter conversion tracking to measure the success of your ads.

Simply log in to your Twitter Ads account and click on the Tools » Event manager from the menu at the top.

Twitter event manager

You should now see a pixel created by Twitter.

Go ahead and click the ‘View Twitter Pixel’ option.

View the Twitter pixel

On the next screen, you will see different options to add the Twitter pixel to your site.

You can use the ‘Pixel Code’ method and simply copy the code.

Copy the pixel code

You will need to add this code to the header of your WordPress site.

First, you need to switch back to your WordPress website’s admin area.

If you haven’t already done so, then go ahead and install and activate the WPCode plugin. For more details, please see our guide on how to install a WordPress plugin.

Upon activation, you need to visit the Code Snippets » Header & Footer page. Now you can paste the Twitter pixel code into the Header section.

Enter the Twitter pixel

Don’t forget to click the ‘Save Changes’ button to store your settings.

After you have successfully installed the pixel code, you can track conversions on your Twitter Ads account.

Optimizing Conversion Rates to Boost Sales

Once you start tracking conversions on your website, the next step is to improve those conversion rates.

You’d be surprised how little things can make a huge impact on your business.

The best way to improve your conversions is by using OptinMonster. It is the best conversion optimization software on the market and helps you convert more visitors into customers.

OptinMonster comes with tools like lightbox popups, fullscreen welcome mats, countdown timers, slide-in boxes, and more.

Choose a campaign type and template

It integrates with any email marketing service and works with all popular eCommerce platforms.

OptinMonster’s display rules allow you to show targeted messages to your customers at the precise time and nudge them into making a buying decision.

Upsell popup preview

For instance, if you notice that customers are leaving a product page without taking any action, then you can offer them a discount when they are about to exit.

Similarly, you can run time-sensitive campaigns to trigger the FOMO effect and give customers a nudge in the right direction.

For more practical tips, see our guide on how ways to recover WooCommerce abandoned cart sales.

We hope this guide helped you set up conversion tracking in WordPress. You may also want to see our comparison of the best email marketing services and the ultimate guide to WordPress speed and performance.

If you liked this article, then please subscribe to our YouTube Channel for WordPress video tutorials. You can also find us on Twitter and Facebook.

The post WordPress Conversion Tracking Made Simple: A Step-by-Step Guide first appeared on WPBeginner.

How to Add Image Icons With Navigation Menus in WordPress

Do you want to add image icons to your WordPress navigation menus?

Images can help visitors understand your site’s navigation at a glance. You can even use icons to highlight the menu’s most important content or call to action.

In this article, we will show you how to add image icons to navigation menus in WordPress. 

How to add image icons to navigation menus in WordPress

Why Add Image Icons With Navigation Menus in WordPress?

Usually, WordPress navigation menus are plain text links. These links work for most websites, but they don’t always look interesting or engaging. 

By adding image icons to the navigation menu, you can encourage visitors to pay attention to the menu and explore more of your site.

An example of image icons in a WordPress navigation menu

If your menu has lots of different options, then image icons can make it easier for visitors to scan the content and find what they’re looking for. This can be an easy way to increase pageviews and reduce bounce rate in WordPress

You might even use an image icon to highlight the most important menu item, such as the Checkout link on your online marketplace

An example of an image icon on an eCommerce site

By highlighting a call to action in the menu bar, you can often get more signups, sales, members, and other conversions.

With that being said, let’s see how you can add image icons to your WordPress navigation menu. Simply use the quick links below to jump straight to the method you want to use.

Method 1: Add Image Icons to Navigation Menus Using a Plugin (Quick and Easy)

The easiest way to add image icons to your WordPress menus is by using the Menu Image plugin. This plugin comes with dashicon icons that you can add with just a few clicks.

An example of a navigation menu, with image icons

If you have added Font Awesome icons to your website, then you can use them with this free plugin. For more information on how to set up Font Awesome, see our guide on how to easily add icon fonts to your WordPress theme.

If you want to use your own icon files, then Menu Image also lets you select an image or icon from the WordPress media library.

The first thing you need to do is to install and activate the Menu Image plugin. For more details, see our step-by-step guide on how to install a WordPress plugin.

Upon activation, click on Menu Image in the WordPress dashboard. On this screen, you can choose whether to get security and feature notifications or click on the ‘Skip’ button.

How to add icons to a WordPress menu using a free plugin

This will take you to a screen where you can configure the plugin’s settings. To start, you’ll see all the different sizes you can use for the image icons.

If you plan to use icons from Font Awesome or dashicons, then Menu Image will resize them automatically. However, if you use images from the media library, then you’ll need to select the size manually.

The plugin supports the default WordPress image sizes, such as thumbnail, image, and large. It also adds three unique sizes that are set to 24×24, 36×36, and 48×48 pixels by default.

Changing the size of image icons in WordPress menus

These settings should work well for most websites, but you can make the icons bigger or smaller by typing in different numbers for 1st, 2nd, or 3rd Menu Image size.

When you’re adding icons to your menu, you’ll see an ‘image on hover’ field by default. This allows you to show a different icon when the visitor hovers over that menu item.

Just be aware this setting is only available when you’re using your own images. You don’t need to worry about the ‘image on hover’ feature if you plan to use dashicons or Font Awesome icons.

Showing a different icon can help visitors see where they are in the navigation menu. This is particularly useful if a menu has lots of different items. For example, you might use different colors or icon sizes to highlight the currently-selected menu item.

If you want to try different hover effects, then make sure you check ‘Enable the image on hover field.’

Adding a hover effect to image icons in a WordPress menu

With that done, click on ‘Save Changes’ to store your settings.

To add icons to the navigation menu, head over to Appearance » Menus. By default, WordPress will show your site’s primary menu.

Editing a WordPress navigation menu

If you want to edit a different menu, then simply open the ‘Select a menu to edit’ dropdown and choose a menu from the list. After that, click on ‘Select.’

Now, find the first menu item where you want to add an icon and give it a click. Then, simply select the new ‘Add Image / Icon’ button.

Adding an image icon to a WordPress navigation menu

You can now decide whether to use your own image or choose an icon.

To use a ready-made icon, click on the radio button next to ‘Icons.’ You can then click to select any dashicon or Font Awesome icon.

Adding a dashicon icon to a WordPress menu

Do you want to use your own images instead?

Then select the radio button next to ‘Image’ and click the ‘Set Image’ link.

Adding WordPress media library images to a navigation menu

You can now either choose an image from the WordPress media library or upload a new file from your computer.

If you checked ‘Enable the image on hover field’ in the plugin’s settings, then you’ll also need to click on ‘Set image on hover.’

Adding an 'on hover' animation a WordPress image icon

Now, choose an image to show when the user hovers over this menu item.

Sometimes, you may want to ignore this setting and show the same icon no matter what. To do this, click on ‘Set image on hover’ and then choose the exact same image.

If you don’t do this, then the icon will disappear when the visitor hovers over it.

How to add image icons with navigation menus in WordPress

After that, open the Image Size dropdown and choose a size from the list. Using the same size for all icons tends to make the menu look more organized.

However, you might make the menu’s most important icon bigger. For example, if you’ve created an online store using a plugin like WooCommerce, then you might use a bigger icon for ‘Checkout’ so it stands out.

When you’re happy with the icon, it’s time to look at the menu item’s label.

By default, the plugin shows the title label after the icon.

Customizing the navigation menus on your website or blog

To change this, select any of the radio buttons in the ‘Title position’ section.

Another option is to remove the navigation label completely, creating an icon-only menu. This can prevent a menu with a lot of items from looking cluttered.

However, you should only hide the labels if it’s obvious what each icon means. If it’s unclear, then visitors will struggle to navigate your WordPress blog or website.

To go ahead and hide the label, select the radio button next to ‘None.’

Hiding the navigation labels on your menu

When you’re happy with how the menu item is set up, click on ‘Save Changes.’

To add an icon to other menu items, simply follow the same process described above.

When you’ve finished, don’t forget to click on the ‘Save Menu’ button. Now, if you visit your website you’ll see the updated navigation menu live.

Method 2: Add Icons to WordPress Menus Using Code (More Customizable)

You can also add image icons to your navigation menus using custom CSS. This gives you more flexibility to control exactly where the icons appear in your menus.

However, it does require you to add custom code in WordPress, so it’s recommended for more intermediate or advanced WordPress users.

An example of a navigation menu with image icons

Before you start, go ahead and upload all your image files to the WordPress media library. For each image, make sure you copy its URL and paste it into a text editor like Notepad. You’ll need to use the links in your code, so this can save you a lot of time.

To find an image’s URL, simply select it in the WordPress media library and then look at the ‘File URL’ field.

Get the URL of an image in the WordPress media library

For more detailed instructions, please see our guide on how to get the URL of images you upload in WordPress.

After that, go to Appearance » Menus.

How to add a WordPress navigation menu to your site or blog

Next, open the ‘Select a menu to edit’ dropdown and choose the menu where you want to add the image icons.

After that, go ahead and click on ‘Select.’

Editing a menu on your website or blog

Next, you need to enable custom CSS classes by clicking on ‘Screen Options.’

In the panel that appears, check the box next to ‘CSS Classes.’

Add custom CSS classes to your website

With that done, you can add custom CSS classes to any item in the navigation menu. This is how you will link each menu item to an image in the WordPress media library.

You can call these classes anything you want, but it’s a good idea to use something that helps you identify the menu item.

To get started, simply click on the first item you want to add an image icon to. In the ‘CSS Classes (optional)’ field, type in the class name you want to use.

Adding custom CSS code to a menu

You’ll use these custom CSS classes in the next step, so make a note of them in your Notepad or similar app.

Simply follow the same process to add a separate class to all your menu items. After that, click on ‘Save Menu’ to store your settings.

Note: Each icon will be tied to its own CSS class, so be sure to label the menu items differently if you want to use separate icons.

Publishing a menu with image icons

Now you’re ready to add image icons to your WordPress navigation menus using CSS.

Often, WordPress tutorials will tell you to add code snippets to your WordPress theme files. However, doing so may cause common WordPress errors and isn’t very beginner-friendly.

That’s why we recommend WPCode.

WPCode is the most popular code snippets plugin used by over 1 million WordPress websites. It allows you to add custom code without editing your theme’s functions.php file.

The first thing you need to do is install and activate the free WPCode plugin. For more details, see our step-by-step guide on how to install a WordPress plugin.

Upon activation, head over to Code Snippets » Add Snippet.

Adding a code snippet to your website using WPCode

Here, simply hover your mouse over ‘Add Your Custom Code.’

When it appears, click on ‘Use snippet.’

How to add custom snippets to a website or blog

To start, type in a title for the custom code snippet. This can be anything that helps you identify the snippet in the WordPress dashboard.

With that done, open the ‘Code Type’ dropdown and select ‘CSS Snippet.’

Adding custom code to WordPress using WPCode

In the code editor, you’ll need to add some code for every icon you want to show.

To help you out, we’ve created a sample snippet below. You can go ahead and change ‘.carticon’ to the custom CSS class you created in the previous step. You’ll also need to replace the URL with a link to the image in your WordPress media library:

.carticon {
background-image: url('http://localhost:10013/wp-content/my-media/cartcheckout.png');
background-repeat: no-repeat;
background-position: left;
padding-left: 5px;
}

Note: You will need to keep the dot ‘.’ in front of the CSS class in the code snippet. That’s what tells WordPress that it’s a class and not another kind of CSS selector.

You will need to adjust the snippet above for each individual menu item you created above. You can simply paste them all into the ‘Code Preview’ field.

When you’re happy with your code, scroll to the ‘Insertion’ section. WPCode can add code to different locations, such as after every post, frontend only, or admin only.

You want to use the custom CSS code across our entire WordPress website, so click on ‘Auto Insert’ if it isn’t already selected.

Then, open the ‘Location’ dropdown menu and choose ‘Site Wide Header.’

Inserting custom code across your website

After that, you’re ready to scroll to the top of the screen and click on the ‘Inactive’ toggle, so it changes to ‘Active.’

Finally, click on ‘Save Snippet’ to make the custom CSS live.

How to add custom CSS code to WordPress easily

Now, if you visit your website you’ll see all the image icons in your navigation menu.

Depending on your theme, you may need to tweak the CSS so it shows the image icons in exactly the right spot. If this is the case, then head to Code Snippets » Code Snippets in the WordPress dashboard.

Then, simply hover over the snippet and click on the ‘Edit’ link when it appears.

Editing a code snippet using WPCode

This opens the code editor, ready for you to make some changes.

We hope this article helped you learn how to add image icons to your WordPress navigation menu. You can also go through our guide on the best drag-and-drop WordPress page builders and how to make money online blogging with WordPress.

If you liked this article, then please subscribe to our YouTube Channel for WordPress video tutorials. You can also find us on Twitter and Facebook.

The post How to Add Image Icons With Navigation Menus in WordPress first appeared on WPBeginner.

How to Easily Organize Media Uploads by Users in WordPress

Do you want to organize media uploads by user in WordPress?

If you run a multi-author website, then you may want to restrict each author’s media library access to only their own uploads. This can prevent an author from accidentally deleting another user’s images, and help keep subscriber-only content private.

In this article, we’ll show you how to organize media uploads by users in WordPress.

How to organize media uploads by users in WordPress

Why Restrict Author Access to Media Uploads?

If you have a multi-author WordPress blog, then people might be uploading lots of different images. This can make it difficult for an author to find the right image, or they might delete or edit another person’s media file by accident.

This can cause all sorts of problems including poor productivity, lots of extra work for site admins and editors, and a complicated editorial workflow.

This unlimited access can also be a privacy concern. For example, if you’re working on a new product or idea, then other authors might see confidential images in the media library before you make a public announcement.

If you have a WordPress membership site, then contributors and subscribers may be able to access premium media files they shouldn’t have access to. For example, if you sell online courses then a contributor might use their media library access to download premium PDFs and other course materials, without buying a subscription.

That being said, let’s take a look at how to restrict who can see media uploads inside your WordPress admin area. Simply use the quick links below to jump straight to the method you want to use.

Method 1. Organizing Media Uploads by Users With a Plugin (Quick and Easy)

The easiest way to restrict access to media uploads is by using the Frontier Restrict Access plugin.

This free plugin checks whether a user has the edit_others_posts permission, which allows them to edit another user’s posts.

By default, this ability is granted to everyone who has the site admin or editor role. If you want to change this, then you can add or remove capabilities to user roles in WordPress.

If the user doesn’t have this permission, then once this plugin is activated, they won’t be able to access another user’s files in the WordPress media library. This allows you to organize media uploads by users, without restricting access for admins and editors.

This plugin works out of the box and there are no settings for you to configure, so you can simply install and activate the Frontier Restrict Access plugin. For more details, see our guide on how to install a WordPress plugin.

Method 2. Organizing Media Uploads Using Code (Advanced)

Another option is to restrict access to files in the media library using code. This method requires you to add a code snippet to your WordPress blog or website, so it isn’t the most beginner-friendly method. However, you won’t need to install a separate plugin just to organize your media uploads.

Often, you’ll find guides with instructions to add custom code to your WordPress theme. However, this isn’t recommended as mistakes and typos in your code can cause common WordPress errors, or even break your site completely.

That’s why we recommend WPCode.

WPCode is the best code snippets plugin used by over 1 million WordPress websites. It makes it easy to add custom code in WordPress without having to edit the functions.php file.

For this method, we’ll be adding code that checks whether the user has the edit_others_posts permission. If they don’t have this permission, then the code snippet below will stop them from accessing other people’s files in the WordPress media library.

The first thing you need to do is install and activate the free WPCode plugin. For more details, see our step-by-step guide on how to install a WordPress plugin.

Upon activation, head over to Code Snippets » Add Snippet.

How to add custom PHP snippets to your site using WPCode

Here, simply hover your mouse over ‘Add Your Custom Code.’

When it appears, click on ‘Use snippet.’

Adding a custom code snippet to WordPress

To start, type in a title for the custom code snippet. This can be anything that helps you identify the snippet in the WordPress dashboard.

After that, open the ‘Code Type’ dropdown and select ‘PHP Snippet.’

Restricting access to the media library using WPCode

In the ‘Code Preview’ area, paste the following code snippet:

add_filter( 'ajax_query_attachments_args', 'user_show_attachments' );
 
function user_show_attachments( $query ) {
    $user_id = get_current_user_id();
    if ( $user_id && !current_user_can('activate_plugins') && !current_user_can('edit_others_posts
') ) {
        $query['author'] = $user_id;
    }
    return $query;
} 

Next, just scroll to the ‘Insertion’ section. WPCode can add your code to different locations, such as after every post, frontend only, or admin only.

We want to use the custom PHP code across our entire WordPress website, so click on ‘Auto Insert’ if it isn’t already selected. Then, open the ‘Location’ dropdown menu and choose ‘Run Everywhere.’

Running custom PHP code across your website using WPCode

After that, you’re ready to scroll to the top of the screen and click on the ‘Inactive’ toggle, so it changes to ‘Active.’

Finally, click on ‘Save Snippet’ to make the PHP snippet live.

How to restrict access to media files using code

Now, users will only have access to the files they upload to the WordPress media library.

We hope this article helped you better organize media uploads by users on your WordPress site. Next, you can check out our ultimate WordPress security guide or see our expert pick of the best contact form plugins for WordPress.

If you liked this article, then please subscribe to our YouTube Channel for WordPress video tutorials. You can also find us on Twitter and Facebook.

The post How to Easily Organize Media Uploads by Users in WordPress first appeared on WPBeginner.

How to Properly Disable Lazy Load in WordPress (Step by Step)

Do you want to disable lazy loading in WordPress?

By default, WordPress comes with a lazy load feature, which delays downloads for images and other media to improve page load speed.

However, for some websites, it may affect user experience by not displaying images and media right away.

In this article, we’ll show you how to easily disable lazy load in WordPress both using a code method as well as a plugin method.

How to properly disable lazy load in WordPress

What is Lazy Loading?

WordPress first introduced lazy loading images in WordPress 5.5. Later it extended the lazy load feature to iframes embeds (e.g. YouTube videos, Spotify, and other embeds).

This practice helps improve your website’s speed and performance by quickly loading content and the visible area first.

A faster website is not just good for users, but it is also good for SEO. Search engines like Google consider speed as an important ranking factor.

Apart from images and embeds, you can also easily lazy load comments and Gravatars to further improve page load speed.

Lazy loading can be seen in action by right-clicking on an image and selecting the Inspect tool in your browser.

Lazy loading images in WordPress

This will split your browser screen and show you the HTML source code. From here, you’ll be able to see the “loading=lazy” attribute added to the image.

Now normally, we don’t recommend disabling lazy load due to its overall benefits for your WordPress website. Turning it off can result in slower website speed, lower conversion rates, and lower SEO rankings.

However, sometimes lazy loading can affect the user experience for some websites.

For instance, if you run a photography website where images are the most significant aspect of your content, then lazy loading them may ruin the user experience for your customers.

In other cases, you might be using a different lazy loading solution and just want to turn off the default WordPress lazy load.

That being said, let’s see how you can easily disable lazy load in WordPress.

You can simply disable the lazy load feature in WordPress by adding a custom code snippet to your theme’s functions.php file.

However, keep in mind that the smallest error while adding the code can result in breaking your website and making it inaccessible to your users.

This is why we recommend using the WPCode plugin to add custom code to your site.

It is the best custom code snippets plugin that makes it super easy for beginners to safely add custom code to their website.

First, you need to install and activate the WPCode plugin. See our guide on how to install a WordPress plugin for more instructions.

Upon activation, go to the Code Snippets » + Add Snippet page.

Add new snippet

This will take you to the ‘Add Snippets’ screen where you’ll see a bunch of ready-to-use code snippets that you can add to your website.

From here, you need to click the ‘Use Snippet’ button under the ‘Add Your Custom Code (New Snippet)’ option.

Once you’re on the ‘Create Custom Snippet’ page, you can start by typing a name for your code snippet.

It can be anything that will help you identify the code snippet and what it does.

Snippet title and type

After that, select ‘PHP Snippet’ from the dropdown menu next to the ‘Code Type’ option.

Now, copy and paste the following PHP code in the ‘Code Preview’ box.

add_filter( 'wp_lazy_loading_enabled', '__return_false' );

This is how the code will look after it is pasted in the ‘Code Preview’ box.

Add code snippet

After adding the code, scroll down to the ‘Insertion’ section.

Here, simply choose ‘Auto Insert’ as the insertion mode. This will ensure that your custom code is automatically executed everywhere on your website once you activate the snippet.

Choose an insertion method

Next, you need to scroll to the top of the page and simply toggle the ‘Inactive’ switch to ‘Active’.

After that, don’t forget to click the ‘Save Snippet’ button to save and execute your custom snippet.

Save your code snippet

Once activated, this custom code snippet will disable the lazy loading feature on your WordPress website.

You can test by right-clicking on an image and selecting Inspect from the browser menu.

In the HTML code for the image, the loading=lazy attribute will now disappear.

Lazy loading disabled

Method 2. Disable Lazy Load in WordPress Using a Plugin

If you don’t want to add code to your site, then you can use the Disable Lazy Load plugin.

The only thing you need to do is install and activate the Disable Lazy Load plugin. For more instructions, check our guide on how to install a WordPress plugin.

Activate plugin to disable lazy load

The plugin works out of the box and does not require any configuration. Once activated, it will automatically disable the lazy load feature on your site.

We hope this article helped you learn how to properly disable lazy load in WordPress. You may also want to see our guide on how to optimize WordPress images for better page load times, or see our pick of the best WordPress image compression plugins.

If you liked this article, then please subscribe to our YouTube Channel for WordPress video tutorials. You can also find us on Twitter and Facebook.

The post How to Properly Disable Lazy Load in WordPress (Step by Step) first appeared on WPBeginner.

How to Easily Add Box Shadow in WordPress (4 Ways)

Recently one of our readers asked if there is an easy way to add box shadows in WordPress?

Shadows can make your most important content stand out and grab your visitors’ attention. They can also help flat website designs appear more engaging and interesting.

In this article, we will show you how to easily add box shadows in WordPress, step by step.

How to easily add box shadow in WordPress

Why Add Box Shadows in WordPress?

A box shadow, sometimes also known as a drop shadow, is a visual effect that makes it look like an onscreen object is casting a shadow.

We tend to pay more attention to objects that appear closer to us. That’s why many website owners add box shadows to their most important content to make it look like it’s hovering above the page.

For example, if you add a big shadow to a call to action button, then it will look physically closer to the visitor. This will draw the person’s attention toward this important button.

With that said, let’s see how you can add box shadows to your WordPress blog or website. Simply use the quick links below to jump straight to the method you want to use.

When adding box shadow, the best practice is to only add it on your most important website elements. If you add a unique shadow effect to each WordPress block, then it can make your site look messy and confusing.

It’s also important that you keep your box shadows consistent across the site. The best way to do this is by defining the style in CSS using WPCode.

WPCode is the best code snippets plugin used by over 1 million WordPress websites. It makes it easy to add custom code in WordPress without having to edit the functions.php file.

With WPCode, even beginners can edit their website’s code without risking mistakes and typos that can cause many common WordPress errors.

The first thing you need to do is install and activate the free WPCode plugin. For more details, see our step-by-step guide on how to install a WordPress plugin.

Upon activation, head over to Code Snippets » Add Snippet.

How to add box shadows using WPCode

Here, simply hover your mouse over ‘Add Your Custom Code.’

When it appears, click on ‘Use snippet.’

Adding drop shadows to WordPress using WPCode

To start, type in a title for the custom code snippet. This can be anything that helps you identify the snippet in the WordPress dashboard.

After that, open the ‘Code Type’ dropdown and select ‘CSS Snippet.’

Adding a CSS snippet to WordPress

In the code editor, add the following code snippet:

.shadow-effect {
box-shadow: 5px 5px 0px 2px #a9a1a1;
}

In the above snippet, you may need to replace the px values depending on the kind of shadow you want to create.

To help you out, here’s what the different px values mean, going from left-to-right:

  • Horizontal offset. When you set a positive value, the shadow gets pushed to the left. If you type in a negative value like -5px, then the shadow will be pushed to the right. If you don’t want to add a horizontal offset, then you can use 0px instead.
  • Vertical offset. If you use a positive value, then the shadow will be pushed downwards. If you type in a negative value then the shadow will be pushed upwards. If you don’t want to offset the shadow vertically, then just type in 0px.
  • Blur radius. This blurs the shadow so that it doesn’t have any harsh edges. The higher the value, the greater the blur effect. If you prefer to use sharp edges, then type in 0px.
  • Spread radius. The higher the value, the greater the shadow’s spread. This value is optional, so skip this one if you don’t want to show a spread.
  • Color. Although grey is the most common color for shadows, you can use any color you want by typing in a hex code. If you’re not sure what code to use, then you can explore different colors using a resource like HTML Color Codes.
Adding shadows to WordPress using custom CSS

When you’re happy with the snippet, scroll to the ‘Insertion’ section. WPCode can add your code to different locations, such as after every post, frontend only, or admin only.

We want to use the custom CSS code across our entire WordPress website, so click on ‘Auto Insert’ if it isn’t already selected. Then, open the ‘Location’ dropdown menu and choose ‘Site Wide Header.’

How to auto-insert custom code using WPCode

After that, you’re ready to scroll to the top of the screen and click on the ‘Inactive’ toggle, so it changes to ‘Active.’

Finally, click on ‘Save Snippet’ to make the CSS snippet live.

Publishing a custom CSS code snipppet

Now, you can add the custom CSS class to any block.

In the WordPress content editor, simply select the block where you want to add a box shadow. Then, in the right-hand menu click to expand the ‘Advanced’ section.

Adding a drop shadow to WordPress using a CSS snippet

Here, you’ll see fields where you can add different classes.

In ‘Additional CSS Class(es),’ type in shadow-effect.

WordPress' advanced code settings

When you’re ready to publish the box shadow, just click on the ‘Publish’ or ‘Update’ button.

Now if you visit your website, you’ll see the box shadow live.

Method 2. Add a Box Shadow Using a Free Plugin (Quick and Easy)

If you’re not comfortable writing code, then you might prefer to create shadows using Drop Shadow Box. This free plugin allows you to add box shadows to any block using the built-in WordPress page and post editor.

A box shadow, created using the Drop Shadow WordPress plugin

First, you’ll need to install and activate the plugin. If you need help, then please see our guide on how to install a WordPress plugin.

There are no settings to configure, so you can start using this plugin straight away.

To add a drop shadow, simply click on the ‘+’ icon and start typing in ‘Drop Shadow Box.’ When the right block appears, give it a click to add it to the page or post.

Adding a Drop Shadow Block in the WordPress page or post editor

This adds the drop shadow as an empty box, so the next step is adding some content.

To do this, go ahead and click on the ‘+’ inside the Drop Shadow Box block.

Adding a shadow block in the WordPress page and post editor

Then, simply add the block you want to use and configure it as normal.

For example, in the following image we’ve added an Image block and selected a picture from the WordPress media library.

An image, with a block shadow

With that done, click to select the Drop Shadow Box block. In the right-hand menu, you’ll see all the settings you can use to style this block.

WordPress sets the shadow’s width automatically but you can change this by opening the ‘Width’ dropdown and then choosing either ‘Pixels’ or ‘%.’

You can then resize it using the settings that appear.

Changing the width of a drop shadow using a free WordPress plugin

The Drop Box Shadow plugin comes with a few different effects such as curved edges and an eye-catching ‘Perspective’ effect.

To preview the different effects, simply open the ‘Effect’ dropdown and choose from the list. The preview will update automatically so you can try different styles to see what you prefer.

Adding different box shadow effects to WordPress

You can also change whether the plugin shows the shadow inside the box, outside the box, or both using the ‘Inside Shadow’ and ‘Outside Shadow’ toggles.

After that, you can change the color of the box and border using the settings under the ‘Colors’ header.

Just be aware that ‘Background’ refers to the inside of the Drop Shadow Box, while ‘Border’ appears outside of the block.

How to add a colored shadow effect to WordPress

If you want to create a softer, curved shadow box then you can enable the ‘Rounded corners’ toggle. Finally, you can change the alignment and padding, similar to how you customize other blocks in WordPress.

To create more box shadows, just follow the same process described above.

When you’re happy with how the page looks, simply click on ‘Update’ or ‘Publish’ to make all your new box shadows live.

Method 3. Add a Box Shadow Using a Page Builder (Advanced)

If you want to add box shadows to landing pages, custom homepages, or any part of your WordPress theme, then we recommend using a page builder plugin.

SeedProd is the best drag and drop WordPress page builder. It allows you to design custom landing pages and even create a custom WordPress theme without having to write a single line of code.

It also lets you add box shadows to any block using its advanced drag-and-drop editor.

First, you need to install and activate the SeedProd plugin. For more details, see our step-by-step guide on how to install a WordPress plugin.

Note: There’s also a premium version of SeedProd that comes with more professionally-designed templates, advanced features, and WooCommerce integration. However, we’ll be using the free version as it has everything you need to add box shadows in WordPress.

After activating the plugin, SeedProd will ask for your license key.

Adding the SeedProd license key to WordPress

You can find this license key under your account on the SeedProd website. After entering the information, click on the ‘Verify Key’ button.

After entering your key, go to SeedProd » Landing Pages in your WordPress dashboard.

SeedProd's professionally-designed templates

SeedProd comes with 150 professionally designed templates that are grouped into categories. Along the top you’ll see categories that let you create beautiful coming soon pages, activate maintenance mode, create a custom login page for WordPress, and more.

All of SeedProd’s templates are easy to customize, so you can use any design you want.

When you find a template that you like, simply hover your mouse over it and click on the checkmark icon.

Selecting a professionally-designed SeedProd page layout

You can now type in a name for your landing page into the ‘Page Name’ field. SeedProd will automatically create a ‘Page URL’ using the page name.

It’s smart to include relevant keywords in your URL wherever possible, as this can help search engines understand what the page is about. This will often improve your WordPress SEO.

To change the page’s automatically-generated URL, simply type into the ‘Page URL’ field.

Adding an SEO-friendly page title to a SeedProd design

When you’re happy with the information you’ve typed in, click on ‘Save and Start Editing the Page.’ This will load the SeedProd page builder interface.

This simple drag-and-drop builder shows a live preview of your page design to the right. On the left is a menu showing all the different blocks and sections you can add to the page.

The SeedProd page editor

When you find a block that you want to add, simply drag and drop it onto your template.

To customize a block, go ahead and click to select that block in the SeedProd editor. The left-hand menu will now update to show all the settings you can use to customize the block.

For example, if you click on a Headline block then you can type in your own text, or change the text color and font size.

Customizing a headline block in SeedProd

As you’re building the page, you can move blocks around your layout by dragging and dropping them. For more detailed instructions, please see our guide on how to create a landing page with WordPress.

To create a box shadow, click to select any block in the SeedProd page editor. The settings in the left-hand menu may vary between blocks, but you’ll typically need to click on an ‘Advanced’ tab.

Adding a box shadow in WordPress using SeedProd

Here, look for a ‘Shadow’ dropdown menu under the ‘Styles’ section. Simply open this dropdown and choose a shadow style such as Hairline, Medium, or 2X Large.

The preview will update automatically, so you can try different styles to see what looks the best on your page design.

How to easily add a box shadow in WordPress using a page builder

If you don’t want to use any of the ready-made styles, then click on ‘Custom.’

This adds some new settings where you can change the color, blur, spread, and position of the custom shadow.

Adding drop shadows to WordPress using SeedProd

That done, you can continue working on the page by adding more blocks and box shadows.

When you’re happy with how the page looks, click the ‘Save’ button and then choose ‘Publish’ to make it live.

Publishing a page with block shadows using SeedProd

Method 4. How to Add a Box Shadow Using CSS Hero (Premium Plugin)

If you’re not comfortable working with code but still want to create advanced box shadows, then you can try CSS Hero. This premium plugin allows you to fine-tune every part of your WordPress theme without having to write a single line of code.

CSS Hero allows you to create a unique shadow for each block, so it’s also a great choice if you want to create lots of different shadow effects.

First, you need to install and activate the CSS Hero plugin. For more details, see our step-by-step guide on how to install a WordPress plugin.

Upon activation, you’ll see a ‘Proceed to Product Activation’ button at the top of the screen. Go ahead and click on this button.

Activating the CSS Hero WordPress plugin

This will take you to the CSS Hero website where you can log into your account and get a license key. Simply follow the onscreen instructions, and you’ll be redirected back to your site in a few clicks.

Next, click the ‘Customize with CSS Hero’ text in the WordPress admin toolbar.

Customizing a WordPress theme using CSS Hero

This will open the CSS Hero editor.

By default, clicking on any piece of content will open a panel with all the settings you can use to customize that content.

The CSS Hero user-friendly page editor

This is great if you want to add a box shadow to your website’s homepage. However, if you want to customize any other page then you’ll need to switch from ‘Select’ mode to ‘Navigate’ mode, as this allows you to interact with menus, links, and other content as normal.

To do this, click on the ‘Select / Navigate’ toggle in the toolbar so that it shows ‘Navigate.’

The CSS Hero WordPress plugin

You can now navigate to the page or post where you want to add the shadow.

As soon as you reach that page, go ahead and click on the ‘Select / Navigate’ toggle again so that it shows ‘Select.’

Switching between Select and Navigation mode using CSS Hero

With that done, click on the paragraph, image, button, or any other content where you want to add a box shadow.

In the left-hand panel, click on ‘Extra.’

Creating a drop shadow using CSS Hero

You can now go ahead and click on ‘Make Shadow,’ which shows all the settings you can use to create a box shadow.

To start, you can change whether the shadow appears inside or outside the block using the ‘Shadow Position’ settings.

Changing the position of a shadow box using CSS Hero

After making this decision, you can fine-tune the shadow’s orientation using the small dot in the ‘Orientation’ box.

Simply drag and drop the dot into a new position to see it move in the live preview.

Customizing a drop shadow in WordPress

When you’re happy with the shadow’s position, you can change its color, blur, and spread.

CSS Hero will show these changes immediately, so you can try different settings to see what looks the best.

Creating a custom box shadow using a drag and drop editor

To add a box shadow to other blocks, just follow the same process described above.

When you’re happy with how the page looks, click on ‘Save & Publish’ to make it live.

How to publish a CSS shadow to WordPress

We hope this tutorial helped you learn how to add a box shadow in WordPress. You may also want to learn how to create a table of content in WordPress, or check out our list of the best WordPress popup plugins.

If you liked this article, then please subscribe to our YouTube Channel for WordPress video tutorials. You can also find us on Twitter and Facebook.

The post How to Easily Add Box Shadow in WordPress (4 Ways) first appeared on WPBeginner.

How to Set Up Google Ads Conversion Tracking in WordPress

Do you want to know how much revenue you’re generating from Google Ads on your website?

Setting up Google Ads conversion tracking will help you uncover insights about your ad campaign’s performance. You can find out which campaign is performing the best, how users interact with your ads, and how you can improve conversions.

In this article, we’ll show you how to properly set up eCommerce Google Ads conversion tracking in WordPress. This is the exact same method that we use on our own websites.

How to setup Google Ads conversion tracking

Why Set Up Google Ads Conversion Tracking in WordPress?

If you’re running Google Ads for your WordPress blog, eCommerce store, or membership site, then it is important to know how they’re performing. You can’t improve, what you can’t measure.

Tracking Google Ads conversions helps you see how much revenue you earned from users who clicked on your ad campaigns. It also helps you see which paid keywords and ad groups drive the most conversions. This way, you can optimize your campaigns and budget for more profitable search terms.

Besides that, Google Ads conversion tracking also uncovers how users behave on your WordPress site after clicking an ad. For instance, you might see a lot of users arrive on a landing page, but abandon it after adding products to the cart.

You can use this information to improve the checkout process, offer discounts and incentives as users are about to leave your site, and provide a better user experience.

That said, let’s see how you can add Google Ads conversion tracking in WordPress.

Adding Google Ads to WordPress Website

The easiest way of connecting Google Ads with WordPress is by using MonsterInsights. It is the best Analytics plugin for WordPress that helps set up Google Analytics without editing.

MonsterInsights offers an Ads addon that lets you setup comprehensive conversion tracking without touching a single line of code or hiring a developer.

We will use the MonsterInsights Pro license for this tutorial because it includes the Ads addon. There is also a MonsterInsights Lite version you can use for free.

First, you’ll need to install and activate the MonsterInsights plugin. If you need help, then please see our guide on how to install a WordPress plugin.

Upon activation, you will be redirected to the welcome screen in your WordPress dashboard. Go ahead and click the ‘Launch the Wizard’ button.

Launch setup wizard

Next, you can follow the onscreen instructions to connect Google Analytics to your site. For more details, you can see our guide on how to install Google Analytics in WordPress.

With MonsterInsights, you can also use dual tracking to set up a Google Analytics 4 property. It is the latest analytics version and will soon replace Universal Analytics. You can learn more by following our guide on how to switch to Google Analytics 4 in WordPress.

Once you’ve connected Google Analytics with WordPress, the next step is to install the Ads addon. Simply go to Insights » Addons from your WordPress dashboard and navigate to the ‘Ads’ addon.

Install the ads addon

Go ahead and click the ‘Install’ button. The addon will now automatically install and activate on your site.

Creating a Conversion Action in Google Ads

Next, you’ll need to create a conversion action in Google Ads.

First, you can visit the Google Ads website and log in to your account.

After that, go ahead and click the ‘Tools and settings’ option at the top. Under the ‘Measurement’ column, simply select the Conversions option.

Click the tools and settings option

On the next screen, you’ll need to create a conversion action.

You can click the ‘New conversion action’ button to get started.

Create new conversion action

Next, Google Ads will ask you to select the type of conversions you want to track. It will show you 4 options, including a website, app, phone call, or import.

For this tutorial, we’ll choose the ‘Website’ option for tracking ad conversions.

Select the kind of conversion to track

After that, you’ll need to enter the website URL where you’d like to measure conversions.

Once that’s done, simply click the ‘Scan’ button.

Enter your domain to scan

Google Ads will now show 2 options to create conversion actions, including an automatic and manual method. In the automatic method, you’ll need to select the conversion goal, choose a match type, and enter the URL. This way is suitable if you know which events to count as conversions.

However, we recommend selecting the manual method. Simply scroll down and click the ‘+ Add a conversion action manually’ option.

Add conversion action manually

Next, you’ll need to enter the Conversion action details.

First, you can select the ‘Goal and action optimization’ for your conversion. This is the action you’d like to track. For example, when a user subscribes to your newsletter, makes a purchase, adds a product to a cart, submits a contact form, and more.

For the sake of this tutorial, we will select ‘Subscribe’ as the goal. After that, you can enter the Conversion name.

Enter conversion action details

You can now scroll down and select a Value for your conversion. Google Ads lets you choose the same value for each conversion, assign different values for conversions, or don’t use a value for conversion action.

We will select the ‘Use the same for each conversion’ option, select the currency, and enter a value for this tutorial.

Enter value for conversion action

Besides that, you can also choose how many conversions to count per click.

If you’re tracking email newsletter signups, then we recommend selecting the ‘One’ option. This way, each subscriber is counted once. However, you can use the ‘Every’ option in an eCommerce store and count each purchase as a conversion.

After selecting these options, simply click the ‘Done’ button at the bottom.

Enter value and count

You can now see your conversion action under the ‘Create conversion actions manually using code’ section.

Go ahead and click the ‘Save and continue’ button to get instructions for adding the tracking tags for conversion action to your site.

Click the save and continue button

On the next screen, you’ll see 3 options to add the conversion action to your site.

Simply select the ‘Use Google Tag Manager’ option. You should see the Conversion ID and Conversion Label. Copy these to a notepad file or keep the browser window/tab open.

Select the use tag manager option

To finish the setup process, you’ll need to head to your WordPress website dashboard and view the MonsterInsights settings.

From here, go to Insights » Settings and click on the ‘Publisher’ tab.

Publisher settings in MonsterInsights

After that, you can scroll down to the ‘Ads Tracking’ section.

Go ahead and enter the Conversion ID. Make sure you follow the format, which will look like this: AW-123456789.

If you are tracking Google Ads on Easy Digital Downloads, WooCommerce, and MemberPress, then enter the Conversion Label in the respective field.

Enter conversion ID and label

That’s it. You’ve successfully set up Google Ads conversion tracking on your WordPress website.

View Google Ads Conversion Tracking Data in Google Analytics

You can take it a step further and connect Google Ads with Google Analytics to get more insights about how people use your website after clicking on an ad.

For instance, you can see the number of visitors from paid search and find out which pages they view after landing on your site. You can also use different filters and create custom reports in Google Analytics.

Let’s see how you can link your Google Ads account with Google Analytics 4 and Universal Analytics.

Connect Google Ads with Google Analytics 4

First, you’ll need to log in to your GA4 account and then go to the ‘Admin’ settings.

Go to admin settings

After that, you can click the ‘Google Ads Links’ option.

It is located under the Property column.

Go to ads links

A new window will now slide in from the right.

Go ahead and click the ‘Link’ button in the top right corner.

Click the link button

Next, you will see different options for Link setup.

First, you can click the ‘Choose Google Ads accounts’ option.

Choose Google ads account to link

On the next screen, you’ll need to select the Google Ads account you wish to connect.

Once that’s done, simply click the ‘Confirm’ button at the top.

Select your google ads account

You will now see the Google Ads account that you want to link.

Go ahead and click the ‘Next’ button.

See selected google ads account

In the next step, Google Analytics will give you options to enable personalized advertising and enable auto-tagging.

You can use the default settings and click the ‘Next’ button.

Change configure settings

After that, you’ll see a summary of your Link setup settings.

If everything checks out, then go ahead and click the ‘Submit’ button.

Review and submit link setup

You should now see a ‘Link Created’ notification in front of your Google Ads account. This means that you’ve successfully connected Google Ads with Google Analytics.

Do note that it can take up to 24 hours for your Google Ads data to appear in Analytics reports.

See link created notification

Next, you can view the Google Ads conversion tracking report in Google Analytics 4.

First, you can head to Acquisition » Traffic acquisition from the menu on your left and scroll down to see how many visitors came from the Paid Search channel.

View paid search traffic

After that, you can go to Acquisition » Acquisition overview and view the Session Google Ads campaign report. This will show which campaign got the most traffic.

You can also click the ‘View Google Ads campaigns’ option at the bottom to view more details.

View session google ads campaign report

For each campaign, you can see the total number of users, sessions, number of Google Ads clicks, cost per click (CPC), conversions, and more.

Using the information from this report, you can see which campaigns perform the best.

View detailed stats for each campaign

Connect Google Ads with Universal Analytics

If you’re using Universal Analytics, then you can first log in to your account.

After that, head to the ‘Admin’ settings.

Click admin settings

Next, you’ll need to go to the Google Ads Links option.

You can find the option under the Property column.

Go to Google Ads links

On the next screen, you’ll need to select the Google Ads account you want to connect.

After selecting your account, simply click the ‘Continue’ button.

Select Google ads account

Next, you will need to enter a Link group title.

You can then select the Views to link with your Google Ads account. Simply click the toggle to ON for the correct Views.

Enter link group title

Once that’s done, simply click the ‘Link accounts’ button.

Google Analytics will now show a summary of your settings. Simply scroll down and click the ‘Done’ button.

Click the done button

That’s it. Your Google Ads account will now be linked to the Universal Analytics property.

To view data from your ad campaigns, head to Acquisition » Google Ads » Campaigns from the menu on your left. You can see the number of clicks, cost, CPC, and more for each campaign.

View Google ads report in UA

Final Thoughts on Google Ads Conversion Tracking in WordPress

When it comes to setting up any conversion tracking, the most important thing you want to make sure is that the setup is done properly. This is why we use and recommend MonsterInsights because it just does everything for you behind the scenes without touching any code.

However if you prefer to add code directly on your WordPress site, then you can do that as well by using a plugin like WPCode. This will help future-proof your customizations. There’s a free version of WPCode that you can use by following our tutorial on adding custom code in WordPress.

We hope this article helped you learn how to set up Google Ads conversion tracking in WordPress. You may also want to see our ultimate WordPress SEO guide and the best WooCommerce plugins to grow your store.

If you liked this article, then please subscribe to our YouTube Channel for WordPress video tutorials. You can also find us on Twitter and Facebook.

The post How to Set Up Google Ads Conversion Tracking in WordPress first appeared on WPBeginner.