Category Archives: google analytics 4

How to Set Up Google Ads Conversion Tracking in WordPress

Do you want to know how much revenue you’re generating from Google Ads on your website?

Setting up Google Ads conversion tracking will help you uncover insights about your ad campaign’s performance. You can find out which campaign is performing the best, how users interact with your ads, and how you can improve conversions.

In this article, we’ll show you how to properly set up eCommerce Google Ads conversion tracking in WordPress. This is the exact same method that we use on our own websites.

How to setup Google Ads conversion tracking

Why Set Up Google Ads Conversion Tracking in WordPress?

If you’re running Google Ads for your WordPress blog, eCommerce store, or membership site, then it is important to know how they’re performing. You can’t improve, what you can’t measure.

Tracking Google Ads conversions helps you see how much revenue you earned from users who clicked on your ad campaigns. It also helps you see which paid keywords and ad groups drive the most conversions. This way, you can optimize your campaigns and budget for more profitable search terms.

Besides that, Google Ads conversion tracking also uncovers how users behave on your WordPress site after clicking an ad. For instance, you might see a lot of users arrive on a landing page, but abandon it after adding products to the cart.

You can use this information to improve the checkout process, offer discounts and incentives as users are about to leave your site, and provide a better user experience.

That said, let’s see how you can add Google Ads conversion tracking in WordPress.

Adding Google Ads to WordPress Website

The easiest way of connecting Google Ads with WordPress is by using MonsterInsights. It is the best Analytics plugin for WordPress that helps set up Google Analytics without editing.

MonsterInsights offers an Ads addon that lets you setup comprehensive conversion tracking without touching a single line of code or hiring a developer.

We will use the MonsterInsights Pro license for this tutorial because it includes the Ads addon. There is also a MonsterInsights Lite version you can use for free.

First, you’ll need to install and activate the MonsterInsights plugin. If you need help, then please see our guide on how to install a WordPress plugin.

Upon activation, you will be redirected to the welcome screen in your WordPress dashboard. Go ahead and click the ‘Launch the Wizard’ button.

Launch setup wizard

Next, you can follow the onscreen instructions to connect Google Analytics to your site. For more details, you can see our guide on how to install Google Analytics in WordPress.

With MonsterInsights, you can also use dual tracking to set up a Google Analytics 4 property. It is the latest analytics version and will soon replace Universal Analytics. You can learn more by following our guide on how to switch to Google Analytics 4 in WordPress.

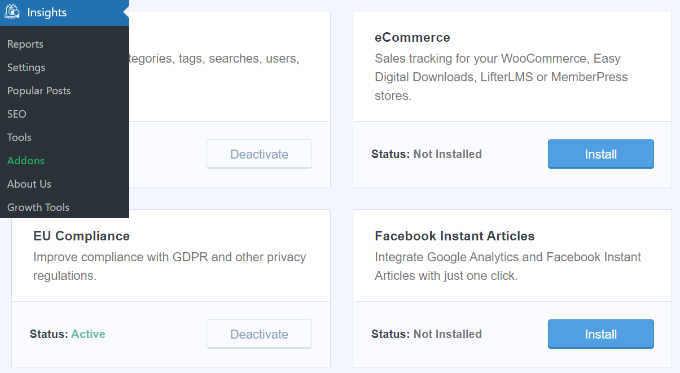
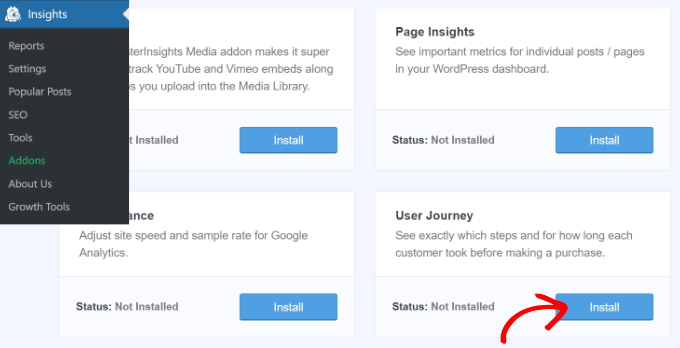
Once you’ve connected Google Analytics with WordPress, the next step is to install the Ads addon. Simply go to Insights » Addons from your WordPress dashboard and navigate to the ‘Ads’ addon.

Install the ads addon

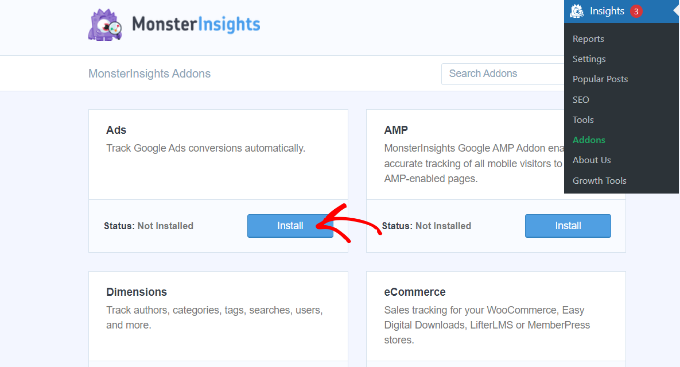
Go ahead and click the ‘Install’ button. The addon will now automatically install and activate on your site.

Creating a Conversion Action in Google Ads

Next, you’ll need to create a conversion action in Google Ads.

First, you can visit the Google Ads website and log in to your account.

After that, go ahead and click the ‘Tools and settings’ option at the top. Under the ‘Measurement’ column, simply select the Conversions option.

Click the tools and settings option

On the next screen, you’ll need to create a conversion action.

You can click the ‘New conversion action’ button to get started.

Create new conversion action

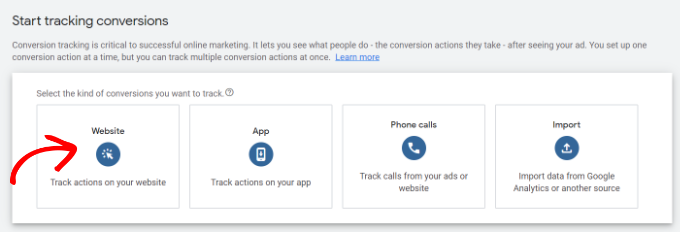
Next, Google Ads will ask you to select the type of conversions you want to track. It will show you 4 options, including a website, app, phone call, or import.

For this tutorial, we’ll choose the ‘Website’ option for tracking ad conversions.

Select the kind of conversion to track

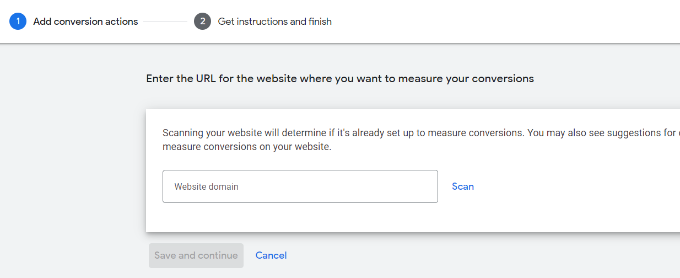
After that, you’ll need to enter the website URL where you’d like to measure conversions.

Once that’s done, simply click the ‘Scan’ button.

Enter your domain to scan

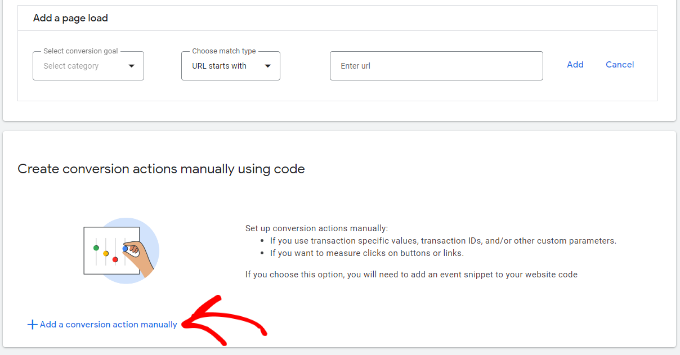
Google Ads will now show 2 options to create conversion actions, including an automatic and manual method. In the automatic method, you’ll need to select the conversion goal, choose a match type, and enter the URL. This way is suitable if you know which events to count as conversions.

However, we recommend selecting the manual method. Simply scroll down and click the ‘+ Add a conversion action manually’ option.

Add conversion action manually

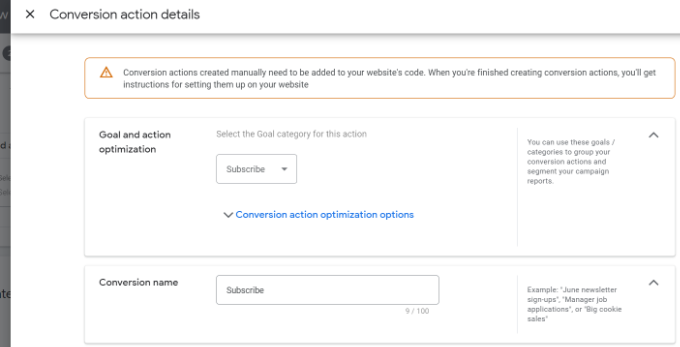
Next, you’ll need to enter the Conversion action details.

First, you can select the ‘Goal and action optimization’ for your conversion. This is the action you’d like to track. For example, when a user subscribes to your newsletter, makes a purchase, adds a product to a cart, submits a contact form, and more.

For the sake of this tutorial, we will select ‘Subscribe’ as the goal. After that, you can enter the Conversion name.

Enter conversion action details

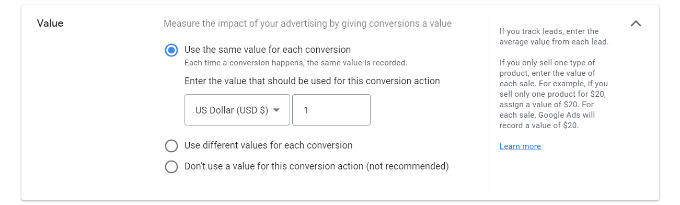
You can now scroll down and select a Value for your conversion. Google Ads lets you choose the same value for each conversion, assign different values for conversions, or don’t use a value for conversion action.

We will select the ‘Use the same for each conversion’ option, select the currency, and enter a value for this tutorial.

Enter value for conversion action

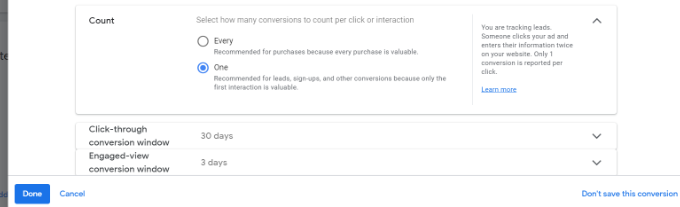
Besides that, you can also choose how many conversions to count per click.

If you’re tracking email newsletter signups, then we recommend selecting the ‘One’ option. This way, each subscriber is counted once. However, you can use the ‘Every’ option in an eCommerce store and count each purchase as a conversion.

After selecting these options, simply click the ‘Done’ button at the bottom.

Enter value and count

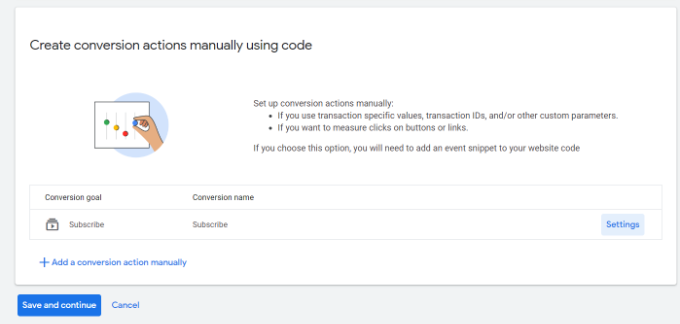
You can now see your conversion action under the ‘Create conversion actions manually using code’ section.

Go ahead and click the ‘Save and continue’ button to get instructions for adding the tracking tags for conversion action to your site.

Click the save and continue button

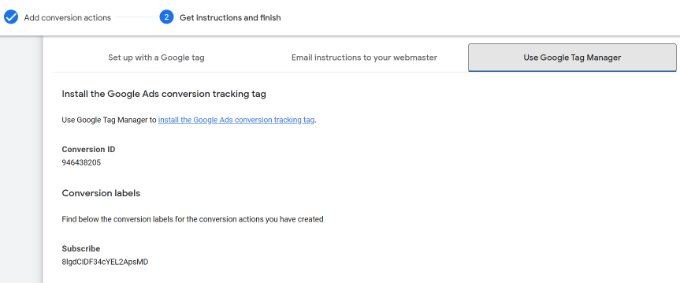
On the next screen, you’ll see 3 options to add the conversion action to your site.

Simply select the ‘Use Google Tag Manager’ option. You should see the Conversion ID and Conversion Label. Copy these to a notepad file or keep the browser window/tab open.

Select the use tag manager option

To finish the setup process, you’ll need to head to your WordPress website dashboard and view the MonsterInsights settings.

From here, go to Insights » Settings and click on the ‘Publisher’ tab.

Publisher settings in MonsterInsights

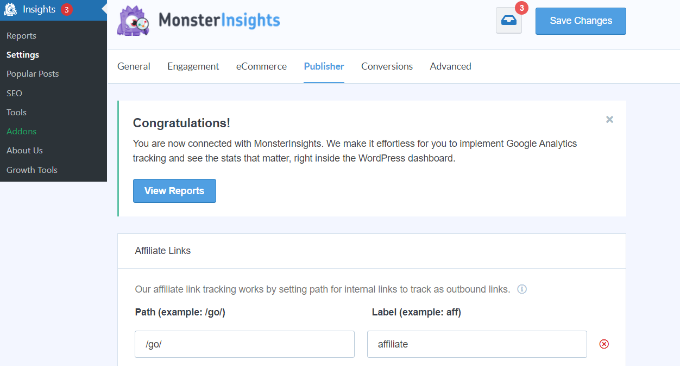
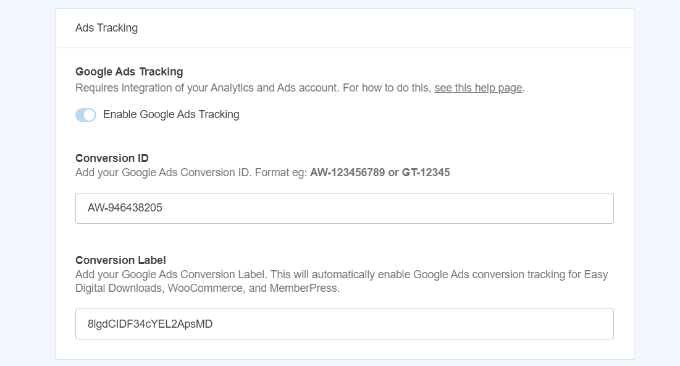
After that, you can scroll down to the ‘Ads Tracking’ section.

Go ahead and enter the Conversion ID. Make sure you follow the format, which will look like this: AW-123456789.

If you are tracking Google Ads on Easy Digital Downloads, WooCommerce, and MemberPress, then enter the Conversion Label in the respective field.

Enter conversion ID and label

That’s it. You’ve successfully set up Google Ads conversion tracking on your WordPress website.

View Google Ads Conversion Tracking Data in Google Analytics

You can take it a step further and connect Google Ads with Google Analytics to get more insights about how people use your website after clicking on an ad.

For instance, you can see the number of visitors from paid search and find out which pages they view after landing on your site. You can also use different filters and create custom reports in Google Analytics.

Let’s see how you can link your Google Ads account with Google Analytics 4 and Universal Analytics.

Connect Google Ads with Google Analytics 4

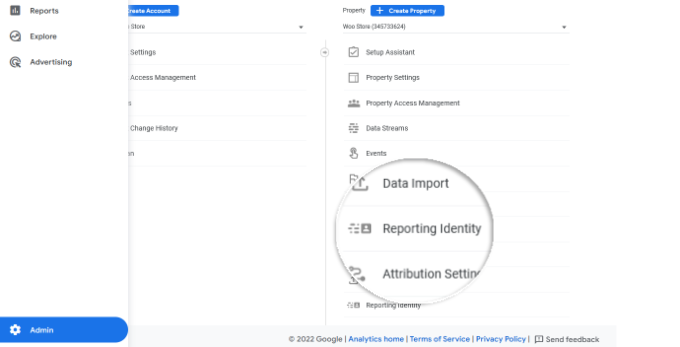
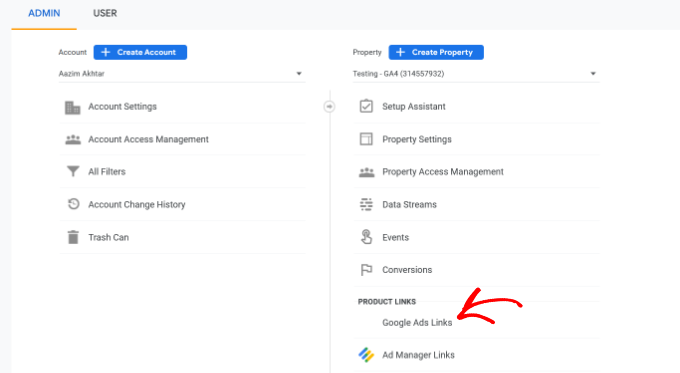
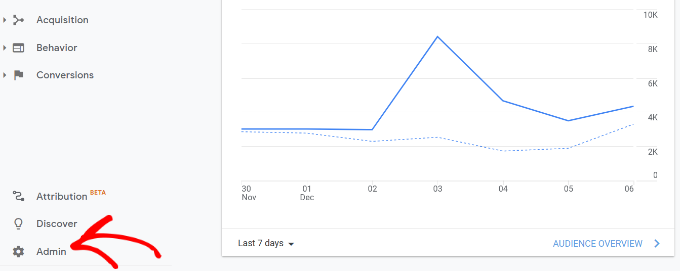
First, you’ll need to log in to your GA4 account and then go to the ‘Admin’ settings.

Go to admin settings

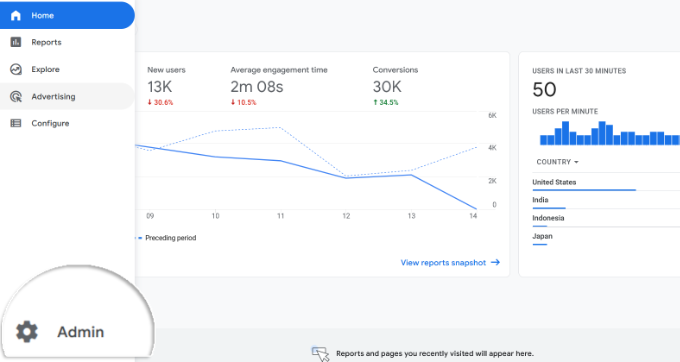
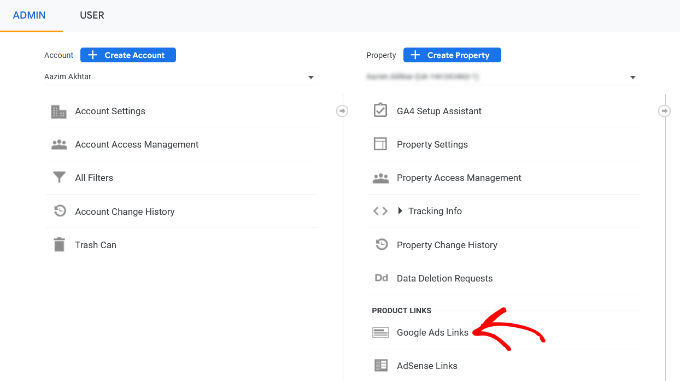
After that, you can click the ‘Google Ads Links’ option.

It is located under the Property column.

Go to ads links

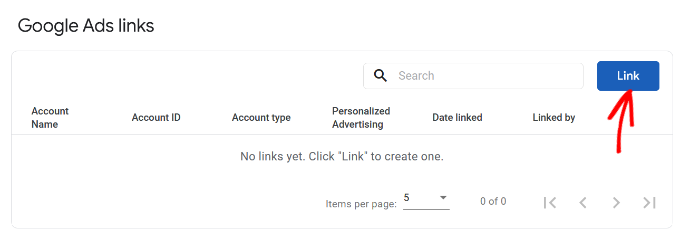
A new window will now slide in from the right.

Go ahead and click the ‘Link’ button in the top right corner.

Click the link button

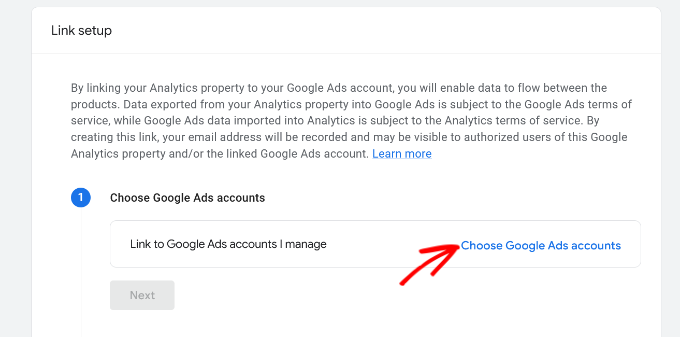
Next, you will see different options for Link setup.

First, you can click the ‘Choose Google Ads accounts’ option.

Choose Google ads account to link

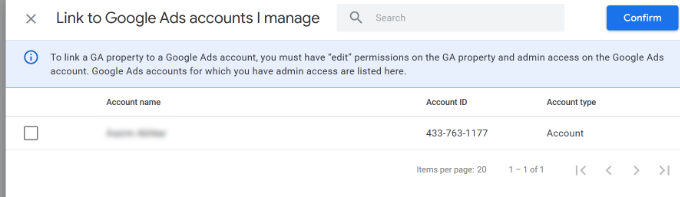
On the next screen, you’ll need to select the Google Ads account you wish to connect.

Once that’s done, simply click the ‘Confirm’ button at the top.

Select your google ads account

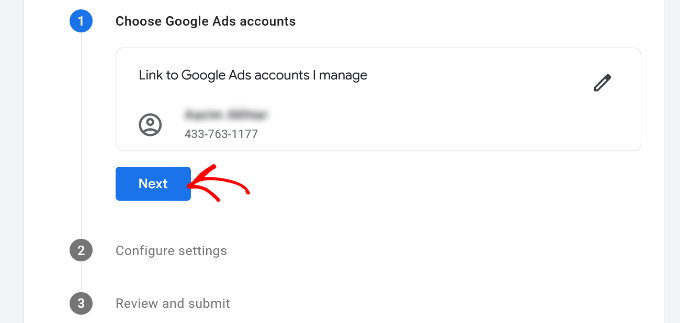
You will now see the Google Ads account that you want to link.

Go ahead and click the ‘Next’ button.

See selected google ads account

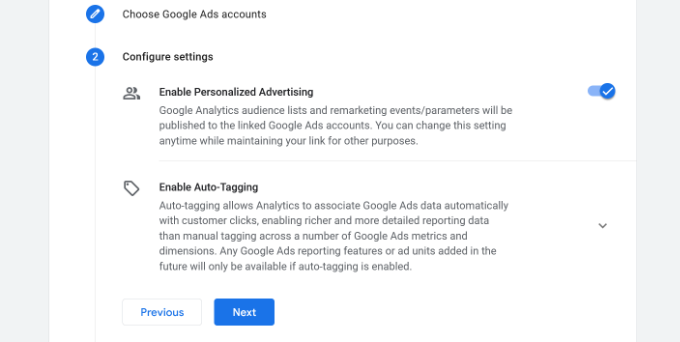
In the next step, Google Analytics will give you options to enable personalized advertising and enable auto-tagging.

You can use the default settings and click the ‘Next’ button.

Change configure settings

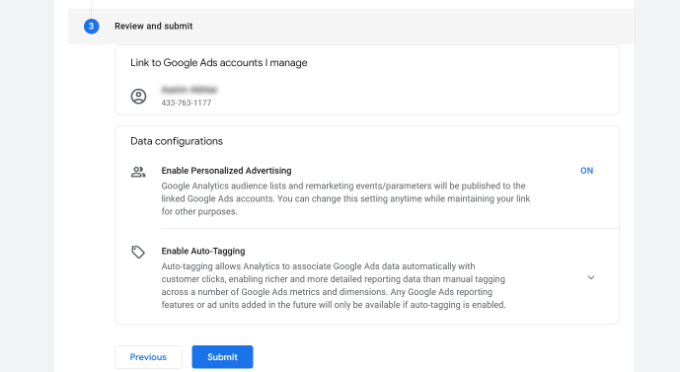
After that, you’ll see a summary of your Link setup settings.

If everything checks out, then go ahead and click the ‘Submit’ button.

Review and submit link setup

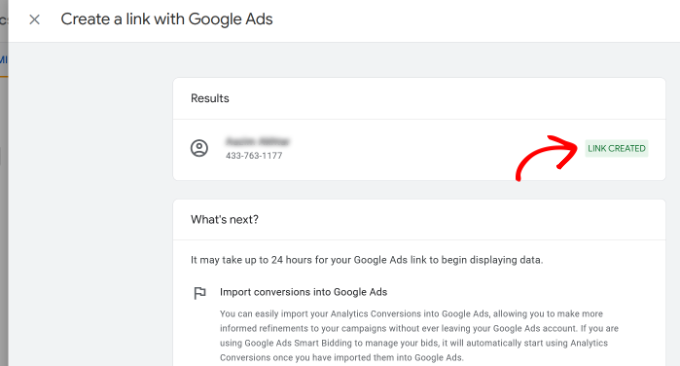
You should now see a ‘Link Created’ notification in front of your Google Ads account. This means that you’ve successfully connected Google Ads with Google Analytics.

Do note that it can take up to 24 hours for your Google Ads data to appear in Analytics reports.

See link created notification

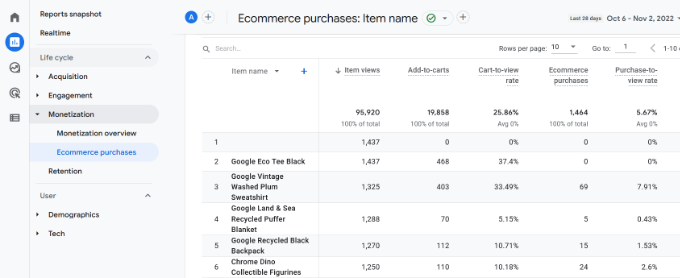
Next, you can view the Google Ads conversion tracking report in Google Analytics 4.

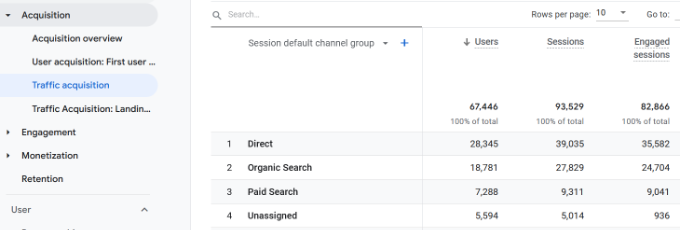
First, you can head to Acquisition » Traffic acquisition from the menu on your left and scroll down to see how many visitors came from the Paid Search channel.

View paid search traffic

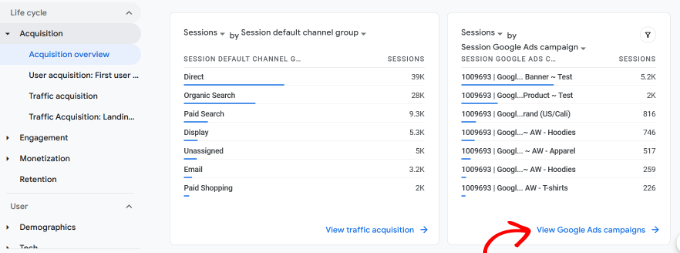
After that, you can go to Acquisition » Acquisition overview and view the Session Google Ads campaign report. This will show which campaign got the most traffic.

You can also click the ‘View Google Ads campaigns’ option at the bottom to view more details.

View session google ads campaign report

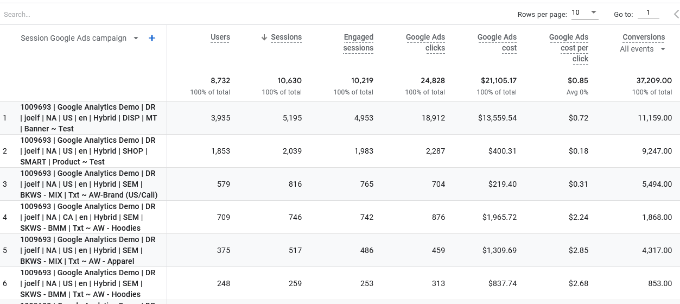
For each campaign, you can see the total number of users, sessions, number of Google Ads clicks, cost per click (CPC), conversions, and more.

Using the information from this report, you can see which campaigns perform the best.

View detailed stats for each campaign

Connect Google Ads with Universal Analytics

If you’re using Universal Analytics, then you can first log in to your account.

After that, head to the ‘Admin’ settings.

Click admin settings

Next, you’ll need to go to the Google Ads Links option.

You can find the option under the Property column.

Go to Google Ads links

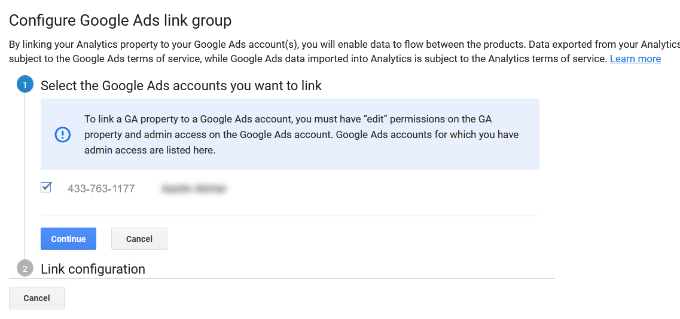
On the next screen, you’ll need to select the Google Ads account you want to connect.

After selecting your account, simply click the ‘Continue’ button.

Select Google ads account

Next, you will need to enter a Link group title.

You can then select the Views to link with your Google Ads account. Simply click the toggle to ON for the correct Views.

Enter link group title

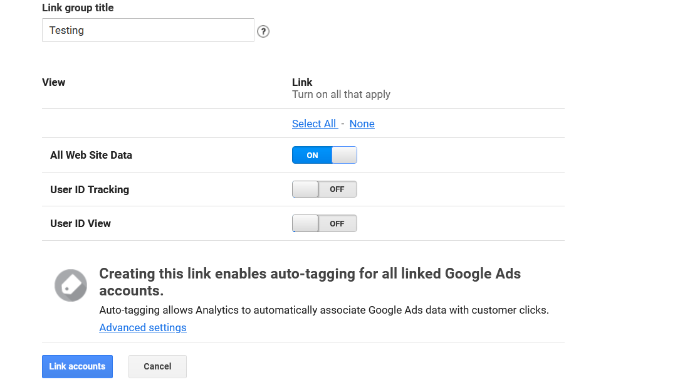
Once that’s done, simply click the ‘Link accounts’ button.

Google Analytics will now show a summary of your settings. Simply scroll down and click the ‘Done’ button.

Click the done button

That’s it. Your Google Ads account will now be linked to the Universal Analytics property.

To view data from your ad campaigns, head to Acquisition » Google Ads » Campaigns from the menu on your left. You can see the number of clicks, cost, CPC, and more for each campaign.

View Google ads report in UA

Final Thoughts on Google Ads Conversion Tracking in WordPress

When it comes to setting up any conversion tracking, the most important thing you want to make sure is that the setup is done properly. This is why we use and recommend MonsterInsights because it just does everything for you behind the scenes without touching any code.

However if you prefer to add code directly on your WordPress site, then you can do that as well by using a plugin like WPCode. This will help future-proof your customizations. There’s a free version of WPCode that you can use by following our tutorial on adding custom code in WordPress.

We hope this article helped you learn how to set up Google Ads conversion tracking in WordPress. You may also want to see our ultimate WordPress SEO guide and the best WooCommerce plugins to grow your store.

If you liked this article, then please subscribe to our YouTube Channel for WordPress video tutorials. You can also find us on Twitter and Facebook.

The post How to Set Up Google Ads Conversion Tracking in WordPress first appeared on WPBeginner.

How to Setup WooCommerce Conversion Tracking (Step by Step)

Do you want to track conversions on your WooCommerce store?

Conversion tracking helps you understand what’s working on your online store and what needs more attention. It helps you keep track of your best-performing products while also allowing you to see what’s stopping customers from completing a purchase.

In this guide, we’ll show you how to easily set up WooCommerce conversion tracking, step by step.

How to setup WooCommerce conversion tracking

Why Set up WooCommerce Conversion Tracking?

WooCommerce makes it easy to sell anything online. However, once you have set up your WooCommerce store, you will need to learn what works on your website to grow your business.

You will need to learn which products are popular among your users, what they are viewing the most, how many users end up making a purchase, how they are finding your website, and more.

To get all this information, you need to set up conversion tracking on your online store. This helps you get access to insights you need to make informed decisions about growing your business.

Conversion tracking helps you unlock key performance indicators including your eCommerce conversion rate, average order value, shopping cart abandonment, cost per acquisition, top referral sources, and more.

Apart from that you also get to learn about:

  • Shopping behavior – It tells you what products users are adding to carts, which products are being abandoned, what pages lead users to a successful purchase, and more.
  • Checkout behavior – Helps you view how users successfully complete a checkout.
  • Product performance – Tells you which products are bringing you the most sales.
  • Product list performance – This allows you to group products and see their performance as a list. This comes in handy when you want to see how different product categories are doing in your online store.

That being said, let’s take a look at how to unlock all this useful information by setting up conversion tracking on your store.

Setting Up WooCommerce Conversion Tracking in WordPress

The easiest way to track WooCommerce conversions is by using MonsterInsights.

It is the best Google Analytics plugin for WordPress and comes with an eCommerce addon that literally enables all the tracking within a few clicks.

The MonsterInsights Google Analytics plugin

The challenge is that setting up Google Analytics with WooCommerce requires a lot of custom coding, event tracking, and more.

The good news is that MonsterInsights makes it super easy to set up eCommerce tracking, and you can do it without writing any code. It works seamlessly with WooCommerce and supports other popular eCommerce plugins.

For this tutorial, we’ll use the MonsterInsights Pro version because it includes the eCommerce addon, advanced tracking features, and eCommerce dashboard report. There is also a MonsterInsights Lite version you can use to get started for free.

First, you will need to install and activate the MonsterInsights plugin. If you need help, then please see our guide on how to install a WordPress plugin.

Upon activation, you can see the MonsterInsights welcome screen in your WordPress admin area. Simply click the ‘Launch the Wizard’ button.

Launch setup wizard

Next, you can follow the onscreen instructions in the setup wizard to configure Google Analytics with your website. See our guide on how to install Google Analytics in WordPress for complete installation instructions.

With MonsterInsights, you can also set up dual tracking and set up a Google Analytics 4 (GA4) property. GA4 is the latest version of Google Analytics, and it will replace Universal Analytics on July 1, 2023.

MonsterInsights Dual Tracking GA v4

After this date, you won’t be able to track your online store’s data in Google Analytics and will have to start from scratch. However, dual tracking lets you send data to GA4 and Universal Analytics at the same time.

This way, you will have historical data in your GA4 property when the time comes to completely switch to the new version. For more details, please see our guide on how to switch to Google Analytics 4 in WordPress.

Once you have installed Google Analytics using MonsterInsights, you can move on to installing the MonsterInsights eCommerce addon.

First, you need to visit the Insights » Addons page from your WordPress dashboard and navigate to the ‘eCommerce’ addon.

Install the eCommerce addon

Go ahead and click the ‘Install’ button. The addon will now install and activate on your site. You should see the ‘Status’ change from ‘Not Installed’ to ‘Active.’

Next, you’ll need to enable enhanced eCommerce in Google Analytics.

Enable Enhanced Ecommerce in Google Analytics

First, you need to go to your Google Analytics account and select your website.

From here, you need to click on the Admin button located at the bottom left corner of the screen.

Click admin settings

Next, you need to click on the ‘Ecommerce settings’ option.

It is located under the ‘View’ column.

Ecommerce settings

After that, you need to turn on the toggles for ‘Enable Ecommerce’ and ‘Enable Enhanced Ecommerce Reporting’ options.

Google Analytics will now turn on the eCommerce reporting feature for your account.

Enable ecommerce and enhanced ecommerce reporting

Next, you can go back to your WordPress dashboard and head over to the Insights » Settings page.

From here, switch to the eCommerce tab and make sure to turn on the ‘Use Enhanced eCommerce’ option.

Use enhanced ecommerce option

MonsterInsights will automatically detect your eCommerce software. Currently, it supports WooCommerce, Easy Digital Downloads, LifterLMS, and MemberPress.

That’s all, you have successfully set up WooCommerce conversion tracking on your online store.

Viewing WooCommerce Conversion Reports

Now that you have set up conversion tracking on your WooCommerce store, you need to give Google Analytics some time to collect data.

After a while, you will be able to view your eCommerce reports in both MonsterInsights and Google Analytics.

Let’s start with your eCommerce reports in MonsterInsights.

eCommerce Reporting in MonsterInsights

Log in to your WordPress site and go to the Insights » Reports page and switch to the eCommerce tab.

Ecommerce report in MonsterInsights

At the top, you’ll get your most important conversion metrics including the conversion rate, transactions, revenue, and average order value.

Below that you will see a list of your top products with quantity, sale percentage, and total revenue.

Next, you’ll see your top conversion sources. You can use this report to attract more customers and offer exclusive discounts for customers from specific sources.

Top conversion sources

That’s not all the data. You can dig deeper with more advanced reports under your Google Analytics account.

WooCommerce Tracking in Universal Analytics

Google Analytics provides even more in-depth reporting for your WooCommerce store.

Simply visit your Universal Analytics dashboard and click on Conversions » Ecommerce from the left column.

Ecommerce report in analytics

First, the overview report will provide you with important numbers such as revenue, conversion rate, transactions, and average order value.

You can then switch to different reports for more in-depth analysis. For example, the ‘Shopping Behavior’ report will break down user sessions to add to cart, cart abandonment, and sessions that resulted in the checkout.

Shopping behavior report

WooCommerce Tracking in Google Analytics 4

To view your WooCommerce reports in Google Analytics 4, you can go to Reports » Monetization » Ecommerce purchases.

Ecommerce report in ga4

In the report, you’ll see different metrics like total items viewed, add to carts, eCommerce purchases, and more for each product.

Boost Your WooCommerce Conversions and Increase Sales

Now that you have the data you need to track your WooCommerce conversions, let’s take a look at how to improve your conversion rates and make more sales.

1. Improve Speed and Performance

According to a StrangeLoop case study, a 1 second delay in page load time can lead to a 7% loss in conversions, 11% fewer page views, and a 16% decrease in customer satisfaction.

Strangeloop case study

Slower websites create a bad user experience which results in lower conversion rates. See our complete step-by-step guide to improve your WooCommerce speed and performance.

2. Recover Abandoned Cart Sales

On average 60 – 80% of people who “add to cart” do not end up buying. This means if you have an online store, then you’re losing out on a lot of sales.

Luckily, there are several best practices that help you recover some of those abandoned cart sales. See our tips on how to recover abandoned cart sales and increase your conversions.

3. Provide Users with Alternatives

If users decide to leave your website without making a purchase, then there is very little chance that they will ever see your website again.

You need to provide users a chance to stay in touch even if they don’t end up making a purchase.

You can do this by creating an email newsletter for your WooCommerce store.

We recommend using Constant Contact or SendinBlue. Both of them are on our list of the best email marketing service for small businesses.

For more techniques, see our guide on how to convert WooCommerce visitors into customers.

We hope this article helped you set up WooCommerce conversion tracking on your eCommerce store. You may also want to see our list of the best WooCommerce plugins and how to choose the best blogging platform.

If you liked this article, then please subscribe to our YouTube Channel for WordPress video tutorials. You can also find us on Twitter and Facebook.

The post How to Setup WooCommerce Conversion Tracking (Step by Step) first appeared on WPBeginner.

How to Enable Customer Tracking in WooCommerce with Google Analytics

Do you want to enable customer tracking in WooCommerce?

Customer tracking allows you to offer a personalized shopping experience based on customer behavior in your eCommerce store.

In this article, we will show you how to easily enable customer tracking in WooCommerce with Google Analytics.

How to Enable Customer tracking in WooCommerce with Google Analytics

Why Enable Customer Tracking in WooCommerce with Google Analytics?

Google Analytics allows you to see where your visitors are coming from and what they do on your website. In other words, it helps you track your traffic sources as well as user engagement on your website.

For eCommerce platforms, Google Analytics offers an enhanced eCommerce tracking feature. This allows you to better understand users’ shopping and checkout behavior. Plus, you can see which products perform the best and track your WooCommerce store’s sales performance.

By default, a WooCommerce store allows your customers to create an account or checkout as guest users. Creating an account helps the user save their shipping and billing information for faster checkout next time. It also helps you offer customers a personalized shopping experience based on their browsing and shopping history.

Wouldn’t it be great if you could track logged-in users with their user IDs in Google Analytics and also see the path customers took before making a purchase?

This will give you access to a treasure trove of information and insights on customer behavior. You can use it to offer a better on-site experience and boost your sales.

Let’s take a look at how to easily enable customer tracking in WooCommerce. Here are quick links that you can use to jump ahead to any section:

Set up Ecommerce Tracking in WordPress with Google Analytics

The best way to set up WooCommerce customer tracking in Google Analytics is using Monsterinsights. It is the best Analytics solution for WordPress and helps you set up tracking without editing code.

The plugin offers an eCommerce addon, which automatically detects WooCommerces and starts tracking customer behavior in Google Analytics. It also comes with a Customer Journey addon that allows you to see users’ behavior before they make a purchase.

First, you will need to install and activate the MonsterInsights plugin. For more details, see our step-by-step guide on how to install a WordPress plugin.

You will need to be on the ‘Pro’ plan to access the eCommerce and User Journey addon, which we will use for this tutorial. However, there is also a MonsterInsights Lite version you can use for free.

Upon activation, you will see the welcome screen and the setup wizard. Simply click the ‘Launch the Wizard’ button and follow the on-screen instructions.

Launch setup wizard

For detailed instructions, see our article on how to install Google Analytics in WordPress.

MonsterInsights also helps you set up Google Analytics 4 (GA4) property through its Dual Tracking feature. GA4 is the latest Analytics version, and it will soon replace Universal Analytics.

MonsterInsights Dual Tracking GA v4

If you haven’t created a Google Analytics 4 property, then now is the best time. That’s because, after July 1, 2023, Universal Analytics will sunset and won’t track your website data. Setting up GA4 after the sunset date will mean you’ll have to start from scratch and won’t have any historical data for comparison.

For more details, please see our guide on how to switch to Google Analytics 4 in WordPress.

Install the MonsterInsights eCommerce Addon

Once you’ve configured Google Analytics on your website, the next step is to install the eCommerce addon.

You need to visit the Insights » Addons page from your WordPress dashboard and navigate to the ‘eCommerce’ addon. Simply click the ‘Install’ button, and the addon will automatically activate.

Install the eCommerce addon

Enable Enhanced Ecommerce Tracking in Google Analytics

The next step is to enable eCommerce tracking in Google Analytics. E-commerce tracking is not enabled by default in your Google Analytics account, and you will have to manually enable it.

First, you’ll need to head over to your Google Analytics account dashboard and click the Admin option.

Click the admin settings button

Next, you need to click on the ‘Ecommerce Settings’ option.

It is located under the View column.

Ecommerce settings

On the settings page, click the slider under Enable Ecommerce and Enable Enhanced Ecommerce Reporting to turn it on.

Don’t forget to click the ‘Save’ button when you’re done.

Enable ecommerce and enhanced ecommerce reporting

Now, your Google Analytics account will start showing enhanced eCommerce reports for your WooCommerce store.

For more details, please see our guide on how to set up WooCommerce conversion tracking.

Enabling User Journey Addon in MonsterInsights

Now that you’ve set up WooCommerce tracking in Google Analytics, the next step is to enable the MonsterInsights Customer Journey addon.

The addon will allow you to see the steps a customer takes before making a purchase in WooCommerce. Plus, it also shows the time it took at each step, the pages a user visited, and more.

First, you’ll need to go to Insights » Addons from your WordPress admin panel. Next, navigate to the User Journey addon and click the ‘Install’ button.

Install the user journey addon

The addon will automatically activate and start tracking your WooCommerce customer’s journey.

Next, you can go to WooCommerce » Orders from your WordPress dashboard to view the path your customers took when purchasing a product.

WooCommerce order select

After that, click on the order for which you’d like to see the user journey.

On the next screen, you’ll see the path a customer took before buying the product. You get to view the pages they visited, where they clicked, and how much time they spent on a page.

User journey in MonsterInsights

This is really useful information to better understand your customers. You can see which product categories are performing the best and where customers are exiting your store during the purchase process. Using the data, you can then fix these issues and optimize your site for more conversions.

Enabling User ID Tracking in Google Analytics

While MonsterInsights makes it very easy to track customers on your WooCommerce store, it also tracks WordPress ID tracking in Google Analytics.

WordPress ID is a unique ID to identify every user on your website. The user ID is called the ‘Client ID’ in Universal Analytics and the ‘App Instance ID’ in Google Analytics.

Do remember that enhanced eCommerce tracking will enable eCommerce reporting features for your WooCommerce store. However, it does not enable user tracking by default.

Let’s take a look at how you can enable user ID tracking in Universal Analytics and Google Analytics 4.

Enabling Customer Tracking in Universal Analytics

To enable individual customer tracking, you need to visit your Google Analytics account dashboard and open the Admin page.

Click the admin settings button

Now, click on the ‘Tracking info’ link under the Property column to expand the submenu.

After that, you can click the User-ID link that appears below.

Go to user ID settings

On the next page, you’ll have to review and agree to the User-ID policy.

Simply click the ‘I agree to the User-ID Policy’ toggle to turn it on.

Enable the user ID feature

From here, click on the ‘Next step’ button to continue.

Google Analytics will now ask how you would like to configure the user-ID tracking.

Copy the user id code

Since you’ll be using MonsterInsights, there’s no need to set up the user-ID tracking code. The plugin will take care of this for you.

Simply scroll down and click the ‘Next step’ button to continue.

Head to the next step

Next, you will see information about creating a user ID view in Google Analytics.

Go ahead and click the ‘Create’ button.

Create user-id view

After that, you will be asked to enter a ‘Reporting View Name’, which will be used to display User ID reports.

We recommend including UserID in the name, so it is easy to remember which view has UserID tracking enabled.

Enter a reporting view name

There is also an option to select the Reporting Time Zone.

Next, you just need to scroll down to the bottom and click on the ‘Create view’ button to save it.

Select timezone and create view

Enabling Customer Tracking in Google Analytics 4

To start, you’ll need to go to the Admin settings from your GA4 dashboard and click the ‘Reporting Identity’ option.

Open reporting identity settings

On the next screen, you will need to select a way to identify users on your online store.

GA4 uses multiple ways to identify customers. These include user ID, Google signals, device ID, and modeled data. For the sake of this tutorial, we’ll select the ‘Observed’ option and click the ‘Save’ button.

Select observed option in reporting identity

Viewing Customer Tracking Reports in Google Analytics

Now that everything is set up, Google Analytics will now track all your website customers. It will also be able to track logged-in users with their unique WordPress user ID.

View User ID Data in Universal Analytics

To view all your individual customer activity, you can go to your Universal Analytics account and click on the Audience » User Explorer menu.

View user explorer client ID in UA

You will see individual customer reports with a unique ID assigned to all non-logged-in users.

To view customer tracking reports for logged-in users in WooCommerce, you need to click on the Google Analytics logo on the top left corner of the screen.

This will show all your Google Analytics profiles. You will see your website profile and under ‘All website data’ you will see the UserID reporting view you created earlier.

Select UA User ID view

Go ahead and click on the UserID reporting view to load it.

Once it’s loaded, you need to click on the Audience » User Explorer menu. This way, you will see a logged-in customer tracking report where each user is represented by their WordPress user ID on your website.

UA user explorer user ID report

You can click on the user ID to view a customer’s individual tracking data.

For instance, the device category they use, acquisition date, the channel they used to arrive on the online store, and more.

UA user explorer user id details

View User ID Data in Google Analytics 4

In Google Analytics 4, you’ll need to head to the ‘Explore’ tab from the menu on your left.

Under Explorations, you’ll see different report templates. Simply click the existing ‘User explorer’ report.

Select user explorer report

Next, you’ll see the User explorer report in Google Analytics 4.

One thing you can notice is the Client ID will be replaced with the App instance ID.

See user explorer report in ga4

You can click on any of the app instance IDs to view more details.

For example, the report shows the total events that were triggered, the location of the user, the time stamp for each event, and more.

View details of app instance ID

Matching Customer Tracking with Their WordPress Accounts

Now that you’ve identified users in Google Analytics, you can match them with WordPress accounts. This will help you know who this customer is, and how you can create personalized offers, emails, or shopping experiences for them.

First, you need to note down the customer ID you see in your Google Analytics User-ID reporting view.

After that, go to your WordPress website’s admin area and click on the ‘Users’ menu. It will show you a list of all users on your WordPress site.

Next, you can click the ‘Edit’ link below any username in the list.

Edit any user profile

WordPress will now open the user profile for you.

If you look in your browser’s address bar you will ‘user_id’ parameter in the URL.

User ID in URL

Next, you need to replace the value next to user_id with the one you copied from your Google Analytics report and press enter key on your keyboard.

WordPress will now load the user profile associated with that particular User ID. You now have the customer’s name, username, email address, and social media information. You can also track their orders, product views, cart activity, and more.

We hope this article helped you learn how to enable customer tracking in WooCommerce with Google Analytics. You may also want to see our expert pick of the best free WooCommerce plugins for your online store and how to get a free email domain.

If you liked this article, then please subscribe to our YouTube Channel for WordPress video tutorials. You can also find us on Twitter and Facebook.

The post How to Enable Customer Tracking in WooCommerce with Google Analytics first appeared on WPBeginner.