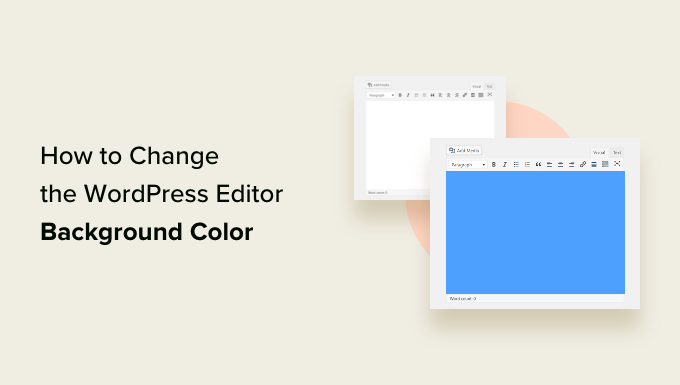
Do you want to change the background color of the WordPress block editor for admins?
Sometimes when working on a custom client project, you may want to change the Gutenberg editor background color in WordPress to match their brand colors.
In this article, we’ll show you how to easily customize the background color of the WordPress block editor for admin area.
Note: This guide covers changing the editor color in WordPress admin. If you’re looking to change the background color in WordPress front-end, then please see our tutorial on how to change background color in WordPress.
Why Change the Background Color of the Block Editor in WordPress?
You may want to change the background color of the WordPress block editor for a number of reasons.
However, if your WordPress theme doesn’t use the same colors, then the appearance of your post inside the editor will look quite different from what your users will see on the live website.
Another reason for changing the background color could be personal preference.
For instance, by default, the block editor uses a plain white background. Some users may find it a bit stressful to look at the white screen for long hours. Eye strain can be a real issue for many people, and the default white background is not easy on the eyes.
That being said, let’s see how you can easily change the WordPress editor background color.
How to Change the WordPress Editor Background Color
You can easily change the WordPress editor background color by adding custom code to your theme’s functions.php file.
However, keep in mind that even the smallest error in the code can break your website and make it inaccessible. That’s why we recommend using the WPCode plugin. It’s the best WordPress code snippets plugin on the market and is the easiest and safest way to add custom code to your WordPress website.
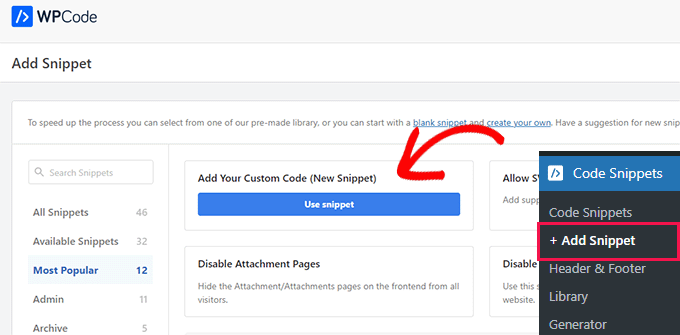
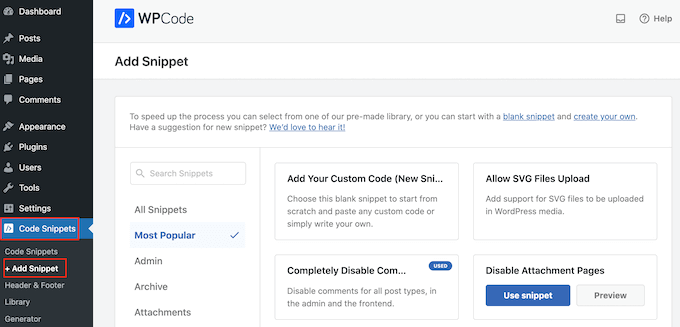
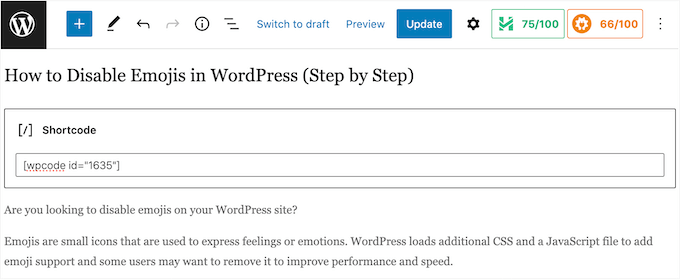
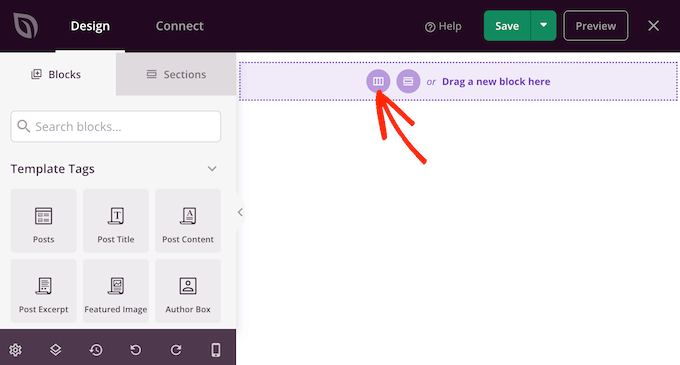
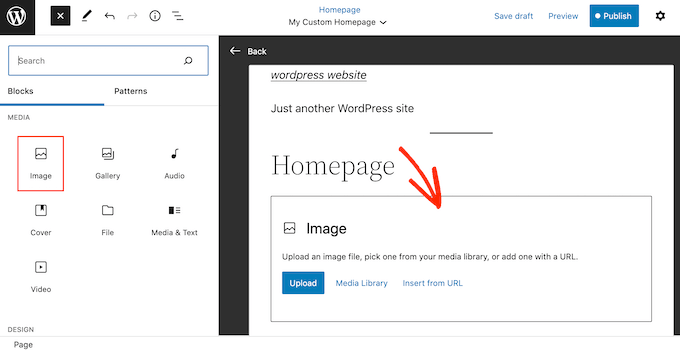
Upon activation, you need to visit the Code Snippets » + Add Snippets page from the admin sidebar.
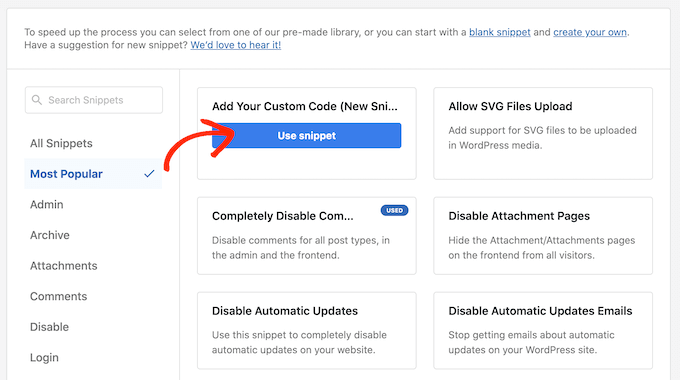
From here, you have to click on the ‘Use Snippet’ button under the ‘Add Your Custom Code (New Snippet)’ option.
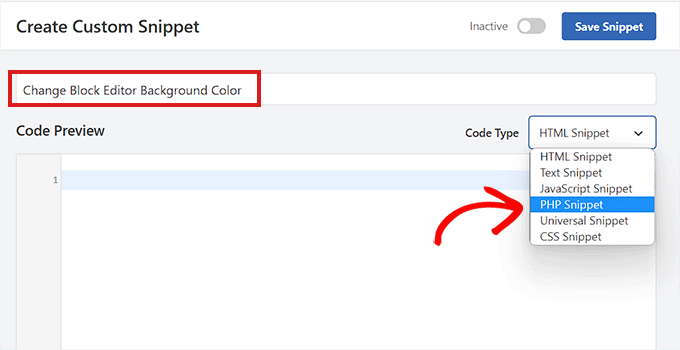
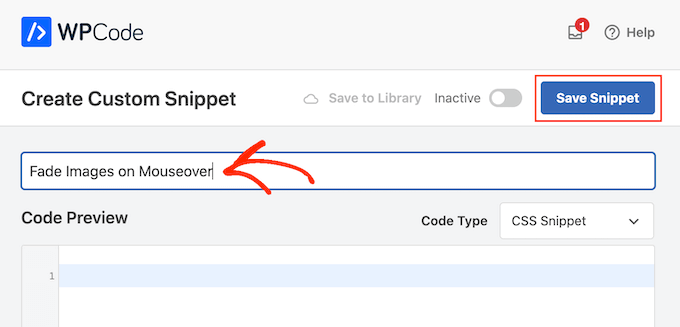
This will take you to the ‘Create Custom Snippet’ page where you can start by typing a name for your code snippet. This is just for you and can be anything that will help you identify the code.
Next, you need to choose ‘PHP Snippet’ as the ‘Code Type’ from the dropdown menu on the right.
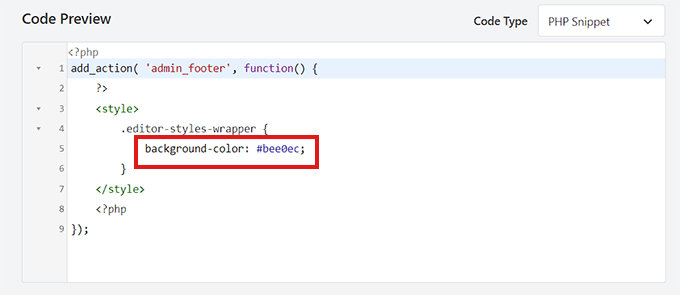
After that, you need to copy and paste the following code into the ‘Code Preview’ box.
Next, you need to look for the following code in the PHP snippet you just pasted.
background-color: #bee0ec;
Then, you have to add the hex code of your preferred color next to the background color option. If you don’t want to use a hex code, you can use some basic color names such as ‘white’ or ‘blue’ instead.
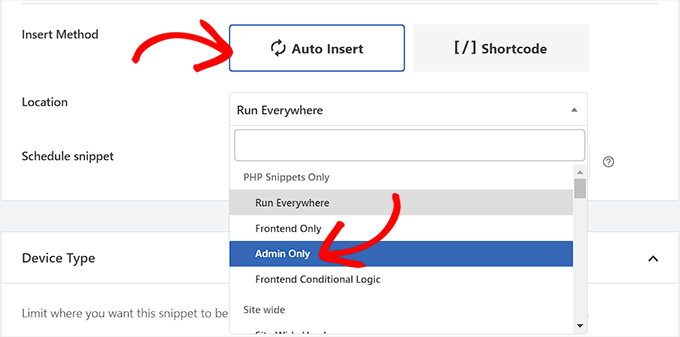
After that, you need to scroll down to the ‘Insertion’ section and choose the ‘Auto Insert’ option.
Next, you need to select the ‘Location’ of the code snippet as ‘Admin Only’ from the dropdown menu.
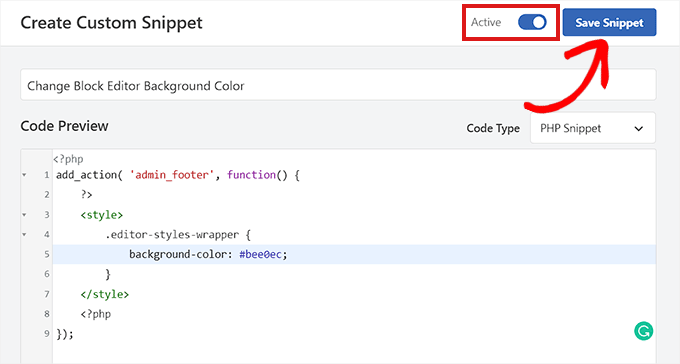
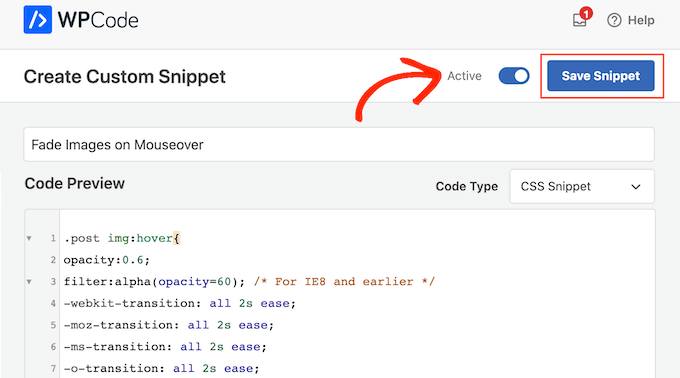
After that, you need to scroll back to the top of the page and toggle the ‘Inactive’ switch to ‘Active.’
Finally, don’t forget to click on the ‘Save Snippet’ button to save your changes.
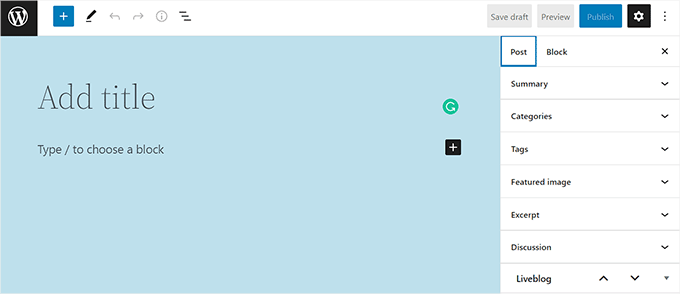
Now, go visit the block editor from the admin sidebar.
This is how the block editor looked on our site after adding the CSS code snippet.
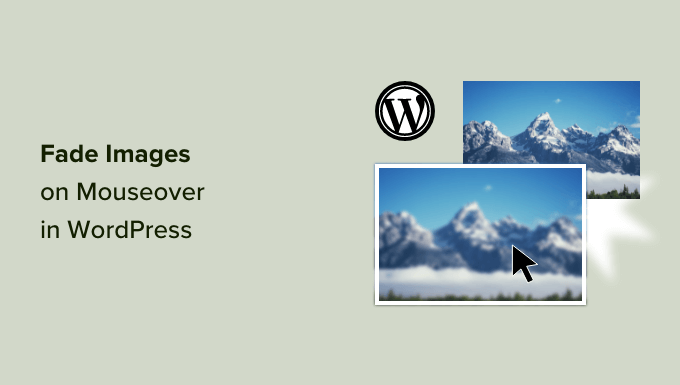
Do you want to fade images on mouseover in WordPress?
A simple fade-in or fade-out animation when a user moves their mouse over an image can make your site more engaging. It also encourages visitors to interact with your content, which can keep them on your site for longer.
In this article, we’ll show you how to add a fade image effect on mouseover in WordPress.
Why Fade Images on Mouseover in WordPress?
Animations are an easy way to make your website more interesting, and can even draw the visitor’s attention toward your page’s most important content, such as your website logo or a call to action.
There are lots of different ways to use CSS animations in WordPress, but adding a hover effect to images is particularly effective. The fade animation means your images will slowly appear or disappear when visitors hover over them.
This encourages people to interact with your images, and can even add a storytelling element to the page. For example, different images might fade in and out as the visitor moves around the page.
Unlike some other animations, the fade image on mouseover effect is subtle so it won’t negatively impact the visitor’s reading experience or any image optimization you’ve done.
With that said, let’s show you how to add a fade to your images on mouseover in WordPress.
Adding Image Fade on Mouseover to all WordPress Images
The easiest way to add a fade effect to all your images is by using WPCode. This free plugin allows you to easily add custom code in WordPress without having to edit your theme files.
With WPCode, even beginners can edit their website’s code without risking mistakes and typos that can cause many common WordPress errors.
In the code editor, add the following code snippet:
.post img:hover{
opacity:0.6;
filter:alpha(opacity=60); /* For IE8 and earlier */
-webkit-transition: all 2s ease;
-moz-transition: all 2s ease;
-ms-transition: all 2s ease;
-o-transition: all 2s ease;
transition: all 2s ease;
}
This code snippet will fade each image for 2 seconds when the user hovers their mouse over it. To make the image fade slower, simply replace ‘2s ease’ with a higher number. If you want to make the picture fade faster, then use ‘1s ease’ or smaller.
You can also make the ‘opacity’ higher or lower by changing the opacity:0.6 line.
If you change any of these numbers then make sure you change them across all the properties (webkit, moz, ms, and o), so the fade effect looks the same on every browser.
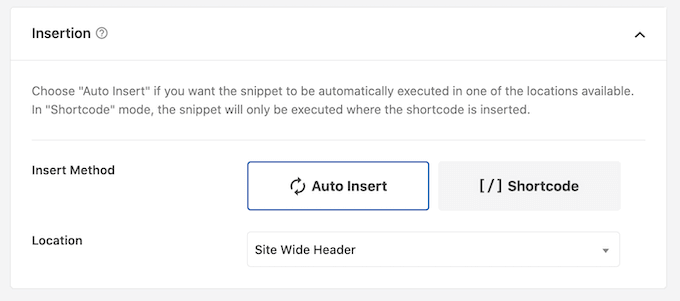
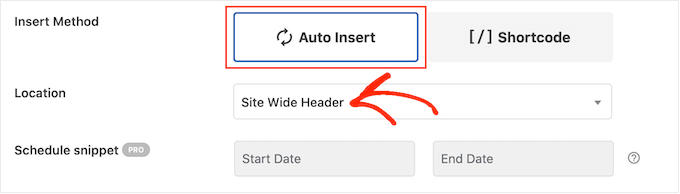
When you’re happy with the snippet, scroll to the ‘Insertion’ section. WPCode can add your code to different locations, such as after every post, frontend only, or admin only.
To add a fade effect to all your images, click on ‘Auto Insert.’ Then, open the ‘Location’ dropdown menu and choose ‘Site Wide Header.’
After that, you’re ready to scroll to the top of the screen and click on the ‘Inactive’ toggle, so it changes to ‘Active.’
Finally, click on ‘Save Snippet’ to make the CSS snippet live.
Now, if you hover the mouse over any image on your WordPress website, you’ll see the fade effect in action.
Adding Image Fade Animations to Individual Pages
Using a fade effect for every single image can become distracting, especially if you’re running a photography website, a stock photo store, or any other site that has lots of images.
With that in mind, you may want to use fade effects on a specific page or post only.
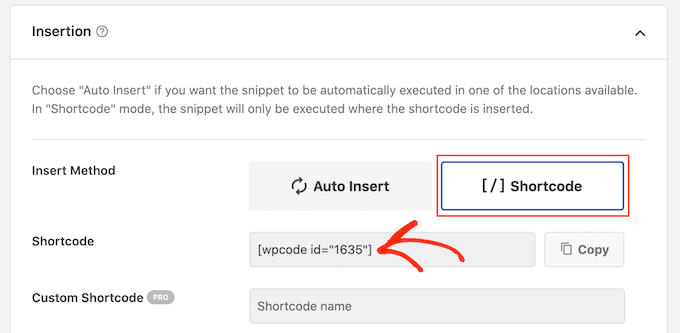
The good news is that WPCode allows you to create custom shortcodes. You can place this shortcode on any page, and WordPress will show fade effects on that page only.
To do this, simply create a custom code snippet and add the fade animation code following the same process described above. Then, click on the ‘Save snippet’ button.
After that, scroll to the ‘Insertion’ section, but this time select ‘Shortcode.’
This creates a shortcode that you can add to any page, post, or widget-ready area.
After that, go ahead and make the snippet live following the same process described above.
You can now go to any page, post, or widget-ready area and create a new ‘Shortcode’ block. Then, simply paste the WPCode shortcode into that block.
With that done, either click on the ‘Update’ or ‘Publish’ button to make the shortcode live. You can then visit that page, page, or widget-ready area to see the fade on mouseover effect.
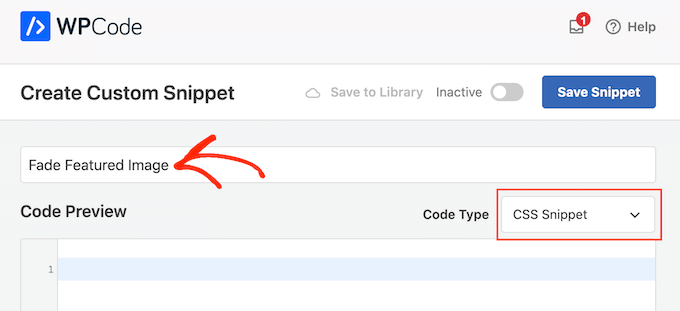
Adding Image Fade Animations to Featured Images
Another option is to add fade animations to your featured images or post thumbnails. These are the post’s primary image and they often appear next to the heading on your home page, archive pages, and other important areas of your website.
By fading featured images on mouseover, you can make your site more eye-catching and engaging, without animating every single image across your WordPress blog or website.
To add a fade animation to your post thumbnails, simply create a new custom code snippet following the same process described above.
However, this time add the following code to the editor:
img.wp-post-image:hover{
opacity:0.6;
filter:alpha(opacity=60); /* For IE8 and earlier */
-webkit-transition: all 2s ease;
-moz-transition: all 2s ease;
-ms-transition: all 2s ease;
-o-transition: all 2s ease;
transition: all 2s ease;
}
After that, scroll to the ‘Insertion’ box and select ‘Auto Insert.’ Then, open the ‘Location’ dropdown menu and choose ‘Site Wide Header.’
After that, you can go ahead and make the code snippet live using the same process described above.
Now, you can hover the mouse over any featured image to see the fade animation in action.
Fade effects are a fun way to make images more interesting, but there are lots more ways to use animations in WordPress. For example, you might use flipbox animations to reveal text when a visitor hovers over an image, or use zoom effects so users can explore a picture in more detail.
If you want to try different effects, then SeedProd has over 40 animations that you can add to images, text, buttons, videos, and more. You can even animate entire sections and columns with just a few clicks.
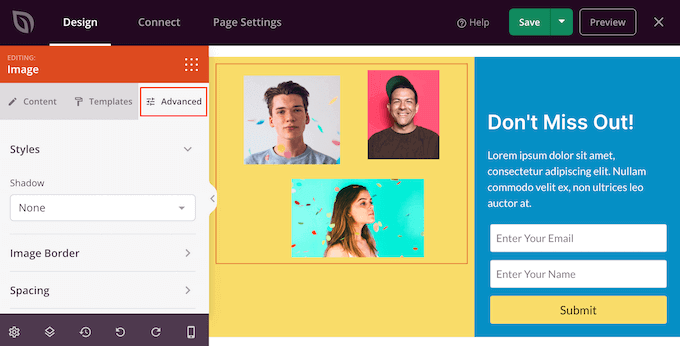
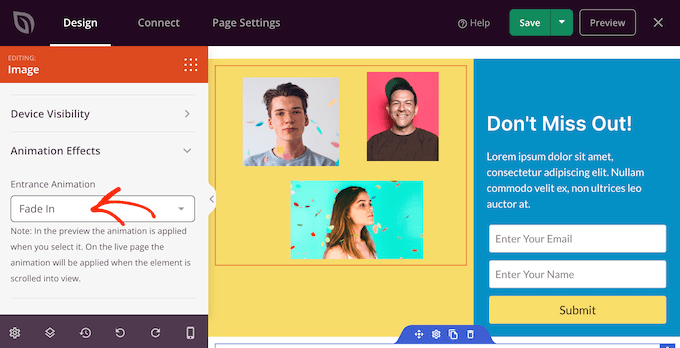
Inside the SeedProd editor, simply click on the content you want to animate, and then select the ‘Advanced’ tab in the left-hand menu.
You can then go ahead and click to expand the ‘Animation Effects’ section.
After that, simply choose an animation from the ‘Entrance Animation’ dropdown, including a wide range of different fade effects.
Do you want to add icon fonts to your WordPress site?
Icon fonts allow you to add resizable vector icons that are loaded like web fonts, so they don’t slow down your website. You can even style them using CSS to get exactly the look you want.
In this article, we will show you how to easily add icon fonts in your WordPress theme.
What are Icon Fonts and Why You Should Use Them?
Icon fonts contain symbols or small pictures instead of letters and numbers.
You can use these icon fonts to show common images. For example, you can use them with your shopping cart, download buttons, feature boxes, giveaway contests, and even in WordPress navigation menus.
Most visitors will immediately understand what a commonly-used icon means. In this way, you can help visitors find their way around your website and engage with your content.
There are several open-source icon font sets that you can use for free such as IcoMoon, Genericons, and Linearicons.
In fact, the WordPress software comes with free dashicon icons built-in. These are the icons you can see in the WordPress admin area.
In this guide, we’ll be using Font Awesome as it is the most popular open-source icon set. We use it on WPBeginner, and in all our premium WordPress plugins.
With that said, let’s look at how you can easily add icon fonts in your WordPress theme. Simply use the quick links to jump straight to the method that you want to use.
Method 1. Adding Icon Fonts Using a WordPress Plugin (Easy)
The easiest way to add icon fonts to WordPress is by using the Font Awesome plugin. This allows you to use icon fonts in your pages and posts without modifying your theme files. You’ll also get any new Font Awesome icons automatically every time you update the plugin.
The first thing you need to do is install and activate the Font Awesome plugin. For more details, see our step-by-step guide on how to install a WordPress plugin.
Upon activation, you can add a Font Awesome icon to any shortcode block. Simply open the page or post where you want to show the icon font, and then click on the ‘+’ icon.
You can now search for ‘Shortcode’ and select the right block when it appears.
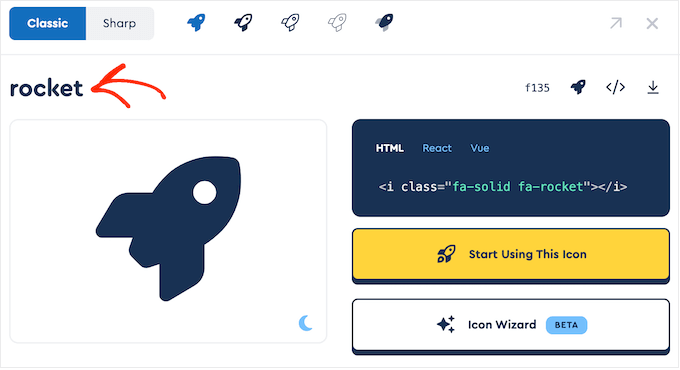
With that done, you can add any Font Awesome icon using the following shortcode:
[icon name="rocket"]
Simply replace “rocket” with the name of the icon that you want to show. To get this name, head over to the Font Awesome site and click on the icon that you want to use.
In the popup that appears, go ahead and click on the icon’s name.
Font Awesome will now copy the name to your clipboard automatically.
With that done, simply paste the name into the shortcode. You can now click on ‘Publish’ or ‘Update’ to make the icon font live.
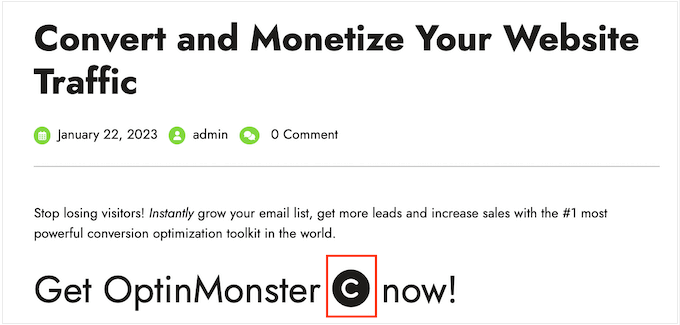
Sometimes you may want to show an icon font inside a block of text. For example, you may need to display a ‘copyright’ symbol after a brand name.
To do this, simply paste the shortcode inside any Paragraph block.
You can then use the settings in the right-hand menu to customize the icon, similar to how you customize options for text blocks. For example, you can change the font size.
WordPress will turn the shortcode into a Font Awesome icon for visitors and show it alongside your text.
Another option is to add the shortcode to any widget-ready area.
For example, you can add a Shortcode block to your site’s sidebar or similar section.
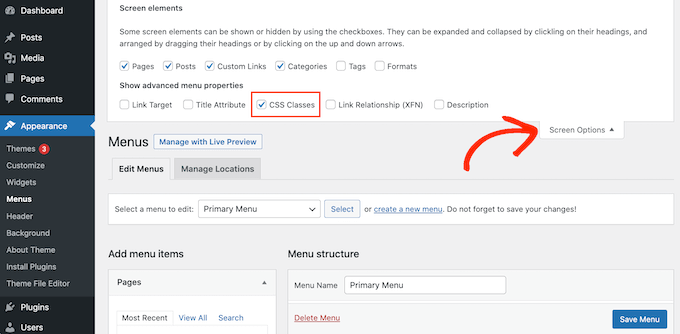
Many websites use icon fonts in their menus, to help visitors find their way around. To add an icon, either create a new menu or open an existing menu in the WordPress dashboard.
Then, click on ‘Screen Options’ and check the box next to ‘CSS Classes.’
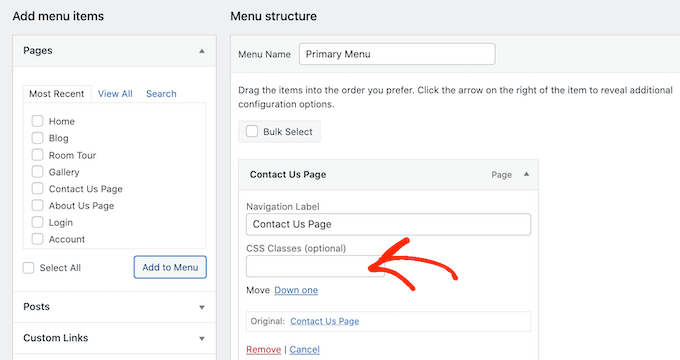
With that done, simply click to expand the menu item where you want to show the icon.
You should now see a new ‘CSS Classes’ field.
To get an icon’s CSS class, simply find the icon font on the Font Awesome website and give it a click. If you want, then you can change the icon’s style by clicking on the different settings.
In the popup, you’ll see an HTML code snippet. The CSS class is simply the text between the quotation marks. For example, in the following image, the CSS class is fa-solid fa-address-book.
Simply copy the text inside the quotes, then switch back to the WordPress dashboard.
You can now paste the text into the ‘CSS Classes’ field.
To add more icon fonts, simply follow the same process described above.
When you’re happy with how the menu is set up, click on ‘Save.’ Now if you visit your WordPress website you’ll see the updated navigation menu.
Method 2. Using Icon Fonts with SeedProd (More Customizable)
If you want more freedom over where you use font icons, then we recommend using a page builder plugin.
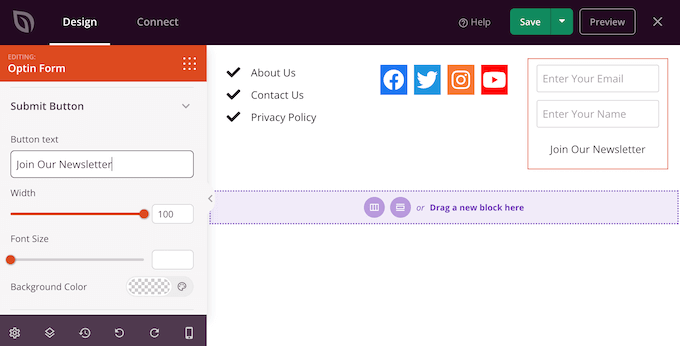
SeedProd is the best drag-and-drop WordPress page builder in the market and has over 1400 Font Awesome icons built-in. It also has a ready-made Icon box that you can add to any page using drag and drop.
The first thing you need to do is install and activate the plugin. For more details, see our beginner’s guide on how to install a WordPress plugin.
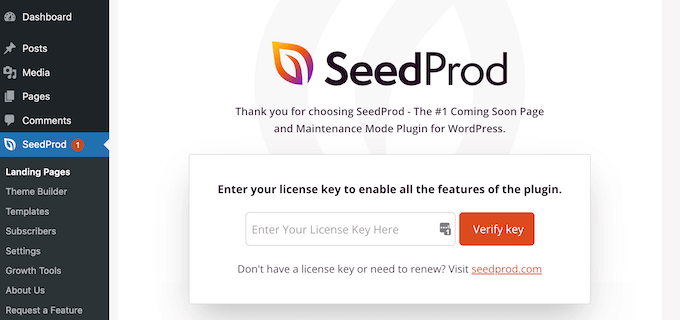
Note: There is a free version of SeedProd, but we’ll be using the Pro version since it comes with the Icon box.
Upon activation, go to SeedProd » Settings and enter your license key.
You can find this information under your account on the SeedProd website. After entering the license key, go ahead and click the ‘Verify Key’ button.
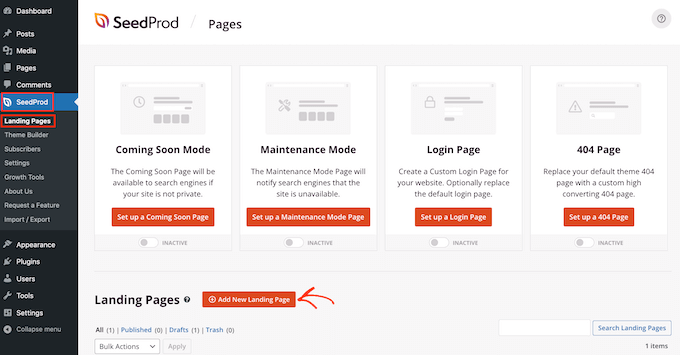
Next, you need to visit SeedProd » Pages and click on the ‘Add New Landing Page’ button.
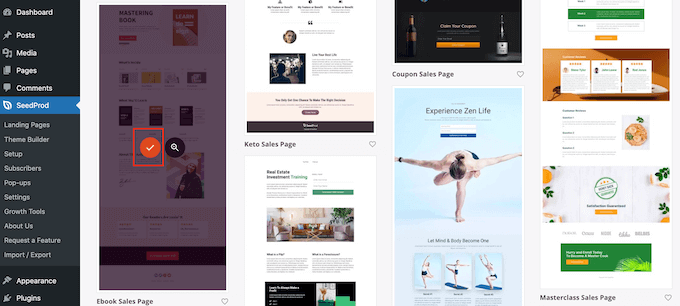
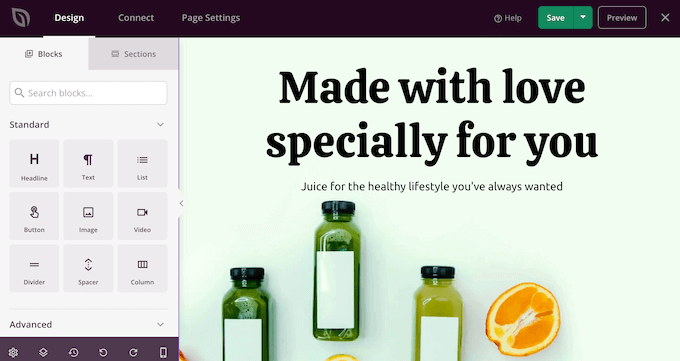
Now, you can choose a template to use as the basis for your page. SeedProd has over 180 professionally-designed templates that you can customize according to your WordPress blog or website’s needs.
To select a template, hover your mouse over it and then click the ‘Checkmark’ icon.
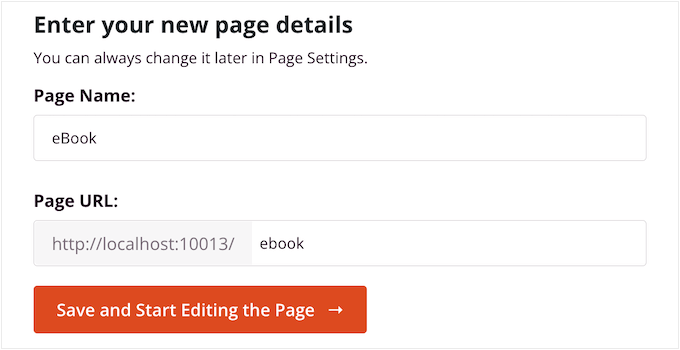
We’re using the ‘Ebook Sales Page’ template in all our images, but you can use any design you want.
Next, go ahead and type in a name for the custom page. SeedProd will automatically create a URL based on the page’s title, but you can change this URL to anything you want.
When you’re happy with the information you’ve entered, click on the ‘Save and Start Editing the Page’ button.
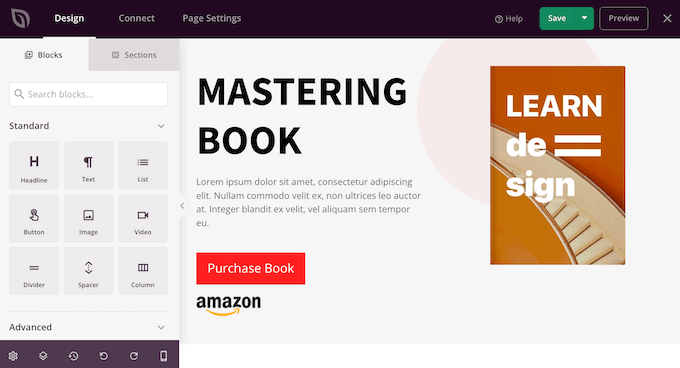
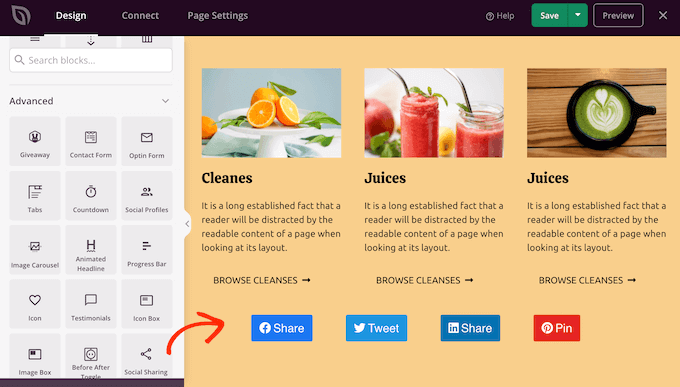
Next, you’ll be taken to the SeedProd drag-and-drop page builder, where you can customize the template.
The SeedProd editor shows a live preview of your design to the right and some block settings on the left.
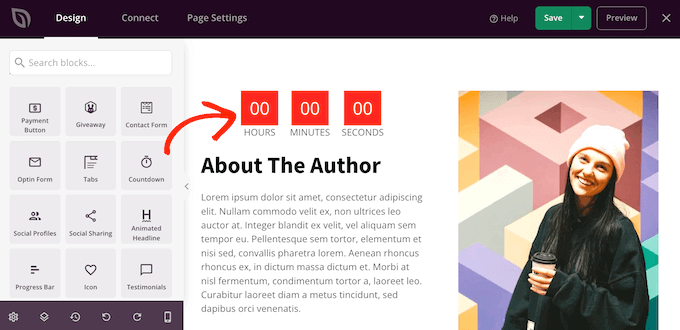
The left-hand menu also has blocks that you can drag onto your design.
You can drag and drop standard blocks like buttons and images or use advanced blocks such as the contact form, countdown, social share buttons, and more.
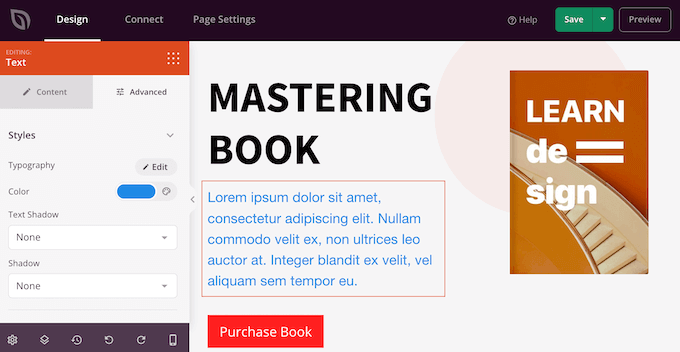
To customize any block, simply click to select it in your layout.
The left-hand menu will now show all the settings you can use to customize that block. For example, you can often change background colors, add background images, or change the color scheme and fonts to better match your brand.
To add an icon font to the page, simply find the ‘Icon’ block in the left-hand column and then drag it onto your layout.
SeedProd will show an ‘arrow’ icon by default.
To show a different Font Awesome icon instead, simply click to select the Icon block.
In the left-hand menu, hover your mouse over the icon and then click on the ‘Icon Library’ button when it appears.
You’ll now see all the different Font Awesome icons that you can choose from.
Simply find the font icon that you want to use and give it a click.
SeedProd will now add the icon to your layout.
After choosing an icon, you can change its alignment, color, and size using the settings in the left-hand menu.
You can continue working on the page by adding more blocks and customizing those blocks in the left-hand menu.
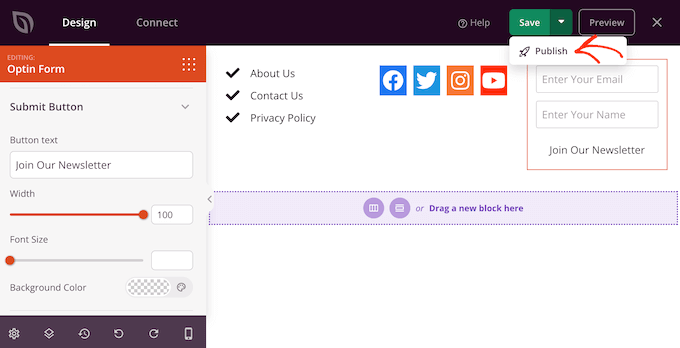
When you’re happy with how the page looks, click the ‘Save’ button. You can then select ‘Publish’ to make that page live.
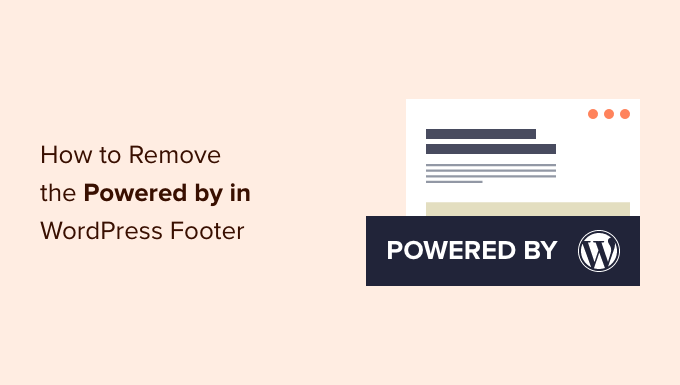
Do you want to remove the ‘powered by WordPress’ footer links on your site?
By default, most WordPress themes have a disclaimer in the footer, but this can make your site look unprofessional. It also leaves less space for your own links, copyright notice, and other content.
In this article, we will show you how to remove the powered by WordPress footer links.
Why Remove the WordPress Footer Credits?
The default WordPress themes use the footer area to show a ‘Proudly powered by WordPress’ disclaimer, which links to the official WordPress.org website.
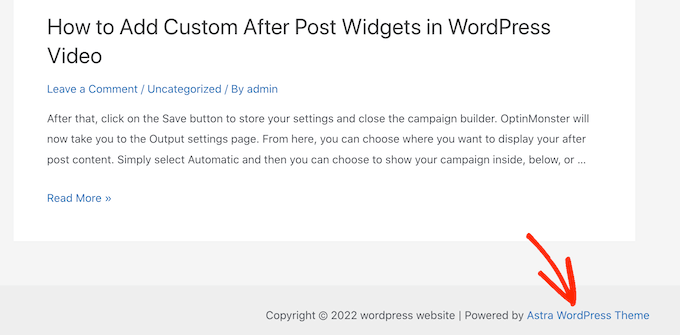
Many theme developers take this further and add their own credits to the footer.
In the following image, you can see the disclaimer added by the Astra WordPress Theme.
While great for the software developers, this ‘Powered by….’ footer can make your site seem less professional, especially if you’re running a business website.
It also lets hackers know that you’re using WordPress, which could help them break into your site.
For example, if you’re not using a custom login URL, then hackers can simply add /wp-admin to your site’s address and get to your login page.
This disclaimer also links to an external site, so it encourages people to leave your website. This can have a negative impact on your pageviews and bounce rate.
Is it legal to remove WordPress footer credit links?
It is perfectly legal to remove the footer credits link on your site because WordPress is free, and it is released under the GPL license.
Basically, this license gives you the freedom to use, modify, and even distribute WordPress to other people.
Any WordPress plugin or theme that you download from the official WordPress directory is released under the same GPL license. In fact, even most commercial plugins and themes are released under GPL.
This means you’re free to customize WordPress in any way you want, including removing the footer credits from your business website, online store, or blog.
With that in mind, let’s see how you can remove the powered by WordPress footer links.
Video Tutorial
If you don’t want the video or need more instructions, then simply use the quick links below to jump straight to the method you want to use.
Method 1. Removing the ‘Powered by’ Link Using the Theme Settings
Most good theme authors know that users want to be able to edit the footer and remove the credit links, so many include it in their theme settings.
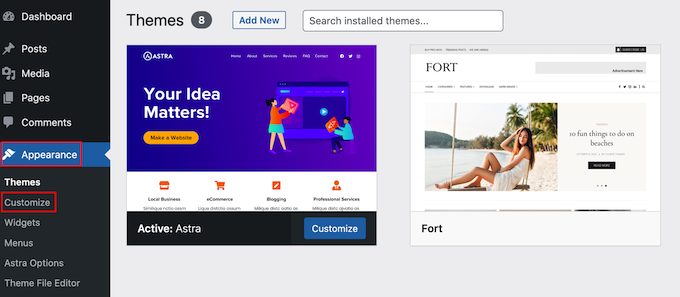
To see whether your theme has this option, go to Appearance » Customize in your WordPress admin dashboard.
You can now look for any settings that let you customize your site’s footer, and then click on that option.
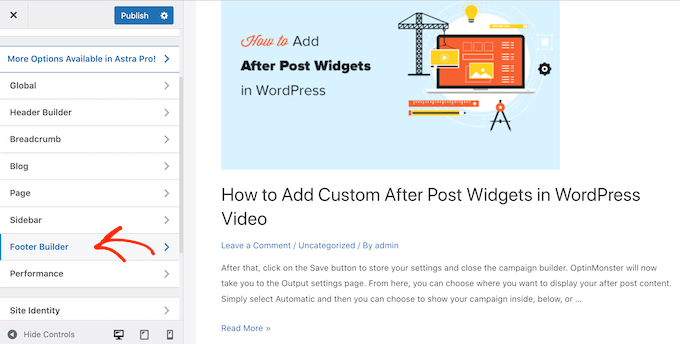
For example, the Astra theme has a section called ‘Footer Builder.’
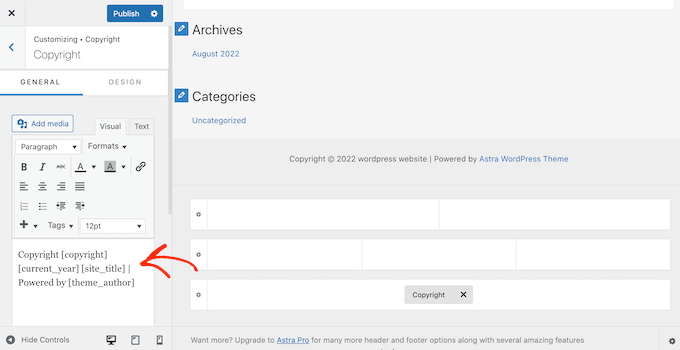
If you’re using this theme, then simply click on the ‘Footer’ section and select ‘Copyright.’
Doing so will open a small editor where you can change the footer text, or even delete it completely.
No matter how you remove the footer disclaimer, don’t forget to click on ‘Publish’ to make the change live on your site.
Method 2. Removing the ‘Powered by’ Credit Using Full Site Editing
If you’re using a block theme, then you can remove the footer disclaimer using Full Site Editing (FSE) and the block editor.
This is a quick and easy way to remove the ‘Powered by’ credit across your entire site, although it won’t work with all themes.
To launch the editor, go to Appearance » Editor.
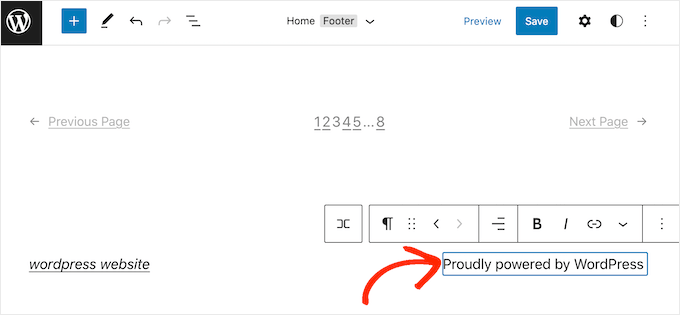
Then, scroll to your website’s footer and click to select the ‘Powered by’ disclaimer.
You can now replace it with your own content, or you can even delete the disclaimer completely.
When you’re happy with how the footer looks, simply click on ‘Save.’ Now if you visit your site, you’ll see the change live.
Method 3. How To Remove the ‘Powered by’ Disclaimer Using a Page Builder
Many WordPress websites use the footer to communicate important information, such as their email address or phone number. In fact, visitors might scroll to the bottom of your site looking specifically for this content.
With that in mind, you may want to go one step further and replace the ‘Powered by’ text with a custom footer. This footer could contain links to your social media profiles, links to your affiliate partners, a list of your products, or other important information and links.
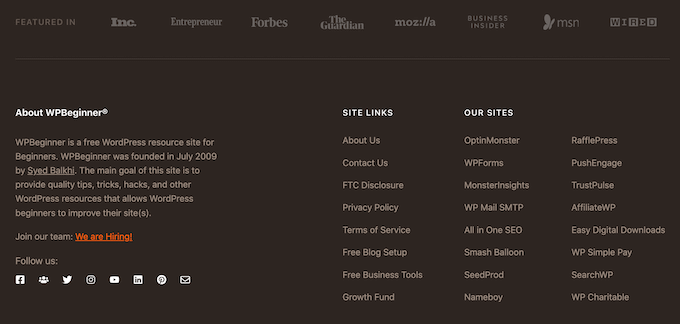
You can see the WPBeginner footer in the following image:
The best way to create a custom footer is by using SeedProd. It is the best page builder plugin and comes with over 180 professionally-designed templates, sections, and blocks that can help you customize every part of your WordPress blog or website.
It also has settings that allow you to create a global footer, sidebar, header, and more.
First, you need to install and activate SeedProd. For more details, see our step-by-step guide on how to install a WordPress plugin.
Note: There’s also a free version of SeedProd that allows you to create all kinds of pages using the drag-and-drop editor. However, we’ll be using the premium version of SeedProd since it comes with the advanced Theme Builder.
After activating the plugin, SeedProd will ask for your license key.
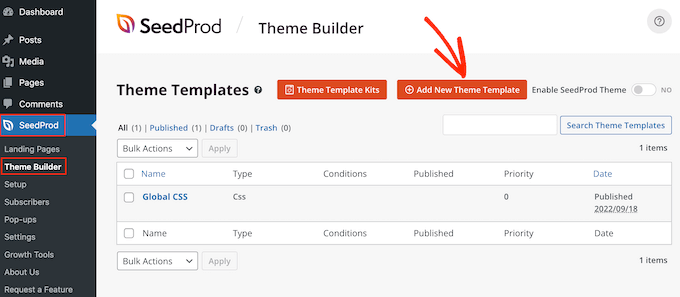
Once you’ve done that, go to SeedProd » Theme Builder. Here, click on the ‘Add New Theme Template’ button.
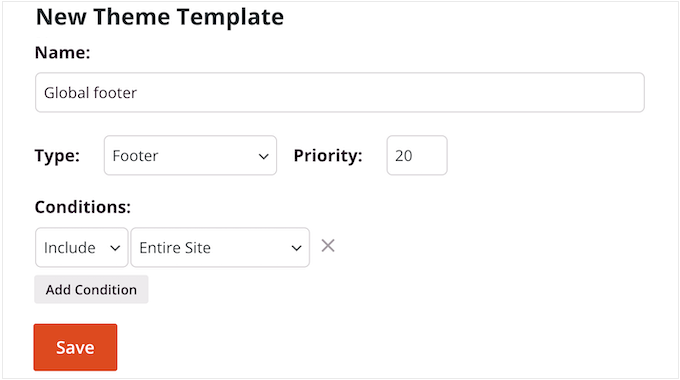
In the popup, type in a name for the new theme template.
Once you’ve done that, open the ‘Type’ dropdown and choose ‘Footer.’
SeedProd will show the new footer template across your entire site by default. However, you can limit it to specific pages or posts using the ‘Conditions’ settings.
For example, you may want to exclude the new footer from your landing pages, so it doesn’t distract from your main call to action.
When you’re happy with the information you’ve entered, click on ‘Save.’
This will load the SeedProd page builder interface.
At first, your template will show a blank screen on the right and your settings on the left. To start, click on the ‘Add Columns’ icon.
You can now choose the layout that you want to use for your footer. This allows you to organize your content into different columns.
You can use any layout you want, but for this guide, we’re using a three-column layout.
Next, you can edit the footer’s background so that it matches your WordPress theme, company branding, or logo.
To change the background color, simply click on the section next to ‘Background Color’ and then use the controls to choose a new color.
Another option is to upload a background image.
To do this, either click on ‘Use Your Own Image’ and then choose an image from the WordPress media library, or click on ‘Use a stock image.’
When you’re happy with the background, it’s time to add some content to the footer.
Simply drag any block from the left-hand menu and drop it onto your footer.
After adding a block, click to select that block in the main editor.
The left-hand menu will now show all of the settings for customizing the block.
Simply keep repeating these steps to add more blocks to your footer.
You can also change where each block appears by dragging them around your layout.
When you’re happy with your design, click on the ‘Save’ button.
Then, you can select ‘Publish’ to complete your design.
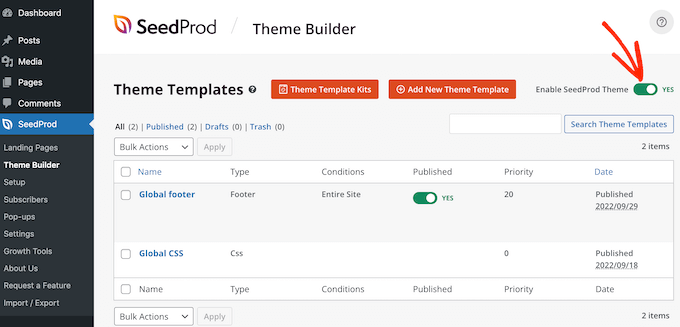
For your new footer to show up on your website, you’ll need to finish building your WordPress theme with SeedProd.
After building your theme, go to SeedProd » Theme Builder. Then, click on the ‘Enable SeedProd Theme’ switch.
Now, if you visit your website you’ll see the new footer live.
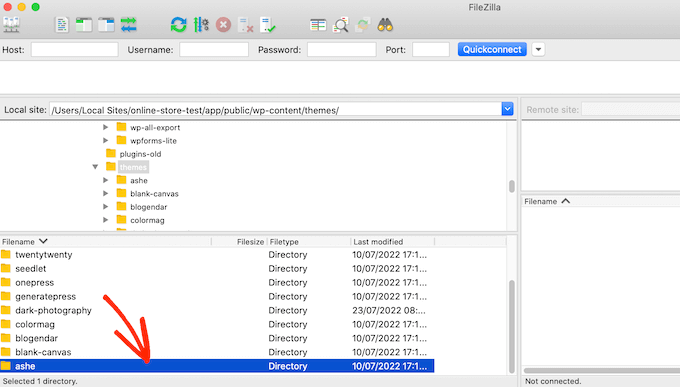
Once you’ve connected to your site, go to /wp-content/themes/ and then open the folder for your current theme or child theme.
Inside this folder, find the footer.php file and open it in a text editor such as Notepad.
In the text editor, look for a section of code that includes the ‘powered by’ text. For example, in the Twenty Twenty-One theme for WordPress, the code looks like this:
You can either delete this code entirely or customize it to suit your needs. For example, you may want to replace the ‘Proudly powered…’ disclaimer with your own copyright notice.
After making your changes, save the file and upload it to your server. If you check your site, then the footer credit will have disappeared.
Warning! Avoid the CSS Method at All Costs!
Some WordPress tutorial sites may show you a CSS method that uses display: none to hide the footer credit links.
While it looks simple, it’s very bad for your WordPress SEO.
Many spammers use this exact technique to hide links from visitors while still showing them to Google, in the hopes of getting higher rankings.
If you do hide the footer credit with CSS, then Google may flag you as a spammer and your site will lose search engine rankings. In the worst-case scenario, Google may even delete you from their index so you never appear in search results.
Instead, we strongly recommend using one of the four methods we showed above. If you can’t use any of these methods, then another option is hiring a WordPress developer to remove the footer credit for you, or you might change your WordPress theme.
Do you want to create a custom homepage in WordPress?
By default, WordPress shows your latest blog posts on the homepage. However, you can often create a better first impression by designing a custom homepage that highlights your site’s most popular content, products, services, and more.
In this article, we will show you how to easily create a custom homepage in WordPress.
What is a Homepage?
A homepage is the first page visitors see when they type in your domain name. For many people, this homepage is their introduction to your business, blog, or website.
A good homepage will make visitors want to learn more about your WordPress website. It will also provide easy access to the links, search bars, menus, and anything else that can help visitors find interesting content.
By default, WordPress shows your latest blog posts on the homepage.
This may be a good fit for personal blogs or hobby bloggers. However, many WordPress blogs and websites can benefit by replacing the standard homepage with a custom homepage.
The good news is that WordPress makes it easy to show a custom page as your homepage, rather than the default list of recent posts.
Selecting a Custom Page to be Used as Homepage in WordPress
In this guide, we’ll show you a few different ways to create a custom homepage. However, afterward, you’ll need to let WordPress know that it should use this page as the homepage.
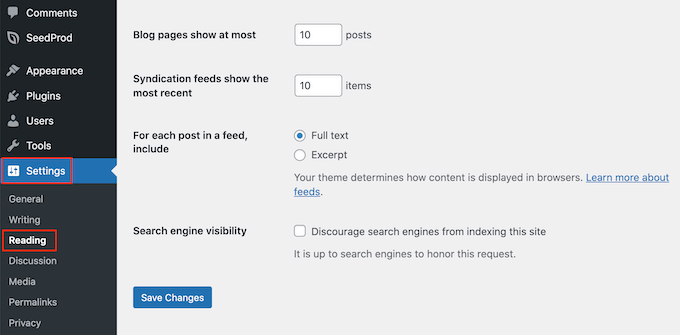
To do that, simply go to Settings » Reading in the WordPress dashboard.
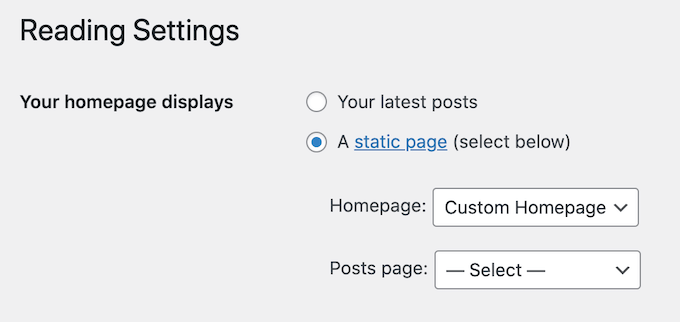
Here, scroll to ‘Your homepage settings’ and select ‘A static page.’
You can now open the ‘Homepage’ dropdown and choose the page that you want to use as the new homepage.
Then, simply scroll to the bottom of the screen and click on ‘Save Changes.’ You can now visit your site to see the new custom homepage live.
If you have a blog, then make sure you create a separate blog page to display your posts. If you don’t, then visitors will struggle to find your latest blogs.
With that being said, let’s see how you can design a custom homepage in WordPress. Simply use the quick links below to jump straight to the method you want to use.
Method 1. Create a Custom Homepage Template Using the Block Editor
If you’re using a block theme, then you can design a custom homepage template using the full site editor.
This method doesn’t work with every theme, so if you’re not using a block-based WordPress theme then we recommend using a page builder like SeedProd or Beaver Builder instead.
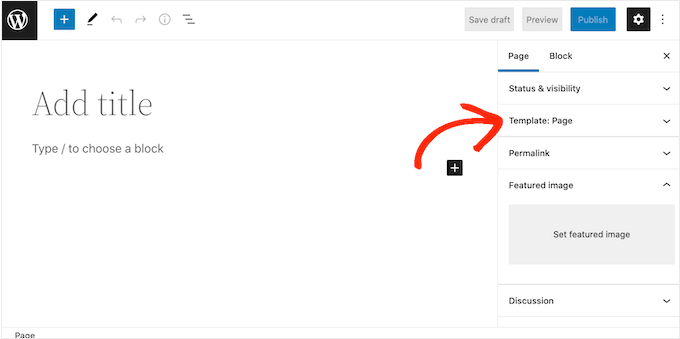
To start, simply create a new page or open an existing page that you want to use as the homepage. Then, click on the ‘Page’ tab in the right-hand menu and click to expand the ‘Template’ section, if it isn’t already open.
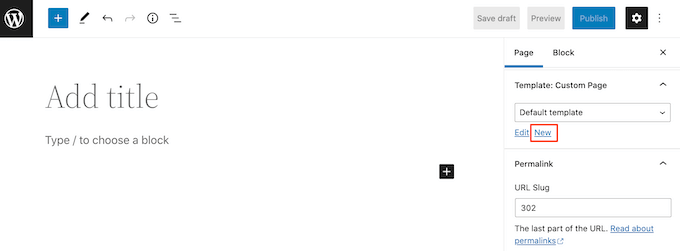
WordPress will now show which template this page is currently using.
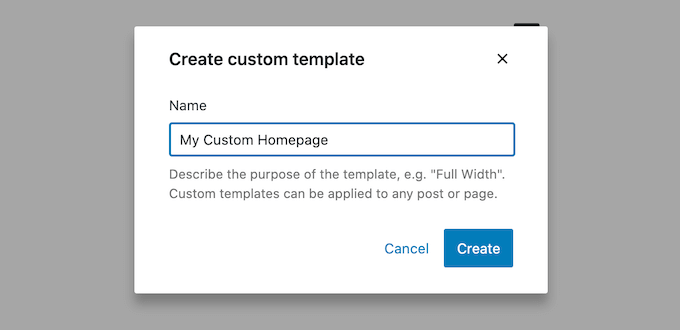
To create a custom homepage template, just click on the ‘New’ link.
In the popup, give your template a name. The name is just for your reference so you can use anything you want.
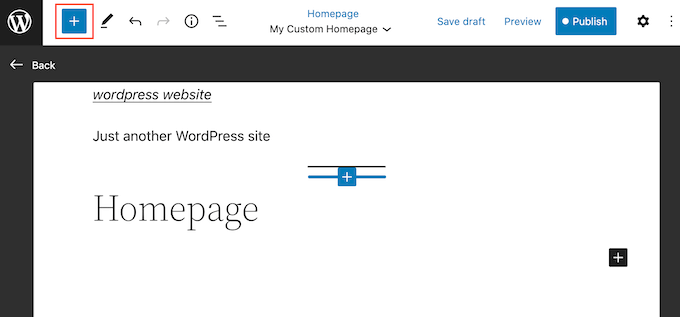
After that, go ahead and click on ‘Create’ to launch the full site editor.
After adding a block, make sure you click to select it in your layout. You can then configure the block using the settings in the right-hand menu and the buttons in the mini toolbar.
To build your custom homepage, simply keep adding more blocks and then configure them using the full site editor settings.
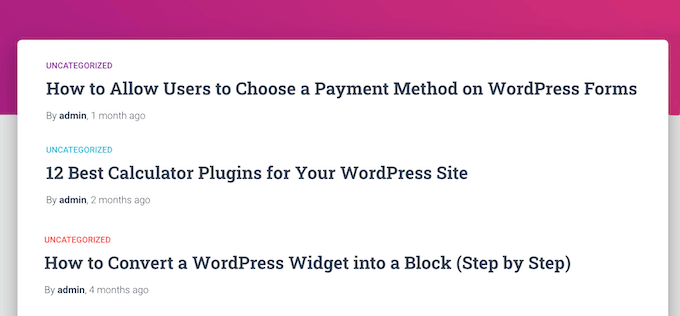
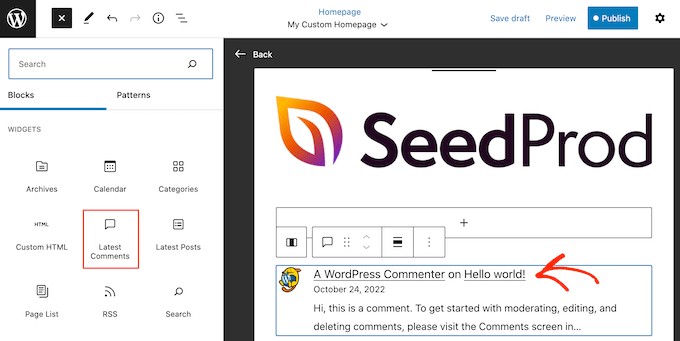
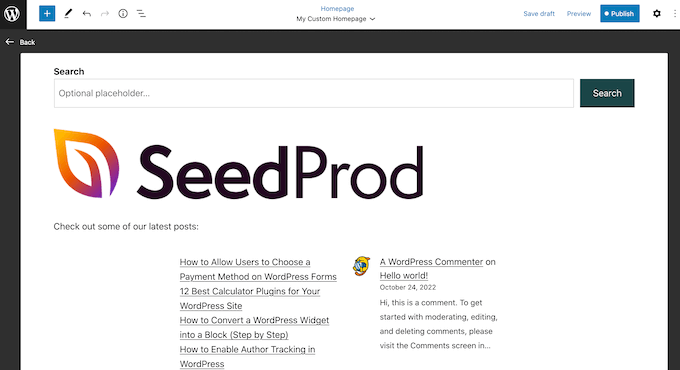
For example, you may want to add blocks such as Latest Posts, Search, Social Icons, Cloud Tag, and more.
When you’re happy with how the template looks, click on the ‘Publish’ button.
The page you created earlier will now be using the new homepage template. You can now tell WordPress to use this page as your homepage by following the process described above.
Method 2. Create a Custom Homepage in WordPress using a Page Builder (Recommended)
The WordPress block-based editor allows you to create a custom homepage using the tools you’re already familiar with. However, it doesn’t work with all themes and is limited in flexibility and features.
If you want to create a completely custom homepage that works with any WordPress theme, then you’ll need a page builder plugin.
For this method, we’ll be using SeedProd. It is the best page builder plugin on the market and allows you to create a custom homepage using a simple drag-and-drop editor.
It also comes with lots of professionally-designed templates and ready-made blocks that you can use on your homepage.
Note: There is a free version of SeedProd on available on WordPress.org but we’ll be using the Pro version since it has more templates, blocks, and features.
The first thing you need to do is install and activate the SeedProd plugin. For more details, see our step-by-step guide on how to install a WordPress plugin.
Upon activation, you need to enter your license key.
You can find this information under your account on the SeedProd website. After entering the license key, go ahead and click the ‘Verify Key’ button.
Next, you need to visit SeedProd » Pages and click on the ‘Add New Landing Page’ button.
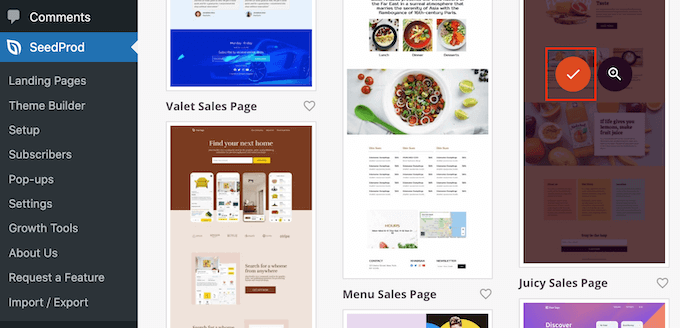
After that, it’s time to choose a template for your custom homepage. SeedProd has lots of professionally-designed templates that you can customize according to your website’s needs.
To select a template, simply hover your mouse over it and then click the ‘Checkmark’ icon.
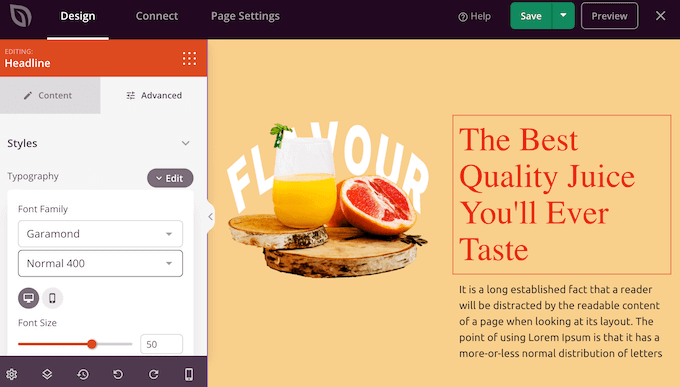
We’re using the ‘Juicy Sales Page’ template in all our images, but you can use any design.
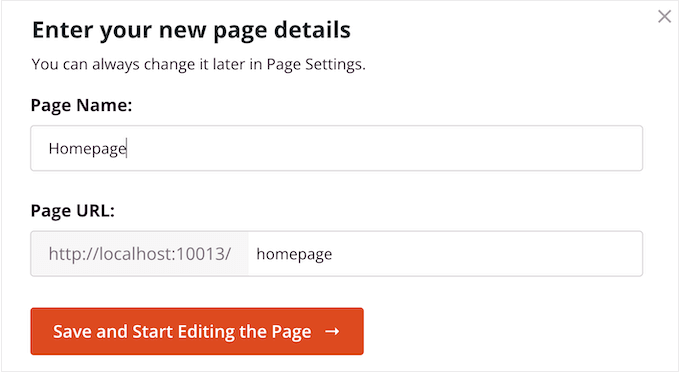
Next, go ahead and type in a name for the custom homepage. SeedProd will automatically create a URL based on the page’s title, but you can change this URL to anything you want.
When you’re happy with the information you’ve entered, click on the ‘Save and Start Editing the Page’ button.
Next, you’ll be taken to the SeedProd drag-and-drop page builder, where you can customize your template.
The SeedProd editor shows a live preview of your design to the right and some block settings on the left.
The left-hand menu also has blocks that you can drag onto your layout.
For example, you can drag and drop standard blocks like buttons and images or use advanced blocks such as the countdown, contact form, social sharing buttons, and more.
To customize any block, simply click to select it in your layout.
The left-hand menu will now show all the settings you can use to configure that block. You can also change background colors, add background images, or change the color scheme and fonts to better match your brand.
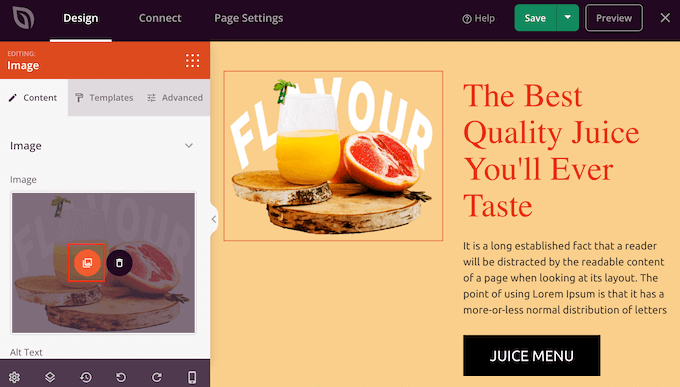
To start, you’ll want to replace any placeholder images with your own photos or custom logo. To do this, simply click to select any Image block in the live preview.
In the left-hand menu, click on the ‘Select Image’ button.
You can now either choose an image from the WordPress media library or upload a new file from your computer.
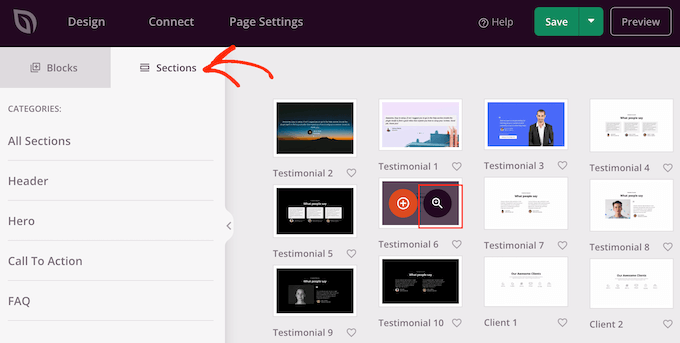
SeedProd also comes with ‘Sections,’ which are collections of blocks that are often used together. For example, SeedProd has a header, hero image, call to action, testimonials, contact form, FAQs, features, footer sections, and more. These can help you create a custom homepage, fast.
To look through the different sections, simply click on the ‘Sections’ tab. To preview any section, just hover your mouse over it and then click on the magnifying glass icon.
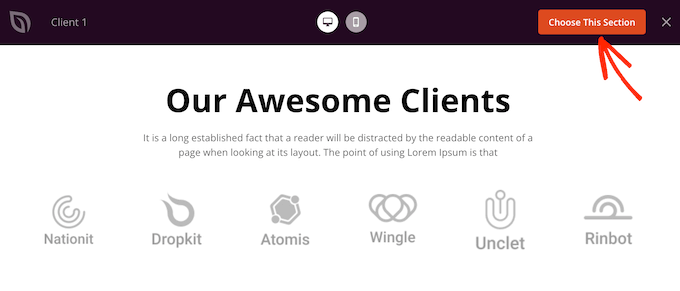
To add the section to your design, simply click on ‘Choose This Section.’
This will add the section to the bottom of your homepage.
You can move sections and blocks around your layout using drag and drop.
When you’re happy with how the homepage looks, don’t forget to click the ‘Save’ button to store your changes.
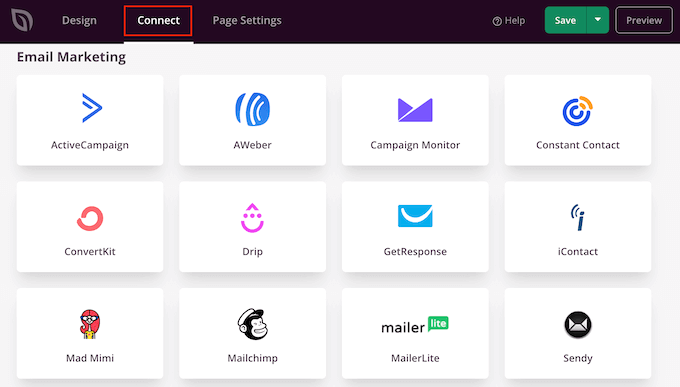
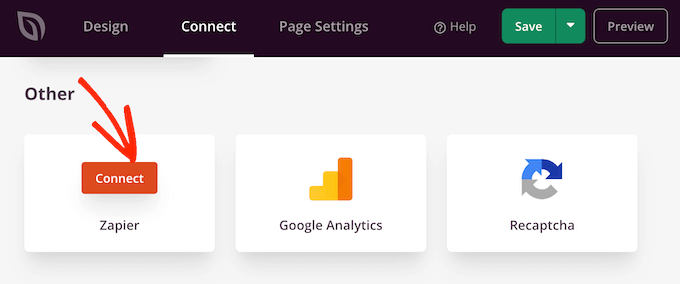
To do this, simply click on the ‘Connect’ tab and then select your email service provider.
SeedProd will now show you how to integrate the homepage with your email provider.
If your provider isn’t listed, then don’t worry. SeedProd works with Zapier which acts as a bridge between SeedProd and more than 3000+ other apps.
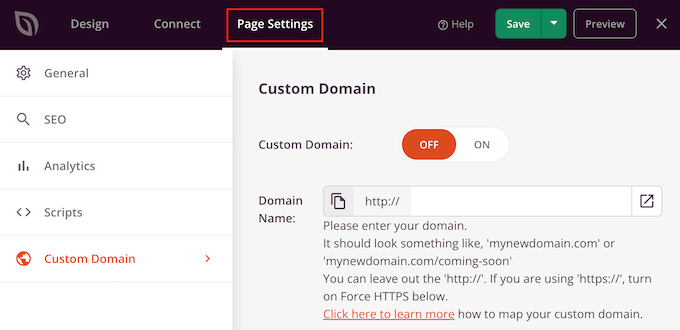
Once you’ve done that, you’re ready to publish your custom homepage. Simply click on the ‘Page Settings’ tab.
There are more options under the Page Settings tab that you may want to look at. For example, you can change the SEO settings, edit the page title, and connect a custom domain.
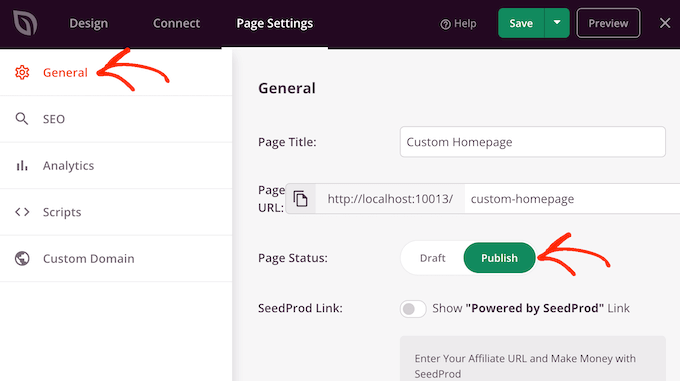
When you’re happy with how the page is set up, go ahead and select the ‘General’ tab.
You can now click on the ‘Page Status’ toggle to change it from ‘Draft’ to ‘Publish.’
Now, you simply need to head over to Settings » Reading and set this page as your new custom homepage.
Method 3. Manually Create a Custom Homepage in WordPress (Coding Required)
You can also create a custom homepage using code. However, this method is complicated and coding mistakes can cause all kinds of common WordPress errors.
That being said, we don’t recommend this method for beginners.
Your WordPress theme is made up of many different files. Some of these files are called templates and they control how different areas of your website look. For more information, please see our WordPress template hierarchy cheat sheet.
One of these templates is called front-page.php.
If your theme has this template, then WordPress will automatically use it to show your homepage. This means you can create a custom homepage by editing this file or replacing it with a new file.
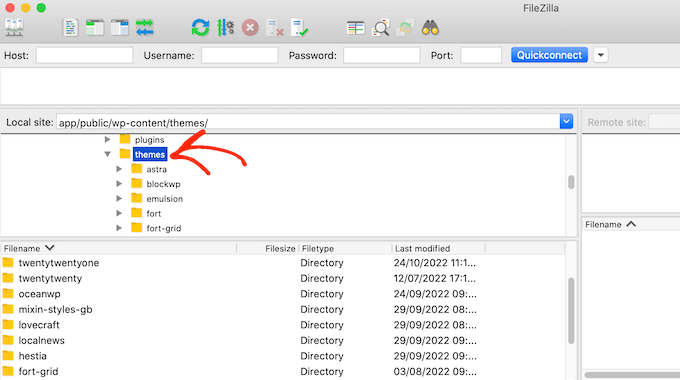
After connecting to the server, go to /wp-content/themes/ and then open the folder for your current WordPress theme.
If this folder already has a front-page.php file, then you can go ahead and open that file in any text editor, such as Notepad. You can then make any changes you want by editing the code.
If your theme doesn’t have a front-page.php file, then you can create a new file with the name front-page.php.
After that, you just need to upload front-page.php to your current theme’s folder on your WordPress hosting account.
As soon as you upload this file, WordPress will start using it to display your homepage. However, since the file is completely empty, you will see a blank page as your homepage.
To fix this, just open the file in a text editor app and start adding HTML code.
If you’re starting with an empty file, then you can save yourself some time by using the existing code and templates in your WordPress theme.
For example, it usually makes sense to include the theme’s header and footer.
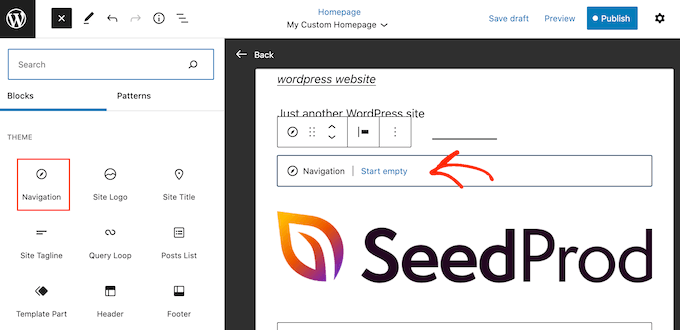
In the following sample code, we’ve removed the content and sidebars while fetching the header and navigation templates from the theme.
<?php /*
This page is used to display the static frontpage.
*/

// Fetch theme header template
get_header(); ?>
    <div id="primary" <?php astra_primary_class(); ?>>

    <div class="custom-homepage-container">

    You custom homepage code goes here

    </div>

    </div><!-- #primary -->
//Fetch the theme footer template
<?php get_footer(); ?>
Tips on Making an Effective Custom Homepage in WordPress
The homepage is your site’s most important page. People will visit this page to learn more about your business, products, and services.
To help visitors find what they’re looking for, we recommend keeping your homepage design as simple as possible and avoiding any clutter.
It’s also a good idea to place your most important content at the top of the page so it’s the first thing visitors see.
Before designing your page, it may help to write down the goals you want to achieve. You can then design every part of the homepage to help you reach this clear target.
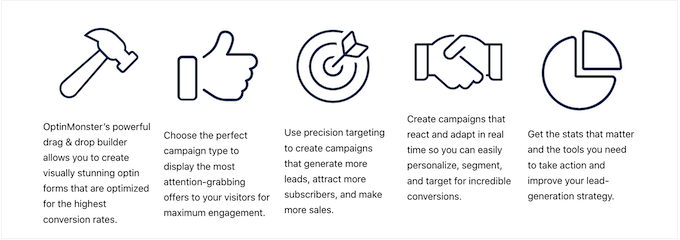
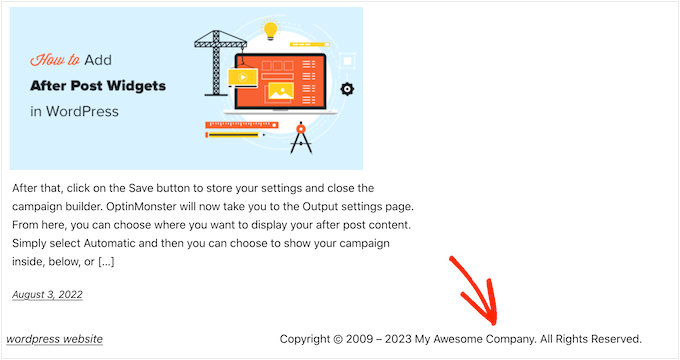
Many businesses and blogs want to convert visitors into customers. To achieve this, we recommend adding OptinMonster to your custom homepage.
OptinMonster is the best WordPress popup plugin and lead generation software. It allows you to create all kinds of popups, floating bars, full-screen welcome mats, slide-in scroll boxes, inline personalized lead forms, gamified spin to win optins, and more.
Next, you’ll want to track how your custom homepage is performing. You can then use this insight to fine-tune the page design and get even more conversions.
MonsterInsights is the best plugin for Google Analytics. It allows you to easily install Google analytics in WordPress and shows you helpful reports directly in the WordPress dashboard.
The best part about using MonsterInsights is that you can add the Google Analytics tracking code without editing code or hiring a developer. Plus, it has a Dual Tracking feature, which makes it super easy to switch to Google Analytics 4.
You should also make it easy for visitors and potential customers to contact you. For this, we recommend WPForms which is the best WordPress form plugin on the market.
Finally, it’s a good idea to look at your competitors and other popular sites in your industry or niche. While it’s never a good idea to copy, you can use them as inspiration or learn best practices that you can then apply to your own homepage layout.
Do you want to add a comment privacy optin checkbox in WordPress? European Union’s new GDPR law requires explicit consent for storing user’s personal information. If you have comments enabled on your website, then you need to add a comment privacy checkbox to comply with the new law. In this article, we will show you how to add a GDPR comment privacy opt-in checkbox in WordPress.
When and Why Add a Comment Privacy Optin Checkbox in WordPress?
Recently, a new European Union law called GDPR (The General Data Protection Regulation) has become effective. The purpose of this law is to give EU citizens control over their personal data and change the data privacy approach of organizations across the world.
To learn more, see our ultimate guide to WordPress and GDPR compliance which answers all your questions in plain English.
WordPress recently addressed GDPR compliance in the latest 4.9.6 release. If you haven’t updated yet, then you need to immediately update to the latest WordPress version.
One of the ways WordPress stores and uses personal information is in the comment form. When a user leaves a comment on your website, their name, email address, and website information is stored in a browser cookie. This cookie allows WordPress to automatically fill in user’s information in the comment form on their next visit.
With WordPress 4.9.6, the default WordPress comment form will now show a comment privacy opt-in checkbox. All WordPress themes that use the default WordPress comment form will now automatically show this checkbox.
If your site is showing the comment privacy checkbox, then you don’t need to read further. However if the comment checkbox is not showing on your site, then you need to continue reading, and we will show you how to add comment privacy checkbox in WordPress.
Adding Comment Privacy Optin Checkbox in WordPress
First, you need to make sure that you are using the latest version of WordPress and your theme. Simply go to Dashboard » Updates page to check for updates.
If an update is available for your current theme or WordPress, then go ahead and install it. Next, check your website’s comment form to see if the update added the comment privacy checkbox.
If both your theme and WordPress are up to date, and you still can’t see the comment privacy checkbox, then this means that your WordPress theme is overriding the default WordPress comment form.
You can ask your theme author to fix this issue by opening a support ticket. You can also try to fix it yourself until your theme author releases an update.
There are two ways you can add the comment privacy checkbox to your WordPress theme. We will show you both methods, and you can try the one that works for you.
Both methods require you to add code to your WordPress theme files. If you haven’t done this before, then see our guide on how to copy and paste code in WordPress.
Method 1. Add comment privacy checkbox to your theme’s comment form
This method is recommended because it tries to protect your theme’s comment form style and layout.
First, you will need to find the code used to override the default WordPress comment form. Normally, you can find it in the comments.php or functions.php file in your theme folder.
You will be looking for a code using the 'comment_form_default_fields'filter. This filter is used by themes to override the default WordPress comment form.
It will have lines for all of your comment form fields in a specific format. Here is an example code to give you an idea of what you would be looking for:
In this code, you can notice that comment_form_default_fields filter is used to modify the author, email, and URL fields. Inside the array, it uses the following format to display each field:
'fieldname' => 'HTML code to display the field',
'anotherfield' => 'HTML code to display the field',
We will add the comment privacy optin checkbox field towards the end. Here is what our code will look like now:
$comments_args = array(
	        // change the title of send button
	        'label_submit'=> esc_html(__('Post Comments','themename')),
	        // change the title of the reply section
	        'title_reply'=> esc_html(__('Leave a Comment','themename')),
	        // redefine your own textarea (the comment body)
	        'comment_field' => '
	        <div class="form-group"><div class="input-field"><textarea class="materialize-textarea" type="text" rows="10" id="textarea1" name="comment" aria-required="true"></textarea></div></div>',

	        'fields' => apply_filters( 'comment_form_default_fields', array(
			    'author' =>'' .
			      '<div><div class="input-field">' .
			      '<input class="validate" id="name" name="author" placeholder="'. esc_attr(__('Name','themename')) .'" type="text" value="' . esc_attr( $commenter['comment_author'] ) .
			      '" size="30"' . $aria_req . ' /></div></div>',

			    'email' =>'' .
			      '<div><div class="input-field">' .
			      '<input class="validate" id="email" name="email" placeholder="'. esc_attr(__('Email','themename')) .'" type="email" value="' . esc_attr(  $commenter['comment_author_email'] ) .
			      '" size="30"' . $aria_req . ' /></div></div>',

			    'url' =>'' .
			      '<div class="form-group">'.
			      '<div><div class="input-field"><input class="validate" placeholder="'. esc_attr(__('Website','themename')) .'" id="url" name="url" type="text" value="' . esc_attr( $commenter['comment_author_url'] ) .
			      '" size="30" /></div></div>',

// Now we will add our new privacy checkbox optin

				'cookies' => '<p class="comment-form-cookies-consent"><input id="wp-comment-cookies-consent" name="wp-comment-cookies-consent" type="checkbox" value="yes"' . $consent . ' />' .
	                                         '<label for="wp-comment-cookies-consent">' . __( 'Save my name, email, and website in this browser for the next time I comment.' ) . '</label></p>',
			    )
		    ),
	    );

	comment_form($comments_args); 	?>
Method 2. Replacing your theme’s comment form with WordPress default
This method simply replaces your theme’s comment form with the default WordPress comment form. Using this method can affect your comment form’s appearance, and you may have to use custom CSS to style your comment form.
Edit your theme’s comments.php file and look for the line with the comment_form() function. Your theme will have a defined arguments, function, or a template inside it to load your theme’s custom comment form. Your comment_form line will look something like this:
<?php comment_form( custom_comment_form_function() ); ?>


You will need to replace it with the following line:


<?php comment_form(); ?>
Don’t forget to save your changes and visit your website. You will now see the default WordPress comment form with the comment privacy optin checkbox.
Do you want to add a smooth background color change effect on your WordPress site? You may have seen on some popular websites where the background color of a specific area or the whole web page automatically transitions from one color to another. This beautiful effect can help you get users attention and improve engagement on your website. In this article, we will show you how to easily add a smooth background color change effect in WordPress.
What is Smooth Background Color Change Effect?
Smooth background color change effect allows you to automatically transition between different background colors. The change happens slowly going through different colors until it reaches the final color. It looks like this:
This technique is used to capture user attention with gentle effects that are pleasing to the eye.
That being said, let’s take a look at how to add this smooth background color change effect in any WordPress theme.
Adding Smooth Background Color Change Effect in WordPress
This tutorial requires you to add code in your WordPress files. If you haven’t done this before, then please take a look at our guide on how to copy and paste code in WordPress.
First, you need to find out the CSS class of the area that you want to change. You can do this by using the Inspect tool in your browser. Simply take your mouse to the area you want to change and right click to select the Inspect tool.
Next, you need to write down the CSS class you want to target. For example, in the screenshot above we want to target the widget area in the bottom which has the CSS class ‘page-header’.
In the next step, you need to open a plain text editor on your computer and create a new file. You need to save this file as wpb-background-tutorial.js on your desktop.
Next, you need to add the following code inside your JS file:
jQuery(function($){
        $('.page-header').each(function(){
            var $this = $(this),
			colors = ['#ec008c', '#00bcc3', '#5fb26a', '#fc7331'];

            setInterval(function(){
                var color = colors.shift();
                colors.push(color);
                $this.animate({backgroundColor: color}, 2000);
            },4000);
        });
        });
If you study this code, then you will notice that we have used the CSS class we want to target in the code. We have also added four colors. Our smooth background effect will start from the first color, then transition to the next color, and keep cycling through these colors.
Don’t forget to save your changes to the file.
Next, you need to upload wpb-bg-tutorial.js file to your WordPress theme’s /js/ folder using FTP. If your theme doesn’t have a js folder inside it, then you need to create one.
After uploading your JavaScript file, it is time to load it in WordPress.
You need to add the following code to your theme’s functions.php file.
That’s all, you can now visit your website to see it in action. You will notice the smooth background color change effect in the area that you targeted.
There are many other ways to use background colors in WordPress to capture user attention or make your content pop-out. For example, you can try:
We hope this article helped you learn how to easily add smooth background color change effect in WordPress. You may also want to see our list of the best WordPress page builder plugins that you can try.
If you liked this article, then please subscribe to our YouTube Channel for WordPress video tutorials. You can also find us on Twitter and Facebook.
Do you want to add a load more posts button in WordPress? Many popular platforms allow users to load more posts when they reach to the bottom of the page. In this article, we will show you how to easily add a load more posts button in WordPress.
When and Why Add Load More Posts Button in WordPress
Many blogs use the simple ‘Older posts’ navigation link at the end of their home, blog, and archive pages. Some websites use numeric page navigation which adds more context.
However, there are certain type of websites that can benefit immensely from infinite scroll or load more posts button. Some examples include: photography websites, listicles, and viral content websites.
Instead of loading a whole new page, ‘load more posts’ button works like infinite scroll. It uses JavaScript to quickly fetch the next set of content. This improves user experience and gives them a chance to view more of your content.
That being said, let’s take a look at how to easily add load more posts button in your WordPress site.
Upon activation, the plugin will add a new menu item labeled ‘Ajax Load More’ to your WordPress admin menu. You need to click on it and head over to the plugin’s settings page.
On the settings page, you can choose the color of your button. You can also replace the button with infinite scroll which loads next batch of posts automatically without users clicking on the button.
Next, you need to visit Ajax Load More » Repeater Template page to add your template for displaying posts.
The plugin comes with a basic template containing the WordPress loop to display posts. However, it does not match your theme and may look out of place on your website.
To fix this, you need to copy the code your theme uses to display posts on index, archive, and blog pages.
Normally, this code is located in the template-parts folder of your theme. In that folder, you will see templates to display different content. For example content-page.php, content-search.php, and more.
You will be looking for the generic content.php template. Here is an example from our demo theme’s content.php file:
Once you find that code, you need to paste it inside the Repeater Templates field in plugin settings.
Don’t forget to click on the ‘Save Template’ button to store your settings.
Next, you need to visit Ajax Load More » Shortcode Builder page to generate the shortcode.
This page contains many different options that you can customize. First you will need to select the container type. If you are unsure, just look at the template you copied earlier. Most modern themes use the <div>; element.
After that scroll down to the button labels section. Here you can change the text that appears on the button. By default, plugin uses ‘Older Posts’, and you can change that to ‘Load more posts’ or anything you want.
Lastly, you need to choose whether you want posts to load automatically or wait for users to click on the load more posts button.
Your shortcode is now ready to be used. In the right column, you will see the shortcode output. Go ahead and copy the shortcode and paste it in a text editor as you will need it in the next step.
Adding Load More Posts in Your WordPress Theme
This part of the tutorial requires you to add code into your WordPress theme files. If you haven’t done this before, then take a look at our guide on how to copy and paste code in WordPress.
You will need to find the template files where you want to add the load more posts button in your theme. Depending on how your theme is organized, usually these files are index.php, archives.php, categories.php, etc.
You will need to add the shortcode you copied earlier into your theme right after the endwhile; tag.
Since we are adding the shortcode in a theme file, we will need to add it inside the do_shortcode function, like this:
You can now save your changes and visit your website to see the ‘Load more posts’ button in action.
We hope this article helped you learn how to add load more posts button in WordPress. You may also want to see our mega list of the most useful WordPress tips, tricks, and hacks for beginners.
If you liked this article, then please subscribe to our YouTube Channel for WordPress video tutorials. You can also find us on Twitter and Facebook.
Do you want to style your WordPress navigation menus to change their colors or appearance? While your WordPress theme handles the appearance of your navigation menus, you can easily customize it using CSS to meet your requirements. In this article, we will show you how to style the WordPress navigation menus on your site.
We will be showing two different methods. The first method is for beginners because it uses a plugin and does not require any code knowledge. The second method is for intermediate DIY users who prefer to use CSS code instead of a plugin.
Method 1: Styling WordPress Navigation Menus Using a Plugin
Your WordPress theme uses CSS to style navigation menus. Many beginners are not comfortable with editing theme files or writing CSS code on their own.
That’s when a WordPress styling plugin comes in handy. It saves you from editing theme files or writing any code.
CSS Hero is a premium WordPress plugin that allows you to design your own WordPress theme without writing a single line of code (No HTML or CSS required). See our CSS Hero review to learn more.
WPBeginner users can use use this CSS Hero Coupon to get 34% discount on their purchase.
Upon activation, you will be redirected to obtain your CSS Hero License key. Simply follow the on-screen instructions, and you will be redirected back to your site in a few clicks.
Next, you need to click on the CSS Hero button in your WordPress admin toolbar.
CSS Hero offers a WYSIWYG (What you see is what you get) editor. Clicking on the button will take you to your website with a floating CSS Hero toolbar visible on screen.
You need to click on the blue icon at the top to start editing.
After you click the blue icon, take your mouse to your navigation menu, and CSS Hero will highlight it by showing the borders around it. When you click on the highlighted navigation menu, it will show you the items that you can edit.
In the screenshot above, it shows us top navigation menu container. Let’s assume we want to change the background color of our navigation menu. In that case, we will select top navigation which affects our entire menu.
CSS Hero will now show you different properties that you can edit like text, background, border, margins, padding, etc.
You can click any property that you want to change. CSS Hero will show you a simple interface where you can make your changes.
In the screenshot above, we selected background, and it showed us a nice interface to select background color, gradient, image, and more.
As you make changes, you will be able to see them live in the theme preview.
Once you are satisfied with the changes, click on the save button in CSS Hero toolbar to save your changes.
The best thing about using this method is that you can easily undo any changes that you make. CSS Hero keeps a complete history of all your changes, and you can go back and forth between those changes.
This method requires you to manually add custom CSS and is meant for intermediate users.
WordPress navigation menus are displayed in an unordered list (bulleted list).
Typically if you use the default WordPress menu tag, then it will display a list with no CSS classes associated with it.
<?php wp_nav_menu(); ?>
Your unordered list would have the class name ‘menu’ with each list item having its own CSS class.
This might work if you only have one menu location. However, most themes have multiple locations where you can display navigation menus.
Using only the default CSS class may cause conflict with menus on other locations.
This is why you need to define CSS class and menu location as well. Chances are that your WordPress theme is already doing that by adding the navigation menus using a code like this:
This code tells WordPress that this is where the theme displays primary menu. It also adds a CSS class primary-menu to the navigation menu.
Now you can style your navigation menu using this CSS structure.
// container class
#header .primary-menu{}

// container class first unordered list
#header .primary-menu ul {}

//unordered list within an unordered list
#header .primary-menu ul ul {}

 // each navigation item
#header .primary-menu li {}

// each navigation item anchor
#header .primary-menu li a {}

// unordered list if there is drop down items
#header .primary-menu li ul {}

// each drop down navigation item
#header .primary-menu li li {}

// each drap down navigation item anchor
#header .primary-menu li li a {}
You will need to replace #header with the container CSS class used by your navigation menu.
This structure will help you completely change the appearance of your navigation menu.
However, there are other WordPress generated CSS classes automatically added to each menu and menu item. These classes allow you to customize your navigation menu even further.
// Class for Current Page
.current_page_item{}

// Class for Current Category
.current-cat{}

// Class for any other current Menu Item
.current-menu-item{}

// Class for a Category
.menu-item-type-taxonomy{}

// Class for Post types
.menu-item-type-post_type{}

// Class for any custom links
.menu-item-type-custom{}

// Class for the home Link
.menu-item-home{}
WordPress also allows you to add your own custom CSS classes to individual menu items.
You can use this feature to style menu items, like adding image icons with your menus or by just changing colors to highlight a menu item.
Head over to Appearance » Menus page in your WordPress admin and click on the Screen Options button.
Once you have checked that box, you will see that an additional field is added when you go to edit each individual menu item.
Now you can use this CSS class in your stylesheet to add your custom CSS. It will only affect the menu item with the CSS class you added.
Examples of Styling Navigation Menus in WordPress
Different WordPress themes may use different styling options, CSS classes, and even JavaScript to create navigation menus. This gives you a lot of options to change those styles and customize your navigation menus to meet your own requirements.
The inspect tool in your web browser will be your best friend when it comes to figuring out which CSS classes to change. If you haven’t used it before, then take a look at our guide on how to use inspect tool to customize WordPress themes.
Basically, you just need to point the cursor to the element you want to modify, right click and then select Inspect tool from browser’s menu.
That being said, let’s take a look at some real life examples of styling navigation menus in WordPress.
1. How to Change Font Color in WordPress Navigation Menus
Here is the sample custom CSS that you can add to your theme to change font color of navigation menus.
#top-menu  li.menu-item a {
color:#ff0000;
}
In this example, the #top-menu is the ID assigned to the unordered list that displays our navigation menu. You will need to use the inspect tool to find out the ID used by your theme.
2. How to Change Background Color of Navigation Menu Bar
First you’ll need to find out the CSS ID or class used by your theme for the container surrounding navigation menu.
After that you can use the following custom CSS to change background color of navigation menu bar.
.navigation-top {
background-color:#000;
}
Here is how it looked on our demo website.
3. How to Change Background Color of a Single Menu Item
You may have noticed that many websites use a different background color for the most important links in their navigation menu. This link could be a login, sign up, contact, or buy button. By giving it a different color, it makes the link more noticeable.
To achieve this, we will add a custom CSS class to the menu item that we want highlight with a different background color.
Head over to Appearance » Menus and click on the Screen Options button at the top right corner of the screen. This will bring up a fly down menu where you need to check the box next to ‘CSS classes’ option.
After that you need to scroll down to the menu item that you want to modify and click to expand it. You will notice a new option to add your custom CSS class.
Now you can use this CSS class to style that particular menu item differently.
6. Create Transparent Navigation Menus in WordPress
Many websites use large or fullscreen background images with their call to action buttons. Using transparent menus makes your navigation blend in with the image. This makes users more likely to focus on your call to action.
Simply add the following sample CSS to your theme to make your navigation menus transparent.