Category Archives: wordpress gdpr compliance

How to Host Local Fonts in WordPress for a Faster Website

Do you want to add third-party fonts to your website without slowing down your website speed?

Custom fonts improve the typography and user experience of your website, but they take longer to load. The good news is that you can host your fonts locally to ensure your website is always fast.

In this article, we’ll show you how to host local fonts in WordPress.

How to Host Local Fonts in WordPress for a Faster Website

Why Host Fonts Locally in WordPress?

While typography and custom fonts can improve the overall website aesthetics, they do have a negative impact on your WordPress performance. For example, if you are using a custom font from Google fonts, then they’re loaded from third-party services which will slow down your website.

Luckily, there is a way to use custom fonts without slowing down your site. A new Webfonts API was introduced in WordPress 6.0. This allows you to host fonts locally so they load faster.

Another reason to host Google Fonts locally is to stay GDPR compliant. That’s an important legal consideration if you have website visitors from the European Union.

When someone visits a website that uses Google Fonts, their IP address is logged by Google when the fonts are loaded. Because this is done without their permission, the EU now considers that a breach of privacy regulations, and you may be liable for damages.

That being said, let’s take a look at how to host local fonts in WordPress for a faster website. We’ll cover two methods, and the first method is recommended for most users.

Method 1: Hosting Local Fonts in WordPress With a Plugin

The first thing you need to do is install and activate the OMGF (Optimize My Google Fonts) plugin. For more details, see our step-by-step guide on how to install a WordPress plugin.

OMGF is one of the best WordPress typography plugins. It offers a beginner-friendly way to improve performance and GDPR compliance by hosting Google Fonts locally.

Upon activation, you need to visit Settings » Optimize Google Fonts to configure the plugin. You should be looking at the ‘Optimize Fonts’ tab.

Notice the statement under the ‘Optimize Google Fonts’ heading that you just need to use the default settings to automatically replace your Google Fonts with locally hosted copies.

OMGF Settings

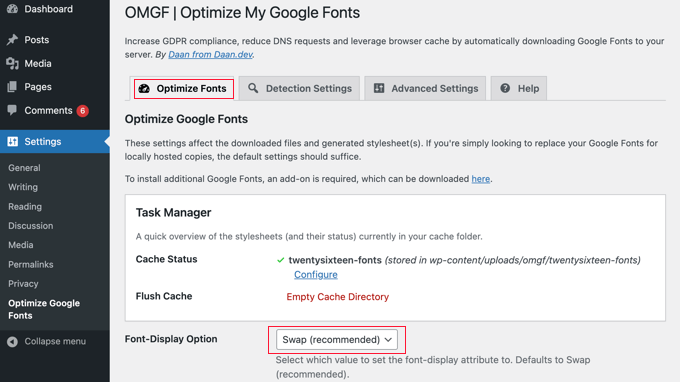
That means that as you scroll down the settings page, all you need to do is make sure that the ‘Font-Display Option’ has the default setting of ‘Swap (recommended)’ selected.

All you need to do now is click the ‘Save & Optimize’ button at the bottom of the page.

Click the Save & Optimize Button

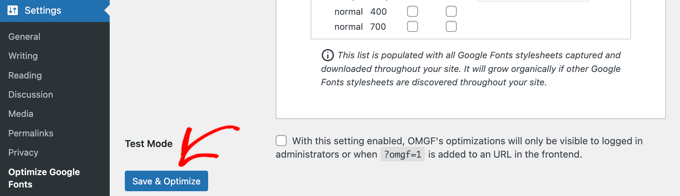
You’ll see a message at the top of the screen that says ‘Optimization completed successfully.’

Congratulations! Your Google Fonts are now hosted locally. Your website will load faster and you have reduced the risk of European lawsuits.

Method 2: Hosting Local Fonts in WordPress Manually

You can also host fonts locally without using a plugin by using the @font-face method from our guide on how to add custom fonts in WordPress. While this method requires more work, it allows you to use any font that you like on your website.

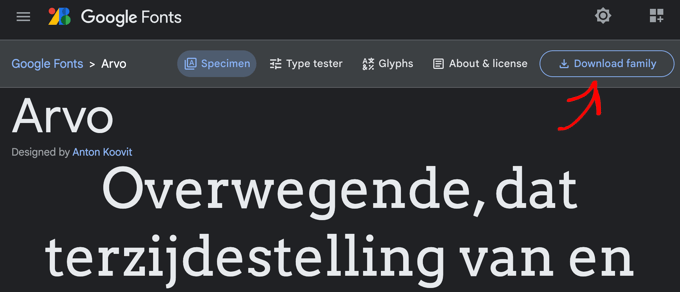
You need to download the fonts you wish to use in a web format. There are many places to find great free web fonts, such as Google Fonts, Typekit, FontSquirrel, and more.

Downloading a Google Font

If you do not have the web format for your font, then you can convert it using the FontSquirrel Webfont generator.

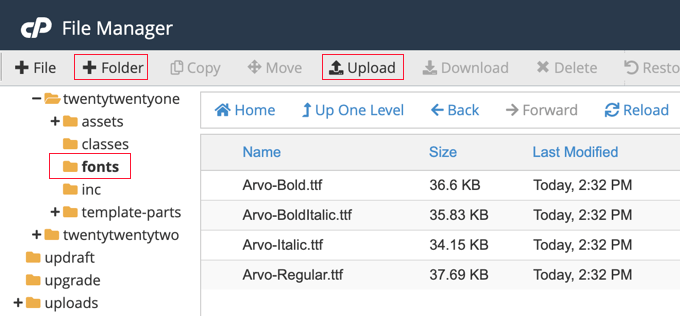
Now you need to store the fonts on your WordPress hosting server. You can upload the files using FTP or using your host’s cPanel File Manager.

You should create a new folder called ‘fonts’ in the directory of your theme or child theme and upload it there.

Upload the Fonts to Your Website

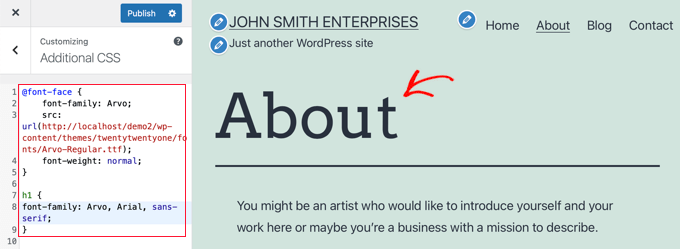
Once you have uploaded the font, you need to load the font in your theme’s stylesheet using custom CSS. You can add the code directly to your theme’s style.css file, or by using the Additional CSS section of the theme customizer.

You can do that using CSS3 @font-face rule like this:

@font-face {
    font-family: Arvo;
    src: url(http://example.com/wp-content/themes/twentytwentyone/fonts/Arvo-Regular.ttf);
    font-weight: normal;
}

Don’t forget to replace the font family and URL with your own.

After that, you can use that font anywhere in your theme’s stylesheet or the Additional CSS section of the theme customizer. The CSS you use will depend on your theme and where you wish to use the local font. Here’s an example from our demo website:

h1 {
font-family: Arvo, Arial, sans-serif;
}

As you can see, our heading is now using the locally hosted Arvo font.

Adding Custom CSS With the Theme Customizer

We hope this tutorial helped you learn how to host local fonts in WordPress for a faster website. You may also want to learn how to increase your blog traffic, or check out our list of must have WordPress plugins to grow your site.

If you liked this article, then please subscribe to our YouTube Channel for WordPress video tutorials. You can also find us on Twitter and Facebook.

The post How to Host Local Fonts in WordPress for a Faster Website first appeared on WPBeginner.

How to Create GDPR Compliant Forms in WordPress

Do you want to create GDPR-compliant forms in WordPress?

European Union’s new GDPR law requires explicit user consent to store personal information so that users can have more personal control over their data stored on websites.

In this article, we will show you how to easily create GDPR-compliant forms in WordPress.

How to Create GDPR compliant forms in WordPress

What is GDPR?

The General Data Protection Regulation (GDPR) is a European Union (EU) law that became effective on May 25th, 2018. This new law aims to give EU citizens control over their personal data and change how companies and businesses handle data privacy around the world.

For more details, see our ultimate guide to WordPress and GDPR compliance which will answer all your GDPR-related questions in plain English.

A typical WordPress site may collect users’ personal information in a number of ways. One of which is by adding forms to the site. Most forms collect personal information, and you may want to make sure that your WordPress forms comply with GDPR.

What is Required to Make a Form GDPR Compliant

In order to make your WordPress forms GDPR compliant, you will need to add the following features:

  • Ask users to give explicit consent for storing and using their personal information.
  • Allow users to request access to their own personal information stored on your website.
  • Allow users to request the deletion of their data from your website.

Having said that, let’s take a look at how to easily create GDPR-compliant WordPress forms. You can click the links below to jump ahead to any section:

How to Make a GDPR Compliant Form in WordPress

We recommend using WPForms to make GDPR-compliant WordPress forms. It is the best contact form plugin for WordPress and has built-in GDPR enhancement features.

For instance, you get a 1-click GDPR Agreement field for your forms, GDPR-compliant data retention best practices, easy entry management system to quickly find, export, or delete user data upon request.

First, you need to install and activate the WPForms plugin. For more details, see our step-by-step guide on how to install a WordPress plugin.

For this tutorial, we’ll use the WPForms Pro version because it includes the disable user cookies and user details options. However, you can also use the WPForms Lite version to create a GDPR-compliant form.

Upon activation, you need to visit WPForms » Settings page and enter your license key. You can find the license key in the WPForms account area.

Entering the WPForms license key

Next, you’ll need to scroll down to the GDPR section.

There, you need to check the box next to the GDPR Enhancements option.

Enable GDPR enhancement option

Enabling the GDPR Enhancements option will reveal two more GDPR-related settings.

The first option, ‘Disable User Cookies,’ will stop WPForms from storing user sessions. This cookie contains a random unique identifier that helps WPForms add features like related entries, form abandonment, and geolocation. Disabling it will also disable those features.

The second option, ‘Disable User Details,’ will stop WPForms from storing user IP addresses and browser information. Both of these settings are optional, and you can check them if you feel that you don’t need these features.

Don’t forget to click the ‘Save Settings’ button to store your changes.

Select Form Template and Add GDRP Agreement Field

WPForms is now ready to create GDPR-compliant forms in WordPress. You can now go to WPForms » Add New page to create a new form.

You will be asked to enter a title for your form and select a template. These templates are ready-made forms that you can use as a starting point. In this tutorial, we’ll use the ‘Simple Contact Form’ template.

Add a new form

This will launch the WPForms builder interface.

You will see your form preview in the right column, and on the left, you will see all the fields that you can add to your form.

Add the GDPR agreement field

Simply drag the ‘GDPR Agreement’ field and add it to your form.

You will now see it appear at the bottom of your form. If you click on it, more options will appear in the settings panel on the left.

Edit the GDPR agreement

You can change the title of the form field and agreement text, and then use the description box to add details like a link to your privacy policy or terms and conditions pages.

Note: The GDPR Agreement field is always a required field, and it cannot be pre-checked to comply with the GDPR law. You can only add one GDPR agreement field to each form.

Next, you can go to the Settings » Confirmations tab in the form builder. Here, you’ll get different options to select when a user submits a form. For instance, you can show a message, a page, or to redirect users to another URL.

Edit form confirmation settings

Once you are satisfied with the form, don’t forget to store your changes.

Adding GDPR Compliant Form to WordPress

WPForms allows you to easily add forms anywhere on your website.

You can simply click the ‘Embed’ button at the top of the form builder to get started.

Click the embed button

Next, a popup will open, which will ask you to create a new page or select an existing page.

We’ll use the ‘Create New Page’ option for this tutorial.

Embed a form in page

After that, you’ll need to enter a name for your page.

Once that’s done, simply click the ‘Let’s Go’ button.

Enter the name of the page

Your form will now appear in the WordPress content editor.

Another way to add forms to any page or post is using the WPForms block. Simply add the block to your content and select your form from the dropdown menu.

Add a WPForms block in wordpress

You can now save or publish your post or page.

Simply visit your website to see your GDPR-ready WordPress form in action.

GDPR form preview

Managing Data Access and Deletion Requirements with WPForms

One of the requirements for GDPR compliance is to give users access and allow them to request the deletion of their data.

To do that, you can create a ‘Data access/delete form’ and add it to your privacy policy page. Users who wish to access their stored data or want it to be deleted can use that form to send you a request.

WPForms has an excellent entry management system that allows you to quickly find any data submitted via your forms.

You can access all form entries by visiting WPForms » Entries page from your WordPress dashboard and selecting the form you wish to view.

View form entries in WPForms

WPForms will show you all entries submitted using that form. You can search for a form entry by entering a name, email address, IP address, or keyword.

From here, you can simply click the ‘Delete All’ option at the top to remove form entries.

Delete form entries

You can also delete individual entries or click the view button to see all data stored for that entry.

Disabling User Details for Specific Forms

With WPForms, you get full control over which forms can store user data. You can disable user details to be stored for each individual form.

First, you’ll need to go to WPForms » Settings from your WordPress dashboard and scroll down to the ‘GDPR’ section.

Here, ensure that the ‘Disable User Details’ option is unchecked.

Disable user details is unchecked

Don’t forget to click the ‘Save Settings’ button when you’re done.

After that, you can change each form’s settings in the form builder.

All you have to do is head to Settings » General in the form builder. Next, click the ‘Advanced’ section to expand it. From here, simply click the toggle for the ‘Disable storing user details (IP address and user agent)’ option.

Disable storing user details-settings

This will prevent extra user information from being stored for individual forms.

We hope this article helped you learn how to easily create GDPR-compliant forms in WordPress. You may also want to see our article on how to track user engagement in WordPress using Google Analytics and the ultimate WordPress SEO guide for beginners.

If you liked this article, then please subscribe to our YouTube Channel for WordPress video tutorials. You can also find us on Twitter and Facebook.

The post How to Create GDPR Compliant Forms in WordPress first appeared on WPBeginner.

How to Add a GDPR Comment Privacy Opt-in Checkbox in WordPress

Do you want to add a comment privacy optin checkbox in WordPress? European Union’s new GDPR law requires explicit consent for storing user’s personal information. If you have comments enabled on your website, then you need to add a comment privacy checkbox to comply with the new law. In this article, we will show you how to add a GDPR comment privacy opt-in checkbox in WordPress.

How to add comment privacy optin checkbox in WordPress

When and Why Add a Comment Privacy Optin Checkbox in WordPress?

Recently, a new European Union law called GDPR (The General Data Protection Regulation) has become effective. The purpose of this law is to give EU citizens control over their personal data and change the data privacy approach of organizations across the world.

To learn more, see our ultimate guide to WordPress and GDPR compliance which answers all your questions in plain English.

WordPress recently addressed GDPR compliance in the latest 4.9.6 release. If you haven’t updated yet, then you need to immediately update to the latest WordPress version.

One of the ways WordPress stores and uses personal information is in the comment form. When a user leaves a comment on your website, their name, email address, and website information is stored in a browser cookie. This cookie allows WordPress to automatically fill in user’s information in the comment form on their next visit.

With WordPress 4.9.6, the default WordPress comment form will now show a comment privacy opt-in checkbox. All WordPress themes that use the default WordPress comment form will now automatically show this checkbox.

Comment privacy checkbox in default WordPress comment form

If your site is showing the comment privacy checkbox, then you don’t need to read further. However if the comment checkbox is not showing on your site, then you need to continue reading, and we will show you how to add comment privacy checkbox in WordPress.

Adding Comment Privacy Optin Checkbox in WordPress

First, you need to make sure that you are using the latest version of WordPress and your theme. Simply go to Dashboard » Updates page to check for updates.

Check for WordPress and theme updates

If an update is available for your current theme or WordPress, then go ahead and install it. Next, check your website’s comment form to see if the update added the comment privacy checkbox.

If both your theme and WordPress are up to date, and you still can’t see the comment privacy checkbox, then this means that your WordPress theme is overriding the default WordPress comment form.

You can ask your theme author to fix this issue by opening a support ticket. You can also try to fix it yourself until your theme author releases an update.

There are two ways you can add the comment privacy checkbox to your WordPress theme. We will show you both methods, and you can try the one that works for you.

Both methods require you to add code to your WordPress theme files. If you haven’t done this before, then see our guide on how to copy and paste code in WordPress.

Method 1. Add comment privacy checkbox to your theme’s comment form

This method is recommended because it tries to protect your theme’s comment form style and layout.

First, you will need to find the code used to override the default WordPress comment form. Normally, you can find it in the comments.php or functions.php file in your theme folder.

You will be looking for a code using the 'comment_form_default_fields' filter. This filter is used by themes to override the default WordPress comment form.

It will have lines for all of your comment form fields in a specific format. Here is an example code to give you an idea of what you would be looking for:

$comments_args = array(
	        // change the title of send button 
	        'label_submit'=> esc_html(__('Post Comments','themename')),
	        // change the title of the reply section
	        'title_reply'=> esc_html(__('Leave a Comment','themename')),
	        // redefine your own textarea (the comment body)
	        'comment_field' => ' 
	        <div class="form-group"><div class="input-field"><textarea class="materialize-textarea" type="text" rows="10" id="textarea1" name="comment" aria-required="true"></textarea></div></div>',

	        'fields' => apply_filters( 'comment_form_default_fields', array(
			    'author' =>'' .
			      '<div><div class="input-field">' .
			      '<input class="validate" id="name" name="author" placeholder="'. esc_attr(__('Name','themename')) .'" type="text" value="' . esc_attr( $commenter['comment_author'] ) .
			      '" size="30"' . $aria_req . ' /></div></div>',

			    'email' =>'' .
			      '<div><div class="input-field">' .
			      '<input class="validate" id="email" name="email" placeholder="'. esc_attr(__('Email','themename')) .'" type="email" value="' . esc_attr(  $commenter['comment_author_email'] ) .
			      '" size="30"' . $aria_req . ' /></div></div>',

			    'url' =>'' .
			      '<div class="form-group">'.
			      '<div><div class="input-field"><input class="validate" placeholder="'. esc_attr(__('Website','themename')) .'" id="url" name="url" type="text" value="' . esc_attr( $commenter['comment_author_url'] ) .
			      '" size="30" /></div></div>',
			    )
		    ),
	    );

	comment_form($comments_args); 	?> 

In this code, you can notice that comment_form_default_fields filter is used to modify the author, email, and URL fields. Inside the array, it uses the following format to display each field:

'fieldname' => 'HTML code to display the field', 
'anotherfield' => 'HTML code to display the field', 

We will add the comment privacy optin checkbox field towards the end. Here is what our code will look like now:

$comments_args = array(
	        // change the title of send button 
	        'label_submit'=> esc_html(__('Post Comments','themename')),
	        // change the title of the reply section
	        'title_reply'=> esc_html(__('Leave a Comment','themename')),
	        // redefine your own textarea (the comment body)
	        'comment_field' => ' 
	        <div class="form-group"><div class="input-field"><textarea class="materialize-textarea" type="text" rows="10" id="textarea1" name="comment" aria-required="true"></textarea></div></div>',

	        'fields' => apply_filters( 'comment_form_default_fields', array(
			    'author' =>'' .
			      '<div><div class="input-field">' .
			      '<input class="validate" id="name" name="author" placeholder="'. esc_attr(__('Name','themename')) .'" type="text" value="' . esc_attr( $commenter['comment_author'] ) .
			      '" size="30"' . $aria_req . ' /></div></div>',

			    'email' =>'' .
			      '<div><div class="input-field">' .
			      '<input class="validate" id="email" name="email" placeholder="'. esc_attr(__('Email','themename')) .'" type="email" value="' . esc_attr(  $commenter['comment_author_email'] ) .
			      '" size="30"' . $aria_req . ' /></div></div>',

			    'url' =>'' .
			      '<div class="form-group">'.
			      '<div><div class="input-field"><input class="validate" placeholder="'. esc_attr(__('Website','themename')) .'" id="url" name="url" type="text" value="' . esc_attr( $commenter['comment_author_url'] ) .
			      '" size="30" /></div></div>',

// Now we will add our new privacy checkbox optin

				'cookies' => '<p class="comment-form-cookies-consent"><input id="wp-comment-cookies-consent" name="wp-comment-cookies-consent" type="checkbox" value="yes"' . $consent . ' />' .
	                                         '<label for="wp-comment-cookies-consent">' . __( 'Save my name, email, and website in this browser for the next time I comment.' ) . '</label></p>',
			    )
		    ),
	    );

	comment_form($comments_args); 	?> 

Privacy checkbox in a custom WordPress comment form

Method 2. Replacing your theme’s comment form with WordPress default

This method simply replaces your theme’s comment form with the default WordPress comment form. Using this method can affect your comment form’s appearance, and you may have to use custom CSS to style your comment form.

Edit your theme’s comments.php file and look for the line with the comment_form() function. Your theme will have a defined arguments, function, or a template inside it to load your theme’s custom comment form. Your comment_form line will look something like this:

<?php comment_form( custom_comment_form_function() ); ?>


You will need to replace it with the following line:


<?php comment_form(); ?>

Don’t forget to save your changes and visit your website. You will now see the default WordPress comment form with the comment privacy optin checkbox.

Default WordPress comment form

We hope this article helped you learn how to add the GDPR comment privacy optin checkbox in WordPress. You may also want to see our tips on getting more comments on your WordPress blog posts.

If you liked this article, then please subscribe to our YouTube Channel for WordPress video tutorials. You can also find us on Twitter and Facebook.

The post How to Add a GDPR Comment Privacy Opt-in Checkbox in WordPress appeared first on WPBeginner.