Category Archives: wordpress tutorial

How to Enable / Activate WordPress Plugins from the Database

Are you looking to enable or activate plugins from the WordPress database?

If you are unable to access your WordPress admin area and need to activate a plugin to restore your access, then you can do that from the WordPress database.

In this article, we will show you how to easily activate your WordPress plugins using the database.
How to enable/activate WordPress plugins from the database

When Should You Activate WordPress Plugins Using Database

A number of common WordPress errors can prevent a website owner from accessing the WordPress admin area. In most of those situations, the user is looking to deactivate WordPress plugins without admin access.

However in some situations, a website owner may need to activate certain plugins to restore access to their WordPress website.

For example, let’s assume an error is stopping you from accessing your WordPress dashboard, and you have found a plugin that can fix that error.

Luckily, WordPress stores the active plugins information in your WordPress database. This means you can manually enter this information directly in the database and tell WordPress to activate a plugin.

The only condition is that the plugin must be installed on your WordPress site. Which means that it should be present in the plugins folder on your WordPress website.

With that being said, let’s see how you can easily enable/activate a plugin using the database.

Step 1. Find Your Database Name Using the Hosting Control Panel

To activate your WordPress plugins using phpMyAdmin, first, you need to find out your WordPress database’s name.

Now, to find the name of your database, you need to log in to your web hosting dashboard. For this tutorial, we will be using Bluehost.

If you are using a different hosting company, then your WordPress hosting dashboard may look slightly different.

Once you are on the cPanel, scroll down to the ‘Files’ section and click the ‘File Manager’ option.
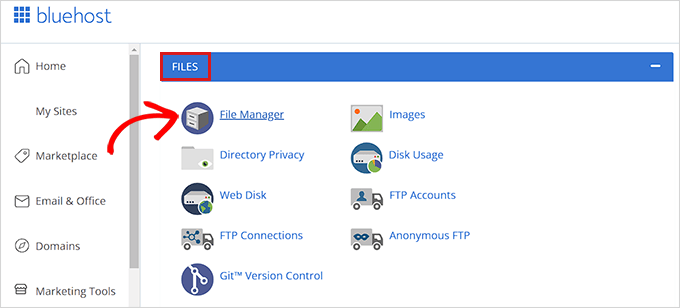
Click at the file manager

This will open up the File Manager in a new window. Here you simply need to locate and click the public_html folder from the left column.

This will open up all the files that are stored in the public_html folder. Now, you simply need to locate and click the folder with your site’s name on it present under the ‘Name’ column.

Go to the publich_html file and find your site name

Some users may instead see their WordPress files and folders installed inside public_html folder.

After you have opened up your WordPress site’s file, locate the wp-config.php file under the ‘Name’ section and right-click on it.

This will open up a menu where you need to select the ‘View’ option.
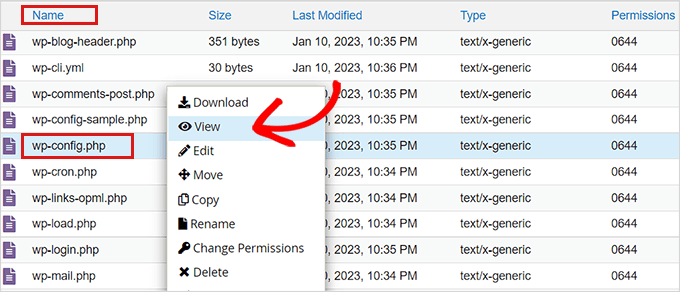
Click View

This will open up the wp-config.php file in a new window where you can locate your database details.

We recommend that you copy and paste your database details including username and password into a notepad on your computer.
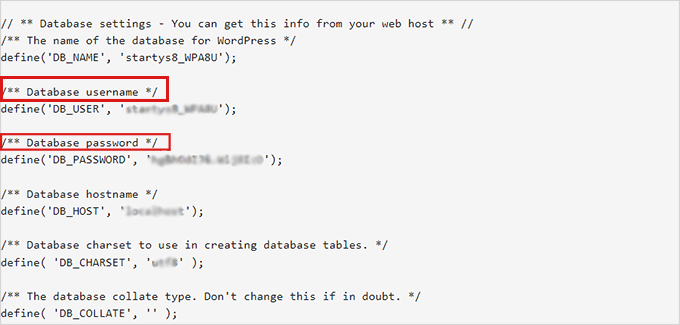
Database details

Now you’ve successfully found your database’s name, let’s move to our next step.

Step 2. Locate Active Plugins Option via PhpMyAdmin

After you have found out the name of your database, you need to go back to your WordPress hosting control panel.

Once there, scroll down to the ‘Databases’ section and click the ‘phpMyAdmin’ option.
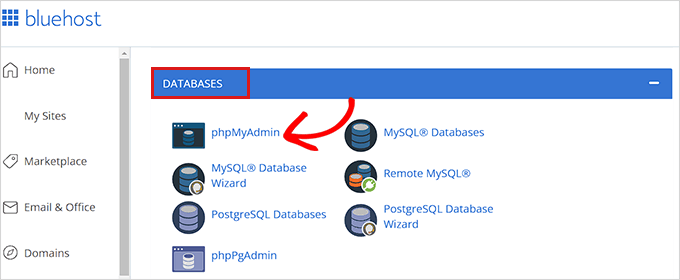
Click the phpMyAdmin option in the cPanel

This will launch the phpMyAdmin app in a new browser tab.

Note: Before you make any kind of changes, please make sure to create a complete backup of your database. It will come in handy if anything goes wrong with the process.

Next, you simply need to click the ‘Database’ tab from the navigation menu present at the top of the page.

Now, simply locate your WordPress database and click on the browse button to expand it.

Click the Database tab from the navigation menu

This will show your WordPress database tables.

Here, you will simply need to locate wp_options table and click browse next to it.

Note: By default, WordPress uses wp_ as the prefix for table names. Your WordPress database table may have a different table prefix.
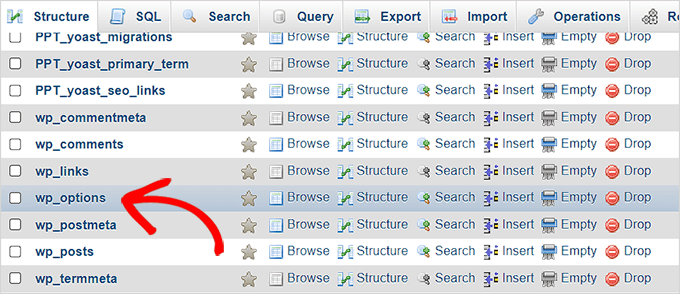
Click at wp-options

Inside the wp_options table, you’ll need to find the row where option_name is set toactive_plugins.

After that, click on the Edit link next to it.
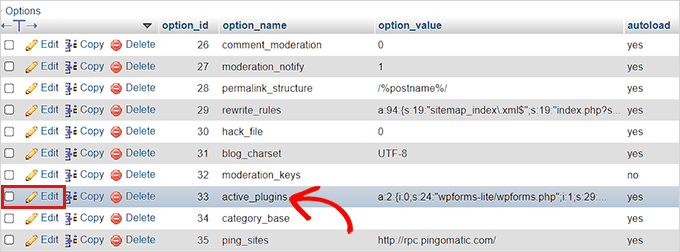
Click the Activate_Plugins option

This will open up a box where you can manually enter details to activate a plugin.

Step 3. Activate a Plugin Using phpMyAdmin

WordPress stores the active plugins information in a special format so that it can be programatically accessed by the software.

In order to tell WordPress which plugins to activate, we’ll need to use that same format.

First, we’ll start by entering the option_value as a:1: and then open up the curly bracket ({).

We are entering this value as 1 because we only want to activate one plugin. You have to change the value to the number of plugins you plan on activating.

Add option value

Next, we will be entering i:0; after the curly bracket. Here we are essentially assigning a serial number to our plugin.

Remember to always assign numbers starting from 0 instead of 1.

Add serial number

Next, we will be entering the number of characters present in the plugin’s name and the php file name of the plugin that we’re about to activate.

For that, we will type s:24: in the box. Keep in mind that the number of characters will differ for each plugin based on the characters in the plugin directory and file name.

For instance, we are activating WPForms in this tutorial which has 24 characters in its name including the file name of the plugin as stored in our file manager.

Add character number

Next, you just need to type the plugin’s directory name. You can find it by visiting the /wp-content/plugins/ folder using the File Manager app.

Don’t forget to add quotation marks before typing the plugin’s directory name.

Type the plugins' name

After the /, you need to enter the plugin’s file name. This is usually the file with similar name inside the plugin folder.
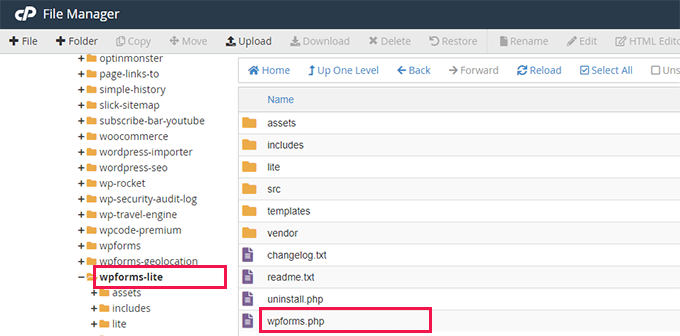
Plugin file and folder name

Now, go back to phpMyAdmin and type the name of the plugin and then close the quotation marks.

After that, simply add a semi-colon (;) and close the curly brackets (}). The final value in this example would look like this:

a:1:{i:0;s:24:"wpforms-lite/wpforms.php";}

This is how it will look once you’re done.

Activating a single plugin

Next, simply click the ‘Go’ button to execute the command.

Now go visit your WordPress dashboard and head over to Plugins » Installed Plugins.

Your plugin has been successfully activated.
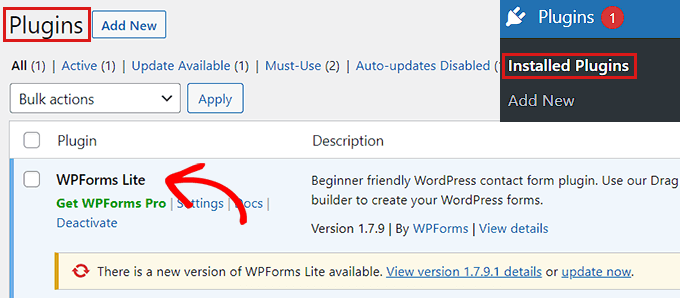
activated-plugin

Now let’s say you want to activate two more plugins.

First you will need to change the number of plugins. After you will adjust each entry for the plugin that you want to activate.

Here is an example:

a:3:{
i:0;s:47:"all-in-one-seo-pack-pro/all_in_one_seo_pack.php";
i:1;s:35:"insert-headers-and-footers/ihaf.php";
i:2;s:24:"wpforms-lite/wpforms.php";
}

Note: We have added line breaks here to make the code look more readable. You need to make sure that there are no line breaks or spaces in your code. Otherwise, it wouldn’t work.

We hope you learned how to activate a plugin using the database. You may also want to see our guide on how to add social media feeds to WordPress, and our comparison of the best domain registrars in the world.

If you liked this article, then please subscribe to our YouTube Channel for WordPress video tutorials. You can also find us on Twitter and Facebook.

The post How to Enable / Activate WordPress Plugins from the Database first appeared on WPBeginner.
How to Properly Disable Lazy Load in WordPress (Step by Step)

Do you want to disable lazy loading in WordPress?

By default, WordPress comes with a lazy load feature, which delays downloads for images and other media to improve page load speed.

However, for some websites, it may affect user experience by not displaying images and media right away.

In this article, we’ll show you how to easily disable lazy load in WordPress both using a code method as well as a plugin method.

How to properly disable lazy load in WordPress

What is Lazy Loading?

WordPress first introduced lazy loading images in WordPress 5.5. Later it extended the lazy load feature to iframes embeds (e.g. YouTube videos, Spotify, and other embeds).

This practice helps improve your website’s speed and performance by quickly loading content and the visible area first.

A faster website is not just good for users, but it is also good for SEO. Search engines like Google consider speed as an important ranking factor.

Apart from images and embeds, you can also easily lazy load comments and Gravatars to further improve page load speed.

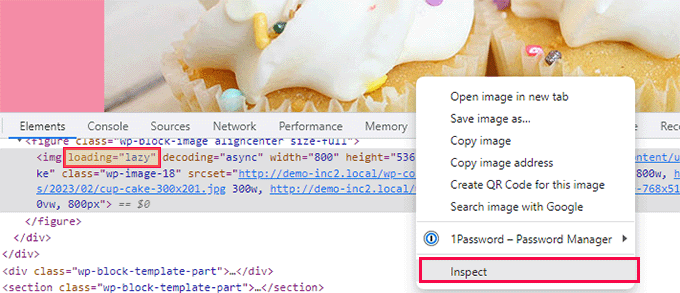
Lazy loading can be seen in action by right-clicking on an image and selecting the Inspect tool in your browser.

Lazy loading images in WordPress

This will split your browser screen and show you the HTML source code. From here, you’ll be able to see the “loading=lazy” attribute added to the image.

Now normally, we don’t recommend disabling lazy load due to its overall benefits for your WordPress website. Turning it off can result in slower website speed, lower conversion rates, and lower SEO rankings.

However, sometimes lazy loading can affect the user experience for some websites.

For instance, if you run a photography website where images are the most significant aspect of your content, then lazy loading them may ruin the user experience for your customers.

In other cases, you might be using a different lazy loading solution and just want to turn off the default WordPress lazy load.

That being said, let’s see how you can easily disable lazy load in WordPress.

You can simply disable the lazy load feature in WordPress by adding a custom code snippet to your theme’s functions.php file.

However, keep in mind that the smallest error while adding the code can result in breaking your website and making it inaccessible to your users.

This is why we recommend using the WPCode plugin to add custom code to your site.

It is the best custom code snippets plugin that makes it super easy for beginners to safely add custom code to their website.

First, you need to install and activate the WPCode plugin. See our guide on how to install a WordPress plugin for more instructions.

Upon activation, go to the Code Snippets » + Add Snippet page.

Add new snippet

This will take you to the ‘Add Snippets’ screen where you’ll see a bunch of ready-to-use code snippets that you can add to your website.

From here, you need to click the ‘Use Snippet’ button under the ‘Add Your Custom Code (New Snippet)’ option.

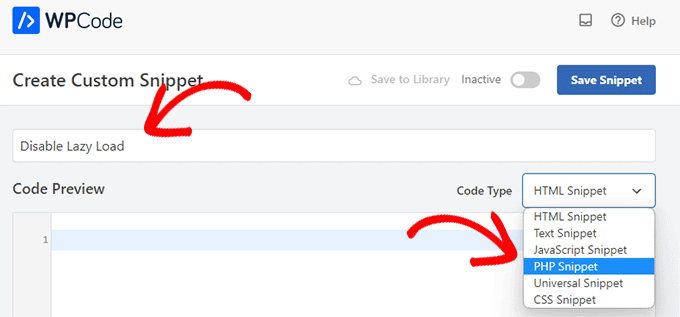
Once you’re on the ‘Create Custom Snippet’ page, you can start by typing a name for your code snippet.

It can be anything that will help you identify the code snippet and what it does.

Snippet title and type

After that, select ‘PHP Snippet’ from the dropdown menu next to the ‘Code Type’ option.

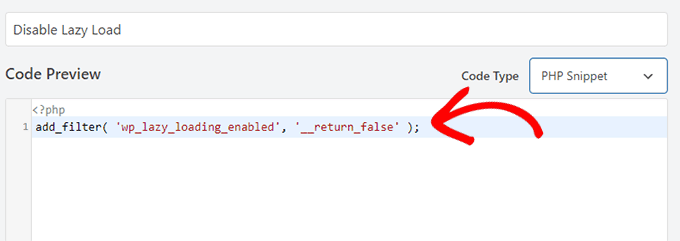
Now, copy and paste the following PHP code in the ‘Code Preview’ box.

add_filter( 'wp_lazy_loading_enabled', '__return_false' );

This is how the code will look after it is pasted in the ‘Code Preview’ box.

Add code snippet

After adding the code, scroll down to the ‘Insertion’ section.

Here, simply choose ‘Auto Insert’ as the insertion mode. This will ensure that your custom code is automatically executed everywhere on your website once you activate the snippet.

Choose an insertion method

Next, you need to scroll to the top of the page and simply toggle the ‘Inactive’ switch to ‘Active’.

After that, don’t forget to click the ‘Save Snippet’ button to save and execute your custom snippet.

Save your code snippet

Once activated, this custom code snippet will disable the lazy loading feature on your WordPress website.

You can test by right-clicking on an image and selecting Inspect from the browser menu.

In the HTML code for the image, the loading=lazy attribute will now disappear.

Lazy loading disabled

Method 2. Disable Lazy Load in WordPress Using a Plugin

If you don’t want to add code to your site, then you can use the Disable Lazy Load plugin.

The only thing you need to do is install and activate the Disable Lazy Load plugin. For more instructions, check our guide on how to install a WordPress plugin.

Activate plugin to disable lazy load

The plugin works out of the box and does not require any configuration. Once activated, it will automatically disable the lazy load feature on your site.

We hope this article helped you learn how to properly disable lazy load in WordPress. You may also want to see our guide on how to optimize WordPress images for better page load times, or see our pick of the best WordPress image compression plugins.

If you liked this article, then please subscribe to our YouTube Channel for WordPress video tutorials. You can also find us on Twitter and Facebook.

The post How to Properly Disable Lazy Load in WordPress (Step by Step) first appeared on WPBeginner.

How to Add Multilingual Search in WordPress (2 Ways)

Do you want to add a multilingual search in WordPress?

If you have a multilingual WordPress site, then adding a multilingual search feature can help users find information more quickly by searching in their own language.

In this article, we’ll show you how to easily add multilingual search in WordPress and delight your users with a better user experience.

How to add multilingual search in WordPress

Why Should You Add Multilingual Search in WordPress?

Often users have trouble finding information on multilingual websites because either there is no search feature that they can use, or the search feature shows them content in the wrong language.

Adding a multilingual search feature helps users easily find the content they are looking for. This improves user experience which means users will stay longer on your website.

Research shows that engaged users are more likely to convert, subscribe, or make a buying decision.

That being said, let’s take a look at how to easily add a multilingual search in WordPress without breaking your website or writing any code.

Method 1: Adding Multilingual Search Using TranslatePress

If you haven’t made your multilingual website yet, or already using TranslatePress, then this method is for you.

TranslatePress is the best WordPress translation plugin on the market. It allows you to easily create a multilingual website using a live editor for quick and easier translation.

It works out of the box and allows default WordPress search to display multilingual results.

The disadvantage of this method is that it uses the default WordPress feature which is not very good at fetching the right results.

If you haven’t used TranslatePress before or need help, then see our tutorial on how to easily create a multilingual WordPress website.

Note: Keep in mind that the free version of TranslatePress only allows you to translate your website into one other language. So if you want to add multilingual search in WordPress for more than two languages, then you’d need to buy the TranslatePress Premium version.

Once you have translated some content on your WordPress website. It is time to add the search form.

Add a Search Block to your WordPress Site

WordPress comes with a built-in search block that you can add anywhere on your website.

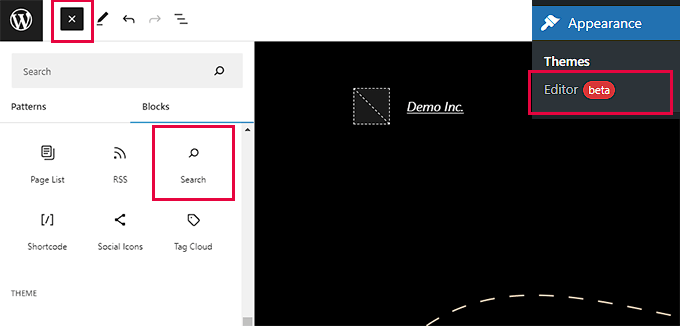
If you’re using a block-based theme like Ultra, then you’ll be using the full site editor to add the search block.

Simply visit the Appearance » Editor page from the WordPress dashboard.

This will launch the full site editor which looks a lot like the block editor you use for writing posts and pages.

Now, click on the add block button (+) to add the Search block.

Adding search block in site editor

You can move the search block up and down to display it anywhere on the page.

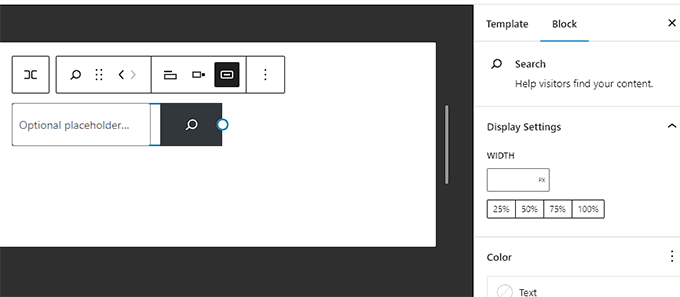
Search block also comes with a few style options that you can choose from the block toolbar or settings.

Search block settings

Once you are finished, don’t forget to click on the Save button to save your changes.

You can now visit your website to see the search form in action.

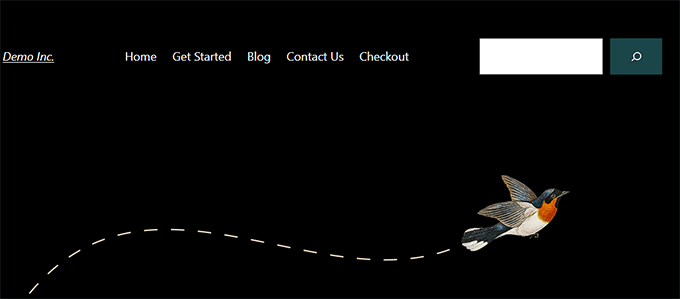
Search form preview

On the other hand, if you’re using a theme that does not support the full-site editor, then you can add a search form as a widget.

Simply go to the Appearance » Widgets page from the WordPress admin dashboard.

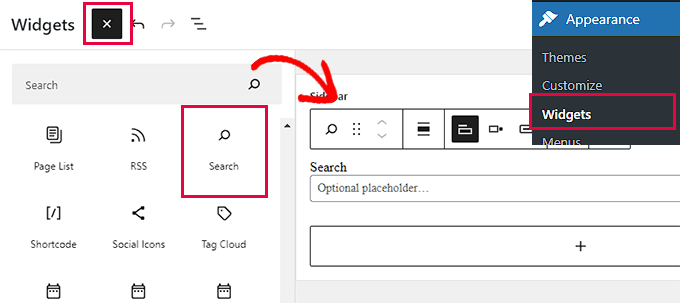
Here, click the Add widget block button (+) and add the Search block to your widget area.

Search widget

Once the ‘Widget Block Menu’ opens up, locate the ‘Search’ block and add it to your WordPress sidebar.

Don’t forget to click the ‘Update’ button at the top to save your changes.

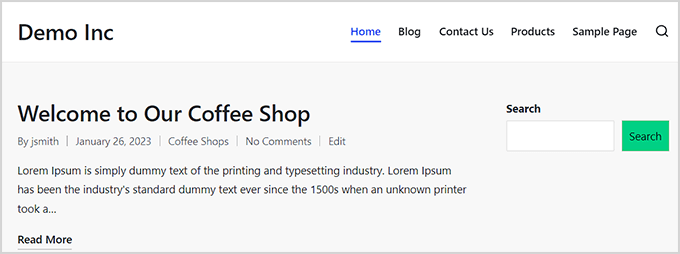
Once you’ve saved the changes, visit your site and see the search box in action.

Website preview

Method 2: Adding Multilingual Search Using SearchWP (Recommended)

The default WordPress search feature used by TranslatePress is not very good. It is quite basic and only looks for search terms in certain places.

This is where SearchWP comes in.

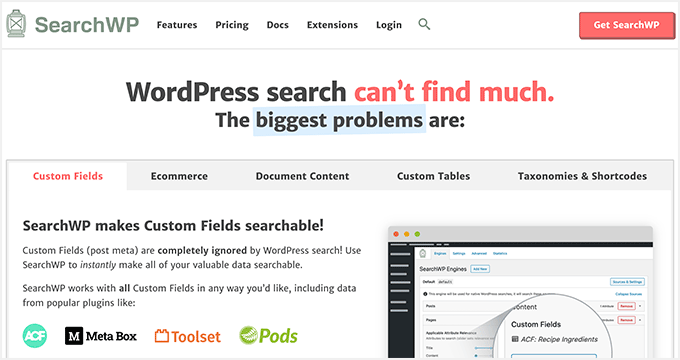
It is the best WordPress search plugin on the market and allows you to easily replace the default WordPress search with a more powerful search feature.

SearchWP

SearchWP automatically builds a search index and matches search keywords in content, title, categories, tags, shortcodes, documents, products, and more.

Plus, it automatically replaces the default search form upon activation so you don’t need to replace it if you were already using it on your site.

That being said, let’s take a look at how to easily add a better multilingual search to your WordPress site.

First, you need to install and activate the SearchWP plugin. For more information, see our guide on how to install a WordPress plugin.

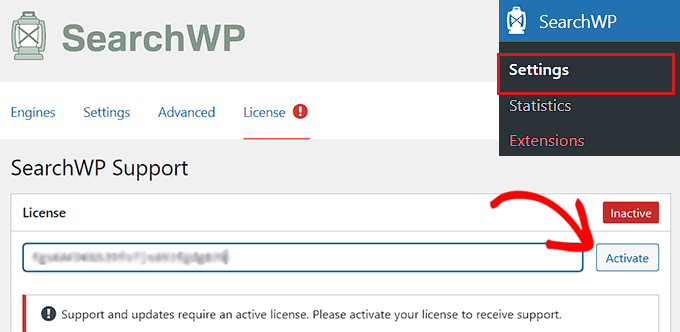
After that, go to the SearchWP » Settings page and then click on the ‘License’ menu option to enter your license key.

You can get the license key from your ‘SearchWP Accounts’ page. Simply copy the license key from there.

After that, paste it into the ‘License Key’ field and then click on the Activate button.

SearcWP license

Now, you are ready to create your first custom search engine.

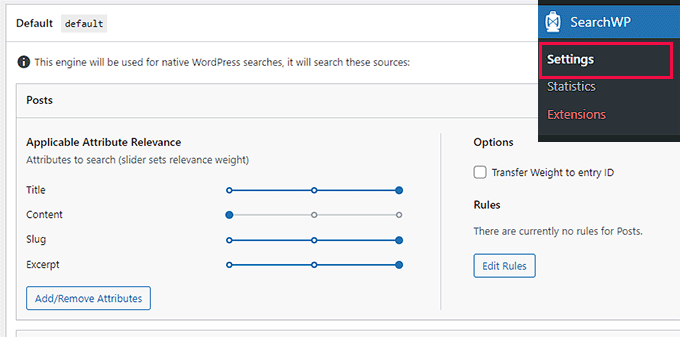
Simply go to the SearchWP » Settings page from the dashboard.

From here, you will see SearchWP’s first default search engine for you. It is pre-configured to work for most websites including multilingual websites.

You’ll see all your post types with different attributes. Next to each attribute there will be a slide that you can move to assign weight for that attribute.

SearchWP settings

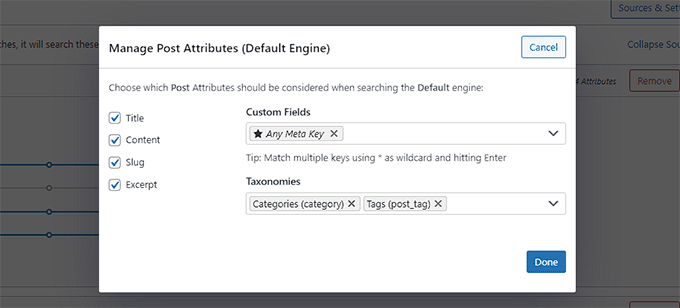
You can also click on the Add/Remove Attributes button to include more areas in the search.

For instance, you can add custom fields and taxonomies to the attributes as well.

Add more attributes to search

If you are unsure about a setting, you can leave it as it is. The default options would work for more use cases.

Finally, click on the Save Engines button to store your settings.

SearchWP will now start building your search index in the background.

Now, all you need to do is add the search form to your site.

Add a Search Block to your WordPress Site

SearchWP replaces the built-in search feature, which means you can use the default WordPress search form and it would still use SearchWP to show the results.

If you haven’t already added a search form to your website, then here is how you would add it.

If you’re using a block-based theme, then you’ll be adding a search block using a full-site editor.

Simply go to the Appearance » Editor page from the admin dashboard.

On the edit screen, click on the add block button (+) at the top and add the search block.

You can move the search block to the area where you want to display the search form by moving it up or down.

Adding search block in site editor

Finally, don’t forget to click on the Save button to save your changes.

If you’re using a theme that doesn’t support the full-site editor, then you’ll need to add a search widget to your website’s sidebar or widget-ready area.

For that, head over to the Appearance » Widgets page from the dashboard.

Now click on the add block button (+) at the top to open up the ‘Widget Block Menu’.

From here, locate and add the Search widget to your preferred widget area.

Search widget

Don’t forget to click the ‘Update’ button at the top to save your changes.

Next, simply visit your website and use your improved search box.

Website preview

For more information and detailed instructions, take a look at our guide on how to improve WordPress search using SearchWP.

We hope this article helped you learn how to add multilingual search in WordPress. You may also want to check out our tutorial on how to fix WordPress search errors, and our article on how to create a multilingual sitemap in WordPress.

If you liked this article, then please subscribe to our YouTube Channel for WordPress video tutorials. You can also find us on Twitter and Facebook.

The post How to Add Multilingual Search in WordPress (2 Ways) first appeared on WPBeginner.