Have you ever thought about how a WordPress theme can shape your website’s look and feel? Picking the right one isn’t just about color or design; it’s about creating a website that feels natural, loads fast, and gives your visitors the best experience. If you’re planning to start your site or thinking of changing your [...]
We all know that the social world is fast-paced and crowded. It’s so quick that if you blink, you miss it. But what if you could create a system that draws attention, gets you conversions, and keeps growing without just relying on what the algorithms tell you? Your website is where that system starts. And [...]
We’ve tested enough hosting providers to know that promises don’t always match reality. Speed, uptime, scalability—everyone claims to be the best. But when traffic spikes, databases strain, and real users start clicking around, the cracks show fast. That’s why we put Rapyd Cloud to the test. A relatively new name in managed hosting, it claims [...]
The last few years have seen quantum computing take a galactic-sized leap from the realm of science-fiction fantasy to a rapidly evolving technology making a revolutionary impact on a host of real-world industries, including custom web development. But what exactly is quantum computing, and, more importantly, what can it do for your WordPress website? You’ll [...]
Managing client sessions in WordPress isn’t exactly smooth. Proofing, watermarking, and delivering final images usually means stitching together multiple plugins—none of which were really built for photographers. That’s where PhotoBerry Studio comes in. It promises to handle everything—client proofing, secure sharing, automated image delivery—in one place. We gave it a try, expecting the same frustrations. [...]
The third and final major new WordPress release of 2024 was released on November 12, bringing with it further improvements and a raft of exciting new features. From a brand new theme to upgrades for both front-end creation and back-end development alike, WordPress 6.7 presents a plethora of upgrades designed to create what product lead [...]
Do you have something worthy on your mind to share with the world today? Absolutely the best way to go about it is to pen your thoughts in the right direction on the right platform that can help you reach out to the very people who would love to read your piece d’art! What better [...]
Do you want to create compact archives on your WordPress website?
If you have been blogging for a few years, then the list of your posts might have become too long to fit in your WordPress sidebar. This will make your sidebar look cluttered which won’t be good for your site presentation
In this article, we’ll show you how to easily create compact archives in WordPress.
Why Do You Need Compact Archives in WordPress?
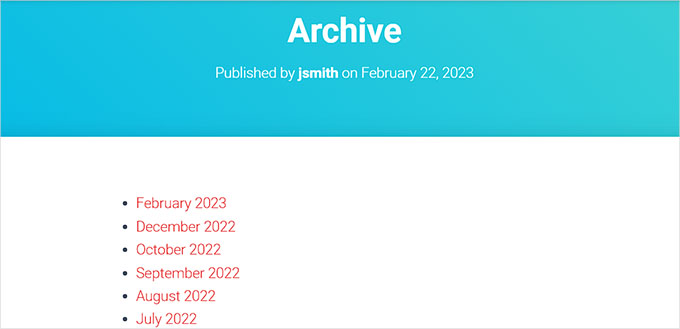
Adding an archive in WordPress allows you to easily display your previously published content on your website for users to go through.
By default, WordPress offers an ‘Archives’ block and widget that can be added to the sidebar of your WordPress blog.
However, the ‘Archives’ block only allows you to display your archives as a long list or a dropdown menu.
A list will make your site look cluttered while a dropdown can be easily overlooked by users as it isn’t as noticeable.
By creating compact archives, you can easily display your archives in the WordPress sidebar without taking up much space. You can also display them on your about page or even create a dedicated Archives section.
That being said, let’s take a look at how to easily add compact archives in WordPress.
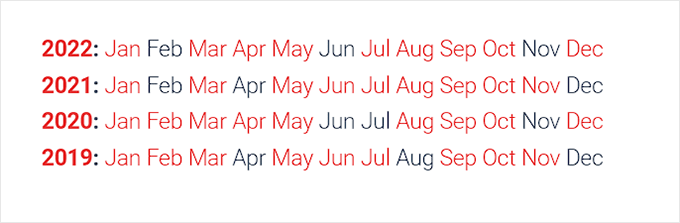
Now, the plugin offers three styles to display compact archives on your website.
Style 1. Relaxed three-letter month initials
Style 2. Compact Monthly Initials
Style 3. Numeric Block
There are multiple ways to easily display compact archives on your website.
In this tutorial, we will be showing you all four methods and you can choose the one that you like the most.
Method 1. Add Compact Archives in WordPress Posts or Pages
It is super easy to add compact archives to your WordPress page or post because the plugin comes with an easy-to-use block that you can add to your post or page.
For this tutorial, we will be creating a new page for compact archives.
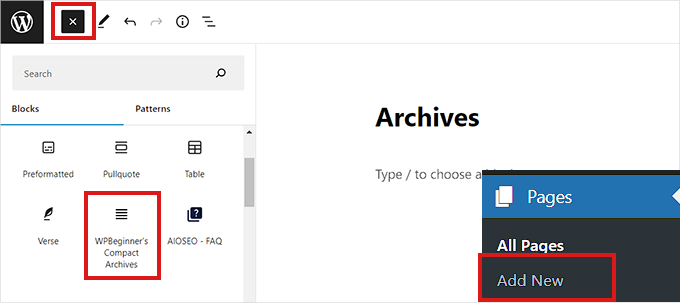
Simply head over to the Pages » Add New page from the admin sidebar. Once a new page opens up in the block editor, you can start by typing a name for your page.
Next, you need to click the ‘Add Block’ (+) button at the top and search for the ‘WPBeginner’s Compact Archvies’ block.
Upon locating it, simply click on the block to add it to your page.
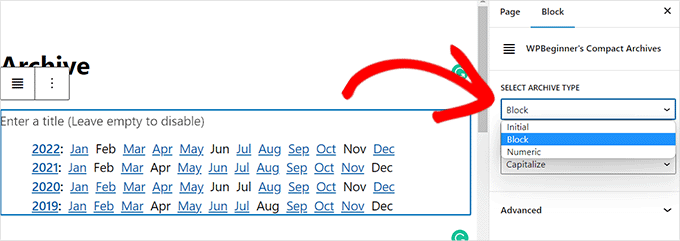
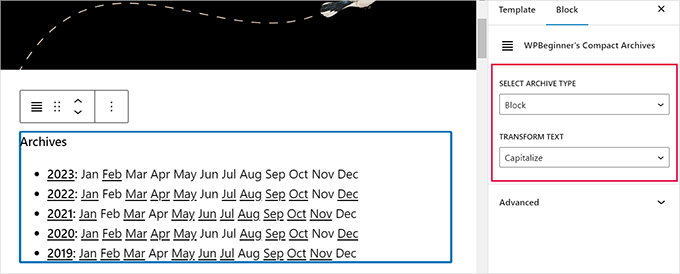
Next, you need to choose a style for your archives from the Block Settings panel on the right corner of the screen.
Simply choose a style of your liking from the dropdown menu below the ‘Select Archive Type’ option.
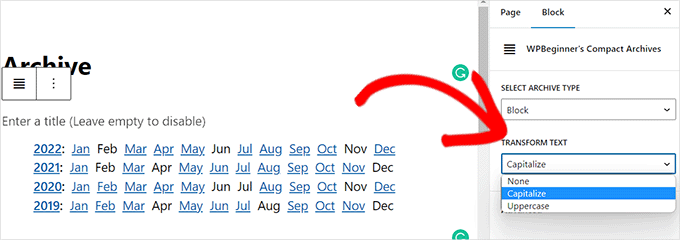
You can also choose if you want your archive text to be capitalized or Uppercase.
For that, you need to open the dropdown menu below the ‘Transform Text’ option.
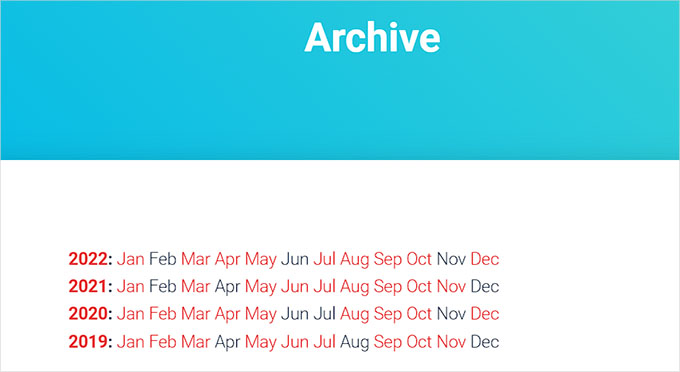
Once you’re satisfied with your choice, simply click the ‘Publish’ or ‘Update’ button at the top.
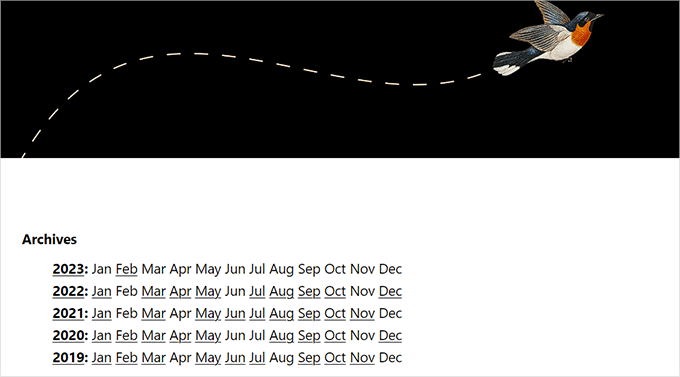
This is how your archives page will look.
Method 2. Add Compact Archives as a Widget
You can also display your archive as a widget on your website.
Adding the Compact Archives Block in Full Site Editor
If you’re using a block-based theme on your website, then you’ll have to add the ‘ WPBeginners’ Compact Archives’ block using the full site editor.
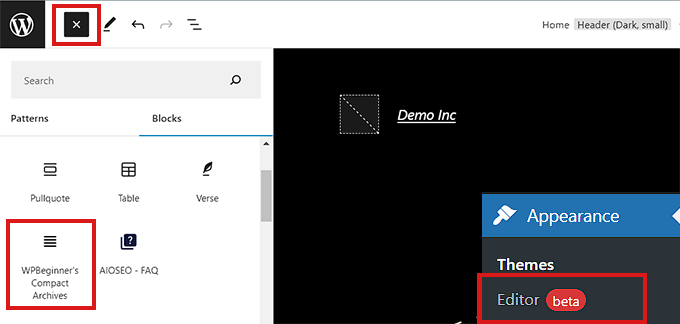
First, you need to visit the Appearance » Editor page from the admin sidebar to launch the FSE.
From here, you need to click the ‘Add Block’ (+) button on the top-left corner of the screen to open up the block menu.
Next, you need to simply locate and add the ‘WPBeginner’s Compact Archvies’ block to your preferred place on the website.
Once you add the block, you can configure its’ style and text settings from the Block Settings panel on the right.
Finally, don’t forget to click on the ‘Save’ button at the top to store your settings.’
Your compact archives will look like this.
Adding the Compact Archives Block Using Widgets
If you’re not using a block-based theme, then this method is for you.
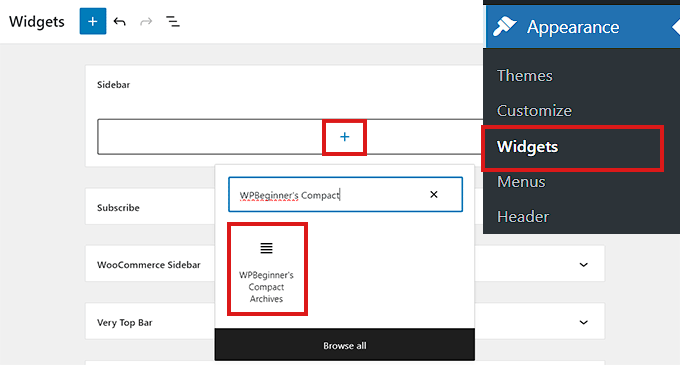
First, you need to visit the Appearance » Widgets page from the admin sidebar.
Once there, simply click the ‘Sidebar’ tab to expand it.
Now, you need to click the ‘Add Block’ (+) button in the sidebar tab.
This will open up the ‘Widget Block Menu’ where you need to search for the ‘WPBeginner’s Compact Archive’ block.
Upon locating it, simply click the block to add it in the sidebar section.
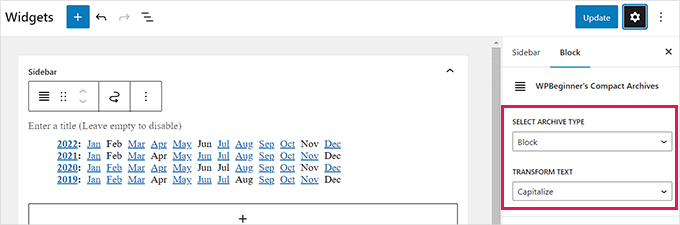
Once the ‘Compact Archives’ block is added you can change the style and text of your archive by configuring the settings from the Block Settings panel on the right.
Don’t forget to click the ‘Update’ button at the top to save your changes.
This is how your website sidebar will look upon adding the ‘Compact Archvies’ block.
Method 3. Displaying Compact Archives in Template Files
For example, $style == 'initial' will display only month name initials and should fit right inside a sidebar. Using$style == 'block', will fit the main column of a page. Using $style == 'numeric', will display numeric months.
Method 4. Add Compact Archives to Your HTML Sitemap
First, you will need to install and activate the All in One SEO for WordPress plugin. For more details see our article on how to install a WordPress plugin.
All in One SEO is the best WordPress SEO plugin on the market. It allows you to easily optimize your website for search engines.
It also comes with an HTML sitemap feature that allows you to easily add an HTML sitemap to your WordPress site.
It is a premium plugin but you can also use the free version called All in One SEO Lite. The free version has fewer features but it includes HTML sitemaps.
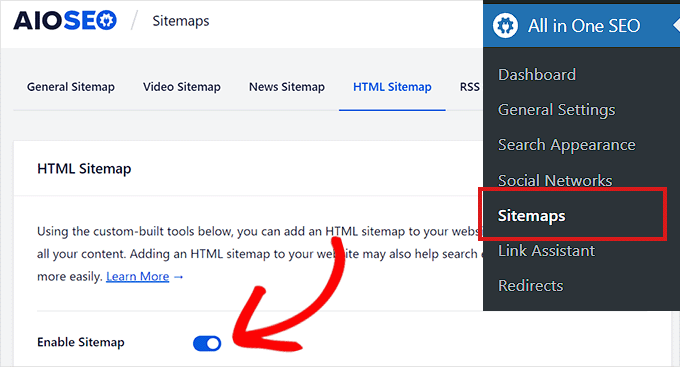
Once finished, you now need to visit the All in One SEO » Sitemaps page from the admin sidebar.
From here, you need to click on the ‘HTML Sitemap’ tab and make sure that the ‘Enable Sitemap’ toggle is turned on.
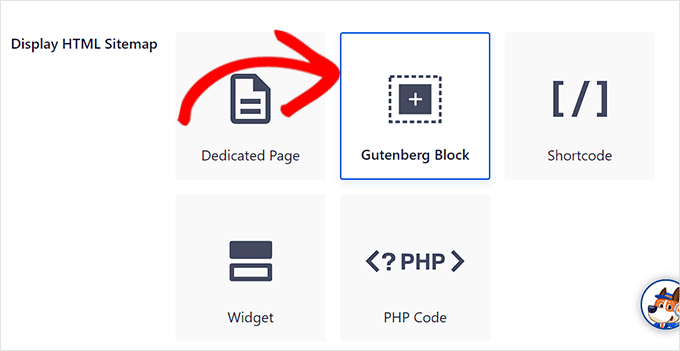
Next, you need to choose how you want to display your HTML sitemap.
For this tutorial, we will be choosing the ‘Gutenberg Block’ option.
If you choose this method, then you’ll have to add the “AIOSEO – HTML Sitemap” block to any page where you wish to display your HTML sitemap.
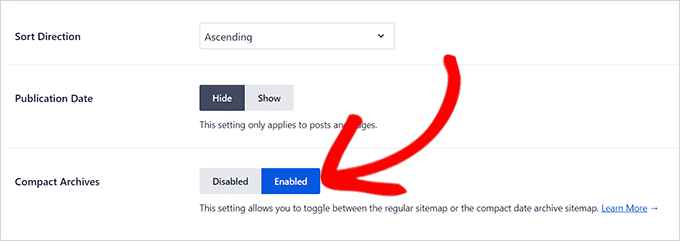
Next, you need to scroll down to the ‘Compact Archives’ option in the ‘HTML Sitemap Settings’ section.
Here, you need to simply toggle the ‘Compact Archives’ switch to ‘Enabled’.
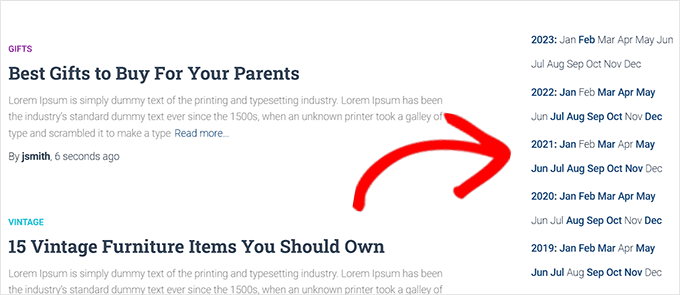
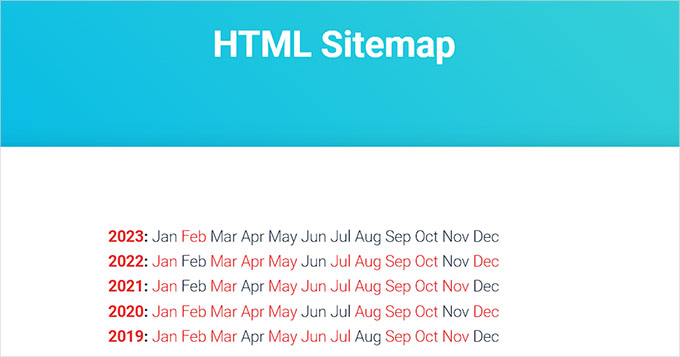
Now your HTML sitemap will be displayed in a compact date archive format.
Finally, don’t forget to click on the ‘Save Changes’ button to store your settings.
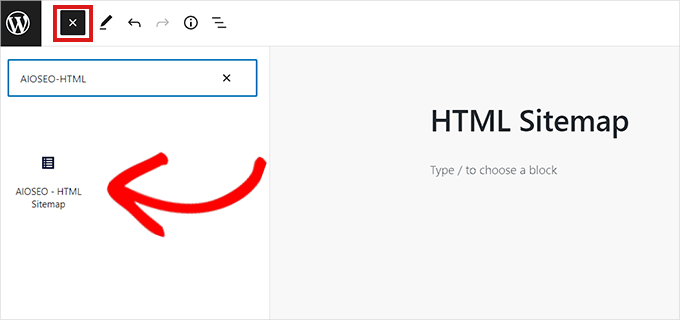
Next, open up a page where you want to display the HTML sitemap from the admin sidebar.
From here, simply click on the ‘Add Block’ (+) button at the top and then add the ‘AIOSEO-HTML Sitemap’ block to your page.
Finally, don’t forget to click the ‘Publish’ or ‘Update’ button to save your changes.
Your compact archives HTML Sitemap will look like this.
We hope this article helped you learn how to easily create compact archives in WordPress. You may also want to see our guide on how to easily create an email newsletter in WordPress and our top picks of the best social media plugins to help promote your website.
If you liked this article, then please subscribe to our YouTube Channel for WordPress video tutorials. You can also find us on Twitter and Facebook.
Are you looking to enable or activate plugins from the WordPress database?
If you are unable to access your WordPress admin area and need to activate a plugin to restore your access, then you can do that from the WordPress database.
In this article, we will show you how to easily activate your WordPress plugins using the database.
When Should You Activate WordPress Plugins Using Database
However in some situations, a website owner may need to activate certain plugins to restore access to their WordPress website.
For example, let’s assume an error is stopping you from accessing your WordPress dashboard, and you have found a plugin that can fix that error.
Luckily, WordPress stores the active plugins information in your WordPress database. This means you can manually enter this information directly in the database and tell WordPress to activate a plugin.
The only condition is that the plugin must be installed on your WordPress site. Which means that it should be present in the plugins folder on your WordPress website.
With that being said, let’s see how you can easily enable/activate a plugin using the database.
Step 1. Find Your Database Name Using the Hosting Control Panel
To activate your WordPress plugins using phpMyAdmin, first, you need to find out your WordPress database’s name.
Now, to find the name of your database, you need to log in to your web hosting dashboard. For this tutorial, we will be using Bluehost.
If you are using a different hosting company, then your WordPress hosting dashboard may look slightly different.
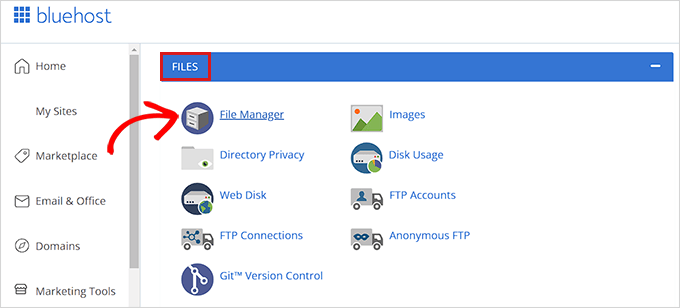
Once you are on the cPanel, scroll down to the ‘Files’ section and click the ‘File Manager’ option.
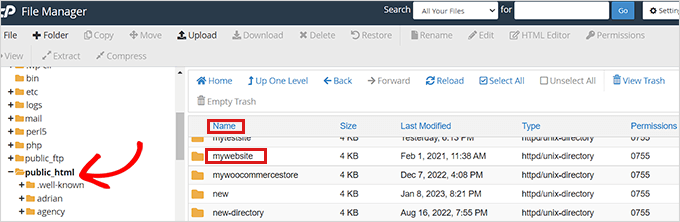
This will open up the File Manager in a new window. Here you simply need to locate and click the public_html folder from the left column.
This will open up all the files that are stored in the public_html folder. Now, you simply need to locate and click the folder with your site’s name on it present under the ‘Name’ column.
Some users may instead see their WordPress files and folders installed inside public_html folder.
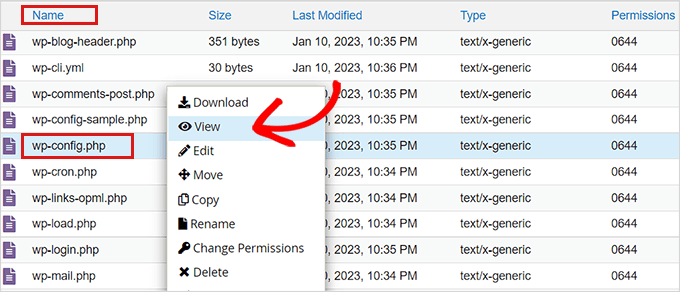
After you have opened up your WordPress site’s file, locate the wp-config.php file under the ‘Name’ section and right-click on it.
This will open up a menu where you need to select the ‘View’ option.
This will open up the wp-config.php file in a new window where you can locate your database details.
We recommend that you copy and paste your database details including username and password into a notepad on your computer.
Now you’ve successfully found your database’s name, let’s move to our next step.
Step 2. Locate Active Plugins Option via PhpMyAdmin
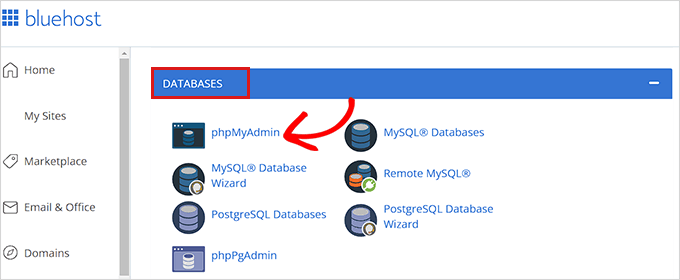
After you have found out the name of your database, you need to go back to your WordPress hosting control panel.
Once there, scroll down to the ‘Databases’ section and click the ‘phpMyAdmin’ option.
This will launch the phpMyAdmin app in a new browser tab.
Note: Before you make any kind of changes, please make sure to create a complete backup of your database. It will come in handy if anything goes wrong with the process.
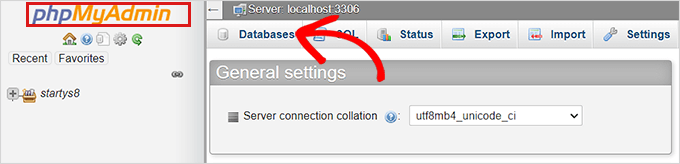
Next, you simply need to click the ‘Database’ tab from the navigation menu present at the top of the page.
Now, simply locate your WordPress database and click on the browse button to expand it.
This will show your WordPress database tables.
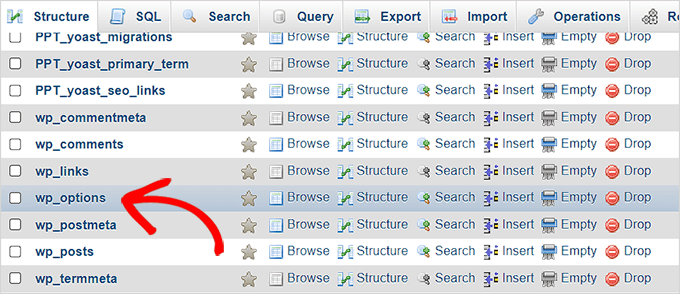
Here, you will simply need to locate wp_options table and click browse next to it.
Note: By default, WordPress uses wp_ as the prefix for table names. Your WordPress database table may have a different table prefix.
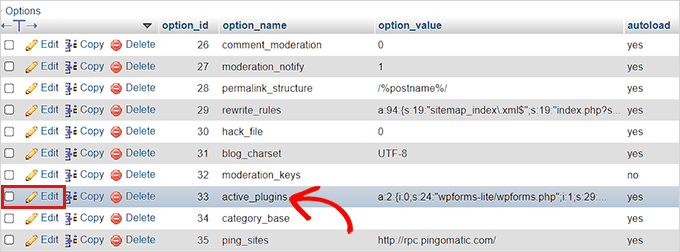
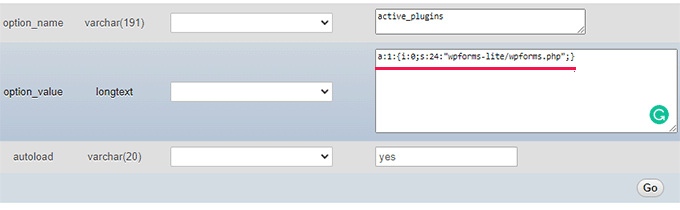
Inside the wp_options table, you’ll need to find the row where option_name is set toactive_plugins.
After that, click on the Edit link next to it.
This will open up a box where you can manually enter details to activate a plugin.
Step 3. Activate a Plugin Using phpMyAdmin
WordPress stores the active plugins information in a special format so that it can be programatically accessed by the software.
In order to tell WordPress which plugins to activate, we’ll need to use that same format.
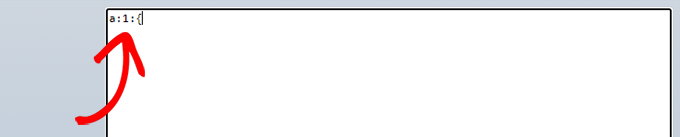
First, we’ll start by entering the option_value as a:1: and then open up the curly bracket ({).
We are entering this value as 1 because we only want to activate one plugin. You have to change the value to the number of plugins you plan on activating.
Next, we will be entering i:0; after the curly bracket. Here we are essentially assigning a serial number to our plugin.
Remember to always assign numbers starting from 0 instead of 1.
Next, we will be entering the number of characters present in the plugin’s name and the php file name of the plugin that we’re about to activate.
For that, we will type s:24: in the box. Keep in mind that the number of characters will differ for each plugin based on the characters in the plugin directory and file name.
For instance, we are activating WPForms in this tutorial which has 24 characters in its name including the file name of the plugin as stored in our file manager.
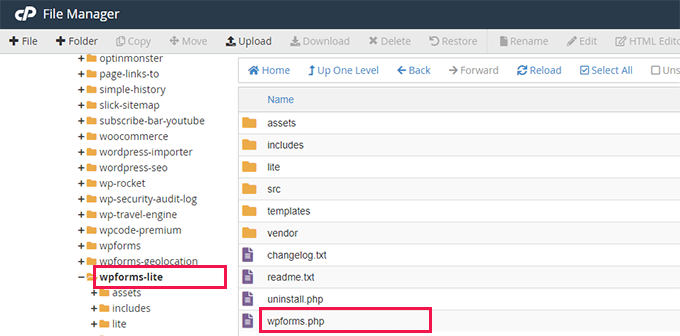
Next, you just need to type the plugin’s directory name. You can find it by visiting the /wp-content/plugins/ folder using the File Manager app.
Don’t forget to add quotation marks before typing the plugin’s directory name.
After the /, you need to enter the plugin’s file name. This is usually the file with similar name inside the plugin folder.
Now, go back to phpMyAdmin and type the name of the plugin and then close the quotation marks.
After that, simply add a semi-colon (;) and close the curly brackets (}). The final value in this example would look like this:
a:1:{i:0;s:24:"wpforms-lite/wpforms.php";}
This is how it will look once you’re done.
Next, simply click the ‘Go’ button to execute the command.
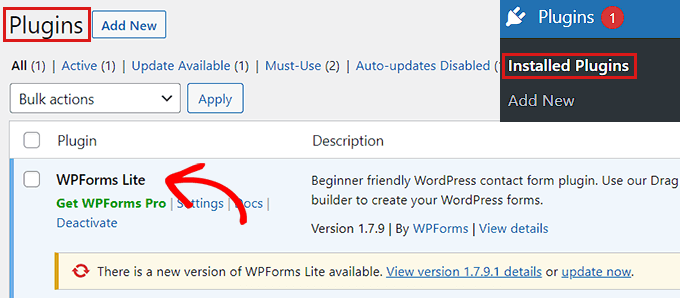
Now go visit your WordPress dashboard and head over to Plugins » Installed Plugins.
Your plugin has been successfully activated.
Now let’s say you want to activate two more plugins.
First you will need to change the number of plugins. After you will adjust each entry for the plugin that you want to activate.
Note: We have added line breaks here to make the code look more readable. You need to make sure that there are no line breaks or spaces in your code. Otherwise, it wouldn’t work.
It’s been a fascinating time here with WPLift team, and now I can finally reveal the major news that has had our whole team buzzing. Your favorite source for WordPress news, reviews, and how-tos is officially a proud member of the UnlimitedWP family. Who is UnlimitedWP? Launched in 2019, UnlimitedWP is an international WordPress development [...]
 Have you ever thought about how a WordPress theme can shape your website’s look and feel? Picking the right one isn’t just about color or design; it’s about creating a website that feels natural, loads fast, and gives your visitors the best experience. If you’re planning to start your site or thinking of changing your [...]
 We all know that the social world is fast-paced and crowded. It’s so quick that if you blink, you miss it. But what if you could create a system that draws attention, gets you conversions, and keeps growing without just relying on what the algorithms tell you? Your website is where that system starts. And
  We’ve tested enough hosting providers to know that promises don’t always match reality. Speed, uptime, scalability—everyone claims to be the best. But when traffic spikes, databases strain, and real users start clicking around, the cracks show fast. That’s why we put Rapyd Cloud to the test. A relatively new name in managed hosting, it claims
  The last few years have seen quantum computing take a galactic-sized leap from the realm of science-fiction fantasy to a rapidly evolving technology making a revolutionary impact on a host of real-world industries, including custom web development. But what exactly is quantum computing, and, more importantly, what can it do for your WordPress website? You’ll
  Managing client sessions in WordPress isn’t exactly smooth. Proofing, watermarking, and delivering final images usually means stitching together multiple plugins—none of which were really built for photographers. That’s where PhotoBerry Studio comes in. It promises to handle everything—client proofing, secure sharing, automated image delivery—in one place. We gave it a try, expecting the same frustrations.
  The third and final major new WordPress release of 2024 was released on November 12, bringing with it further improvements and a raft of exciting new features. From a brand new theme to upgrades for both front-end creation and back-end development alike, WordPress 6.7 presents a plethora of upgrades designed to create what product lead