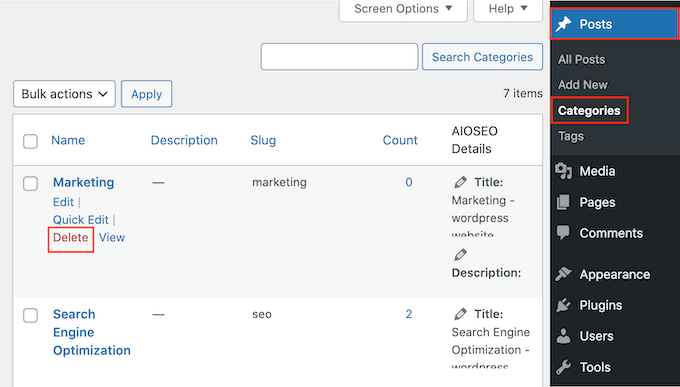
Are you looking to install Google Tag Manager in WordPress?
Google Tag Manager lets you add tracking code snippets to your WordPress website. It is a free tool and allows you to track different user interactions.
In this article, we will show you how to properly install and set up Google Tag Manager in WordPress and explain the benefits.
What is Google Tag Manager?
Google Tag Manager (GTM) is a free tool by Google that lets you add, update, and manage code snippets called tags on your WordPress site.
Often website owners need to add multiple code snippets to track their conversions, form submissions, link clicks, and gather other analytical data on their website. With Google Tag Manager, you can easily add and manage all of these scripts from a single dashboard.
There are built-in tag templates for Google Analytics, Google Ads, Google Optimize, DoubleClick, and Google AdSense. The Tag Manager also works with several third-party analytics and tracking platforms.
This saves you the time of adding and removing tags from your code rather than managing it from an easy dashboard. Not to mention, all of these separate snippets get loaded in one script.
That said, let’s see how to add Google Tag Manager to WordPress. We will also show you an alternative method for tracking different user interactions on your site. The best part, you don’t have to edit code or set up tags.
Simply click the links below to jump ahead to your preferred section:
First, you’ll need to visit the Google Tag Manager website and click the ‘Start for free’ button to sign up.
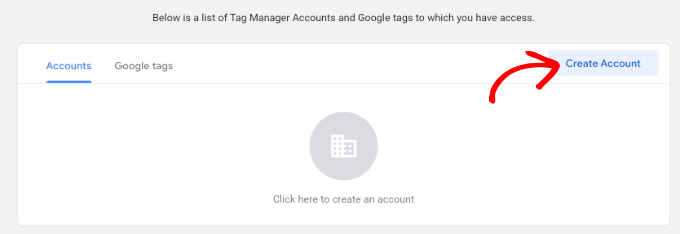
After login, you will come to the add new account page.
Go ahead and click the ‘Create Account’ button.
Next, you can enter a name for your account and select a Country from the dropdown menu.
Tag Manager will also give you the option to share data anonymously with Google. You can simply click the checkbox and scroll down.
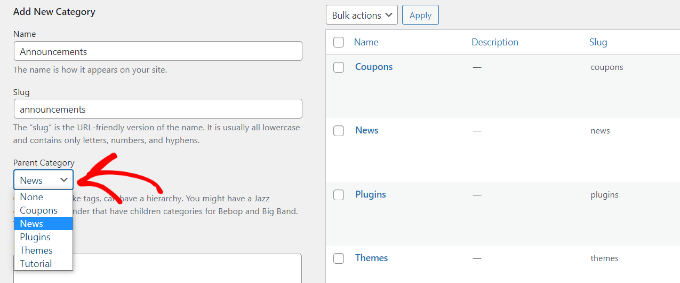
Now you need to add a container to your account. A container could be a website, iOS or Android apps, or a server. In this case, we will use the ‘Web’ option.
You can use your site’s domain for the container name. Once you’re done, click on the ‘Create’ button to continue.
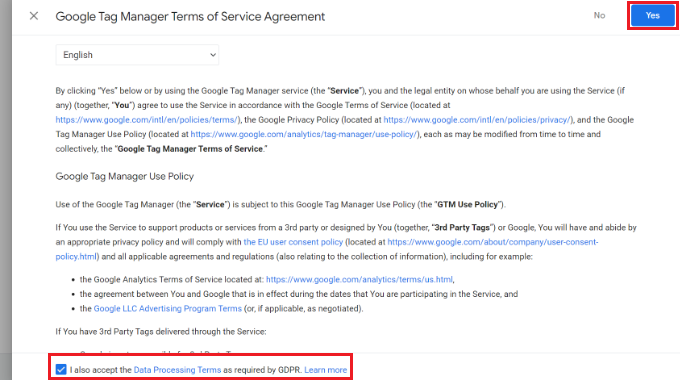
You will now see a new window slide in from the right with the Google Tag Manager terms of service agreement.
You can click the checkbox at the bottom to accept the data processing terms and then click the ‘Yes’ button at the top.
Google Tag Manager will now create your account.
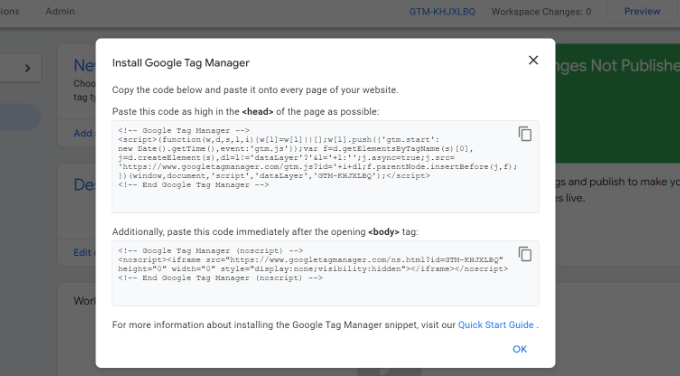
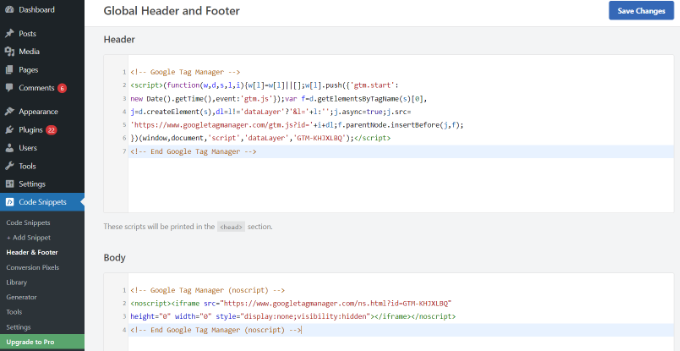
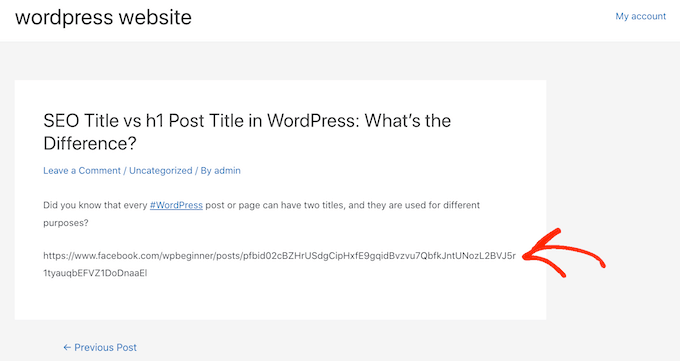
Next, it will now show you tracking codes that you need to add to your site.
Simply copy these 2 codes, as you will need to add them to the header and body section on your WordPress website.
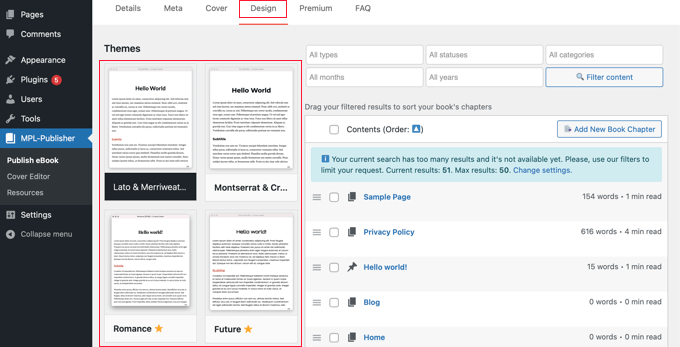
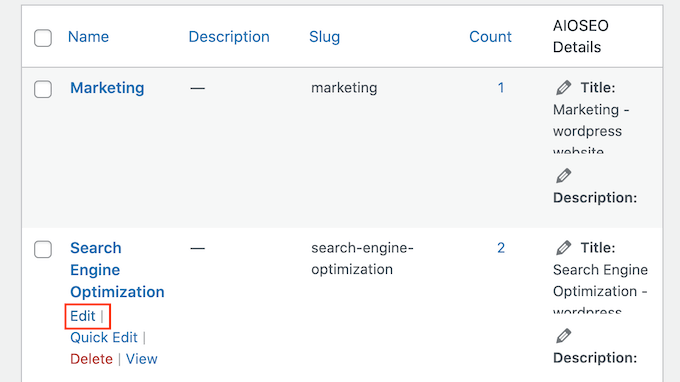
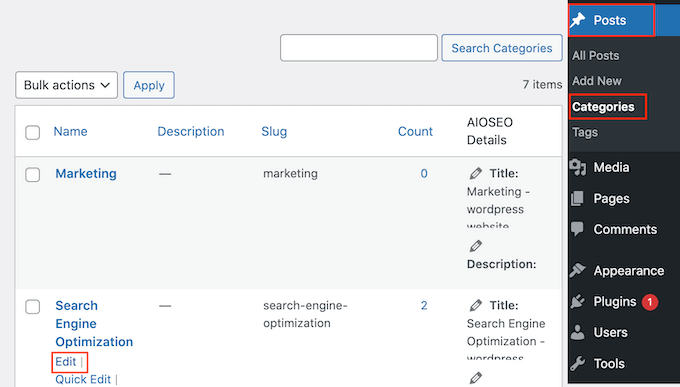
Adding Google Tag Manager Code to WordPress
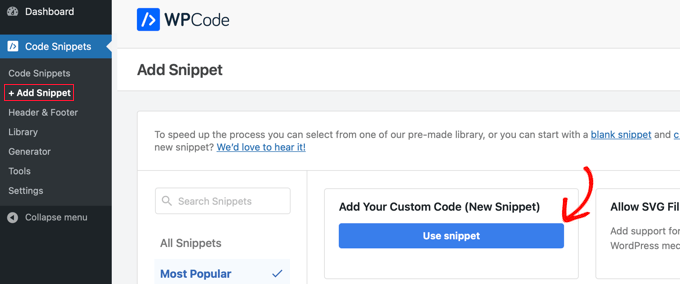
The easiest way of adding code snippets in WordPress is using the WPCode plugin. It is the best WordPress code snippet plugin and lets you add and manage different custom codes on your website.
The best part, you can get started for free with the WPCode. However, there is also a premium version that offers more features like a code snippet library, conditional logic, auto-insert snippets, and more.
First, you’ll need to install and activate the free WPCode plugin. If you need help, then please see our guide on how to install a WordPress plugin.
Upon activation, you need to visit the Code Snippets » Headers & Footers page from the WordPress admin panel. Now enter the codes you copied earlier.
Ensure that you paste the <head> code in the Header field and the <body> code in the Body field, as you can see below.
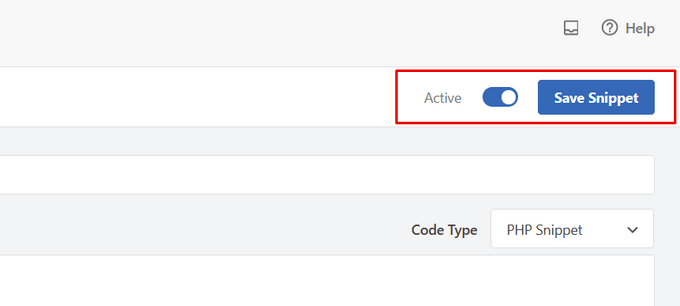
Once you’re done, don’t forget to click the ‘Save Changes’ button.
Google Tag Manager is now ready to use on your WordPress website.
Creating a New Tag in Google Tag Manager
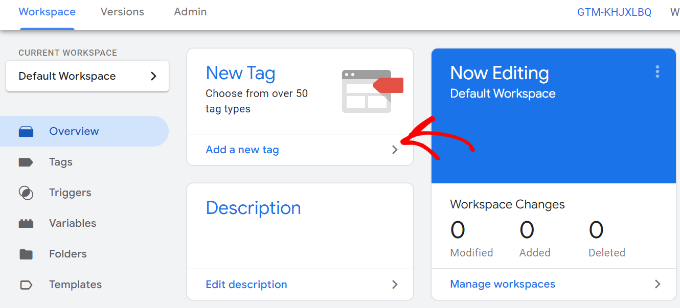
Next, you can create a new tag in Google Tag Manager and set up tracking on your WordPress website.
First, you’ll need to click on the ‘Add a new tag’ option from your Tag Manager dashboard.
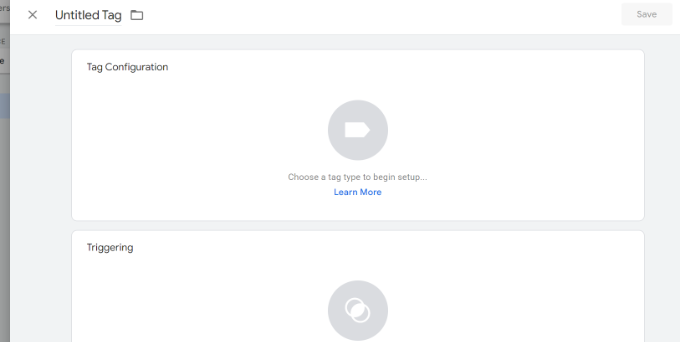
After that, you can enter a name for your tag at the top.
From here, simply click on the ‘Tag configuration’ option.
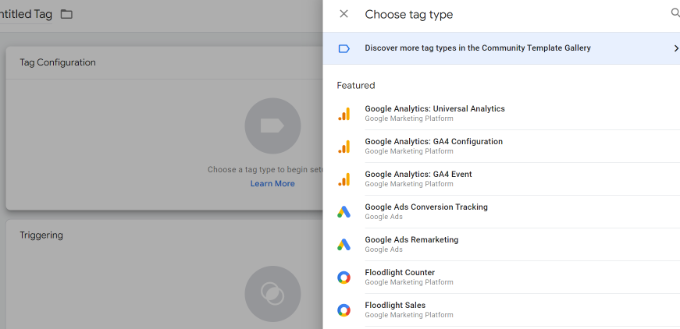
Next, Tag Manager will show you different tag types to choose from.
For instance, this will include tags for Google Analytics, Google Ads, Floodlight, and more. We’ll select ‘Google Analytics: GA4 Configuration’ for this tutorial.
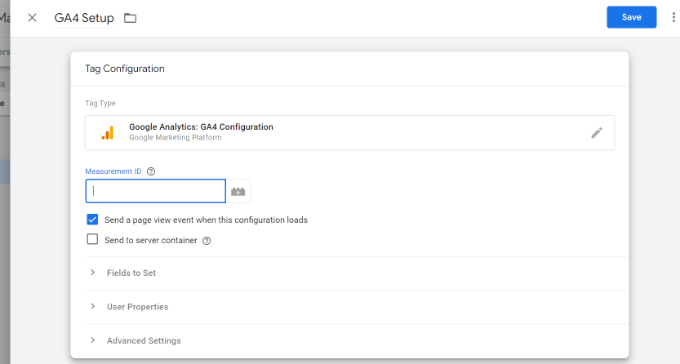
Next, you will need to enter the details of your tag.
First, you can add the Measurement ID.
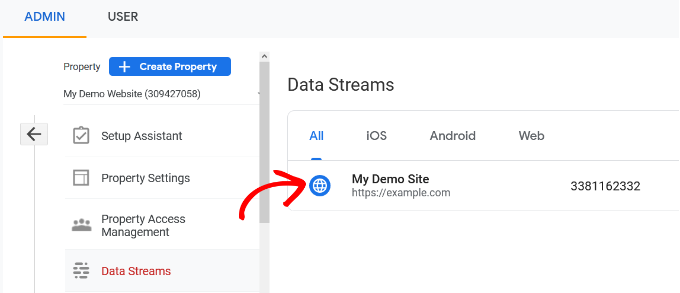
You can find the Measurement ID by logging into your Google Analytics account.
Simply head to the Admin » Data Streams option under the Property column. Go ahead and click on your Data Streams to view the measurement ID.
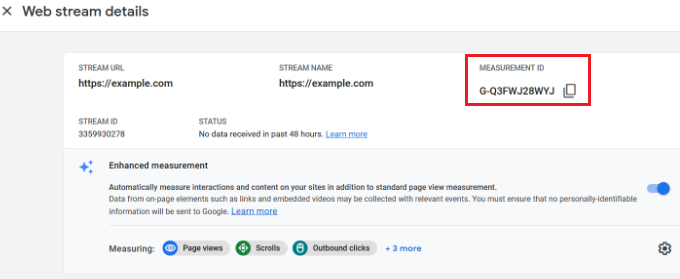
When a new window opens, you should see the Measurement ID in the top right corner.
You can simply copy the ID.
Now head back to the Google Tag Manager window or tab, and enter the measurement ID.
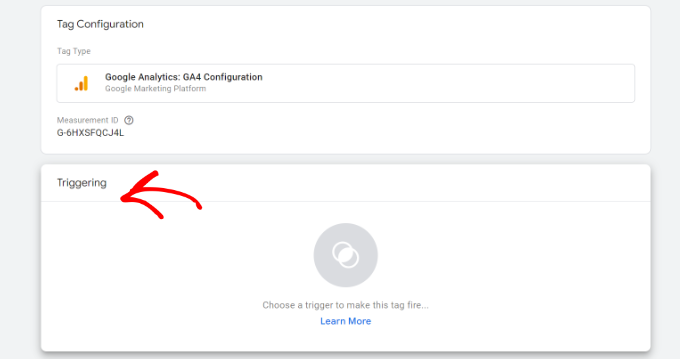
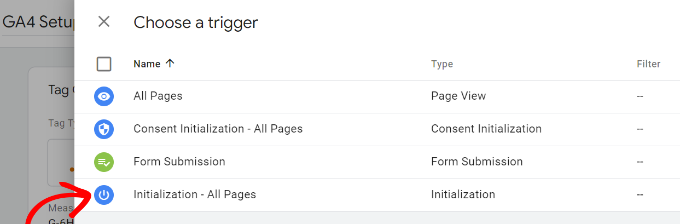
After that, you can scroll down and click on the ‘Triggering’ option.
Google Tag Manager will now show built-in triggers to choose from.
Go ahead and select the ‘Initialization – All Pages’ option.
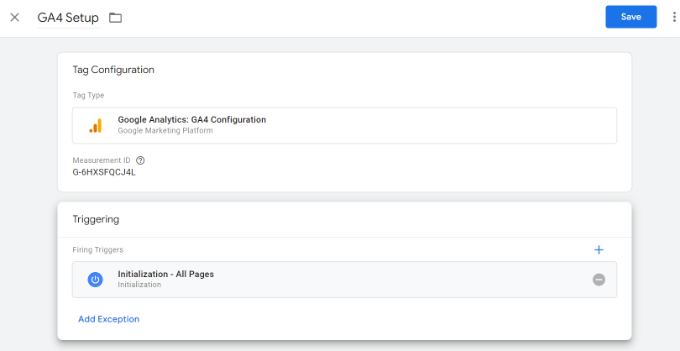
After selecting the trigger, you will need to store your settings.
Simply click the ‘Save’ button in the top right corner.
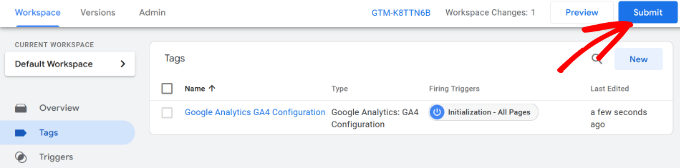
You should now see your newly created tag.
Go ahead and click the ‘Submit’ button to run the tag.
Set Up Advanced Tracking Using MonsterInsights (Easy Way)
Now that you know how to install and use Google Tag Manager, you can use an easier way of setting up advanced tracking on your WordPress site.
With MonsterInsights, you don’t have to perform complicated setups in GTM. It is the best Google Analytics plugin for WordPress and automatically configures advanced tracking for you. You also don’t have to worry about making a mistake that could mess up your tracking data.
The best part, MonsterInsights shows reports inside your WordPress dashboard. You won’t have to leave your site to see its performance. It presents data that matters for your business and helps uncover insights.
For this tutorial, we will use the MonsterInsights Pro version because it includes advanced tracking features and premium addons. There is also a MonsterInsights Lite version you can use to get started for free.
First, you’ll need to install and activate the MonsterInsights plugin. If you need help, then please see our guide on how to install a WordPress plugin.
Upon activation, you will see the MonsterInsights welcome screen. You can click the ‘Launch the Wizard’ button and follow the onscreen steps to configure Google Analytics.
MonsterInsights will work out of the box and automatically add tracking in Google Analytics.
Here are some of the tracking features the plugin offers:
1. Track Link and Button Clicks
MonsterInsights sets up link click and button click tracking out of the box on your website. Google Analytics doesn’t track link clicks by default, and you’d have to use GTM to add tracking.
For instance, you can track affiliate performance and see which links users click the most. This way, you can grow your revenue by promoting affiliates that are getting a lot of clicks.
Similarly, the plugin also tracks outbound link clicks. These are links to other websites on your site. You can use this data to see create new partnerships, signup for an affiliate program, and create new content on your own site.
Besides that, MonsterInsights also helps track telephone links, file downloads, call-to-action (CTA) button clicks, and more.
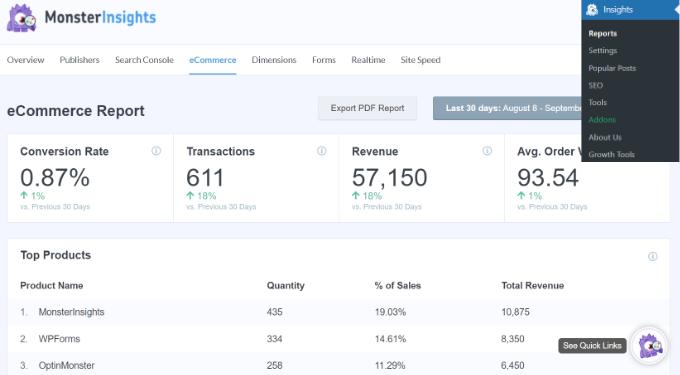
2. Set Up eCommerce Tracking in WordPress
If you have an online store, then MonsterInsights helps you track its performance without editing the tracking script or using Google Tag Manager.
It offers an eCommerce addon that lets you enable eCommerce tracking in WordPress in just a few clicks. You can see your site’s overall conversion rate, transactions, revenue, average order value, top-selling products, and much more.
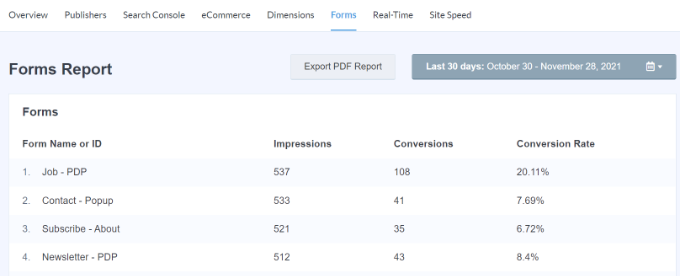
With MonsterInsights, you can also set up form conversion tracking in Google Analytics. The plugin offers a Forms addon that automatically tracks WordPress forms on your site.
If you use Google Tag Manager, then you’d have to create separate tags for all your forms and track them in Google Analytics.
However, MonsterInsights makes this process super simple. Plus, you can view the data inside the WordPress dashboard.
4. Automatically Enable Scroll Depth Tracking
Ever wonder how far people scroll your web page before leaving your site? Scroll depth tracking shows exactly that and helps you place your banner ads and CTAs in the right place to boost conversions.
MonsterInsights automatically enables scroll tracking on your website. There is no need for additional setup using Google Tag Manager or modifying the tracking code at all.
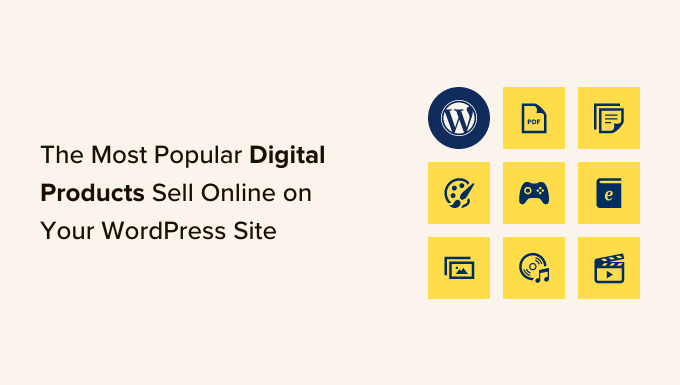
Are you looking for popular digital product ideas to sell online?
In today’s creator economy, there are many opportunities to make money online. You can sell items like music files, videos, blog posts, eBooks, software, apps, podcasts, premium content, and more.
In this article, we will share the most popular digital products that you can sell online.
What are Digital Products?
A digital product is essentially anything that you can buy, download, and use on a device such as a computer or mobile phone. For example, ebooks, software, videos, music, online courses, and more can be digital products that you can purchase at an online store.
They are delivered to you electronically, usually through a direct download in your user dashboard or in an email with a download link inside. In general, you can easily access them anytime or anywhere.
Why Sell Digital Products Online?
Digital products have a lot of advantages compared to selling physical products.
First, you don’t have to worry about keeping inventory and meeting supply or demand requirements. Once you create a digital product, you can sell it again and again.
This also relieves you of any storage issues. Some physical products need to be kept at a warehouse and may require special storage conditions like refrigeration, which can be costly. On the other hand, you don’t have to worry about storing your digital products.
Besides that, you get to generate a passive income stream with digital goods and easily grow your sales. They also help reach a wider audience across the globe, as people from around the world can buy your digital products.
That said, let’s look at some of the most popular digital products you can sell online today.
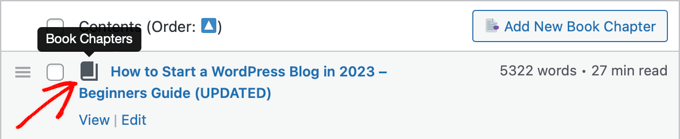
1. eBooks
eBooks are a great digital product to have, and you can write about any topic you like. The best part, once you’ve created an ebook, you can simply market it and earn passive income.
Now, if you have a WordPress blog or write articles regularly on any other platform, then you can repurpose the content for your ebook.
For instance, your most popular guides would already have enough content to be converted into an ebook. Or you can combine several blog posts into an ebook about a particular topic.
The next most popular digital product you can sell is online courses. People are always looking to improve their skillset and learn new things.
You can use this opportunity to share your expertise and teach other people through a virtual classroom. For example, if you’re a fitness instructor, then you can create an online course and teach people different exercises.
The best part, you need very little investment and no technical knowledge to create online courses.
There are many tools in the market that can help you get started in no time. All you need is a domain name for your site, WordPress website hosting, and a learning management system (LMS) plugin.
LMS software like MemberPress or Thrive Apprentice makes it super easy to create interactive courses without editing code. Plus, you can manage students and course material, offer quizzes, and more.
Just like ebooks and online courses, a membership website is another simple way of making money online. You can sell premium memberships with access to exclusive content and community features.
For example, you can lock specific guides, cheat sheets, interviews, videos, podcasts, newsletters, and other content behind premium memberships.
On the other hand, you can offer exclusive entry to different communities, like a forum, Slack channel, or Facebook group, through a membership site.
What’s great about memberships is that you don’t have to rely on advertising revenue. You can allow your website visitors to support your site and generate continuous income.
There are many membership plugins and tools you can use to get started. For instance, MemberPress lets you restrict access to content, integrate different payment services, create unlimited membership levels, allow drip content, and more.
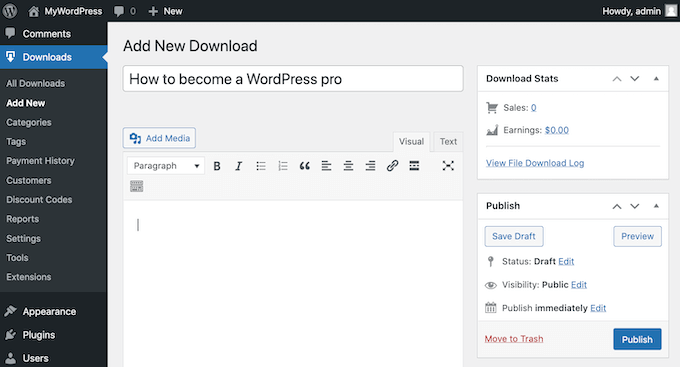
You can also sell individual guides and tutorials as digital products. This is a great way to earn more money if you have long articles or multiple blog posts on a particular topic.
Simply turn your guides into a downloadable file like a PDF document. You can then charge a fee to visitors who are willing to purchase your content.
For example, let’s say you have a detailed guide on email marketing. You can turn that guide into a PDF file and sell it as a digital product.
There are many WordPress eCommerce platforms you can use to sell digital products. We recommend using Easy Digital Downloads because it is beginner friendly, offers a shopping cart, easily integrates with payment gateways, and more.
Spreadsheets are another type of digital product you can sell on your website and generate revenue. You can create all types of useful spreadsheets for your audience.
For example, let’s say you have expertise in search engine optimization (SEO). You can create a technical SEO checklist for beginners and offer that as a paid spreadsheet. Similarly, you can create checklists, templates, calculators, lists, and other types of spreadsheets.
The best part is that you don’t need any investment to create a spreadsheet. Plus, it helps offer evergreen content that can you use to generate leads and a passive income stream.
You can also create WordPress plugins and sell them as digital products.
WordPress is open-source software, and it powers over 43% of the website on the internet. There are over 60,000 WordPress plugins that include free and paid options. This shows that there is a huge potential to create a plugin that generates revenue.
Usually, you need basic coding knowledge like PHP, CSS, HTML, and JavaScript to write a plugin. For more details, you can see our step-by-step guide on how to create a WordPress plugin.
You can also hire a developer to help you create a plugin. There are many WordPress developer job websites where you can post an opening and hire the right talent for a specific project.
If you’re willing to take on a DIY project, then you can also use a plugin called Pluginception. It lets you create a WordPress plugin from the WordPress dashboard. To learn more, please follow our guide on how to create a WordPress plugin using a plugin.
7. Software and Mobile Apps
Just like WordPress plugins, you can also create software and mobile apps. There are many SaaS (software as a service) products that you can create for any niche. It can be productivity software, workout apps, games, and more.
Usually, SaaS products have a recurring subscription. This means that you’ll need to generate income on a monthly or annual basis.
Since creating such software and apps requires specific skills, you might need to hire developers. This process can be expensive because you’ll need investment for creating software or purchasing an existing one ($15,000 and upwards).
As an alternative, you can convert your WordPress websites into mobile apps and monetize them. There are tools and plugins that can turn your site into an app. For example, let’s say you have a membership site. Converting it into an app will help you attract mobile users and sell it as a digital product.
On the other hand, you can also join affiliate programs and earn a commission on each sale. You can create a WordPress blog to review different software and apps and promote them as affiliates. Or you could create an online store using affiliates.
Similarly, you can make WordPress themes and sell them online. Themes are necessary for every WordPress user, and often users look for themes that offer specific features and customization options.
There are many platforms where you can sell website themes. Some of these include Enavto, Themeforest, CodeCanyon, and Creative Market.
You can also list a free version of your theme on the WordPress.org theme directory. From here, you can encourage users to upgrade to a premium version to unlock more features.
We recommend selling the digital products on your own websites instead of a marketplace like Envato because they charge a large commission on every sale without much benefit.
You can use an eCommerce solution like Easy Digital Downloads to create your own digital store.
9. Digital Art and Graphics
If you’re a graphic designer or an artist, then you can create a variety of digital products and sell them online.
For example, you can create logos, design templates, original digital artwork, clip art, patterns, brushes, backgrounds, icons, fonts, shapes, and more.
Besides that, creating assets for different photo editing software like Adobe PhotoShop, Canva, Affinity Designer, and Affinity Photo can also help you make money online.
Another great digital product you can sell online is photography. Many people look for images that they can use for their WordPress websites and blogs.
There are different types of photos you can sell. Some of these include stock photos, event pictures, portraits, drone images, backgrounds, and more.
Now, you can sell your images to different stock photo sites, like Shutterstock, 500px, iStock Photo, Adobe Stock, and more. Each of these websites has a payment structure where they’ll share a percentage of direct sales or give you a royalty fee.
On the other hand, you can create your own photography website and sell your images there. This way, you don’t have to share the profits with another third party and have more control over your images.
Videos are the next digital products on our list that you can sell online.
For example, videos like drone footage, stock videos, online training, product reviews, video game reviews, and gameplay footage are some of the ideas you can use to create a video-based digital product.
One of the easiest ways of monetizing your videos is by creating a video membership site. This way, you don’t have to rely on ad revenue from other platforms and get recurring payments from users who pay to access your content.
12. Recipes
Are you a chef, a home cook, or a food blogger? If you do, then you can sell recipes as digital products.
The food industry is worth trillions of dollars and is very competitive. However, you can find a niche that your audience likes and share recipes to earn money.
For instance, you can start a food blog and offer premium recipes for subscribers. Or you could combine multiple recipes into an ebook and sell that as a digital product.
Plus, you can offer cooking courses and other premium content by creating a membership site. We recommend MemberPress for this sort of site, as it’s the best plugin for that on the market.
13. Podcasts
Podcasts are audio shows that users can subscribe to. They are generally made up of audio files that listeners can download or stream to listen to.
There are many topics you can create a podcast on. For example, if your topic is music, then you can narrow it down to a specific genre. Similarly, if you’re into sports, then you can create a podcast on football.
Another great way of selling podcasts is by inviting industry experts and serving it as a masterclass. You can charge a premium or only offer these podcasts to members to generate income.
Many podcasters rely on their communities supporting them, whether that’s through a service like Patreon or creating their own membership site.
For more details, you can follow our guide on how to start a podcast and make it successful.
14. Professional Services and Coaching
You can also sell your expertise as a digital product and help other businesses.
For example, if you’re a copywriter, graphic designer, social media expert, developer, fitness coach, legal professional, translator, SEO expert, offer technical support through live chat, or any type of consultant, then you can offer your services to others for a fee.
Now, you can sign up for different freelancing websites like Upwork, or create your own site. From here, simply market your expertise on social media platforms and build a following to get more projects and clients.
15. Research and Data
Do you conduct industry-wide surveys, polls, and research? If yes, then you can create digital products and sell the research data.
Many businesses are looking for insights into their industry. They want to better understand their audience and find out what they like or don’t like.
You can carry out research on popular topics, collaborate with companies, or simply run a survey to gather data. After that, you can create a report, add it to your website, and sell it to consumers.
If you have a membership website, then you can also offer research and data to subscribers.
For examples, see some of our research articles we offer for free here at WPBeginner:
Bonus: Plugins and Tools to Market Your Digital Products
Now that you know some of the most popular digital products to sell online, you’ll also need to market them to your customers.
Here’s a list of WordPress plugins and tools that you can use to promote your product and boost conversions:
OptinMonster – It is the best lead generation and popup plugin for WordPress. You can create different campaigns and use smart targeting rules to promote digital products and increase conversions.
WPForms – This is the best WordPress form plugin. You can use it to create an order form, payment form, and more.
All in One SEO (AIOSEO) – The plugin helps you optimize your website for search engines. This way, you get to improve search engine rankings, attract more organic visitors to your site, and boost sales of your digital products.
MonsterInsights – It is the best Google Analytics plugin for WordPress. Using the plugin, you can track your digital products performance, which files get the most downloads, uncover the most popular products, and track eCommerce revenue without editing code.
PushEngage – This is a push notification software for WordPress and allows you to send personalized web notifications to customers about new products, promotions, sales, etc.
WP Simple Pay – You can collect online payments on your website using this plugin. The best part, you don’t have to set up a shopping cart to sell digital products while using WP Simple Pay.
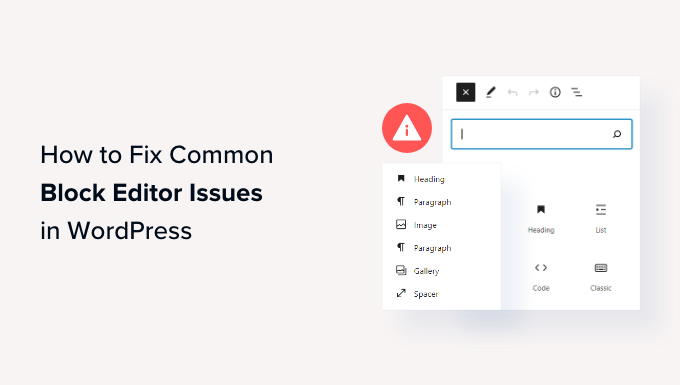
Are you running into errors when using the WordPress block editor?
WordPress replaced the old classic editor in 2019 with a brand new content editor called Gutenberg. This new editor uses blocks to create content in WordPress. However, sometimes you may come across annoying issues when using it.
In this article, we’ll share how to fix the most common WordPress block editor problems, so you can improve your workflow.
What is WordPress Block Editor?
WordPress block editor, or Gutenberg, is a new content editor introduced in the WordPress 5.0 release. Since then, WordPress has improved the editor and added new features and functionalities.
It provides more customization features compared to the Classic Editor. You get different blocks to add different elements to your content and don’t have to edit code to change the appearance and style.
It tries to show how your blogs and pages will look in real time by mimicking the same font and colors of your WordPress theme.
For example, you can use an image block to add pictures to your blog posts. Plus, you get options like image style, size, alignment, and more using the block.
Besides that, many WordPress plugins add their blocks to the content editor. This makes it super easy to embed things like forms, social media feeds, and tables of content in just a few clicks.
That said, the block editor isn’t perfect. Like any other WordPress plugin, you may come across different errors or bugs. Here are a few common issues in the content editor. You can click the links below to see your preferred section.
One of the most common issues users face is the ‘WordPress block editor not working.’
There are multiple reasons why this error occurs. For instance, it could be because of an old outdated theme, a faulty plugin, or other technical errors.
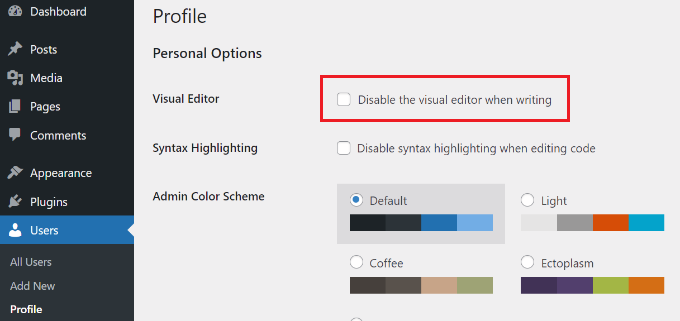
The WordPress block editor may also not work if you have a misconfigured setting on your site, like disabling the visual editor when creating a user profile.
You can check this by going to Users » Profile from your WordPress dashboard. From here, just ensure that the ‘Disable the visual editor when writing’ option is not selected.
If the problem still persists, then you can try deactivating all the plugins on your site. This should help rule out any conflicts a plugin might be causing and stop the block editor from working.
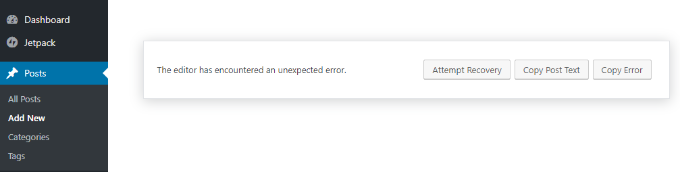
Another common issue that some users face is the WordPress block editor would crash unexpectedly.
When it crashes, you would see a ‘The editor has encountered an unexpected error’ error message. WordPress would then show 3 options, including attempt recovery, copy post text, and copy error.
There could be multiple reasons for this issue. For instance, a plugin could break the block editor and show this error, or your WordPress version isn’t up to date.
You can fix this by deactivating all the plugins and reactivating them one by one. Another fix is to change your WordPress to a default theme, like Twenty Twenty-Two, and see if the problem persists.
If you’re still facing this issue after checking the WordPress plugins and theme, then try updating the WordPress version and clearing the WordPress cache.
3. Remove The Invalid JSON Error in the Content Editor
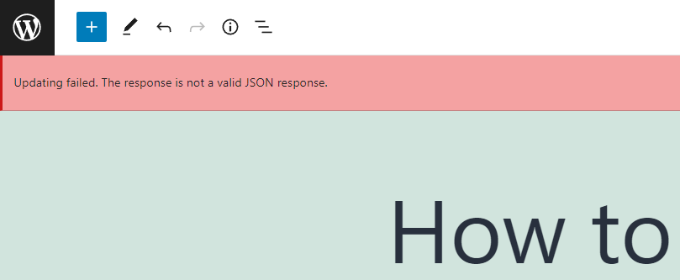
When you’re editing a blog post or page, a ‘The response is not a valid JSON response’ error may occur when you click the Update button in the block editor.
WordPress is in continuous communication with the website server in the background when you’re editing a post on your WordPress blog. This error is caused when WordPress fails to receive a response from the server or the response is not in the JSON format.
Here are a few reasons why you would get an invalid JSON error and how to fix them:
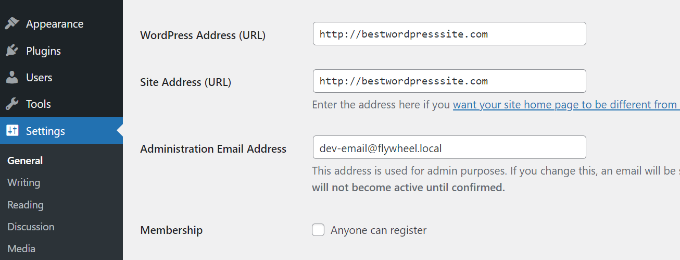
Check WordPress URLs in Settings – You will need to ensure that the WordPress Address and Site Address in your site’s settings are correct. Simply go to the Settings » General page and check if the URLs are the same. The JSON error could be triggered if the Site Address is different.
Fix Permalink Settings in WordPress – In WordPress, you can set up SEO-friendly URLs for your pages and posts. However, incorrect settings can make it hard for the block editor to get a valid JSON response. Just make sure to select the right permalink format.
Check WordPress .htaccess File Settings – The .htaccess file is used as a configuration file in WordPress to manage SEO-friendly URLs (permalinks). Usually, WordPress will automatically regenerate and update it. However, incorrect settings or out-of-date .htaccess files can cause JSON errors.
See REST API Debug Logs – The REST API is a set of techniques WordPress uses to communicate with your site’s server. A JSON error can also mean that REST API encountered an error. You can check this by viewing the REST API logs on the Site Health page in WordPress.
Try Deactivating All The Plugins – A conflict between different WordPress plugins can also result in an invalid JSON error. Try deactivating all the plugins on your website and see if the error reoccurs.
Switch to the Classic Editor – If you’re still unable to resolve the JSON error, then you can switch back to the Classic Editor in WordPress. The old content editor doesn’t rely on REST API to get a JSON response from the website server.
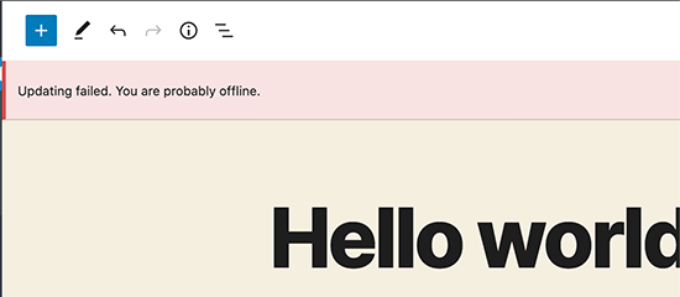
Another error you might see when updating or publishing a blog post or page in the WordPress block editor is: ‘Updating failed. You are probably offline.’
This issue occurs when WordPress REST API cannot communicate with the WordPress database.
If the block editor fails to send and receive requests from the WordPress hosting database, then different parts of your site won’t function. This includes the block editor.
The REST API may stop working if you’re not connected to the internet or have lost connectivity. To fix this issue, please make sure that your internet connection is working properly, and then try to update or publish your page.
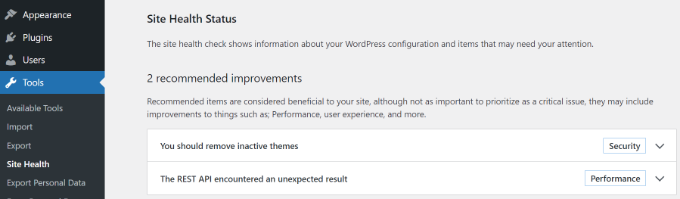
Aside from that, you can go to Tools » Site Health from your WordPress dashboard and view the REST API logs. If there is an issue with REST API, then you will see it under the ‘recommended improvements’ section.
The error log will show what happened to the REST API and may give you clues about what might have caused the issue.
5. Add or Remove Blank Spaces between WordPress Blocks
When creating custom pages and posts using the WordPress block editor, you may notice too much or too little space between blocks.
Usually the spacing is controlled by your WordPress theme. However, there are options in the block editor that also let you control the layout of your page and offer a better user experience.
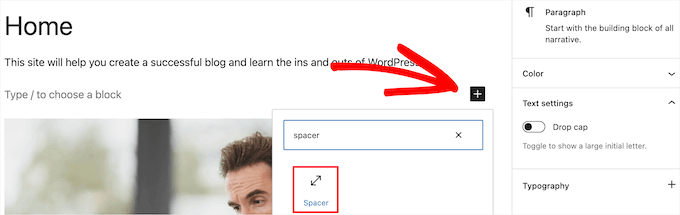
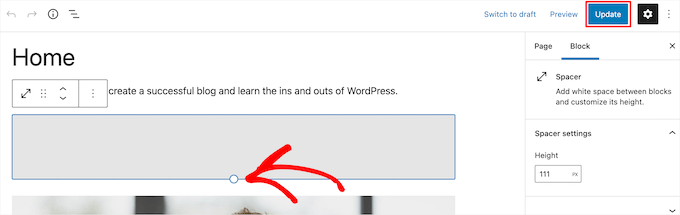
For instance, you can add a Spacer block to add blank spaces. Simply click the ‘+’ button and add the Spacer block anywhere in the content.
This way, you can add additional space between blocks.
WordPress also lets you adjust the size of the spacer block. You can make it bigger or smaller by dragging the block up or down.
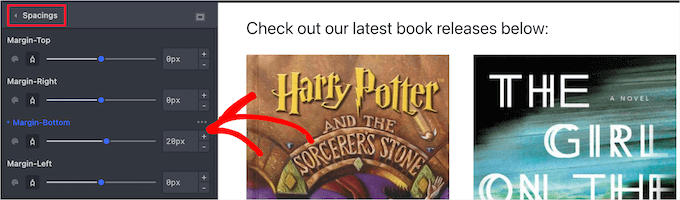
If you want to remove extra blank space between blocks, then you will need to enter custom CSS into your WordPress theme or use a CSS plugin like CSS Hero.
The plugin lets you edit your website’s CSS without editing the code. It offers different spacing options that you can use to adjust the blank space between blocks.
6. Copy and Paste Content without Formatting Issues
Have you ever noticed that when you copy and paste content from a desktop app or a web page into the block editor, you end up pasting unwanted formatting as well?
You’ll see that the font and colors of the pasted content don’t match your WordPress theme. This is very common if you’re using Microsoft Word or Google Docs to write the content and then enter it in the block editor.
Some simple tips for keeping the original formatting include using Word and Google Docs heading styles. This way, WordPress automatically picks the headline level when you paste the content into the block editor.
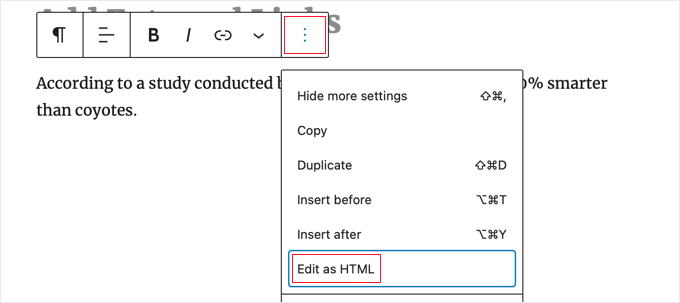
Besides that, you should check the HTML code of your page or post after pasting the content. In the WordPress content editor, you can select a block and then click the 3 vertical dots option. From the dropdown menu, simply select the ‘Edit as HTML’ option.
This way, you should be able to find any formatting errors, like incorrect bolds and italics, unwanted text, and more.
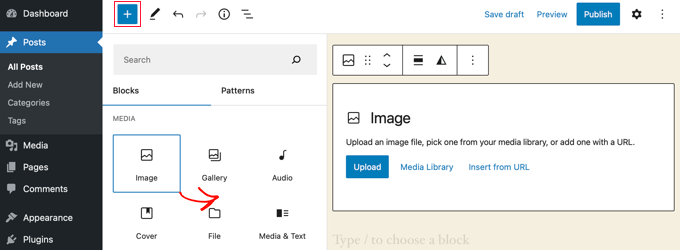
Next, you might see an error when uploading images in the WordPress block editor. It is one of the most common image issues in WordPress.
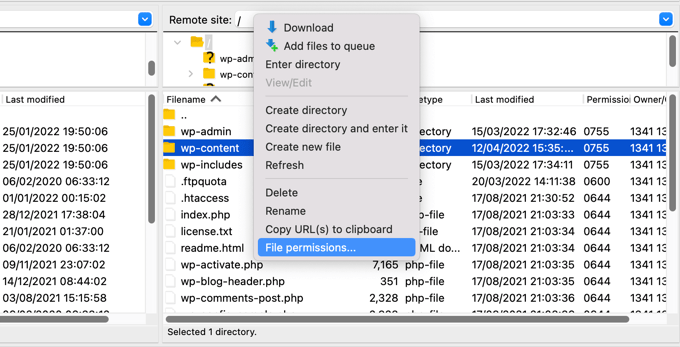
The main reason for this error is due to incorrect file permissions. All your website files are stored on your web hosting service and require specific file and directory permissions to work.
If these permissions are incorrect, it can prevent WordPress from reading and uploading files onto the hosting server. As a result, you will notice that images will disappear from the media library when uploaded, or you may see an error that says:
‘Unable to create directory wp-content/uploads/2019/04. Is its parent directory writable by the server?’
To fix this issue, you’ll need to edit the file permissions. You can use an FTP client and access the /wp-content/ folder. From here, you can right-click the folder and change the file permissions.
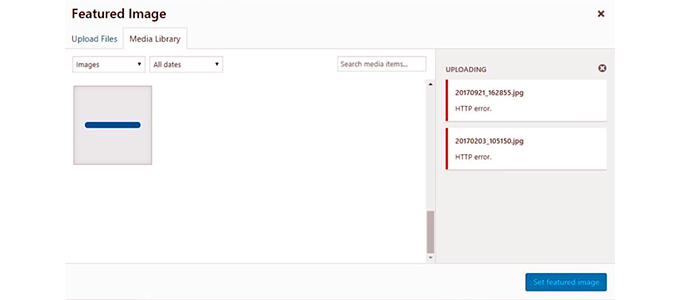
Another issue you may encounter when uploading images in the WordPress block editor is the HTTP error.
WordPress will show a generic ‘HTTP’ error’ when you upload images in the Media Library and you won’t be able to see a preview of the picture.
There are several things that could cause this issue. The frustrating part is that the error message doesn’t give many clues to the actual cause.
To fix this, you can try a bunch of things. First, you can simply wait a few minutes and try reuploading the image. At times, your website server could encounter a problem like unusual traffic and low server resources.
Besides that, you can increase WordPress memory limit and prevent lack of memory from causing the HTTP error. Other things you can try include changing the image editor library used by WordPress and editing the .htaccess file.
Also, your login might have expired, and this error will sometimes go away by going to your login screen and entering your username and password again.
9. Remove Missed Schedule Post Errors in WordPress
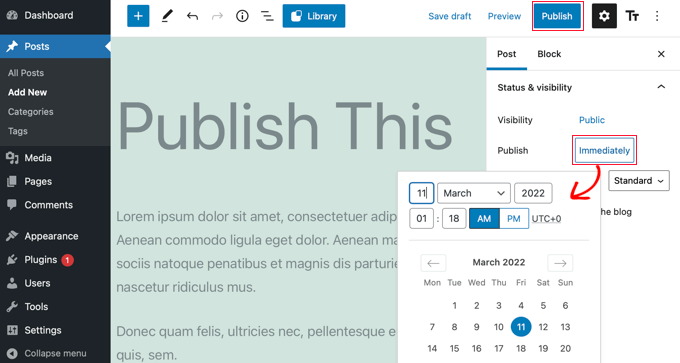
Did you know that WordPress offers a built-in option to schedule blog posts?
In the WordPress content editor, you can change the date and time for publishing your blog posts. However, sometimes your scheduled content may not get published at the set time.
The main reason for this error is due to the WordPress hosting environment or plugin conflicts. WordPress uses a technology called ‘cron’ to automatically publish your post at a later time.
If a plugin or the website hosting server is affecting the cron jobs, then it will lead to missed schedule post error in WordPress.
You can fix this issue by checking the timezone of your WordPress site. It is possible that your site’s timezone doesn’t match the timezone you’d like to use for scheduling your blogs.
Simply head to Settings » General from the WordPress admin panel and scroll down to the Timezone section.
10. Fixing Alignment Issues in WordPress Block Editor
Another common WordPress block editor you might face is that your content and images may not be properly aligned.
For example, let’s say you added a bullet list to a blog post and center-aligned it. However, the list appears left-aligned in the block editor when editing the post. Similarly, a center-aligned image block may appear aligned to the left or right.
If you have the Gutenberg plugin installed and active on your WordPress site, then it can cause block alignment issues. We recommend that you deactivate the Gutenberg plugin and see if it resolves the problem.
Another solution is to add the following custom CSS code for the text you’d like to center-align:
Have you ever noticed that when you share an article on Facebook, the post thumbnails are incorrect?
The problem can be caused by conflicting plugins, content delivery network (CDN) issues, or missing open graph meta tags for Facebook.
Now, this isn’t an issue that you will see in the WordPress block editor. However, you can specify an open graph image for Facebook using the content editor.
Another social media-related block editor issue you will face is adding Facebook and Instagram content to WordPress.
In the past, you could easily embed posts from Instagram or Facebook in WordPress. However, Facebook has changed the way oEmbed works now.
You can no longer embed videos, images, updates, and other content in WordPress. It will instead show a plain URL of the content.
You can easily fix this issue using a social media WordPress plugin like Smash Balloon. It helps you embed content from Facebook and Instagram easily using oEmbed, and you can also show social media feeds on your website.
13. Unable to See Embedded Content Preview in Block Editor
This is an issue that was raised in WordPress 5.7 version. Whenever you embedded a video from YouTube and Vimeo or added audio from Spotify and SoundCloud, the preview wouldn’t appear in the block editor.
Instead, you would simply see ‘Preview is not available’ written in the blocks. The main cause of this problem was the default lazy loading feature.
In WordPress 5.5, iFrames were lazy-loaded by default, which meant embedded content like pictures would not load until a visitor scrolled down to the location of the content.
A simple fix to this issue is updating your WordPress version. This bug has since then been resolved. If you’re using version 5.7 or lower, then we highly recommend updating your WordPress to the latest version.
Do you need a technical search engine optimization (SEO) checklist?
Optimizing your site for search engines can be a challenge if you’re not sure what to look for. Many website owners will ensure basic SEO practices but overlook technical elements.
In this article, we will show a WordPress technical SEO framework and share a checklist you can use for your business.
Why Do You Need a WordPress Technical SEO Framework?
Technical SEO is a key component of your WordPress SEO strategy. You could be creating the world’s best content, but if search engines can’t find and understand your content, then all your efforts are wasted.
That’s why it is important to have a WordPress technical SEO framework.
Our WordPress SEO framework checklist will ensure that search engines can easily crawl and index your content. Plus, you can also evaluate other technical aspects of your WordPress website that might be preventing you from achieving higher rankings.
For example, your website might be taking a long time to load. This would result in poor rankings since the page load time is a ranking factor.
There are many SEO tools that let you conduct SEO audits and find out if your site is technically optimized. However, not all tools will show details inside your WordPress dashboard.
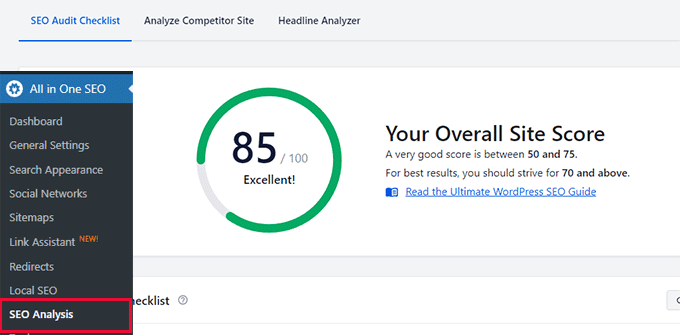
The easiest way to evaluate technical SEO for your WordPress site is by using All in One SEO (AIOSEO). It is the best WordPress SEO plugin that helps you optimize your website for search engines.
It offers a free SEO Analysis tool that you can use to conduct a technical SEO audit. The tool is available in the AIOSEO Lite version, which you can use for free. There are also premium AIOSEO plans that offer more features like schema markups, sitemaps, redirection manager, and more.
First, you’ll need to install and activate the AIOSEO plugin. For more details, please see our guide on how to install a WordPress plugin.
Upon activation, you can go to All in One SEO » SEO Analysis from your WordPress admin panel. Under the ‘SEO Audit Checklist’, you’ll see an overall score for your website.
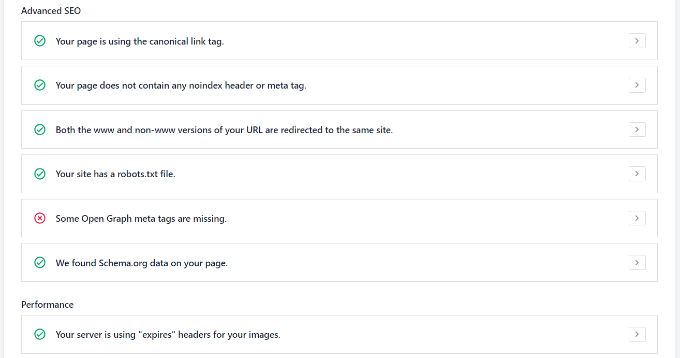
Next, you can scroll down to the Advanced SEO and Performance sections.
Here, the plugin will evaluate the technical SEO aspects of your website based on different parameters and ranking signals. It will then highlight missing elements and critical issues that could stop your site from ranking higher.
You can use AIOSEO to continuously monitor your site’s technical SEO and fix issues. Similarly, you can also perform a competitor analysis and see what they’re doing differently for their technical SEO optimization.
That said, let’s look at our WordPress SEO framework checklist that you can use to ensure higher rankings and organic traffic. You can click the links below to jump ahead to any section:
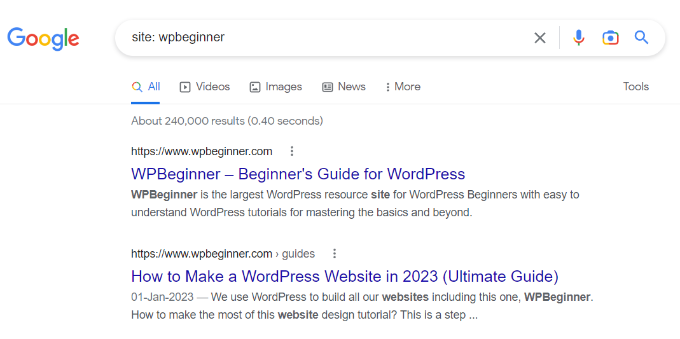
1. Ensure Your Website is Visible to Search Engines
The first thing you need to check is whether search engines are able to find your WordPress site.
You can simply enter site:example.com in the search engine and see if your website appears in the search results. Just replace ‘example.com’ with your own domain.
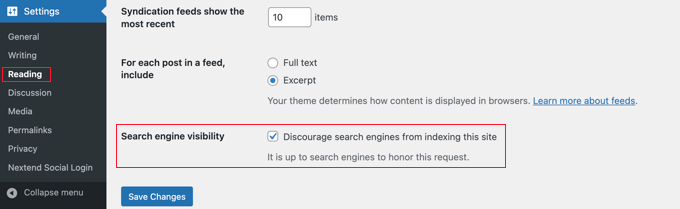
If your site isn’t showing up, then you can check the visibility settings in WordPress.
Go ahead and visit the Settings » Reading page from your WordPress admin panel. Next, scroll down to the Search engine visibility setting and be sure the ‘Discourage search engines from indexing this site’ option is unchecked.
This option is usually enabled if your website is under construction or is put in maintenance mode.
2. Uncover Crawling and Indexing Issues
If your website is visible to search engines, then it is important to check that your content is crawled and indexed.
Crawling is the process where Google, Bing, and other search engines discover and understand your website. Indexing is the process where search engines collect and store information about your website.
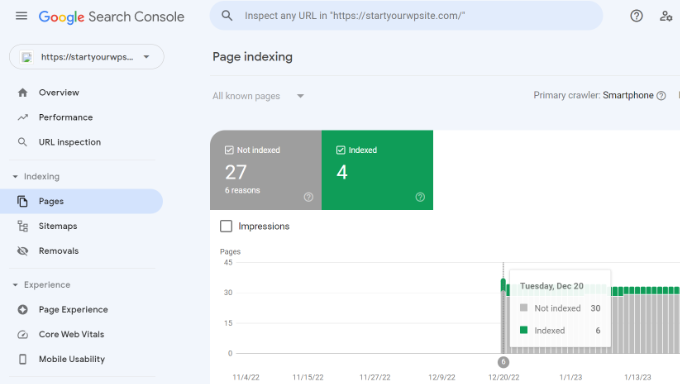
A simple way of checking crawling and indexing issues is using webmaster tools. For example, Google Search Console is a free tool by Google that shows your site’s performance on search results, helps uncover bugs, and allows you to submit your site to Google.
In Google Search Console, you can head to the ‘Pages’ report. Here, you’ll see pages that are indexed and not indexed.
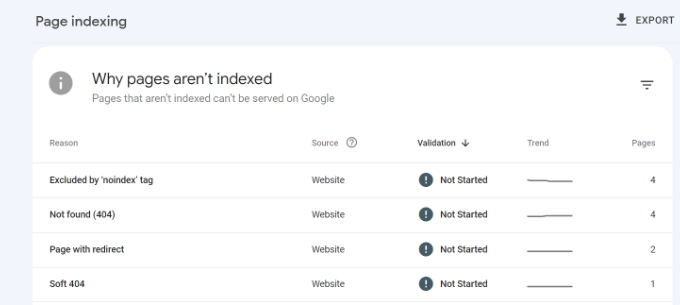
Next, you can scroll down to the ‘Why pages aren’t indexed’ report.
Google Search Console will show you crawling and indexing errors on your website and which pages are affected by them. You can then resolve these issues, so your web pages can appear in Google search results.
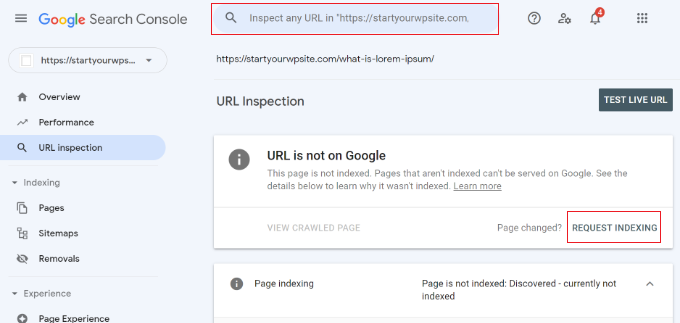
Besides that, you can also check indexing and crawling issues for individual URLs.
Simply enter the page link in the URL inspection tool at the top. Google Search Console will then show you a report on whether the URL is indexed and on Google.
If it is not, then you’ll see a ‘URL is not on Google’ message. To fix this, you can click the ‘Request Indexing’ button so Google can crawl and index your page.
3. Make Sure Your Website is Secure with HTTPS
Another important thing to check from a technical SEO framework standpoint is whether your website is secure or not.
Google and other search engines will give preference to sites that use HTTPS over those that use HTTP. To secure your site, you will need an SSL certificate to encrypt the connection between your website server and the user’s browser.
You can check this by looking for the padlock sign in your browser’s search bar at the top.
Most WordPress hosting companies now offer free SSL with all their plans. You can ask your host to see if they offer that.
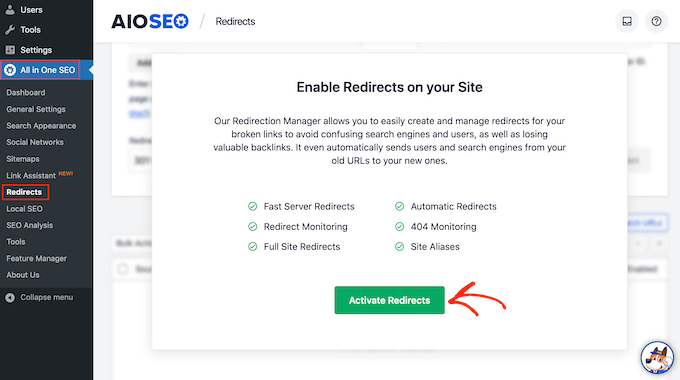
Broken links are bad for your website’s SEO framework, and it negatively impacts your user experience. These are links that no longer exist and will return a 404 error.
Since search engine crawlers find different pages on your website by following internal links. A broken link can stop them from discovering new content. As a result, your page might not get indexed in the search results.
Similarly, if a visitor clicks on a link and is unable to find a page they’re looking for, then they might exit your website.
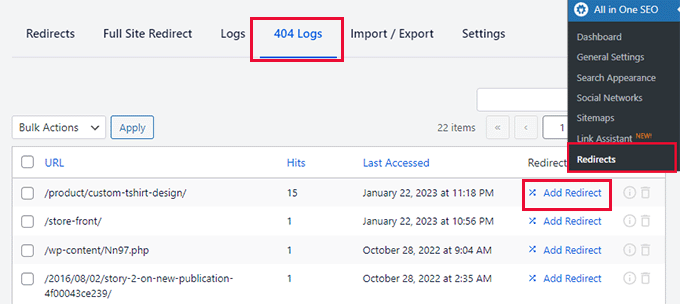
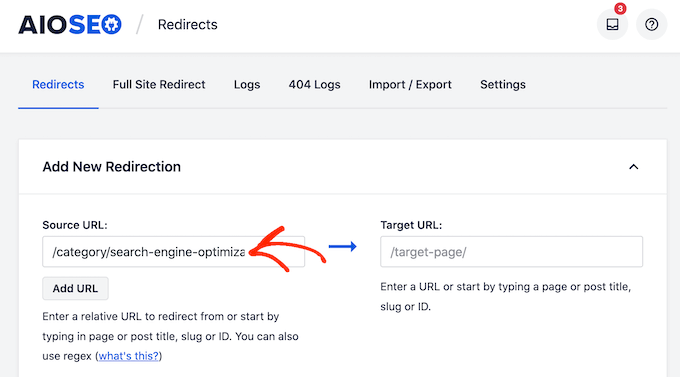
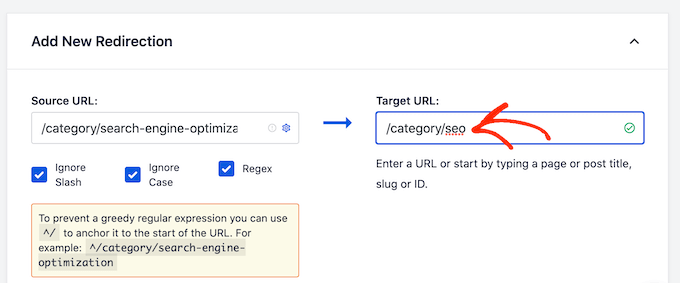
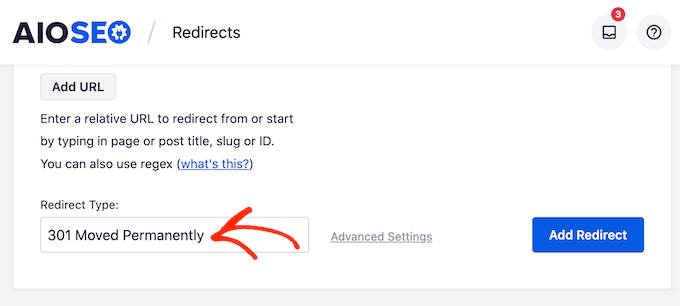
With All in One SEO (AIOSEO), you can easily find and fix broken links on your WordPress website.
It offers a powerful redirection manager that helps track 404 errors on your website and lets you set up permanent 301 redirects to fix broken links.
It is important that Google and other search engines only index one version of your website.
Your website can have different versions, but they should all point to one version. For example, you can have a site that has www and non-www version or HTTP and HTTPS version:
Whether you choose a www or non-www version, all the URLs should redirect to the primary WordPress URL. Otherwise, Google will consider each version as a different website.
This can negatively impact your overall SEO rankings. Search engines won’t know which version to index, and it could cause duplicate content issues.
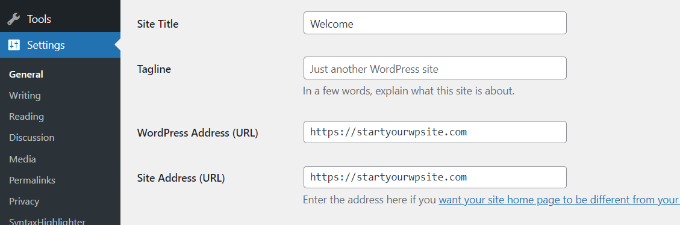
You can check the primary URL for your site by going to Settings » General from the WordPress dashboard. Next, look at the web address in the ‘WordPress Address (URL)’ and ‘Site Address (URL)’ fields.
With AIOSEO, you can automatically set the proper canonical URL in your site header, so search engines will know your preference.
6. Use SEO-Friendly URL Structures
After setting a primary URL for search engines to index, you can now check the URL structure of your website.
URL structure plays an important role in your SEO. Having an SEO-friendly URL structure will help Google, Bing, and other search engines easily crawl your pages and understand your content.
Here’s an example of a bad URL structure:
https://www.example.com/category.php?id=42012
Instead, you should be using URLs that describe the content, like:
You can create SEO-friendly URLs by making sure that they are short and descriptive. Besides that, don’t forget to include a keyword in the permalinks, use hyphens to separate words, keep all the words in lowercase, and don’t use stop words.
Pro Tip: Don’t include numbers in your URL slugs, either. That way, you can update your content in the future
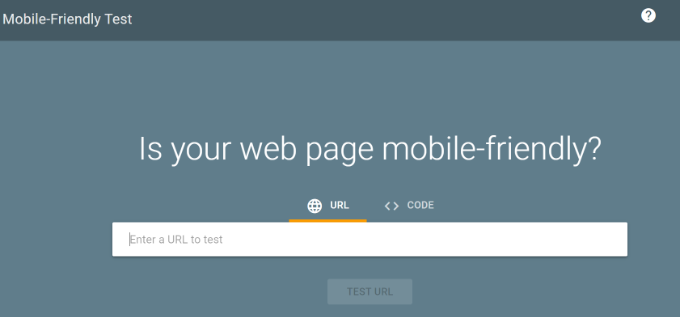
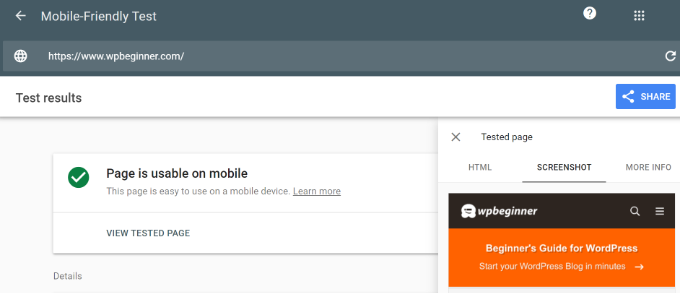
7. Ensure Your Site is Mobile Friendly
The next item in the technical SEO framework checklist is to ensure your WordPress site is mobile responsive.
With Google now going mobile-first, it will now index your site’s mobile version instead of the desktop version.
8. Check Your Website Speed and Improve Performance
Your website speed is also a critical part of your WordPress technical SEO framework. Google uses page load speed as a ranking factor and will rank fast-loading sites higher compared to slow-performing websites.
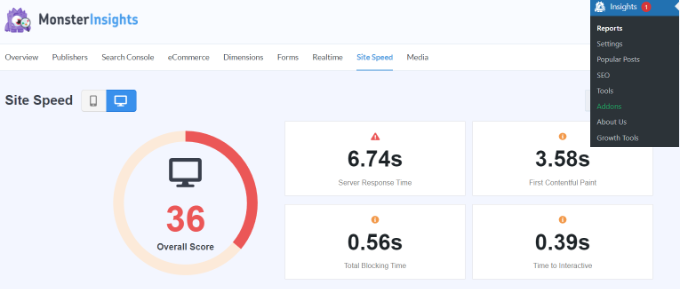
You can check website load time by running a site speed test. For instance, you can use MonsterInsights, which is the best Google Analytics plugin that shows a site speed report inside your WordPress dashboard.
After that, you can head to the Insights » Reports page from your WordPress admin panel. Next, you can go to the ‘Site Speed’ tab. Here, you’ll see an overall score for your website speed for desktop and mobile.
The report will also show other metrics that are important for measuring your website speed.
If you scroll down, then MonsterInsights offers recommendations and benchmark goals for each metric you should target.
A quick tip that you can use to improve your website speed is minifying your CSS and JavaScript files.
The term minified means reducing the size of website files by removing white spaces, lines, and unnecessary characters. When a user visits your website, different files are sent to the user’s browser, which includes CSS, HTML, and JavaScript files.
By reducing the file size, you can significantly improve website speed and performance. There are many WordPress plugins and hosting services that allow you to minify CSS and JavaScript files, like WP Rocket and SiteGround.
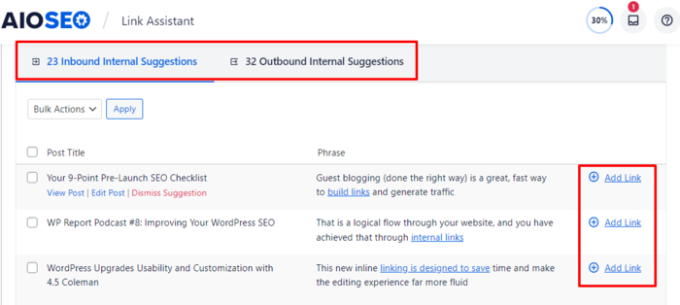
9. Improve Your Internal Linking Structure and Remove Orphaned Pages
Internal links play an important role in your website’s technical SEO framework. Search engines reward websites that have a proper internal linking structure without too many orphaned pages.
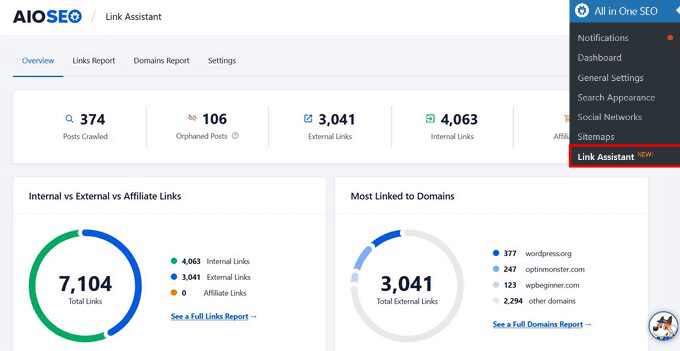
AIOSEO has a powerful SEO Link Assistant feature that makes it easy for you to discover link opportunities and even automate the process for you.
It is the best internal linking plugin for WordPress that crawls the links on your WordPress website and provides a detailed report. You can see the number of internal links, outbound links, and affiliate links for each post and page.
You can see all the link suggestions in one place, and it can even automatically go back and add internal links in your older posts with a single click.
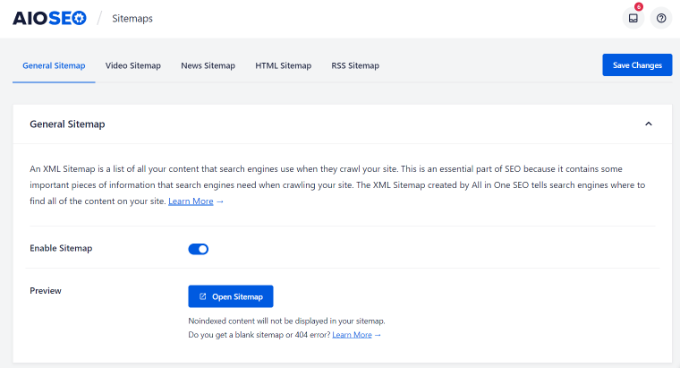
10. Generate XML Sitemaps and Submit Them to Search Engines
Another important part of technical SEO framework is making it easier for search engines to find your content. One of the ways you can do that is by creating an XML sitemap.
It tells search engines about the important pages on your website. This way, search engine bots can crawl your site faster and index your content. While a sitemap won’t boost your rankings, it will improve the overall crawling and indexing process.
You can create and customize the sitemap using AIOSEO. The plugin will automatically generate a sitemap upon activation. Besides, it also lets you create a video sitemap, a news sitemap, an HTML sitemap, and an RSS sitemap.
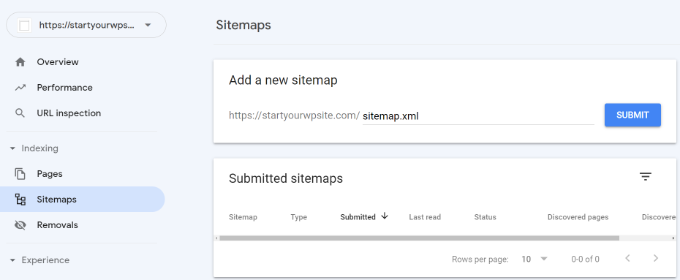
Once you’ve created a sitemap, you can then submit it to different search engines using their webmaster tools.
For instance, Google Search Console gives the option to enter the sitemap URL and submit it to the search engine. To learn more, you can see our guide on how to submit your site to search engines.
Similarly, you can also add your site to Bing Webmaster Tool and then submit an XML sitemap to improve crawling and indexing.
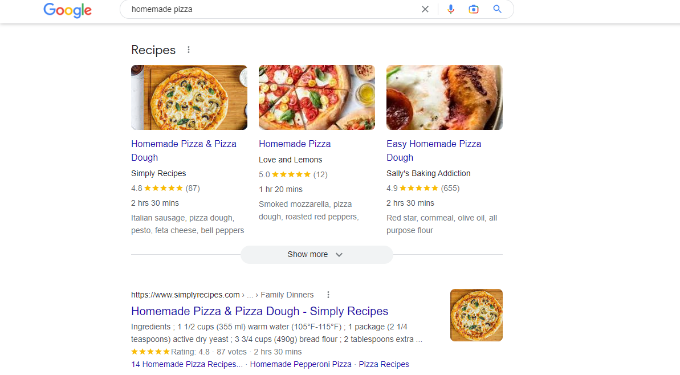
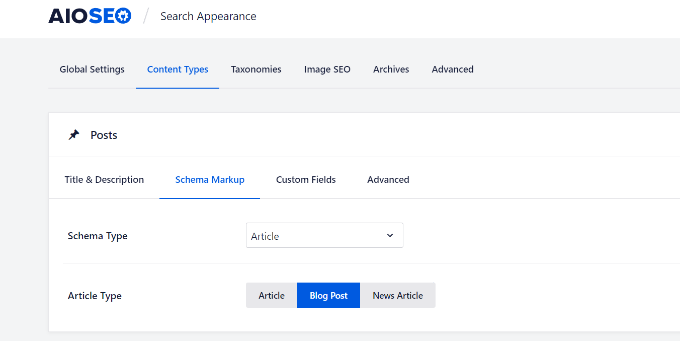
11. Use Schema Markup for Rich Snippets
The next technical SEO framework item you should check is schema markup. It helps search engines understand your content better and how it will appear on the search results.
Search engines can use this information and display rich results. It also helps capture Google featured snippets, which can increase organic clicks and traffic.
For example, here’s how Google shows recipes, ingredients, ratings, cooking time, and other information for blog posts that use a recipe schema markup.
The plugin lets you choose the schema type depending on your content, and it takes care of the rest.
With AIOSEO, you can also add completely custom schema markups based on your needs using the WordPress custom schema generator feature. This can help you get star ratings, and other rich snippets in Google.
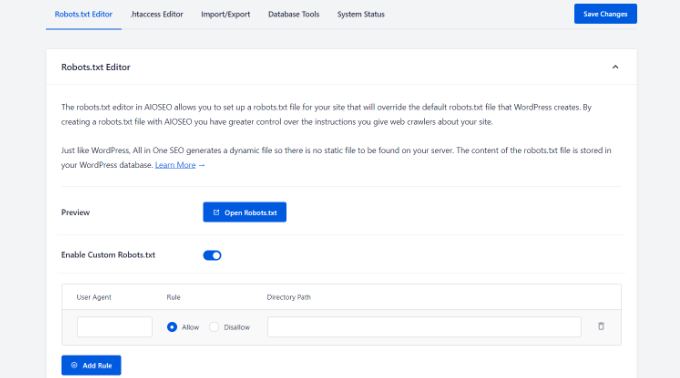
12. Optimize Your Robots.txt File for SEO
Robots.txt is a text file that specifies instructions for search engine bots on how to crawl your website. You can tell which pages to crawl and which pages to skip while crawling.
Here’s what a robots.txt file would look like for a WordPress site:
Adding a robots.txt file helps save the crawl quota. A search engine crawler will crawl a certain number of pages during a session. If they don’t finish crawling all the pages on your site, they will resume crawling in the next session.
This can slow down the indexing of your content, and it will appear in search results after some delay. That’s why optimizing the robots.txt file is an important component of the technical SEO framework.
You can disallow pages unnecessary pages like the WordPress admin area, theme folder, plugin files, and more. This way, you get to save the crawl quota and allow search engine bots to crawl even more pages.
On the other hand, you can add sitemaps and other important pages to robots.txt. This way, search engines will crawl and index them as quickly as possible.
A simple way of optimizing the robots.txt file is by using AIOSEO. You can enable custom robots.txt using the plugin and add rules to allow or disallow search engines to crawl.
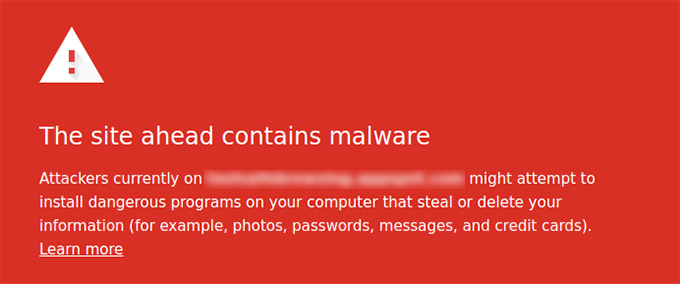
13. Make Sure Google Doesn’t Flag Your Site for Malware
Another important technical SEO checklist item is to ensure your site isn’t flagged by Google for malware or unwanted software.
If your website is a security risk for users, then Google will show the following warning message:
This can be really bad for your WordPress SEO. It will keep people away from visiting your website, and impact your rankings, and overall website traffic.
To scan for malicious files on your website, you can use a WordPress security scanner. At WPBeginner, we use Sucuri as it is the best WordPress firewall and security plugin. It checks for vulnerabilities like malware, spam injection, malicious code, and helps clean up the website.
14. Use Server Side Rendering vs Client Side Rendering
Another technical SEO best practice is ensuring that your site’s JavaScript renders on the server side and not on the client side.
Server-side rendering is when the JavaScript files render on the website server. While client-side rendering is when the JavaScript files render in the user’s browser.
Client-side rendering is bad for your site’s user experience and SEO. All the burden of loading your site quickly falls on the visitor. Plus, search engine bots use JavaScript resources for crawling and indexing your content. This could result in JavaScript content being missed by crawlers and not included in the search engine index.
With server-side rendering, your website server ensures everything loads quickly. This way, you get a better user experience, faster page load speed, and reduce any risk of content being missed from indexing.
One way of ensuring that JavaScript is rendering on your site’s server is by running a site speed test. If your website speed is low, then it could be because of this issue. You can also look at crawled pages in Google Search Console and see if Google missed any content while crawling. If it did, then it could be because of JaveScript-related SEO issues.
That’s it. You’ve made it to the end of the list. You don’t need to go through each and every point in the technical SEO framework at once. Simply go one step at a time and work your way through the list.
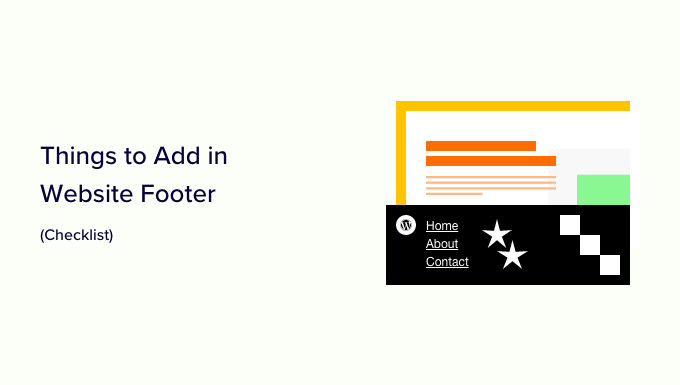
Are you wondering what to add to the footer of your WordPress site?
The footer is the area at the bottom of your website. Although it’s easy to overlook, the footer can improve the user experience on your site in lots of significant ways.
In this checklist, we will share the top things that you should add to the footer of your WordPress website.
What is the Footer in WordPress?
The footer is the area that appears below the content part of your website. It is a common website design feature used by millions of websites.
‘Footer’ can also refer to the footer code area. Third-party services like Google Analytics, Facebook Pixel, and many others may ask you to add code snippets to your website’s footer.
This sort of footer code doesn’t appear to visitors but it allows you to add features, services, and other content to your WordPress website.
With so many options, beginners may struggle to decide what to add to the footer area. As a result, many website owners miss out on opportunities to improve their sites and provide a better visitor experience.
That being said, let’s take a look at some of the things to add to the footer of your WordPress site, and how to make it more useful.
Here are all the things we’ll add, so feel free to jump straight to the items that interest you.
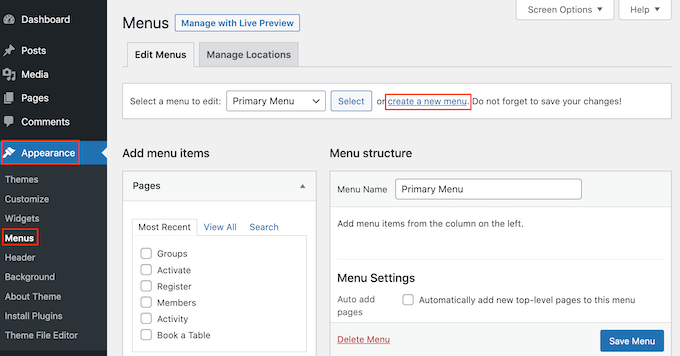
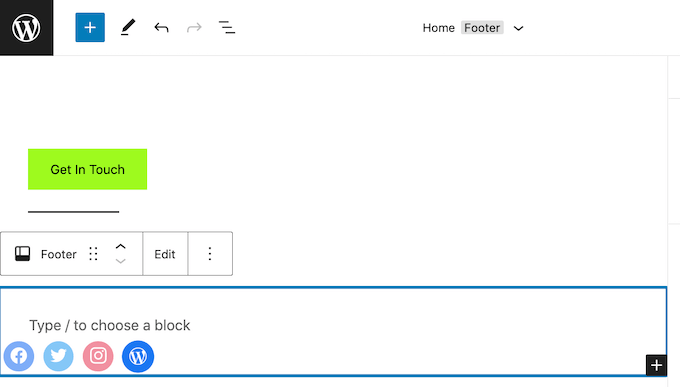
1. Adding Links to The Footer of Your WordPress Site
Many websites add links to the footer area. This helps visitors find your site’s most important content such as the about page, products page, checkout, contact form, and more.
All popular WordPress themes come with a footer widget area where you can add different content and elements.
To add links to the footer area, go to the Appearance » Menus page and click on the ‘create a new menu’ link.
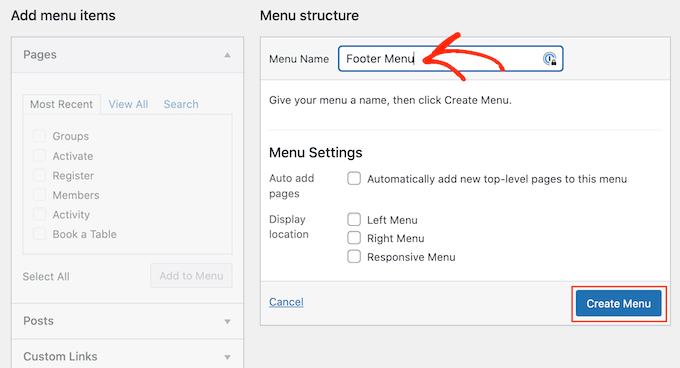
After that, type in a name for the menu. This is just for your reference so you can use anything you want.
With that done, click on the ‘Create Menu’ button.
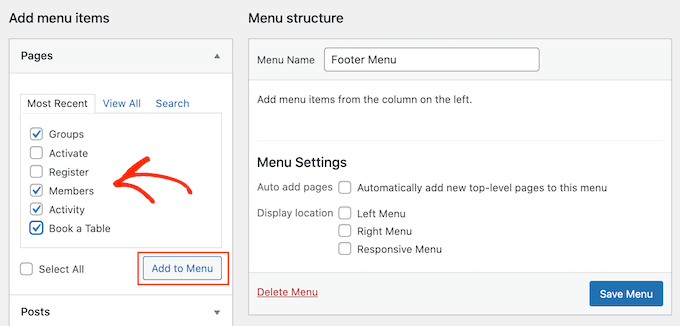
Now, check the box next to each item that you want to add to the menu.
Then, click on ‘Add to Menu.’
When you’re happy with how the menu is set up, click on the ‘Save Menu’ button to store your changes. For more help, see our guide on how to create navigation menus in WordPress.
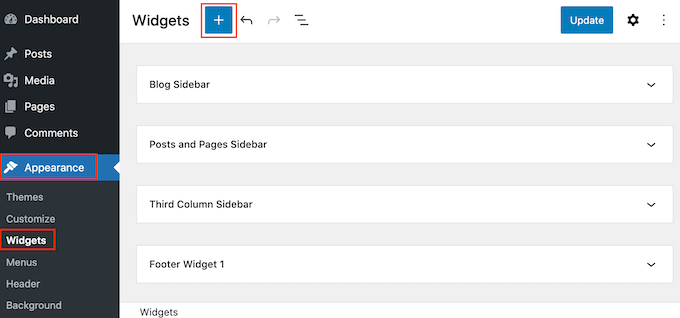
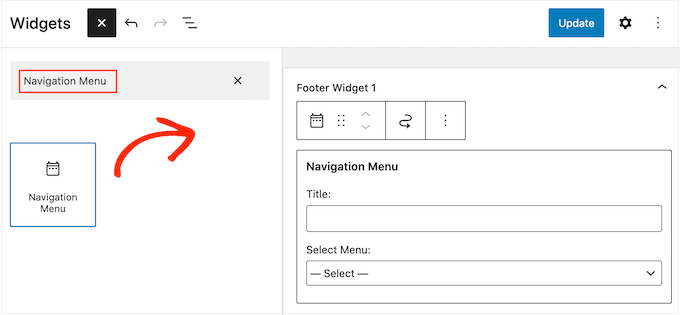
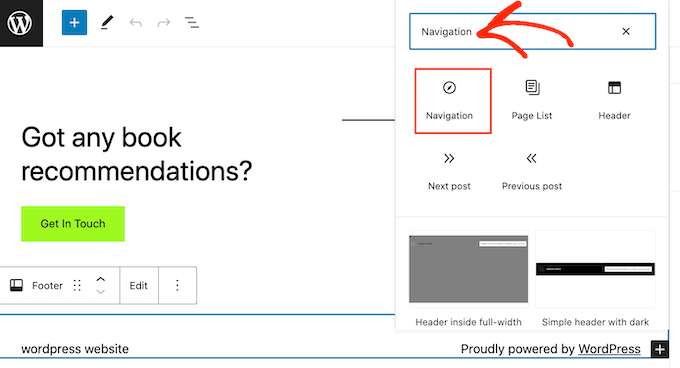
Now you’ve created a menu, let’s add it to the footer area of your website by going to Appearance » Widgets. Here, click on the blue ‘+’ button.
In the ‘Search’ field, type in ‘Navigation Menu.’
When the right block appears, drag and drop it onto the ‘Footer’ or similar area.
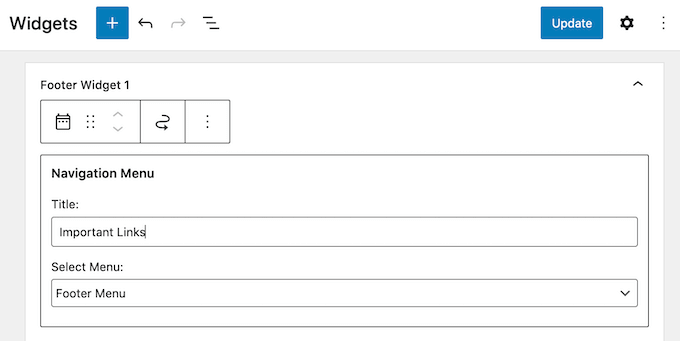
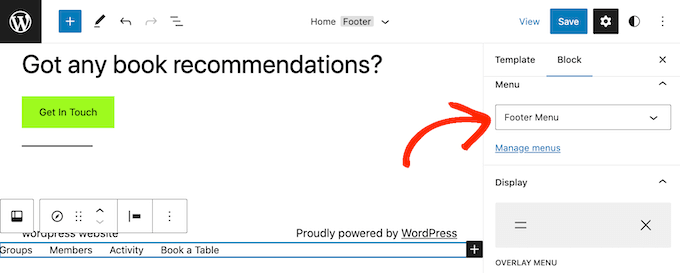
After that, open the Select Menu’ dropdown and choose the footer menu you created earlier.
You may also want to type in a title, which will appear above the links in your website’s footer.
With that done, click on the ‘Update’ button.
Now, if you visit your website you’ll see all the links in the footer area.
You can also add links to the footer using a drag-and-drop page builder plugin like SeedProd. You can even create different footers for individual WordPress pages.
Adding a Menu to Your Footer with the Full-Site Editor
If you’re using a block-based theme such as ThemeIsle Hestia Pro or Twenty Twenty-Three, then the process of adding a menu to the footer is slightly different.
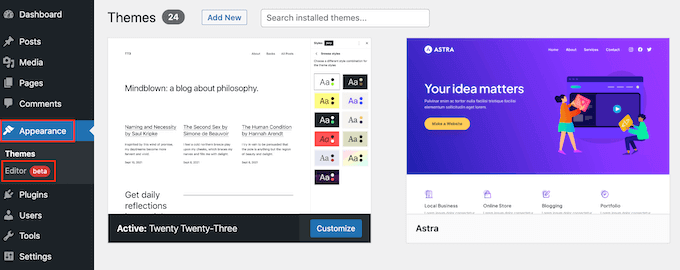
Simply create a navigation menu following the same process described above. Then, go to Themes »Editor in the WordPress dashboard to open the full-site editor.
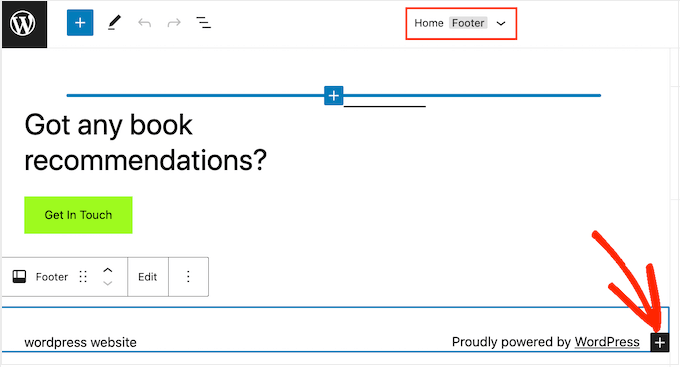
Here, click on the downwards-pointing arrow in the toolbar and select the ‘Footer’ template.
In the footer area, go ahead and click on the ‘+’ button to add a new block.
In the ‘Search’ bar, type in ‘Navigation.’
When the right block appears, click to add it to the footer area.
The full-site editor will show one of your navigation menus by default.
If you want to show a different menu instead, then open the ‘Select menu’ dropdown in the right-hand panel and choose the menu you want to use.
When you’re happy with how the menu looks, click on ‘Save’ to make your changes live.
2. Adding Code in WordPress Footer
Sometimes you may need to add snippets to your WordPress blog or website’s footer.
You could edit your theme files directly and paste the new code in the footer.php template. However, this isn’t recommended as the custom code will disappear if you change the WordPress theme, or update that theme.
Editing your theme files directly can also be risky. Even a simple typo or mistake could cause lots of common WordPress errors.
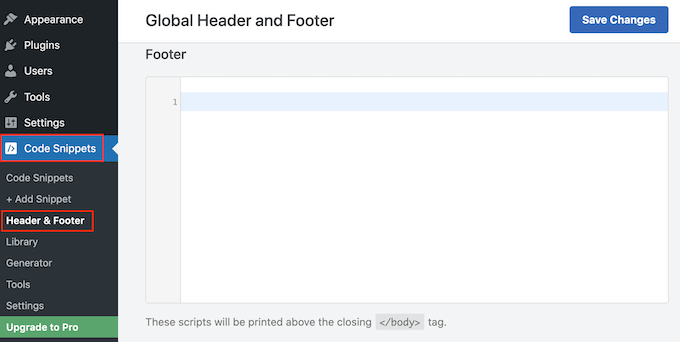
The best way to add code in the WordPress footer is by using a code snippets plugin. WPCode is the best code snippets plugin for WordPress. It makes it easy to insert code into your WordPress site’s headers and footers without needing to edit your theme files.
First, you need to install and activate the WPCode plugin. For more details, see our step-by-step guide on how to install a WordPress plugin.
Upon activation, go to Code Snippets » Header & Footer. From here you can paste your code snippet into the ‘Footer’ box.
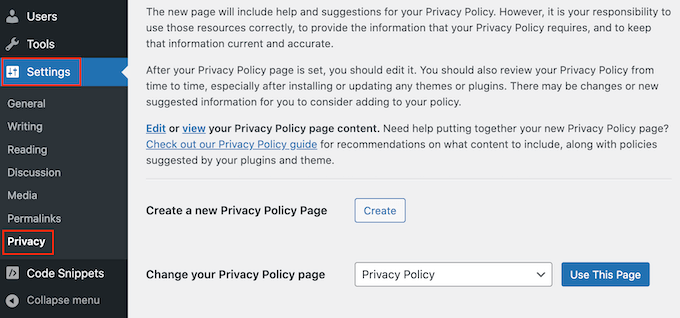
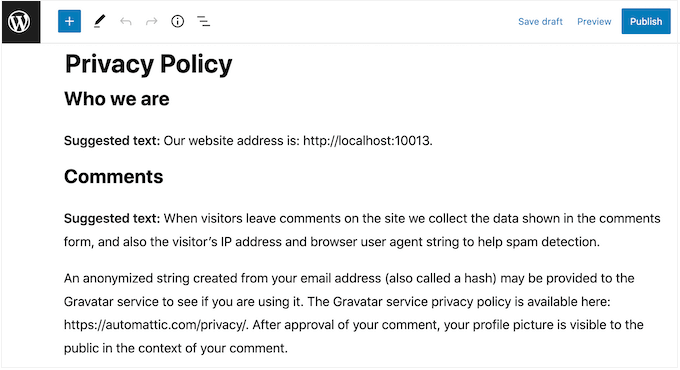
To comply with GDPR and other privacy-related laws in different countries, you need to add a privacy policy page in WordPress and then link to it from all the other pages.
Since the footer appears across your entire website, it’s the perfect place to add this URL.
First, you need to go to Settings » Privacy in the admin area. You’ll notice that WordPress has already created a Privacy Policy page draft for you.
To use the default Privacy Policy page, simply click on ‘Use This Page.’ If you want to use a different page instead, then open the dropdown menu and choose a new page from the list.
You can also create a new privacy policy page from this screen. Simply click on the ‘Create’ button and WordPress will generate a new post with some basic privacy policy text.
No matter how you create the privacy policy page, you can edit it just like any other page in WordPress. For example, you can add more information about your requirements, and terms and conditions.
When you’re happy with the information you’ve entered, click on the ‘Publish’ button to make the privacy policy live.
With that done, you’ll need to add a link to your website’s footer. To add a navigation menu to the footer area, simply follow the same process described above.
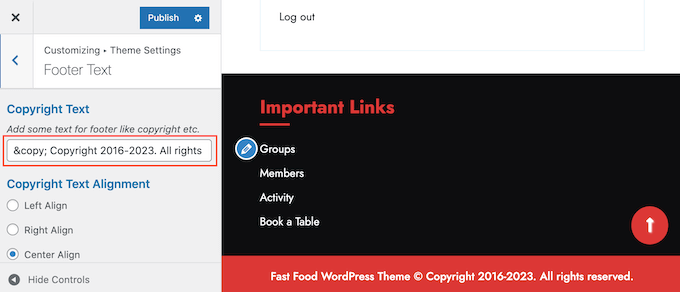
4. Adding Copyright Date in WordPress Footer
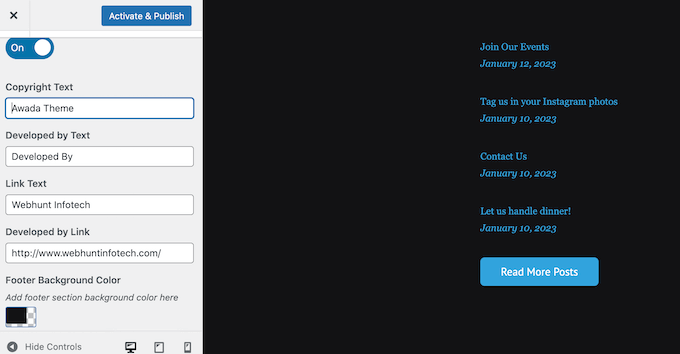
You may also want to add a copyright date in the WordPress footer area to let visitors know that your content is copyrighted. One way to do this is by simply adding the text to your theme settings.
Many top WordPress themes allow you to add text in the footer area, so it’s worth checking whether your theme has this setting.
Simply go to the Appearance » Customize page and look for any footer settings in the left-hand menu. These are usually labeled ‘Footer Options,’ ‘Footer Settings’ or similar.
To add the copyright symbol, simply paste the following into the ‘Footer Credits,’ ‘Copyright Text’ or similar section.
The WordPress Theme Customizer will update automatically so you can see how the copyright text will look on your website.
Depending on your theme, you may also be able to change the font size and text alignment using the theme settings.
If you’re happy with how the copyright notice looks, then click on the ‘Publish’ button to make your changes live.
Pro Tip: With this approach, you’ll still need to update the copyright notice every year. To add the new year automatically, see our guide on how to add a dynamic copyright date in the WordPress footer.
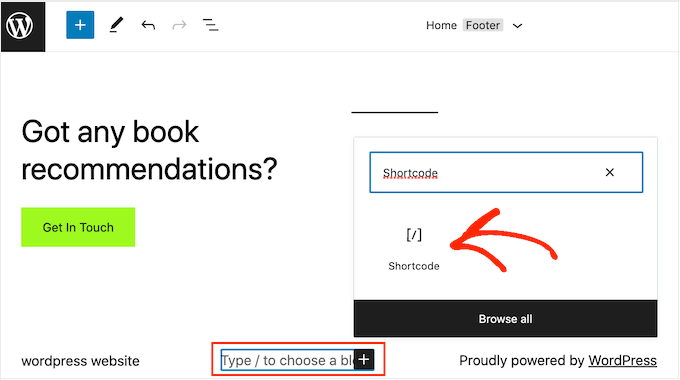
Adding a Copyright Date to Your Footer with the Full-Site Editor
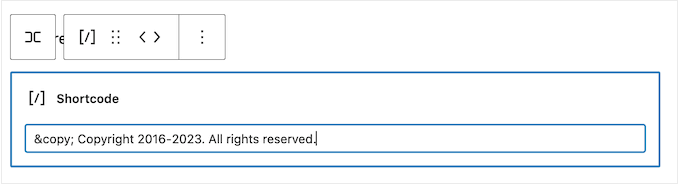
If you’re using a block-enabled theme, then it’s easy to add a copyright date to the footer. Simply go to Themes »Editor to open the full-site editor.
Then, scroll to the footer section and click on the ‘+’ to add a new block. You can now start typing in ‘Shortcode’ and select the right block when it appears.
After that, simply click on the ‘Save’ button to make the copyright notice live.
5. Remove Powered by Links from Footer in WordPress
Some free WordPress themes add links to the footer area. Typically this is a ‘Powered by WordPress’ disclaimer that links to the official WordPress website, but some theme developers also include links to their own websites.
These outgoing links encourage visitors to leave your website and can have a negative effect on your WordPress SEO. With that in mind, it’s a good idea to remove them from the footer area by going to Appearance » Customize.
Some themes make it difficult to remove these links so you may have to spend time looking through the different settings.
To start, we recommend looking for any settings labeled ‘Footer Options,’ ‘Footer & Copyright Options,’ or similar.
Here, you should be able to delete the links or even replace them with your own URLs.
Some themes hard-code the links in the theme files and don’t give you the option to remove them using the WordPress Customizer.
Removing Powered By Links with the Full-Site Editor
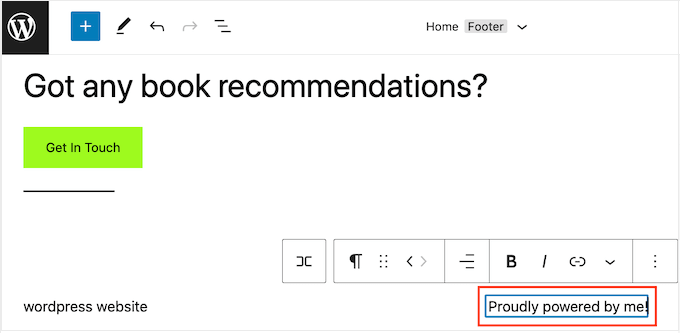
To remove the ‘Powered By’ links in a block-enabled theme, simply open the full-site editor by following the same process described above.
In the editor, find the ‘Proudly powered by WordPress’ or similar text. You can replace this with your own text by typing into the ‘Paragraph’ block.
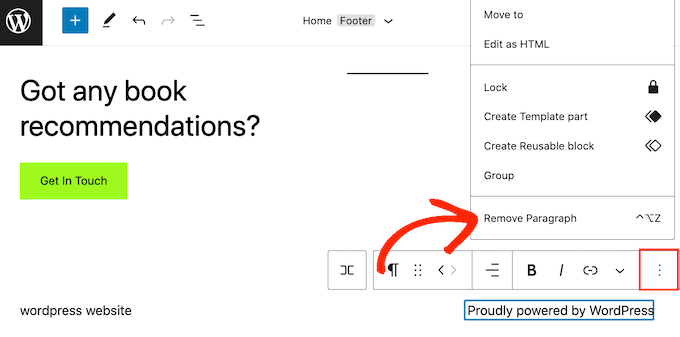
If you want to remove the text completely, then simply click to select the ‘Paragraph’ block. After that, click on the three-dotted ‘options’ button.
Finally, click on ‘Remove Paragraph’ to delete the block.
You can then go ahead and click on ‘Save.’ Now, if you visit your website you’ll see that this text has been removed.
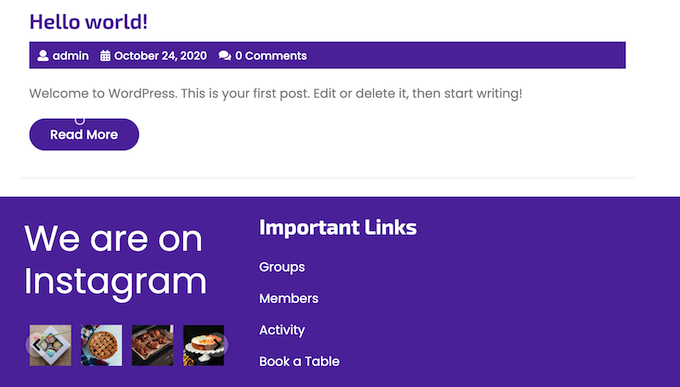
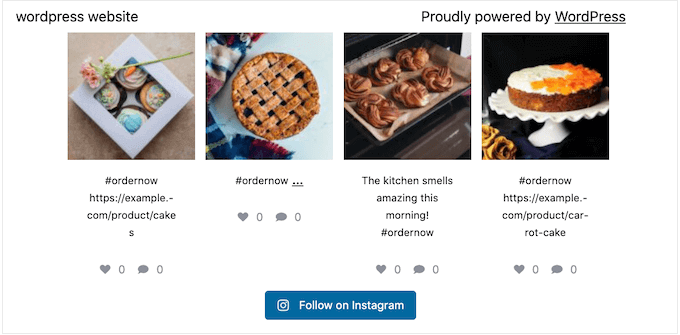
6. How to Add Instagram Feed in WordPress Footer
Do you regularly post beautiful photos and videos to Instagram?
People won’t see your Instagram content if they just visit your website. With that in mind, you may want to show recent Instagram photos in your website’s footer.
This is an easy way to promote your social media page and encourage more people to follow you on Instagram.
After adding the social media feed to your footer, Smash Balloon will fetch new Instagram photos automatically. In this way, your footer will always show your latest Instagram photos to the people who visit your website.
Smash Balloon has all the tools you need to fine-tune how the Instagram feed looks in your footer. For example, you can choose between different layouts, add a ‘Follow’ button, optimize your feed for mobile devices, and more with the user-friendly Smash Balloon editor.
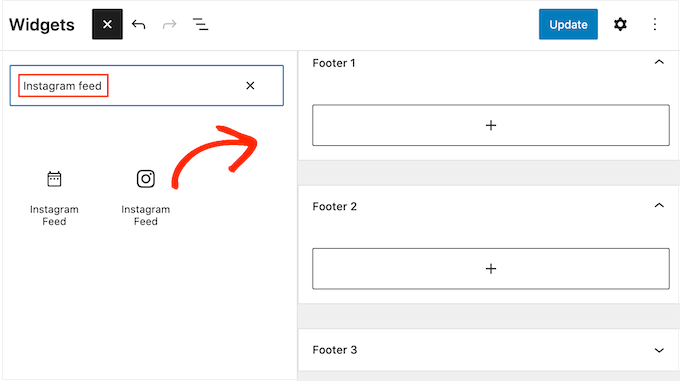
When you’re happy with how the feed looks, it’s time to add it to your website’s footer. Simply go to Appearance » Widgets and click on the blue ‘+’ button.
In the search field, type in ‘Instagram Feed’ to find the right block. Just be aware that WordPress has a built-in Instagram Feed button, so make sure you use the block that has the official Instagram logo.
You can now drag and drop the block onto your site’s footer.
With that done, simply click on ‘Update.’ After that, you can visit your website to see your Instagram feed in the footer.
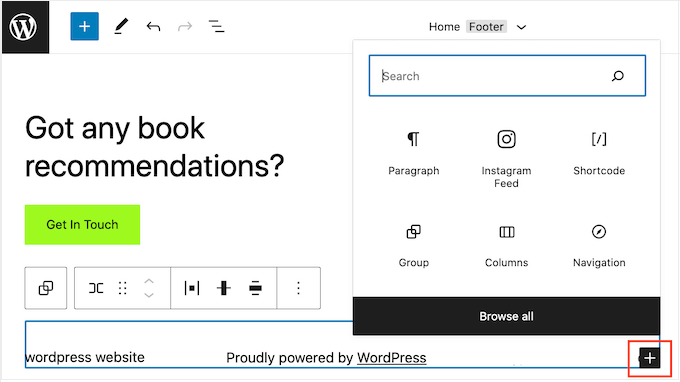
Adding an Instagram Feed with the Full-Site Editor
It’s easy to add the Smash Balloon Instagram feed to a block-enabled WordPress theme.
Simply open the full-site editor following the exact same process described above, and then click on the ‘+’ button in the footer template.
With that done, type in ‘Instagram Feed’ and select the right block when it appears to add it to the footer.
The full-site editor will automatically show the Instagram feed you created.
With that done, simply click on ‘Save’ to make the Instagram feed live.
7. Add a Sticky Footer Bar in WordPress
Want to show special offers or notifications in the footer area?
You can create a footer bar that stays stuck to the bottom of the screen as the visitor scrolls.
To create this kind of sticky footer bar, you’ll need OptinMonster. It is the best conversion optimization software in the market and allows you to turn website visitors with a high bounce rate into users and customers.
OptinMonster also comes with powerful display rules so you can show personalized custom messages in your website’s footer.
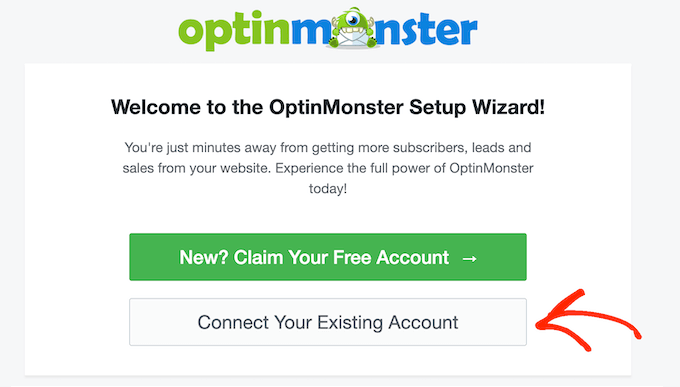
After that, install and activate the OptinMonster plugin on your WordPress website. Upon activation, select Connect Your Existing Account.
You can now type in the email address and password for your OptinMonster account.
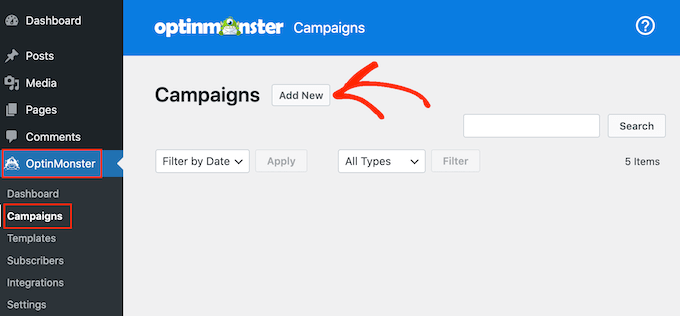
Once connected, go to the OptinMonster » Campaigns page and click on the ‘Create your first campaign’ or ‘Add New’ button.
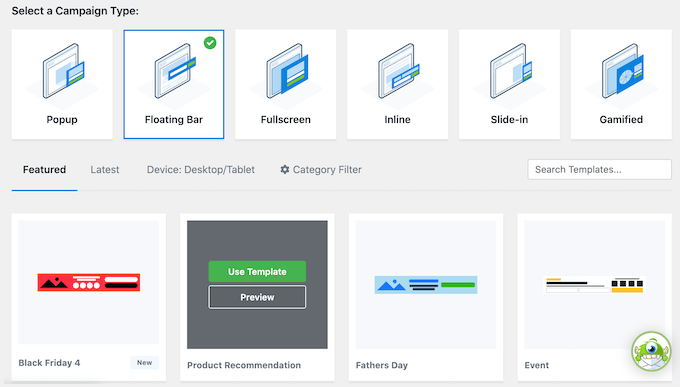
On the next screen, choose ‘Floating Bar’ as your campaign type and then select a template.
To preview an OptinMonster template, simply hover your mouse over it and then click on the ‘Preview’ button.
When you find a template you like, click on its ‘Use Template’ button.
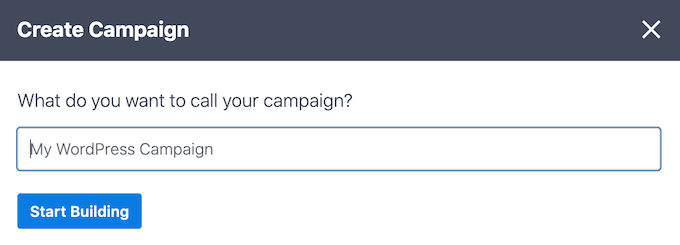
You can then type in a name for the campaign. This is just for your reference so you can use any title you want.
With that done, click on Start Building.
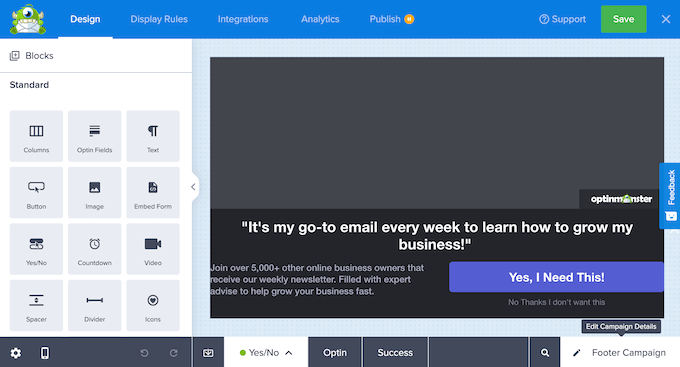
This will take you to OptinMonster’s drag-and-drop campaign builder where you can design the footer bar. Simply click on any element you want to edit, or drag and drop new blocks from the left-hand column.
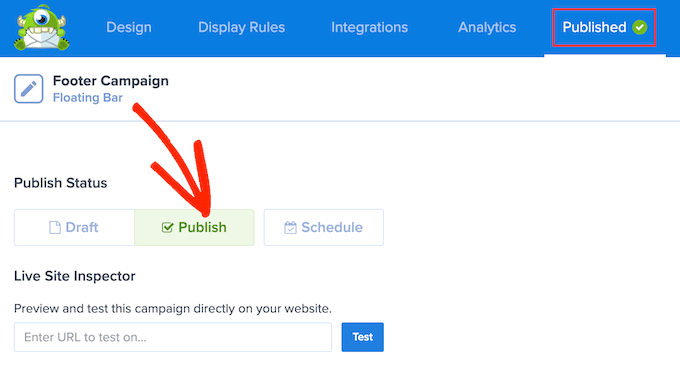
When you’re happy with how the campaign looks, simply click on the ‘Publish’ button.
Then, select ‘Publish’ to make the campaign live.
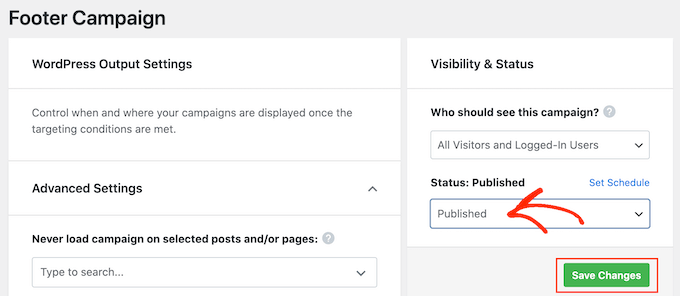
You can now select the ‘Save’ button to store your changes and then click on the ‘X’ in the upper-right corner to close the OptinMonster campaign builder.
Back in the WordPress dashboard, open the ‘Status’ dropdown and select ‘Published.’
Finally, click on ‘Save.
Now, visit your WordPress website to see the floating footer bar in action.
You can use OptinMonster to create all kinds of high-converting campaigns including slide-in footer popups, countdown timers, and targeted footer notifications that can help you recover abandoned cart sales.
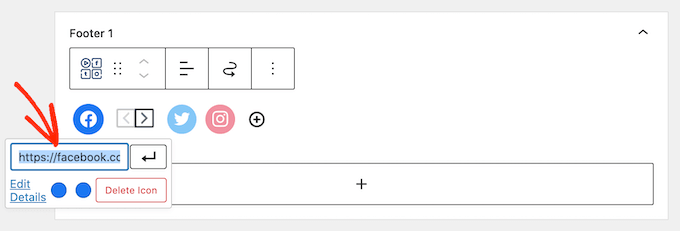
8. Add Social Buttons in WordPress Footer
Another good way to use the footer space in your WordPress theme is by displaying social media icons. This is an easy way to promote your different profiles and get more followers on Twitter, Facebook, and other popular platforms.
The best way to add these buttons is by using the Social Icons Widget plugin. This plugin supports all the major social networks and comes with multiple icon styles that you can choose from.
After activating Social Icons Widget, go to the Appearance » Widgets page. You can then click on the ‘+’ button and search for ‘Social Icons Block.’
When the right block appears, drag and drop it onto the footer area.
By default, the Social Icons Block already has a few social media icons built-in.
To link any of these icons to your own social profiles, simply give it a click. In the little bar that appears, type in the URL of the page you want to promote.
Want to use a different icon for this social media platform?
Then simply click on the ‘Edit Details’ link. This opens a window where you can choose a new image for the social icon.
Simply repeat this process for each built-in social media icon.
If you want to remove one of these default icons, then click on the ‘Delete icon.’
There are countless social media platforms and other websites that you may want to add to the footer area.
To do this, click on the ‘+’ button.
You can now choose a social media icon and add a link by following the same process described above.
When you’re happy with how the social media icons are set up, click on ‘Update.’ Now, simply visit your website and scroll to the footer area to see the social buttons in action.
Bonus: Want to add more social features to your website? Take a look at our expert pick of the best social media plugins for WordPress to grow your audience.
Adding Social Buttons with the Full-Site Editor
Are you using a block-enabled theme? Then you can add social icons to the footer by going to Themes »Editor.
In the footer, click on the ‘+’ button and then type in ‘Social Icons block.’
When the right block appears, click to add it to the footer.
This adds a block with the default social icons.
You can now customize these icons and add new social buttons, by following the same process described above.
When you’re happy with how the buttons look, simply click on the ‘Save’ button. Now if you visit your website you’ll see the social icons in the block-enabled footer.
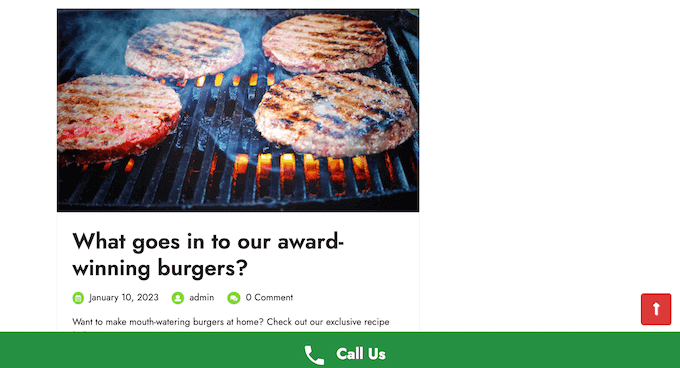
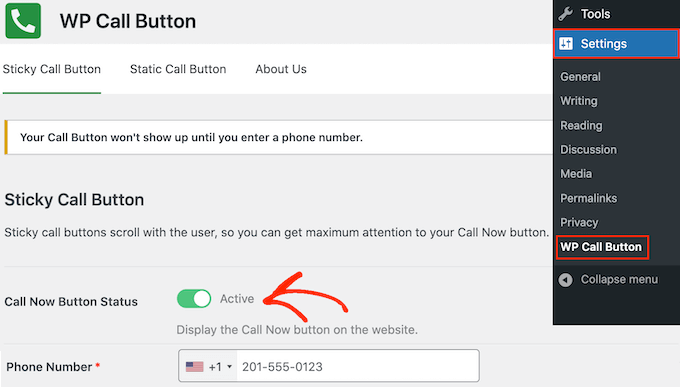
9. Add a Phone Number in WordPress Footer
If you offer customer support over the phone, then adding your phone number in the WordPress footer area can help users contact you.
For this, you’ll need a business phone number. We recommend using Nextiva, which is the best business phone service for small businesses.
Nextiva allows you to make cheaper calls and use advanced features like call forwarding, unlimited free domestic calling, voicemail to email and text, and more. You can also use the same number on multiple devices and handsets, and manage calls from any device that has an internet connection.
Once you have a business phone number, you’ll need to add it to your website. The easiest way is by using the WP Call Button plugin, which adds a click-to-call button to your WordPress site.
After activating the plugin, go to Settings » WP Call Button in the WordPress dashboard.
Here, click on the ‘Call Now Button Status’ switch so it shows ‘Active.’
Next, type your business phone number into the ‘Phone Number’ field.
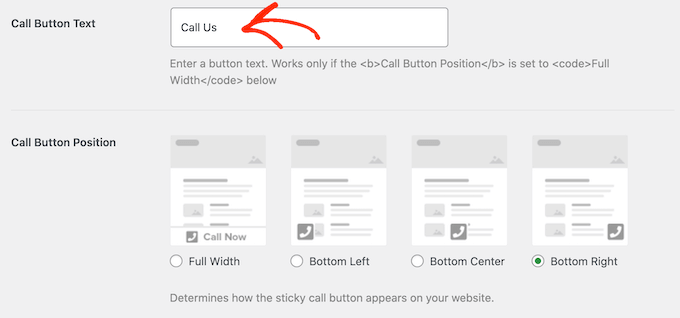
By default, the button shows ‘Call Us’ text but you can replace this with your own custom messaging by typing into the ‘Call Button Text’ field.
After that, scroll to the Call Button Position section and choose where you want to show the button on your website. For example, you can show the button in the bottom-right corner, or create a banner that covers the whole footer area.
When you’re happy with how the button is set up, click on ‘Save Changes.’ After that, simply head over to your website to see the call-to-click button in action.
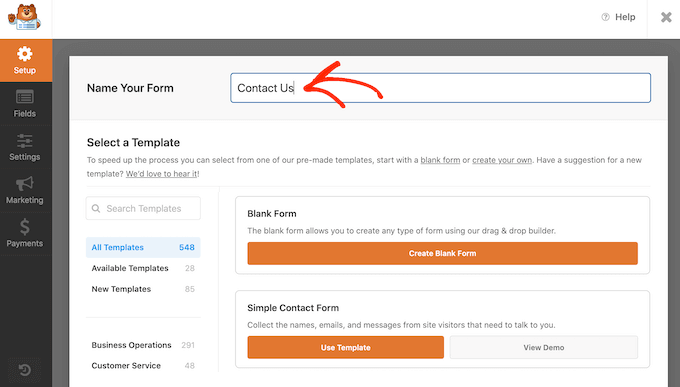
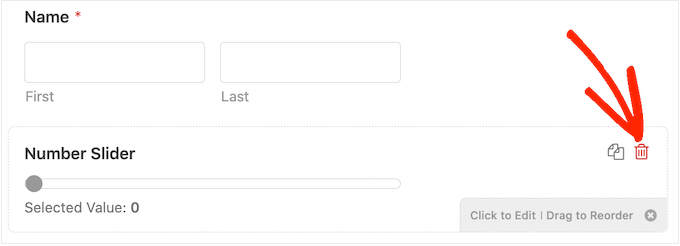
Your website’s footer doesn’t have to be a dead-end. If you’ve added a navigation menu following the process described above, then you’re off to a great start. However, you can also encourage customers to connect with you by adding a contact form to the footer area.
WPForms is the best WordPress contact form plugin and comes with a ready-made Simple Contact Form template that allows you to create a contact form with just a few clicks.
After activating the plugin, go to WPForms » Add New and type in a name for the contact form. This is just for your reference so you can use anything you want.
Simply find the ‘Simple Contact Form’ template and click on its ‘Use Template’ button.
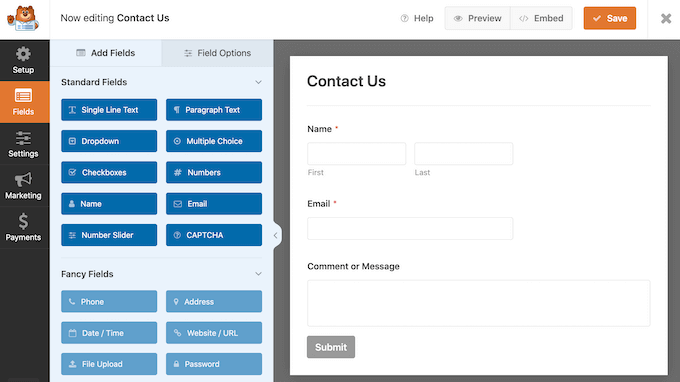
WPForms will now open the template in its form builder. The template already has all the fields you’ll typically need, but you can add more fields by dragging them from the left-hand menu and dropping them onto your form.
You can also click on any field to edit it, and rearrange them in the form using drag and drop.
To delete a field, simply hover your mouse over it and then click on the small trash can icon when it appears.
When you’re ready, click on the ‘Save’ button to store your changes.
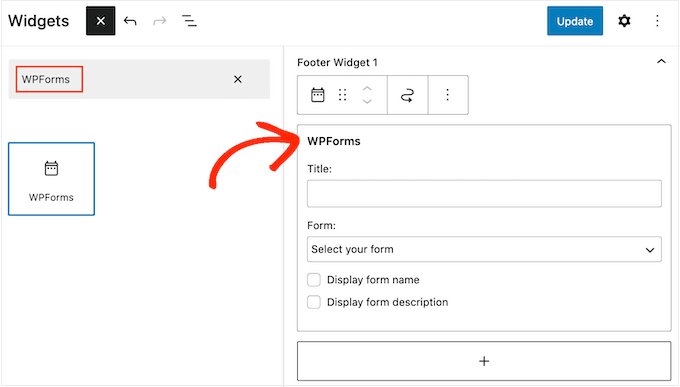
To add the contact form to your footer, head over to the Appearance » Widgets page in the WordPress dashboard.
Here, click on the ‘+’ button and search for ‘WPForms.’ When the right block shows up, drag and drop it onto your theme’s footer area.
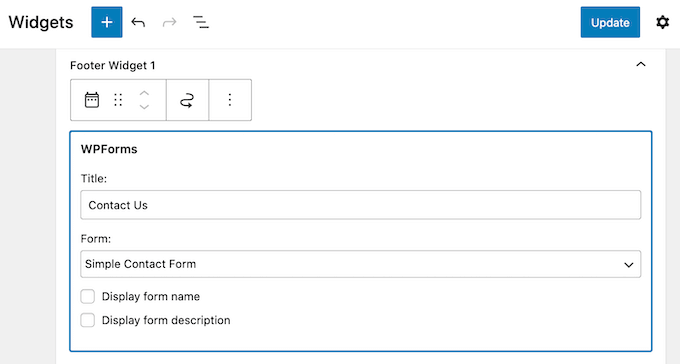
After that, open the ‘Form’ dropdown and select your contact form.
You can also add an optional title, which will appear above the contact form.
Once you’ve done that, click on the ‘Update’ button.
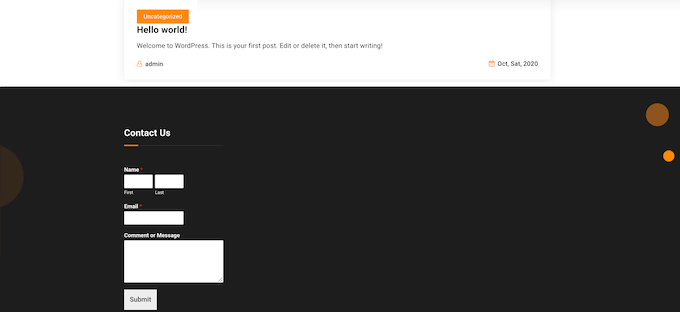
Now, if you visit your website you’ll see the new contact form in the footer.
Adding a Contact Form with the Full-Site Editor
Want to add a contact form to the footer of a block-enabled theme?
Then you’ll need to head over to Themes »Editor. Here, scroll to the bottom of the screen and click on the ‘+’ in the footer area.
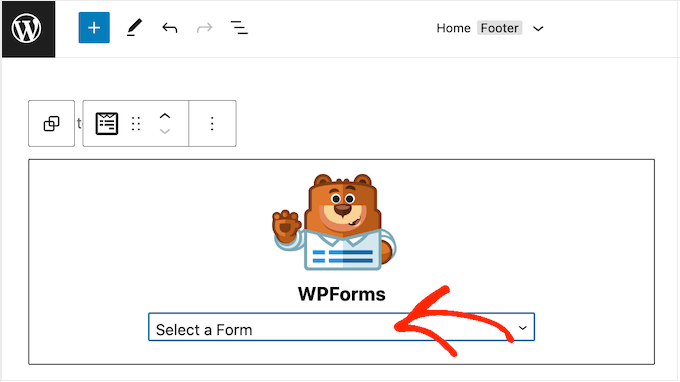
With that done, type in ‘WPForms’ to find the right block.
Give this block a click to add it to the footer area.
In the WPForms block, open the ‘Select a Form’ dropdown and choose the contact form we just created.
When you’re ready to make the contact form live, simply click on the ‘Save’ button.
We hope this article helped you decide which things to add to your WordPress footer to make it more useful. Next, you can see our guide on how to improve your WordPress website speed and performance, and our expert pick of the best WordPress plugins to use on your site.
If you liked this article, then please subscribe to our YouTube Channel for WordPress video tutorials. You can also find us on Twitter and Facebook.
What’s the Difference Between Alt Text and Image Title?
‘Alt text’ is short for ‘alternate text’ and is an attribute that is added to an HTML image tag. The text describes the image, so visitors who can’t see the image and search engine bots will understand what the image is about.
If an image on your WordPress website can’t be found or displayed for some reason, then the alt text will be shown instead, as you can see in the following screenshot.
Alt text is different from the image’s title. The title will be displayed in a small popup box when you bring your mouse cursor over the image.
Alt text and image titles are also used to improve the accessibility of your website for those with poor vision and who use screen reader devices to read your site’s content.
When the screen reader comes to an image, it will read the alt text. Depending on the user’s settings, it may also read the title text.
For both accessibility and search engine optimization (SEO), alt text is more important than title text. This is why we strongly recommend including alt text for all your images.
How to Add Alt Text to an Image in WordPress
WordPress allows you to easily add alt text to your images. You can do this from the block editor, the classic editor, or the WordPress Media Library.
Adding Alt Text in the Block Editor
Simply create a new post or page or edit an existing one, and add an Image block.
Now you need to upload your image or drag and drop it into the Image block. You can then set the alt text on the right-hand side of the page.
Adding Alt Text in the Classic Editor
If you’re still using the classic WordPress editor, then you can add image alt text when adding the image.
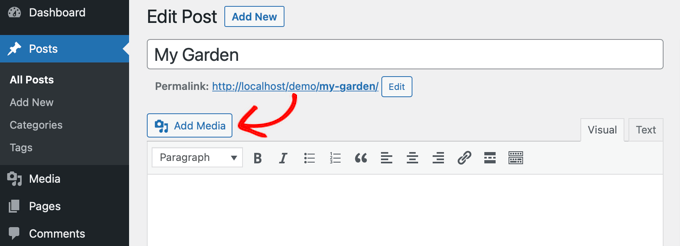
First, click on ‘Add Media’ above the posting box.
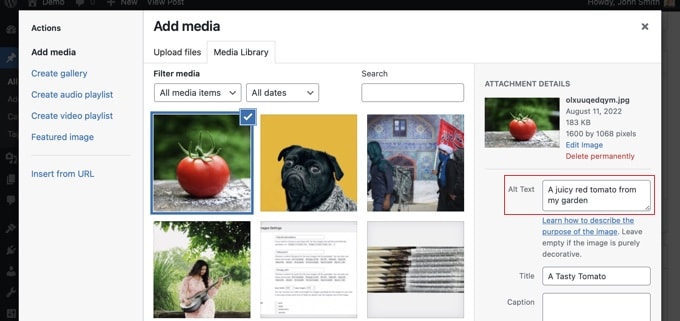
After that, you should either upload the image from your computer or click the ‘Media Library’ tab to view images you’ve already uploaded.
Next, click on the image you want in order to select it, and then type the alt text you want into the ‘Attachment Details’ of your image.
Adding Alt Text in the Media Library
You can also add alt text to an image by going to Media » Library and clicking on the image to edit it.
Remember, this won’t change the alt text for any instances of that image that you’ve already inserted into posts or pages. However, if you add the image to a post or page after adding alt text here, then the alt text will be included with it.
How to Add Image Titles in WordPress
It’s important to understand that there are two types of titles that you can add to your images.
First, there is the default image title WordPress uses internally to identify media files in the Media Library and attachments pages. Second, there is the HTML image title attribute added to images in your posts and pages.
Let’s take a look at how to add both types of titles.
Adding the WordPress Image Title in the Media Library
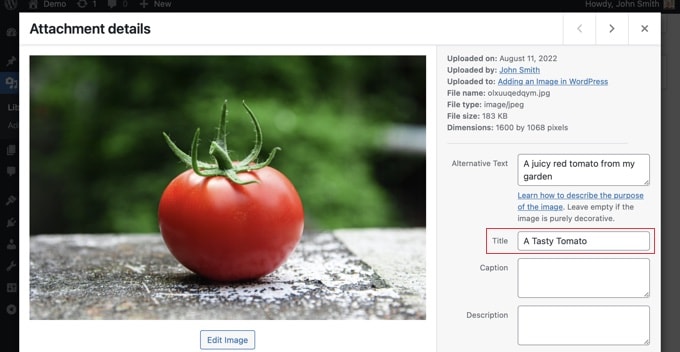
You can add WordPress media titles to your images using the Media Library. When you edit an image in the Media Library, you will see a ‘Title’ field.
This title is used by WordPress to identify the image. When you click the ‘View attachment page’ link at the bottom of the screen, you’ll see the title is used as the title on that page.
The WordPress media title isn’t necessary for image SEO or for users with screen readers. While it may be helpful in some cases, it’s not as useful as the image’s HTML title attribute. So how do you create that?
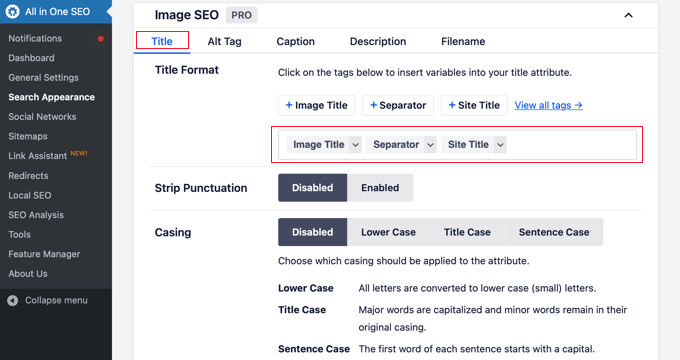
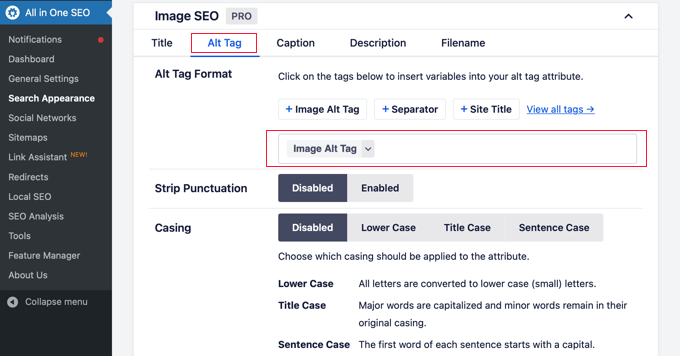
Pro Tip: Would you like to automatically use the WordPress media title as the image’s title attribute in your posts and pages? Take a look at the section below where we show you how to do this using All in One SEO Pro.
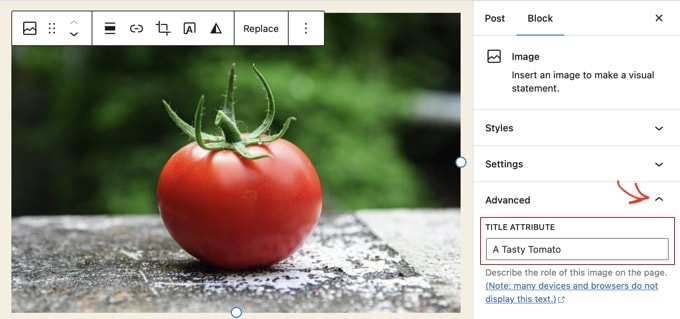
Adding an HTML Image Title Attribute in the Block Editor
It’s easy to add a title attribute in the block editor. Simply click the image and then click the down arrow next to ‘Advanced’ to show the advanced image options.
Now you can simply type the title in the ‘Title Attribute’ field.
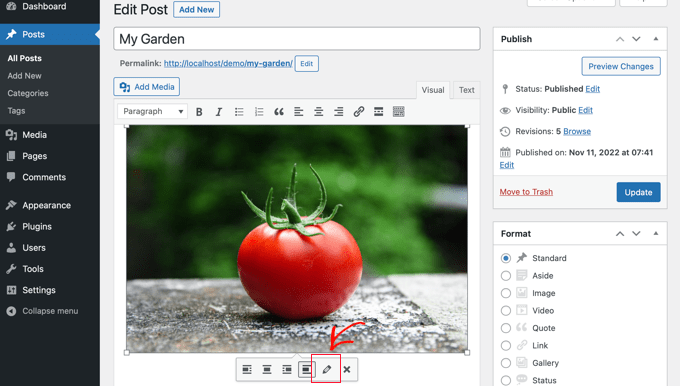
Adding an HTML Image Title Attribute in the Classic Editor
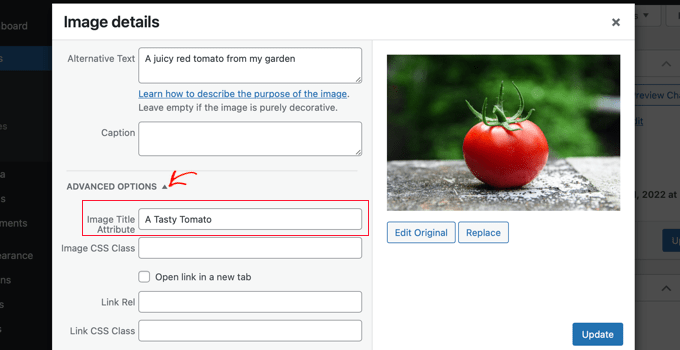
Adding a title attribute using the old classic editor is similar. You can add the title attribute by clicking on an image and then clicking the pencil icon.
You’ll then see the ‘Image Details’ screen. To set the image title attribute, you need to click the little down arrow next to ‘Advanced Options’ at the bottom.
You can then set the image’s title attribute. Make sure you click the ‘Update’ button at the bottom of the screen when you’re done.
How to Automatically Set Alt Text and Image Titles Using AIOSEO
All in One SEO (AIOSEO) is the best WordPress SEO plugin on the market. It will add a proper image sitemap and other SEO features to improve your SEO ranking. It also lets you automatically set your alt text and image titles, and more.
The first thing you need to do is install and activate the All in One SEO plugin. For more details, see our step-by-step guide on how to install a WordPress plugin. To use the Image SEO feature, you will need the Plus plan or above.
Upon activation, the plugin will launch the setup wizard automatically. You can learn how to configure the plugin in our guide on how to set up All in One SEO correctly.
Now you need to navigate to All in One SEO » Search Appearance and then click on the ‘Image SEO’ tab. After that, you’ll have to click the ‘Activate Image SEO’ button to enable the premium image SEO features.
Setting Image Titles Using All in One SEO
Make sure that you are looking at the ‘Title’ tab of the Image SEO page. Here you can choose tags that will set the format used to automatically generate title attributes for your images.
For example, if you include the ‘+ Image Title’ tag, then each image in your posts and pages will automatically use the WordPress media title in the HTML title attribute.
You can also add other tags, such as your website title, to your image title attribute. All in One SEO can even strip punctuation from the title and change its capitalization.
Setting Alt Text Using All in One SEO
Next, you need to click the ‘Alt Tag’ tab on the AIOSEO’s Image SEO page. Here you can automatically format the alt text of your images.
By default, AIOSEO will simply use the image’s alt text. If you like, you can also add your website’s title and other information to the alt text of each image on your website.
Why Use Alt Text and Image Titles in WordPress?
We strongly recommend using alt text for all images. Here on WPBeginner, we also add a title to all images. However, this is less important than the alt text.
Alt text is important because Google focuses on it as a ranking factor for images. It is also used by screen readers to help visitors with impaired vision to fully engage with your content.
You should never just stuff keywords into alt and title tags. It’s important that you make them descriptive and helpful so that they’re useful for visitors who need them. You can use your keywords where relevant, but don’t overdo it.
For example, if you’re writing an article about the best WordPress hosting, then your target keyword could be “best WordPress hosting”.
You might also have a screenshot in your article showing users how to set up an account with a popular web host like Bluehost. Let’s take a look at some good and bad examples of alt text for that image:
“Account setup” is not very descriptive and also doesn’t include anything related to your keyword.
“Best WordPress hosting, WordPress hosting, best web hosting for WordPress” doesn’t describe the image and is stuffed with keywords.
“Setting up a WordPress hosting account” is much better as it’s descriptive and uses part of the keyword in a natural and appropriate way.
Did you know that you can create an ebook from your WordPress blog posts?
Offering ebook downloads on your WordPress website is a good way to make money online or grow your email list. Writing a book is a big job, but you may discover that you’ve already written enough content for a book on your blog.
In this article, we’ll show you a smart way on how to create an ebook from your WordPress blog posts.
Why Create an Ebook From Your WordPress Blog Posts?
If you publish regular blog posts on your WordPress website, then you have a lot of content that you can repurpose or monetize. One of the best ways to repurpose your content is to turn your blog into an ebook.
However, writing a book is difficult, and 97% of people who start to write a book never finish.
The good news is that you may have already written a book. Your most popular blog posts may already contain enough quality content to repurpose as a successful ebook. Or you can use your blog to write a new book one post at a time.
With that being said, let’s take a look at how to create an ebook from your WordPress blog posts. Here’s what we’ll cover in this tutorial:
Your first job is to decide which blog posts should be included in your ebook. If your blog is about a certain topic or niche, then you may just need to find your most popular blog posts. Each post will become a chapter of your ebook.
However, if you wish to create multiple ebooks, then you should choose blog posts that cover more specific topics, such as popular posts in a specific category. You can even consider future ebook ideas when you are planning the content to write about on your blog.
How to Find Your Most Engaging Content to Include in an Ebook
You want to create an ebook that people actually want to read. A good starting point is to find your most engaging and popular blog posts. That way, you already know that your readers are interested in these topics.
If you are not already tracking user engagement on your WordPress blog, then the best way to get started is by using MonsterInsights. It’s the best Analytics plugin for WordPress and helps you configure Google Analytics without writing code.
When you install and activate MonsterInsights, you will also set up Google Analytics tracking in WordPress. Once your blog has been tracked for some time, you will be able to view important user engagement metrics such as your most popular content.
You just need to visit the Insights » Reports page in your WordPress admin area and go to the ‘Overview’ report. You can scroll down to see different reports, and you will find your most popular content under the ‘Top Posts/Pages’ section.
Now that you know what your most popular posts are, you need to choose which ones to include in your ebook. They should contain evergreen content that will stay fresh and also fit together logically as chapters to form a complete ebook.
Writing a Series of Blog Posts to Create Content for an Ebook
Another way to come up with blog content for an ebook is to write a series of articles on a particular topic. These blog posts can then be compiled into an ebook.
We do something similar on WPBeginner, where we regularly compile a series of posts into a new article. Here are some examples of articles we have compiled with repurposed content from our existing articles:
In fact, whenever you are writing about a complex topic, it is almost always better to write a series of posts that break the topic up into smaller parts.
Quickly Updating the Posts You Choose for Your Ebook
Once you have chosen the blog posts you wish to include in your ebook, take some time to quickly update them if necessary. By doing that now, you will make sure that both the blog post and ebook are free from errors and contain all of the necessary information.
You can start by making sure there are no spelling or grammar errors in the post. Most likely you did this before publishing each post, but it’s worth checking this again in case something was missed.
Also, take time to check the comments on each post. They may identify areas where the blog post isn’t clear enough or is missing important information. Take time to address those issues.
Later in this article, you will make further edits that will be needed in the ebook but not the blog posts.
Creating Professional-Looking Cover Art for Your Ebook
One of the best ways to create an ebook that looks professional is to use a well-designed ebook cover. Your readers will actually judge your book by its cover.
You could hire a graphic designer using websites such as 99designs or Fiverr. Or you can use graphic design software or web services to do it yourself even if you don’t have design skills.
Before you create the cover art for your book, make sure you first finalize the ebook title. It should be clear and concise, grab the reader’s attention, and describe what the book is about. You may also want to create a subtitle and book description.
One of the easiest ways to create cover art is with Canva, a free online graphic design tool. It comes with easy-to-use tools that allow you to create a book cover from a template.
The basic Canva account is free and gives you access to dozens of ready-made templates. To get the full power of Canva, you may want to sign up for a Pro account. This lets you upload your own fonts, set your brand colors, and more.
After creating your account, simply type ‘book cover’ into the search box and then click on the ‘Book Cover’ search result.
Canva will display a list of thousands of book cover templates. These have the correct width ratio of 1.6 and also a high-quality resolution of 1410 x 2250 pixels.
You can filter the list by clicking the genres at the top of the screen, or by checking one of the styles or themes on the left. This will help you find the most suitable templates quickly.
Once you find a template you want to use for your cover art, you should click it to preview it. You will also see whether it is a free, paid, or pro template. After that, you should click the ‘Customize this template’ button.
Canva will now load its drag-and-drop editing interface. You can point and click on any item in the template to edit it. Make sure you type the correct title, subtitle, and author. You can rotate, resize, crop, and delete items.
You can also add more text, icons, shapes, patterns, and backgrounds to your design from the left column. However, you will often get the best result by making simple changes.
When you have finished creating your cover art, you will need to save it to your computer. Simply select File » Download from the menu at the top of the screen.
You can select a variety of file types from the drop-down menu, including PDF, JPG, and PNG. For this tutorial, we will choose PNG and then click the ‘Download’ button.
Method 1: Turning Blog Posts Into an Ebook Using Google Docs (Free)
You can create an ebook from your blog posts using Google Docs. This requires a little more manual work than our second method, but it’s free and makes it easy for you to edit and customize your ebook.
You need to start by creating a new Google Doc and naming it with your ebook’s title.
After that, make sure that under the View menu, ‘Show Print Layout’ is checked. This will allow you to see how each page of your ebook will look.
Inserting Your Ebook Cover Art
The first thing you need to do is insert the cover art you created earlier.
You can either use drag and drop to place it on the first page, or select Insert » Image from the menu and upload it to your computer.
Once you’ve done that, you should select Insert » Break » Page break from the menu to start a new page.
Creating a Title Page and Table of Contents
On the new page, you should type the title of your ebook. Before you press enter, make sure you format it as a title by selecting ‘Title’ from the Styles drop-down menu.
If you wish to center the title, then you need to select Format » Align & Indent » Center.
You can now press the Enter key several times and type the ebook’s subtitle if you have one, as well as your name or your blog’s name as the author.
You might like to format them using a larger font and center them. Don’t use a heading style, or these lines will be included in your table of contents. You can also use the enter key to space these lines appropriately down the page.
Once you’re done, you should select Insert » Break » Page break from the menu again to start another new page.
On the next page, you will add the table of contents. Google Docs will populate this with headings as you add content to the document.
Start by typing the heading ‘Table of Contents’ and format it with the Heading 1 style.
Tip: If your text is still being centered, then you will need to select Format » Clear formatting from the menu to return to the default formatting.
Now you can press Enter and select Insert » Table of Contents from the menu. You can choose from a version with page numbers and a version with hyperlinks.
At the moment, the table of contents will be quite empty, but it will be updated as you add blog posts to your ebook.
Pasting the Your Blog Post Contents
Now it’s time to start pasting the content from your blog posts into Google Docs. Before you paste each blog post, make sure you insert a new page break (Insert » Break » Page break) so each ebook chapter starts on a new page.
Then, just head to your WordPress website and navigate to your blog post.
Simply highlight the entire post, copy it to the clipboard, and then paste it into Google Docs. After that, insert another page break and repeat until all the blog posts have been copied.
You may also want to set the title of the posts to Heading 2 in Google Docs so they’re included as chapters in your Table of Contents and document outline.
For our demo ebook, we pasted the contents of 7 blog posts into Google Docs to produce a 167-page ebook. Selecting Tools » Word count from the menu shows that the document contains almost 25,000 words.
Editing Your Ebook Contents
Now you should work through your ebook content and make any changes that are necessary. Some things that work well in a blog post won’t belong in an ebook.
For example, you may need to tweak the title of each blog post so it works better as a chapter heading. And if you added a call to action at the bottom of each blog post, then you may need to remove it from each chapter in your ebook.
You may need to replace references to ‘posts’ with ‘chapters’. Also, you should replace internal links to your blog with links to the chapters in your ebook if they are included.
You should also work on the transitions between chapters so your book flows better, otherwise, it might read like a collection of separate blog posts. You might also want to add a stronger introduction and conclusion to the book.
You might also like to add additional material to the book, such as sections on:
How to use this book
What you’ll find in this book
About the author
Contact information
Copyright information
Disclosures
Resources and links
Footnotes and sources
Finally, make sure you correct any spelling and grammar errors you find while editing.
Customizing Your Ebook’s Design
Before you export your ebook from Google Docs, consider whether you can improve the design of your ebook.
For example, you can customize the appearance of your headings or normal text.
This is easy to do in Google Docs. You can start by changing the format of a particular heading directly. Just select the font you want, if you want it bold or underlined, or other design choices.
After that, with that text still highlighted, select Heading 1 » Update Heading 1 to match from the drop-down menu to automatically change all other headings to match.
You can also add a header or footer that includes your ebook title and page numbers.
Just select Insert » Headers & Footers and then click ‘Header’ or ‘Footer’ in the menu. You can set up page numbers by clicking the ‘Options’ menu from the header.
When you are happy with the way your ebook is formatted, then it’s time to export it in an ebook format.
Exporting Your Ebook as a PDF
Now that you have finished creating your ebook, you can save it to your computer as a PDF. Simply select File » Download » PDF Document from the menu.
Tip: Before exporting your ebook, we recommend you update the table of contents to include any new chapters you have added. When you click on the table of contents, you will find a button labeled ‘Update table of contents’ at the top.
Google Docs also allows you to download the ebook as an EPUB Publication. This format should be used if you want to make the book available in a marketplace such as Amazon’s Kindle Store.
Method 2: Turning Blog Posts Into an Ebook Using a Plugin
You can also create an ebook from your blog posts using a plugin. MPL-Publisher is the best ebook creator plugin because it covers everything you need to do in an easy-to-use interface.
You will need to use the premium version to export your ebook as a PDF file. This costs $49 per WordPress site and also offers a cover editor and the ability to store the settings for multiple books. The free version can export in EPUB and Microsoft Word formats, and more.
Upon activation, you will need to enter the license key that was emailed to you. Simply navigate to MPL-Publisher » Publish eBook on the admin sidebar, then click on the ‘Premium’ tab. Now you can paste the license key into the field provided.
Entering the Book Details
Next, you need to enter some details about your book. Make sure you are looking at the ‘Details’ tab of the MPL-Publisher » Publish eBook page.
From here, you can fill in the book details such as the title, subtitle, author, and description.
Next, you should click on the ‘Meta’ tab where you can enter metadata about the book.
You will find fields where you can fill in the book’s ISBN (or some other unique identifier), language, publication date, publisher name, and copyright information.
You can scroll to the bottom of the page and click the ‘Save’ button to store the book details and metadata.
Inserting Your Ebook Cover Art
Now you can move to the ‘Cover’ tab. Here you can add the cover image that you created earlier.
Simply click the ‘Select Image’ button and you will be taken to your site’s Media Library. From there, you can upload the cover art and then click the ‘Select’ button.
If you haven’t already created your cover art, you can use the plugin’s Cover Editor to create a book cover right from the WordPress dashboard. Note that this is one of the plugin’s premium features.
Customizing Your Ebook’s Design
Now you can switch to the plugin’s ‘Design’ tab to choose how your book will be formatted. Several themes are available, and you simply click on the theme you wish to use.
When you scroll down the page, you can choose whether to include the post’s featured images in the ebook and whether to insert or embed the images in the ebook.
Make sure you choose the second or third option. We recommend you avoid the first option, which is to link the images from your website.
Advanced users can also format their books using custom CSS.
Make sure you scroll down and click the ‘Save’ button to store your progress.
Selecting the Posts to Include in Your Ebook
On the left of the screen, you will see a list of posts on your website. To include a post in the ebook, simply click its checkbox.
If you have a lot of posts on your website, then you make it easier to find the posts you wish to include by filtering the list. You will find filters for type, status, category, month, and year.
For this tutorial, we’ll filter the list to include only posts (not pages) that have been published. We’ll also filter the list by the ‘Blogging’ category.
Simply select the desired criteria from the drop-down menus and then click the ‘Filter content’ button.
Next to each post, you will see a word count and how long the chapter will take to read.
Once you check the posts you wish to include, you can reorder them by dragging and dropping the hamburger icon. That’s the icon that looks like three horizontal lines.
When creating your ebook, MPL-Publisher will automatically create a table of contents containing these chapters.
Editing Your Ebook Contents
You can edit a post by clicking the ‘Edit’ link that appears under the post when you hover your mouse over it. The changes will be seen in both your ebook and the post on your website.
If you want to edit the ebook contents only, leaving the post on your website as it is, then you need to click the ‘Duplicate and Edit’ link. This will create a duplicate of the post with the ‘Book Chapter’ custom post type.
Once you update the book chapter, you will need to uncheck the original post, then locate and check the new book chapter you just created. Book chapters display a book icon beside the title.
If you want to add a new chapter to your book that doesn’t appear on your blog, then you can click the ‘Add New Book Chapter’ button.
This will create a new blank book chapter that will be found only in your book, and not on your blog.
In Method 1 above, we provide a list of additional material you might like to add to your ebook, such as contact information, disclaimers, and more.
Exporting Your Ebook as a PDF
Once you have finished setting up the ebook, you can export it. You need to scroll down to the ‘Output format’ and choose ‘Adobe File (PDF)’ as the file type.
Alternatively, you could select ‘Microsoft Word (DOCX)’ if you plan to continue editing the book or sending it to a professional editor, or ‘EPUB 3.0’ if you plan to make the book available in an online ebook store.
If you like, you can check the ‘Validate content before download’ box. This ensures that the ebook will not contain HTML errors.
Finally, simply click the ‘Download eBook’ button, and MPL-Publisher will compile your ebook and download it in the format you specified.
How to Promote and Monetize Your eBook in WordPress
Now that you have created an ebook from your blog posts, you need a way to promote it, so more visitors can get your ebook. There are a few ways to do this.
The method you choose depends on your business goal. You can giveaway the ebook for free to raise awareness, use ebook as a lead magnet to get more email subscribers, or sell your ebook to make money online.
1. Allowing Free Ebook Downloads in WordPress
You can offer your ebook as a free download using the WordPress file block.
Simply edit the post or page where you want to add your ebook download and then add a ‘File’ block.
This will allow you to upload the ebook to your site, and it will be displayed in the post in a small PDF viewer by default.
Tip: Want your visitors to be able to search for your ebook’s content on your website? WordPress doesn’t do this by default, so we wrote a guide on how to add PDF indexing and search in WordPress.
2. Using Ebook Downloads to Get More Subscribers
If you’re using your ebook to grow your email list or capture leads, then you’ll want to make sure your visitors can’t access the ebook until they share their email addresses.
Once installed and activated, you can easily add new downloads to your website. It’s easy to add a title and description for your ebook, as well as categories and tags.
The plugin also handles pricing. You can choose variable pricing with multiple options. You may have one option to sell just the ebook and another that includes an additional product. Using EDD, they will both show on the same product page.
You can also simply set a single price for your ebook purchase.
After that, you can upload your ebook and add a cover image that will be displayed on your website.
The easiest way to promote your ebook is to your existing audience. Both email newsletters and push notifications are an excellent way to spread the word about your new ebook launch.
You can use PushEngage to setup push notification for your blog readers. This has among the highest engagement rates.
Another proven technique you can use to promote your ebook is giveaways. These help you leverage the power of social media to bring more new users to your blog.
We recommend using RafflePress plugin to create a viral giveaway since it seamlessly connects with all major social media platforms.
We hope this tutorial helped you learn how to create an ebook from your WordPress blog posts. You may also want to learn how to start your own podcast, or check out our comparison of the best WordPress SEO plugins to grow your traffic.
If you liked this article, then please subscribe to our YouTube Channel for WordPress video tutorials. You can also find us on Twitter and Facebook.
Do you want to change how often your trash is emptied on your WordPress website, or stop WordPress from emptying the trash automatically?
By default, WordPress will automatically delete anything that has been in the trash for 30 days. However, some users might like the trash to be emptied more or less often, or prefer to empty the trash manually.
In this article, we will show you how to limit or disable the trash being automatically emptied in WordPress.
What Is Trash in WordPress?
WordPress added a trash feature way back in version 2.9. It works just like the recycle bin or trash on your computer.
In other words, your deleted posts aren’t removed permanently but are sent to the trash instead so they can be recovered for a time. Anyone can delete a post accidentally. That’s why WordPress makes it easy to restore deleted posts and pages.
You can view them by going to Posts » All Posts from your WordPress dashboard and then clicking the ‘Trash’ option.
Your WordPress website will automatically delete anything in the trash after 30 days so that it doesn’t pile up.
What if you don’t want WordPress to automatically delete items from the trash? Or you’d prefer it to be emptied more or less often than once a month.
Let’s have a look at how you can have it automatically emptied as often as you like. We’ll cover three methods below. The first method is the easiest for most users. You can use the links below to jump to your preferred method.
Upon activation, you should visit the Settings » General page of your admin dashboard. Once there, scroll to the bottom of the page, and you will find a new ‘Time to empty trash (in days)’ setting.
Simply type in the number of days that WordPress should take to empty the trash. For example, you can type 1 for daily, 7 for weekly, or 30 for monthly.
If you type 0, then deleted posts and pages will be deleted permanently instead of being placed in the trash.
Note: Be very careful about setting the time to empty to 0. It can be difficult to recover permanently deleted posts and pages. Make sure you’re using a backup plugin, just in case.
Don’t forget to click the ‘Save Changes’ button to store your settings.
Method 2: Changing when WordPress Trash Is Emptied with Code
You can also configure how regularly the trash is emptied by the use of a code snippet. This method is not recommended for beginners, so if you’re not familiar with code, then you should use Method 1 instead.
For this method, you’ll have to edit your wp-config.php file.
If you haven’t edited the wp-config.php file before, then take a look at our guide on how to edit wp-config.php file in WordPress.
You can simply add the following line of code to your wp-config.php file.
define('EMPTY_TRASH_DAYS', 1 ); //Integer is the amount of days
You should paste it near the end of the file, just before the line that says, ‘That’s all, stop editing! Happy blogging.’
If you leave this code snippet as it is, then your trash will be emptied every day. Feel free to change the number 1 to some other number, and the trash will be emptied after that number of days.
If you don’t wish to use the trash feature at all, then you should set the number to 0. Deleted posts and pages will then be deleted permanently without being placed in the trash.
Make sure you have a backup plugin set up first, just in case you need to restore any accidentally deleted pages.
Don’t forget to save the wp-config.php file once you have made your changes.
Method 3: Stopping WordPress from Automatically Emptying Trash
Do you want to stop WordPress from automatically deleting items from the trash?
Now, we don’t generally recommend editing your site’s theme files directly. The slightest mistake can break your website. A better way of adding code snippets is by using WPCode.
Are you wondering which marketing data you should be tracking on your WordPress website?
After launching a website, most small business owners rely on their best guesses to make important marketing decisions. Not only does that add huge risk, but it also significantly slows down growth.
In this guide, we will share the top website marketing data that you must track on every WordPress site, so you can make data-driven decisions to grow your business.
Why Do You Need to Track Marketing Data in WordPress?
We believe it’s easy to double your traffic and sales when you know exactly how people find and use your website. Most business owners do not realize how easy it is to track important marketing metrics on your WordPress site.
For example, with a few clicks, you can find out who your visitors are, where they are coming from, and what they do on your website. You can learn which of your articles are getting more visits and which pages on your site are not getting any views.
If you run an online store, then you can see what’s your website conversion rate, which page drives the most sales, what are your top referral sources, and more.
You can use all this marketing data to make informed business decisions and grow your business with confidence.
That said, let’s take a look at the top website marketing stats that you must track on every WordPress site. You can click the links below to quickly jump to any section you’re interested in:
The best way to track marketing data on your WordPress website is by using Google Analytics. It is the most popular website analytics software in the world and is loved by businesses, bloggers, and marketers because it provides a treasure trove of information.
For example, you can use Google Analytics to learn:
The number of visits and pageviews on your website
Who is visiting your website (visitor location, browser, operating system, screen size, and more)
How they found your website
How users interact with your website
And a whole lot more
Google Analytics is an essential tool in our own business. However, you’ll need to add a tracking code to your website, which requires editing code. This can be tricky for beginners, and the slightest mistake can mess up your tracking.
An easier way of setting up Google Analytics is using MonsterInsights. It is the best WordPress Analytics plugin and helps you set up advanced tracking in WordPress without editing code.
Any link that takes users away from your website is called an outbound link. If you use affiliate marketing to make money from your website, then those outbound links are also known as affiliate links.
Tracking these outbound links help you see how much traffic you are sending to other sites, and you can use this data to build stronger partnerships with those sites.
As a blogger, you can see which affiliate links are clicked more often by your visitors. This information can help you make a proper affiliate marketing strategy and boost your referral earnings.
The easiest way to track affiliate links in WordPress is by using MonsterInsights. It tracks outbound links and affiliate links on your site out of the box.
You also get easy-to-understand reports inside your WordPress dashboard, including your top affiliate and outbound links.
Checkout behavior and tracking the abandoned cart information
Product lists performance
Uncover top conversion sources
Sales performance
Setting up enhanced eCommerce tracking on your WordPress store can be difficult. However, MonsterInsights makes it easy for you and it literally takes a few clicks to configure with no coding needed.
The best part is that you get to see eCommerce reports in your dashboard. It shows how your online store is performing, which products are getting the most sales, where your customers are coming from, and more at a glance.
4. Track User Engagement Data with Google Analytics
User engagement shows you what users do when they arrive on your website. It helps you identify patterns of highly engaged user behavior which leads to more conversions and sales.
For example, you may find out that users visiting a specific page are 10 times more likely to make a purchase. You can then use this insight to send more users to that page, or replicate a similar experience on other pages of your website.
Basically, you will be tracking data about how users interact with your website. For example:
Google Analytics is really good at tracking where your website traffic comes from. It can even categorize your traffic based on their source, including organic search, organic social, referral, email, and more.
However, when you’re running paid ad campaigns, email marketing campaigns, or social media promotions, you need detailed campaign tracking.
That’s where UTM tracking comes in.
Campaign-level tracking allows you to see exactly which email, ad, or specific call-to-action link helped you get the most traffic or sales.
To make it easy for you to generate UTM links, MonsterInsights comes with a free campaign URL builder, so you can get more detailed reports. You can enter custom campaign parameters like the source, medium, campaign name, and more to create a custom URL.
These tags include native analytics parameters which are tracked by Google Analytics and are included in your reports. You can then see exactly which link users clicked and how your campaigns are performing.
6. Track and Improve Facebook Retargeting Campaigns
Did you know that Facebook allows you to display targeted ads to people who have visited your website in the past? Yes, it’s called retargeting.
You can install a Facebook pixel and display targeted ads to anyone who visits your website. However, if you install Facebook retargeting pixel today, then you will only be able to show your ads to people who visited today and onward.
Even if you are not running a Facebook advertising campaign right now, we recommend installing the retargeting pixel, so you have a built-in audience when you’re ready to get started.
If you run pay-per-click (PPC) campaigns using Google AdSense, then you can easily see how your ads are performing in the AdSense dashboard. However, these reports only tell you how users interact with your ads not what they do after that.
For that, you’ll need Google Analytics which comes with built-in integration with your AdSense account. This integration enables you to easily track your paid traffic conversions.
Google Search Console is a set of free tools offered by Google to give publishers a look at how their website is seen by the search engine.
It provides immensely useful information like how your pages rank for different keywords (more on this later), the overall performance of your site in search engines, and any errors Google crawler found on your website.
For example, here is a report showing errors that occur when a user views the site on their mobile devices. Without Google Search Console, it will be very difficult to pinpoint such issues and quickly resolve them.
Keywords are the phrases users enter in search engines to find what they’re looking for. To get more traffic from search engines, you need to know exactly which keywords are bringing you the most traffic to your website, so you can focus on what’s working.
We have a complete WordPress SEO guide that you can use to learn how to optimize your content for specific keywords.
Normally, beginners rely on manually entering keywords in Google search to see if their site is ranking. This is highly inefficient as you would miss out on thousands of keywords where your site can be easily ranked.
Google Search Console is a free tool that provides you with valuable keyword data with the average position. You can see which search terms are ranking high, search impressions, and how many average clicks you get.
If you’re using MonsterInsights, then you can view the Search Console report inside your WordPress dashboard.
However, it only allows you to see your own site’s keyword data. If you want to research your competitors, then you’ll need SEMRush. This incredibly powerful SEO tool allows you to view in-depth keyword data for any website.
Most popular email marketing services come with stats and insights that you can track. These reports provide useful data like open rate, click-through rate, unsubscribe rate, and more.
You can also see the traffic coming from your email campaigns to your website in your Google Analytics 4 reports under Acquisition » Traffic acquisition.
From here, you can see how well your email newsletter traffic converts, and what you can do to improve.
Tracking email marketing data helps you grow your email list. You can create new email forms, change form placements, and use popups to boost subscribers.
While there are definitely other marketing metrics that you can track, we believe these are the top marketing data that every business owner must track on their WordPress site.
Do you want to change, move, or delete WordPress categories?
Categories help organize your content and make it easy for visitors to find interesting posts. However, as your website grows and you learn more about your audience, you may need to change your categories.
In this article, we will show you how you can easily change, move, and delete the categories on your WordPress website.
Why Change, Move or Delete WordPress Categories?
Categories help sort your blog posts and make it easier for users to find what they are looking for. This will keep them on your website for longer and encourage them to convert.
However, it can be difficult to plan all your categories in advance. This is especially true if you’re just getting started with WordPress, or aren’t sure which direction to take your new blog, online store, or small business website.
You may also want to try out different categories and content, and then analyze what works the best by installing Google Analytics in WordPress. You can then use this insight to fine-tune your categories.
With that being said, at some point, you may need to change your WordPress categories. This might involve renaming a category to include the keywords that got the most clicks during A/B split testing, or fixing a spelling mistake.
You might even organize your categories and subcategories into new parent-child relationships to help visitors discover new content.
If you don’t make these changes carefully, then it could hurt the visitor experience, damage your SEO, and make it more difficult for visitors to navigate your website.
With that being said, let’s see how you can properly change, move, and delete WordPress categories. Simply use the quick links below to jump straight to the change you want to make.
To start, you can change a category’s name, assign it to a different parent category, or display a category description to help other authors understand how to use that category.
To make any of these changes, head over to Posts » Categories.
Here, find the category that you want to change and hover the mouse over it.
When the ‘Edit’ link appears, give it a click.
This will take you to a screen where you can rename the category, add a parent or subcategory, or write a category description. For example, if you’ve used a keyword research tool to find some new keywords or phrases, then you may want to change the category’s name to include these words.
To rename a category, simply type the new title into the ‘Name’ field.
When you’re happy with the changes you’ve made, don’t forget to click on ‘Update’ to store your settings.
After that, WordPress will automatically update all the posts within this category.
How to Properly Move a WordPress Category (Without Causing Broken Links)
Sometimes you may want to change where this archive page is located. For example, if you’ve renamed a category, then you might also change its archive URL to avoid confusing visitors.
However, changing the slug means that anyone who tries to visit the original URL will get a 404 error.
This is a bad user experience and can impact your WordPress SEO. Thankfully, you can easily fix this problem by creating a redirect.
With that in mind, go ahead and change the slug by going to Posts » Categories. Then, find the category that you want to edit and hover the mouse over it.
When the ‘Edit’ button appears, give it a click.
In the ‘URL’ field, you’ll see the current slug for this category’s archive page.
Simply type in the new URL that you want to use. Just be aware that you can only use lowercase letters, numbers, and hyphens in the URL.
When you’re happy with how the slug looks, scroll to the bottom of the screen and click on ‘Update’ to store your changes.
Now, you’ll see the archive page if you visit the new URL, but you’ll get an error if you type in the original link.
The easiest way to redirect from the old URL to the new link is by using AIOSEO.
AIOSEO is the best SEO plugin for WordPress and can help you get more visitors from search engines like Google. It even has a setup wizard that will help you choose the best SEO settings for your website and improve your rankings, even if you’re completely new to search engine optimization.
For this guide, we’ll be using the AIOSEO Pro version because it has the Redirection Manager that you’ll need to set up a redirect. However, there is also a free version of AIOSEO that you can use to optimize your website no matter what your budget.
First, you’ll need to install and activate the plugin. If you need help, then please see our guide on how to install a WordPress plugin.
Upon activation, AIOSEO will automatically launch the setup wizard. You can simply click on ‘Let’s Get Started’ and then follow the onscreen instructions to improve your site’s search engine rankings.
Since we want to use the plugin’s premium features, you’ll need to enter a license key when asked. You can find this information under your account on the AIOSEO website.
After entering the license key, click on the ‘Finish Setup’ button to save your settings and close the setup wizard.
With that out of the way, head over to All in One SEO » Redirects in the WordPress dashboard. You can then go ahead and click on Activate Redirects.
Now you’ve activated the Redirection Manager, you can start by typing in the source URL. This is the category archive’s original web address, and will usually start with /category/ followed by the original category name.
Here, we’re redirecting anyone who tries to visit /category/search-engine-optimization.
After typing in the source URL, make sure you click on the small cog icon to see some extra settings that you can configure.
You’ll need to check the box next to ‘Regex.’
Now, it’s time to move to the target URL, which is our new category archive page.
In the following image, visitors will be redirected to /category/seo.
Your next task is choosing the type of redirect that AIOSEO should use. There are various types of redirects that are identified with numbers such as 301, 302, and 307.
If you’re permanently moving the archive to a new location, then you’ll want to use a 301 redirect as this tells search engines that the page will always be at this new location. This way, all the old archive’s traffic and backlinks are transferred to the new page.
Simply open the ‘Redirect Type’ dropdown and choose ‘301 Moved Permanently.’
If you’re only temporarily moving the category archive page to a new URL, then you should choose ‘307 Temporary Redirect’ instead.
When you’ve done that, go ahead and click on the ‘Add Redirect’ button.
Now, if you try to visit the original category archive page, AIOSEO will automatically redirect you to the new target URL.
How to Properly Delete a WordPress Category
Sometimes you may no longer need a particular category. For example, you may have accidentally created two very similar categories or changed the direction of your WordPress blog so you no longer cover the same content.
Before deleting a category, it’s important to think about how this will affect your WordPress website. Firstly, WordPress will remove the deleted category from all your posts. Any posts that no longer have a category, will be marked as ‘uncategorized.’
Lots of uncategorized content will make it more difficult for visitors to explore your website. With that being said, you may want to look through all the posts within the category you plan to delete, to make sure they have at least one alternate category.
You can also set up a redirect for that category’s archive page by following the same process described above. This can help you fix any broken links before they hurt your search engine rankings or the visitor experience.
When you’re ready to delete the category, simply go to Posts » Categories. You can then hover the mouse over the category and click on the ‘Delete’ link when it appears.
How to Change the Default Uncategorized Category
If you don’t assign a category to a post, then WordPress will assign one automatically. By default, this is ‘uncategorized’ but you may want to change this to an alternative category.
Another option is to continue using the ‘uncategorized’ category, but give it a more descriptive and useful name.
This change is particularly important if you run a WordPress multi-author blog or accept guest contributions, as these people may forget to add a category to their posts.
Changing the default category can also improve your WordPress SEO by making sure that every post has a descriptive category.
Let’s start by renaming the uncategorized category by going to Posts »Categories.
Here, find ‘Uncategorized’ and hover your mouse over it. When the ‘Edit’ link appears, give it a click.
You can now type a new title into the ‘Name’ field.
After that, scroll to the bottom of the screen and click on ‘Save.’
Another option is to change the default category. This can be useful if you’ve already created a general category, and now want to use it as your default.
To make this change, head over to Settings » Writing in the WordPress dashboard. You can then open the ‘Default Post Category’ dropdown and choose any category from the list.
After that, don’t forget to click on ‘Save Changes’ to store your settings.
How to Add a Subcategory in WordPress
WordPress allows you to add category hierarchy, so you can add sub categories as needed.
You can do this easily by using the Parent category dropdown on the Add New Category screen.
Categories and tags are both important ways to organize and group your posts. However, to help visitors find their way around your site, you should use them in slightly different ways.
Categories are great for broadly grouping your posts, while tags are meant to describe the specific details of each post.
Visitors can use categories to quickly find the type of content they’re interested in, or their favorite subject. They can then use tags to pinpoint the exact post within that category.
At WPBeginner we have a Beginner’s Guide category, which is aimed at new WordPress users. Each post in the Beginner’s Guide has different tags, such as custom taxonomy, SEO, and sorting your content.
It’s easy to get categories and tags mixed up, especially if you’re just getting started with WordPress. Your website may also change over time, to the point where one of your tags would now work better as a category.
You can easily turn categories into tags, using the Categories to Tags Converter plugin. For example, you can turn a ‘Beginner’s Guide’ category into a ‘Beginner’s Guide’ tag with the click of a button. Even better, all posts that were categorized as ‘Beginner’s Guide’ will be assigned the new ‘Beginner’s Guide’ tag automatically.
This can save you a ton of time and let you test different ways of organizing your content.
First, you’ll need to install and activate the Categories to Tags Converter plugin. If you need help, then please see our guide on how to install a WordPress plugin.
Upon activation, go to Tools » Import. Here, find ‘Categories and Tags Converter’ and click on its ‘Run importer’ link.
You’ll now see all the different categories and tags you’ve created for your website, organizied into tabs.
To convert a category into a tag, simply check the box next to it. You can then click on the ‘Convert Categories’ button.
After a few moments, you’ll see a ‘Converted successfully’ message. To turn more categories into tags, simply repeat the process described above.
To turn a tag into a category, select the ‘Tags’ tab. You can now check the box next to the tag that you want to change, and click on the ‘Convert Tags’ button.