Category Archives: Beginners Guide

How to Create Your Own Customized Short URL for Your Blog

Do you want to create your own customized short URL for your blog?

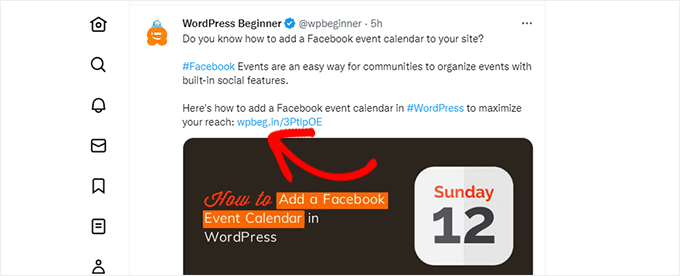
Customized short URLs are often branded short URLs that are easy to remember and share. We use wpbeg.in for our own branded custom short URLs.

In this article, we’ll show you how to easily create your own customized short URLs for your blog.

Creating customized short urls in WordPress

Why Use a Branded Customized Short URL in WordPress?

You may have noticed how popular websites like The New York Times, Twitter, Facebook, and TechCrunch use branded short URLs on social media.

The New York times uses nyti.ms, TechCrunch uses tcrn.ch, and WPBeginner uses wpbeg.in domain name for shorter customized URLs.

Short URL used on social platforms

These branded domain names are called domain hacks.

They are created by combining the brand name and a domain TLD to cleverly spell a brand name.

Since most websites use .com as their primary domain, this is a good way to create a short url for your WordPress site. See our tips on picking the best domain for your blog.

Using your own customized short URL improves brand recognition among your users. It also allows you to create shorter URLs for easy sharing on social platforms.

Most importantly, you can easily track these URLs to see how many clicks you got when you shared a URL.

Having said that, let’s see how to create your own branded customized short URLs in WordPress.

Note: If you’re just looking to create memorable short URLs using your main domain, then we recommend using the Pretty Links plugin. This is what top podcasters and YouTubers use to mention short links in their videos.

Step 1: Buy a Short URL or Short Domain Name

Most of us do not have a short URL as our primary domain name. This means you will need to register a new domain name that is much shorter than your current domain.

For example, when choosing a branded shorter domain for WPBeginner.com we registered WPBeg.in. This made our short URL 6 characters shorter than our primary domain.

There are many free domain name generators that allow you to automatically generate domain name suggestions. See our list of 14 best free domain name generators.

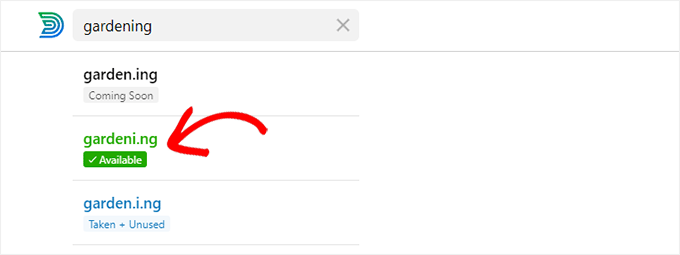
Domainr is the one that specializes in helping you find short domains using domain hacks.

Using domain hack to generate short url

Try different combinations and explore creative ways to spell your brand name.

Once you have found a domain name that meets your needs and is available, you can register it on any of the top domain registrars.

We recommend using Domain.com. They are the best domain registrar on the market and you can get a 25% discount using our Domain.com coupon code.

The Domain.com website with search bar

Other domain registrars that we recommend include Network Solutions and GoDaddy.

The cost of domain name registration depends on which TLD you select. Country-specific TLDs cost a little more than some other new TLDs.

Once you have registered your domain name, you will be able to manage it from your domain registrar’s control panel.

Step 2: Setup Your Custom Domain in Bitly

Bitly is a popular URL shortner service that allows you to manage and track links. We use it to shorten our WordPress URLs and manage them.

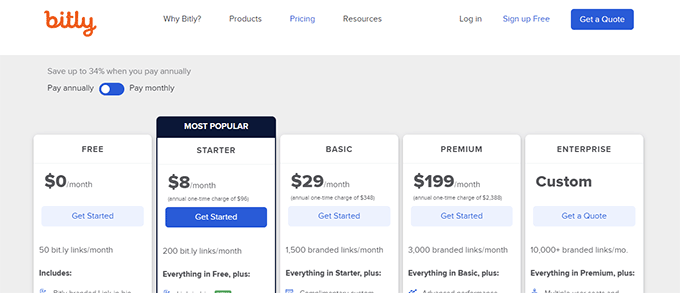
First, you will need to create a Bitly account. You’ll need at least Basic plan to use your own custom domain name for link shortening.

Sign up for a paid Bitly plan

After completing the sign up, you’ll reach your Bitly account dashboard.

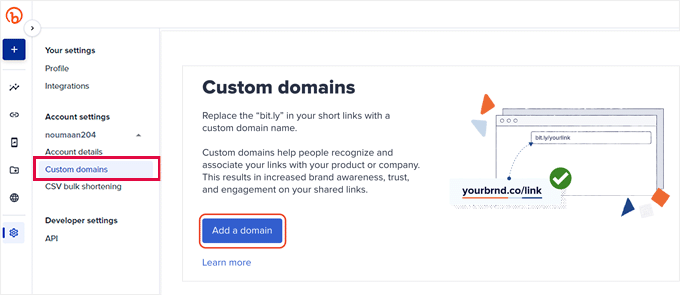
From here, you need to click on Account settings » Custom domains menu and then click on the Add a domain button.

Add custom domain to Bitly

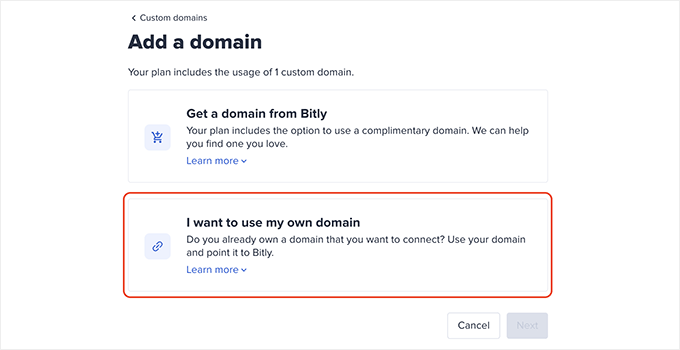
On the next screen, you’ll see options to buy a new domain name or use your own domain name.

Go ahead, and click on the ‘I want to use my own domain name’ option to continue.

Continue with your own custom domain

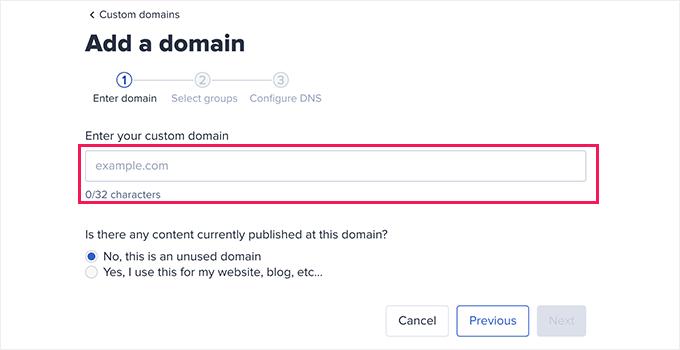
Next, enter the domain name you recently purchased.

Below that, select ‘No, this is an unused domain name’ option and click Next.

Enter domain name

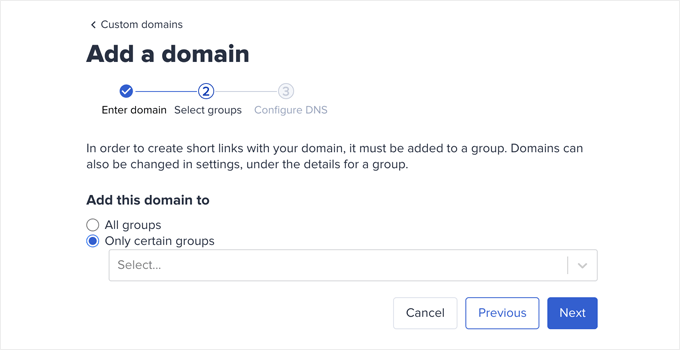
Now you will see the option to choose a group.

Bitly allows you to organize your links, domains, and users into groups. This allows you to limit certain domains to specific users.

Choose All groups to make your custom domain available for all groups.

Allow groups

Next, you will be asked to add DNS records to your branded domain name before continuing.

You can leave this window open and proceed to the next step.

Finish adding domain

Step 3: Set DNS A Record to Point to Bit.ly

In order to create your own branded custom short URLs, you need to point your domain to Bitly servers.

To do that, you will need to add DNS records to your custom domain name. DNS records are kind of instructions that point domain name to proper servers.

You can find the DNS records that you need to add on Bitly website.

Bitly DNS records

There are two types of DNS records that you can add.

For root domain names (e.g. wpbeg.in), you’ll need to enter A records.

However, If your custom domain is a subdomain (e.g. on.wsj.com), then you’ll need to enter the CNAME records.

To add the records, simply visit the domain management area on your domain registrar’s website and look for DNS records.

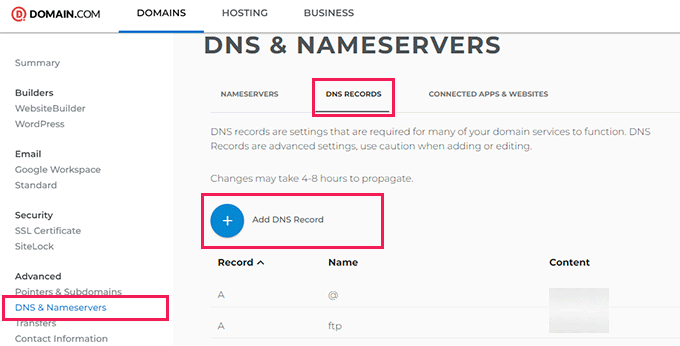
If you took our advice and registered your domain with Domain.com, then you will find the DNS & Nameservers settings under the left column.

DNS records

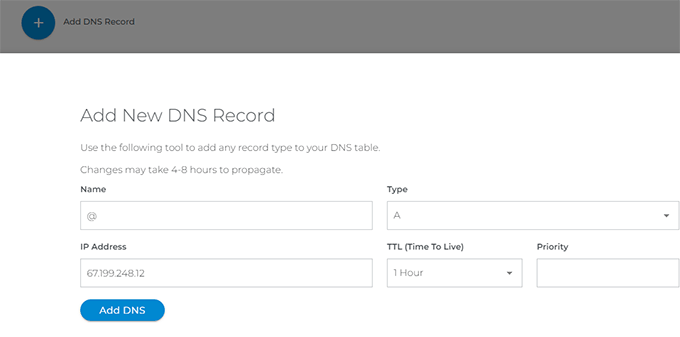
Switch to the DNS Records tab and then click on the Add DNS Record button.

This will bring up a popup where you need to enter the following information

  • Hostname under the Name field
  • Choose A as the Type
  • Copy and paste the Bitly IP address
  • Choose 1 hour under the TTL
Setting up A records

Click on the Add DNS button to save your settings.

If you are using a subdomain for example on.wsj.com, then you need to set a CNAME record and point it to cname.bitly.com

After adding DNS records you can switch back to Bitly website and click on the Add Domain button.

Finish adding domain

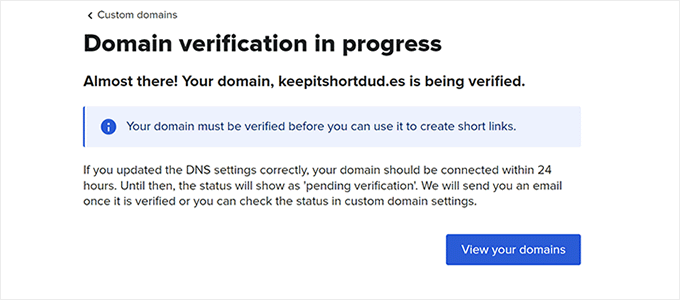
Now, you will see a notification that your domain settings are being verified.

Bitly will check your domain for DNS records and if everything looks ok you’ll recieve an email notification.

Domain verification

Step 4: Set up Short URL on Your WordPress Site

The best part about using Bitly is that you can easily manage, share, and track your short URLs directly from your WordPress site.

First, thing you need to do is install and activate the Bitly’s WordPress Plugin. For more details, see our step by step guide on how to install a WordPress plugin.

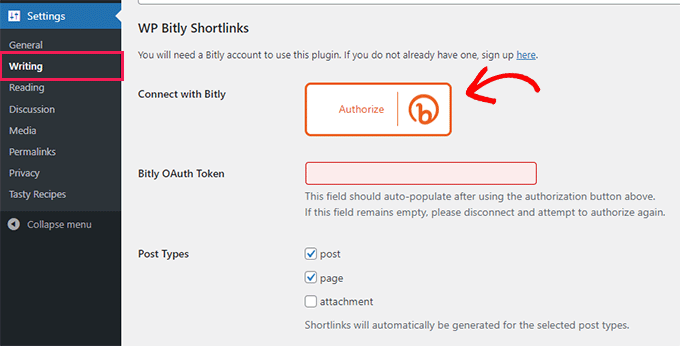
Upon activation, you need to visit Settings » Writing page and scroll down to the ‘WP Bitly Shortlinks’ section.

Connect Bitly to WordPress

Simply click on the Authorize button and then Allow Bitly to connect your WordPress site.

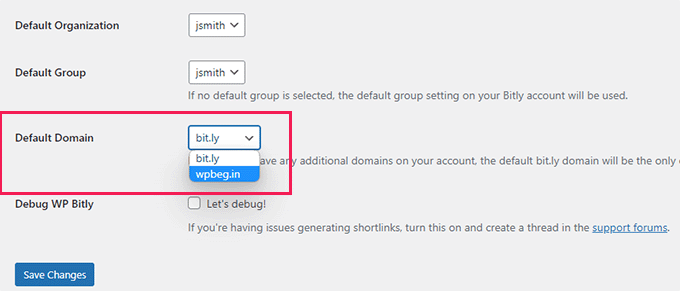
Once connected, you can choose which post types you want to generate shortlinks for. Below that, you can choose the default domain that you added earlier.

Choose default domain

Don’t forget to click on the Save changes button to store your settings,

The plugin will now start generating your custom branded short URLs. You can see them by visiting your Bitly dashboard.

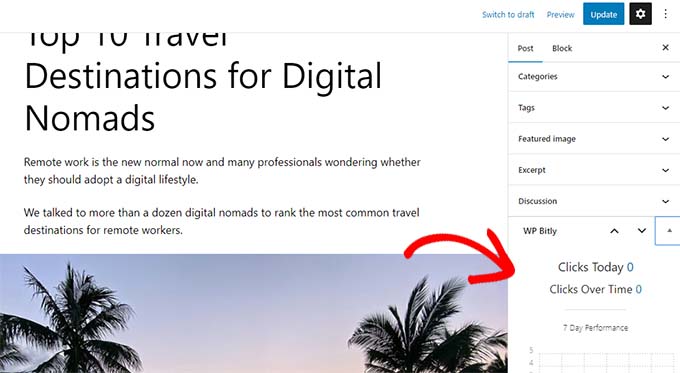
WP-Bitly plugin will also show you BitLy stats for each post. You can see those stats by editing a post and look for WP Bitly metabox.

Bitly stats inside WordPress post editor

This will allow you to track how many times your short URL for this post has been clicked and from which websites.

We hope this article helped you learn how to create your own customized short URLs in WordPress. You may also want to see our complete WordPress conversion tracking guide or see our pick of the best social media plugins for WordPress.

If you liked this article, then please subscribe to our YouTube Channel for WordPress video tutorials. You can also find us on Twitter and Facebook.

The post How to Create Your Own Customized Short URL for Your Blog first appeared on WPBeginner.

What is rel=”noopener” in WordPress? (Explained)

Have you been wondering what rel="noopener" means in WordPress?

When you add a link that opens in a new tab, WordPress will automatically add the rel="noopener" attribute to the link.

In this article, we will explain what rel="noopener" means in WordPress and how it affects your website.

What Is rel="noopener" in WordPress? (Explained)

What Is rel=”noopener” in WordPress?

When you add links to your WordPress website, you can use HTML attributes to control what happens when you click the link.

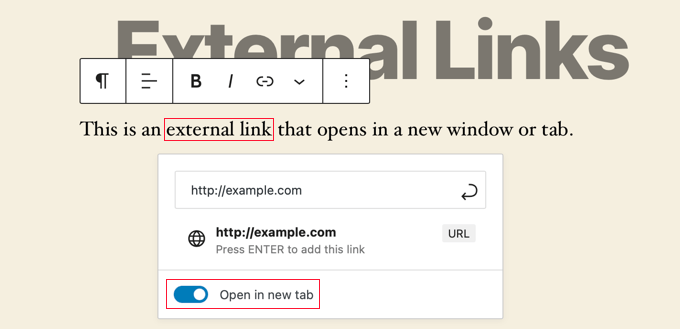
For example, when you create a link, there is a toggle switch that allows you to open it in a new tab.

Opening a Link in a New Tab

The HTML code generated by WordPress for this link looks like this:

<a href="http://example.com" target="_blank" rel="noreferrer noopener">external link</a>

Notice that some HTML attributes have been added to the link, rel="noopener" and rel="noreferrer". These attributes are added to address a security vulnerability.

The problem is that JavaScript code can be used to allow a new tab to get control of its referring window. If you link to an external website affected by the malicious code, then that website can use the window.opener property in JavaScript to change the original page (your website) to steal information and spread malicious code.

WordPress adds rel="noopener" to prevent the new tab from taking advantage of this JavaScript feature. Similarly, the rel="noreferrer" attribute prevents passing the referrer information onto the new tab.

How Does rel=”noopener” Affect Your WordPress SEO?

It doesn’t.

Even though the rel="noopener" attribute improves WordPress security, some users avoid using it because they think it will impact their WordPress SEO.

But that’s just a myth.

It has no impact on your site’s SEO rankings or your overall WordPress performance.

What’s the Difference Between “noopener” and “nofollow”?

It’s easy to confuse rel="noopener" with rel="nofollow". However, they are completely separate attributes.

The noopener attribute prevents your website from cross-site hacking and improves WordPress security.

On the other hand, the nofollow attribute prevents your website from passing on SEO link-juice to the linked website.

Search engines look for and consider the nofollow attribute when following a link on your website. However, they do not give any consideration to the noopener tag.

By default, WordPress does not allow you to add nofollow to your external links. If you want to add nofollow in WordPress, then you will need to use a plugin.

To learn more, see our article on how to add title and nofollow to links in WordPress.

Does rel=”noreferrer” Affect Affiliate Links in WordPress?

The rel="noreferrer" does not affect affiliate links in WordPress. Some users believe that it does because rel="noreferrer" prevents the referrer information passing to the new tab.

However, most affiliate programs provide you with a unique URL that has your affiliate ID. This means your affiliate ID is passed along as a URL parameter for the other website to track.

Secondly, most affiliate marketers use a link cloaking plugin for their affiliate links.

With link cloaking, the affiliate link that your users click on is actually your website’s own URL, which then redirects users to the destination URL.

How Do You Disable rel=”noopener” in WordPress?

There is no need to remove rel="noopener" from links on your website. It is good for your website’s security and has no performance or SEO impact on your website.

However, if you must remove it, then you will have to disable the Gutenberg block editor in WordPress and use the old classic editor.

That’s because if you remove rel="noopener" from the link manually, the block editor will automatically add it back in to keep your website safe.

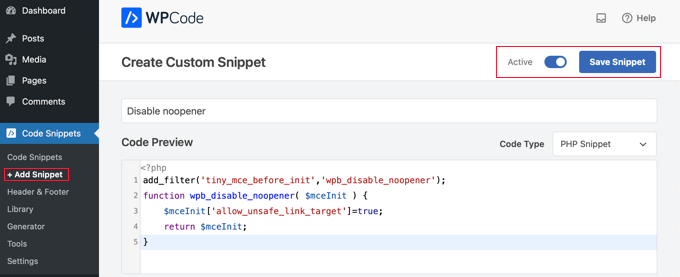
Once the block editor is disabled, you will need to add a code snippet to your theme’s functions.php file or to the WPCode plugin (recommended). You can learn how to use the WPCode Free Plugin in our guide on how to easily add custom code in WordPress.

Simply copy the following code into a new PHP snippet:

add_filter('tiny_mce_before_init','wpb_disable_noopener');
function wpb_disable_noopener( $mceInit ) {
    $mceInit['allow_unsafe_link_target']=true;
    return $mceInit;
}
Adding a Code Snippet Using WPCode

Make sure you change the ‘Active’ toggle on and then click the ‘Save Snippet’ button.

This will stop WordPress from adding rel="noopener" to new links. You will also need to manually edit any old links to remove the attribute.

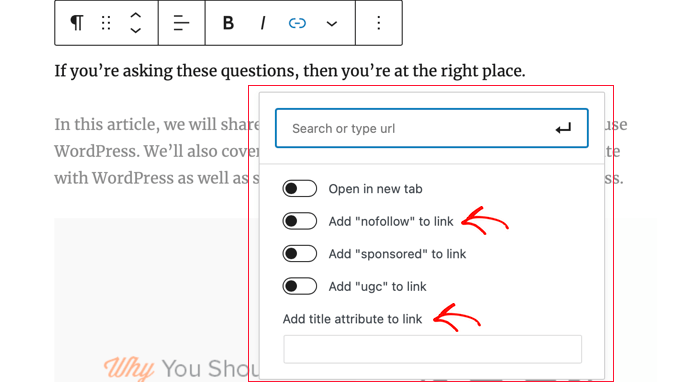
Want even more control over which rel attributes get added to your links in WordPress? We recommend using the AIOSEO plugin because it lets you add title, nofollow, and other link attributes right inside the WordPress editor.

AIOSEO Adds NoFollow and Title Attributes to the Insert Link Popup

We hope this article helped you learn about rel="noopener" in WordPress. You may also want to learn how to get a free email domain, or see our list of tips to speed up WordPress performance.

If you liked this article, then please subscribe to our YouTube Channel for WordPress video tutorials. You can also find us on Twitter and Facebook.

The post What is rel=”noopener” in WordPress? (Explained) first appeared on WPBeginner.

Is It Safe to Use Outdated WordPress Plugins?

Are you wondering whether it’s safe to install and use an outdated WordPress plugin?

Sometimes when you are searching for a plugin to add a new feature to your website, you may find one that looks perfect, but it hasn’t been updated for a while or hasn’t been tested with your version of WordPress. Often times this leads to beginner readers asking the question can I use it without breaking my website?

In this article, we’ll discuss how to determine whether or not you can safely install outdated WordPress plugins.

Is It Safe to Use Outdated WordPress Plugins?

How Do WordPress Plugins Become Outdated?

A WordPress plugin can become outdated if it hasn’t received any updates for a while, or if it hasn’t been tested by the plugin author to ensure it’s compatibility with the latest 3 major releases of WordPress.

We always recommend our readers to keep the plugins in your WordPress website up to date. These updates keep the plugin compatible with changes made to WordPress core, add new features, fix bugs, and address security vulnerabilities.

But what if a plugin that you are using or want to use hasn’t been updated for some time? Or what if it hasn’t been tested with the latest version of WordPress? Is it still safe to use?

The short answer is, it depends on the plugin.

Sometimes outdated plugins simply will not work correctly with newer versions of WordPress. Or the plugin may have even been abandoned by the developer, so that no new features will ever be added.

The biggest concern with outdated plugins is that there may be security issues that can come up. If the plugin isn’t maintained or updated, it might become a target for hackers.

However, just because a plugin is outdated doesn’t mean that it has any of those issues. Some outdated plugins are perfectly safe to use. However, we recommend that you thoroughly test the plugin before installing it on your live site.

With that being said, let’s take a look at how to tell if a WordPress plugin is outdated, and how you can decide whether it is safe to install.

Checking Whether a Plugin Is Outdated

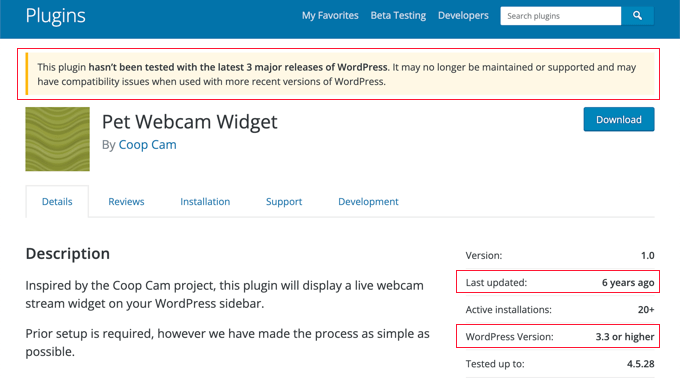
The WordPress Plugin Directory displays a lot of useful information about each plugin. For example, it clearly shows the date each plugin was last updated, and the latest version of WordPress it was tested with.

If a plugin has not been tested for several versions of WordPress, then a warning will be displayed at the top of the plugin page, similar to this one:

This plugin hasn’t been tested with the latest 3 major releases of WordPress. It may no longer be maintained or supported and may have compatibility issues when used with more recent versions of WordPress.
Checking Whether a WordPress Plugin is Outdated

Where does WordPress get this information? Plugin authors are required to provide it in a readme file when submitting plugins to the WordPress plugin directory.

Unfortunately, busy developers don’t always update the readme file when a new WordPress update is released. Sometimes a plugin was tested more recently than its plugin page shows.

Now that you know how to check if a WordPress plugin is outdated, let’s take a look at how to tell whether it is safe to install.

Checking Whether an Outdated Plugin Is Safe to Install

Just because a plugin hasn’t been updated or tested recently doesn’t mean that it won’t work. How can you tell if the plugin is safe to install on your WordPress site?

Check User Ratings and Reviews

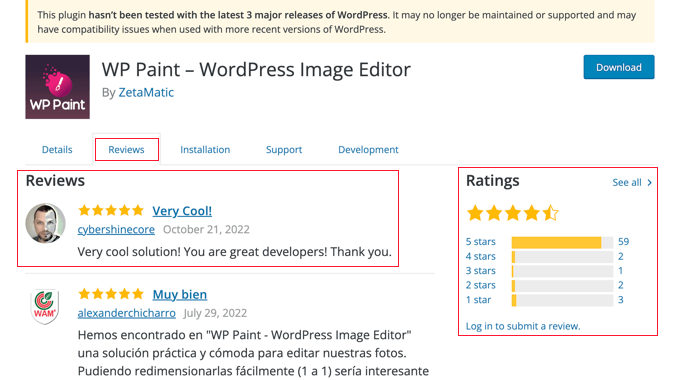
You can click on the ‘Reviews’ tab on the WordPress Plugin Directory to see user opinions and complaints about the plugin. If there is a compatibility problem with a recent version of WordPress, then other users may have mentioned it on this page.

Checking User Reviews and Ratings

You can also check the user ratings. If the reviews are recent and five stars, then it’s safe to assume that you can use the plugin on your website.

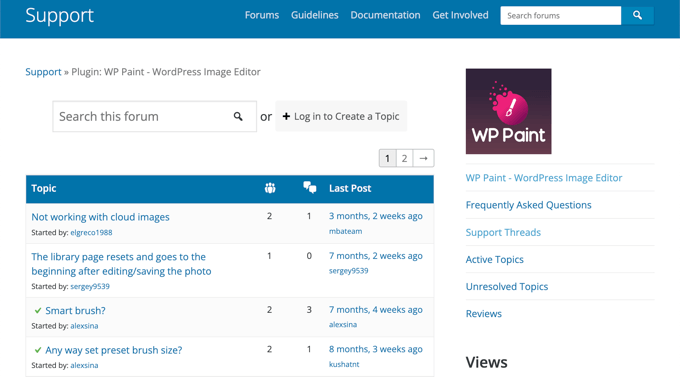
Check the Plugin Support Page

When you click the ‘Support’ tab, you will be taken to the support forum for the plugin. Here you can see any issues that users have been having with the plugin.

Checking the Plugin's Support Page

You will also see how responsive the plugin’s developer is, and whether they successfully solve issues in a timely manner.

If you decide to install the plugin, this is where you should come if you need support. You can learn more in our guide on how to properly ask for WordPress support and get it.

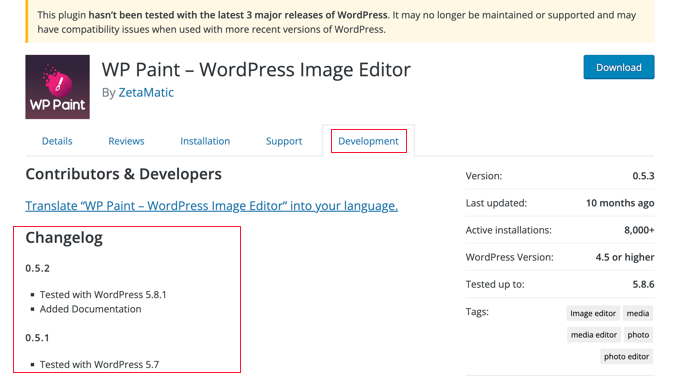
Check the Plugin Development Page

Another way to check whether it’s safe to install the plugin is by going to the plugin development page. This shows you how active the plugin developer is.

Simply go to the WordPress plugin page and click on the ‘Development’ tab.

Checking the Plugin's Development Page

In particular, take a look at the ‘Changelog’ section to see how often the plugin is being updated and what recent changes and improvements have been made.

If the developer is actively updating the plugin, then it usually means the plugin is high quality and safe to use on your WordPress website.

On the other hand, if a plugin hasn’t been updated in more than two years, then it may mean the plugin has been abandoned. In that case, you shouldn’t install the plugin since the developer is not actively maintaining it.

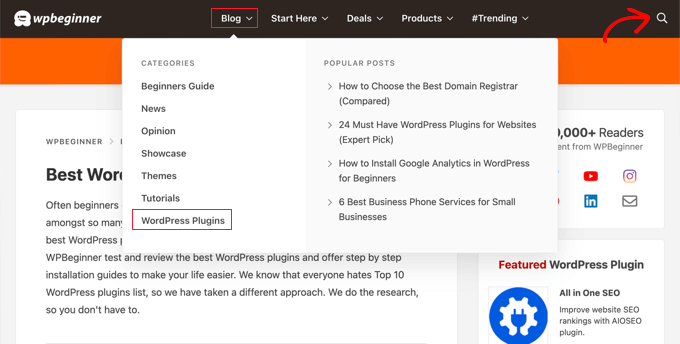
Check for WPBeginner Tutorials on the Plugin

You can also check whether the plugin is safe to install on the WPBeginner blog. You can look for tutorials on the plugin by navigating to the Blog » WordPress Plugins page or by using the search feature.

Checking WPBeginner Tutorials on the Plugin

If we recently published a tutorial on a plugin, then this means the plugin was compatible with the latest version of WordPress when we tested it.

Testing the Plugin on a Staging Site or Local WordPress Installation

Let’s say that you’ve gone through the steps above and decided that an outdated plugin looks safe to install. What should you do next?

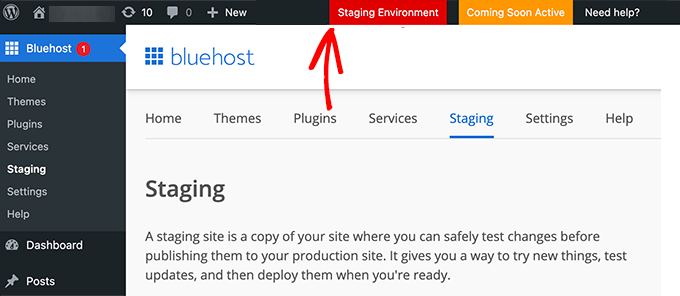
Instead of immediately installing the plugin on your live site, you may wish to first test it on a staging site or local WordPress installation.

A WordPress staging site is a test site that you can use to safely test a plugin for problems before going live.

The staging site lives on your web hosting server, so you can be confident that if the plugin works there, you won’t encounter problems on your live site.

Working on staging environment

Some of the best WordPress hosting companies such as Bluehost, SiteGround, and WP Engine offer one-click staging websites. You can also create a staging site manually or by using a plugin.

You can learn how in our guide on how to easily create a staging site for WordPress.

As an alternative to a staging site, you can install WordPress on your own computer and test the plugin there. You can follow our guides on how to install WordPress locally on Mac or Windows, or using XAMPP.

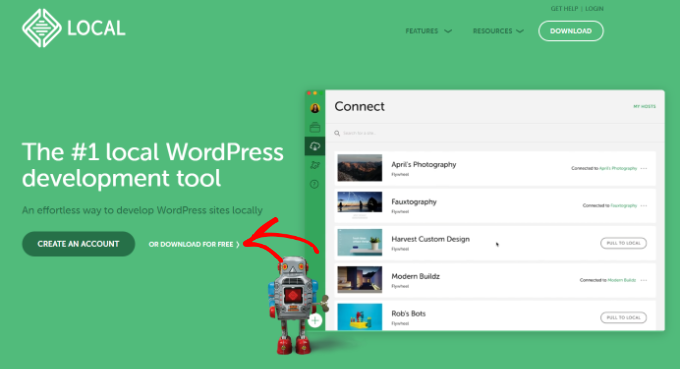
Download Local by Flywheel

If the plugin works fine on your test site, then it’s safe to install it on your live website.

Final Thoughts

While it’s not a good idea to use outdated plugins, sometimes the plugin you’re looking for is the only one that does what you need. In that case, you will need to do your due diligence as we mentioned in our guide.

Other things you can look for is author’s reputation. If it’s a popular plugin author, then you can email them and ask whether they have plans to update the plugin.

Some plugins are so simple that they don’t need any updates, and this is why the author may not push out an update because they know it still works. The popular Page Links To plugin is a good example of that.

It’s written by one of WordPress core contributors, Mark Jaquith, and the plugin has been around for a long time. It doesn’t need any active development because it does one thing and does it well. So even though it shows the outdated error on WordPress.org, this plugin would be something that you can safely install.

The downside though is that if you were hoping to have more advanced redirection features, then it’s going to be lacking in the plugin which is why many users switch to the All in One SEO plugin because it includes this feature and many more powerful SEO features in the plugin.

We hope this tutorial helped you learn whether it’s safe to use outdated plugins with WordPress. You may also want to learn how to register a domain name for free, or check out our expert pick of the must-have WordPress plugins to grow your site.

If you liked this article, then please subscribe to our YouTube Channel for WordPress video tutorials. You can also find us on Twitter and Facebook.

The post Is It Safe to Use Outdated WordPress Plugins? first appeared on WPBeginner.

How to Check If Your WordPress Blog Posts Are Ranking for the Right Keywords

Do you want to check if your WordPress posts are ranking for the right keywords?

Most beginners manually check rankings for their articles by typing keywords in Google. This does not give you an accurate idea of where your articles stand for the target keyword.

In this article, we will show you how to easily check if your WordPress blog posts are ranking for the right keywords.

How to Check If Your WordPress Blog Posts Are Ranking for the Right Keywords

Why Check Keyword Rankings for Your WordPress Posts?

If you follow our complete WordPress SEO guide, then you will learn how to optimize each article on your website for specific keywords. This helps you get more traffic to your website.

Most beginners simply search on Google to see if their posts are appearing for those keywords. Even then, they usually only check the first or second page at best.

The issue is that sometimes your article might be ranking way below the first two pages or worst it may not even be ranking for the keyword that you want.

If you rely on manually checking your keyword rankings, then you are missing out on useful information that you can use to improve your SEO rankings and increase traffic.

That being said, let’s take a look at how to properly check keyword rankings for your WordPress blog posts. We’ll cover three different keyword reference tools, and then show how to use keyword ranking information to increase traffic to your site.

Method 1: Checking Keyword Rankings With Semrush

SEMRush

Semrush is one of the best SEO and keyword research tools on the market. It’s a comprehensive SEO suite with all the useful tools you’ll need.

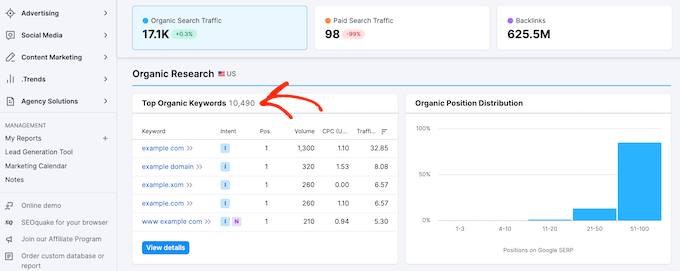
It comes with a powerful organic research tool that can show keyword rankings for any domain name. You don’t need to type in URLs for individual articles. It will automatically fetch results for all URLs on that domain name.

Using Semrush to check that your blog is ranking for the right keywords

Simply enter the domain name you want to look up and Semrush will get a ton of information. After that, click on the organic research tab to view the full list of all keywords your website is ranking for.

You can sort the results by position, URL, traffic, and more. You can also export the results to a CSV file and research offline using your favorite spreadsheet program.

You can also track specific keywords with Semrush, and they will track those keywords on your dashboard, so you can instantly see their performance.

Semrush can also do these things for any domain name. That means you can enter your competitor’s domain name and see which keywords they are ranking for.

You will also be able to see their paid search traffic, paid keywords, and other useful information that you can use to outrank them.

Method 2: Checking Keyword Rankings With Google Search Console

The Google Search Console

Google Search Console (formerly Google Webmaster Tools) is a set of tools offered by Google to help webmasters improve their website for search. See our guide on how to add your website to Google Search Console.

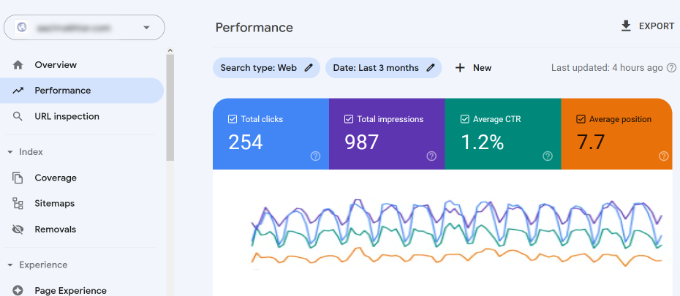
At the top of the Performance tab, you will see a graph of your website’s performance in search results.

Finding your keyword positions in Google Search Console

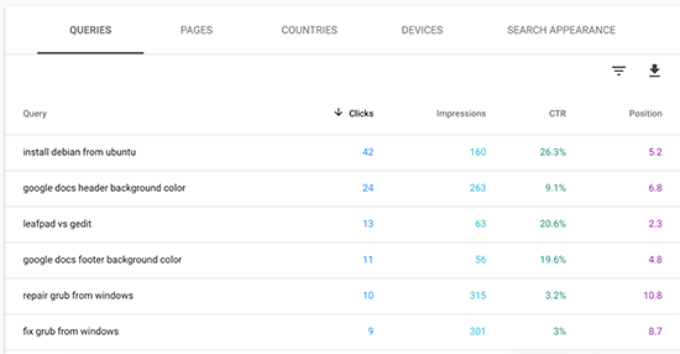
As you scroll down, you will see the keywords data. Next to each keyword, you will see how many clicks and impressions it gets, and its position on the search results page.

You can sort this data by clicking on any column.

Top keyword in search console

If you sort the list by position, then you will be able to see your top ranking keywords. As you scroll down the list, you will see keywords where your site appears lower on search engine results pages.

You can also export this data and open it with your favorite spreadsheet software.

Method 3: Checking Keyword Rankings With Ahrefs

The Ahrefs keyword research and SEO tool

Ahrefs is another popular SEO tool among professional marketers. It comes with an easy to use interface and tries to make information understandable even for new users.

Simply enter your website domain name in the search box, and it will create a neatly organized report with beautiful graphs and charts.

You will find all your keyword rankings under the organic keywords report.

Next to each keyword, you’ll be able to see its search volume, keyword ranking position, keyword density, and more.

Ahrefs Keywords Report

Using Keyword Rankings to Get More Traffic in WordPress

Now that you have learned how to check keyword rankings for your WordPress site, let’s talk about improving your rankings.

How to Analyze Which Keywords Need Improvement

When you’re deciding which keywords to improve, it’s important to note that not all keywords are created equal.

For example, ranking #5 on a high traffic keyword is way better than ranking #1 for a low traffic keyword.

Also, appearing in the #1 position won’t always bring you the most traffic. You might notice that while some of your keywords rank pretty well, they don’t get a significant number of clicks or impressions.

During your research, you might also find some surprise keywords that you didn’t know you were ranking for.

If these keywords have a significant number of impressions and search volumes, then you should see if you can make strategic changes to your content to improve the rankings for those keywords as well.

How to Improve Rankings for Specific Keywords

After you decide which keywords you need to work on, you can go ahead and see which of your articles are ranking on those keywords and what you can do to optimize them better.

Here are a few tips.

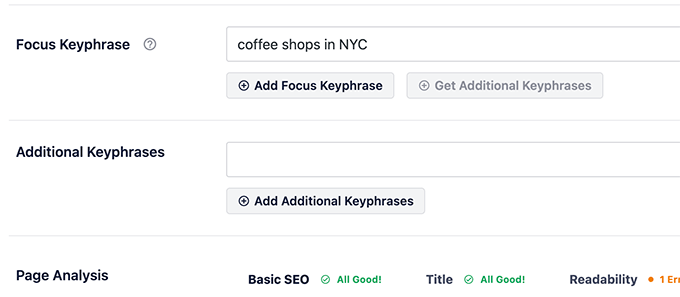
You can find helpful suggestions on how to improve these important keywords by using the All in One SEO plugin. When editing a post, simply scroll down to the AIOSEO settings at the bottom and you will find fields for your ‘Focus Keyphrase’ and ‘Additional Keyphrases’.

All in One SEO Focus Keyphrase

Simply enter the most important keyword for the post in the ‘Focus Keyphrase’ field then click the ‘Add Focus Keyphrase’ button. You can add other keywords as additional keyphrases.

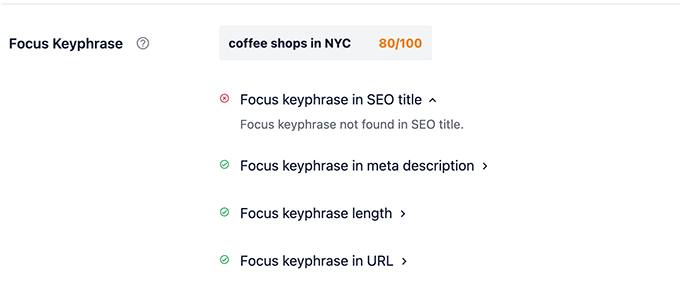
All in One SEO will now analyze your content for that particular keyphrase and will show you a score along with practical tips to improve your content for that keyphrase.

Focus Keyphrase Score

To learn more, see our beginner’s guide on how to use a focus keyphrase in WordPress.

Next, you should look for articles that are old, don’t have enough content, or contain outdated information. Updating these articles with newer information and just improving the content can give them an SEO boost.

Finally, see if you can improve your internal linking, where you link to an article from other pages of your site. Linking to an article from other related posts can give it an SEO bump. Use your target keyword as the anchor text when linking to it from other articles on your website.

For more details on this topic, please see our article on how to optimize your WordPress blog posts for SEO.

Learning What Your Visitors Do on Your Website

Semrush and Google Search Console can help you find your keyword positions, but they can’t show you how many visitors are coming to your articles, where they are from, and what they do when they are on your website.

This information is crucial when planning your content strategy to rank for certain keywords.

This is where Google Analytics comes in. It shows you the number of pageviews for your articles, your top content, your visitor information, and more.

Google Analytics can be difficult to set up for beginners, that’s why we recommend using MonsterInsights. It’s a Google Analytics plugin for WordPress that will help you easily install Google Analytics and see all reports inside your WordPress dashboard.

To learn more, see our guide on how to track website visitors to your WordPress site.

We hope this article helped you check if your WordPress posts are ranking for the right keywords. You may also want to see our list of actionable tips to drive traffic to a new WordPress site, and learn how to keep your website secure.

If you liked this article, then please subscribe to our YouTube Channel for WordPress video tutorials. You can also find us on Twitter and Facebook.

The post How to Check If Your WordPress Blog Posts Are Ranking for the Right Keywords first appeared on WPBeginner.

Why Blog? 14 Benefits of Blogging in 2023

We are often asked by users why they should blog and what are the benefits of blogging.

Blogging has been around since 1993 and has become an essential marketing tool for many businesses. But is it still relevant in the age of social media?

In this article, we’ll talk about why you should blog. And what are the benefits of blogging?

What are the benefits of blogging and why you should blog

Top Reasons and Benefits of a Blog

Blogs began as a way for individuals to write about their passions, day-to-day life, and things they found interesting. They were like online journals or diaries.

However, blogging quickly became an important part of the marketing strategy for businesses due to its benefits.

Currently, there are 1.9 billion websites in the world, and over 600 million are blogs. That means that the blogging industry makes up a third of the web.

For more information, see our guide on what is a blog and how is it different from a website.

Out of these, WordPress powers more than 43% of all websites, which makes it the best website builder and the best blogging platform.

It is used by both individuals and businesses to promote their ideas, brands, stories, products, and more.

Let’s dig deeper and take a look at some of the most important benefits of blogging and why you should consider starting a blog.

1. A Blog Brings Traffic to Your Website

Grow website traffic

A typical business website consists of a few important pages. You may have a homepage, landing pages for your products/services, a contact page, and a few more.

Search engines may not find your website more important than thousands of other much older websites in the same industry.

Adding a blog allows you to publish additional content which over time will help you bring more traffic to your website.

For instance, let’s say you sell gardening hoses on your website. There are thousands of companies selling similar products and users may never find your website on their own.

However, with blogging, you can add more content relevant to the topics they’re searching for.

For instance, you can write about ‘Environment-friendly gardening tools’ or ‘water preservation.’ You can also write guides on how to maintain small lawns and gardens and more.

Writing content for a blog opens a doof for more traffic to your website, allowing you to reach more customers, gain a wider audience, and even poach business from big-name brands.

2. Blogging Helps you Generate More Leads and Conversions

Convert traffic into sales

Now bringing traffic to your website by creating a blog was the easy part. The more complex part is to convert that traffic into sales and growth for your business.

More than 70% of people visiting your website today, will never find it again. That’s because there is so much content and information on the internet.

A blog helps you convert website traffic into potential leads, convert them into subscribers and social media followers, and allow you to reach out to them later.

Tools like OptinMonster, help you build an email list and grow your social media following.

Add push notifications to your blog, and you can send targeted messages to your blog visitors and bring them back to your website.

3. Helps you Repurpose Content for Other Marketing Channels

Repurpose content

To build an active marketing presence, you need to actively promote your business online.

However, the problem with a static website is that there is no new content for you to share.

Adding a blog to your website allows you to actively use blog content across your other marketing channels.

For instance, here are some ways you can reuse blog post content.

  • Share the link to your blog post on social media
  • Use the blog post content in your email newsletter
  • Make a YouTube video based on blog post content
  • Edit YouTube videos to create content for TikTok, Instagram Stories, and more.

These are all the ways that we reuse WPBeginner content across our social media and marketing channels and it works really well.

4. Helps you Build Authority in Your Industry

Build authority

It is harder to prove your expertise and authority on a subject if all you have is a five-page website selling your products/services.

Adding a blog allows you to regularly publish content on topics related to your industry. This helps you establish authority and win users’ trust.

If you are consistently publishing new content, you’ll become the go-to place for your users and other businesses interested in those topics.

Whether you are a business or an individual, this trust is an invaluable asset. It will unlock tremendous growth opportunities.

5. Helps You Strengthen Brand Recognition

Brand recognition

A blog helps you strengthen your brand identity. It gives you more opportunities to use your custom logo across your website, your social profiles, search results, and more.

This brand recognition when combined with customer trust and authority adds enormous value to your digital assets.

As an individual, you get recognized by industry leaders, influencers, and enthusiasts. This opens doors to many opportunities.

Similarly, as a business, your brand becomes more valuable and this weight will be considered by any potential buyer if you want to sell your business in the future.

6. Helps You Build an Engaging Audience

User engagement

A static website doesn’t leave much room for a conversation. It is uninspiring and often quite boring.

Adding a blog to your website helps you bring the conversation to your website. Now users can engage with your blog posts by leaving a comment, sharing it on social media, writing about it, and more.

We recommend all our users engage with comments and other user activity on their blogs.

It helps you build a community around your business which is extremely useful.

When people leave a few comments on your blog, they develop an affinity with your brand which pays off when they are looking to make a purchase.

These users are also more likely to recommend your products/services to their friends and family.

7. Share Business News, Announcements, Sales, and More

share news and announcements

On a typical static website, it is hard to share your business news, announcements, sales events, and more.

A blog on the other hand makes it super easy. In fact, you can get into more details, add context, and write more persuasive content.

For instance, if you are launching a Black Friday sale, you can promote it with a blog post. And then promote that blog post across your website with a floating header or footer banner.

You can make it more rewarding for your regular users and offer a special coupon code to your blog readers.

8. Helps You Improve Long Term SEO

WordPress and SEO

A static website has fewer pages and even if they are ranking high you are still limited to a fixed set of keywords.

Adding a blog allows you to target related keywords and cover more ground by writing on different but related topics.

Over a period of time, you will have multiple posts ranking top on several keywords. Each of these pieces of content is like a soldier in your army.

If you properly optimize WordPress SEO with All in One SEO, then you can gradually build a whole army of content.

It not only helps you rank for secondary keywords with such authority even your home page and other pages start ranking higher.

9. Beat Competition in Organic Search Traffic

Beat competition

A big part of keyword research is to find out what keywords your competition is ranking for.

This helps you see which keywords bring them more business, and then you can just go ahead and create your own content targeting that keyword.

Having a blog provides you plenty of room to beat your competition in organic search traffic.

For more details, see our tutorial on how to do an SEO competitor analysis in WordPress.

10. Allows You to Educate Customers

Educate users

When asked why they read blog posts, 33% of people said they wanted to learn something new.

Blog posts allow you to educate customers about different ways they can use your products.

You can utilize this opportunity to compare your product with competitors, showcase product features, inform users about benefits, and more.

This makes your blog posts highly valuable even for your existing customers. They can use blog articles to learn about new features that they may not be using.

Basically, it is an opportunity for you to provide real value to your users while promoting your products/services at the same time.

11. Build Additional Revenue Streams for Your Business

Make money through affiliate marketing

Blogs provide many opportunities to generate additional revenue for your business and make money online using your WordPress blog.

For instance, you can display ads in your blog posts using Google AdSense. You can also promote affiliate products and make money with affiliate marketing.

You can even use your blog to sell premium content using MemberPress or Easy Digital Downloads.

12. Helps You Learn Online Marketing

Social Media Marketing Statistics

Adding a blog provides you with more opportunities to expand your marketing skills. You’ll have more content to promote which may be suitable for even more marketing channels.

For instance, you will find more opportunities to promote new posts on social media websites. You will also have more useful content to include in your newsletter.

As you explore different opportunities to promote each piece of content, you get to learn more marketing skills to reach new audiences.

13. Unlocks Partnerships and Opportunities for Growth

A growth chart

Blogs are a magnet to attract partnership opportunities to boost your business growth.

With all the activity going on with your blog, you will attract the attention of individuals and businesses looking for mutually beneficial opportunities.

For instance, new vendors may reach out to offer you better pricing or wholesale pricing, smaller shops may want to sell your products, large businesses may want to partner with you regionally, and more.

Similarly, if you sell services or just promoting your personal brand, then your blog may help you get the introduction to the right people. You’ll be able to gradually grow your network and influence.

14. Helps You Find Your Dream Job

Find a job

Your blog may eventually lead you to find your dream job. Blogging is a popular tool to build a personal brand and promote your services and skills online.

You can show your passion, skills, and knowledge in your specific interests. This may get the attention of businesses looking for talented individuals like you.

Even if businesses don’t reach out to you, you can reach out to them. Your blog will help you see your interest, passion, and expertise in a more interesting way than a plain CV.

How to Get Started with Blogging Right Away

Getting started with a blog is quite easy.

First, you need to choose the right platform. We recommend using WordPress which is the world’s most popular blogging platform.

Now when we say WordPress, we mean WordPress.org and not WordPress.com.

See the difference between WordPress.org and WordPress.com in our detailed comparison.

To start a WordPress.org blog, you’ll need a domain name and a hosting account.

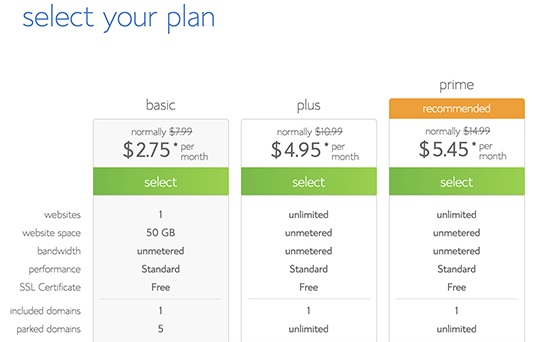
Our friends at Bluehost are offering WPBeginner users a free domain name with a generous discount on hosting. Basically, you’ll be able to get started with just $2.75 per month.

Once you have signed up for a domain name and hosting, Bluehost will automatically install WordPress for you.

Need more help? See our complete beginner’s guide on how to start a blog with step-by-step instructions.

We hope this article helped you learn why you should blog and the benefits of blogging. You may also want to see our list of popular online business ideas or take a look at our guide on starting an online store with your blog.

If you liked this article, then please subscribe to our YouTube Channel for WordPress video tutorials. You can also find us on Twitter and Facebook.

The post Why Blog? 14 Benefits of Blogging in 2023 first appeared on WPBeginner.

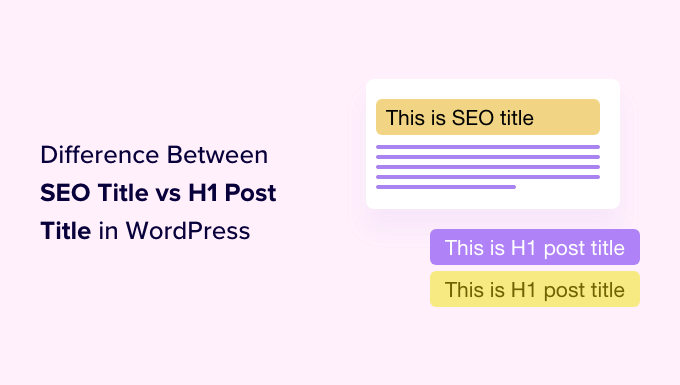
SEO Title vs H1 Post Title in WordPress: What’s the Difference?

Did you know that every WordPress post or page can have two titles, and they are used for different purposes?

These different post titles help you attract potential readers by showing them what your content is about in a clear and interesting way. They are also used by search engines when it comes to SEO rankings.

In this article, we’ll explain the difference between SEO titles and H1 post titles, so you can better optimize your content for higher rankings.

SEO Title vs H1 Post Title in WordPress: What's the Difference?

Here’s what we’ll cover in this tutorial:

What’s the Difference Between SEO Titles and Post Titles?

Every post and page on your WordPress website will have two titles, one that visitors will see at the top of the post, and one that search engines use when indexing your site. While these are two completely different use-cases, the two titles will most often be the same.

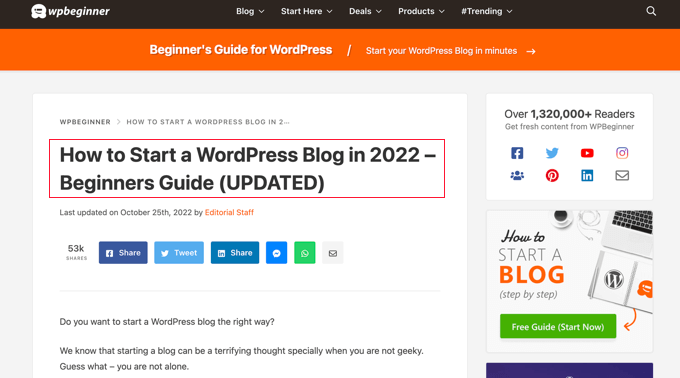
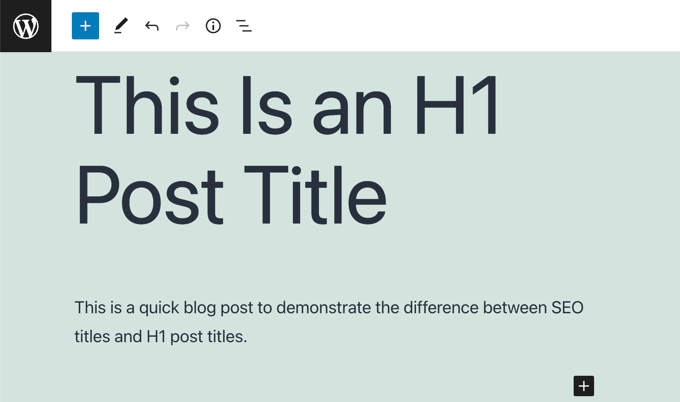
The title that is displayed at the top of every WordPress post is called the H1 post title, because WordPress will surround it with <h1> HTML tags to show that it is the most important heading in the post.

This title should let your visitors know what the post is about and attract their attention, so they click on the post and read it.

Example of a H1 Post Title

Search engines like Google pay close attention to your <h1> header tags, but they also look for a different title, one enclosed in HTML <title> tags. This is your post’s SEO title and is also known as the meta title.

The SEO title is used when search engines rank your page and display it in search results.

Example of an SEO Meta Title on a Search Engine Results Page

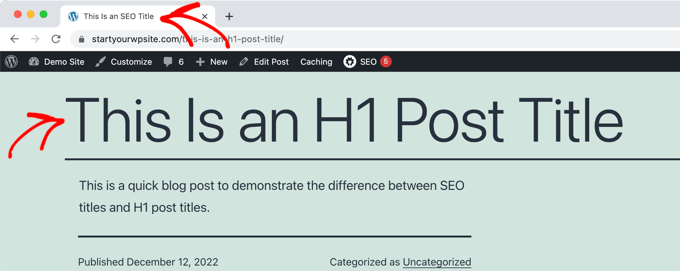
Your visitors won’t see the SEO title anywhere on your website. However, it will be used as the page title in the browser tab, and other websites may use it when linking to your post.

By default, the SEO title will follow the following template: ‘Post Title — Site Title’. This will work fine for most blog posts. However, if you wish to customize the SEO title of a post or page, then you will need to use a WordPress SEO plugin.

With that being said, let’s take a look at how to add H1 post titles and SEO titles in WordPress.

How to Add H1 Post Titles in WordPress

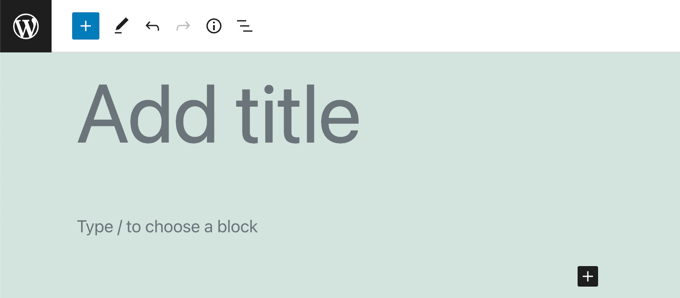
Adding a title to your post is simple. When you add a new post in WordPress, the block editor will ask you to add a post title, and then allow you to create blocks where you can add the content of the post.

Empty Post in the WordPress Block Editor

If you’re new to the block editor, then you can learn how to use it step-by-step in our guide on how to use the WordPress block editor.

You can add a post title by simply typing it on the first ‘Add title’ line of the post.

Adding an H1 Post Title in the WordPress Block Editor

Your website visitors will see this title displayed at the top of the post on your blog, and it will also be used in the post list on your blog’s home page.

When you view the HTML source of the post, you will notice that WordPress has wrapped the title in <h1> tags to identify it as the post title.

Viewing HTML H1 Tags for the Post Title

The <h1> tag is the most important heading tag, and should be used only for the post’s title. If you use subheadings in your post, then you should use less important heading tags, such as <h2>, <h3>, and <h4>.

How to Add SEO Titles in WordPress

The easiest way to add and customize SEO titles is with the All in One SEO (AIOSEO) plugin. AIOSEO is the original WordPress SEO plugin that’s used on over 3 million websites including our own.

In this tutorial, we’ll use the free version of All in One SEO because it allows you to customize the SEO title. However, AIOSEO Pro offers even more features to help you rank better in search engine results pages.

The first thing you need to do is install the free All in One SEO Lite plugin. For more details, see our step-by-step guide on how to install a WordPress plugin.

Upon activation, you will need to configure the plugin using the AIOSEO setup wizard. For detailed instructions, see our guide on how to set up All in One SEO for WordPress correctly.

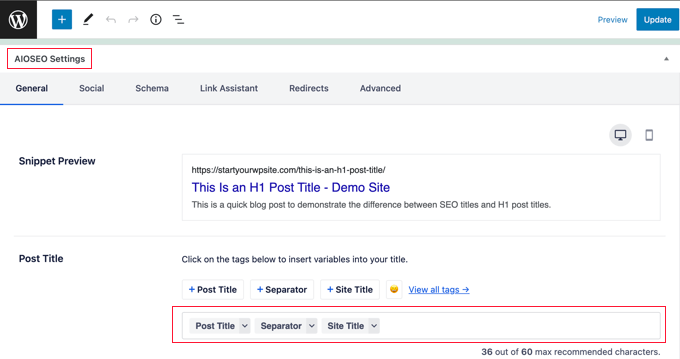
Now, when you are adding or editing a post or page, there will be an ‘AIOSEO Settings’ section below the post content. Here you will find a section labeled ‘Post Title’ where you can customize the SEO title.

All in One SEO's Default SEO Title

Notice that the default SEO title is the H1 post title followed by a separator and the site title.

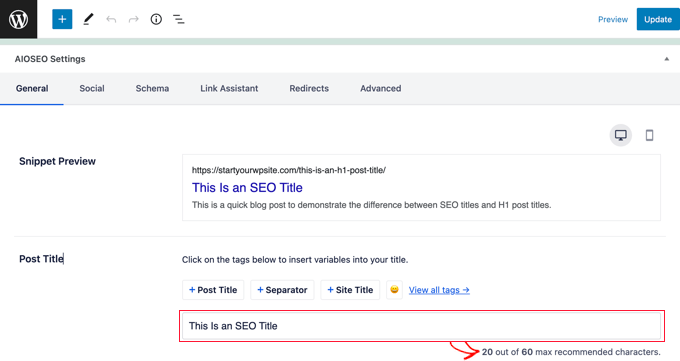
You will also see a preview of how the title will look in a Google search and the number of characters you used. This will help you create a title that is not too long. The recommended length of an SEO title is 60 characters so it isn’t cut off on search engine results pages.

You might like to leave the default SEO title as it is, or you can customize it using smart tags (more on that later) or by simply typing a new SEO title like this:

Entering a Custom SEO Title Using All in One SEO

When you view the HTML source of the post, you will notice that WordPress has used <title> tags to identify it as the SEO title.

Viewing the HTML Source of an SEO Title

Visitors to your website will see the H1 post title at the top of the post. They will see the SEO title in their browser tab and on search engine results pages.

Example of an H1 Title in the Post and SEO Title in the Browser Tab

How to Customize the Default SEO Title in WordPress

You can customize the default SEO title used for posts and pages using the All in One SEO plugin.

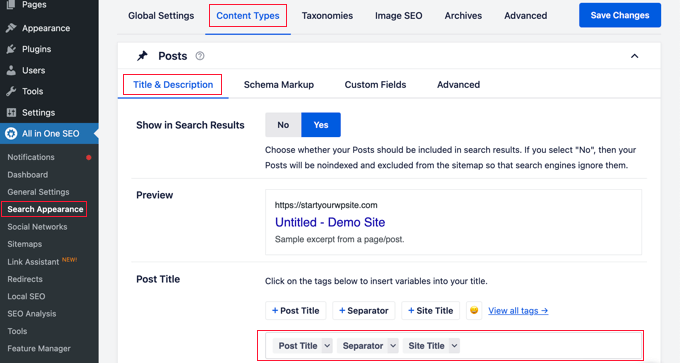
First, you need to navigate to the All in One SEO » Search Appearance page and then click the ‘Content Types’ tab.

Near the top of that page, you will see the ‘Posts’ section. Make sure you’re on the ‘Title & Description’ tab and you will see the default SEO title used for posts next to ‘Post Title’.

You Can Change the Default SEO Title Using All in One SEO

By default, you will see smart tags for the post title, a separator, and the site title. You can customize the default SEO title by adding or removing smart tags.

For example, to make the SEO title just the post title without the site name at the end, simply delete the ‘Separator’ and ‘Site Title’ smart tags. You can do this with the backspace key on your keyboard, or by clicking on a smart tag and then clicking the trash icon on the popup.

Deleting Smart Tags in the Default SEO Title

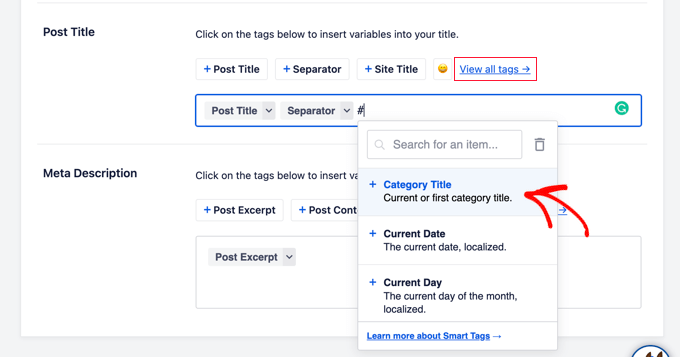
You can also easily add smart tags to the default SEO title. You can do this by clicking the buttons for commonly used tags found above the Post Title field, or clicking the ‘View all tags’ link to see a list of all smart tags.

Adding Smart Tags to the Default SEO Title

Simply click on a smart tag to add it to the SEO title. When finished, make sure you click the ‘Save Changes’ button at the top of the screen to save the new default post title.

You can customize the default page title in a similar way by scrolling down to the ‘Pages’ section below.

Tips for Creating the Best Post Titles in WordPress

Choosing the right title for your blog post can help it rank higher in search results. It can also motivate users to click on your article when they see it in the search results thus boosting your CTR (aka click through rate).

Here are some tips on how to write more effective post titles.

Write Your Posts Titles for Users, Not Search Engines

When you think of a title to use for your post, keep your users in mind, not just search engines.

When you write a title for users, you’re likely to come up with something that’s more engaging, and it will lead to more clicks.

You want to make sure that your title is readable, understandable, memorable, and clearly describes the content of the post.

Make Sure the Title Is Not Too Long

The length of an SEO title is important because if it is longer than 600 pixels, then Google will not be able to display the full title in search engine results. Because of this, we recommend keeping your SEO titles shorter than 60 characters.

You can check the length of the SEO title and see a preview of how it will look in a Google search when you customize it using All in One SEO.

Entering a Custom SEO Title Using All in One SEO

Include the Focus Keyword in the Title

You can make your blog post title more SEO-friendly by using your focus keyword in the title. We also recommend making it catchy and click-worthy. That’s because your organic click-through rate (CTR) plays an important role in SEO.

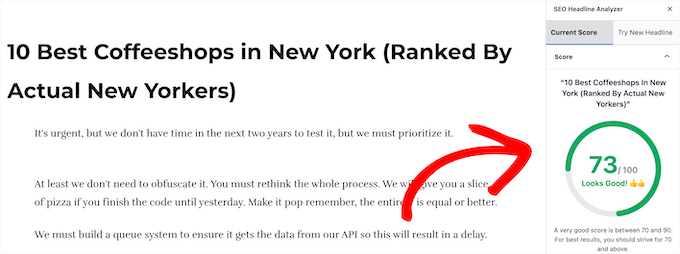
The best way to improve your titles is with the AIOSEO headline analyzer tool. This will evaluate your headline, give it a score, and offer tips to make your headline even better.

AIOSEO headline analyzer

For more details, see our guide on how to use a headline analyzer in WordPress to improve SEO titles.

Rank Even Higher by Adding a Meta Description and Keywords

Now that you’ve taken time to craft an effective title, you should also add keywords and a meta description to help your post rank even higher. You can learn how to do this step-by-step in our guide on how to add keywords and meta descriptions in WordPress.

AIOSEO meta description

When Should You Use a Different SEO Title?

In most cases, your H1 post title and SEO title will be the same. However, there are times when you may want to customize the SEO title so that it is different from the H1 post title.

A More Engaging SEO Title

For example, you may want to tweak the SEO version of the title, so it is more engaging to potential visitors and more likely they will click on it in a Google search. You could then display a more detailed and descriptive H1 title on your website.

A Shorter SEO Title

Another reason to change the SEO title is if you have created the perfect H1 title for your post, but it is longer than 600 pixels. In that case, Google will not have room to display the full title in the search results, and you should create a shorter SEO title.

A Longer SEO Title

On the other hand, if your H1 title is very short, then you can take the opportunity to make your SEO title longer by adding relevant keywords that will improve your page ranking.

Warning: Google Regularly Changes Your SEO Title

There’s one last thing about titles we should warn you about. Google is likely to rewrite your SEO title to try to make it more suitable for those performing searches. In fact, a study has found that Google is changing more than 60% of post titles to improve search quality.

This can be frustrating if you have worked hard on crafting the perfect SEO title.

What we have found is that your title is more likely to be changed when your SEO title is different from the H1 title. When these two titles match, the study found that Google rewrites the title only 20% of the time. This is a good reason to use the same title in both places if you can.

We hope this tutorial helped you learn the difference between SEO titles and H1 post titles in WordPress. You may also want to learn about what are push notifications and how you can use it to grow your traffic, or check out our list of must-have WordPress plugins to grow your site.

If you liked this article, then please subscribe to our YouTube Channel for WordPress video tutorials. You can also find us on Twitter and Facebook.

The post SEO Title vs H1 Post Title in WordPress: What’s the Difference? first appeared on WPBeginner.

How to Easily Create a Multilingual WordPress Site

Do you want to translate your WordPress site in multiple languages?

WordPress powers more than 35% of all websites on the internet. Many of them serve non-English or multilingual audiences.

In this article, we will show you how to easily create a multilingual WordPress site. We will cover three different solutions, so you can choose the one that works best for you.

With each solution, you’ll be able to easily translate your WordPress posts, pages, tags, categories, and themes into as many languages as you like.
Creating a multilingual WordPress site

What is a Multilingual WordPress Website?

A multilingual WordPress website serves the same content in multiple languages. It can automatically redirect users to a language based on their region, or users can select their preferred language using a dropdown link.

There are few different approaches used to create a multilingual website.

The first approach allows you to manually translate all the content into languages of your choice with the help of human translators.

The second method does not actually create a multilingual site but uses machine translations of your existing content by using auto-translate services.

However, Google Translate has stopped supporting new accounts for website translation. The other options are either not-free or not very good in quality.

It goes without saying that manually translating your content is a much better approach. This allows you to maintain quality throughout your website. You can translate the content yourself or hire professionals to do that.

Choosing a WordPress Multilingual Plugin

There are several WordPress plugins that you can use to translate your website into multiple languages. You need to choose a plugin that helps you easily manage translations without making things unnecessarily difficult for your users.

In this guide, we will show you three of the top WordPress multilingual plugins with step by step instructions on how to set them up.

If you know which plugin you are going with, then you can directly jump to the instructions.

  1. TranslatePress
  2. WPML
  3. Polylang

All three of them comes with the necessary features you’ll need to make a robust multilingual website.

  • They allow you to translate posts, pages, products, and other post types
  • You can easily translate your categories, tags, plugins, and themes
  • They allow you to set up SEO friendly URLs for each language

With that said, let’s get started.

1. Create Multilingual WordPress Website Using TranslatePress

TranslatePress is one of the best WordPress translation plugins on the market. It is a bit different than other solutions mentioned in this guide.

Normally, multilingual plugins ask you to create multiple versions of the same article in order to translate it. TranslatePress allows you to create translations at the same time.

It also allows you to use a live editor to translate all the visual aspects of your website.

Most importantly, you can combine machine and human translations. This means you can use Google Translate or similar AI-powered tools to generate machine translations and only improve the parts that artificial intelligence missed.

The first thing you need to do is install and activate the TranslatePress plugin. For more details, see our step by step guide on how to install a WordPress plugin.

If you want to translate your website to more than one language, then you will also need to install ‘Extra Languages’ add-on. You can do this from the download addons button under your account on the TranslatePress website.
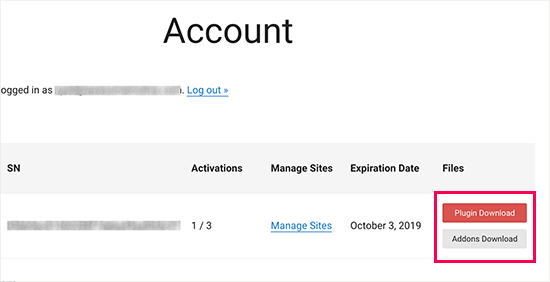
Download addons

After downloading the add-on, you can install and activate it like any other WordPress plugin.

Upon activation, you need to visit Settings » TranslatePress page to configure plugin settings.
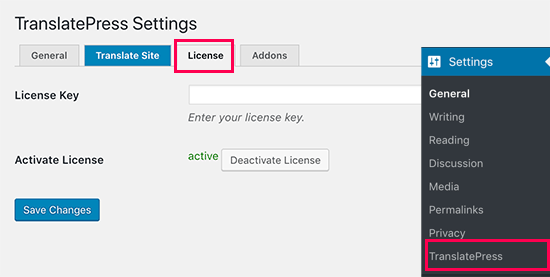
Add license

First, you need to switch to the license tab and enter your license key. You can find this information under your account on the TranslatePress website.

After that, you need to switch to the General settings tab to set up other settings.
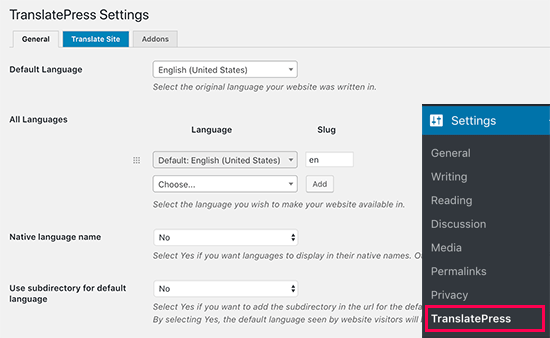
TranslatePress settings

The first option on the page is to choose the default language of your website, and the languages you want to translate your website into.

Next, you need to choose whether you want to display language names in the native language. The default option is ‘No’ which means language names will be shown in the default language.

After that you need to choose whether you want to display the default language name in the URL as a subdirectory. For example, http://example.com/en/.

The default choice is no which means only the other languages will have the language name in URL as a subdirectory. We recommend leaving this setting as-is for best SEO.
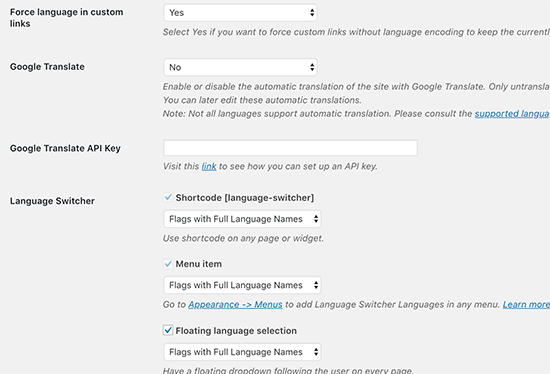
TranslatePress settings

This brings you to the next setting, ‘Force language in custom links’. The default option is ‘Yes’, because that will change custom links for translated languages making the URLs more SEO friendly.

Next, you need to choose whether you want to use Google Translate for automatic translations. The default choice is ‘No’, but you can change that if you would like to use Google Translate.

You will need to provide a Google Translate API key in the next option. You will find a link under the option which will show you instructions on how to get one.

Finally, you will come to the options on how you want to display the language switcher on your website. TranslatePress provides you with three choices.

You can use a shortcode, add switcher to your navigation menu, or display a floating menu. We will show you how to add the language switcher to your website later in this article.

Go ahead and click on the ‘Save Changes’ button to store your settings.

Translating Your Website Content

To translate your website, you can simply click on the ‘Translate Site’ tab on plugin’s settings page or the button in your WordPress admin bar.
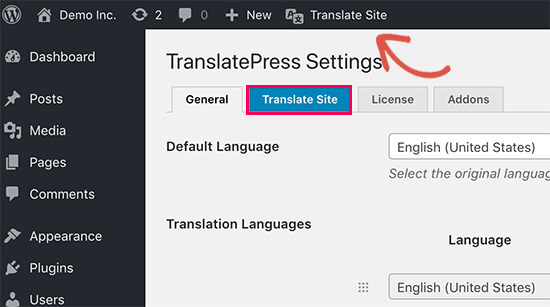
Translate site button

This will open the live translation editor in a new browser tab.

In this live editor, you can click on any text on your website in the right pane and TranslatePress will load it in the left column to translate.
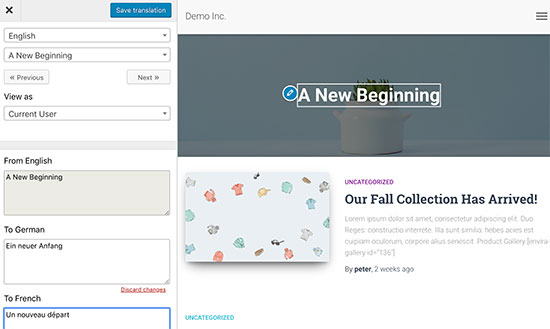
Translating site in TranslatePress

Now click on the language you want to translate the string into and then provide your translation.

After entering the translation, click on the ‘Save Translation’ button on the top and then click on the next button. TranslatePress will automatically load the next string on the page for you to translate.

You can also just click on the drop-down menu below your default language, and it will show you the list of translatable text strings on the page. You can select a string and then provide its translation.
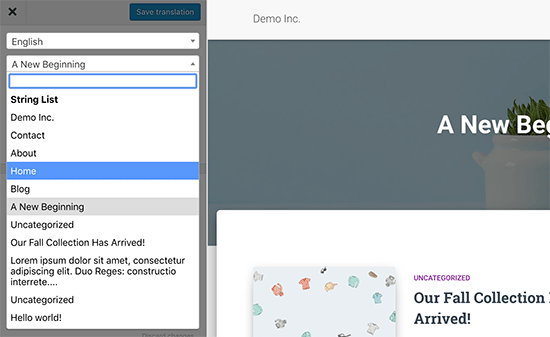
Select and translate strings on a page

You can translate all content on any page. This includes navigation menus, buttons, sidebar widgets, meta text, and more.

You can also visit any page by clicking on the links on the screen and start translating that page.

TranslatePress allows you to instantly start translating any page or post on your site when logged in. Simply click on the ‘Translate Page’ button on the top to enter the live editor.
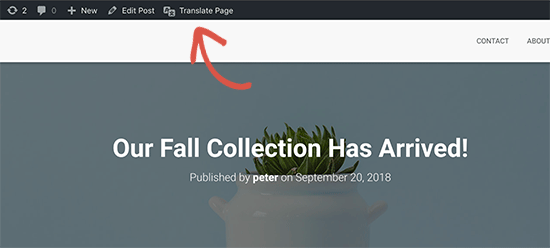
Start translating any page

Once you have translated a string, the plugin will automatically translate it for you on other places. For example, if you translated a post title, then the post title in your sidebar widgets will be automatically translated.

Adding Language Switcher to Your Website

Language switcher allows your website visitors to select a language when they visit your website. It usually displays the flag of each country to indicate languages available on your site.

TranslatePress allows you to add language switcher by using a shortcode, as a navigation menu item, or as a floating banner. The language switcher can be displayed as flags, language names, or both.

Adding language switcher in WordPress using shortcode

You just need to add [language-switcher] shortcode to posts, pages, or a sidebar widget where you want to display the language switcher.
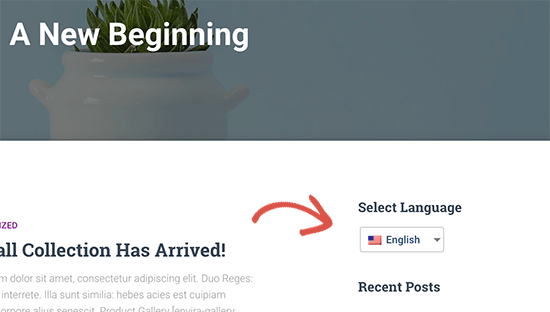
Shortcode switcher

Adding language switcher to your WordPress navigation menu

Simply go to Appearance » Menus page and click on the ‘Language Switcher’ tab in the left column. Now select the languages you want to display and then click on add to menu button.
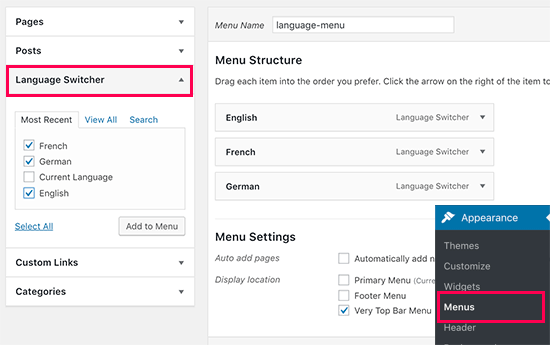
Adding language switcher to WordPress navigation menus

You will now see languages added to your WordPress navigation menu. Don’t forget to click on the ‘Save Menu’ button to store your changes.

This is how it looked on our test site:
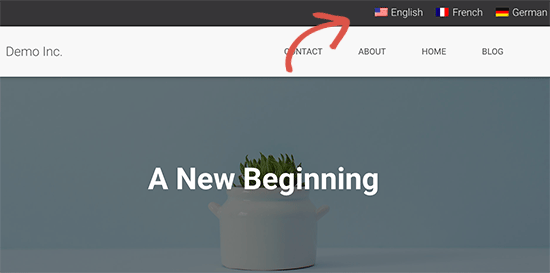
Language switcher in navigation menu

Adding a floating language switcher

Go to plugin’s settings page and scroll down to language switcher section. From here make sure the box next to the ‘Floating language selection’ option is checked.
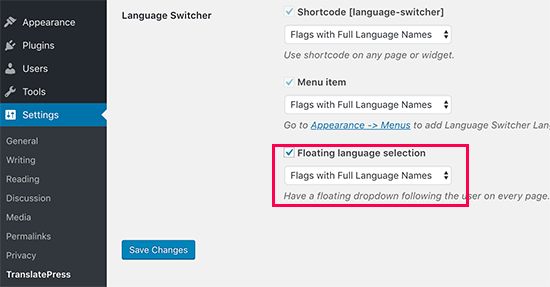
Floating language switcher

Don’t forget to click on the save changes button to store your settings.

You can now visit your website to see the floating language switcher at the bottom of every page on your website.
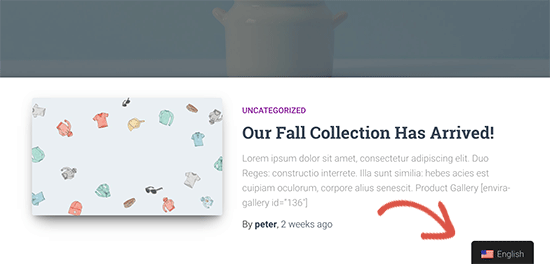
Floating language switcher

2. Create Multilingual WordPress Website Using WPML

WPML (short for WordPress Multi-lingual) is one of the oldest and most popular WordPress multilingual plugin.

First thing you need to do is install and activate the WPML (WordPress Multi-language) plugin. For more details, see our step by step guide on how to install a WordPress plugin.

Upon activation, the plugin will add a new menu item labeled ‘WPML’ in your WordPress menu. Clicking on it for the first time will take you to plugin’s settings wizard.
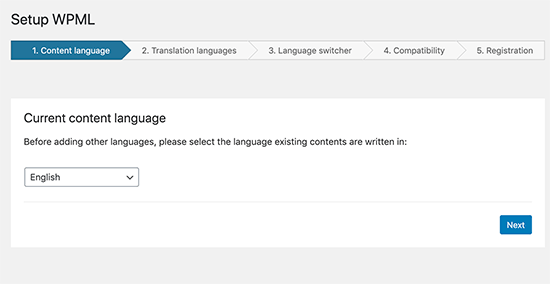
WPML Setup - Choose primary language

WPML will automatically detect your WordPress site’s language. You can change it here now if you want.

After that click on the next button to continue.

On the next screen, you will be asked to select the languages you want to enable on your site. Simply select the languages from the list that you want to add to your site.
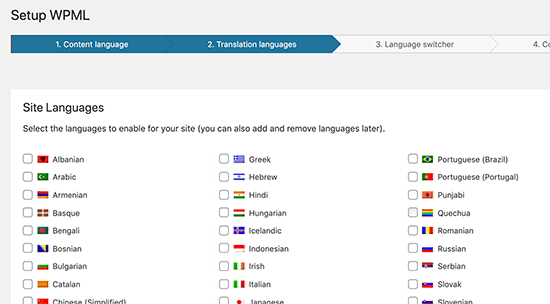
WPML select languages

You can always add or remove languages later if you need them. Once you have selected the languages, click on the Next button.

Now you will be asked to add a language switcher to your site. This language switcher will allow your users to choose a language to view content in their preferred language.
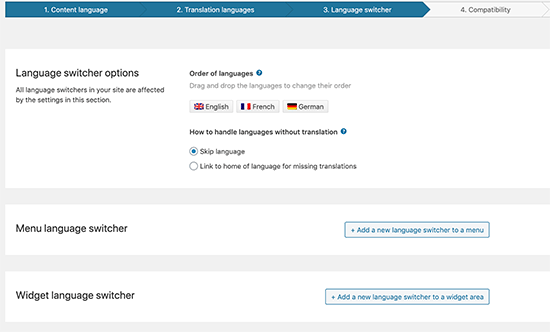
WPML language switcher

WPML allows you to automatically add content switcher as a sidebar widget, in your navigation menu, a plain list, or in the footer area.

Next, you will be asked if you like to send a compatibility report to WPML regarding the plugin and themes you are using.
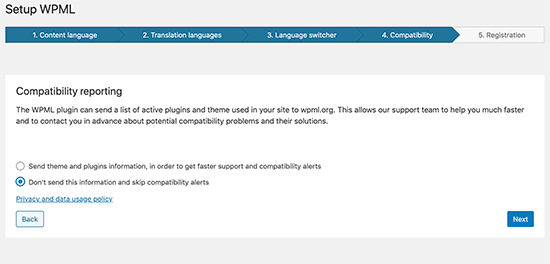
WPML compatibility report

It is up to you to decide whether or not you want to send this data to WPML.

As the final step, you will be asked to enter your site key. If you have not generated one yet, then you can click on ‘Generate a key for this site’ button.
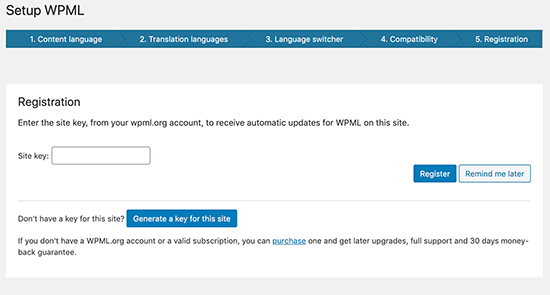
WPML site key

This will take you to the WPML website, where you will be asked to add the site you are coming from to your WPML account.

Once your site is added, you can click on it to get to your site key. Copy and paste this key into your WordPress site.

That’s all you have successfully finished the WPML setup wizard. You can now click on the Finish button to exit the setup.

Adding Multilingual Content into WordPress with WPML

WPML makes it really easy to translate every area of your WordPress site into multiple languages.

You will be able to easily translate your WordPress posts, pages, tags, categories, and themes into as many languages as you like.

Adding Multilingual Posts and Pages

Simply click on the posts menu to view your existing posts. You will notice the language column next to your post titles.
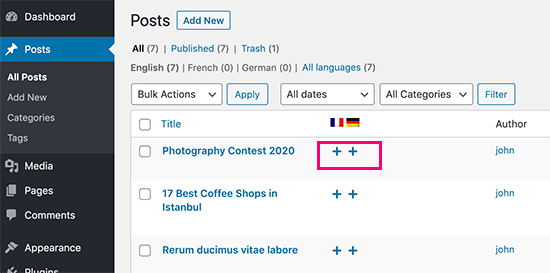
WPML translate posts and pages

WPML assumes that your existing content is in your site’s primary language. It will show Add buttons for each language next to your posts. Click on the add button under a language to translate a post.

You can also manage translations by editing a post.

On the post edit screen, you will notice the new ‘Language’ meta box to manage translations.
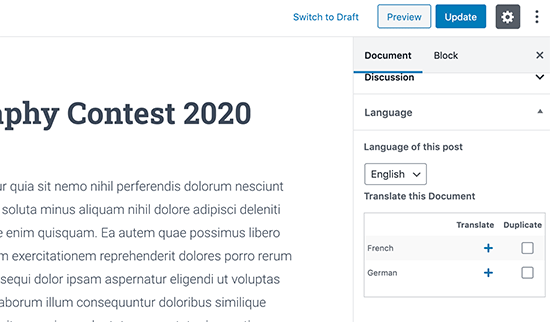
Managing translations while editing a post

WPML also offers a better way to manage users who work as translators on your website. If you purchase their Multilingual CMS Plan, then you can use their translation management module.

The translation management module allows you to add users as translators regardless of what role they have on your WordPress site. You can even add subscribers as translators.
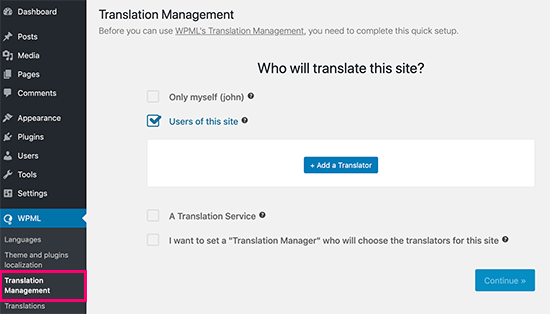
Adding translators
Instead of editing posts, these translators will be able to add translations directly in WPML.

Adding Translations for Categories and Tags

WPML allows you to easily translate categories and tags, or any other custom taxonomies that you may be using.

Visit WPML » Taxonomy Translation and load the custom taxonomies you want to translate.

For example: in this screenshot we selected categories, and it displayed all categories from our example site.
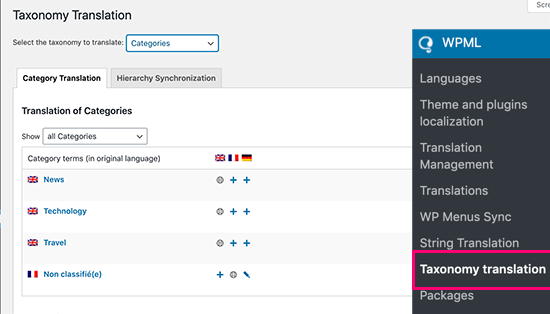
Translate categories and tags

Click on the add button next to the taxonomy term to add the translation.

Translating Navigation Menus

WordPress comes with a robust navigation menu system. WPML allows you to translate it just like you would translate posts or taxonomies.

Visit Appearance » Menus page on your site. If you have more than one menus, then select the menu you want to translate.

In the right-hand column, you will see your menu with links to translate into other languages enabled on your site.
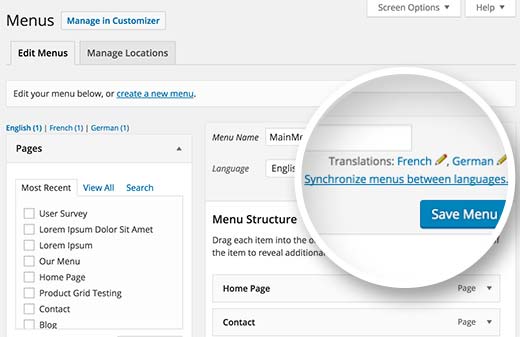
Translate Menus in multilingual WordPress

Clicking on a language will create a new menu for that language. You will need to add the same menu items as in your primary language menu.

If you have your posts and pages in navigation menus, then you will first need to translate them. After that, you can add them from the tabs on the left in edit menu screens.

Don’t forget to click on the Save button to save your menu.

Translating Themes, Plugins, & Other Text with WPML

WPML multilingual CMS allows you to choose between official translations of themes and plugins or use its own string translator.

Go to WPML » Themes and plugins localization page.
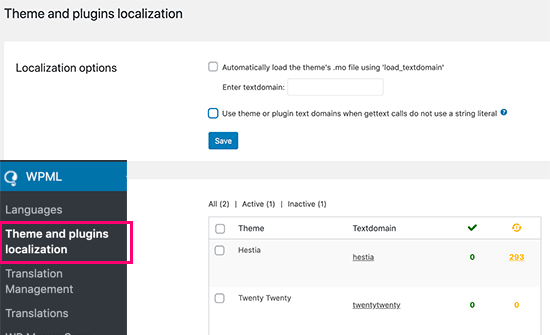
WPML themes & plugin translations

By default, WPML will look for your plugin’s translation files if they are available, and use them.

However, if your WordPress theme or WordPress plugins are not translated into the languages you are using, then you can translate them using the WPML string translation feature.
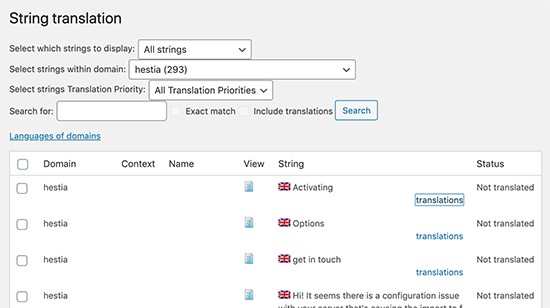
WPML string translations

Simply scan your theme or plugin to load the strings and then start translating those strings.

This module will also allow you to translate custom fields, widgets, and other translatable strings generated by WordPress.

3. Create Multilingual WordPress Website Using Polylang

Polylang is a free WordPress multilingual plugin with more than 500,000 active installs. It allows you to easily create a multilingual website without purchasing the premium version.

Note: If you are running WooCommerce or need support, then you may want to upgrade to the Polylang Pro or purchase their WooCommerce addon.

For this tutorial, we’ll be using the free version of the plugin.

The first thing you need to do is install and activate the Polylang plugin. For more details, see our step by step guide on how to install a WordPress plugin.

Upon activation, you need to visit Languages » Languages page to configure the plugin.
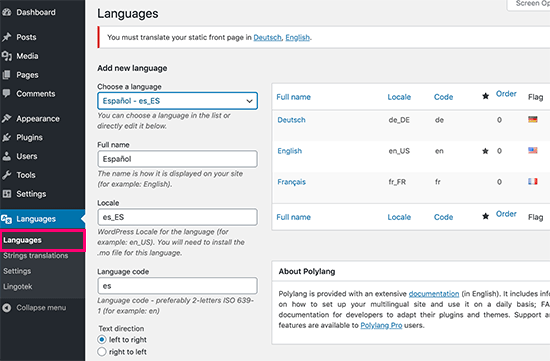
Adding languages

The language settings page is divided into three tabs. The first tab is labeled ‘Languages’. This is where you add the languages you want to use on your site.

You will need to add the default language, as well as select all other languages that users can choose on your site.

After adding the languages, switch to the ‘Strings Translations’ tab. Here you need to translate site title, description, and then choose the date and time format.
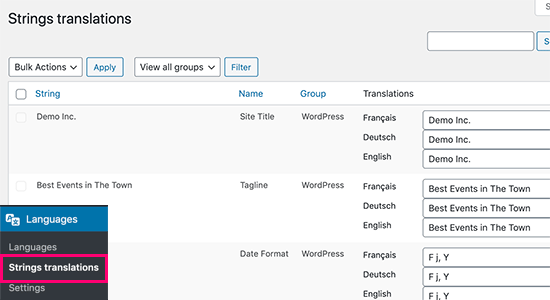
Translate website title, description, and date format

Next, you need to visit Languages » Settings page. From here you can set the URL settings for languages and set up SEO friendly URLs.
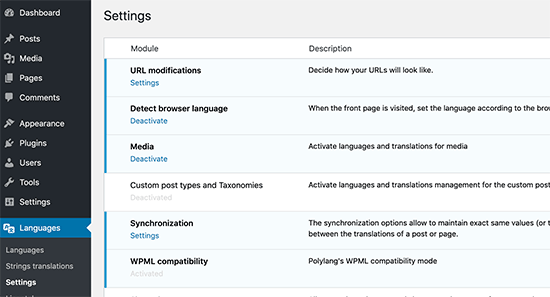
Polylang settings

Once you are done, click on the save changes button to store your settings.

Translating Content in WordPress with Polylang

Polylang makes it super easy to add content in different languages. Simply create a new post/page or edit an existing one. On the post edit screen, you will notice the language meta box.
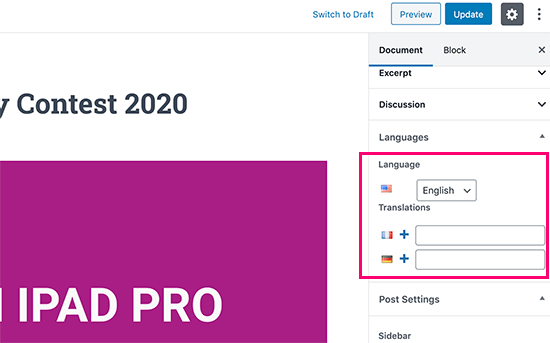
Adding multilingual content in Polylang

Your default language will automatically be selected, so you can first add content in your default language, and then translate it into others.

To translate, you need to click on the + button next to a language and then add content for that language.
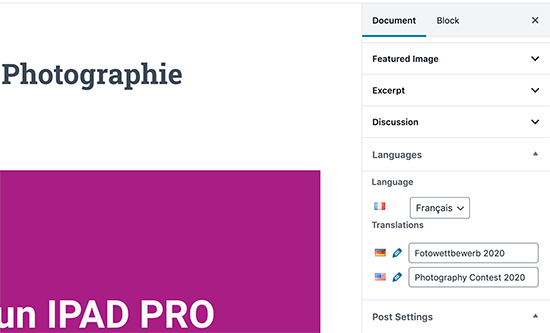
Polylang translations

Repeat the process for all languages. Once you are done, you can publish your posts and pages.

Translating Categories, Tags, and Custom Taxonomies

You can also translate categories and tags, or any custom taxonomies you may be using.

If you want to translate categories, then go to Posts » Categories.
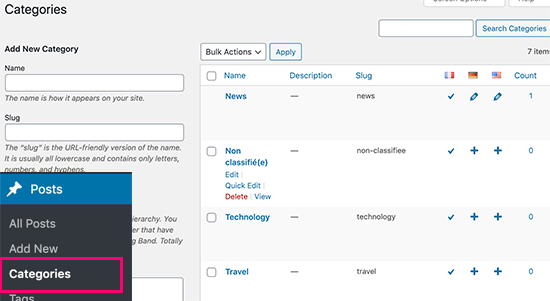
Translating categories

Add a category in your default language and then click on the plus icon for each language to start adding translations.

Displaying Language Switcher on Your WordPress Site

Adding a language switcher allows users to select a language when viewing your site. Polylang makes it super simple. Just go to Appearance » Widgets and add the language switcher widget to your sidebar or another widget-ready area.
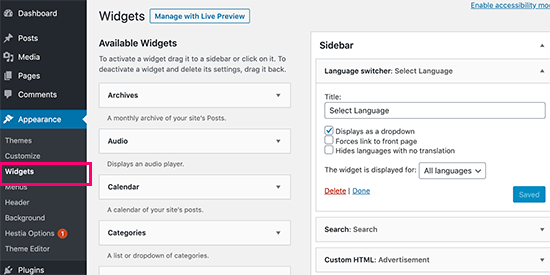
Polylang language switcher widget

You can choose a drop-down, or use language names with flags. Once you are done, click the save button to store your widget settings.

You can now preview your site to see the language switcher in action.

Language switcher preview

FAQs About Creating a Multilingual WordPress Site

Having helped thousands of beginners start their websites, we know a thing or two about making a multilingual website. Following are some of the top questions we have been asked about multilingual WordPress websites.

1. Which WordPress multilingual plugin is the best?

All three plugins mentioned in this guide are the best. However, they are slightly different in some aspects.

If you are a beginner looking for an easier solution then we recommend using TranslatePress. Its live editor makes translations easier.

Advanced users and eCommerce websites may find WPML more comprehensive for their needs. Lastly, if you are looking for a free solution, then Polylang is the best option for you.

2. How to translate my WordPress admin area for users?

WordPress allows each user on your website to select the admin interface language. They simply need to edit their user profile and there they will find the option to select language.
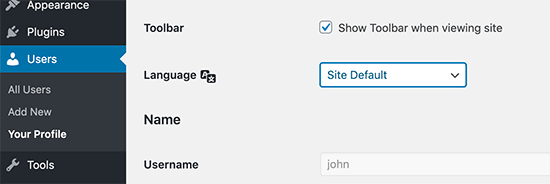
User language

3. How do I translate my WordPress theme?

All three plugins will allow you to automatically fetch theme translations. You can also find and translate a WordPress theme by yourself and then upload translation files to your website.

4. How do I translate a WordPress plugin

Many of the top WordPress plugins are translation ready. However, they may not be translated into all languages. TranslatePress and WPML allow you to easily translate strings within the plugin interface.

You can also translate WordPress plugins on your own and upload the translations to your website manually.

We hope this article helped you learn how to make a multilingual WordPress site like a pro. You may also want to see our guide on how to easily get more traffic to your website.

If you liked this article, then please subscribe to our YouTube Channel for WordPress video tutorials. You can also find us on Twitter and Facebook.

The post How to Easily Create a Multilingual WordPress Site appeared first on WPBeginner.
How to Create a Child Page in WordPress

Do you want to create a child page on your site? Pages in WordPress can be standalone or hierarchical, which means a page can have its own sub-pages also known as child pages. In this article, we will show you how to easily create a child page in WordPress to better organize your pages.

How to create a child page in WordPress

What is a Child Page in WordPress?

Pages and posts are two default content types in WordPress. To learn more, see our guide on the difference between posts vs pages in WordPress.

Posts are part of a blog and are displayed in a reverse chronological order (newer entries first). They are normally organized with categories and tags.

Pages are one-off or standalone content that is not part of a blog. For example, ‘About us’ page or ‘Contact us’ page. They can be hierarchical, which means you can organize them with parent and child pages.

Typically, business websites use Pages to build a website structure. This way they can build a website without creating a blog. Those who want to add a blog to their content marketing strategy can still do so by simply creating a separate blog page.

However if you have too many pages, then it becomes difficult to organize them. This is where child pages come in. You can create a broader page as a ‘Parent’ and then add child pages to better organize your website structure and layout.

WordPress pages used to create a website structure

For example, a parent page called ‘About us’ can have team members, history, careers, and other pages as child pages.

Any child page can also have their own child pages and so on. This way you can build relationships between your pages and create a proper website structure.

That being said, let’s take a look at how to easily create a child page in WordPress.

How to Create a Child Page?

To create a child page, you will need a parent page. If you already have a page that you would like to use as the parent, then you are good to go.

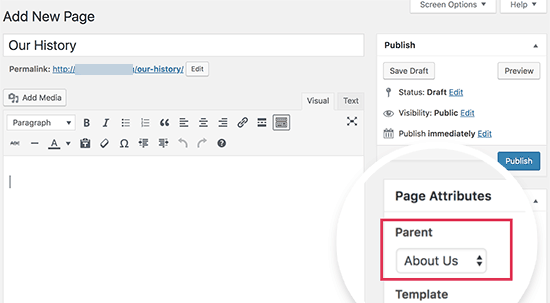
Simply go to the Pages » Add New to create a new page or edit an existing page in your WordPress admin area. On the right side, you will see Page Attributes box with Parent dropdown.

Select parent page

In the Parent drop-down, you will see the list of all pages from your site. By default, it is set to ‘no parent’ which means this page is an individual page with no association. You need to select the page you want to use as the parent from the drop-down menu.

After that, you can just go ahead and save your changes. You can repeat this process to create more child pages.

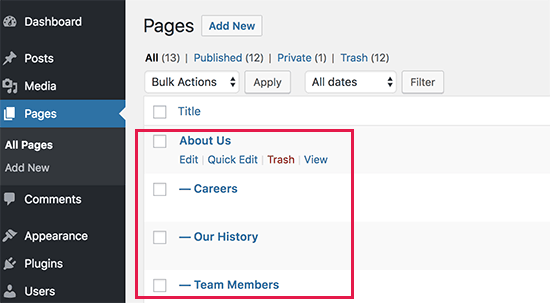
To view child pages, you can go to the ‘Pages » All Pages’ page in WordPress admin area. You will see child pages listed under their parent page with a prefix.

Parent page

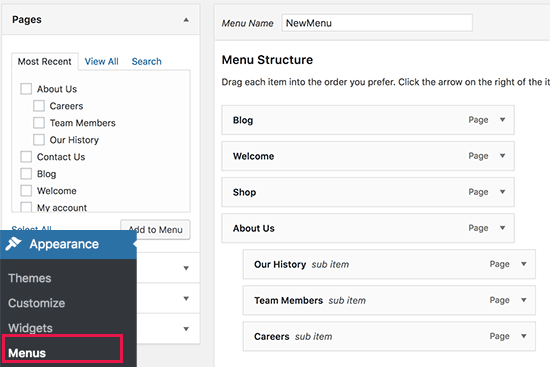
Next, you can go ahead and add your child pages to your website’s navigation menu as sub-menu items.

Adding child pages in WordPress navigation menus

Advanced users can use other methods to automatically display a list of child pages for a parent page in WordPress sidebar widgets or theme templates.

We hope this article helped you learn how to create a child page in WordPress. You may also want to see our complete guide on how to convert WordPress categories to custom taxonomies to sort the content on your site.

If you liked this article, then please subscribe to our YouTube Channel for WordPress video tutorials. You can also find us on Twitter and Facebook.

The post How to Create a Child Page in WordPress appeared first on WPBeginner.
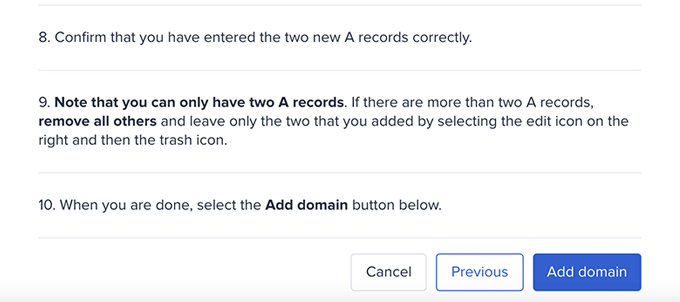
Com vs Net – What’s the Difference Between Domain Extensions

We are often asked by our users about .com vs .net domain name extensions. Choosing a domain name is extremely important for your business goals because it can have an impact on your branding and search rankings. In this article, we will explain the difference between Com vs Net domain extensions and which one is better for your website.

Difference between Com vs Net domain name extensions

What is Com and Net Domain Name Extensions?

A domain name is your website’s address on the internet. This is what your users will type in their browser to access your website. For example, wpbeginner.com

To learn more about domain names, see our beginner’s guide on what is a domain name and how do domains work.

Domain names come in various extensions like com, net, org, and more.

example.com
example.net
example.org

You can freely choose a domain name from any of these extensions to make a website. However, these extensions were created to distinguish between different types of websites.

You need to choose a domain name extension that fits your business while helping you build a recognizable brand and authority in your industry.

That being said, let’s compare the difference between .com vs .net domain extensions to see which one is better for your business.

Differnce Between .Com vs .Net Domain Names

Domain name extensions

Com and Net are two of the most popular domain name extensions. If your preferred dot com domain name extension is not available, then many domain name generator tools will suggest .net as the alternative.

However, it is not a suitable alternative for your business in most cases.

COM in the .com domain name represents commercial domain names. This includes all business websites, websites that want to make money online, personal websites, blogs, portfolios, and almost anything in between.

On the other hand, the NET in the .net domain name extension represents “network”. It is recommended and suitable for internet, email, and networking service providers.

When You Should Choose a COM Domain Name?

The .com domain extension has become synonymous with the internet. Nearly 46% of all registered domain names are .com domains.

This is why it is way easier for users to remember a .com domain name than any other domain extension. Due to the popularity of .com domain names, they are also easier to brand, promote, and help you grow your business.

If you want to make any kind of business website, then you should always use a .com domain name extension. It gives your website a familiar address and makes your business look more professional and established.

Now the problem is that .com domain names are so popular that it feels like all good ones are already taken. However, there are still plenty of clever ways to get the perfect .com domain name.

Here are some tips on choosing the best .com domain name.

  • Your domain name should represent your business and what you do. For example, stargardeningservices.com is better than starservices.com
  • If your preferred domain name is taken, then you can add small words before or after it to make it unique. For example, stargardeninghouston.com
  • Make sure your domain name can be easily pronounced. Don’t use hyphens or numbers in your domain name.
  • Take advantage of online domain name generators. These free tools will help you come up with clever domain name ideas that are unique and still available.

Need more help? See our article on how to choose the best domain name for your website with practical tips and real examples.

When You Should Use Net Domain Extension?

You should use .net domain name if you are going to offer internet, networking, database hosting, email hosting, or similar services.

You can still use a .net domain name if it suits your brand. However, you will need some serious marketing talent to pull this off.

For example, Behance.net is a popular online design community which successfully uses a .net domain extension for their website. It suits them because they wanted to be a network of artists, designers, and companies looking for talent.

Nearly 4% of all domain names registered are using the .net domain extension. Domain name registrar’s started presenting .net and other domain name extensions as an alternative to .com, which may give you an impression that it is more commonly used than it actually is.

Originally, it was supposed to be a domain name extension for internet and networking service providers. Many real and well-known internet companies still primarily use their .com domain name for the business. For example, visiting comcast.net will take you to their new .com website.

Now, you may think 4% is quite a lot of domain names (around 14 Million at the time of writing this article). Who else is using .net domain names?

Many businesses register a .net domain extension for their brand so that someone else couldn’t infringe on their business name.

Some companies started using it because they couldn’t get their preferred .com domain name. Majority of these companies soon transfer to a .com domain extension but they keep .net domain name for technical and legal reasons.

Com vs Net – Which One is Better for SEO?

A lot of our users ask us which domain extension will help them rank higher. If you are asking between Net and Com, then choosing either of them will not affect your SEO.

Search engines will treat both domain extensions the same. You will need to just focus on SEO best practices and create useful targeted content to rank higher.
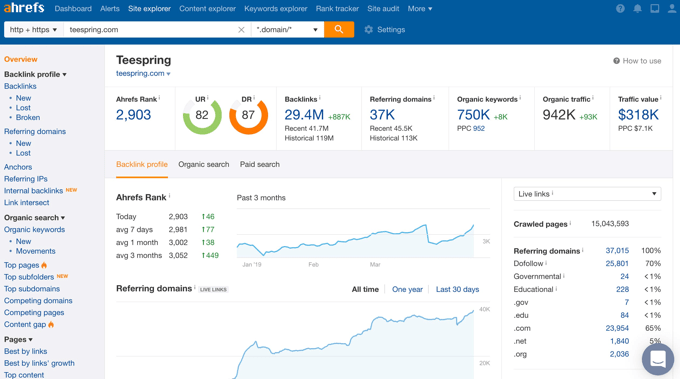
The actual important part will be your domain name itself, not the extension. For example, stargardeningservices.com will rank better than starservices.net because it contains the keyword that people are more likely to search.
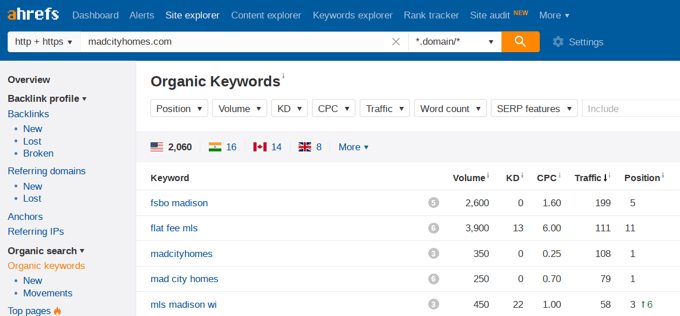
How to Buy a Domain Name?

There are two ways to get a domain name. You can choose the one that best suits you.

1. Get a FREE Domain Name with Bluehost

If you want to make a website then you will also need website hosting. See our article on the difference between domain name and website hosting.

Usually, you will pay $14.99 per year for a domain name and $7.99 / month for hosting. Now, if you are just starting out, then this sounds like a lot of money.

Luckily, folks at Bluehost are offering WPBeginner users a free domain name and 60% discount on hosting.

→ Click Here to Claim Your Free Domain Name ←

2. Register a Domain Name

If you don’t want to make website, then you can still register a domain name and make a website later.

We recommend using GoDaddy. They are the largest domain name registration company in the world currently managing 72+ million domain names.

For detailed step by step instructions, see our article on how to register a domain name.

We hope this article helped you learn the difference between com vs net domain name extensions. You may also want to see our step by step guide on how to start a blog.

If you liked this article, then please subscribe to our YouTube Channel for WordPress video tutorials. You can also find us on Twitter and Facebook.

The post Com vs Net – What’s the Difference Between Domain Extensions appeared first on WPBeginner.