Category Archives: selling digital products

How to Sell Audiobooks Online (3 Simple & Easy Ways)

Do you want to sell audiobooks online?

By selling your books as downloadable audio files, you can make money without having to pay for shipping or printing. You can also sell the same audio file an unlimited number of times.

In this article, we will show you how to easily sell audiobooks online using WordPress.

How to sell audiobooks online

Why Sell Audiobooks Online?

There are lots of ways to share your experiences or knowledge online. You can create an online course, record a webinar, or even start a podcast.

Another option is recording that information as an audiobook. This is a great way to collect everything you want to say into a single, downloadable file that’s easy to distribute and sell to other people.

Unlike traditional printed books, you don’t have to pay printing or shipping fees for your audiobooks. You also don’t have to worry about physical storage, supplies, or managing your inventory. All of this means lower costs and bigger profits, which makes audiobooks the perfect way to make money online with WordPress.

If you have an ebook, then there are plenty of services that can help you turn it into an audiobook including ACX. Every audiobook you make on ACX will be available on Audible.com, Amazon.com, and iTunes, but it’s also a good idea to add the audiobook to your own website.

With that in mind, let’s see how you can sell audiobooks online. Simply use the quick links below to jump straight to the method you want to use.

Method 1. How to Sell Audiobooks With Easy Digital Downloads (Recommended)

The easiest way to sell audiobooks online is by using Easy Digital Downloads. Easy Digital Downloads is one of the best eCommerce WordPress plugins, and it’s designed specifically to sell digital products.
How to sell an audiobook in WordPress using Easy Digital Downloads

Unlike general eCommerce plugins, Easy Digital Downloads has the specific features you need to promote, sell, and distribute digital products with ease. This means you don’t have to waste time and effort with unnecessary settings, such as configuring your store’s shipping.

Even better, if you’re using SiteGround then Easy Digital Downloads already comes pre-installed on their EDD plan, so you can start using it straight away.

If you’re using a different hosting provider, then you’ll need to install and activate the Easy Digital Downloads plugin. If you need help, then please see our guide on how to install a WordPress plugin.

Upon activation, go to Downloads » Settings in the WordPress dashboard.
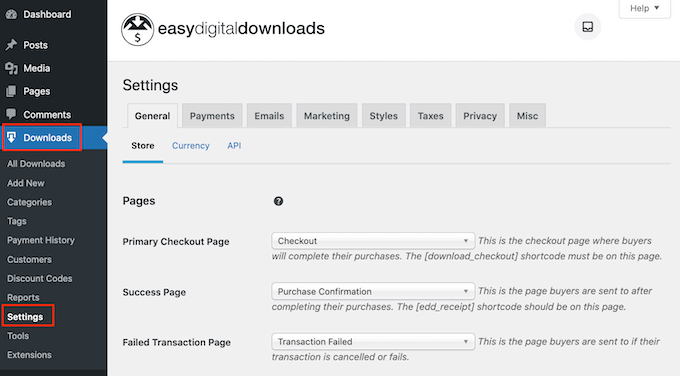
The Easy Digital Downloads plugin's settings

Even though you’re selling audiobooks, you’ll need to set your store’s location. This allows Easy Digital Downloads to auto-fill some fields in the order form, which will help improve the customer experience.

Easy Digital Downloads also uses your location to calculate sales tax.

To add your location, simply open the ‘Business Country’ dropdown menu. You can then choose where your business is based.
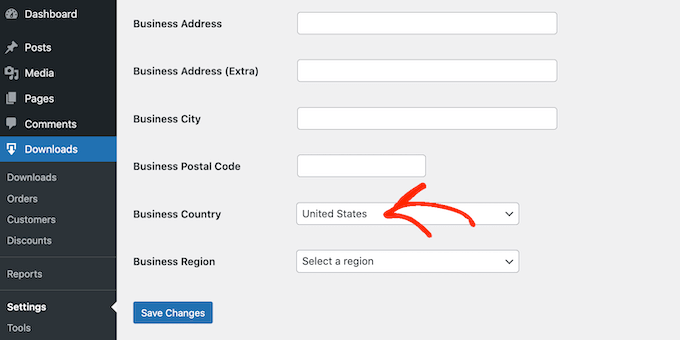
Setting the location for your audiobook store

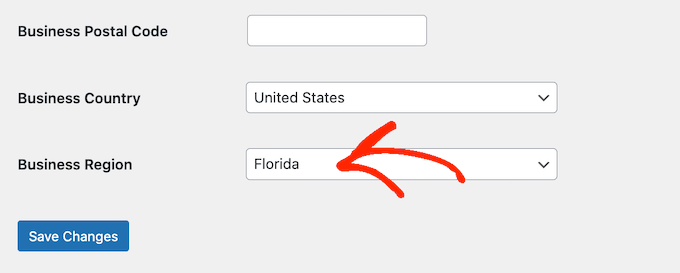
Next, find the ‘Business Region’ field.

Here you can open the dropdown and choose the region where your store operates from.
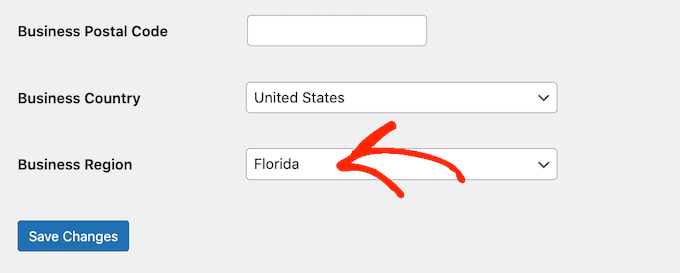
Setting the region for your online audiobook store

After making these changes, go ahead and click on Save Changes to store your settings.

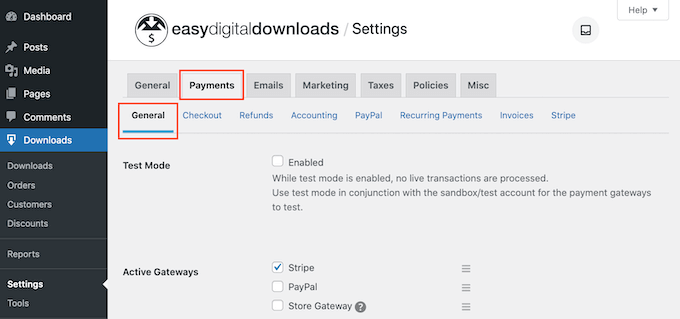
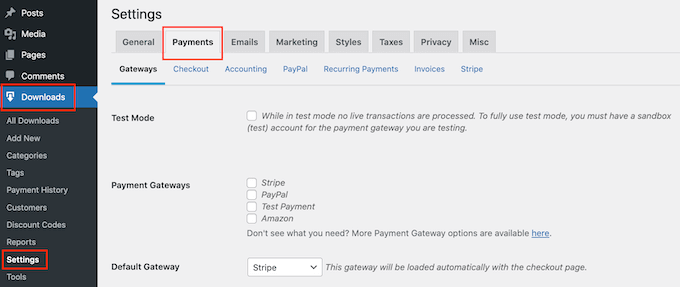
Next, you’ll need a way to accept credit card payments in WordPress by clicking on the ‘Payments’ tab. Then make sure the ‘General’ tab is selected.
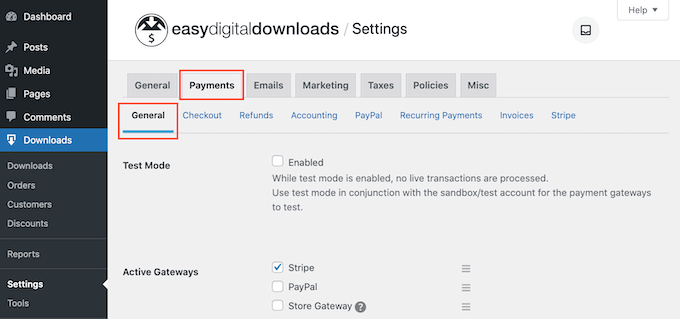
Adding payment gateways to your WordPress website

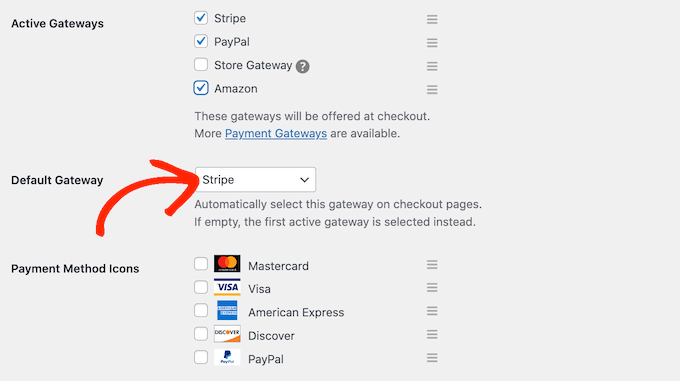
In the Payment Gateways section, check the box next to each gateway that you want to add to your WordPress blog or website.

If you add more than one payment method, then you’ll need to choose a default gateway.

Adding multiple payment gateways to an online store

You can use any gateway you want, but Stripe can accept credit cards as well as Apple Pay and Google Pay. This is why we recommend using Stripe as the default payment gateway.

With that done, click on the ‘Save Changes’ button.

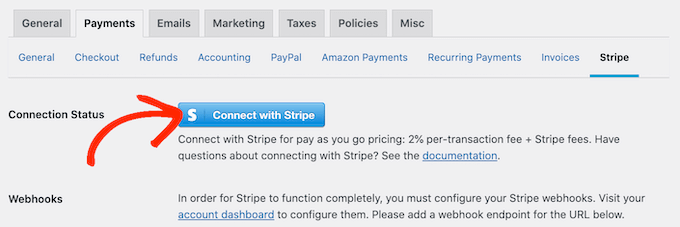
You’ll now see some new tabs where you can configure each payment method.
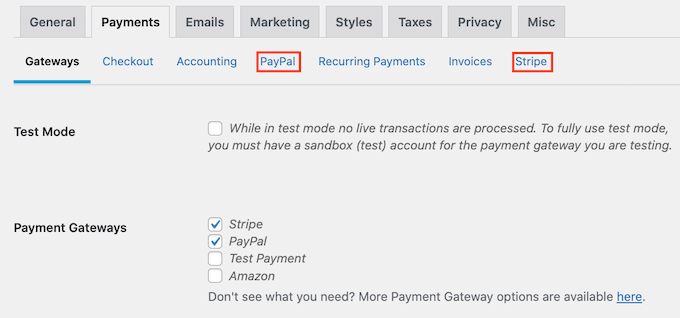
Configuring payment gateways including Stripe

Configuring the payment gateway will be slightly different depending on which gateway you’re using, but Easy Digital Downloads will walk you through the process.

Once you’ve set up at least one payment gateway, you’re ready to start uploading audiobooks to your WordPress website.

To create a digital product, select Downloads from the left-hand menu. Then, click on the ‘Add New’ button.
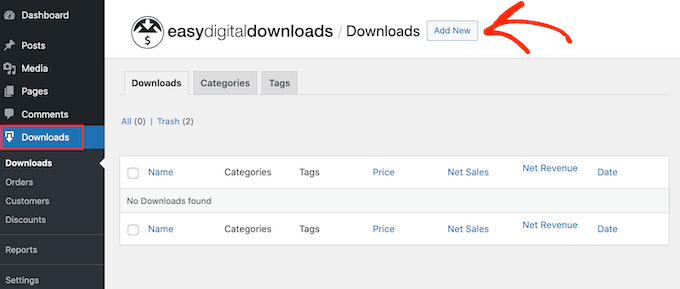
Adding a downloadable audiobook to your WordPress website

You can now type a name for the product into the ‘Enter download name here’ field. This will appear on the audiobook’s page, so you’ll want to use something that catches the visitor’s attention and accurately describes the book.

Next, type out the description that will appear on the ebook’s product page. You’ll want to give visitors all the information they need to decide whether this book is right for them.
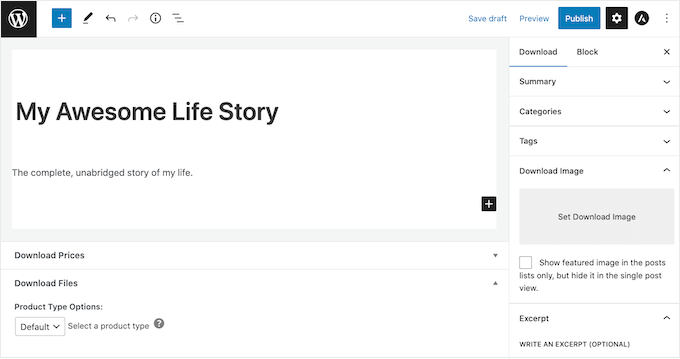
Adding a title to a downloable audiobook

Many online stores use product categories and tags to help shoppers find what they’re looking for. If you’re selling lots of audiobooks, then these categories and tags help visitors find related audiobooks, which can get you more sales.

You can create new categories and tags in the Categories and Tags boxes.
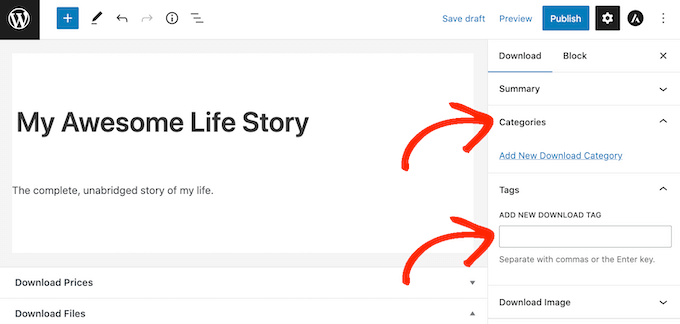
Adding categories and tags to a downloadable ebook

For more information, see our step-by-step guide on how to add categories and tags for WordPress pages.

Next, you’ll want to set a price by scrolling to the Download Prices section. Here, type in how much visitors will pay to download the audiobook.
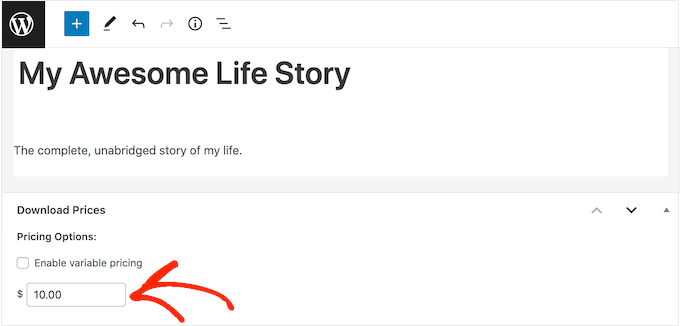
Adding prices to an audio book in WordPress

You’re now ready to upload the audio file that you want to sell. When it comes to audio, WordPress supports mp3, ogg, and wav. It also supports m4a, although this format may not work on all browsers.

Pro Tip: If you want to sell audiobooks in a file type that WordPress doesn’t support, then see our guide on how to allow additional file types in WordPress.

To add an audio file, simply scroll to the Download Files section.
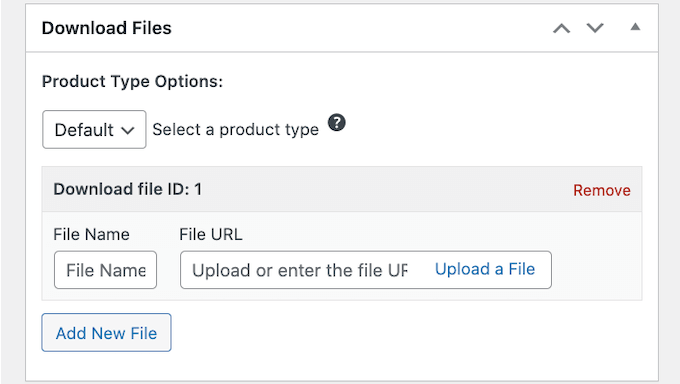
How to upload a downloadable audiobook to WordPress

In the File Name field, type a name for the file that shoppers will get when they buy the audiobook. Then, simply click on ‘Upload a File.’

You can now choose any audio file from the WordPress media library, or you can upload a new audiobook from your computer.

Finally, you’ll need to add a product image, which will usually be your audiobook’s front cover. Simply scroll to the Download Image section and then click on the ‘Set Download Image’ link.

Adding a featured image to your audiobook

This launches the WordPress media library where you can choose an image or upload a new file from your computer.

When you’re happy with your digital download, click on the Publish button to make it live.

Easy Digital Downloads will now create the audiobook as a downloadable product, but visitors still need a way to access the product page.

This might mean adding the page to your website’s menu, creating a sales page where you advertise all your audiobooks, or even adding the book to a custom home page.

No matter what method you choose, you’ll need to know the audiobook’s URL.

To get this link, simply go to Downloads » Downloads. Then, find the audiobook you just created, and click on its ‘Edit’ link.
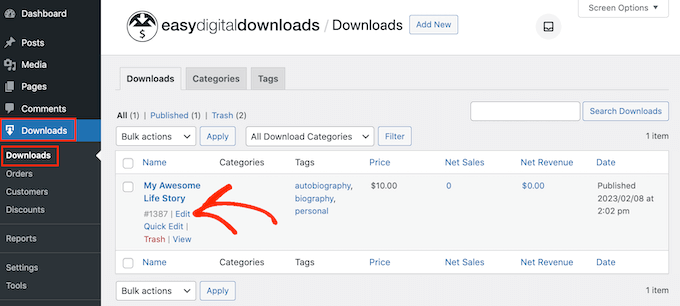
How to get a link to a downloadable audiobook product

You will then find the URL directly below the product title.

Now, you can link to this product page from any area of your website, simply by using its URL. To learn more, see our step-by-step guide on how to add a link in WordPress.

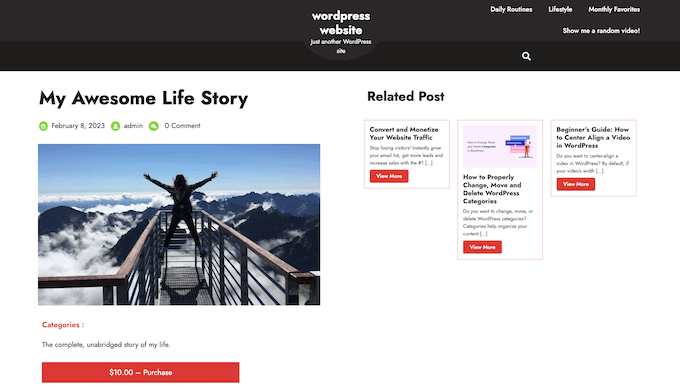
Easy Digital Downloads also creates a ‘Purchase’ button for this particular audiobook. Visitors can click this button to add the audiobook to their cart.
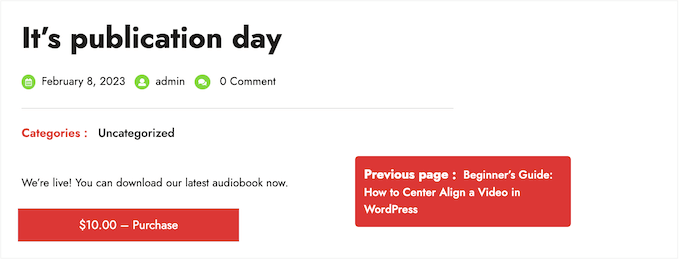
Adding an audiobook purchase button to an online store

You can add the button for this book to any page, post, or widget-ready area. This allows visitors to start the purchasing process without even Needing to visit the individual product’s page.

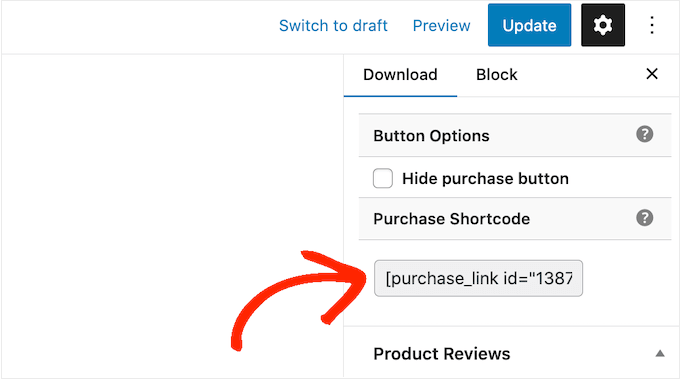
To get the audiobook’s shortcode, simply scroll to its Download Settings section. You can then copy the text in the ‘Purchase Shortcode’ field.
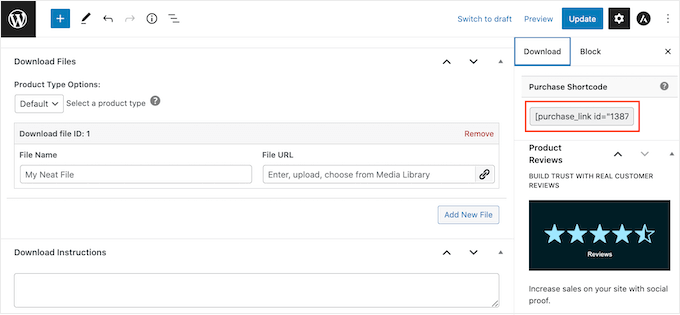
Adding an audiobook to your site using a product shortcode

For more information on placing the shortcode, please see our guide on how to add a shortcode in WordPress.

Every time someone buys an audiobook from your website, Easy Digital Downloads will send them an email and download link.
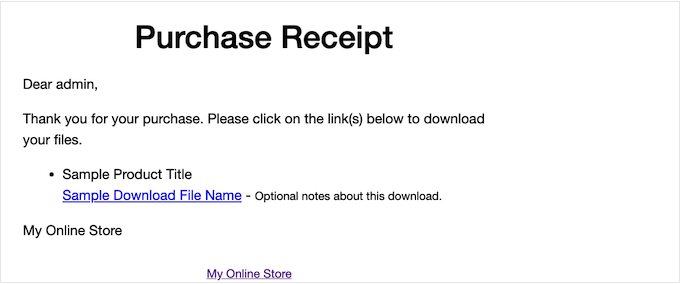
A purchase receipt for an audiobook

While this email has everything the customer needs to access their download, it’s a good idea to customize it. For example, we recommend adding your own logo and branding.

To customize the default email, simply go to Downloads » Settings. Then click on the ‘Emails’ tab.
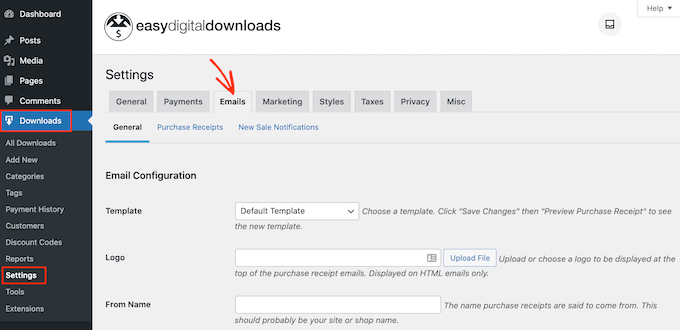
Customizing the Easy Digital Download emails

When you’ve finished making changes, you may want to send a test email so you can see how the message will look to your customers.

To do this, simply click on the ‘Send Test Email’ button and Easy Digital Downloads will send an email to your admin email address.

Sending a test email for your downlodable audiobook

Have you clicked on the ‘Send Test Email’ button, but haven’t got a test email? If your site isn’t sending emails correctly, then customers won’t be able to download your audiobook.

With that in mind, you can follow our guide on how to fix the WordPress not sending email issue. You can use WP Mail SMTP to make sure the purchase confirmation emails arrive safely in the customer’s inbox.

When you’re happy with how the email looks, you can go ahead and click on the ‘Save Changes’ button.

This is all you need to start selling audiobooks online. However, Easy Digital Downloads has lots more advanced features that can help you sell audiobooks.

For more information on Easy Digital Downloads, please see our guide on how to sell digital downloads on WordPress.

Method 2. How to Sell Audiobook Memberships (Best for Recurring Revenue)

Another option is using your audiobooks to create recurring revenue streams.

For example, you might offer members unlimited monthly or annual access to all your audiobooks for a membership fee. In this way, you can get reliable recurring revenue over a longer period of time.

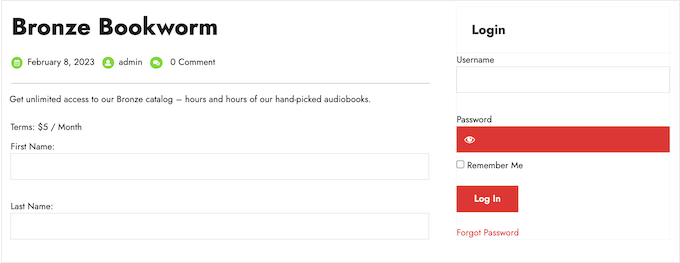
How to add an audiobook to your site using MemberPress

A membership site is also a great choice if you’re releasing your audiobooks as a series.

If you want to get recurring revenue, then MemberPress is the best WordPress membership plugin. It allows you to accept payments, create an unlimited number of membership levels, restrict access to audiobook pages based on membership subscription, and more.

First, you need to install and activate the MemberPress plugin. For more details, see our step-by-step guide on how to install a WordPress plugin.

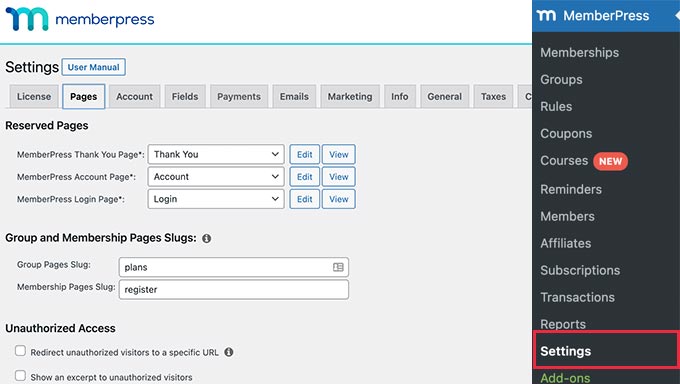
Upon activation, go to the MemberPress » Settings page to configure the plugin settings.

How to configure the MemberPress plugin

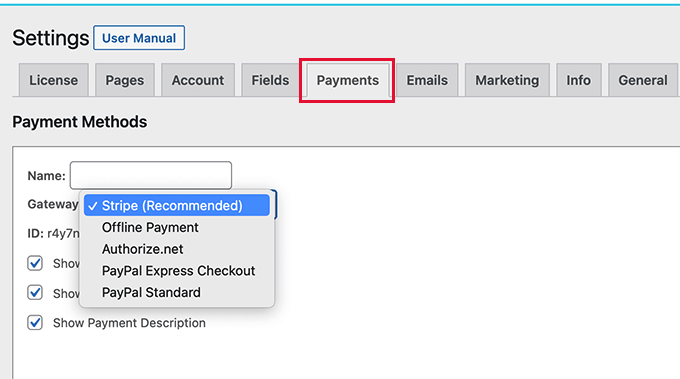
To start, you’ll need to set up a payment gateway.

Out of the box, MemberPress supports PayPal (Standard, Express, and Pro), Stripe, and Authorize.net. You simply need to select the payment method you want to use and then type in the required credentials, such as your PayPal email address.

Adding a payment gateway to a membership site

You may want to add multiple methods, so members can use their preferred gateway. When that’s done, don’t forget to click on the Update Options button to save your settings.

With the setup out of the way, it’s time to create one or more membership levels. These are the subscriptions that visitors will buy to access your audiobooks, or other content.

MemberPress allows you to offer different content for different membership levels. For example, you might create Bronze, Silver, and Gold memberships and then give members access to different audiobooks.

To create the first membership plan, go to the MemberPress » Memberships page and then click on the ‘Add New’ button.

Adding a membership level to your audiobook website

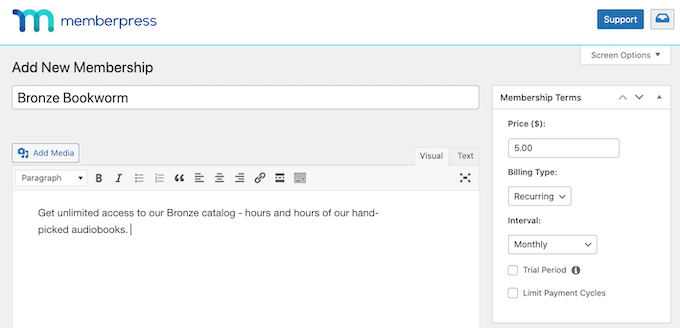
On the next screen, you’ll need to provide a title for the membership plan and then add details in the post editor.

After that, you can set the pricing, billing type, interval, and expiration under the ‘Membership Terms’ section.

How to sell audiobooks online using MemberPress

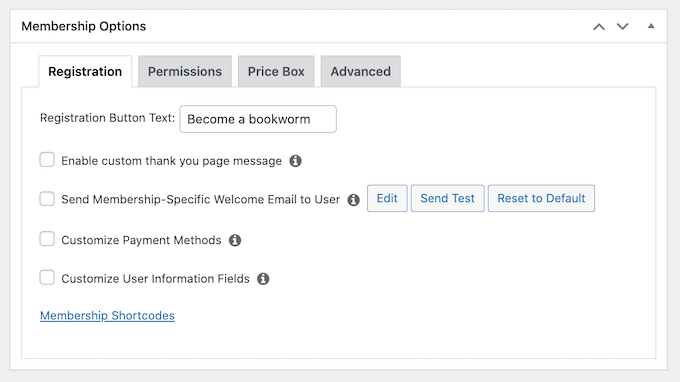
Next, scroll to the Membership Options box below the editor.

Here, you can customize the plan permissions and membership options.

Adding a membership level to your WordPress blog or website

When you’re happy with how the plan is set up, go ahead and click on ‘Publish.’ To create more membership levels, simply repeat the same process described above.

Once you’ve created all the membership levels, it’s time to add some access rules. These allow you to restrict access to your audiobooks based on the user’s membership plan.

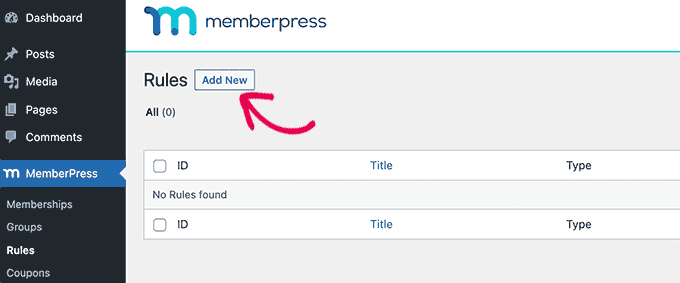
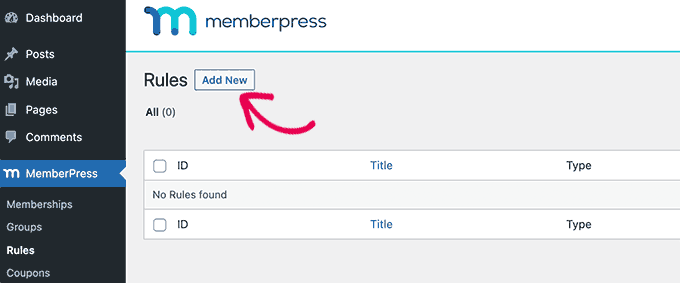
Just go to MemberPress » Rules and then click on the Add New button.

Adding a new rule to your WordPress membership site

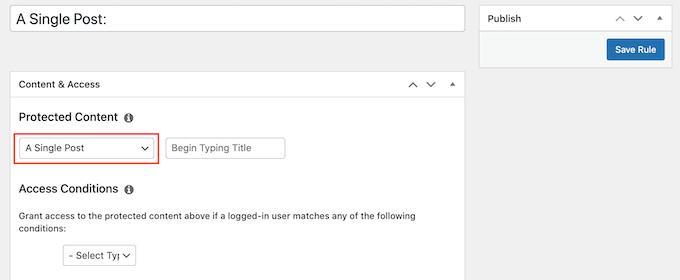
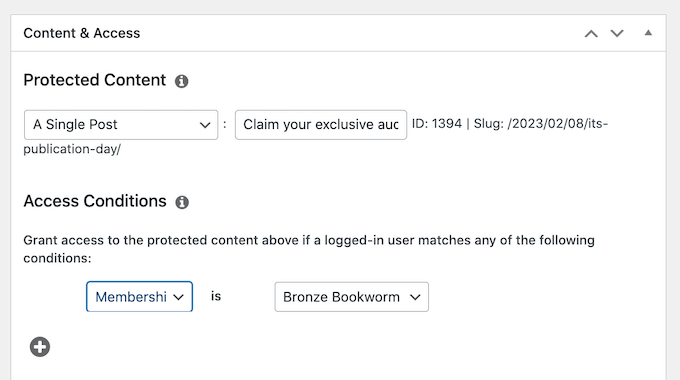
Here, you can create all kinds of access rules, but you’ll typically start by selecting the audiobook that you want to restrict access to.

Under ‘Protected Content,’ open the dropdown menu and choose an option from the list. This might be the specific page where you embedded the audio file, content that has a particular tag, or any other option from the list.

Creating content restriction rules in WordPress

After that, open the ‘Access Conditions’ dropdown and choose ‘Membership.’

In the second dropdown menu, select the membership level people will need in order to access this content.

Creating subscriptions for your audiobooks

There are more settings that you can configure, but this is all you need to create a simple access rule.

When you’re happy with how the rule is set up, click on ‘Save Rule.’ To create more access rules, simply follow the same process described above.

Now that everything is set up, you’ll need to make sure visitors can buy memberships and log into their accounts. Thankfully, MemberPress comes with ready-made forms that you can add to your site.

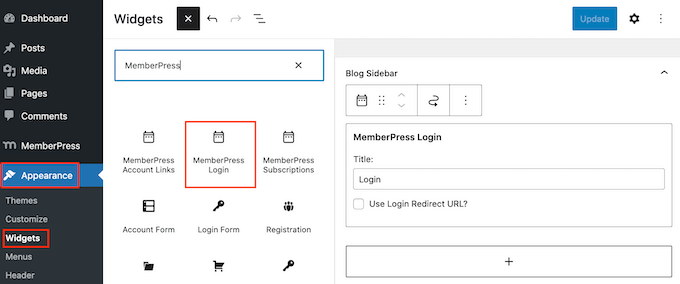
We recommend adding the MemberPress login widget to a widget-ready area, so members can log in from any page.

Simply head over to Appearance » Widgets and add the ‘MemberPress login’ widget to the sidebar or similar section.

Adding a MemberPress login widget to WordPress

To learn more, please see our guide on how to add and use widgets in WordPress.

Don’t forget to click on the ‘Update’ button to save your widget settings.

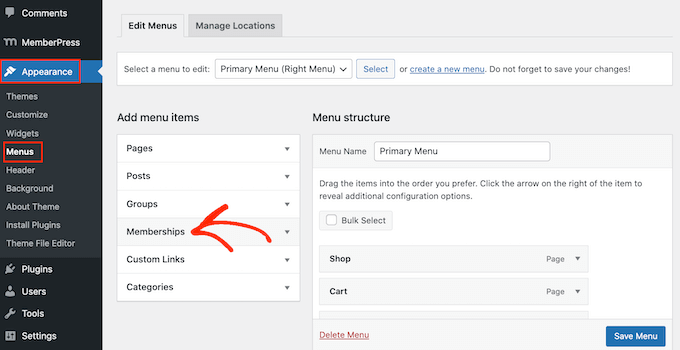
There are a few different ways to add a signup page to your website, but MemberPress automatically creates a registration page for each membership level. This means you can simply add these pages to your main navigation menu.

In your WordPress dashboard, go to Appearance » Menus. In the left-hand menu, simply click to expand the ‘Memberships’ section.

Adding membership subscriptions to your WordPress website

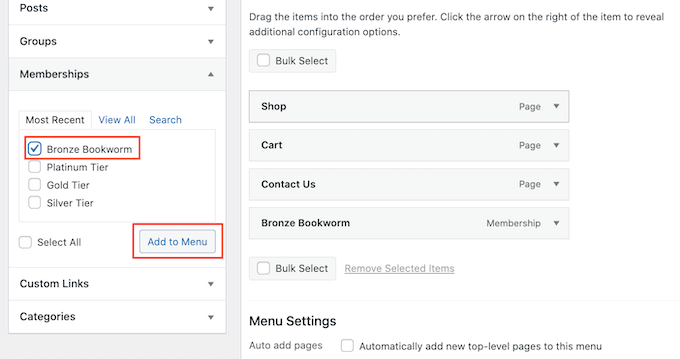
You’ll now see a list of all the different MemberPress levels.

To add a membership to the navigation menu, simply check the box next to it and then select ‘Add to menu.’

How to sell audiobooks online

For step-by-step instructions, please see our guide on how to add a navigation menu.

When you’re happy with how the menu is set up, click on ‘Save Menu.’

At this point, you’ve created a website where visitors can buy audiobook subscriptions. However, MemberPress has lots more settings you can use to sell audiobooks, grow your brand, and get more members.

For more information about MemberPress, check out our ultimate guide to creating a WordPress membership site.

Method 3. How to Sell Audiobooks With WooCommerce (Best For Online Stores)

Easy Digital Downloads makes it easy to sell audiobooks on any WordPress blog or website, without you having to configure lots of unnecessary settings like shipping and handling.

However, if you’ve already created a WooCommerce store, then you can sell digital products like audiobooks using this popular eCommerce plugin.

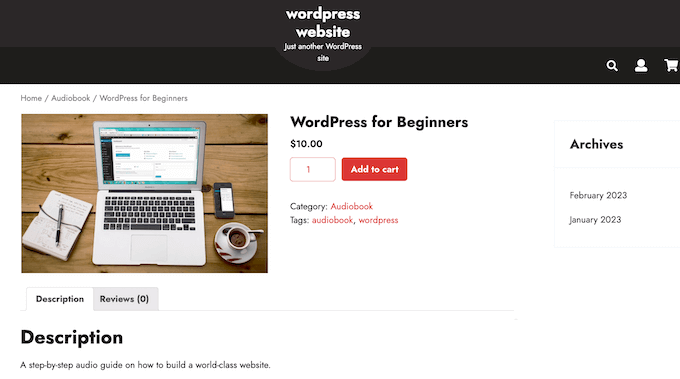
How to sell an audiobook online using WooCommerce

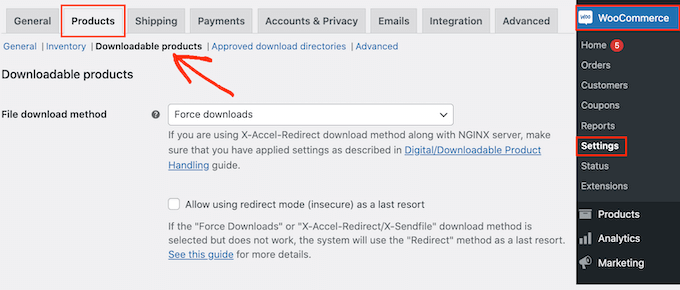
Although it’s mostly used to sell physical products, you can add support for digital products by going to WooCommerce » Settings and then clicking on the ‘Products’ tab.

Here, click on the ‘Downloadable products’ link.

Creating downloadable WooCommerce products

You can now open the ‘File download method’ dropdown and choose an option from the list.

When you’re selling digital downloads, there is a risk that customers may share the direct link with other people. This allows people to download your audiobook without paying.

‘Force Downloads’ helps to protect your site from direct linking, so it’s the recommended method. However, just be aware that very large files may result in a timeout, especially if your server has limited resources.

If this happens, then you may need to change your WordPress hosting plan or select a different file download method.

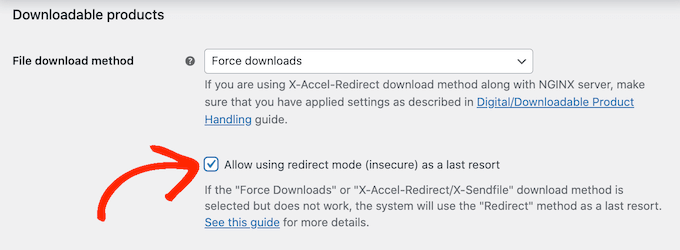
You may also want to enable the checkbox next to ‘Allow using redirect mode (insecure) as a last resort.’ If WooCommerce encounters any problems, then this setting will deliver the audiobook via an unsecured redirect link rather than showing an error.

This is a much better customer experience.

WooCommerce's downloadable product settings

The second option is ‘X-Accel-Redirect/X-Sendfile,’ which serves the file directly to the customer. This protects the audiobook from unauthorized downloads without impacting your site’s performance.

However, this method requires you to install and enable the X-Accel-Redirect/X-Sendfile module on your server, so it’s not very beginner-friendly. Depending on your plan, you may also need to speak to your WooCommerce hosting provider.

The final option is ‘Redirect only,’ which uses a direct link to the file. This means your audiobook isn’t protected and anyone can access it using the URL. That said, we don’t recommend the ‘Redirect only’ method.

After selecting a download method, you can choose whether visitors must be logged into an account in order to download the audiobook.

Allowing guest checkout can get you more sales and downloads, but requiring users to register with your online store can help you do lead generation.

To make this decision, either enable or disable the ‘Downloads require login’ checkbox.

How to disable guest checkout for audiobooks in WooCommerce

By default, customers can download the audiobook while their order is processing.

If you want to wait until the order is complete, then uncheck the following box: ‘Grant access to downloadable products after payment.’

By default, WooCommerce will download the audiobook to the customer’s computer.

Most of the time this is the best customer experience, but you can set the file to open in a new tab instead. The customer can then decide whether they want to save the file.

There are some use cases where this may be the better option. For example, if you’re showing the customer a free sample, or your audiobooks are short enough to enjoy in one sitting.

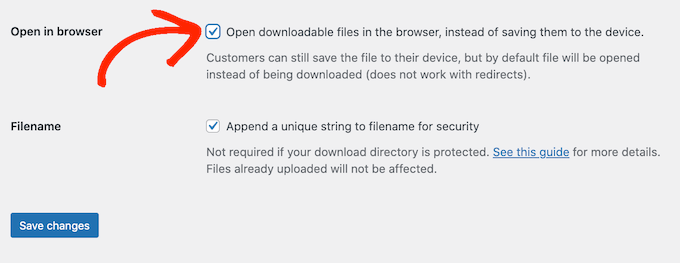
In this case, you may want to check the box next to ‘Open downloadable files in the browser.’

How to set up downloadable files in WooCommerce

When you’re happy with the settings you’ve entered, click on ‘Save Changes.’

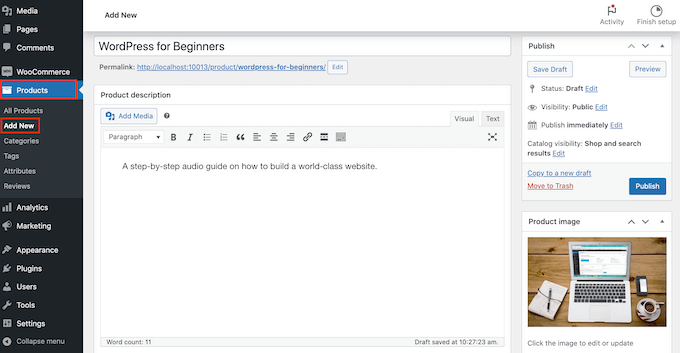
With that done, you’re ready to add the audiobook as a downloadable product by going to Products » Add New. Here, you can type in a title, add a description, upload a product image, and set the price as normal.

Creating a downloadable WooCommerce product

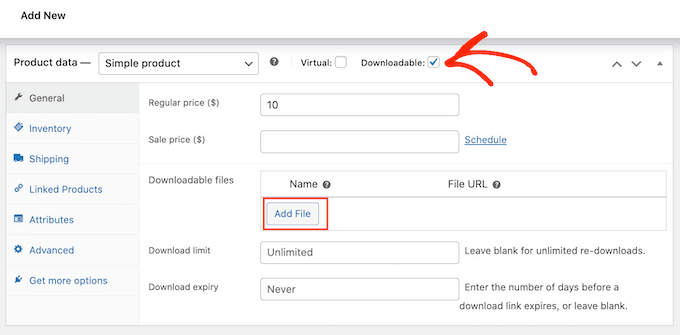
Then, scroll to ‘Product Data’ and check the box next to ‘Downloadable,’ which adds some new settings.

To start, click on ‘Add File.’

Adding a downloadable audiobook to a WooCommerce online store

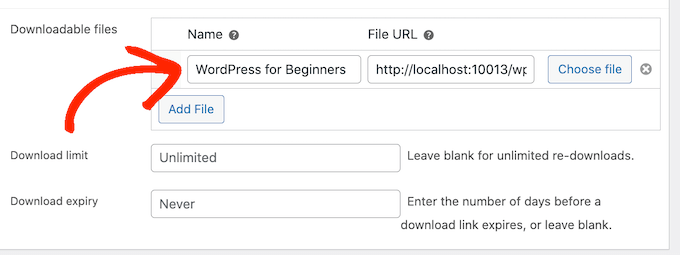
You can now either choose the audiobook from your media library or upload a new file from your computer.

After that, type in a filename for the audiobook.

Adding a downloadable audiobook in WooCommerce

By default, customers can download the audiobook as many times as they want, for as long as they want.

If you want to limit the number of downloads per customer, then type a number into the ‘Download limit’ field.

Adding a download limit for your audiobook

If you want the download link to expire after a certain number of days has passed, then type a number into the ‘Download expiry’ field.

When you’re happy with how the audiobook is set up, click on the ‘Publish’ button. The audiobook will now appear as a downloadable product on your online store.

We hope this article helped you learn how to sell audiobooks online. You may also want to check out our expert pick of the best WordPress plugins to grow your site, and our comparison of the best email marketing services for small businesses.

If you liked this article, then please subscribe to our YouTube Channel for WordPress video tutorials. You can also find us on Twitter and Facebook.

The post How to Sell Audiobooks Online (3 Simple & Easy Ways) first appeared on WPBeginner.

15 Most Popular Digital Products You Can Sell Online in 2023

Are you looking for popular digital product ideas to sell online?

In today’s creator economy, there are many opportunities to make money online. You can sell items like music files, videos, blog posts, eBooks, software, apps, podcasts, premium content, and more.

In this article, we will share the most popular digital products that you can sell online.

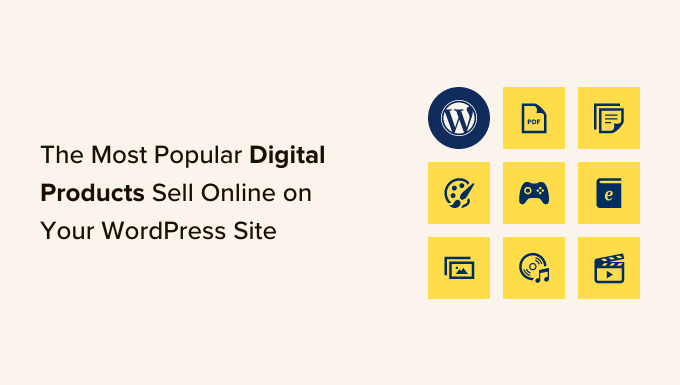
Most popular digital products you can sell online

What are Digital Products?

A digital product is essentially anything that you can buy, download, and use on a device such as a computer or mobile phone. For example, ebooks, software, videos, music, online courses, and more can be digital products that you can purchase at an online store.

They are delivered to you electronically, usually through a direct download in your user dashboard or in an email with a download link inside. In general, you can easily access them anytime or anywhere.

Why Sell Digital Products Online?

Digital products have a lot of advantages compared to selling physical products.

First, you don’t have to worry about keeping inventory and meeting supply or demand requirements. Once you create a digital product, you can sell it again and again.

This also relieves you of any storage issues. Some physical products need to be kept at a warehouse and may require special storage conditions like refrigeration, which can be costly. On the other hand, you don’t have to worry about storing your digital products.

Besides that, you get to generate a passive income stream with digital goods and easily grow your sales. They also help reach a wider audience across the globe, as people from around the world can buy your digital products.

That said, let’s look at some of the most popular digital products you can sell online today.

1. eBooks

Sell ebooks online

eBooks are a great digital product to have, and you can write about any topic you like. The best part, once you’ve created an ebook, you can simply market it and earn passive income.

Now, if you have a WordPress blog or write articles regularly on any other platform, then you can repurpose the content for your ebook.

For instance, your most popular guides would already have enough content to be converted into an ebook. Or you can combine several blog posts into an ebook about a particular topic.

Once you’re done with the writing part, you can then add the ebook to your WordPress site so people can download it.

You can follow our guide on how to create and sell ebooks in WordPress from start to finish.

2. Online Courses

Online course digital product

The next most popular digital product you can sell is online courses. People are always looking to improve their skillset and learn new things.

You can use this opportunity to share your expertise and teach other people through a virtual classroom. For example, if you’re a fitness instructor, then you can create an online course and teach people different exercises.

The best part, you need very little investment and no technical knowledge to create online courses.

There are many tools in the market that can help you get started in no time. All you need is a domain name for your site, WordPress website hosting, and a learning management system (LMS) plugin.

LMS software like MemberPress or Thrive Apprentice makes it super easy to create interactive courses without editing code. Plus, you can manage students and course material, offer quizzes, and more.

You can learn more by following our guide on how to create and sell online courses in WordPress.

3. Premium Memberships

Create a membership site

Just like ebooks and online courses, a membership website is another simple way of making money online. You can sell premium memberships with access to exclusive content and community features.

For example, you can lock specific guides, cheat sheets, interviews, videos, podcasts, newsletters, and other content behind premium memberships.

On the other hand, you can offer exclusive entry to different communities, like a forum, Slack channel, or Facebook group, through a membership site.

What’s great about memberships is that you don’t have to rely on advertising revenue. You can allow your website visitors to support your site and generate continuous income.

There are many membership plugins and tools you can use to get started. For instance, MemberPress lets you restrict access to content, integrate different payment services, create unlimited membership levels, allow drip content, and more.

To start selling memberships, you can see our step-by-step guide on creating a WordPress membership site.

4. Tutorials and Guides

Tutorial and guides

You can also sell individual guides and tutorials as digital products. This is a great way to earn more money if you have long articles or multiple blog posts on a particular topic.

Simply turn your guides into a downloadable file like a PDF document. You can then charge a fee to visitors who are willing to purchase your content.

For example, let’s say you have a detailed guide on email marketing. You can turn that guide into a PDF file and sell it as a digital product.

There are many WordPress eCommerce platforms you can use to sell digital products. We recommend using Easy Digital Downloads because it is beginner friendly, offers a shopping cart, easily integrates with payment gateways, and more.

You can learn more by going through our guide on how to sell digital downloads on WordPress.

5. Spreadsheets

Spreadsheets and cheatsheet

Spreadsheets are another type of digital product you can sell on your website and generate revenue. You can create all types of useful spreadsheets for your audience.

For example, let’s say you have expertise in search engine optimization (SEO). You can create a technical SEO checklist for beginners and offer that as a paid spreadsheet. Similarly, you can create checklists, templates, calculators, lists, and other types of spreadsheets.

The best part is that you don’t need any investment to create a spreadsheet. Plus, it helps offer evergreen content that can you use to generate leads and a passive income stream.

You can check out our guide on how to sell spreadsheets online for more details.

6. WordPress Plugins

Create WordPress plugins

You can also create WordPress plugins and sell them as digital products.

WordPress is open-source software, and it powers over 43% of the website on the internet. There are over 60,000 WordPress plugins that include free and paid options. This shows that there is a huge potential to create a plugin that generates revenue.

Usually, you need basic coding knowledge like PHP, CSS, HTML, and JavaScript to write a plugin. For more details, you can see our step-by-step guide on how to create a WordPress plugin.

You can also hire a developer to help you create a plugin. There are many WordPress developer job websites where you can post an opening and hire the right talent for a specific project.

If you’re willing to take on a DIY project, then you can also use a plugin called Pluginception. It lets you create a WordPress plugin from the WordPress dashboard. To learn more, please follow our guide on how to create a WordPress plugin using a plugin.

7. Software and Mobile Apps

Build an app and software

Just like WordPress plugins, you can also create software and mobile apps. There are many SaaS (software as a service) products that you can create for any niche. It can be productivity software, workout apps, games, and more.

Usually, SaaS products have a recurring subscription. This means that you’ll need to generate income on a monthly or annual basis.

Since creating such software and apps requires specific skills, you might need to hire developers. This process can be expensive because you’ll need investment for creating software or purchasing an existing one ($15,000 and upwards).

As an alternative, you can convert your WordPress websites into mobile apps and monetize them. There are tools and plugins that can turn your site into an app. For example, let’s say you have a membership site. Converting it into an app will help you attract mobile users and sell it as a digital product.

On the other hand, you can also join affiliate programs and earn a commission on each sale. You can create a WordPress blog to review different software and apps and promote them as affiliates. Or you could create an online store using affiliates.

For more information, check out our ultimate guide to affiliate marketing for beginners.

8. Website Themes

Website themes

Similarly, you can make WordPress themes and sell them online. Themes are necessary for every WordPress user, and often users look for themes that offer specific features and customization options.

There are many platforms where you can sell website themes. Some of these include Enavto, Themeforest, CodeCanyon, and Creative Market.

You can also list a free version of your theme on the WordPress.org theme directory. From here, you can encourage users to upgrade to a premium version to unlock more features.

We recommend selling the digital products on your own websites instead of a marketplace like Envato because they charge a large commission on every sale without much benefit.

You can use an eCommerce solution like Easy Digital Downloads to create your own digital store.

9. Digital Art and Graphics

Digital art

If you’re a graphic designer or an artist, then you can create a variety of digital products and sell them online.

For example, you can create logos, design templates, original digital artwork, clip art, patterns, brushes, backgrounds, icons, fonts, shapes, and more.

Besides that, creating assets for different photo editing software like Adobe PhotoShop, Canva, Affinity Designer, and Affinity Photo can also help you make money online.

To get started, please follow our guide on how to sell digital art and graphics online.

10. Photographs

Photography

Another great digital product you can sell online is photography. Many people look for images that they can use for their WordPress websites and blogs.

There are different types of photos you can sell. Some of these include stock photos, event pictures, portraits, drone images, backgrounds, and more.

Now, you can sell your images to different stock photo sites, like Shutterstock, 500px, iStock Photo, Adobe Stock, and more. Each of these websites has a payment structure where they’ll share a percentage of direct sales or give you a royalty fee.

On the other hand, you can create your own photography website and sell your images there. This way, you don’t have to share the profits with another third party and have more control over your images.

To help you get started, check out some useful WordPress plugins for photographs.

11. Videos

Create videos

Videos are the next digital products on our list that you can sell online.

For example, videos like drone footage, stock videos, online training, product reviews, video game reviews, and gameplay footage are some of the ideas you can use to create a video-based digital product.

One of the easiest ways of monetizing your videos is by creating a video membership site. This way, you don’t have to rely on ad revenue from other platforms and get recurring payments from users who pay to access your content.

12. Recipes

Create recipes and cookbook

Are you a chef, a home cook, or a food blogger? If you do, then you can sell recipes as digital products.

The food industry is worth trillions of dollars and is very competitive. However, you can find a niche that your audience likes and share recipes to earn money.

For instance, you can start a food blog and offer premium recipes for subscribers. Or you could combine multiple recipes into an ebook and sell that as a digital product.

Plus, you can offer cooking courses and other premium content by creating a membership site. We recommend MemberPress for this sort of site, as it’s the best plugin for that on the market.

13. Podcasts

Podcast

Podcasts are audio shows that users can subscribe to. They are generally made up of audio files that listeners can download or stream to listen to.

There are many topics you can create a podcast on. For example, if your topic is music, then you can narrow it down to a specific genre. Similarly, if you’re into sports, then you can create a podcast on football.

Another great way of selling podcasts is by inviting industry experts and serving it as a masterclass. You can charge a premium or only offer these podcasts to members to generate income.

Many podcasters rely on their communities supporting them, whether that’s through a service like Patreon or creating their own membership site.

For more details, you can follow our guide on how to start a podcast and make it successful.

14. Professional Services and Coaching

Professional services

You can also sell your expertise as a digital product and help other businesses.

For example, if you’re a copywriter, graphic designer, social media expert, developer, fitness coach, legal professional, translator, SEO expert, offer technical support through live chat, or any type of consultant, then you can offer your services to others for a fee.

Now, you can sign up for different freelancing websites like Upwork, or create your own site. From here, simply market your expertise on social media platforms and build a following to get more projects and clients.

15. Research and Data

Research data

Do you conduct industry-wide surveys, polls, and research? If yes, then you can create digital products and sell the research data.

Many businesses are looking for insights into their industry. They want to better understand their audience and find out what they like or don’t like.

You can carry out research on popular topics, collaborate with companies, or simply run a survey to gather data. After that, you can create a report, add it to your website, and sell it to consumers.

If you have a membership website, then you can also offer research and data to subscribers.

For examples, see some of our research articles we offer for free here at WPBeginner:

Bonus: Plugins and Tools to Market Your Digital Products

Now that you know some of the most popular digital products to sell online, you’ll also need to market them to your customers.

Here’s a list of WordPress plugins and tools that you can use to promote your product and boost conversions:

  • OptinMonster – It is the best lead generation and popup plugin for WordPress. You can create different campaigns and use smart targeting rules to promote digital products and increase conversions.
  • WPForms – This is the best WordPress form plugin. You can use it to create an order form, payment form, and more.
  • All in One SEO (AIOSEO) – The plugin helps you optimize your website for search engines. This way, you get to improve search engine rankings, attract more organic visitors to your site, and boost sales of your digital products.
  • MonsterInsights – It is the best Google Analytics plugin for WordPress. Using the plugin, you can track your digital products performance, which files get the most downloads, uncover the most popular products, and track eCommerce revenue without editing code.
  • PushEngage – This is a push notification software for WordPress and allows you to send personalized web notifications to customers about new products, promotions, sales, etc.
  • WP Simple Pay – You can collect online payments on your website using this plugin. The best part, you don’t have to set up a shopping cart to sell digital products while using WP Simple Pay.

We hope this article helped you find the most popular digital products to sell online. You may also want to see our guide on low-cost and easy online business ideas that make money and the best email marketing tools to promote your digital products.

If you liked this article, then please subscribe to our YouTube Channel for WordPress video tutorials. You can also find us on Twitter and Facebook.

The post 15 Most Popular Digital Products You Can Sell Online in 2023 first appeared on WPBeginner.

How to Sell Music Online in WordPress (Step by Step)

Recently, one of our readers asked if it was possible sell music online in WordPress?

The answer is yes. Whether you’re selling your own songs or creating an online music store, you can easily do this in WordPress. Selling music online is a great way to make money without having to pay high shipping or manufacturing costs. It can also be an easy way to promote your own band or music, as well as grow your fanbase.

In this article, we will show you how to easily sell music online in WordPress, step by step.

How to sell music online in WordPress

How to Sell Music Online in WordPress

The easiest way to sell music online is by using Easy Digital Downloads. Easy Digital Downloads is the best eCommerce WordPress plugin that’s designed specifically to sell digital products including music.

How to sell music online using WordPress

Unlike general eCommerce plugins like WooCommerce, Easy Digital Downloads is built specifically with the features you need to promote, sell, and distribute digital music online.

In this way, you don’t have to waste time configuring features that aren’t necessary for selling digital products, such as shipping and inventory management settings.

With that being said, let’s see how you can easily sell music online in WordPress.

Note: If you are looking to sell physical copies of your music, too, such as vinyl records or CDs, check out our guide on how to set up an online store.

Before You Get Started

Before you can start selling music online, it’s important that you have a WordPress site setup already.

For this, you will need a domain name and WordPress hosting.

We recommend using SiteGround’s EDD hosting because it comes with Easy Digital Downloads pre-installed.

SiteGround Managed Hosting forEasy Digital Download (EDD)

But you can also use any other WordPress hosting provider and follow our instructions below.

Step 1. Setting Up Your eCommerce Plugin

The first thing you need to do is install and activate the Easy Digital Downloads plugin. For detailed instructions, please see our guide on how to install a WordPress plugin.

The Easy Digital Downloads WordPress plugin

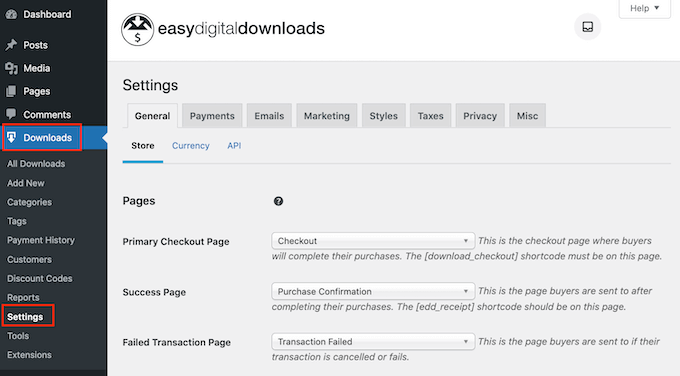
Upon activation, head over to Downloads » Settings in the WordPress dashboard.

How to set up the Easy Digital Downloads WordPress plugin

Even though you’re selling music, you still need to set your store’s location. This allows Easy Digital Downloads to auto-fill some fields in the order form, which will make it easier for fans to buy your music. Easy Digital Downloads will also use this information to calculate sales tax.

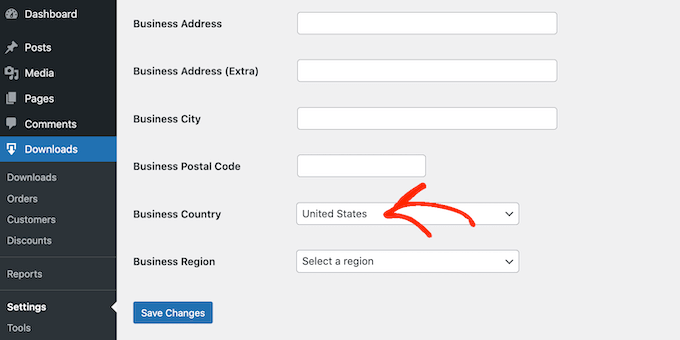
To add your location, simply open the ‘Business Country’ dropdown menu. You can then choose where your business is based.

Setting the location of your online music store

Next, open the ‘Business Region’ dropdown menu and choose the state or province where your store operates from.

After making these changes, go ahead and click on Save Changes to store your settings.

Adding a region to your digital music store

Step 2. Adding a Payment Gateway to Your Music Store

When selling music online, you’ll need a way to accept credit card payments in WordPress.

By default, Easy Digital Downloads supports popular payment gateways including Stripe, PayPal and Amazon Payments.

Pro Tip: Want to use a different payment gateway instead? You can add extra payment options using the Easy Digital Download extensions.

To add payment gateways to your website, go ahead and click on the ‘Payments’ tab. Then make sure the ‘General’ tab is selected.

Adding a payment gateway to your WordPress website

In the Active Gateways section, check the box next to each gateway you want to use on your WordPress website.

If you check more than one payment method, then you’ll need to choose a default gateway, which will be selected automatically when the visitor arrives at the checkout.

To make this decision, simply open the ‘Default Gateway’ dropdown and choose the payment method you want to use. You can use any gateway you want, but Stripe can accept credit cards as well as Apple Pay and Google Pay. With that in mind, we recommend using Stripe as your default gateway.

Adding a Stripe gateway to your WordPress blog or website

After selecting one or more payment gateways, click on the ‘Save Changes’ button. You’ll now have access to some new tabs where you can configure each payment gateway.

The process will vary depending on which gateway you’re using, but Easy Digital Downloads will walk you through the process.

Let’s use Stripe as an example.

To set up Stripe, simply select the ‘Stripe’ tab and then click on ‘Connect with Stripe.’

Connecting the Stripe payment gateway to WordPress

This launches a setup wizard that will walk you through the process of configuring Stripe as your payment gateway.

If you’re using multiple payment gateways, then you’ll need to repeat these steps to set up each gateway separately.

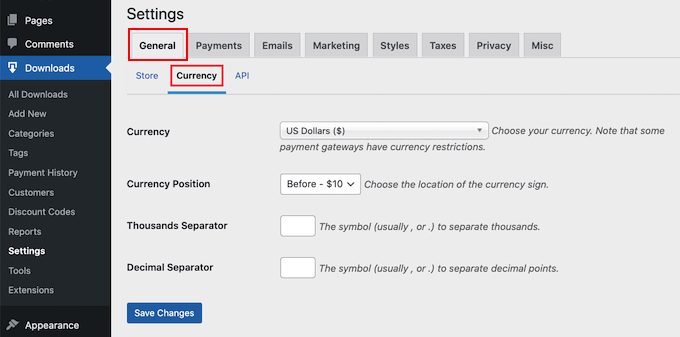
By default Easy Digital Downloads shows all your prices in US dollars. Once you’ve set up your payment gateway, you may want to change the currency that’s used on your website.

To show your prices in any currency other than US dollars, just click on the ‘General’ tab. Then, select ‘Currency.’

How to change the currency settings in your online music store

Next, open the ‘Currency’ dropdown. You can now choose the currency that you want to use on your online music store.

Just be aware that some payment gateways may not accept every currency. If you’re unsure, then you can always check your chosen payment gateway’s website. Most have a list of all the currencies they support.

With that done, click on ‘Save Changes’ to store your settings.

Step 3. Turn Your Music Files into Downloadable Products

Once you’ve set up a payment gateway, you’re ready to start adding music to your online store. With Easy Digital Downloads, you can add sell a single song or add multiple files to the same digital product. This is perfect for selling EPs, albums, compilations, and other products that have multiple separate audio files.

Create a New Digital Product

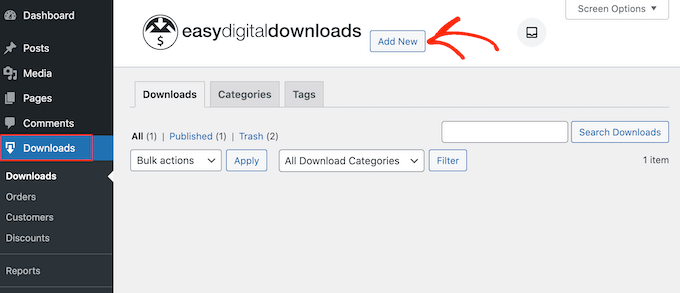
To create a digital product, simply select ‘Downloads’ from the left-hand menu. Then, click on the Add New button.

Adding music as a downloadable product

You can now type in a name for the product. This will be shown on the product’s page, so you’ll typically want to use something descriptive like the title of the album or single.

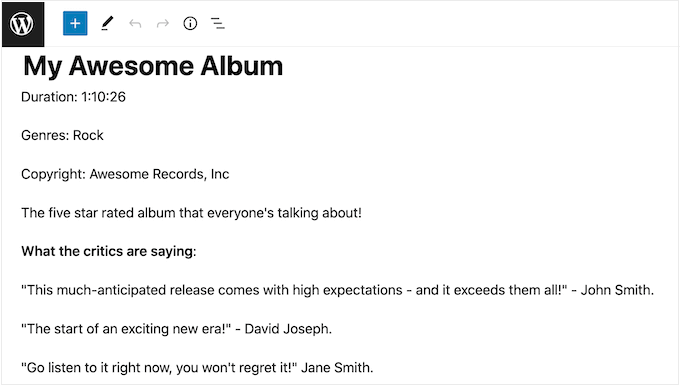
Next, type out the description that will appear on the product page.

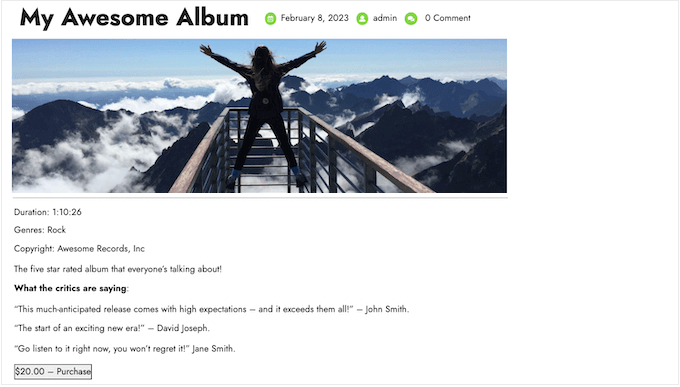
This should give shoppers all the information they need to decide whether the product is right for them. For example, you might include the genre, duration, and track listing. You might also want to show customer reviews, quotes from music critics, or the star rating.

Adding customer reviews to your WordPress website using Easy Digital Downloads

Add Categories and Tags

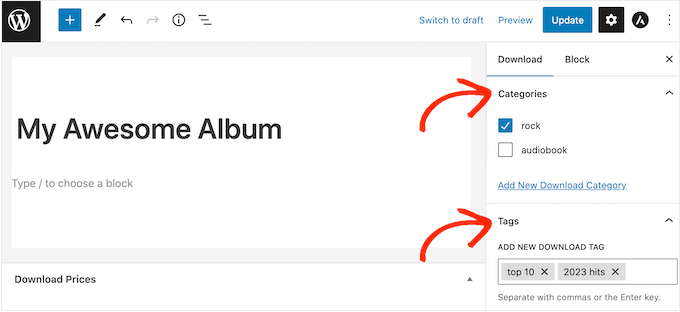
If you’re planning to sell music from lots of different artists, then categories and tags can help shoppers find what they’re looking for.

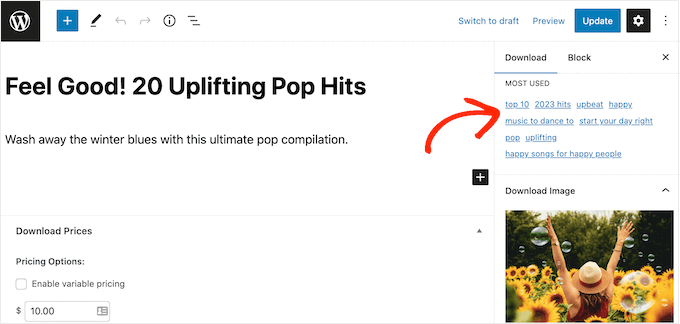
Helpful and descriptive categories can encourage shoppers to explore related artists and genres, which can get you more sales. You might even get creative and add tags for different characteristics like mood, influences, or activities, as you can see in the following image.

Adding product tags to your WordPress website

You can create new categories and tags in the ‘Categories’ and ‘Tags’ boxes.

This works similarly to adding categories and tags to WordPress pages.

Adding product tags and categories to your music website

Set a Price (Or Create Variable Pricing)

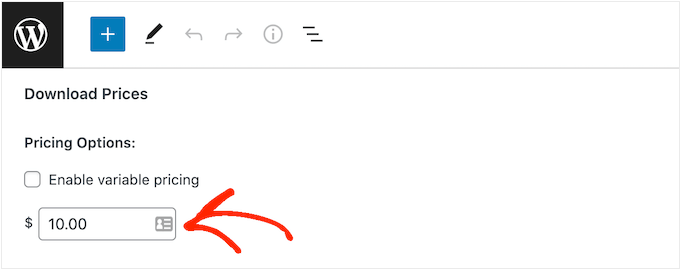
After that, you’ll want to set a price by scrolling to the Download Prices section.

Here, type in how much visitors need to pay before they can download the digital product.

Adding a price to a digital music download

Most of the time you’ll want to charge a fixed amount, but Easy Digital Downloads also supports variable pricing.

You might use variable pricing to sell different versions of the same digital product. For example, you could create an extended album with additional tracks, or have several versions of a single with different bonus songs.

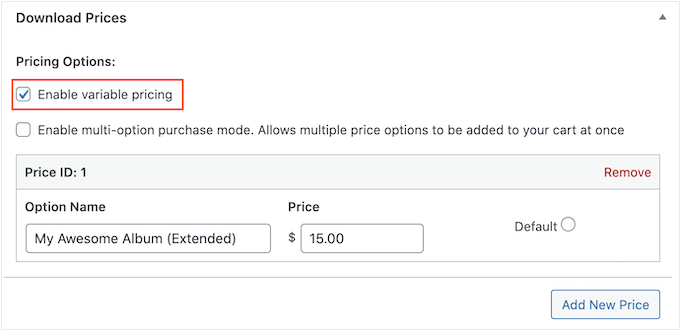
If you want to sell variations, then select the ‘Enable variable pricing’ checkbox. This adds a new section where you can start to build your variations.

For now, just type in a title and price for each variation.

How to enable variable pricing

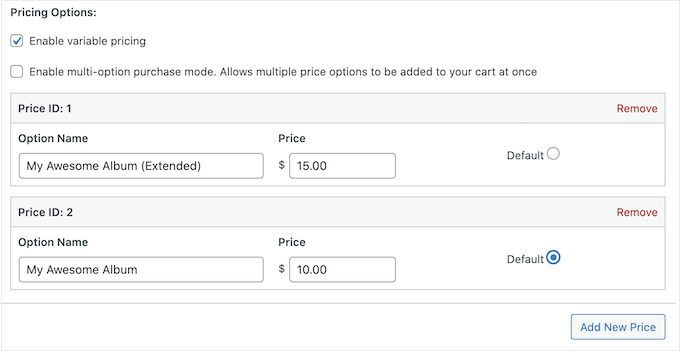
To add more variations, simply click on ‘Add New Price.’ This adds another section where you can type in a title and price.

With that done, you’ll need to set the default variation, which will be selected when the visitor first lands on the product page. Simply check the radio button next to the variation you want to use.

Adding variable pricing to your songs, albums, and EPs

Add Your Audio Files

You’re now ready to start uploading audio, which can either be a single file or multiple separate audio tracks.

When it comes to music, WordPress supports mp3, ogg, and wav. WordPress also supports m4a, although this format may not work in all browsers.

Pro Tip: If you want to sell music in a file type that WordPress doesn’t support, then see our guide on how to allow additional file types in WordPress.

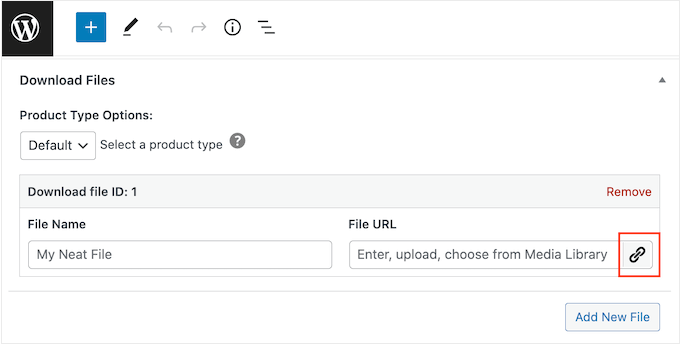
You can now scroll to the Download Files section and click on the ‘Upload a File’ icon.

Uploading audio and music files to an eCommerce store

Now simply choose a song from the media library, or upload a new file from your computer.

With that done, type a title into the ‘File Name’ field. This will be visible to the shopper, so you’ll typically want to use the song’s title. However, you can also add extra information such as the artist’s name.

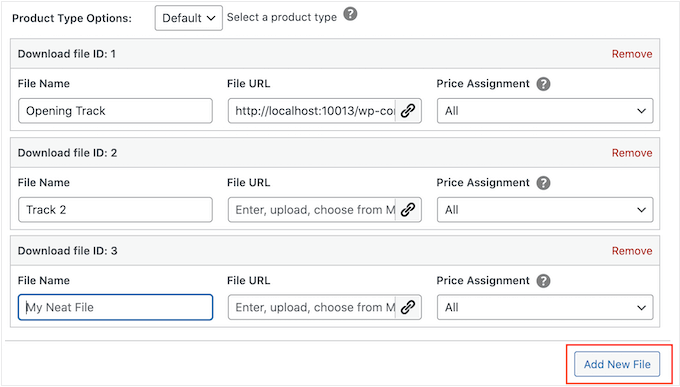
If you want to add multiple tracks to the digital product, then click on ‘Add New File.’ This adds a section where you can upload another file.

How to sell songs, audio files, and albums online using WordPress

Simply repeat these steps to upload all the files you want to include in the digital product.

Finish Setting Up Variable Pricing (Optional)

Did you enable variable pricing in the previous step? If you’re selling different versions of the same product, then you’ll need to choose which files to include in each variation.

For example, you might release ‘My Awesome Album’ with 10 tracks, and ‘My Awesome Album Extended Edition’ with 12 tracks.

Note: If you set a single price, then skip ahead to the next section.

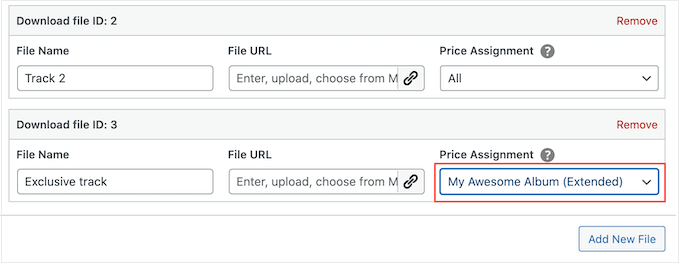
In the ‘Price Assignment’ column, you’ll see that every audio file is set to ‘All’ by default. This means it’s included in every variation.

To change this, simply open a file’s ‘Price Assignment’ dropdown and choose the variation that customers need to purchase, in order to get this audio file.

How to create variable music downloads using WordPress

Simply repeat these steps to build unique variations with different track listings.

Protect Your Music By Setting a Download Limit

By default, a customer can download a product as many times as they want after purchasing it. This can be useful if the person accidentally deletes their download, or they want to listen to the track on multiple devices such as their smartphone, tablet, and computer.

However, offering unlimited downloads can make you vulnerable to scams. For example, a customer might share their direct download link with dozens of other people, who then download your music for free.

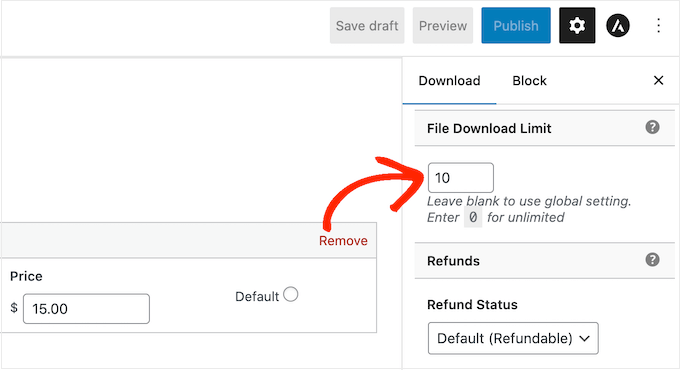
With that in mind, you may want to set a reasonable file download limit by typing into the ‘File Download Limit’ field.

Add a download limit to your music files

Note: If you set this value too low, then customers may occasionally contact you asking for extra downloads. If there’s a genuine reason why they need to re-download the file, then you can simply resend the purchase receipt by going to Downloads » Payment History in your WordPress dashboard.

Create a Refund Policy

Hopefully, everyone who buys your music will be happy with their purchase. However, it’s still smart to think about how you’ll handle refunds.

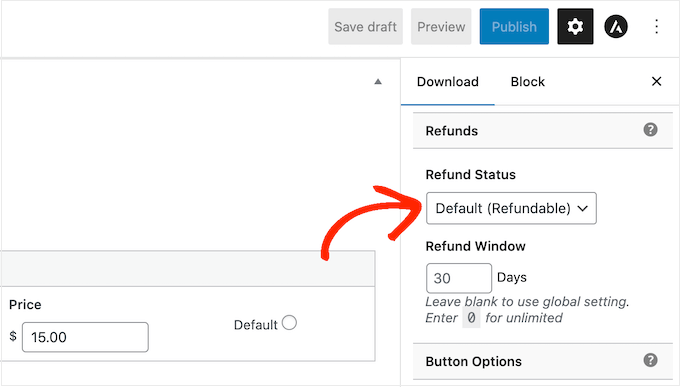
If you scroll to the ‘Refunds’ section in the left-hand menu, then you’ll see that Easy Digital Downloads offers your customers a 30-day refund by default.

Creating a refund policy for your online store

If you want to give customers more or less time to claim a refund, then simply type a new number into the ‘Refund Window’ field.

A generous refund policy can make customers see your site as trustworthy and fair, which could get you more sales. It will also help turn hesitant visitors into first-time customers.

Giving unhappy customers their money back is a big part of good customer service. Even if they didn’t like their purchase, an easy refund process may still convince people to buy from you in the future.

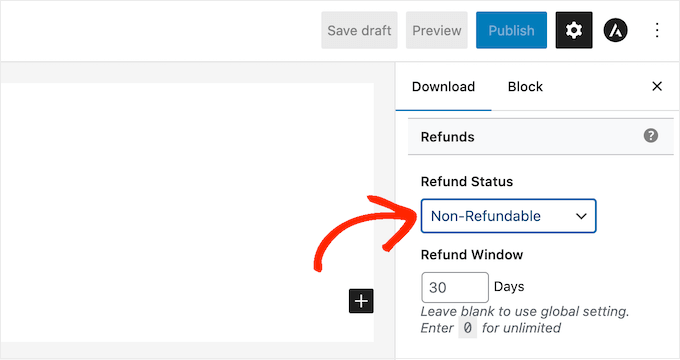
For that reason, we recommend offering refunds wherever possible. However, if you don’t want to give refunds, then open the ‘Refund status’ dropdown and choose ‘Non-Refundable.’

Changing the refund policy on your music store

Upload Your Album or Song’s Cover Art

With that done, you’ll need to add a product image. This will typically be the album or single’s front cover, or the musician’s logo.

Pro Tip: If you don’t already have a product image, then you can create one using web design software such as Canva.

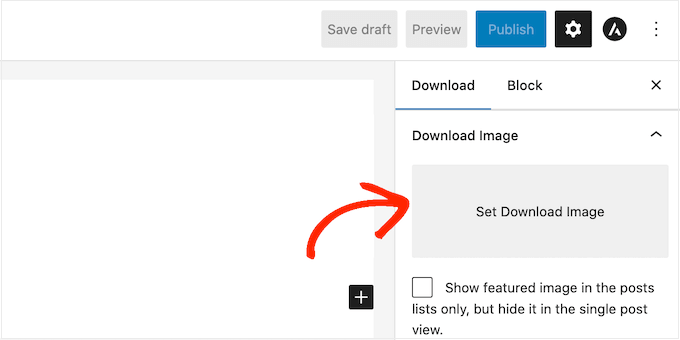
To add a product image, simply scroll to the Download Image section and then click on the ‘Set Download Image’ link.

Adding a product image to a music store

This launches the WordPress media library where you can choose an image or upload a new file from your computer.

Add Download Instructions

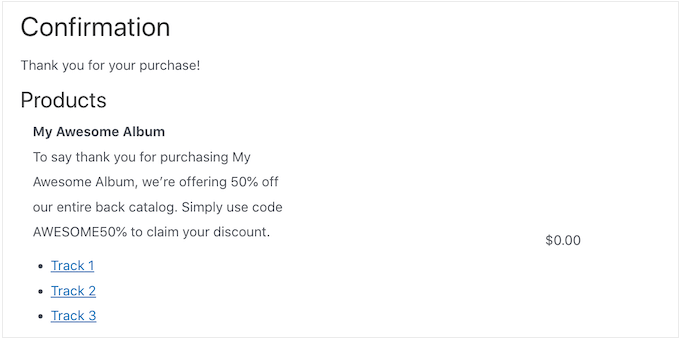
Finally, you may want to add some download instructions, which will appear on the order confirmation page.

An example of download instructions, on a purchase confirmation page

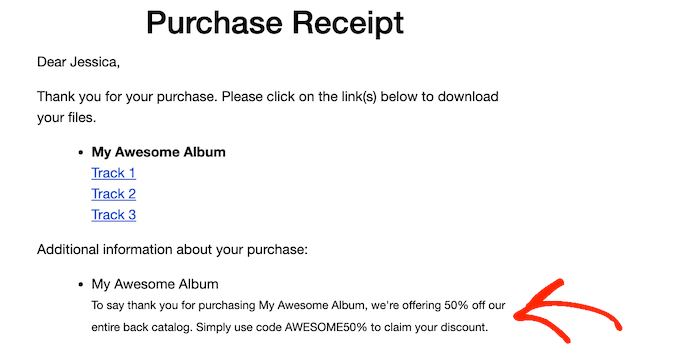
They’ll also be added to the bottom of the purchase receipt email customers get when they buy from your site.

You can use this section to share technical information, such as the file format or the programs it’s compatible with. However, you can also write a thank you note, or even share exclusive perks such as a coupon code.

Download instructions, on a music purchase receipt

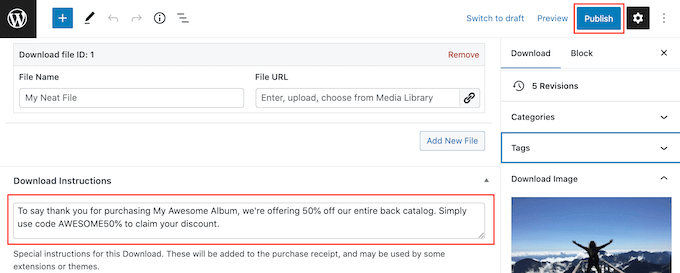
No matter what information you want to share, go ahead and type it into the ‘Download Instructions’ box.

Once that’s done, you can go ahead and click on the ‘Publish’ button to make the digital download live.

Adding download instructions to a digital music download

Step 4. Customize Your Digital Download Emails

Every time someone buys music from your store, Easy Digital Downloads will send them an email.

Inside the email, they will find a download link to their purchased music.

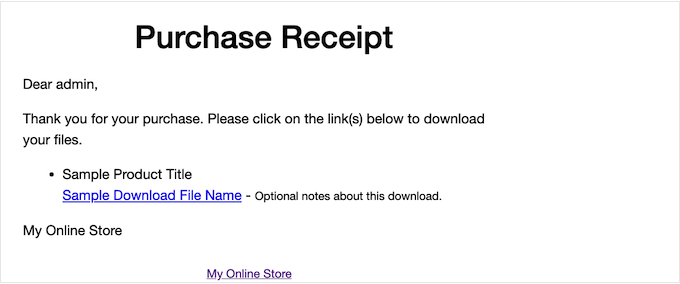
The default Easy Digital Downloads purchase receipt email

While this email has everything the customer needs by default, it’s a good idea to customize it. For example, you might help your email stand out by adding your own branding and logo.

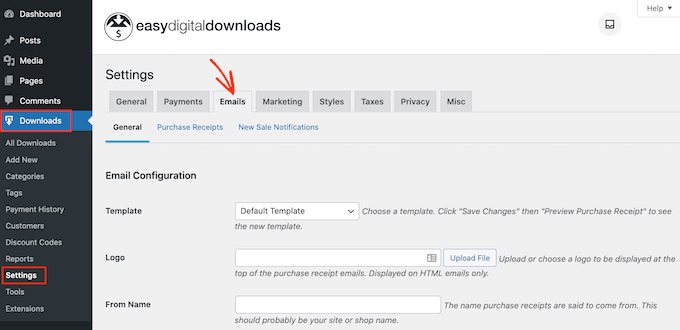
To customize the default email, head over to Downloads » Settings. Then click on the ‘Emails’ tab.

How to customize the purchase confirmation email on your online store

Add Your Own Logo and Branding

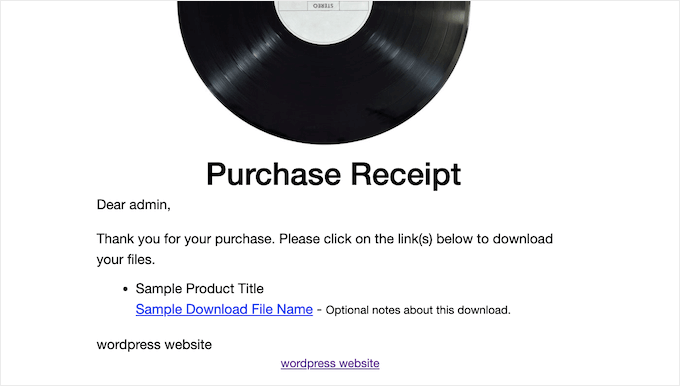
You may want to start by adding a logo to the purchase confirmation email.

This logo appears at the top of the screen, so customers can immediately see who the purchase email is from.

Adding your music store's logo to the purchase receipt email

To add a logo, click on the ‘Upload File’ button. You can now either choose an image from the WordPress media library or upload a file from your computer.

Change the ‘From’ Name and Email

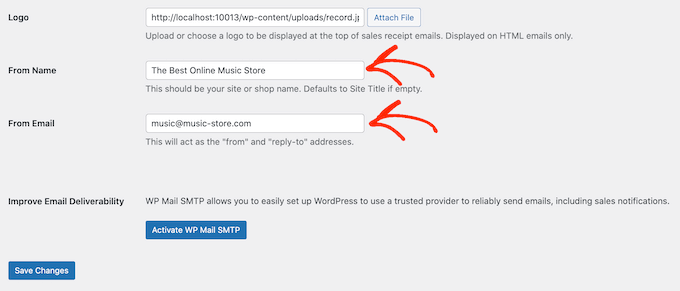
You can also add a ‘From Name’ which will appear in the customer’s inbox. With that being said, you’ll want to use something that the customer will recognize such as the name of your band or online music store.

You’ll also need to add a ‘From Email,’ which will act as the ‘from’ and ‘reply-to’ address.

Configuring the payment confirmation email

Some customers may reply to the purchase receipt email. For example, if they’re having problems downloading your music, then they might reach out by clicking ‘Reply.’

Because of that, you’ll want to use a business email address that you frequently check.

Improve Your Email Deliverability

If shoppers don’t get the purchase receipt email, then they won’t be able to download the music they just bought.

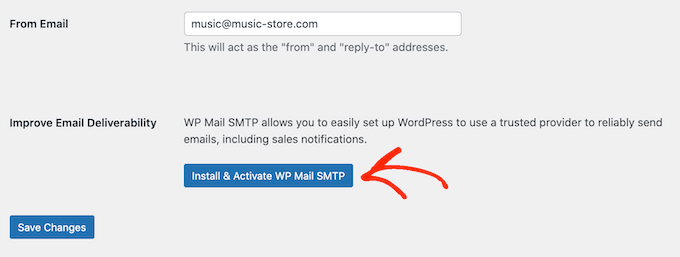
This is a bad customer experience, so you’ll want to make sure the purchase receipt email arrives in the shopper’s inbox and not in their spam folder. For that reason, we recommend using WP Mail SMTP to improve email deliverability rates.

Simply click on the ‘Install & Activate WP Mail SMTP’ button and then follow the onscreen instructions to configure the free plugin. For more information, please see our step-by-step guide on how to fix the WordPress not sending email issue.

How to fix the WordPress not sending email issue

When you’re finished, don’t forget to click on the ‘Save Changes’ button.

Write Your Purchase Email

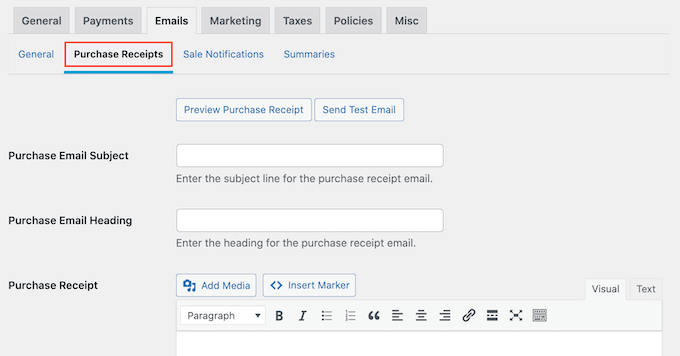
After all that, click on the ‘Purchase Receipts’ tab.

How to create a custom purchase receipt for an online store

On this screen, you can type in an email subject, add a heading and also change the email’s body text.

You could simply type in the text that you want to send to every customer. However, you can create more helpful and personalized emails by using the Conditional Emails feature.

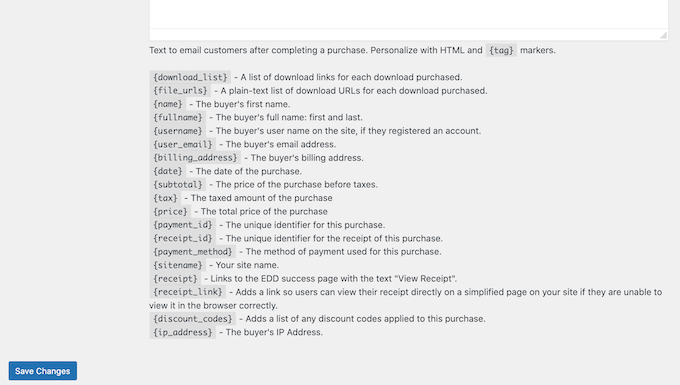
Conditional Emails use ‘template tags’ to personalize your messages. These template tags change based on factors such as the buyer’s name, how much they paid for their music download, and any coupon codes they used for the purchase.

When Easy Digital Downloads sends an email, it’ll automatically replace the template tags with real values.

To see all the different tags you can use, simply scroll to the bottom of the page.

Easy Digital Download's conditional email settings

Test Your Purchase Receipt Email

When you’ve finished making changes, you may want to send a test email to check how the message will look to your customers.

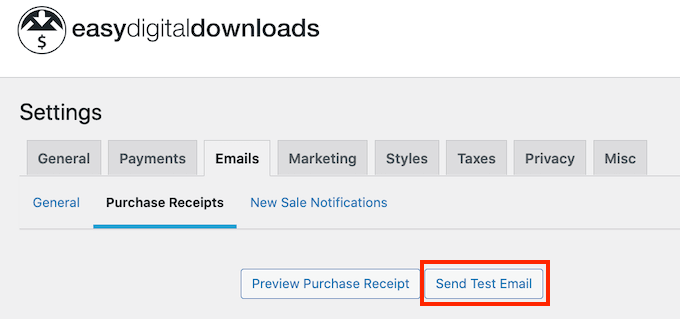
Simply click on the ‘Send Test Email’ button and Easy Digital Downloads will send an email to your admin email address.
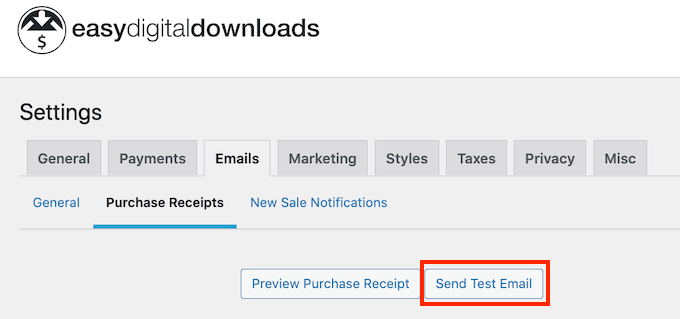
Sending a test email from your online music store

When you’re happy with how the purchase receipt email looks, you can go ahead and click on the ‘Save Changes’ button.

Step 5. Test Your Digital Music Download

After all that, it’s a good idea to test the digital download to see whether there are any problems or anything you want to change.

Enable Test Purchases

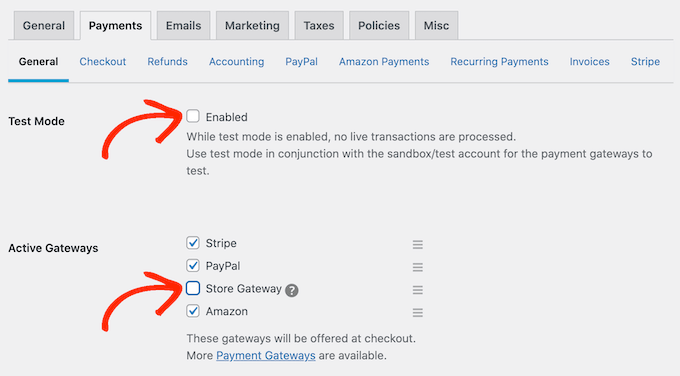
To start, you’ll need to put Easy Digital Downloads into test mode so you can buy products without having to enter any payment information.

In the WordPress dashboard, go to Downloads » Settings and then click on ‘Payments.’

Adding a payment gateway to Easy Digital Downloads

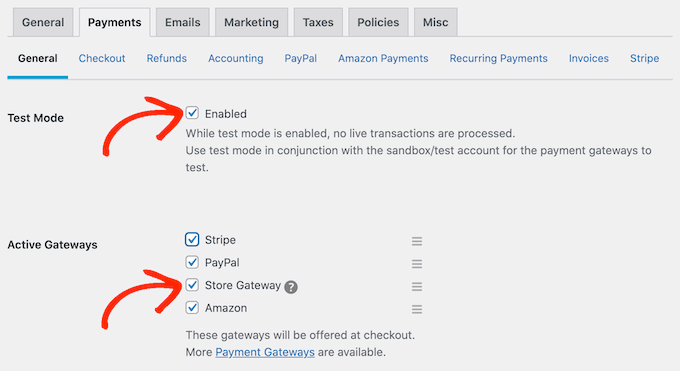
On this screen, check the box next to ‘Test Mode.’

Next, select ‘Store Gateway’ as this allows you to make a purchase without typing in any credit or debit card information.

Adding payment gateways to WordPress

After that, click on ‘Save Changes’ to store your settings.

Make a Test Purchase

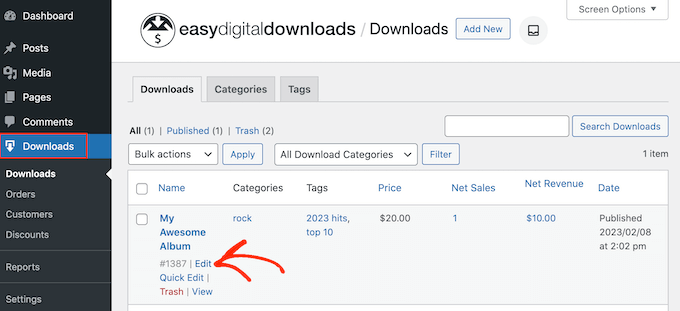
Now you’re in test mode, go to Downloads » Downloads and hover your mouse over the product you want to test.

When it appears, click on the ‘View’ link.

How to customize a music download

This opens the item’s product page.

To go ahead and make a test purchase, click on the ‘Purchase’ button.

Testing a music purchase on your WordPress website

Easy Digital Downloads will now add this product to your shopping cart.

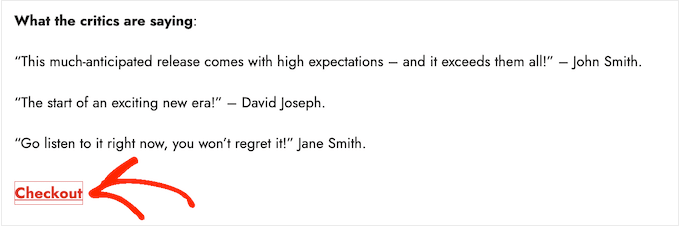
To proceed, click on the ‘Checkout’ button.

How to sell music online with WordPress

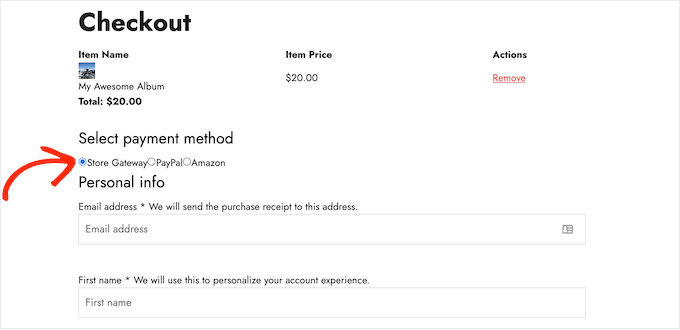
Under ‘Select payment method,’ click to select the radio button next to ‘Store Gateway.’

You can now type in your name and email address. Easy Digital Downloads will send the purchase receipt to this address, so you’ll need to use a real email address that you have access to.

How to sell albums, songs, and music online using WordPress

After a few moments, you’ll get a purchase confirmation email containing links to download each track in the digital product.

If everything works as expected, then you’re ready to start accepting payments from real-life music fans.

To take Easy Digital Downloads out of test mode, go to Downloads » Settings, and then select the ‘Payments’ tab. Here, uncheck the box next to ‘Test Mode’ and the box next to ‘Store Gateway.’

How to accept payments online using WordPress

With that done, click on ‘Save Changes’ to store your settings. You’re now ready to accept credit card payments in WordPress.

Step 6. How to Promote Your Music Downloads

At this point, you’ve created one or more digital products, but you still need to drive potential customers to your product pages so they can buy your music.

This might mean creating a sales page where you advertise all the latest releases, adding a particular product page to your website’s menu, or even highlighting your favorite track on a custom home page.

You could even write a WordPress blog where you talk about music topics such as the latest releases, your tour experiences, or your favorite records. These posts are the perfect place to include links to any relevant albums and singles that readers may want to buy.

No matter how you promote a product, you’ll need to know its URL.

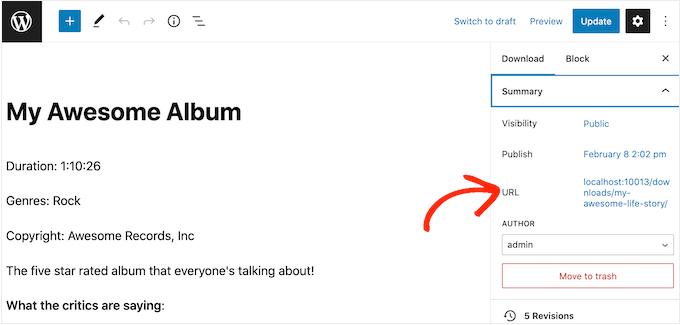
To find this link, head over to Downloads » Downloads. You can then hover your mouse over the product and click on its ‘Edit’ link.

Selling music online using WordPress and Easy Digital Downloads

You’ll find the URL under ‘Summary’ in the right-hand menu.

You can now link to this product page from any area of your website, simply by using its URL. To learn more, see our step-by-step guide on how to add a link in WordPress.

Adding a product page to your WordPress website

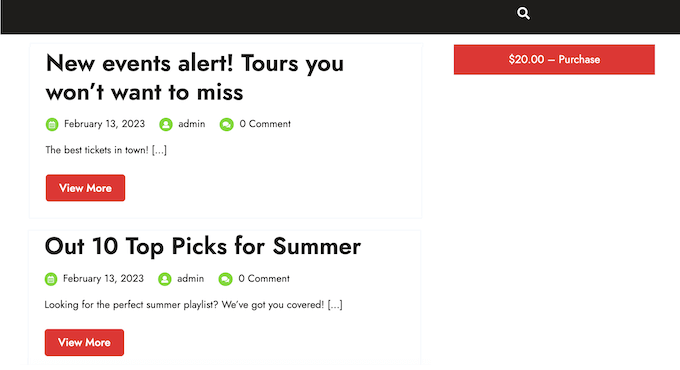
Easy Digital Downloads also creates a ‘Purchase’ button for each digital download. Visitors can click this button to add that specific product to their shopping cart.

You can add this button to any page, post, or widget-ready area. This allows visitors to start the purchasing process without necessarily visiting the product’s page.

Adding a music purchase button to your website or blog

To get the button’s shortcode, simply scroll to the product’s Download Settings section. You can then copy the text in the ‘Purchase Shortcode’ field.

For more information on placing the shortcode, please see our guide on how to add a shortcode in WordPress.

How to add a digital down to WordPress using shortcode

We hope this article helped you learn how to sell music online with WordPress. You can also go through our guide on the best live chat software for small businesses and our step by step guide on how to create an email newsletter.
If you liked this article, then please subscribe to our YouTube Channel for WordPress video tutorials. You can also find us on Twitter and Facebook.
The post How to Sell Music Online in WordPress (Step by Step) first appeared on WPBeginner.