Do you want to add an HTML sitemap page in WordPress?
Unlike XML sitemaps that are submitted to search engines for better crawling, HTML sitemaps present an organized list of your pages and posts for your website visitors.
In this article, we’ll show you how to add an HTML sitemap page in WordPress.
What’s the Difference Between XML and HTML Sitemaps?
An XML sitemap is a file that lists your website content in an XML format for search engines like Google and others.
On the other hand, an HTML sitemap is for your actual website visitors. It is a simple page that lists all your posts and pages in an organized way.
Now that you know the difference, let’s take a look at how to add an HTML sitemap page to WordPress using two different WordPress plugins. You can use the quick links below to jump straight to the method you want to use.
Method 1. Add HTML Sitemap Page in WordPress With All in One SEO
We recommend using the All in One SEO plugin to add an HTML sitemap page in WordPress. It’s the best WordPress SEO plugin in the market used by over 3 million websites and lets you create an HTML sitemap with a couple of clicks.
Note: There is a free version of All in One SEO Lite available which includes the HTML sitemap feature below, but we will be using the premium version in our screenshots because it includes powerful features like smart sitemaps, redirection manager, SEO schema, and more.
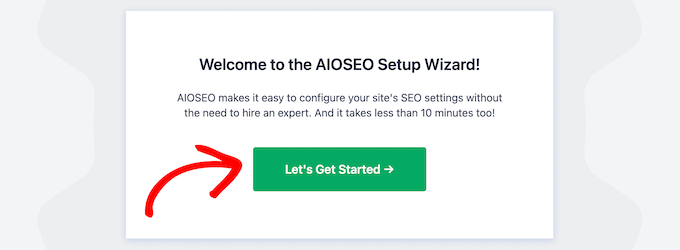
Upon activation, the AIOSEO setup wizard will open, which will guide you through setting up the plugin and getting your SEO settings right.
Simply click the ‘Let’s Get Started’ button and follow the steps.
After that, you’ll be taken to the WordPress admin dashboard, where you’ll have a new menu option called ‘All in One SEO’.
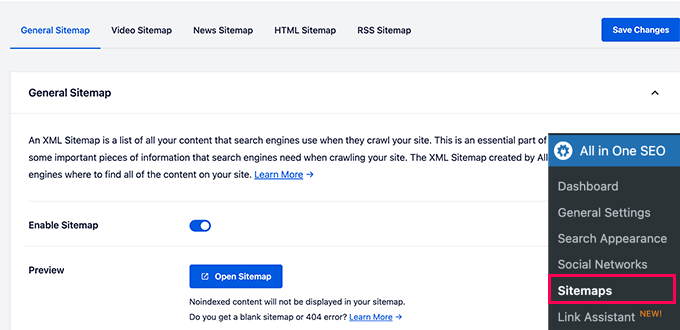
Then, you need to go to All in One SEO » Sitemaps, click on the ‘HTML Sitemap’ menu option, and make sure the ‘Enable Sitemap’ toggle is turned on.
Next, you can choose how you want to display your HTML sitemap.
For this tutorial, we’ll select the ‘Dedicated Page’ option, but you can also add it as a shortcode, block, widget, and more.
Then, enter the page URL where you want the HTML sitemap to display. The plugin will automatically create a new page for you.
Once you’ve done that, scroll down to the ‘HTML Sitemap Settings’ section.
Here you can customize how your HTML sitemap will display. You have control over what posts and pages will display, taxonomies such as categories and tags, sort order, and more.
You can also turn on ‘Compact Archives’ to display your HTML sitemap in a compact date archive format.
This is similar to how we display our compact archives on our 404 pages here at WPBeginner.
After you’re done customizing your HTML sitemap settings, make sure to click the ‘Save Changes’ button.
Now your visitors can view your HTML sitemap and more easily navigate around your website.
If you chose the ‘Dedicated Page’ option above, then you can visit the page by clicking the ‘Open HTML Sitemap’ button.
Method 2. Add HTML Sitemap Page in WordPress With Simple Sitemap
Simple Sitemap is a free plugin that lets you easily add an HTML sitemap to your WordPress website.
Once the plugin is activated, you can open an existing page, or create a new HTML sitemap page by navigating to Pages » Add New.
Adding an HTML Sitemap With Simple Sitemap Using Blocks
This plugin has newly added Gutenberg blocks that you can use to simply add an HTML sitemap page.
All you need to do is click the ‘Plus’ icon, then select the ‘Simple Sitemap’ option.
Another block included with this plugin is the ‘Simple Sitemap Group’ that creates a branching visual sitemap. But, we’re going to use the ‘Simple Sitemap’ block for this tutorial.
Once you add the block, it will automatically create your HTML sitemap.
On the right-hand menu, you have customization options where you can choose to display ‘Posts’ or ‘Pages’, or both together.
In the box under ‘Select post types to display’, simply enter ‘Post’ or ‘Page’ to choose what you want to display.
Next, you can change how the list displays by changing the ‘Orderby’ or ‘Order’ drop-downs.
You can also display the excerpt for the pages or posts listed, and enable or disable links. However, we’re going to keep the default plugin settings to keep our HTML sitemap simple and easy to browse.
Once you’ve finished customizing your HTML sitemap page, click ‘Publish’ or ‘Save’ if you’re updating an older page.
When your visitors go to your HTML sitemap, they’ll see a navigation page that looks similar to the one below.
Adding an HTML Sitemap With Simple Sitemap Using Shortcodes
Another way to add an HTML sitemap to WordPress is by using a shortcode. This gives you more control over the placement of your HTML sitemap and works for those who are using the classic editor.
Simply create a new page by navigating to Pages » Add New, then give your new page a name.
After that, click the ‘Plus’ icon to add a new block to your page.
Then, type ‘shortcode’ into the search box and select the ‘Shortcode’ block.
After that, simply copy and paste one of the following shortcodes into the text editor. The first shortcode will list your posts by category, and the second shortcode will list your pages.
[simple-sitemap-group]

[simple-sitemap]
Once you’ve done that, click ‘Publish’ or ‘Update’ to save your changes.
In this case, you would want your HTML sitemap to show pages in the proper hierarchical order.
Here is how you can add an HTML Sitemap with only pages.
Simply add this shortcode to the page where you want to display your HTML sitemap. Follow the same steps above to add the shortcode to a new WordPress page.
[simple-sitemap]
This is how it will display your HTML sitemap with all your WordPress pages listed in a hierarchical list.
Do you need a technical search engine optimization (SEO) checklist?
Optimizing your site for search engines can be a challenge if you’re not sure what to look for. Many website owners will ensure basic SEO practices but overlook technical elements.
In this article, we will show a WordPress technical SEO framework and share a checklist you can use for your business.
Why Do You Need a WordPress Technical SEO Framework?
Technical SEO is a key component of your WordPress SEO strategy. You could be creating the world’s best content, but if search engines can’t find and understand your content, then all your efforts are wasted.
That’s why it is important to have a WordPress technical SEO framework.
Our WordPress SEO framework checklist will ensure that search engines can easily crawl and index your content. Plus, you can also evaluate other technical aspects of your WordPress website that might be preventing you from achieving higher rankings.
For example, your website might be taking a long time to load. This would result in poor rankings since the page load time is a ranking factor.
There are many SEO tools that let you conduct SEO audits and find out if your site is technically optimized. However, not all tools will show details inside your WordPress dashboard.
The easiest way to evaluate technical SEO for your WordPress site is by using All in One SEO (AIOSEO). It is the best WordPress SEO plugin that helps you optimize your website for search engines.
It offers a free SEO Analysis tool that you can use to conduct a technical SEO audit. The tool is available in the AIOSEO Lite version, which you can use for free. There are also premium AIOSEO plans that offer more features like schema markups, sitemaps, redirection manager, and more.
First, you’ll need to install and activate the AIOSEO plugin. For more details, please see our guide on how to install a WordPress plugin.
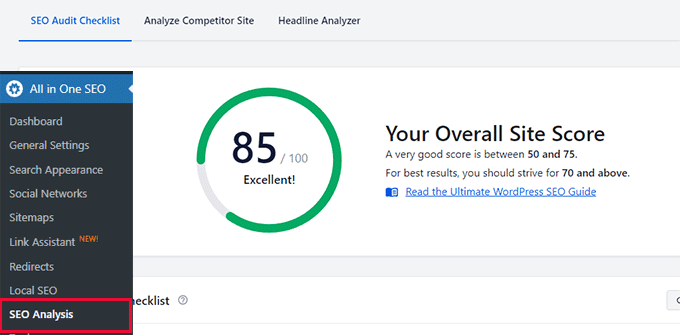
Upon activation, you can go to All in One SEO » SEO Analysis from your WordPress admin panel. Under the ‘SEO Audit Checklist’, you’ll see an overall score for your website.
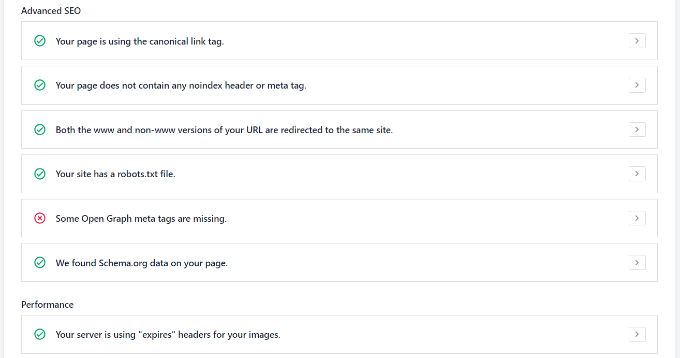
Next, you can scroll down to the Advanced SEO and Performance sections.
Here, the plugin will evaluate the technical SEO aspects of your website based on different parameters and ranking signals. It will then highlight missing elements and critical issues that could stop your site from ranking higher.
You can use AIOSEO to continuously monitor your site’s technical SEO and fix issues. Similarly, you can also perform a competitor analysis and see what they’re doing differently for their technical SEO optimization.
That said, let’s look at our WordPress SEO framework checklist that you can use to ensure higher rankings and organic traffic. You can click the links below to jump ahead to any section:
1. Ensure Your Website is Visible to Search Engines
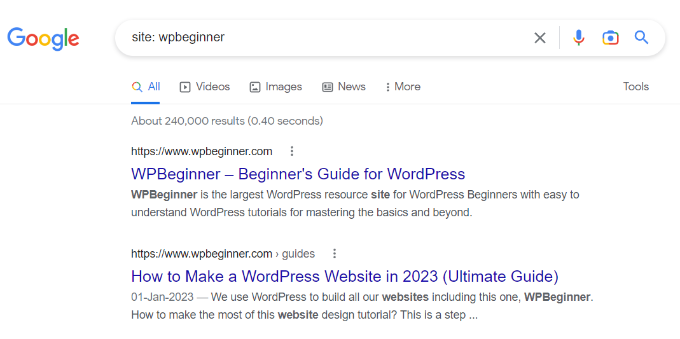
The first thing you need to check is whether search engines are able to find your WordPress site.
You can simply enter site:example.com in the search engine and see if your website appears in the search results. Just replace ‘example.com’ with your own domain.
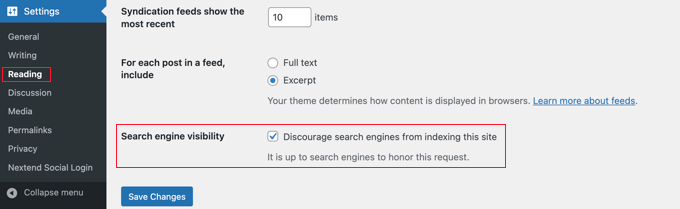
If your site isn’t showing up, then you can check the visibility settings in WordPress.
Go ahead and visit the Settings » Reading page from your WordPress admin panel. Next, scroll down to the Search engine visibility setting and be sure the ‘Discourage search engines from indexing this site’ option is unchecked.
This option is usually enabled if your website is under construction or is put in maintenance mode.
2. Uncover Crawling and Indexing Issues
If your website is visible to search engines, then it is important to check that your content is crawled and indexed.
Crawling is the process where Google, Bing, and other search engines discover and understand your website. Indexing is the process where search engines collect and store information about your website.
A simple way of checking crawling and indexing issues is using webmaster tools. For example, Google Search Console is a free tool by Google that shows your site’s performance on search results, helps uncover bugs, and allows you to submit your site to Google.
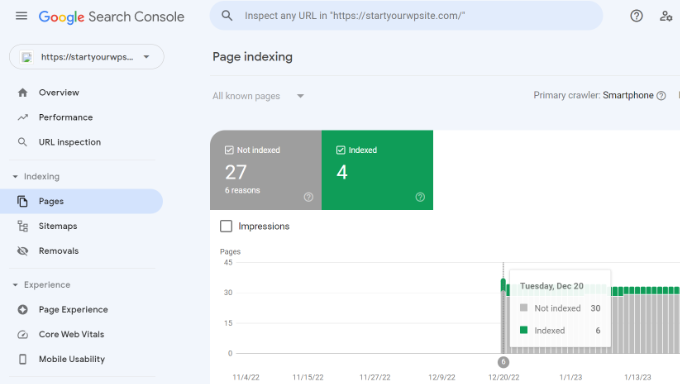
In Google Search Console, you can head to the ‘Pages’ report. Here, you’ll see pages that are indexed and not indexed.
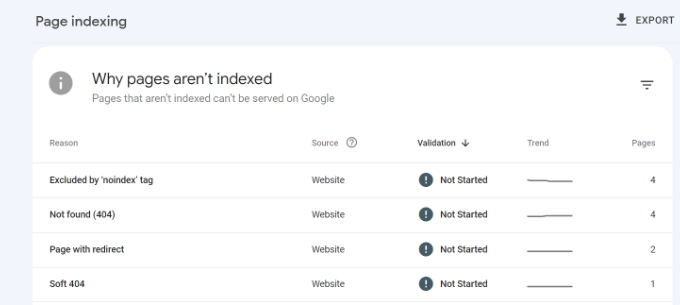
Next, you can scroll down to the ‘Why pages aren’t indexed’ report.
Google Search Console will show you crawling and indexing errors on your website and which pages are affected by them. You can then resolve these issues, so your web pages can appear in Google search results.
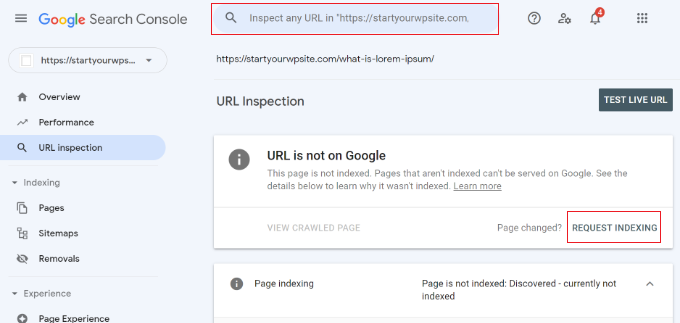
Besides that, you can also check indexing and crawling issues for individual URLs.
Simply enter the page link in the URL inspection tool at the top. Google Search Console will then show you a report on whether the URL is indexed and on Google.
If it is not, then you’ll see a ‘URL is not on Google’ message. To fix this, you can click the ‘Request Indexing’ button so Google can crawl and index your page.
3. Make Sure Your Website is Secure with HTTPS
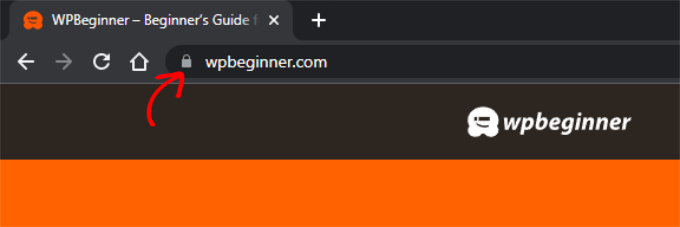
Another important thing to check from a technical SEO framework standpoint is whether your website is secure or not.
Google and other search engines will give preference to sites that use HTTPS over those that use HTTP. To secure your site, you will need an SSL certificate to encrypt the connection between your website server and the user’s browser.
You can check this by looking for the padlock sign in your browser’s search bar at the top.
Most WordPress hosting companies now offer free SSL with all their plans. You can ask your host to see if they offer that.
Broken links are bad for your website’s SEO framework, and it negatively impacts your user experience. These are links that no longer exist and will return a 404 error.
Since search engine crawlers find different pages on your website by following internal links. A broken link can stop them from discovering new content. As a result, your page might not get indexed in the search results.
Similarly, if a visitor clicks on a link and is unable to find a page they’re looking for, then they might exit your website.
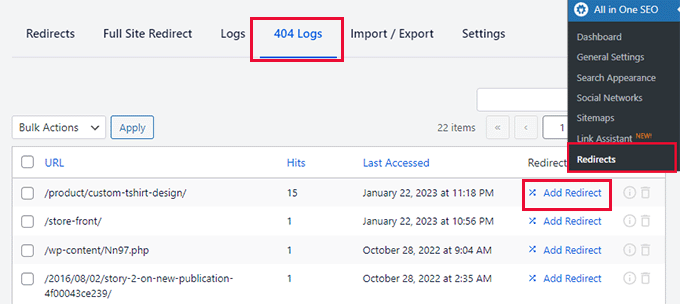
With All in One SEO (AIOSEO), you can easily find and fix broken links on your WordPress website.
It offers a powerful redirection manager that helps track 404 errors on your website and lets you set up permanent 301 redirects to fix broken links.
It is important that Google and other search engines only index one version of your website.
Your website can have different versions, but they should all point to one version. For example, you can have a site that has www and non-www version or HTTP and HTTPS version:
Whether you choose a www or non-www version, all the URLs should redirect to the primary WordPress URL. Otherwise, Google will consider each version as a different website.
This can negatively impact your overall SEO rankings. Search engines won’t know which version to index, and it could cause duplicate content issues.
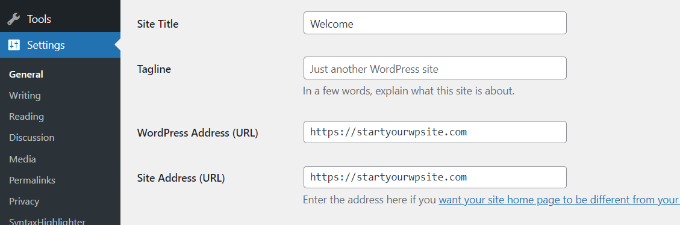
You can check the primary URL for your site by going to Settings » General from the WordPress dashboard. Next, look at the web address in the ‘WordPress Address (URL)’ and ‘Site Address (URL)’ fields.
With AIOSEO, you can automatically set the proper canonical URL in your site header, so search engines will know your preference.
6. Use SEO-Friendly URL Structures
After setting a primary URL for search engines to index, you can now check the URL structure of your website.
URL structure plays an important role in your SEO. Having an SEO-friendly URL structure will help Google, Bing, and other search engines easily crawl your pages and understand your content.
Here’s an example of a bad URL structure:
https://www.example.com/category.php?id=42012
Instead, you should be using URLs that describe the content, like:
You can create SEO-friendly URLs by making sure that they are short and descriptive. Besides that, don’t forget to include a keyword in the permalinks, use hyphens to separate words, keep all the words in lowercase, and don’t use stop words.
Pro Tip: Don’t include numbers in your URL slugs, either. That way, you can update your content in the future
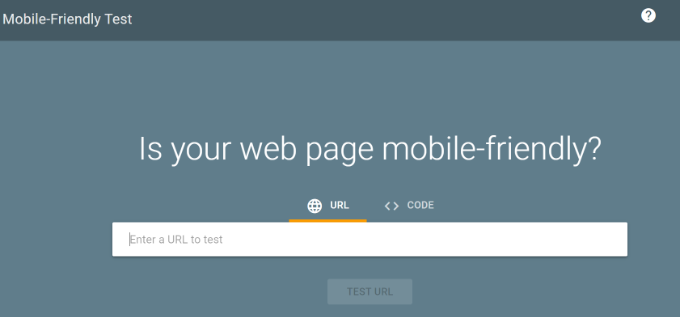
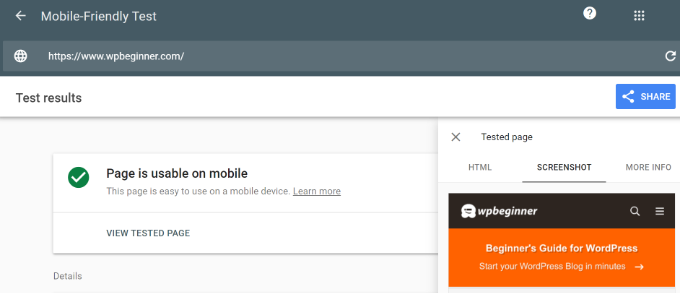
7. Ensure Your Site is Mobile Friendly
The next item in the technical SEO framework checklist is to ensure your WordPress site is mobile responsive.
With Google now going mobile-first, it will now index your site’s mobile version instead of the desktop version.
8. Check Your Website Speed and Improve Performance
Your website speed is also a critical part of your WordPress technical SEO framework. Google uses page load speed as a ranking factor and will rank fast-loading sites higher compared to slow-performing websites.
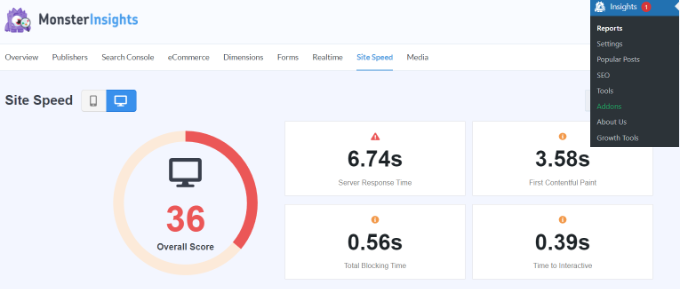
You can check website load time by running a site speed test. For instance, you can use MonsterInsights, which is the best Google Analytics plugin that shows a site speed report inside your WordPress dashboard.
After that, you can head to the Insights » Reports page from your WordPress admin panel. Next, you can go to the ‘Site Speed’ tab. Here, you’ll see an overall score for your website speed for desktop and mobile.
The report will also show other metrics that are important for measuring your website speed.
If you scroll down, then MonsterInsights offers recommendations and benchmark goals for each metric you should target.
A quick tip that you can use to improve your website speed is minifying your CSS and JavaScript files.
The term minified means reducing the size of website files by removing white spaces, lines, and unnecessary characters. When a user visits your website, different files are sent to the user’s browser, which includes CSS, HTML, and JavaScript files.
By reducing the file size, you can significantly improve website speed and performance. There are many WordPress plugins and hosting services that allow you to minify CSS and JavaScript files, like WP Rocket and SiteGround.
9. Improve Your Internal Linking Structure and Remove Orphaned Pages
Internal links play an important role in your website’s technical SEO framework. Search engines reward websites that have a proper internal linking structure without too many orphaned pages.
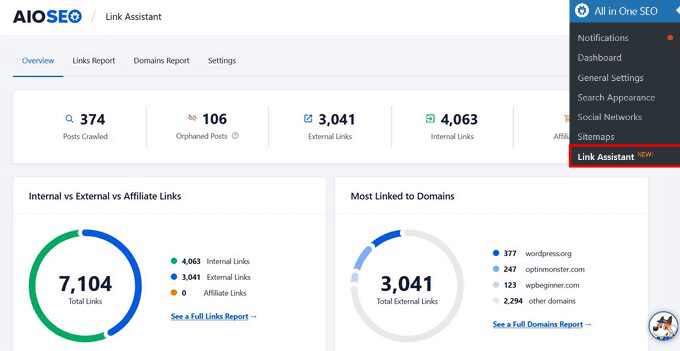
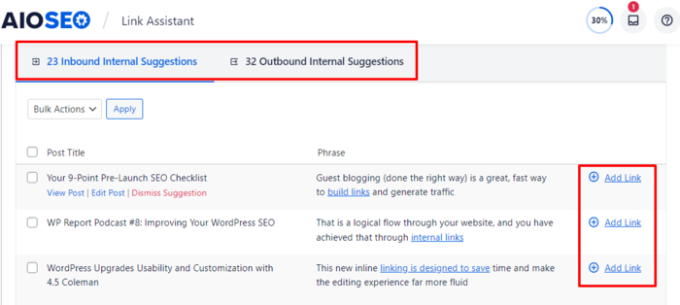
AIOSEO has a powerful SEO Link Assistant feature that makes it easy for you to discover link opportunities and even automate the process for you.
It is the best internal linking plugin for WordPress that crawls the links on your WordPress website and provides a detailed report. You can see the number of internal links, outbound links, and affiliate links for each post and page.
You can see all the link suggestions in one place, and it can even automatically go back and add internal links in your older posts with a single click.
10. Generate XML Sitemaps and Submit Them to Search Engines
Another important part of technical SEO framework is making it easier for search engines to find your content. One of the ways you can do that is by creating an XML sitemap.
It tells search engines about the important pages on your website. This way, search engine bots can crawl your site faster and index your content. While a sitemap won’t boost your rankings, it will improve the overall crawling and indexing process.
You can create and customize the sitemap using AIOSEO. The plugin will automatically generate a sitemap upon activation. Besides, it also lets you create a video sitemap, a news sitemap, an HTML sitemap, and an RSS sitemap.
Once you’ve created a sitemap, you can then submit it to different search engines using their webmaster tools.
For instance, Google Search Console gives the option to enter the sitemap URL and submit it to the search engine. To learn more, you can see our guide on how to submit your site to search engines.
Similarly, you can also add your site to Bing Webmaster Tool and then submit an XML sitemap to improve crawling and indexing.
11. Use Schema Markup for Rich Snippets
The next technical SEO framework item you should check is schema markup. It helps search engines understand your content better and how it will appear on the search results.
Search engines can use this information and display rich results. It also helps capture Google featured snippets, which can increase organic clicks and traffic.
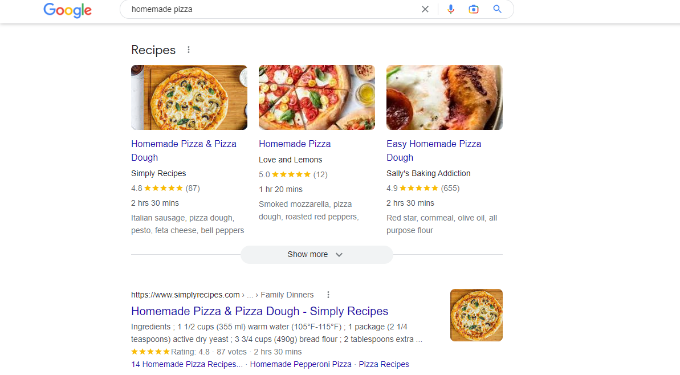
For example, here’s how Google shows recipes, ingredients, ratings, cooking time, and other information for blog posts that use a recipe schema markup.
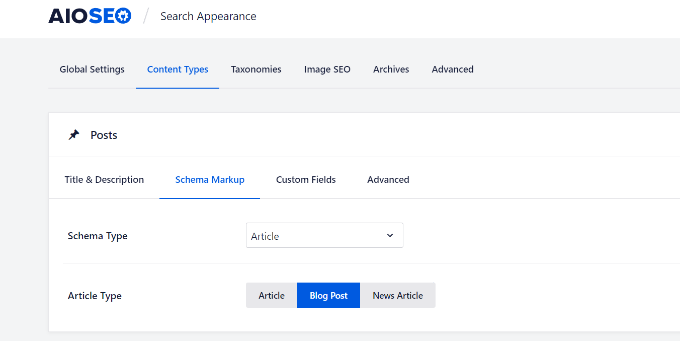
The plugin lets you choose the schema type depending on your content, and it takes care of the rest.
With AIOSEO, you can also add completely custom schema markups based on your needs using the WordPress custom schema generator feature. This can help you get star ratings, and other rich snippets in Google.
12. Optimize Your Robots.txt File for SEO
Robots.txt is a text file that specifies instructions for search engine bots on how to crawl your website. You can tell which pages to crawl and which pages to skip while crawling.
Here’s what a robots.txt file would look like for a WordPress site:
Adding a robots.txt file helps save the crawl quota. A search engine crawler will crawl a certain number of pages during a session. If they don’t finish crawling all the pages on your site, they will resume crawling in the next session.
This can slow down the indexing of your content, and it will appear in search results after some delay. That’s why optimizing the robots.txt file is an important component of the technical SEO framework.
You can disallow pages unnecessary pages like the WordPress admin area, theme folder, plugin files, and more. This way, you get to save the crawl quota and allow search engine bots to crawl even more pages.
On the other hand, you can add sitemaps and other important pages to robots.txt. This way, search engines will crawl and index them as quickly as possible.
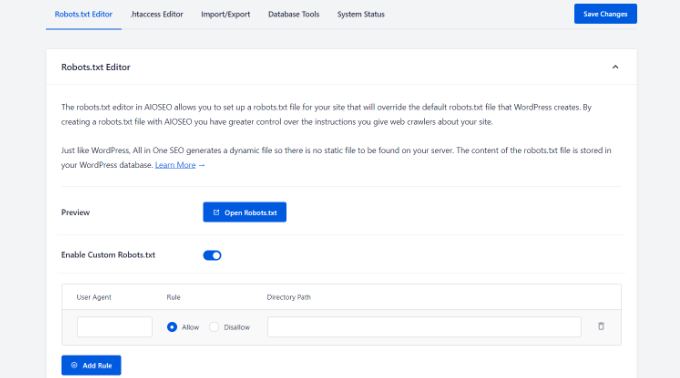
A simple way of optimizing the robots.txt file is by using AIOSEO. You can enable custom robots.txt using the plugin and add rules to allow or disallow search engines to crawl.
13. Make Sure Google Doesn’t Flag Your Site for Malware
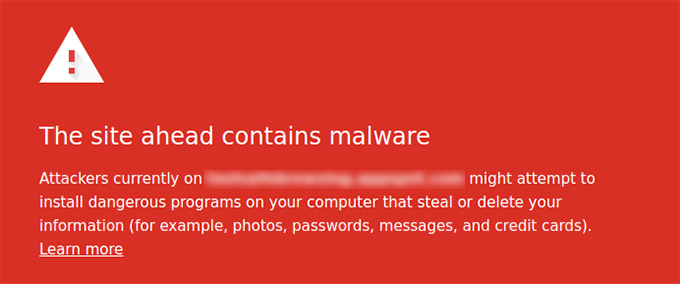
Another important technical SEO checklist item is to ensure your site isn’t flagged by Google for malware or unwanted software.
If your website is a security risk for users, then Google will show the following warning message:
This can be really bad for your WordPress SEO. It will keep people away from visiting your website, and impact your rankings, and overall website traffic.
To scan for malicious files on your website, you can use a WordPress security scanner. At WPBeginner, we use Sucuri as it is the best WordPress firewall and security plugin. It checks for vulnerabilities like malware, spam injection, malicious code, and helps clean up the website.
14. Use Server Side Rendering vs Client Side Rendering
Another technical SEO best practice is ensuring that your site’s JavaScript renders on the server side and not on the client side.
Server-side rendering is when the JavaScript files render on the website server. While client-side rendering is when the JavaScript files render in the user’s browser.
Client-side rendering is bad for your site’s user experience and SEO. All the burden of loading your site quickly falls on the visitor. Plus, search engine bots use JavaScript resources for crawling and indexing your content. This could result in JavaScript content being missed by crawlers and not included in the search engine index.
With server-side rendering, your website server ensures everything loads quickly. This way, you get a better user experience, faster page load speed, and reduce any risk of content being missed from indexing.
One way of ensuring that JavaScript is rendering on your site’s server is by running a site speed test. If your website speed is low, then it could be because of this issue. You can also look at crawled pages in Google Search Console and see if Google missed any content while crawling. If it did, then it could be because of JaveScript-related SEO issues.
That’s it. You’ve made it to the end of the list. You don’t need to go through each and every point in the technical SEO framework at once. Simply go one step at a time and work your way through the list.
Are you looking to improve the search engine rankings of your site’s multilingual pages?
Creating a multilingual sitemap helps Google, Bing, and other search engines easily find your content and index it. You can get more international search traffic simply by giving search engines an easy way to find multilingual content on your WordPress site.
In this article, we’ll show you how to create a multilingual sitemap for WordPress.
Why Create a Multilingual Sitemap in WordPress?
A sitemap is a file that contains all the important content on your WordPress website. It is in the XML format and is targeted toward search engines instead of people.
Creating an XML sitemap for your multilingual website helps search engines find and index your content faster. For instance, if you have different domains or subdomains translated into multiple languages, then you’ll need to create a sitemap for each website.
A sitemap is extremely important for your WordPress SEO. Let’s say you just created a new multilingual website. Your new site won’t have many backlinks, and it can be hard for search engines to discover your new articles and pages.
The sitemap provides a way for search engines to learn about your new content in another language. This way, your multilingual pages will start to get indexed and appear in search results.
That being said, let’s take a look at how you can create a multilingual sitemap in WordPress.
Creating a Multilingual Sitemap in WordPress
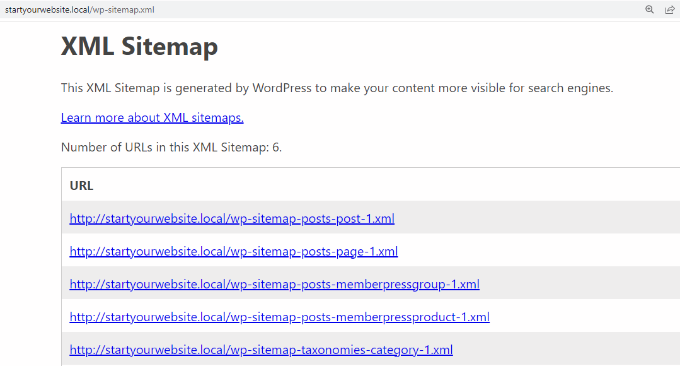
By default, WordPress automatically creates an XML sitemap for new websites. You can add wp-sitemap.xml at the end of the domain, and WordPress will display the default XML sitemap.
However, this feature is fairly limited and not very flexible. You can’t control which content to add or remove from the sitemap.
It also automatically creates a sitemap for a multilingual site and gives you more control over which pages and website sections you want to show in the sitemap.
The sitemap feature is available in the AIOSEO Lite version for free. However, if you’re looking for more features like video sitemaps, news sitemaps, redirections manager, and link assistant, then we recommend using the AIOSEO Pro version.
First, you’ll need to install and activate the AIOSEO plugin. If you need help, then please see our guide on how to install a WordPress plugin.
Upon activation, you’ll see the AIOSEO setup wizard. Simply click the ‘Let’s Get Started’ button and follow the onscreen instructions. For more details, you can visit our guide on how to set up All in One SEO plugin for WordPress.
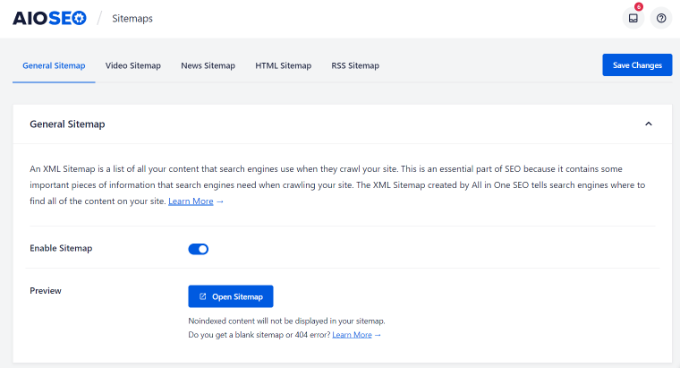
After that, you’ll need to go to All in One SEO » Sitemaps from your WordPress dashboard and ensure that the ‘Enable Sitemap’ option is enabled.
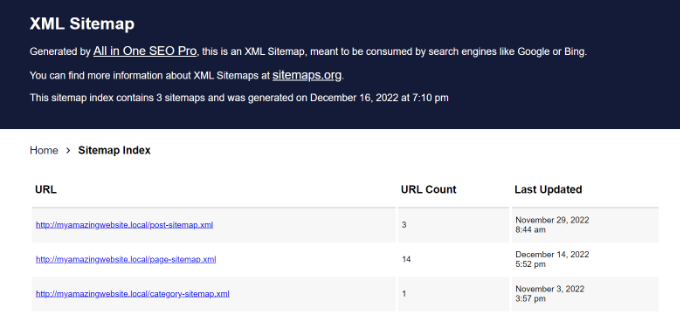
AIOSEO will automatically create a sitemap for your multilingual website.
You can click the ‘Open Sitemap’ button to preview it or simply add ‘sitemap.xml’ to your website URL.
Please note that if you’re using WPML to create multilingual sites, then AIOSEO will automatically serve sitemaps across different languages.
For instance, your sitemap URL will be something like /nl/sitemap.xml, /de/sitemap.xml, or /fr/sitemap.xml.
If you’re using TranslatePress to create your WordPress multilingual site, then you will need to install their SEO pack addon which is fully compatible with AIOSEO.
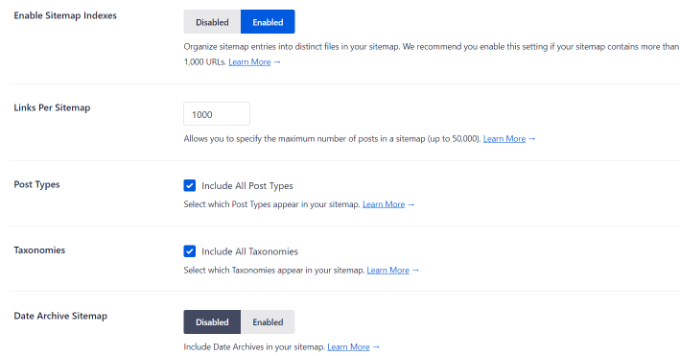
To further customize your multilingual sitemaps, you can scroll down in AIOSEO Sitemaps settings to view more options.
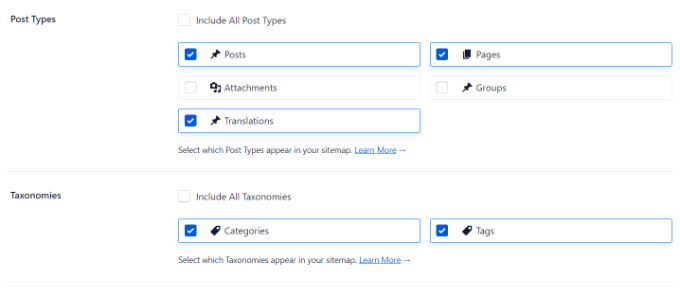
By default, the plugin lets you include all post types and taxonomies in the sitemap. It also gives the option to include date archives and author sitemaps.
However, you can uncheck the ‘Post Types’ and ‘Taxonomies’ options and view more options.
For example, let’s say you have translated content as a custom post type. You can simply check that option to include in the sitemap and exclude other post types.
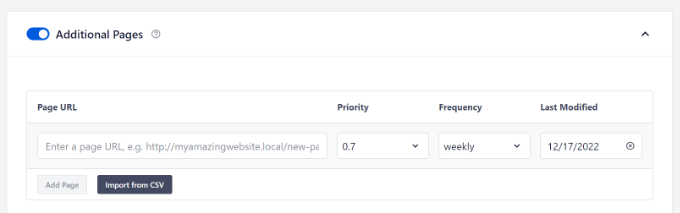
Besides that, you can also add more pages from your multilingual website to the sitemap.
For example, let’s say you’ve translated a pillar article or an evergreen content into another language. You can add the page URL to the sitemap using AIOSEO and help search engines easily find your content.
Simply scroll down and click the ‘Additional Page’ toggle to enable the option. After that, you can add the page URL, and choose the priority and the frequency.
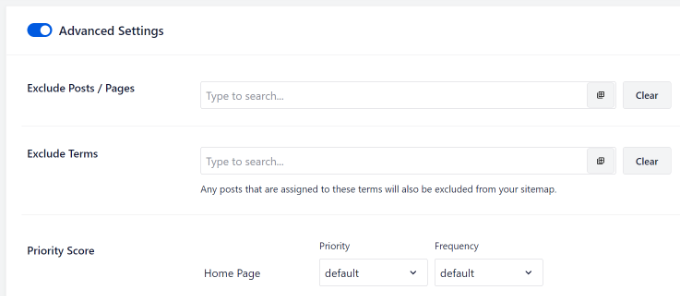
AIOSEO lets you exclude posts, pages, and specific terms from your WordPress sitemaps.
For instance, you can add different multilingual posts and pages that you don’t to include in the sitemap. These can be contact us page, or terms of service pages translated in another language.
First, you’ll need to enable the ‘Advanced Settings’ option. Then enter the URLs in the ‘Exclude Posts / Posts’ field and the terms in the ‘Exclude Terms’ field.
Submitting Your Multilingual Sitemap to Search Engines
Now that you’ve created a multilingual sitemap, the next step is to submit it to different search engines. This way, Google, Bing, and other search engines can easily find new content.
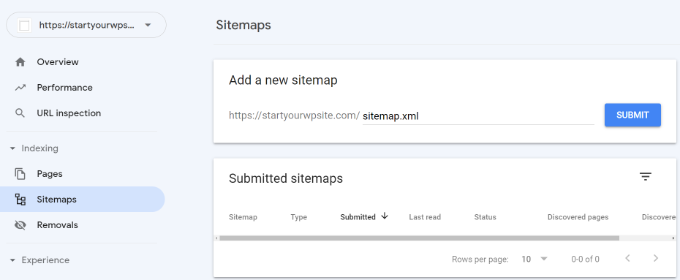
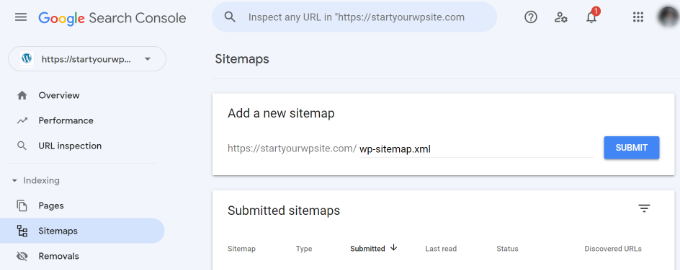
Submit Multilingual Sitemap to Google
Google Search Console is a free tool by Google that you can use to monitor your site’s performance on search results. It helps you see which keywords people use to find your website and resolve any errors that might prevent you from appearing on Google.
Submitting your multilingual sitemap to the Search Console helps Google quickly discover new content.
You can simply log in to your account and head to the ‘Sitemaps’ option from the menu on your left. Next, enter your multilingual sitemap URL under the ‘Add a new sitemap’ option and click the ‘Submit’ button.
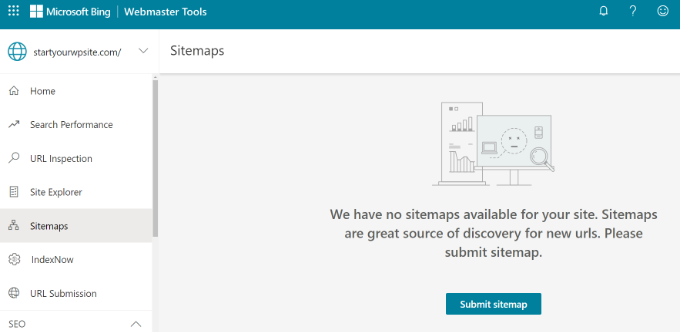
Submit Multilingual Sitemap to Bing, Yahoo, and DuckDuckGo
Similarly, you can submit the sitemap to Bing using the Webmaster Tools. The best part is that, when you submit your site to Bing, it’s also automatically submitted to the Yahoo and DuckDuckGo search engines.