Category Archives: multilingual wordpress

How to Easily Translate Your WordPress with TranslatePress

Do you want to translate your website into another language?

By default, WordPress does not offer an easy way to manage multilingual content. However, you can easily translate your WordPress website by using plugins.

In this article, we’ll show you how to easily translate your WordPress website with TranslatePress.
How to translate your WordPress with TranslatePress

Why Use TranslatePress for Translating a WordPress Website?

The best part about WordPress is that it can be used in any language. Most WordPress themes and plugins can also be used and translated into any language as well.

If your business website has a multilingual audience, then it can be super beneficial to translate your content.

You can rely on machine translations like Google Translate, but these translations are not good and sometimes can be quite misleading.

On the other hand, if you’re using a multilingual WordPress plugin, then you need to create multiple posts which require switching back and forth between different languages.

With the TranslatePress plugin, you can translate your website and content using a live editor and won’t need to create multiple posts for the same content.

You can instantly switch languages from the live editor and can also translate themes and plugins using TranslatePress.

Having said that, let’s see how you can easily translate your WordPress website with TranslatePress.

Step 1: Install TranslatePress in WordPress

The first thing you need to do is install and activate the TranslatePress plugin. For more details, see our step-by-step guide on how to install a WordPress plugin.

Upon activation, head over to the Settings » TranslatePress page from the WordPress admin dashboard to configure your plugin settings.

From here, you need to switch to the ‘General’ tab.

Now, you first need to choose the default language of your website from the dropdown menu beside the ‘Default Language’ option.

This is the language your WordPress is already downloaded in.
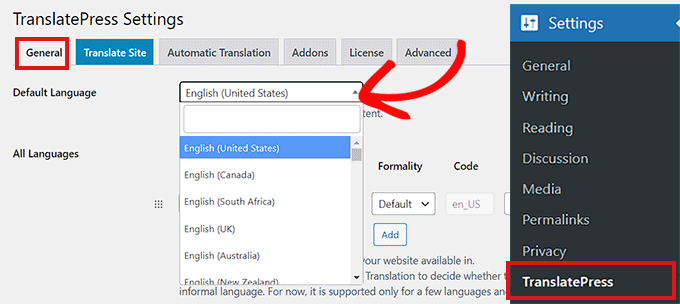
Choose a default language in TranslatePress

After that, you need to choose the language that you want to translate your site into.

Simply head over to the ‘All Languages’ section, and choose a language you want to translate your website into from the dropdown menu below the ‘Language’ option.

After that, you need to click the ‘Add’ button.
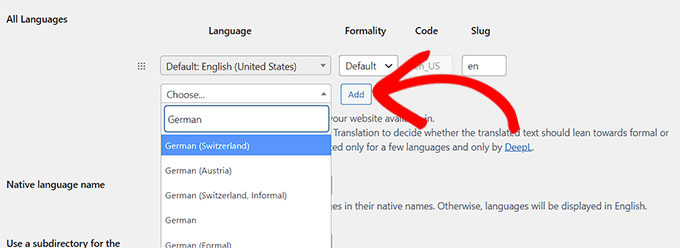
Choose a translation language

Now scroll down to the ‘Native Language Name’ setting on the page.

Here, you need to select whether you want to display language names in their own language or in English. You can choose ‘Yes’ or ‘No’ accordingly.

The next option is to choose if you want to display the default language name in the URL as a subdirectory. For example, http://example.com/en/.

We recommend leaving this setting as it is because it is better for search engine optimization.

After that, head over to the ‘Force language in custom links’ setting.

The default option for it is ‘Yes’ which will allow the plugin to change custom links for translated languages, making the URLs more SEO-friendly.

Configure other General settings

In the next option, you can choose if you want to use Google Translate for automatic translations.

The default choice is ‘No’, but you can change that if you would like to use Google Translate.

All you would need to do is provide a Google Translate API key in the next option. You will find a link under the option which will show you instructions on how to get one.

Provide Google Translate API if you want to activate it

Finally, you will come to the options on how you want to display the language switcher on your website. TranslatePress provides you with three choices.

You can use a shortcode, add a switcher to your navigation menu, or display a floating menu. We will show you how to add the language switcher to your website later in this article.

Now, simply go ahead and click on the ‘Save Changes’ button to store your settings.

Step 2: Translating Your Website Content

To translate your website, you can either click the ‘Translate Site’ tab on the plugin’s settings page or the ‘Translate Site’ button in your WordPress admin bar.

This will open the live translation editor in a new browser tab.
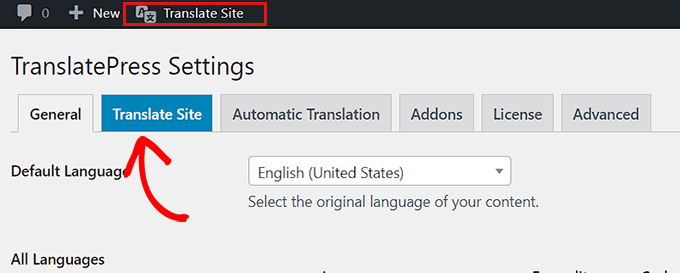
Click Translate Site button

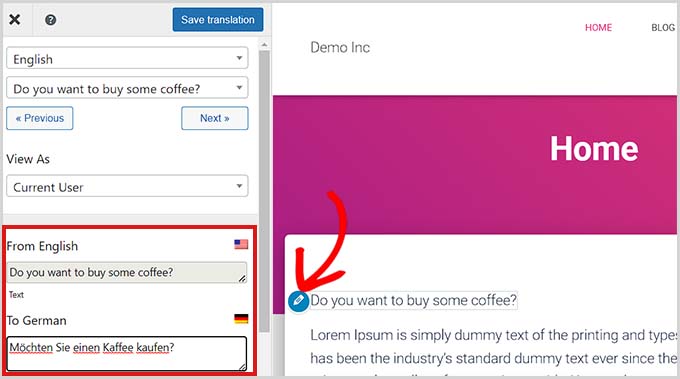
Now, you need to simply click the blue translate icon present next to any text on your website that you want to translate.

After that, TranslatePress will automatically load the chosen text in the left column of the translation editor.
Translate website

Once the text is loaded in the column, simply add its transition in the box below and then click the ‘Save Translation’ button at the top to store your changes.

This way, you can translate all the content on any page of your site including navigation menus, buttons, sidebar, widgets, meta-text, and more.

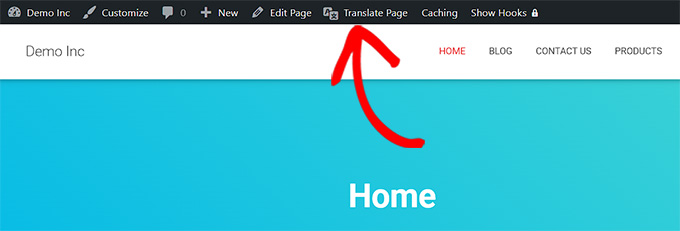
With TranslatePress, you can also instantly start translating any page or post on your site when logged in.

All you would need to do is click on the ‘Translate Page’ button on the top to open up the live editor.
Directly translate page

Another benefit of this plugin is that you only need to translate a specific string once.

Once you have translated a string, the plugin will automatically translate it for you in other places.

Step 3: Adding Language Switcher to Your Website

After translating your site, you will need to add a language switcher to your website.

A language switcher allows users to select a language when they visit your website. It usually displays the flag of each country to indicate languages available on your site.

TranslatePress allows you to add a language switcher by using a shortcode, as a navigation menu item, or as a floating banner.

The language switcher can be displayed as flags, language names, or both.

Adding language switcher in WordPress using shortcode

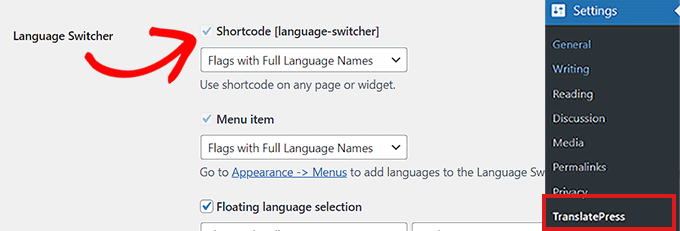
If you want to add a language switcher in WordPress using shortcode, then head over to the Settings » TranslatePress page from the admin dashboard.

Once you’re on the ‘Settings’ page, scroll down on the ‘General’ tab and then copy the [language-switcher] shortcode in the ‘Language Switcher’ section.
Copy shortcode for the language switcher

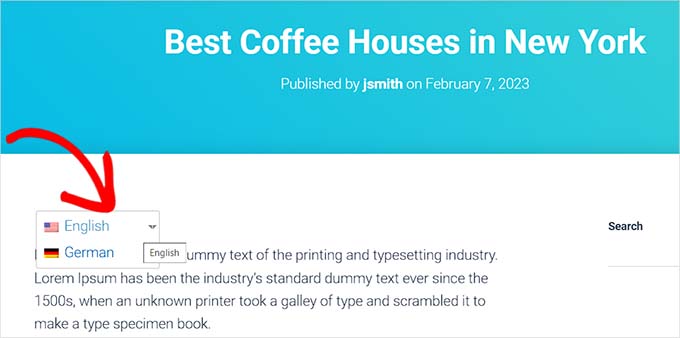
You can now paste this shortcode on any page, post, or sidebar widget where you want to display the language switcher.

This is how the language switcher looked on our demo site.
Shortcode language switcher

Adding a language switcher to your WordPress navigation menu

If you want to add a language switcher as a navigation menu item, then go to the Appearance » Menus page from the dashboard.

Note: If you are using a block-based theme with a full site editor, then this method won’t work for you.

From here, you need to click on the ‘Language Switcher’ tab in the ‘Add Menu Items’ section on the left corner of the screen.

Once the tab expands, simply check the languages that you want to display in the language switcher.

After that, click the ‘Add Menu’ button to add the language switcher as a menu item.
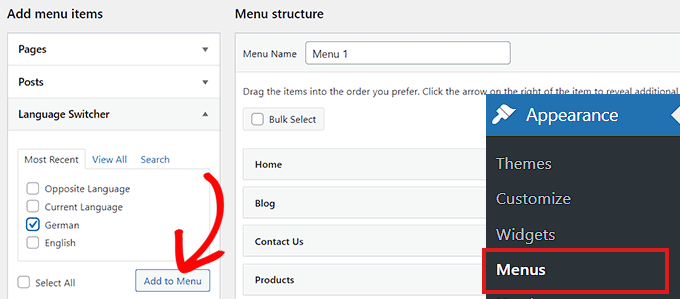
Add language switcher in navigation menu

Finally, don’t forget to click on the ‘Save Menu’ button to store your changes.

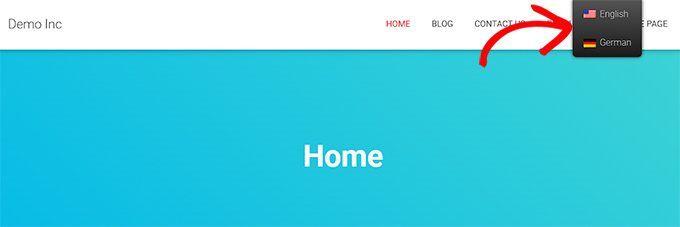
You will now see a language switcher added to your WordPress navigation menu.

This is how it looked on our test site.

Language switcher added in nav menu

Adding a floating language switcher

If you want to add a floating language switcher, then you simply need to head over to the Settings » TranslatePress page from the admin dashboard.

First, you need to scroll down to the ‘Language Switcher’ section in the ‘General’ tab.

From here, make sure to check the box next to the ‘Floating language selection’ option.

You can also switch the position of the floating language switcher from the dropdown menu on the right corner of the screen.

Add a floating language switcher

After that, don’t forget to click on the save changes button to store your settings.

You can now visit your website to see the floating language switcher at the bottom of every page on your website.
Add floating switcher

We hope this article helped you learn how to translate your WordPress site with TranslatePress. You may also want to see our article on how to create a multilingual sitemap in WordPress and our list of the best WordPress plugins for business websites.

If you liked this article, then please subscribe to our YouTube Channel for WordPress video tutorials. You can also find us on Twitter and Facebook.

The post How to Easily Translate Your WordPress with TranslatePress first appeared on WPBeginner.
How to Easily Create a Multilingual Sitemap in WordPress

Are you looking to improve the search engine rankings of your site’s multilingual pages?

Creating a multilingual sitemap helps Google, Bing, and other search engines easily find your content and index it. You can get more international search traffic simply by giving search engines an easy way to find multilingual content on your WordPress site.

In this article, we’ll show you how to create a multilingual sitemap for WordPress.

How to create a multilingual sitemap in WordPress

Why Create a Multilingual Sitemap in WordPress?

A sitemap is a file that contains all the important content on your WordPress website. It is in the XML format and is targeted toward search engines instead of people.

Creating an XML sitemap for your multilingual website helps search engines find and index your content faster. For instance, if you have different domains or subdomains translated into multiple languages, then you’ll need to create a sitemap for each website.

Note: If you’re looking for an easy way to set up a website in different languages, then follow our step-by-step guide on how to easily create a multilingual WordPress site.

A sitemap is extremely important for your WordPress SEO. Let’s say you just created a new multilingual website. Your new site won’t have many backlinks, and it can be hard for search engines to discover your new articles and pages.

The sitemap provides a way for search engines to learn about your new content in another language. This way, your multilingual pages will start to get indexed and appear in search results.

That being said, let’s take a look at how you can create a multilingual sitemap in WordPress.

Creating a Multilingual Sitemap in WordPress

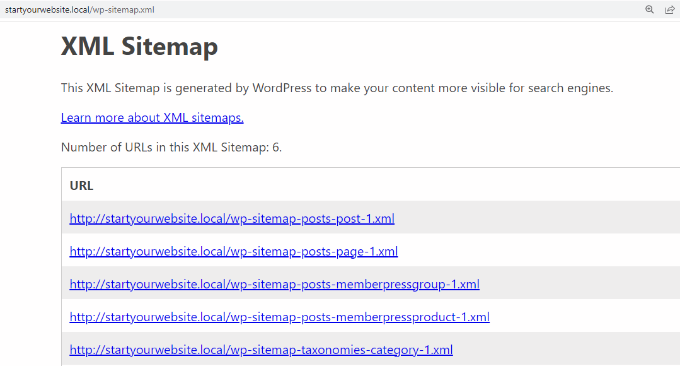
By default, WordPress automatically creates an XML sitemap for new websites. You can add wp-sitemap.xml at the end of the domain, and WordPress will display the default XML sitemap.

View default sitemap

However, this feature is fairly limited and not very flexible. You can’t control which content to add or remove from the sitemap.

The best way to create an XML sitemap in WordPress is by using the All in One SEO (AIOSEO) plugin. It is the best WordPress SEO plugin and helps you optimize your site for search engines.

It also automatically creates a sitemap for a multilingual site and gives you more control over which pages and website sections you want to show in the sitemap.

The sitemap feature is available in the AIOSEO Lite version for free. However, if you’re looking for more features like video sitemaps, news sitemaps, redirections manager, and link assistant, then we recommend using the AIOSEO Pro version.

First, you’ll need to install and activate the AIOSEO plugin. If you need help, then please see our guide on how to install a WordPress plugin.

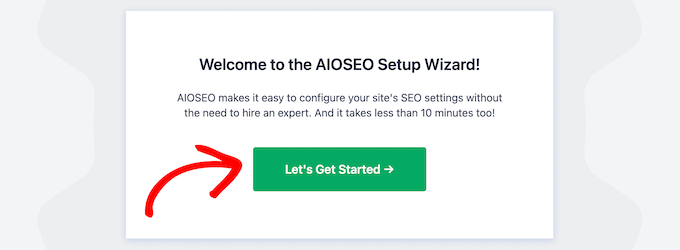
Click let's get started AIOSEO setup wizard

Upon activation, you’ll see the AIOSEO setup wizard. Simply click the ‘Let’s Get Started’ button and follow the onscreen instructions. For more details, you can visit our guide on how to set up All in One SEO plugin for WordPress.

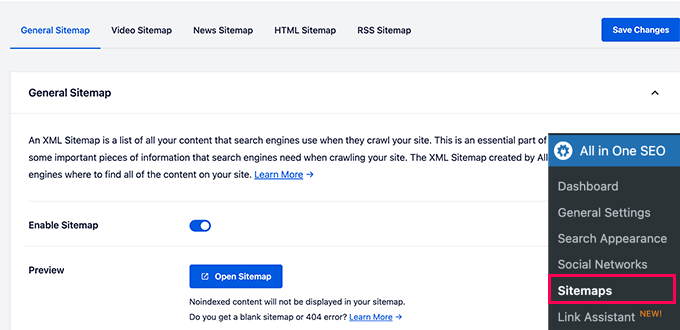
After that, you’ll need to go to All in One SEO » Sitemaps from your WordPress dashboard and ensure that the ‘Enable Sitemap’ option is enabled.

AIOSEO sitemaps

AIOSEO will automatically create a sitemap for your multilingual website.

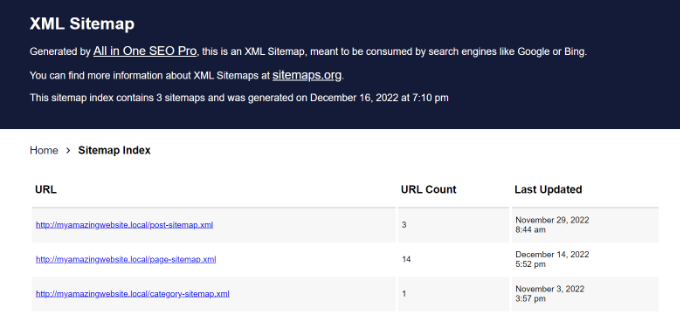
You can click the ‘Open Sitemap’ button to preview it or simply add ‘sitemap.xml’ to your website URL.

XML sitemap preview

Please note that if you’re using WPML to create multilingual sites, then AIOSEO will automatically serve sitemaps across different languages.

For instance, your sitemap URL will be something like /nl/sitemap.xml, /de/sitemap.xml, or /fr/sitemap.xml.

If you’re using TranslatePress to create your WordPress multilingual site, then you will need to install their SEO pack addon which is fully compatible with AIOSEO.

Configuring Additional Multilingual Sitemap Settings

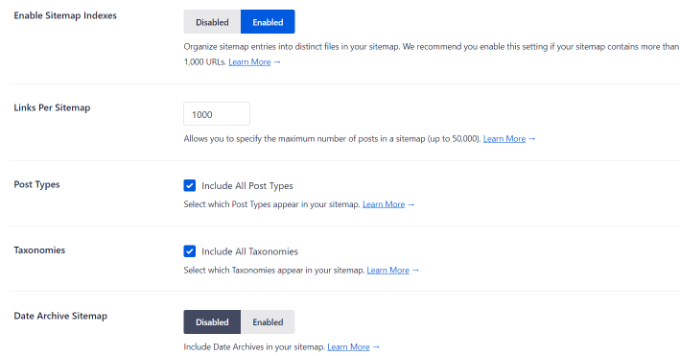
To further customize your multilingual sitemaps, you can scroll down in AIOSEO Sitemaps settings to view more options.

By default, the plugin lets you include all post types and taxonomies in the sitemap. It also gives the option to include date archives and author sitemaps.

View more sitemap settings

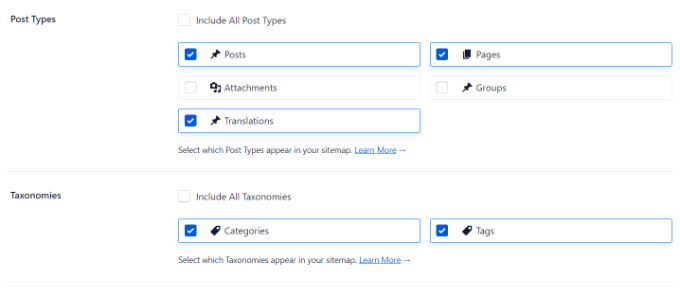
However, you can uncheck the ‘Post Types’ and ‘Taxonomies’ options and view more options.

For example, let’s say you have translated content as a custom post type. You can simply check that option to include in the sitemap and exclude other post types.

Add translations to sitemap

Besides that, you can also add more pages from your multilingual website to the sitemap.

For example, let’s say you’ve translated a pillar article or an evergreen content into another language. You can add the page URL to the sitemap using AIOSEO and help search engines easily find your content.

Simply scroll down and click the ‘Additional Page’ toggle to enable the option. After that, you can add the page URL, and choose the priority and the frequency.

Add additional pages to sitemap

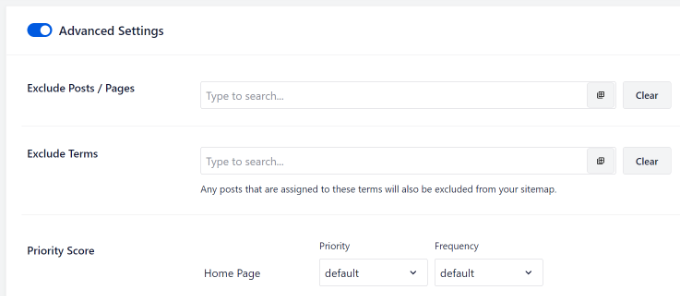
AIOSEO lets you exclude posts, pages, and specific terms from your WordPress sitemaps.

For instance, you can add different multilingual posts and pages that you don’t to include in the sitemap. These can be contact us page, or terms of service pages translated in another language.

First, you’ll need to enable the ‘Advanced Settings’ option. Then enter the URLs in the ‘Exclude Posts / Posts’ field and the terms in the ‘Exclude Terms’ field.

View additional settings in sitemap

Submitting Your Multilingual Sitemap to Search Engines

Now that you’ve created a multilingual sitemap, the next step is to submit it to different search engines. This way, Google, Bing, and other search engines can easily find new content.

Submit Multilingual Sitemap to Google

Google Search Console is a free tool by Google that you can use to monitor your site’s performance on search results. It helps you see which keywords people use to find your website and resolve any errors that might prevent you from appearing on Google.

Submitting your multilingual sitemap to the Search Console helps Google quickly discover new content.

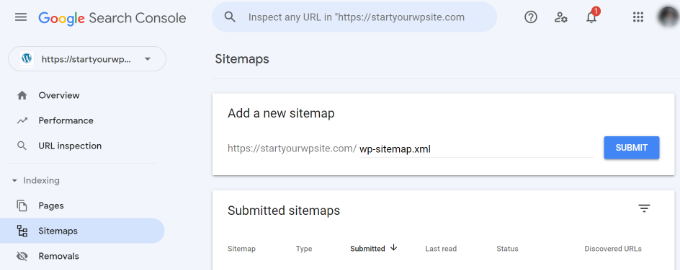
You can simply log in to your account and head to the ‘Sitemaps’ option from the menu on your left. Next, enter your multilingual sitemap URL under the ‘Add a new sitemap’ option and click the ‘Submit’ button.

Submit your site to search console

For more details, please see our guide on how to submit your website to search engines.

Submit Multilingual Sitemap to Bing, Yahoo, and DuckDuckGo

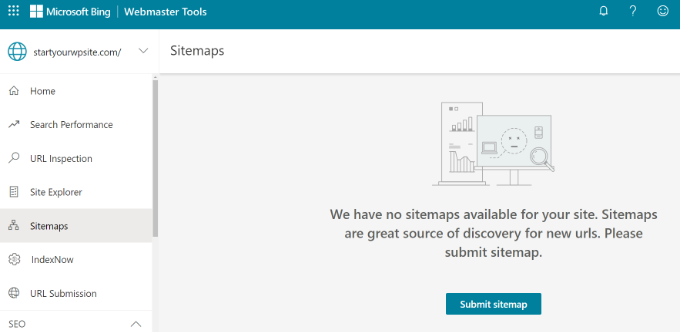
Similarly, you can submit the sitemap to Bing using the Webmaster Tools. The best part is that, when you submit your site to Bing, it’s also automatically submitted to the Yahoo and DuckDuckGo search engines.

Submit sitemap in Bing

You can see our step-by-step tutorial on how to add your website to Bing Webmaster Tools for more details.

We hope that this article helped you learn how to create a multilingual sitemap in WordPress. You may also want to see our expert SEO tips to optimize your blog posts, and our expert pick of the best keyword research tools to improve your SEO rankings.

If you liked this article, then please subscribe to our YouTube Channel for WordPress video tutorials. You can also find us on Twitter and Facebook.

The post How to Easily Create a Multilingual Sitemap in WordPress first appeared on WPBeginner.