Category Archives: common wordpress errors

What is 414 Request URI Too Long Error and How to Fix It

Have you ever encountered a 414 request URI too long error on your WordPress website?

The error is usually caused when there is a critical error between your web browser and a server. You’ll see this error when clicking on a link or any action performed by a WordPress plugin.

In this article, we will show you what is the ‘414 request URI too long’ error and how to fix it.
What is 414 request URI too long error and how to fix it

What is 414 Request URI Too Long Error?

A 414 request URI too long error occurs when a URL or an action you’re requesting is too long for the server to handle.

Do note that there is a difference between URI and URL. A URI or Uniform Resource Identifier can be a resource’s name, location, or both. On the other hand, a URL or Uniform Resource Locator can only be the location of a resource.

Both terms are usually used interchangeably because URL is part of URI. However, the 414 error can be triggered by both components, so let’s look at the causes.

What Causes 414 Request URI Too Long Error?

You might see the 414 error when you click on the link, and the server is unable to process it because it’s too long.

One situation where a link might to very long is using UTM (Urchin Tracking Module) parameters. If you’re using UTM codes to track conversions on your WordPress website and there are a lot of parameters in the URL, then it can cause this error.

Another situation that can cause a 414 error is a redirect loop. This is when a misconfiguration or a setting in a WordPress plugin causes a lot of redirect requests.

As a result, you get incredibly long URLs and 414 requests URI too long error.

Similarly, some plugins can also generate lengthy URIs as part of their functionality. You’re most likely to encounter this error if you have all-in-one WordPress security plugins installed on your site.

In a rare event, a developer-side issue can also trigger a 414 error when a POST request converts into a GET request with query information being too long. Lastly, cyber attacks on your website server can also result in 414 URI too long issues.

That said, let’s see how you can fix the 414 error on your WordPress website.

Fixing 414 Request URI Too Long Error

A quick way to fix this issue is by increasing the size of the URI your website server can process.

Before we move forward, we recommend creating a WordPress backup. That’s because fixing the 414 error involves editing the website configuration files. In case anything goes wrong, you’ll have a backup copy of your site ready to restore.

For more details, please see our guide on how to backup a WordPress site.

Determine if Your Website is Using Apache or Nginx

First, you’ll need to find out the type of server your WordPress website is using. There are 2 main types of servers, which includes Apache and Nginx.

A simple way to do that is by opening your site in a browser. After that, you can right-click on the homepage and select the ‘Inspect’ option.
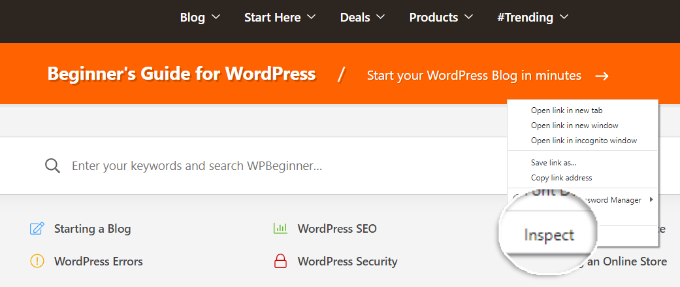
Open inspect element

Next, you’ll need to switch to the ‘Network’ tab at the top.

From here, you can select any element under the Name column. After that, you will need to scroll down to the ‘Response Headers’ section and see the ‘Server’ details.
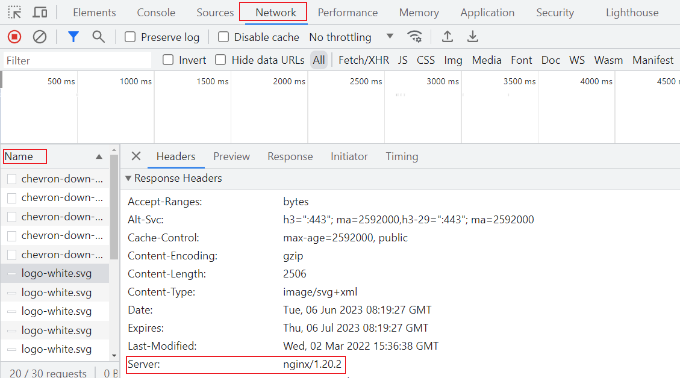
View server type of your site

This will show you whether your site is using Nginx or Apache.

If you’re still unsure which server type to use, then you can reach out to your WordPress hosting provider to get more details.

Once you’ve determined the server type, let’s look at how to fix the 414 request URI too long error for Apache and Nginx.

Fixing 414 Request URI Too Long Error in Nginx

First, you’ll need an FTP or file transfer protocol client to access website configuration files.

There are many FTP clients you can use. For this tutorial, we will use Filezilla. If you need help setting up FTP and accessing website files, then please see our guide on how to use FTP to upload files to WordPress.

Once you’re logged in, you’ll need to download the ‘nginx.conf’ file. You can access this by following this path: /etc/nginx/nginx.conf
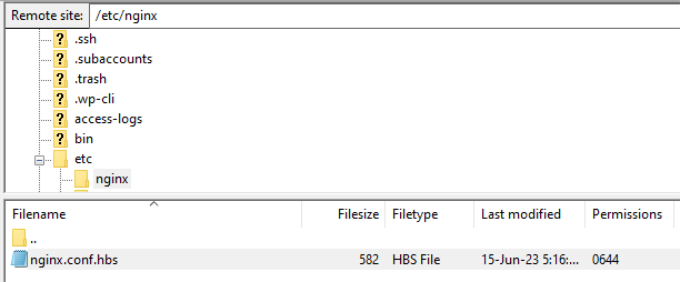
Access Nginx file

After locating the file, go ahead and download it on your computer and then open it in a notepad software.

From here, you can search for large_client_header_buffers 4 8K settings. If it’s not there, then simply add it to the end of the file.

You will see 2 sets of values, which relate to a number and size. Simply edit the size from 8K to 128K. This will increase the URI size and allow the site server to process long URLs.
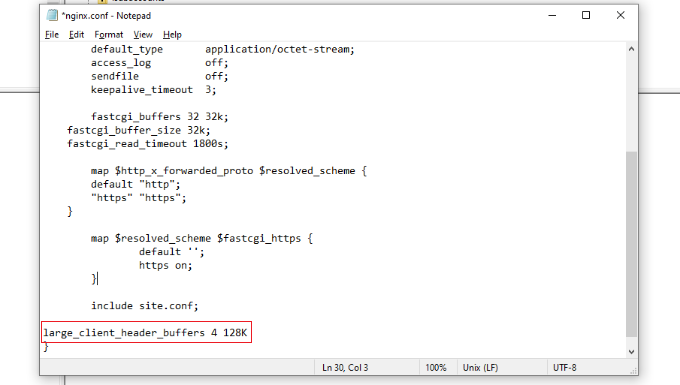
Increase URI size in Nginx

Once you’re done, simply save the text file and reupload it to your website using the FTP client.

For more details, please see our guide on how to use FTP to upload files to WordPress.

Fixing 414 Request URI Too Long Error in Apache

If you’re using the Apache server type, then the process is similar to that of Nginx. First, you’ll need an FTP client to access website files.

Once you’re logged in, you’ll need to locate the ‘apache2.conf’ file. Simply head to the following path using the FTP client: /etc/apache2/apache2.conf
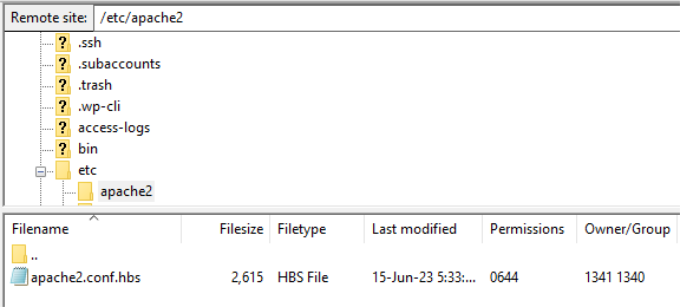
Access apache config files

Next, you’ll need to download the file and open it in notepad software.

After that, you can look for LimitRequestLine 128000 settings. If you don’t see one, then simply add it to the end of the file.

Usually, LimitRequestLine is set to 128000. However, you can increase this to 256000 or higher to remove the 414 error. Just make sure that the value you set is a multiple of 2.
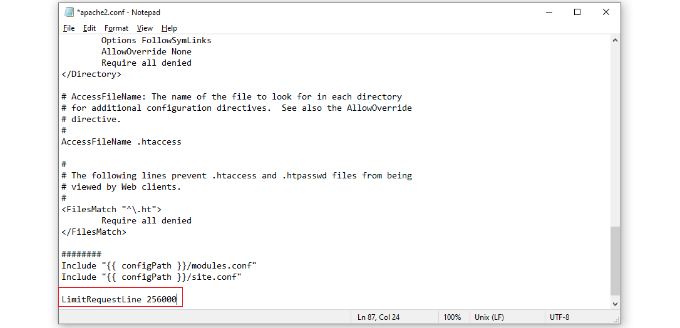
Increase URI size in apache

Once you’re done, simply upload the file back to the website using the FTP client. This should help resolve the 414 error on your WordPress website.

We hope this article helped you learn about what is 414 request URI too long error and how to fix it. You may also want to see our guide on WordPress security and the most common WordPress errors.

If you liked this article, then please subscribe to our YouTube Channel for WordPress video tutorials. You can also find us on Twitter and Facebook.

The post What is 414 Request URI Too Long Error and How to Fix It first appeared on WPBeginner.
How to Fix the ERR_CONNECTION_REFUSED Error in Chrome

Are you seeing the ERR_CONNECTION_REFUSED error when trying to access a website or when viewing a website resource using your browser’s inspect tool?

This error message appears when your browser is unable to connect to the website you’ve requested. You might also see it in your browser’s inspect tool when you are exploring why a certain resource on the website won’t load.

In this article, we’ll show you how to fix the ERR_CONNECTION_REFUSED error in Chrome.

How to Fix the ERR_CONNECTION_REFUSED Error in Chrome

What Is the ‘ERR_CONNECTION_REFUSED’ Error in Chrome?

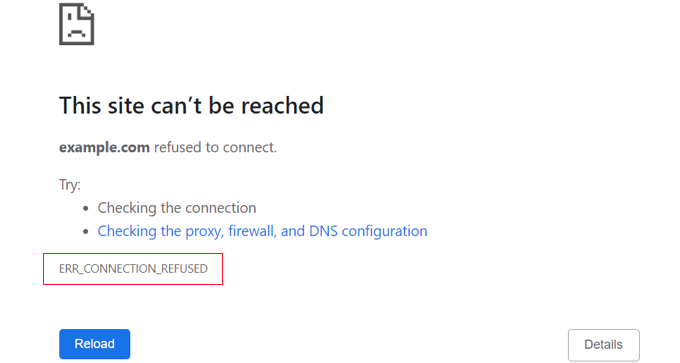
The ERR_CONNECTION_REFUSED message is displayed in Google Chrome when it is trying to open a web page or website resource but is unable to do so. This error code is usually included inside an error message such as:

  • ‘This site can’t be reached’
  • ‘Failed to load resource’

There are lots of common WordPress errors, but this error may stop you from visiting your own website and logging in to the WordPress admin area. You’ll typically want to solve this problem as quickly as possible.

Often when you see this error message, your WordPress website is still working, but something is stopping the browser from accessing it. In many cases, you will only need to fix a problem with your own browser or internet connection.

With that being said, let’s take a look at how to fix the ERR_CONNECTION_REFUSED error in Chrome. First, we’ll look at how to fix the error when you can’t access an entire website, then we’ll show the solution for when you can’t access a specific file or resource on a website.

How to Fix the ‘This Site Can’t Be Reached’ Error

Usually, this message is displayed when you can’t access an entire website.

You will see the Chrome error message ‘This site can’t be reached’ along with the ERR_CONNECTION_REFUSED error code. The message may even suggest a few things to try to fix the error, such as checking the connection, proxy, firewall, and DNS configuration.

This Site Can't Be Reached Error

Other browsers will display similar messages, such as:

  • ‘Unable to connect’
  • ‘Hmmm…can’t reach this page’

There are many things that can interfere with your connection to the website, and you will need to follow some troubleshooting steps to identify and fix the problem.

We’ll briefly cover the steps you should take below. For detailed instructions, see our guide on how to easily fix the ‘This site can’t be reached’ error in WordPress.

Check Your Internet Connection

The simplest fix is to check that you’re connected to the internet and restart your modem and router. Resetting your internet connection may be all it takes to reconnect to your website.

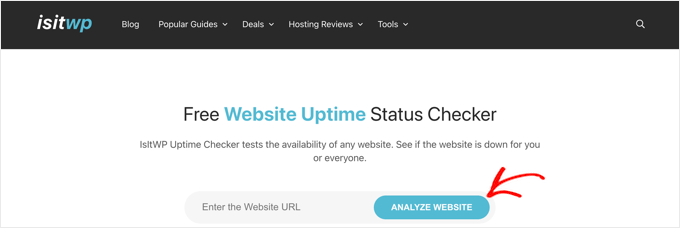
If not, you should check to see whether your website is working. Simply visit the Website Uptime Status Checker website, then enter the URL of your own site.

IsItWP Uptime Checker Tool

If your site is down, then you should contact your WordPress hosting provider to let them know your website is down.

Clear Your Browser Cache

Your web browser stores files and data from the websites you visit, so it doesn’t have to download them again. However, this can cause problems if the cached files become outdated or corrupt.

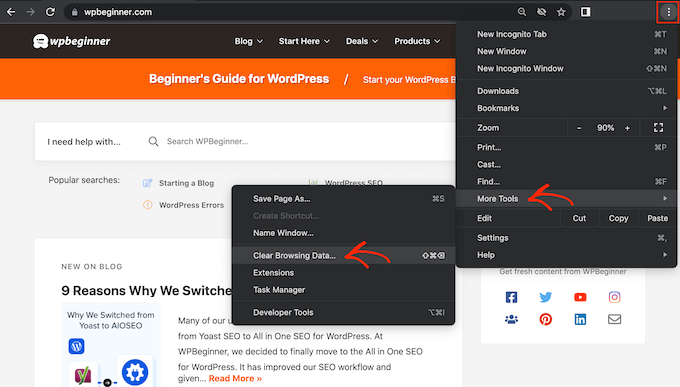
You can easily clear the browser cache in Google Chrome by clicking on the three-dotted icon in the upper-right corner and then selecting ‘More Tools,’ followed by ‘Clear Browsing Data…’

How to clear the browser cache in Google Chrome

In the popup that appears, check the box next to ‘Cached images and files’ and then click the ‘Clear data’ button.

Now try revisiting the website to check whether you can access it.

Troubleshoot the Software on Your Computer

Some of the security and networking software you run on your computer may be interfering with your connection to the website. This can include your firewall, antivirus software, VPN, and proxy server.

We offer detailed instructions on how to troubleshoot each of these in our guide on how to fix the ‘This site can’t be reached’ error.

Troubleshoot Your DNS Settings

Similar to the browser cache, your computer stores the IP addresses of all the websites you visit. This means the browser doesn’t have to look up the same IP address multiple times.

By flushing your DNS cache, you’ll get the very latest information about a website, including its new domain name or address.

To help you out, we’ve created a complete guide on how to clear your DNS cache for Mac, Windows, and Google Chrome.

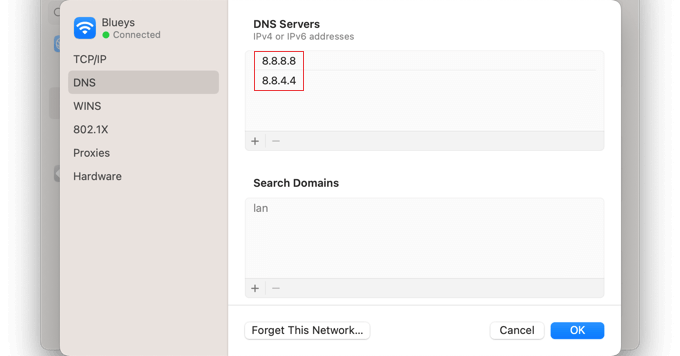
If you still can’t access the website after doing this, then you can try changing your DNS server as well. You can follow the detailed instructions in the change the DNS server step of our guide on how to fix the ‘This site can’t be reached’ error.

Add the Addresses for Google's DNS Servers

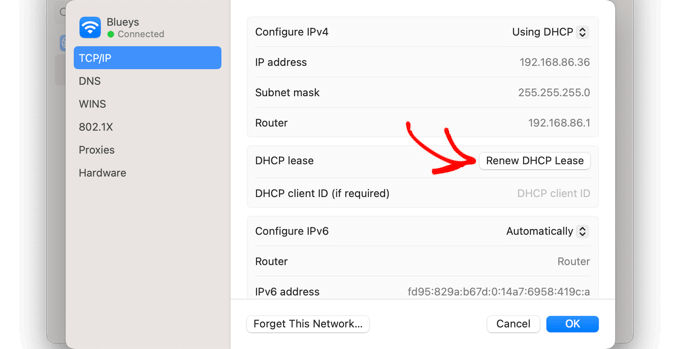
Reset the TCP/IP Settings

Finally, if there’s a problem with how your internet connection is configured, then renewing your TCP and IP protocol will return the connection to its default settings, which may solve the problem.

You can learn how to do this step-by-step in the reset the TCP/IP settings section of our guide on how to fix the ‘This site can’t be reached’ error.

Click the 'Renew DHCP Lease' Button

How To Fix the ‘Failed To Load Resource’ Error

You might notice that, while your website loads, a certain resource or file doesn’t. This file could be an image or other media file, JavaScript, or a CSS stylesheet. A missing resource can cause your website to misbehave or not function properly.

When that happens, the browser will add a notice in the error console for debugging purposes.

In most cases, you would see this error in your browser’s error console when using the Inspect tool. You might see the error message Failed to load resource: net::ERR_CONNECTION_REFUSED.

Refused to Load Resource Error

This error message happens when your website’s code mentions the file, but your browser is unable to download it. This can happen when there is a problem with the file itself, or the URL that points to it.

To fix the problem, you will need to either replace the resource in question or fix the URL. We offer detailed instructions for both of these in our guide on how to fix the ‘Failed to load resource’ error in WordPress.

We hope this tutorial helped you learn how to fix the ERR_CONNECTION_REFUSED error in Chrome. You may also want to see our ultimate WordPress security guide, or check out our list of easy ways to increase your blog traffic.

If you liked this article, then please subscribe to our YouTube Channel for WordPress video tutorials. You can also find us on Twitter and Facebook.

The post How to Fix the ERR_CONNECTION_REFUSED Error in Chrome first appeared on WPBeginner.
How to Fix the WordPress Failed to Open Stream Error

Are you seeing the ‘failed to open stream’ error in WordPress? This error usually points out the location of the scripts where the error has occurred. However, it is quite difficult for beginner users to understand it. In this article, we will show you how to easily fix the WordPress failed to open stream error.

Failed to open stream error in WordPress

Why Failed to Open Stream Error Occurs?

Before we try to fix the error, it would be helpful to understand what causes the ‘Failed to open stream’ error in WordPress.

This error occurs when WordPress is unable to load the file mentioned in website code. When this error occurs, sometimes WordPress will continue loading the site and only show a warning message, while other times WordPress will show a fatal error and will not load anything else.

The message phrasing will be different depending on where the error occurs in the code and the reason for failure. It will also give you clues about what needs to be fixed.

Typically, this message would look something like this:

Warning: require(/home/website/wp-includes/load.php): failed to open stream: No such file or directory in /home/website/wp-settings.php on line 19 

Fatal error: require(): Failed opening required ‘/home/website/wp-includes/load.php’ (include_path=’.:/usr/share/php/:/usr/share/php5/’) in /home/website/wp-settings.php on line 19

Here is another example:

Last Error: 2018-04-04 14:52:13: (2) HTTP Error: Unable to connect: ‘fopen(compress.zlib://https://www.googleapis.com/analytics/v3/management/accounts/~all/webproperties/~all/profiles?start-index=1): failed to open stream: operation failed’

Having said that, let’s take a look at how to troubleshoot and fix ‘failed to open stream’ error in WordPress.

Fixing Failed to Open Stream Error in WordPress

As we mentioned earlier, the error can be caused by a variety of reasons and the error message will be different depending on the cause and location of the file that’s causing the error.

In each instance, failed to open stream phrase would be followed by a reason. For example, permission denied, no such file or directory, operation failed, and more.

Now if your error message contains ‘no such file or directory’, then you need to look in the code to figure out which file is mentioned at that particular line.

If it is a plugin or theme file, then this means that the plugin or theme files were either deleted or not installed correctly. Simply deactivate and reinstall the theme / plugin in question to fix the error.

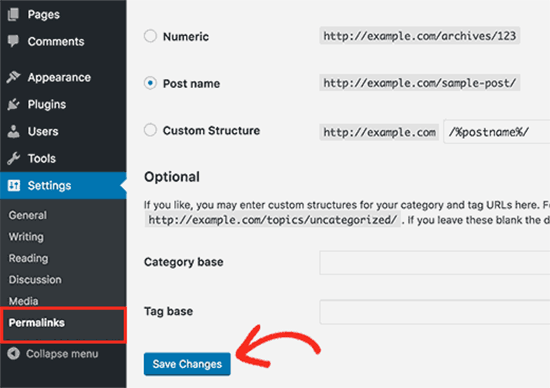
However, it is also possible that WordPress is unable to locate the files because of a missing .htaccess file in your root folder. In that case, you need to go to Settings » Permalinks page in your WordPress admin and just click on the ‘Save changes’ button to regenerate the .htaccess file.

Regenerate htaccess file in WordPress

If the error message is followed by ‘Permission denied’, then this means that WordPress does not have the right permission to access the file or directory referenced in the code.

To fix this, you need to check WordPress files and directory permissions and correct them if needed.

Lastly, some WordPress plugins load scripts from third-party sources like Google Analytics, Facebook APIs, Google Maps, and other third-party APIs.

Some of these APIs may require authentication or may have changed the way developers can access them. A failure to authenticate or incorrect access method will result in WordPress failing to open the required files.

To fix this, you will need to contact the plugin author for support. They will be able to help you fix the error.

If none of these tips help you resolve the issue, then follow the steps mentioned in our WordPress troubleshooting guide. This step by step guide will help you pinpoint the issue, so you can easily find the solution.

We hope this article helped you fix the WordPress ‘failed to open stream’ error. You may also want to bookmark our list of the most common WordPress errors and how to fix them.

If you liked this article, then please subscribe to our YouTube Channel for WordPress video tutorials. You can also find us on Twitter and Facebook.

The post How to Fix the WordPress Failed to Open Stream Error appeared first on WPBeginner.

How to Fix Add Media Button Not Working in WordPress

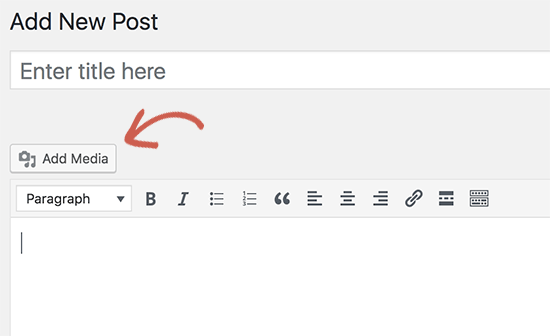
Recently one of our users reported that the ‘Add Media’ button on their WordPress site has suddenly stopped working. This problem does not display any error or warning which leaves users clueless about why their ‘Add Media’ button is not working. In this article, we will show you how to easily fix the ‘Add Media’ button not working issue in WordPress.

Fixing add media button not working in WordPress

What causes the WordPress ‘Add Media’ Button to Stop Working?

This problem is commonly caused by conflicting scripts or stylesheets loaded by WordPress plugins or themes installed on your site. The default behavior of WordPress is to load all required scripts and stylesheets by combining the requests.

This is usually done in the WordPress admin area to improve performance and speed.

The WordPress post editor uses JavaScript for all buttons on the screen including the add media button. A conflict can stop JavaScript from working which will disable the ‘Add Media’ button.

Add media button stopped working in WordPress

That being said, let’s take a look at how to troubleshoot and fix the ‘Add Media’ button not working in WordPress.

Fixing Add Media Button Not Working Issue in WordPress

The quick fix is to add the following code to your wp-config.php file. You can do this by editing wp-config.php file and adding this code just before the line that says ‘That’s all, stop editing! Happy blogging’.

define('CONCATENATE_SCRIPTS', false );

This code simply tells WordPress to load each script separately which helps avoiding a JavaScript conflict with buggy scripts and the core WordPress features.

After you have added the code, go ahead and the visit post edit screen to see if the add media button is working as expected.

Note: Adding this code is not a proper long-term solution because you still have a script that is causing the issue. An easier way to find the source of the problem is by using the inspect tool. It will show you console errors which can lead you to the source of the conflict.

If you want a long-term fix for this issue, then you need to perform the basic WordPress troubleshooting tips to figure out which plugin or theme may be causing the issue.

We strongly recommend that you do this on your staging site instead of a live site. Here’s a step by step guide on how to create a WordPress staging site. All the best WordPress hosting companies like Bluehost, SiteGround, WP Engine, and Liquid Web offer 1-click staging functionality.

On your staging site, you need to start by deactivating all your WordPress plugins and then check if it fixed the ‘Add Media’ button. If it does, then this means one of the plugins was causing the issue.

Deactivate all plugins

You can now activate the plugins one-by-one, and after activating a plugin check the ‘Add Media’ button. This will help you find out which plugin is causing the issue. After you find the culprit, you can replace it with another plugin or ask plugin author for help.

If deactivating plugins doesn’t solve the issue, then the next step is to temporarily switch to a default WordPress theme like Twenty Seventeen.

Switch to a default WordPress theme

If switching to the default theme fixes the issue for you, then this means your theme is causing the conflict. You can ask theme author for support or switch to a different WordPress theme.

Once you find the source of the problem on your staging site, then you can apply the fix on your live WordPress site.

We hope this article helped you learn how to fix add media button not working in WordPress. You may also want to see our list of the most common WordPress errors and how to fix them.

If you liked this article, then please subscribe to our YouTube Channel for WordPress video tutorials. You can also find us on Twitter and Facebook.

The post How to Fix Add Media Button Not Working in WordPress appeared first on WPBeginner.
How to Fix the HTTP Image Upload Error in WordPress

Are you seeing the HTTP error while uploading media in WordPress? This error usually occurs when you are uploading an image or other files to WordPress using the built-in media uploader. In this article, we will show you how to easily fix the HTTP image upload error in WordPress.

How to fix http error when uploading images in WordPress

What Causes HTTP Error During Media Upload in WordPress?

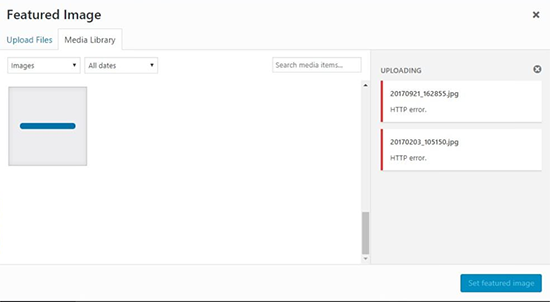
There are a number of things that could lead to a HTTP error when you are trying to upload files using the WordPress media uploader. Basically, WordPress is unable to figure out the cause and that’s why it displays the generic ‘HTTP error’ message.

HTTP Error

The frustrating part is that this error message doesn’t give you any clue as to what may have caused it. This means that you will have to try different solutions to find the cause and fix the error.

That being said, let’s take a look at how to troubleshoot and fix the HTTP error during media upload in WordPress.

1. Make Sure The HTTP Error is Not Temporary

First, you should wait a few minutes and then try uploading your image file again. This error is sometimes caused by unusual traffic and low server resources, which are automatically fixed on most WordPress hosting servers.

If that doesn’t work, then you may want to try uploading a different image file. If the other file uploads successfully, then try saving your original image file to a smaller size and retry uploading.

Lastly, you may want to try saving the file to a different format. For example, change jpeg to png using an image editing software. After that, retry uploading the file.

If all these steps result in the HTTP error, then this means that the error is not caused by a temporary glitch and definitely needs your immediate attention.

2. Increase WordPress Memory Limit

The most common cause of this error is lack of memory available for WordPress to use. To fix this, you need to increase the amount of memory PHP can use on your server.

You can do this by adding the following code to your wp-config.php file.

define( 'WP_MEMORY_LIMIT', '256M' );

This code increases the WordPress memory limit to 256MB, which would be enough to fix any memory limit issues.

File uploaded successfully

3. Change Image Editor Library Used by WordPress

WordPress runs on PHP which uses two modules to handle images. These modules are called GD Library and Imagick. WordPress may use either one of them depending on which one is available.

However, Imagick is known to often run into memory issues causing the http error during image uploads. To fix this, you can make the GD Library your default image editor.

You can do this by simply adding this code to your theme’s functions.php file or a site-specific plugin.

function wpb_image_editor_default_to_gd( $editors ) {
	$gd_editor = 'WP_Image_Editor_GD';
	$editors = array_diff( $editors, array( $gd_editor ) );
	array_unshift( $editors, $gd_editor );
	return $editors;
}
add_filter( 'wp_image_editors', 'wpb_image_editor_default_to_gd' );

After adding this code, you can retry uploading files using the media uploader. If this doesn’t solve the issue, then you can remove this code and try other methods described in this article.

4. Using The .htaccess Method

This method allows you to control how Imagick uses server resources. Many shared hosting providers limit Imagick’s ability to use multiple threads for faster image processing. However, this would result in you seeing the http error when uploading images.

An easy fix is be to add the following code in your .htaccess file:

SetEnv MAGICK_THREAD_LIMIT 1

This code simply limits Imagick to use a single thread to process images.

We hope this article helped you fix the HTTP error during media upload in WordPress. You may also want to see our WordPress troubleshooting guide as well as the ultimate list of most common WordPress errors and how to fix them.

If you liked this article, then please subscribe to our YouTube Channel for WordPress video tutorials. You can also find us on Twitter and Facebook.

The post How to Fix the HTTP Image Upload Error in WordPress appeared first on WPBeginner.
How to Fix the Mixed Content Error in WordPress (Step by Step)

Are you seeing the mixed content error in WordPress? Mixed content error in WordPress is caused by incorrect HTTPs/SSL settings. Often times it doesn’t affect your website’s functionality, but it can have adverse affects on your website’s SEO and user experience. In this article, we will show you how to fix the mixed content error in WordPress.

How to fix the mixed content error in WordPress

What is Mixed Content Error in WordPress?

It is highly recommended to add HTTPS / SSL in WordPress because after July 2018 Google Chrome will mark all http versions of website as insecure.

SSL adds an additional security layer around data transferred from your website to users’ browsers. Search engines like Google recommend using SSL on your website as well.

All best WordPress hosting companies are now offering free SSL as part of their packages. If your hosting company doesn’t offer that, then you can get free SSL through Let’s Encrypt for your WordPress site.

If you have correctly implemented SSL on your website, then you will see a green padlock icon next to your website’s URL in the browser address bar.

Secure content sign

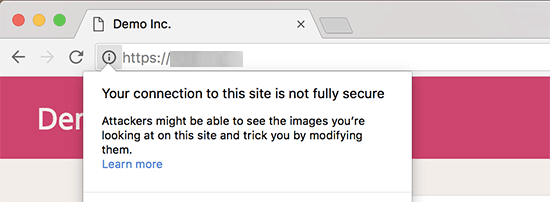
On the other hand if your HTTPs/SSL settings are not properly setup, then you will see an info sign or a broken padlock icon in the address bar.

Not fully secure due to mixed content

This indicates that while your website is using a SSL certificate, some content on your website is still served from non HTTPS urls.

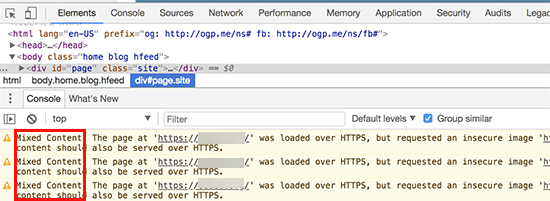
You can find out which content is served through insecure protocol by using the Inspect tool. The mixed content error will be displayed as a warning in the console with details for each mixed content item.

Mixed content displayed in developer tools

If it is just a single item that you can manually fix, then you can go ahead and fix it by editing the post, page, or theme file where it appears.

However, in most cases these items are added dynamically by WordPress or stored in your database. In that case, it will be hard to detect all of them and fix them manually.

That being said, let’s take a look at how to easily fix the mixed content error in WordPress.

Fixing Mixed Content Error in WordPress

First thing you need to do is install and activate the SSL Insecure Content Fixer plugin. For more details, see our step by step guide on how to install a WordPress plugin.

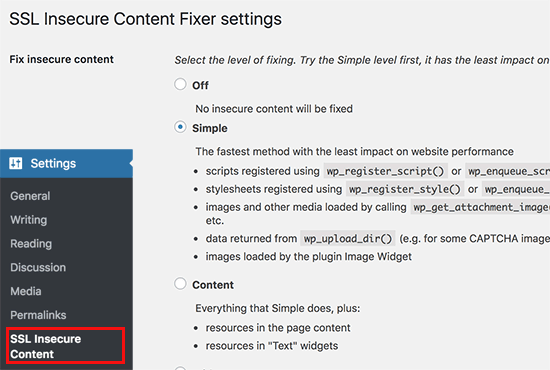
Upon activation, you need to visit Settings » SSL Insecure Content page to configure the plugin settings.

SSL secure content plugin settings

This plugin provides different levels of fixes to the mixed content error. We will explain each one of them, what they do, and which one is best for you.

1. Simple

This is the fastest and recommended method for all beginner users. It automatically fixes the mixed content error in WordPress for scripts, stylesheets, and WordPress media library images.

2. Content

If the simple method doesn’t fix the mixed content error on your website, then you should try this method. It will use all the features of simple, in addition to checks for fixes inside WordPress content and text widgets.

3. Widgets

This includes all fixes applied in content level plus an additional fix to resources loaded in all WordPress widgets on your website.

4. Capture

This method captures everything on every page of your website from header to footer and replaces all URLs with HTTPs. It is slower and would affect performance of your website.

5. Capture all

When all above levels fail, then you can try this method. It attempts to fix everything which may result in some unexpected behavior on your website. It will also have the most negative impact on performance.

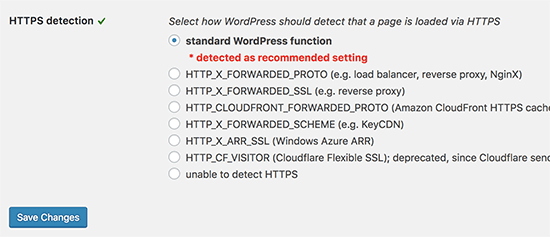
After selecting a content fix level, you need to scroll down to the HTTPS detection section. This is where you can choose how to detect the HTTPs content on your website.

HTTPS detect

The default option is to use a WordPress function, which would work for most website.

Below that you will find other options which are particularly useful if you’re using Cloudflare CDN, nginx web server, and more. Go ahead and select the method that you think applies to your website depending on your particular setup.

Don’t forget to click on the save changes button to store your settings.

You can now visit your website to see if this resolved the insecure content issues on your website. Make sure to clear your WordPress cache before checking your website.

If the mixed content error in WordPress is not fixed, then revisit the plugin’s settings page and readjust the fix levels.

We hope this article helped you learn how to fix the mixed content error in WordPress. You may also want to see our list of the most common WordPress errors and how to fix them.

If you liked this article, then please subscribe to our YouTube Channel for WordPress video tutorials. You can also find us on Twitter and Facebook.

The post How to Fix the Mixed Content Error in WordPress (Step by Step) appeared first on WPBeginner.
How to Fix the WordPress 429 Too Many Requests Error

Are you seeing the 429 too many requests error on your WordPress site? This error can be extremely frustrating because it is hard to figure out what’s causing it. In this article, we will show you how to easily fix the WordPress 429 too many requests error.

How to fix WordPress 429 too many requests error

What Causes WordPress 429 Too Many Requests Error?

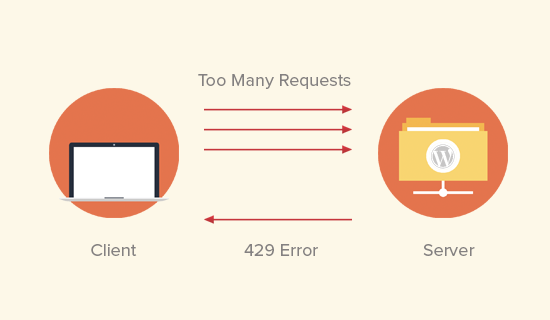
The most common reason for the 429 too many requests error is when a user, bot, or a script tries to make too many requests to the servers. It is a measure to prevent DDOS attacks on websites.

However if it is not properly configured, then it may end up preventing search engines or other APIs to run properly. This would cause unexpected behavior on your website.

Causes of 429 error in WordPress

Sometimes the error is caused when a script on your website is making too many requests to another website or service using an API. In that case, the API would respond back with a 429 error code.

That being said, let’s take a look at how to easily troubleshoot and fix 429 too many requests error in WordPress.

Fixing 429 Too Many Requests Error in WordPress

This error can be caused by a number of factors. We will show you multiple ways to troubleshoot and fix the 429 too many request error.

Find and Deactivate Misbehaving Plugin

The most common culprit of 429 error is usually a bad plugin on your website. Plugins can sometimes make subsequent requests to your website which may be rejected by the server with a 429 error code.

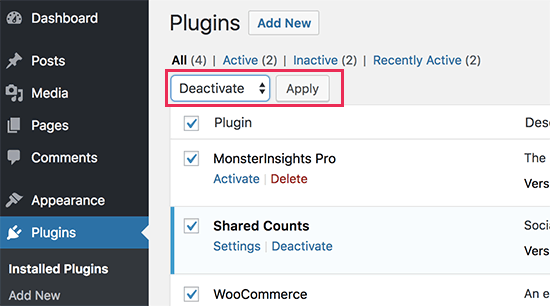
First thing you need to do is deactivate all WordPress plugins on your website. You can do this by visiting the plugins page in your WordPress admin area and selecting all plugins. After that, select ‘Deactivate’ under the bulk actions drop box and click apply.

Deactivate all WordPress plugins

If you are unable to access the WordPress admin area, then see our guide on how to deactivate all WordPress plugins via FTP.

Now check your website again to see if you can reproduce the 429 too many requests error again. If you can’t, then this means a plugin was causing this issue.

You can now turn on your plugins one by one and check your website after activating each plugin. This way you will be able to find the plugin causing the error.

Once you find the plugin causing the error, you can replace it with an alternative plugin or try reaching out to the plugin author to let them know about the error.

Switch to a Default WordPress Theme

More and more WordPress themes include functionality that normally comes with plugins. Such themes may also cause 429 error too many requests on your website.

The easiest way to find out is by switching to a default WordPress theme like Twenty Seventeen. If this resolves the 429 error issue, then you can find another WordPress theme or report the problem to the theme developer and they may be able to fix it.

Ask Your Hosting Provider

A lot of times, you will see a 429 too many requests error in third-party services that need access to your website. This could be search engines, crawlers, and other web apps.

If you are seeing the error in Google Search console or any third-party service, then most likely they are sending too many requests to your website. In that case, you need to ask your WordPress hosting provider to not block those requests.

We hope this article helped you fix the WordPress 429 error too many requests on your website. You may also want to see our list of most common WordPress errors and how to fix them.

If you liked this article, then please subscribe to our YouTube Channel for WordPress video tutorials. You can also find us on Twitter and Facebook.

The post How to Fix the WordPress 429 Too Many Requests Error appeared first on WPBeginner.
How to Fix the 413 Request Entity Too large Error in WordPress

Are you seeing the 413 Request entity too large error in WordPress? This error usually occurs when you are trying to upload a theme or plugin file in WordPress. In this article, we will show you how to easily fix the 413: request entity too large error in WordPress.

WordPress 413 error - Request entity too large

What Causes WordPress 413 Request Entity Too Large Error?

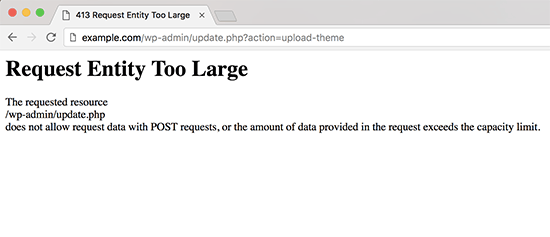
This error usually happens when you are trying to upload a file that exceeds the maximum file upload limit on your WordPress site.

Your web server will fail to upload the file, and you will see the 413 request entity too large error page.

413 request entity too large error example

Normally, most WordPress hosting companies have their servers configured, so that WordPress users can easily upload large images and other media.

However, sometimes this setting is not high enough to upload large theme or plugin files.

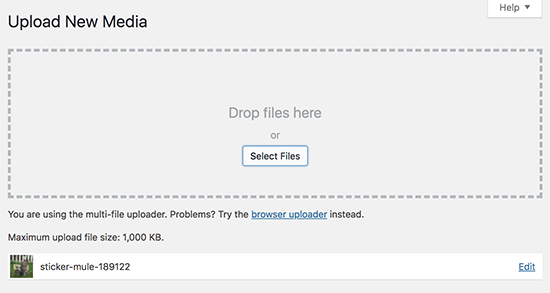
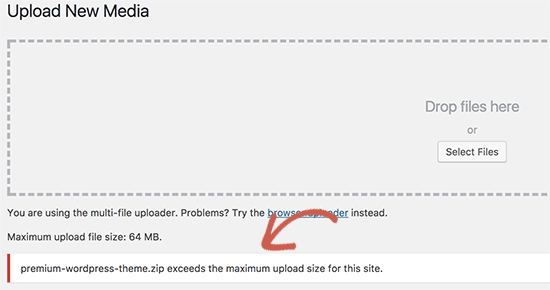
It would also stop you from uploading large files in media library. In that case, you will see a different message, clearly stating that the file size exceeds maximum allowed limit.

File size exceeds maximum upload size limit

That being said, let’s take a look at how to fix the the WordPress 413 request entity too large error.

Fixing 413 Request Entity Too Large Error in WordPress

There are multiple ways to fix the request entity too large error in WordPress. We will cover all these methods, and you can try the one that works best for you.

Method 1. Increase Upload File Size Limit via Functions File

Simply add the following code to your theme’s functions.php file or a site-specific plugin.

@ini_set( 'upload_max_size' , '64M' );
@ini_set( 'post_max_size', '64M');
@ini_set( 'max_execution_time', '300' );

You can increase the values in upload_max_size and post_max_size to be more than the file you are trying to upload. You will also need to increase the max_execution_time to the time you think it would take for the file to upload. If you are unsure, then you can try doubling this value.

Method 2. Increase Upload File Size Limit via .htacces File

For this method, you will need to edit the .htaccess file and add the following code at the bottom:

php_value upload_max_filesize 64M
php_value post_max_size 64M
php_value max_execution_time 300
php_value max_input_time 300

To learn more about increasing file upload size limit, see our guide on how to increase the maximum file upload size in WordPress.

Method 3. Manually Upload File via FTP

If the 413 error only occurs when you are uploading one particular file, then you may want to consider uploading the file manually via FTP.

If you are trying to upload a WordPress theme, then see our guide on how to install a WordPress theme and jump to the ‘Installing a WordPress theme using FTP’ section.

If you are trying to upload a plugin, then see our guide how to install a WordPress plugin and jump to ‘Manually install a WordPress plugin using FTP’ section.

For other files, see our guide on how to manually upload WordPress files using FTP.

We hope this article helped you learn how to fix the WordPress 413 request entity too large error. You may also want to see our list of the most common WordPress errors and how to fix them.

If you liked this article, then please subscribe to our YouTube Channel for WordPress video tutorials. You can also find us on Twitter and Facebook.

The post How to Fix the 413 Request Entity Too large Error in WordPress appeared first on WPBeginner.
How to Turn Off PHP Errors in WordPress

Recently one of our readers asked how to turn off PHP errors in WordPress? PHP warnings and notices help developers debug issues with their code. However it looks extremely unprofessional when they are visible to all your website visitors. In this article, we will show you how to easily turn off PHP errors in WordPress.

How to turn off PHP errors in WordPress

Why and When You Should Turn Off PHP Errors in WordPress?

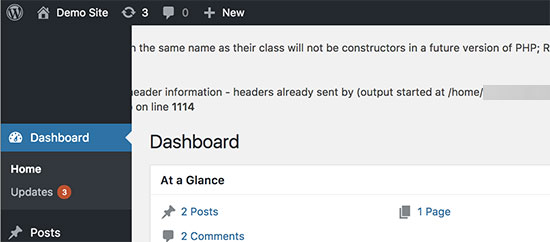
PHP errors that you can see on your WordPress site are usually warnings and notices. These are not like internal server error, syntax errors, or fatal errors, which stop your website from loading.

Notices and warnings are the kind of errors that do not stop WordPress from loading your website. See how WordPress actually works behind the scenes for more details.

PHP errors in WordPress admin area

The purpose of these errors are to help developers debug issues with their code. Plugin and theme developers need this information to check for compatibility and best practices.

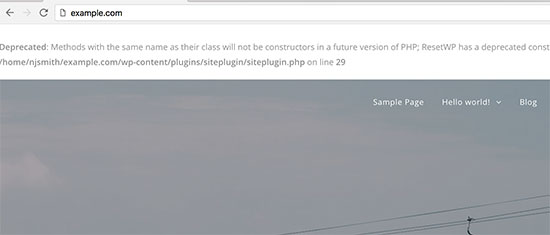
However, if you are not developing a theme, plugin, or a custom website, then these errors should be hidden. Because if they appear on the front-end of your website to all your visitors, it looks extremely unprofessional.

WordPress warning errors on homepage

If you see an error like above on on your site, then you may want to inform the respective theme or plugin developer. They may release a fix that would make the error go away. Meanwhile, you can also turn these errors off.

Let’s take a look at how to easily turn off PHP errors, notices, and warnings in WordPress.

Turning off PHP Errors in WordPress

For this part, you will need to edit the wp-config.php file.

Inside your wp-config.php file, look for the following line:

define('WP_DEBUG', true);

It is also possible, that this line is already set to false. In that case, you’ll see the following code:

define('WP_DEBUG', false);

In either case, you need to replace this line with the following code:

ini_set('display_errors','Off');
ini_set('error_reporting', E_ALL );
define('WP_DEBUG', false);
define('WP_DEBUG_DISPLAY', false);

Don’t forget to save your changes and upload your wp-config.php file back to the server.

You can now visit your website to confirm that the PHP errors, notices, and warnings have disappeared from your website.

Turning on PHP Errors in WordPress

If you are working on a website on local server or staging area, then you may want to turn on error reporting. In that case you need to edit your wp-config.php file and replace the code you added earlier with the following code:

define('WP_DEBUG', true);
define('WP_DEBUG_DISPLAY', true);

This code will allow WordPress to start displaying PHP errors, warnings, and notices again.

We hope this article helped you learn how to turn off php errors in WordPress. You may also want to see our list of the most common WordPress errors and how to fix them.

If you liked this article, then please subscribe to our YouTube Channel for WordPress video tutorials. You can also find us on Twitter and Facebook.

The post How to Turn Off PHP Errors in WordPress appeared first on WPBeginner.
How to Fix Secure Connection Error in WordPress

Are you seeing ‘Unable to establish secure connection error’ in WordPress? It is a common WordPress error and usually occurs when you are trying to install or update a WordPress plugin or theme from official WordPress.org directory. In this article, we will show you why this error occurs and how to easily fix secure connection error in WordPress.

Fixing secure connection error in WordPress

What Causes Unable to Establish Secure Connection Error in WordPress?

WordPress comes with a built-in system to manage updates. This system regularly checks for updates and show notifications for you to install plugin / theme updates.

However, it needs to connect to the WordPress.org website in order to check for updates or install them. Due to some misconfiguration on your WordPress hosting server, your website may fail to connect with WordPress.org website.

This will result in a secure connection error, and you will see an error message like this:

An unexpected error occurred. Something may be wrong with WordPress.org or this server’s configuration. If you continue to have problems, please try the support forums. (WordPress could not establish a secure connection to WordPress.org. Please contact your server administrator.) in /home/username/public_html/wp-admin/includes/update.php on line 122

Secure connection error in WordPress

That being said, let’s see how to easily fix secure connection error in WordPress.

Fixing Secure Connection Error in WordPress

There are multiple ways to fix the unexpected secure connection error in WordPress. You can try one of the following solutions based on your situation.

Hosting and Server Related Issues

If your shared hosting server is under DDoS attack, then it is likely that the connection to WordPress.org will timeout causing the secure connection error.

In that case, you can wait for a few minutes and try again. If the error persists, then you need to reach out to your web hosting company’s support team.

Cloud or VPS Server Connectivity Issue

If you are on a cloud or VPS hosting, then it is possible that your server is unable to connect to WordPress.org due to some DNS issues.

In that case, you can point your server directly to WordPress.org servers. You will need to connect to your server using SSH.

SSH is short for secure shell which is an encrypted protocol that allows you to connect to your server using command line tools.

Windows users can use a tool called PuTTy whereas Mac / Linux users can use the terminal app.

You will need login credentials for the account with shell access to your hosting account. You can get this information from your hosting account’s cPanel dashboard or ask your web hosting server provider.

In the terminal, you can connect to your server like this:

ssh [email protected]

Don’t forget to replace username with your own username and example.com with your own domain name.

Once connected, you need to run the following command:

sudo nano /etc/hosts

This will open a file, and you will need to add the following code at the bottom of the file:

66.155.40.202 api.wordpress.org

You can now save your changes and exit the the editor. Visit your website to see if this resolved the error.

Fixing WordPress Secure Connection Error on Localhost

If you are running WordPress on your own computer (localhost), then you may not have cURL extension enabled for PHP. This extension is required to access WordPress.org for updates.

You will need to edit the php.ini file on your computer. This file is usually located in the PHP folder of your Mamp, Xampp, or WAMP folder.

If you are on a Windows computer, then look for the following line:

;extension=php_curl.dll

Mac and Linux users would have to look for this line:

;extension=curl.so

Now you need to remove the semicolon before the text to enable the extension. Don’t forget to save your php.ini file.

Lastly, don’t forget to restart the Apache server for changes to take affect.

Check Open Ports in Firewall

If cURL extension is properly installed on your local server, then the next step is to check your internet connection firewall.

Your computer’s firewall may be blocking outgoing connections from local server to WordPress.org. If you are on Windows, then press the start button and search for Windows Firewall. Mac users can find firewall settings in System Preferences » Security & Privacy

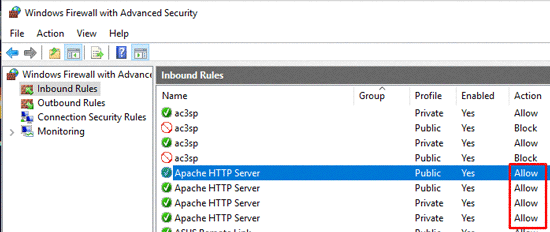
You need to add Apache to your firewall’s allowed programs and allow both incoming and outgoing connections.

Firewall Apache

You will need to restart Apache for changes to take effect.

We hope this article helped you solve the WordPress secure connection error. You may also want to see our ultimate step by step WordPress security guide for beginners.

If you liked this article, then please subscribe to our YouTube Channel for WordPress video tutorials. You can also find us on Twitter and Facebook.

The post How to Fix Secure Connection Error in WordPress appeared first on WPBeginner.