Category Archives: Beginners Guide

How and Why You Should Leave Reviews on WordPress

WordPress is a community built around the open source philosophy. Developers, designers, and marketers contribute to it by lending their skills and sharing their plugins / themes. As a user, there are many ways you can help out as well. One of them is by leaving reviews of products that you use. In this article, we will talk about how and why you should leave reviews on WordPress.
Why you should leave reviews on WordPress

How do Reviews Work on WordPress?

There are two different of WordPress platforms. There is WordPress.com which is a hosting solution, and then there is WordPress.org also known as self-hosted WordPress. See our comparison of WordPress.com vs WordPress.org for more details.

In this article, we will be talking about WordPress.org, which is home to the open source WordPress CMS platform that we all love. It is the place where you can get more than 50,000 free WordPress plugins and hundreds of free WordPress themes for your website.

Just like WordPress, all these themes and plugins are open source software. This means that developers of these plugins and themes don’t get paid by WordPress.org for sharing their products. Learn more about who owns WordPress and how does it make money.

When you browse the plugin or theme directory on WordPress.org, you will find reviews for them in the search results.
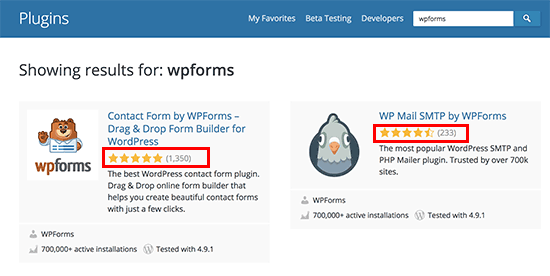
Review stars displayed in WordPress plugin search

You can also read each individual review on the Reviews tab, and you can add your own review as well.
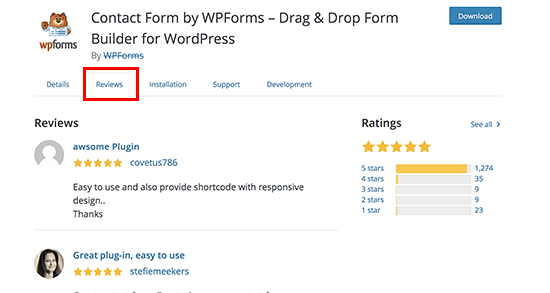
Reviews tab on plugin page in WordPress.org directory

Why You Should Add Reviews on WordPress.org?

If you are using a plugin or theme, and you find it useful, then your review can help others users make the right decision.

Users usually feel less inclined to install and try plugins or themes that has fewer installs with no star ratings. This means newer plugins and themes may go unnoticed even if they are good and really useful.
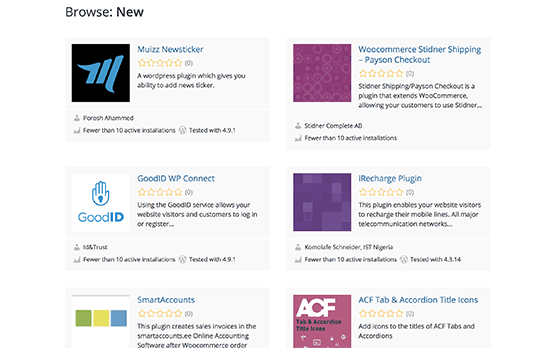
New plugins with no reviews and fewer installs

With your review, you can change that and more users will start using that plugin.

It is also in your own interest to do so. Good reviews help developers find motivation to continue the project and give it their time and skills. Without proper feedback, they may feel demotivated and abandon the plugin/theme.

What if I have a Negative Review?

Negative reviews are not bad. However, before adding your negative review, you should try to reach out to the plugin author through support tab.
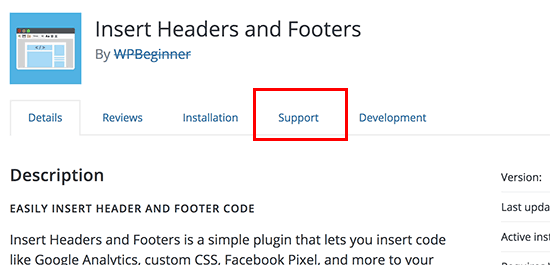
Plugin support tab

Sometimes plugin authors make mistakes, and your support request can prompt them to help you out or quickly release a fix. Learn more about how to ask for free WordPress support and get it.

In case you are unable to get help for the issues, you are free to share your negative review. However, please be respectful in the way you share your negative feedback about a FREE product.

How to Leave Reviews For Plugin and Themes on WordPress.org

First you’ll need a free WordPress.org account. Go to the WordPress.org’s plugin or theme directory page and click on the ‘Register’ link at the top right corner of the screen.
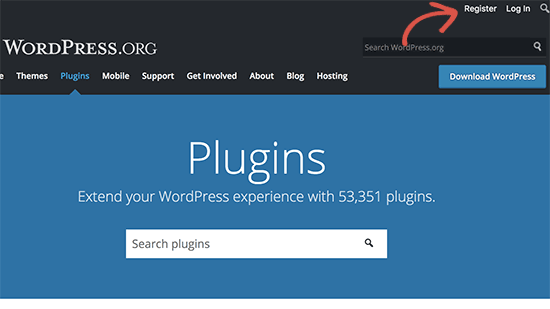
Register for free WordPress.org account

Once you are logged in, you can go to the plugin’s page and click on the ‘Reviews’ tab. You will see other reviews for the plugin. Simply scroll down to the bottom of the page, and you will see ‘Create a new review’ section.
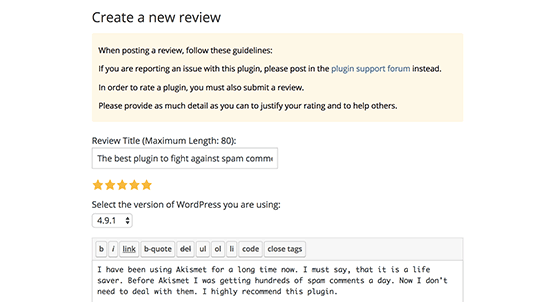
Leaving a review

You need to provide a title for your review and then select the star rating that you’d like to give this plugin. Next, you can write your detailed review.

For WordPress themes, you can go to the theme’s page and then click on the ‘Add your review’ button.
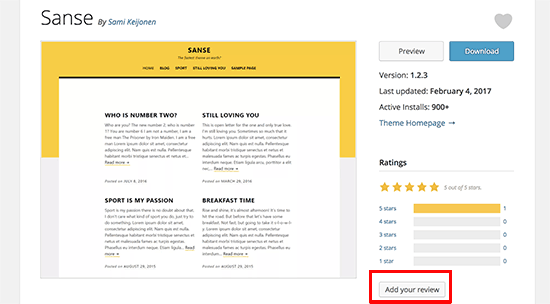
Theme review

Tips on Writing Helpful Reviews

If you find a plugin or theme useful, then feel free to describe how it worked. You can describe that it is easy to use and how it helped you improved your website.

Feel free to add any suggestions you have for the improvement. This helps developers figure out the most wanted features their users need, and they can prioritize those improvements.

On the other hand, if you find a bad plugin or theme, then first you will want to make sure that it is an issue with the plugin or theme. That’s why you should first try the support forum to see if there is a solution to it.

If you are unable to get help, then you can go ahead and add your review. Make sure that you are polite and respectful in your review. Describe the problem and the issue with the plugin or theme.

Most of the time plugin and theme author would respond to your negative review and will try to solve the issue you faced. Once the issue is resolved, you can change your rating and review for the plugin.
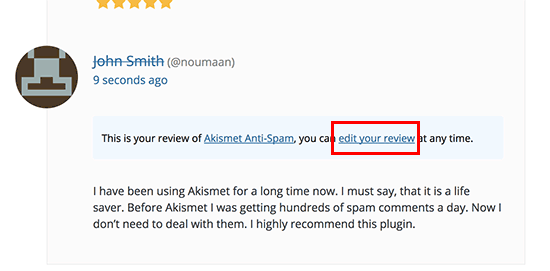
Edit your review to change your rating

You want to make sure that your review polite. Make it helpful by describing what you found missing from the plugin. Provide more details about the issues and don’t forget to add your suggestions for possible solutions.

Many plugin and theme developers are often very grateful for a polite and well-written negative review. In fact, we have seen some developers go to great lengths to convert a negative review into a 5 star review.

We hope this article helped you learn how and why you should leave reviews on WordPress. You may also want to see other ways you can get involved with the WordPress.org project.

If you liked this article, then please subscribe to our YouTube Channel for WordPress video tutorials. You can also find us on Twitter and Facebook.

The post How and Why You Should Leave Reviews on WordPress appeared first on WPBeginner.
How to use FTP to upload files to WordPress for Beginners

Are you looking to learn how to use FTP to upload files on your WordPress website? FTP or file transfer protocol is a fast and simple way to upload files from your computer to your website. In this article, we will show you how to use FTP to upload files to WordPress.

Using FTP to upload files in WordPress

Video Tutorial

If you don’t like video tutorials or want to move at your own pace, then continue reading the instructions below.

What is FTP?

FTP is short for File transfer protocol. It allows you to transfer files from your computer to your website hosting account.

Now you might be thinking there is already a media uploader inside the WordPress admin area for uploading files like images, video, audio, PDF and more.

Why do you need FTP?

You need FTP to be able to manually upload files in WordPress that sometimes won’t work due to an error on your site.

Normally, you don’t need FTP to upload files at all. You can easily upload images from WordPress admin area. You can even upload plugins and themes from WordPress itself.

However, sometimes you will need to upload a plugin or theme file manually for WordPress troubleshooting purposes and fixing most common WordPress errors.

Using FTP to Upload WordPress Files

First, you will need to download and install a FTP client on your computer. FTP client is an app that helps you connect to your website and transfer files using the FTP protocol.

Here are some of the most popular FTP clients that you can install.

For the sake of this tutorial, we will be using FileZilla. You can use any other FTP client that you like. The basic concepts are the same regardless of the software you use.

Connecting To Your WordPress Site Using FTP

When you open your FTP software, it will ask you to connect to your website using your FTP login credentials.

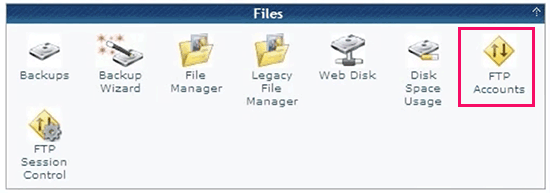
Your FTP login credentials are sent to you via email when you sign up for your WordPress hosting account. You can also find your FTP account information in your hosting account’s cPanel dashboard.

Managing FTP accounts inside cPanel

If you cannot find the login credentials, then you can contact your hosting provider to get this information.

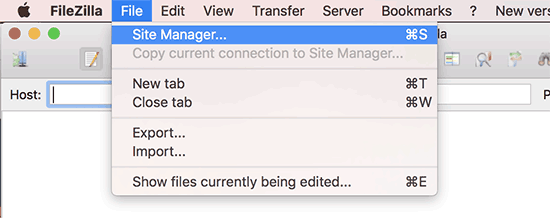
Once you have the login information, you need to open FileZilla and then go to File » Site Manager.

Site manager in FileZilla FTP client

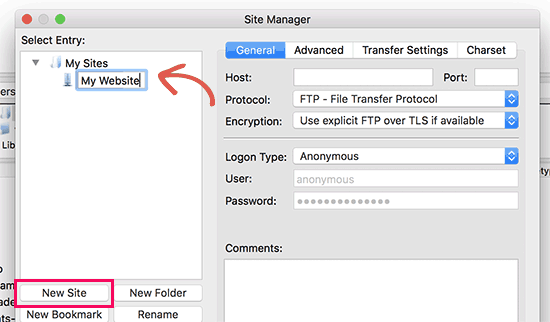
This will bring up a pop up window where you can add your website information. Click on the ‘New Site’ button and provide a title for your website.

Adding a new website in FileZilla

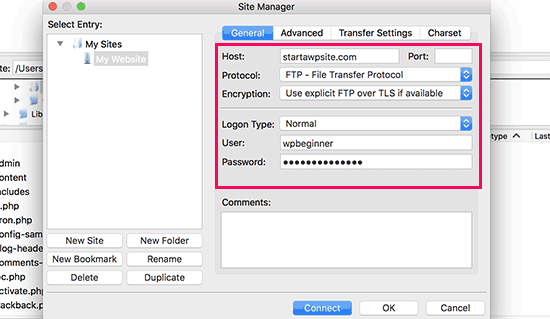
In the next column, you will be asked to enter your host. This is usually your domain name.

Under the logon type field, select ‘Normal’ and then enter your FTP username and password.

Login credentials

Now you can click on the connect button to continue. FileZilla will save your website settings for future logins and open a new FTP connection to your website.

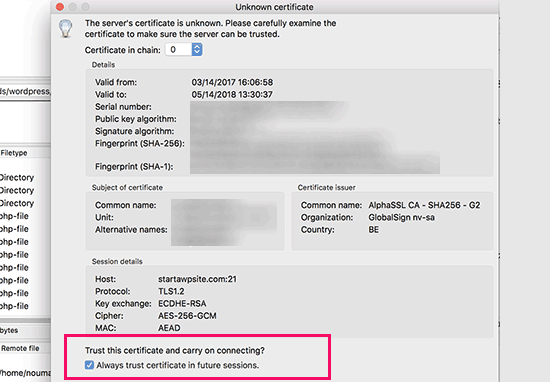
If this is your first time connecting to your website from this computer, then FileZilla may show you a certificate popup.

Trust certificate

Check the box next to ‘Always trust certificate for future sessions’ and click on the OK button to continue.

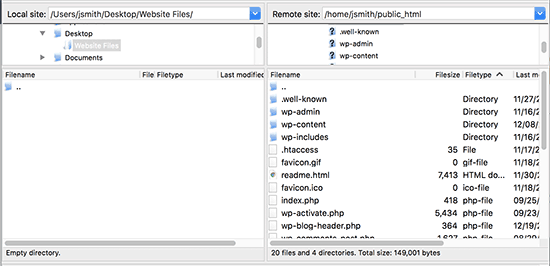
FileZilla will now attempt to login to your website using the credentials you entered. Once connected, you will see the list of files and folders on your website under the ‘Remote site’ column.

Local and remote file columns in Filezilla

The remote site column displays files and folders on your website and the ‘Local site’ section shows files on your computer.

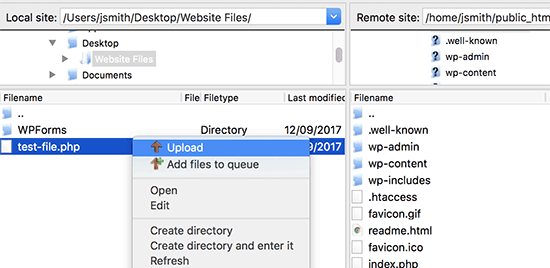
You can browse Local site to locate the files on your computer that you want to upload to your website. Next, you need to right click the file and select upload from the menu.

Upload file from your computer to your website

FileZilla will now transfer the file from your computer to your WordPress site.

However, WordPress needs certain files and folders in specific locations to work properly. This means you cannot just upload a file anywhere. You need to know where to upload a file in your WordPress site.

For example, if you want to manually upload a plugin to your WordPress website. Then first you will need to download the plugin to your computer.

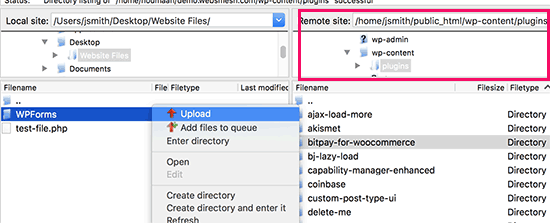
After that you will need to unzip the plugin file. Inside the zip file, you will find the plugin folder. WordPress looks for plugins in the /wp-content/plugins/ folder.

You will first need to go to /wp-content/plugins/ folder in the Remote site column. After that you can upload the plugin folder from your computer to your website.

Upload plugin folder

Once you have uploaded the plugin, you need to visit the plugins page inside your WordPress admin area to activate the plugin.

Installed plugin in WordPress admin area

Similarly, if you wanted to upload a premium theme to your website, you will first download and unzip the theme folder on your computer. After that, you can upload it to /wp-content/themes/ folder on your website.

FTP is not just used to upload files from your computer to your WordPress website. It can also be used to download files from your website and edit them.

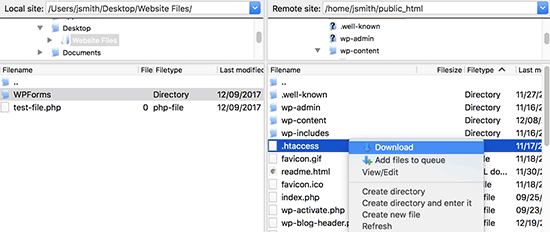
Simply right-click on the files or folders you want to download under the ‘Remote Site’ column and click on the download button.

Download a file from your website to your computer

You can also use FTP to backup all WordPress files. Simply select all files and folders and download them to your computer.

However, keep in mind that this is just the backup of your WordPress files, and it doesn’t include your content (Database). If you want to backup content as well, then you can do so by creating a manual backup of your WordPress database.

We hope this article helped you learn how to use FTP to upload files to WordPress. You may also want to see our step by step WordPress security guide for beginners.

If you liked this article, then please subscribe to our YouTube Channel for WordPress video tutorials. You can also find us on Twitter and Facebook.

The post How to use FTP to upload files to WordPress for Beginners appeared first on WPBeginner.
How to Appear in Google Answer Boxes with Your WordPress Site

Do you want your articles to appear in Google answer boxes? Answer boxes are Google’s push to answer questions directly on the search results page. In this article, we will explain how to appear in Google Answer Boxes for WordPress users.

How to appear in Google Answer Boxes for WordPress users

What is a Google Answer Box?

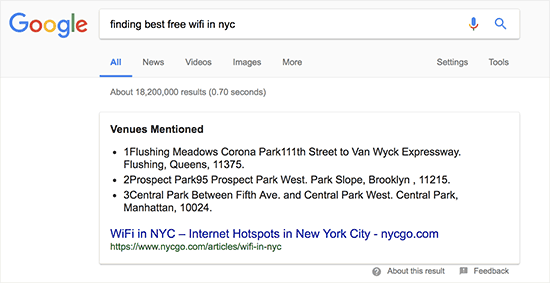
Google Answer box is part of Google’s Knowledge graph. It is an algorithm that tries to answer user’s questions right on the search page.

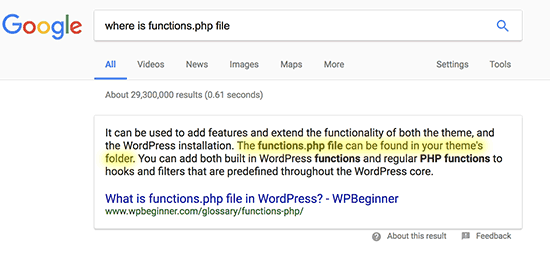
A search term displaying Google Answer Box

It uses carousels, side boxes, lists, tables, and answer boxes to display the most relevant information at the top. This information is gathered from various sources and the algorithm decides which results should be displayed inside an answer box.

According to research conducted by Advanced Web Ranking, Answer boxes secure almost 32.3% CTR. This makes them immensely important for your WordPress SEO strategy.

How Google Displays Information in The Answer Box?

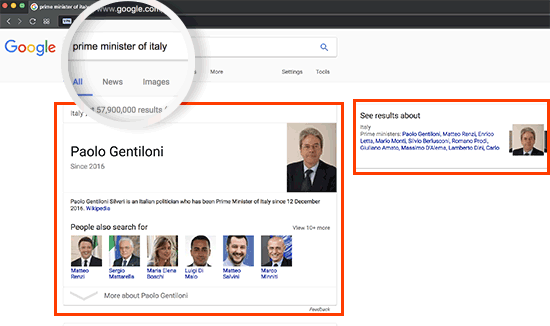
The purpose of Answer Boxes is to offer instant gratification to the users. This works particularly well when users are looking for factual information like public figures, distances, conversion rates, scores, and similar information.

Instant answer in Google Search result using Knowledge Graph

In such cases, if users got the exact information they needed, then they can move on and search for something else. For many queries it can just display a sidebox from the web’s most reliable knowledge sources like Wikipedia.

In a way, it might sound like Google is trying to keep all the traffic for itself. However, not all users are looking for information that Google’s knowledge graph can answer with accuracy.

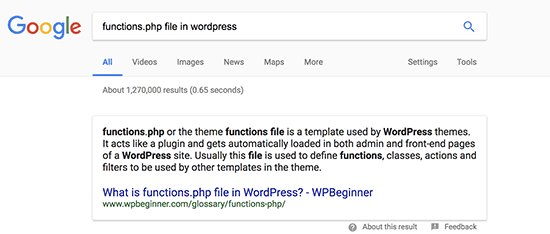
If user’s keywords require an opinionated, well thought, or research based answer, then Google relies on other web sources.

Google Answer box displaying other web sources

If you are among the top 10 results for a keyword, then you are already closer to appear in Google Answer Box.

How to Make Your Pages Appear in Google Answer Box?

Google Answer Box results change quite often, and you can easily appear as the best answer by simply improving your content.

Let’s explore a number of content optimization steps that you can take to appear in the answer box.

Add Short and Helpful Answers in Your Content

The purpose of Answer Boxes is to provide quick answers. Make sure that your article answers the question as early in the article as possible.

You also need to make your answer short, concise, and easy to understand.

Provide short and helpful answers in your article

It also helps to include your keywords in the form of a question followed by the short answer.

After that, feel free to add as much detail to your answer as you want. Adding more information will allow you to use the keyword throughout the article, and you can even use the same article to answer other questions your users may have about the same topic.

Answer other questions about the same topic

Optimize Your Page’s Meta Description

Meta description is a brief description explaining what your page is about. It is added in the <head> section of your site’s HTML.

You can add meta description for your articles by using a WordPress SEO plugin like Yoast SEO or All in One SEO plugin.

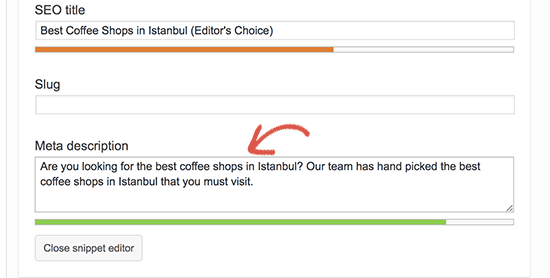
Optimize meta description for answer box

Make sure that your meta description includes your target keyword. It also needs to explain what questions or topics this particular page will be answering.

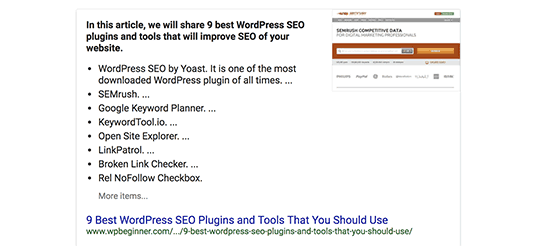
For example, our article about WordPress SEO tools and plugins uses this meta description:

“Are you looking for best WordPress SEO plugin and tools to boost your SEO? Check out our list of 9 best WordPress SEO Plugins and Tools.”

Here is how it appears in the answer box.

Meta description optimization effect on Google Answer Box

Utilize Lists, Tables, Table of Contents

Users love properly formatted content because it helps them quickly get the information they need. That’s why websites like list25 are so popular. They publish informative content in a viral listicle format that is easier to consume and share.

Google understands that and tends to highlight the websites that use formatting to make content consumption easier for users.

Tables in Google Answer Box

This includes:

  • Pages that use tables to list items.
  • How to articles that use step by step instructions.
  • Top lists that simply just list items.
  • Lenghty articles that utilize table of contents
  • and more.

This does not mean that you must always use one of these formats to write your articles. However, if using formatting can help your users get to the information quickly, then use it.

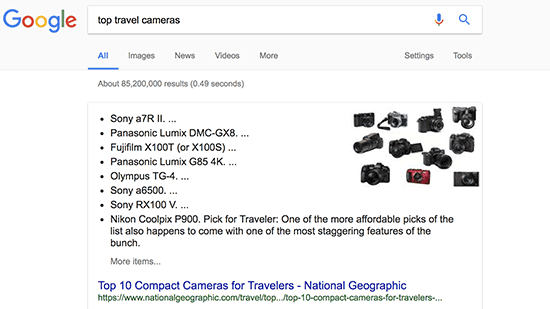
Lists in Google Answer Box

Optimize Content with Data Driven Decisions

Data is the most important thing you need for an effective content strategy. This is where Google Analytics comes in. It helps you understand your audience and plan accordingly.

You will need MonsterInsights to properly track user engagement in WordPress. It is the best Google Analytics plugin in the market, and it will help you learn where your users are coming from, and what they do while they are on your site.

These stats provide you a clear picture of what’s already working on your website. You can then expand on it and make informed decisions for better SEO.

Follow SEO Best Practices

Apart from answering the user questions, you also need to make sure that Google can find your page and understand it just as easily.

This means you still need to optimize your posts for SEO just like you would normally do.

  • Include your keywords in SEO title, description, and keywords.
  • Add your focus keyword in content and sub-headings in your article.
  • Properly utilize categories and tags.
  • Make sure there is enough content to cover the topic.
  • Make internal linking a habit and link to your other posts and pages
  • Add title and alt tags to your images.

Are Google Answer Boxes Worth The Effort?

Yes, absolutely. As we mentioned earlier the click-through rate for results in the answer box is way higher. Depending on the topic and your content, it could go as high as 51.2%.

However, we do not recommend you overthink it. The purpose of Answer boxes is to help users find information quickly. If you focus on answering questions through helpful and informative content, then search results will start picking it up.

Google’s search features are always changing. There are no shortcuts that will help you win forever. Building your website as an authority / reliable source of useful information will help you win in the long run.

We hope this article helped you learn how to appear in Google Answer Boxes. You may also want to see our list of the must-have WordPress plugins that will help you take your website to the next level.

If you liked this article, then please subscribe to our YouTube Channel for WordPress video tutorials. You can also find us on Twitter and Facebook.

The post How to Appear in Google Answer Boxes with Your WordPress Site appeared first on WPBeginner.