Category Archives: Beginners Guide

How to Use the WordPress Desktop App for Your Self-Hosted Blog

Do you want to use the WordPress desktop app for your self-hosted WordPress.org blog? WordPress desktop app allows you to easily write and edit blog posts without being distracted by other browser tabs. In this article, we will show you how to use the WordPress desktop app for your self-hosted WordPress blog.

How to use WordPress desktop app for self hosted WordPress site

Pros and Cons of Using the WordPress Desktop App

WordPress desktop app is created by Automattic, a company founded by WordPress co-founder Matt Mullenweg. It is also the company behind JetPack and WordPress.com. For details, see our article on the comparison between WordPress.com vs WordPress.org.

WordPress desktop app offers an improved user experience for self-hosted WordPress websites, which is particularly great for users looking for a distraction free editor to create content.

However, just like everything else in the world it has its own pros and cons.

Pros

Here are the advantages of using the WordPress desktop app on your computer to manage your self hosted WordPress.org website.

  • Offers a nice user interface to manage your website
  • It syncs your content fast and offers a great writing experience
  • Offers a clean distraction free writing area to create your content
  • Allows you to perform website management tasks without opening your browser like updating plugins and answering comments.

Cons

Following are the disadvantages you need to consider before using the WordPress desktop app for managing a self-hosted WordPress site.

  • It doesn’t work while offline. This means you cannot write posts and just save them to your computer using the desktop app.
  • Doesn’t load custom fields created by plugins in the post editor. For example, if you are using Yoast SEO, then you will not be able to edit post’s SEO settings from the app.
  • Requires you to install the JetPack plugin and sign up for a WordPress.com account.

That being said, let’s take a look at how to use the WordPress desktop app for your self-hosted WordPress.org site.

Using WordPress Desktop App for Self-Hosted WordPress

First thing you need to do is install and activate the JetPack plugin on your website. For more details, see our step by step guide on how to install a WordPress plugin.

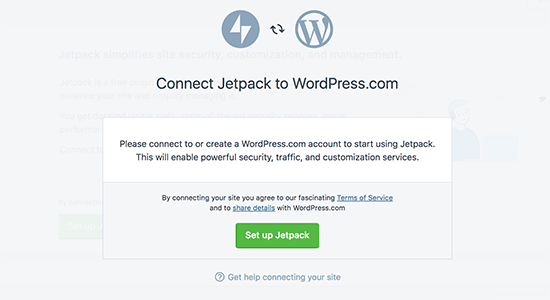
Upon activation, you will be asked to connect JetPack to a WordPress.com account.

Connect JetPack to WordPress.com

You need to click on the ‘Setup Jetpack’ button to continue.

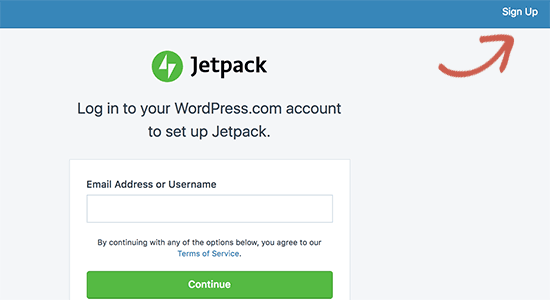
This will take you to the WordPress.com website. If you already have a WordPress.com account, then you can login. Alternatively, you need to click on the sign up button to create a new account.

Login or sign up for a WordPress.com account

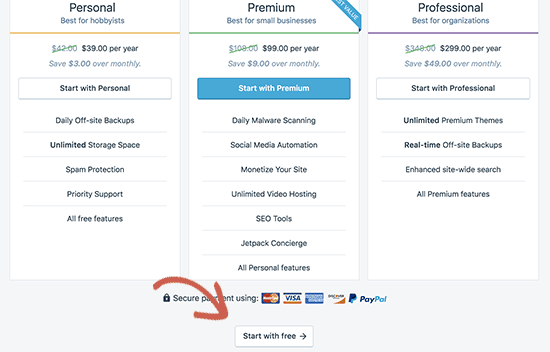
After sign up, you will be taken to the pricing page. Simply scroll down to the bottom of the page and click on the ‘Start with free’ button.

Get free account

WordPress.com will now create your free account, and you will be redirected back to your website.

Next, you need to download and install the WordPress Desktop App on your computer.

WordPress app login screen

After installation go ahead and launch the app. You will see the login screen where you need to enter your WordPress.com username and password to login.

Once logged in, you will see the WordPress.com reader screen where you can explore content and follow blogs. To manage your website, you will need to switch to the My Sites tab.

WordPress desktop dashboard

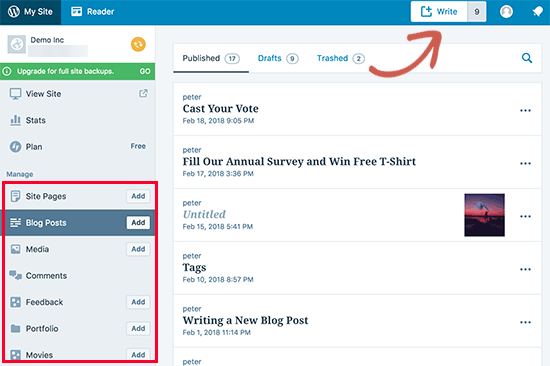
You will now see your website title in the left menu along with other website management sections. In the right column, you will see JetPack traffic reports.

Using the admin bar on the left column, you can edit and create posts, pages, and custom post types. You can also add a new blog post by clicking on the write button at the top.

Adding content to your site from the app

The content editing area offers a very polished user experience.

On the right column, you will find post settings like status, post scheduling, categories and tags, featured image, and more. To the left, you have a distraction free writing area with a rich text editor.

Writing posts in WordPress desktop app

You can add photos and galleries to your article by clicking on the ‘Add’ button in the editor. You can close the settings column by clicking on the gear icon at the top.

Now let’s take a look at the Comments section.

The WordPress desktop app allows you to easily manage comments on your website. You can reply to comments as well as approve or delete comments pending moderation.

managing comments in WordPress desktop app

The themes section in the app allows you to manage themes installed on your website. You can also install a new theme without leaving the app.

Managing themes

However, you cannot customize your theme inside the app. Clicking on customize will open the customizer window on your website in a new browser tab.

The plugin section allows you to install, upload, and activate plugins directly from the app.

Manage plugins

The app will also notify you of plugin updates, and you can update them directly from the app. You can also optionally choose to auto-update plugins that you trust.

Updating plugins from the app

Now, let’s review the Sharing section.

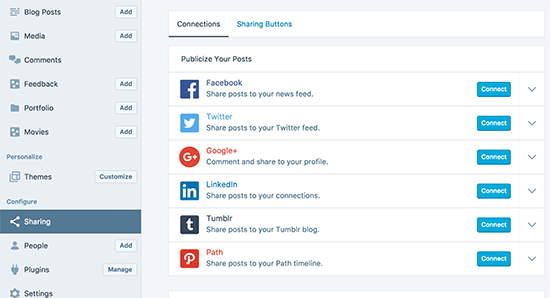
Here you can connect the JetPack plugin to popular social media websites and automatically share new posts on social media.

Enabling social sharing in WordPress.com

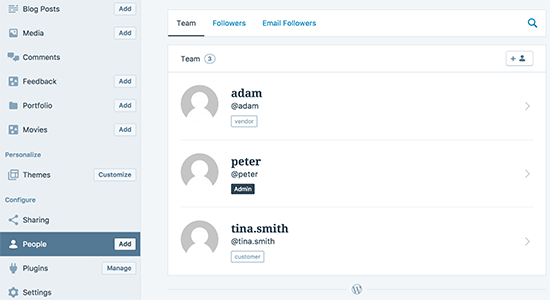
If you want to add new authors and users to WordPress, then you can do so directly from the ‘People’ section in the app. It shows all registered users on your website as well as users following your blog using the JetPack follow feature.

managing users via WordPress app

You can click on the add button to invite new users and click on existing user accounts to view their details and delete accounts if needed.

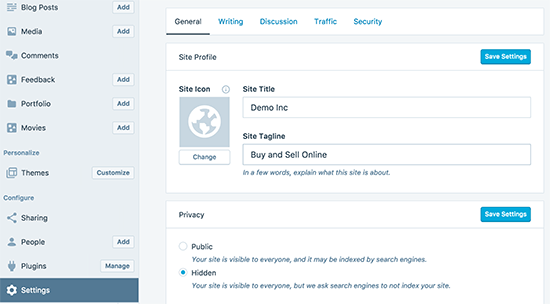
The Settings section inside the app allows you to manage WordPress settings from the app. Some of these settings are specific to the app and JetPack plugin while others are WordPress settings that you would normally manage in the admin area.

Settings panel in WordPress app

If you manage multiple WordPress sites, then you can add them to the app and manage them from the same dashboard.

Any new website you add should have JetPack installed and connected to the same WordPress.com account you are using in your app. After that you can simply click on the add new site button at the bottom right corner of the app to add them.

Add new site to WordPress app

We hope this article helped you learn how to use WordPress desktop app for your self-hosted website. You may also want to see our list of best mobile apps to manage your WrodPress site.

If you liked this article, then please subscribe to our YouTube Channel for WordPress video tutorials. You can also find us on Twitter and Facebook.

The post How to Use the WordPress Desktop App for Your Self-Hosted Blog appeared first on WPBeginner.

Beginner’s Guide: How to Center Align a Video in WordPress

Do you want to center-align a video in WordPress?

By default, if your video’s width is less than your article area, then WordPress automatically aligns it to the left, leaving extra white space on the right side.

In this article, we will show you how to easily center align a video in WordPress.

How to center align a video in WordPress

Why Center Align Videos in WordPress?

When you embed a video in WordPress, it automatically aligns them to the left by default. This is because videos are external content embedded in the content, so WordPress is unable to guess how you would like to display it.

As a best practice, it automatically aligns it to the left, leaving it up to you to adjust the alignment if needed.

By aligning the video to the center, users will have a better experience viewing your content. This way, you won’t have noticeable blank space on the one side of the page, which could give an unprofessional look.

Besides, if you upload videos directly to WordPress, the same thing will happen to them if their width is less than your content area. WordPress will align them to the left by default.

That being said, let’s see how you can easily center-align a video in a WordPress website. We’ll cover both the block editor and classic editor, so you can click the links below to jump ahead to any section.

How to Center Align Video in WordPress Content Editor

If you want your video to fill the width of your content area, then the best way to do this is by adding a YouTube or Vimeo video URL directly in the WordPress content editor.

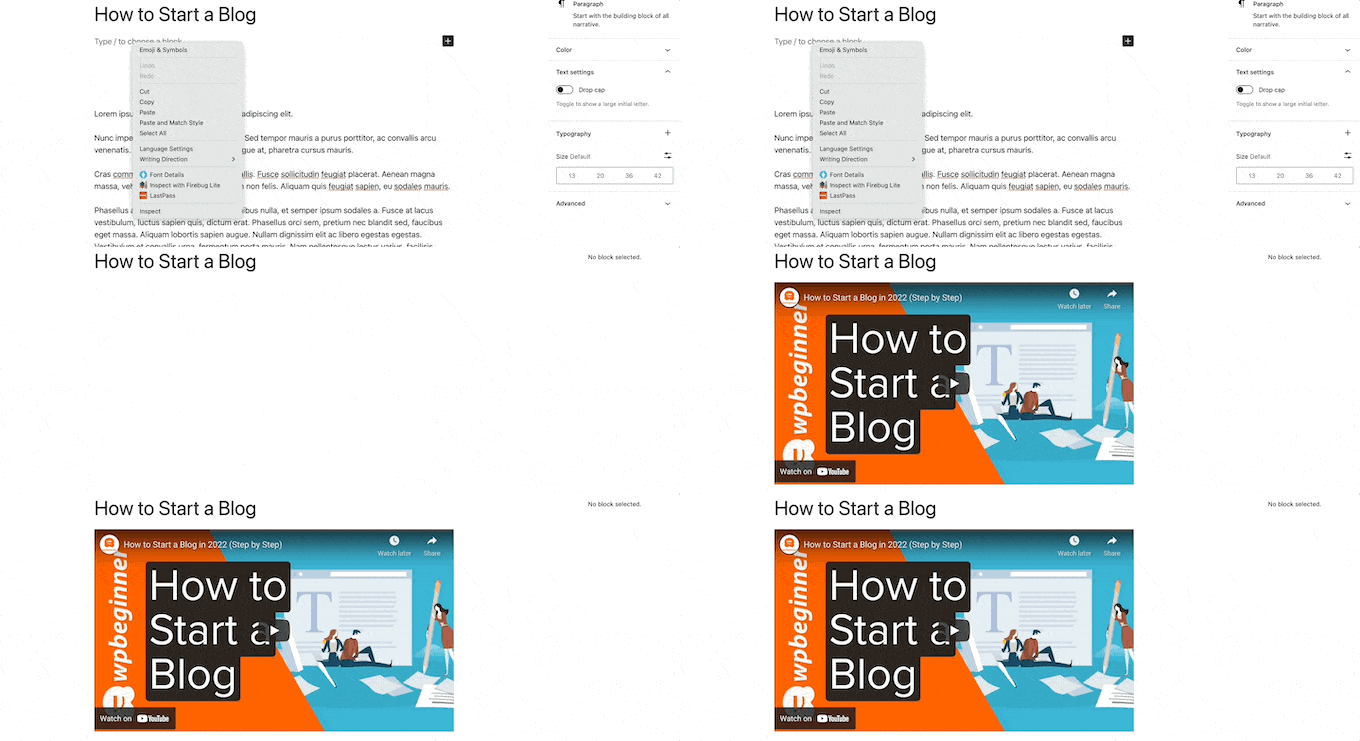
First, you’ll need to edit a post or a page or add a new one. Once you are in the content editor, simply paste the link to the video. WordPress will embed the video automatically.

Paste video embed code in block editor

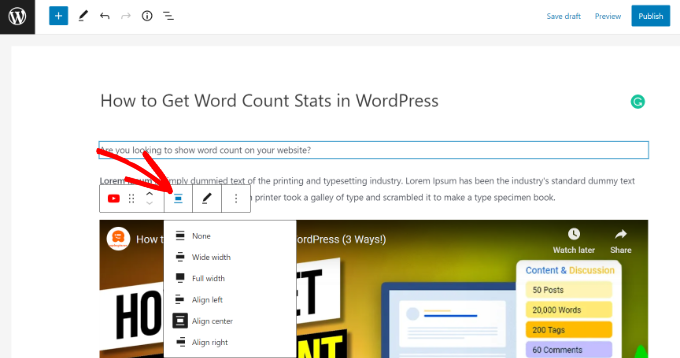
Next, select the video block and then click the Change Alignment option. From the dropdown menu, you can choose the position of the video.

WordPress lets you choose from the following alignments:

  • wide width
  • full width
  • align left
  • align center
  • align right.

Go ahead and select the ‘Align center’ option.

Align the video to the center

After that, you can preview and publish your page or post.

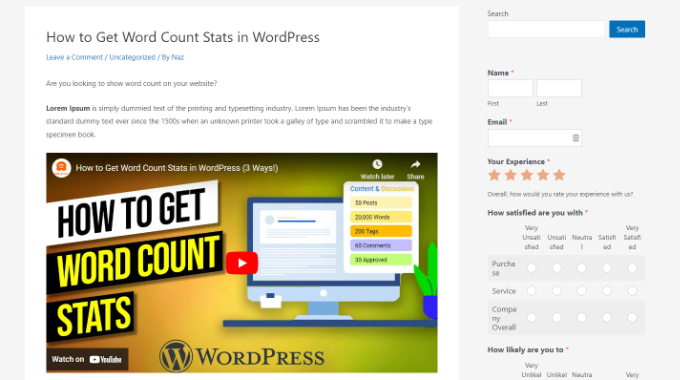
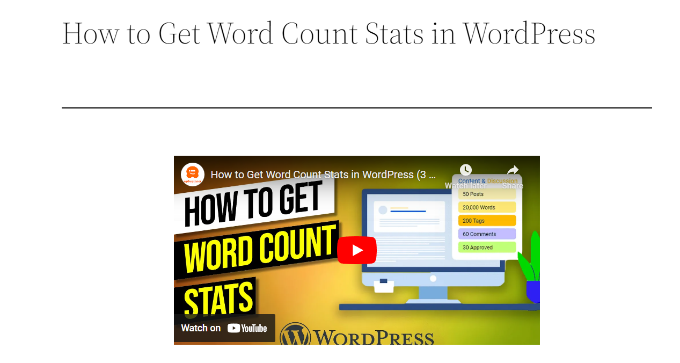
The video will now be center-aligned.

Center aligned video preview

However, sometimes for one reason or another, you may need to use the embed code. In that case, you will need to add some simple HTML around your video’s embed code.

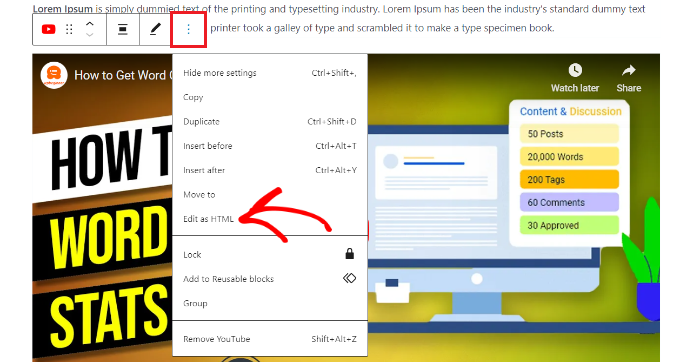
First, you need to click the 3 dotted icons in the video block. After that, you can select the ‘Edit as HTML’ option from the dropdown menu.

Edit as HTML

Next, you can enter the following piece of HTML code around the embed code of the video:

<div style="text-align:center;">

/// your video embed code goes here

</div>

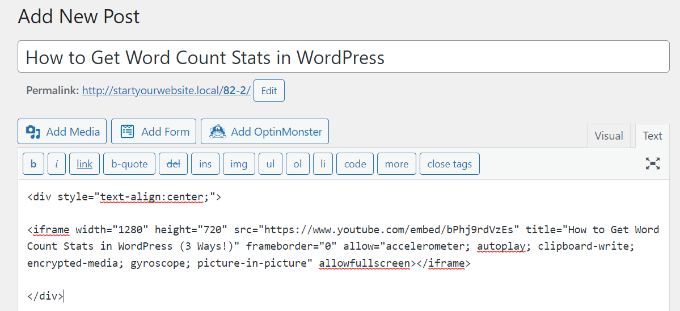
Here’s what your embed code would look like with the custom HTML.

Preview of custom HTML code

You can now save your changes and preview the post or page. Your video will be neatly aligned in the center of your content area.

Another approach is to manually increase your video’s width to fit the content area. To achieve this, you need to add or change the ‘width’ parameter in your embed code.

<iframe width="760" height="315" src="https://www.youtube.com/embed/4YpyiJ05YOg" frameborder="0" allow="autoplay; encrypted-media" allowfullscreen></iframe>

How to Center Align Video in the Classic Editor

If you’re using the Classic editor, then you can center align videos by editing a post or creating a new one.

Once you’re in the editor, switch to the Text view. Now enter the following HTML code:

<div style="text-align:center;">

/// your video embed code goes here

</div>

Just make sure to replace ‘your video embed code goes here’ with your video’s embed code.

Once that’s done, it will look something like this:

Center align videos in classic editor

You can now preview and publish your page.

Simply visit your website to see the center-aligned video.

Center aligned video classic editor preview

We hope this article helped you learn how to center align a video in WordPress. You may also want to see our guide on how to start a WordPress blog and must-have WordPress plugins.

If you liked this article, then please subscribe to our YouTube Channel for WordPress video tutorials. You can also find us on Twitter and Facebook.

The post Beginner’s Guide: How to Center Align a Video in WordPress first appeared on WPBeginner.

10 Highest Performing Google AdSense Banner Sizes & Formats for Your WordPress Site

One of the most common questions beginners ask after signing up with Google AdSense is which are the highest performing Google AdSense banner sizes? Some Google AdSense ad formats are more noticeable which means they get more clicks and bring more revenue. In this article, we will show you the highest performing Google AdSense banner sizes and formats, and where to place them for best results.

Google AdSense Banner Sizes

How to Properly Setup Google AdSense Ads in WordPress?

Before getting started, you will need to sign up for a Google AdSense account. Once you have signed up, see our guide on how to properly add Google AdSense in WordPress.

By default, you can easily place AdSense ads in your website’s sidebar. Some WordPress themes may also have dedicated areas to display ads.

However, the best way to manage your Google AdSense ads in WordPress is by using an ad management plugin. We recommend using AdSanity, it is super easy to use and allows you to easily insert ads into sidebars, post content, and anywhere else you want.

Why Some Google AdSense Banner Sizes and Formats Work Better?

Google AdSense comes with several banner sizes and ad formats that you can add on your website. However, not all of them produce the same level of results.

Ads that are closer to the content and easily visible upon page load will get you a higher CTR (click through rate). You need to make sure that you choose the ad size that is easily noticeable. Some of the Google AdSense ad sizes are too small and some could be too large to affect user experience.

Next, factor that affects ad performance on your website is how many advertisers are running ads for that format. Some ad formats and banners are more popular among advertisers which means using them gets you a larger inventory and better paying ads.

Lastly, some ad formats are optimized for mobile devices. If mobile users make the most of your traffic, then these ads are going to perform better on your website than other sizes.

Top Performing Google AdSense Banner Sizes and Formats

Most website owners try different banner sizes to determine which formats work best for their websites. Google AdSense engineers also continuously run their own tests to see how ads are performing on participating websites.

We have done several testing with Google AdSense over the years on our own websites. Below are the top performing Google AdSense banner sizes and ad formats that offer the best value for your advertising real estate.

1. The Medium Rectangle (300×250)

Medium rectangle

This ad format supports both display / text ads, and it can also be used on mobile layouts. The best part about this ad size is that it’s easy to fit in the sidebar or inside the content area without annoying users.

That’s why this ad format gets a larger ad inventory which means more and better paying ads for your site. Since it’s perfectly-sized for in-content ads, it is also reported to have the best CTR for most websites.

2. Large Rectangle (336×280)

Large rectangle

Large rectangle takes the second position on our list. It is larger and more noticeable than the medium rectangle ad above, but it may not fit in all website sidebars and is not mobile optimized.

If your website’s sidebar or content area is a bit narrow, then the ad could squeeze the content which is not good for user experience.

That being said, the large rectangle could easily outperform medium rectangle on your website if placed inside the content area in between paragraphs. It supports both image and text ads.

Due to its size and ideal placement next to content, this ad size gets a better ad inventory as well.

3. The Leaderboard (728×90)

Leaderboard

The leaderboard is a traditional banner ad size that is perfect for website header. It supports both text and image ad formats but doesn’t support mobile ads.

Since the leaderboard is ideal to be placed on top (inside or immediately after the website header), it gets more ads which means better ads for your website. Due to its size and prominent placement, it performs fairly well on most websites.

4. Half Page aka Large Skyscraper (300×600)

Half page

Large Skyscraper is a wide vertical banner also known as half page due to its size. It gets attention from advertisers who want more ad space to effectively communicate their message during retargeting.

It is becoming more popular among publishers because it tends to give more exposure for brands which means better paying ads.

You can place the large skyscraper in the sidebar or next to the content. However, due to its size it may not be a good fit for all websites.

5. Large Mobile Banner (320×100)

Mobile banner

Large mobile banner is a mobile ad format, and it is an equivalent of the leaderboard ad format in terms of effectiveness but for mobile devices. Ideally it works best when placed on top just below the header.

Since mobile traffic makes up a good chunk of users for most websites, this ad format gets a better ad inventory.

It can be placed as a less intrusive ad and as an alternate to the medium rectangle ad format.

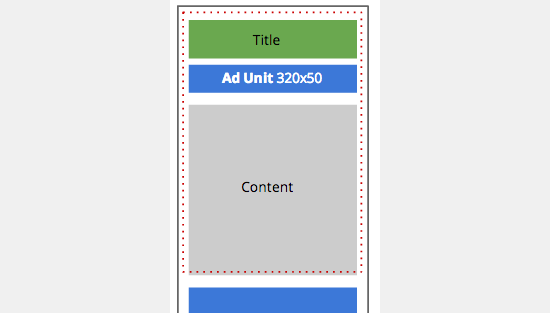
6. Mobile Leaderboard (320×50)

mobile leaderboard

Mobile leaderboard is half in height compared to the large mobile banner ad format. It is slightly less effective but also less intrusive and offers even better ad experience on smaller mobile devices.

Mobile ads are popular among advertisers which means it gets a sizable ad inventory. With proper placement, it can work really well with your mobile traffic.

7. Wide Skyscraper (160×600)

Skyscraper

The wide skyscraper is a vertical banner ad that is designed specifically for narrow sidebars. It supports both image and text ad formats and is popular among advertisers.

It is a less intrusive ad option and can easily blend in with your website design. However, it is less effective than wider half page banner ads which tends to draw more user attention towards ad.

8. Portrait (300×1050)

Portrait

Portrait is a slightly wider and longer vertical banner. Due to its size, this ad format attracts brand-centric advertisers who want more ad space for their message.

It is ideally placed next to the content or in the sidebar where it is more noticeable as your users scan the contents of your page. The tricky part is to implement it without affecting user experience on your website.

9. The Billboard (970×250)

Billboard

The billboard is another brand-centric ad format. It is a wide horizontal banner ad that can be ideally placed on top or bottom of your pages. It tends to get better ads due to the space it offers to the advertisers, but it has a smaller ad inventory.

Depending on the content and keywords of your website, it could be a hit or a miss if it fails to attract enough ads for your website.

10. The Square (250×250)

Generally larger ads are considered more noticeable. However, not all websites are designed in the same fashion. If you are using a minimalist WordPress theme, then this small square ad format could beautifully fit in your layout and still be noticeable.

The downside is that it has a smaller ad inventory which could result into low paying ads. However, if your website is in a competitive industry, then it can work really well without affecting user experience.

More Tips to Make the Most out of Your Ad Space

We are often asked by users how they can make more money with Google AdSense? Since each website is different, there is no single perfect answer to this question.

Here are some tips to make sure that you are fully utilizing your website’s potential when using Google AdSense to generate revenue.

  • Test different ad placements – Try different ad formats to figure out which formats give you a better CTR and which formats give you better ads.
  • Display multiple ads – Google AdSense allows you to use up to 3 ad units on a page. Try different placements and ad formats to test which combinations work best for you.
  • Think of users first – While ad revenue is important for the survival of many websites, you also need to think of your users. Placing ads in a way that affects user experience would affect your website’s user engagement as well as your WordPress SEO.
  • Optimize website performance – Research shows that faster websites usually get more engaged audience which means higher CTR for your ads. See how to speed up WordPress and boost performance.

We hope this article helped you find the highest performing Google AdSense banner sizes and formats. You may also want to check out our comprehensive guide on other ways to make money online to supplement your Google AdSense income.

If you liked this article, then please subscribe to our YouTube Channel for WordPress video tutorials. You can also find us on Twitter and Facebook.

The post 10 Highest Performing Google AdSense Banner Sizes & Formats for Your WordPress Site appeared first on WPBeginner.

How to Start a Fashion Blog (and Make Money) – Step by Step

Are you looking to start a fashion blog but don’t know where to begin? It is easy to start a blog, but the difficult part is to be successful and make money from it. In this article, we will show you how to start a fashion blog as well as share tips on how to make money from your fashion blog.

Starting a fashion blog and making money

Why You Should Start a Fashion Blog?

If you are passionate about fashion and style, then you must have seen some top fashion bloggers and influencers on Instagram.

These fashion blogs not only provide a platform to the bloggers, but they also bring lots of opportunities their way. You will be surprised to discover the many ways fashion bloggers make money from their blogs.

According to Harper’s Bazaar, designers and top brands spend over a BILLION dollar each year advertising on Instagram alone.

Top 10 Fashion Blog Examples That Are Crushing it in 2018

Top fashion blog examples

Apart from money, a fashion blog allows you to express yourself in the most creative way. Here are some of the top fashion blog examples that you can follow for inspiration.

  1. We Wore What – (Danielle Bernstein)
  2. Sincerely Jules – (Julie Sariñana)
  3. The Blonde Salad – (Chiara Ferragni)
  4. Gal Meets Glam – (Julia Engel)
  5. Song of Style – (Aimee Song)
  6. Kayture – (Kristina Bazan)
  7. Wendy’s Lookbook – (Wendy Nguyen)
  8. Atlantic-Pacific – (Blair Eadie)
  9. The Chriselle Factor – (Chriselle Lim)
  10. Gary Pepper Girl – (Nicole Warne)

One thing you’ll notice about each of the top fashion blog examples above, is that they all have their own unique voice, personality, and taste in fashion. These fashion bloggers bring their own unique perspective to highlight their favorite products, merchandise, and brands.

If you believe that you have a unique take on fashion and style, then you should definitely start a fashion blog.

While setting up the fashion blog part is easy, like all important things in life making the blog popular and monetizing it requires effort.

However if you do it right, then you’ll certainly find the experience to be rewarding and fulfilling.

What You’ll Need to Start Your Fashion Blog

Fashion blogging

First, you need to choose the right platform to build your own fashion blog. You have plenty of choices, but each one of them have its own pros and cons (see our comparison of the best blogging platforms).

For example, you can start a free blog on a platform like WordPress.com, Tumblr, Blogger, etc.

These are called free blogs, and they are very limited in terms of features and flexibility when it comes to growing your personal brand. Most important limitation is your ability to make money from your content.

What about Starting a Fashion Blog with Instagram?

Instagram is awesome, but you don’t own it. You can build a huge following and all of this can go away immediately if Instagram decides that your content violated some of their policy.

We are not saying that you shouldn’t use Instagram. You must use it to build a large audience, but you will need a central platform that you can control where you can keep the audience coming back for years to come.

The best way to build your fashion blog is by creating your own website with complete ownership and full control.

Now the question is, how could a beginner with no knowledge of coding can build a website?

This is where WordPress.org comes in. It is a powerful website builder which gives you absolute control and full ownership of your website. It’s important not to confuse WordPress.org with WordPress.com. They’re two different platforms. (See our comparison of WordPress.com vs WordPress.org for more details).

There are three things you need to start a fashion blog using WordPress.org:

  1. Domain name – This will be your website’s address and what users will type in browser to visit your blog (Example, wpbeginner.com).
  2. Web hosting – This will be your blog’s home and where you will store all your website files.
  3. Your undivided attention for 30 mins

Yes, you can start a brand new fashion blog in 30 minutes, and we’ll walk you through the whole set up step by step.

In this tutorial, we will cover the following:

  • How to Register a Domain Name for Free
  • How to Choose the Best Web Hosting
  • How to Install WordPress
  • How to Find the Perfect Theme (website design) for Your Fashion Blog
  • How to Add Content to Your Fashion Blog
  • How to Get More Visitors to Your Fashion Blog
  • How to Make Money from Your Food Blog
  • Resources to Learn WordPress and Grow Your Fashion Blog

Ready? Let’s get started.

Setting up a Fashion Blog Using WordPress

A domain name typically costs $14.99 / year and web hosting normally costs $7.99 / month.

That’s a lot for beginners who are just starting out.

Luckily, our friends at Bluehost are offering a free domain, a free SSL, and a 60% discount on hosting to our readers.

Basically, you can get started for as low as $2.75 / month.

← Click here to Claim this Exclusive Bluehost offer →

NOTE: At WPBeginner we believe in transparency. If you sign up with Bluehost using our referral link, we will earn a small commission at no extra cost to you (in fact, you will save money and get a free domain). We would get this commission for recommending just about any WordPress hosting company, but we only recommend products that we use personally use and believe will add value to our readers.

Let’s go ahead and setup your web hosting + domain so you can get started.

First you need to go to the Bluehost website and click on the get started button.

On the next screen, you will be asked to choose a plan. We recommend either the basic or plus plans. You can always upgrade later if you need to.

Next, it will ask you to choose a domain name for your website.

Choose domain name

Domain name is your website’s address and this is what your users will type in their browsers to visit your blog.

You need to choose a domain name that reflects your personal voice. It should be unique, creative, and interesting. For more details, see our tips on choosing a great domain name for your website.

After you enter your domain name, you need to fill out your details to complete the purchase.

You will receive your account details in an email sent to the address you provided during signup. This email contains your web hosting dashboard link and login information.

Once you have purchased hosting, the next step is to install WordPress. You can do that by following the instructions in our step by step guide on how to start a blog.

Choosing a Design for Your Fashion Blog

Fashion blog design examples

A blog about fashion and style cannot just go with a plain looking business or blogging layout. Your website needs a design that represents your unique sense of style and creativity.

Most fashion bloggers are not website designers, so how do create a website design that is unique, elegant, stylish, and of course creative?

Luckily there are thousands of pre-made WordPress templates that you can choose from.

Our editors have hand-picked the best WordPress themes for fashion blogs that you can check out. All themes in the list feature creative designs with flexible options to easily make them uniquely yours. Most importantly, all of them are responsive (aka mobile friendly) which means they look good on mobile and tablets as well.

Each of these themes comes with its own settings page. This is where you will set up the theme, add your website logo, choose colors, and select basic settings.

Depending on which theme you choose, you will find tons of customization options. We recommend striving for simplicity in your website’s design for a cleaner look.

Add Useful Content To Your Fashion Blog

Gal Meets Glam - a top fashion blog

Once you have a functioning design in place, you can start working on content. We recommend adding the static content first.

Static content are pages that are common among all websites on the internet. This includes a contact form page, about us page, and a privacy policy page.

If your theme includes a page builder plugin, then you can use it to create other static landing pages as well.

Next, you would want to start adding articles / blog posts. See our guide on how to add a new blog post in WordPress and utilize all the features.

Now, this is where you will develop your own voice. Your blog posts need to be entertaining, informative, and helpful. Running a blog means, you will need to regularly come up with new ideas for your blog posts. Check out these 73 types of blog posts that are proven to work, and you can easily adapt them for your fashion blog.

We recommend choosing a consistent frequency for your articles. Busier and larger websites post new content every day. You can start by adding a few posts per week and then gradually increase your frequency to daily updates.

To come up with regular blog post ideas, visit popular blogs in the fashion industry to gather inspiration. See what these top blogs are doing and replicate it on your blog.

Hashtag fashion on Instagram

We are not saying that you should just steal / recreate the same content.

You just need to gather topics, collect ideas, and get inspiration. After that you should use those ideas on your blog by adding your own unique voice, style, and flavor to it.

Optimize Your Fashion Blog to Get More Visitors

Once you start adding useful content, the next step is to make sure that users can find your website.

Here is how you ensure that your website gets visitors and those visitors engage with your content.

Start Working on Your Website’s SEO

Improve your blog SEO

Most popular blogs get a large portion of their traffic from search engines like Google and Bing. Marketers use SEO, Search Engine Optimization, to optimize their website for higher rankings.

WordPress itself is quite SEO friendly out of the box, but there are still things you can do to further optimize it. Follow our step by step WordPress SEO guide for improving your website ranking.

Improve Website Speed

Improve your blog speed

Speed is one of the most important factors that affects user experience on your website. It also affects your website’s search engine rankings as Google considers speed one of the top ranking factors.

You can make your website significantly faster by implementing certain performance tweaks in WordPress. We have created a complete step by step guide on how to speed up WordPress and boost performance.

Track User Engagement

Following user activities on your blog

Things your users do after arriving on your website are called user engagement. Highly engaged audience means, more page views and more success for your fashion blog.

This is where you’ll need Google Analytics. It tells you where your visitors are coming from, what they do on your website, and how you can keep them coming back.

Simply head over to our tutorial on how to install Google Analytics in WordPress, and it will start tracking your website traffic.

Google Analytics offers a lot of data. How do you figure out where to look for the information you need?

To answer this question, we have a separate article on how to track user engagement in WordPress using Google Analytics.

Start Making Money from Your Fashion Blog

Making money from your fashion blog

Ever wondered how fashion bloggers afford their clothes, makeup, and accessories? Actually, they don’t have to. Most successful fashion bloggers promote sponsored content where brands pay them to promote products.

Paid and sponsored content is the major source of revenue for many fashion bloggers. Here we will list the most effective ways you can start making money from your fashion blog when you’re first starting out.

1. Display Ads Using Google AdSense

Most websites on the internet rely on ads to generate revenue. Google AdSense allows you to easily display ads on your website and make money from your blog even when you’re just starting.

See our step by step guide on how to properly add Google AdSense in WordPress for detailed instructions.

2. Affiliate Marketing

Affiliate marketing allows you to recommend products you love. You get a referral commission when your users purchase a product after clicking on your link.

To make money with affiliate marketing, you will need to find fashion products and brands with an affiliate program. The biggest affiliate partner you can sign up for is Amazon Affiliates. They have tons of products in fashion, clothing, and accessories that you can recommend and get paid for it.

See our guide on how to add and manage affiliate links in WordPress.

3. Build an Instagram Following

Instagram has placed itself as the top social network for fashion and style influencers. You need to join Instagram and start posting with relevant hashtags to make sure that your posts reach the right audience.

The best way to come up with an Instagram strategy is by following other top fashion blogs on Instagram. Study their posts, descriptions, and hashtags and try to replicate the same effect with your Instagram posts.

You should also network with other influencers and do S4S, share for share, campaigns. In this strategy, each party will share the other’s Instagram posts and tag them. It helps both people increase their following.

Another easy way to build Instagram following is by sharing your Instagram posts on your WordPress blog.

4. Brand Promotions

Allow brands to reachout to you

Reach out to brands, fashion startups, and agencies to partner up with them. The best way to find which companies are doing blog promotions is to keep an eye on top fashion bloggers and their Instagram posts.

For more ways to generate revenue from your fashion blog, see our guide on proven ways to make money from your blog.

Mastering WordPress Skills

WordPress is easy to use and beginner friendly. However, whenever you start using a new platform, there are always new things to discover and learn. This is where WPBeginner can help.

WPBeginner is the largest free WordPress resource site for beginners. We have lots of helpful content which is created specifically for beginners, business owners, and bloggers.

To expand your WordPress skills you should check out:

  • WPBeginner Dictionary – Our WordPress glossary is the best place to familiarize yourself with the WordPress lingo
  • WPBeginner Videos – New WordPress users can start with these 23 videos to master WordPress.
  • WPBeginner Blog – The central place for all our WordPress tutorials and guides.

You can also subscribe to our YouTube Channel where we regularly upload new video tutorials to help you learn WordPress.

We hope this article helped you start your fashion blog and make money from it. You may also want to see our ultimate WordPress security guide to keep your blog safe.

If you liked this article, then please subscribe to our YouTube Channel for WordPress video tutorials. You can also find us on Twitter and Facebook.

The post How to Start a Fashion Blog (and Make Money) – Step by Step appeared first on WPBeginner.

What, Why, and How-To’s of Creating a Site-Specific WordPress Plugin

Do you want to add a site-specific plugin to your WordPress website? A site-specific plugin allows you to easily add code snippets to your WordPress website without relying on your theme. In this article, we will explain how to create a site specific WordPress plugin and why it’s important.

Site Specific WordPress Plugin

What is a Site-Specific WordPress Plugin

A site-specific WordPress plugin is a standalone plugin that you can use to add all customization snippets that are not theme dependent.

When working on your website, you’ll often find WordPress tutorials asking you to add code to your theme’s functions.php file or a site-specific plugin.

WordPress doesn’t come with a site-specific plugin. You’ll need to create your own and then install / activate it.

Why Create a Site-Specific WordPress Plugin?

As we mentioned earlier that you’ll often come across tutorials showing some code that you can add to your theme’s functions.php file or a site-specific plugin.

These custom codes can be used to add new post types, taxonomies, shortcodes, and tons of hacks to improve your website.

If you add the custom code to your theme’s functions file, then it will disappear if you update or switch your theme. You can create a child theme and use the child theme’s functions file to save your code. However, your code will still disappear if you switch themes.

A site-specific WordPress plugin allows you to easily add custom code snippets to your WordPress website and make sure they’re theme independent. It is a standalone WordPress plugin which means it doesn’t depend on your theme, and you are free to update or switch your theme.

That being said, let’s take a look at how to easily add custom code using site-specific plugin. We will show you two ways to do that, and you can choose the method that works best for you (hint Method #2 is easier for beginners).

Method 1. Manually Create a Site-Specific WordPress Plugin

We know this may sound a bit geeky to beginners, but we will try to make it as simple as possible for you.

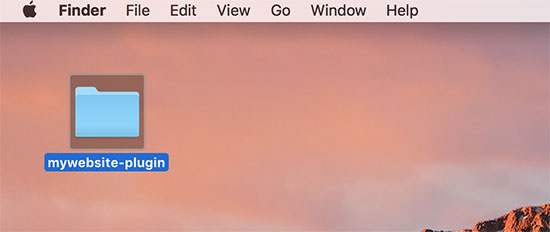
First you need to create a new folder on your desktop and name it after your website for example, mywebsite-plugin.

Creating your site-specific plugin folder

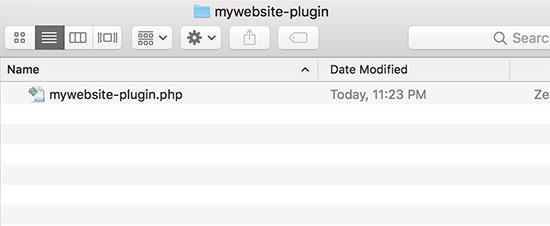
Now open a plain text editor on your computer like Notepad or TextEdit. You need to create a new file and save it as mywebsite-plugin.php in the plugin folder on your desktop.

Creating the plugin file for your site-specific plugin

Your plugin file needs specific header code so that WordPress can recognize it as a plugin. Go ahead and add the following code to your mywebsite-plugin.php file:

<?php
/*
Plugin Name: Site Plugin for example.com
Description: Site specific code changes for example.com
*/
/* Start Adding Functions Below this Line */
 
 
/* Stop Adding Functions Below this Line */
?>

You can replace example.com with your own domain name. Once you do that, your site-specific plugin is ready.

There are two ways to upload your site-specific plugin to your website. You can either upload it via your WordPress admin panel or use FTP.

1. Install Site-Specific Plugin from WordPress Admin Area

This method is easier and recommended for all users.

First, you need to create a zip file of your site-specific plugin folder.

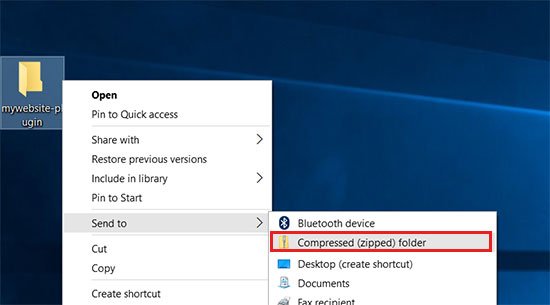
Windows users can simply right-click on plugin folder and select Send to » Compressed (zip) folder.

Creating zip file in Windows

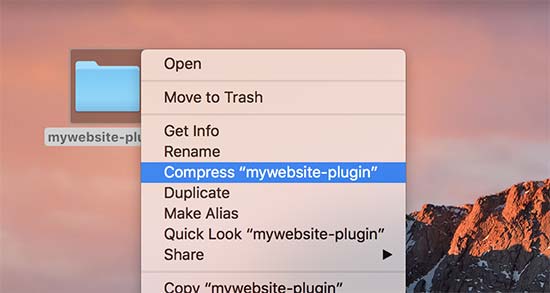
Mac users need to right-click and select “Compress mywebsite-plugin”.

Creating a zip folder on Mac

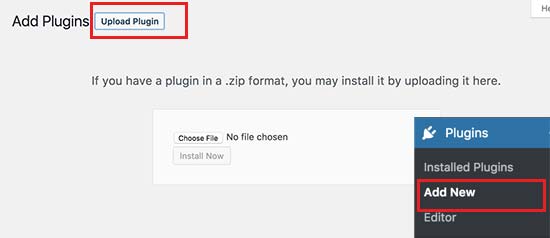
Once you have the plugin’s zip file, go to the Plugins » Add New page in your WordPress admin area and click on the ‘Upload Plugin’ button on the top.

upload plugin

Next, click on the choose file button to select the zip file you created earlier and then click on the ‘Install Now’ button.

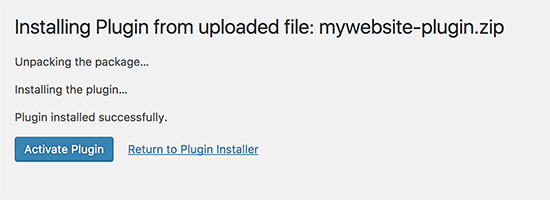
WordPress will now upload and install the plugin for you. Once its uploaded, you need to click on the activate button to start using your site-specific plugin.

Activate plugin

2. Upload Your Site-Specific WordPress Plugin via FTP

For this method, you don’t need to create a zip file. You will be uploading the plugin via FTP.

First, you will need to connect to your website using a FTP client.

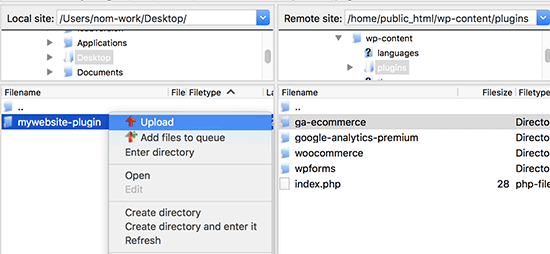
Once connected, go to /wp-content/plugins/ folder under remote site column. Next, you need to select your site-specific plugin folder and upload it to your website.

Uploading plugin via FTP

Your FTP client will now transfer your site-specific plugin folder to your WordPress website. This will install the plugin on your website.

However, you’ll still need to activate the plugin to start using it. You can do this by going to the ‘Plugins’ page inside your WordPress admin area and then click on the ‘Activate’ link below your site-specific plugin.

Activate plugin

That’s all. Your site-specific plugin is now ready to be used.

Adding Custom Code Snippets to Your Site-Specific Plugin

There are two ways to edit your plugin and add custom code snippets to it.

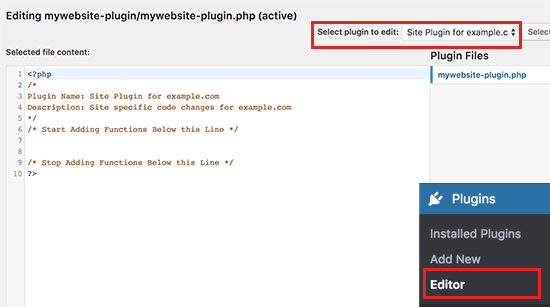
First method is to do it via WordPress admin area. You can go to Plugins » Editor page. You will see a warning message, and you need to click on ‘I understand’ button to continue.

Next, you need to select your site-specific plugin from the drop down menu labeled ‘Select plugin to edit’. The editor will load your plugin file, and you will be able to add code snippets in it.

Plugin editor

Once you are done, click on the ‘Update File’ button to save your changes.

If there is something missing in your code or it has potential to break your website, then the plugin editor will automatically undo your changes.

However, if the editor fails, and you see the white screen of death, then you can use FTP to edit your plugin file and undo those changes.

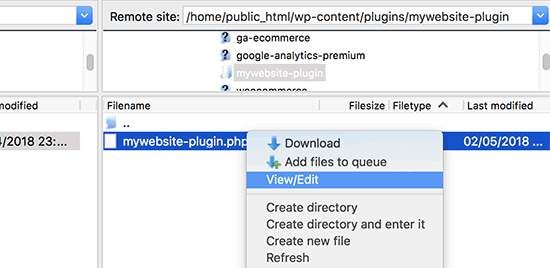
The second method is to directly edit the plugin file using FTP. Simply go to the plugin folder using your FTP client. Right click on the plugin file and then select View/Edit file.

Editing plugin file via FTP

You can also download the plugin file to your computer, edit it, and then upload it back.

Method 2. Using The Code Snippets Plugin

This method is a lot simpler and gives you a better way to manage your individual code snippets in WordPress.

First thing you need to do is install and activate the Code Snippets plugin on your website. For more details, see our step by step guide on how to install a WordPress plugin.

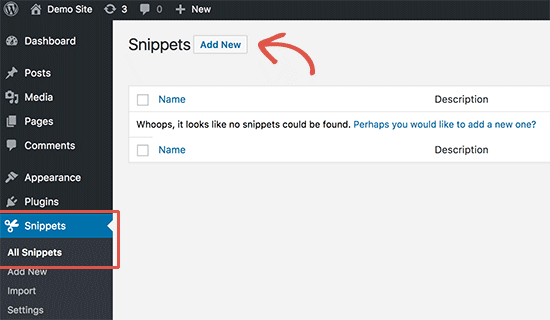
Upon activation, the plugin will add a new menu item labeled “Snippets” to your WordPress admin menu. This is where you will manage all your custom codes.

To add a custom code, you need to go to Snippets » All Snippets page and click on the ‘Add New’ button at the top.

Adding a new code snippet

This will bring you to the ‘Add New Snippet’ page.

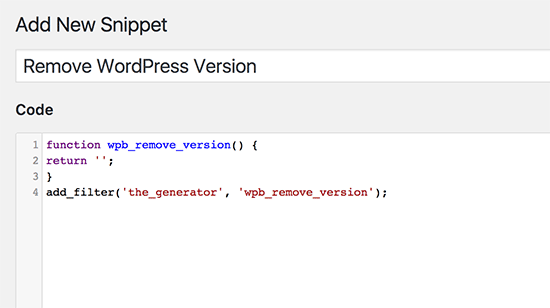
First enter a title for your custom code snippet. This could be anything that helps you identify the code.

After that you can go ahead and paste your code snippet into the code box.

Adding custom code

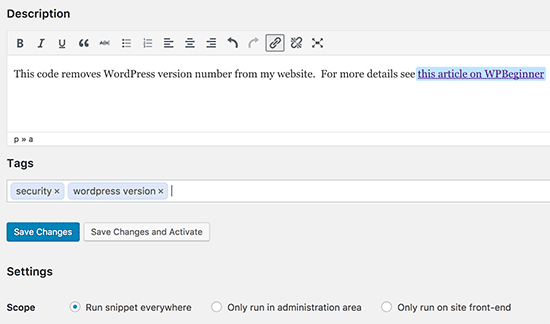
You can also add a description for the code in the field below the code box. You should use this area to write down what this code does, where you found it, and why you are adding it to your website. This will help the “future you” remember why the “past you” added this code.

Add your code description

You also have the option to assign tags to your code snippets which can help organize code snippets by topic and functionality.

Finally, you can click on the ‘Save Changes and Activate’ button. If you just want to save the code snippet without activating it, then you can click on save changes button instead.

The plugin also allows you to select where you want to run the code snippet. You can choose from admin area, front-end, or everywhere options.

If you are unsure, then keep the default ‘everywhere’ option checked.

Once you have saved and activated a code snippet, it would become effective on your website.

For more details see our guide on how to easily add custom code snippets in WordPress.

We hope this article helped you learn why and how to create a site-specific WordPress plugin. You may also want to see our list of useful functions file tips and most wanted WordPress hacks to best use your site-specific plugin.

If you liked this article, then please subscribe to our YouTube Channel for WordPress video tutorials. You can also find us on Twitter and Facebook.

The post What, Why, and How-To’s of Creating a Site-Specific WordPress Plugin appeared first on WPBeginner.
How to Start a Food Blog and Make Money From Your Recipes (2018)

Do you want to start a food blog and make money from your recipes? Starting a new food blog can be challenging for beginners, specially when you are not a techy. Having helped over 100,000+ users start their own blogs, we are often asked about how to start a food blog and successfully earn money from it. In this step by step guide, we will show you how to start a food blog and make money from your recipes without any technical skills.

Starting a food blog and making money from your recipes

We have broken the process down, so it’s easy to follow whether you’re 20 years old or 60 years old. However if you need help, our expert team will help you setup your blog for free. → Click Here to Get Your Free WordPress Blog Setup!

What do you need to start a food blog?

There are three things you need to start a food blog using WordPress:

  1. A domain name (this will be your blog’s name that people will type to find your site e.g. wpbeginner.com)
  2. A web hosting account (this is where your website files are stored on the internet)
  3. Your undivided attention for 30 minutes.

Yes, you can start a brand new food blog in less than 30 minutes, and we will walk you through the whole process, step by step.

In this tutorial, we will cover the following:

  • How to Register a Domain Name for Free
  • How to Choose the Best Web Hosting
  • How to Install WordPress
  • How to Find the Perfect Theme (website design) for Your Food Blog
  • How to Write Recipes with SEO Friendly Formatting
  • How to Make Money from Your Food Blog
  • How to Get More Traffic to Your Food Blog
  • Resources to Learn WordPress and Grow Your Food Blog

That being said, let’s get started.

Step 1. The Right Setup

The biggest mistake new users make is starting off with the wrong blogging platform. You’ll not be making this mistake since you are already here.

We recommend using WordPress.org for your blog because it gives you access to all the WordPress features, and most importantly you can make money from your blog without any limitations.

It’s important you don’t confuse WordPress.org with WordPress.com. They are actually two different platforms. WordPress.com, which is a hosted blogging platform and WordPress.org is a free self-hosted platform. (See our comparison of WordPress.com vs WordPress.org for more details)

Now you might be wondering, why is WordPress.org free? What’s the catch?

There truth is that there’s no catch. It’s free because you have to do the setup and host it yourself.

In other words, you need a domain name and web hosting. See our guide on the difference between domain name and web hosting to learn more.

A domain name is what people type to get to your website. It’s your website’s address on the internet. Think google.com or wpbeginner.com.

Web hosting is where your website files are stored. It’s your website’s house on the internet. Every website needs web hosting.

A domain name typically costs $14.99 / year and web hosting normally costs $7.99 / month.

That’s a lot for beginners who are just starting out.

Thankfully, Bluehost, an official WordPress recommended hosting provider, has agreed to offer our users a free domain name and over 60% off on web hosting.

→ Click here to Claim this Exclusive Bluehost offer ←

Bluehost is one of the largest hosting companies in the world, and they host millions of WordPress websites including some of our own.

They’re committed to giving back to the WordPress community since 2005. They have promised us that if you cannot get your blog setup within 30 minutes by following this tutorial, then our expert team will complete the process for you without any cost. They will compensate us, so you don’t have to. Simply contact us for free blog setup help.

NOTE: At WPBeginner we believe in full transparency. If you sign up with Bluehost using our referral link, then we will earn a small commission at no extra cost to you (in fact you will save money and get a free domain + free SSL). We would get this commission for recommending just about any WordPress hosting company, but we only recommend products that we use personally use and believe will add value to our readers.

Now that we have covered that, let’s go ahead and purchase your domain + hosting for your food blog.

Open Bluehost website in a new window and follow along.

First thing you need to do is click on the green ‘Get Started Now’ button.

Getting started with Bluehost

On the next screen, you need to select the plan that you want (basic and plus are the most popular).

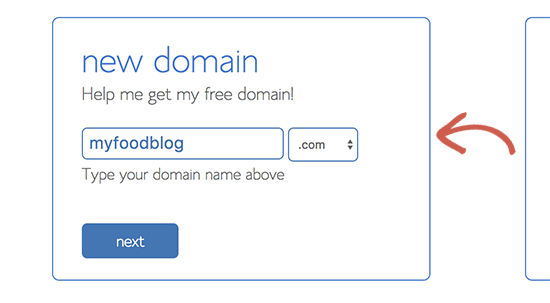
After that, you will be asked to enter the domain name for your website.

Choose domain name

Tip: Make sure your domain name is brandable. It’s also a bonus if it uses keywords you think your users will search for. This will help you get more traffic from search engines like Google. For more details, see our guide on choosing the best domain name for your blog.

Once you have selected your domain name, click on the next button to continue.

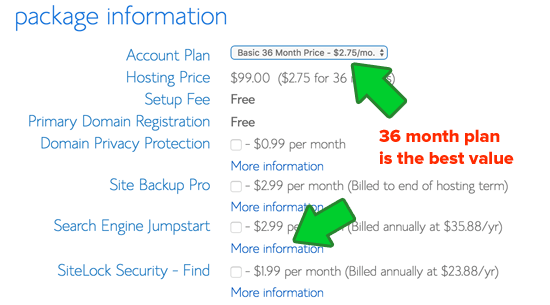
Now, you will need to add your account information and finalize the package information to complete the process. We recommend going with the 36 month plan because that’s best value.

On this screen, you will see optional extras that you can purchase. It’s entirely up to you whether or not you purchase these, but we generally don’t recommend purchasing them right away. You can always add them later on, if you decide that you need them.

Optional hosting addons

Once completed, you will receive an email with details on how to login to your web hosting control panel (cPanel). This is where you manage everything from support, emails, among other things. But most importantly, this is where you install WordPress.

Step 2. Install WordPress

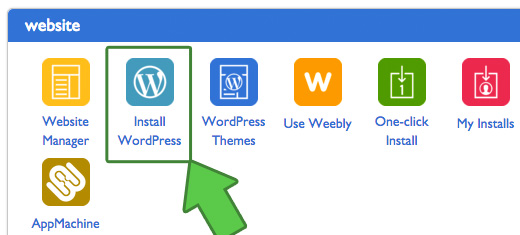
In your hosting dashboard (cPanel), you will see small icons for different hosting features and services. You need to scroll down to the website section and click on the WordPress icon.

Install WordPress

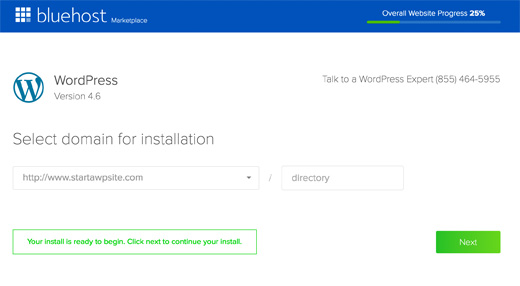
On the next screen, click on the Get Started button. You will be asked to select your domain name. Choose the domain from the dropdown and then click Next.

WordPress installation

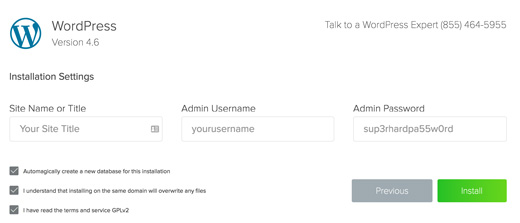
After that, you need to enter your Site Name, username, and a password for your site. You also need to check all the checkboxes and then click Install.

Website settings

The QuickInstall will start installing WordPress. You will be prompted to browse WordPress themes, while WordPress is being installed.

No need to do that right now. We’ll show you how to find the best WordPress theme for your food blog later.

Once WordPress is finished installing, you will see the success notice in the top header bar.

Installation successful

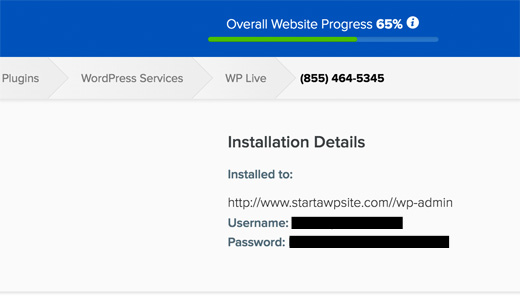
Click on the Installation Complete link, and it will take you to the screen with your WordPress login URL and password.

Installation finished

Congratulations, your WordPress website is now ready. You can continue login to your website by visiting the WordPress admin area.

http://yoursite.com/wp-admin

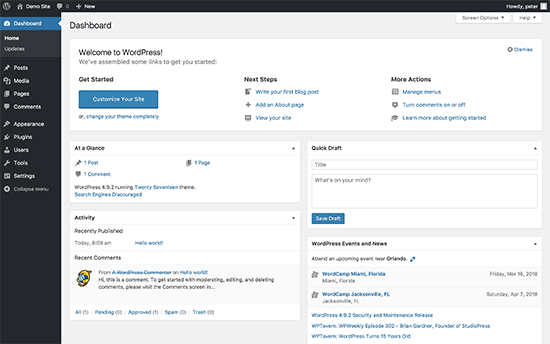
Don’t forget to replace yoursite.com with your own domain name. Once logged in, you will see the WordPress admin dashboard.

WordPress dashboard

Now you are ready to customize your food website’s appearance and start adding recipes.

Step 3. Choosing a Theme for Your Food Blog

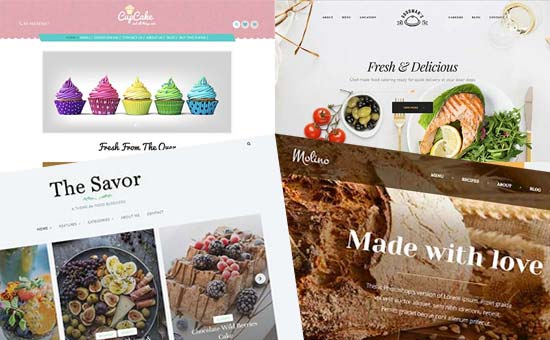
Choosing a theme for a food and recipes blog

WordPress themes control your website’s design and appearance. There are thousands of free and paid WordPress themes that you can install on your website.

However, not all of them are suitable for a food blog. You will need a theme that matches the look and feel of a food blog. Our expert team has hand-picked the best WordPress themes for recipe and food blogs that you should try.

Once you have found a theme that you like, head over to our guide on how to install a WordPress theme for step by step installation instructions.

Step 4. Choosing a Recipe Plugin that’s SEO Friendly

If you want your recipes to get traffic from search engines, then you need to make them search engine friendly.

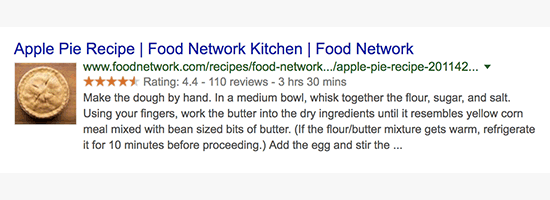
The best way to write recipes is by using Schema.org formatting. Schema.org formatting allows search engines to display extra information like rating, preparation time, etc.

Recipe search

Now, we know this might sound a bit too geeky for beginners. Don’t worry, we will make it super easy for you to add recipes in schema.org formatting without any special skills.

First, thing you need to do is install and activate the WP Recipe Maker plugin. For more details, see our step by step guide on how to install a WordPress plugin.

You can also use the premium version of the WP Recipe Maker plugin to take full advantage of its extensive features like enhanced SEO, ingredient linking, user ratings, taxonomies, and more.

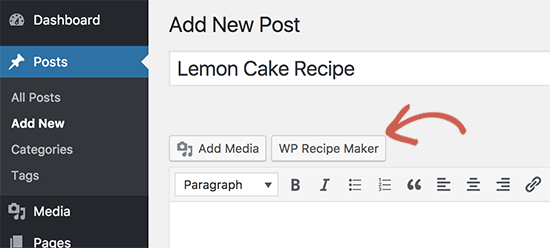
Once you have activated the plugin, you need to create a blog post or edit an existing one. On the post edit screen, click on the WP Recipe Maker button.

Launch recipe maker

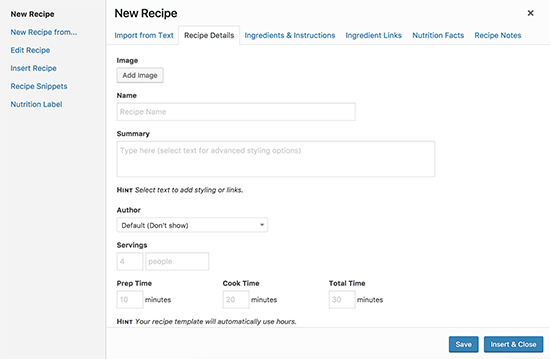
This will bring up a popup where you can enter your recipe details. You will start by adding an image for the recipe, recipe name, description, serving, duration, and other information.

Adding a new recipe

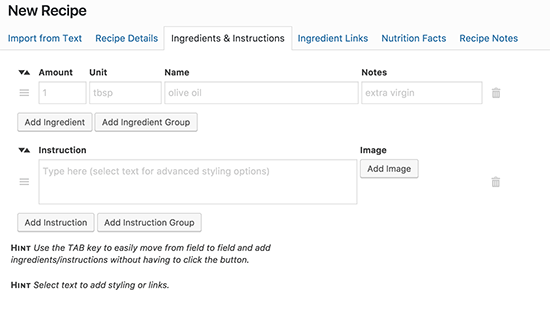
After adding general information, click on the ‘Ingredients & Instructions’ tab and start adding ingredients and instructions.

Ingredients and Instructions

You can add ingredients and instructions as plain lists, or you can divide them into groups as well for different parts of the recipe.

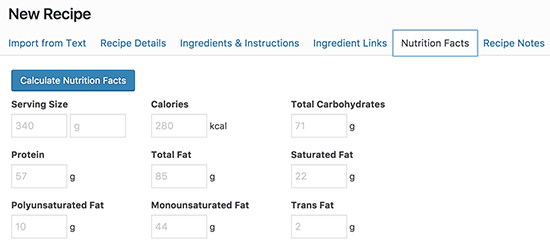
Next, you need to switch to the Nutrition Facts tab and click on the calculate nutrition facts button.

Calculate nutrition facts

The plugin will now fetch Nutrition facts for matching ingredients. Once you are satisfied, you can click on the calculate nutrition facts button again, and it will calculate the values.

Now if you are satisfied with the recipe, you can go ahead and click on insert and close button.

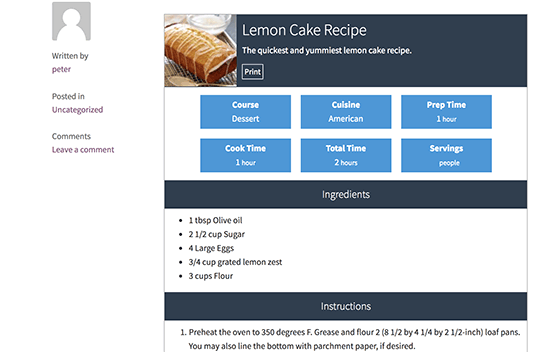
The plugin will now add the required shortcode to your post editor. You can now save or publish your post and then click on the preview button to see your recipe in action.

Preview of a recipe in WordPress

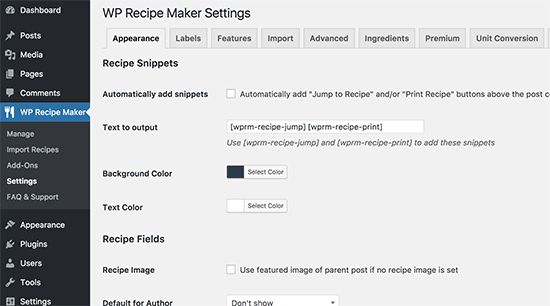
The plugin comes with extensive settings including several styles and templates to display your recipes. You can go to WP Recipe Maker » Settings page to change the appearance of your recipes and other settings.

WP Recipe Maker settings

Step 5. How to Monetize Your Food Blog

After you have added a few of your best recipes, it is time to start making money from your food blog. There are plenty of ways to monetize your food blog and start earning from your recipes.

Here are some of the most effective ways to monetize your food blog.

1. Selling eBooks with Your Recipes

Selling ebooks

The most effective strategy to make money from your recipe blog would be to sell your own products or digital downloads. These products can be physical goodies and merchandise such as t-shirts, printed books, mugs, or they can be digital downloads such as ebooks.

To sell things from your WordPress blog, you will need WooCommerce. It is available as a WordPress plugin and will add an online store to your existing food blog.

You can also sell memberships on your website, allowing paid members to download ebooks, videos, secret recipes, or submit their own content. If you want to go the subscription route, then you will need MemberPress. For detailed instructions, see our guide on how to make a membership website.

2. Display Ads Using Google AdSense

Display ads on your food blog

The easiest way to instantly start earning from your website is by using Google AdSense. It allows you to display advertisement on your food blog and earn money when your users click on those ads.

Adding Google AdSense to your website is super easy and requires no coding skills at all. See our guide on how to properly add Google AdSense to your WordPress blog for step by step instructions.

3. Affiliate Marketing

Affiliate marketing

Affiliate marketing is another way to generate an income stream from your food blog. Basically you add links to affiliate products from your recipes and blog posts. Every time someone purchases those products using your link, then you will earn a commission.

You will need to find food related affiliate products first. Many top websites in the food industry offer affiliate programs. You can also join Amazon’s affiliate program and start recommending products from the world’s largest eCommerce store.

See our list of the best affiliate marketing tools and plugins that you can use on your food blog to boost your affiliate earnings.

For more monetization tips, see our article on how to make money online from your WordPress blog.

Step 6. How to Get More Traffic to Your Food Blog

Your food blog’s earnings directly depend on your website’s traffic. More users visiting your website means more earnings, brand recognition, and success for your website.

Here are some tips to get more visitors to your website.

Start Building an Email List

Email Marketing

More than 75% of visitors who visit your website, will not come back again. There is nothing wrong with your website. It’s just that there is so much content on the internet that your website disappears like a needle in the haystack.

Email marketing allows you to capture those users as subscribers, so that you can reach them via email and bring them back to your website.

See our guide on why you should start building your email list right away. Once you set up an email marketing solution, then check out our guide on how to do lead generation in WordPress. It will help you grow your email list like a total pro.

Create a YouTube Channel

YouTube

When it comes to food, videos are a lot more engaging than text. This is where YouTube comes in. It is not only the largest video sharing website in the world, it is also the second biggest search engine and the second most active social media platform in the world.

Creating a YouTube channel not allows you to add video recipes to your blog, it also helps you find new users who can become active subscribers, and your most engaged fans.

Utilize Instagram to Drive Traffic

Instagram

Food pics are instant hits among Instagram viewers. The popular photo and video sharing platform is rapidly growing and has very high engagement.

Upload your food photos and use hashtags, so that Instagram users can discover your photos. Easiest way to grow your Instagram following is by sharing your Instagram photos in WordPress.

There are many ways to bring more users to your food blog. See more tips to drive traffic to your new WordPress blog.

Step 7. Learning WordPress with More Resources

As you start using WordPress, you will quickly discover new things. Some of these new things may look too technical or complicated. That’s where we can help.

WPBeginner is the largest free WordPress resource site in the world for beginners.

Our goal is to provide helpful content that is easy to understand for beginners, business owners, and bloggers.

To expand your WordPress knowledge, you should check out:

  • WPBeginner Dictionary – The best place for beginners to start and familiarize themselves with the WordPress lingo
  • WPBeginner Videos – New to WordPress? Watch these 23 videos to master WordPress.
  • WPBeginner Blog – The central place for all our WordPress tutorials.

You can also subscribe to our YouTube Channel where we regularly share video tutorials to help you learn WordPress.

We hope this article helped you learn how to start a food blog and make money from your recipes. You may also want to see our complete step by step WordPress SEO guide for beginners.

If you liked this article, then please subscribe to our YouTube Channel for WordPress video tutorials. You can also find us on Twitter and Facebook.

The post How to Start a Food Blog and Make Money From Your Recipes (2018) appeared first on WPBeginner.
How to Properly Add Google AdSense to Your WordPress Site

Google AdSense is one of the most popular ways to monetize your website. You can easily add Google AdSense to your WordPress site and start making money. In this article, we will show you how to add Google AdSense in WordPress along with some best practices and tips to increase your earnings.

Properly adding Google AdSense in WordPress

What is Google AdSense?

Google AdSense is an advertising network run by Google that allows bloggers and website owners an opportunity to earn money by showing text, image, video, and other interactive advertisement on their websites. These ads are targeted by site content and audience.

Google AdSense is hassle free because you don’t have to deal with advertisers or worry about collecting money. Google administers and maintain relationships with the advertisers. They collect the payment, take their management fee, and send the rest of the money to you.

AdSense offers cost-per-click ads (CPC) which means that you earn money every time a user clicks on the ad on your website. The amount received per click varies based on a variety of factors.

Video Tutorial

If you don’t like the video or need more instructions, then continue reading.

Getting Started with AdSense

First thing you need to do is sign up for a Google AdSense account. If you have a Gmail account, then you can use your existing account to sign up.

Once you’ve submitted your application, you will receive an email within 6 – 8 hours telling you whether you have passed the first step of the review process. If you passed the first check, then you can log in to your AdSense account and get your ad code.

Start by clicking on the My ads tab and then click on the New ad unit button.

Creating a new AdSense ad unit

This will bring you to a create new ad screen, and you will be asked to choose an ad type. You can select from ‘text and display ads’, ‘In-feed ads’, and ‘In-article ads’.

If you are unsure, then start with the text and display ads.

Choose an ad type

Next, you need to provide a name for this ad unit and select the ad size, type, style, and colors.

AdSense ad units

The name of the Ad is only used for internal purposes, so you can name it anything like “SiteName Sidebar”.

The next option is choosing the Ad Size. While Google offers a wide-variety of ad sizes, there are certain sizes that are listed under recommended because those are the most popular among advertisers.

What that means is that these ads are likely to have a higher inventory thus a better payout.

After that you will need to choose Ad type. We recommend having both text & display ads.

Ad style allows you to control the display of your text based ad units. We recommend using your site’s color scheme for best results.

The custom channels feature allows you to better track the ad performance based on sites. You don’t have to use it if you don’t want to.

For ‘If no ads available’ option, you can either choose to collapse the ad space or fill it with your own ad. This is shown when Google cannot find an appropriate ad (which rarely happens).

Once you’re done with this setup, simply click on Save and get code button. You will be prompted with a message “Ad successfully created”, and you will also see the Ad code.

Ad code

Copy your ad code and paste it in a plain text editor like Notepad or TextEdit. You will need it in the next step.

Adding Google AdSense in WordPress

You need to determine where you want to show the ad on your website. Ads are most commonly displayed in the sidebar. You can add Google Adsense in your sidebar by using WordPress widgets.

Simply go to Appearance » Widgets page in your WordPress admin area. Next, drag & drop the ‘Custom HTML’ widget to the appropriate widget area and paste your Google AdSense code in there.

Add your AdSense ad code in custom HTML widget in WordPress

For better placement control and tracking, we recommend that you check out AdSanity WordPress plugin. (See: Best Ad Management WordPress solutions)

AdSense Best Practices and Frequently Asked Questions

Over the years, we’ve answered several AdSense related questions. Having used AdSense on several of our sites such as List25, we’ve learnt a whole lot about optimizing. Below are some AdSense best practices and frequently asked questions.

What’s the best AdSense Ad Size?

Although ad placement is key, we’ve found that the best sizes are 336×280 and 300×250. These ads tend to fit on most screen sizes and have the best pay rate as well.

What’s the Best AdSense Placement?

This entirely depends on your layout. The goal is to get more clicks, so you want to place your ads in a more prominent spot. We have found that ads within post content towards the top of the screen tends to get the most clicks.

Several users have asked us about adding AdSense in a floating widget because it will be very prominent. We strongly recommend against that because it is not allowed by Google Terms of Service. If you violate their TOS, then you can get banned from the program.

Can I click on my own Google AdSense Ads?

Often beginners are tempted to click on their own ads or ask their family members to click on their ads. Please don’t do that. Google’s algorithm is very smart and knows when you’re clicking on your own ad. This can get you banned from the program.

What is Page RPM in Google AdSense?

RPM stands for Revenue per Mille meaning revenue per 1000 impressions. This is determined by multiplying the total number of clicks and cost per click and then dividing that by the total number of pageviews.

Can I use my Blogger or YouTube AdSense account with WordPress?

Yes, you can. If you started using AdSense on one of Google’s hosted platforms like Blogger or YouTube, then you can change your AdSense account type and use it with WordPress. You’ll need to provide Google AdSense with the URL of the site you want to monetize by filling out an application form.

Simply login to your AdSense account and then under ‘My Ads’ click on ‘Other Products’ option. Next, you need to click ‘Upgrade now’ and complete the application form.

What is CTR in Google AdSense?

CTR or click-through-rates differ vastly for different kind of websites. Your ad clicks depend on a lot of factors like your website’s topics, your audience type, ad placement on your site, and more. The ideal CTR for Google AdSense is really hard to define because you don’t have access to the click rates of other websites like your own.

However, Google AdSense has built-in tools that will start showing you messages if your site is not getting a good CTR. You can follow the optimization guides shown inside Google AdSense dashboard to improve your ad revenue.

When and how does Google AdSense pay publishers?

Each month, Google AdSense calculates your previous month’s earnings and shows them on your your ‘Transactions’ page. If your earnings match the required threshold, then your payment is processed and released by the 21st of that month.

There are multiple payment methods available including direct electronic transfer, wire transfer, check, Western Union, and more.

Why Google AdSense rejected my application?

Google Adsense may reject your application if your website doesn’t meet the AdSense program policies or their terms and conditions.

What are the requirements to get Google AdSense application approved?

Here are the minimum requirements to get your Google AdSense account application approved.

  • Your website and all its content must comply with AdSense program policies and terms and conditions.
  • Your website should be at least 6 months old.
  • You, the applicant, must be over 18 years old.

Note: Even if your application meets all the requirements, Google AdSense still reserves the right to decline your application.

Can I add Google AdSense in my WordPress.com blog?

WordPress.com does not allow you to add Google AdSense to your website unless you upgrade to the Business plan. For more on this topic, please see our guide on the difference between WordPress.com vs WordPress.org.

What is the difference between Google AdSense vs Google AdWords?

Google AdWords allows you to advertise on other websites including those participating in the Google AdSense program.

Google AdSense allows you to make money from your website by showing ads on your website.

We hope this article helped you add Google AdSense in your WordPress site. You may also want to check out our guide on 25 ways to make money online blogging.

If you liked this article, then please subscribe to our YouTube Channel for WordPress video tutorials. You can also find us on Twitter and Facebook.

The post How to Properly Add Google AdSense to Your WordPress Site appeared first on WPBeginner.
How to Create a Private Post in WordPress

Do you want to create a private post in WordPress? Unlike regular WordPress posts, a private post is not visible to your website visitors. Only logged in users with specific permissions can see them. In this article, we will show you how to easily create a private post in WordPress.

Creating private post in WordPress

What is a Private Post in WordPress? How Does it Work?

A private post in WordPress is not visible to the public. Only logged in users with right permissions can see it among your blog posts.

WordPress comes with a built-in user role system that assigns permissions and capabilities to different user roles. Each WordPress user has a role assigned to them which gives them permissions to do specific tasks on a website.

Any user who has the permission to publish a post can write a private post and publish it. The post will be visible to the user and following user roles.

  • Administrator – Can create, edit, and delete any private post created by any user on a WordPress site.
  • Editor – Can create, edit, and delete any private posts created by any user.
  • Author – Can create, publish, edit, view and delete their own private posts. They cannot see private posts created by other users.

That being said, let’s take a look at how to create a private post in WordPress.

Creating a Private Post or Private Page in WordPress

First you need to create a new post or page. You can also edit an existing post that you want to make private.

On the post edit screen, you need to click on the ‘Edit’ link next to the ‘Visibility’ option in ‘Publish’ meta box.

Edit visibility options of a blog post or page in WordPress

You will now see options to make a post sticky, password protected, or private. Go ahead and select private and then click the OK button to continue.

Private post option in WordPress post edit screen

You can now continue editing the post or you can save/publish it.

If you visit your website, then you will see your Private blog post marked like this:

Private post preview in WordPress

Users who don’t have permission to see private posts will not see it.

Note: Images you add to a private post are not private and can be viewed in media library by other authors. Images can also be viewed by anyone who has the image URL.

We hope this article helped you learn how to create a private post in WordPress. If you are looking to create a full-feature membership website with private content and courses, then you may want to check out our ultimate guide on how to create a membership site in WordPress.

If you liked this article, then please subscribe to our YouTube Channel for WordPress video tutorials. You can also find us on Twitter and Facebook.

The post How to Create a Private Post in WordPress appeared first on WPBeginner.

What’s the Difference Between Domain Name and Web Hosting (Explained)

We are often asked by our readers to explain what is the difference between a domain name and web hosting? Many beginners don’t know that these are two separate things. In this beginner’s guide, we will explain the difference between a domain name and web hosting.

Difference between domain name and web hosting

What is a Domain Name?

Domain name is the address of your website that people type in the browser’s URL bar to visit your website.

In other words, if your website was a house, then your domain name will be its address.

Now let’s get into the detailed explanation.

Internet is basically a giant network of computers connected to each other through cables. To easily identify them, each computer is assigned a series of numbers called IP Address.

This IP address is a combination of numbers separated with dots. Typically, IP addresses look like this:

66.249.66.1

Computers have no problem identifying and remembering these numbers. However, it is impossible for humans to remember and use these numbers to connect to websites on the internet.

To solve this problem, domain names were invented.

A domain name can have words which makes it easy to remember website addresses.

Now if you wanted to visit a website on the internet, you don’t need to type a string of numbers. Instead, you can type in an easy to remember domain name, for example, wpbeginner.com.

To learn more about domain names, take a look at our beginner’s guide on domain names and how do they work.

What is Web Hosting?

What is web hosting?

Web hosting is the place where all the files of your website live. It is like the home of your website where it actually lives.

A good way to think about this is if the domain name was the address of your house, then web hosting is the actual house that address points to. All websites on the internet, need web hosting.

When someone enters your domain name in a browser, the domain name is translated into the IP address of your web hosting company’s computer. This computer contains your website’s files, and it sends those files back to the users’ browsers.

Web hosting companies specialize in storing and serving websites. They offer different types of hosting plans to their customers. See our article on WordPress hosting to learn more about choosing the right hosting for your website.

How Domain Names and Web Hosting are Related?

Domain names and web hosting are two different services. However, they work together to make websites possible.

Basically domain name system is like a massive address book that is constantly updated. Behind each domain name, there is an address of the web hosting service storing the website’s files.

Without domain names, it will not be possible for people to find your website and without web hosting you cannot build a website.

What do I need to Build a Website? Domain Name or Web Hosting?

What you need to build a website?

To build a website you will need both a domain name and web hosting account.

Buying a domain name alone only gives you right to use that particular domain name for a specific period (usually 1 year).

You need web hosting to store your website’s files. After you get hosting, you need to update your domain name settings and point it to your web hosting service provider.

You can also buy both the domain and hosting from the same company. Typically a domain name costs $14.99 / year, and web hosting normally costs $7.99 / month.

If you are starting your first website, then this may sound like a lot.

Thankfully, Bluehost, an official WordPress recommended hosting provider, has agreed to offer our users a free domain name and over 60% off on web hosting.

→ Click here to start with Bluehost ←

Once you have purchased hosting and registered your domain name, you can start building your website. For complete step by step instructions, see our guide on how to make a website.

Do I have to buy them together? Or can I buy them separately?

You can buy domain name and web hosting from two different companies. However, in that case you will have to point your domain name to your web hosting company by editing its DNS settings.

On the other hand, if you purchase your domain name and web hosting from the same company, then you will not have to change domain name settings.

It is also much easier to manage and renew both services under the same dashboard.

If you want to buy domain names separately, then you can do so from top providers like: Godaddy and NameCheap.

Can I Move My Domain Name to a Different Company?

Moving domain name

Yes, you can. Normally when you register the domain name, you own the right to use it and transfer it anywhere you want.

For example, let’s say you purchased your domain name from Godaddy and bought your hosting from Bluehost. Now you want to move your domain name to Bluehost, so that it is easier to manage and renew.

You can easily do that. Both companies have detailed step by step instructions that you can follow to transfer your domain name.

Note: We recommend you to wait at least 45 days after the registration or renewal to initiate the transfer. ICANN the international organization that oversees domain names, requires one year renewal whenever a transfer is initiated. By transferring your domain name before that period you could lose that year’s renewal fee.

Can I Move My Website to Another Web Hosting Company Without Changing Domain?

Yes, you can do that as well. You own the domain name and can change its settings to point it to any web hosting company.

For example, you purchased your domain name and hosting from Godaddy, and now you want to move your web hosting to Bluehost. You can move your site from one host to another by simply transferring files and data. After that you need to edit your domain name settings and point them to your new web hosting provider.

Another example, you purchased your domain name from WordPress.com (See our guide on the difference between WordPress.com vs WordPress.org). Later you wanted to move to self hosted WordPress.org website.

First, you will need to sign up for a WordPress hosting account. After that you can move your site from WordPress.com to WordPress.org. Lastly, you will just edit your domain name settings on WordPress.com and point them to your new WordPress hosting provider.

We hope this article helped you learn the difference between a domain name and web hosting. You may also want to see our comparison of popular website builders for beginners with pros and cons.

If you liked this article, then please subscribe to our YouTube Channel for WordPress video tutorials. You can also find us on Twitter and Facebook.

The post What’s the Difference Between Domain Name and Web Hosting (Explained) appeared first on WPBeginner.