Category Archives: google adsense

The Ultimate Affiliate Marketing Guide for Beginners – Step by Step

Affiliate marketing is one of the most popular ways to make money online from your blog. It allows you to add a steady income stream to your blog’s monetization strategy. In this affiliate marketing guide for beginners, we will explain how affiliate marketing works, and how to get started right away.

Ultimate affiliate marketing guide for beginners

What is Affiliate Marketing?

By definition, affiliate marketing is a referral arrangement in which an online retailer (advertiser) pays you a commission when users purchase their product from your referral link.

Unlike other ad types which pays based on clicks or views, affiliate marketing works on a CPA (cost-per-acquisition), or CPL (cost-per-lead) basis. In other words, you only earn a commission when someone takes an action (i.e buys the product or signup for a free trial).

Because there is less risk for the advertiser, affiliate programs pay out much higher commissions to publishers compared to Google AdSense or other types of ads.

Affiliate marketing requires a more hands-on approach. You have to find a product or service that you believe will be helpful to your users. After that you have to strategically add it in your blog posts and other areas of your site, so users can purchase the product using your referral link.

How Does Affiliate Marketing / Tracking Work?

First, you have to find a company or product that you want to promote. You need to select a product or service that you believe will be relevant to your blog’s topic and useful for your audience. The product or company you choose will be called a ‘Merchant’.

Next, you have to partner up with the company by joining their partner program. This makes you their ‘Affiliate’. Some companies also use the terms associates, partners, etc.

Once you have joined their partner program (also called Affiliate Program), you will get a unique affiliate ID. You will need to use this affiliate ID in all affiliate links that you add in your website to promote the product.

You can promote the product by adding an in-depth product reviews, recommend it in your articles, display banner ads, sending an email newsletter, and more. All traffic you send to the merchant website with your unique ID will be tracked.

Once a user makes a purchase, you will earn a commission. Your payment is issued once your earnings reach a particular threshold typically 45 – 60 days.

How to Get Started with Affiliate Marketing

First, you need to make sure that you are using the right blogging platform, and you are allowed to run affiliate marketing campaigns on your website.

For example, if you are using WordPress.com, then there are some restrictions regarding the products and services you can link to. For more details see our comparison of WordPress.com vs WordPress.org.

On the other hand if you are on self-hosted WordPress.org website, then you can add any affiliate link you want and efficiently manage your affiliate campaigns.

If you haven’t created a website already, then you can get started right away. Simply follow the instructions in our step by step guide on how to start a blog, and you’ll be up and running in less than 30 minutes.

Next, you need to let your users know how you make money from your website by adding a disclosure page. See WPBeginner’s disclosure page and feel free to use it as a template.

You will also need to add a privacy policy and terms of service page to your blog.

These are amongst the must have pages for every WordPress blog. They not only save you from legal issues in the future, but they also help you build trust with your audience.

Finding Affiliate Products and Services to Promote

There are many ways to find products and companies that you can partner up with as an affiliate. Here are some of the easiest ways to find the products you can promote.

1. Become an affiliate for products you already use

First, you need to look at the products and services that you already use and find useful. This makes it easy for you to convince your users about the product since you already know the pros and cons.

Next, you need to go to the product’s website and search for terms like ‘Affiliate program’, ‘Partners’, or ‘Affiliates’. Many companies are actively looking for affiliate marketers to promote their products that’s why they add a link to their affiliate page in their website’s footer.
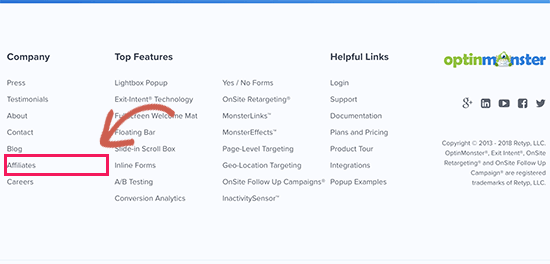
Finding affiliate programs to join

2. Look for products other blogs are recommending

Another way to find products is by looking at other blogs similar to yours. You will be able to find many similar blogs that are using affiliate marketing to make money.

But how do you know that they are promoting affiliate products?

First, look for the obvious and easily noticeable banner ads on their website. Take your mouse to the banner ad, and you will see a link in your browser’s status bar.
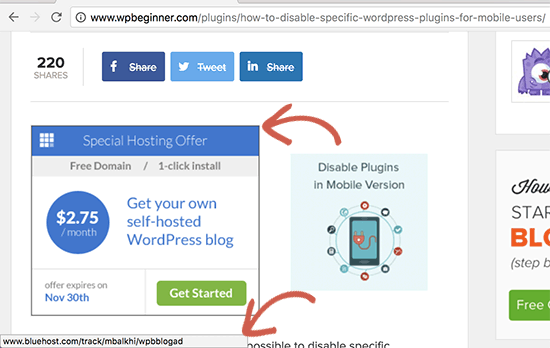
finding affiliate links

This link will usually have an affiliate ID. Affiliate ID helps merchants track which affiliate partner is sending them traffic / sales.

Sometimes these links may look like internal links, but when you click on them they will take you to a product website with affiliate marketer’s ID in the link. You will also find similar affiliate links through-out their content.

3. Join Bigger Affiliate Networks

Another way to find products to promote is by joining affiliate networks. These websites act as a middleman between affiliate marketers and merchants.

You will notice that many products and companies that you want to partner with already use an affiliate network. This helps you quickly find a lot of products that you can start promoting on your website.

4. Reach out to Companies

If you really want to promote a product but can’t find any information about their affiliate program, then you can simply ask them via email.

Some companies may not be actively promoting their affiliate program. If they have an affiliate program, then they can invite you to join.

What are Affiliate Networks? Why You Should Join Them?

Affiliate networks act as a middleman between you (the affiliate marketer) and merchants (companies that want to sell their products).

For merchants, they provide their platform as a service to list their products, track affiliate traffic, manage affiliates, and send payments.

For affiliate marketers, they offer an easy to use platform to search for products, sign up as an affiliate, track your campaign performance and earnings.

Following are some of the most popular affiliate networks that you can join.

  • ShareaSale – One of the largest affiliate networks with many high-paying affiliate products for almost every category imaginable. Popular WordPress hosting company, WPEngine, uses ShareASale to manage their affiliates. WPEngine’s Affiliate program offers a very generous payout to their affiliate partners.
  • CJ Affiliate (Formerly, Comission Junction) – Another top affiliate network with a huge number of merchants and products neatly organized in categories and easily searchable. Companies like GoDaddy, Expedia, and many others use CJ.
  • ClickBank – This is a large online marketplace for selling digital products in various categories from different vendors. It is easy to use and has tons of learning resources for new affiliate marketers.
  • Amazon Associates – Amazon is world’s largest ecommerce store with millions of products. You can sign up for their affiliate program and start earning by sending people to a website they already use for their online shopping.

Which affiliate networks should you join?

You should join affiliate networks that have the products you want to promote. You can join multiple affiliate networks for different products. We use all the above networks and few others.

Make sure that you always check the network program policies. You also need to review program policies of individual products and merchants. This will give you a clear idea about your earnings, payments, additional incentives, and more.

Affiliate Marketing Tips to Increase Earnings

Now that we have covered the basics, let’s dive into some more tips on how to actually make money from affiliate marketing.

1. Choose good products and companies to promote

As an affiliate marketer, you don’t have control over the future of products that you are recommending. That’s why you need to make sure that you are recommending the best products from reputable companies.

The best way to do this is by recommending the products and services that you have actually used. If you want to recommend a product that looks useful, then feel free to contact them to learn more.

If you ask nicely, most companies will gladly offer you a free account or copy to review / test their product or service.

2. Offer highly useful and valuable content

You can add affiliate links and banners anywhere on your WordPress site. However, simply adding links will not result in convincing your users to actually buy those products.

You need to convince your users by offering useful and valuable information about the product. Many affiliate marketers do that by writing in-depth product reviews, video reviews, product comparisons with pros and cons, and more.

3. Keep your audience in mind

Keep your website’s audience and their interests in mind when choosing the product. For example, if you run a fashion blog, then you would want to promote fashion accessories, clothing, and similar products that your audience would want to buy.

You also need to make sure that you are not just recommending products because they are offering higher commissions. If a user buys a product based on your recommendation, and it doesn’t turn out useful, then they will never trust your recommendations again.

Affiliate Marketing Plugins and Tools for WordPress

As your blog grows, you will be recommending a lot of different products. This will make it difficult for you to manage all the affiliate links, banners, and ads spread all over your website.

Luckily, there are excellent affiliate marketing tools and plugins for WordPress that you can use to help with management.

1. ThirstyAffiliates

Manually adding links to your content becomes quite difficult as your site grows. You will have to copy the URL with your affiliate ID every time you mention the product and paste it into WordPress.

This is where ThirstyAffiliates can help. It is an affiliate link management plugin that allows you to easily add affiliate links in WordPress.

It also lets you change lengthy affiliate links into cloaked pretty links which are more user-friendly.

ThirstyAffiliates also has the option to automatically replace keywords with affiliate links which can significantly help you boost your affiliate revenue.

2. AdSanity

AdSanity is the best WordPress ad management plugin and a must-have for every affiliate marketer’s toolbox. It allows you to create banner ads from your WordPress site and manage them from a single dashboard.

AdSanity also makes it easy to insert ads into your WordPress posts, pages, and sidebar widgets. You can use it to manage your third-party ads like Google AdSense ads and banners as well. For detailed instructions, see our guide on how to manage ads in WordPress with AdSanity.

3. MonsterInsights

MonsterInsights is the best Google Analytics plugin for WordPress. It allows you to see where your users are coming from and what they do when they are on your website.

It also helps you track your outbound affiliate links using Google Analytics. This enables you to find out which affiliate links are clicked more often and help you discover missed opportunities.

Need more tools? See our full list of top affiliate marketing tools and plugins for WordPress.

We hope this ultimate affiliate marketing guide for beginners helped you learn how to become an affiliate marketer. You may also want to see our ultimate WordPress SEO guide to bring more visitors to your website.

If you liked this article, then please subscribe to our YouTube Channel for WordPress video tutorials. You can also find us on Twitter and Facebook.

The post The Ultimate Affiliate Marketing Guide for Beginners – Step by Step appeared first on WPBeginner.
How to Sell Ads on Your WordPress Blog (Step by Step)

Do you want to sell ads on your WordPress blog? Selling ads on a blog or website is one of the most common ways to make money online. In this article, we will show you how to sell adds on your WordPress blog and explain the different types of ad options available to you.

Selling ads on your WordPress blog

What Do You Need to Sell Ads on Your WordPress Blog?

First, you need to make sure you are using the right blogging platform. There are two types of WordPress blogs, WordPress.com which is a hosted blogging service and WordPress.org also called self-hosted WordPress. See the difference in our comparison of WordPress.com vs WordPress.org.

WordPress.com have their own WordAds program and only allows third-party ads if you sign up for the business plan.

On the other hand, you can run ads on your self-hosted WordPress.org website out of the box.

If you don’t yet have a WordPress.org website, then follow the instructions in our guide on how to start a WordPress blog, and you will be up and running in no time.

That being said, let’s take a look at what kind of ads you can sell on your WordPress blog.

Types of Ads You Can Sell on Your WordPress Blog

There are different types of ads that you can sell on your WordPress blog. One ad type may work better than the other depending on your website’s topic, audience, and overall traffic.

You can also choose to combine different ad types to create an effective monetization strategy for your blog.

1. CPC or Cost-Per-Click Ads

Pay per click ads

Cost-per-click ads are the most common type of ads displayed on the majority of websites. Ads are sold on a per-click basis which means you are only eligible to get paid when a user clicks on the ad.

The reason this ad type is so successful is that it works effectively for both publishers and advertisers. Advertisers get traffic to their websites which they can use to generate leads or increase sales. The publisher is able to get paid for sending traffic.

Advertising programs like Google AdSense allow you to easily sell cost per click ads on your website. Once you sign up with the Google AdSense program, your website will become available to Google’s enormous network of advertisers.

For more details see our guide on how to properly add Google AdSense in WordPress.

One downside is that if you have low traffic, or your ads are not placed at strategic locations, then you may get a very low click-through rate for ads on your website. However, many website owners quickly overcome this by optimizing their ads in WordPress.

2. CPM or Cost-Per-Thousand-Impressions Ads

Cost per Mille ads

CPM (cost per mille) or cost-per-thousand-impression are ads that are sold based on how many times they are displayed. This means you get paid for displaying ads on your website whether users click on them or not.

CPM ads often fail to generate the same amount of revenue as you would generate with cost-per-click ads alone. However, they can be a significant source of income if you have a high traffic website, and you don’t want to place ads too close to your content.

Advertisers are particularly keen on buying CPM ads on websites with a high reputation among their target audiences.

3. Flat Fee Ads

Flat fee ads

Flat fee ads allow you to sell ad spots on your website for a specific time-period. You can price your ads based on how much traffic your website generates on an average.

This type of ads provide more impressions and clicks to advertisers and allow website owners to know exactly how much they will earn at the end of the period.

Advertisers usually purchase this type of ads on websites with higher traffic matching their target demographics. You can sell ads directly through your website by creating an ‘Advertise Here’ page. Alternatively, you can also join programs like BuySellAds or DoubleClick by Google.

4. Affiliate Ads

Affiliate marketing

Affiliate ads can also be called action based ads. Basically, you send traffic to an advertiser’s website, but you only get paid if a user completes an action. This action could be anything like making a purchase, downloading software, creating an account, etc.

Affiliate programs provide you a unique URL with your referral ID. You can then use this URL to create banners, graphics, or add links directly in your articles.

The benefit of affiliate ads is that you get paid substantially higher than what you would get paid on a cost per click or cost per mille ad.

You can sign up for affiliate programs of different products and services that you want to promote. Each product, service, and affiliate program comes with its own commission rates, terms, and conditions.

For example, WPEngine’s affiliate program allows you to earn on each new sign up you send their way. Your commission will be based on the user’s entire first month payment or fixed $200 whichever is higher.

You can easily manage your affiliate links in WordPress using ThirstyAffiliates. You will also find plenty of tools and plugins to boost your affiliate marketing.

Setting up Banner Ads on Your Website

After looking at the different ad types you can come up with a monetization strategy that works for you. Don’t worry if you are still not sure which is the right choice for you.

Most website owners use multiple ad types and then prioritize them based on their earning potential.

Once you have chosen a monetization strategy, you are now ready to add banner ads to your website. WordPress has several really good ad management plugins that you can use.

We recommend using AdSanity, it is one of the most beginner-friendly ad management plugin for WordPress.

First thing you need to do is install and activate the AdSanity plugin. For more details, see our step by step guide on how to install a WordPress plugin.

Upon activation, simply go to Adsanity » Create Ad to create your first ad.

Create new ad in AdSanity

AdSanity allows you to create any kind of ad. You can create a self-hosted ad, local ad, or add the ad code provided by an ad program like Google AdSense.

If you are running a local ad, then you can upload a banner image and graphics. If it is a third-party ad, then you can go ahead and enter the ad code.

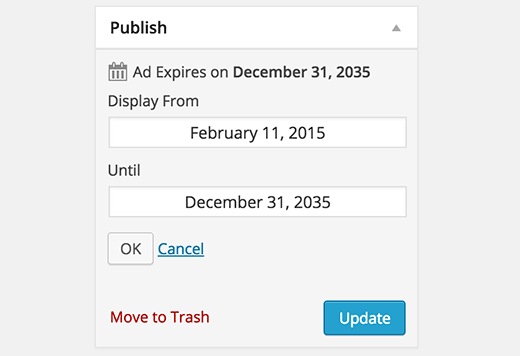
Under the publish meta box, you can also schedule the ad to run for a specific period or allow it to run indefinitely. Don’t forget to click on the publish or update button to save your changes.

Schedule or publish the ad

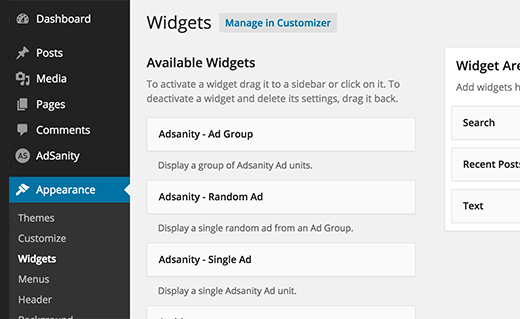
AdSanity allows you to display ads anywhere on your website using widgets and shortcodes. Simply go to Appearance » Widgets page and drag and drop the AdSanity single ad widget to a sidebar.

AdSanity sidebar widgets

For detailed instructions, see our article on how to manage ads in WordPress with AdSanity.

We hope this article helped you learn how to sell ads on your WordPress blog. You may also want to see our guide on more ways to make money online using WordPress.

If you liked this article, then please subscribe to our YouTube Channel for WordPress video tutorials. You can also find us on Twitter and Facebook.

The post How to Sell Ads on Your WordPress Blog (Step by Step) appeared first on WPBeginner.

10 Highest Performing Google AdSense Banner Sizes & Formats for Your WordPress Site

One of the most common questions beginners ask after signing up with Google AdSense is which are the highest performing Google AdSense banner sizes? Some Google AdSense ad formats are more noticeable which means they get more clicks and bring more revenue. In this article, we will show you the highest performing Google AdSense banner sizes and formats, and where to place them for best results.

Google AdSense Banner Sizes

How to Properly Setup Google AdSense Ads in WordPress?

Before getting started, you will need to sign up for a Google AdSense account. Once you have signed up, see our guide on how to properly add Google AdSense in WordPress.

By default, you can easily place AdSense ads in your website’s sidebar. Some WordPress themes may also have dedicated areas to display ads.

However, the best way to manage your Google AdSense ads in WordPress is by using an ad management plugin. We recommend using AdSanity, it is super easy to use and allows you to easily insert ads into sidebars, post content, and anywhere else you want.

Why Some Google AdSense Banner Sizes and Formats Work Better?

Google AdSense comes with several banner sizes and ad formats that you can add on your website. However, not all of them produce the same level of results.

Ads that are closer to the content and easily visible upon page load will get you a higher CTR (click through rate). You need to make sure that you choose the ad size that is easily noticeable. Some of the Google AdSense ad sizes are too small and some could be too large to affect user experience.

Next, factor that affects ad performance on your website is how many advertisers are running ads for that format. Some ad formats and banners are more popular among advertisers which means using them gets you a larger inventory and better paying ads.

Lastly, some ad formats are optimized for mobile devices. If mobile users make the most of your traffic, then these ads are going to perform better on your website than other sizes.

Top Performing Google AdSense Banner Sizes and Formats

Most website owners try different banner sizes to determine which formats work best for their websites. Google AdSense engineers also continuously run their own tests to see how ads are performing on participating websites.

We have done several testing with Google AdSense over the years on our own websites. Below are the top performing Google AdSense banner sizes and ad formats that offer the best value for your advertising real estate.

1. The Medium Rectangle (300×250)

Medium rectangle

This ad format supports both display / text ads, and it can also be used on mobile layouts. The best part about this ad size is that it’s easy to fit in the sidebar or inside the content area without annoying users.

That’s why this ad format gets a larger ad inventory which means more and better paying ads for your site. Since it’s perfectly-sized for in-content ads, it is also reported to have the best CTR for most websites.

2. Large Rectangle (336×280)

Large rectangle

Large rectangle takes the second position on our list. It is larger and more noticeable than the medium rectangle ad above, but it may not fit in all website sidebars and is not mobile optimized.

If your website’s sidebar or content area is a bit narrow, then the ad could squeeze the content which is not good for user experience.

That being said, the large rectangle could easily outperform medium rectangle on your website if placed inside the content area in between paragraphs. It supports both image and text ads.

Due to its size and ideal placement next to content, this ad size gets a better ad inventory as well.

3. The Leaderboard (728×90)

Leaderboard

The leaderboard is a traditional banner ad size that is perfect for website header. It supports both text and image ad formats but doesn’t support mobile ads.

Since the leaderboard is ideal to be placed on top (inside or immediately after the website header), it gets more ads which means better ads for your website. Due to its size and prominent placement, it performs fairly well on most websites.

4. Half Page aka Large Skyscraper (300×600)

Half page

Large Skyscraper is a wide vertical banner also known as half page due to its size. It gets attention from advertisers who want more ad space to effectively communicate their message during retargeting.

It is becoming more popular among publishers because it tends to give more exposure for brands which means better paying ads.

You can place the large skyscraper in the sidebar or next to the content. However, due to its size it may not be a good fit for all websites.

5. Large Mobile Banner (320×100)

Mobile banner

Large mobile banner is a mobile ad format, and it is an equivalent of the leaderboard ad format in terms of effectiveness but for mobile devices. Ideally it works best when placed on top just below the header.

Since mobile traffic makes up a good chunk of users for most websites, this ad format gets a better ad inventory.

It can be placed as a less intrusive ad and as an alternate to the medium rectangle ad format.

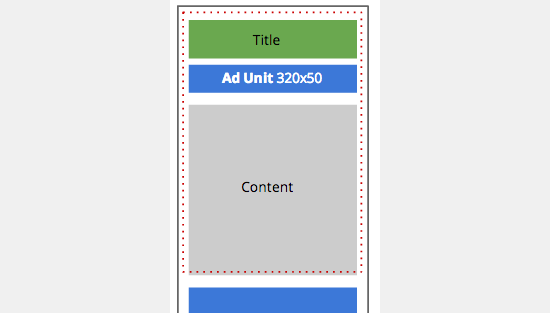
6. Mobile Leaderboard (320×50)

mobile leaderboard

Mobile leaderboard is half in height compared to the large mobile banner ad format. It is slightly less effective but also less intrusive and offers even better ad experience on smaller mobile devices.

Mobile ads are popular among advertisers which means it gets a sizable ad inventory. With proper placement, it can work really well with your mobile traffic.

7. Wide Skyscraper (160×600)

Skyscraper

The wide skyscraper is a vertical banner ad that is designed specifically for narrow sidebars. It supports both image and text ad formats and is popular among advertisers.

It is a less intrusive ad option and can easily blend in with your website design. However, it is less effective than wider half page banner ads which tends to draw more user attention towards ad.

8. Portrait (300×1050)

Portrait

Portrait is a slightly wider and longer vertical banner. Due to its size, this ad format attracts brand-centric advertisers who want more ad space for their message.

It is ideally placed next to the content or in the sidebar where it is more noticeable as your users scan the contents of your page. The tricky part is to implement it without affecting user experience on your website.

9. The Billboard (970×250)

Billboard

The billboard is another brand-centric ad format. It is a wide horizontal banner ad that can be ideally placed on top or bottom of your pages. It tends to get better ads due to the space it offers to the advertisers, but it has a smaller ad inventory.

Depending on the content and keywords of your website, it could be a hit or a miss if it fails to attract enough ads for your website.

10. The Square (250×250)

Generally larger ads are considered more noticeable. However, not all websites are designed in the same fashion. If you are using a minimalist WordPress theme, then this small square ad format could beautifully fit in your layout and still be noticeable.

The downside is that it has a smaller ad inventory which could result into low paying ads. However, if your website is in a competitive industry, then it can work really well without affecting user experience.

More Tips to Make the Most out of Your Ad Space

We are often asked by users how they can make more money with Google AdSense? Since each website is different, there is no single perfect answer to this question.

Here are some tips to make sure that you are fully utilizing your website’s potential when using Google AdSense to generate revenue.

  • Test different ad placements – Try different ad formats to figure out which formats give you a better CTR and which formats give you better ads.
  • Display multiple ads – Google AdSense allows you to use up to 3 ad units on a page. Try different placements and ad formats to test which combinations work best for you.
  • Think of users first – While ad revenue is important for the survival of many websites, you also need to think of your users. Placing ads in a way that affects user experience would affect your website’s user engagement as well as your WordPress SEO.
  • Optimize website performance – Research shows that faster websites usually get more engaged audience which means higher CTR for your ads. See how to speed up WordPress and boost performance.

We hope this article helped you find the highest performing Google AdSense banner sizes and formats. You may also want to check out our comprehensive guide on other ways to make money online to supplement your Google AdSense income.

If you liked this article, then please subscribe to our YouTube Channel for WordPress video tutorials. You can also find us on Twitter and Facebook.

The post 10 Highest Performing Google AdSense Banner Sizes & Formats for Your WordPress Site appeared first on WPBeginner.

How to Use Google Matched Content to Show Related Posts in WordPress

Did you know that you can use Google AdSense to also show related posts in WordPress? Matched Content is a Google AdSense feature that allows you to show related posts in WordPress while also make money by displaying ads alongside. In this article, we will show you how to easily use Google Matched Content to show related posts in WordPress.

Using Google Matched Content to show related posts in WordPress

What is Google AdSense Matched Content?

Google AdSense Matched Content is a native ad unit that allows you to show related posts from your website. You also have the option to monetize this unit with relevant ads that are shown alongside your related posts.

Here’s how the Matched Content unit looks like:

Google AdSense Matched Content Unit

You can customize the look and feel of the widget to match your website layout, and it is 100% responsive (mobile-friendly).

You might be wondering what are the Pros and Cons of using Google Matched Content unit?

Pros:

  • Less Server Resources – By default, WordPress related posts plugins are resource intensive. By using Matched Content widget from Google, you’re offloading the server load to them.
  • Better Related Posts Algorithm – Google’s sophisticated algorithm shows a post that’s more relevant to the person viewing.
  • Monetization – This is another way for you to make money from your blog.

Cons:

  • Powered by Logo – Google displays a powered by link in Matched Content Unit which some might find unattractive.

Now that you know what is Google Matched Content, let’s take a look at how to add it in your WordPress site.

Getting Started with Google Matched Content

First thing you will need to do is sign up with Google AdSense program if you haven’t already done so.

Google AdSense allows you to make money online from your WordPress blog. You can see our guide on how to properly add Google AdSense in WordPress for detailed instructions.

Google Matched Content feature is available for websites meeting a certain traffic requirement.

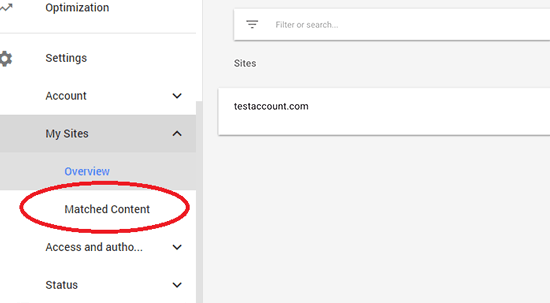
To see if your website meets the requirement, you need to visit your Google AdSense dashboard and click on Settings » My Sites from the left menu.

If you can see the ‘Matched Content’ option there, then you are good to go. Otherwise, your site or sites do not meet the requirements for matched content.

Matched Content in AdSense

That being said, let’s see how to easily add Google Matched Content to show related posts in WordPress.

Adding Google Matched Content in WordPress

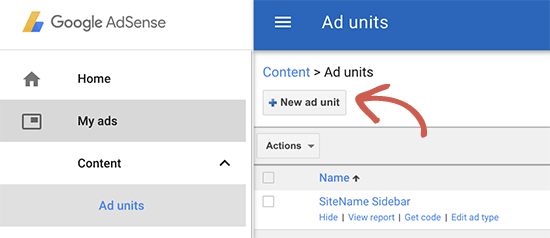
First, you need to login to your Google AdSense account, click on My Ads from the left menu, and then click on the ‘New Ad’ button.

Creating a new ad unit in Google AdSense

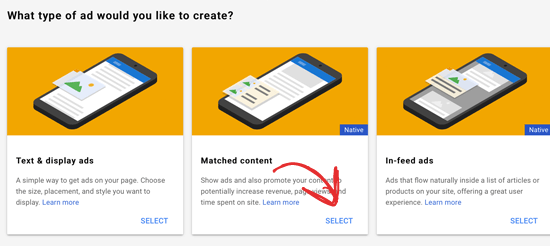
Next, you need to select ‘Matched Content’ as your ad type.

Select Google Matched Content

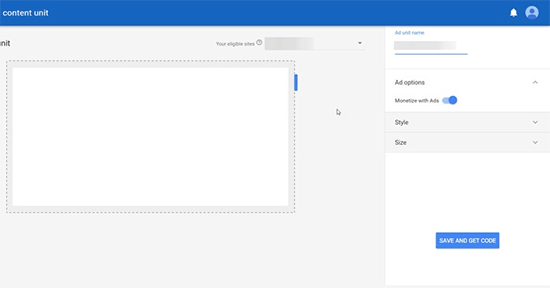
On the next screen, you will see a preview of your Matched Content box with the ad settings. On the right hand side, you will see the option to customize the unit settings.

You will also see the option to monetize the matched content unit with ads, so you can make money. Of course, you can choose not to show ads and only use Matched Content for related posts.

Matched Content unit settings

Once you are done with the settings, simply click on the ‘Save and Get Code’ button.

You need to copy your ad code and paste it in a plain text editor like Notepad or TextEdit because you will need it in the next step.

Displaying Matched Content Related Posts in WordPress

The most effective place to display related posts is below your individual posts. Many WordPress themes already come with a widget area or sidebar that appears below post content and before comments area.

However, if your theme does not have a widget area below single post content, then you can add one by following our guide on how to easily add after post widget area in any WordPress theme.

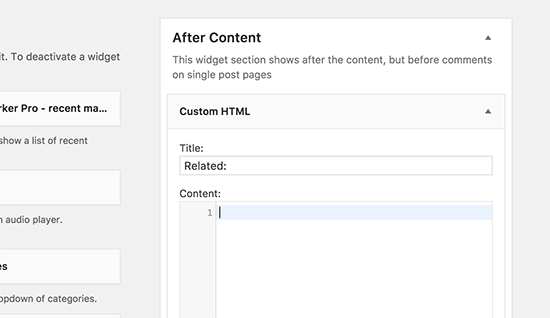
After that, you need to visit Appearance » Widgets page and drag the ‘Custom HTML’ widget to the after post widget area. Inside the widget, you need to paste your Matched Content ad code that you copied in the previous step.

Add Matched Content code here

Don’t forget to click on the save button to store your widget settings. You can now visit your website to see the Matched Content related posts in action.

Matched Content preview

You can now visit your website to see the Matched Content box in action.

We hope this article helped you learn how to easily add Google Matched Content related posts in WordPress. If you are looking for a different WordPress related posts option, then you may want to check out our list of the best related posts plugins for WordPress.

If you liked this article, then please subscribe to our YouTube Channel for WordPress video tutorials. You can also find us on Twitter and Facebook.

The post How to Use Google Matched Content to Show Related Posts in WordPress appeared first on WPBeginner.

How to Properly Add Google AdSense to Your WordPress Site

Google AdSense is one of the most popular ways to monetize your website. You can easily add Google AdSense to your WordPress site and start making money. In this article, we will show you how to add Google AdSense in WordPress along with some best practices and tips to increase your earnings.

Properly adding Google AdSense in WordPress

What is Google AdSense?

Google AdSense is an advertising network run by Google that allows bloggers and website owners an opportunity to earn money by showing text, image, video, and other interactive advertisement on their websites. These ads are targeted by site content and audience.

Google AdSense is hassle free because you don’t have to deal with advertisers or worry about collecting money. Google administers and maintain relationships with the advertisers. They collect the payment, take their management fee, and send the rest of the money to you.

AdSense offers cost-per-click ads (CPC) which means that you earn money every time a user clicks on the ad on your website. The amount received per click varies based on a variety of factors.

Video Tutorial

If you don’t like the video or need more instructions, then continue reading.

Getting Started with AdSense

First thing you need to do is sign up for a Google AdSense account. If you have a Gmail account, then you can use your existing account to sign up.

Once you’ve submitted your application, you will receive an email within 6 – 8 hours telling you whether you have passed the first step of the review process. If you passed the first check, then you can log in to your AdSense account and get your ad code.

Start by clicking on the My ads tab and then click on the New ad unit button.

Creating a new AdSense ad unit

This will bring you to a create new ad screen, and you will be asked to choose an ad type. You can select from ‘text and display ads’, ‘In-feed ads’, and ‘In-article ads’.

If you are unsure, then start with the text and display ads.

Choose an ad type

Next, you need to provide a name for this ad unit and select the ad size, type, style, and colors.

AdSense ad units

The name of the Ad is only used for internal purposes, so you can name it anything like “SiteName Sidebar”.

The next option is choosing the Ad Size. While Google offers a wide-variety of ad sizes, there are certain sizes that are listed under recommended because those are the most popular among advertisers.

What that means is that these ads are likely to have a higher inventory thus a better payout.

After that you will need to choose Ad type. We recommend having both text & display ads.

Ad style allows you to control the display of your text based ad units. We recommend using your site’s color scheme for best results.

The custom channels feature allows you to better track the ad performance based on sites. You don’t have to use it if you don’t want to.

For ‘If no ads available’ option, you can either choose to collapse the ad space or fill it with your own ad. This is shown when Google cannot find an appropriate ad (which rarely happens).

Once you’re done with this setup, simply click on Save and get code button. You will be prompted with a message “Ad successfully created”, and you will also see the Ad code.

Ad code

Copy your ad code and paste it in a plain text editor like Notepad or TextEdit. You will need it in the next step.

Adding Google AdSense in WordPress

You need to determine where you want to show the ad on your website. Ads are most commonly displayed in the sidebar. You can add Google Adsense in your sidebar by using WordPress widgets.

Simply go to Appearance » Widgets page in your WordPress admin area. Next, drag & drop the ‘Custom HTML’ widget to the appropriate widget area and paste your Google AdSense code in there.

Add your AdSense ad code in custom HTML widget in WordPress

For better placement control and tracking, we recommend that you check out AdSanity WordPress plugin. (See: Best Ad Management WordPress solutions)

AdSense Best Practices and Frequently Asked Questions

Over the years, we’ve answered several AdSense related questions. Having used AdSense on several of our sites such as List25, we’ve learnt a whole lot about optimizing. Below are some AdSense best practices and frequently asked questions.

What’s the best AdSense Ad Size?

Although ad placement is key, we’ve found that the best sizes are 336×280 and 300×250. These ads tend to fit on most screen sizes and have the best pay rate as well.

What’s the Best AdSense Placement?

This entirely depends on your layout. The goal is to get more clicks, so you want to place your ads in a more prominent spot. We have found that ads within post content towards the top of the screen tends to get the most clicks.

Several users have asked us about adding AdSense in a floating widget because it will be very prominent. We strongly recommend against that because it is not allowed by Google Terms of Service. If you violate their TOS, then you can get banned from the program.

Can I click on my own Google AdSense Ads?

Often beginners are tempted to click on their own ads or ask their family members to click on their ads. Please don’t do that. Google’s algorithm is very smart and knows when you’re clicking on your own ad. This can get you banned from the program.

What is Page RPM in Google AdSense?

RPM stands for Revenue per Mille meaning revenue per 1000 impressions. This is determined by multiplying the total number of clicks and cost per click and then dividing that by the total number of pageviews.

Can I use my Blogger or YouTube AdSense account with WordPress?

Yes, you can. If you started using AdSense on one of Google’s hosted platforms like Blogger or YouTube, then you can change your AdSense account type and use it with WordPress. You’ll need to provide Google AdSense with the URL of the site you want to monetize by filling out an application form.

Simply login to your AdSense account and then under ‘My Ads’ click on ‘Other Products’ option. Next, you need to click ‘Upgrade now’ and complete the application form.

What is CTR in Google AdSense?

CTR or click-through-rates differ vastly for different kind of websites. Your ad clicks depend on a lot of factors like your website’s topics, your audience type, ad placement on your site, and more. The ideal CTR for Google AdSense is really hard to define because you don’t have access to the click rates of other websites like your own.

However, Google AdSense has built-in tools that will start showing you messages if your site is not getting a good CTR. You can follow the optimization guides shown inside Google AdSense dashboard to improve your ad revenue.

When and how does Google AdSense pay publishers?

Each month, Google AdSense calculates your previous month’s earnings and shows them on your your ‘Transactions’ page. If your earnings match the required threshold, then your payment is processed and released by the 21st of that month.

There are multiple payment methods available including direct electronic transfer, wire transfer, check, Western Union, and more.

Why Google AdSense rejected my application?

Google Adsense may reject your application if your website doesn’t meet the AdSense program policies or their terms and conditions.

What are the requirements to get Google AdSense application approved?

Here are the minimum requirements to get your Google AdSense account application approved.

  • Your website and all its content must comply with AdSense program policies and terms and conditions.
  • Your website should be at least 6 months old.
  • You, the applicant, must be over 18 years old.

Note: Even if your application meets all the requirements, Google AdSense still reserves the right to decline your application.

Can I add Google AdSense in my WordPress.com blog?

WordPress.com does not allow you to add Google AdSense to your website unless you upgrade to the Business plan. For more on this topic, please see our guide on the difference between WordPress.com vs WordPress.org.

What is the difference between Google AdSense vs Google AdWords?

Google AdWords allows you to advertise on other websites including those participating in the Google AdSense program.

Google AdSense allows you to make money from your website by showing ads on your website.

We hope this article helped you add Google AdSense in your WordPress site. You may also want to check out our guide on 25 ways to make money online blogging.

If you liked this article, then please subscribe to our YouTube Channel for WordPress video tutorials. You can also find us on Twitter and Facebook.

The post How to Properly Add Google AdSense to Your WordPress Site appeared first on WPBeginner.

How to Create and Manage Ads.txt files in WordPress

Do you want to create and manage an ads.txt files in WordPress? Ads.txt file protects publishers from ad fraud, and it can potentially increase your ad revenue. In this article, we will show you how to easily create and manage ads.txt file in WordPress.

How to create and manage Ads.txt file in WordPress

What is Ads.txt File?

Ads.txt file allows publishers to declare who can sell ads on their website. It is an initiative created by IAB Tech Lab, a non-profit focused on improving digital advertising standards.

The initiative is supported by Google’s advertising platforms like Google Adsense, Doubleclick, and Ad Exchange. It is also supported by many other leading digital advertising platforms.

Why is Ads.txt file important?

Ad fraud cost millions of dollars in damages to online advertisers and publishers each year. People with malicious intent continuously try to trick ad platforms with domain spoofing, fake clicks, fake impressions, and more.

Ads.txt file improves transparency in online advertisement by allowing publishers to declare who can sell their ad inventory. Here is how it works:

If you are an advertiser and someone tells you that they can display your ad on a particular website, then you can go and checkout that website’s ads.txt file. It will show you if the company you are dealing with has the permission to sell advertising space on that particular website or not.

Since this data is publicly available, it can be crawled, stored, and searched by advertisers, publishers, and resellers.

If you are displaying ads on your website using Google Adsense, DoubleClick, or Ad Exchange, then adding Ads.txt file is recommended.

Many other advertising platform and software also support or require ads.txt file to be declared.

How to Create and Manage Ads.txt Files in WordPress?

First thing you need to do is install and activate the Ads.txt Manager plugin. For more details, see our step by step guide on how to install a WordPress plugin.

Upon activation, you need to visit the Settings » Ads.txt page to configure plugin settings.

Ads.txt manager settings

The plugin provides a simple text area where you can add lines to declare each individual platform or reseller. For example, you can add the following line to declare Google Adsense.

google.com, pub-0000000000000000, DIRECT, f08c47fec0942fa0

Don’t forget to replace pub-0000000000000000 with your own publisher ID.

As you can see, this line has four fields separated by comma. The first field is the domain of the company allowed to sell or resell your ad inventory. After that it has your publisher ID which corresponds to your account ID in the advertising platform.

The third field declares relationship type DIRECT or RESELLER. The last field is optional, and it represents an ID of the advertising platform. For all Google advertising programs, you’ll use the same unique ID.

Troubleshooting Earnings at risk Error in Adsense

A missing declaration in your ads.txt file may result in the following warning message in your Google Adsense account.

Earnings at risk – One or more of your ads.txt files doesn’t contain your AdSense publisher ID. Fix this now to avoid severe impact to your revenue.

This message indicates that your ads.txt file doesn’t have your publisher ID. To fix this message, simply go to Settings » Ads.txt page to make sure that you have correct publisher ID in plugin settings.

Note: Since ads.txt file is supposed to be in the root directory of a domain name, this plugin currently only works for root level domain like example.com. It does not work for WordPress installed in subdomain, subdirectory, or a single site in a multi-site network.

We hope this article helped you learn how to create and manage ads.txt file in WordPress. You may also want to see our guide on legit ways to make money online blogging with WordPress.

If you liked this article, then please subscribe to our YouTube Channel for WordPress video tutorials. You can also find us on Twitter and Facebook.

The post How to Create and Manage Ads.txt files in WordPress appeared first on WPBeginner.