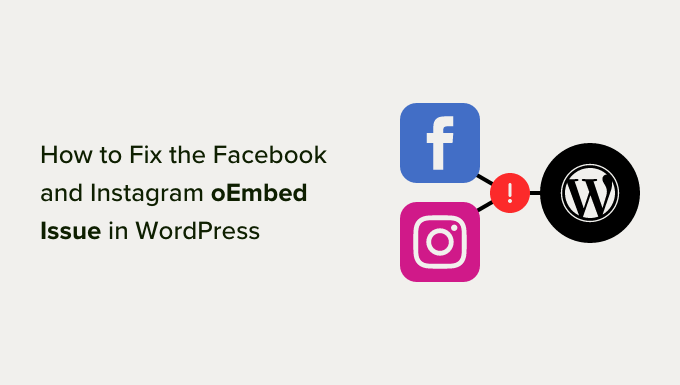
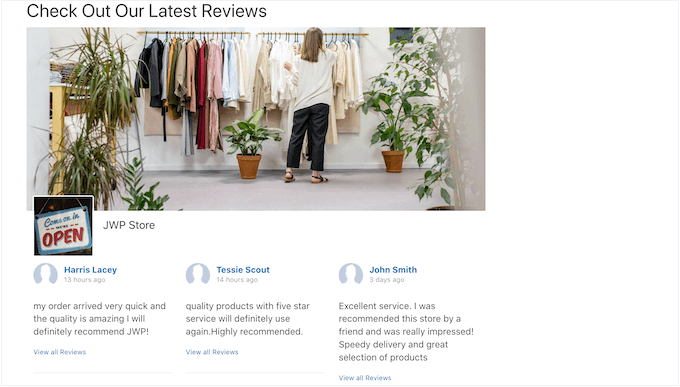
Do you want to learn how to fix the Facebook and Instagram oEmbed issue in WordPress?
If you’ve previously added Facebook or Instagram content to WordPress using the default oEmbed or Embed block, then this feature no longer works. This can cause errors and missing content on your WordPress website.
In this guide, we’ll show you how to fix the Facebook and Instagram embed issue, so visitors can enjoy social content on your WordPress website.
What is the Facebook and Instagram oEmbed Issue in WordPress?
In the past, you could easily embed Instagram and Facebook posts in WordPress using a protocol known as oEmbed.
However, Facebook changed the way that oEmbed works so you can no longer easily embed videos, pictures, updates, and other content from Facebook or Instagram.
Instead, you now need to register an app and use a client token to get data from the Facebook Graph API, before you can embed Facebook or Instagram content on your WordPress blog.
This would take a lot of time and effort, especially if you want to show lots of different social posts across your website. With that in mind, the people behind WordPress decided to remove the Facebook and Instagram embed feature.
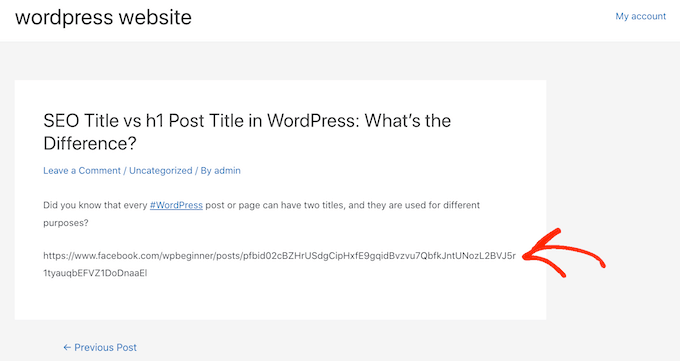
If you previously added any Facebook content to your website using oEmbed, it’ll now look something like the following image.
If you embedded any Instagram posts using oEmbed, then you’ll get a similar error.
This is a bad user experience, and some visitors may assume that your website is broken, no longer maintained, or that you’re not a trustworthy or reliable business.
There are ways to fix the problem manually. For example, you might go through each page and post and delete the embedded content. However, this would take a lot of time and effort, and there’s no guarantee you’ll manage to find every broken embed.
With that being said, let’s see how you can easily fix the Facebook and Instagram oEmbed issue on WordPress.
How to Fix the Facebook & Instagram oEmbed Issue
The easiest way to fix the oEmbed issue is by using one of the free Smash Balloon plugins.
First, you need to install and activate the plugin. For more details, see our step by step guide on how to install a WordPress plugin.
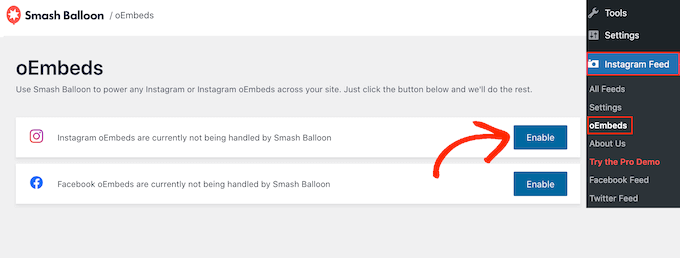
After installing either plugin, simply head over to Instagram Feed » oEmbeds or Facebook Feed » oEmbeds, depending on the plugin you’re using.
We’re using the Social Photo Feed plugin in all our images, but the steps will be exactly the same no matter what plugin you’re using.
On this screen, simply click on the ‘Enable’ button.
That’s it. You can now embed Facebook and Instagram posts on your WordPress website.
How to Embed Instagram or Facebook Posts in WordPress
Whether you’re using Facebook or Instagram, you can embed a specific post in any page, post, or widget-ready area, such as the sidebar.
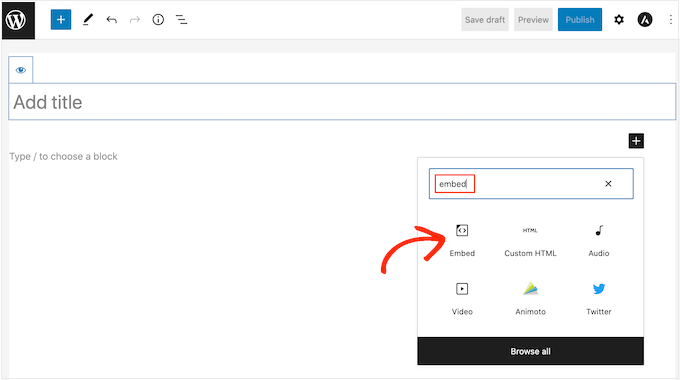
One option is to open the page or post where you want to show the social content. Then, click on the ‘+’ icon and type in ‘Embed.’
When the right block appears, click to add it to the page or post.
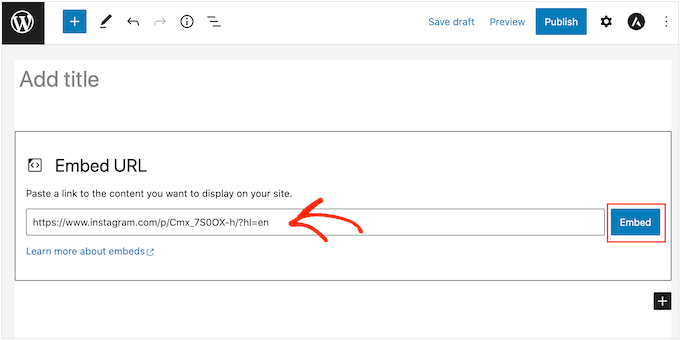
In the ‘Embed’ field, simply paste the URL of the Instagram or Facebook post that you want to show on your website.
Then, click on ‘Embed.’
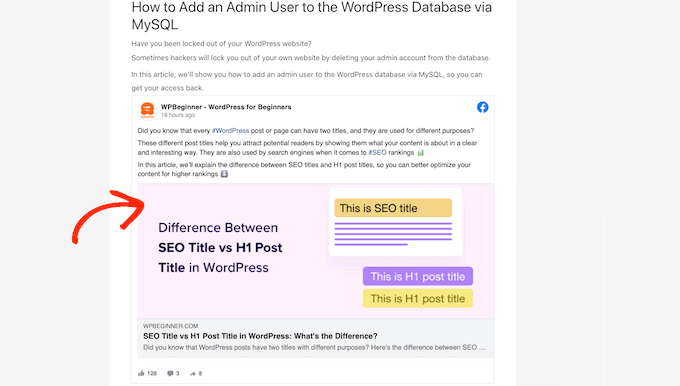
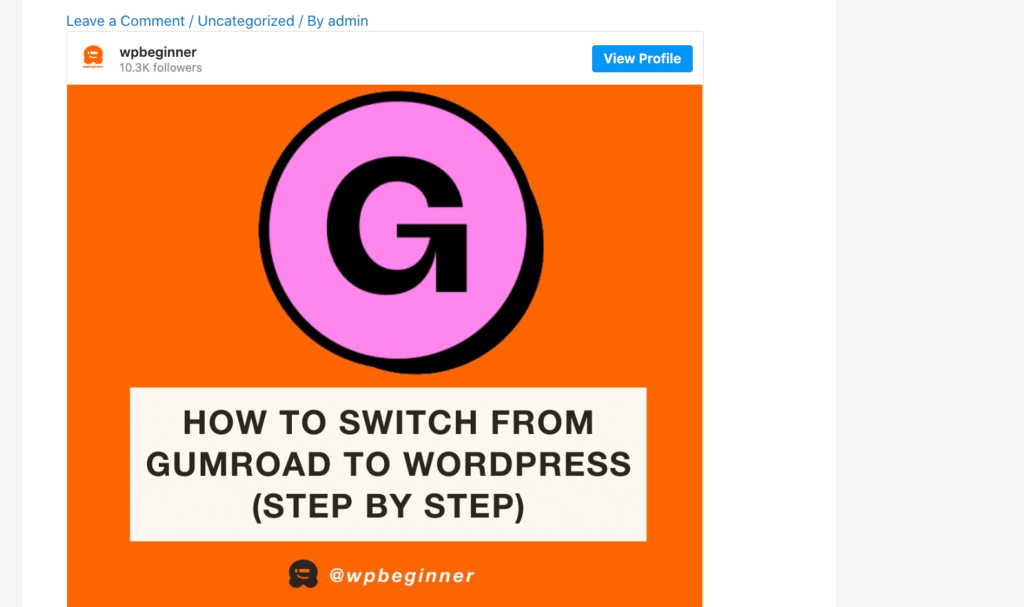
WordPress will now show that specific post. When you’re ready to make the post live, simply click on ‘Update’ or ‘Publish.’
Now when you visit the page, you’ll see the social media post live.
Another option is adding the Instagram or Facebook post to a widget-ready area such as the sidebar. That way, you can promote the same post across every page of your website.
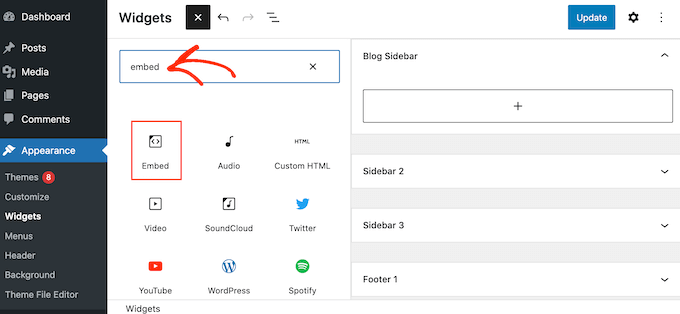
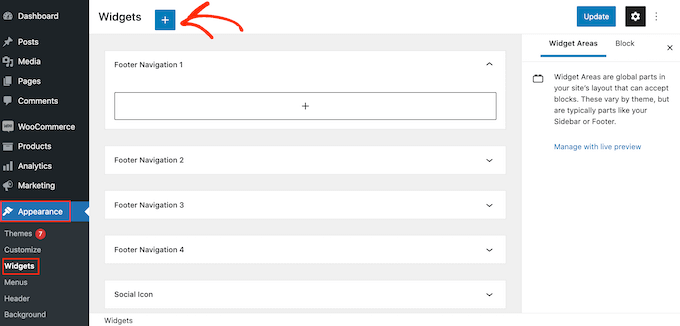
To add a Facebook or Instagram post to a widget-ready area, simply go to Appearance » Widgets and click on the blue ‘+’ button.
In the search bar, type in ‘Embed’ to find the right block.
When the ‘Embed’ block appears, drag it onto the area where you want to show the Facebook or Instagram post.
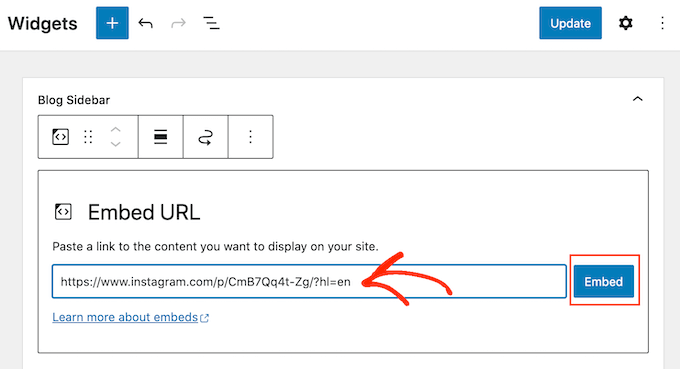
In the ‘Embed’ field, simply paste the URL of the Instagram or Facebook post that you want to show on your website. Then, click on ‘Embed.’
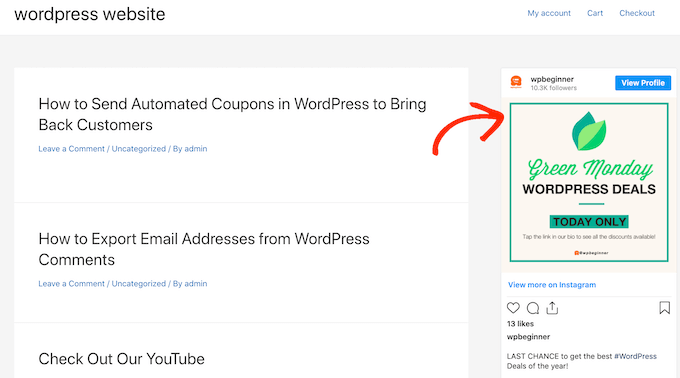
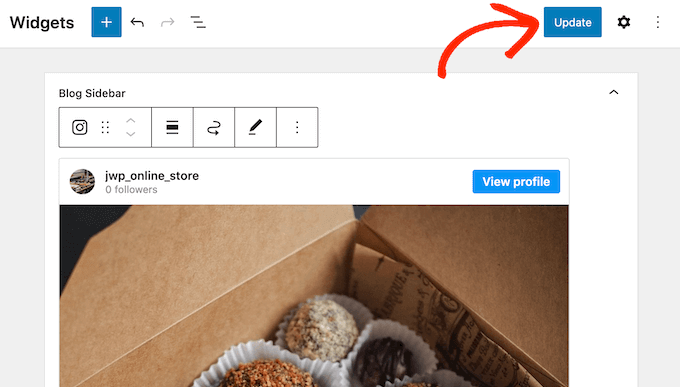
WordPress will now show that specific post.
If you’re happy with how it looks, then click on ‘Update’ to make it live.
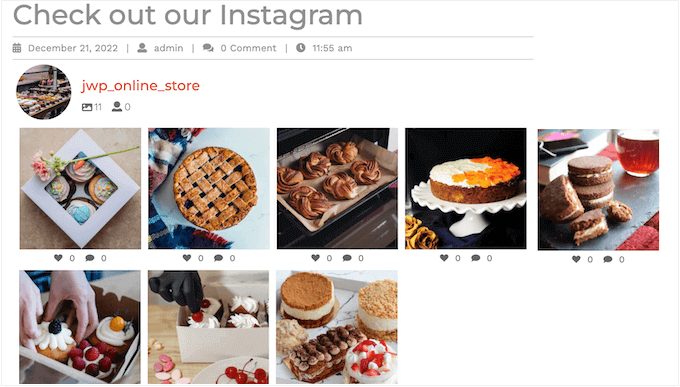
Now, when you visit your website, you’ll see the Instagram or Facebook post live.
How to Add an Instagram or Facebook Feed to WordPress
With the free Smash Balloon plugins, it’s easy to fix the oEmbed issue so you can add Facebook and Instagram posts to your website.
This is great if you only want to embed a small number of posts or you want to control exactly where each social post appears on WordPress. However, you may also want to embed a Facebook or Instagram feed on your website.
By creating a feed, you can show all your latest posts in a nice layout. Even better, the feed will update automatically so visitors will always see the newest posts without you having to update your site manually.
This can keep your site fresh and interesting, even for regular visitors.
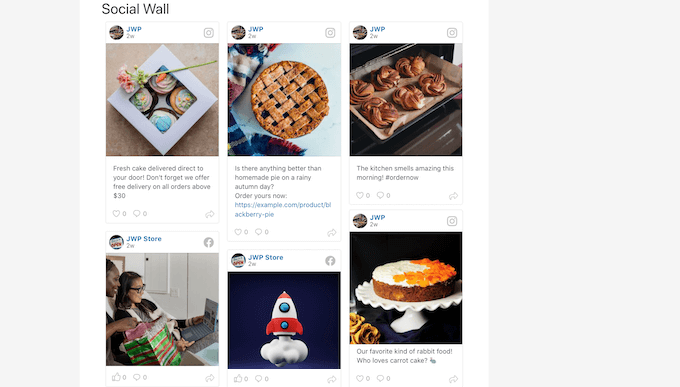
Want to add both Facebook and Instagram feeds to your WordPress website? Then you may want to look at Smash Balloon Social Wall.
This powerful plugin lets you combine any feeds you’ve created using the Smash Balloon plugins, including Facebook, Twitter, YouTube feeds, and more.
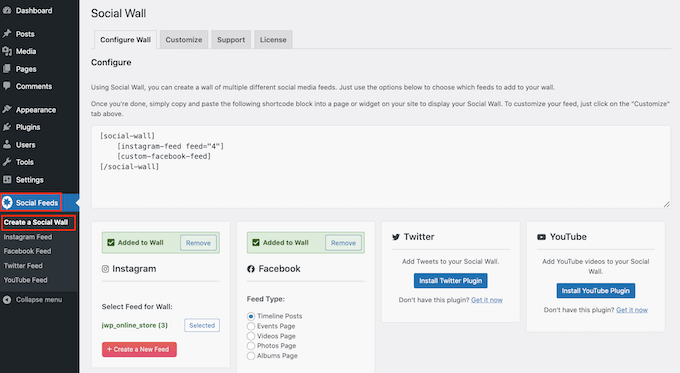
For example, if you’ve set up the Facebook Feed and Instagram Feed plugins, then you can simply go to Social Feeds »Create a Social Wall in your WordPress dashboard.
Here, you’ll see all the different feeds you’ve created so far.
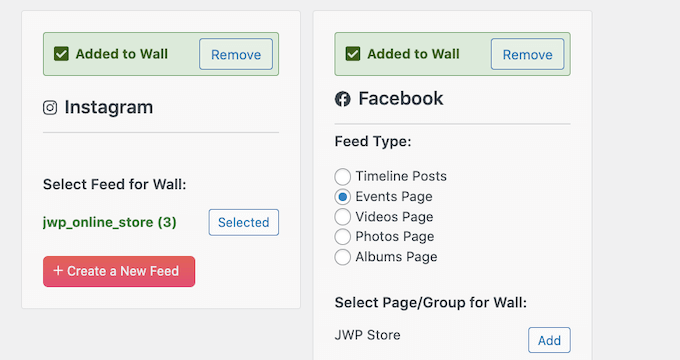
Simply select each feed that you want to add to the social wall.
For example, you can combine posts from your Instagram and Facebook accounts.
Small Balloon Social Wall will then create a shortcode that allows you to add the social wall to any page, post, or widget-ready area.
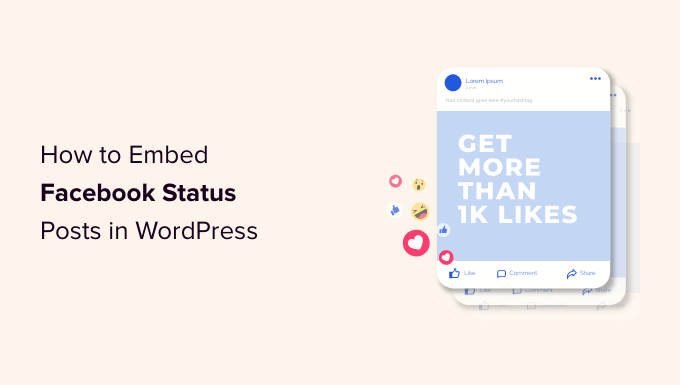
Are you looking for a way to embed Facebook status posts in WordPress?
Facebook statuses are an easy way to share important updates and time-sensitive information with your audience. By embedding your Facebook timeline in WordPress, you can get more engagement, let people know what’s happening on your Facebook page or group, and grow your followers.
In this article, we will show you how to embed Facebook status posts in WordPress.
Why Embed Facebook Status in WordPress?
Facebook is the most popular social media platform in the world and has billions of active users. For website owners, Facebook is a powerful way to connect with a new audience and engage with the people who already know about your brand.
Facebook is also perfect for sharing time-sensitive information in real time. In this way, you can use FOMO to create a sense of urgency.
For example, you might post a status about how visitors are running out of time to enter your giveaway in WordPress, or take advantage of your flash sale.
However, people won’t see your Facebook status if they just visit your website. This makes it difficult to grow your Facebook following and build a relationship with your audience.
By embedding your Facebook status posts in WordPress, you can promote your social media page and encourage more people to follow you on Facebook.
As you post new statuses, they’ll appear on your site automatically, so it’s also a great way to keep your website fresh, even for regular visitors.
That being said, let’s see how to embed Facebook status posts in WordPress.
This plugin lets you display text and links from your Facebook page or group.
In this guide, we’ll be using the free version of Smash Balloon as it allows you to embed Facebook statuses no matter what your budget. However, there’s Smash Balloon Facebook Feed that lets you embed different kinds of content. For example, you can embed a Facebook video in WordPress, and show images and videos in a lightbox popup on your site.
The first thing you need to do is install and activate the Smash Balloon Social Post Feed plugin. For more details, see our guide on how to install a WordPress plugin.
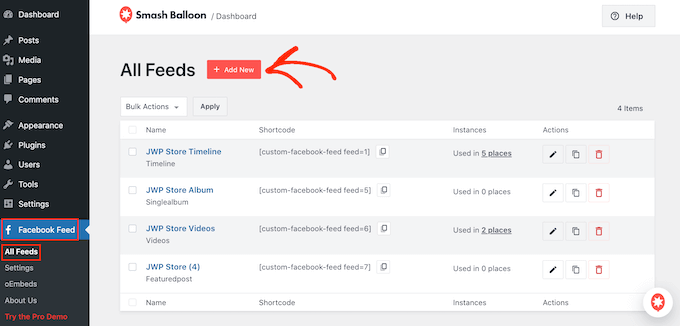
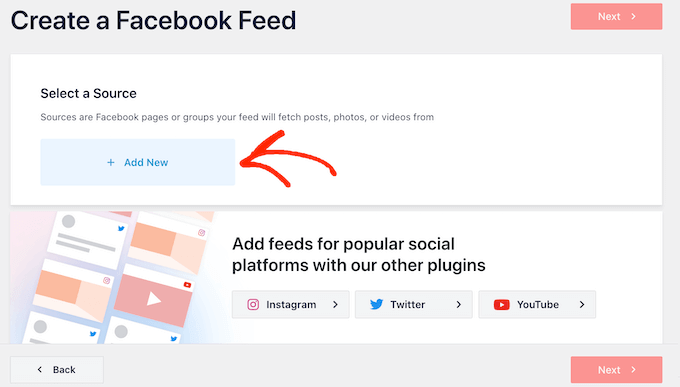
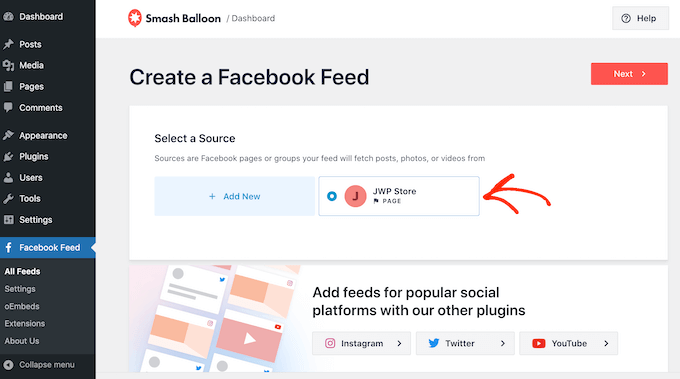
After that, you’ll need to connect Smash Balloon to your Facebook page or group, by going to Facebook Feed » All Feeds. Here, click on ‘Add New.’
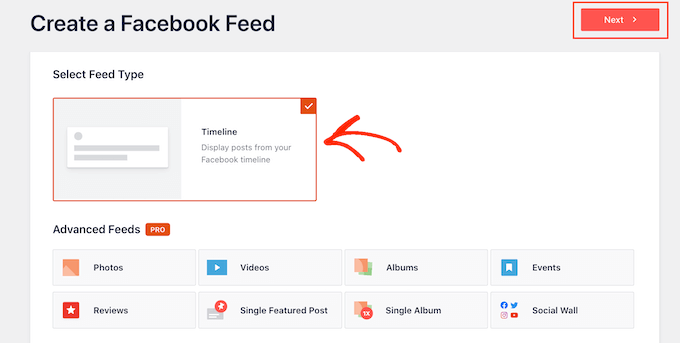
Smash Balloon pro lets you show posts from your photo albums, timeline, events, and more.
However, the free version only allows you to embed your Facebook statuses so click on ‘Timeline’ and then select ‘Next.’
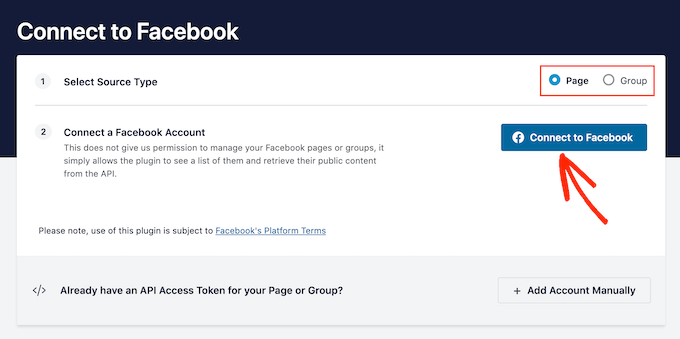
Now, you need to select the page or group which you’ll get the Facebook statuses from.
After that, go ahead and click on ‘Connect to Facebook.’
This opens a popup where you can log into your Facebook account and choose the pages or groups which you want to get the status updates from.
As soon as you’ve done that, click on ‘Next.’
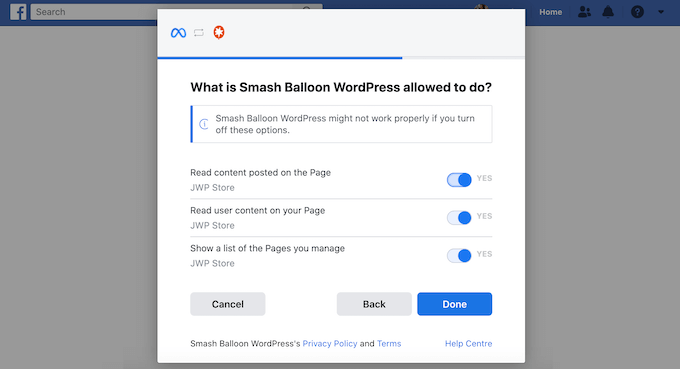
Facebook will then show all the information that Smash Balloon will have access to and the actions it can perform.
To restrict Smash Balloon’s access to your Facebook account, just click any of the switches to turn it from ‘Yes’ to ‘No.’ Just be aware that this may affect the content that you can embed on your WordPress blog or website.
With that in mind, it’s a good idea to leave all the switches enabled.
When you’re happy with how your Facebook permissions are set up, click on ‘Done.’
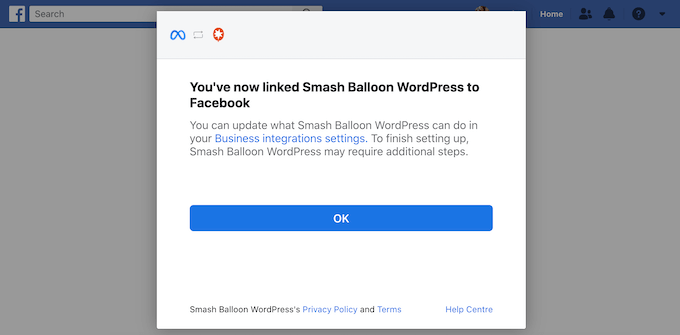
After a few moments, you should see a message confirming that you’ve connected your WordPress website to Facebook. With that done, click on the ‘OK’ button.
Smash Balloon will now take you back to the WordPress dashboard automatically.
How to Embed Facebook Status Posts in WordPress
You will now see a popup with the source you just linked to your website. Simply select the radio button next to your Facebook page or group and then click on the ‘Add’ button.
If you accidentally closed the popup, then don’t worry. You can simply refresh the tab to reopen the popup.
After that, Smash Balloon will take you back to the Facebook Feed » All Feeds page automatically. Just like before, click on the ‘Add New’ button, select ‘Timeline,’ and then click on the ‘Next’ button.
Now, select your Facebook page or group, and click on ‘Next.’
Smash Balloon will now go ahead and create a timeline feed from the Facebook page or group you’ve chosen.
This is a good start, but Smash Balloon has lots of settings that you can use to customize your embedded timeline.
How to Customize Your Embedded Facebook Status Posts
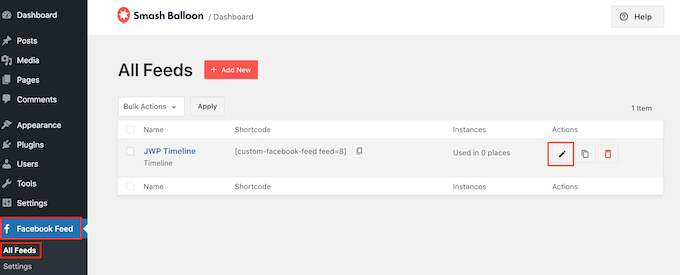
To fine-tune your timeline, go to Facebook Feed » All Feeds in the WordPress dashboard.
Here, find the timeline feed you just created and click on the ‘Edit’ button next to it.
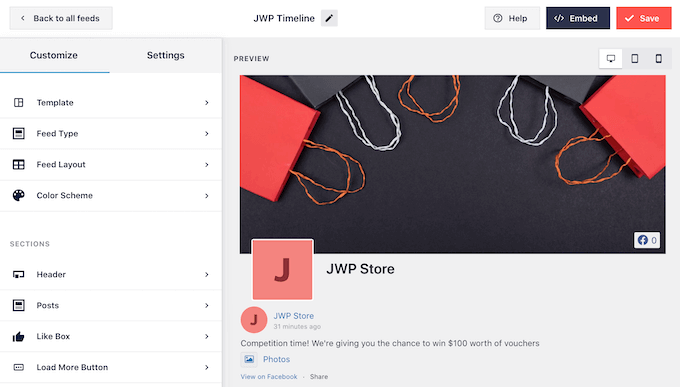
This opens the Smash Balloon feed editor, which shows a preview of your timeline to the right.
On the left-hand side, you’ll see all the different settings you can use to customize how the timeline looks on your site. Most of these settings are self-explanatory, but we’ll quickly cover all the main areas.
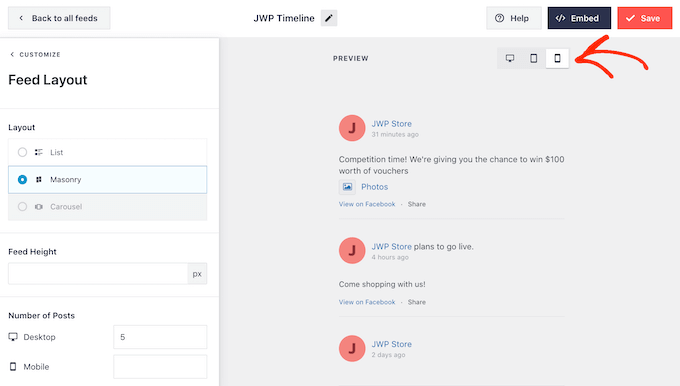
To start, you can change how the statuses are displayed by clicking on ‘Feed Layout.’
On this screen, you can switch between list and masonry layouts, as well as change the feed height. As you make changes, the preview will update automatically so you can try different settings to see what looks the best for your website.
You can preview how your status feed will look on desktop computers, tablets, and smartphones using the row of buttons in the upper-right corner.
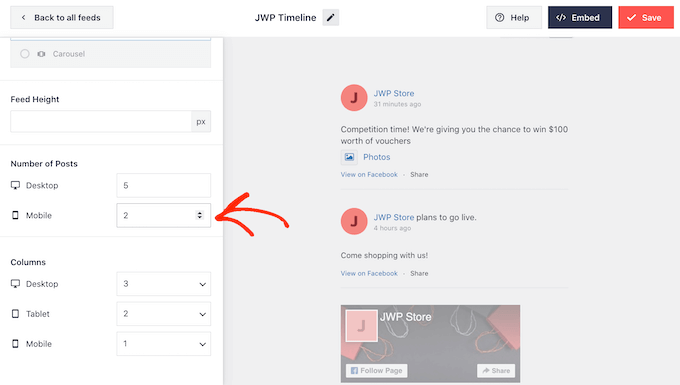
Mobile devices usually have smaller screens and less processing power, so if you’re not happy with how the feed looks then it’s smart to show fewer statuses on tablets and smartphones.
To make this change, just type a different number into the ‘Mobile’ field in the ‘Number of Posts’ section.
By trying out different layouts you can create a Facebook status feed that looks great across all devices.
By default, Smash Balloon feed shows fewer columns on smartphones and tablets, compared to desktop computers. This helps your Facebook statuses fit comfortably on smaller screens.
By default, Smash Balloon adds a header to your feed, which is your Facebook profile picture and the name of the group or page.
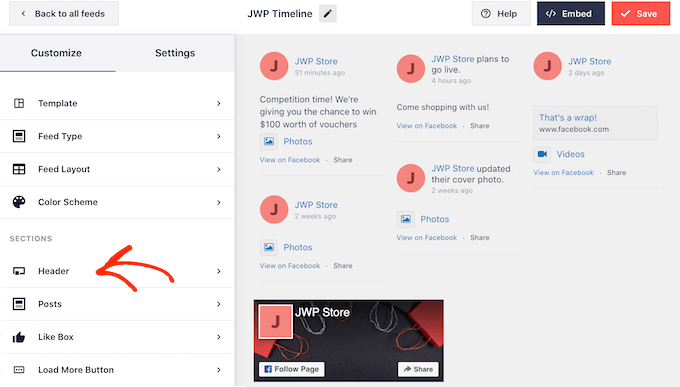
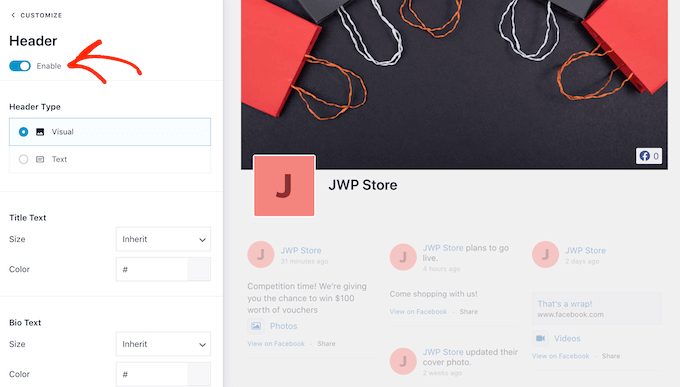
To customize this section, click on ‘Header’ in the left-hand menu.
Here, you can change the header size and color, hide your Facebook profile picture, and more.
If you would prefer to remove the header entirely, then click to turn off the ‘Enable’ toggle.
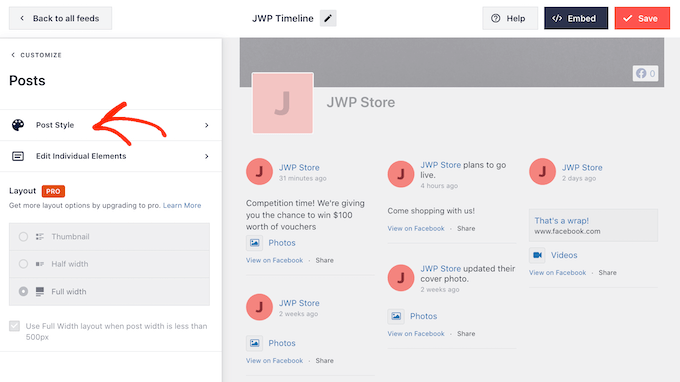
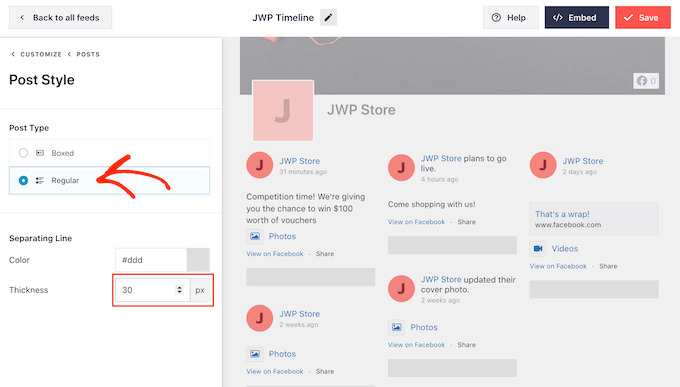
Next, you can change how the individual posts look inside your feed by selecting ‘Post Style’ from the left-hand menu.
After that, click on ‘Post Style’ again.
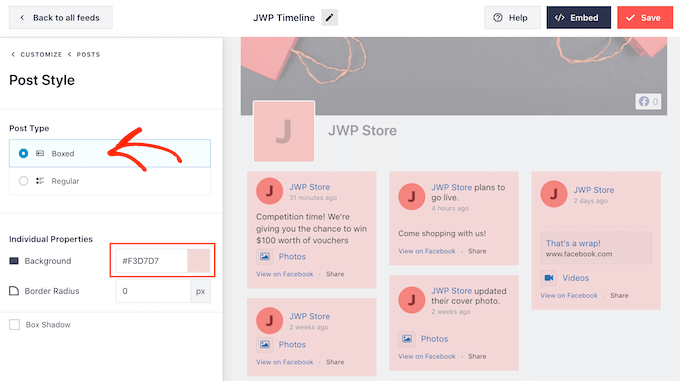
On this screen, you can choose between a regular and boxed layout.
If you select ‘Boxed’ then you can create a colored background for each Facebook post.
If you choose ‘Regular’ then you can change the thickness and color of the line that separates your different social media posts.
In the following image, we’ve added a thicker line to our Facebook status feed.
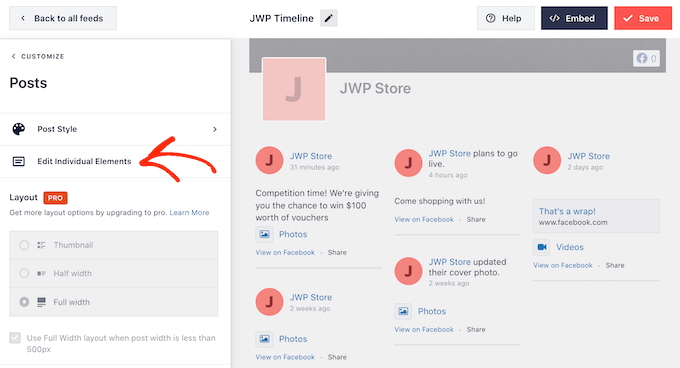
You can also customize the individual parts within each status by going back to the main settings screen.
Once again, select ‘Post Style’ but this time choose ‘Edit Individual Elements’ instead.
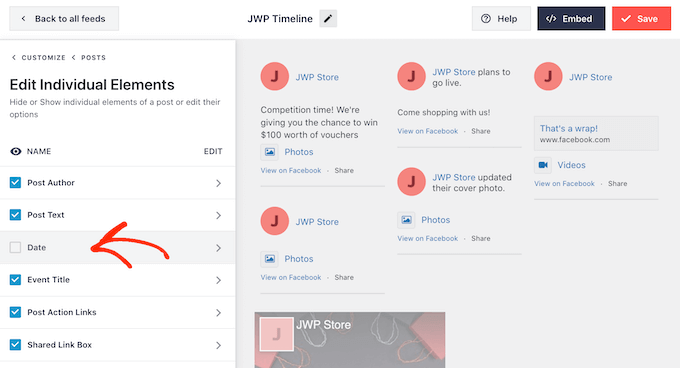
You will now see a list of all the different content that Smash Balloon includes in each post, such as the date, post author, and event title.
To remove a piece of content from your feed, simply click to uncheck its box.
You can also customize how each type of content looks by clicking on it.
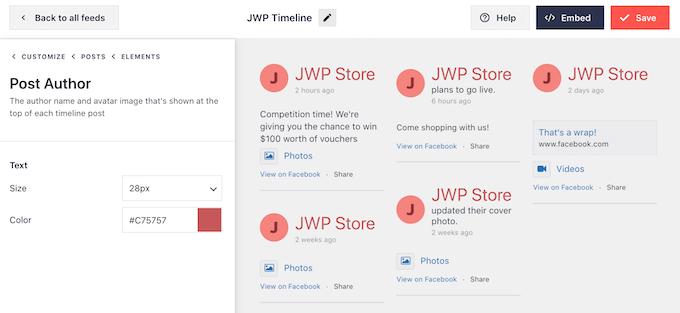
For example, in the following image, you can see settings to change the size and color of the author text.
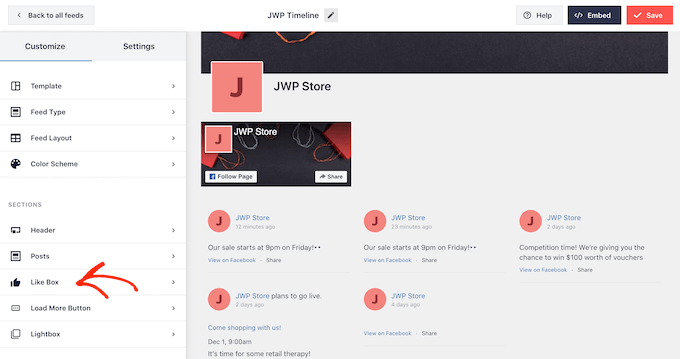
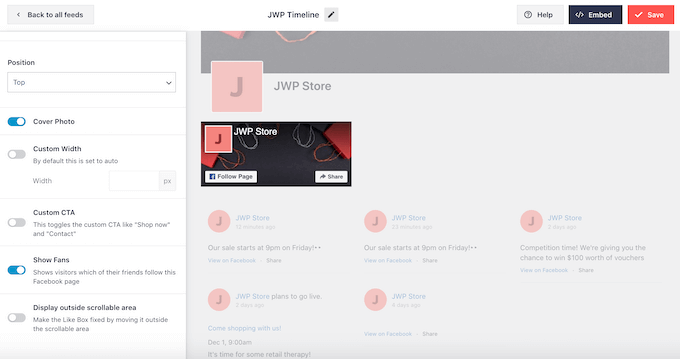
By default, Smash Balloon doesn’t include the Facebook ‘like’ button in your feed.
This button makes it easier for visitors to follow you on Facebook, so you may want to add it to your status feed by selecting the ‘Like Box’ settings.
After that, simply click on the ‘Enable’ button so that it turns blue.
You can now use the settings to change where the link box appears and the kind of content included in the box, such as your Facebook cover photo and total number of followers.
If you upgrade to Smash Balloon premium, then there are some more settings to explore. This includes a lightbox feature that allows visitors to explore your content in a popup.
Since you’re using the free version of Smash Balloon for now, you can go ahead and click on ‘Save’ to store your changes.
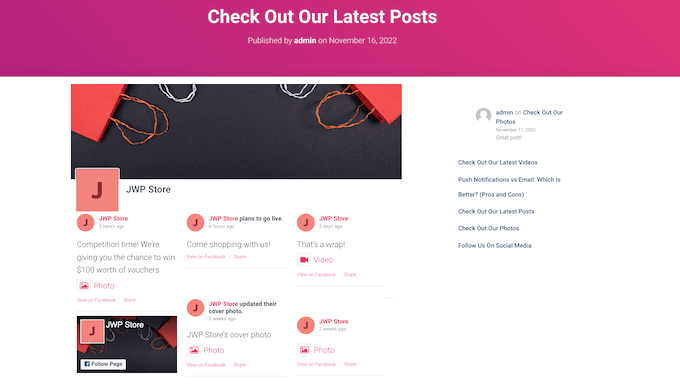
The next step is adding the Facebook status feed to your WordPress website.
How to Embed Facebook Status Posts in WordPress
You can add your Facebook status feed to WordPress using a block, widget, or shortcode.
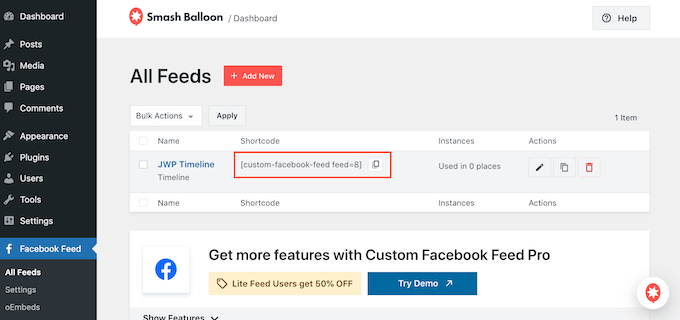
If you’ve created more than one feed using Smash Balloon, then you’ll need to know the feed’s code if you’re going to add it using a block or widget.
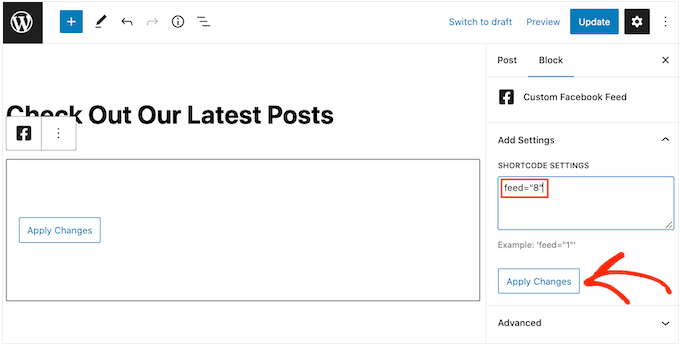
To get this information, simply go to Facebook Feed »All Feeds and then look at the feed="" part of the shortcode. You’ll need to add this code to the block or widget, so make a note of it.
In the following example, we’ll need to use feed="8".
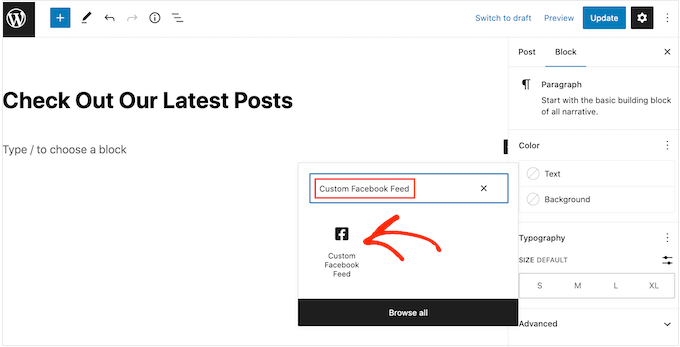
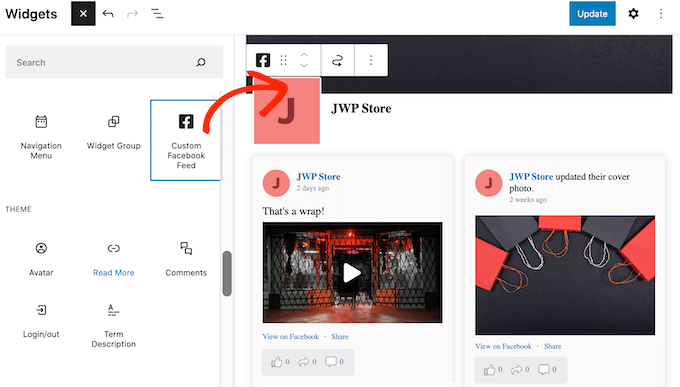
If you want to embed your Facebook statuses in a page or post, then we recommend using the ‘Custom Facebook Feed’ block.
Simply open the page or post where you want to embed the status feed. Then, click on the ‘+’ icon to add a new block and start typing ‘Custom Facebook Feed.’
When the right block appears, click to add it to the post or page.
The block will show one of your Smash Balloon feeds by default. If you want to use a different feed instead, then simply find ‘Shortcode Settings’ in the right-hand menu.
You can now add the feed="" code to this box. Once you’ve done that, click on the ‘Apply Changes’ button.
The block will now show all the status updates from your Facebook page or group. Just publish or update the page to make the feed live.
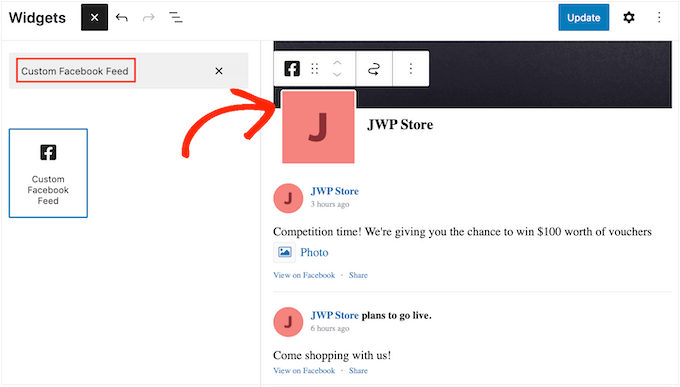
Another option is to add the feed to any widget-ready area, such as the sidebar or similar section. This allows visitors to see your latest Facebook updates across your entire website.
Simply go to Appearance » Widgets in the WordPress dashboard and then click on the blue ‘+’ button.
Now, start typing ‘Custom Facebook Feed’ into the search bar to find the right widget.
You can now drag it onto the area where you want to show your Facebook status updates. By default, the widget will show one of the feeds you created using Smash Balloon.
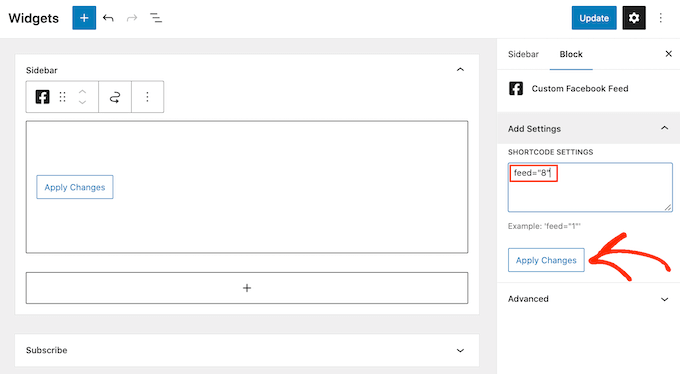
To show a different feed instead, type the feed’s code into the ‘Shortcode Settings’ box and then click on ‘Apply Changes.’
You can now click on the ‘Update’ button to make the widget live.
Finally, you can embed your status on any page, post, or widget-ready area using a shortcode. To get the shortcode, simply go to Facebook Feed »All Feeds and copy the value in the ‘Shortcode’ column.
Hey, WordPress fans. We are checking in with your latest dose of weekly WordPress news. This week, it was a bit quiet, though. There’s a new Slack channel for full-time sponsored WordPress contributors, which generated some debate on Twitter and at WP Tavern. Beyond that, there were some vulnerabilities in some popular WordPress plugins – [...]
Did your WordPress site’s Facebook or Instagram embeds stop working suddenly on October 24? Don’t worry, you’re not alone, and there’s nothing wrong with your site. Instead, Facebook recently made a big change to its API that breaks pretty much all Facebook embeds (and Instagram embeds, for that matter). Before, you used to be able ... Read more
Hey, WordPress fans. This week, there was another big acquisition in the WooCommerce space. GoDaddy acquired SkyVerge, the company behind over 60 different WooCommerce add-ons. Most notably, WooCommerce Memberships and Jilt, an email marketing solution for eCommerce. GoDaddy has been really pushing its WooCommerce plans, so there will likely be some good synergy here. As ... Read more Weekly WordPress News: GoDaddy Acquires SkyVerge
Formerly known as Tweet Old Post, the free Revive Old Posts plugin from Revive.Social is an excellent tool to help you maximize the value of your older blog content, giving those long-forgotten posts a new lease of life and turning them into a whole new source of traffic for your website. In this guide, we’ll ... Read more Drive Traffic to Older Blog Content for Free with the Revive Old Post Plugin
One of the beautiful things about the Internet is how it enables users from all across the world to engage and enter a dialogue on your site. To get people talking, though, you need a space where users can interact. By default, WordPress offers this space in the comments section. It’s barebones, but it works. ... Read moreWordPress Comments Plugins that make Your Comments Section Awesome
Ae you looking for the best Facebook plugins for WordPress? Facebook is the world’s largest social media platform with more than 1 billion active users. In this article, we have hand-picked the best WordPress Facebook plugins to help you grow your blog and get more traffic.
Shared Counts is one of the best social media plugins for WordPress. It allows you to easily add social sharing buttons to your WordPress posts including the Facebook share button.
It is highly optimized for speed and performance and can accurately show shares count for Facebook, Twitter, LinkedIn, and more. It comes with multiple button styles which allows you to choose the one that looks best on your site.
Custom Facebook Feed allows you to display your posts from a Facebook page on your WordPress website. This custom Facebook feed is responsive, SEO friendly, and customizable. You can even fetch multiple feeds from different Facebook pages and display them anywhere on your website using a shortcode.
You can create a new page for your Facebook feed or display it in your blog’s sidebar. The plugin is optimized for speed and makes it super easy to change colors / style of your feeds from the WordPress admin area. For detailed instructions, see our article on how to create a custom Facebook feed in WordPress.
Pixel Cat Facebook Pixel plugin allows you to add your Facebook retargeting pixel to your WordPress site. This pixel allows you to show customized ads to Facebook users who have visited your website. To learn more, see our article on how to install Facebook retargeting pixel in WordPress.
Aside from making it easy to install the Facebook pixel in WordPress, this plugin also helps you track WooCommerce customers and show them better ads in their Facebook feeds.
Facebook Reviews plugin allows you to display Facebook page reviews on your WordPress website. It comes with an easy to use widget that allows you to connect your website to your Facebook page and display Facebook users reviews.
This helps you add social proof to your website and build trust in your brand. The free version works fine, but you will need the pro version to display reviews in Schema.org rich snippets format.
Facebook Widget plugin allows you to easily add a Facebook page plugin to your blog’s sidebar. It is extremely easy to use and comes with a shortcode that you can use to display the Facebook Like box anywhere on your website.
It comes with the same customization options as the default Facebook page plugin. You can show or hide profile pics, page cover, customize width / height, and select language.
It works seamlessly with the default WordPress login and registration forms, so users have the option to use Facebook or use the default signup method. Once registered, users can disconnect their social account at any time by visiting their user profile page inside the admin area.
As the name suggests, AccessPress Facebook Auto post allows you to automatically share new articles on your Facebook page or profile. Upon activation, you will need to connect to your profile and authorize your website.
It allows you to choose which content you want to share: posts, pages, and custom post types. You can even disable sharing for a single item before publishing it. For detailed setup instructions, see our article on how to automatically post to Facebook from WordPress.
You can also use it to add a Facebook like or share button. The plugin comes with a handy shortcode that you can use to embed different items anywhere on your site. It also comes with really good documentation to help you make the most out of it.
Yoast SEO is the complete WordPress SEO plugin on the market. Apart from adding SEO meta tags, it does so many other things to improve your website including social features.
You can use it to fix incorrect Facebook thumbnail issue and automatically add Facebook Open Graph meta tags to every page on your website. You can also let search engines discover social media profiles associated with your website.
That’s all, we hope this article helped you discover the best WordPress Facebook plugins to grow your blog. You may also want to see these actionable tips to drive traffic to your WordPress site.
If you liked this article, then please subscribe to our YouTube Channel for WordPress video tutorials. You can also find us on Twitter and Facebook.
Do you want to embed a Facebook video in WordPress?
The videos that you post to Facebook also make great content for your website. By embedding a Facebook video feed, you can keep your site fresh and interesting while also growing your Facebook following.
In this article, we’ll show you an easy way to embed Facebook videos in WordPress.
Why Add Facebook Videos in WordPress?
Videos are a great way to connect with your audience and keep them engaged. This is true no matter whether you’re running a personal blog or a business website.
Creating engaging and entertaining videos takes time and effort so if you’re posting videos to Facebook, then it makes sense to re-use them on your WordPress website.
By linking your website to your Facebook account, any new videos that you post to Facebook will appear on your website automatically. In this way, you can keep your website fresh with very little day-to-day effort.
Embedded videos can even help grow your Facebook page. If website visitors see lots of interesting videos and playlists then they’ll want to follow you on Facebook. This can get you some extra followers and more engagement.
With that being said, let’s see how you can easily embed a Facebook video in WordPress.
Installing a Facebook Video Plugin in WordPress
The easiest way to embed a Facebook video in WordPress is by using the Custom Facebook Feed Pro plugin.
In this guide, we’ll be using the pro version of Smash Balloon as it allows you to embed videos in WordPress including HD, 360o, and Facebook Live videos.
Smash Balloon Pro also lets you show photos in a custom Facebook feed, and display the total number of likes, shares, comments, and reactions below each post. However, if you’re just starting out and have a limited budget, then there’s also a free version you can use.
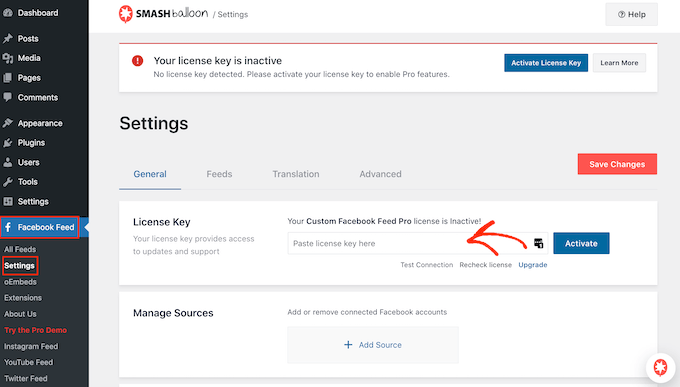
Upon activation, head over to Facebook Feed » Settings and enter your license key into the ‘License Key’ field.
You’ll find this information under your account on the Smash Balloon website.
After entering the key, click on the ‘Activate’ button.
Connect Your Facebook Page or Group to WordPress
Smash Balloon Custom Facebook Feed allows you to embed videos from Facebook pages and groups. You can even show the videos in a lightbox popup so people can watch the full video directly on your WordPress website.
The first step is connecting your Facebook page or group to WordPress, so go to Facebook Feed » All Feeds and then click on ‘Add New.’
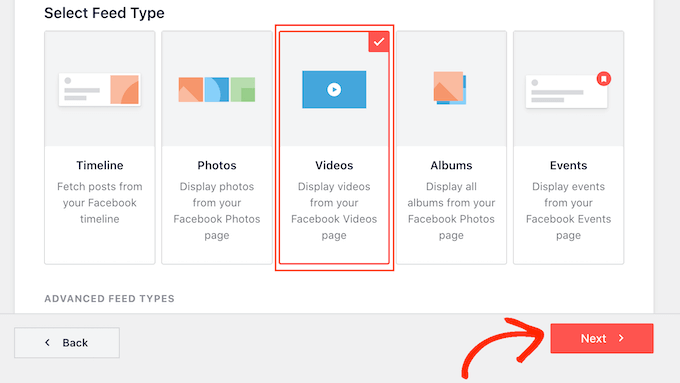
Smash Balloon lets you show posts from your Facebook timeline, photo albums, Facebook statuses, events, and more.
Since we want to embed Facebook videos in WordPress, you’ll need to select ‘Videos’ and then click on ‘Next.’
Now, you need to select the Facebook page or group where you’ll get the videos from.
To do this, click on ‘Add New.’
Next, choose whether you want to show videos from a Facebook page or group.
Once you’ve done that, click on ‘Connect to Facebook.’
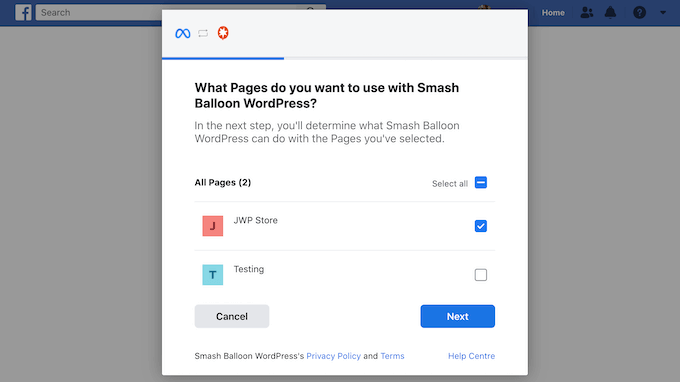
This opens a popup where you can log into your Facebook account and choose the pages or groups that you want to use with Smash Balloon.
After that, click on ‘Next.’
Now, Facebook will show all the information that Smash Balloon will have access to, and the actions it can perform.
To restrict Smash Balloon’s access to your Facebook account, simply click to disable any of the switches.
Just be aware that this may affect the videos that you can embed on your WordPress blog or website so we recommend leaving all the switches enabled.
When you’re happy with how the permissions are set up, click on ‘Done.’
After a few moments, you should see a message confirming that you’ve connected your WordPress website to Facebook.
With that done, you’re ready to click on ‘OK.’
Smash Balloon will now return you to the WordPress dashboard automatically.
How to Embed Facebook Videos in WordPress
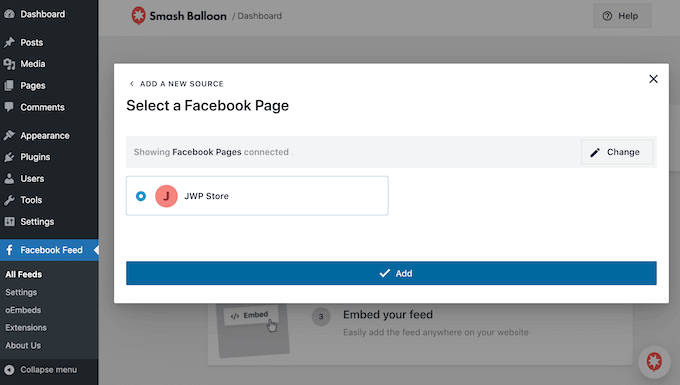
At this point, you’ll see a popup with the Facebook group or page that you just linked to your website. Simply select the radio button next to the page or group you want to use and then click on the ‘Add’ button.
If you accidentally closed the popup, don’t worry. You can simply refresh the page to reopen the popup.
Once you’ve done that, WordPress will take you back to the Facebook Feed » All Feeds page automatically. Just like before, click on ‘Add New,’ select ‘Videos’ and then click on the ‘Next’ button.
Now, select your Facebook page or group, and click on ‘Next.’
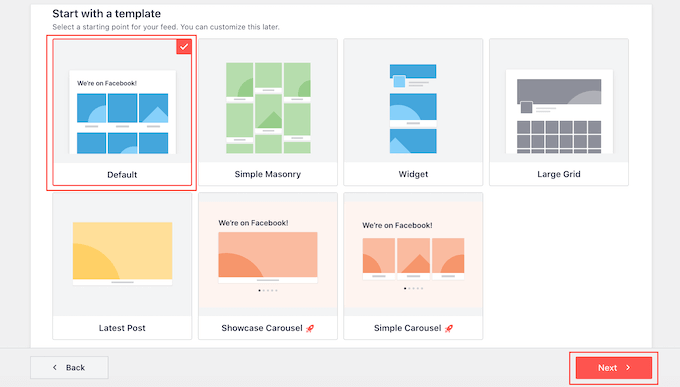
On this screen, you can choose the template that you want to use for the video feed.
All of these templates are fully customizable so you can fine-tune the design depending on how you want to show the Facebook videos on your website.
We’re using the ‘Default’ template, but you can choose any template you want. After making your selection, click on ‘Next.’
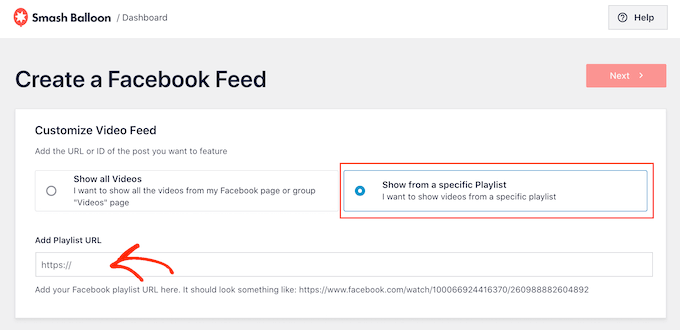
After that, you can choose whether to show all the videos from your Facebook page or group or just the videos from a specific playlist.
If you choose ‘Show from a specific playlist,’ then you’ll need to enter that playlist’s URL.
Once you’ve made a decision, go ahead and click on the ‘Next’ button.
Smash Balloon will now create a feed based on your source and the template you’ve chosen. This is a good start, but you may want to fine-tune how the videos appear on your site.
How to Customize Your Embedded Facebook Videos
The Smash Balloon Custom Facebook Feed plugin gives you lots of ways to customize how the videos appear on your website. That being said, it’s worth taking a look at these settings.
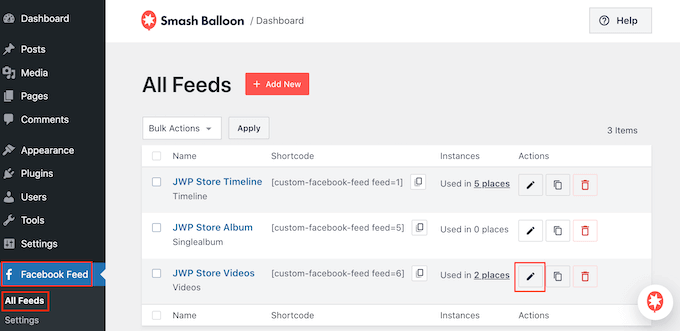
In the WordPress dashboard, go to Facebook Feed » All Feeds. Here, find the video feed you just created and click on the ‘Edit’ button next to it, which looks like a small pencil.
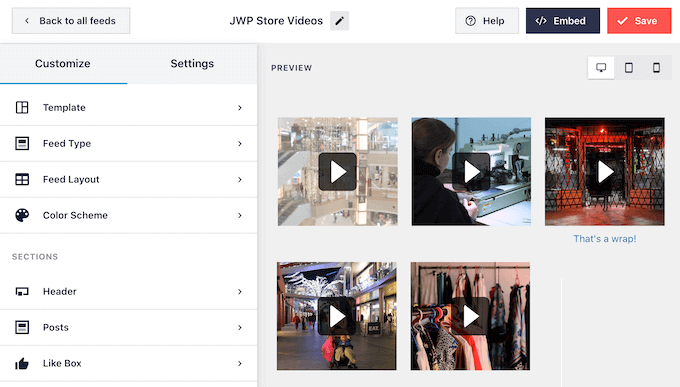
This opens the Smash Balloon feed editor, which shows a preview of your Facebook video feed to the right.
On the left-hand side, you’ll see all the different settings you can use to customize how these videos appear on your WordPress website. Most of these settings are self-explanatory, but we’ll quickly cover the major areas.
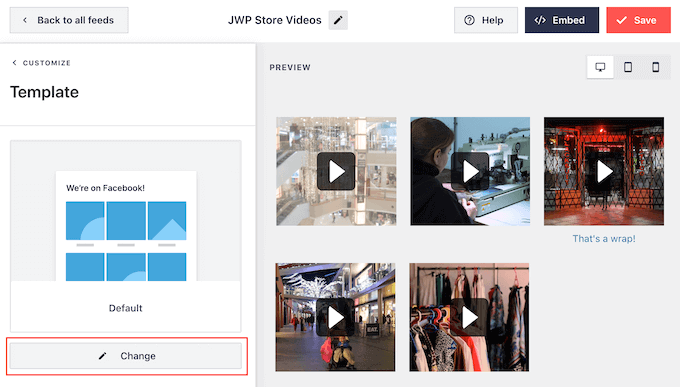
If you want to change the template, then click on ‘Template.’
Then, select the ‘Change’ button.
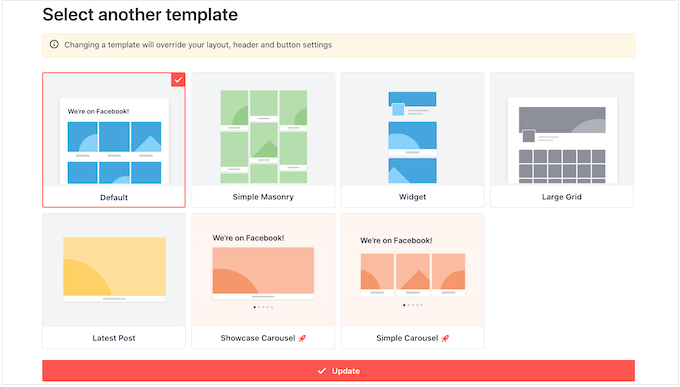
This opens a popup showing all the different templates you can use for your video feed.
Simply select the design you want to use instead, and then click on ‘Update.’
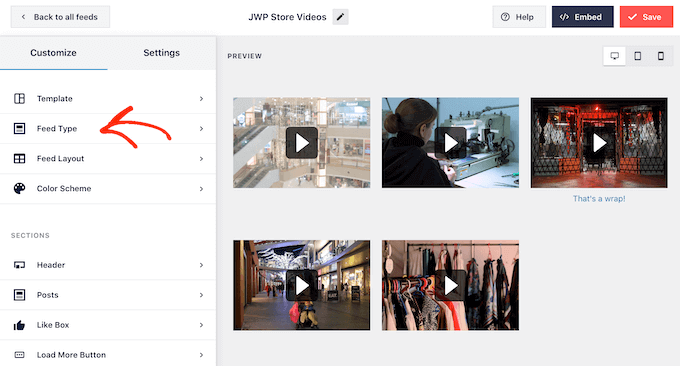
The next setting is ‘Feed Type,’ which allows you to show different content in your feed. For example, you might decide to show photos, albums, or events instead of videos.
Since we want to embed Facebook videos, you’ll typically want to ignore this area.
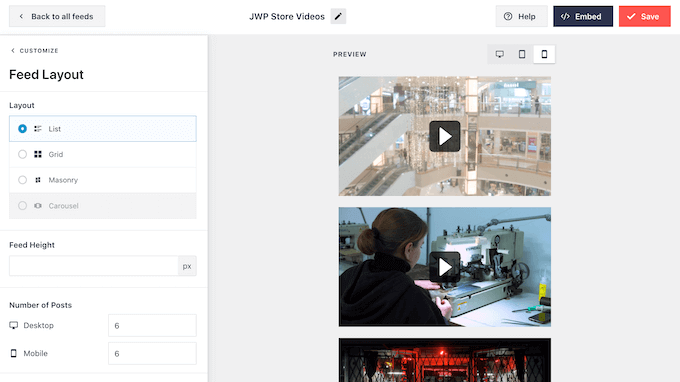
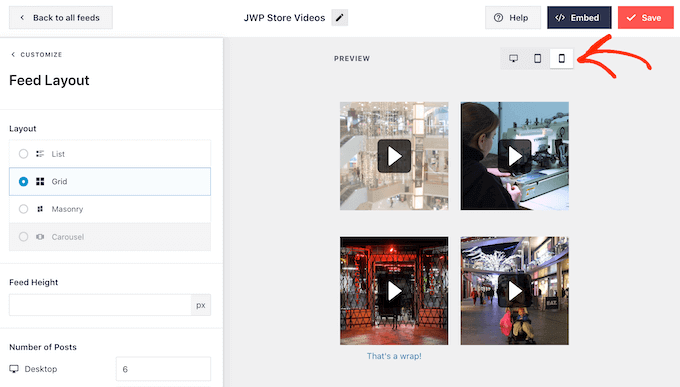
Next, click on ‘Feed Layout.’
Here, you can choose between different layouts, such as masonry and grid, and change the feed height.
As you make changes, the preview will update automatically so you can try different settings to see what looks the best.
By default, Smash Balloon will show the same number of videos on desktop computers and mobile devices such as smartphones.
You can preview how your videos will look on desktop computers, tablets, and smartphones using the row of buttons in the upper-right corner.
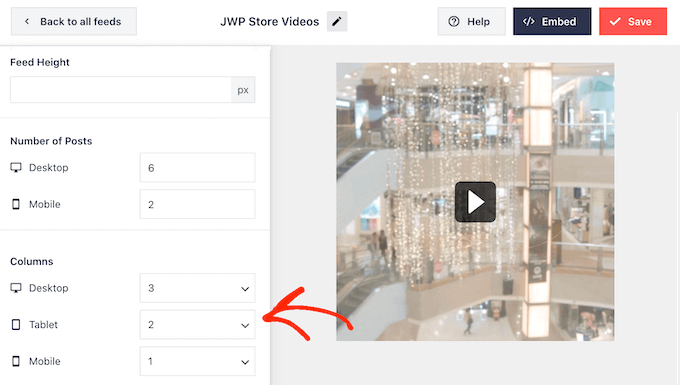
Mobile devices usually have smaller screens and may struggle to process lots of large, high-resolution videos. Visitors may also be using their mobile data rather than free Wi-Fi.
With that being said, you may want to show fewer videos on smartphones and tablets. To do this, simply type a different number into the ‘Mobile’ field under ‘Number of Posts.’
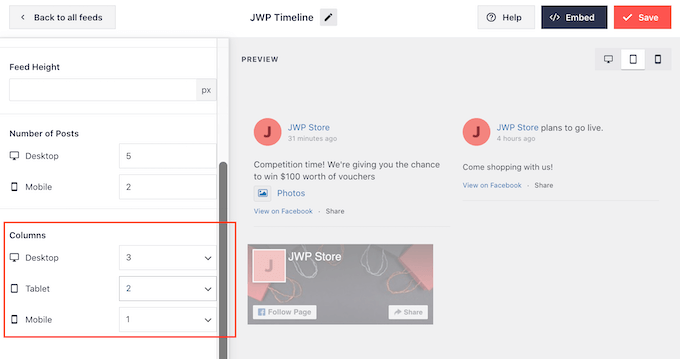
By default, the Facebook feed shows fewer columns on smartphones and tablets, compared to desktop computers. This helps all your videos fit comfortably on smaller screens.
You can change the number of columns that Smash Balloon uses on tablets, mobiles, and desktop computers using the ‘Columns’ settings.
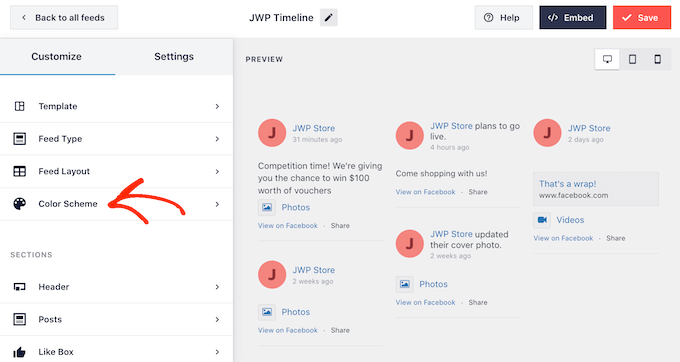
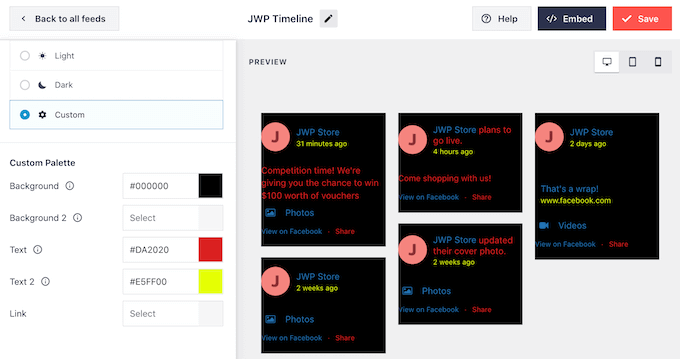
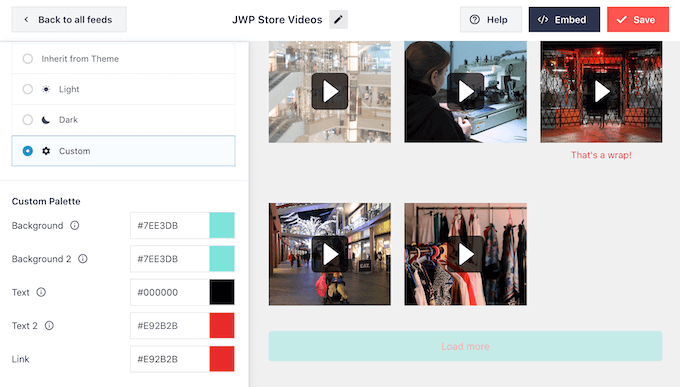
The next settings page is ‘Color Scheme.’
Smash Balloon uses the colors inherited from your WordPress theme by default, but on this screen, you can switch to a ‘Light’ or ‘Dark’ color scheme instead.
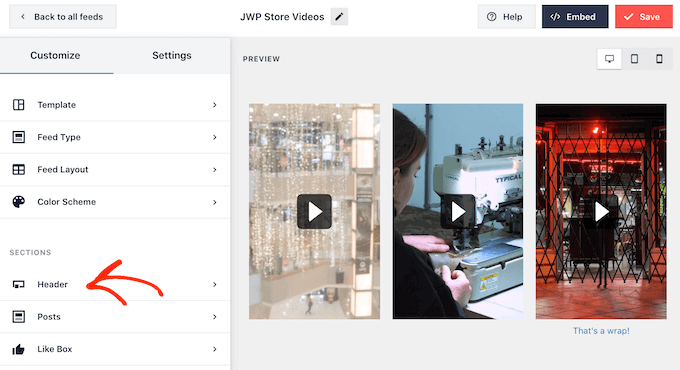
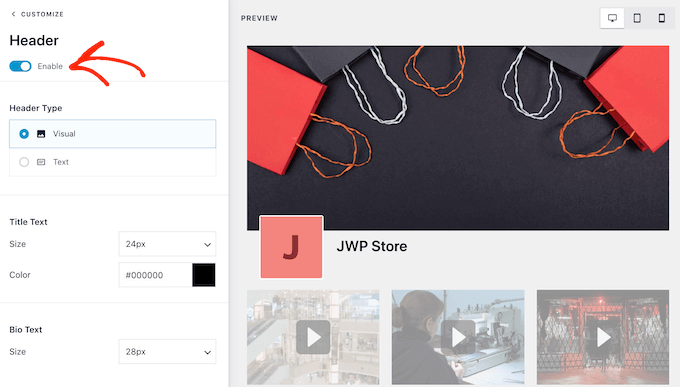
Smash Balloon can add a header to your feed, which is your Facebook profile picture and the name of the page or group. This lets visitors know where the embedded videos come from, and where they can find this content on Facebook.
To add this section, click on ‘Header’ in the left-hand menu.
You can then click on the ‘Enable’ toggle.
After adding a header you can change how this area looks, including hiding or adding your Facebook profile picture, changing the size of the bio text, and more.
If you want to remove the header completely, then click to turn off the ‘Enable’ toggle.
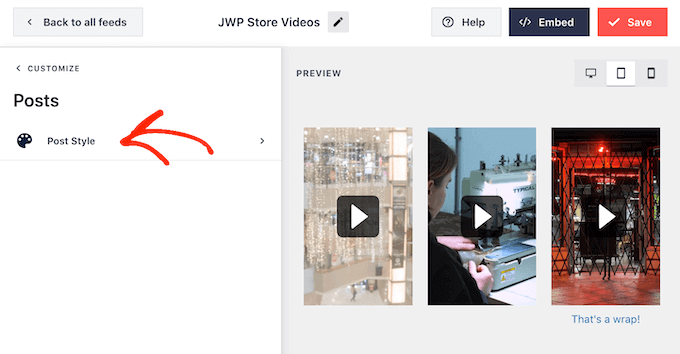
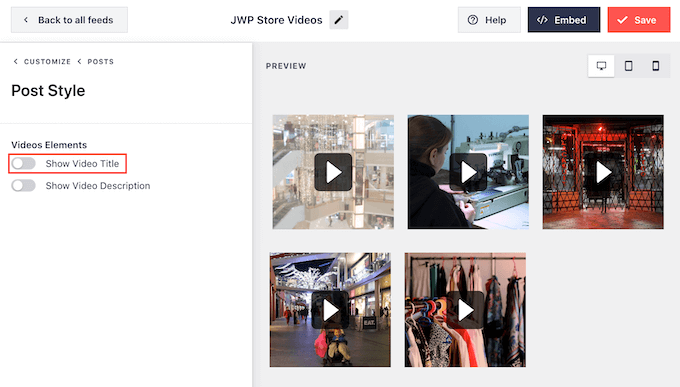
By default, Smash Balloon shows the title of each video. If you want to hide the title, then select ‘Posts’ from the main Smash Balloon editor menu.
Then, go ahead and click on ‘Post Style.’
On this screen, you can hide the video titles by clicking on the ‘Show Video Title’ slider.
This can be useful if you haven’t added titles to all your videos, or your titles don’t make sense outside of Facebook.
On this screen, you can also hide or show the video descriptions. For example, you may use these descriptions to provide extra information about the video.
To add the description, simply click to enable the ‘Show Video Description’ switch.
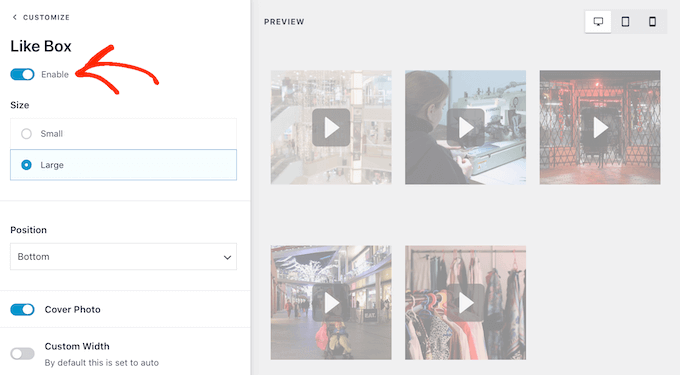
By default, Smash Balloon doesn’t add the Facebook ‘like’ button to your video feed. If visitors like your embedded videos then they may want to follow you on Facebook.
With that being said, you may want to add a ‘like’ button to the feed, by selecting ‘Like Box’ from the editor’s left-hand menu.
After that, simply click on the ‘Enable’ button so that it turns blue.
Smash Balloon adds this button below your video feed, but you can change this by opening the ‘Position’ dropdown and choosing ‘Top.’
On this screen, you can also change how the ‘like’ section looks including changing its width, showing how many people follow you on Facebook, adding a custom call to action, and more.
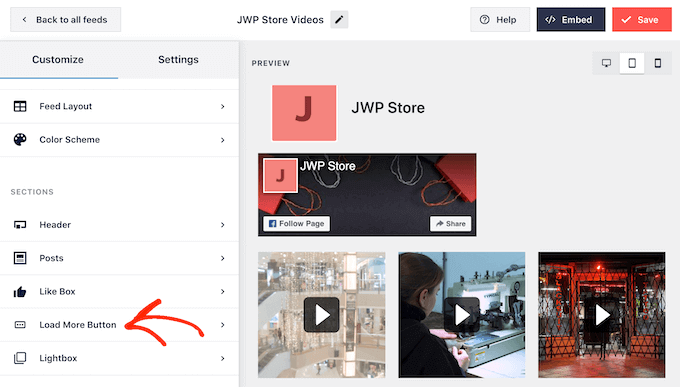
When you’re happy with how the button looks, you can move on to the next settings page by selecting ‘Load More Button.’
The Load More button encourages visitors to scroll through more of your video feed, so Smash Balloon adds it to your embedded Facebook feed by default.
Since it’s such an important button, you may want to customize this button by changing its background color, hover state, label, and more.
Another option is to remove the button completely, by clicking the ‘Enable’ toggle. For example, you might remove this button and then encourage visitors to check out your Facebook page in order to see more of your videos.
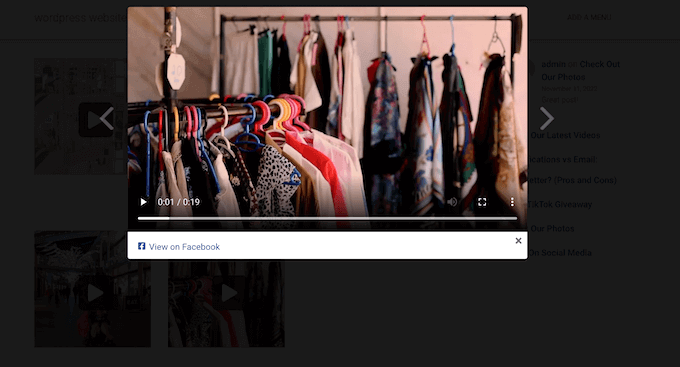
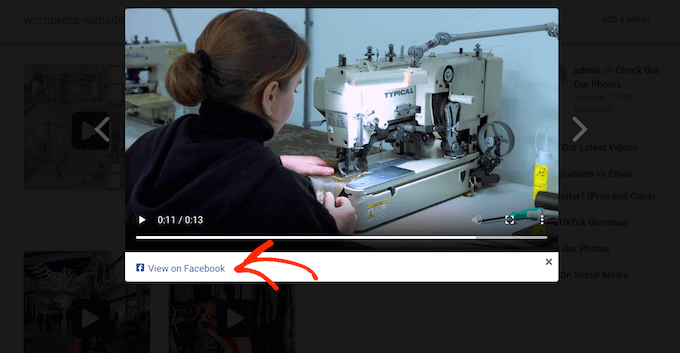
By default, Smash Balloon allows visitors to watch your Facebook videos without leaving your WordPress website.
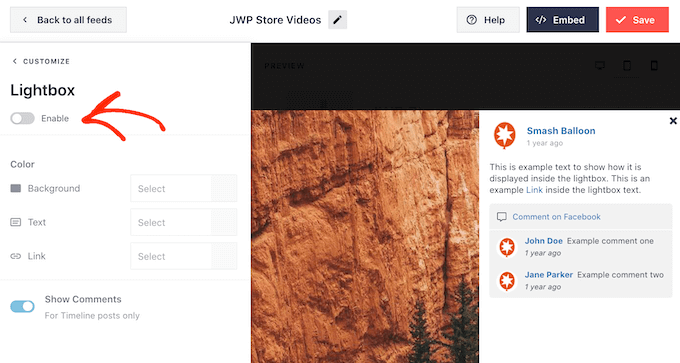
They can simply click on any video thumbnail to open it in a lightbox, as you can see in the following image
Visitors can scroll through the videos in your feed using the arrows.
If they want to like a photo, leave a comment, or share the video to their page, then they can click on the ‘View on Facebook’ link.
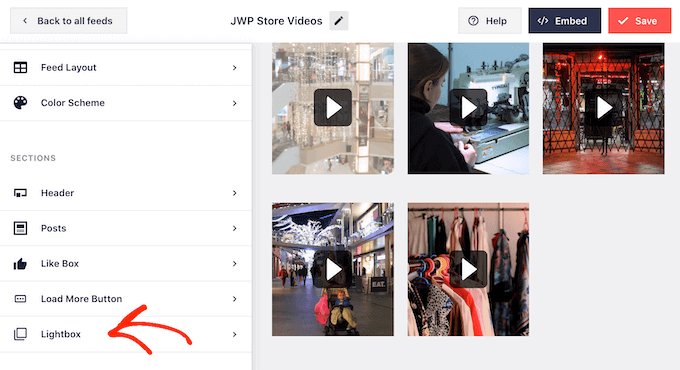
There are a few different ways that you can customize Smash Balloon’s default lightbox.
To see your options, click on ‘Lightbox’ in the left-hand menu.
Here, you can change the color of the lightbox’s text, links, and background colors.
The lightbox feature allows visitors to watch your videos in a popup. If you prefer, then you can disable the lightbox so that all your videos play as small thumbnails, embedded inside the page content.
In this way, you can encourage people to visit your Facebook page, to see the full-size video. To disable the lightbox, simply click on the ‘Enable’ toggle to turn it from blue to grey.
When you’re happy with how the video feed looks, don’t forget to click on ‘Save.’
You’re now ready to embed the Smash Balloon feed in your website.
How to Add Facebook Videos to WordPress
With Smash Balloon, you can add the video feed to your WordPress website using a block, widget, or shortcode.
If you’ve created more than one feed using Smash Balloon, then you’ll need to know the feed’s code if you’re going to use a widget or block.
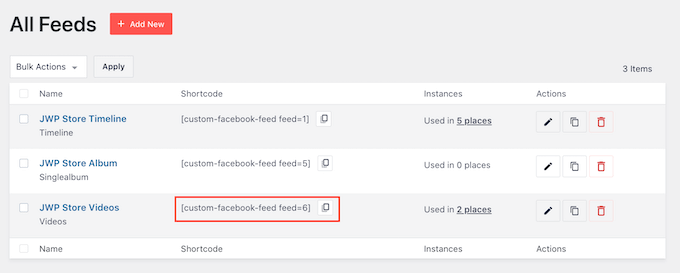
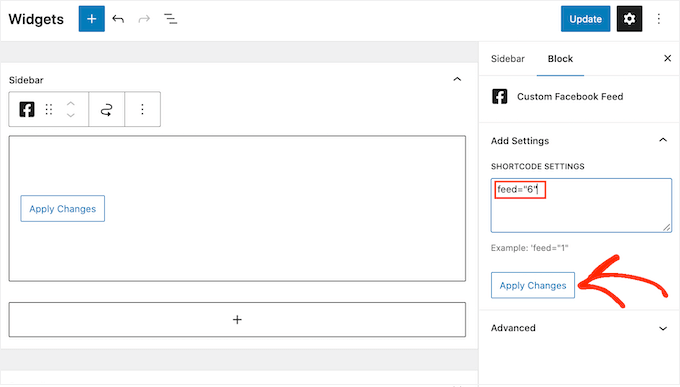
To get this code, go to Facebook Feed »All Feeds and then look at the feed="" part of the shortcode. You’ll need to add this code to the block or widget, so make a note of it.
In the following image, we’ll need to use feed="6"
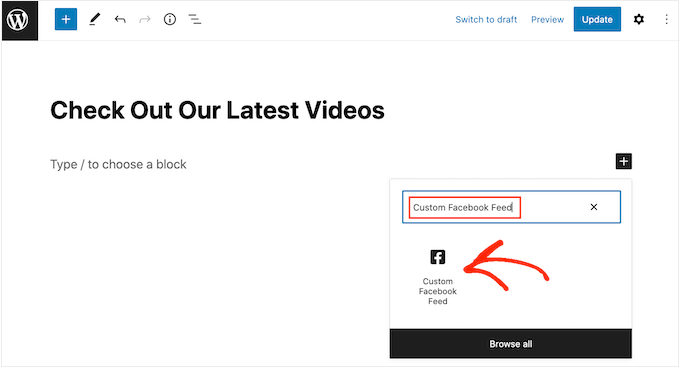
If you want to embed your Facebook feed in a page or post, then we recommend using the Custom Facebook Feed block.
Just open the page or post where you want to embed your Facebook videos. Then, click on the ‘+’ icon to add a new block and start typing ‘Custom Facebook Feed.’
When the right block appears, click to add it to the page or post.
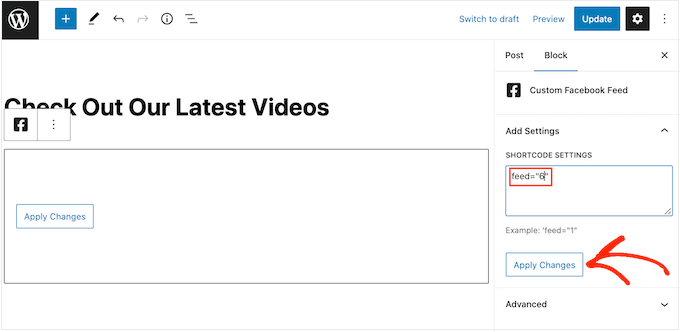
The block will show one of your Smash Balloon feeds by default. If you want to use a different video feed instead, then find ‘Shortcode Settings’ in the right-hand menu.
Here, simply add the feed="" code and then click on ‘Apply Changes.’
The block will now show the videos from your Facebook page or group. Just publish or update the page to make the video feed live on your website.
Another option is to add the feed to any widget-ready area, such as the sidebar or similar section. This allows visitors to watch your Facebook videos from any page of your site.
Simply go to Appearance » Widgets and then click on the blue ‘+’ button.
After that, find the ‘Custom Facebook Feed’ widget.
Then, just drag it onto the area where you want to show the video feed.
The widget will show one of your Smash Balloon feeds automatically.
To show a different feed instead, type or paste the feed’s code into the ‘Shortcode Settings’ box and then click ‘Apply Changes.’
You can now make the widget live by clicking on the ‘Update’ button. For more information, please see our step-by-step guide on how to add and use widgets in WordPress.
Finally, you can embed videos on any page, post, or widget-ready area using a shortcode.
Simply go to Facebook Feed »All Feeds and copy the code in the ‘Shortcode’ column. You can now add this code to any Shortcode block.
Sometimes you may want to embed a specific Facebook video in a page or post. For example, you might have a Facebook video that talks about the same topics as your latest blog, or a promotional video showing the product you’ve just launched on your online store.
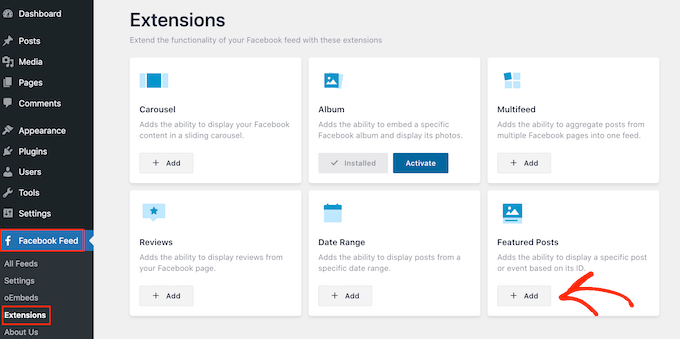
To embed a specific video, you’ll need to buy and install the Featured Posts extension as it allows you to display a particular post or event using its ID.
To start, go to Facebook Feed » Extensions.
Here, find the ‘Featured Posts’ extension and click on its ‘Add’ button.
This will open the Smash Balloon website in a new tab, with instructions on how to purchase the extension.
Once you have the extension, you can install it in exactly the same way you install a plugin. If you need help, then please see our guide on how to install a WordPress plugin.
After activating the plugin, go to Facebook Feed » All Feeds and click on ‘Add New.’
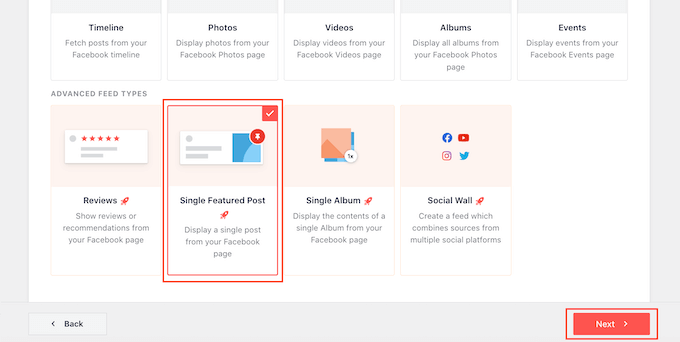
Under ‘Advanced Feed Types,’ select ‘Single Featured Post’ and then click ‘Next.’
You can now choose the page or group that you want to use as your source by following the same process described above.
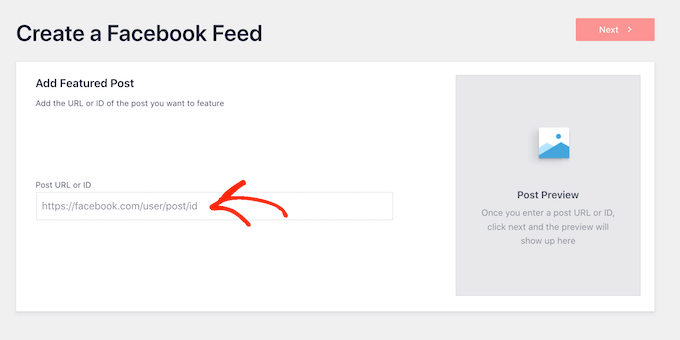
On the next page, you’ll need to enter the ID of the video that you want to embed.
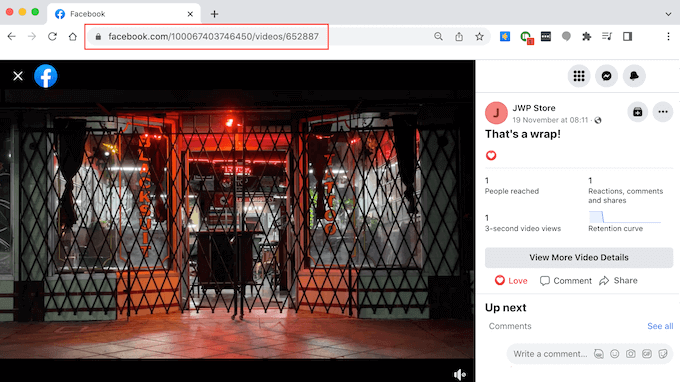
To get this ID, visit Facebook in a new tab and then open the video that you want to embed.
You can now go ahead and copy the URL.
After that, just post the URL into your WordPress dashboard and click on ‘Next.’
Once you’ve done that, you can style the video and then add it to your site following the same process described above.
Like last week, there wasn’t very much WordPress news this week. We did find a neat post from Cloudways where they survived a bunch of WordPress users on Facebook on various topics. And Greg Schoppe also posted some interesting Gutenberg benchmarks. Other than that, we have plenty of helpful tutorials, as well as some of ... Read moreWeekly WordPress News: Surveying The WordPress Facebook Community