Are you seeing a 500 internal server error in WordPress?
The internal server error is one of the most common WordPress errors. Since the error doesn’t give any other information, many beginners find it quite frustrating.
In this article, we will show you how to easily fix the 500 internal server error in WordPress.
Here is a quick overview of the topics we’ll cover in this article.
- What is The 500 Internal Server Error?
- What Causes The Internal Server Error in WordPress?
- Video Tutorial
- Fixing The 500 Internal Server Error in WordPress
- Clear WordPress and Browser Cache
- Checking for Corrupt .htaccess File
- Increasing the PHP Memory Limit
- Deactivate All WordPress Plugins
- Switch to a Default WordPress Theme
- Re-uploading Core Files
- Enable Debug Logs in WordPress
- Ask your Hosting Provider
What is The 500 Internal Server Error?
The 500 internal server error is a common web server error. It is not specific to WordPress websites and can happen with any website.
The 500 in the error message is technically an HTTP error code. Looking up this code will only show its standard description.
“500 Internal Server Error response code indicates that the server encountered an unexpected condition that prevented it from fulfilling the request.“
This is a generic catch-all error message which means that the server was unable to assign a better more helpful error message when it encountered the issue.
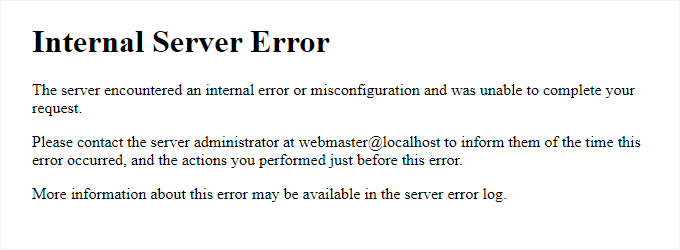
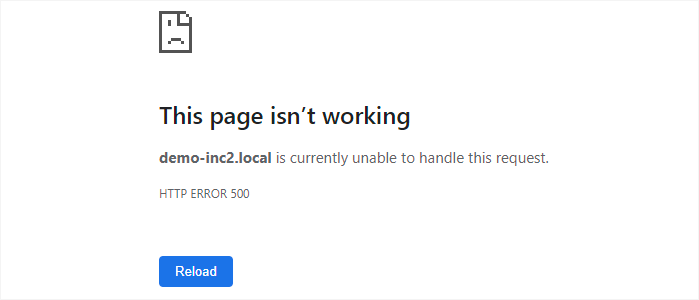
The error page looks different depending on which web server software (Nginx or Apache) your website is using and which browser you are using.
Here is how the Apache error page may look.
It may look different if you are using Nginx and Google Chrome.
It will also look different if Google chrome is unable to find an error page to display:
For beginners, this can be incredibly frustrating. There is no clue or message that would point them in the right direction to quickly fix it.
Asking how to fix an internal server error is like asking your doctor how to fix the pain you’re experiencing without telling them where the pain is.
However, if we know the common causes that trigger this error, then we can try fixing them one by one to resolve the error without breaking anything.
What Causes The Internal Server Error in WordPress?
Internal server error in WordPress is often caused by a corrupt .htaccess file, poorly coded plugins, or your active WordPress theme.
Other possible causes of the internal server error in WordPress that we know of are: PHP memory limit or corrupt core WordPress files.
In some conditions, the internal server error may only show up when you are trying to access the WordPress admin area while the rest of the site works fine.
That being said, now let’s take a look at how to go about troubleshooting the internal server error in WordPress.
Video Tutorial
If you prefer written instructions, then continue reading.
Fixing The 500 Internal Server Error in WordPress
Before you begin troubleshooting, make sure that you have a complete WordPress backup of your website on hand.
If you have access to the WordPress admin area, then you can a WordPress backup plugin to create a complete backup of your website. We recommend using Duplicator to handle this.
On the other hand, if you don’t have access to the WordPress admin area, then you can manually create a WordPress backup using phpMyAdmin and an FTP client.
After that, you can follow the following steps to troubleshoot and fix the internal server error on your website.
Clear WordPress and Browser Cache
Browsers and your WordPress caching plugins can sometimes mistakenly store a cached copy of an error page.
The easiest way to fix this is by first clearing your browser cache.

After that, if you have access to the WordPress admin area of your website, then you can empty the WordPress cache by visiting your caching plugin’s settings page.
For details, see our tutorial on how to clear WordPress cache.
Checking for Corrupt .htaccess File
The .htaccess file is a server configuration file that is also used by WordPress to set up redirects.
One of the most common causes of the internal server error is the corrupt .htaccess file.
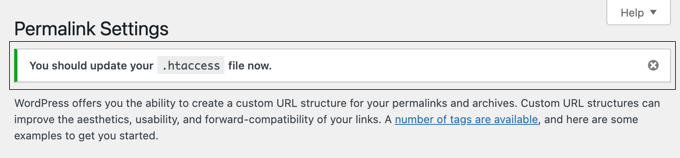
The easiest way to fix this is by simply visiting the Settings » Permalinks page in the WordPress admin area and then clicking on the ‘Save Changes’ button without making any changes at all.
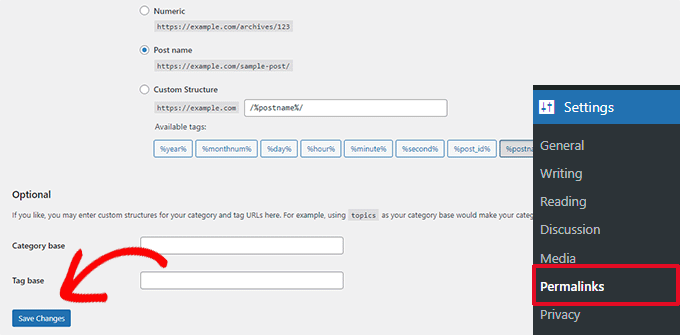
WordPress will now try to update your .htaccess file or generate a new one for you. You can now visit your website to see if this has resolved the internal server error.
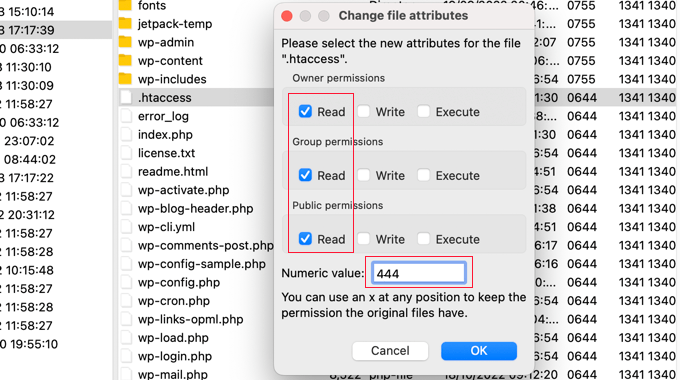
If you can still see the error, then you need to make sure that WordPress was able to generate or write to the .htaccess file.
Sometimes, due to file and directory permissions, WordPress may not be able to create or write to your .htaccess file.
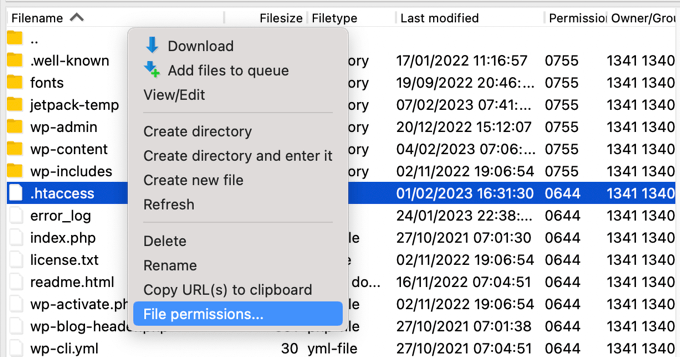
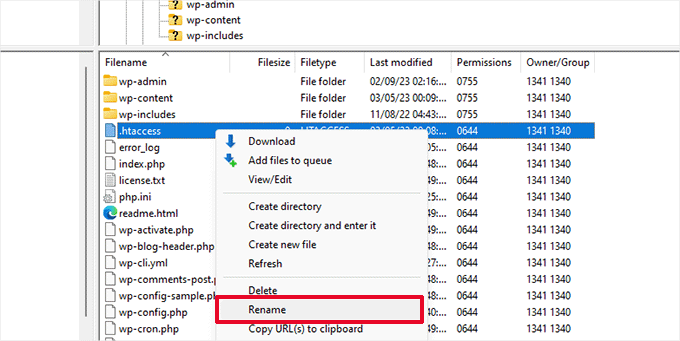
You can now try to manually replace the .htaccess file. First, you need to login to your website using FTP or the File Manager app under your hosting account control panel.
Next, you need to rename your main .htaccess file to something like .htaccess_old. This lets you keep the file as a backup, but WordPress won’t recognize it.
To rename the .htaccess file, you will need to login to your site using FTP or File Manager app in your hosting account’s cPanel dashboard.
Once you are connected, the .htaccess file will be located in the same directory where you will see folders like wp-content, wp-admin, and wp-includes.
Simply, right-click on the .htaccess file and rename it to .htaccess_old.
Next, you need to create a new .htaccess file.
Inside your site’s root folder, right-click and then select ‘Create new file’ option in your FTP client or File Manager app.
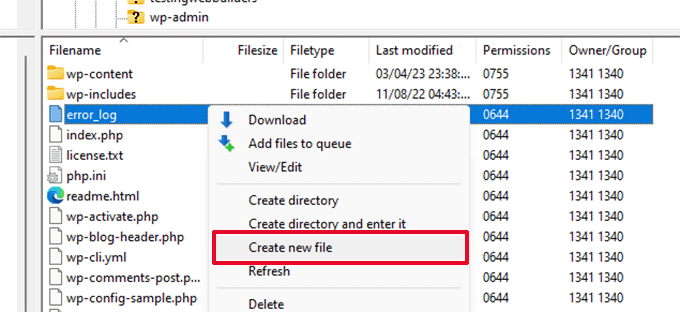
Name this new file .htaccess and click OK to save it.
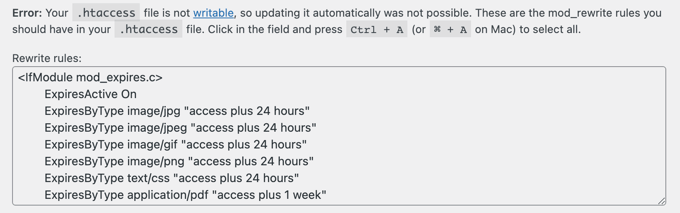
Now, this .htaccess file is currently empty and you need to add default WordPress rewrite rules to it.
Simply right-click on the file and then select View/Edit in your FTP client or File Manager app.

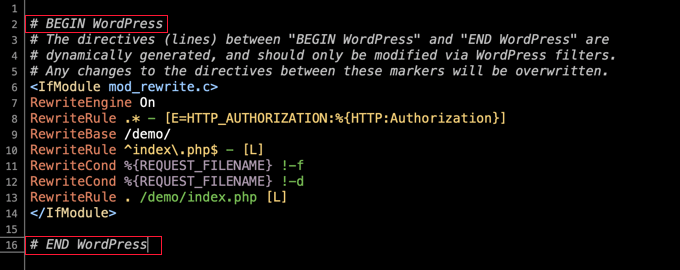
The empty file will open in a plain text editor like Notepad or TextEdit. Now, you need to copy and paste the following code inside it.
# BEGIN WordPress
<IfModule mod_rewrite.c>
RewriteEngine On
RewriteBase /
RewriteRule ^index.php$ - [L]
RewriteCond %{REQUEST_FILENAME} !-f
RewriteCond %{REQUEST_FILENAME} !-d
RewriteRule . /index.php [L]
</IfModule>
# END WordPress
This code is the default rule set used by WordPress. Don’t forget to save your changes and upload the file back to the server.
You can now visit your website to see if this has resolved the internal server error.
If it did, then give yourself a pat on the back because you fixed the internal server error.
Important: Before you move on with other things, make sure that you go to Settings » Permalinks page in the WordPress admin area and click the save button without making any changes. This will regenerate the .htaccess file for you with proper rewrite rules to ensure that your post pages do not return a 404 error.
If checking for the corrupt .htaccess file solution did not work for you, then you need to continue reading this article.
Increasing the PHP Memory Limit
Sometimes the internal server error can happen if a script is consuming all the PHP memory limit.
The easiest way to increase the PHP memory limit is by editing the wp-config.php file. Be careful when you do this if you’re a beginner. You want to follow these instructions carefully because even small mistakes in WordPress core files can break your site.
To begin, simply connect to your WordPress website using an FTP client or the File Manager app under your hosting account control panel.
You’ll find wp-config.php file inside the main folder of your website. Right-click on it and select ‘Download.’ This will ensure that you have a backup of the file in case something goes wrong.
When you’ve saved that, you can right-click on it and select ‘View/Edit.’
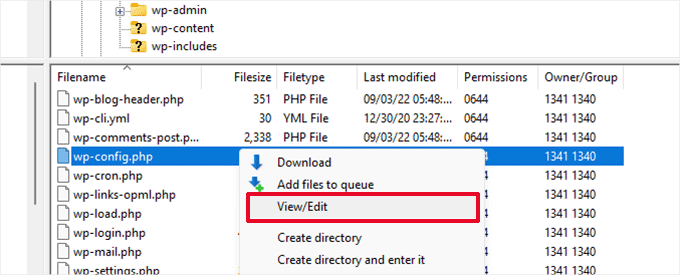
Inside the wp-config.php file, you need to add the following code just above the line that reads ‘That’s all, stop editing! Happy publishing’.
define( 'WP_MEMORY_LIMIT', '256M' );
For more details, see our tutorial on how to increase PHP memory limit in WordPress.
If you are seeing the internal server error only when you try to log in to your WordPress admin or upload an image in your wp-admin, then you should increase the memory limit by following these steps:
- Create a blank text file on your computer and name it php.ini
- Paste this code in there: memory=256MB
- Save the file
- Upload it into your /wp-admin/ folder using FTP
If increasing the memory limit fixed the problem for you, then you have only fixed the problem temporarily. You still need to find the cause that is exhausting your memory limit.
This could be a poorly coded plugin or even a theme function. We strongly recommend that you ask your WordPress web hosting company to look into the server logs to help you find the exact diagnostics.
If increasing the PHP memory limit did not fix the issue for you, then you are in for some more troubleshooting.
Deactivate All WordPress Plugins
If none of the above solutions worked for you, then this error is most likely being caused by a specific plugin installed on your website.
It is also possible that it is a combination of plugins that are not playing nice with each other.
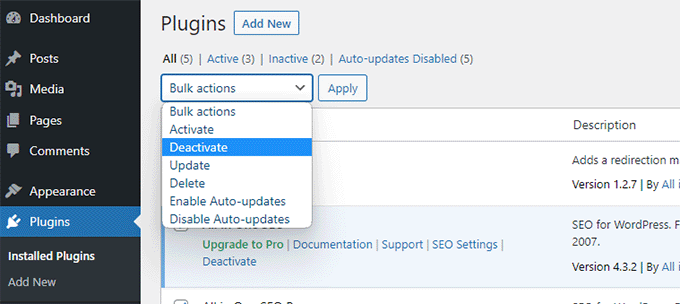
If you can access the WordPress admin area of your website, then you can simply go to the plugins page and deactivate all WordPress plugins.
However, if you are unable to access the WordPress admin area, then you can deactivate all WordPress plugins using FTP.
Simply connect to your WordPress website using an FTP client or the file manager app under your hosting account control panel.
Once connected, navigated to the /wp-content/ folder and rename the plugins folder to plugins.deactivated.
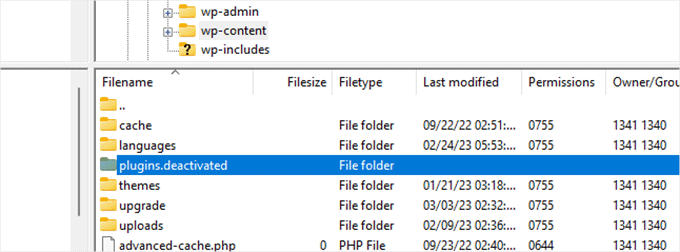
WordPress looks for plugins in the plugins folder. If the plugins folder is not found, then it will automatically deactivate all plugins.
You can now try visiting your website to see if this resolved the internal server error on your website.
To restore all your plugins, you can simply rename the plugins.deactivated folder back to plugins.
Your plugins will now be restored but they will still be deactivated.
You can now activate plugins one by one and visit your website to figure out which plugin is causing the internal server error.
For more details, see our guide on how to deactivate all WordPress plugins without WP-Admin.
If deactivating all plugins didn’t fix the internal server error on your website, then continue reading.
Switch to a Default WordPress Theme
One possible cause of the internal server error could be some code in your WordPress theme.
To find out if this is the case, you need to switch your theme to a default WordPress theme.
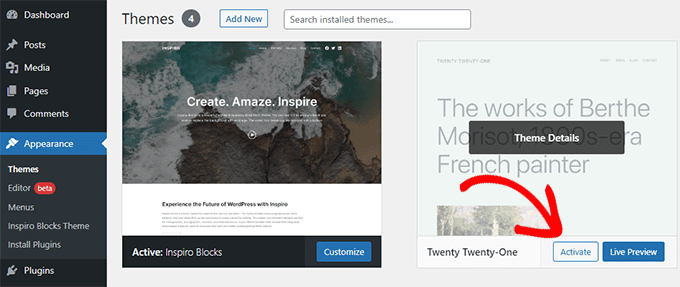
If you have access to the WordPress admin area, then simply go to the Appearance » Themes page. If you have a default theme already installed then you can simply click on the Activate button to switch theme.
If you don’t have a default theme installed, then you can click on the Add New button at the top and install a default theme (Twenty Twenty-Three, Twenty Twenty-Two, etc).
Now in case you don’t have access to the WordPress admin area, you can still switch to a default theme.
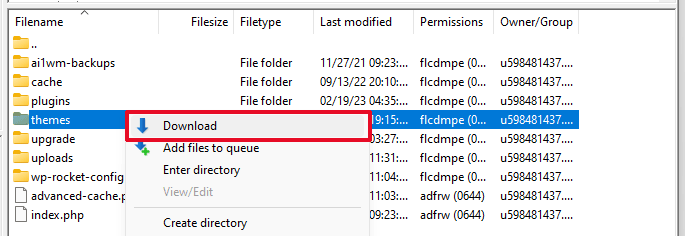
Simply, connect to your WordPress website using an FTP client and navigate to the /wp-content/ folder.
Right-click to select the themes folder and download it to your computer as a backup.
Next, you need to delete the themes folder from your website. Once it is deleted, go ahead and create a new themes folder.
Your new themes folder will be completely empty which means you don’t have any WordPress themes installed at the moment.
Next, you need to visit the WordPress themes directory and download a default WordPress theme to your computer.
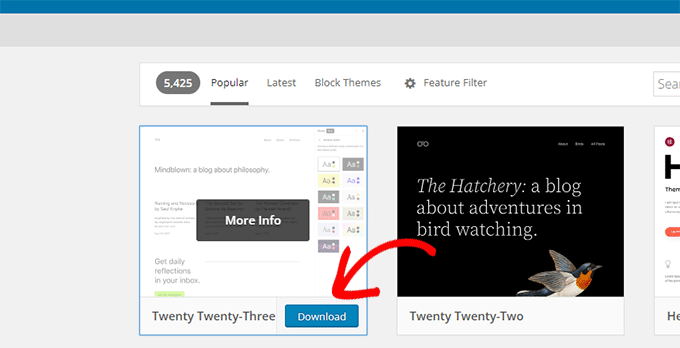
Your browser will then download the theme as a zip file to your computer.
Locate the file on your computer and then unzip it. Windows users can unzip file by right-clicking on it and then selecting Extract All. Mac users can double-click on the zip file to extract it.
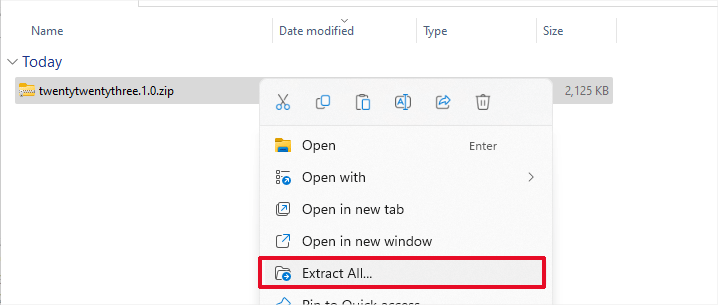
You’ll now see a folder containing your WordPress theme.
Switch back to your FTP client or File Manager up and upload this folder to the empty themes folder.
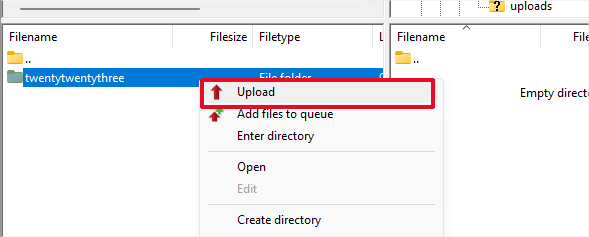
Once uploaded, WordPress will automatically start using the default theme.
You can now visit your website to see if this resolved the internal server error.
If this didn’t work, then you can reupload your WordPress themes from the backup or switch back to the theme you were using.
Don’t worry there are still a few more things you can do to fix the error.
Re-uploading Core Files
If the plugin and theme options didn’t fix the internal server error, then it is worth re-uploading the /wp-admin/ and /wp-includes/ folders from a fresh WordPress install.
This will NOT remove any of your information, but it may solve the problem in case any file was corrupted.
First, you will need to visit the WordPress.org website and click on the Download button.
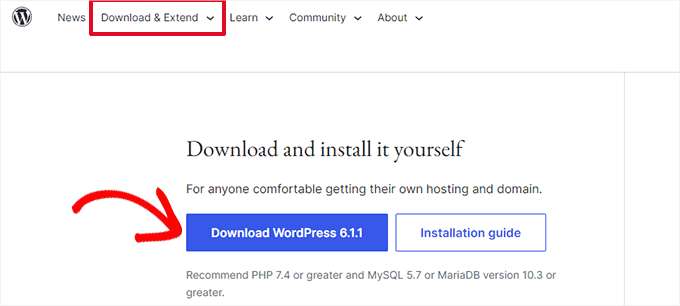
This will download the WordPress zip file to your computer.
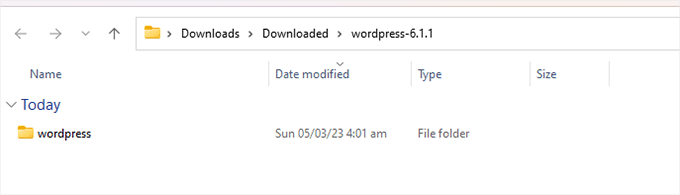
Go ahead and extract the zip file. Inside it, you will find a wordpress folder.
Next you need to connect to your WordPress website using an FTP client.
Once connected go to the root folder of your website. It is the folder that has wp-admin, wp-includes, wp-content folders inside it.
In the left column open the WordPress folder on your computer.
Now you need to select all files inside the wordpresss folder and upload them to your website.
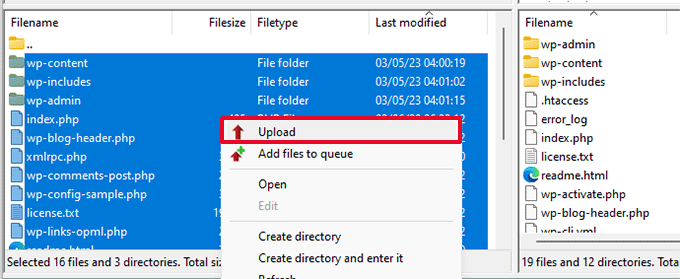
Your FTP client will now transfer those folders to your server.
It will ask you whether you would like to overwrite the files. Select ‘Overwrite’ and then select ‘Always use this action’.

Your FTP client will now replace your older WordPress files with new, fresh copies.
If your WordPress files were corrupted, then this step will fix the internal server error for you.
Enable Debug Logs in WordPress
WordPress comes with a built-in system to keep logs for debugging.
You can turn it on by using the WP Debugging plugin. For more details, see our guide on how to install a WordPress plugin.
Once activated, the plugin will turn on debugging logs on your WordPress website.
If you don’t have access to the admin area of your WordPress website, then you can turn on debugging by adding the following code to your wp-config.php file.
define( 'WP_DEBUG', true);
define( 'WP_DEBUG_LOG', true);
Once you have turned on debug logs, you can view these logs by using an FTP client and navigating to the /wp-content/ folder.
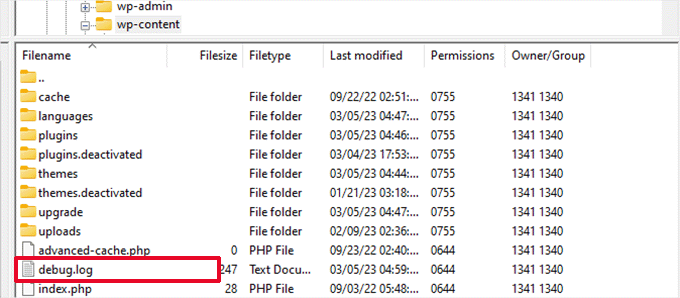
You can open the debug log file in a text editor and it will show you a list of errors and warnings that occur on your website.
Some of these errors and warnings can be harmless incidents that may not need fixing. However, if you are seeing an internal server error on your website then these may point you in the right direction.
Ask your Hosting Provider
If all methods fail to fix the internal server error on your website, then it is time to get some more help. Contact your web hosting support team and they will be able to check the server logs and locate the root cause of the error.
If you want to continue troubleshooting on your own, then see our ultimate WordPress troubleshooting guide for beginners.
We hope this article helped you fix the internal server error in WordPress. You may also want to see our complete list of the most common WordPress errors, and our guide on how to choose the best web hosting provider.
If you liked this article, then please subscribe to our YouTube Channel for WordPress video tutorials. You can also find us on Twitter and Facebook.
The post How to Fix the 500 Internal Server Error in WordPress first appeared on WPBeginner.