Category Archives: wpforms

How to Create an Interactive Poll in WordPress (Step by Step)

Do you want to create an online poll on your WordPress site?

Polls are an interactive way to engage your audience while getting useful information from them. You can get feedback from your users and find out what they like.

In this article, we will show you how to easily create and add a poll in your WordPress.

How to Create an interactive poll in WordPress

Which Tool to Choose for Adding a Poll in WordPress?

Adding interactive polls to your website is a great way to engage users, as it instantly grabs their attention. You can generate leads using polls and, at the same time, collect valuable feedback from your audience.

That said, there are plenty of plugins and online tools that allow you to embed polls on your WordPress site. Many of them require you to create an account, some store data on their own servers, and others have a terrible user experience.

If you are looking for a good user experience with full control of poll data, then you’ll need WPForms. It is the best WordPress form builder plugin and includes powerful surveys and polls addon.

With WPForms, you’ll be able to do the following:

  • Create polls in WordPress using a drag-and-drop form builder
  • Gather poll results on your own websites
  • Show votes count when user submit their vote
  • Display poll anywhere on your website
  • Show poll results anywhere on your website

With that, let’s look at how to easily create online polls in WordPress using WPForms.

Creating Online Polls in WordPress

The first thing you need to do is install and activate the WPForms plugin. For more details, see our step-by-step guide on how to install a WordPress plugin.

You will need the WPForms Pro plan because it includes the survey and polls addon. WPBeginner users get an additional discount by using the WPForms coupon code. There is also a WPForms Lite version you can try for free.

Upon activation, you need to visit the WPForms » Settings page to enter your license key. You can find this information in your WPForms account.

Entering the WPForms license key

Next, you need to visit WPForms » Addons page and scroll down to the Surveys and Polls addon.

Go ahead and click on the ‘Install’ addon button.

Install surveys and polls addon

Now you are ready to create an online poll.

You can start by going to WPForms » Add New page to create a new form. First, you need to provide a title for your poll form and then select the ‘Poll Form’ template.

Select the poll form template

This will launch the WPForms drag-and-drop form builder interface.

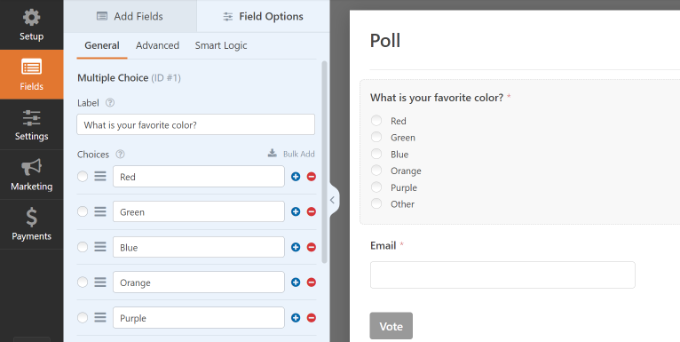
You will see a pre-made poll form template with example fields already added to the form.

Edit your poll form template

There are options to add new form fields from the left column. All you have to do is drag and drop the field you’d like to add to the form.

Besides that, you can just point and click to edit any field, rearrange them, or remove them.

For example, if you click the poll question in the template, then you will see more options in the menu on your left. Simply rearrange the order, and edit their titles, labels, and more.

Rearrange poll question order

Next, you need to click on the Settings button from the left menu and then go to the ‘Surveys and Polls’ tab. Here you can enable or disable the poll results option.

By default, the WPForms poll template will display poll results to users after they submit their votes. If you disable this option, then users will not see the poll results.

Enable survey and poll results option

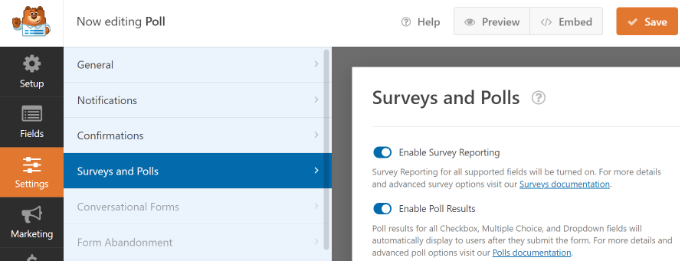
On the other hand, you can show users a custom message or redirect them to another page or URL.

Simply go to the ‘Confirmation’ tab. Here, you can choose the Confirmation Type from the dropdown menu.

Go to confirmation settings

Once you have created the poll form, go ahead and click on the ‘Save’ button to store your form settings.

Adding The Poll to Your WordPress Website

WPForms makes it easy to add your online poll anywhere on your website, including posts, pages, custom post types, and sidebar widgets.

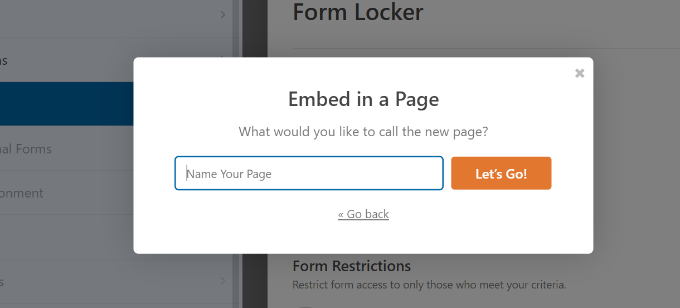
You can click the ‘Embed’ button in the form builder to add your poll form. Once you do that, a new popup window will open. You can select an existing page or create a new one to embed your form.

Embed a form in page

Let’s select the ‘Create New Page’ button for this tutorial.

In the next step, you’ll need to enter a name for your page. After that, you can click the ‘Let’s Go’ button.

Enter name for your new page

You should now see your poll form embedded in the WordPress content editor.

Another way of adding your form is by using the WPForms block. Simply click the ‘+’ button to add the WPForms and select your form from the dropdown menu.

Add a WPForms block in wordpress

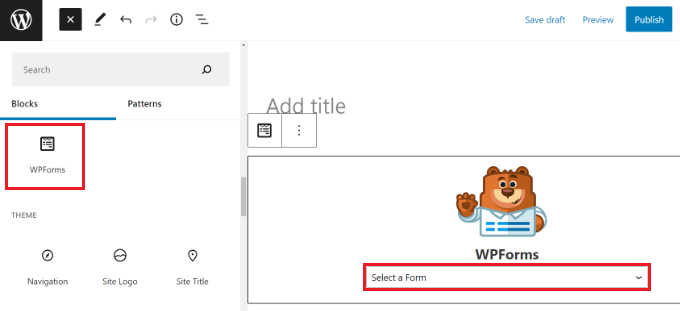
Next, you’ll see a preview of your form.

You can save or publish your post/page and visit your website to see your poll in action.

View poll form preview

You can also add your poll to a sidebar or widget-ready area.

To do that, you need to go to the Appearance » Widgets page and add the WPForms widget block to a sidebar where you want to display the poll.

Add WPForms widget block

In the WPForms widget block, you need to select the poll form you created earlier.

Don’t forget to click the ‘Update’ button to store your widget settings. You can now visit your website to see your online poll displayed in a sidebar or another widget-ready area.

View poll form in sidebar

Viewing Live Poll Results

If you have enabled poll results, then your users will see the results after submitting their votes.

View your poll results

You can also view poll results at any time without submitting a vote.

Simply visit WPForms » All Forms page and click on the ‘Survey Results’ link below your poll form.

Click the survey results option

This will take you to the poll results page, where you will see poll responses in an interactive chart.

You can change the charge type and export the results in JPEG, PDF, and print formats.

See poll results in dashboard

Embed Poll Results Anywhere in WordPress

WPForms also allows you to easily embed your online poll results anywhere on your website. This is particularly useful if you have disabled poll results and want to share them later.

First, you will need to find out your poll form’s ID. You can do this by going to WPForms » All Forms page and looking for the shortcode next to your poll form.

View form shortcode

In the shortcode, you will find your poll’s ID number. For example, our test poll’s ID is 76, as shown in the screenshot above.

Next, you need to find out the field ID. This is the field in your form for which you want to show the results.

Simply edit your poll form and click on the poll field. You will find the field ID in the left column.

View the field ID

Now that you have both required IDs, you can go ahead and add the poll results shortcode like this:

Don’t forget to replace the form ID and field ID values with your own. You can use this shortcode in WordPress posts, pages, and text widgets.

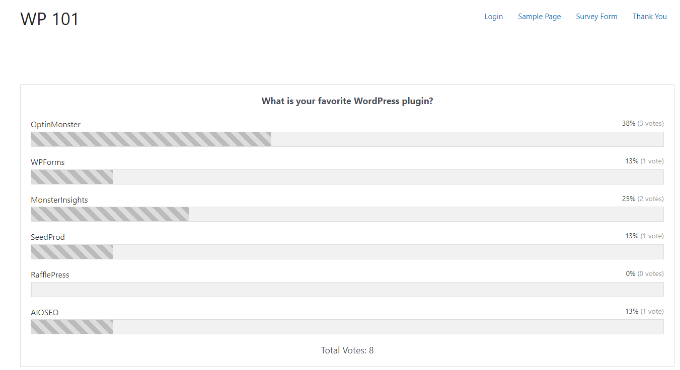
Here’s a preview of what your poll results will look like:

Preview of form results

We hope this article helped you create an interactive poll in WordPress. You may also want to see our guide on how to start a WordPress blog and the best email marketing services.

If you liked this article, then please subscribe to our YouTube Channel for WordPress video tutorials. You can also find us on Twitter and Facebook.

The post How to Create an Interactive Poll in WordPress (Step by Step) first appeared on WPBeginner.

How to Create a Survey in WordPress (with Beautiful Reports)

Do you want to create a survey in WordPress? Surveys help you gather valuable information, so you can use to make data-driven decisions. In this article, we will show you how to easily create a survey in WordPress and generate beautiful reports.

Survey Plugin for WordPress

Choosing The Best Survey Tool for WordPress

There are many online services that allow you to create survey forms and embed them in WordPress. The downside of these forms is that the data is stored on third-party servers, and you have limited customization options.

Some of these forms are also limited to the number of responses you can collect. You have to pay extra to get more responses and usually these services have high monthly costs.

Wouldn’t it be nice if you could run surveys on your own website without relying on third-party services?

This is where WPForms comes in. It is the best WordPress form builder plugin in the market.

They recently announced a powerful new WordPress surveys and polls addon that you can use to easily create survey forms on your website.

With WPForms survey feature, you get the following:

  • Powerful drag and drop form builder to create surveys
  • Smart survey fields like Rating, Likert Scale, and more
  • Conditional logic to personalize survey fields based on user input
  • Interactive survey reports with bars, graphs, charts, and tables
  • Ability to export survey graphs as JPEG, PDF, or Print Formats
  • Export survey results as CSV to use elsewhere

That being said, let’s take a look at how to easily create and add survey in your WordPress website.

Disclosure: WPForms is created by the same team behind WPBeginner. It is one of our premium WordPress plugins.

Creating a Survey in WordPress

First thing you need to do is install and activate the WPForms plugin. For more details, see our step by step guide on how to install a WordPress plugin.

WPForms surveys and polls addon is part of their Pro plan. WPBeginner users can use our WPForms coupon to ge 10% OFF on all WPForms licenses.

Once the plugin is activated, you need to head over to WPForms » Settings page to enter your license keys. You can find this information under your account on the WPForms website.

WPForms License

Next, you need to visit the WPForms » Addons page and scroll down to the Surveys and Polls addon. Go ahead and click on the Install addon button to install the survey addon. Once installed, you need to click on the ‘Activate’ button to start using the addon.

Install survey and polls addon

Now you are ready to create a survey form.

You need to visit WPForms » Add New page to create a new form. This will launch the WPForms’ drag and drop form builder interface.

Create survey form

First you need to provide a title for your survey form and then click on the Survey Form template.

This will load a sample customer feedback form template with several fields already added into the form.

Survey form template

You can just point and click to edit any field, rearrange them with drag and drop, or remove them from the form. You can also add new form fields from the left column.

WPForms supports all commonly used form fields including drop down, radio buttons, checkboxes, likert scale, text input, rating scale, and many more. This makes it super easy for you to build highly interactive survey forms.

WPForms also includes conditional logic which means you can personalize your survey questions based on user input in one of the previous fields.

Conditional fields

Once you have created the form, you need to click on the save button to store your form settings. You can now click on the close button to exit the form builder.

Adding The Survey Form in Your WordPress Website

WPForms makes it very simple to add your forms anywhere on your website. You can easily add your survey form in any WordPress post, page, custom post type, or your sidebar.

To add the survey form in a WordPress post, page, or post type, you need to visit the post edit screen and click on the ‘Add Form’ button.

Add form button

This will bring up a popup where you can select the survey form you created earlier and click on the insert form button to continue.

You will now see the form shortcode added into the post editor.

Once you are done editing the post, go ahead and publish it. You can visit your website to see your survey form live in action.

Survey form preview

WPForms also allows you to easily add your survey form into any sidebar or widget ready area. Simply head over to the Appearance » Widgets page in your WordPress admin area and drag the WPForms widget to any sidebar.

Survey form widget

In the widget settings, select the survey form you created earlier and don’t forget to click on the save button to store your changes.

You can now visit your website to see your survey form displayed in the sidebar.

Sidebar survey widget

Viewing Your Survey Form Results

WPForms shows survey results in beautiful charts and graphs. You can also print survey results and export them to use in your favorite spreadsheet software.

To view your survey results, you need to visit WPForms » All Forms page and click on the ‘Survey Results’ link below your survey form.

View survey results

On the results page, you will see your survey responses displayed in an interactive chart and tables. You can export responses to a single question, as well as the entire survey.

Survey results

On the top, you will see options to switch to different chart types and the export option. You can save individual survey results as JPEG, PDF, and Print formats to easily share them on presentation slides, blog posts, or social media.

Result tables

Convert Any Form into a Survey

WPForms also allows you to make any form into a survey form and display past results as a survey. You can even select specific form fields that you want to be treated as survey fields.

This is particularly useful if you want to gather data through other forms like a contact form, user registration, or newsletter sign up forms.

To convert an existing WPForms form into a survey, simply edit the form in WPForms and go to the Settings » Surveys and Polls section. You need to check the box next to ‘Enable Survey Reporting’ option and save your changes.

Enable survey reporting for any form in WPForms

To enable survey reporting for an individual form field, simply edit the form and then click on the field that you want to enable.

Under the ‘Field Options’ section on your left side, you need to click on the Advanced Options and check ‘Enable Survey Reporting’ option.

Enable survey reporting for any form field

We hope this article helped you learn how to easily create and add beautiful survey forms in WordPress. You may also want to see our beginner’s guide on how to track user engagement in WordPress with Google Analytics.

If you liked this article, then please subscribe to our YouTube Channel for WordPress video tutorials. You can also find us on Twitter and Facebook.

The post How to Create a Survey in WordPress (with Beautiful Reports) appeared first on WPBeginner.

How to Use Contact Form to Grow Your Email List in WordPress

Did you know that you can use your WordPress contact form to grow your email list? Users are most engaged when they are trying to reach out using the contact form on your website. In this article, we will show you how you can use contact forms to grow your email list in WordPress.

How to use Contact Forms to Grow Your Email List

Why Use Contact Forms for Email List Building in WordPress?

Email marketing is the most cost effective way to reach your audience. If you haven’t started it yet, then you need to see our article on why you should start building your email list right away.

You will need to combine different tools and methods for encouraging users to signup. Offering multiple choices to sign up helps you quickly get more subscribers.

Many users focus on adding email signup forms to their websites, which is good start but you need to get more creative. Contact forms, in fact any kind of forms on your website are the perfect place to add an email signup option.

Here is why:

  • Your users have already entered their email address in the contact form.
  • They are already interested in what you have to offer, that’s why they are filling the form. Why not ask them to subscribe as well?
  • Many users feel that their chances of getting a response will increase if they opted in for your email list
  • You can use it in a variety of ways not just contact forms, but surveys, quizzes, ebook downloads, and more.

That being said let’s see how to easily integrate your email list to your WordPress forms and use contact forms to boost your email subscribers.

Connecting Your Email List to WordPress Contact Forms

First thing you will need to do is install and activate the WPForms plugin. For more details, see our step by step guide on how to install a WordPress plugin.

It is a paid plugin, and you will need at least the Plus plan to access email marketing addons.

You can use this WPForms Coupon: WPB10 to get 10% off your purchase on any WPForms plan.

Upon activation, you need to visit WPForms » Settings page to enter your license key. This will enable automatic updates and give you access to respective addons.

WPForms license key

Next, head over to WPForms » Addons page to install the addon for your email marketing service.

WPForms comes with integration addons for the top email marketing services including Constant Contact, MailChimp, AWeber, and more.

Install addon

Once you have installed and activated the Addon, you need to visit WPForms » Settings page and click on the integrations tab. You will see your email service provider listed there.

Click on your email service provider name and enter the required credentials. You can find this information from your email service account.

Connect your email service provider to WPForms

Now that you have connected WPForms to your email marketing service, you can easily add email optins into your forms and add them anywhere on your website.

Adding Email Signup Checkbox to Your Contact Forms

First you need to create a simple contact form for your website. See our detailed instructions on how to easily create a contact form in WordPress.

Once you have created your form, the next step is to add an email sign up option into the same form. Click on the checkbox field from the fields column.

Add checkbox to your form

You will notice a new field added to your form with three checkboxes. Clicking on the field will open its settings. You need to remove the two checkboxes and change the field label to something appropriate like ‘Signup for our Email List’.

Edit checkbox

You can check the box next to the choice field. Doing so, your email signup field will be checked by default.

Now your form is ready, we just need to tell it what to do when someone fills up the form.

You can do this by clicking on the ‘Marketing’ tab in the form builder. Here you need to select your email service provider and then click on the ‘Add New Connection’ button.

Add new email connection

You will be asked to provide a name for this connection.

Next, WPForms will fetch your email service account. It will show the label you added for the account when you added it in the integrations.

It will also fetch email lists available under your email service account. You need to select the email list where you want to add users.

Mapping form fields to email list fields

In the next section, you will be asked to map the form fields to your email service fields. After that you need to click on the checkbox next to ‘Enable conditional logic’ option.

Enable conditional logic

Select ‘Process’ this form if condition and then select your checkbox field and the checked reply.

Your contact form with email signup optin is now ready. You need to click on the Save button at the top bar and then exit form builder.

You can now add this form into any WordPress post or page. Simply click on the Add Form button when editing a post and then select your contact form.

Add form button

Here is a preview of a contact form on our demo website with email sign up optin.

A contact form with email subscription optin

Adding Email Subscription Checkbox to Other Forms

You can add email subscription checkbox to any form you create with WPForms. Here are a few creative ways to display forms and then you can add email subscription option to all these forms.

We hope this article helped you learn how to use contact forms to build your email list in WordPress. You may also want to see our ultimate guide on how to do lead generation in WordPress like a pro.

If you liked this article, then please subscribe to our YouTube Channel for WordPress video tutorials. You can also find us on Twitter and Facebook.

The post How to Use Contact Form to Grow Your Email List in WordPress appeared first on WPBeginner.