Category Archives: wpforms

How to Create a WordPress Form with Payment Options (Easy Way)

Are you looking for an easy way to create a WordPress form with a payment option?

Often small business owners need to create an easy way to accept payments on their website without setting up a complex shopping cart. A simple payment form allows you to accept custom payment amounts, setup recurring payments, and collect custom details with ease.

In this article, we will show you how you can easily create forms with a payment option.
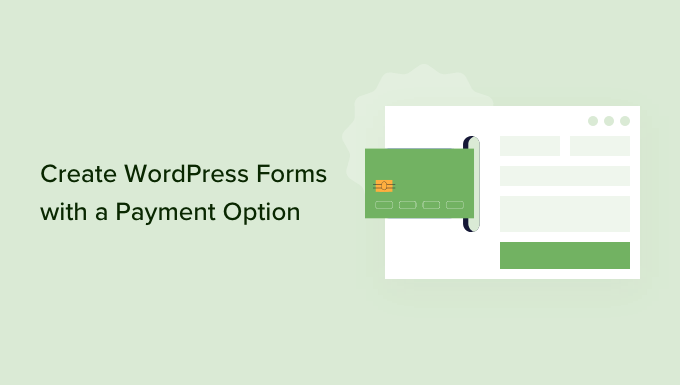
How to create WordPress forms with a payment option

Why Create WordPress Forms with a Payment Option?

If you want to create a simple form with custom payment options, then you don’t need to create a full online store. While eCommerce plugins like Easy Digital Downloads and WooCommerce are very powerful, you may not need something as comprehensive if you’re only selling a few items, services, or need to accept custom amounts from each customer.

In some cases, creating a simple payment form is a much better solution than using a dedicated eCommerce plugin.

For example, on a non-profit website, you may want to give visitors the option to make a donation while they’re filling out a volunteer application form.

Some website owners like to accept optional tips from visitors who are reaching out for help.

Or, you may want to offer a digital download with a ‘pay what you like’ system, where visitors choose how much they want to pay for a product or service. We’ve even seen WordPress websites offer products as a free download, while giving visitors the option to pay for a premium upgrade or extra content.

Note: You will need to enable HTTPS/SSL on your website so that you can securely accept payments. For more details, you can follow our guide on how to get a free SSL certificate for your WordPress site.

That being said, let’s look at how you can create optional payment forms. Simply use the quick links below to jump straight to the method you want to use.

Method 1. Using WP Simple Pay (Best Free Option)

The easiest way to create a simple WordPress payment form is by using WP Simple Pay.

WP Simple Pay is the best Stripe payment plugin for WordPress that lets you accept credit card payments, Apple Pay, Google Pay, and more without any having to install any special eCommerce plugins.
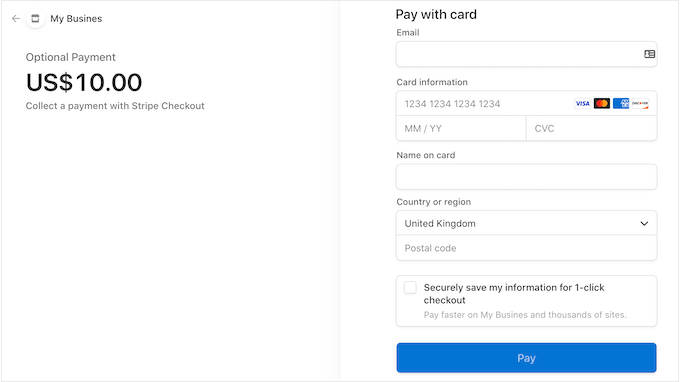
A simple payment form, created using WP Simple Pay

This free plugin is perfect for non-profits, small businesses, volunteers, and anyone who wants to collect payments without having to invest in advanced eCommerce plugins.

For this guide, we will be using the free version of WP Simple Pay since it has everything you need to start accepting payments online. There’s also a pro version that lets you accept payments using ACH direct debit, set up a recurring payment plan, add a buy now pay later plan to WordPress, and much more.

First, you’ll need to install and activate the WP Simple Pay plugin. If you need help, then please see our guide on how to install a WordPress plugin.

Upon activation, the plugin will automatically launch the setup wizard. Go ahead and click the ‘Let’s Get Started’ button.
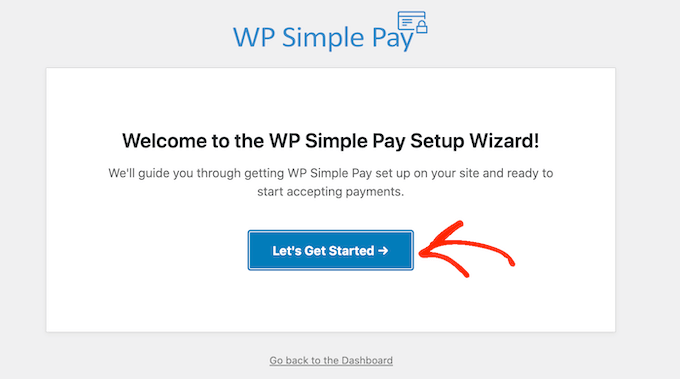
Installing the WP Simple Pay WordPress plugin

In the next step, you’ll need to connect a Stripe account to WP Simple Pay. Stripe is a beginner-friendly payment processor for website owners.

To get started, click on the ‘Connect with Stripe’ button.
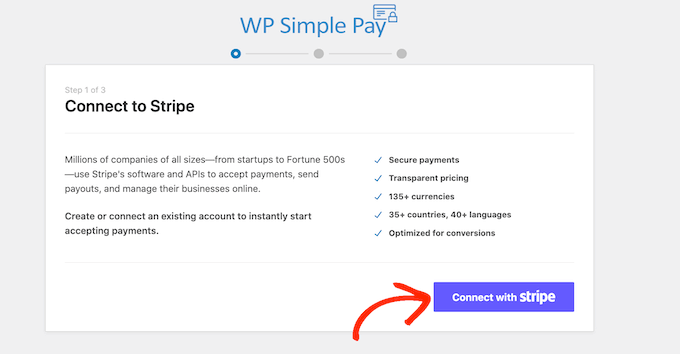
How to connect your WordPress website to Stripe

After that, you can either log into an existing Stripe account or create a new one.

If you’ve already registered with Stripe, then simply type in the email address and password for that account.
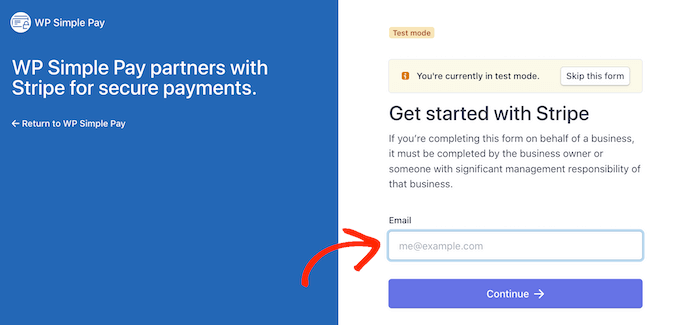
Creating an optional payment form with WP Simple Pay

WP Simple Pay will now show you how to connect your Stripe account to WordPress.

If you’re not already registered with Stripe, then type in your email address and then follow the onscreen instructions to create your free Stripe account.

Once you’re logged into a Stripe account, go ahead and click on ‘Create a Payment Form.’

If you’ve clicked away from this screen by accident, then don’t worry. You can reach the same screen by going to WP Simple Pay » Add New in the WordPress dashboard.
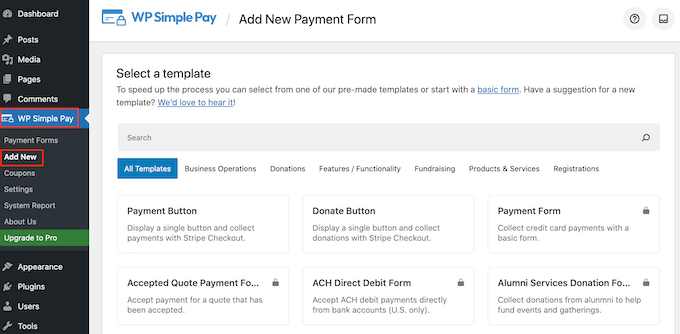
How to create a form with an optional payment button

The free WP Simple Pay plugin has a few different payment templates that can help you create different kinds of payment forms within minutes. You can unlock extra templates by upgrading to WP Simple Pay Pro, including a template that adds a Stripe donate button in WordPress.

Since we want to create a simple WordPress payment form, hover over the ‘Payment Button’ template and then click on ‘Create Payment Button’ when it appears.
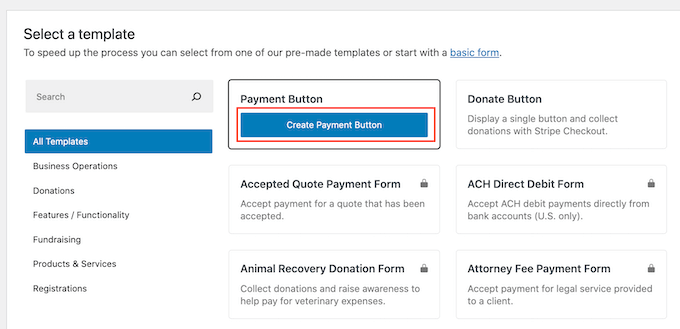
Creating a simple optional payment form

In the ‘Title’ field, type in a name for your payment form.

This title is just for your reference so you can use anything you want.
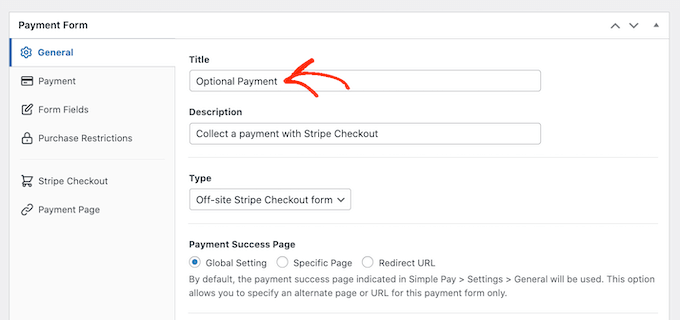
Adding a title to your WordPress payment form

You can also use the ‘Description’ field to add some information about your payment form. Again, WordPress won’t show this to your site’s visitors but it can be useful for your own reference or for anyone else who shares your WordPress dashboard.

After that, click on the ‘Payment’ tab.

By default, WP Simple Pay will create your payment form in test mode, meaning you can’t accept payments from visitors.

We recommend leaving the ‘Global Settings (Test Mode)’ radio button selected, so you can test how the form works before you start accepting payments from visitors.
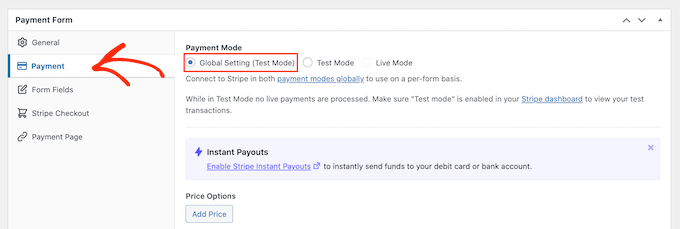
Creating a payment form in test mode

However, if you want to start accepting real payments straight away, then you can select the ‘Live Mode’ button instead.

Next, you can decide how much you’ll charge visitors by typing a number into the ‘One-Time Amount’ field.

Setting a payment amount in WP Simple Pay

Note: By default, WP Simple Pay uses the dollar currency. If you want to accept payments in any other currency, then simply head over to WP Simple Pay » Settings. You can then select the ‘Currency’ tab and choose a new currency.

After you’ve done that, select the ‘Form Fields’ tab.
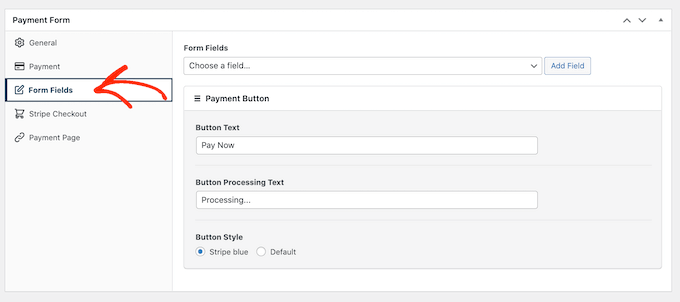
WP Simple Pay's form field settings

By default, your button will have the label ‘Pay Now’, but you can change this to anything you want by typing into the ‘Button Text’ field.

Since we’re creating an optional payment form, you may want to use something like ‘Send Us a Tip’ or ‘Buy Me a Coffee.’
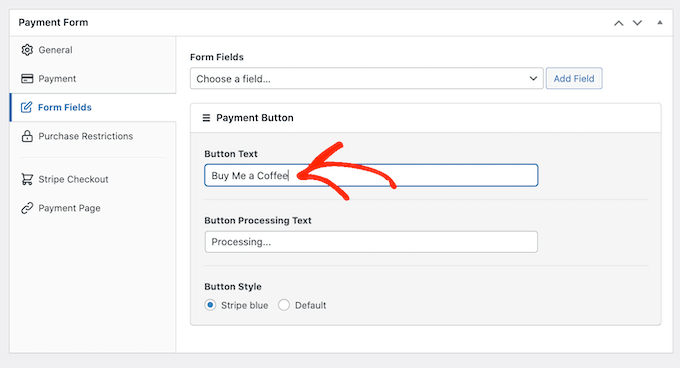
Adding a button label to your optional payment form in WordPress

You can also change the ‘Button Processing Text,’ which is the message that WP Simple Pay will show to shoppers while it’s processing their payment.

Again, since this is an optional payment form you might use something that reflects this, such as ‘We’re processing your donation.’

By default, WP Simple Pay will use the same button style as your WordPress theme. It also has a ‘Stripe blue’ style that you can use, as you can see in the following image.
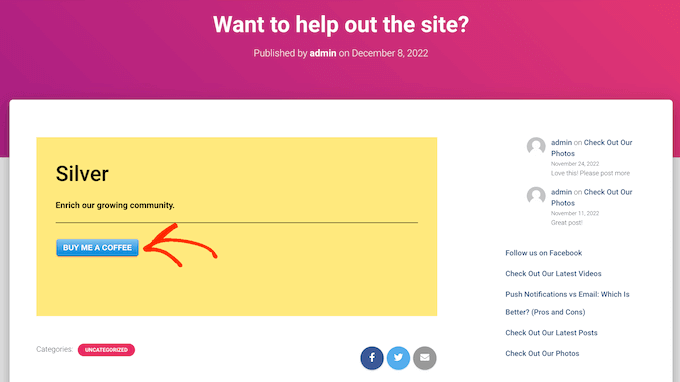
A payment form with the Stripe blue style

If you want to use this button style, then simply select the ‘Stripe blue’ radio button in the ‘Payment Button’ section.

​After that, select the Stripe Checkout tab and choose the information that WP Simple Pay will collect from visitors at checkout.

For example, if you’re selling a physical product then you’ll want to check the ‘Collect Shipping Address’ box.
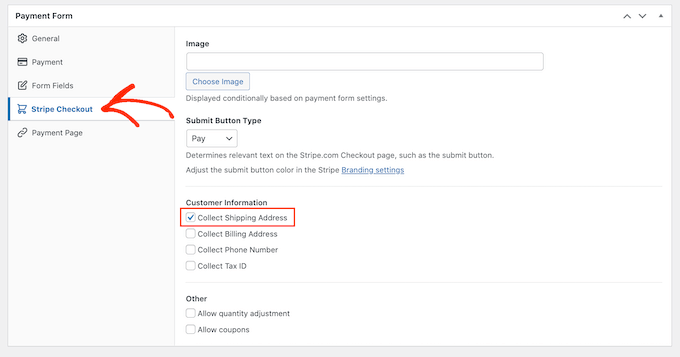
Setting up the Stripe checkout

As you’re working on the payment form, you can preview how it looks at any point simply by clicking on the ‘Preview’ button.

This opens the payment form in a new tab, in exactly the same way you preview posts and pages in the standard WordPress editor.
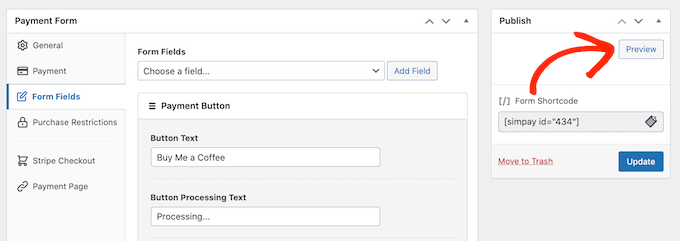
How to preview a payment form in WordPress

When you’re happy with how the payment form looks, go ahead and make it live by clicking on the ‘Publish’ button.

You can now add the payment form to any page, post, or widget-ready area using the value in ‘Form Shortcode.’
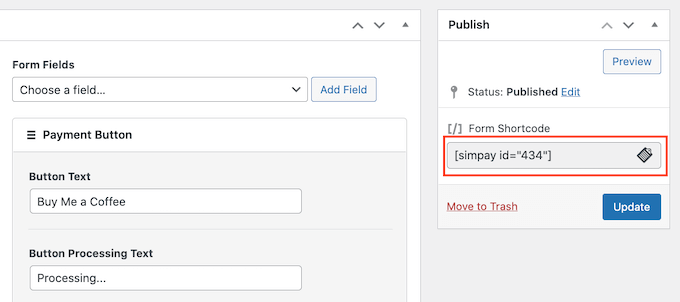
Adding an optional payment form to your WordPress site using shortcode

For more details on how to place the shortcode, you can see our guide on how to add a shortcode in WordPress.

If you published the form in test mode, then the Stripe dashboard doesn’t show any payments you get during this time, which makes it difficult to test your optional payment form.

To see your transactions, you’ll need to activate test mode in Stripe by logging in to your Stripe dashboard and then selecting the ‘Payments’ tab.
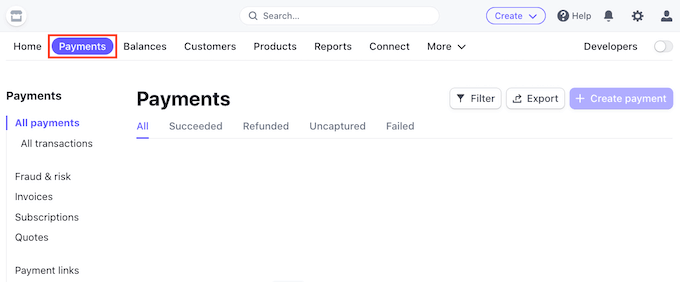
Enabling test mode in the Stripe dashboard

Next, click on the ‘Developers’ toggle in the upper right corner.

Once you’ve done that, all of your test payments will appear in the Stripe dashboard so you can check that the form is working properly.

When you’re happy with how the form is set up, you can start accepting real payments by going to WP Simple Pay » Payment Forms in the WordPress dashboard.

Here, simply hover your mouse over the optional payment form, and click on the ‘Edit’ link.
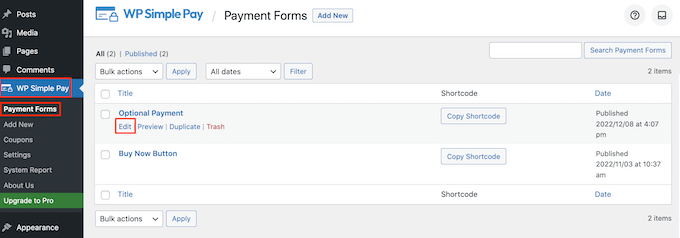
Adding a payment form to WordPress using shortcode

You can now go ahead and select the ‘Payment’ tab, and then click on the radio button next to ‘Live Mode.’

Finally, click on ‘Update.’ Your payment form is now live, and you’re ready to start accepting money from your audience.

How to put WP Simple Pay into live mode

Method 2. Using WPForms (Best For Flexible and Optional Payments)

Sometimes you may want to let customers choose how much money to send as part of a payment or donation. For example, you might create a ‘pay what you want’ model.

Other times, you may want to collect additional details as part of the form or even allow users to submit paid content to your blog or website.

If you’re looking to create a flexible payment form, then you’ll need an advanced form builder plugin.

WPForms is the best form builder plugin for WordPress. You can use it to quickly create lots of different forms, including contact forms, booking forms, and more. Over 5 million website owners use WPForms.

Using this plugin, you can create a form that shows different fields depending on whether the customer wants to send you a payment or not.

For this guide, we’ll be using WPForms Pro because it comes with addons that make it easy to collect payments using popular payment gateways such as Stripe and PayPal. There is also a WPForms Lite version that is 100% free, but it doesn’t include the payment addons.

First, you’ll need to install and activate WPForms Pro. If you need help, then please see our guide on how to install a WordPress plugin.

After activating WPForms, head over to WPForms » Settings in your WordPress dashboard.
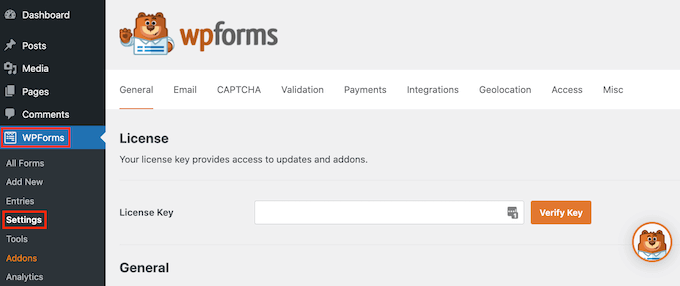
WPForms' pro settings

You can now enter your license key into the ‘License Key’ field. You’ll find this information in your WPForms account.

After activating the WPForms plugin, you’ll need to install at least one payment addon.

To encourage visitors to pay for your product or service, you may want to set up multiple addons so visitors can pay using their favorite method.

To install one or more payment addons, simply go to WPForms » Addons.

You can now find the addon that you want to use, and click on its ‘Install Addon’ button. WPForms lets you accept payments using Stripe, Square, PayPal, and Authorize.net.

For example, if you want to accept payments using PayPal, then you’ll need to install the PayPal Standard Addon.
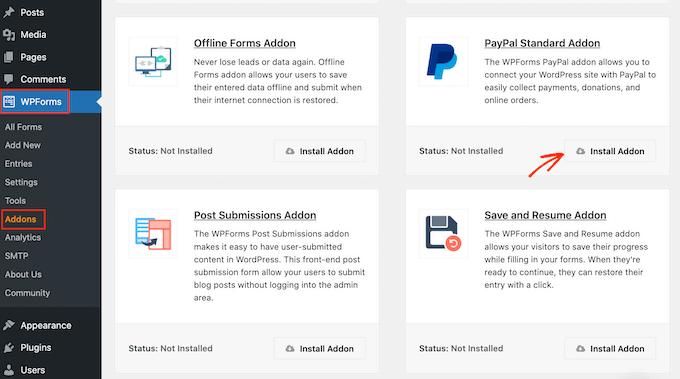
WPForms' PayPal addon

After activating one or more payment addons, the next step is connecting WPForms to the related payment account. For example, if you installed the Square addon, then you’ll need to connect WPForms to your Square account.

To make this connection, go to WPForms » Settings. You can then click on ‘Payments.’
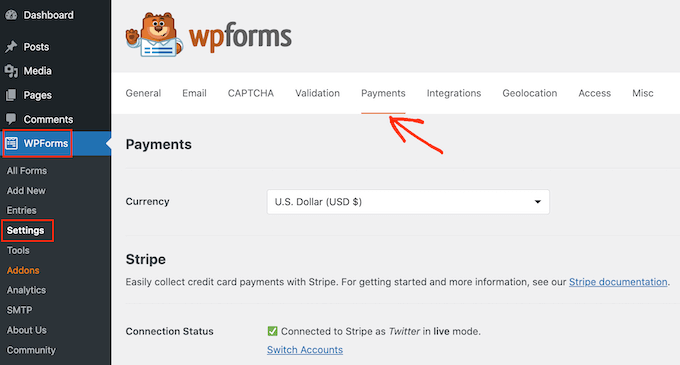
WPForms' payment settings

On this screen, you’ll see a ‘Connect with…’ button for each payment addon that you installed.

Here, simply click on the ‘Connect with…’ button. This will launch a setup wizard, which will guide you through the process of connecting WPForms to your payment account.
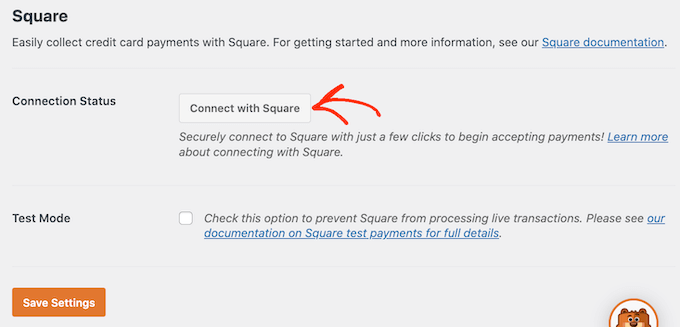
Connecting WPForms to Square

Simply repeat these steps for every payment addon that you want to use.

As soon as you’ve done that, click on the ‘Save Settings’ button at the bottom of the screen. Then, head over to WPForms » Add New.
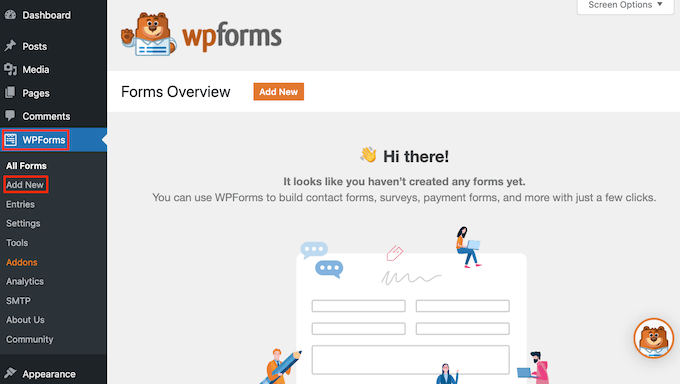
Creating a new WordPress form

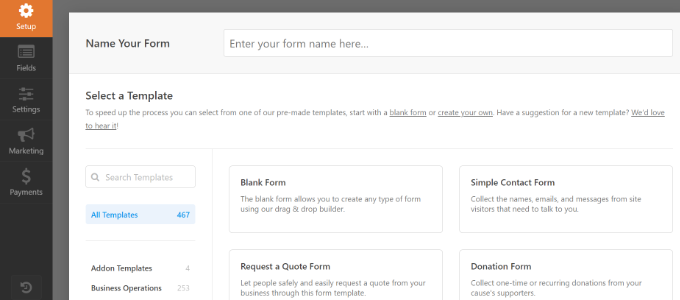
Here, type a name for your form into the ‘Name Your Form’ field.

Your site visitors won’t see the name, so it’s just for your reference.
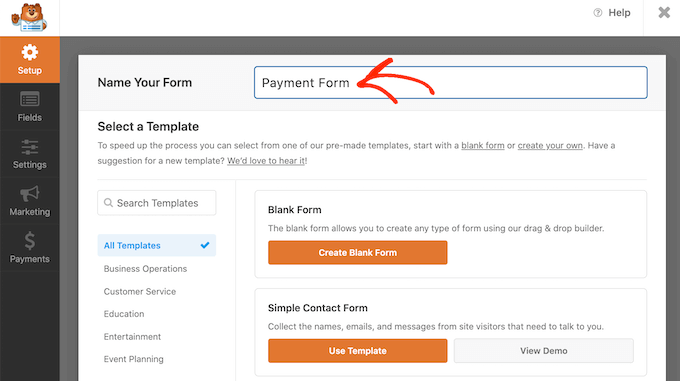
Creating a payment form using WPForms

WPForms has different templates so you can quickly get started and build all kinds of forms.

To take a closer look at a template, simply hover your mouse over the template. Then, go ahead and click on the View Demo button.
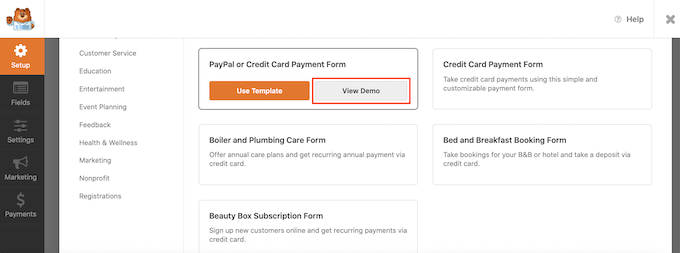
Previewing a credit card payment template

For this guide, we’ll be using the Simple Contact Form template, but you can add a payment field to any WPForms template.

When you find a template that you want to use, simply click on its Use Template button. This will launch WPForms drag and drop form builder.
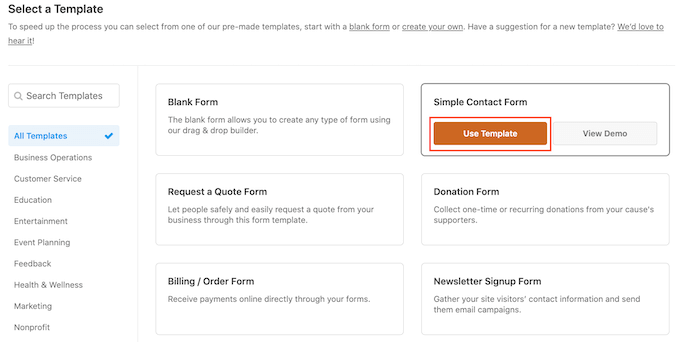
The WPForms Simple Contact template

The Simple Contact Form template already has fields where customers can type in their name, email address, and message.

So next, we need to add a field where visitors can decide whether to send you a payment. The easiest way to do this is by using a Multiple Choice field.

In the left-hand menu, find the Multiple Choice field and then add it to your form using drag and drop.
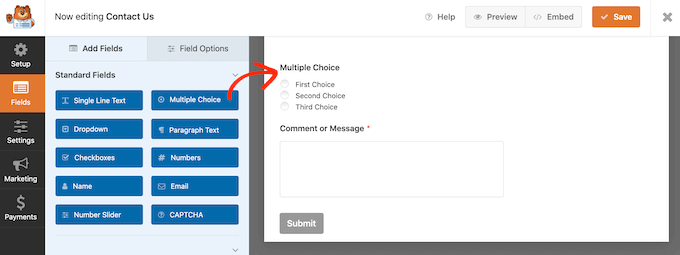
The WPForms 'multiple choice' field

To start, we need to change the label that WPForms shows at the top of the Multiple Choice section.

This is the perfect place to ask visitors whether they want to send you a payment. For example, you might use ‘Would you like to send us a donation?’ or ‘Do you want to support this website?’

To change the default label, simply click to select the Multiple Choice section in your form. The left-hand menu will now show all the settings that you can use to customize this section.

In the left-hand menu, delete the placeholder ‘Multiple Choice’ text in the ‘Label’ field. You can then type in the new text that you want to use.
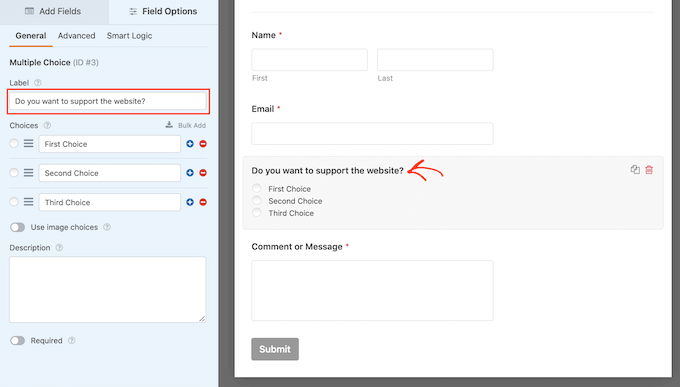
A WordPress form with an optional payment section

By default, the Multiple Choice section has three choices, but we only need two choices.

To remove one of these choices, go ahead and click on the – button next to it.
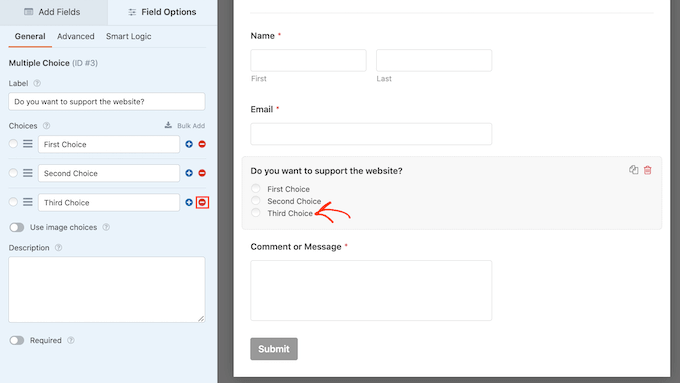
Deleting fields from WPForms

The next step is customizing the text for ‘First Choice’ and ‘Second Choice.’

In the left-hand menu, simply delete the placeholder text and type in the text that you want to use instead. For example, you may want to type in ‘Yes, I want to support the website’ and ‘No, thanks.’
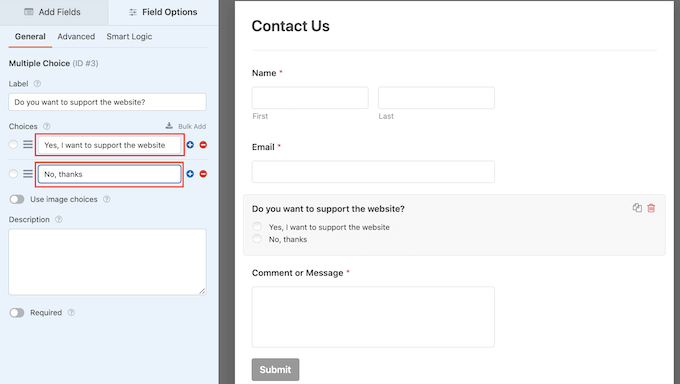
Adding an optional payment to a WordPress form

When creating WordPress forms with a payment option, you may want to let visitors decide how much money to send you.

To do this, simply click on the ‘Add Fields’ tab in the left-hand menu. Then, drag and drop a ‘Single Item’ field onto your form.
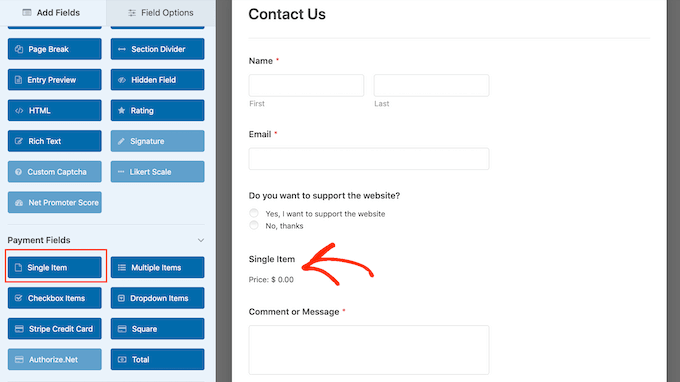
Adding a 'single item' field to a WordPress form

To customize this field, just give it a click.

By default, the field shows a ‘Single Item’ label. You can replace this label with your own text, by typing into the ‘Label’ field in the left-hand menu.

For example, you may want type in text such as ‘I want to send you…’ or ‘Donation Amount.’
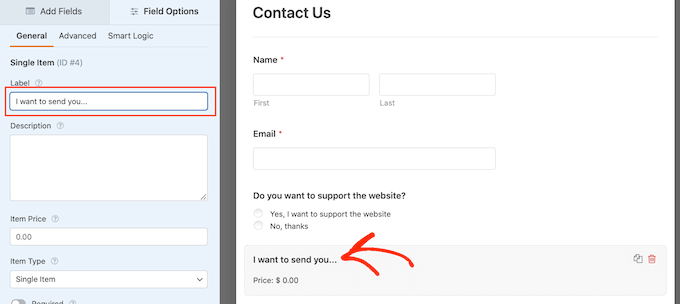
Customizing a WordPress form

Next, open the ‘Item Type’ dropdown and click on User Defined.

Visitors will now be able to type any value into this field, and send you this amount of money.
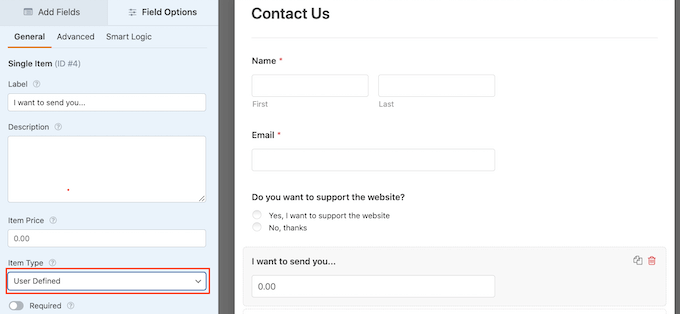
Adding a user defined field to WordPress form

You may also want to suggest the amount of money you would like to get. This can make it easier for visitors to complete your form, since they can click to choose an amount rather than having to make this decision themselves.

To add some suggestions to your form, simply drag and drop a ‘Multiple Items’ field onto your WordPress form.
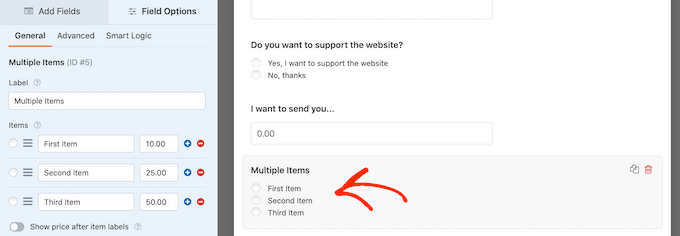
WordPress payment form

Then, go ahead and customize the section’s label and option text by following the same process described above.

Once you’ve done that, you’ll need to set a price for each option by typing the value into the field next to it.
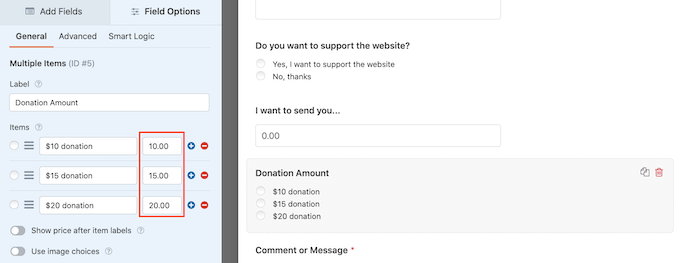
A WordPress form with an optional payment

By default, the Multiple Items section has three options. To add more choices, simply click on the ‘+’ icon.

You can then customize the new option’s text, and type in a value following the same process described above.
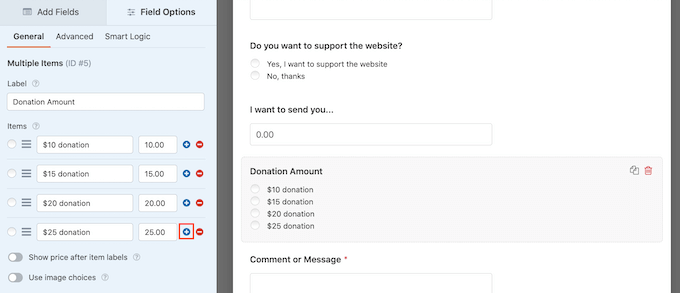
Adding payment choices to a WordPress form

Want to remove an option from the Multiple Items section instead?

To do this, simply click on its ‘-‘ button.
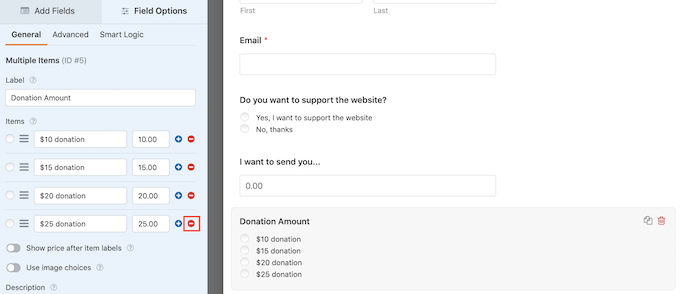
Deleting fields from a WordPress form

After adding some fields, you can change the order these fields appear in your form by dragging and dropping them.

Once you’ve done all that, you’ll need to add at least one payment option to your form.

In the left-hand menu, scroll to the ‘Payment Fields’ section. Here, you’ll find fields for all the different payment addons that you installed.

To add a payment option to your form, just give it a click.
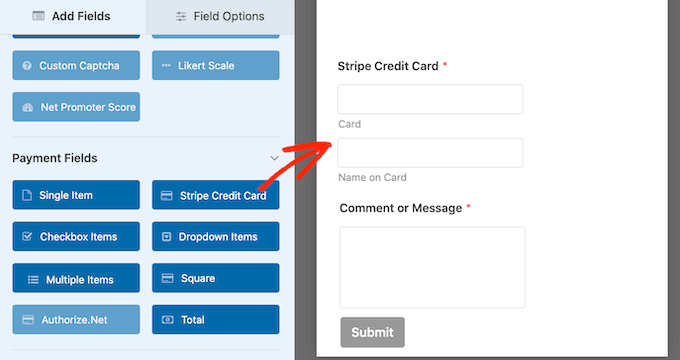
Adding payment fields to a WordPress form

After adding a payment option field, it’s a good idea to click on it. WPForms will now show all the settings that you can use to configure this field.

For example, if you click on the ‘Stripe Credit Card’ field, you’ll be able to edit the label and add a description.
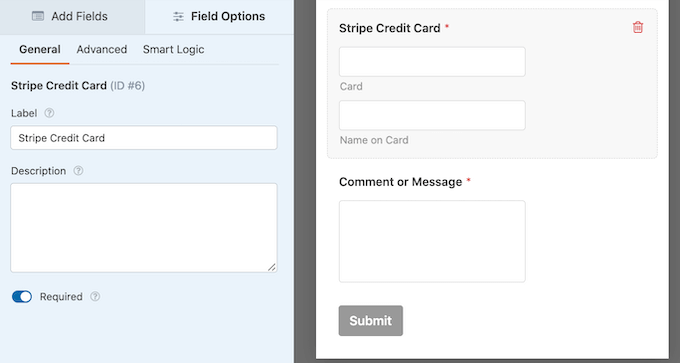
Configuring Stripe payment in WordPress

We only want to show the payment field to visitors who choose to send you a payment. To do this, you need to enable conditional logic for your payment field.

If you haven’t already, then click to select the payment field in your form. Then, simply click on the ‘Smart Logic’ tab in the left-hand menu.

Once you’ve done that, go ahead and click on the ‘Enable Conditional Logic’ slider to turn it from grey (inactive) to blue (active).
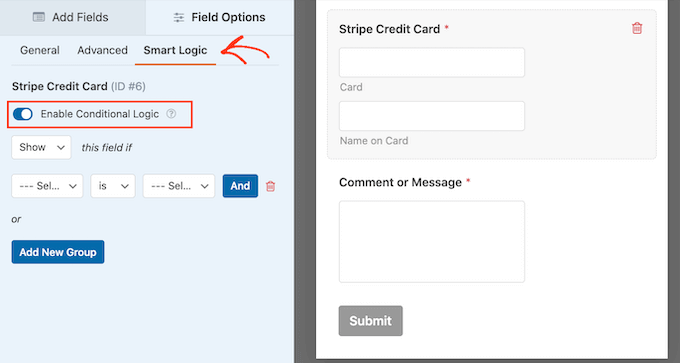
Adding conditional logic to a WordPress form

Next, we need to tell WPForms to only shows the payment field if the visitor selects your ‘Yes, I want to support the website’ option.

To do this, make sure the ‘this field if’ dropdown is set to ‘Show.’

Then, open the field that shows ‘Select Field’ and choose the ‘Do you want to support the website?’ field.
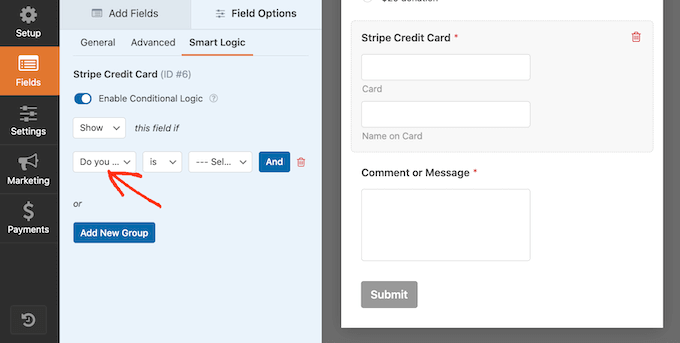
Creating a WordPress form with conditional logic

Once you’ve done that, open the next dropdown and click on ‘is.’

Finally, open the dropdown that shows ‘Select Choice’ by default, and choose the ‘Yes, I want to support the website’ field.
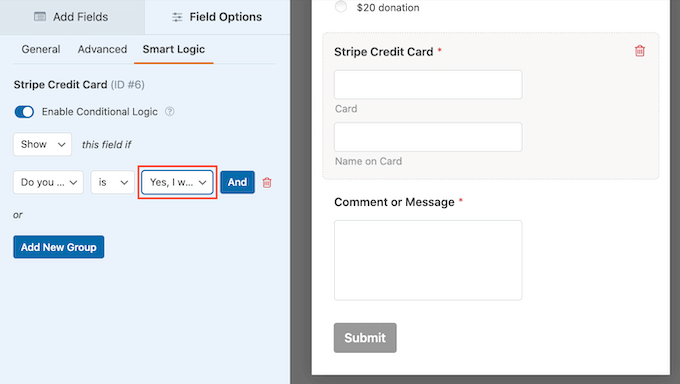
WPForms' smart logic settings

In the image above, we’re telling WPForms to only show the payment field when a visitor confirms that they want to support the website.

Adding Payment Methods to WPForms

The next step is enabling payments for the form. To do that, click on the ‘Payments’ tab in the left-hand menu.

You’ll now see all the different payment options that you can enable for the form.
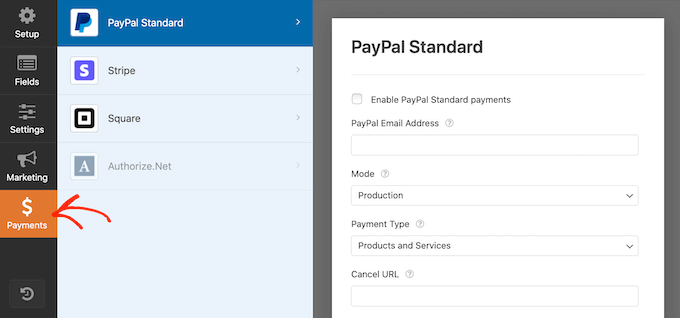
Configuring PayPal payments with WPForms

To get started, simply click on the payment option that you want to configure.

After that, just check the box next to ‘Enable….’

Depending on the payment option, there may be some extra settings you need to configure. For example, if you’re enabling PayPal then you’ll need to type in the email address where you want to get your payments.
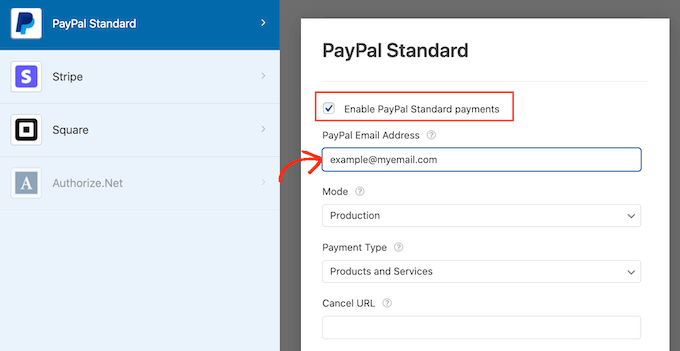
Enabling PayPal payments in WPForms

You’ll also want to use conditional logic rules with your payment settings.

To use conditional logic, click on the ‘Enable Conditional Logic’ slider. Then, open the ‘this charge if’ dropdown and select ‘Don’t process.’
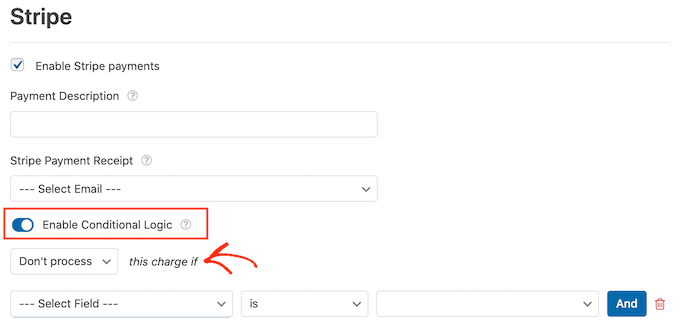
Creating conditional logic rules for WordPress payments

Once you’ve done that, go ahead and open the dropdown that shows ‘Select Field’ by default. You can now choose your ‘Do you want to support this website?’ or a similar field.

Then, make sure the next dropdown menu is set to ‘is.’
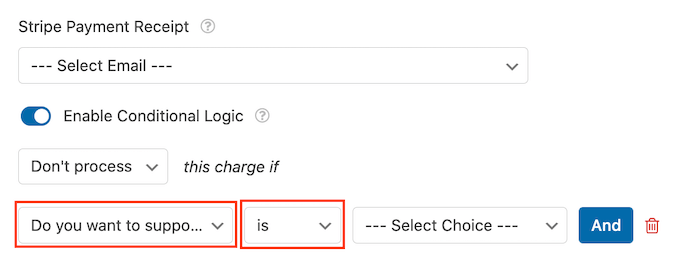
Creating an optional payment form with conditional logic

After you’ve done that, you’re ready to open the ‘Select Choice’ dropdown menu and click on the ‘No, thanks’ or similar field.

Now, your site will refuse to process any payments if the visitor chooses the ‘No, thanks’ option, no matter what they type into the rest of your form.
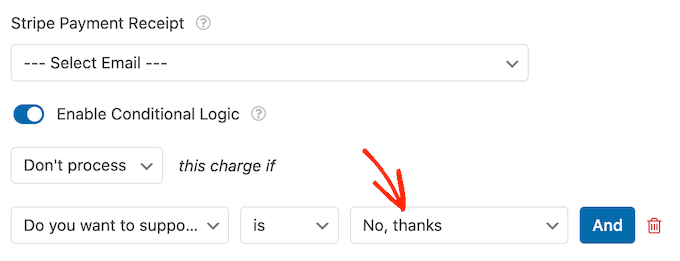
WPForms' conditional logic settings

If you’re offering a choice of payment options, then simply repeat the above process by checking the ‘Enable’ box and then configuring any extra settings. You can also enable conditional logic.

In the following screenshot, you can see that Stripe has different settings compared to PayPal, so it’s always worth checking these extra settings carefully.
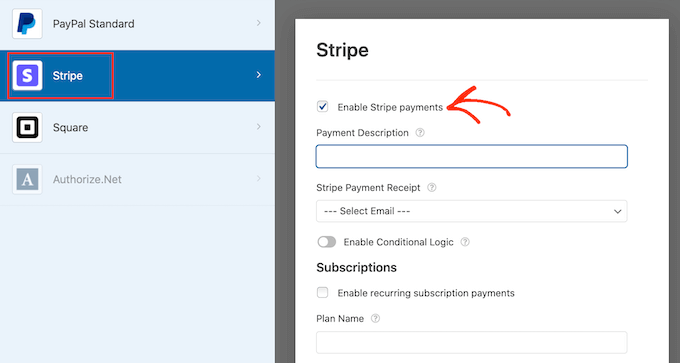
Configuring Stripe payments with WPForms

Once you’ve done that, it’s a good idea to enable AJAX form submissions. This allows users to submit the payment form without reloading the entire page.

To enable AJAX submissions, simply go to Settings » General.
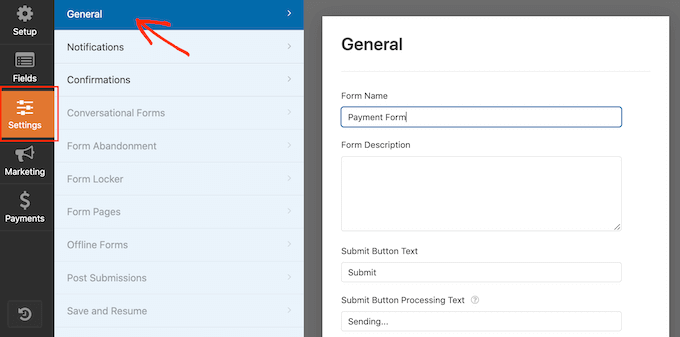
Editing the WPForms settings

Then, just click to expand the ‘Advanced’ section.

After that, you can go ahead and check the ‘Enable AJAX form submission’ box.
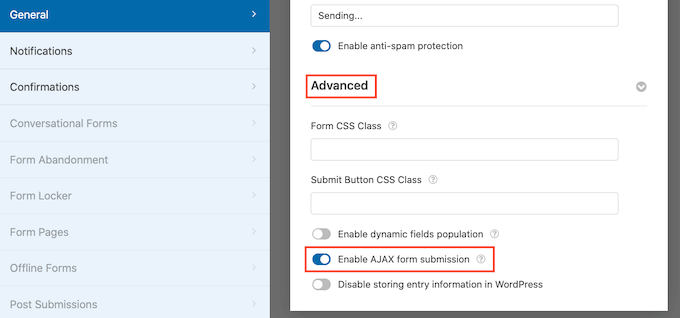
Enabling AJAX submissions

When you’re happy with how your WordPress form looks, go ahead and save your changes.

To do this, just click on the ‘Save’ button at the top of the screen.
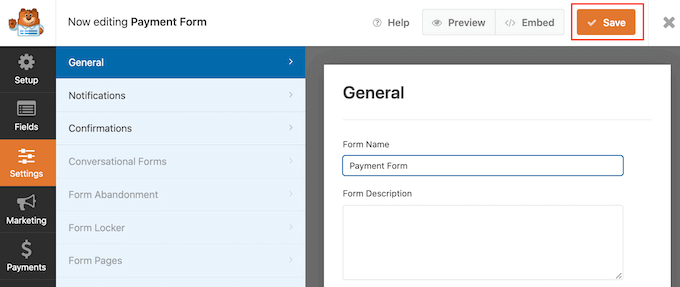
Saving your WPForms form

By default, WPForms will send an email to your WordPress admin every time someone submits this form. However, you may only want to get a notification when someone chooses to send you a payment.

To change WPForms’ default email settings, click on the ‘Settings’ tab. Then, go ahead and click on ‘Notifications’ in the left-hand menu.
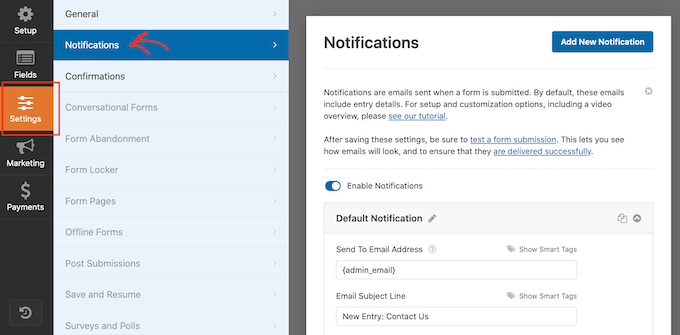
Creating notifications for your WordPress forms

Now, scroll to the bottom of the screen and click on the ‘Enable Conditional Logic’ slider.

As soon as you activate the slider, WPForms will show some extra settings.
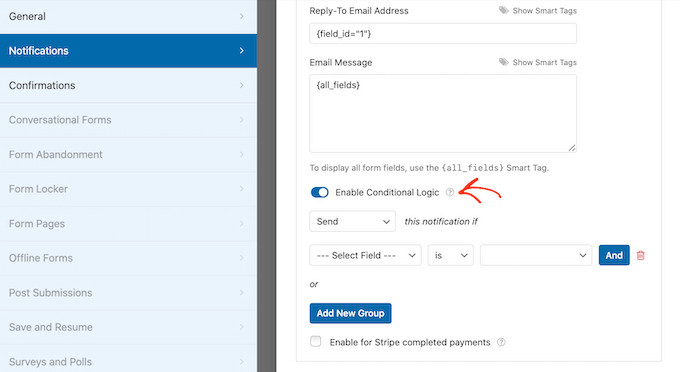
Creating conditional logic emails and notifications

Next, make sure the ‘this notification if’ dropdown is set to ‘Send.’

After you’ve done that, open the dropdown that shows ‘Select Field’ by default and click on the ‘Do you want to support the website?’ or a similar field.

Next, make sure the dropdown is set to ‘is.’
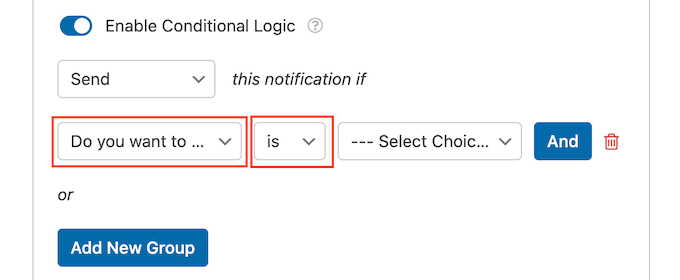
Creating a WordPress form with an optional payment

Finally, open the dropdown that shows ‘Select Choice’ by default.

The final step is choosing the ‘Yes, I want to support the website’ or a similar field.
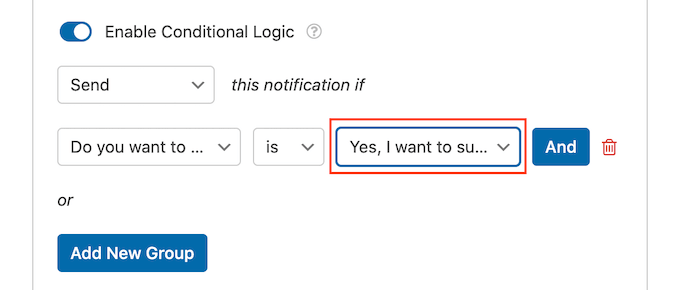
Enabling conditional logic in WPForms

When you’re happy with these changes, don’t forget to click on the ‘Save’ button.

By default, WPForms will send the email to your WordPress admin email. You can send these messages to any other email address, or even multiple addresses.

To change the default settings, find the ‘Send To Email Address’ field. By default this is set to {admin_email}. This is a dynamic value that tells WordPress to send its emails to your WordPress admin.

You can replace this dynamic text with any other email address by typing the new address into the ‘Send To Email Address’ field.

If you want to email multiple people, then simply separate each address with a comma as you can see in the following screenshot.
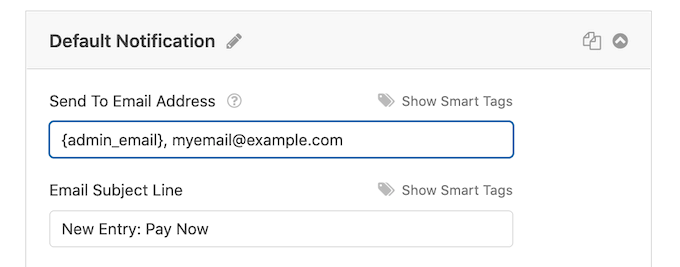
Creating email notifications

By default, WPForms uses ‘New Entry’ and the name of your form for the email subject line.

If you want to use something else then simply type the new text into ‘Email Subject Line.’
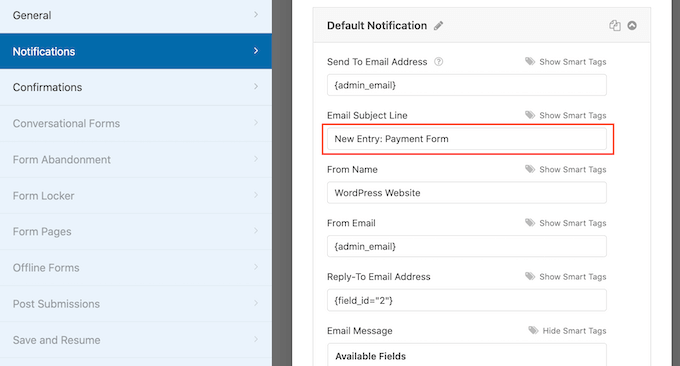
Creating a custom WPForms subject line

Another option is to use dynamic text in your email subject. To do this, click on the ‘Show Smart Tags’ link and then choose a tag from the ‘Available Fields’ list.

Now when WPForms creates its emails, it will automatically replace the smart tags with values taken from the submitted form. For example, if you click on ‘Total Amount’ then WPForms will show the total payment in its email subject line.
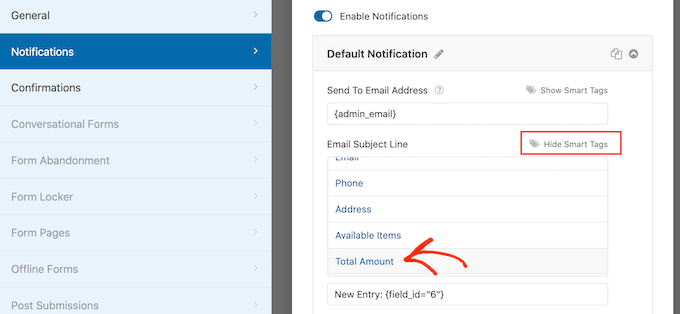
WPForms' smart tags

You can also change the text that’s included in the email’s body.

Once again, you have the option to use smart tags to create a more informative email.
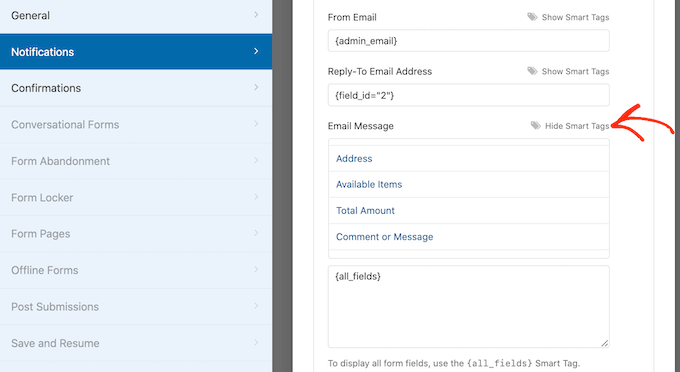
Using dynamic text with WPForms

After creating your custom email notifications, you’ll want to make sure they’re sent to the recipient’s email inbox and not to the spam folder.

The best way to do this is by using an SMTP service provider along with WP Mail SMTP to improve email deliverability. For more details, see our guide on how to fix WordPress not sending email issue.

You may also want to show a confirmation message to your customers. For example, you might confirm you’ve received their form safely or show them a personalized ‘Thank You’ message. WPForms will show this message automatically whenever a customer submits the WordPress form.

To configure this message, click on the ‘Confirmations’ tab. Then, just open the ‘Confirmation Type’ dropdown and choose ‘Message.’
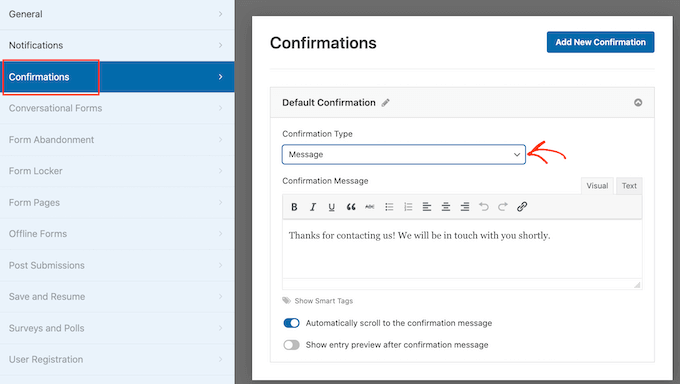
Showing a custom form confirmation message

If you want to show the same text to all visitors, then you can simply type your text into the ‘Confirmation Message’ box.

Another option is to create a personalized message by adding smart tags, following the same process described above.

Instead of showing a message, you might prefer to show a particular page or redirect visitors to another URL. To do this, simply open the ‘Confirmation Type’ dropdown.

You can now choose from ‘Show Page’ or ‘Go to URL.’
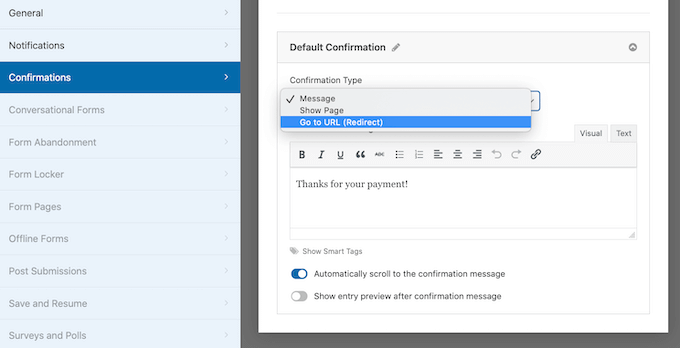
Changing the payment confirmation settings

After that, you can use the settings to configure the page or URL that WPForms will show after the customer submits the form.

When you’re happy with these settings, don’t forget to save your changes by clicking on the ‘Save’ button.

After all that, you’re ready to add this form to your website.

To do this, simply open up the page or post where you want to show the form. Then click on the plus ‘+’ icon.

In the popup that appears, type ‘WPForms’ to find the right block. As soon as you click on the WPForms block, it will add the block to your page.
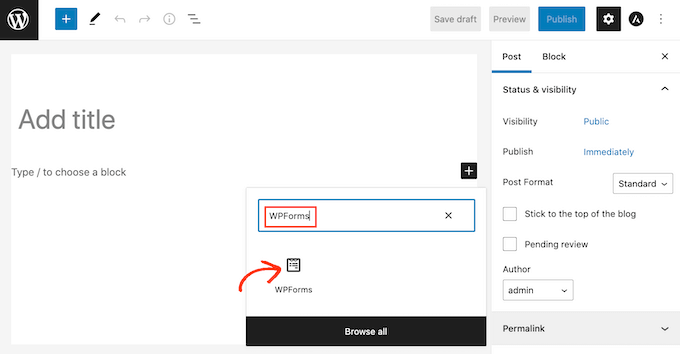
The WordPress WPForms block

In your new block, go ahead and click to open the dropdown menu.

You will now see a list of all the forms you’ve created using WPForms. Simply click to select the WordPress form with a payment option.
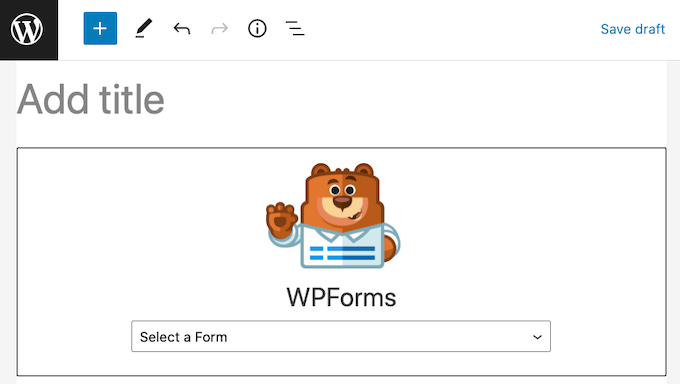
The WPForms WordPress block

WPForms will now show a preview of how your form will look directly in the WordPress editor.

You can also preview the entire page by clicking on the ‘Preview’ button in the toolbar.
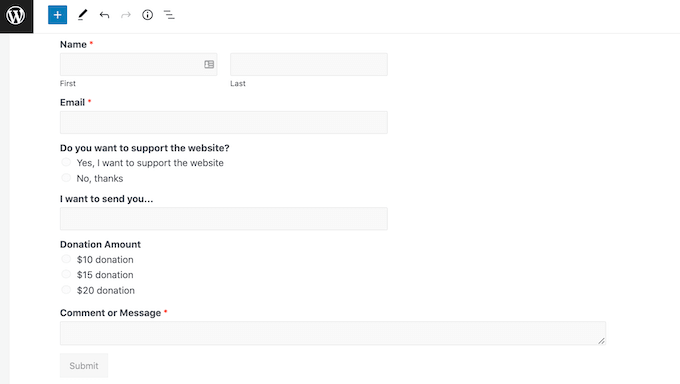
WordPress form with a payment option

When you’re happy with how your form looks, you can either publish or update this page as normal. Now if you visit this page or post, you’ll see the optional payment form live on your WordPress website.

We hope this article helped you learn how to create WordPress forms with a payment option. You may also want to check out our guide on how to create and sell online courses with WordPress and our comparison of the best live chat software for small businesses.

If you liked this article, then please subscribe to our YouTube Channel for WordPress video tutorials. You can also find us on Twitter and Facebook.

The post How to Create a WordPress Form with Payment Options (Easy Way) first appeared on WPBeginner.

8 Best Typeform Alternatives for 2023 (Free + Paid)

Are you looking a Typeform alternative for your website?

Typeform is a tool that lets you create different types of forms. However, it is expensive software, especially for small businesses. There are other WordPress form plugins and other alternatives that offer more features and are extremely affordable.

In this article, we’ll show you the best Typeform alternatives. We’ll include free and paid options so that you can choose the best plugin for your business.

Best Typeform alternatives free and paid

Why Do You Need a Typeform Alternative?

Typeform is a popular software for creating different forms for your WordPress website. You can use it to make a survey or a poll for your business. It also allows you to create quizzes, application forms, and order forms.

While Typeform offers many features and form templates, it has some drawbacks. For instance, because Typeform is a SaaS (software as a service) tool, it stores data on its external servers. This can be a security vulnerability, as you’ll be trusting someone else with your customer’s personal data.

Another drawback of using Typeform is the cost. The basic plan starts from $25 per month, which can be expensive for small businesses. Plus, you cannot remove the Typeform branding in the basic plan.

If you want more features and integrations, or if you want to use your own branding, then you’ll need to upgrade to a higher pricing plan. Not to mention that they restrict the number of responses you can collect in a month. For example if you want more than 100 responses a month, you’ll be paying $600 per year, and then the next level up is $996 per year.

This will significantly drive up the cost of running a website and make Typeform less attractive for WordPress users.

There is also a free version of Typeform, but it lacks many features. This is why most smart website owners use WordPress plugins as alternatives and get more options for free.

That said, let’s look at the best Typeform alternatives.

1. WPForms

The WPForms form builder plugin and signature addon

WPForms is the best WordPress contact form plugin and offers a lot more features compared to Typeform. Over 5 million professionals use WPForms on their websites to create all types of forms.

It is super easy to use and offers a drag-and-drop form builder. Plus, you get many prebuilt form templates and multiple customization options.

Choose a form template

Even in the free version of WPForms, you get features like spam protection, basic form fields, email notifications, and more. This is more than what Typeform’s free version offers users.

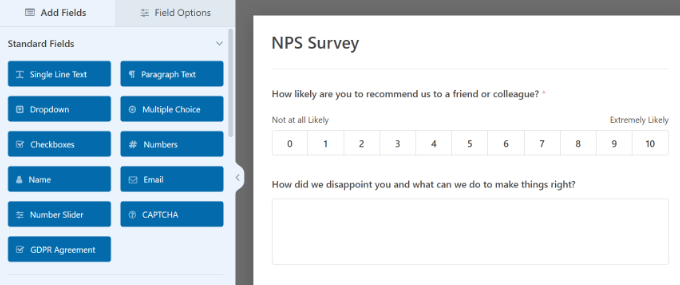
Besides that, WPForms comes with powerful addons. For instance, you can create a conversational form in just a few clicks or create stunning surveys and polls with ease. You also get interactive survey reports and advanced fields like the Likert scale, net promoter score (NPS), and star ratings.

Edit your NPS survey

Another advantage WPForms offers over Typeforms is that it easily integrates with popular email marketing tools, payment gateways to accept online payments, and other WordPress plugins like OptinMonster.

For instance, you can add a form from WPForms to an OptinMonster campaign and show it in a popup. Similarly, you can track form conversions and performance by integrating it with MonsterInsights.

Besides that, WPForms also offers other features that you won’t find in Typeform. For example, WPForms lets you track user journeys, collect geolocation data, track and reduce form abandonment, allow file uploads, and more.

Pricing: WPForms premium plans start from $49.50 per year. WPBeginner users can avail of an exclusive 50% OFF discount on all plans using our WPForms coupon. There is also a WPForms Lite version you can use for free.

2. Formidable Forms

The Formidable Forms plugin and Signature addon

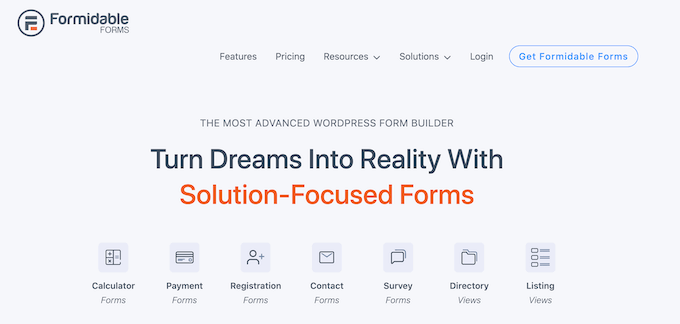
Formidable Forms is an advanced WordPress form plugin and a great alternative to Typeform. You can create complex and technical forms without editing code, which is not possible in Typeform.

For instance, Formidable Forms makes it super easy to create calculators like mortgage calculators, quote request calculators, or car payment calculators.

Besides that, you can use the plugin to collect customer feedback and data by creating polls and surveys. It also makes it super easy to set up automated quizzes with grading, collect online payments, and even display form data on the front end of your website.

Other features offered by Formidable Forms include an easy-to-use drag-and-drop form builder, conditional logic, multiple form templates, visual form styler, landing pages, and more.

Pricing: Formidable Forms pricing starts from $39.50 per year. You can also use a free version of the plugin as an alternative to Typeform.

3. Gravity Forms

Gravity forms

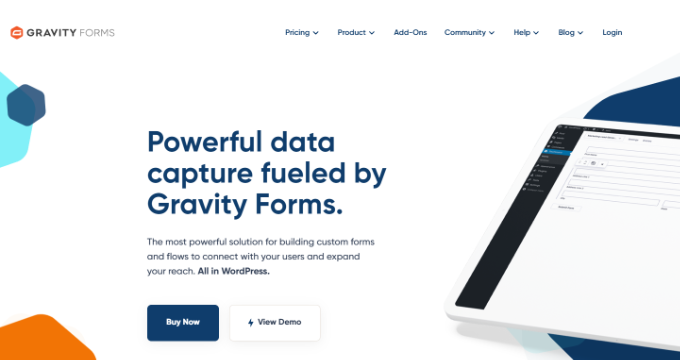
Gravity Forms is a popular Typeforms alternative you can use for your website. It is used by some of the biggest brands, like Nike, ESPN, NASA, and UNICEF.

Gravity Forms offers robust features and helps create complex form solutions at a fraction of the cost compared to Typeforms. For instance, you can use it to create quizzes, surveys, web directories, and accept user-generated content on the front end of your site.

Besides that, the plugin offers a drag-and-drop visual form builder, prebuilt form templates, and many customization options. You can also set up automated workflows and show or hide form fields, buttons, and form sections based on user behavior.

Pricing: Gravity Forms is a premium alternative to Typeforms, with prices starting from $59 per year.

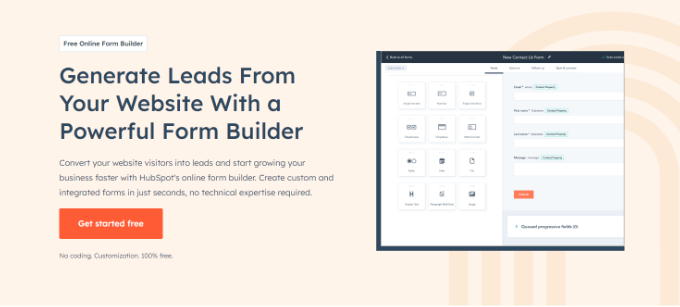
4. HubSpot Forms Builder

HubSpot

HubSpot Form Builder is the next Typeform alternative on our list, and it is a powerful all-in-one marketing toolkit. It includes a form builder, live chat, analytics, popups, and other marketing tools.

Using HubSpot, you get a complete customer relationship management (CRM) platform. This helps to automatically sync your WordPress form with your contacts, easily manage them, create different segments, and more.

HubSpot Form Builder also makes a great alternative to Typeforms if you’re already using other HubSpot products, like its email marketing tool. Besides that, it easily integrates with other contact form plugins like WPForms and Formidable Forms.

Another advantage of using HubSpot is that you get to see how your forms are performing. You don’t have to integrate it with a third-party tool like Google Analytics. With built-in analytics reports, you can see which forms are converting the best.

Pricing: You can sign-up for free on HubSpot and use the CRM, live chat, and other features for free. However, their premium plans start from $45 per month (billed annually).

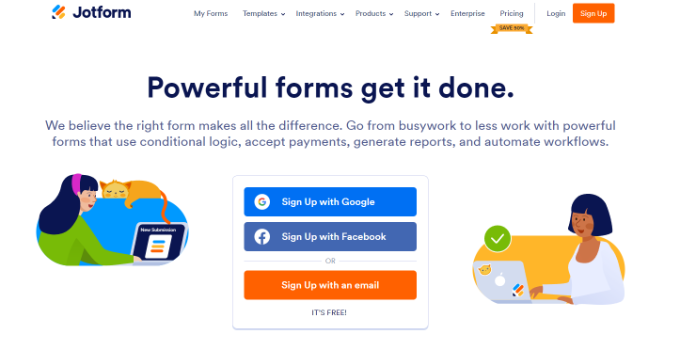
5. Jotform

Jotform

Jotform is a popular form builder that makes it super easy to create different types of online forms. Whether you want a simple contact form or a form to collect online payments, Jotform lets you build one in just a few minutes.

What makes Jotform a great Typeform alternative is that you can customize your forms and add your own branding and logo even in all the paid plans.

Besides that, you get a lot more features in the free version of Jotform compared to Typeform. For example, you can create up to 5 forms, get 100 monthly submissions, 100MB of storage space, and more.

Jotform also offers other products along with a form builder. You can use its store builder to create an online store, add tables, build online apps, turn form responses into visual reports, edit PDF files for free, and more.

Pricing: Jotform premium plans start from $34 per month, and you get a 30-day money-back guarantee. There is also a free Jotform version you can use to get started.

6. Ninja Forms

Ninja Forms

Ninja Forms is another Typeform alternative you can use for free. It lets you create interactive online forms with no coding skills required. Plus, the drag-and-drop form builder makes it super easy to design all types of forms without hiring a designer.

Asides from that, Ninja Forms also offers premium extensions for more features. For instance, you can create conversational forms using conditional logic addon or set up a multi-step form.

Other paid addons include an advanced date picker, file uploader, PDF form submission option, and more. Ninja Forms also integrates with different payment services like PayPal and Stripe, email marketing tools like MailChimp CRMs like Salesforce, and other tools like Slack and Webhooks.

Pricing: The base plugin of Ninja Forms is free to use. However, if you want more features, then you’ll need its premium extensions. The Personal plan starts from $49 per year and includes 4 addons.

7. Zoho Forms

Zoho Forms

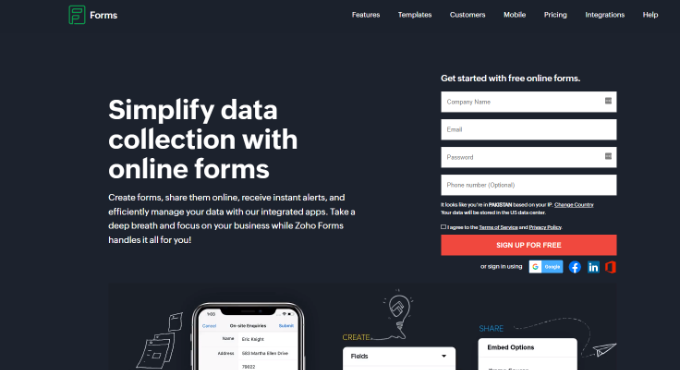
Zoho Forms is a premium form builder that offers lots of features and seamless integration. It is a great alternative to Typeform if you’re already using Zoho CRM and other Zoho tools.

Zoho Forms lets you create over 30 different types of forms, including contact forms, surveys, polls, and more. Plus, it offers different form templates for multiple industries, like businesses, medical institutions, eCommerce sites, and more.

Besides that, Zoho Forms also provide multiple security options. These include SSL, field encryption, form audit, CAPTCHA, and more.

Pricing: Zoho Forms prices start from $10 per month and offers 10,000 submissions per month, 500MB storage, unlimited forms and reports, and more.

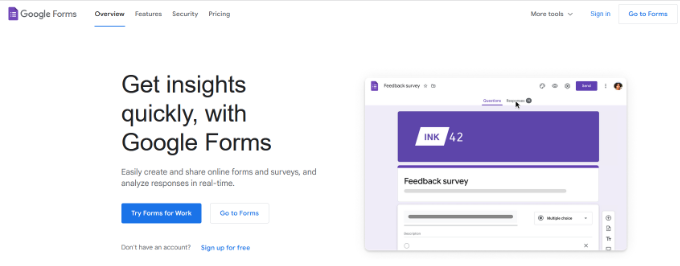
8. Google Forms

Google Forms

Google Forms is a free form building tool by Google and is very easy to use. You can create all types of online forms, surveys, questionnaires, feedback forms, and more.

It is a great Typeform alternative if you’re looking for a basic form builder that gets the job done. It has a simple interface and offers a drag-and-drop builder.

You can also add images to your form, break up long forms into multiple steps, get email notifications in Gmail, add skip logic to form fields, and more. Plus, your form responses get organized and stored in Google Sheets.

That said, it provides limited customization options compared to other form plugins on our list. If you want more features, then do check out our guide on Google Forms alternatives.

Pricing: Google Forms is free to use.

Which Typeform Alternative Should You Use?

After going through multiple WordPress form plugins and tools, we believe that WPForms is the best Typeform alternative. It offers the most customization options and form templates, and it has a very beginner-friendly interface.

You can create all sorts of online forms for your website using WPForms. Plus, it easily integrates with other plugins, payment methods, email marketing tools, CRMs, and other tools.

The best part is that WPForms has a free version that has more features and options compared to Typeform’s free version.

On the other hand, if you’re looking to create complex form solutions like calculators, then we recommend Formidable Forms. It offers pre-built templates and customization options, which aren’t available in Typeform.

We hope this article helped you find the best Typeform alternative. You can also go through our ultimate WordPress SEO guide and how to choose the best blogging platform.

If you liked this article, then please subscribe to our YouTube Channel for WordPress video tutorials. You can also find us on Twitter and Facebook.

The post 8 Best Typeform Alternatives for 2023 (Free + Paid) first appeared on WPBeginner.

Weekly WordPress News: WordPress Plugin Acquisitions

Hey, WordPress friends. We are checking in with your latest dose of weekly WordPress news.  There are two acquisitions in the WordPress space this week. The Events Calendar acquired WP Conference Schedule. Meanwhile, Pirate Forms is now part WPForms.  Beyond that, there’s a short-cycle maintenance release that fixes a number of bugs. We recommend updating [...]

Read More...

The post Weekly WordPress News: WordPress Plugin Acquisitions appeared first on Learn WordPress with WPLift.

7 Google Forms Alternatives in 2022: More Features Means Better Flexibility

There are plenty of Google Forms alternatives available, but which one should you choose? In this article, I discuss why you should consider switching from Google forms to an alternative. I also look at the key features good alternatives should have. Finally, I will show you some of the best options currently available. Why Consider [...]

Read More...

The post 7 Google Forms Alternatives in 2022: More Features Means Better Flexibility appeared first on Learn WordPress with WPLift.

Welcome Uncanny Owl and Automator Plugin to the WPBeginner Growth Fund

Today, I’m extremely excited to announce that WPBeginner Growth Fund has taken an investment stake in Uncanny Owl, the parent company of a fast growing WordPress automation plugin, Uncanny Automator, and a suite of e-learning plugins for WordPress.

Over 25,000+ websites use Uncanny Owl plugins to automate and grow their businesses.

WPBeginner Growth Fund invests in Uncanny Owl and Uncanny Automator Plugin

About Uncanny Owl and Uncanny Automator Plugin

Uncanny Owl is a Toronto based WordPress company founded by Ryan Moore and Ken Young.

They specialize in helping automate WordPress-powered learning platforms and membership sites to deliver compelling e-learning solutions.

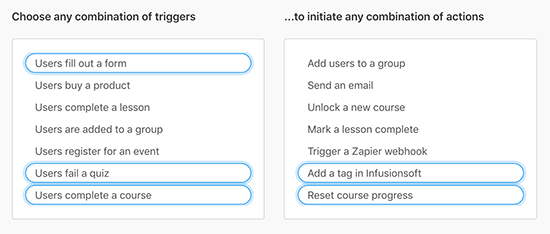
Their team is behind the fast growing WordPress automation plugin, Uncanny Automator, which helps you automate various WordPress admin tasks, so you can save time & money.

Uncanny Automator Explained

It seamlessly integrates with many popular WordPress plugins and third-party platforms, so you can easily build automation recipes without writing any code (over 300 triggers & actions).

In plain English, it helps your WordPress plugins talk to each other, so you can do cool things like:

  • Have 2 WordPress sites talk to each other – sell products on one while create users & setup access on another.
  • Create buttons that can automatically create user accounts and perform other actions in WordPress.
  • Add custom user attributes to user profiles based on user’s actions.
  • Trigger automation recipes in one plugin from the action taken by another plugin (for example, a submission of WPForms can be used to register a user in MemberPress, add them to a BuddyBoss group, and get a calendar event added).
  • Connect your WordPress site with 2000+ external services using a single Zapier integration.
  • … and so much more

Uncanny Automator Triggers and Actions

Uncanny Owl is also known for their popular Uncanny Toolkit and other e-learning extensions.

Background Story — Why Uncanny Owl?

I got introduced to Uncanny Owl brand through their Uncanny Automator plugin because I have always wished something like this existed in WordPress.

Having the ability for two plugins to talk to each other and seamlessly automate tasks is a dream come true.

What’s even better is that they let you do it across two sites without writing any code. The moment I saw it, I was like … this is Zapier for WordPress.

The fact that they had already built the product that would save website owners a lot of time, I wanted to work with them.

Coincidently, two of our mutual friends, Artur and Chris from Extendify, reached out and asked if I would be interested in chatting with the Uncanny Owl founders to discuss a deeper partnership.

My answer was, absolutely!

After few conversations, we decided to join forces.

I invested in the Uncanny Owl business through the WPBeginner Growth Fund and will be advising the team on how to expand their WordPress product business.

At Awesome Motive, we have years of experience building popular WordPress plugins that are used by over 15 million websites including OptinMonster, WPForms, MonsterInsights, and many more.

Not to mention, our other WPBeginner growth fund portfolio companies like MemberPress, Formidable Forms, Pretty Links, Wholesale Suite, and others have seen tremendous growth over the years.

Sharing our combined knowledge with Uncanny Owl will help all of us better serve the larger WordPress community.

I’m really excited to be working with Ryan, Ken, and the entire team to help accelerate their growth in 2021 and beyond.

Thank you so much for your continued support of WPBeginner.

Sincerely,

Syed Balkhi
Founder of WPBeginner

P.S. Want us to acquire or invest in your WordPress business? Learn more about the WPBeginner Growth Fund.

The post Welcome Uncanny Owl and Automator Plugin to the WPBeginner Growth Fund appeared first on WPBeginner.

WPForms vs. Gravity Forms (2022): Two Popular Form Builders Go Head-to-Head

You may not give them credit, but forms are an essential part of your WordPress site. They let people contact you, help you build your email list, allow visitors to register, and just generally power your WordPress site in any number of unsexy ways. [...]

Read More...

The post WPForms vs. Gravity Forms (2022): Two Popular Form Builders Go Head-to-Head appeared first on Learn WordPress with WPLift.

Gravity Forms vs. WPForms vs. Caldera Forms: Which is Best? [Updated 2018]

You may not give them credit, but forms are an essential part of your WordPress site. They let people contact you, help you build your email list, allow visitors to register, and just generally power your WordPress site in any number of unsexy ways.

The post Gravity Forms vs. WPForms vs. Caldera Forms: Which is Best? [Updated 2018] appeared first on Learn WordPress with WPLift.

How to Create a Net Promoter Score® (NPS) Survey in WordPress

Do you want to create a Net Promoter Score (NPS) survey in WordPress?

Net Promoter Score is a popular method to measure customer loyalty, so you can improve your brand image, find new product ideas, and provide better customer service.

In this article, we will show you how to easily create a Net Promoter Score® Survey in WordPress, and how to properly use it to improve your business.

How to create a net promoter score survey in WordPress

What is Net Promoter Score?

Net Promoter Score is a management tool that helps businesses measure customer loyalty. The idea was first introduced in 2003, and since then more than two-thirds of Fortune 1000 companies have adopted it.

Here is how it works.

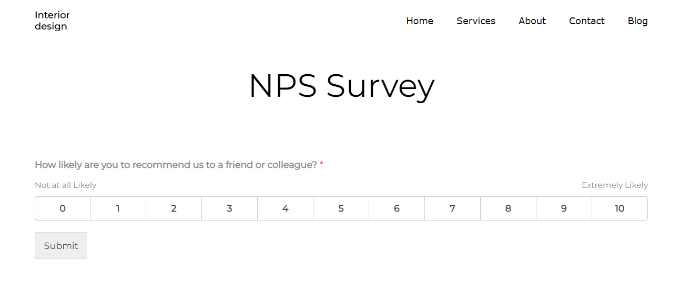
It is based on a single question, ‘How likely are you to recommend our company/product/service to a friend or colleague?’

The answer is provided on a scale of 0 to 10.

NPS survey form preview

Customers who respond with a score of 9 or 10 are called ‘Promoters’. These are your brand’s most loyal customers and are highly likely to purchase again and recommend your business to others.

Users who answer with a score between 0-6 are considered ‘Detractors’. These are the customers who are unhappy with your business and are least likely to purchase or recommend your business.

Customers responding with a score of 7 or 8 are called ‘Passives’. They can be either promoters or detractors and are less likely to actively recommend your business and products to their friends or colleagues.

Your final NPS score is calculated by subtracting the percentage of detractors from the percentage of promoters. The overall score ranges from -100 to 100.

A -100 score means all customers are detractors and a full 100 score means all customers that took part in the survey were promoters. Normally, a score of positive numbers (0-40) is considered good, and a score of 50 or above is considered excellent.

Due to the popularity of NPS surveys among businesses, there are numerous very expensive survey tools that will charge you hundreds of dollars per month. These solutions are not very affordable for small businesses.

Luckily, you can use a WordPress survey plugin by WPForms which helps you create powerful NPS surveys at a fraction of the cost.

Let’s take a look at how to create a Net Promoter Score survey in WordPress.

Creating a Net Promoter Score (NPS) Survey in WordPress

The first thing you need to do is install and activate the WPForms plugin. For more details, see our step-by-step guide on how to install a WordPress plugin.

WPForms is a paid plugin, and you will need at least their Pro plan to access the surveys addon used in this tutorial.

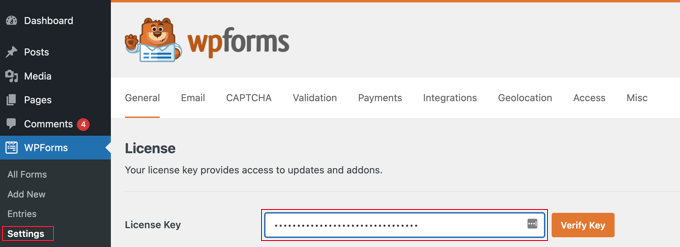
Upon activation, you need to visit WPForms » Settings page from your WordPress to enter your license key. You can find this information under your account area on the WPForms website.

Entering the WPForms license key

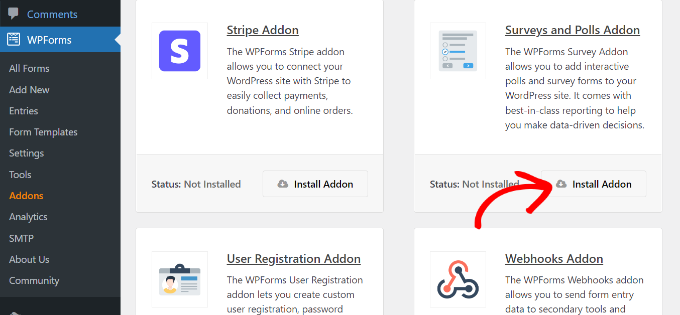
After entering your license key, you need to visit the WPForms » Addons page and locate the ‘Surveys and Polls Addon.’

Go ahead and click on the ‘Install Addon’ button. WPForms will now install and activate the addon.

Install surveys and polls addon

You are now ready to create your first Net Promoter Score survey form.

Head over to WPForms » Add New from the WordPress admin panel to create a new form. First, you need to provide a title for your form, and then select a form template.

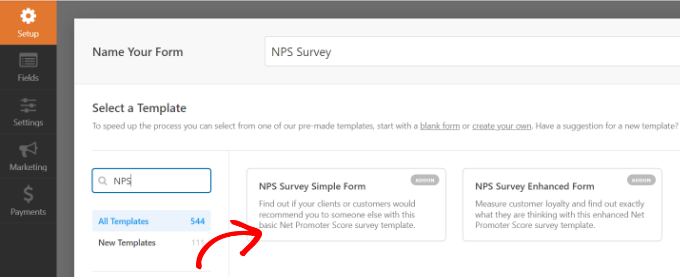
WPForms offers lots of prebuilt form templates. You can simply search for an NPS form template from the search bar on the left.

For this tutorial, we will use the ‘NPS Survey Simple Form’ template.

Select a NPS survey form template

WPForms will now load the form builder interface with some typical survey form fields.

This is a drag-and-drop form builder where you can just point and click to edit any existing form fields or add new fields from the left column.

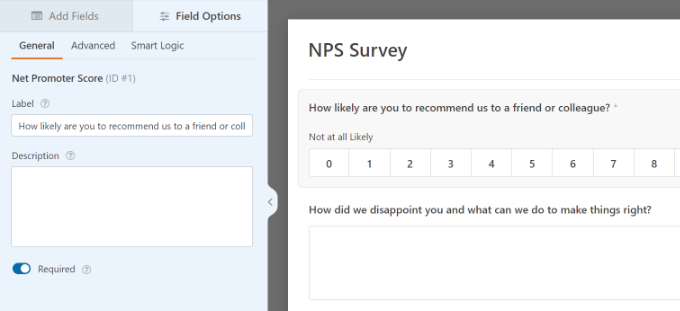
Edit your NPS survey

If you click on the existing fields in the form, then you’ll see more options for customization.

For instance, you can change the text for each question and make it a required field.

Customize each NPS survey field

Your Net Promoter Score survey form is now almost ready. Simply getting the score is not very helpful because you don’t know why these customers are unhappy or happy.

Let’s add some smart conditional fields to the form to get more helpful feedback from users.

Adding Conditional Logic to Net Promoter Score Survey Form

WPForms comes with a smart conditional logic feature that allows you to show or hide form fields based on the user’s answers to previous form fields.

You can use that feature to ask users for more feedback based on their answers. For example, you can ask users who select a score between 0-6 to give you another chance to make things right. These customers are unhappy and asking them for an opportunity to make things right will help you improve your relationship with these customers.

Similarly, you can also ask users giving a score between 9-10 to leave a testimonial and ask for their permission to share it on your website. These are your most loyal customers, and their testimonials can help you add social proof to your website.

Let’s add these conditional fields to your NPS survey form.

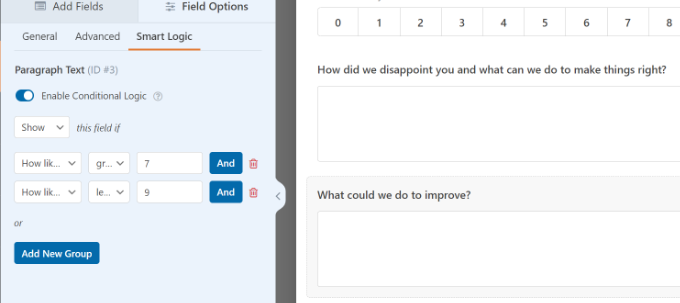
First, select the question after the NPS scale. Next, switch to the ‘Smart Logic’ tab from the menu on your left and click the ‘Enable Conditional Logic’ toggle to enable the option.

Enable conditional logic

We only want to show this field to users responding with a score between 0 and 6. To do that, we will add conditional logic to this form field.

WPForms will add the logic by default. However, you can edit the rating for which you’d like to show the survey question.

Similarly, you can set up conditional logic for the second question in the survey. By default, WPForms will set the condition for you and only show the field when the score is between 7 and 9.

Conditional logic for second question

You can edit these conditions according to your survey needs. However, if you’re just starting out, then we recommend using the default settings.

Now repeat the process for other questions in the form. Don’t forget to save your changes.

Adding Your Net Promoter Score Survey in WordPress

WPForms makes it super easy to add forms to any post or page on your website.

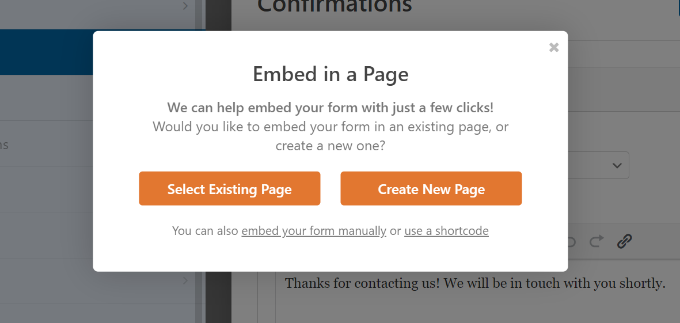
You can simply click the ‘Embed’ button inside the form builder to get started.

Click the embed button

Next, you’ll see 2 options to embed the NPS survey. You can create a new page or select an existing page.

We’ll choose the ‘Create New Page’ option for this tutorial.

Embed a form in page

After that, a popup window will open.

Simply enter a name for your new page and click the ‘Let’s Go’ button.

Enter name for your new page

Next, you should see your NPS survey form embedded in the content editor.

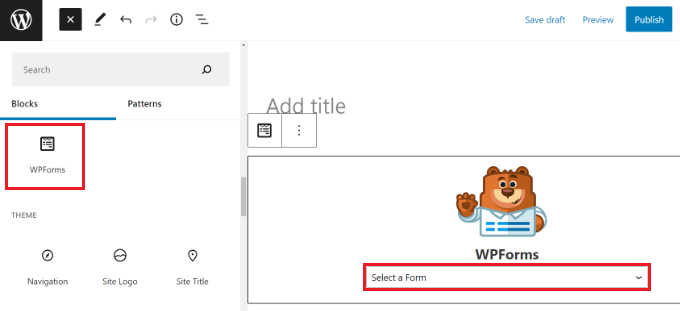
Alternatively, you can also use the WPForms block to add the NPS form anywhere on your website.

Add a WPForms block in wordpress

Simply click the ‘+’ button to add the WPForms block. After that, select your form from the dropdown menu.

You can now save your changes and visit your website to see the form in action.

NPS survey form preview

Now, whenever a user selects a score between 0 to 6, they will see another form field asking for their feedback.

Viewing Your Net Promoter Score Results

After your form is live, WPForms will start calculating your Net Promoter Score based on survey results. You can send the NPS survey link to your customers using an email marketing service to encourage them to fill it out.

After a few users have filled out the form, you can go ahead and check your score.

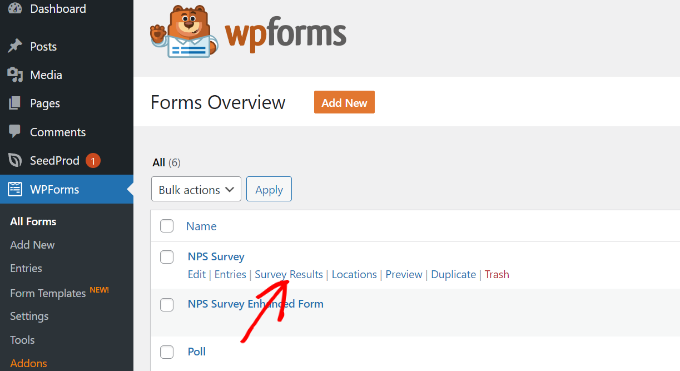
To do that, head over to WPForms » All Forms from your WordPress dashboard and click on the ‘Survey Result’ link under your Net Promoter Survey form.

View survey results in WPForms

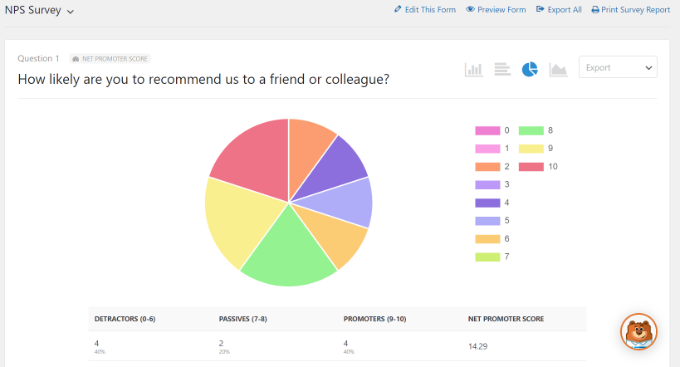
WPForms will now display your total Net Promoter Score along with the number of promoters, detractors, and passives. It will also break down the results into beautiful charts, bars, and graphs.

You can use the feedback from users to improve your product, add new features, as well as offer support to unhappy customers and turn them into loyal brand evangelists.

View NPS survey results

We hope this article helped you learn how to easily create a Net Promoter Score (NPS) survey in WordPress. You may also want to see our article on how to choose the best WordPress hosting and how to get free SSL certificate for your WordPress site.

If you liked this article, then please subscribe to our YouTube Channel for WordPress video tutorials. You can also find us on Twitter and Facebook.

The post How to Create a Net Promoter Score® (NPS) Survey in WordPress first appeared on WPBeginner.
How to Create an Event Registration Page in WordPress

Do you want to add an event registration page on your WordPress site? Recently one of our readers asked if they can allow users to sign up and buy tickets online for their events. In this article, we will show you how to easily create an event registration page in WordPress and sell tickets online.

Creating an event registration page in WordPress

Why Create an Event Registration Page in WordPress?

There are plenty of third-party event registration and ticketing tools available in the market. You can also add Facebook events to your WordPress site.

However, many third-party event registration and ticketing services will charge a small fee for each ticket you sell. This quickly adds up, and you could end up paying a lot more than expected.

You will have limited options to promote your event on social media and even on your own website. Some event management services will insist on displaying their branding in your event emails, widgets, and tickets.

You can avoid some of these issues by creating your own event registration page in WordPress. This will allow you to collect online payments directly, store attendee information on your website, and use your own brand name when promoting the event.

That being said, let’s take a look at how to easily create an event registration page in WordPress.

Creating an Event Registration Page in WordPress

First thing you need to do is install and activate the WPForms plugin. For more details, see our step by step guide on how to install a WordPress plugin.

WPForms is a paid plugin, and you will need at least their PRO plan to access the PayPal add-on, which we will be using in this tutorial.

Upon activation, you need to visit the WPForms page in your WordPress admin area and click on the Add New button.

Add New Form

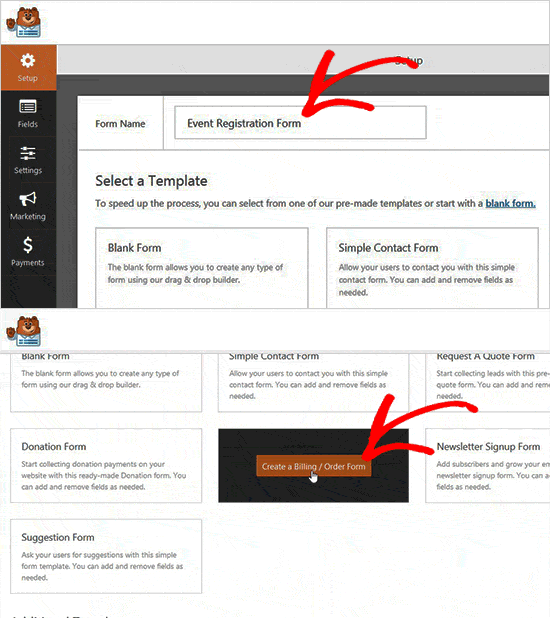
On the form builder, first you need to enter a title for your event registration form. Below that, you will see a list of ready-to-use form templates that you can select. Click on the Billing / Order Form template to continue.

New Event Registration Form

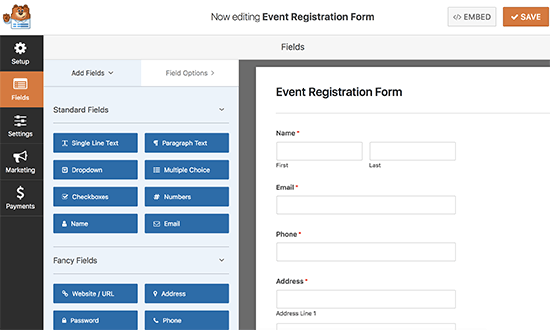
This template will set up a basic online order form asking users for their information like name, email, phone, address, available items, and more.

You can point and click on any field to edit or delete it. You can also add new form fields from the column on your left.

Billing / Order form template

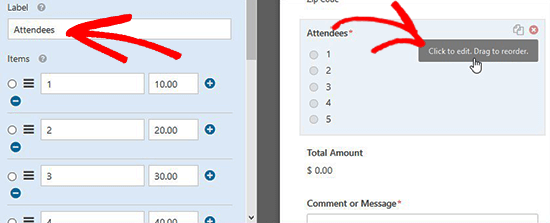
To add tickets, click on the available items field and change it to attendees or tickets.

Add Tickets / Attendees Details

Your users will see the calculated price in the Total Amount field. Next, you need to set up the payment method.

Let’s go ahead and connect your event registration form to a payment service provider.

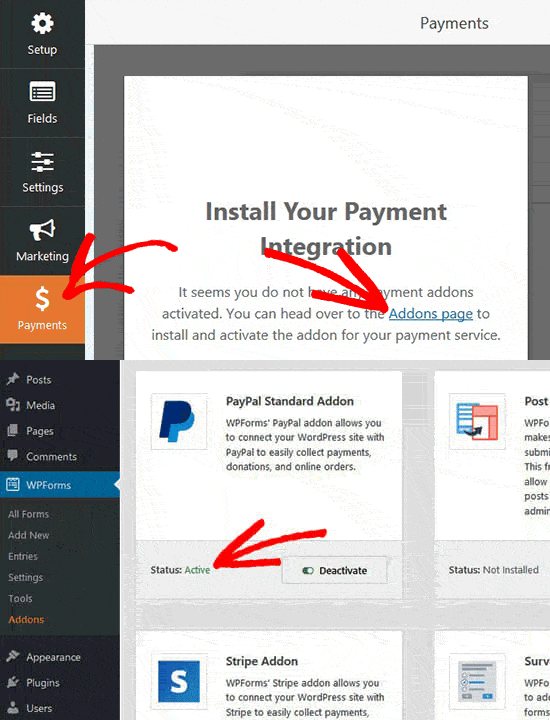
You need to click on the Payments tab in the left column and then click on the ‘Addons page’ link.

Note: You can also visit the addons page from your WordPress admin area by going to WPForms » Addons.

Install Payment Addon Service

This will take you to the addons page. WPForms comes with addons for PayPal and Stripe. You can install either or both of them.

Note: In order to use Stripe, your website must have HTTPS / SSL enabled.

Click on the install button below the addon and then click on the activate button.

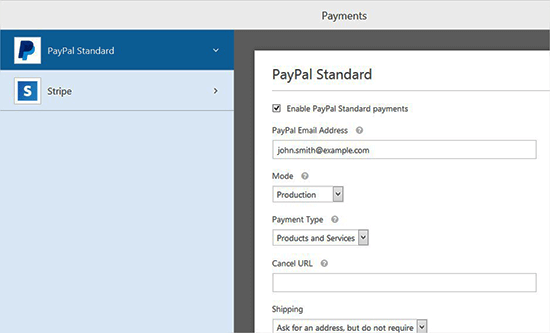
Once activated, you need to go back to Payments section to configure payment services on your form. Select your payment service and enable it.

You need to add the details like PayPal email address, mode, payment type, cancel URL, and more.

Edit Payment Service

If you are using Stripe, then you will need to enter the API keys. For detailed instructions see how to use the Stripe addon with WPForms.

You will also need to enter a credit card field to your form before you can set up Stripe. Simply switch to the ‘Fields’ section and add a credit card field.

Add a credit card field to the form

After setting up payments, let’s set up notification emails for both you and your users.

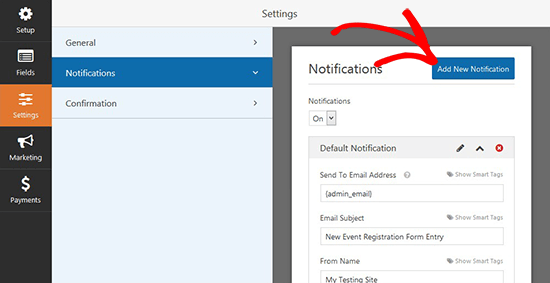
Simply go to Settings » Notifications and click on the Add New Notification button.

Add New Email Notification

In the Send To Email Address section, you need to select user’s email from Smart Tags to send the ticket receipt.

Add Users Email

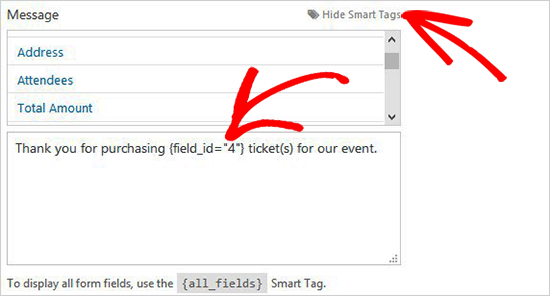
Now you need to scroll down to the Message section and add your custom message with the fields that you created for the registration from using Smart Tags.

Custom Message for Tickets

Once you are done, you can save your changes and close the form builder.

You can display this form on any page on your WordPress site. Let’s create a new event registration page in WordPress to display the form.

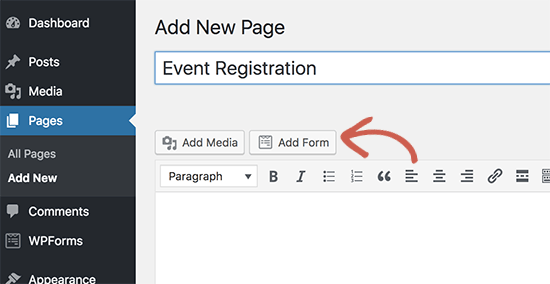
On the page edit screen, you will see a new button labeled ‘Add Form’ just above the editor.

Add form button

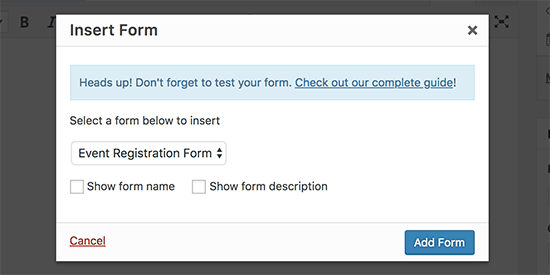
Clicking on it will bring up a popup where you will be able to select and insert the event registration form you created earlier.

Insert event registration form

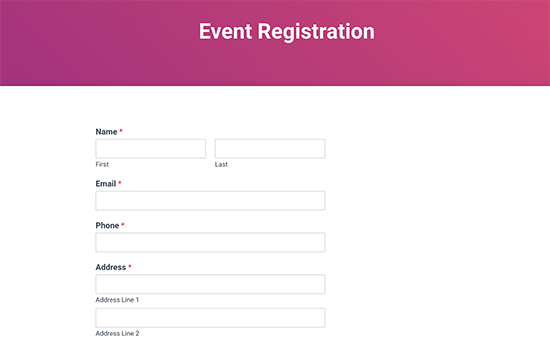
The plugin will now add the required shortcode to your page editor. You can save your changes and click on the preview to see your event registration page in action.

Event registration form preview

We hope this article helped you learn how to create an event registration page in WordPress. You may also want to see our list of the best WordPress booking plugins.

If you liked this article, then please subscribe to our YouTube Channel for WordPress video tutorials. You can also find us on Twitter and Facebook.

The post How to Create an Event Registration Page in WordPress appeared first on WPBeginner.
How to Create GDPR Compliant Forms in WordPress

Do you want to create GDPR-compliant forms in WordPress?

European Union’s new GDPR law requires explicit user consent to store personal information so that users can have more personal control over their data stored on websites.

In this article, we will show you how to easily create GDPR-compliant forms in WordPress.

How to Create GDPR compliant forms in WordPress

What is GDPR?

The General Data Protection Regulation (GDPR) is a European Union (EU) law that became effective on May 25th, 2018. This new law aims to give EU citizens control over their personal data and change how companies and businesses handle data privacy around the world.

For more details, see our ultimate guide to WordPress and GDPR compliance which will answer all your GDPR-related questions in plain English.

A typical WordPress site may collect users’ personal information in a number of ways. One of which is by adding forms to the site. Most forms collect personal information, and you may want to make sure that your WordPress forms comply with GDPR.

What is Required to Make a Form GDPR Compliant

In order to make your WordPress forms GDPR compliant, you will need to add the following features:

  • Ask users to give explicit consent for storing and using their personal information.
  • Allow users to request access to their own personal information stored on your website.
  • Allow users to request the deletion of their data from your website.

Having said that, let’s take a look at how to easily create GDPR-compliant WordPress forms. You can click the links below to jump ahead to any section:

How to Make a GDPR Compliant Form in WordPress

We recommend using WPForms to make GDPR-compliant WordPress forms. It is the best contact form plugin for WordPress and has built-in GDPR enhancement features.

For instance, you get a 1-click GDPR Agreement field for your forms, GDPR-compliant data retention best practices, easy entry management system to quickly find, export, or delete user data upon request.

First, you need to install and activate the WPForms plugin. For more details, see our step-by-step guide on how to install a WordPress plugin.

For this tutorial, we’ll use the WPForms Pro version because it includes the disable user cookies and user details options. However, you can also use the WPForms Lite version to create a GDPR-compliant form.

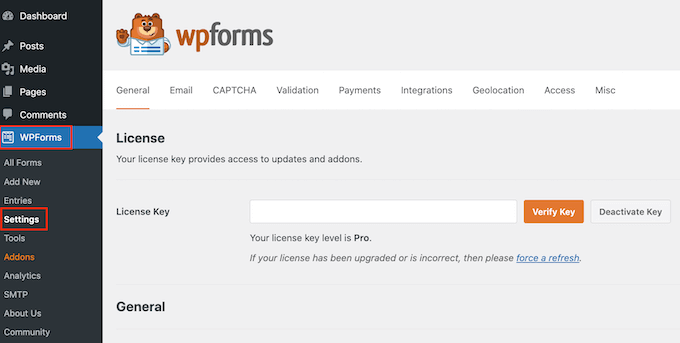
Upon activation, you need to visit WPForms » Settings page and enter your license key. You can find the license key in the WPForms account area.

Entering the WPForms license key

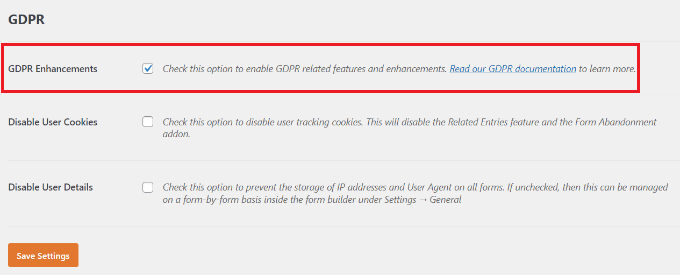
Next, you’ll need to scroll down to the GDPR section.

There, you need to check the box next to the GDPR Enhancements option.

Enable GDPR enhancement option

Enabling the GDPR Enhancements option will reveal two more GDPR-related settings.

The first option, ‘Disable User Cookies,’ will stop WPForms from storing user sessions. This cookie contains a random unique identifier that helps WPForms add features like related entries, form abandonment, and geolocation. Disabling it will also disable those features.

The second option, ‘Disable User Details,’ will stop WPForms from storing user IP addresses and browser information. Both of these settings are optional, and you can check them if you feel that you don’t need these features.

Don’t forget to click the ‘Save Settings’ button to store your changes.

Select Form Template and Add GDRP Agreement Field

WPForms is now ready to create GDPR-compliant forms in WordPress. You can now go to WPForms » Add New page to create a new form.

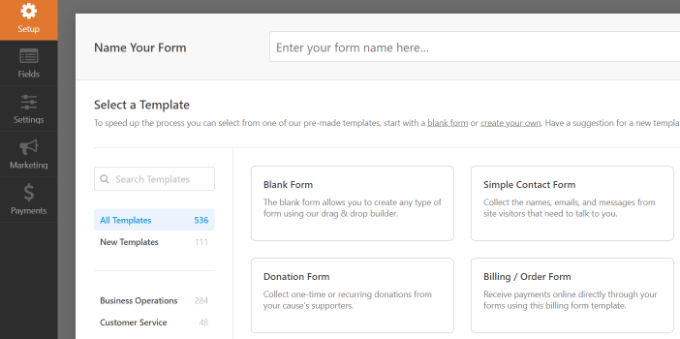
You will be asked to enter a title for your form and select a template. These templates are ready-made forms that you can use as a starting point. In this tutorial, we’ll use the ‘Simple Contact Form’ template.

Add a new form

This will launch the WPForms builder interface.

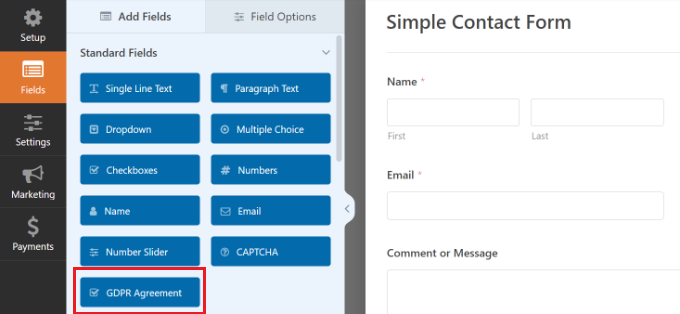
You will see your form preview in the right column, and on the left, you will see all the fields that you can add to your form.

Add the GDPR agreement field

Simply drag the ‘GDPR Agreement’ field and add it to your form.

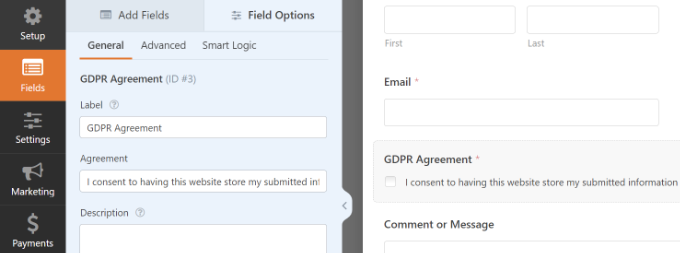
You will now see it appear at the bottom of your form. If you click on it, more options will appear in the settings panel on the left.

Edit the GDPR agreement

You can change the title of the form field and agreement text, and then use the description box to add details like a link to your privacy policy or terms and conditions pages.

Note: The GDPR Agreement field is always a required field, and it cannot be pre-checked to comply with the GDPR law. You can only add one GDPR agreement field to each form.

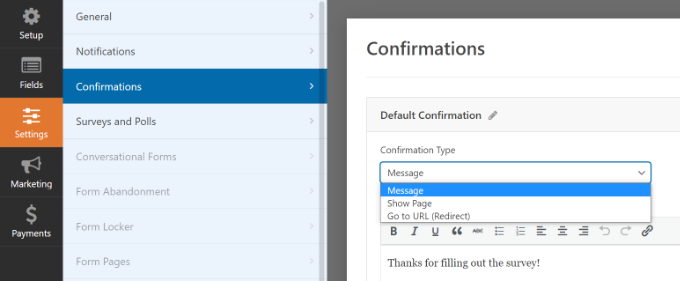
Next, you can go to the Settings » Confirmations tab in the form builder. Here, you’ll get different options to select when a user submits a form. For instance, you can show a message, a page, or to redirect users to another URL.
Edit form confirmation settings

Once you are satisfied with the form, don’t forget to store your changes.

Adding GDPR Compliant Form to WordPress

WPForms allows you to easily add forms anywhere on your website.

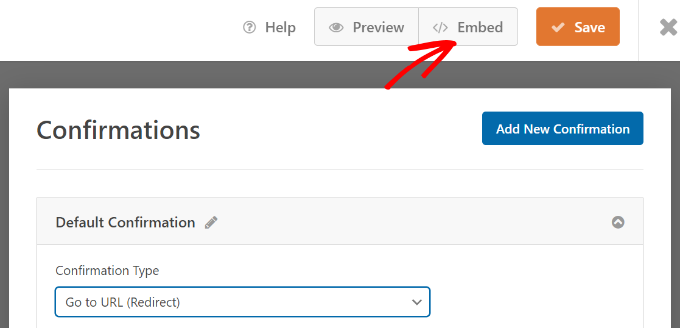
You can simply click the ‘Embed’ button at the top of the form builder to get started.

Click the embed button

Next, a popup will open, which will ask you to create a new page or select an existing page.

We’ll use the ‘Create New Page’ option for this tutorial.

Embed a form in page

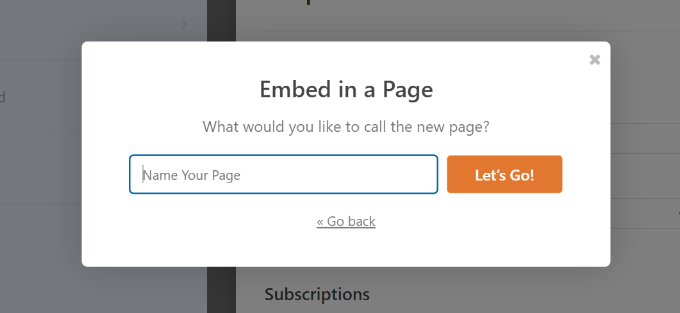
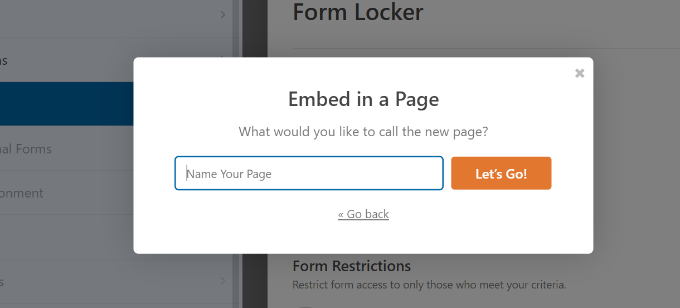
After that, you’ll need to enter a name for your page.

Once that’s done, simply click the ‘Let’s Go’ button.

Enter the name of the page

Your form will now appear in the WordPress content editor.

Another way to add forms to any page or post is using the WPForms block. Simply add the block to your content and select your form from the dropdown menu.
Add a WPForms block in wordpress

You can now save or publish your post or page.

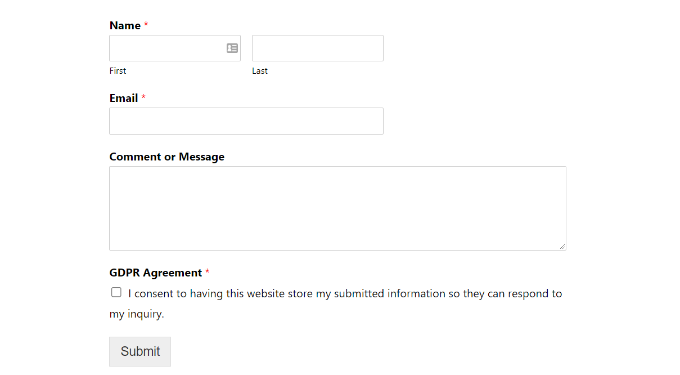
Simply visit your website to see your GDPR-ready WordPress form in action.

GDPR form preview

Managing Data Access and Deletion Requirements with WPForms

One of the requirements for GDPR compliance is to give users access and allow them to request the deletion of their data.

To do that, you can create a ‘Data access/delete form’ and add it to your privacy policy page. Users who wish to access their stored data or want it to be deleted can use that form to send you a request.

WPForms has an excellent entry management system that allows you to quickly find any data submitted via your forms.

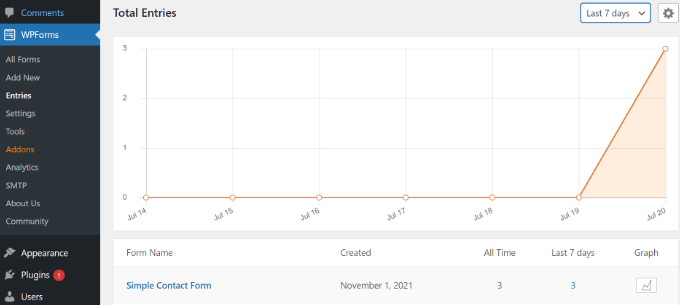
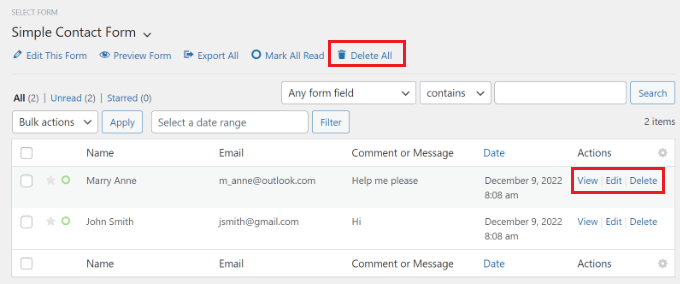
You can access all form entries by visiting WPForms » Entries page from your WordPress dashboard and selecting the form you wish to view.

View form entries in WPForms

WPForms will show you all entries submitted using that form. You can search for a form entry by entering a name, email address, IP address, or keyword.

From here, you can simply click the ‘Delete All’ option at the top to remove form entries.

Delete form entries

You can also delete individual entries or click the view button to see all data stored for that entry.

Disabling User Details for Specific Forms

With WPForms, you get full control over which forms can store user data. You can disable user details to be stored for each individual form.

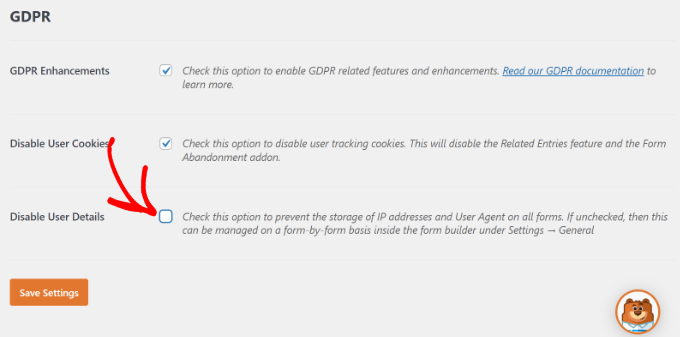
First, you’ll need to go to WPForms » Settings from your WordPress dashboard and scroll down to the ‘GDPR’ section.

Here, ensure that the ‘Disable User Details’ option is unchecked.

Disable user details is unchecked

Don’t forget to click the ‘Save Settings’ button when you’re done.

After that, you can change each form’s settings in the form builder.

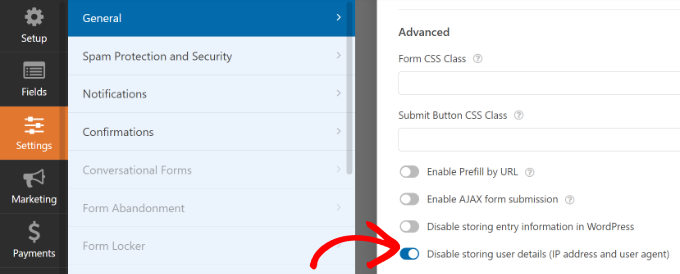
All you have to do is head to Settings » General in the form builder. Next, click the ‘Advanced’ section to expand it. From here, simply click the toggle for the ‘Disable storing user details (IP address and user agent)’ option.

Disable storing user details-settings

This will prevent extra user information from being stored for individual forms.

We hope this article helped you learn how to easily create GDPR-compliant forms in WordPress. You may also want to see our article on how to track user engagement in WordPress using Google Analytics and the ultimate WordPress SEO guide for beginners.

If you liked this article, then please subscribe to our YouTube Channel for WordPress video tutorials. You can also find us on Twitter and Facebook.

The post How to Create GDPR Compliant Forms in WordPress first appeared on WPBeginner.