Category Archives: optinmonster

How to Use Cookie Retargeting in WordPress to Show Custom On-Site Messages

Do you want to use cookie retargeting in WordPress?

Cookie retargeting is the secret tool already used by many of the most popular websites. It allows you to show custom on-site messages to your users based on their past behavior which helps you boost sales.

In this article, we’ll show you how to use cookie retargeting in WordPress to show custom on-site messages and boost conversions.

How to use onsite cookie retargeting in WordPress

What is Cookie Retargeting?

Cookie retargeting is a marketing technique where websites use cookies to track user behavior and offer a personalized experience.

There are two types of cookie retargeting techniques.

First, there is off-site cookie retargeting. This method is used to track user activities across the web.

Facebook pixel and Google remarketing are two of the most popular advertising programs that allow you to use their massive reach and show targeted ads to people who visit your website.

Secondly, you have on-site cookie retargeting, which allows you to show targeted messages to users based on how they interact with your WordPress website.

What are cookies?

Cookies are small text files containing pieces of data. Websites set cookies in users’ browsers to store temporary information such as login status, user preferences, session details, and more.

How to Use On-Site Cookie Retargeting to Boost Conversions?

There are a number of ways website owners use on-site retargeting messages to boost conversions and increase sales.

For instance, eCommerce stores can show custom offers to users based on how they interact with other offers. This allows you to create a dynamic sales funnel that leads users to make a purchase.

Another use-case scenario would be lead generation. With on-site retargeting, if a user closes one sign-up form, then you can show them a different message with another offer.

On-site retargeting messages are highly effective because:

  • It shows personalized messages to users at a time when they are already engaged with your website.
  • Allows you to create customized campaigns that get better with each user interaction until they convert
  • You save money on paid advertising campaigns by utilizing your existing website traffic to the max

That being said, let’s take a look a how to use cookie retargeting in WordPress.

Creating On-Site Retargeting Campaign in WordPress

The best way to create on-site retargeting messages is by using OptinMonster. It is the best conversion optimization and lead generation software in the world.

You can use it to easily create attention-grabbing signup forms, popups, welcome mats, in-line offers, custom offers, and more.

First, you need to signup for an OptinMonster account by visiting the website and clicking the ‘Get OptinMonster Now’ button. You’ll need at least their Pro plan for cookie retargeting and Growth plan for follow-up campaigns.

OptinMonster

Next, you’ll need to install and activate the OptinMonster plugin. For more details, see our step-by-step guide on how to install a WordPress plugin.

This plugin acts as a connector between your WordPress site and the OptinMonster app.

Upon activation, you will see the welcome screen. Simply click the ‘Connect Your Existing Account’ button.

Connect your existing account

Next, a new window will open, where you’ll need to sign in to your account and connect your website with OptinMonster.

Go ahead and click the ‘Connect to WordPress’ button.

Connect OptinMonster to WordPress

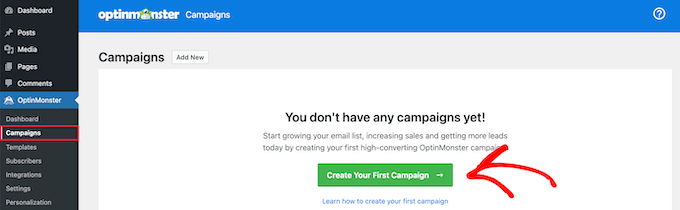
Now, you’re ready to create a new campaign.

First, you’ll need to go to OptinMonster » Campaigns from your WordPress admin panel and then click the ‘Create Your First Campaign’ button.

Create first OptinMonster campaign

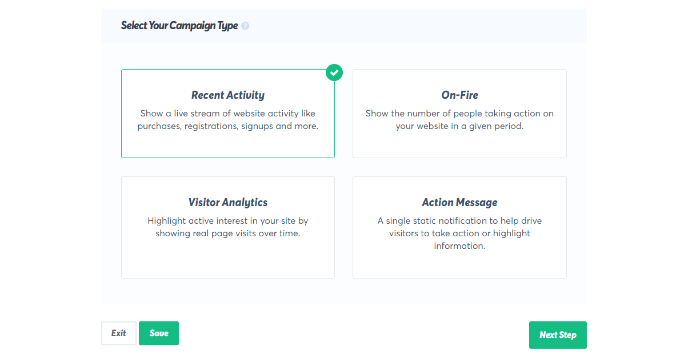
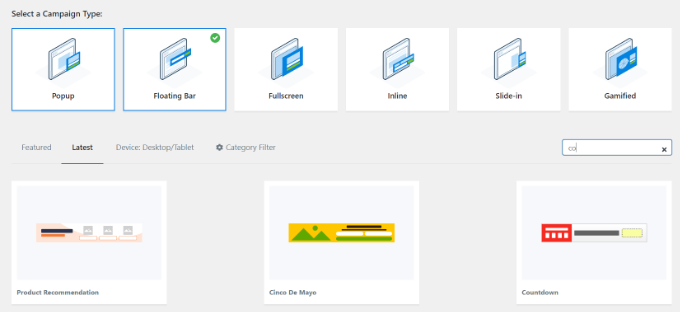
This will take you to the OptinMonster website, where you’ll be asked to choose a campaign type and a template.

You can choose any campaign type or template, but for this tutorial, we’ll be creating a lightbox popup.

Choose a campaign type and template

You can select any template that you’d like to use for your campaign.

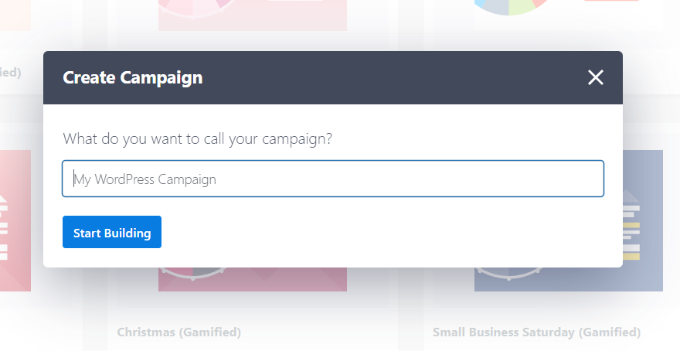
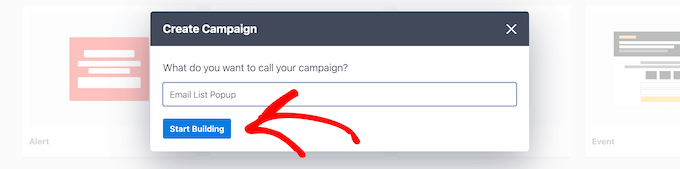
Next, you’ll be asked to provide a name for your campaign and click the ‘Start Building’ button.

Click start building

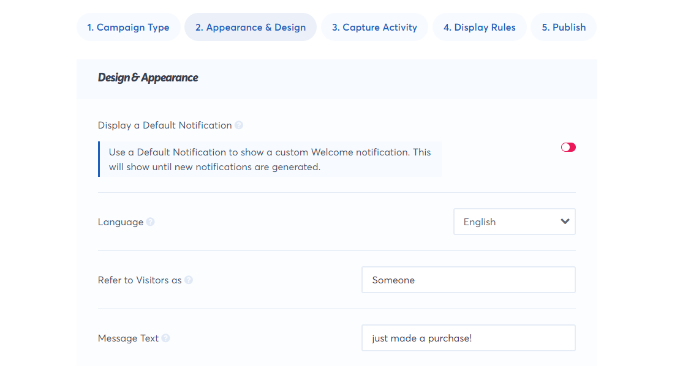
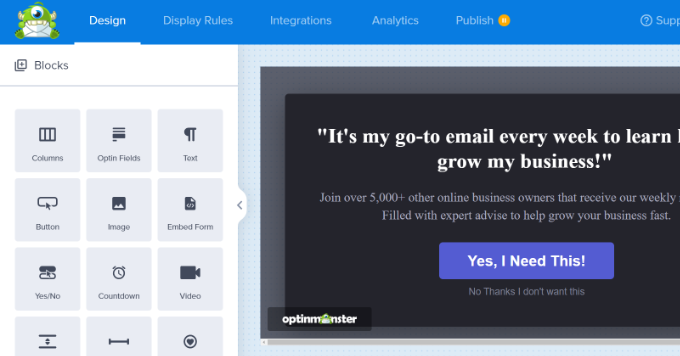
After that, you’ll enter the drag-and-drop campaign builder interface.

It is a powerful design tool where you can simply point and click on any item to edit it. You can also add new items like buttons, images, columns, and more to your popup campaign.

Edit your onsite targeting campaign

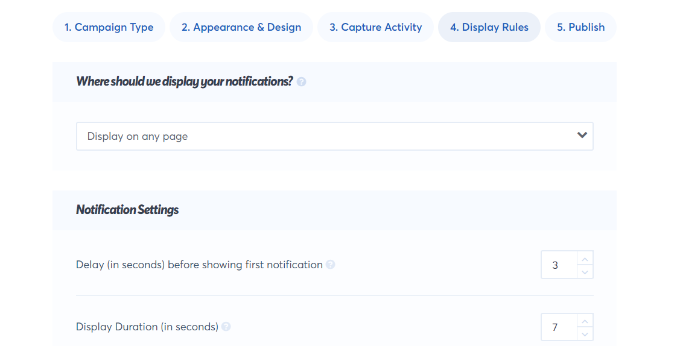
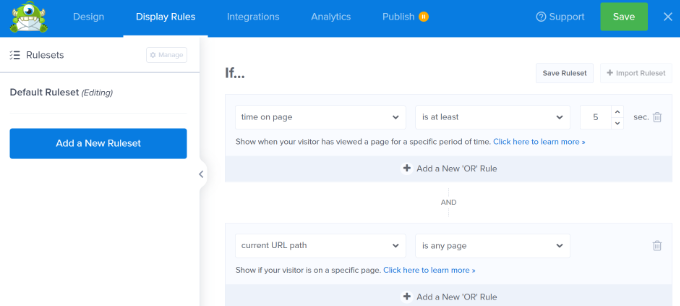
Next, you can switch to the ‘Display Rules’ tab at the top.

Here, OptinMonster will give you different options for displaying your onsite targeting campaigns.

Select display rules

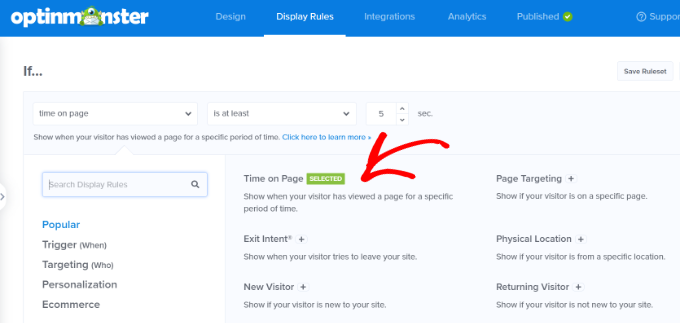
For instance, you can show the popup after users spend a certain time on the page, are from a particular location, or are about to exit your website.

By default, OptinMonster will show your campaign after a visitor spends at least 5 seconds on the site. Plus, it appears on all the pages.

Set up display rules

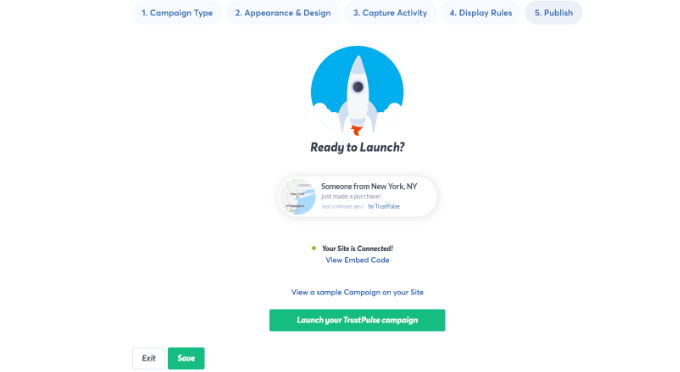
Once you are satisfied, simply switch to the publish tab.

Next, you’ll need to make your campaign live by changing its status from Draft to Publish. Don’t forget to click the ‘Save’ button when you’re done.

Publish your onsite targeting campaign

Now by default, OptinMonster will show this campaign to all users who visit your website. Users will be able to close the popup or perform their desired action.

Creating a Retargeting Campaign to Show Custom Messages

Now that you have launched your first campaign, let’s add another campaign using the follow-up retargeting feature.

Click on the create new campaign button in the OptinMonster dashboard and select your campaign type and template. Since we have used a lightbox popup, we’ll be using a ‘Floating bar’ as our retargeting campaign.

Choose a floating bar template

After selecting a template, you’ll enter your campaign name.

Then simply click the ‘Start Building’ button to continue.

Click start building

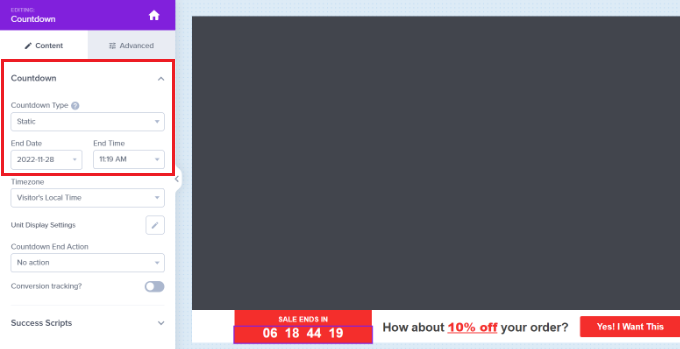
After that, you’ll enter the OptinMonster builder where you can design your campaign using simple drag-and-drop tools.

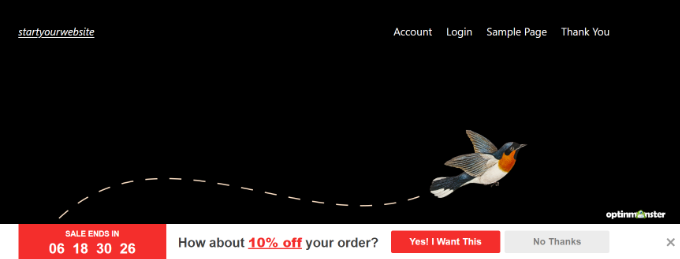
You can edit the optin text, adjust the countdown timer to generate FOMO, add a coupon, and so much more.

Edit the floating bar campaign

Once you are satisfied with the design, it is time to select which users you want to show this custom message to.

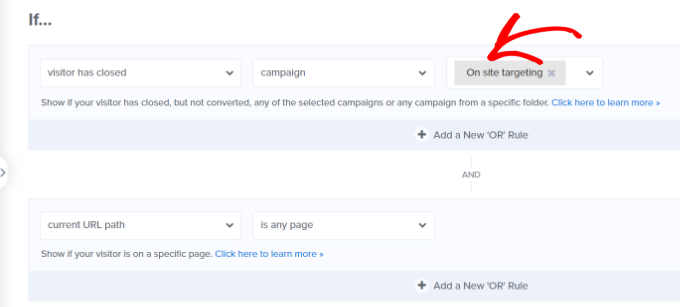
Simply switch to the Display Rules tab at the top of the builder. OptinMonster offers a ton of display rules that you can choose from. You can also add multiple rulesets.

Choose has closed display rule

Next, under the If menu, go to the ‘Personalization’ display rules options and select Has Closed.

After that, select ‘Campaign’ and then select your previous campaign.

Select previous campaign

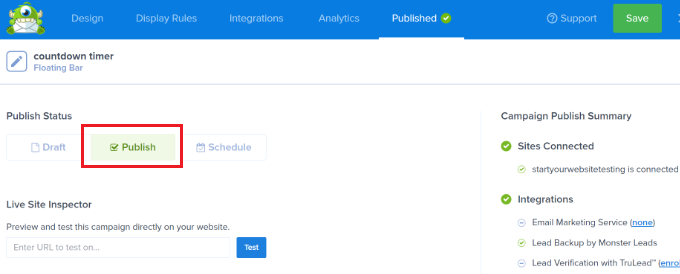
Next, you need to switch to the ‘Publish’ tab.

Here, simply change your campaign status from Draft to Publish under ‘Publish Status.’ Once that’s done, simply click the ‘Save’ button and exit the campaign builder.

Publish has closed campaign

You can now visit your website in the incognito browser tab to see your campaign and the follow-up retargeting message.

Adding Cookie Retargeting with Custom Messages

Cookie retargeting allows you to show custom messages to users based on their previous actions, cart status, shopping history, and more.

This allows you to create promotions and upsells designed for customers at different stages of your sales funnel.

When customizing your campaign, simply switch to the ‘Display Rules’ tab.

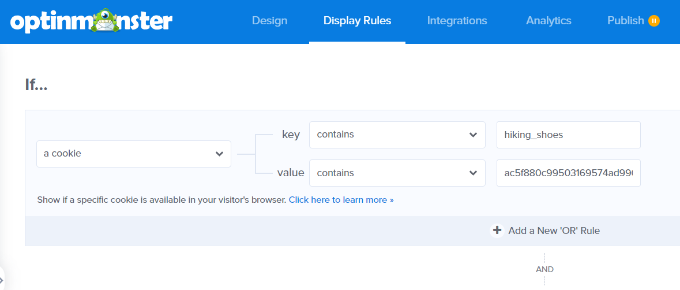
Under the If menu, you can go to the ‘Targeting (Who)’ display rules options and select Cookie Targeting.

Select cookie targeting

Next, you’ll need to enter the cookie key and value. The key is the cookie name, and the value parameter is the contents of the cookie.

OptinMonster lets you select different operators to use for the display rule. These include options like match exactly, contain, exist, start with, ends with, and more operators.

For instance, if you are using WooCommerce, then you can use WooCommerce cookies to target users who have added products to their cart. This way, you can cross-sell items in their cart, reduce cart abandonment, and more.

Enter cookie key and value

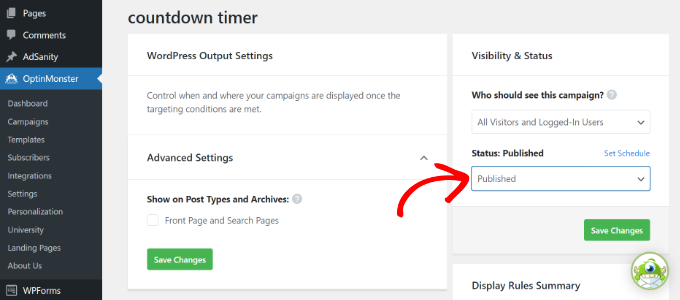
After adding cookie retargeting rules, go to the ‘Publish’ tab.

From here, simply change the Publish Status from Draft to Publish for your campaign.

Publish has closed campaign

OptinMonster will now display your custom message based on the cookie-targeting rules you have set.

We hope this article helped you learn how to use cookie retargeting in WordPress to show custom on-site messages. You may also want to see our guide on how to recover abandoned cart sales in WooCommerce as well as our comparison of the best live chat software for websites.

If you liked this article, then please subscribe to our YouTube Channel for WordPress video tutorials. You can also find us on Twitter and Facebook.

The post How to Use Cookie Retargeting in WordPress to Show Custom On-Site Messages first appeared on WPBeginner.

How to Greet Each User With a Custom Welcome Message in WordPress

Do you want to greet each user with a custom welcome message in WordPress? Greeting users with a welcome message can help boost engagement on your website. It can also be used to generate leads and increase sales. In this article, we will show you how to greet each user with a custom welcome message in WordPress.

Greet users with custom welcome message in WordPress

Why and When You Should Greet Users with Welcome Message in WordPress?

Not all websites need to greet users with a custom welcome message. However, if you are running an online store, trying to generate leads, or boost user engagement, then a custom welcome message can be very useful.

There are different types of welcome messages that you can use. The goal here is to offer users a lot of value with each message. For example, you can offer them discounts, live help, encourage them to ask questions, and more.

You can use integrations to connect welcome messages with your email service provider, live chat service, or contact form plugin.

That being said, let’s see how to easily greet each user with a custom welcome message in WordPress.

Method 1. Greet Users with a Custom Welcome Message using OptinMonster

For this method, we will be using OptinMonster. It is the most popular lead generation software in the world that helps you convert website visitors into subscribers and customers.

First, you need to sign up for an OptinMonster account. It is a paid service, but they also offer a limited free-forever plan.

Once signed up, you will be taken to your OptinMonster dashboard where you need to click on the ‘Create Campaign’ button.

Create campaign

Next, you need to choose a campaign type and a template. OptinMonster comes with different campaign types, and you can use any of them to greet users with a welcome message in WordPress.

For the sake of this article, we will be using the slide-in campaign type with Flatland template.

Choose campaign type and template

Next, you will be asked to give your campaign a name and select a website where you want to run this campaign. Click on select website field and then click on ‘Add website’ to add a new website.

Campaign options

After that, click on the ‘Start Building’ button to continue.

OptinMonster will now launch the drag and drop editor where you can simply point and click on any element to edit it. You can add blocks, columns, and elements with text, video, buttons, sign up fields, and more.

OptinMonster builder interface

Simply click on the text fields to add your own welcome message to greet new users. You can also integrate it with your email service provider by clicking on the ‘Integrations’ tab on the top.

Add integration

Next, you need to switch to the ‘Display Rules’ tab to select when you want to display the greeting. OptinMonster comes with a bunch of options that you can use to create less intrusive and highly engaging messages.

Display rules

Once you are finished designing your custom welcome message, click on the Publish button at the top and toggle the ‘Status’ option to live.

Publish your optin

You are now ready to add this custom welcome message campaign to your website.

Switch to your WordPress admin area to install and activate the OptinMonster plugin. For more details, see our step by step guide on how to install a WordPress plugin.

Upon activation, the plugin will add a new menu item labeled ‘OptinMonster’ to your WordPress admin sidebar. Clicking on it will take you to plugin’s settings page.

Enter your API key

You will be asked to enter your API key. You can find this information under your account on the OptinMonster website.

Don’t forget to click on the save settings button after entering your API key.

Next, you need to click on the ‘Campaigns’ tab. If you cannot see your campaign listed there then click on the refresh campaigns button.

After that, click on the ‘Go Live’ link next to the campaign you just created.

Make your campaign go live

You can now visit your website to see your custom welcome message in action.

Greeting preview

You can use OptinMonster to greet users with different welcome messages based on visits, time spent, logged in status, referral source, or use page level targeting for your landing pages.

Method 2. Greet Users with a Custom Welcome Message using LiveChat

LiveChat Inc is the best live chat support software for WordPress websites. It allows you to create beautifully designed live chat buttons, eye-catchers, and live chat support to your WordPress site.

You can customize the greeting message, display your own buttons, upload your logo, show agent profiles, and more.

LiveChat is a paid solution (starting from $16.99 per agent). They also offer a free 30-day trial allowing you to check out the features and see if its a good fit for your business.

First, you need to visit the LiveChat website and sign up for an account.

Live Chat sign up

After creating your account, you will be taken to your LiveChat dashboard. Next, you need to click on the settings tab to customize the appearance of the LiveChat button.

LiveChat settings

From here, you can choose the chat window colors and theme. After that click on ‘Advanced window tweaks’ link to upload your own logo and add your social media profiles.

Next, you need to switch to the Engagement » Greetings section. By default, LiveChat enables a few greetings displayed based on few simple rules like time spent on site, pages viewed, returning visitor, and more.

Edit custom greetings

You can click on these greetings to edit them and add your own custom welcome message. You can also delete them or click on the ‘Add new greeting’ button to create a new custom greeting.

You will be able to select when to display a greeting by using display rules. You can also combine different rules to match and create highly dynamic custom greetings.

Adding dynamic greetings

Next, you need to select an eye-catcher. These eye-catchers are images that are displayed when the LiveChat window is minimized.

LiveChat comes with several ready-made eye-catchers that you can use. You can also upload your images to use as eye-catchers.

Select an eye-catcher

Once you are satisfied with the design and appearance of your LiveChat window and custom greetings, you are ready to add them to your WordPress website.

Switch back to your WordPress admin area to install and activate the LiveChat plugin. For more details, see our step by step guide on how to install a WordPress plugin.

Upon activation, the plugin will add a new menu item labeled LiveChat to your WordPress admin sidebar. Clicking on it will take you to plugin’s settings page.

Connect Live Chat to your WordPress site

Go ahead and click on the ‘Sign in with LiveChat’ button to connect your WordPress site to your LiveChat account.

Once connected, you will see some very basic display settings. You can turn off LiveChat on mobile, turn off sounds, or hide it for users who are not logged in. If you are unsure, then we recommend leaving these options as they are.

LiveChat settings for WordPress

You can now visit your website in a new browser tab to see the LiveChat button in action. It will greet users with the eye-catcher you selected and display a custom welcome greeting based on the rules you choose in settings.

Custom welcome greeting

We hope this article helped you learn how to greet each user with a custom welcome message in WordPress. You may also want to see our article on how to track user engagement in WordPress using Google Analytics.

If you liked this article, then please subscribe to our YouTube Channel for WordPress video tutorials. You can also find us on Twitter and Facebook.

The post How to Greet Each User With a Custom Welcome Message in WordPress appeared first on WPBeginner.

How to Use FOMO on Your WordPress Site to Increase Conversions

Are you looking to use FOMO and social proof notifications on your WordPress site?

FOMO, short for fear of missing out, is basically a marketing technique used to create anticipation and excitement for a product. It uses a basic psychology principle to help customers make a buying decision faster.

In this article, we will show you how to properly use FOMO on your WordPress website to increase conversions and sales.

How to use FOMO on your WordPress site to increase conversions

What is FOMO and How Does it help with Conversions?

FOMO or ‘fear of missing out’ is a psychological term that describes anxiety about missing out on something exciting and trendy.

As a WordPress website owner, you can take advantage of this human behavior in your marketing strategy and improve your conversions.

The concept of FOMO is not new. It’s actually been used by marketers even before the arrival of the internet. However, with online marketing, FOMO has become far easier to implement and much more effective.

For example, if you run an online store, then you can create anticipation about an upcoming sale and limited-time offers by adding social proof to your landing pages.

You can also use it to build your email list, run affiliate marketing campaigns, boost app downloads, and more.

With that said, let’s take a look at how to easily add FOMO to your WordPress site. We will show you two techniques that we have successfully used on our own websites with incredible results.

Method 1: Adding FOMO with Social Proof by Using TrustPulse

People feel more comfortable with their buying decision when they know others have also bought the same product or service and had a good experience with it.

This is why smart business owners use social proof in their marketing.

The best way to add social proof to your website is by using TrustPulse. It is one of the best social proof plugins for WordPress on the market.

TrustPulse allows you to display real-time user activity notifications on your website, such as products purchased, forms submitted, etc.

TrustPulse

To get started, you’ll need to install and activate the TrustPulse plugin on your website. For more details, see our step-by-step guide on how to install a WordPress plugin.

The plugin helps you connect your WordPress site to the TrustPulse app.

Upon activation, click on the TrustPulse menu from the WordPress admin sidebar and click the ‘Get started for free’ button to continue.

Connect TrustPulse with your site

This will take you to the TrustPulse website, where you can sign up for a free account. The free plan is good for up to 500 sessions per month.

Once you sign up, you are ready to create your first campaign. Simply click on the ‘Create Campaign’ button to start your first FOMO campaign.

Create a new campaign

Next, you will need to provide a title for your campaign and select your website.

If you scroll down, then you can choose a campaign type.

Enter name for campaign and select site

TrustPulse offers 4 different campaign types to choose from.

These include showing recent activities, the number of people taking action, visitor analytics, or a static notification with helpful information.

Select campaign type for fomo

After selecting a campaign type, don’t forget to click the ‘Next Step’ button.

You can now head to the ‘Appearance & Design’ tab and choose language and appearance options for your campaign. You can change the position, badge image, style, and more.

Change the appearance of notification

Once done, click on the next step to continue.

Next, you need to choose how you want to capture the activity.

We recommend using ‘AutoMagic,’ which allows you to select the activity that matches different conditions. For example, you can select your checkout page to automatically capture eCommerce activity.

Capture activity settings

You can also use Zapier to capture activities from 1000+ integrations.

Once done, click on the next step button to continue.

Next, you need to set up the display rules. You can display the badge on all pages or specific pages on your site. You can also choose the delay between notifications, run them as a loop, and enable mobile notifications.

Change the display rules

After that, click on the ‘Publish’ tab at the top.

In the next step, simply click the ‘Launch your TrustPulse campaigns’ button.

Launch your TrustPulse campaign

Don’t forget to click the ‘Save’ button to store your changes and then exit the campaign builder.

You can now visit your website to see your FOMO campaign in action.

Fomo notification preview

Method 2: Adding FOMO Countdown Timers with OptinMonster

We have all seen marketers using ‘Urgency’ to get customers’ attention. Whether it is your local grocery store or a big name-brand website, it is one of the oldest marketing techniques, which works just as effectively online.

Basically, you show users an offer with a sense of urgency, which triggers the fear of missing out on a valuable deal and helps users make a purchasing decision.

Urgency hacks can be used with limited-time offers, seasonal sale campaigns, one-time discounts, and more. To learn more, see this article on using urgency to hack conversion rates with proven methods.

The best way to add urgency timers in WordPress or WooCommerce is by using OptinMonster. It is the most popular conversion optimization and lead generation software that helps businesses turn potentially abandoning website visitors into subscribers and customers.

First, you will need to sign up for an OptinMonster account. It is a paid tool, and you will need at least the ‘Basic’ plan to use their Floating bar campaigns.

OptinMonster

After signing up for an account, you will need to install and activate the OptinMonster plugin. For more details, see our step-by-step guide on how to install a WordPress plugin.

This plugin is a connector between your WordPress site and the OptinMonster application.

Upon activation, click on the ‘Connect Your Existing Account’ button on the OptinMonster welcome screen.

Connect your existing account

Next, you should see a new window open where you’ll be asked to connect your website.

Go ahead and click the ‘Connect to WordPress’ button.

Connect OptinMonster to WordPress

After connecting your website, you will need to go to OptinMonster » Campaigns from your WordPress dashboard.

From here, click on the ‘Create Your First Campaign’ button to continue.

Create your first campaign

This will launch the OptinMonster campaign builder.

First, you will need to select an optin type and then select a theme. We will use a ‘Floating bar’ campaign with the ‘Countdown’ theme.

Select floating bar campaign type

Next, you will be asked to choose a name for your campaign.

Once that’s done, simply click the ‘Start Building’ button.

Enter a name for your campaign

On the next screen, you’ll see the drag-and-drop tool, where you can simply point and click to design your campaign.

You’ll see a live preview of your campaign in the right panel and a bunch of customization blocks and options in the left panel.

With the floating bar countdown campaign, the preview will appear near the bottom of the screen for you, just as it does for the users.

Edit the floating bar campaign

Go ahead and click on the countdown timer in the live preview to set the countdown style and end date. You can use two types of countdown timers: Static and Dynamic.

The static timer remains the same for all your users, while the Dynamic timer changes based on user behavior on your website.

Edit countdown timer settings

For this tutorial, we will be using the static timer. Since we are using a floating bar with a countdown theme, we can move the floating bar to the bottom or the top.

You can just point and click to edit the text in your floating bar. You can add a coupon code, add links to special offers, and style it any way you want.

Next, you can go to the ‘Display Rule’ tab at the top. Here, you’ll see different options for showing your campaign.

Select display rules

For instance, you can select the ‘Time on Page’ option and show the floating bar after a user spends at least 5 seconds on your website.

Below that, you also get to select the location for your campaign. We’ll use the default setting where the countdown timer floating bar will appear on all the pages on your website.

Set up display rules

Once you are satisfied, don’t forget to click on the ‘Save’ button at the top.

After that, head to the ‘Publish’ tab. Now, change the Publish Status from Draft to Publish.

Publish your floating bar campaign

Don’t forget to click the ‘Save’ button and close the campaign builder.

You will now see the WordPress Output settings for your recently created campaign.

Change status to publish

By default, your campaign will be disabled, and you just have to click on the Status dropdown menu to change it from Pending to Published.

Once that’s done, click the ‘Save Changes’ button.

You can now visit your website to see your countdown timer FOMO campaign in action.

Countdown timer preview

Tracking Your Conversions in WordPress

FOMO techniques work really well for conversions, but how do you keep track of their performance? Without tracking, you wouldn’t know how many sales or leads were generated because of these campaigns.

All expert marketers use Google Analytics. It not only helps you see where your users are coming from but also allows you to track user engagement on your website.

The easiest way to use Google Analytics in WordPress is through MonsterInsights. It is the best Google Analytics plugin for WordPress and makes it super easy to track conversions on your website.

For instance, it has an eCommerce addon, which helps you track your eCommerce performance without leaving the WordPress dashboard. Plus, you can also track form conversions, link clicks, and more with MonsterInsights.

Ecommerce report in MonsterInsights

For more details, please see our guide on WordPress conversion tracking make simple.

We hope this article helped you learn how to add FOMO to your WordPress website and boost conversions. You may also want to see our list of must-have WordPress plugins for business websites and how to start a WordPress blog.

If you liked this article, then please subscribe to our YouTube Channel for WordPress video tutorials. You can also find us on Twitter and Facebook.

The post How to Use FOMO on Your WordPress Site to Increase Conversions first appeared on WPBeginner.

How to Use Contact Form to Grow Your Email List in WordPress

Did you know that you can use your WordPress contact form to grow your email list? Users are most engaged when they are trying to reach out using the contact form on your website. In this article, we will show you how you can use contact forms to grow your email list in WordPress.

How to use Contact Forms to Grow Your Email List

Why Use Contact Forms for Email List Building in WordPress?

Email marketing is the most cost effective way to reach your audience. If you haven’t started it yet, then you need to see our article on why you should start building your email list right away.

You will need to combine different tools and methods for encouraging users to signup. Offering multiple choices to sign up helps you quickly get more subscribers.

Many users focus on adding email signup forms to their websites, which is good start but you need to get more creative. Contact forms, in fact any kind of forms on your website are the perfect place to add an email signup option.

Here is why:

  • Your users have already entered their email address in the contact form.
  • They are already interested in what you have to offer, that’s why they are filling the form. Why not ask them to subscribe as well?
  • Many users feel that their chances of getting a response will increase if they opted in for your email list
  • You can use it in a variety of ways not just contact forms, but surveys, quizzes, ebook downloads, and more.

That being said let’s see how to easily integrate your email list to your WordPress forms and use contact forms to boost your email subscribers.

Connecting Your Email List to WordPress Contact Forms

First thing you will need to do is install and activate the WPForms plugin. For more details, see our step by step guide on how to install a WordPress plugin.

It is a paid plugin, and you will need at least the Plus plan to access email marketing addons.

You can use this WPForms Coupon: WPB10 to get 10% off your purchase on any WPForms plan.

Upon activation, you need to visit WPForms » Settings page to enter your license key. This will enable automatic updates and give you access to respective addons.

WPForms license key

Next, head over to WPForms » Addons page to install the addon for your email marketing service.

WPForms comes with integration addons for the top email marketing services including Constant Contact, MailChimp, AWeber, and more.

Install addon

Once you have installed and activated the Addon, you need to visit WPForms » Settings page and click on the integrations tab. You will see your email service provider listed there.

Click on your email service provider name and enter the required credentials. You can find this information from your email service account.

Connect your email service provider to WPForms

Now that you have connected WPForms to your email marketing service, you can easily add email optins into your forms and add them anywhere on your website.

Adding Email Signup Checkbox to Your Contact Forms

First you need to create a simple contact form for your website. See our detailed instructions on how to easily create a contact form in WordPress.

Once you have created your form, the next step is to add an email sign up option into the same form. Click on the checkbox field from the fields column.

Add checkbox to your form

You will notice a new field added to your form with three checkboxes. Clicking on the field will open its settings. You need to remove the two checkboxes and change the field label to something appropriate like ‘Signup for our Email List’.

Edit checkbox

You can check the box next to the choice field. Doing so, your email signup field will be checked by default.

Now your form is ready, we just need to tell it what to do when someone fills up the form.

You can do this by clicking on the ‘Marketing’ tab in the form builder. Here you need to select your email service provider and then click on the ‘Add New Connection’ button.

Add new email connection

You will be asked to provide a name for this connection.

Next, WPForms will fetch your email service account. It will show the label you added for the account when you added it in the integrations.

It will also fetch email lists available under your email service account. You need to select the email list where you want to add users.

Mapping form fields to email list fields

In the next section, you will be asked to map the form fields to your email service fields. After that you need to click on the checkbox next to ‘Enable conditional logic’ option.

Enable conditional logic

Select ‘Process’ this form if condition and then select your checkbox field and the checked reply.

Your contact form with email signup optin is now ready. You need to click on the Save button at the top bar and then exit form builder.

You can now add this form into any WordPress post or page. Simply click on the Add Form button when editing a post and then select your contact form.

Add form button

Here is a preview of a contact form on our demo website with email sign up optin.

A contact form with email subscription optin

Adding Email Subscription Checkbox to Other Forms

You can add email subscription checkbox to any form you create with WPForms. Here are a few creative ways to display forms and then you can add email subscription option to all these forms.

We hope this article helped you learn how to use contact forms to build your email list in WordPress. You may also want to see our ultimate guide on how to do lead generation in WordPress like a pro.

If you liked this article, then please subscribe to our YouTube Channel for WordPress video tutorials. You can also find us on Twitter and Facebook.

The post How to Use Contact Form to Grow Your Email List in WordPress appeared first on WPBeginner.