Do you want to add a WordPress login popup modal on your site? A modal login popup allows your users to quickly login to your website without leaving the page that they are viewing. This improves user experience and engagement on your website. In this article, we will show you how to easily create a WordPress login popup modal – step by step.
Normally, when users click on the login link, they are taken to the default WordPress login page or another custom login page on your website. Once users are logged in,they are redirected again to another page.
A modal login popup enables you to display the login form without sending users to a different page. Once logged in, you can redirect users to any page you want.
A modal login popup is faster and improves user experience on your website. A faster and more polished user experience can boost your sales and conversions.
That being said, let’s take a look at how to easily create a modal login popup in WordPress. We will show you two methods to do that, and you can choose the one that best fits your needs.
Method 1. Create a Modal Login Popup Using CSH Login
This method is easier and recommended for most users.
Upon activation, you need to go to Modal Login page in your WordPress admin area and select a type for modal login form.
After selecting the modal login box type, you can scroll down and manage login / logout redirects for the form. You can also allow users to generate their own passwords.
Next, you need to scroll down to the Styles section and select layout, display labels, background color, button color, link color, and more.
Furthermore, you can add registration email, email subject, use Google reCaptcha, and more. This plugin also allows you to add social login like Facebook, Twitter, and Google.
Make sure to save the changes and copy the shortcode located at the top of this page. You’ll need to create a new page in WordPress or edit an existing one to add the shortcode in the content editor.
You can also add the modal login in your WordPress sidebar. Simply go to Appearance » Widgets to drag and drop the CSH login widget in sidebar of your site.
CSH modal login can also be added in your websites template files. Once you have added it on your site, simply visit your WordPress site to see the modal login link in action.
Method 2. Create a Modal Login Popup with WPForms and OptinMonster
For this method you will need the WPForms plugin and OptinMontser. If you already have these two plugins, then this method is the better solution for you.
WPForms is the best WordPress contact form plugin. You will need at least their Pro plan to access the User registration addon.
OptinMonster is the best lead generation software on the market. It helps you convert website visitors into subscribers and customers. You will need at least the Pro plan to access MonsterLinks feature used in this article.
Upon activation, you need to go to WPForms » Addons page to install and activate the User Registration Addon.
After activating the addon, you need to go to WPForms » Add New page to create the user login form.
Once the WPForms builder is launched, you need to choose the pre-built User Login Form template.
This login form template have the email and password fields that will work similar to the default WordPress login form. You can drag and drop any additional fields from the left side of the screen as needed.
Next, click on the Password field in preview section, and it will show the field options on the left side. You can add the code given below in the description box of Password field to display options like forget password and user registration.
Can't remember your password? <a href="{url_lost_password}">Click here</a>. Don't have an account? <a href="{url_register}">Register here</a>.
After that you need to click on the Save button and then click on the Embed button.
A popup window will open with the embed code. You need to copy this code and save it to use later.
Your login form is ready. Now you can go ahead and create the modal popup.
Upon activation, you need to go to OptinMonster in WordPress admin area and click on Create New Campaign button.
Your OptinMonster dashboard will open on a new web page.
Once inside, you need to select Lightbox Popup as campaign type, so you can add your login form in the popup.
Next, you need to select the Canvas campaign template which is a blank template and allows you to add custom code and shortcodes.
It will ask you to add a name to your lightbox and select the website where you want to load this popup.
Once you click on the Start Building button, you will be redirected to OptinMonster campaign setup page.
From here, you need to go to Optin tab and set width and height of the canvas, add login form embed code in Custom Canvas HTML field, manage display and sound effects for modal popup, and more.
Note: The login form embed code should be the code that you copied after creating your login form in the previous step.
Since you are creating a modal login popup, you need to go to the setup tab and set ‘0’ value for Cookie Duration and Success Cookie Duration. It will display the form to all visitors whenever they click on your link.
Next, you need to visit the Display Rules tab and expand MonsterLink to change the status to active.
Make sure to click on the Save button at the top right corner and go to Publish section to make the status active.
Now you can add this modal login popup in your WordPress pages or posts.
Adding Modal Login in WordPress
You need to go back to OptinMonster in your WordPress admin area, and it will show you the list of campaigns. If you don’t see your recently created campaign for modal login, then simply click on the Refresh Campaigns button.
Next, you need to edit the campaign output settings to enable optin on your site and select who should see the modal login popup. Make sure to click on the Save Settings button.
After that you need to go back to the campaigns overview page and copy the slug that is visible below the live option of the campaign. This unique slug can be used in shortcodes and code to display the modal login in WordPress.
Next, you can create a new WordPress page or edit an existing one and add this code with your unique campaign slug.
You can also add the code above in your WordPress menus, sidebar, or any other area on your site.
Make sure to save the changes to WordPress page and visit your site to see the modal login in action.
We hope this article helped you learn how to create a modal login in WordPress. You may also want to see our complete list of best WordPress login page plugins and design your own login page easily.
If you liked this article, then please subscribe to our YouTube Channel for WordPress video tutorials. You can also find us on Twitter and Facebook.
If you want your WordPress site to load fast, optimizing the images that you use is one of the biggest things that you can do. Images comprise about 65% of an average webpage. And unoptimized images are something that Google Pagespeed Insights will often yell at you about. So what’s the easiest way to optimize ... Read moreWP Compress Review: Optimize Your WordPress Images + Real Test Data
Do you want to create GDPR-compliant forms in WordPress?
European Union’s new GDPR law requires explicit user consent to store personal information so that users can have more personal control over their data stored on websites.
In this article, we will show you how to easily create GDPR-compliant forms in WordPress.
What is GDPR?
The General Data Protection Regulation (GDPR) is a European Union (EU) law that became effective on May 25th, 2018. This new law aims to give EU citizens control over their personal data and change how companies and businesses handle data privacy around the world.
A typical WordPress site may collect users’ personal information in a number of ways. One of which is by adding forms to the site. Most forms collect personal information, and you may want to make sure that your WordPress forms comply with GDPR.
What is Required to Make a Form GDPR Compliant
In order to make your WordPress forms GDPR compliant, you will need to add the following features:
Ask users to give explicit consent for storing and using their personal information.
Allow users to request access to their own personal information stored on your website.
Allow users to request the deletion of their data from your website.
Having said that, let’s take a look at how to easily create GDPR-compliant WordPress forms. You can click the links below to jump ahead to any section:
We recommend using WPForms to make GDPR-compliant WordPress forms. It is the best contact form plugin for WordPress and has built-in GDPR enhancement features.
For instance, you get a 1-click GDPR Agreement field for your forms, GDPR-compliant data retention best practices, easy entry management system to quickly find, export, or delete user data upon request.
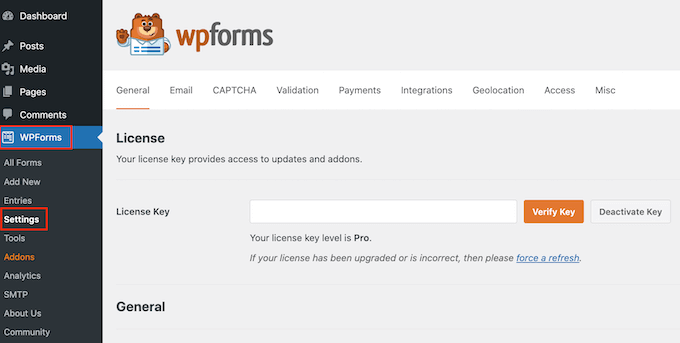
For this tutorial, we’ll use the WPForms Pro version because it includes the disable user cookies and user details options. However, you can also use the WPForms Lite version to create a GDPR-compliant form.
Upon activation, you need to visit WPForms » Settings page and enter your license key. You can find the license key in the WPForms account area.
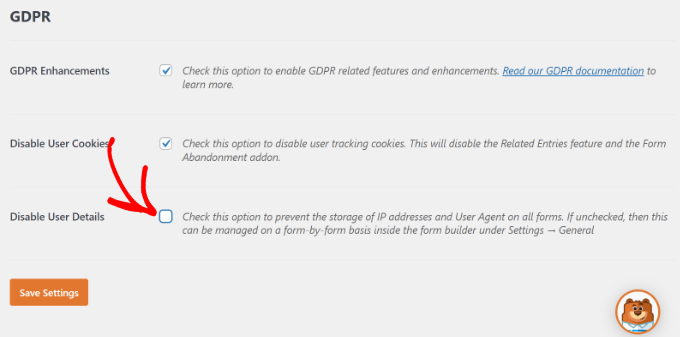
Next, you’ll need to scroll down to the GDPR section.
There, you need to check the box next to the GDPR Enhancements option.
Enabling the GDPR Enhancements option will reveal two more GDPR-related settings.
The first option, ‘Disable User Cookies,’ will stop WPForms from storing user sessions. This cookie contains a random unique identifier that helps WPForms add features like related entries, form abandonment, and geolocation. Disabling it will also disable those features.
The second option, ‘Disable User Details,’ will stop WPForms from storing user IP addresses and browser information. Both of these settings are optional, and you can check them if you feel that you don’t need these features.
Don’t forget to click the ‘Save Settings’ button to store your changes.
Select Form Template and Add GDRP Agreement Field
WPForms is now ready to create GDPR-compliant forms in WordPress. You can now go to WPForms » Add New page to create a new form.
You will be asked to enter a title for your form and select a template. These templates are ready-made forms that you can use as a starting point. In this tutorial, we’ll use the ‘Simple Contact Form’ template.
This will launch the WPForms builder interface.
You will see your form preview in the right column, and on the left, you will see all the fields that you can add to your form.
Simply drag the ‘GDPR Agreement’ field and add it to your form.
You will now see it appear at the bottom of your form. If you click on it, more options will appear in the settings panel on the left.
You can change the title of the form field and agreement text, and then use the description box to add details like a link to your privacy policy or terms and conditions pages.
Note: The GDPR Agreement field is always a required field, and it cannot be pre-checked to comply with the GDPR law. You can only add one GDPR agreement field to each form.
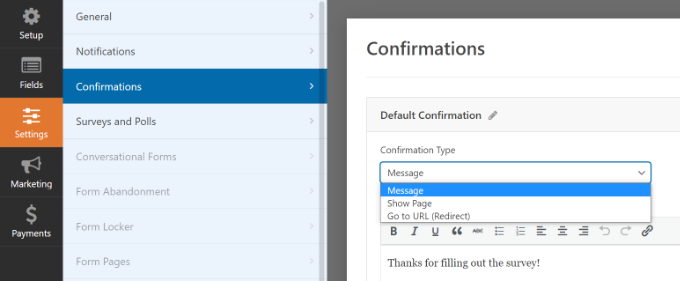
Next, you can go to the Settings » Confirmations tab in the form builder. Here, you’ll get different options to select when a user submits a form. For instance, you can show a message, a page, or to redirect users to another URL.
Once you are satisfied with the form, don’t forget to store your changes.
Adding GDPR Compliant Form to WordPress
WPForms allows you to easily add forms anywhere on your website.
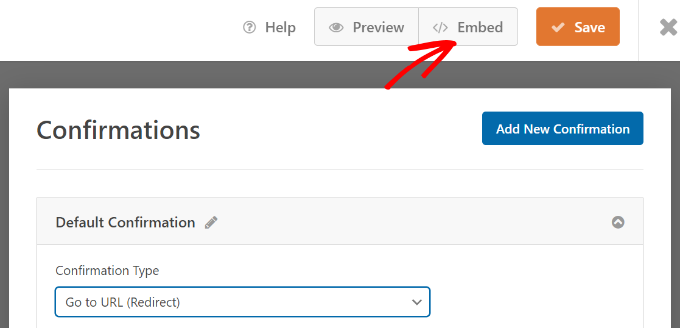
You can simply click the ‘Embed’ button at the top of the form builder to get started.
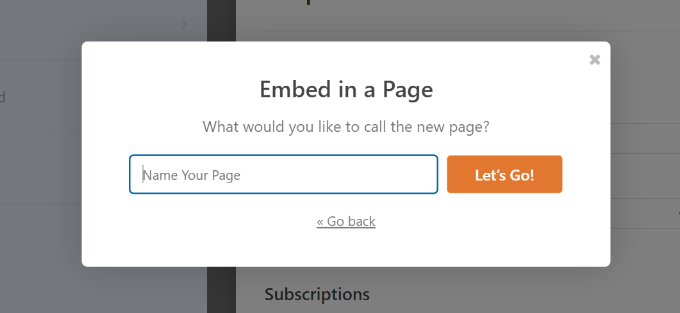
Next, a popup will open, which will ask you to create a new page or select an existing page.
We’ll use the ‘Create New Page’ option for this tutorial.
After that, you’ll need to enter a name for your page.
Once that’s done, simply click the ‘Let’s Go’ button.
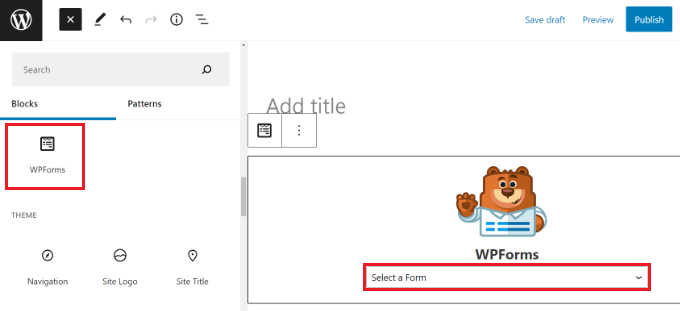
Your form will now appear in the WordPress content editor.
Another way to add forms to any page or post is using the WPForms block. Simply add the block to your content and select your form from the dropdown menu.
You can now save or publish your post or page.
Simply visit your website to see your GDPR-ready WordPress form in action.
Managing Data Access and Deletion Requirements with WPForms
One of the requirements for GDPR compliance is to give users access and allow them to request the deletion of their data.
To do that, you can create a ‘Data access/delete form’ and add it to your privacy policy page. Users who wish to access their stored data or want it to be deleted can use that form to send you a request.
WPForms has an excellent entry management system that allows you to quickly find any data submitted via your forms.
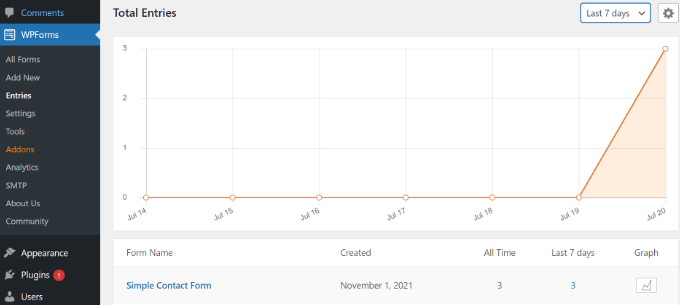
You can access all form entries by visiting WPForms » Entries page from your WordPress dashboard and selecting the form you wish to view.
WPForms will show you all entries submitted using that form. You can search for a form entry by entering a name, email address, IP address, or keyword.
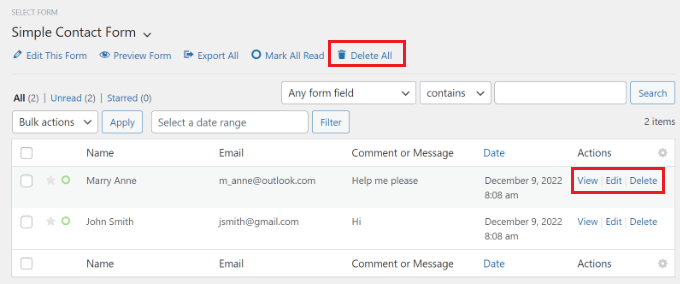
From here, you can simply click the ‘Delete All’ option at the top to remove form entries.
You can also delete individual entries or click the view button to see all data stored for that entry.
Disabling User Details for Specific Forms
With WPForms, you get full control over which forms can store user data. You can disable user details to be stored for each individual form.
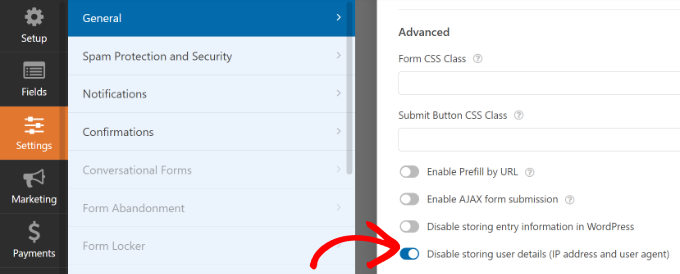
First, you’ll need to go to WPForms » Settings from your WordPress dashboard and scroll down to the ‘GDPR’ section.
Here, ensure that the ‘Disable User Details’ option is unchecked.
Don’t forget to click the ‘Save Settings’ button when you’re done.
After that, you can change each form’s settings in the form builder.
All you have to do is head to Settings » General in the form builder. Next, click the ‘Advanced’ section to expand it. From here, simply click the toggle for the ‘Disable storing user details (IP address and user agent)’ option.
This will prevent extra user information from being stored for individual forms.
Looking for a WordPress image compression plugin to automatically shrink and resize the images that you upload to your WordPress site? Images comprise about 65% of an average website’s file sizes, so finding ways to reduce the size of your images is a great way to speed up your WordPress site. And with the right ... Read more5 Best WordPress Image Compression Plugins Compared And Tested (2018)
Recently one of our readers asked if it’s possible to connect an Etsy store to WordPress. Having your Etsy shop integrated with your WordPress site can help you sell more products online. In this article, we will show you how to add your Etsy store in WordPress.
Why Add Your Etsy Store in WordPress?
Etsy shops are somewhat limited in features when compared to other popular eCommerce platforms like Shopify or WooCommerce. Mainly because Etsy is an online marketplace for creative goods, while WooCommerce and Shopify are complete eCommerce platforms.
Etsy shops have strict product guidelines with limited payment options, which may not be available in many countries. You also don’t have the ability to add advanced features to your Etsy Shop like you can do with a WooCommerce online store.
However, Etsy offers you more exposure to a niche clientele looking for handcrafted, artistic, and unique products. It is very easy to use, and you don’t have to spend much time on finding customers because they are already there.
If you want to expand your business, then you may want to use WordPress to create a website to better showcase your Etsy shop products.
That being said, let’s take a look at how to easily add your Etsy store in WordPress.
Upon activation, you need to go to Settings » Etsy Shop page and enter your Etsy API key to connect your shop with the plugin.
Note: If you don’t have an Etsy API key, then simply follow the link to get one from your Etsy store.
Once you click on the link, it will ask you to create a new app. You need to add the name for your app, describe your app, and add your WordPress site URL. After that, you need to select the best choices for your application and click on the Create App button below.
You will now see a success message with your Etsy API key. Go ahead and copy the key from here.
Next, you need to go back to your WordPress admin area and paste the Etsy API key. Once done, click on the Save Changes button, and the plugin will validate your API key and connect to your Etsy shop.
After connecting your Etsy store successfully, you can display and sell products from your Etsy shop right on your WordPress blog.
To add the Etsy store products in WordPress, you need to create a new page in WordPress or edit an existing page. On this page, you need to add the following shortcode to your page edit area.
Don’t forget to replace the shop name and section ID in this shortcode with your Etsy shop name and ID.
To get these two details, you need to go to your Etsy store and click on Shop Manager from top right corner of the screen.
Note: Make sure that you are already logged in to your Etsy account.
On this page, you need to click the link in the left menu to access your shop.
First, you need to copy the name of your shop and then click on the Edit Shop button to find the section ID.
From here, you need to click on Listings tab located in the left menu.
On this page, you will be asked to select the section in which you have added your products. You can select the Sections from the dropdown as displayed in the screenshot below.
The section ID of your shop will be displayed in the page URL when your selected section is loaded. Go ahead and copy this section ID to replace in the shortcode.
After adding the shortcode with your shop name and section ID, you can visit the post/page to see your Etsy store in WordPress.
You can add the same shortcode to multiple posts or pages in WordPress to display your Etsy shop. To show different listings, you need to change the section ID in the shortcode. However, the shop name can remain same.
We hope this article helped you learn how to add your Etsy store in WordPress. You may also want to see our guide on how to create an online marketplace using WordPress, so you can create your own Etsy like eCommerce marketplace.
If you liked this article, then please subscribe to our YouTube Channel for WordPress video tutorials. You can also find us on Twitter and Facebook.
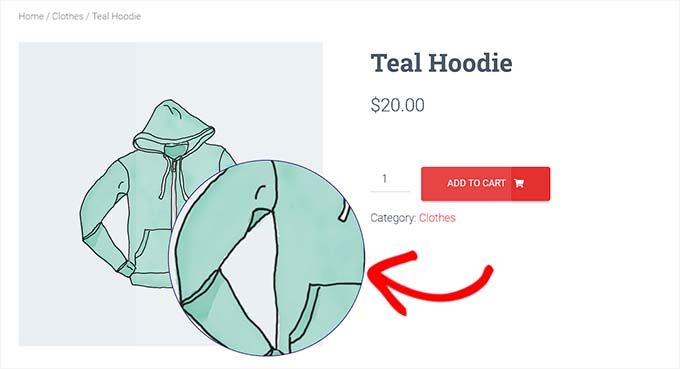
Do you want to add an Amazon-like magnifying zoom for images in WordPress?
Adding a zoom feature will allow users to see details that they would not see in a normal-sized image.
In this article, we’ll show you how to easily add magnifying zoom for images in WordPress.
Why Add a Magnifying Zoom for Images?
Adding a magnifying zoom feature on your WordPress website will allow visitors to view the intricate details of the images clearly.
If you have a photography website, then adding a magnifying feature will allow users to zoom in on your photographs to view the finer details.
Similarly, if you run an online store, then your customers will be able to zoom in on product images.
Many big eCommerce websites already use magnifying zoom for product images. It allows customers to examine the product and creates a better shopping experience in your store.
That being said, let’s see how you can easily add a magnifying zoom for images in WordPress.
How to Add a Magnifying Zoom For Images in WordPress
Upon activation, you need to head over to the WP Image Zoom » Zoom Settings page from the WordPress admin sidebar.
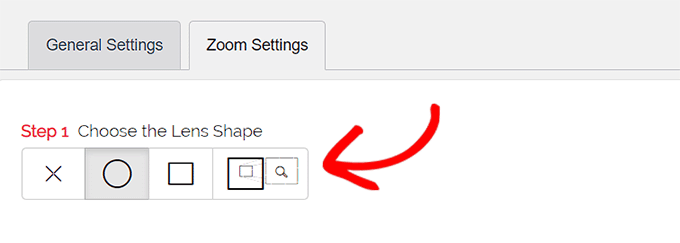
Next, you need to configure the zoom effect settings by switching to the ‘Zoom Settings’ tab and choose a lens shape that you want to use.
You can choose from circle, square, and zoom window lens shapes. You can even choose a ‘No Lens’ (⨯) option if you don’t want to use a shape for magnifying effect.
After choosing your preferred lens, you need to scroll down to the next step where you can preview an image with the selected lens to see how it works. The plugin has a preview image that you can use to test your changes.
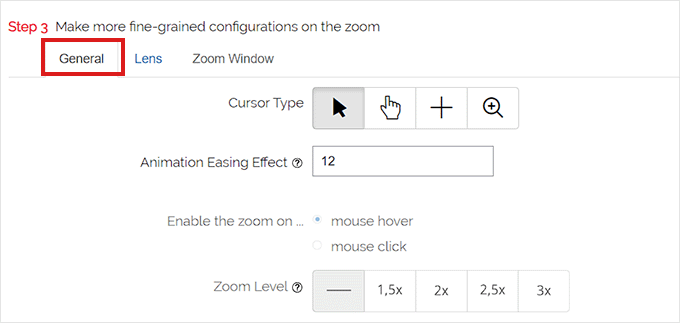
Next, you need to switch to the ‘General’ tab.
From here, you can select a cursor type, set an animation effect, enable the zoom on mouse hover or mouse click, and define a zoom level.
If you want even more options, some of the features are only available for the pro version of the WP Image Zoom plugin.
After making your choices accordingly, simply go to the ‘Lens’ tab from the top.
You can now configure settings like lens size, lens color, lens border options, and more if you selected the ‘circle’ or ‘square’ lens in Step 1.
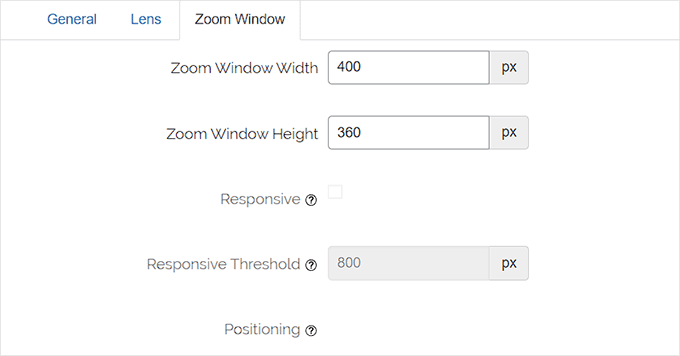
If you selected the Zoom Window Lens, then you need to switch to the ‘Zoom Window’ configuration tab.
From here, you can change the width and height of the zoom window, positioning, distance from the main image, border colors, and more.
Next, you need to simply click the ‘Save Changes’ to store your settings.
After that, all you have to do is configure a few general settings.
Configure General Plugin Settings
Next, you need to switch to the General Settings tab under the plugin settings.
From here, you can now enable features like zoom on WooCommerce product images, thumbnails, mobile devices, attachment pages, product category pages, and more.
All you need to do is simply check the boxes next to these options.
You can also remove the lightbox effect, so users can smoothly zoom images.
However, you would need the Pro version of the plugin for this feature.
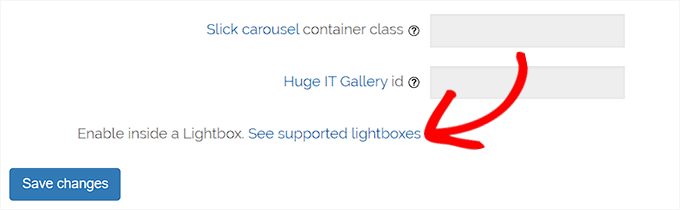
If you are not going to remove the lightbox for images, then you need to scroll down to the ‘Enable inside a Lightbox’ option and check the box next to it.
Note: You can see supported lightboxes to make sure that the zoom works fine inside a lightbox on your site.
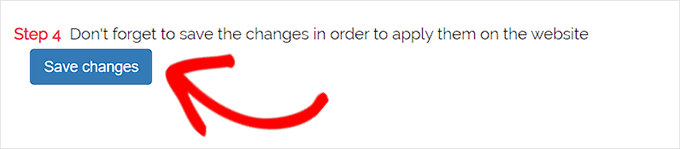
Once you are done adjusting the settings, don’t forget to click on the ‘Save Changes’ button to store your settings.
Magnifying zoom will now be enabled for WooCommerce products.
You can go visit your online store to check our zoom feature.
However, if you want to enable zoom for images on WordPress posts and pages, you need to follow the step below.
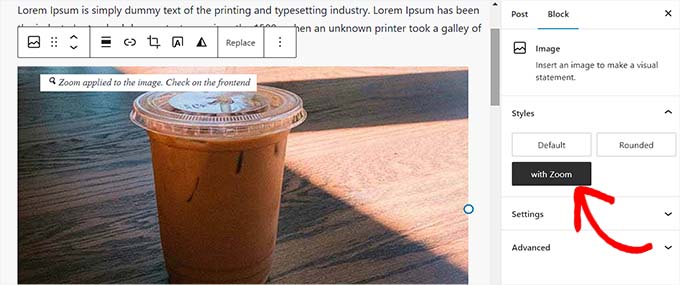
Step 3. Enable Magnifying Zoom for Images in Block Editor
By default, the magnifying zoom is not enabled for images on your posts and pages. You need to do it manually after adding an image to your content.
First, you need to open a post you want to edit in the block editor.
Next, you need to upload an image to that post from the media library or your computer.
Once you do that, simply click on the image to open up its’ Block Settings panel on the right corner of the screen.
From here, simply go to the ‘Styles’ tab and click on the ‘With Zoom’ button to apply magnifying zoom to your image.
After that, simply click the ‘Update’ or ‘Publish’ button at the top to store your settings.
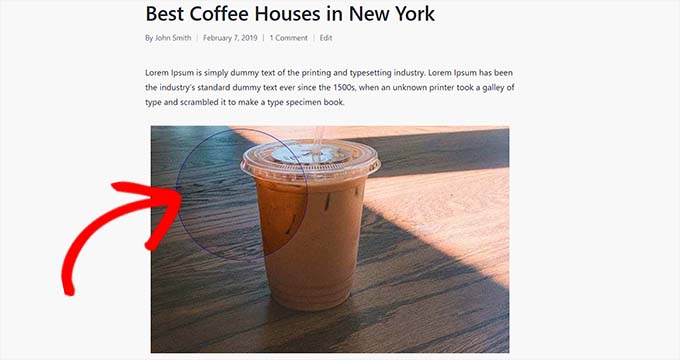
The zoom feature will look like this on your site:
Note: You will need to repeat this step each time you want to add the zoom effect to an individual image.
We recommend using high-quality images for the zoom feature to look great. High-quality images are normally larger in file size and take longer to load which will affect your website speed and performance.
WordPress users love page builders. And when it comes to page builders, we’re already a bit spoiled for choice. But Blox Page Builder aims to make us…spoiled’er. It’s a brand new entrant to the WordPress page builder market (though it’s been around longer as a page builder for Joomla). In my Blox Page Builder review, ... Read moreBlox Page Builder Review: A Brand New WordPress Page Builder
Do you want to create a product catalog in WordPress without adding a full-blown shopping cart? Sometimes businesses want to take order by phone while still displaying their product catalog on the website. In this article, we will show you how to easily create a product catalog in WordPress without a shopping cart.
Why Add a Product Catalog without Shopping Cart>
Some businesses have products that they can’t sell online because they have an undetermined price. This makes it impossible for them to use a shopping cart plugin, but they still want to make a website, so they can showcase those products and attract potential customers.
Normally, people associate eCommerce platforms with online shopping. However, you can still use them to display products without using shopping cart feature.
That being said, let’s take a look at how to easily create a product catalog in WordPress without using the shopping cart feature.
Getting Started with Your Product Catalog in WordPress
The best way to create a product catalog in WordPress is by using WooCommerce. Don’t worry, you will not be using any of its shopping cart features.
If you already have a WordPress website, then you can go ahead and install and activate the WooCommerce plugin. For more details, see our step by step guide on how to install a WordPress plugin.
If you don’t have a WordPress site setup, then see our guide on how to create an online store to quickly set up WordPress with WooCommerce.
Once you have installed WooCommerce, you can move on to creating your product catalog in WordPress.
Creating Product Catalog in WordPress without Shopping Cart
By default, WooCommerce displays an add to cart or buy button next to all your products. This makes it difficult to create a product catalog without the shopping cart feature.
Luckily, there’s an easy solution that fixes this problem.
Upon activation, you need to visit YITH Plugins » Catalog Mode page to configure the plugin settings.
First, you need to check the box next to ‘Enable YITH WooCommerce Catalog Mode’ option to enable the plugin. After that, you need to choose where you want to hide the ‘Add to cart’ button.
You can choose to hide it on the shop pages or product details pages.
But in this case, you should go with the last option which allows you to disable shop feature everywhere by disabling the checkout page, cart page, and removing all add to cart button everywhere.
Don’t forget to click on the ‘Save Changes’ button to store your settings.
Adding Products to Your WordPress Product Catalog
You can now go ahead and start adding products to your site. Simply visit Products » Add New page to enter your product information.
On the products screen, you can provide product title, description, short description, product image, and product gallery. Under the ‘Product’ data section, you will find the price options. You can leave them blank if you don’t want to display product pricing.
Once you are finished, go ahead and publish your product. Repeat the process to add as many products as needed to build up your catalog.
Viewing Your WordPress Product Catalog
You can visit your WooCommerce shop page to view your default catalog in action. Your shop page is usually located at a URL like this:
http://example.com/shop/
Replace example.com with your own URL to view your WooCommerce shop page in the catalog mode.
If you don’t want to use the shop page, then you can also display your products on any WordPress page and use it as your product catalog.
All you have to do is create a new WordPress page or edit an existing one, and add the following shortcode in the content area:
[products columns="4" limit="8" paginate="true"]
Feel free to change the number of columns and the items per page limit to your own requirements. Once you have adjusted the shortcode, go ahead and save or publish your page to preview it.
You will notice that the product pages will not show any add to cart or buy buttons. You can click on any individual product to see the product details page.
It will show all the product information images, description, gallery, without an add to cart or buy button.
We hope this article helped you learn how to easily create a product catalog in WordPress without the shopping cart feature. You may also want to see our list of the best WooCommerce themes that you can use for your product catalog website.
If you liked this article, then please subscribe to our YouTube Channel for WordPress video tutorials. You can also find us on Twitter and Facebook.
CSS gives you the power to change pretty much everything about how your WordPress site looks. It’s that powerful… But here’s the problem with CSS: It’s not accessible to beginners – you need to know at least a bit about code if you want to do anything with it. And even if you do know ... Read moreCSS Hero Review: Makes Theme And Plugin CSS Beginner-Friendly
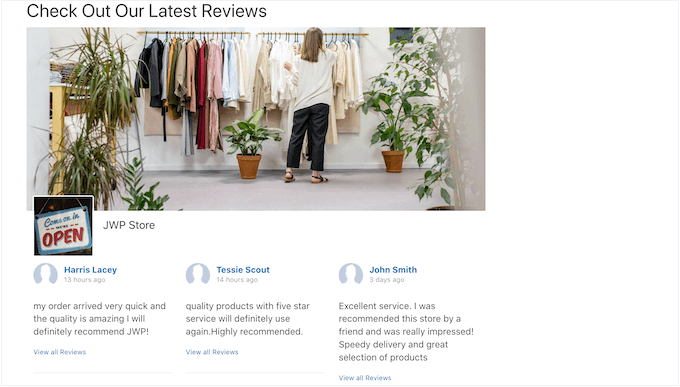
Do you want to display Facebook page reviews in WordPress?
Reviews and ratings can help you gain the trust of potential customers and encourage them to buy from your website. If you have a Facebook page, then you may already have lots of reviews that you can easily embed in your WordPress website.
In this article, we’ll show how to display your Facebook page reviews and ratings on your WordPress website.
Why Should You Display Facebook Page Reviews in WordPress?
Reviews can help you build social proof and gain the trust of your visitors, which means more sales for your business.
However, Facebook has its own built-in review system. If you already have a Facebook page, then followers can review your products and services on that platform. This is great for helping you build an engaging and trusted Facebook page.
But it’s also a good idea to show these reviews on your WordPress website. That way, people can see all your positive reviews, even if they don’t visit your Facebook page.
The reviews can also highlight benefits and features that you missed in your website’s text and are great for improving your WordPress SEO.
After embedding the review feed on your site, new reviews will appear on your site automatically. This means visitors will always see the latest reviews without you having to add them to your site manually.
With that in mind, let’s see how to display your Facebook page reviews in WordPress.
This plugin and extension allow you to show all your Facebook page reviews in an attractive and fully-customizable layout. As you get more reviews, they’ll be added to your WordPress website automatically.
Note: In this guide, we’ll be using the Pro version of Smash Balloon, as it allows you to embed Facebook reviews on your WordPress website. However, there’s also a free version that allows you to easily embed Facebook status posts in WordPress.
The first thing you need to do is install and activate the Smash Balloon Custom Facebook Feed plugin. For more details, see our guide on how to install a WordPress plugin.
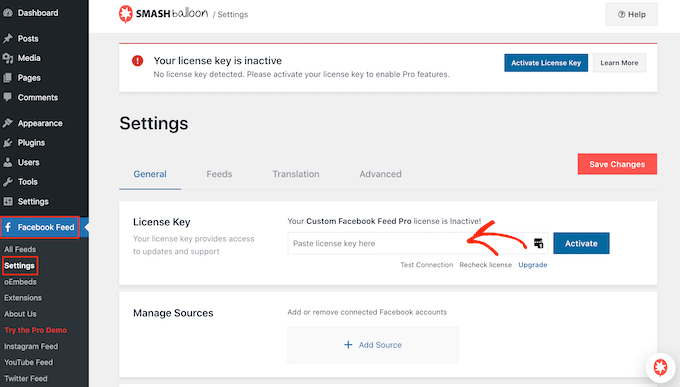
Upon activation, you’ll need to go to Facebook Feed » Settings and enter your license key into the ‘License Key’ field.
You’ll find this information under your account on the Smash Balloon website. After entering the key, click on the ‘Activate’ button.
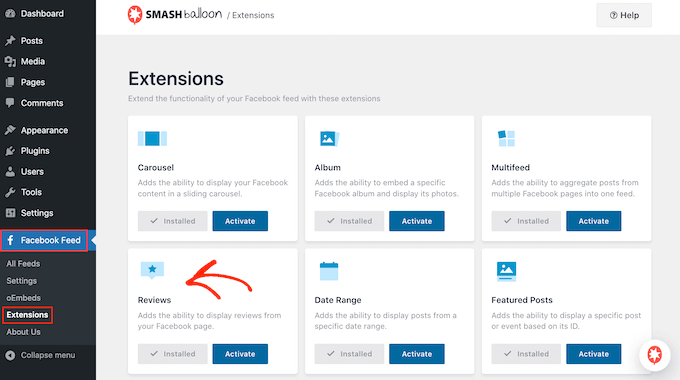
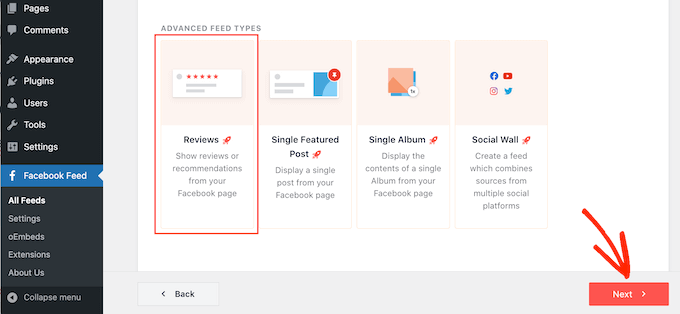
Next, go to Facebook Feed »Extensions. Here, find the ‘Reviews’ extension.
If you haven’t purchased the bundle or extension, then click on its ‘Install’ button. You can then follow the onscreen instructions to purchase the Reviews extension.
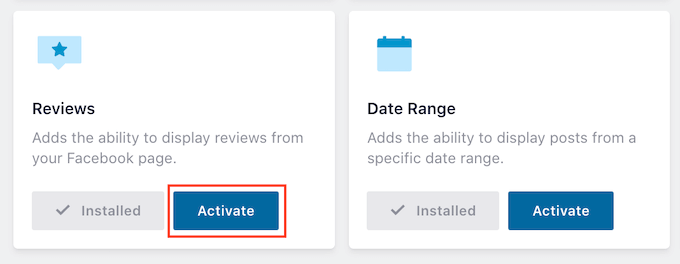
You can then install the extension in exactly the same way you set up a WordPress plugin. For more details, see our guide on how to install a WordPress plugin.
Once you have the extension installed, go ahead and click on the ‘Activate’ button.
Connect the Facebook Reviews Plugin to Your Page
Now, it’s time to connect your Facebook page to WordPress so that you can show reviews from that page.
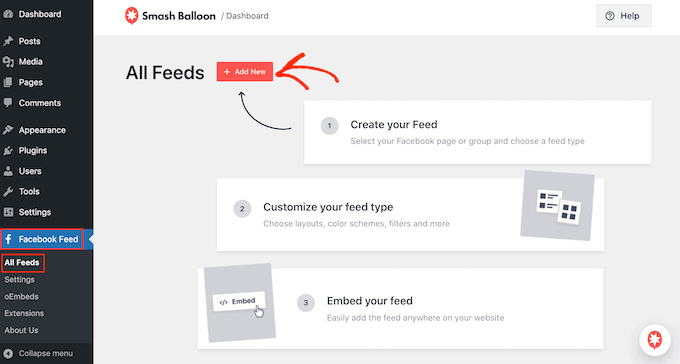
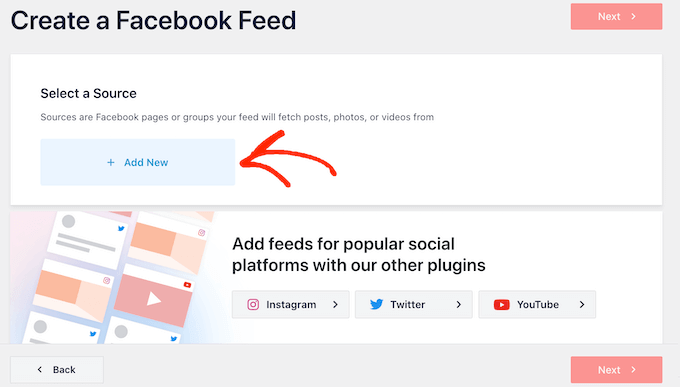
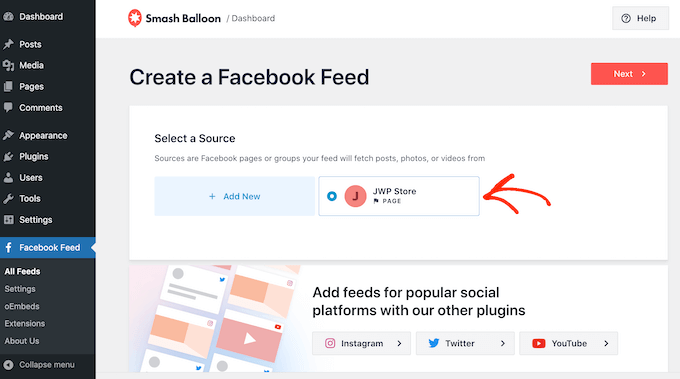
To get started, go to Facebook Feed » All Feeds and click on ‘Add New.’
Since we want to embed our Facebook page reviews, click on ‘Reviews’ and then select the ‘Next’ button.
After that, you’ll need to select the Facebook page where you’ll get the reviews from.
To do that, click on ‘Add New.’
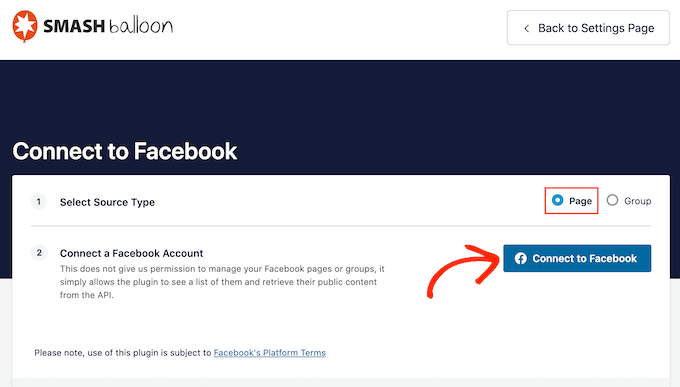
On the next screen, select the radio button next to ‘Page.’
Once you’ve done that, go ahead and click on ‘Connect to Facebook.’
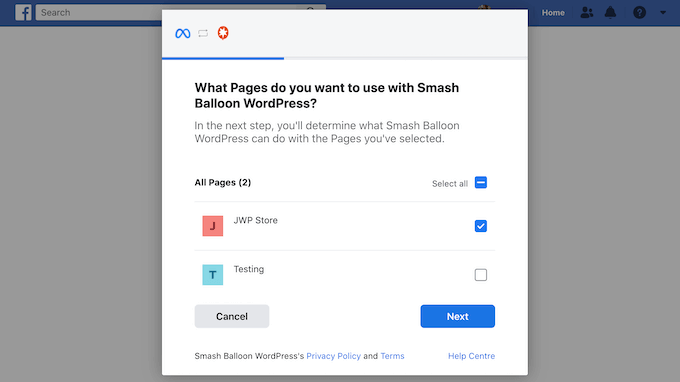
This opens a popup where you can log into your Facebook account and choose the pages where you’ll get the reviews from.
Once you’ve done that, click on ‘Next.’
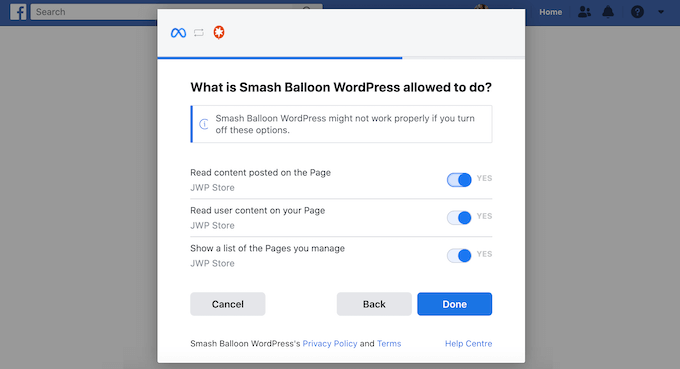
Facebook will then show all the information that Smash Balloon will have access to and the actions it can perform.
To restrict Smash Balloon’s access to your Facebook page, simply click any of the switches to turn it from ‘Yes’ to ‘No.’ Just be aware that this may affect the content that you can show on your WordPress blog or website.
With that in mind, it’s a good idea to leave all the switches enabled.
When you’re happy with how the Facebook permissions are configured, click on ‘Done.’
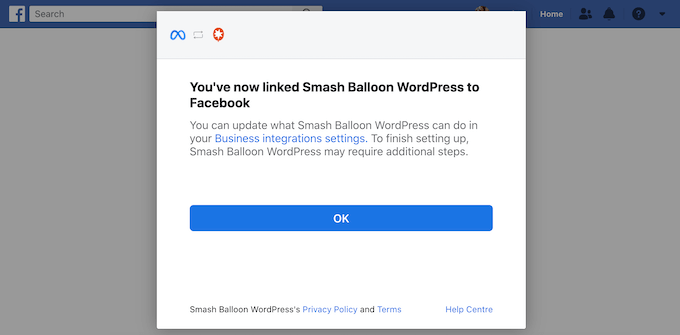
After a few moments, you should see a message confirming that you’ve connected your WordPress website and your Facebook page.
With that done, click on the ‘OK’ button.
Smash Balloon will automatically take you back to the WordPress dashboard.
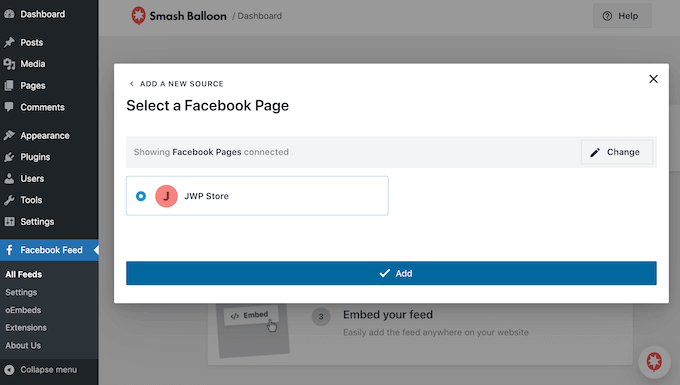
How to Display Your Facebook Page Reviews in WordPress
You’ll now see a popup with the Facebook page you connected to your WordPress website. Simply select the radio button next to your page and then click on the ‘Add’ button.
If you closed the popup by accident, don’t worry. You can simply refresh the tab to reopen the Smash Balloon popup.
After that, Smash Balloon will take you back to the Facebook Feed » All Feeds page automatically. Just like before, click on the ‘Add New’ button, select ‘Radio,’ and then click on the ‘Next’ button.
Now, select your Facebook page, and click on ‘Next.’
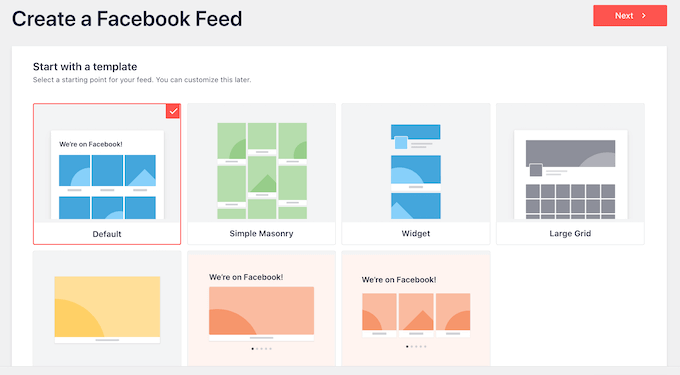
On this screen, you can choose the template you’ll use as the starting point for your review feed. You can customize all of these templates using the Smash Balloon editor.
We’re using the ‘Default’ template, but you can choose any template you want.
With that done, click on the ‘Next’ button.
Smash Balloon will now go ahead and create a feed of all your Facebook reviews.
How to Customize Your Embedded Facebook Reviews
This is a good start, but Smash Balloon has lots of settings that you can use to customize how the reviews appear on your WordPress website.
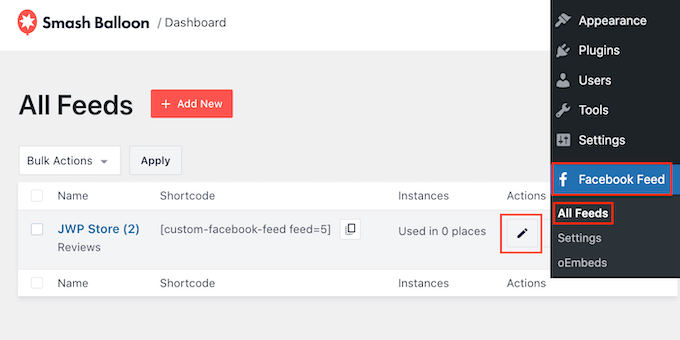
To fine-tune your review feed, go to Facebook Feed » All Feeds. Here, find the feed you just created and click on the ‘Edit’ button next to it.
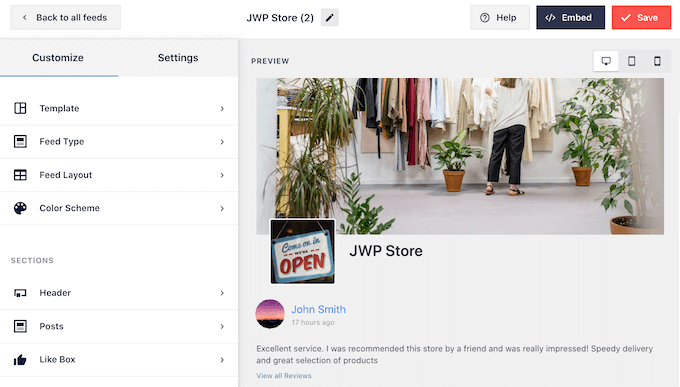
This opens the Smash Balloon feed editor, which shows a preview of your review feed.
On the left-hand side, you’ll see all the different settings you can use to customize how the review feed looks on your site. Most of these settings are fairly straightforward, but we’ll quickly cover all the main settings.
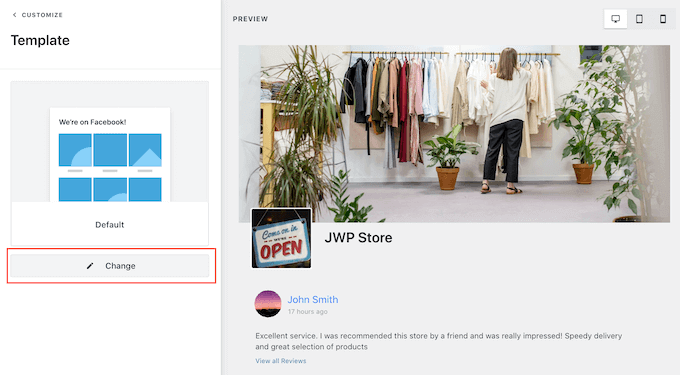
If you want to change the template you’re using, simply click on ‘Template.’
Then, select the ‘Change’ button and choose a new template.
When you’re happy with the layout, click on the ‘Customize’ link.
This will take you back to the main Smash Balloon editor, where you can move to the next settings screen, which is ‘Feed Layout.’
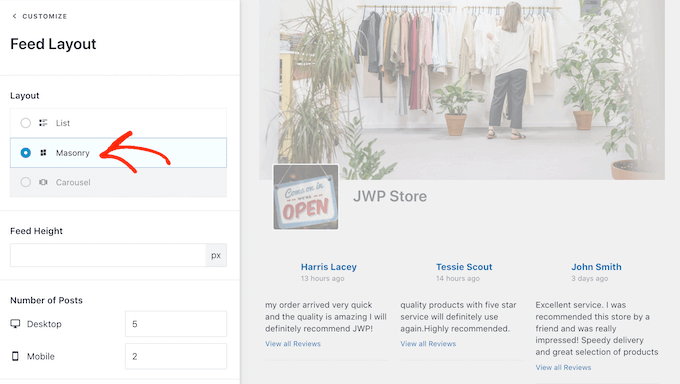
On this screen, you can switch between masonry and list layouts and change the feed height.
As you make changes, the preview on the right will update automatically, so you can try different settings to see what works best for your Facebook review feed.
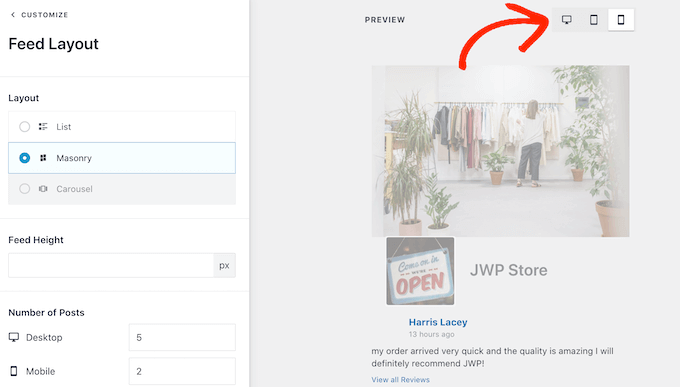
By default, Smash Balloon will show a different number of reviews on desktop computers and mobile devices.
You can preview how the feed will look on desktop computers, tablets, and smartphones using the row of buttons in the upper-right corner.
Just because your feed looks great on desktop devices, doesn’t mean it will look as good on smartphones and tablets.
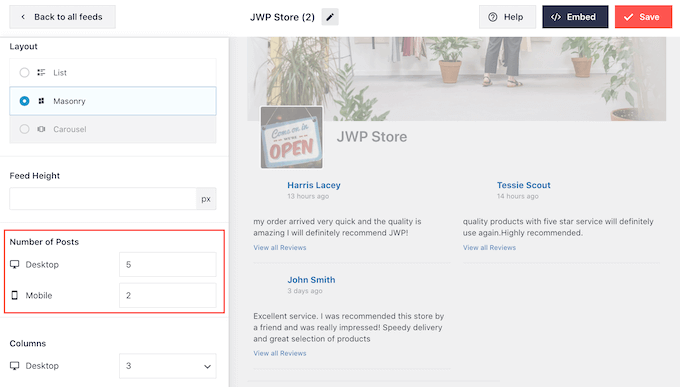
To make this change, simply find the ‘Number of Posts’ section and type a different number into the ‘Mobile’ field.
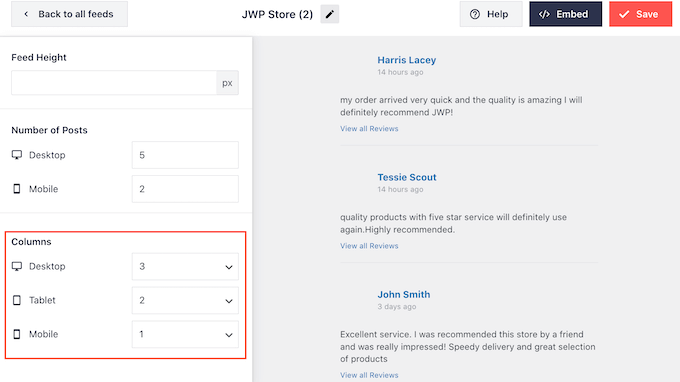
If you do want to show less content on smartphones and tablets, then you can also change the number of columns.
To show fewer columns on mobile devices, simply type some new numbers into the ‘Columns’ settings. In the following image, we’re splitting the content into 3 columns on desktop, 2 columns on tablet, and 1 column on mobile devices.
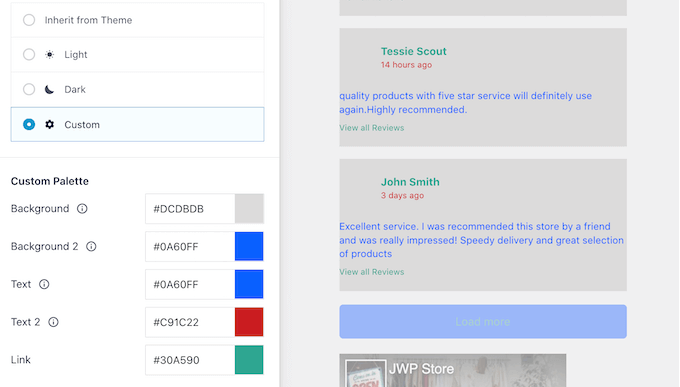
By default, Smash Balloon uses the same color scheme as your WordPress theme, but it also lets you switch to a ‘Light’ or ‘Dark’ color scheme.
To take a look at these options, click on ‘Color Scheme’ on the main Smash Balloon menu. Here, you can test out the ‘Light’ and ‘Dark’ color schemes, change the text color in WordPress, select ‘Custom’ and use the controls to change the background color, and more.
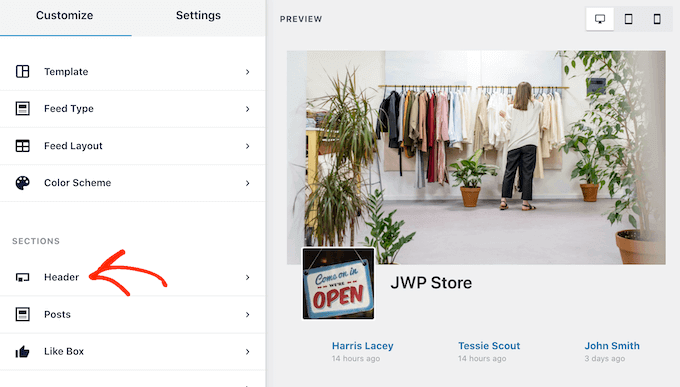
Next, you can add a header above your review feed, which can include content like your page’s profile picture and name. This makes it clear that all the positive reviews are for your page or business.
To add a header section, select ‘Header’ from the left-hand menu.
To start, you can add or hide the header by clicking on the ‘Enable’ slider.
If you do show a header, then you can use the controls to change the size of the header and its color, hide or show your page’s profile picture, show your page’s bio and likes, and more.
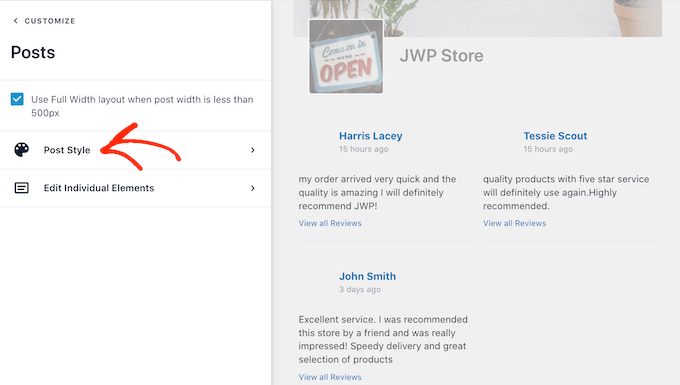
After that, you can change how the individual reviews look inside the feed by selecting ‘Post Style’ from the left-hand menu.
After that, click on ‘Post Style’ again.
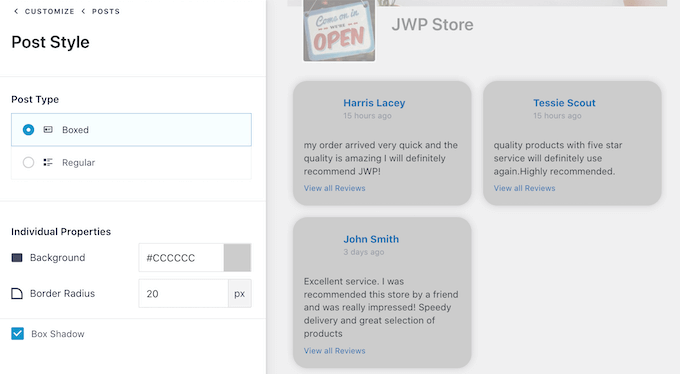
Here, you can choose between a regular and a boxed layout.
If you click on ‘Boxed,’ then you can create a colored background for each post. You can also make the border radius larger to create curved corners or add a border shadow to help your reviews stand out.
If you choose a ‘Regular’ layout, then you can change the color and thickness of the line that separates the different reviews.
In the following image, we’ve increased the line thickness and used a different color.
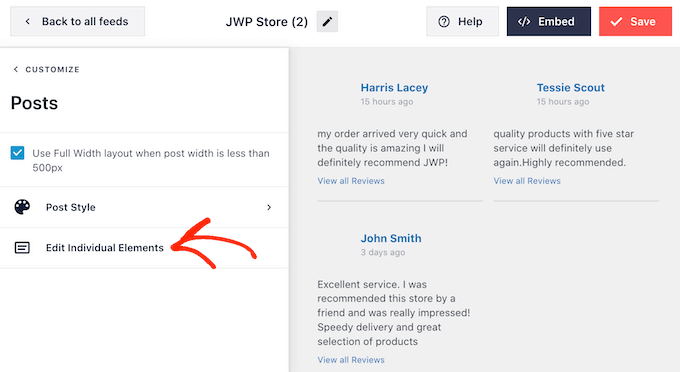
You can also style the individual parts within each review by going back to the main Smash Balloon settings screen.
Once again, select ‘Post Style’ and then click on ‘Edit Individual Elements’ instead.
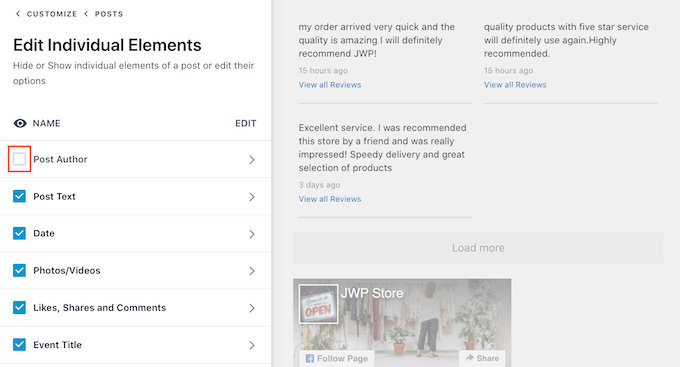
You’ll now see all the different content that Smash Balloon shows from each review, such as the customer’s name, the date, and the number of likes, shares, and comments.
To remove a piece of content from your embedded reviews, click to uncheck its box.
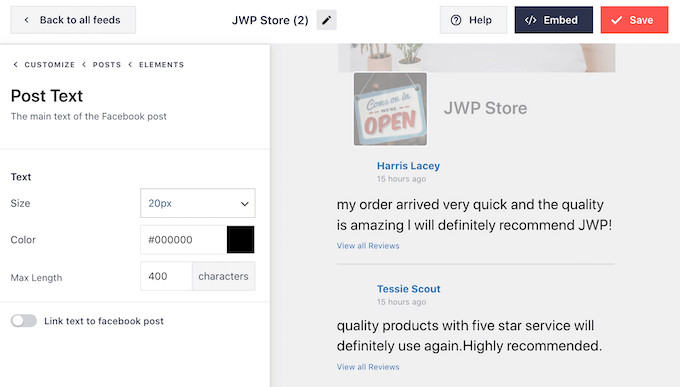
To style a piece of content, simply click on its title. This will take you to a screen where you can change its text size and text color.
This allows you to make certain content stand out more than others. For example, you may want to make the review text bigger than the name of the person who left the review.
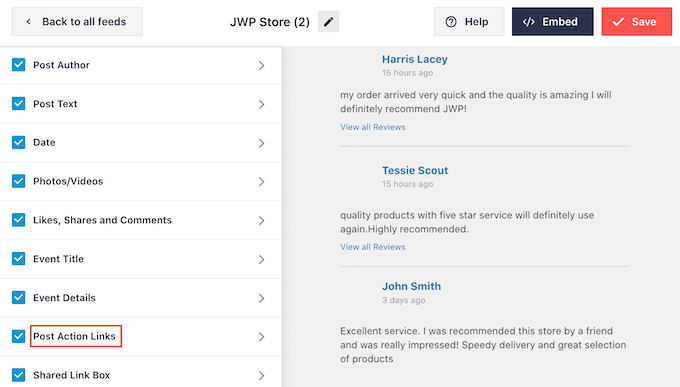
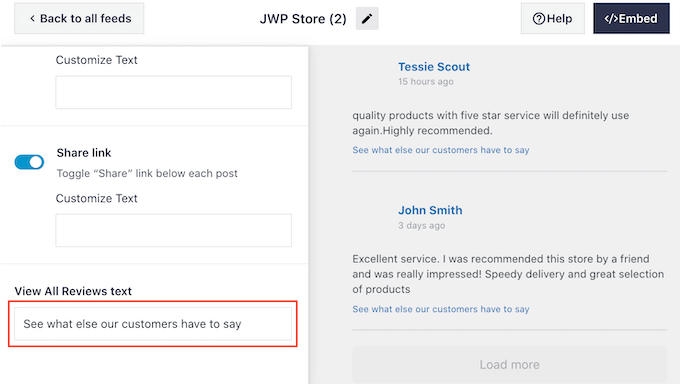
By default, Smash Balloon will show a ‘View all Reviews’ link below each review.
You can change how this link looks or even replace it with your own message by clicking on ‘Post Action Links.’
Here, you can change the text size and color.
To replace the default text, simply type into the ‘View All Reviews text’ field.
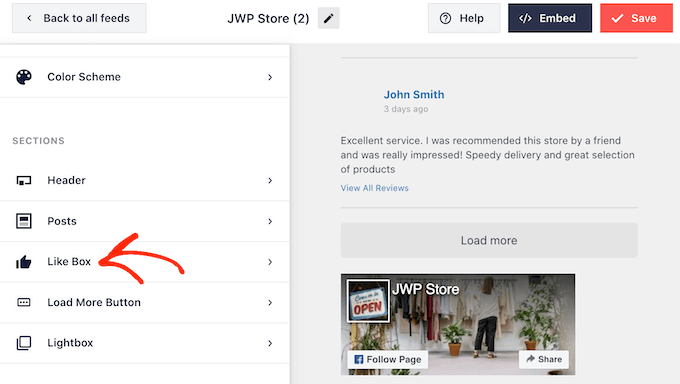
By default, Smash Balloon doesn’t add a Facebook ‘Like’ button to your review feed. This button makes it easier for visitors to follow you on Facebook, so they can learn more about your business.
For this reason, you may want to add this button by selecting the ‘Like Box’ settings.
Here, simply click on ‘Enable’ so that the toggle turns blue.
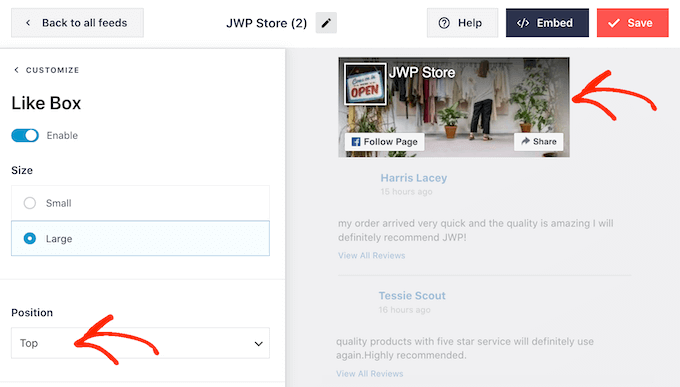
You can now use the ‘Position’ dropdown to show the Like Box below or above the review feed.
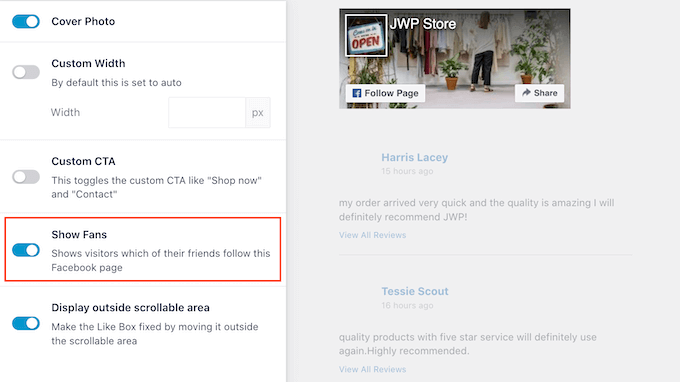
You can also use these settings to make the button large or small, show your page’s cover photo, or add a custom call-to-action.
Reviews are already a powerful form of social proof, but you may also want to show the total number of people who follow you on Facebook. To do this, simply click on the ‘Show fans’ switch so that it turns blue.
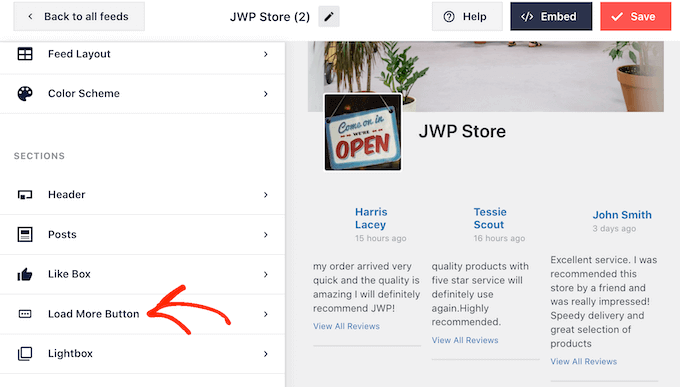
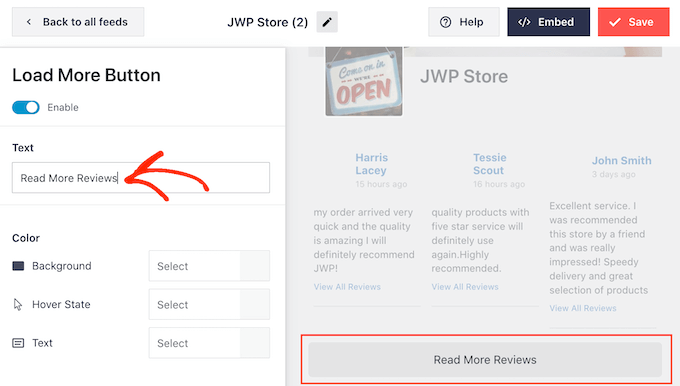
The ‘Load More’ button gives visitors an easy way to scroll through more of your reviews. If you have a lot of reviews, then it’s a good idea to add this button to your feed if it isn’t already enabled.
To do this, select the ‘Load More Button’ option from the left-hand menu.
Then, click on the ‘Enable’ toggle so that it turns blue.
You can also make the button stand out by changing its background color, hover state, and text color.
You can even add your own messaging to the button by typing into the ‘Text’ field. For example, you may want to use something like ‘Read More Reviews.’
When you’re happy with how the Facebook review feed looks, don’t forget to click on ‘Save’ to store your changes.
How to Embed Your Facebook Review Feed in WordPress
You’re now ready to add the review feed to your site using a block, widget, or shortcode.
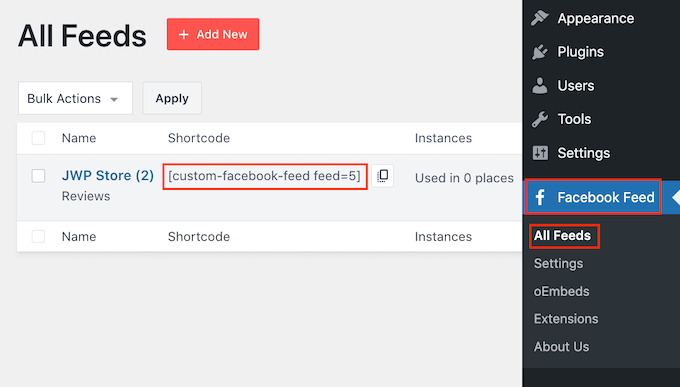
If you’ve created more than one feed using Smash Balloon, then you’ll need to know the review feed’s code if you’re planning to use a block or widget.
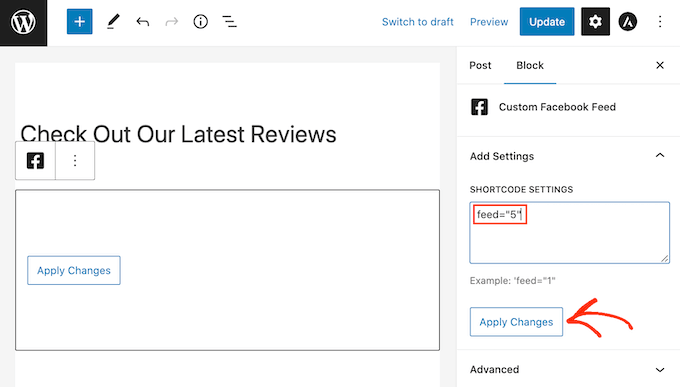
To get this information, go to Facebook Feed »All Feeds and then look at the feed="" part of the shortcode. This is the code you’ll need to add to a block or widget, so make a note of it.
In the following image, we’ll need to use feed="5".
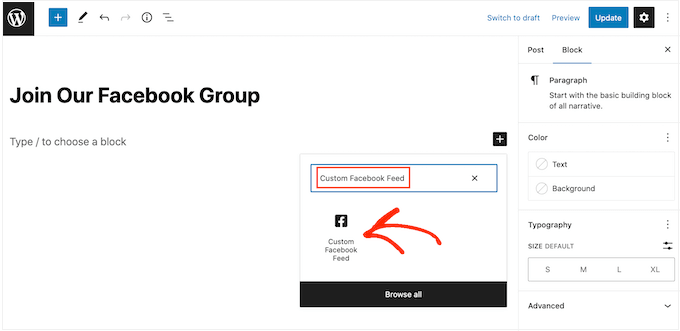
If you want to embed your reviews in a page or post, then you can use the ‘Custom Facebook Feed’ block.
Simply open the page or post where you want to show your reviews. Then, click on the ‘+’ icon to add a new block and start typing ‘Custom Facebook Feed.’
When the Facebook block appears, click to add it to your page or post.
The block will show one of your Smash Balloon feeds by default. If this isn’t your Facebook review feed, then find the ‘Shortcode Settings’ section in the right-hand menu.
Here, go ahead and add the feed="" code, then click on ‘Apply Changes.’
After that, publish or update the page to make the reviews live on your website.
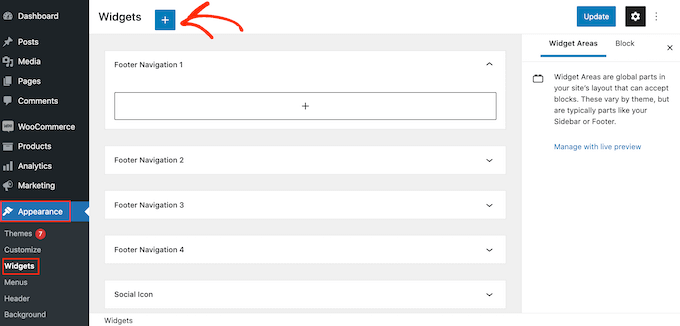
Another option is to add the feed to any widget-ready area, such as the sidebar or similar section. This allows visitors to see your latest reviews no matter where they are on your WordPress website.
To do this, head over to Appearance » Widgets in the WordPress dashboard and then click on the blue ‘+’ button.
After that, type ‘Custom Facebook Feed’ into the search bar.
When the right widget appears, drag it to where you want to show the reviews on your WordPress website, such as the sidebar.
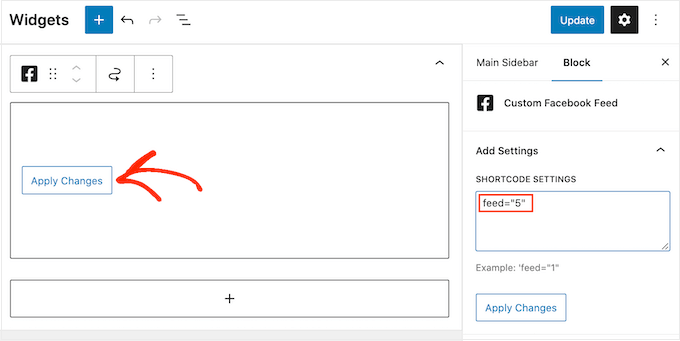
By default, the widget will show one of the feeds you created using Smash Balloon.
If this isn’t your Facebook review feed, then type the feed’s code into the ‘Shortcode Settings’ box. After that, click on ‘Apply Changes.’
Another option is embedding the review feed on any page, post, or widget-ready area using a shortcode. Simply head over to Facebook Feed »All Feeds and copy all the code under the ‘Shortcode’ column.
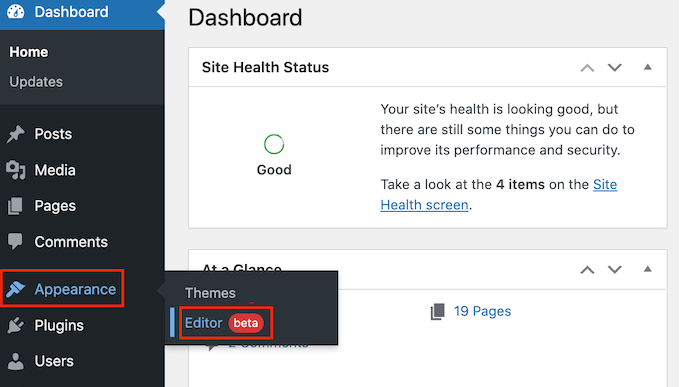
Finally, if you have a block-enabled theme, then you can use the full-site editor to add the ‘Custom Facebook Feed’ block anywhere on your site.
In the WordPress dashboard, simply go to Appearance » Editor.
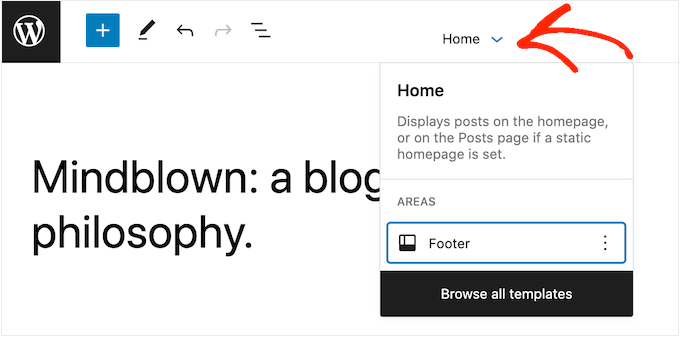
By default, the full-site editor will show the theme’s home template. If you want to add the review feed to a different template, then click on the arrow next to ‘Home.’
You can then choose a template from the dropdown menu, such as the footer template.
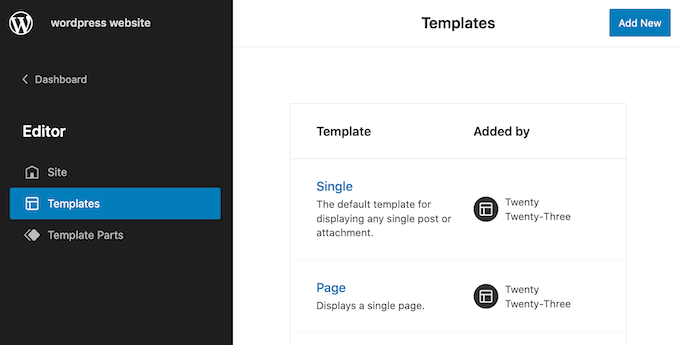
Another option is to click on ‘Browse all templates.’
The full-site editor will now show a list of all the templates you can edit. Simply click on the template where you want to show your reviews.
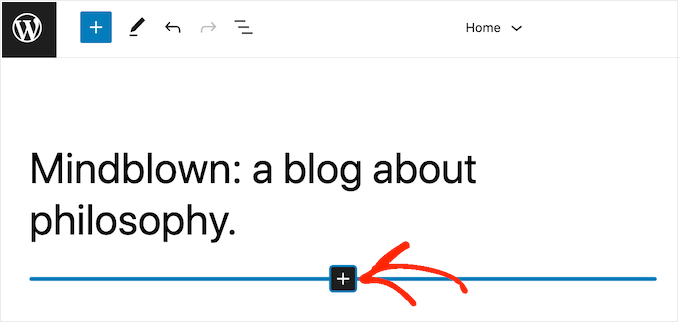
Once you’ve chosen your template, simply hover your mouse over the area where you want to add the review feed.
Then, click on the blue ‘+’ when it appears.
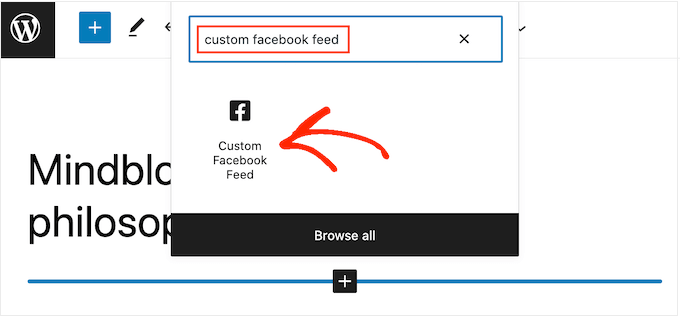
After that, start typing in ‘Custom Facebook Feed.’
When the right block appears, click to add it to the template.
As always, Smash Balloon will show a feed by default. You can change this feed by adding a shortcode following the same process described above.