7 Best WordPress Accordion Plugins (2018)

Are you looking for the best accordion plugins? An accordion is a neat web design technique which allows you to display content in collapsible tabs. In this article, we have hand-picked the 7 best WordPress accordion plugins that you can use on your website.
Best WordPress accordion plugins

Why Do You Need to Add Accordions in WordPress?

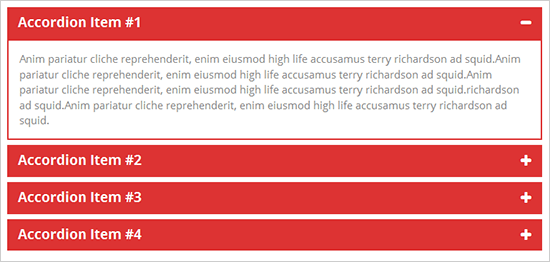
Accordions allow you to display more content on your posts and pages without adding long scrolls. If you want to shrink the length of a page, then you should consider adding your content in an accordion element.

You can add vertical or horizontal accordions with the text inside each tab. When users click or mouseover on the tab, it expands to reveal the content.
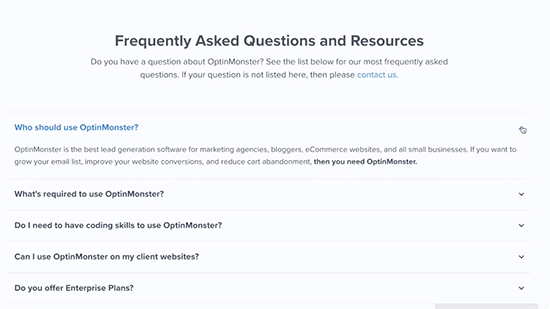
Example of accordion used on a website

Accordions are most commonly used to add a frequently asked questions (FAQs) section, by displaying questions as tabs. However, you can use them to add any kind of content where you want to save users from scrolling.

That being said, let’s take a look at some of the best WordPress accordion plugins that you can use on your WordPress website.

1. Accordion

Accordion plugin

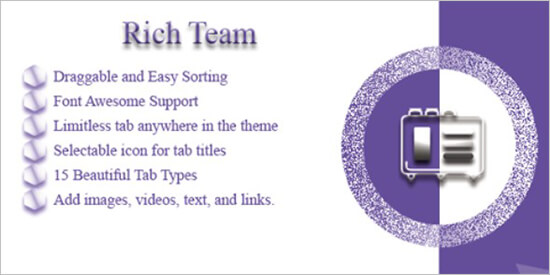
Accordion is a handy WordPress plugin which allows you to add beautiful accordions in your pages, posts, template files, and anywhere on your site using shortcodes. It has a responsive design and displays your content beautifully on all devices. Accordion has Font Awesome icon font support which allows you to use beautiful icons to your accordion tabs.

You can add unlimited accordions on your site using this plugin. It allows you to change styles for the opened and closed accordion, hide the accordion without deleting, text alignment for content, and more.

2. Accordion FAQ

Accordion FAQ

Accordion FAQ is another accordion plugin for WordPress sites. It has a drag and drop builder that helps you easily add accordions anywhere on your WordPress blog. You can sort the accordions and manage their placement by dragging them up or down in the backend.

It has multiple templates, unlimited color options, Font Awesome icons support, bootstrap framework for responsive design, and more. Accordion FAQ loads faster which is great for search engine rankings of your site.

3. Tab – Accordion, FAQ

Tab accordion FAQ

Tab, Accordion and FAQ is a WordPress plugin that allows you to add beautiful animated tabs and accordions in WordPress. You can easily add responsive horizontal, vertical, animated, and other accordions to WordPress posts, pages, and sidebar widget areas.

It has multiple transition effects, different layouts, drag and drop functionality for sorting tabs, and more.

4. Arconix Shortcodes

Acronix shortcode

Arconix Shortcodes is a multipurpose WordPress plugin based on different style shortcodes to add tabs and accordions on your site. It displays your content in accordions and appears neatly on all mobile devices.

You can create unlimited accordions and add them anywhere with the help of shortcodes. The plugin also comes with a compatibility mode which allows you to prevent shortcode name conflicts.

5. Easy Accordion

Easy accordion

Easy Accordion is another WordPress accordion plugin that allows you to set up unlimited accordions and add them on your pages, posts, widget areas, and template files.

If you buy their premium version, then it comes with additional features like advanced shortcode system, accordions from WordPress categories and custom taxonomies, themes, unlimited colors support, and more.

6. Shortcodes Ultimate

Shortcodes ultimate

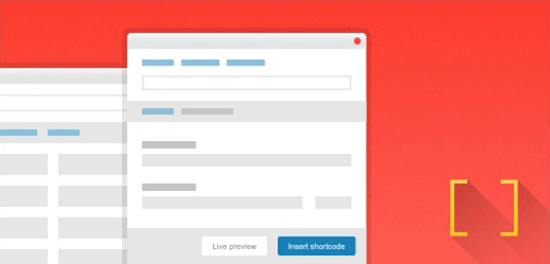
Shortcodes Ultimate is a comprehensive WordPress plugin that comes with a set of shortcodes to add multiple features. You can use this plugin to add accordions on your site with its 1-click shortcode insertion and live preview.

It has a custom widget that you can use to add the accordion in any widget area of your WordPress site. Shortcodes Ultimate is easy to use and functions smoothly with modern WordPress themes.

7. Smooth Accordion

Smooth accordion

Smooth Accordion is a simple WordPress accordion plugin. Like other accordion plugins, it allows you to add accordions on your pages and posts. Smooth Accordion adds an icon in your WordPress post editor that helps in adding the accordions in your posts and pages right away.

You can customize the background color, add custom styles to accordions, and align your content easily in plugin settings.

We hope this article helped you find the best WordPress accordion plugins. You may also want to see our ultimate step by step WordPress speed and performance guide for beginners.

If you liked this article, then please subscribe to our YouTube Channel for WordPress video tutorials. You can also find us on Twitter and Facebook.

The post 7 Best WordPress Accordion Plugins (2018) appeared first on WPBeginner.
5 Best WordPress Front End Editor Plugins For Easy Content Creation

Ever wished that you could edit and write WordPress posts from the front end of your site? If so, you’re in luck because WordPress front end editor plugins can make that dream a reality. With them, you, and potentially other users at your site, can edit posts without ever needing to look at the back ... Read more5 Best WordPress Front End Editor Plugins For Easy Content Creation

The post 5 Best WordPress Front End Editor Plugins For Easy Content Creation appeared first on Learn WordPress with WPLift.

How to Greet Each User With a Custom Welcome Message in WordPress

Do you want to greet each user with a custom welcome message in WordPress? Greeting users with a welcome message can help boost engagement on your website. It can also be used to generate leads and increase sales. In this article, we will show you how to greet each user with a custom welcome message in WordPress.

Greet users with custom welcome message in WordPress

Why and When You Should Greet Users with Welcome Message in WordPress?

Not all websites need to greet users with a custom welcome message. However, if you are running an online store, trying to generate leads, or boost user engagement, then a custom welcome message can be very useful.

There are different types of welcome messages that you can use. The goal here is to offer users a lot of value with each message. For example, you can offer them discounts, live help, encourage them to ask questions, and more.

You can use integrations to connect welcome messages with your email service provider, live chat service, or contact form plugin.

That being said, let’s see how to easily greet each user with a custom welcome message in WordPress.

Method 1. Greet Users with a Custom Welcome Message using OptinMonster

For this method, we will be using OptinMonster. It is the most popular lead generation software in the world that helps you convert website visitors into subscribers and customers.

First, you need to sign up for an OptinMonster account. It is a paid service, but they also offer a limited free-forever plan.

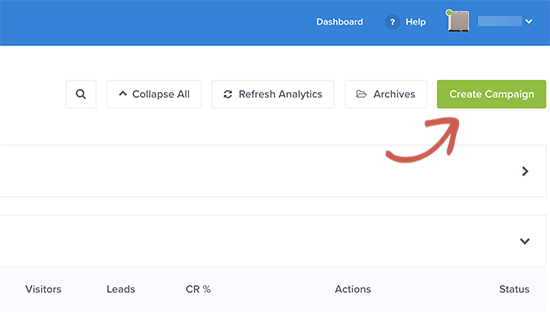
Once signed up, you will be taken to your OptinMonster dashboard where you need to click on the ‘Create Campaign’ button.

Create campaign

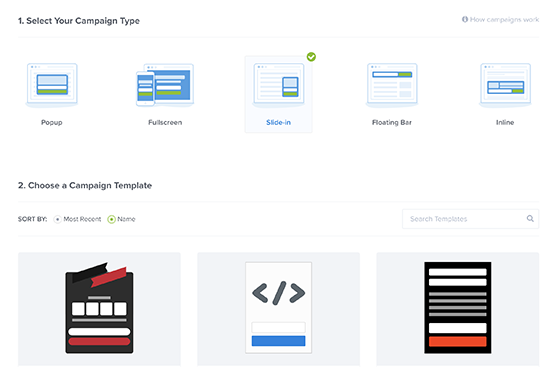
Next, you need to choose a campaign type and a template. OptinMonster comes with different campaign types, and you can use any of them to greet users with a welcome message in WordPress.

For the sake of this article, we will be using the slide-in campaign type with Flatland template.

Choose campaign type and template

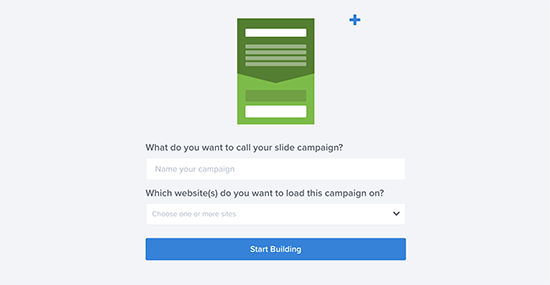
Next, you will be asked to give your campaign a name and select a website where you want to run this campaign. Click on select website field and then click on ‘Add website’ to add a new website.

Campaign options

After that, click on the ‘Start Building’ button to continue.

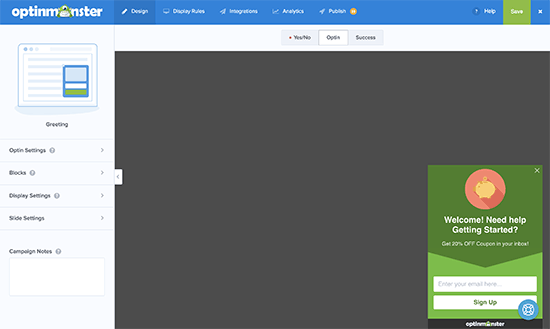
OptinMonster will now launch the drag and drop editor where you can simply point and click on any element to edit it. You can add blocks, columns, and elements with text, video, buttons, sign up fields, and more.

OptinMonster builder interface

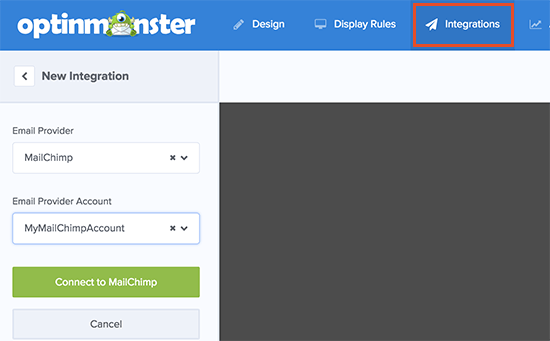
Simply click on the text fields to add your own welcome message to greet new users. You can also integrate it with your email service provider by clicking on the ‘Integrations’ tab on the top.

Add integration

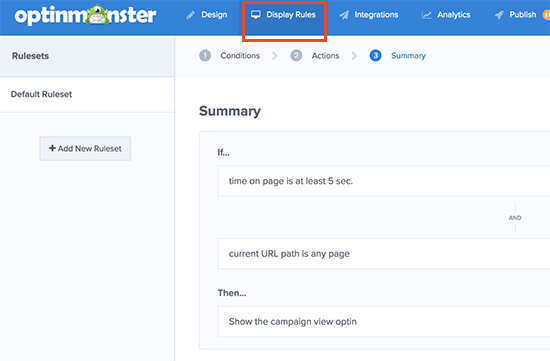
Next, you need to switch to the ‘Display Rules’ tab to select when you want to display the greeting. OptinMonster comes with a bunch of options that you can use to create less intrusive and highly engaging messages.

Display rules

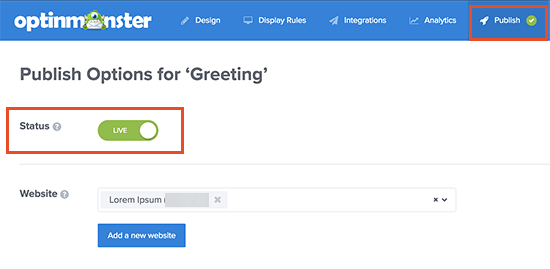
Once you are finished designing your custom welcome message, click on the Publish button at the top and toggle the ‘Status’ option to live.

Publish your optin

You are now ready to add this custom welcome message campaign to your website.

Switch to your WordPress admin area to install and activate the OptinMonster plugin. For more details, see our step by step guide on how to install a WordPress plugin.

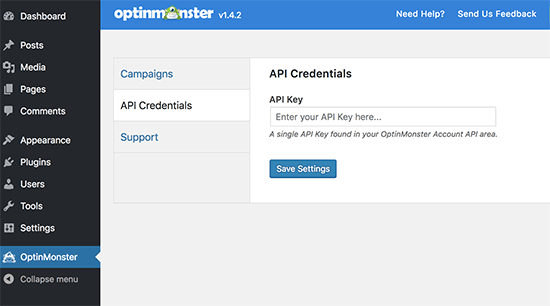
Upon activation, the plugin will add a new menu item labeled ‘OptinMonster’ to your WordPress admin sidebar. Clicking on it will take you to plugin’s settings page.

Enter your API key

You will be asked to enter your API key. You can find this information under your account on the OptinMonster website.

Don’t forget to click on the save settings button after entering your API key.

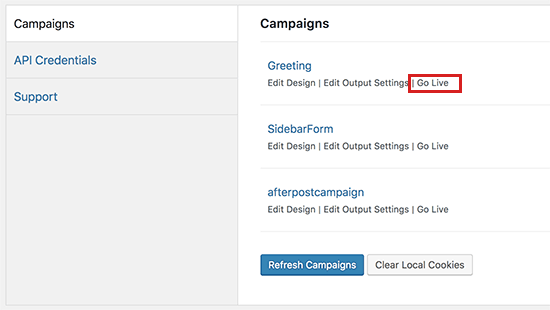
Next, you need to click on the ‘Campaigns’ tab. If you cannot see your campaign listed there then click on the refresh campaigns button.

After that, click on the ‘Go Live’ link next to the campaign you just created.

Make your campaign go live

You can now visit your website to see your custom welcome message in action.

Greeting preview

You can use OptinMonster to greet users with different welcome messages based on visits, time spent, logged in status, referral source, or use page level targeting for your landing pages.

Method 2. Greet Users with a Custom Welcome Message using LiveChat

LiveChat Inc is the best live chat support software for WordPress websites. It allows you to create beautifully designed live chat buttons, eye-catchers, and live chat support to your WordPress site.

You can customize the greeting message, display your own buttons, upload your logo, show agent profiles, and more.

LiveChat is a paid solution (starting from $16.99 per agent). They also offer a free 30-day trial allowing you to check out the features and see if its a good fit for your business.

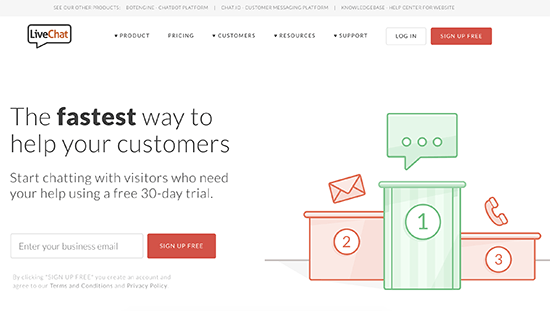
First, you need to visit the LiveChat website and sign up for an account.

Live Chat sign up

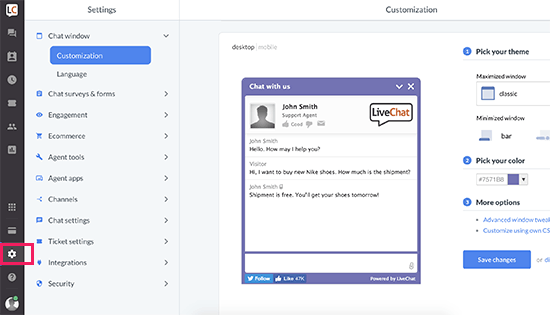
After creating your account, you will be taken to your LiveChat dashboard. Next, you need to click on the settings tab to customize the appearance of the LiveChat button.

LiveChat settings

From here, you can choose the chat window colors and theme. After that click on ‘Advanced window tweaks’ link to upload your own logo and add your social media profiles.

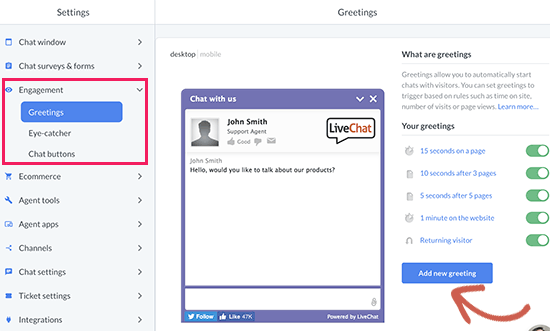
Next, you need to switch to the Engagement » Greetings section. By default, LiveChat enables a few greetings displayed based on few simple rules like time spent on site, pages viewed, returning visitor, and more.

Edit custom greetings

You can click on these greetings to edit them and add your own custom welcome message. You can also delete them or click on the ‘Add new greeting’ button to create a new custom greeting.

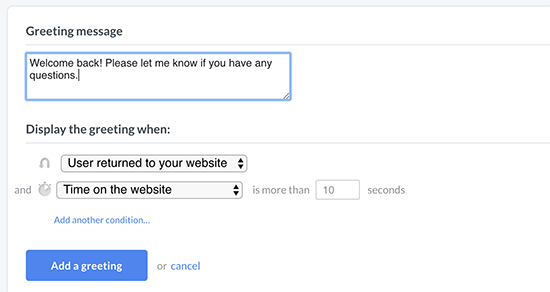
You will be able to select when to display a greeting by using display rules. You can also combine different rules to match and create highly dynamic custom greetings.

Adding dynamic greetings

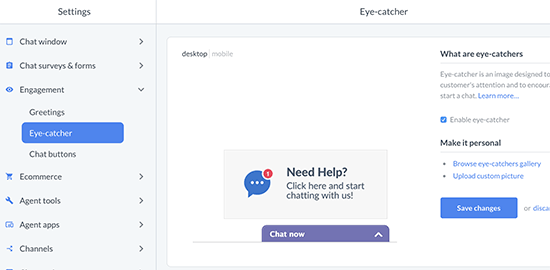
Next, you need to select an eye-catcher. These eye-catchers are images that are displayed when the LiveChat window is minimized.

LiveChat comes with several ready-made eye-catchers that you can use. You can also upload your images to use as eye-catchers.

Select an eye-catcher

Once you are satisfied with the design and appearance of your LiveChat window and custom greetings, you are ready to add them to your WordPress website.

Switch back to your WordPress admin area to install and activate the LiveChat plugin. For more details, see our step by step guide on how to install a WordPress plugin.

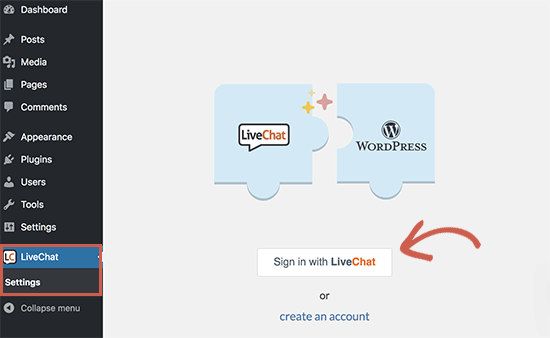
Upon activation, the plugin will add a new menu item labeled LiveChat to your WordPress admin sidebar. Clicking on it will take you to plugin’s settings page.

Connect Live Chat to your WordPress site

Go ahead and click on the ‘Sign in with LiveChat’ button to connect your WordPress site to your LiveChat account.

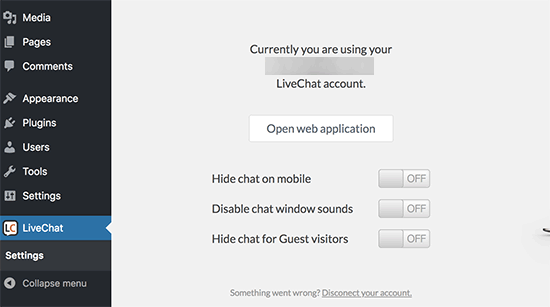
Once connected, you will see some very basic display settings. You can turn off LiveChat on mobile, turn off sounds, or hide it for users who are not logged in. If you are unsure, then we recommend leaving these options as they are.

LiveChat settings for WordPress

You can now visit your website in a new browser tab to see the LiveChat button in action. It will greet users with the eye-catcher you selected and display a custom welcome greeting based on the rules you choose in settings.

Custom welcome greeting

We hope this article helped you learn how to greet each user with a custom welcome message in WordPress. You may also want to see our article on how to track user engagement in WordPress using Google Analytics.

If you liked this article, then please subscribe to our YouTube Channel for WordPress video tutorials. You can also find us on Twitter and Facebook.

The post How to Greet Each User With a Custom Welcome Message in WordPress appeared first on WPBeginner.
Oxygen 2.0 Review: A Visual Website Builder For WordPress

Back in June 2017, we reviewed a new visual website builder for WordPress called Oxygen. That was Oxygen 1.0. Now, the team at Soflyy (also behind WP All Import and WP Sandbox) is back with a big update – Oxygen 2.0. Like 1.0, Oxygen 2.0 helps you build your entire WordPress site using a visual ... Read moreOxygen 2.0 Review: A Visual Website Builder For WordPress

The post Oxygen 2.0 Review: A Visual Website Builder For WordPress appeared first on Learn WordPress with WPLift.

WordPress Alternatives: 9 Viable Competitors To WordPress For Blogs Or Websites

While WordPress is, by a large margin, the most popular way to build a website, that doesn’t mean it’s for everyone. And if you’re looking for a change of pace, there are plenty of quality WordPress alternatives that you can use for both basic blogs and full websites. In this post, I’ve collected nine of ... Read moreWordPress Alternatives: 9 Viable Competitors To WordPress For Blogs Or Websites

The post WordPress Alternatives: 9 Viable Competitors To WordPress For Blogs Or Websites appeared first on Learn WordPress with WPLift.

14 Best WordPress Security Scanners for Detecting Malware and Hacks

Recently one of our readers asked if there is an easy way to scan your website for security, hacks, and vulnerabilities. If you suspect that your website may be hacked, then a quick WordPress security scan can be a good starting point. In this article, we have handpicked some of the best WordPress security scanners that will help you run quick security checks.

Best WordPress vulnerability scanners

What WordPress Security and Malware Scanners Can Do?

Online vulnerability or malware scanners can help you check your website for some very common security risks. For example, they can look for malicious code, suspicious links, suspicious redirects, WordPress version, and more.

However, they are quite limited because they cannot run tests on your WordPress database, user accounts, WordPress settings, plugins, and more.

Hackers can easily disguise malicious code and go unnoticed by these basic security checkups. This is why we recommend using Sucuri‘s web application firewall. It is a complete website security service that detects and neutralizes any malicious code even before it reaches your website.

To make your WordPress site more secure, see our complete WordPress security guide with step by step instructions to protect your website.

Having said that, let’s take a look at some of the best WordPress vulnerability scanners that you can try.

1. Sucuri SiteCheck

Sucuri SiteCheck

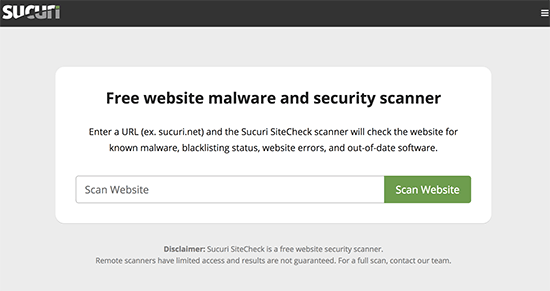
SiteCheck is an online tool by Sucuri, the best WordPress firewall and security service. It offers a thorough check of your website looking for malicious code, spam injection, website defacement, etc.

It also checks your website on several domain name blacklist tools including Google Safe Browsing. Sucuri’s SiteCheck tool not just scans the URL you enter, it will also crawl other pages linked from it to offer a thorough and fast scan.

2. IsItWP Security Scanner

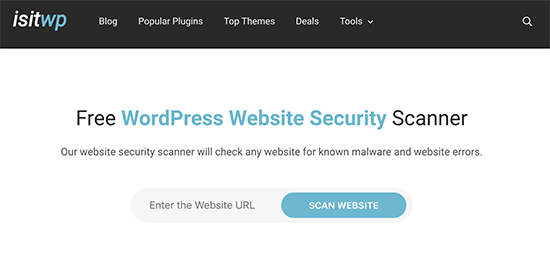
IsItWP Security Scanner

IsItWP Security Scanner allows you to quickly check your WordPress website for malware and other security vulnerabilities. It is powered by Sucuri and helps you quickly check your website with step by step instructions to tighten WordPress security.

It also checks your website in Google Safe Browsing and other malware blacklists to make sure that your domain is clean.

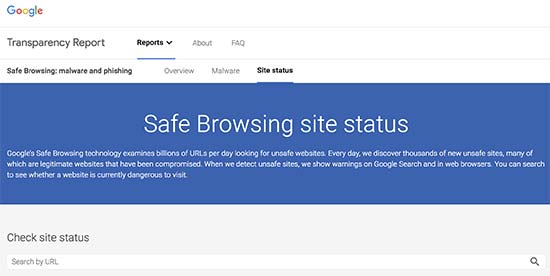
3. Google Safe Browsing

Google Safe Browsing

Google’s Safe Browsing tool allows you to see if a URL is marked unsafe to visit by Google. Google monitors billions of URLs and if they suspect that a website is distributing malware, then they mark it as unsafe to visit.

This could potentially ruin your website’s reputation as users coming from Google search or Google Chrome will be shown a warning page when they visit your website. If you are using Google Search Console, then you will be warned when your website is marked as unsafe with instructions to get the warning removed.

4. WPScans

WPScans

WPScans checks your website against known vulnerabilities and suspicious code. They maintain an index of vulnerabilities detected by their system and check your website for those security leaks.

It also tries to detect your WordPress version, installed plugins, and robots.txt files. After the scan, results are presented in an easy to understand format with the explanation of each item.

5. ScanWP

ScanWP

ScanWP is a very basic WordPress vulnerability scanner. It tries to detect your WordPress version to see if you are using the latest version. It also detects the WordPress generator tag, and whether or not your site is showing it.

The generator tag shows which WordPress version you are using. Some security experts believe that this could help hackers to effectively target a website and they recommend removing the WordPress generator tag.

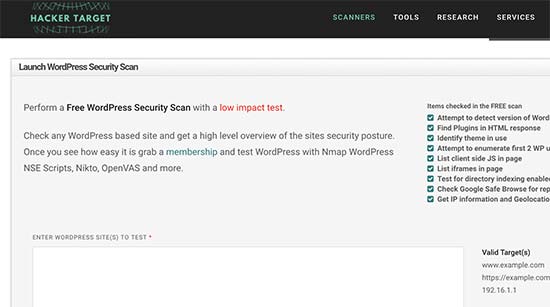
6. WordPress Security Scan

WordPress Security Scan

WordPress Security Scan runs a thorough test by attempting to detect your WordPress plugins, usernames, WordPress version, active theme, and more. It also checks your website on Google Safe Browsing index to make sure it is not blacklisted.

It provides a detailed report of your site status with a brief explanation of each item. These are mostly the items that are common WordPress security best practices like using the latest version of WordPress and keeping your plugins updated.

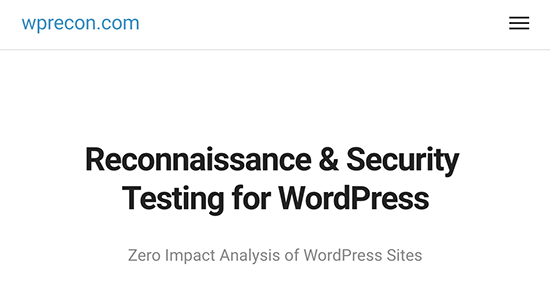
7. wprecon

wprecon

wprecon is another basic WordPress vulnerability scanner tool. It detects WordPress version to see if you need updates, checks Google Safe Browsing index, and then attempts to detect installed WordPress plugins.

It also scans for directory indexing, theme path detection, external links, iframes, and JavaScripts. Results are presented in a nice format with good explanation for each scanned item.

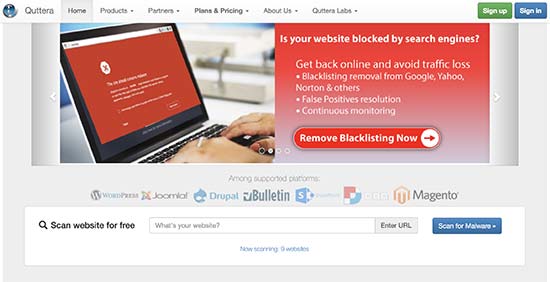
8. Quttera

Quttera

Quttera offers a useful online vulnerability scanner tool. It runs a deep test crawling through your website to search for suspicious files, malicious code, iframe embeds, redirects, and external links.

It also checks for your domain among blacklisted domains databases including Google Safe Browsing, Malware Domain List, PhishTank, and more. The detailed report is broken down into different sections and you can click on each item to view scan status.

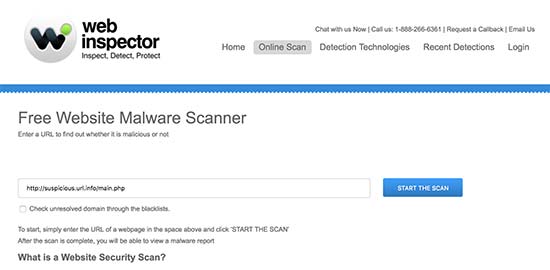
9. Web Inspector

Web Inspector

Web Inspector’s online website security scanner is another useful tool that can be used to test your WordPress site. It first checks your website in Google Safe Browsing and Comodo analysts indexes. After that, it scans for malware downloads, drive-by malware, suspicious code resembling a WordPress backdoor, worm, trojan, iframes, suspicious scripts and files.

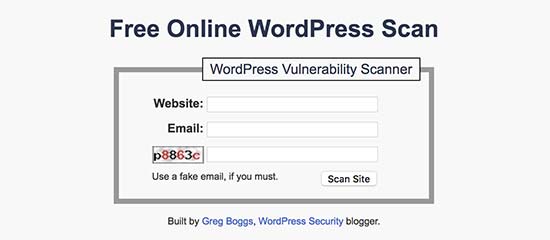
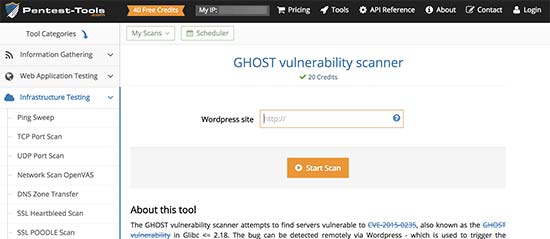
10. WordPress Vulnerability Scanner

WordPress Vulnerability Scanner

WordPress Vulnerability Scanner will test your WordPress site for common website vulnerability indicators. It scans for your WordPress version, installed plugin and themes, check for plugins with known vulnerabilities.

The website also provides several other scanning tools for advanced users which can be useful in detecting a website with compromised security.

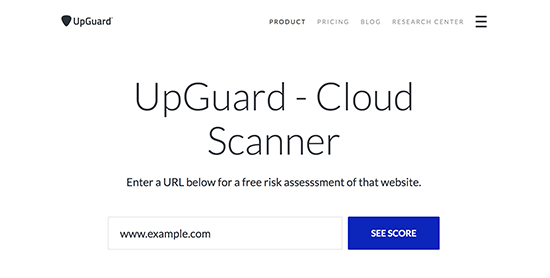
11. UpGuard Cloud Scanner

UpGuard Cloud Scanner

UpGuard Cloud Scanner is another online utility to scan your WordPress site for security risks. It first checks your domain’s records, DNS, open ports, and mail settings. Domain and server-based hacks can hijack your domain name or misuse it to send spam or malware.

After that, it looks for known malicious code, malware patterns, suspicious links, and phishing attempts. The scan result is displayed in a nice easy to understand format.

12. urlquery URL Scanner

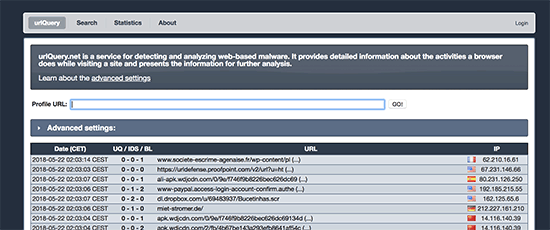
urlquery URL Scanner

A common technique used by hackers and malware is to redirect your website visitors to a spam website. These hacks only redirect non-logged in users, which allows them to go unnoticed for a long time.

urlquery URL scanner simply checks a given URL to detect if it redirects users, initiates a malware download, sets cookies, and more. This information can be used to further analyze your website’s security status.

13. VirusTotal

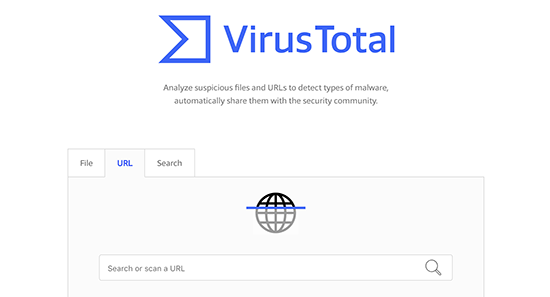
VirusTotal

VirusTotal is another way to quickly scan a URL for security vulnerabilities and malware. It checks your websites URL in dozens of malware databases and presents a detailed report. It also scans for redirects and suspicious code in the website header.

14. Norton Safe Web

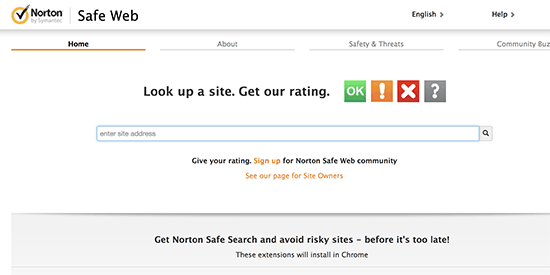
Norton Safe Web

Norton Safe Web is another useful tool to scan your WordPress site for security threats. It uses Symantec’s advanced detection technologies to look for common malware, phishing, and spam patterns.

The results will display computer threats, identify threats, and annoyance factors. A clean website will get the perfect 0 on all three scans. If your website is unsafe, then it will display the detected threats which can help you further investigate and fix the problem.

We hope this article helped you find some of the best WordPress vulnerability scanners online. You may also want to see our beginner’s guide on fixing a hacked WordPress site.

If you liked this article, then please subscribe to our YouTube Channel for WordPress video tutorials. You can also find us on Twitter and Facebook.

The post 14 Best WordPress Security Scanners for Detecting Malware and Hacks appeared first on WPBeginner.
The Easy Way To Create A Sports Website With WordPress: For Teams Or Leagues

Need to create a website for your sports team or league? As the world’s most popular way to build a website, WordPress is more than capable of creating a sports website. Whether you just want to create a website for a single team to showcase your matches, roster, and more, or you’re looking to create ... Read moreThe Easy Way To Create A Sports Website With WordPress: For Teams Or Leagues

The post The Easy Way To Create A Sports Website With WordPress: For Teams Or Leagues appeared first on Learn WordPress with WPLift.

How to Make a Small Business Website – Step by Step (2018)

Are you looking to make a website for your small business so you can find new customers on the internet? Making a small business website has become quite easy, and you can do it all by yourself without hiring a developer. In this article, we will show you how to easily make a small business website (step by step).

Making a small business website

Step 0. Before Making a Small Business Website

Unlike the old days, building a small business website has become quite easy. You can do it all by yourself without knowing any coding or hiring a developer by following our step by step guide.

Here is an overview of what you’ll learn:

  • Choosing a domain name for your small business website
  • Purchasing website hosting
  • Installing WordPress
  • Making a content outline for your small business website
  • Choosing a template to change your site’s design
  • Adding more features by using addons and extensions
  • Resources to get help and improve your WordPress skills

Which is The Best Platform to Make a Small Business Website?

The biggest mistake most beginners make is choosing the wrong platform to make a business website. Thankfully, you are here so you would not be making that mistake.

WordPress is the most popular website builder in the world. It powers 31% of all websites on the internet including millions of small business websites all over the world.

The best thing about WordPress is that it gives you access to thousands of pre-made website templates, extensions, and addons. You can make almost any kind of website imaginable without learning to code.

That being said, let’s take a look at how to easily create a small business website using WordPress on a budget.

Step 1. What You Need to Make a Small Business Website

You will need the following three items to make a small business website.

  • A domain name – This will be your website’s name such as wpbeginner.com
  • Website hosting – This will be your website’s home and where all your files will be stored
  • 60 minutes of your time

Ready? Let’s begin.

Step 2. Setting up Your Small Business Website

There are two types of WordPress available. WordPress.com, which is a hosted solution, and then you have WordPress.org also known as self-hosted WordPress. See our full comparison of WordPress.com vs WordPress.org to understand the difference.

We will be using self-hosted WordPress.org because it will give you instant access to all WordPress features out of the box.

Next, you will need a domain name and WordPress hosting to make a website.

We recommend using Bluehost to set up your website. It is one of the biggest hosting companies in the world and an officially recommended WordPress hosting provider.

Normally, you will pay $14.99 / year for a domain name and website hosting starts from $7.99 per month. This is a lot of money if you’re just starting out.

Thankfully, Bluehost has agreed to offer our users a free domain name, free SSL, and 60% discount on website hosting. Basically, you can get started for $2.75 per month.

→ Click Here to Claim This Exclusive Bluehost Offer ←

Let’s go ahead and purchase a domain name and hosting.

Step 3. Choosing a Domain Name for Your Small Business Website

First, you need to visit the Bluehost website in a new browser window and click on the green ‘Get Started Now’ button.

Getting started with Bluehost

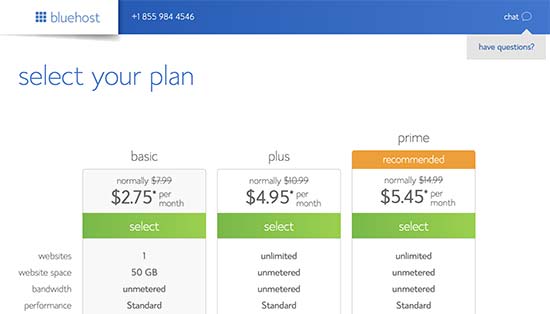
On the next page, you will be asked to select a pricing plan. Basic and Plus plans are the most popular choices among small business owners.

Choose a plan

Click on the ‘Select’ button to choose a plan and move on to the next step.

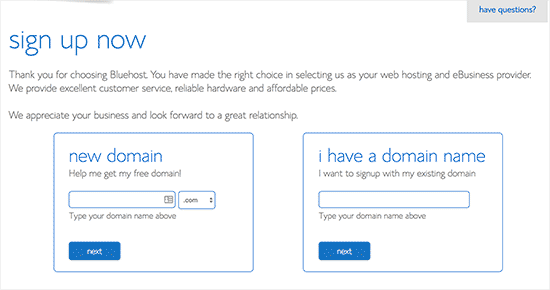
Now, you will be asked to choose a domain name for your website.

Choosing a domain name for your website

Tips on Finding a Domain Name for Your Business Website

Domain names are crucial to the success of your website. You need to spend some time on choosing the perfect domain name for your business but don’t overthink it.

  1. Stick to the .com version because users find it easier to remember (see .com vs .net – which is better)
  2. Your domain name should be related to your business (For example, stargardening.com )
  3. If your preferred domain name is not available, then try adding geographical location next to it. This increases your domain’s visibility in local search results (For example, stargardeninghouston.com)
  4. Keep it simple, short, and easy to pronounce.
    • Need more help? See our guide on how to choose the best domain name for your business website.

      Setp 4. Installing WordPress

      After choosing your domain name, you will be asked to enter your account information such as name, address, email, etc.

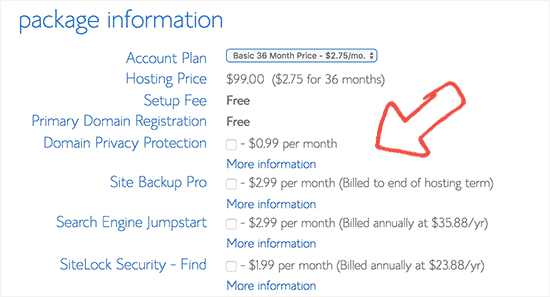
      Below that, you will see some extra hosting options that you can purchase. We don’t recommend purchasing these extras right away, so go ahead and uncheck them. You can always add them later if needed.

      Uncheck hosting extras

      Next, you will need to add your payment information to finish the purchase.

      After completing your purchase, you’ll receive an email with details on how to login to your web hosting control panel.

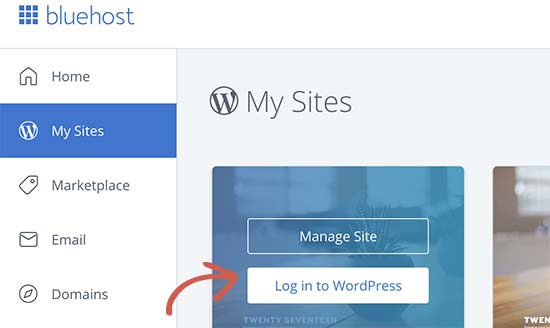
      Bluehost will automatically install WordPress for you, and you will be able to login to your WordPress site directly from the hosting dashboard.

      Bluehost hosting dashboard

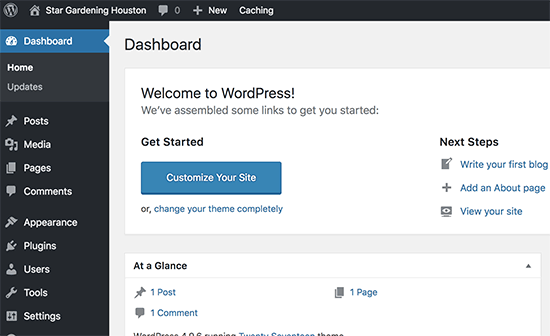
      Once logged in, you will see the WordPress admin area. This is where you will manage your website, change settings, and add new content.

      WordPress dashboard

      Step 5. Creating Content Layout for a Small Business Website

      Now that you have WordPress installed, you need to create an outline of your website content. Good small business websites are simple and follow a standard website layout.

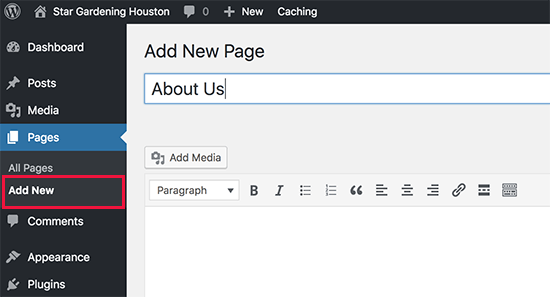
      Simply go to Pages » Add New page to create a new page in WordPress.

      Adding a new page in WordPress

      Don’t worry about the content, text, and images at the moment. Just adding a simple title, some text, and a couple of images would be fine. You can always edit these pages and add more content if needed.

      Here are some of the most common pages used in a small business website layout.

      • Homepage – This is the welcome page of your website. Add your business name with a call to action to your services/products or contact page. Provide a brief description of why your customers should choose you.
      • About Us – Your customers want to know more about people behind a business before they can make a decision. Create an about us page to tell users who you are, what are your business values, and what relevant experience you have in your industry.
      • Services / Products – Create a page to list details about services or products you are offering. Add a heading for each service/product and provide a brief description. You can also add pricing or ask users to contact you for a quote.
      • Contact Us – This is the page your users will need to contact you. You will need to add a contact form so that users can contact you directly. Additionally, you can add your businesses’ physical address or phone number.

      Additionally, you can create more pages if needed. For example, you can create a separate blog page, individual pages for each service or product, and more.

      Step 6. Choosing a Design for Your Website

      By default, WordPress comes with a basic template that you can use. If you don’t like the default theme, then there are thousands of free and paid WordPress themes that you can choose from.

      You can take a look at our selection of the best WordPress themes for business websites. If you need more help, then see our tips on choosing the perfect WordPress theme for your website.

      We recommend looking for a simple design that looks great and has all the right elements.

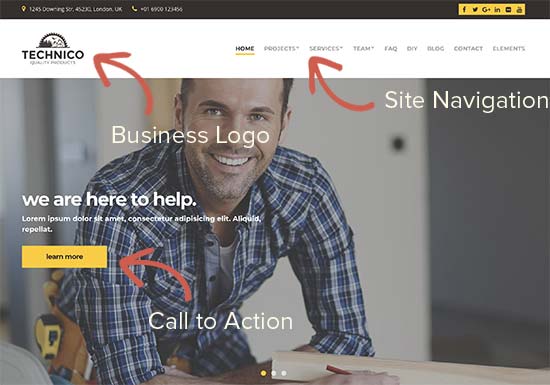
      Normally, a business website has a navigation menu on top. The homepage usually has a welcome message with a call to action button, which is followed by other content.

      Example of a simple business website design

      Once you have chosen a theme, you can go ahead and install it. For detailed instructions, see our beginner’s guide on how to install a WordPress theme.

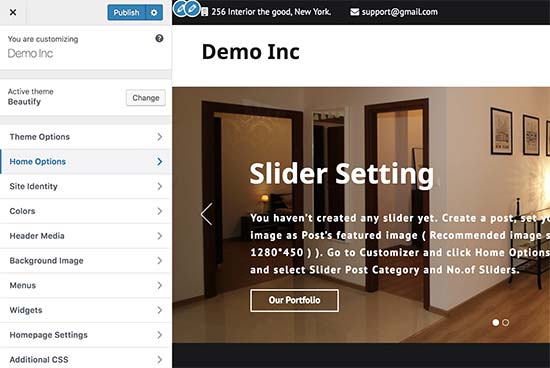
      Each WordPress theme comes with different settings to customize its appearance. Many of these options are located under Appearance » Customize page in WordPress admin area.

      Customize your website design in WordPress

      From here you can add navigation menus, change colors, add or remove different sections, and more. Once you are satisfied with the design, don’t forget to click on the Publish button on top to save your changes.

      If you’re unable to find the theme that fits your need, then you can use one of the popular drag & drop page builders for WordPress to create a custom design for your needs.

      We recommend using either Beaver Builder or Divi theme.

      Step 7. Using WordPress Plugins to Add More Features

      Adding WordPress plugins

      WordPress plugins are like apps for your WordPress site. You can install them to add new features to your website like contact forms, Google Analytics, sliders, and more.

      There are more than 50,000 free plugins available in the WordPress plugin directory alone. This means, no matter what feature you want to add there is good chance you will be able to find a plugin for that.

      Below are the plugins that we install on every website:

      Need some cool plugins for your website? See our expert pick of the essential WordPress plugins for business websites.

      For detailed instructions, see our step by step guide on how to install a WordPress plugin.

      Step 8. Learning WordPress

      Now that you have a WordPress site, you may want to step up your game and learn more tips to improve your website.

      WPBeginner is the largest free WordPress resource site in the world. Following are the handy WordPress resources you will find on WPBeginner, all of them are completely free.

      • WPBeginner Blog – This is where we publish our WordPress tutorials, how tos, and step by step guides.
      • WPBeginner Videos – These step by step videos will help you learn WordPress FAST.
      • WPBeginner on YouTube – Need more video instructions? Subscribe to our YouTube channel with more than 52,000 subscribers and 7 Million+ views.
      • WPBeginner Dictionary – The best place for beginners to start and familiarize themselves with the WordPress lingo.
      • WPBeginner Blueprint – Check out plugins, tools, and services we use on WPBeginner.
      • WPBeginner Deals – Exclusive discounts on WordPress products and services for WPBeginner users.
      You can also use Google to find answers on WPBeginner by simply adding ‘wpbeginner’ at the end of your search term.

      If you are unable to find an answer, then feel free to reach out to us using our contact form. We will try our best to answer your question or point you in the right direction.

      We hope this article helped you learn how to make a small business website. You may also want to see our complete WordPress SEO guide for beginners.

      If you liked this article, then please subscribe to our YouTube Channel for WordPress video tutorials. You can also find us on Twitter and Facebook.

      The post How to Make a Small Business Website – Step by Step (2018) appeared first on WPBeginner.