Buttonizer Review: Add A Floating Action Button To WordPress

Interested in adding a floating action button to WordPress? Buttonizer is a freemium floating action button plugin that can help you create custom buttons for everything from chat, promotions, social sharing, opening popups, printing pages, and lots more. Beyond offering versatile button actions, it also comes with tons of targeting, triggering, and analytics features to ... Read more Buttonizer Review: Add A Floating Action Button To WordPress

The post Buttonizer Review: Add A Floating Action Button To WordPress appeared first on Learn WordPress with WPLift.

Weekly WordPress News: WordCamp Europe Kicks Off

WordCamp Europe is officially in full swing! If you couldn’t make it to Belgrade but still want to watch the talks, you can snag a free livestream ticket. And you can also grab the official app if you are attending. Other than WordCamp Europe, Wordfence detailed an interesting new malware attack that’s making the rounds, and ... Read moreWeekly WordPress News: WordCamp Europe Kicks Off

The post Weekly WordPress News: WordCamp Europe Kicks Off appeared first on Learn WordPress with WPLift.

11 Best Analytics Solutions for WordPress Users

Are you looking for the best analytics solutions for your WordPress site? Website analytics allow you learn how many visitors are coming to your website, where they come from, and what they do on your site. In this article, we have hand-picked the best analytics solutions for WordPress users.

Best analytics solutions for WordPress users

Why Do You Need Analytics for Your WordPress Site?

Website analytics help you get detailed insights on your website visitors. Here are just a few things you can learn from your website analytics:

  • Number of visitors coming to your website.
  • Which sources are sending you traffic. For example, search engines, social media, advertisements, or referral links.
  • What are your most popular pages.
  • What users do when they are on your website.

A good WordPress analytics solution presents all this data in an easy to understand report. This enables you to make informed decisions about your website, which ultimately helps you get more traffic, customers, and sales.

That being said, let’s take a look at the best analytics solutions for WordPress.

1. MonsterInsights

MonsterInsights

MonsterInsights is the best analytics solution for your WordPress site. It allows you to easily install Google analytics in WordPress and shows you to helpful reports in your WordPress dashboard.

It adds a website stats dashboard in your WordPress admin area showing your top traffic sources. MonsterInsights also displays the top ranking articles, pages, and more, so you can better understand the user behavior and grow your business with confidence.

2. ExactMetrics

ExactMetrics

ExactMetrics (formerly Google Analytics Dashboard for WP) is one of the top Google Analytics plugins for WordPress. Many beginners find Google Analytics reports a bit hard to understand. ExactMetrics makes them easy to understand and shows beautiful reports right inside your WordPress admin area.

It includes demographics reports, enhanced link tracking, affiliate link tracking, real-time reports, and more.

3. Google Analytics

Google Analytics

Google Analytics is the most popular analytics solution available. It is free and can be easily installed in WordPress using the plugins mentioned above. However, you can also install it directly by adding the code on your site.

You can use a single account to install it on multiple websites and view all your reports under one dashboard.

It not only shows you the number of visitors, but with advanced reports you can track links, perform A/B testing, track user engagement, get real time traffic insights, and more.

4. KISSmetrics

KISSmetrics

KISSmetrics is an analytics and conversion optimization service. While MonsterInsights and Google Analytics tell you what’s happening on your site, KISSmetrics tells you who is doing it.

It integrates easily using the KISSmetrics plugin for WordPress. You can track an individual user and see what they did throughout the time spent on your site.

KISSmetrics is great for large eCommerce websites and helps with events / products based user tracking.

5. WP Power Stats

WP Power Stats plugin

WP Power Stats is a lightweight WordPress plugin that offers statistical information on page views, types of devices used to visit your site, referral sources, operating system, and more. It allows you to customize statistical reports and manage tracking for individual users.

Unlike Google Analytics which stores analytics data on Google’s servers, WP Power Stats saves the tracking information and analytics data on your WordPress hosting account. This means your website database can get really large leading to larger backup size and potential website speed issues.

6. WP Statistics

WP Statistics plugin

WP Statistics is a WordPress analytics plugin for your site. It displays tracking stats with simple graphs in your WordPress admin area.

The plugin helps in tracking redirects from search engines like Google, Bing, Yahoo, Yandex, and more. You can manage user roles to display these stats in WordPress dashboard.

WP Statistics allows you to filter data according to browser versions, visitors country, search keywords, IPs, pages, and more. It can also automatically email reports for all statistics.

7. Crazy Egg

Crazy Egg

Crazy Egg shows you where your visitors are clicking on your site. This technology is called heat-mapping, and it allows you to visualize how your users interact with your website.

Other than heat-mapping, it shows you how far do the users scroll on your pages, so you can analyze the content of your website. Their Confetti tool allows you to segment the clicks into referrals, sources, search terms, etc.

It offers an A/B testing tool to pick the right color, font, and image based on the user stats. This helps you make data-driven action for your website’s design and landing pages.

8. Mixpanel

Mixpanel

Mixpanel helps you add real-time event tracking for your campaigns. It is available for websites as well as mobile apps. It comes with a powerful user level targetting and helps you build user retention by sending push notifications and emails to your users.

It also allows you to create funnels to track customers and increase conversions. The pricing is based on actions people take on your site/app, so this could go higher than your expectation.

9. Matomo

Matomo

Matomo (formerly Piwik) is a free self-hosted open source analytics solution for your websites. It has a premium cloud-hosted version too. Matomo offers user-centric insights, data protection, custom and extensive analytics reports and more.

You can use it on enterprise level. Matomo’s support team actively helps you configure the analytics platform on your site. It has a mobile app that can display statistics on your phone.

10. Woopra

Woopra web analytics solution for WordPress

Woopra is another web analytics solution that offers real-time statistics and tracks users to the individual level. It focuses on customer trends, retention, segmentation, and more.

You can create funnels and monitor what’s stopping your users from taking an action on your site. Woopra has a WordPress plugin that makes the integration easy.

11. Jetpack

Jetpack by WordPress.com

Jetpack by WordPress.com displays basic stats in your WordPress dashboard. You can use this plugin on any self-hosted WordPress site to track your visitors.

It is free to use and a good option for small blogs, offering simple and easy to understand traffic reports. You will need a free WordPress.com account to connect your website to WordPress.com servers and run Jetpack on your site.

We hope this article helped you find the best analytics solutions for WordPress. You may also want to see our expert pick of the best content marketing tools and plugins for WordPress.

If you liked this article, then please subscribe to our YouTube Channel for WordPress video tutorials. You can also find us on Twitter and Facebook.

The post 11 Best Analytics Solutions for WordPress Users appeared first on WPBeginner.

How To Add Font Awesome Icons To WordPress: 3 Easy Methods

Want to add Font Awesome icons to WordPress? Font Awesome icons are awesome (sic!) because, unlike regular images: You can resize them with no quality loss because they’re vectors. They’re super easy to customize – you can change sizes, add animation, throw on a border, and lots more. Right this moment, Font Awesome includes over 2,986 ... Read moreHow To Add Font Awesome Icons To WordPress: 3 Easy Methods

The post How To Add Font Awesome Icons To WordPress: 3 Easy Methods appeared first on Learn WordPress with WPLift.

How to Add a Search Bar to WordPress Menu (Step by Step)

Do you want to add a search bar to your WordPress navigation menu? Search form can be really helpful for your users to find what they’re looking for on your site. In this article, we will show you how to add a search bar to your WordPress menu.

How to add a search bar to WordPress menu

Why You Should Add a Search Bar in Menu?

A search bar makes it easy for your users to find what they’re looking for without scrolling to all the pages.

If you add a search bar to your top navigation menu, then it will appear on all pages that display the menu, and your users can easily search all the content on your site.

There are multiple search plugins that you can use to add a search bar to your site. Let’s take a look on how to add a search bar to your WordPress menu.

Adding a Search Bar to WordPress Menu

First thing you need to do is to install and activate the Add Search to Menu plugin. For more details, see our step by step guide on how to install a WordPress plugin.

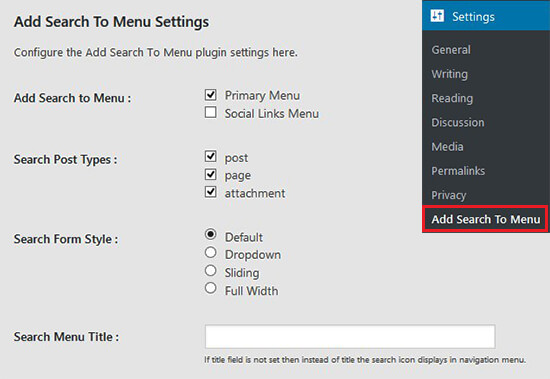
Upon activation, you need to go to Settings » Add Search To Menu page in your WordPress admin area to configure search bar to your menu.

Add search to menu plugin page

On this page, you need to select the menu where you want to add the search bar. This list of menus (Primary Menu and Social Links Menu) belongs to your WordPress template. If you change the template of your site, then the list will be automatically updated with the available menus from your template.

Once selected, the search bar will be added to your navigation menu. You can define the search post types, search form style, search menu title, manage mobile display for search, and more. These settings will also help in controlling the search results for your users.

After that, you can head over to your site to see the search bar in the WordPress navigation menu.

Add search bar to menu

You can also add the search bar to all other menus of your site. Simply select the menu from plugin settings where you want to display your search form.

We hope this article helped you learn how to add a search bar to WordPress menu. You may also want to see our expert pick of the useful tips and tricks to speed up WordPress site performance and search results.

If you liked this article, then please subscribe to our YouTube Channel for WordPress video tutorials. You can also find us on Twitter and Facebook.

The post How to Add a Search Bar to WordPress Menu (Step by Step) appeared first on WPBeginner.

How to Create a Child Page in WordPress

Do you want to create a child page on your site? Pages in WordPress can be standalone or hierarchical, which means a page can have its own sub-pages also known as child pages. In this article, we will show you how to easily create a child page in WordPress to better organize your pages.

How to create a child page in WordPress

What is a Child Page in WordPress?

Pages and posts are two default content types in WordPress. To learn more, see our guide on the difference between posts vs pages in WordPress.

Posts are part of a blog and are displayed in a reverse chronological order (newer entries first). They are normally organized with categories and tags.

Pages are one-off or standalone content that is not part of a blog. For example, ‘About us’ page or ‘Contact us’ page. They can be hierarchical, which means you can organize them with parent and child pages.

Typically, business websites use Pages to build a website structure. This way they can build a website without creating a blog. Those who want to add a blog to their content marketing strategy can still do so by simply creating a separate blog page.

However if you have too many pages, then it becomes difficult to organize them. This is where child pages come in. You can create a broader page as a ‘Parent’ and then add child pages to better organize your website structure and layout.

WordPress pages used to create a website structure

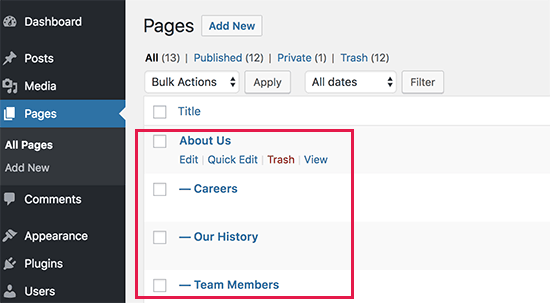
For example, a parent page called ‘About us’ can have team members, history, careers, and other pages as child pages.

Any child page can also have their own child pages and so on. This way you can build relationships between your pages and create a proper website structure.

That being said, let’s take a look at how to easily create a child page in WordPress.

How to Create a Child Page?

To create a child page, you will need a parent page. If you already have a page that you would like to use as the parent, then you are good to go.

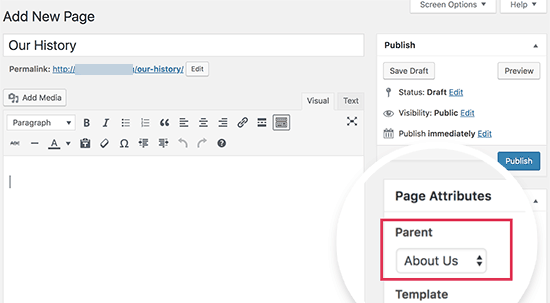
Simply go to the Pages » Add New to create a new page or edit an existing page in your WordPress admin area. On the right side, you will see Page Attributes box with Parent dropdown.

Select parent page

In the Parent drop-down, you will see the list of all pages from your site. By default, it is set to ‘no parent’ which means this page is an individual page with no association. You need to select the page you want to use as the parent from the drop-down menu.

After that, you can just go ahead and save your changes. You can repeat this process to create more child pages.

To view child pages, you can go to the ‘Pages » All Pages’ page in WordPress admin area. You will see child pages listed under their parent page with a prefix.

Parent page

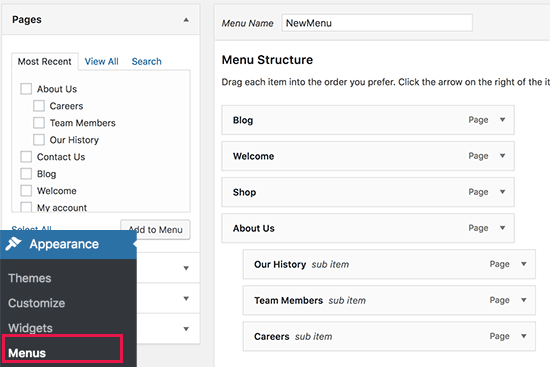
Next, you can go ahead and add your child pages to your website’s navigation menu as sub-menu items.

Adding child pages in WordPress navigation menus

Advanced users can use other methods to automatically display a list of child pages for a parent page in WordPress sidebar widgets or theme templates.

We hope this article helped you learn how to create a child page in WordPress. You may also want to see our complete guide on how to convert WordPress categories to custom taxonomies to sort the content on your site.

If you liked this article, then please subscribe to our YouTube Channel for WordPress video tutorials. You can also find us on Twitter and Facebook.

The post How to Create a Child Page in WordPress appeared first on WPBeginner.

50+ Best Photography Themes for WordPress 2018

Photography is one of the most popular forms of art. We live in a digital age where everything is centered around photos, thanks to social media platforms such as Instagram and Pinterest. Being a photographer, this is your opportunity to take advantage of this era with your own photography blog or website to put your ... Read more50+ Best Photography Themes for WordPress 2018

The post 50+ Best Photography Themes for WordPress 2018 appeared first on Learn WordPress with WPLift.

How to Create a Landing Page With WordPress

Do you want to create a custom landing page on your WordPress site? Landing pages help businesses convert website visitors into customers and leads. In this article, we will show you how to easily create a landing page in WordPress.

Creating a landing page with WordPress

What is a Landing Page?

A landing page is a purpose-built page designed to increase sales or generate leads for a business. It is used in paid marketing, email, and social media campaigns. Users coming from these sources will land on this page first, which is why it is called landing page.

What is the difference between the homepage and a landing page?

A homepage is your website’s front page and what users will see when they enter your domain name in their browser. On the other hand, a landing page can be a standalone page where most visitors land from paid or third-party traffic sources.

A homepage is designed for visitors to engage with your website, explore other pages, browse products, or sign up. It has more links and provides users with more choices.

On the other hand, a landing page is built for conversion. It has fewer links and is designed for users to make a purchasing decision or give their information for future outreach.

Normally, your website can have only one homepage, but you can create as many landing pages as you want for different campaigns. For example:

  • A landing page for your paid advertising campaigns
  • Visitors coming from specific traffic sources like email list, social media, and more
  • Users landing on a specific product or service page
  • and many more…

That being said, let’s take a look at how to create a beautiful custom landing page in WordPress. We will show you two solutions, and you can choose the one that suits you best.

Creating a Landing Page in WordPress using Beaver Builder

Beaver Builder is one of the best WordPress landing page plugins. It allows you to easily create a landing page using ready-made templates that you can modify with simple drag and drop tools.

First, you need to do is install and activate the Beaver Builder plugin. For more details, see our step by step guide on how to install a WordPress plugin.

Upon activation, you need to visit Settings » Beaver Builder page to configure plugin settings.
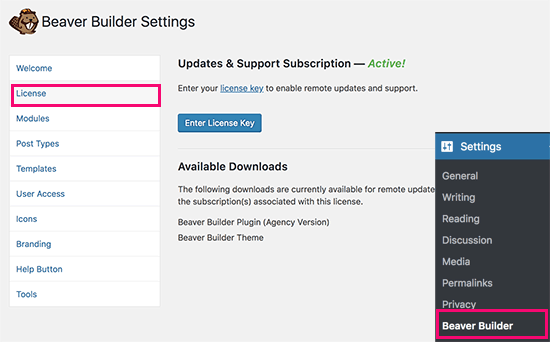
Beaver Builder license

Under the License tab, click on the ‘Enter License Key’ button to add your license key. You can find this information under your account on Beaver Builder website.

Next, you need to head over to Pages » Add New page to create your first landing page. Many WordPress themes now include a page builder or a full-width template. These templates are designed to work with page builder plugins.

If your theme doesn’t have such a template, then you can create one on your own. For detailed instructions, see our guide on how to create a full width page in WordPress.

Select a page builder or full-width template from the ‘Page Attributes’ box in the right column and now save your page to apply the changes.
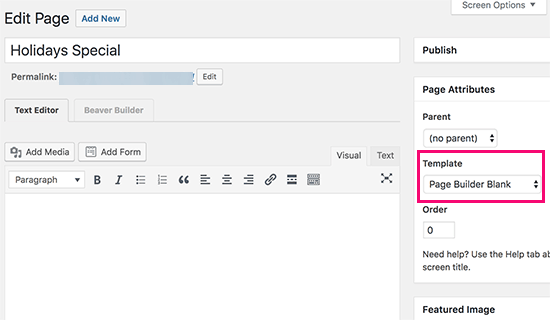
Select a template

You are now ready to make a landing page. Click on the Beaver Builder tab above the post editor to launch the builder interface.
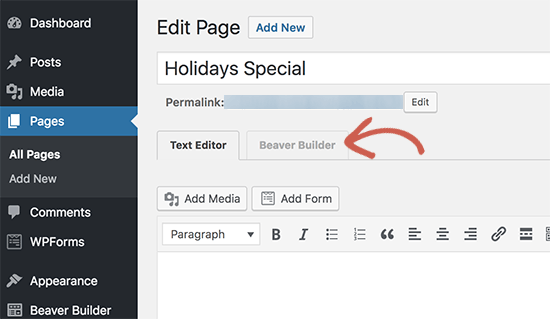
Launch Beaver Builder

Beaver Builder will open with your existing page template. You need to click on the add button on the top right corner of the screen and switch to the templates tab.
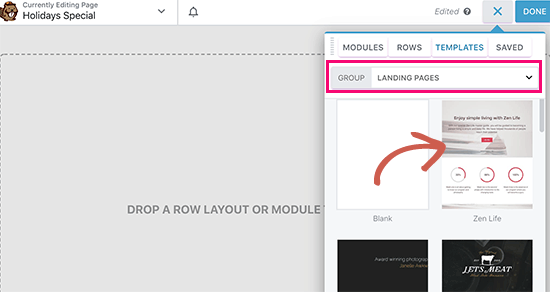
Choose a template

Beaver Builder comes with several ready-made templates. Select ‘Landing Pages’ from the group drop-down menu and then choose a template that looks close to what you have in your mind.

Once you select a template, Beaver Builder will load it in the preview window.

Point and click to edit

You can now point and click on any item to edit it. You can change the text, change background color or images, adjust width and height of the rows and columns.

You can add or remove content items from your template. Simply click on the add button and switch to the rows tab. You can add either single or multiple columns.
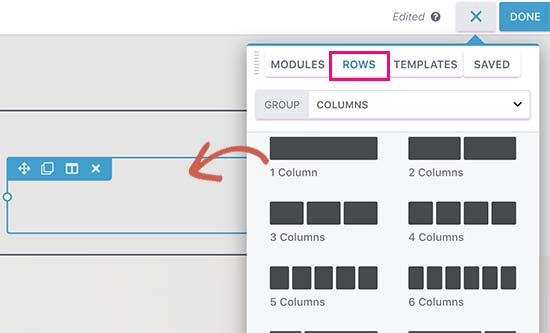
Add rows to your landing page

After adding a row, switch to the modules tab. Modules are content elements that you can add to your landing page. Beaver builder comes with all the essential modules including text, headings, buttons, video, audio, animated countdown timer, and more.
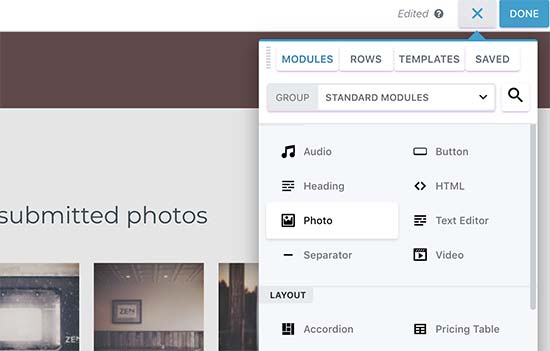
Add modules to your template

Once you are satisfied with the design, you can click on the ‘Done’ button at the top and then save or publish your page.

Save or publish your landing page

You can now visit the page to view your landing page in action. Feel free to edit it again if you need to adjust, add, or remove anything.

Preview your landing page

Creating a Landing Page in WordPress using Leadpages

Leadpages is another easy to use platform for creating beautiful landing pages and adding them to your WordPress site.

Unlike BeaverBuilder, LeadPages is a standalone landing page builder which means you can use it with or without a WordPress site.

First, you need to visit Leadpages website and sign up for an account. After that you will see the Leadpages dashboard where you need to click on the ‘Create new Leadpage’ button.
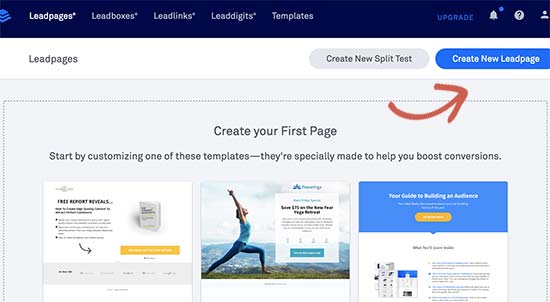
Creating a new landing page with Leadpages

On the next screen, you will be asked to choose a template. Leadpages comes with dozens of beautifully designed templates which are neatly organized into different categories.
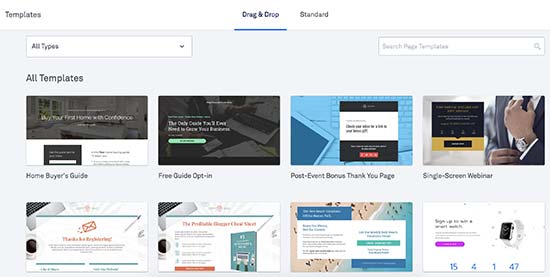
Choose a template for your landing page

Click on any template to preview it. You need to select a template that looks closest to what you have in mind and then click on the ‘Use this template’ button to continue.

This will launch the Leadpages builder interface. It is a drag and drop interface where you can just point and click on an item to edit it.
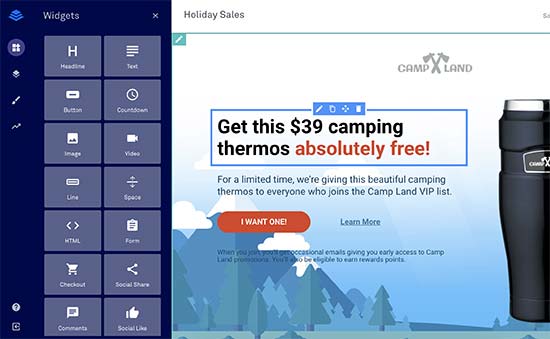
Leadpages builder

You can now point and click to edit any item on the page. You can replace images, text, background images, and more. You can also add new widgets from the left column.

You can also adjust different sections of your landing page by clicking on the page layout tab. Simply drag and drop sections to adjust them on the page. You can also add new sections or remove them.
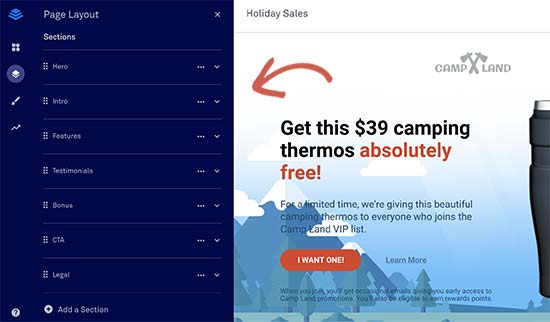
Drag and drop page layout

Leadpages also connects with several third-party apps including all top email marketing services. Simply add a sign-up form to your landing page and then click on ‘Add Integration’ button.
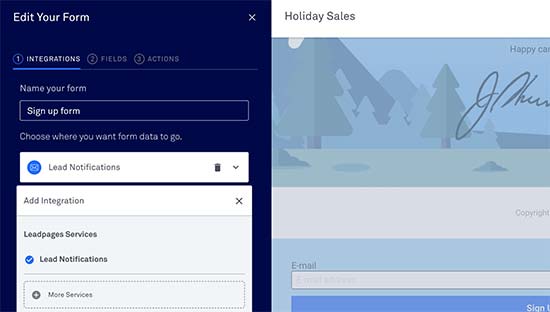
Add integrations

Once you are finished editing your landing page, you can click on the publish button to make it live.

After that you need to click on the ‘Publish Options’ button and switch to ‘Other publishing options’ tab. From here you can download the Leadpages WordPress plugin.
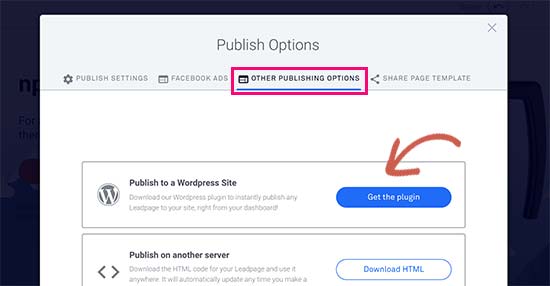
Get WordPress plugin

Next, you need to switch to your WordPress site to install and activate the plugin. For more details, see our step by step guide on how to install a WordPress plugin.

Upon activation, you need to visit the Leadpages menu in your WordPress admin area to login with your Leadpages account.

Once logged in, go to Leadpages » Add New page. You will be able to see your landing page listed there with few options.

You can publish this page as a normal landing page, homepage, a welcome gate, or a 404 error page. You can also choose a URL slug for your landing page.
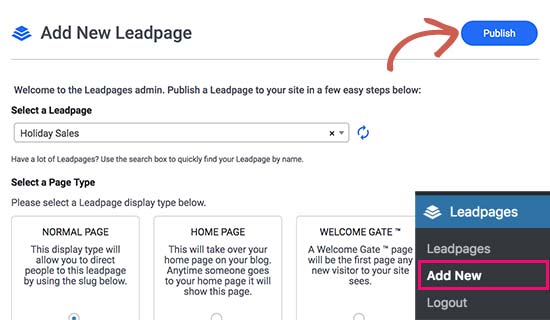
Publish your landing page to WordPress

After reviewing the options, go ahead and click on the publish button. Leadpages will now publish the page on your WordPress site.

You can now visit this page on your website to see it in action. You can make any changes you want from the Leadpages website and those changes will show up on your site.

We hope this article helped you learn how to create a landing page with WordPress. You may also want to see our tips on driving more traffic to your WordPress site.

If you liked this article, then please subscribe to our YouTube Channel for WordPress video tutorials. You can also find us on Twitter and Facebook.

The post How to Create a Landing Page With WordPress appeared first on WPBeginner.

TemplateMonster Spring Sale: Best-Selling WordPress Themes of 2018 with a discount!

If you are looking for the trendiest WordPress themes that can be bought at the discounted price, then you have reached the right place. One of the biggest digital marketplaces TemplateMonster Marketplace initiated the great June sale, as part of which you can buy any item from the inventory with about 70% discount. WordPress themes ... Read moreTemplateMonster Spring Sale: Best-Selling WordPress Themes of 2018 with a discount!

The post TemplateMonster Spring Sale: Best-Selling WordPress Themes of 2018 with a discount! appeared first on Learn WordPress with WPLift.

How to Display Yelp Reviews on your WordPress Site

Do you want to display Yelp reviews on your site? Yelp reviews are user reviews about the restaurants, brands, services, lifestyle products, hospitals, doctors and more. In this article, we will show you how to display Yelp reviews on your WordPress site for users to read general public reviews.

Yelp Reviews WordPress

Why You Should Display Yelp Reviews on Your Site?

Yelp is a public-based reviews website. It has reviews and ratings on local businesses from experienced users. These reviews and ratings are helpful for the new visitors to get a word from someone who already used the particular product or service.

Don’t have a Yelp Business page yet? Click here to Claim Your Yelp Business Page.

Like the Facebook page reviews for your business, Yelp reviews also reassure stability of your brand or service to the new visitors. However, the difference is that Facebook reviews are limited to those who follow your brand page on the social media platform whereas Yelp reviews can be from anyone who uses your brand or service.

If you own a business listing blog or membership site, then you can also display Yelp reviews for different local businesses from your town and increase organic traffic on your website.

That being said, let’s take a look at how to display Yelp reviews in WordPress.

Showing Yelp Reviews on Your WordPress Site

First thing you need to do is to install and activate the Yelp Reviews Widget plugin. For more details, see our step by step guide on how to install a WordPress plugin.

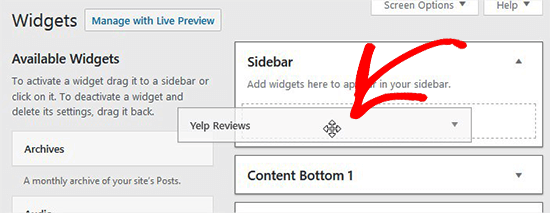
Upon activation, you need to go to Appearance » Widgets page in your WordPress admin area. You need to drag and drop Yelp Reviews Widget in the Sidebar widget area.

Add Yelp reviews widget in sidebar

Next, you need to create a new app from Yelp developers page and get an API key to launch Yelp business reviews in this widget.

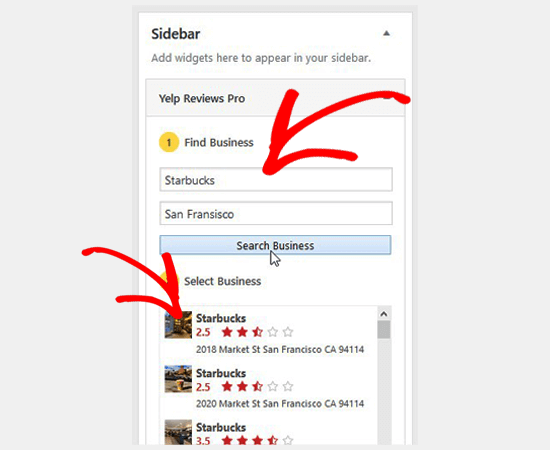
Once the API key is added, you can search for the brand or service in Yelp reviews widget by adding the name and location of the business. A list of businesses will be displayed, and you can select your business to show reviews in the sidebar widget area of your site.

Search business and select from the list

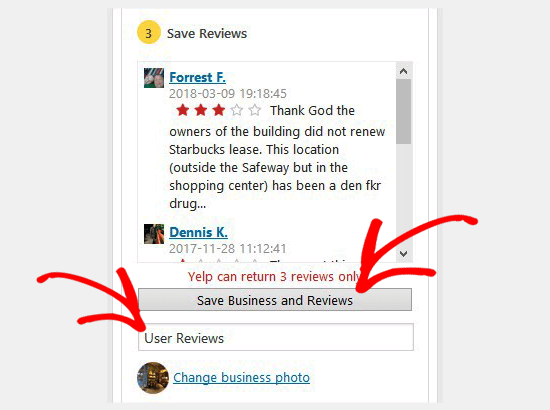
After selecting your business from the list, you can click on the Save Business and Reviews button. You need to add the title for this widget too. It allows you to change business photo for your brand or service.

Save business reviews

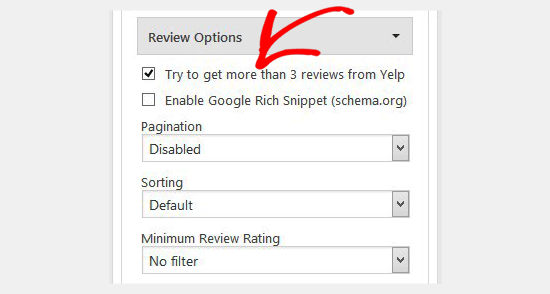
You can expand the settings one by one to display Yelp reviews on your site. By default, Yelp can only return 3 reviews, but you can check the setting to try and get more than 3 reviews. It also allows you to enable Google rich snippets, pagination, sorting and more.

Yelp review settings

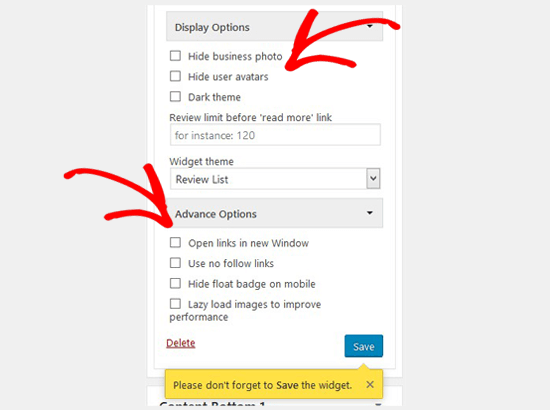
In display settings, you can hide business photo and user avatars, change theme to dark, add character limit to reviews and manage the widget theme.

The advance options allow you to open links in new window, use no follow links in reviews, lazy load images, and more.

Yelp display and advance settings

Once you are done, make sure to save the widget settings and go to your website to see your Yelp business reviews in the sidebar.

Yelp reviews in WordPress sidebar widget

The plugin also allows you to create shortcodes for Yelp reviews and display them anywhere on your site. For this, you need the Yelp Reviews Pro plugin.
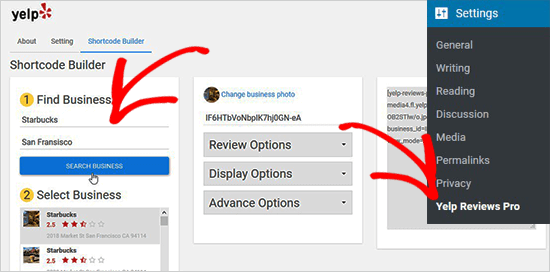
Once activated, simply go to the Settings » Yelp Reviews Pro page and go to the Shortcode Builder tab. Like the Yelp reviews widget, you can search the for a brand or service with its name and location.

Create shortcodes for Yelp reviews

You need to select your business from the list and save the reviews. The other 3 sections to manage Yelp reviews are similar to the settings in the Yelp reviews widget.

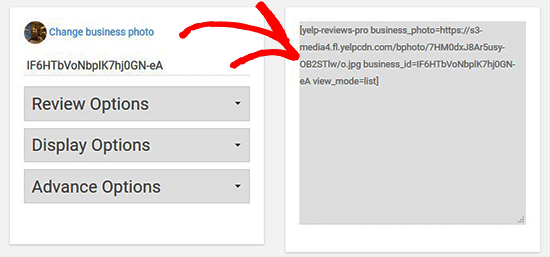
After you save these reviews, it will automatically update the shortcode box on the right side of the screen.

Copy Yelp reviews shortcode

Next, you need to go ahead and paste this shortcode in WordPress blog post or page. After that head over to your site to see the Yelp reviews in action.

Display Yelp reviews in WordPress posts and pages

We hope this article helped you learn how to display Yelp reviews on your WordPress site. You may also want to see our expert pick of the best product review plugins for WordPress.

If you liked this article, then please subscribe to our YouTube Channel for WordPress video tutorials. You can also find us on Twitter and Facebook.

The post How to Display Yelp Reviews on your WordPress Site appeared first on WPBeginner.