This week, we got the release of WordPress 4.9.6. True to the numbers, it’s technically a minor privacy and maintenance release. But because it adds some big new features to tackle the GDPR, some people think it straddles the line between minor and major release. CodeinWP also published the results of their 2018 hosting survey. ... Read moreWeekly WordPress News: WordPress 4.9.6…A “Major” Minor Release?
Are you looking for the best content marketing tools and plugins that will help you create killer content for your WordPress blog? Great content helps you increase your website traffic, get more subscribers, and grow your sales. In this article, we have hand-picked the best content marketing tools and plugins for your WordPress site.
Why Do You Need Content Marketing Tools & Plugins?
Often businesses rely on their best guesses to create a content strategy. Each day millions of gigabytes of new content is created on the internet. All of this content competes against each other to attract a large but limited number of audience.
Relying on your best guess will not take you very far. This is why smart marketers use tools to create a better content marketing strategy that’s data-driven.
These content creation tools not only help you find what to write about, but they also help you see what your users are looking for, and how you can get more traffic for existing content.
That being said, let’s take a look at some of the best content marketing tools and plugins for your WordPress site.
MonsterInsights is the best Google Analytics plugin for WordPress. It allows you to properly install Google Analytics and view your website traffic reports inside WordPress dashboard.
MonsterInsights helps you see how people find and use your website. You can see your top content, top referral source, most profitable pages, and more.
Aside from keeping traffic stats, MonsterInsights also helps you track user engagement which is extremely useful in planning your content strategy.
Yoast SEO is the best WordPress SEO plugin. Often people don’t understand the full power of Yoast’s plugin. It’s not just a plugin to add meta tags. It is a complete content optimization suite with tons of features to help you improve your website.
For more on this topic, see our complete WordPress SEO guide with step by step instructions that will take website SEO to the next level.
Having a proper editorial workflow helps you create useful content on a regular basis. Edit Flow helps you add custom post statuses, leave editorial feedback, view editorial calendar, and execute your content strategy like a pro.
All these things come particularly handy if you are running a multi-author WordPress blog. For detailed instructions, see our guide on how to improve your editorial workflow in WordPress.
Used by thousands of SEO professionals, SEMRush is one of the best SEO tools on the market. It allows you to easily gather analytics and competitor insights to help improve your own SEO.
You can learn about your competitor’s top organic keywords, how they get backlinks, their advertising strategy, and more. It also helps you monitor your own keywords, backlinks, find out keywords that you can easily rank for, and tons of other useful data that you can use to improve your content strategy.
Ahrefs is another popular tool to find out why your competitors are ranking higher than you, and what you can do to outrank them in search results. It comes with keyword explorer and content research tools, which help you find out what kind of content is ranking for those keywords and why.
It has a powerful crawler that monitors the web. You can use it to track your backlinks, search rankings, competitor backlinks, paid advertising keywords, and more.
Not everyone can create beautiful images for their blog posts. This is where Canva comes in. It helps you create beautiful images for your blog posts like a Pro without worrying about copyright.
It comes with a powerful yet extremely simple image editing tool that runs in your browser. You can select from a large number of templates, graphics, icons, banners, and infographics to use as a starting point. Once you are done editing, simply export the image and use it in your articles.
Grammarly is one of the best online grammar checker tools for WordPress users. It works in any writing area, including your WordPress post editor. You can install it as a browser add-on for Google Chrome, Firefox, and even Microsoft Edge.
Upon installation, it will show an indicator at the bottom right corner of the writing area. Clicking on the indicator will show you the number of errors. Spelling, grammar, and contextual errors will be highlighted with an underline as you write.
reSmush.it is the best WordPress image compression plugin, that can automatically reduce image file size without affecting quality. It also offers a bulk optimization option which allows you to quickly optimize older images on your website.
There is a lot that goes into creating a good piece of content. You need to proofread, add images, set featured image, select categories and tags, configure SEO settings, and more.
It’s easy to forget an important part of the process and end up publishing the article with mistakes.
Good Writer Checkify plugin helps you avoid silly mistakes by adding a simple blog post checklist. You can add items that you need to check before hitting the publish button. It is particularly useful if you are running a multi-author website.
Shared Counts is one of the best social media plugins for WordPress. It allows you to easily add social media sharing buttons to your blog posts. It can also display share counts for each platform as well as the total number of shares for your article.
Unlike other social media plugins which slows down your website, Shared Counts is highly optimized for speed. It comes with only the best social media websites and multiple button styles that you can use.
Many SEO experts recommend adding a nofollow tag to external links. However, WordPress doesn’t come with a default option to add nofollow tag. Title and Nofollow for links solves this problem by adding the title and nofollow options to the insert link popup in WordPress.
Sometimes your blog’s old articles will get neglected due to lack of time and resources. Revive Old Posts helps you solve this by automatically sharing your old articles on your social media profiles.
This helps you promote your old articles automatically while actively driving traffic to your blog. It also helps your new social media followers discover content that they may have missed before.
More than 75% of visitors abandoning your website will leave and never come back. This is where you need OptinMonster. It is the best lead generation software that helps you convert abandoning website visitors into subscribers, customers, and followers.
It comes with beautiful optin forms, that you can connect with your email marketing service or CRM software. You use it to effectively reduce bounce rate, increase user engagement, and boost email subscriptions.
We hope this article helped you find the best content marketing tools and plugins for your WordPress website. You may also want to see our actionable tips on driving traffic to your WordPress blog.
If you liked this article, then please subscribe to our YouTube Channel for WordPress video tutorials. You can also find us on Twitter and Facebook.
Do you want to create a product catalog in WordPress without adding a full-blown shopping cart? Sometimes businesses want to take order by phone while still displaying their product catalog on the website. In this article, we will show you how to easily create a product catalog in WordPress without a shopping cart.
Why Add a Product Catalog without Shopping Cart>
Some businesses have products that they can’t sell online because they have an undetermined price. This makes it impossible for them to use a shopping cart plugin, but they still want to make a website, so they can showcase those products and attract potential customers.
Normally, people associate eCommerce platforms with online shopping. However, you can still use them to display products without using shopping cart feature.
That being said, let’s take a look at how to easily create a product catalog in WordPress without using the shopping cart feature.
Getting Started with Your Product Catalog in WordPress
The best way to create a product catalog in WordPress is by using WooCommerce. Don’t worry, you will not be using any of its shopping cart features.
If you already have a WordPress website, then you can go ahead and install and activate the WooCommerce plugin. For more details, see our step by step guide on how to install a WordPress plugin.
If you don’t have a WordPress site setup, then see our guide on how to create an online store to quickly set up WordPress with WooCommerce.
Once you have installed WooCommerce, you can move on to creating your product catalog in WordPress.
Creating Product Catalog in WordPress without Shopping Cart
By default, WooCommerce displays an add to cart or buy button next to all your products. This makes it difficult to create a product catalog without the shopping cart feature.
Luckily, there’s an easy solution that fixes this problem.
Upon activation, you need to visit YITH Plugins » Catalog Mode page to configure the plugin settings.
First, you need to check the box next to ‘Enable YITH WooCommerce Catalog Mode’ option to enable the plugin. After that, you need to choose where you want to hide the ‘Add to cart’ button.
You can choose to hide it on the shop pages or product details pages.
But in this case, you should go with the last option which allows you to disable shop feature everywhere by disabling the checkout page, cart page, and removing all add to cart button everywhere.
Don’t forget to click on the ‘Save Changes’ button to store your settings.
Adding Products to Your WordPress Product Catalog
You can now go ahead and start adding products to your site. Simply visit Products » Add New page to enter your product information.
On the products screen, you can provide product title, description, short description, product image, and product gallery. Under the ‘Product’ data section, you will find the price options. You can leave them blank if you don’t want to display product pricing.
Once you are finished, go ahead and publish your product. Repeat the process to add as many products as needed to build up your catalog.
Viewing Your WordPress Product Catalog
You can visit your WooCommerce shop page to view your default catalog in action. Your shop page is usually located at a URL like this:
http://example.com/shop/
Replace example.com with your own URL to view your WooCommerce shop page in the catalog mode.
If you don’t want to use the shop page, then you can also display your products on any WordPress page and use it as your product catalog.
All you have to do is create a new WordPress page or edit an existing one, and add the following shortcode in the content area:
[products columns="4" limit="8" paginate="true"]
Feel free to change the number of columns and the items per page limit to your own requirements. Once you have adjusted the shortcode, go ahead and save or publish your page to preview it.
You will notice that the product pages will not show any add to cart or buy buttons. You can click on any individual product to see the product details page.
It will show all the product information images, description, gallery, without an add to cart or buy button.
We hope this article helped you learn how to easily create a product catalog in WordPress without the shopping cart feature. You may also want to see our list of the best WooCommerce themes that you can use for your product catalog website.
If you liked this article, then please subscribe to our YouTube Channel for WordPress video tutorials. You can also find us on Twitter and Facebook.
CSS gives you the power to change pretty much everything about how your WordPress site looks. It’s that powerful… But here’s the problem with CSS: It’s not accessible to beginners – you need to know at least a bit about code if you want to do anything with it. And even if you do know ... Read moreCSS Hero Review: Makes Theme And Plugin CSS Beginner-Friendly
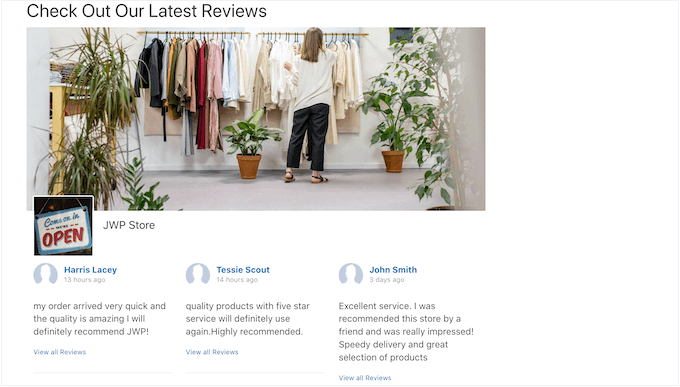
Do you want to display Facebook page reviews in WordPress?
Reviews and ratings can help you gain the trust of potential customers and encourage them to buy from your website. If you have a Facebook page, then you may already have lots of reviews that you can easily embed in your WordPress website.
In this article, we’ll show how to display your Facebook page reviews and ratings on your WordPress website.
Why Should You Display Facebook Page Reviews in WordPress?
Reviews can help you build social proof and gain the trust of your visitors, which means more sales for your business.
However, Facebook has its own built-in review system. If you already have a Facebook page, then followers can review your products and services on that platform. This is great for helping you build an engaging and trusted Facebook page.
But it’s also a good idea to show these reviews on your WordPress website. That way, people can see all your positive reviews, even if they don’t visit your Facebook page.
The reviews can also highlight benefits and features that you missed in your website’s text and are great for improving your WordPress SEO.
After embedding the review feed on your site, new reviews will appear on your site automatically. This means visitors will always see the latest reviews without you having to add them to your site manually.
With that in mind, let’s see how to display your Facebook page reviews in WordPress.
This plugin and extension allow you to show all your Facebook page reviews in an attractive and fully-customizable layout. As you get more reviews, they’ll be added to your WordPress website automatically.
Note: In this guide, we’ll be using the Pro version of Smash Balloon, as it allows you to embed Facebook reviews on your WordPress website. However, there’s also a free version that allows you to easily embed Facebook status posts in WordPress.
The first thing you need to do is install and activate the Smash Balloon Custom Facebook Feed plugin. For more details, see our guide on how to install a WordPress plugin.
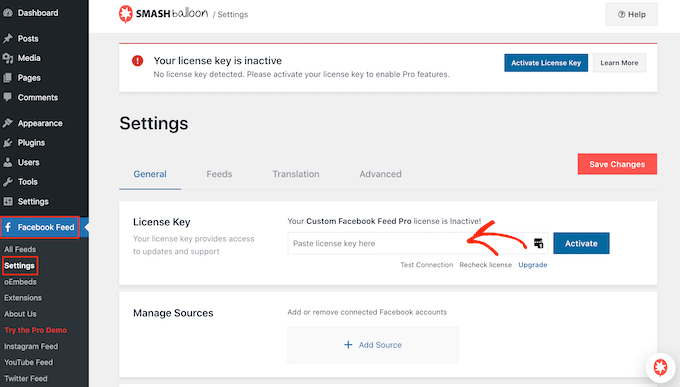
Upon activation, you’ll need to go to Facebook Feed » Settings and enter your license key into the ‘License Key’ field.
You’ll find this information under your account on the Smash Balloon website. After entering the key, click on the ‘Activate’ button.
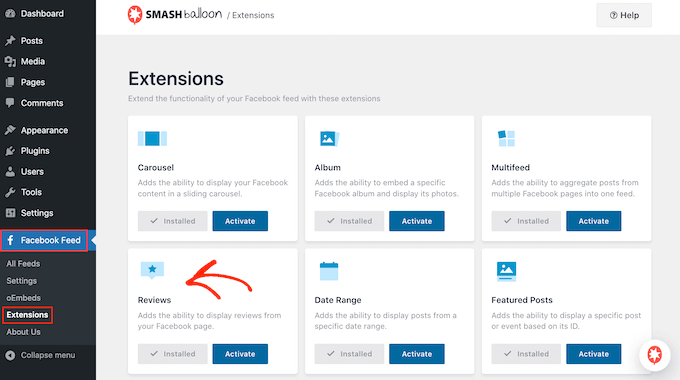
Next, go to Facebook Feed »Extensions. Here, find the ‘Reviews’ extension.
If you haven’t purchased the bundle or extension, then click on its ‘Install’ button. You can then follow the onscreen instructions to purchase the Reviews extension.
You can then install the extension in exactly the same way you set up a WordPress plugin. For more details, see our guide on how to install a WordPress plugin.
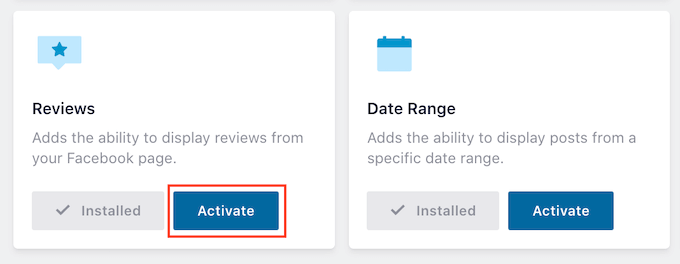
Once you have the extension installed, go ahead and click on the ‘Activate’ button.
Connect the Facebook Reviews Plugin to Your Page
Now, it’s time to connect your Facebook page to WordPress so that you can show reviews from that page.
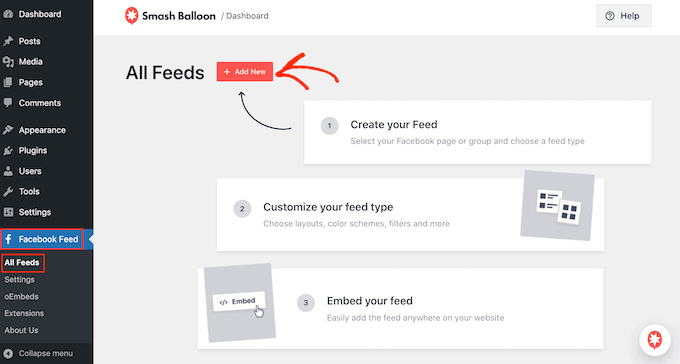
To get started, go to Facebook Feed » All Feeds and click on ‘Add New.’
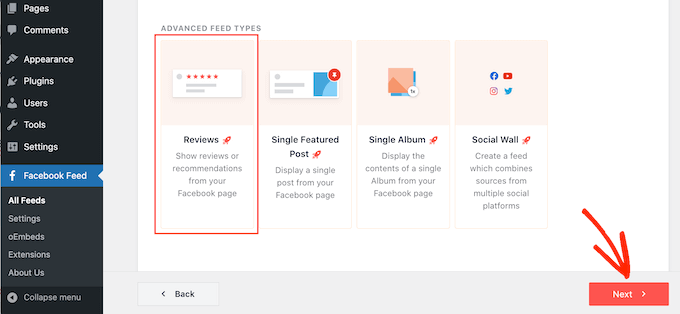
Since we want to embed our Facebook page reviews, click on ‘Reviews’ and then select the ‘Next’ button.
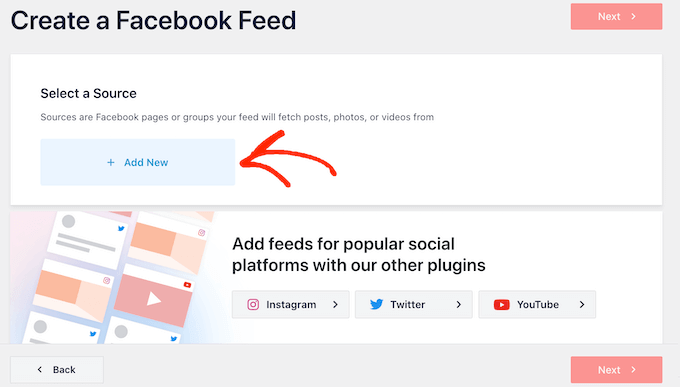
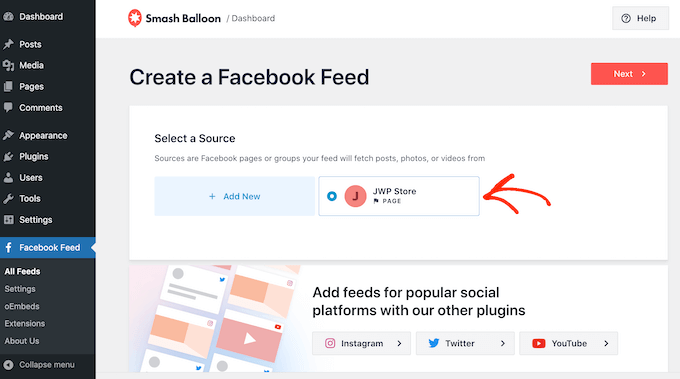
After that, you’ll need to select the Facebook page where you’ll get the reviews from.
To do that, click on ‘Add New.’
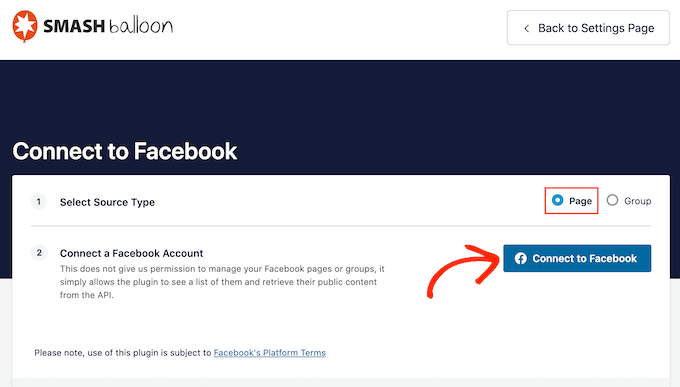
On the next screen, select the radio button next to ‘Page.’
Once you’ve done that, go ahead and click on ‘Connect to Facebook.’
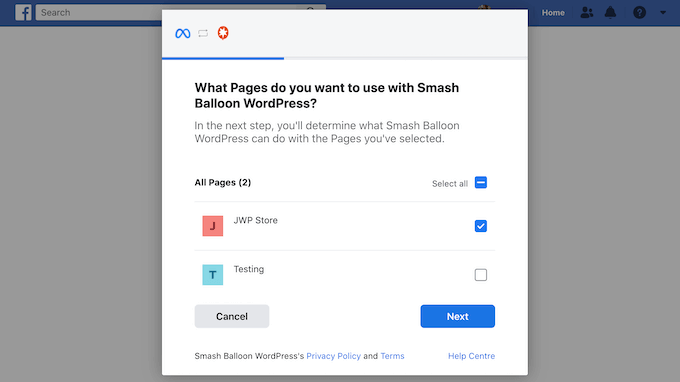
This opens a popup where you can log into your Facebook account and choose the pages where you’ll get the reviews from.
Once you’ve done that, click on ‘Next.’
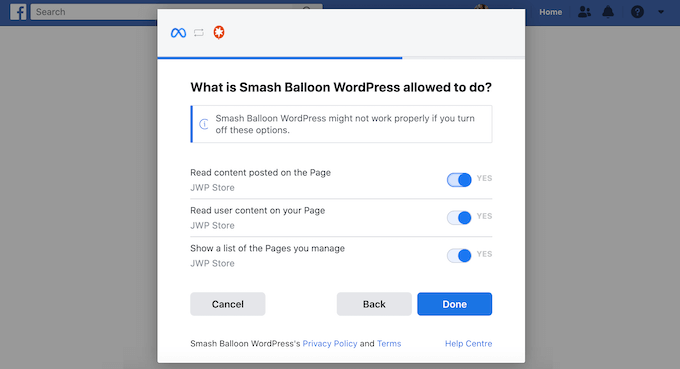
Facebook will then show all the information that Smash Balloon will have access to and the actions it can perform.
To restrict Smash Balloon’s access to your Facebook page, simply click any of the switches to turn it from ‘Yes’ to ‘No.’ Just be aware that this may affect the content that you can show on your WordPress blog or website.
With that in mind, it’s a good idea to leave all the switches enabled.
When you’re happy with how the Facebook permissions are configured, click on ‘Done.’
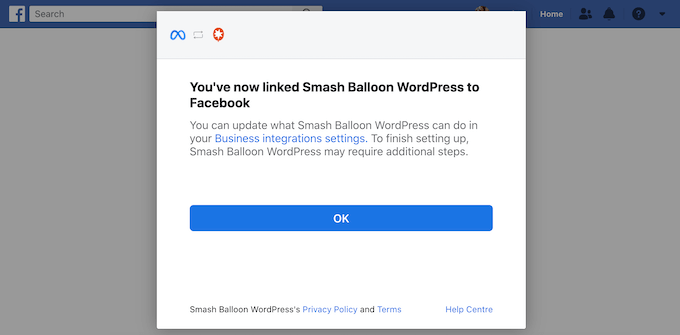
After a few moments, you should see a message confirming that you’ve connected your WordPress website and your Facebook page.
With that done, click on the ‘OK’ button.
Smash Balloon will automatically take you back to the WordPress dashboard.
How to Display Your Facebook Page Reviews in WordPress
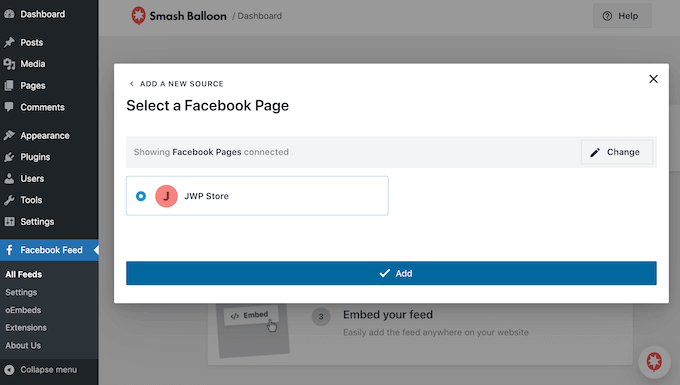
You’ll now see a popup with the Facebook page you connected to your WordPress website. Simply select the radio button next to your page and then click on the ‘Add’ button.
If you closed the popup by accident, don’t worry. You can simply refresh the tab to reopen the Smash Balloon popup.
After that, Smash Balloon will take you back to the Facebook Feed » All Feeds page automatically. Just like before, click on the ‘Add New’ button, select ‘Radio,’ and then click on the ‘Next’ button.
Now, select your Facebook page, and click on ‘Next.’
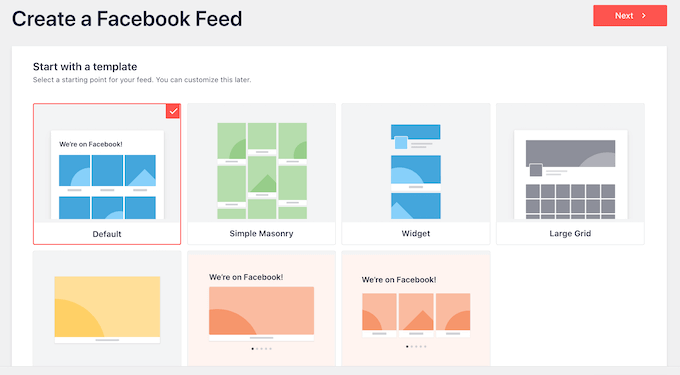
On this screen, you can choose the template you’ll use as the starting point for your review feed. You can customize all of these templates using the Smash Balloon editor.
We’re using the ‘Default’ template, but you can choose any template you want.
With that done, click on the ‘Next’ button.
Smash Balloon will now go ahead and create a feed of all your Facebook reviews.
How to Customize Your Embedded Facebook Reviews
This is a good start, but Smash Balloon has lots of settings that you can use to customize how the reviews appear on your WordPress website.
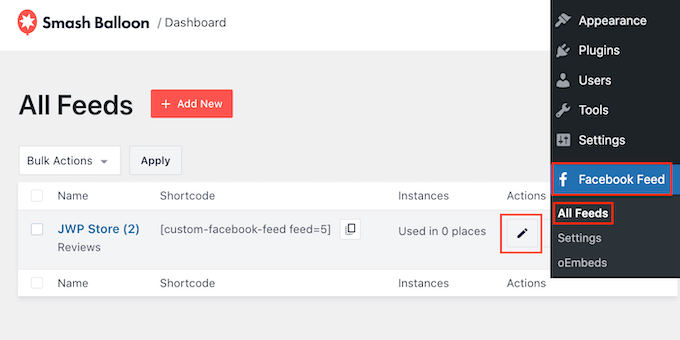
To fine-tune your review feed, go to Facebook Feed » All Feeds. Here, find the feed you just created and click on the ‘Edit’ button next to it.
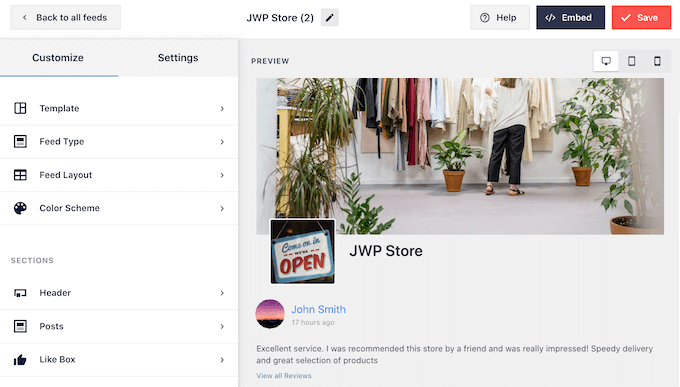
This opens the Smash Balloon feed editor, which shows a preview of your review feed.
On the left-hand side, you’ll see all the different settings you can use to customize how the review feed looks on your site. Most of these settings are fairly straightforward, but we’ll quickly cover all the main settings.
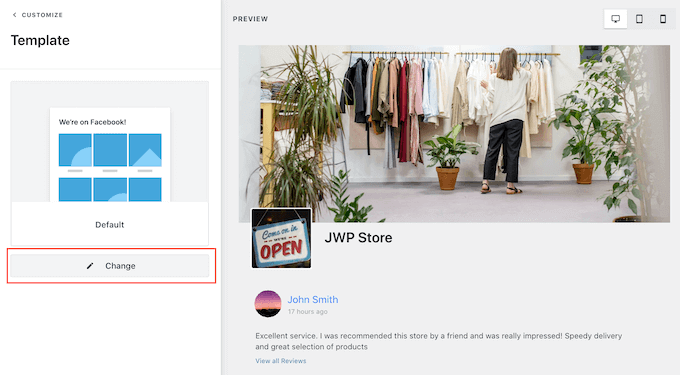
If you want to change the template you’re using, simply click on ‘Template.’
Then, select the ‘Change’ button and choose a new template.
When you’re happy with the layout, click on the ‘Customize’ link.
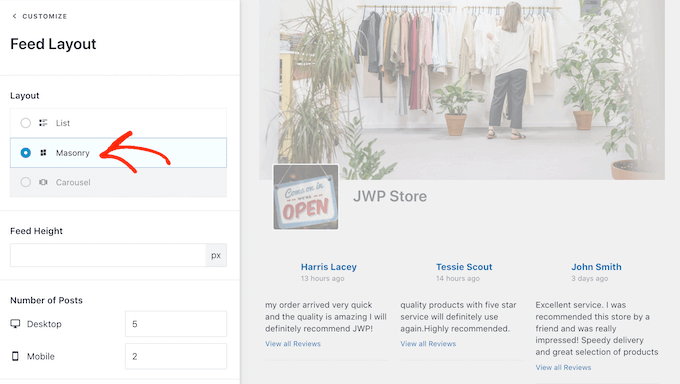
This will take you back to the main Smash Balloon editor, where you can move to the next settings screen, which is ‘Feed Layout.’
On this screen, you can switch between masonry and list layouts and change the feed height.
As you make changes, the preview on the right will update automatically, so you can try different settings to see what works best for your Facebook review feed.
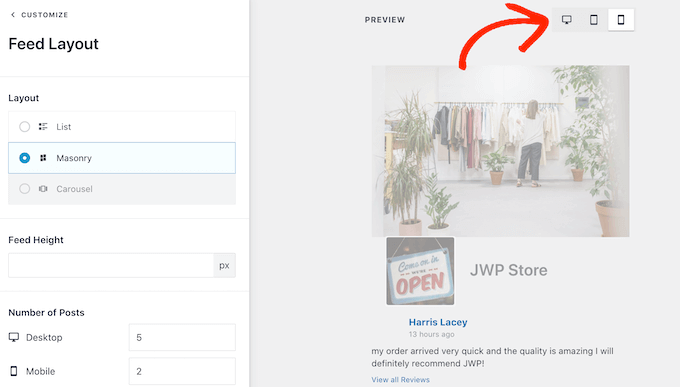
By default, Smash Balloon will show a different number of reviews on desktop computers and mobile devices.
You can preview how the feed will look on desktop computers, tablets, and smartphones using the row of buttons in the upper-right corner.
Just because your feed looks great on desktop devices, doesn’t mean it will look as good on smartphones and tablets.
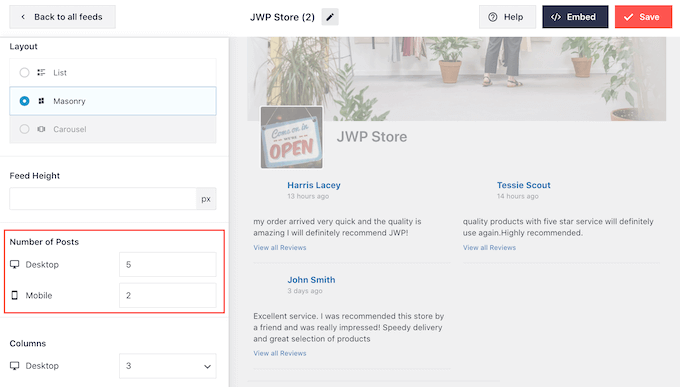
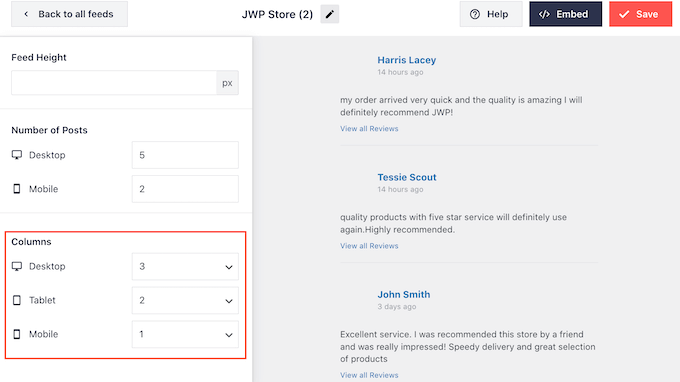
To make this change, simply find the ‘Number of Posts’ section and type a different number into the ‘Mobile’ field.
If you do want to show less content on smartphones and tablets, then you can also change the number of columns.
To show fewer columns on mobile devices, simply type some new numbers into the ‘Columns’ settings. In the following image, we’re splitting the content into 3 columns on desktop, 2 columns on tablet, and 1 column on mobile devices.
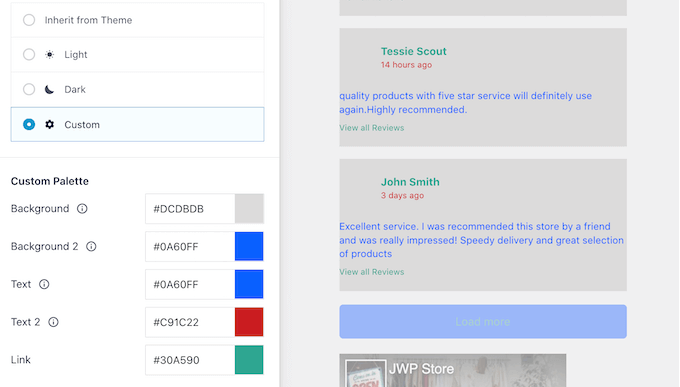
By default, Smash Balloon uses the same color scheme as your WordPress theme, but it also lets you switch to a ‘Light’ or ‘Dark’ color scheme.
To take a look at these options, click on ‘Color Scheme’ on the main Smash Balloon menu. Here, you can test out the ‘Light’ and ‘Dark’ color schemes, change the text color in WordPress, select ‘Custom’ and use the controls to change the background color, and more.
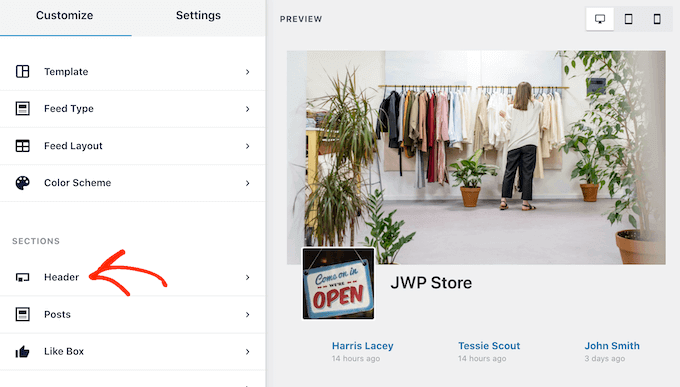
Next, you can add a header above your review feed, which can include content like your page’s profile picture and name. This makes it clear that all the positive reviews are for your page or business.
To add a header section, select ‘Header’ from the left-hand menu.
To start, you can add or hide the header by clicking on the ‘Enable’ slider.
If you do show a header, then you can use the controls to change the size of the header and its color, hide or show your page’s profile picture, show your page’s bio and likes, and more.
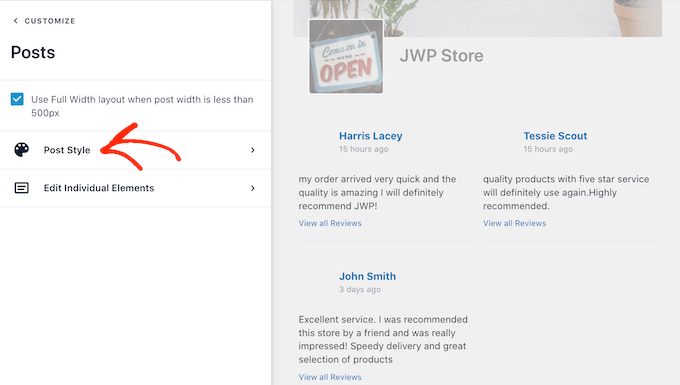
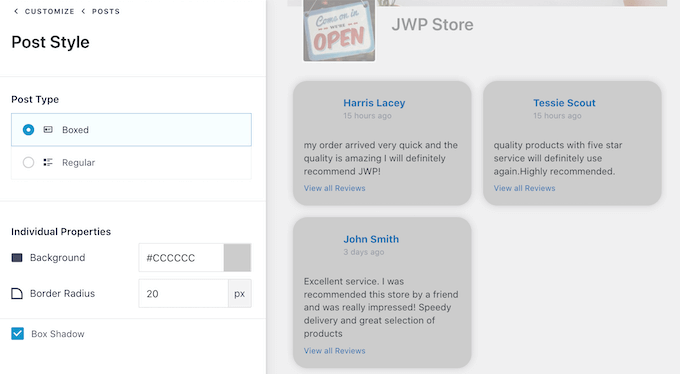
After that, you can change how the individual reviews look inside the feed by selecting ‘Post Style’ from the left-hand menu.
After that, click on ‘Post Style’ again.
Here, you can choose between a regular and a boxed layout.
If you click on ‘Boxed,’ then you can create a colored background for each post. You can also make the border radius larger to create curved corners or add a border shadow to help your reviews stand out.
If you choose a ‘Regular’ layout, then you can change the color and thickness of the line that separates the different reviews.
In the following image, we’ve increased the line thickness and used a different color.
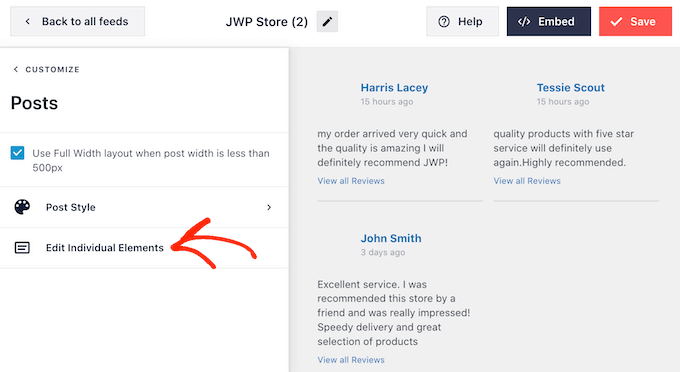
You can also style the individual parts within each review by going back to the main Smash Balloon settings screen.
Once again, select ‘Post Style’ and then click on ‘Edit Individual Elements’ instead.
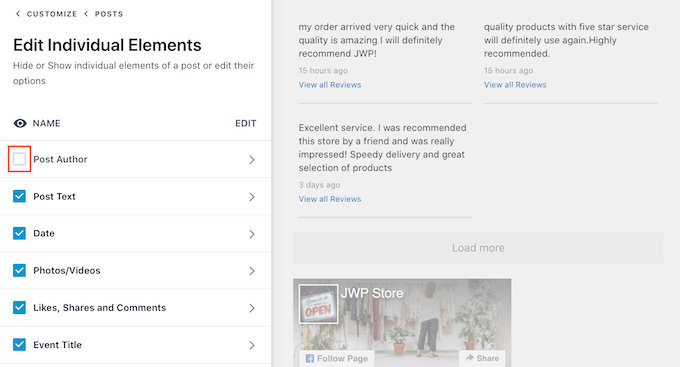
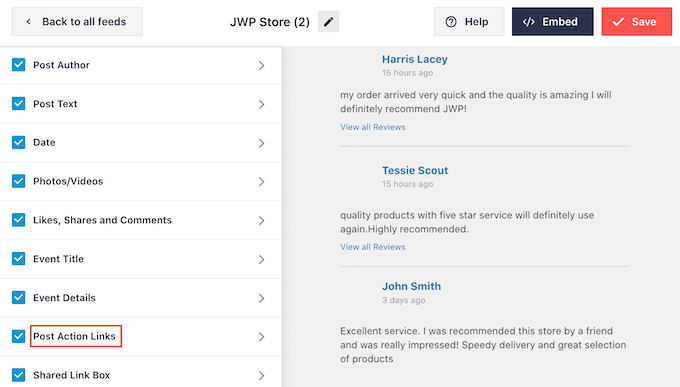
You’ll now see all the different content that Smash Balloon shows from each review, such as the customer’s name, the date, and the number of likes, shares, and comments.
To remove a piece of content from your embedded reviews, click to uncheck its box.
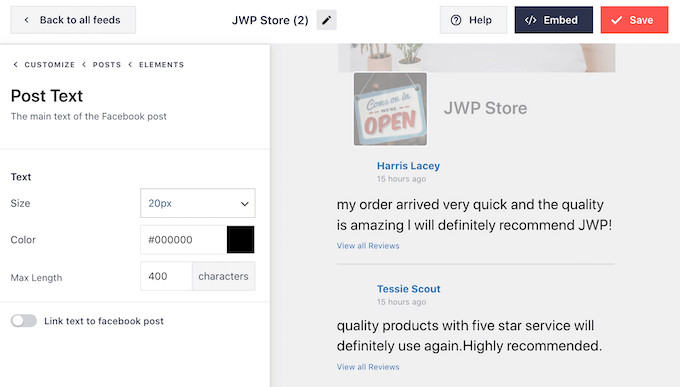
To style a piece of content, simply click on its title. This will take you to a screen where you can change its text size and text color.
This allows you to make certain content stand out more than others. For example, you may want to make the review text bigger than the name of the person who left the review.
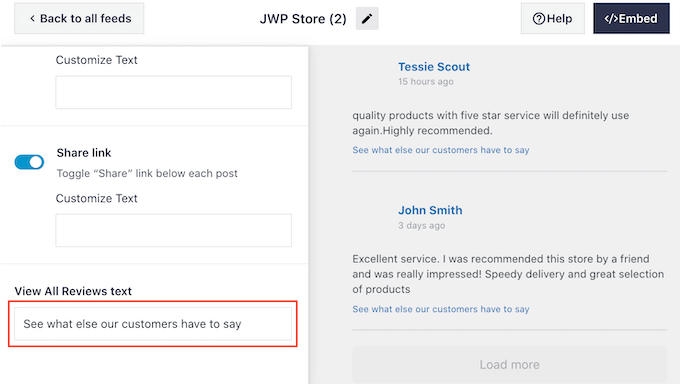
By default, Smash Balloon will show a ‘View all Reviews’ link below each review.
You can change how this link looks or even replace it with your own message by clicking on ‘Post Action Links.’
Here, you can change the text size and color.
To replace the default text, simply type into the ‘View All Reviews text’ field.
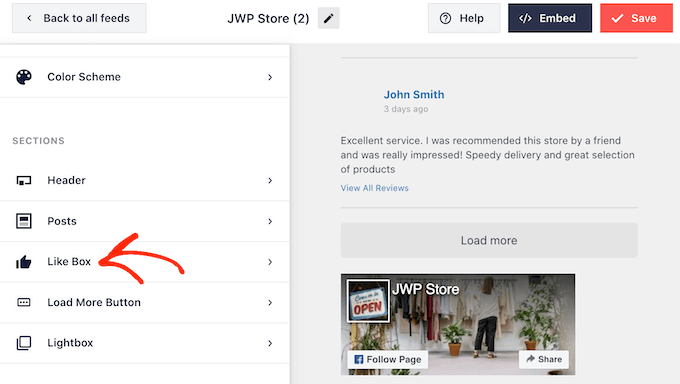
By default, Smash Balloon doesn’t add a Facebook ‘Like’ button to your review feed. This button makes it easier for visitors to follow you on Facebook, so they can learn more about your business.
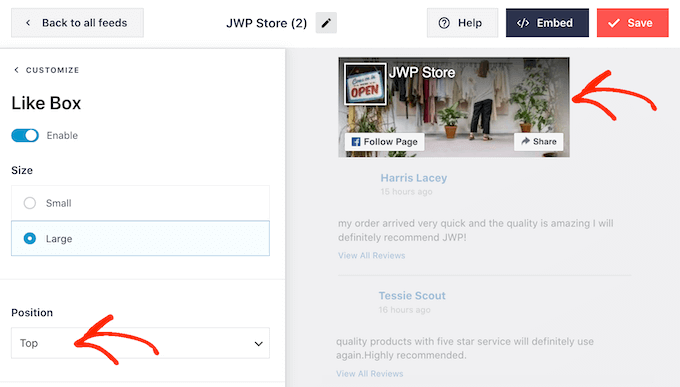
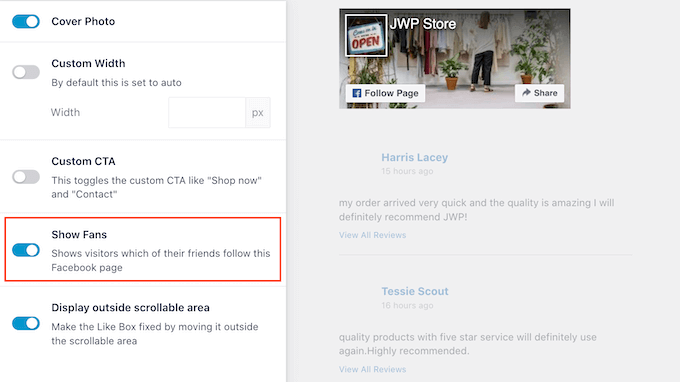
For this reason, you may want to add this button by selecting the ‘Like Box’ settings.
Here, simply click on ‘Enable’ so that the toggle turns blue.
You can now use the ‘Position’ dropdown to show the Like Box below or above the review feed.
You can also use these settings to make the button large or small, show your page’s cover photo, or add a custom call-to-action.
Reviews are already a powerful form of social proof, but you may also want to show the total number of people who follow you on Facebook. To do this, simply click on the ‘Show fans’ switch so that it turns blue.
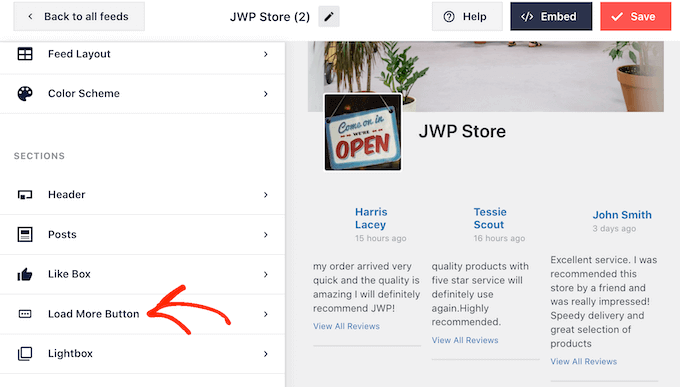
The ‘Load More’ button gives visitors an easy way to scroll through more of your reviews. If you have a lot of reviews, then it’s a good idea to add this button to your feed if it isn’t already enabled.
To do this, select the ‘Load More Button’ option from the left-hand menu.
Then, click on the ‘Enable’ toggle so that it turns blue.
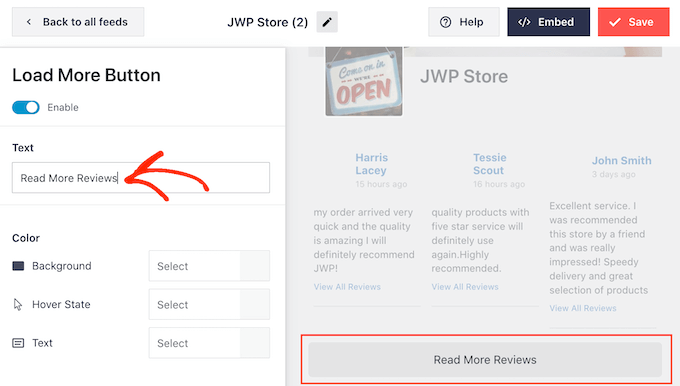
You can also make the button stand out by changing its background color, hover state, and text color.
You can even add your own messaging to the button by typing into the ‘Text’ field. For example, you may want to use something like ‘Read More Reviews.’
When you’re happy with how the Facebook review feed looks, don’t forget to click on ‘Save’ to store your changes.
How to Embed Your Facebook Review Feed in WordPress
You’re now ready to add the review feed to your site using a block, widget, or shortcode.
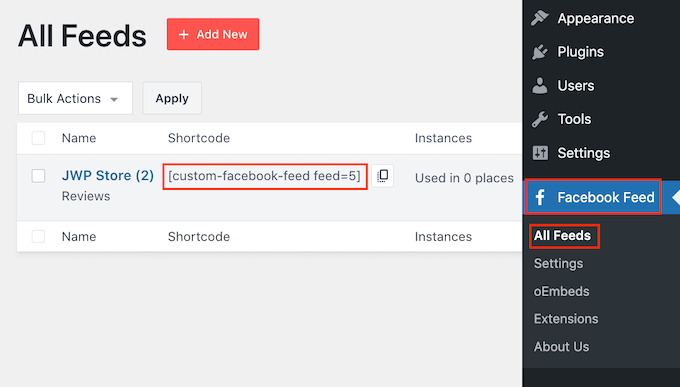
If you’ve created more than one feed using Smash Balloon, then you’ll need to know the review feed’s code if you’re planning to use a block or widget.
To get this information, go to Facebook Feed »All Feeds and then look at the feed="" part of the shortcode. This is the code you’ll need to add to a block or widget, so make a note of it.
In the following image, we’ll need to use feed="5".
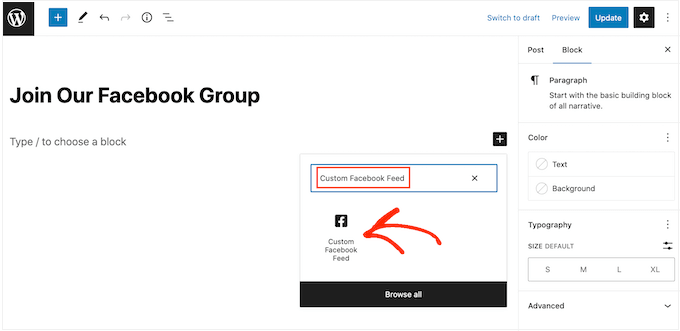
If you want to embed your reviews in a page or post, then you can use the ‘Custom Facebook Feed’ block.
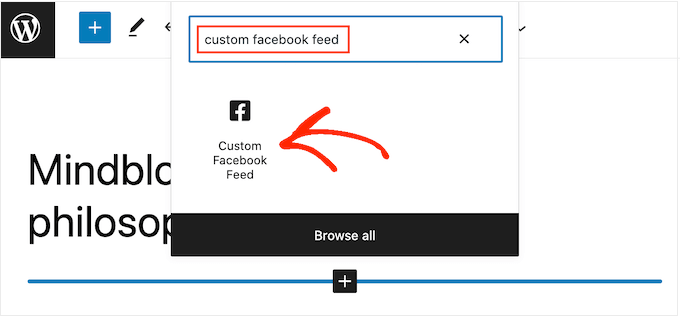
Simply open the page or post where you want to show your reviews. Then, click on the ‘+’ icon to add a new block and start typing ‘Custom Facebook Feed.’
When the Facebook block appears, click to add it to your page or post.
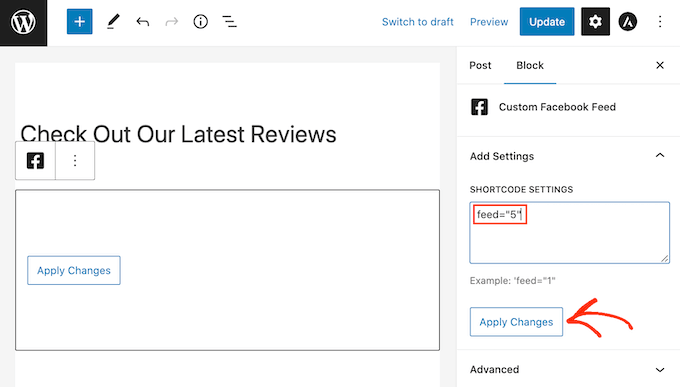
The block will show one of your Smash Balloon feeds by default. If this isn’t your Facebook review feed, then find the ‘Shortcode Settings’ section in the right-hand menu.
Here, go ahead and add the feed="" code, then click on ‘Apply Changes.’
After that, publish or update the page to make the reviews live on your website.
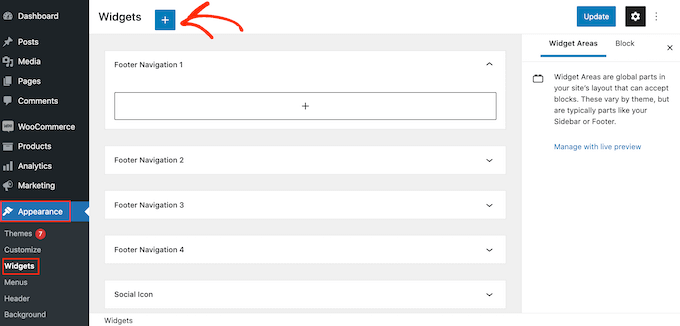
Another option is to add the feed to any widget-ready area, such as the sidebar or similar section. This allows visitors to see your latest reviews no matter where they are on your WordPress website.
To do this, head over to Appearance » Widgets in the WordPress dashboard and then click on the blue ‘+’ button.
After that, type ‘Custom Facebook Feed’ into the search bar.
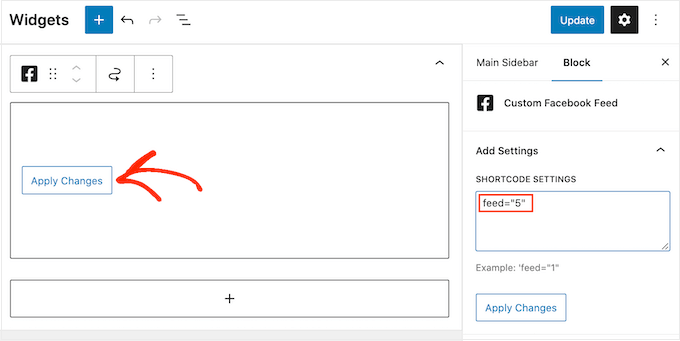
When the right widget appears, drag it to where you want to show the reviews on your WordPress website, such as the sidebar.
By default, the widget will show one of the feeds you created using Smash Balloon.
If this isn’t your Facebook review feed, then type the feed’s code into the ‘Shortcode Settings’ box. After that, click on ‘Apply Changes.’
Another option is embedding the review feed on any page, post, or widget-ready area using a shortcode. Simply head over to Facebook Feed »All Feeds and copy all the code under the ‘Shortcode’ column.
Finally, if you have a block-enabled theme, then you can use the full-site editor to add the ‘Custom Facebook Feed’ block anywhere on your site.
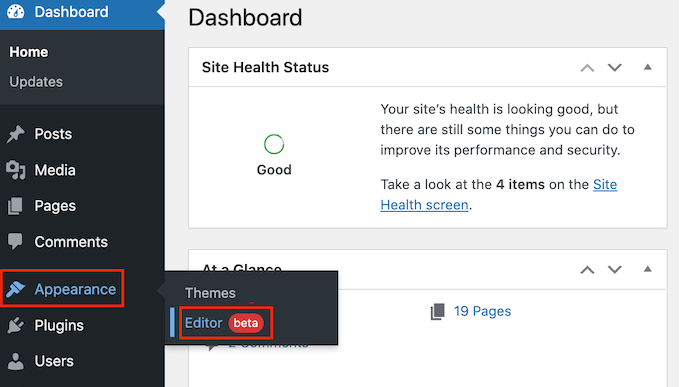
In the WordPress dashboard, simply go to Appearance » Editor.
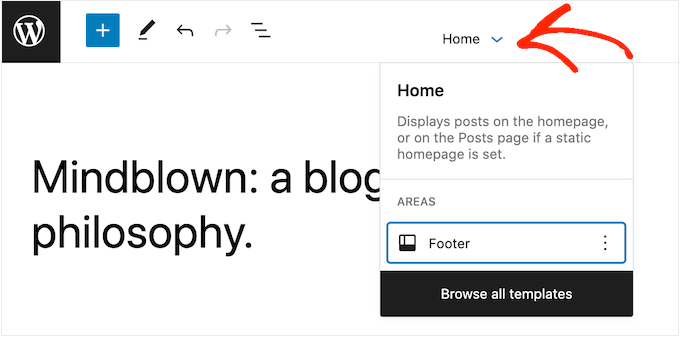
By default, the full-site editor will show the theme’s home template. If you want to add the review feed to a different template, then click on the arrow next to ‘Home.’
You can then choose a template from the dropdown menu, such as the footer template.
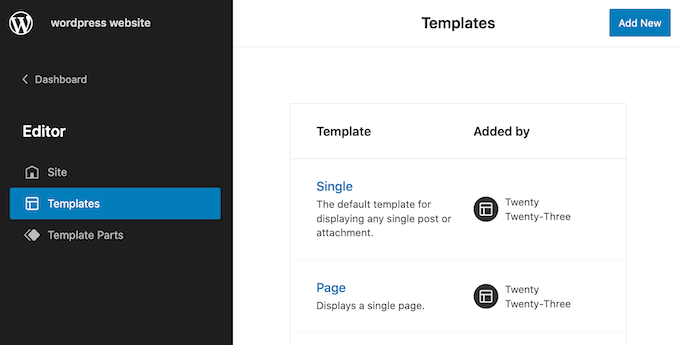
Another option is to click on ‘Browse all templates.’
The full-site editor will now show a list of all the templates you can edit. Simply click on the template where you want to show your reviews.
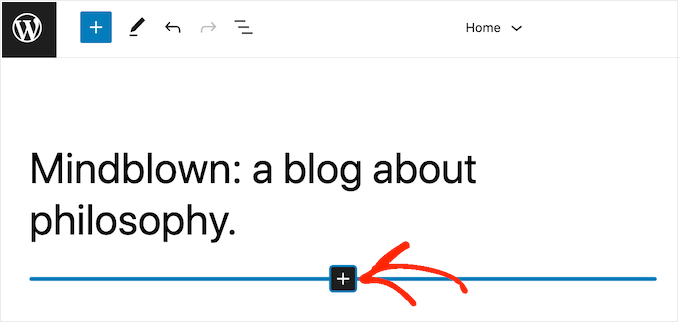
Once you’ve chosen your template, simply hover your mouse over the area where you want to add the review feed.
Then, click on the blue ‘+’ when it appears.
After that, start typing in ‘Custom Facebook Feed.’
When the right block appears, click to add it to the template.
As always, Smash Balloon will show a feed by default. You can change this feed by adding a shortcode following the same process described above.
Do you want to add an image to a sidebar widget in WordPress? By default, WordPress makes it easy to upload and add images anywhere on your website. In this article, we will show you how to easily add an image in your WordPress sidebar widget. We will share multiple methods, so you can use one that works best for you.
Adding an Image in WordPress Using The Image Widget
The easiest way to add an image in WordPress sidebar is by using the default ‘Image’ widget.
Simply go to Appearance » Widgets page and add the ‘Image’ widget to your sidebar. If you haven’t used widgets before, then see our guide on how to add and use widgets in WordPress.
The widget will expand, and you will be able to see its settings.
The first option is to add a title to the image widget. After that, click on the ‘Add Image’ button to continue.
This will bring up the WordPress media uploader where you can click on the upload files button to upload your image or select an image you have previously uploaded.
After uploading the image, you will see image settings in the right column. From here, you can provide a title / ALT text for the image, add a description, select size, or even add a link.
Once you are done, you can click on the ‘Add to Widget’ button to save your changes. You will now see a preview of the image inside the widget settings area.
Don’t forget to click on the ‘Save’ button to save your image widget.
You can now visit your website to see the image displayed on your WordPress blog’s sidebar.
Adding an Image in WordPress Sidebar Using Text Widget
Adding an image to the sidebar using the default ‘Image’ widget is quite easy. However, sometimes you may need to add an image with custom HTML or text with formatting. In that case, you will need to use the ‘Text’ widget instead.
Simply go to Appearance » Widgets page and add the ‘Text’ widget to your sidebar. Under the widget settings, you will see the ‘Add Media’ button above text edit area.
Clicking on the button will bring up the media uploader allowing you to upload or select an image from the media library.
After selecting your image, click on the ‘Insert into post’ button. You will now be able to see an image preview in the text widget settings.
You can continue adding text and other elements to the text widget. The toolbar in the text editor gives you some basic formatting buttons.
Once you are done, don’t forget to click on the ‘Save’ button to store your widget settings.
You can now visit your website to see the sidebar image in action.
Manually Adding an Image in WordPress Sidebar Widget
In some cases, you may need to add additional HTML code to your image. The default text widget allows some very basic HTML, but it may not work with advanced HTML or formatting. In that case, you will need to manually add an image to your blog’s sidebar.
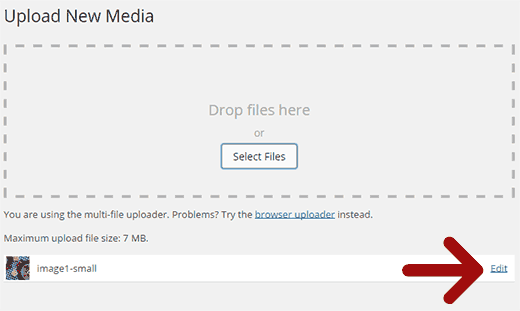
First, you need to upload the image to your WordPress site. Simply go to Media » Add New and upload your image file.
After uploading the image, you need to click on the Edit link next to the image.
WordPress will now take you to the ‘Edit Media’ page where you will see the image file URL on the right side of the screen. You need to copy this URL and paste it into a text editor like Notepad.
Next, you need to go to Appearance » Widgets screen and drag-drop ‘Custom HTML’ widget to your sidebar where you want to display the image.
In the text box area of the widget, you need to add your image using this code:
<img src="Paste The File URL Here" alt="Strawberries" />
The img tag is used in HTML to display images. It needs two attributes, the first one is src which defines the image file location. This is where you will paste the URL you copied earlier.
The second one is alt which is used to provide an alternate text for the image. Your final img tag will look something like this:
You need to click on the Save button to store your widget settings and then preview your website.
Adding an Image in WordPress Sidebar Using a Plugin
Another way to add images to your WordPress sidebar is by using a plugin. This will give you a few more options and a simple interface, which some beginners may find easier than the default ‘Image’ widget.
Upon activation, simply go to Appearance » Widgets page. You will notice a new widget labeled ‘Image Widget’ under available widgets column. Simply drag and drop this image widget to your WordPress sidebar where you want to display an image.
Next, click on the ‘Select Image’ button to upload an image or select one from the media library. After that you need to click on the ‘Insert to Widget’ button, and you will see the image preview under widget settings.
You can add a title, alt text, link, and a caption for the image. You can also choose an image size from the list of available options.
Once you are satisfied, simply click on the Save button to save the image widget. That’s all, you can now go to your website and see the image displayed in your sidebar.
We hope this article helped you add an image in WordPress sidebar widget. If you come across a problem, don’t forget to look at our guide on how to fix common image issues in WordPress.
If you liked this article, then please subscribe to our YouTube Channel for WordPress video tutorials. You can also find us on Twitter and Google+.
There’s something exciting about knowing a secret, right? And when it comes to business, what’s more secret than a private business’ income numbers? Most private companies keep their revenue and expenses close to the chest…but some WordPress companies make things a bit more transparent by publishing public income reports. If you’re a casual user, reading ... Read more7+ WordPress Businesses That Actively Share Income And Transparency Reports In 2018
Do you want to better manage online booking on your WordPress site? Many WordPress businesses and individuals rely on a booking system to efficiently run their business and manage customers. In this article, we will show you how to better manage online booking in WordPress with StartBooking.
Why Manage Online Booking in WordPress with StartBooking
Often business websites need an online booking management system to allow customers to book appointments online without calling.
Aside from offering convenience to customers, it also enables you to efficiently manage your time and services. There are plenty of booking plugins for WordPress to choose from. Here are some of the things you should look for in an online booking solution.
Does it allow you to easily add booking forms to your website?
Are the features customizable enough to match your business?
Does it integrate with third-party services like Google Calendar?
Does it have smart scheduling to avoid overlapping or incorrect appointments?
Does it have the ability to add staff schedules which is highly useful for services like salons, spas, etc?
That being said, let’s see how to easily manage online booking in WordPress with StartBooking.
Managing Online Booking in WordPress with StartBooking
First, you need to visit StartBooking website to create an account. StartBooking is a paid service, but it does offer a free plan for those starting out.
Once you have signed up, you will be taken to your account dashboard. From here you need to click on your account name at the top right corner, so you can access the settings page.
On the settings page, you need to click on the ‘Hours’ section from the left column and then start saving your business hours for each day.
If you run a multi-staff business like spa or salon, then you can add your staff by visiting the users section under account settings. You will be able to edit hours, notifications, and role for each user.
StartBooking allows you to add multiple services that customers can book for. You can visit the ‘Services’ page where an ‘Example Service’ will already be added for you.
You can edit or delete the Example Service. You can also create new services as needed.
On the new service page, you can provide a title and description for the service offered. After that, you need to select the duration, cost, user (staff member assigned to the task), and add price.
Once you are done, click on the ‘Add Service’ button to save your changes. Repeat the process to add more services if necessary.
Now that you have set your StartBooking account, let’s connect it to WordPress by using their WordPress booking plugin.
Upon activation, the plugin will add a new menu item labeled ‘Booking’ to your WordPress admin sidebar. Clicking on it will take you to the plugin’s settings page.
You need to click on the ‘Connect My Account’ button and log in using your StartBooking account details. Once connected, you will see the plugin’s settings page.
It will automatically create a new page on your WordPress site called ‘Book Now’ and the online booking form shortcode inside it.
You can click on the ‘View Page’ link to see your online booking system in action.
If you have multiple services, then users will first see the option to select a service and then click on continue button. On the next screen, they will be able to select the date and time.
In the next step, customers will provide their contact information and save their appointment.
After that StartBooking will see send a confirmation email to the customers, and they will also be able to see their appointment details on screen. You or the staff member assigned for the service will also receive an email notification.
If you don’t want to use the default ‘Book Now’ page created by the plugin, then you can also select any other page on your WordPress site to display your online booking form. Simply add the following shortcode to your page.
[startbooking]
This shortcode will display full booking form flow with services, date, time, and customer information.
You can also create call to action buttons to be used on your services pages. Simply use the following shortcode with a service ID which you can find under the plugin settings.
Viewing and Managing Your Online Booking Appoinments
StartBooking not only makes it easy for your users to make a booking, but it also allows you to easily manage your time using a simple dashboard.
Simply head over to the StartBooking website, and you will be able to see all your booked time slots. You can switch the calendar view into day, week, or month to see more appointments or click on an individual appointment to see details.
StartBooking can also integrate into your Google Calendar to sync your appointments. Simply go to your account settings and then click on the ‘Integrations’ tab.
You need to click on the connect button next to Google Calendar. This will take you to your Google account where you will be asked to give StartBooking access to update your Google Calendar.
Click on the ‘Allow’ button to continue.
After that, you will be able to see all your appointments on your phone using the Google Calendar app.
At this point, I’ve already stuck my foot in my mouth when it comes to quoting the price of cryptocurrencies here at WPLift. Suffice it to say, there are all kinds of reasons you might want to accept cryptocurrency payments at your WooCommerce store – you probably know most of them already if you’re reading ... Read moreWooCoinbase Review: Add Coinbase Commerce Gateway To WooCommerce
Are you unable to find the custom fields option on your WordPress site? Custom field is an advance WordPress feature that helps you add custom content to your WordPress posts and pages by following various WordPress tutorials. In this article, we will show you how to easily fix custom fields not showing issue in WordPress.
Fixing Custom Fields Not Showing Issue in WordPress
In the past, custom fields were visible by default on the post edit screen of all WordPress sites. However since it is an advance feature, the WordPress core development team decided to hide custom fields by default for all new users in the WordPress 3.1 release.
They also made it easy for anyone to make them visible with just two clicks from within the post edit screen.
Simply create or edit an existing post / page, and then click on the ‘Screen Options‘ button at the top right corner of the screen. This will show you a menu with several options that you can show or hide on your post edit screen.
Go ahead and click on the checkbox next to ‘Custom Fields’ option.
Note: If you don’t see the Custom Fields option on your site, then please scroll to the troubleshooting option below in the article.
You can now scroll down on the post edit screen, and you will notice a new meta box labeled ‘Custom Fields’ below your post editor.
Since WordPress remembers your display choice, it will continue to display the custom fields box whenever you are editing posts on your website.
You can use this box to add, edit, and delete custom fields and their values.
What are Custom Fields? What Can You Do with them?
By default, when you write a new post, page, or any content type, WordPress saves it into two different areas. The first part is the body of your content that you add using the post editor.
The second part is the information about that particular content. For example, title, author name, date / time, and more. This bit of information about the post is called metadata.
Apart from the default post metadata, WordPress also allows you to save custom metadata by using custom fields.
WordPress developers use custom fields to store custom post metadata for your posts. For example, the Yoast SEO plugin uses custom fields to store SEO settings for your posts.
However instead of using the default custom fields box shown above, these plugin developers create their own custom meta boxes. This makes it easier for users to input information.
Recently one of our readers came to us with a problem where the Custom Fields option was missing from the WordPress screen options. After some investigation, we were able to find the cause of the issue.
If your WordPress site is missing the custom fields option under the ‘Screen Options’ menu, then you need to check if you have the Advanced Custom Fields (ACF) plugin active on your site.
ACF is a very popular WordPress plugin that developers use to create custom meta boxes. ACF is running on over 1 million websites.
In ACF version 5.5.13, they added a setting to remove the default WordPress custom field metabox to speed up the load times on the post edit page. The idea being that you shouldn’t need the default metabox since you’re using ACF.
However if you need to have the default WordPress custom field metabox enabled, then you need to add the following code to your WordPress theme’s functions.php file.
This will solve the custom fields option missing issue in WordPress.
We hope this article helped you fix the custom fields not showing issue on your WordPress site. You may also want to see our ultimate list of most useful WordPress tips, tricks, and hacks.
If you liked this article, then please subscribe to our YouTube Channel for WordPress video tutorials. You can also find us on Twitter and Facebook.