19 Best WordPress Themes for Podcasters

Are you looking for perfect WordPress theme for your podcast website? We have an article on how to start a podcast in WordPress, and several of our readers ask for best podcast theme suggestions. In this article, we have hand-picked some of the best WordPress themes for Podcasters.

WordPress themes for podcasters

Building a Podcast Website with WordPress

WordPress is a popular website builder among podcasters all over the world. Mainly, due to its flexibility and ease of use.

There are two different types of WordPress, and it’s very important that you choose the right one. WordPress.com which is a hosted platform, and WordPress.org which is also known as self-hosted WordPress. For details see our comparison of WordPress.com vs WordPress.org.

We recommend using self-hosted WordPress.org to build your podcast website. It gives you access to all powerful WordPress features out of the box.

To start your website with self hosted WordPress, you will need a domain name (e.g. wpbeginner.com). This will be your website’s address on the internet. You’ll also need a WordPress hosting account, this is where your website’s files are stored.

We recommend using Bluehost. They are one of the largest hosting companies in the world and an officially recommended WordPress hosting provider.

Next, you will need to set up your podcast. For detailed instructions see our step by step guide on how to start a podcast.

That being said, let’s take a look at some of the best WordPress themes for podcasters.

1. Satchmo
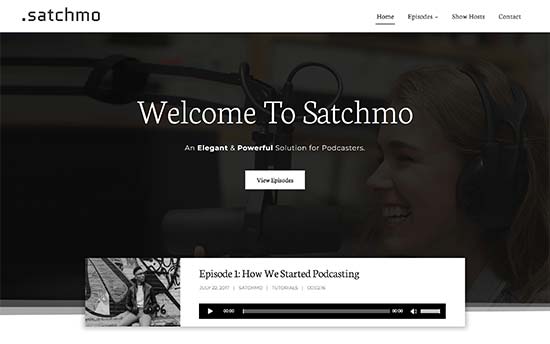
Satchmo

Satchmo is a WordPress podcasting theme designed specifically for podcasters. It features a gorgeous design with a large background image, call to action button, and the latest episode widget.

It has many podcasting related features and a beautiful episode player that looks excellent on all devices. It also comes with full support for drag and drop page builder plugins and works with all top WordPress plugins for podcasters.

2. Ultra

Themify Ultra

Ultra is an all-purpose WordPress theme that comes packed with ready-made designs and 1-click install. It also includes a powerful page builder to edit any page or create your own designs.

Ultra comes with features that will make your podcast stand out. It includes a beautiful audio player that goes along with your theme effortlessly. For easier set up, it has 1-click demo importer and custom theme settings page.

3. Gumbo

Gumbo

Gumbo is another excellent WordPress theme for podcasters. It is designed to leave a lasting first impression on your audiences with a stunning and modern design.

It comes with full support for Blubrry podcast hosting and the PowerPress podcasting plugin. It also supports self-hosted as well as external embeds from any host including Soundcloud, YouTube, Vimeo, and more.

4. Aesthetic

Aesthetic

Aesthetic is a beautifully designed WordPress theme for podcasters and bloggers. It offers multiple listing styles for posts which would work great for your podcast episodes.

It includes easy editing with page builder and comes with quick setup options like 1-click importer and theme options panel. Inside you will also find a beautiful audio player that works great for self-hosted media files for your podcast.

5. Pepper+

Pepper+

Pepper+ is a multi-purpose WordPress theme suitable for any kind of website including podcasts. It takes a modular approach to design and allows you to just drag and drop items on a page to create beautiful designs.

It comes with multiple ready-made website designs with demo content that you can install with 1-click and then edit those pages with your own content. It is super easy to use and works nicely with essential WordPress plugins including any podcasting plugins you may want to use.

6. Music
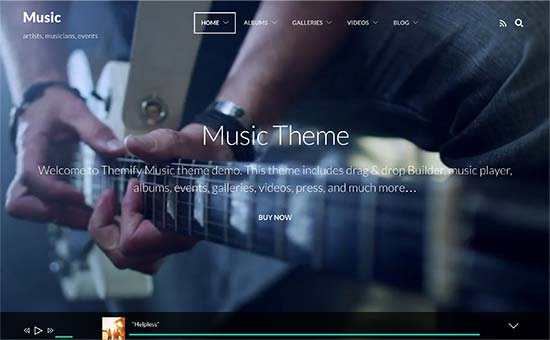
Music

As the name suggests, Music is a WordPress theme designed for musicians, artists, radio shows, and podcasts. It comes with a gorgeous fullscreen background image and a full width audio player at the bottom.

It is super easy to use and includes everything you will need for your podcasting website. It has a super flexible drag and drop builder that allows you to easily create unlimited designs on your own. Theme set up is quite straight forward, you can also import demo content to make setup even easier.

7. Oscillator

Oscillator

Oscillator is a powerful yet easy to use WordPress theme for musicians and podcasts. It comes with a beautiful streaming audio player that looks great on mobile devices as well.

It includes built-in sections to add sliders, artists, discography, events, photo galleries and videos. It has a drag and drop home page with custom widgets for content discovery and social media integration.

8. Lenscap
Lenscap

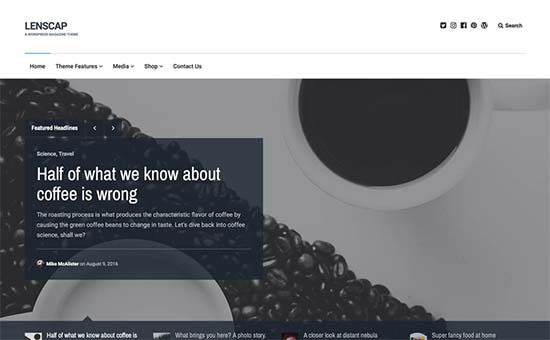
Lenscap is a beautifully designed WordPress theme for magazines and all media-rich websites including podcasts. Its homepage features a highly customizable content carousel that allows you to showcase the best of your podcast at the top.

It is super easy to use and all theme options are neatly organized. It works out of the box and comes with a handy guide to help you setup your website. It is eCommerce ready and can also be used to add an online store.

9. Monochrome

Monochrome

If you are looking for a minimalist WordPress theme, then you should take a look at Monochrome. It features lots of white space with elegant typography that makes your content stand out.

It is built on top of Genesis theme framework, which is great for performance and speed. It has a customizable header, easy to set up home page with multiple widget ready areas where you can place an audio player widget.

10. Oxium
Oxium

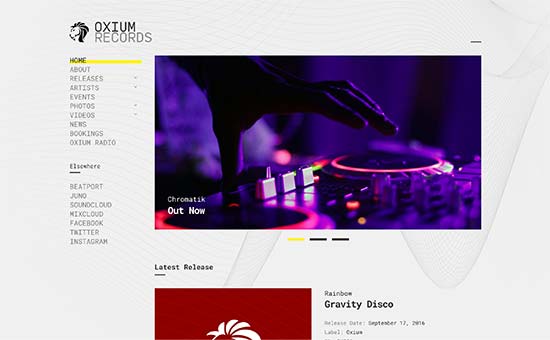
Oxium is a WordPress theme for music, artists, bands, and podcasts. It features a unique design with a narrow sidebar and navigation menus on the left and your most important content to the right.

It includes audio streaming player and custom sections to add artists, video galleries, photos, and more. With its widgetized homepage, powerful options, and custom widgets it is quite easy to setup and use.

11. Medias

Medias

Medias is a powerful WordPress theme for blogs, podcasts, and personal websites. It comes with multiple layouts and styles to display your posts and other content.

Other notable features include mega menu, slider plugin, custom header, and Google fonts. It can also be used to create multilingual WordPress sites with WPML.

12. Amplify
Amplify

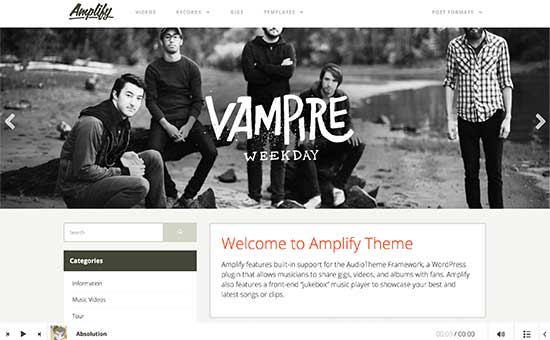
Amplify is a WordPress theme for musicians, artists, podcasts, and other websites that use audio content. It comes with a companion plugin to easily add audio player, discography, artists, and more.

It has templates for event pages, video galleries, photo gallery, and albums and tracks. It is compatible with Beaver Builder which allows you to create your own custom page layouts if you need.

13. Obsidian

Obsidian

Looking for a more modern and stylish WordPress theme, then you will like Obsidian. This stylish WordPress theme features a dark color scheme with fullscreen background and an audio player.

It includes full support to display audio playlists as well as video content on your website. Theme setup is managed with live customizer which allows you to see your changes as you edit your website.

14. Designer
Designer

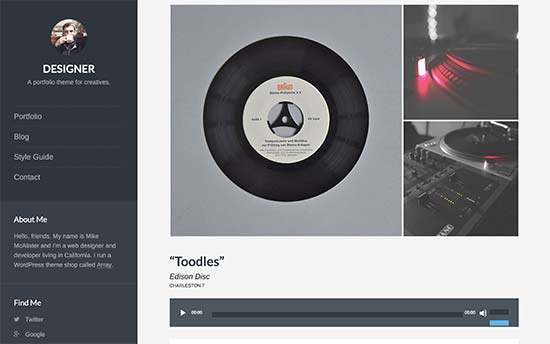
Designer is basically a WordPress portfolio theme for any kind of artists and designers. What makes it suitable for podcasting is that it comes with beautiful templates to display your audio content, which is great for podcasting websites.

It is super user-friendly and only comes with options that you’ll need. It is compatible with all podcasting plugins and comes with templates for contact form, video portfolio, blog page, and more.

15. Promenade

Promenade

Promenade combines minimalism with style in beautifully crafted WordPress theme. Designed for audio content, musicians, and bands, this theme is perfect for serious podcasts as it allows users to focus more on content than other elements.

Other notable features include full support for audio video content, related posts, Google Fonts and TypeKit support, gigs, and full-width page template to use with any page builder plugin.

16. Nayma
Nayma

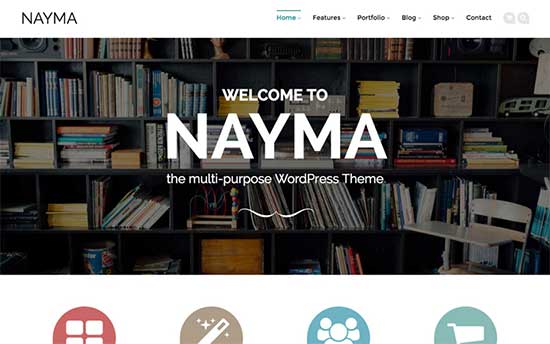
Nayma is a multi-purpose WordPress theme that can handle any kind of content and make it look beautiful. It is suitable for podcasts and comes with an audio post format that works great for podcast episodes.

It is eCommerce ready and also supports multilingual websites. It has built-in templates for portfolio, galleries, adding a contact form, and more. For easier setup it ships with multiple readymade designs with content that you can just replace with your own.

17. Tracks

Tracks

If you are looking for a free theme, then take a look at Tracks. It features a dark, simple, and minimalist design that makes it great for publish both text and audio content.

Notable features include social media icons, search bar, comment display controls, premium layouts, and more. It is easy to use and all theme options can be accessed under live customizer.

18. Elegant

Themify Elegant

Elegant is a beautifully crafted WordPress theme to beautifully display all sorts of content with a distraction free layout. It is suitable for personal blogs, podcasters, and magazine sites that need a simple design.

It includes beautiful typography, unlimited layouts, portfolio section, custom header, page templates, and multiple color schemes. It has a powerful page builder to take your website to the next level.

19. Dixie

Dixie

Dixie is specifically made WordPress theme for podcasters. It features a stunning homepage design with fullscreen background and episode player. It comes loaded with podcasting related features that will make it easy for you to quickly setup your podcast website.

It also supports all popular podcasting plugns as well as top WordPress page builder plugins. It includes multiple layout choices, podcast hosts page, and Newsletter signup form. It has plenty of theme options and the whole theme is translation ready.

We hope this article helped you find the best WordPress theme for podcasting. You may also want to see our ultimate step by step WordPress SEO guide for beginners.

If you liked this article, then please subscribe to our YouTube Channel for WordPress video tutorials. You can also find us on Twitter and Facebook.

The post 19 Best WordPress Themes for Podcasters appeared first on WPBeginner.

Astra Theme Review – Customizable, Page Builder Ready and Fast

Astra is a very simple and customizable theme developed by Brainstorm Force, that’ll make your life so much easier. Not only that – it is also very SEO friendly and fast. Made to work with various page builders, it provides options that will suit all your needs even if you don’t have any HTML knowledge. ... Read moreAstra Theme Review – Customizable, Page Builder Ready and Fast

The post Astra Theme Review – Customizable, Page Builder Ready and Fast appeared first on Learn WordPress with WPLift.

How and Why You Should Leave Reviews on WordPress

WordPress is a community built around the open source philosophy. Developers, designers, and marketers contribute to it by lending their skills and sharing their plugins / themes. As a user, there are many ways you can help out as well. One of them is by leaving reviews of products that you use. In this article, we will talk about how and why you should leave reviews on WordPress.

Why you should leave reviews on WordPress

How do Reviews Work on WordPress?

There are two different of WordPress platforms. There is WordPress.com which is a hosting solution, and then there is WordPress.org also known as self-hosted WordPress. See our comparison of WordPress.com vs WordPress.org for more details.

In this article, we will be talking about WordPress.org, which is home to the open source WordPress CMS platform that we all love. It is the place where you can get more than 50,000 free WordPress plugins and hundreds of free WordPress themes for your website.

Just like WordPress, all these themes and plugins are open source software. This means that developers of these plugins and themes don’t get paid by WordPress.org for sharing their products. Learn more about who owns WordPress and how does it make money.

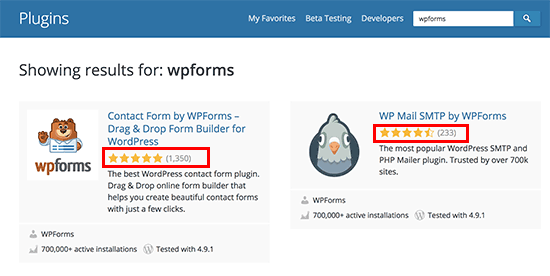
When you browse the plugin or theme directory on WordPress.org, you will find reviews for them in the search results.

Review stars displayed in WordPress plugin search

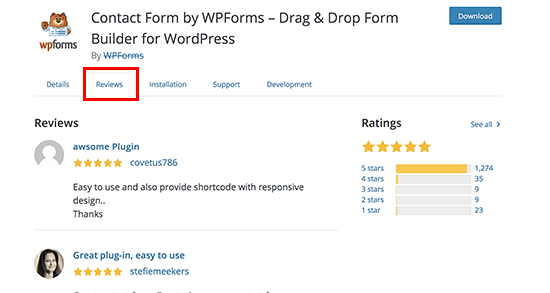
You can also read each individual review on the Reviews tab, and you can add your own review as well.

Reviews tab on plugin page in WordPress.org directory

Why You Should Add Reviews on WordPress.org?

If you are using a plugin or theme, and you find it useful, then your review can help others users make the right decision.

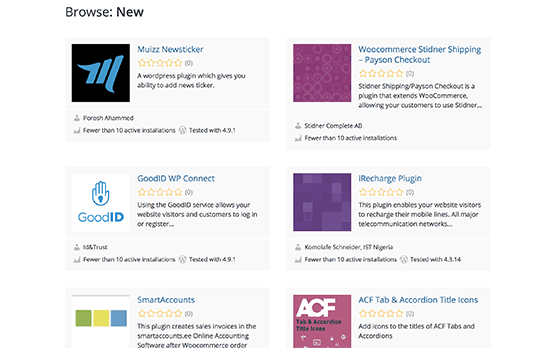
Users usually feel less inclined to install and try plugins or themes that has fewer installs with no star ratings. This means newer plugins and themes may go unnoticed even if they are good and really useful.

New plugins with no reviews and fewer installs

With your review, you can change that and more users will start using that plugin.

It is also in your own interest to do so. Good reviews help developers find motivation to continue the project and give it their time and skills. Without proper feedback, they may feel demotivated and abandon the plugin/theme.

What if I have a Negative Review?

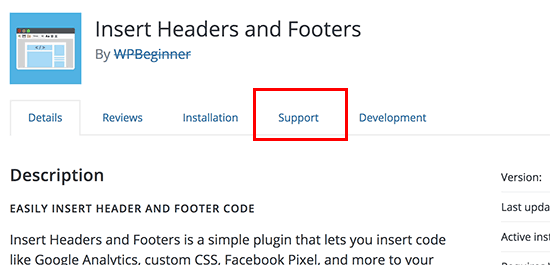
Negative reviews are not bad. However, before adding your negative review, you should try to reach out to the plugin author through support tab.

Plugin support tab

Sometimes plugin authors make mistakes, and your support request can prompt them to help you out or quickly release a fix. Learn more about how to ask for free WordPress support and get it.

In case you are unable to get help for the issues, you are free to share your negative review. However, please be respectful in the way you share your negative feedback about a FREE product.

How to Leave Reviews For Plugin and Themes on WordPress.org

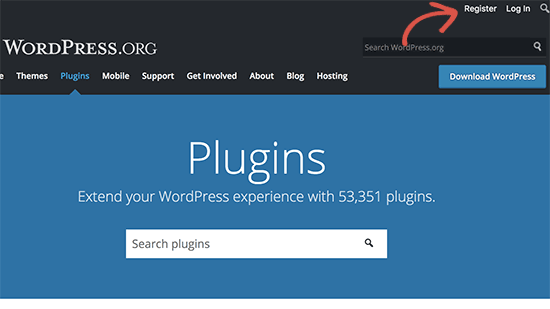
First you’ll need a free WordPress.org account. Go to the WordPress.org’s plugin or theme directory page and click on the ‘Register’ link at the top right corner of the screen.

Register for free WordPress.org account

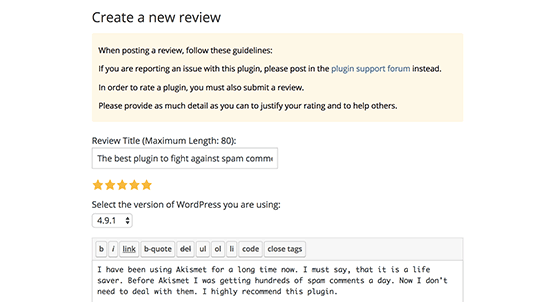
Once you are logged in, you can go to the plugin’s page and click on the ‘Reviews’ tab. You will see other reviews for the plugin. Simply scroll down to the bottom of the page, and you will see ‘Create a new review’ section.

Leaving a review

You need to provide a title for your review and then select the star rating that you’d like to give this plugin. Next, you can write your detailed review.

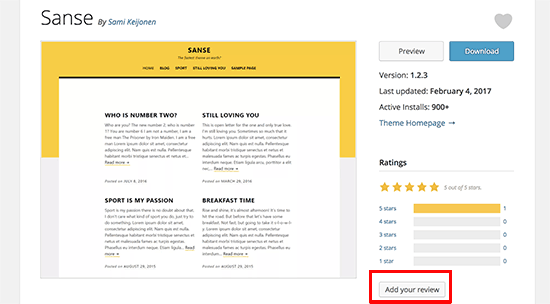
For WordPress themes, you can go to the theme’s page and then click on the ‘Add your review’ button.

Theme review

Tips on Writing Helpful Reviews

If you find a plugin or theme useful, then feel free to describe how it worked. You can describe that it is easy to use and how it helped you improved your website.

Feel free to add any suggestions you have for the improvement. This helps developers figure out the most wanted features their users need, and they can prioritize those improvements.

On the other hand, if you find a bad plugin or theme, then first you will want to make sure that it is an issue with the plugin or theme. That’s why you should first try the support forum to see if there is a solution to it.

If you are unable to get help, then you can go ahead and add your review. Make sure that you are polite and respectful in your review. Describe the problem and the issue with the plugin or theme.

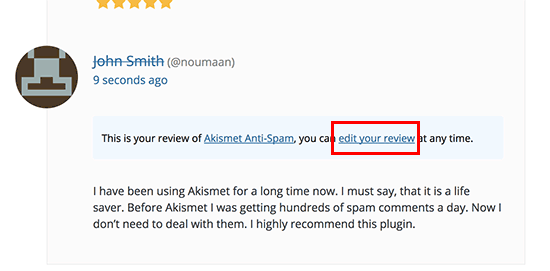
Most of the time plugin and theme author would respond to your negative review and will try to solve the issue you faced. Once the issue is resolved, you can change your rating and review for the plugin.

Edit your review to change your rating

You want to make sure that your review polite. Make it helpful by describing what you found missing from the plugin. Provide more details about the issues and don’t forget to add your suggestions for possible solutions.

Many plugin and theme developers are often very grateful for a polite and well-written negative review. In fact, we have seen some developers go to great lengths to convert a negative review into a 5 star review.

We hope this article helped you learn how and why you should leave reviews on WordPress. You may also want to see other ways you can get involved with the WordPress.org project.

If you liked this article, then please subscribe to our YouTube Channel for WordPress video tutorials. You can also find us on Twitter and Facebook.

The post How and Why You Should Leave Reviews on WordPress appeared first on WPBeginner.
How To Accept Bitcoin On WordPress: WooCommerce, Donations, EDD + More

At the time that I’m sitting down to write this post, one Bitcoin sits at $18,474.10. By the time you read this post, that price might seem either shockingly low or bizarrely high – who knows! But one thing I do know is that Bitcoin fever is sweeping the nation. And that means you might ... Read moreHow To Accept Bitcoin On WordPress: WooCommerce, Donations, EDD + More

The post How To Accept Bitcoin On WordPress: WooCommerce, Donations, EDD + More appeared first on Learn WordPress with WPLift.

How to Use SMTP Server to Send WordPress Emails

Are you having trouble receiving or sending emails from your WordPress site? One solution for that is to use third party email services such as Mailgun. However, these services will cost you extra money. In this article, we will show you how to use a SMTP server to send WordPress emails.

Using SMTP Server to Send WordPress Emails

The Problem with WordPress Emails

WordPress uses mail function in PHP to send emails. Many shared hosting providers do not have this function configured properly, or they have disabled it entirely to avoid abuse. In either case, this causes your WordPress emails to not be delivered.

The alternative solution is to use a third party email service to send out your emails. You can use services like Mailgun, Google Apps for work, or Sendgrid.

You will have to pay for your account, and the cost will vary depending on how many users/accounts you add or the number of emails you send. See our tutorial on how to fix WordPress not sending email issue.

What if we told you that there is another option, and most likely you are already paying for it?

Using Email Accounts by Your Host

Most WordPress hosting providers offer email services for each domain you host with them. This means you can create email accounts with your own domain name like [email protected].

First you will need to create an email account. For the sake of this example, we will show you how to create an email account in cPanel. Your hosting service provider may use some other account management system, but the basic process is the same on most hosting services.

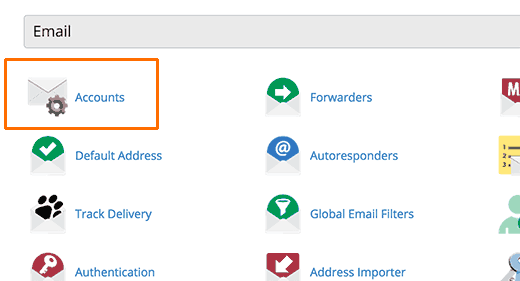
Log into your hosting account, and click on email accounts under the mail section.

Email accounts

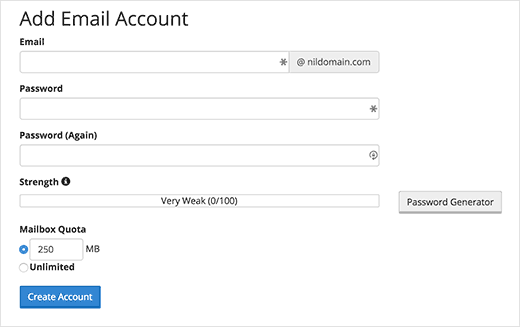
This will show you a simple form where you need to fill out information required to create your email account.

Since we will be using this account to send WordPress emails, we recommend that you create an email account like [email protected]. Make sure to replace example.com with your own domain name.

Creating email account in cPanel

After creating your email account, you are now ready to use it in WordPress. But before you do that, you will need the following information from your hosting service provider.

  1. SMTP Host for your email address.
  2. SMTP Port for secure login.

You can check the support section on your host’s website for this information. Most likely there will be an article providing this information. If you don’t find it, then you should contact the hosting support to request this information.

Using Your Branded Email Address in WordPress

You will now need to install and activate the WP Mail SMTP plugin. For more details, see our step by step guide on how to install a WordPress plugin.

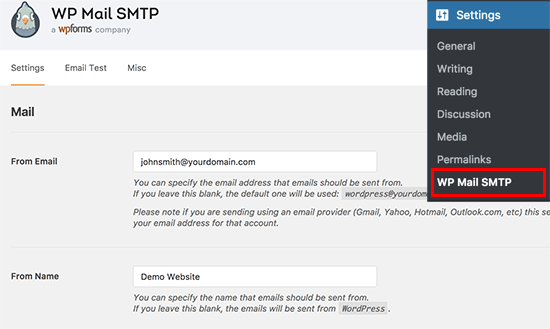
Upon activation, you need to visit Settings » Email to configure the plugin settings.

WP-Mail-SMTP Settings

First you need to enter the email address you just created. After that you can add a from name, this will be used as the sender name.

If you do not add a from name, then the plugin will use the default WordPress.

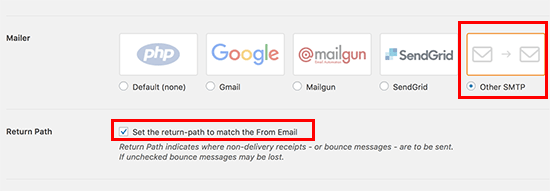
Next, you need to choose the mailer. Go ahead and click on the ‘Other SMTP’ option to select it.

Choose Mailer

After that, you need to check the box next to ‘Return Path’ option. This option sets the return path to match the sender email address. If you leave it unchecked, bounced messages and non-delivery receipts will be lost.

Next, you need to set up SMTP options.

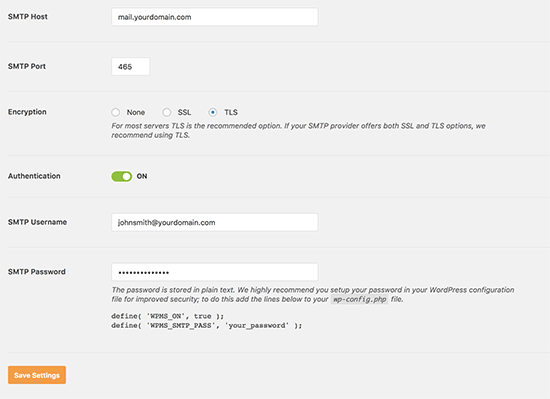
SMTP settings

First you need to enter your SMTP host and port. You can obtain this information from your hosting provider. Typically, SMTP host is mail.yourdomain.com (replace yourdomain.com with your own domain name). For SMTP Port 465 is commonly used.

Next, you need to choose encryption. Most WordPress hosting companies support SSL and TLS. We recommend using TLS option when available.

After that turn on the authentication toggle and provide your SMTP username and password. Normally, your email address is also your SMTP username.

Your password is stored as plain text, which is not safe. Don’t worry, we will show you how to make more secure later in this article.

Don’t forget to click on the save settings button to store your changes.

Testing Your SMTP Settings

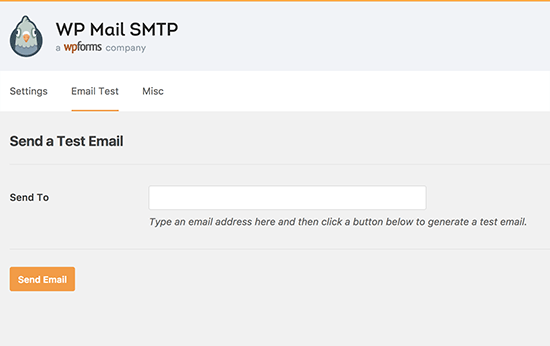
Now that you have set up WP Mail SMTP to send emails, let’s test if everything is working fine. On the plugin’s settings page, click on the ‘Email Test’ tab.

Send test email

You need to provide an email address where you would like to receive test email. This could be any valid email address that you can access. After that click on the Send Email button to continue.

WP Mail SMTP will now send an email message using the SMTP settings you entered earlier. You will see a success message when email is sent successfully.

Securing Your Email Password

You may need to enter your email account password in WP MAIL SMTP settings. This password is normally stored as plain text which is unsafe.

However, the plugin also provides you an option to make it more secure. To do that, you will need to add some code to your wp-config.php file. If you haven’t done this before, then please see our guide on how to edit wp-config.php file in WordPress.

First you will need to connect to your website using a FTP client or File Manager app in cPanel. Once connected, you will find your wp-config.php file in the root folder of your website.

You can edit this file using any plain text editor like Notepad or TextEdit.

Locate the line that says ‘That’s all, stop editing! Happy blogging’ and add the following code just before it.

define( 'WPMS_ON', true );
define( 'WPMS_SMTP_PASS', 'your_password' );

Don’t forget to replace ‘your_password’ with your actual SMTP password. After that, save and upload your wp-config.php file back to server.

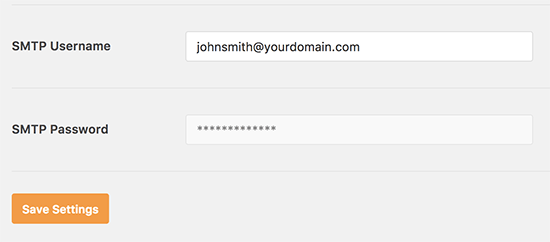
You can now visit your WordPress admin area and go to Settings » WP Mail SMTP page. Scroll down to the SMTP options section and you will see password field is now disabled.

SMTP password disabled

Troubleshooting WordPress Email Issues

The most common reason for errors in sending emails using SMTP is incorrect SMTP host or port. Make sure that you are entering the correct host and port settings provided by your hosting provider.

Make sure that you select the correct encryption method. Usually SSL works on most environments, but we recommend that you check with your web host if your emails are not getting delivered.

Pros and Cons of Using Your Web Host’s Mail Servers for WordPress Emails

First and the most obvious advantage is that you can use your own branded email address for outgoing emails in WordPress.

Another advantage is that you have already paid for this service when signing up for your hosting account. You will not need to pay any extra money for sending and recieving emails.

However, some WordPress hosting providers enforce limitations on outgoing emails. This is why we don’t recommend using WordPress to send newsletter emails.

Another common problem with shared hosting providers is that their mail servers can be quite unreliable at times. If you notice delays in email delivery, then you should consider using third party email services like Google Apps for Work, Mailgun, or SendGrid.

We hope this article helped you learn how to use SMTP server to send WordPress emails. You may also want to see our list of the must have WordPress plugins for businesses.

If you liked this article, then please subscribe to our YouTube Channel for WordPress video tutorials. You can also find us on Twitter and Facebook.

The post How to Use SMTP Server to Send WordPress Emails appeared first on WPBeginner.

How to Add User Role Label Next to Comments in WordPress

One of our readers asked if it was possible to highlight user role next to each comment in WordPress? Displaying user role label gives weight to comments made by registered users on your website specifically authors, editors, and admins. In this article, we will show you how to easily add user role label next to comments in WordPress.

Add user role next to comments in WordPress

Why Show User Role Label Next to Comment Author Name in WordPress?

If you allow user registration on your website or run a multi-author WordPress website, then user labels can introduce users to each other based on their user roles.

For example, users with the editor user role will show a badge next to their name in comments letting other users know that this comment was made by an editor.

It builds up user trust and increases user engagement in comments on your website.

Many WordPress themes only highlight comments made by post author. They don’t show labels for any other user roles even if other comments are made by registered users or site administrators.

That being said, let’s take a look at how to easily add user role label next to comments in WordPress.

Adding User Role Label Next to Comment Author Name in WordPress

This tutorial requires you to add code to your WordPress theme files. If you haven’t done this before, then please take a look at our guide on how to easily copy and paste code in WordPress.

First thing you need to do is add the following code to your theme’s functions.php file or a site-specific plugin.


if ( ! class_exists( 'WPB_Comment_Author_Role_Label' ) ) :
class WPB_Comment_Author_Role_Label {
public function __construct() {
add_filter( 'get_comment_author', array( $this, 'wpb_get_comment_author_role' ), 10, 3 );
add_filter( 'get_comment_author_link', array( $this, 'wpb_comment_author_role' ) );
}

// Get comment author role 
function wpb_get_comment_author_role($author, $comment_id, $comment) { 
$authoremail = get_comment_author_email( $comment); 
// Check if user is registered
if (email_exists($authoremail)) {
$commet_user_role = get_user_by( 'email', $authoremail );
$comment_user_role = $commet_user_role->roles[0];
// HTML output to add next to comment author name
$this->comment_user_role = ' <span class="comment-author-label comment-author-label-'.$comment_user_role.'">' . ucfirst($comment_user_role) . '</span>';
} else { 
$this->comment_user_role = '';
} 
return $author;
} 

// Display comment author                	
function wpb_comment_author_role($author) { 
return $author .= $this->comment_user_role; 
} 
}
new WPB_Comment_Author_Role_Label;
endif;

This function code above hooks into WordPress filters used to display comment author name to include user role label.

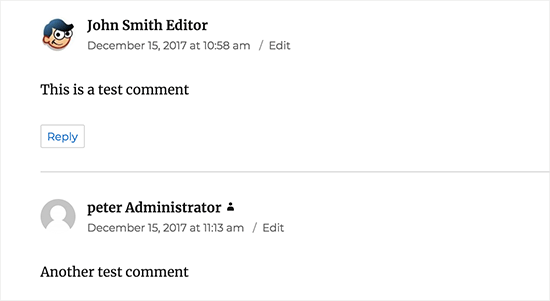
You can now visit any post with comments to see it in action. Comments made by registered users will display their user role next to the comment author name. Any comment made by non-registered users will only display comment author name.

User role label shown next to their comment

Now that we have added the user role, it’s time to style it and make it look clean.

In our code, we have added a CSS class for each user role, so we can use these CSS classes to customize each user badge differently (i.e use different colors, etc)

You can use the following sample CSS as an starting point:

.comment-author-label {
    padding: 5px;
    font-size: 14px;
    border-radius: 3px;
}

.comment-author-label-editor {	
background-color:#efefef;
}
.comment-author-label-author {
background-color:#faeeee;
}

.comment-author-label-contributor {
background-color:#f0faee;	
}
.comment-author-label-subscriber {
background-color:#eef5fa;	
}

.comment-author-label-administrator { 
background-color:#fde9ff;
}

Feel free to adjust the CSS to your liking. This is how it looked on our demo website:

User role badges displayed with their comments

We hope this article helped you learn how to add user role label next to comments in WordPress. You may also want to see our guide on how to lazy load gravatars in WordPress comments.

If you liked this article, then please subscribe to our YouTube Channel for WordPress video tutorials. You can also find us on Twitter and Facebook.

The post How to Add User Role Label Next to Comments in WordPress appeared first on WPBeginner.
How to Set Up WordPress Error Logs in WP-Config

Do you want to set up WordPress error logs in wp-config file? The wp-config file in WordPress not only controls your WordPress site settings, it is also a very a useful debugging tool to help you find and fix errors. In this article, we will show you how to set up WordPress error logs in the wp-config file.

Setting up WordPress error logs

Why and When You Need to Set up WordPress Error Logs in WP-Config

The wp-config.php file is a WordPress configuration file that contains important WordPress settings. These settings tell your website how to connect to your WordPress database, which database table prefix to use, and generates authentication keys to make your WordPress site more secure.

To learn more about wp-config file, please see our article on how to edit wp-config file in WordPress.

Apart from default WordPress settings, wp-config file can also be used to define several other parameters. It can also enable WordPress debugging mode and save WordPress error logs.

This helps you find WordPress errors by identifying the plugins or scripts that are causing them. You can then go ahead and find a fix for those WordPress errors.

That being said, let’s take a look at how to enable and setup WordPress error logs in wp-config file.

Setting up WordPress Error Logs in WP-Config File

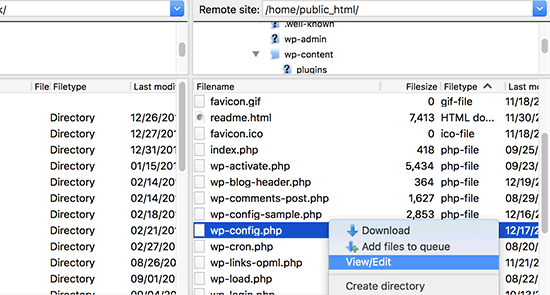
First, you will need to edit your wp-config.php file. You can access it by connecting to your website using an FTP client or File Manager app in cPanel.

Edit wp-config file

You will find wp-config.php file in the root directory of your website. Open the file in any text editor and look for the line that says ‘That’s all, stop editing! Happy blogging.’

Just before this line you need to add the following code:

define( 'WP_DEBUG', true );

It is possible that this code is already in your wp-config.php file and is set to false. In that case, you just need to change it to true.

This line alone will turn on WordPress debug mode. However the downside of using this debugging alone is that you will see WordPress errors and warnings inside your admin area as well as front page of your website.

If you want errors to be logged, then you will also need to add the following code in your wp-config.php file just below the WP_DEBUG line.

define( 'WP_DEBUG_LOG', true );

Don’t forget to save your changes and upload your wp-config.php file back to your website.

Reviewing Your WordPress Error Logs

First you need to visit your WordPress site and access the pages that were resulting in errors or warnings. After that, you will need to connect to your website using a FTP client or file manager app in your WordPress hosting cPanel.

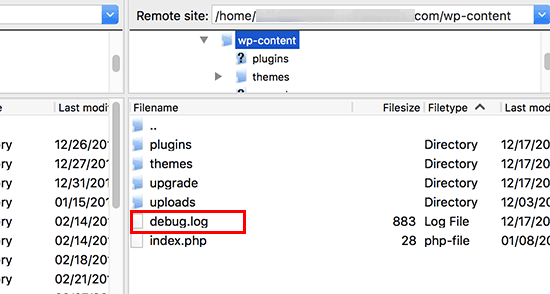
Once connected, go to /wp-content/ folder and inside it your will find a file called debug.log.

Debug log

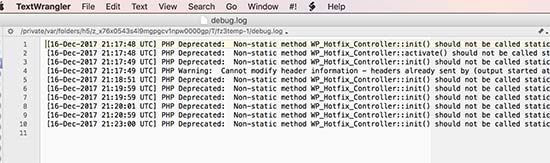
You can download, view, or edit this file. It will contain all WordPress errors, warnings, and notices that were logged.

WordPress errors logged

That’s all we hope this article helped you learn how to set up WordPress error logs in WP-Config file. You may also want to see our ultimate list of most wanted WordPress tips, tricks, and hacks for beginners.

If you liked this article, then please subscribe to our YouTube Channel for WordPress video tutorials. You can also find us on Twitter and Facebook.

The post How to Set Up WordPress Error Logs in WP-Config appeared first on WPBeginner.
Onepage Studio: A Multipurpose, Conversion-Oriented, Landing Page Template

Your website’s conversions rate is a direct indication of whether your marketing efforts are making a difference or not. In fact, the more conversions you secure, the more sales you are likely to have. It’s even safe to say that your website’s overall conversion rates are more important than driving traffic to your website. Why, ... Read moreOnepage Studio: A Multipurpose, Conversion-Oriented, Landing Page Template

The post Onepage Studio: A Multipurpose, Conversion-Oriented, Landing Page Template appeared first on Learn WordPress with WPLift.

The Best Free WordPress Themes November 2017

Sorry – we’re a bit later than usual. But better late than never. The year is almost at an end. At this time, different reviews and round-ups emerge, detailing the best of the best. No matter what it’s about, such reviews are very useful. In this article, we’ll go through some of the best WordPress ... Read moreThe Best Free WordPress Themes November 2017

The post The Best Free WordPress Themes November 2017 appeared first on Learn WordPress with WPLift.

Weekly WordPress News: People Seem To Like Gutenberg

This week was a bit light on WordPress news – perhaps people are too busy gearing up for the holidays! There’s plenty more Gutenberg talk. And there are also a bunch of developer-focused tutorials. But other than that – a pretty quiet week so far! Let’s get to the news that there is… WORDPRESS NEWS ... Read moreWeekly WordPress News: People Seem To Like Gutenberg

The post Weekly WordPress News: People Seem To Like Gutenberg appeared first on Learn WordPress with WPLift.