Category Archives: Tutorials

How to Choose the Best WooCommerce Hosting Company?

Are you looking for the best WooCommerce hosting to create your online store? Choosing the best hosting provider is one of the most important decision you’ll make for your eCommerce business.

A typical shared hosting provider may not always be a good choice for WooCommerce. That’s because you will need more resources, SSL certificate, and WooCommerce-centric support platform. In this guide, we will help you choose the best WooCommerce hosting for your online store.

At WPBeginner, we have helped more than 100,000+ users start their websites. As the largest unofficial WordPress resource site and years of experience with hosting services, we know the importance of choosing the best WooCommerce hosting for an eCommerce startup. Our goal is to offer insights on things you need to consider when choosing a WooCommerce hosting company.

To make the process easier, we have created the ultimate guide on how to choose the best WooCommerce hosting company.

The post How to Choose the Best WooCommerce Hosting Company? appeared first on WPBeginner.

How to Manage WordPress Comment Notification Emails

Do you want to improve your WordPress comment notification emails? Comments drive discussion and user engagement on many blogs. However, WordPress doesn’t do such a great job when it comes to notifying users about comment activity. In this article, we will show you how to better manage WordPress comment notification emails and boost user activity on your website.

How to manage WordPress comment notifications

Why Improve WordPress Comment Notification Emails

Comments are an important activity on many WordPress websites, particularly news sites and blogs. More comments mean a more engaged audience which results in more page views and ultimately more revenue.

However, default WordPress comment system is fairly limited. It sends comment notifications only to site administrators and article authors. Apart from that, there isn’t a default option for other users to be notified of new comments.

Wouldn’t it be nice if users were able to get comment notifications for the posts they like? or when someone replies to their comment?

In this article, we will show you how you can extend the default WordPress comment notification emails for a more engaged user experience on your website.

The Default Comment Notification Options in WordPress

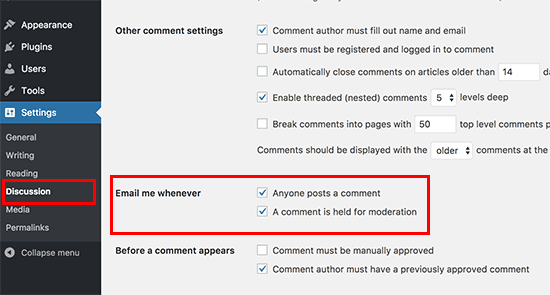
By default, WordPress does not have an option to send notifications to commenters. However, it does have an option to send email notifications to you when a new comment is published and when a comment is held for moderation.

Default WordPress comment email notifications

Both these notifications are sent to the site administrators. WordPress also sends an email notification to post author about new comments.

If you don’t want to receive notifications for comments held for moderation, then you can simply uncheck the box here. This is particularly helpful if you get a lot of comments on your website.

Let Users Know When Their Comment is Approved

Users have no idea whether you approved their comment or not. They do see that their comment is awaiting moderation when they leave a comment. Many of these users never return to your website, and they don’t even know that you approved their comment or replied to it.

You can fix this by installing and activating Comment Approved plugin. For more details, see our step by step guide on how to install a WordPress plugin.

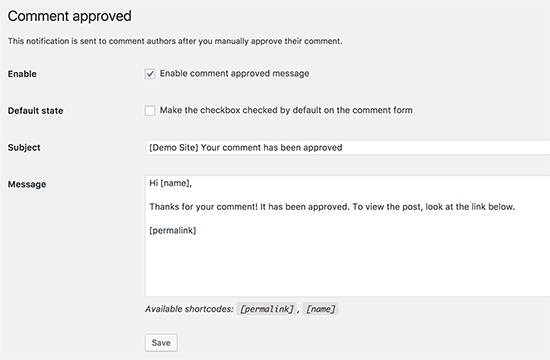
Comment Approved allow users to be notified when their comment is approved. Users can check the option when leaving a comment. You can also customize the email message sent to users after their comment is approved.

Comment Approved settings

For detailed instructions, see our article on how to notify users when their comment is approved in WordPress.

Allow Users to Subscribe to Comments in WordPress

Your commenters have no way of knowing whether you or others replied to their comment. Once they leave a comment, they will have to manually visit your website again to see if someone replied.

To solve this, you need to install and activate Subscribe to Comments Reloaded plugin. For more details, see our step by step guide on how to install a WordPress plugin.

It allows your users to subscribe to comments on any article with or without leaving comments. It also makes it easier for users to unsubscribe at any time.

Subscribe to Comments Reloaded settings

For detailed step by step instructions, see our article on how to allow users to subscribe to comments in WordPress.

Allow Users to Subscribe to Only their own Comments in WordPress

Many users may not want to receive notifications for all comments on an article. However, they may want to know if someone replied only to their own comments.

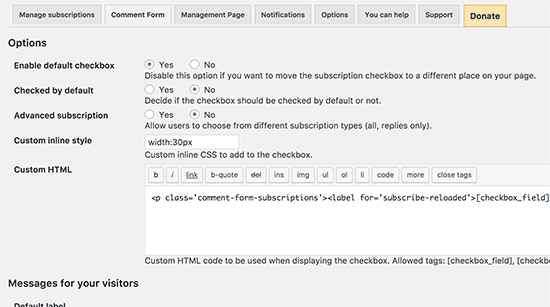
You can add this feature as well using the same Subscribe to Comments Reloaded plugin. Simply visit the plugin’s settings page and click on yes next to ‘Advanced Subscription’ option.

Subscribe to Comments Reloaded settings

For more details, see our article on how to notify users on replies to their own comments in WordPress.

Allow Authors to Subscribe To Other Author’s Posts

If you run a multi-author blog, then other authors may want to keep up with discussions across your website. If you already have comment subscriptions enabled, then each author can manually go and subscribe to comments.

However, if you wanted certain users to recieve all comment notifications, then you can do this with cbnet Multi Author Comment Notification plugin. For more details, see our step by step guide on how to install a WordPress plugin.

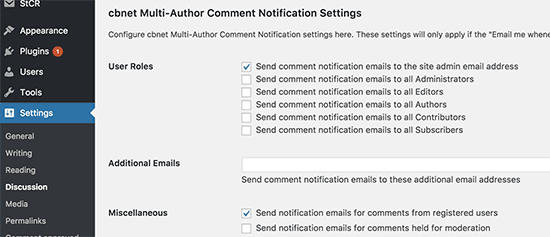
After installing and activating the plugin, you need to visit Settings » Discussion page to configure plugin settings.

Multi author comment notification settings

It allows you to select the user roles that you want to be notified of new comments. You can also add email addresses of individual users you want to notify.

This is particularly useful if you have registered users who are responsible for comment engagement and moderation.

Creating Custom Comment Notification in WordPress

Want to create your own custom comment notifications in WordPress? Custom notifications can allow you to change the notification sent by WordPress and replace them with your own.

First you will need to install and activate the Better Notifications for WordPress plugin. For more details, see our step by step guide on how to install a WordPress plugin.

Upon activation, you need to visit Notifications » Add New page to create your custom comment notifications.

Add new custom notification

You can modify the new comment, comment awaiting moderation, and comment reply notifications. You can send notifications to any user role, individual users, or add email addresses manually.

It also allows you to completely customize the email sent by WordPress. You can use shortcodes inside the email text to add custom tags.

For more details see our article on how to add better custom notifications in WordPress.

Improve Deliverability of WordPress Email Notifications

All above tips will fail if your WordPress site fails to send email notifications, or if those emails are marked spam by email providers.

To fix WordPress email issues and improve email deliverability, you need to install and activate WP Mail SMTP plugin. For more details, see our step by step guide on how to install a WordPress plugin.

Upon activation, visit Settings » WP Mail SMTP page to configure plugin settings.

WP Mail SMTP settings

This plugin allows you to use SMTP (Simple Mail Transfer Protocol) to send emails. SMTP is a much better and reliable method than the default mail function used by WordPress.

It works with any email service that supports SMTP. This includes your free Gmail account as well as Gsuite or Google Apps for Work, Mailgun, and Sendgrid.

For details see our article on how to use SMTP server to send WordPress emails.

We hope this article helped you learn how to efficiently manage WordPress comment notifications for more user engagement and pageviews. You may also want to see our ultimate step by step guide on improving WordPress speed and performance for beginners.

If you liked this article, then please subscribe to our YouTube Channel for WordPress video tutorials. You can also find us on Twitter and Facebook.

The post How to Manage WordPress Comment Notification Emails appeared first on WPBeginner.

How to Use SMTP Server to Send WordPress Emails

Are you having trouble receiving or sending emails from your WordPress site? One solution for that is to use third party email services such as Mailgun. However, these services will cost you extra money. In this article, we will show you how to use a SMTP server to send WordPress emails.

Using SMTP Server to Send WordPress Emails

The Problem with WordPress Emails

WordPress uses mail function in PHP to send emails. Many shared hosting providers do not have this function configured properly, or they have disabled it entirely to avoid abuse. In either case, this causes your WordPress emails to not be delivered.

The alternative solution is to use a third party email service to send out your emails. You can use services like Mailgun, Google Apps for work, or Sendgrid.

You will have to pay for your account, and the cost will vary depending on how many users/accounts you add or the number of emails you send. See our tutorial on how to fix WordPress not sending email issue.

What if we told you that there is another option, and most likely you are already paying for it?

Using Email Accounts by Your Host

Most WordPress hosting providers offer email services for each domain you host with them. This means you can create email accounts with your own domain name like [email protected].

First you will need to create an email account. For the sake of this example, we will show you how to create an email account in cPanel. Your hosting service provider may use some other account management system, but the basic process is the same on most hosting services.

Log into your hosting account, and click on email accounts under the mail section.
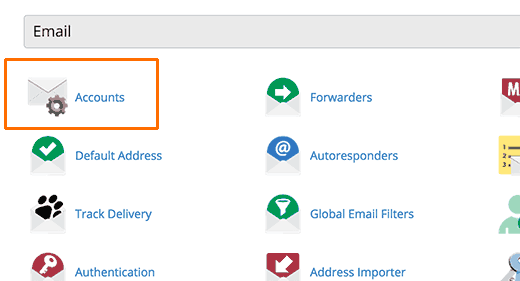
Email accounts

This will show you a simple form where you need to fill out information required to create your email account.

Since we will be using this account to send WordPress emails, we recommend that you create an email account like [email protected]. Make sure to replace example.com with your own domain name.
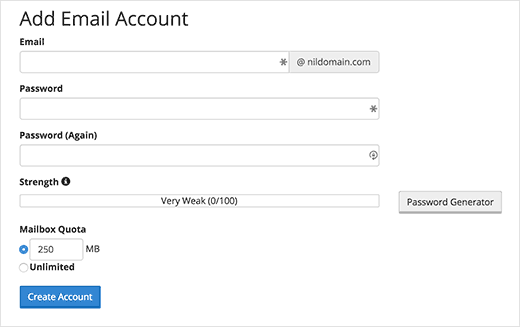
Creating email account in cPanel

After creating your email account, you are now ready to use it in WordPress. But before you do that, you will need the following information from your hosting service provider.

  1. SMTP Host for your email address.
  2. SMTP Port for secure login.

You can check the support section on your host’s website for this information. Most likely there will be an article providing this information. If you don’t find it, then you should contact the hosting support to request this information.

Using Your Branded Email Address in WordPress

You will now need to install and activate the WP Mail SMTP plugin. For more details, see our step by step guide on how to install a WordPress plugin.

Upon activation, you need to visit Settings » Email to configure the plugin settings.
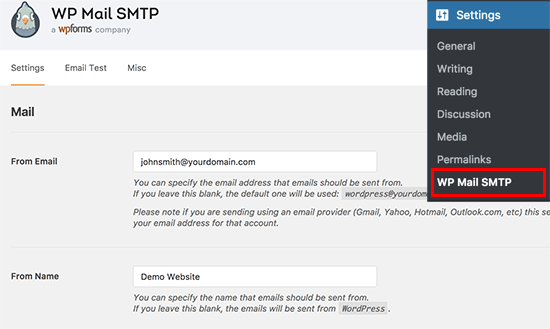
WP-Mail-SMTP Settings

First you need to enter the email address you just created. After that you can add a from name, this will be used as the sender name.

If you do not add a from name, then the plugin will use the default WordPress.

Next, you need to choose the mailer. Go ahead and click on the ‘Other SMTP’ option to select it.
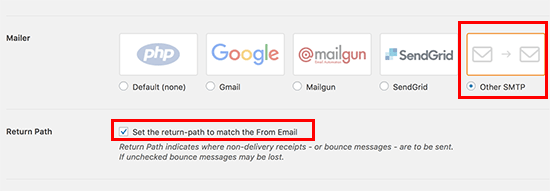
Choose Mailer

After that, you need to check the box next to ‘Return Path’ option. This option sets the return path to match the sender email address. If you leave it unchecked, bounced messages and non-delivery receipts will be lost.

Next, you need to set up SMTP options.
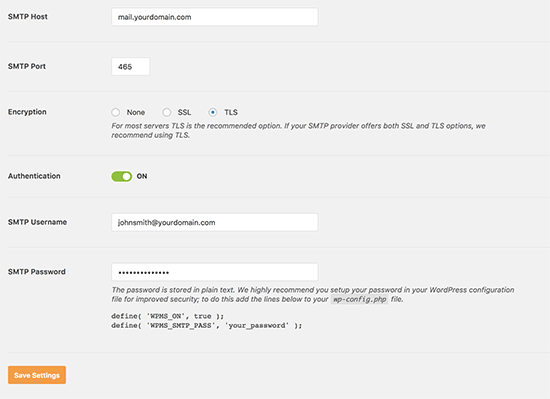
SMTP settings

First you need to enter your SMTP host and port. You can obtain this information from your hosting provider. Typically, SMTP host is mail.yourdomain.com (replace yourdomain.com with your own domain name). For SMTP Port 465 is commonly used.

Next, you need to choose encryption. Most WordPress hosting companies support SSL and TLS. We recommend using TLS option when available.

After that turn on the authentication toggle and provide your SMTP username and password. Normally, your email address is also your SMTP username.

Your password is stored as plain text, which is not safe. Don’t worry, we will show you how to make more secure later in this article.

Don’t forget to click on the save settings button to store your changes.

Testing Your SMTP Settings

Now that you have set up WP Mail SMTP to send emails, let’s test if everything is working fine. On the plugin’s settings page, click on the ‘Email Test’ tab.
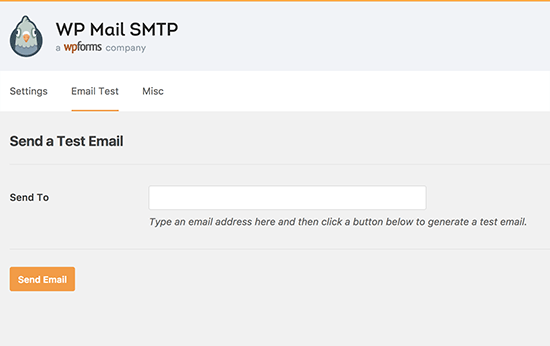
Send test email

You need to provide an email address where you would like to receive test email. This could be any valid email address that you can access. After that click on the Send Email button to continue.

WP Mail SMTP will now send an email message using the SMTP settings you entered earlier. You will see a success message when email is sent successfully.

Securing Your Email Password

You may need to enter your email account password in WP MAIL SMTP settings. This password is normally stored as plain text which is unsafe.

However, the plugin also provides you an option to make it more secure. To do that, you will need to add some code to your wp-config.php file. If you haven’t done this before, then please see our guide on how to edit wp-config.php file in WordPress.

First you will need to connect to your website using a FTP client or File Manager app in cPanel. Once connected, you will find your wp-config.php file in the root folder of your website.

You can edit this file using any plain text editor like Notepad or TextEdit.

Locate the line that says ‘That’s all, stop editing! Happy blogging’ and add the following code just before it.

define( 'WPMS_ON', true );
define( 'WPMS_SMTP_PASS', 'your_password' );

Don’t forget to replace ‘your_password’ with your actual SMTP password. After that, save and upload your wp-config.php file back to server.

You can now visit your WordPress admin area and go to Settings » WP Mail SMTP page. Scroll down to the SMTP options section and you will see password field is now disabled.
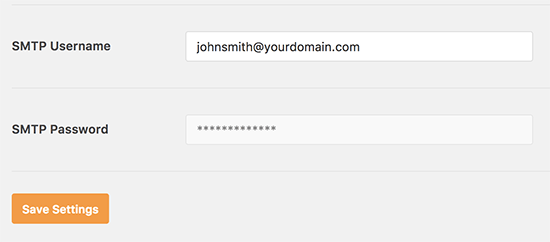
SMTP password disabled

Troubleshooting WordPress Email Issues

The most common reason for errors in sending emails using SMTP is incorrect SMTP host or port. Make sure that you are entering the correct host and port settings provided by your hosting provider.

Make sure that you select the correct encryption method. Usually SSL works on most environments, but we recommend that you check with your web host if your emails are not getting delivered.

Pros and Cons of Using Your Web Host’s Mail Servers for WordPress Emails

First and the most obvious advantage is that you can use your own branded email address for outgoing emails in WordPress.

Another advantage is that you have already paid for this service when signing up for your hosting account. You will not need to pay any extra money for sending and recieving emails.

However, some WordPress hosting providers enforce limitations on outgoing emails. This is why we don’t recommend using WordPress to send newsletter emails.

Another common problem with shared hosting providers is that their mail servers can be quite unreliable at times. If you notice delays in email delivery, then you should consider using third party email services like Google Apps for Work, Mailgun, or SendGrid.

We hope this article helped you learn how to use SMTP server to send WordPress emails. You may also want to see our list of the must have WordPress plugins for businesses.

If you liked this article, then please subscribe to our YouTube Channel for WordPress video tutorials. You can also find us on Twitter and Facebook.

The post How to Use SMTP Server to Send WordPress Emails appeared first on WPBeginner.

How to Add User Role Label Next to Comments in WordPress

One of our readers asked if it was possible to highlight user role next to each comment in WordPress? Displaying user role label gives weight to comments made by registered users on your website specifically authors, editors, and admins. In this article, we will show you how to easily add user role label next to comments in WordPress.

Add user role next to comments in WordPress

Why Show User Role Label Next to Comment Author Name in WordPress?

If you allow user registration on your website or run a multi-author WordPress website, then user labels can introduce users to each other based on their user roles.

For example, users with the editor user role will show a badge next to their name in comments letting other users know that this comment was made by an editor.

It builds up user trust and increases user engagement in comments on your website.

Many WordPress themes only highlight comments made by post author. They don’t show labels for any other user roles even if other comments are made by registered users or site administrators.

That being said, let’s take a look at how to easily add user role label next to comments in WordPress.

Adding User Role Label Next to Comment Author Name in WordPress

This tutorial requires you to add code to your WordPress theme files. If you haven’t done this before, then please take a look at our guide on how to easily copy and paste code in WordPress.

First thing you need to do is add the following code to your theme’s functions.php file or a site-specific plugin.


if ( ! class_exists( 'WPB_Comment_Author_Role_Label' ) ) :
class WPB_Comment_Author_Role_Label {
public function __construct() {
add_filter( 'get_comment_author', array( $this, 'wpb_get_comment_author_role' ), 10, 3 );
add_filter( 'get_comment_author_link', array( $this, 'wpb_comment_author_role' ) );
}

// Get comment author role 
function wpb_get_comment_author_role($author, $comment_id, $comment) { 
$authoremail = get_comment_author_email( $comment); 
// Check if user is registered
if (email_exists($authoremail)) {
$commet_user_role = get_user_by( 'email', $authoremail );
$comment_user_role = $commet_user_role->roles[0];
// HTML output to add next to comment author name
$this->comment_user_role = ' <span class="comment-author-label comment-author-label-'.$comment_user_role.'">' . ucfirst($comment_user_role) . '</span>';
} else { 
$this->comment_user_role = '';
} 
return $author;
} 

// Display comment author                	
function wpb_comment_author_role($author) { 
return $author .= $this->comment_user_role; 
} 
}
new WPB_Comment_Author_Role_Label;
endif;

This function code above hooks into WordPress filters used to display comment author name to include user role label.

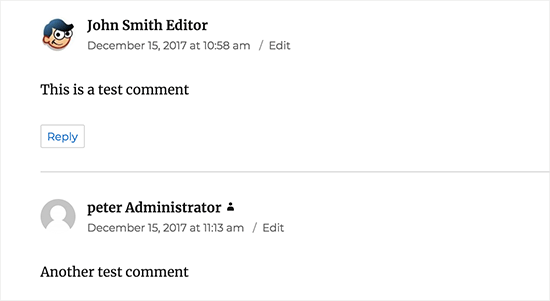
You can now visit any post with comments to see it in action. Comments made by registered users will display their user role next to the comment author name. Any comment made by non-registered users will only display comment author name.

User role label shown next to their comment

Now that we have added the user role, it’s time to style it and make it look clean.

In our code, we have added a CSS class for each user role, so we can use these CSS classes to customize each user badge differently (i.e use different colors, etc)

You can use the following sample CSS as an starting point:

.comment-author-label {
    padding: 5px;
    font-size: 14px;
    border-radius: 3px;
}

.comment-author-label-editor {	
background-color:#efefef;
}
.comment-author-label-author {
background-color:#faeeee;
}

.comment-author-label-contributor {
background-color:#f0faee;	
}
.comment-author-label-subscriber {
background-color:#eef5fa;	
}

.comment-author-label-administrator { 
background-color:#fde9ff;
}

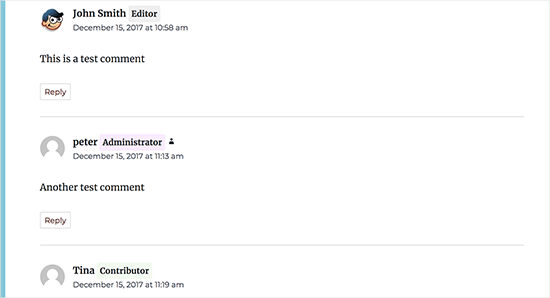
Feel free to adjust the CSS to your liking. This is how it looked on our demo website:

User role badges displayed with their comments

We hope this article helped you learn how to add user role label next to comments in WordPress. You may also want to see our guide on how to lazy load gravatars in WordPress comments.

If you liked this article, then please subscribe to our YouTube Channel for WordPress video tutorials. You can also find us on Twitter and Facebook.

The post How to Add User Role Label Next to Comments in WordPress appeared first on WPBeginner.
How to Set Up WordPress Error Logs in WP-Config

Do you want to set up WordPress error logs in wp-config file? The wp-config file in WordPress not only controls your WordPress site settings, it is also a very a useful debugging tool to help you find and fix errors. In this article, we will show you how to set up WordPress error logs in the wp-config file.

Setting up WordPress error logs

Why and When You Need to Set up WordPress Error Logs in WP-Config

The wp-config.php file is a WordPress configuration file that contains important WordPress settings. These settings tell your website how to connect to your WordPress database, which database table prefix to use, and generates authentication keys to make your WordPress site more secure.

To learn more about wp-config file, please see our article on how to edit wp-config file in WordPress.

Apart from default WordPress settings, wp-config file can also be used to define several other parameters. It can also enable WordPress debugging mode and save WordPress error logs.

This helps you find WordPress errors by identifying the plugins or scripts that are causing them. You can then go ahead and find a fix for those WordPress errors.

That being said, let’s take a look at how to enable and setup WordPress error logs in wp-config file.

Setting up WordPress Error Logs in WP-Config File

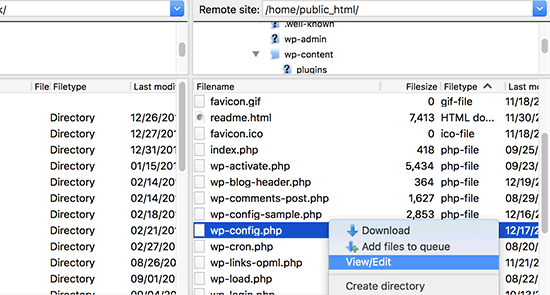
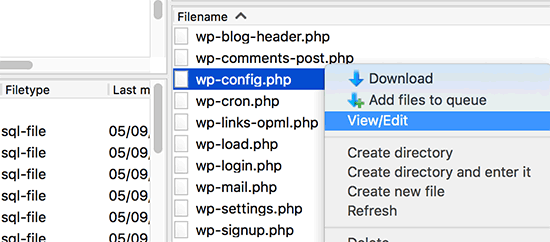
First, you will need to edit your wp-config.php file. You can access it by connecting to your website using an FTP client or File Manager app in cPanel.

Edit wp-config file

You will find wp-config.php file in the root directory of your website. Open the file in any text editor and look for the line that says ‘That’s all, stop editing! Happy blogging.’

Just before this line you need to add the following code:

define( 'WP_DEBUG', true );

It is possible that this code is already in your wp-config.php file and is set to false. In that case, you just need to change it to true.

This line alone will turn on WordPress debug mode. However the downside of using this debugging alone is that you will see WordPress errors and warnings inside your admin area as well as front page of your website.

If you want errors to be logged, then you will also need to add the following code in your wp-config.php file just below the WP_DEBUG line.

define( 'WP_DEBUG_LOG', true );

Don’t forget to save your changes and upload your wp-config.php file back to your website.

Reviewing Your WordPress Error Logs

First you need to visit your WordPress site and access the pages that were resulting in errors or warnings. After that, you will need to connect to your website using a FTP client or file manager app in your WordPress hosting cPanel.

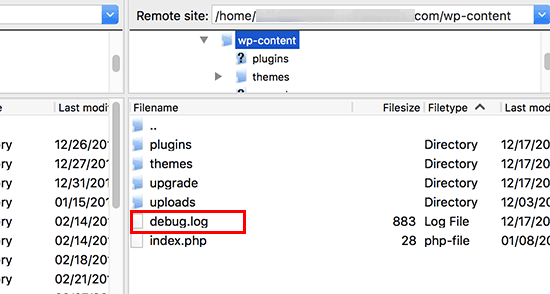
Once connected, go to /wp-content/ folder and inside it your will find a file called debug.log.

Debug log

You can download, view, or edit this file. It will contain all WordPress errors, warnings, and notices that were logged.

WordPress errors logged

That’s all we hope this article helped you learn how to set up WordPress error logs in WP-Config file. You may also want to see our ultimate list of most wanted WordPress tips, tricks, and hacks for beginners.

If you liked this article, then please subscribe to our YouTube Channel for WordPress video tutorials. You can also find us on Twitter and Facebook.

The post How to Set Up WordPress Error Logs in WP-Config appeared first on WPBeginner.
How to Turn Off PHP Errors in WordPress

Recently one of our readers asked how to turn off PHP errors in WordPress? PHP warnings and notices help developers debug issues with their code. However it looks extremely unprofessional when they are visible to all your website visitors. In this article, we will show you how to easily turn off PHP errors in WordPress.

How to turn off PHP errors in WordPress

Why and When You Should Turn Off PHP Errors in WordPress?

PHP errors that you can see on your WordPress site are usually warnings and notices. These are not like internal server error, syntax errors, or fatal errors, which stop your website from loading.

Notices and warnings are the kind of errors that do not stop WordPress from loading your website. See how WordPress actually works behind the scenes for more details.

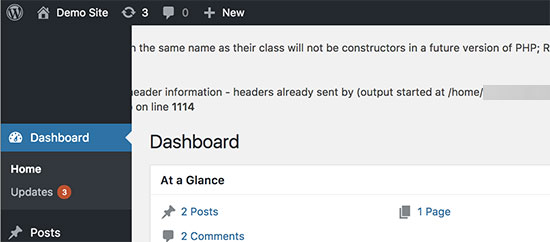
PHP errors in WordPress admin area

The purpose of these errors are to help developers debug issues with their code. Plugin and theme developers need this information to check for compatibility and best practices.

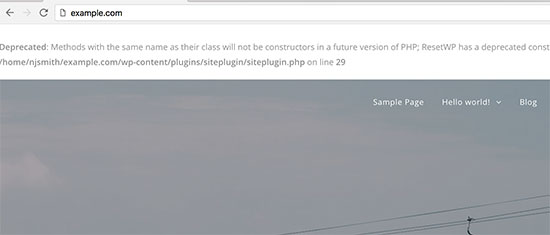
However, if you are not developing a theme, plugin, or a custom website, then these errors should be hidden. Because if they appear on the front-end of your website to all your visitors, it looks extremely unprofessional.

WordPress warning errors on homepage

If you see an error like above on on your site, then you may want to inform the respective theme or plugin developer. They may release a fix that would make the error go away. Meanwhile, you can also turn these errors off.

Let’s take a look at how to easily turn off PHP errors, notices, and warnings in WordPress.

Turning off PHP Errors in WordPress

For this part, you will need to edit the wp-config.php file.

Inside your wp-config.php file, look for the following line:

define('WP_DEBUG', true);

It is also possible, that this line is already set to false. In that case, you’ll see the following code:

define('WP_DEBUG', false);

In either case, you need to replace this line with the following code:

ini_set('display_errors','Off');
ini_set('error_reporting', E_ALL );
define('WP_DEBUG', false);
define('WP_DEBUG_DISPLAY', false);

Don’t forget to save your changes and upload your wp-config.php file back to the server.

You can now visit your website to confirm that the PHP errors, notices, and warnings have disappeared from your website.

Turning on PHP Errors in WordPress

If you are working on a website on local server or staging area, then you may want to turn on error reporting. In that case you need to edit your wp-config.php file and replace the code you added earlier with the following code:

define('WP_DEBUG', true);
define('WP_DEBUG_DISPLAY', true);

This code will allow WordPress to start displaying PHP errors, warnings, and notices again.

We hope this article helped you learn how to turn off php errors in WordPress. You may also want to see our list of the most common WordPress errors and how to fix them.

If you liked this article, then please subscribe to our YouTube Channel for WordPress video tutorials. You can also find us on Twitter and Facebook.

The post How to Turn Off PHP Errors in WordPress appeared first on WPBeginner.
How to Fix Secure Connection Error in WordPress

Are you seeing ‘Unable to establish secure connection error’ in WordPress? It is a common WordPress error and usually occurs when you are trying to install or update a WordPress plugin or theme from official WordPress.org directory. In this article, we will show you why this error occurs and how to easily fix secure connection error in WordPress.

Fixing secure connection error in WordPress

What Causes Unable to Establish Secure Connection Error in WordPress?

WordPress comes with a built-in system to manage updates. This system regularly checks for updates and show notifications for you to install plugin / theme updates.

However, it needs to connect to the WordPress.org website in order to check for updates or install them. Due to some misconfiguration on your WordPress hosting server, your website may fail to connect with WordPress.org website.

This will result in a secure connection error, and you will see an error message like this:

An unexpected error occurred. Something may be wrong with WordPress.org or this server’s configuration. If you continue to have problems, please try the support forums. (WordPress could not establish a secure connection to WordPress.org. Please contact your server administrator.) in /home/username/public_html/wp-admin/includes/update.php on line 122

Secure connection error in WordPress

That being said, let’s see how to easily fix secure connection error in WordPress.

Fixing Secure Connection Error in WordPress

There are multiple ways to fix the unexpected secure connection error in WordPress. You can try one of the following solutions based on your situation.

Hosting and Server Related Issues

If your shared hosting server is under DDoS attack, then it is likely that the connection to WordPress.org will timeout causing the secure connection error.

In that case, you can wait for a few minutes and try again. If the error persists, then you need to reach out to your web hosting company’s support team.

Cloud or VPS Server Connectivity Issue

If you are on a cloud or VPS hosting, then it is possible that your server is unable to connect to WordPress.org due to some DNS issues.

In that case, you can point your server directly to WordPress.org servers. You will need to connect to your server using SSH.

SSH is short for secure shell which is an encrypted protocol that allows you to connect to your server using command line tools.

Windows users can use a tool called PuTTy whereas Mac / Linux users can use the terminal app.

You will need login credentials for the account with shell access to your hosting account. You can get this information from your hosting account’s cPanel dashboard or ask your web hosting server provider.

In the terminal, you can connect to your server like this:

ssh [email protected]

Don’t forget to replace username with your own username and example.com with your own domain name.

Once connected, you need to run the following command:

sudo nano /etc/hosts

This will open a file, and you will need to add the following code at the bottom of the file:

66.155.40.202 api.wordpress.org

You can now save your changes and exit the the editor. Visit your website to see if this resolved the error.

Fixing WordPress Secure Connection Error on Localhost

If you are running WordPress on your own computer (localhost), then you may not have cURL extension enabled for PHP. This extension is required to access WordPress.org for updates.

You will need to edit the php.ini file on your computer. This file is usually located in the PHP folder of your Mamp, Xampp, or WAMP folder.

If you are on a Windows computer, then look for the following line:

;extension=php_curl.dll

Mac and Linux users would have to look for this line:

;extension=curl.so

Now you need to remove the semicolon before the text to enable the extension. Don’t forget to save your php.ini file.

Lastly, don’t forget to restart the Apache server for changes to take affect.

Check Open Ports in Firewall

If cURL extension is properly installed on your local server, then the next step is to check your internet connection firewall.

Your computer’s firewall may be blocking outgoing connections from local server to WordPress.org. If you are on Windows, then press the start button and search for Windows Firewall. Mac users can find firewall settings in System Preferences » Security & Privacy

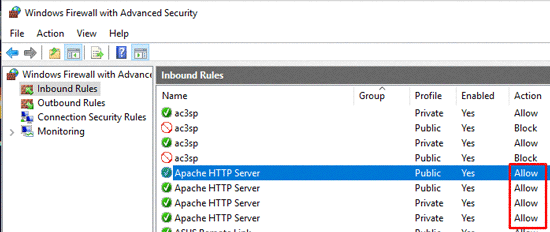
You need to add Apache to your firewall’s allowed programs and allow both incoming and outgoing connections.

Firewall Apache

You will need to restart Apache for changes to take effect.

We hope this article helped you solve the WordPress secure connection error. You may also want to see our ultimate step by step WordPress security guide for beginners.

If you liked this article, then please subscribe to our YouTube Channel for WordPress video tutorials. You can also find us on Twitter and Facebook.

The post How to Fix Secure Connection Error in WordPress appeared first on WPBeginner.

How to Remove v=XXXX string from WordPress URLs

Are you seeing strange v=xxxx string in your WordPress URLs? Recently, one of our readers asked us how to get rid of v=xxxx string from their WordPress URLs. This string is made up of seemingly random letter and numbers added as a parameter to your permalinks. In this article, we will show you how to easily remove v=xxxx string from your WordPress URLs.

How to Remove v=xxxx string from WordPress URLs

Why Are You Seeing v=XXXX String in Your WordPress URLs?

This string appears on websites running an online store using WooCommerce. It is not a bug or an error, but an actual feature of the plugin.

String with letters and numbers added to WordPress URLs by WooCommerce

The purpose of this string is to help WooCommerce calculate tax and shipping based on a user’s geographic location. The string helps make the feature compatible with WordPress caching plugins like WP Super Cache or W3 Total Cache.

However, if you don’t need to calculate shipping and taxes based on different locations, then you probably accidentally enabled this feature.

Let’s take a look at how to easily disable it and remove the random v=xxxxxx strings from your WordPress URLs.

Removing v=xxxx String from WordPress URLs

First you need to login to your WordPress admin area and head over to the WooCommerce » Settings page.

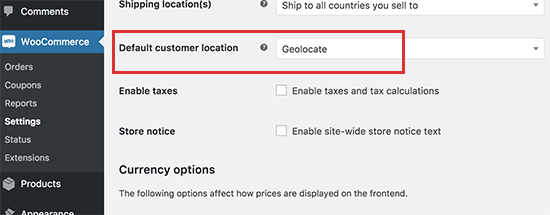
Under the General tab, you need to scroll down to ‘Default customer location’ option.

Disable Geolocation

It would be set to ‘Geolocate (with page caching support)’. You need to change it to either ‘No location by default’ or ‘Shop base address’.

Don’t forget to click on the save changes button to store your settings.

If you are using a caching plugin, then you will need to clear your WordPress cache. After that you can visit your website, and the geolocation string will disappear from your WordPress URLs.

ِ

How to GeoLocate Default Location Without the URL String?

You can do that by selecting the ‘Geolocate’ option in the ‘Default customer location’ setting.

Geolocate without caching

However, this option is not compatible with static caching plugins, and it will show incorrect shipping and tax information to users due to previously cached page.

Running WooCommerce without caching is not recommended because it will slow down your site’s speed and performance.

If you must use Geolocate to calculate shipping and taxes on the fly, then for the time being you will have to tolerate the ugly v=xxxx string in your WordPress URLs.

We hope this article helped you learn how to remove v=xxxx string from your WordPress URLs. You may also want to see our ultimate list of the most common WordPress errors and how to fix them.

If you liked this article, then please subscribe to our YouTube Channel for WordPress video tutorials. You can also find us on Twitter and Facebook.

The post How to Remove v=XXXX string from WordPress URLs appeared first on WPBeginner.

How to Properly Add JavaScripts and Styles in WordPress

Do you want to learn how to properly add JavaScripts and CSS stylesheets in WordPress? Many DIY users often make the mistake of directly calling their scripts and stylesheets in plugins and themes. In this article, we will show you how to properly add JavaScripts and stylesheet in WordPress. This will be particularly useful for those who are just starting to learn WordPress theme and plugin development.

Properly adding JavaScripts and styles in WordPress

Common Mistake When Adding Scripts and Stylesheets in WordPress

Many new WordPress plugins and theme developers make the mistake of directly adding their scripts or inline CSS into their plugins and themes.

Some mistakenly use the wp_head function to load their scripts and stylesheets.

<?php
add_action('wp_head', 'wpb_bad_script');
function wpb_bad_script() {
echo 'jQuery goes here';
}
?>

While the above code may seem easier, it is the wrong way of adding scripts in WordPress, and it leads to more conflicts in the future.

For example, if you load jQuery manually and another plugin loads jQuery through the proper method, then you have jQuery being loaded twice. If it is loaded on every page, then this will negatively affect WordPress speed and performance.

It is also possible that the two are different versions which can also cause conflicts.

That being said, let’s take a look at the right way of adding scripts and stylesheets.

Why Enqueue Scripts and Styles in WordPress?

WordPress has a strong developer community. Thousands of people from around the world develop themes and plugins for WordPress.

To make sure that everything works properly, and no one is stepping on another’s toes, WordPress has an enqueuing system. This system provides a programmable way of loading JavaScripts and CSS stylesheets.

By using wp_enqueue_script and wp_enqueue_style functions, you tell WordPress when to load a file, where to load it, and what are its dependencies.

This system also allow developers to utilize the built-in JavaScript libraries that come bundled with WordPress rather than loading the same third-party script multiple times. This reduces page load time and helps avoid conflicts with other themes and plugins.

How to Properly Enqueue Scripts in WordPress?

Loading scripts properly in WordPress is very easy. Below is an example code that you would paste in your plugins file or in your theme’s functions.php file to properly load scripts in WordPress.

?php
function wpb_adding_scripts() {

wp_register_script('my_amazing_script', plugins_url('amazing_script.js', __FILE__), array('jquery'),'1.1', true);

wp_enqueue_script('my_amazing_script');
}
 
add_action( 'wp_enqueue_scripts', 'wpb_adding_scripts' );  
?>

Explanation:

We started by registering our script through the wp_register_script() function. This function accepts 5 parameters:

  • $handle – Handle is the unique name of your script. Ours is called “my_amazing_script”
  • $src – src is the location of your script. We are using the plugins_url function to get the proper URL of our plugins folder. Once WordPress finds that, then it will look for our filename amazing_script.js in that folder.
  • $deps – deps is for dependency. Since our script uses jQuery, we have added jQuery in the dependency area. WordPress will automatically load jQuery if it is not being loaded already on the site.
  • $ver – This is the version number of our script. This parameter is not required.
  • $in_footer – We want to load our script in the footer, so we have set the value to be true. If you want to load the script in the header, then you would make it false.

After providing all the parameters in wp_register_script, we can just call the script in wp_enqueue_script() which makes everything happen.

The last step is to use wp_enqueue_scripts action hook to actually load the script. Since this is an example code, we have added that right below everything else.

If you were adding this to your theme or plugin, then you can place this action hook where the script is actually required. This allows you to reduce the memory footprint of your plugin.

Now some might wonder why are we going the extra step to register the script first and then enqueuing it? Well, this allows other site owners to deregister your script without modifying the core code of your plugin.

Properly Enqueue Styles in WordPress

Just like scripts, you can also enqueue your stylesheets. Look at the example below:

<?php
function wpb_adding_styles() {
wp_register_style('my_stylesheet', plugins_url('my-stylesheet.css', __FILE__));
wp_enqueue_style('my_stylesheet');
}
add_action( 'wp_enqueue_scripts', 'wpb_adding_styles' );  
?>

Instead of using wp_enqueue_script, we are now using wp_enqueue_style to add our stylesheet.

Notice that we have used wp_enqueue_scripts action hook for both styles and scripts. Despite the name, this function works for both.

In the examples above, we have used plugins_url function to point to the location of the script or style we wanted to enqueue.

However, if you are using the enqueue scripts function in your theme, then simply use get_template_directory_uri() instead. If you are working with a child theme, then use get_stylesheet_directory_uri().

Below is an example code:

<?php
 
function wpb_adding_scripts() {
wp_register_script('my_amazing_script', get_template_directory_uri() . '/js/amazing_script.js', array('jquery'),'1.1', true);
wp_enqueue_script('my_amazing_script');
}
 
add_action( 'wp_enqueue_scripts', 'wpb_adding_scripts' );  
?>

We hope this article helped you learn how to properly add jacvascript and styles in WordPress. You may also want to study the source code of the top WordPress plugins for some real life code examples.

If you liked this article, then please subscribe to our YouTube Channel for WordPress video tutorials. You can also find us on Twitter and Facebook.

The post How to Properly Add JavaScripts and Styles in WordPress appeared first on WPBeginner.