Category Archives: Tutorials

How to Host WordPress on DigitalOcean Yourself (Even If You’re Not a Techie)

Lately, we’ve been fascinated with hosting WordPress on DigitalOcean. We’ve seen people sharing pictures of how fast their tiny $5 per month Droplet was loading WordPress for billions of requests.  But then we came across a tool called SpinupWP that claims to make hosting WordPress on DigitalOcean something that even a non-techie person like you [...]

Read More...

The post How to Host WordPress on DigitalOcean Yourself (Even If You’re Not a Techie) appeared first on Learn WordPress with WPLift.

How to Do A/B Split Testing in WordPress using Google Optimize

Do you want to run A/B split tests on your WordPress site to improve conversions? Split testing helps you understand how small changes in content and design affect user behavior. In this article, we will show you how to easily do A/B split testing in WordPress using Google Optimize.

Split testing in WordPress using Google Analytics

What is A/B Split Testing?

A/B split testing is a technique that allows you to compare two versions of the same web page against each other, so you can determine which one performs better and produces better results.

Marketers use A/B split testing for their landing pages to find out which one gets them more conversions and sales.

Split testing can be used to test any element on the page including call-to-action buttons, color schemes, layout changes, marketing text, images, and more.

How A/B Split Testing Works?

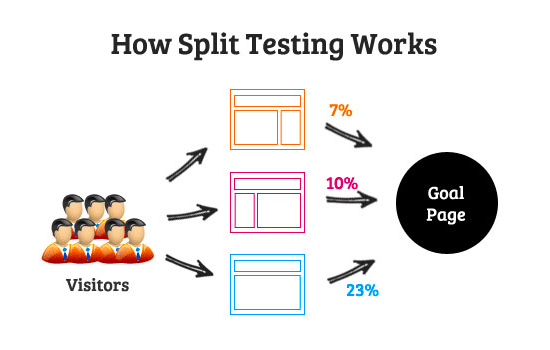
Basically, you show different variations of a page to your audience. After that, you track user engagement and conversions to find out which variation gives you the best results.

How split testing works

Preparing for A/B Split Testing

Before we move forward, there are a few things you would need for this tutorial.

First, you will need MonsterInsights plugin. For more details, see our step by step guide on how to install a WordPress plugin.

MonsterInsights is the best Google Analytics plugin for WordPress. You’ll need at least their Pro plan in order to access Google Optimize addon which we will be using in this tutorial.

If you haven’t already done so, then you need to sign up and install Google Analytics in WordPress.

Lastly, you will need Google Optimize. It is a free tool that allows you to run split testing experiments on your website. We will show you how to set it up in the next step.

Ready? Let’s get started.

Setting up Google Optimize in WordPress

First, you need to visit the Google Optimize website to create your account.

Get started with Google Optimize

Follow the on-screen instructions, and you will reach your account dashboard. Google Optimize will automatically create an Account and a Container for you.

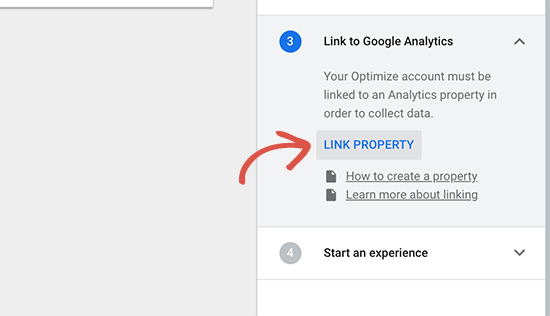
Next, you need to connect your Google Optimize account to the Google Analytics property of your website. To do that, click on ‘Link to Google Analytics’ tab from the right-hand column.

Link Google Analytics property

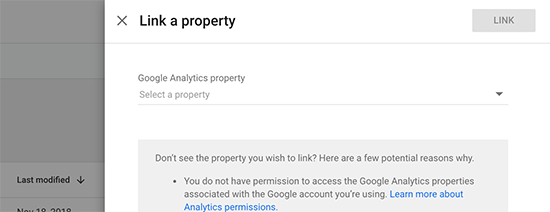
Clicking on the button will show all Google Analytics properties available under your Google account. You need to select the one associated with your website.

Select and link property

Next, click on the Link button to continue.

Google Optimize will now connect to your Google Analytics property. This will allow Google Optimize to share data with Google Analytics which you can then view in your reports.

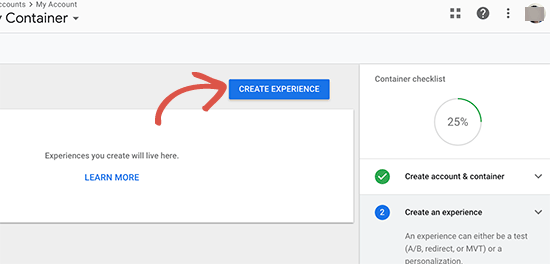
Now, it is time to create your first experience. Click on the ‘Create Experience’ button to continue.

Create experience

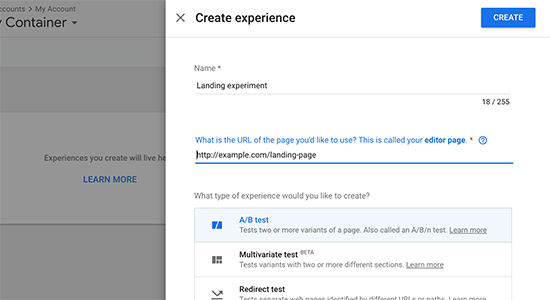
You will now be asked to provide a name for your experience and enter the URL of the page where this experience will run.

Experience detail

You will also be asked to choose a type for your experience. You need to select A/B test and then click on the ‘Create’ button to continue.

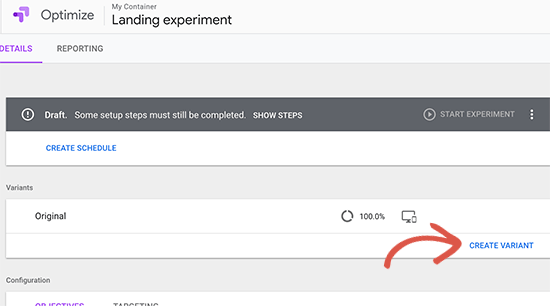
Optimize will now create your experience, and you will be redirected to the experience page. It will automatically show the original page as your first variation.

Create variant

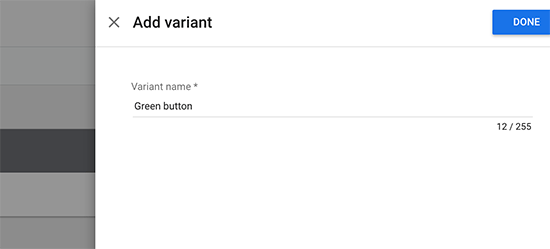
You need to click on the add variation button to create a new version. Optimize will ask you to provide a name for this variation. It is a good practice to use a name that reflects the changes you are going to apply in this variation.

Variant name

Click on the Done button to continue.

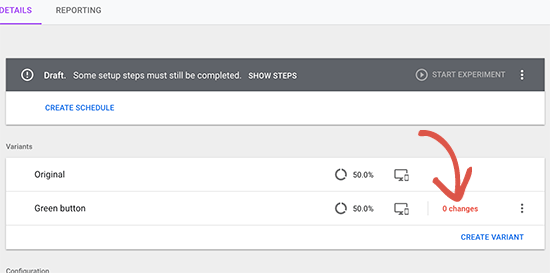
Optimize will now list your new variation on the experience page. Click on the ‘0 changes’ link next to your new variation to edit it.

Change variation

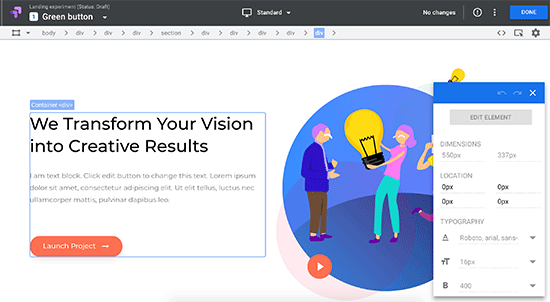
Google Optimize will now open the page where you want to run the test with a powerful editor. It is a simple drag and drop tool that you can use to make changes to your page.

Edit variation

You can just point and click on any element in your page to make changes. For the purpose of this tutorial, we are going to change the color of our main call to action button.

After you have made the changes that you want to test, you need to click on the ‘Done’ button to exit the editor.

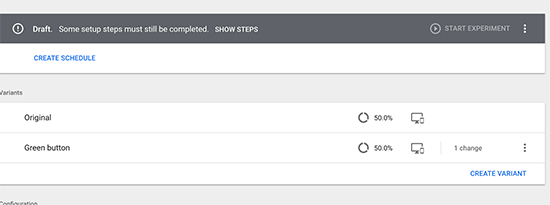
You will now see your new variation listed with the number of changes you made to it.

Changed variation

You can continue editing or add another variant to your experience.

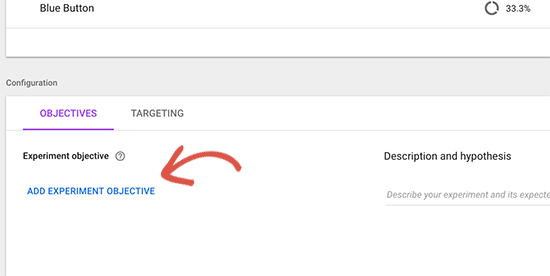
After that, you need to select an objective for your experience. Just below the variants you will see the option to select experience objective.

Experience objective

Clicking on it will open views from your Google Analytics reports.

If you are already using goals and events, or eCommerce tracking, then you will see them listed there.

After selecting objective, you can enter a hypothesis about what you are testing and what you are expecting from this experiment.

Your experience is almost ready but first, you need to connect Google Optimize with MonsterInsights.

Connecting Google Optimize to MonsterInsights

MonsterInsights helps you easily connect your WordPress site to Google Optimize.

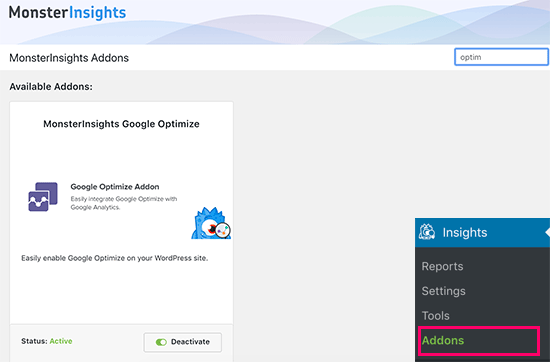
First, you need to visit Insights » Addons page in your WordPress admin area. From here, you need to install and activate the ‘Google Optimize’ addon.

Google Optimize addon for MonsterInsights

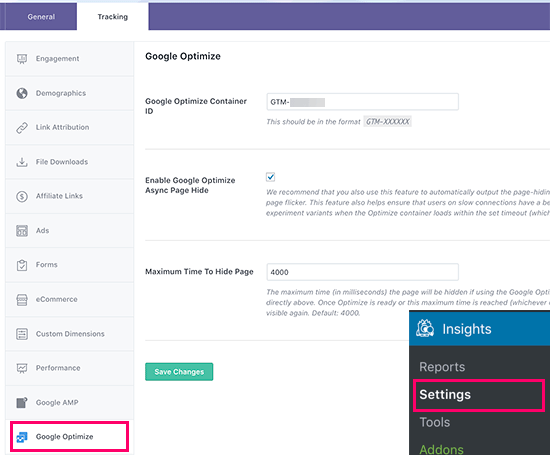
Upon activation, you need to visit Insights » Settings page and switch to the tracking tab. From here you need to scroll down and click on the Google Optimize tab.

Google Optimize settings in MonsterInsights

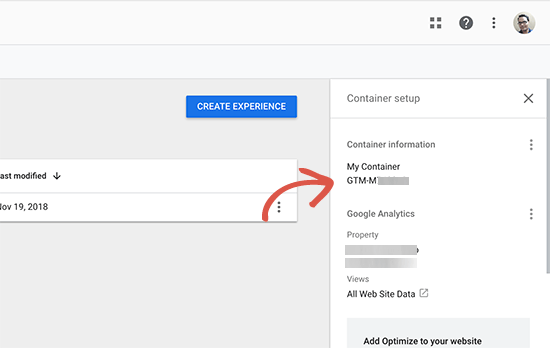
Now you need to provide your Google Optimize container ID. You can find this information under your Google Optimize account by clicking on the ‘Container Setup’ tab in the right column.

Container ID

Copy and paste your container ID in MonsterInsights’ Google Optimize settings page and then click on the ‘Save changes’ button to store your settings.

That’s all you have successfully installed Google Optimize on your website and you are now ready to run your experiments.

Scheduling and Running Your A/B Split Test

Now that everything is in order, you are ready to schedule and run your A/B split test.

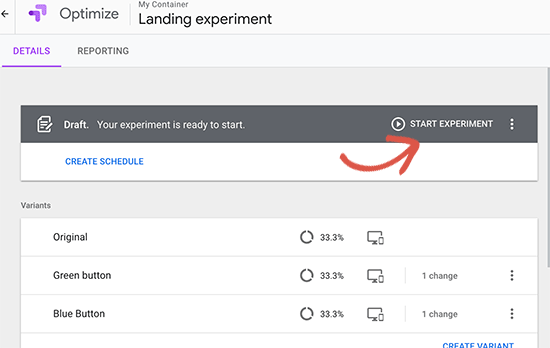
Switch to Google Optimize dashboard and open your experience. From here you can just go ahead and click on the ‘Run Experiment’ button to manually launch it.

Run experiment

You can also click on the ‘Create Schedule’ button to set up a schedule for your experiment. Make sure you provide enough time for the experiment to collect visits and data.

Viewing Your A/B Split Testing Reports in Google Optimize

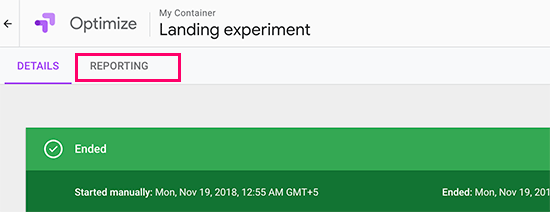
Google Optimize will now show different variations of your page to users and start collecting data. After it has collected enough data, you can view the results under the reporting tab.

Split test reporting

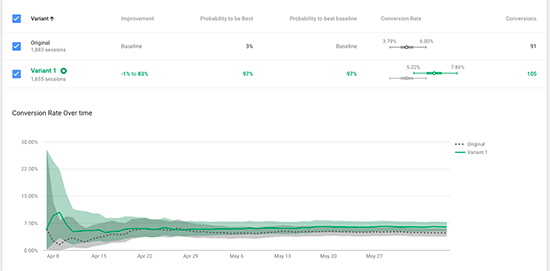
It will show how each variant performed based on the experiment objective (Google Analytics goals, event, or views you selected).

Google Optimize reports

We hope this article helped you learn how to do A/B split testing in WordPress using Google Analytics and Google Optimize. You may also want to see our guide on how to convert WooCommerce visitors into customers.

If you liked this article, then please subscribe to our YouTube Channel for WordPress video tutorials. You can also find us on Twitter and Facebook.

The post How to Do A/B Split Testing in WordPress using Google Optimize appeared first on WPBeginner.

How To Install WordPress Locally: A Tutorial + 6 Easy Tools For Local WordPress Development

Have you ever wondered if it is possible to install WordPress locally? While there are some pros and cons to working in a local WordPress development environment, this approach is great because: It’s just plain faster because you don’t have to wait on your network connection. You can work offline, which is great if you [...]

Read More...

The post How To Install WordPress Locally: A Tutorial + 6 Easy Tools For Local WordPress Development appeared first on Learn WordPress with WPLift.

How to Add Specific Posts to WordPress Navigation Menu

Do you want to add specific posts to your WordPress navigation menu? Menus in WordPress can be fully customized, and you can add custom links, pages, posts, categories and more. In this article, we will show you how to easily add specific posts to WordPress navigation menu.

Add specific posts to WordPress navigation menu

When and Why Add Specific Posts to Navigation Menu?

Navigation menus allow you to create a navigational structure for your website. This helps users quickly find the most important sections of your website.

WordPress makes it very easy to create and add navigation menus on your website. By default, it shows sections to easily add pages, categories, custom links, and more.

Adding items to navigation menu

Normally website owners add pages to their navigation menus like about page, a separate blog page, pricing page, or a contact form page.

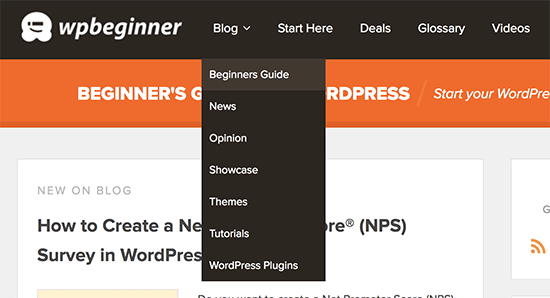
Some websites add categories to navigation menus which allows users to quickly jump to different topics on their site.

Categories and topics in navigation menu

However, sometimes you may need to add an individual post to your navigation menu. This could be your most popular post or something that you would like your users to find quickly.

That being said, let’s take a look at how to easily add specific posts to WordPress navigation menu.

Adding Specific Posts to WordPress Navigation Menu

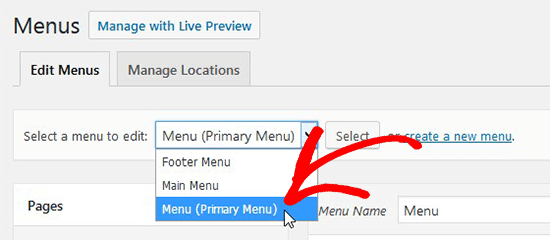
First thing you need to do is go to Appearance » Menus page in your WordPress admin area and select a menu to edit. You can also create a new menu and use it as your navigation menu.

Select menu to edit

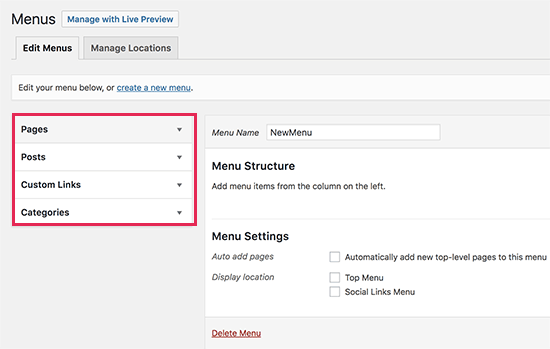
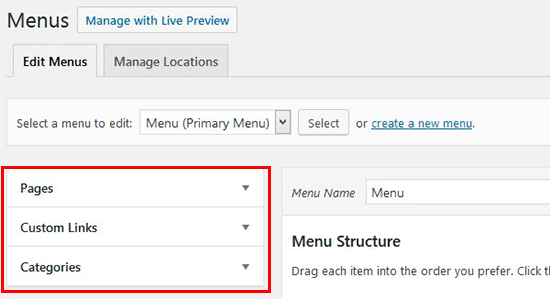
After selecting the menu, you’ll see tabs for pages, posts, custom links, and categories. You can click on each tab to expand it.

Options for menu

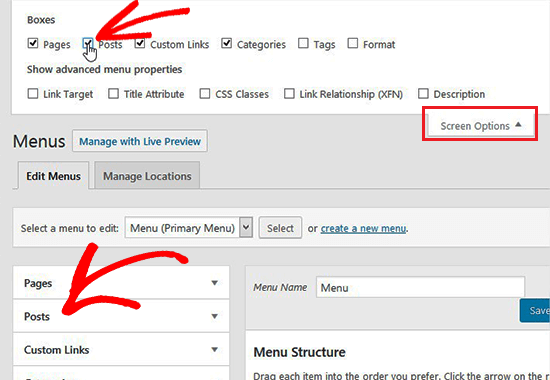
If you cannot see the Posts tab there, then you need to add it by clicking on the Screen Options button at the top right corner of the screen.

Add post box

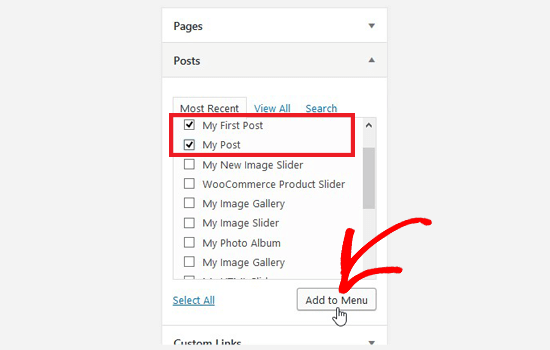
Once the Post box appears, you need to expand it to select the specific posts that you want to add to your navigation menu and click on the Add to Menu button.

Select specific posts

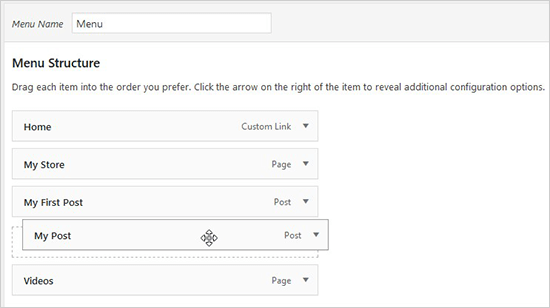
After adding the specific posts to the navigation menu, you can drag and drop menu items to adjust their display order.

Drag and drop menu items

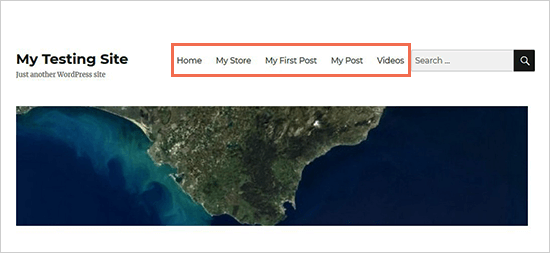
You can also customize the label to change the post title into a smaller title. Make sure to save it and visit your website to see your WordPress navigation menu with specific posts in action.

Navigation menu with specific posts

Navigation menus can be further customized to add search bar, social media icons, log in / log out links for your blog, post type archive, and more. You can also style your navigation menus to change their colors and appearance.

We hope this article helped you learn how to add specific posts to WordPress navigation menu. You may also want to see our expert pick of the best tutorials to master WordPress navigation menus to easily customize and manage your blog navigation.

If you liked this article, then please subscribe to our YouTube Channel for WordPress video tutorials. You can also find us on Twitter and Facebook.

The post How to Add Specific Posts to WordPress Navigation Menu appeared first on WPBeginner.

How to Greet Each User With a Custom Welcome Message in WordPress

Do you want to greet each user with a custom welcome message in WordPress? Greeting users with a welcome message can help boost engagement on your website. It can also be used to generate leads and increase sales. In this article, we will show you how to greet each user with a custom welcome message in WordPress.

Greet users with custom welcome message in WordPress

Why and When You Should Greet Users with Welcome Message in WordPress?

Not all websites need to greet users with a custom welcome message. However, if you are running an online store, trying to generate leads, or boost user engagement, then a custom welcome message can be very useful.

There are different types of welcome messages that you can use. The goal here is to offer users a lot of value with each message. For example, you can offer them discounts, live help, encourage them to ask questions, and more.

You can use integrations to connect welcome messages with your email service provider, live chat service, or contact form plugin.

That being said, let’s see how to easily greet each user with a custom welcome message in WordPress.

Method 1. Greet Users with a Custom Welcome Message using OptinMonster

For this method, we will be using OptinMonster. It is the most popular lead generation software in the world that helps you convert website visitors into subscribers and customers.

First, you need to sign up for an OptinMonster account. It is a paid service, but they also offer a limited free-forever plan.

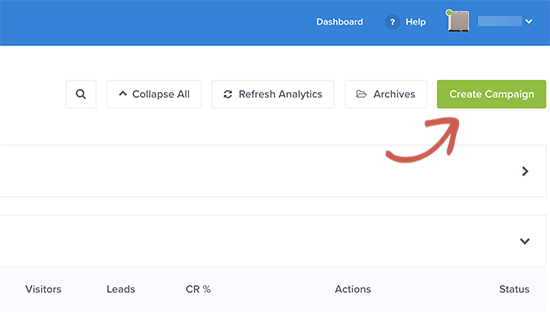
Once signed up, you will be taken to your OptinMonster dashboard where you need to click on the ‘Create Campaign’ button.

Create campaign

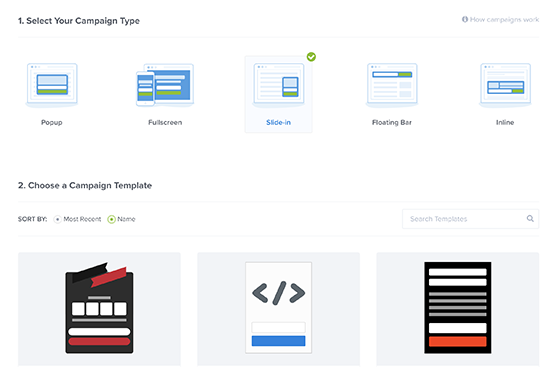
Next, you need to choose a campaign type and a template. OptinMonster comes with different campaign types, and you can use any of them to greet users with a welcome message in WordPress.

For the sake of this article, we will be using the slide-in campaign type with Flatland template.

Choose campaign type and template

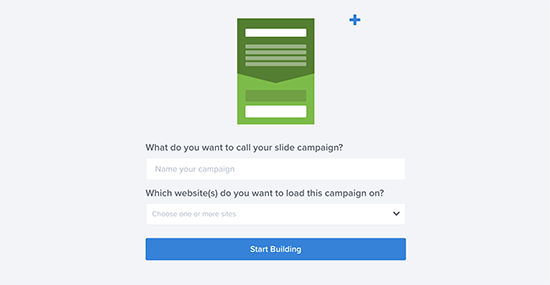
Next, you will be asked to give your campaign a name and select a website where you want to run this campaign. Click on select website field and then click on ‘Add website’ to add a new website.

Campaign options

After that, click on the ‘Start Building’ button to continue.

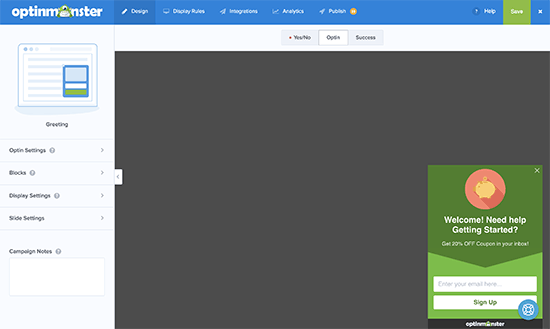
OptinMonster will now launch the drag and drop editor where you can simply point and click on any element to edit it. You can add blocks, columns, and elements with text, video, buttons, sign up fields, and more.

OptinMonster builder interface

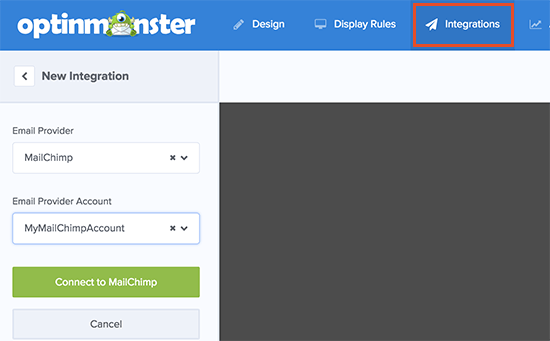
Simply click on the text fields to add your own welcome message to greet new users. You can also integrate it with your email service provider by clicking on the ‘Integrations’ tab on the top.

Add integration

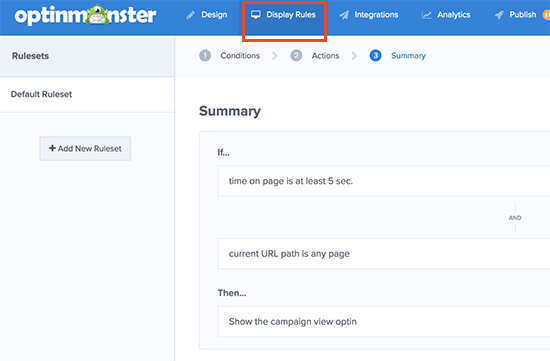
Next, you need to switch to the ‘Display Rules’ tab to select when you want to display the greeting. OptinMonster comes with a bunch of options that you can use to create less intrusive and highly engaging messages.

Display rules

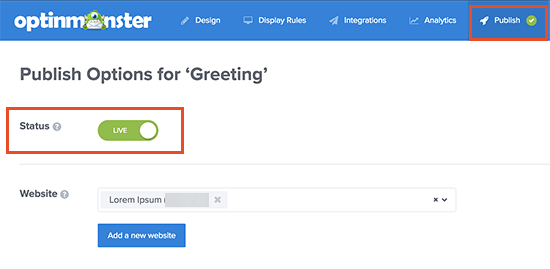
Once you are finished designing your custom welcome message, click on the Publish button at the top and toggle the ‘Status’ option to live.

Publish your optin

You are now ready to add this custom welcome message campaign to your website.

Switch to your WordPress admin area to install and activate the OptinMonster plugin. For more details, see our step by step guide on how to install a WordPress plugin.

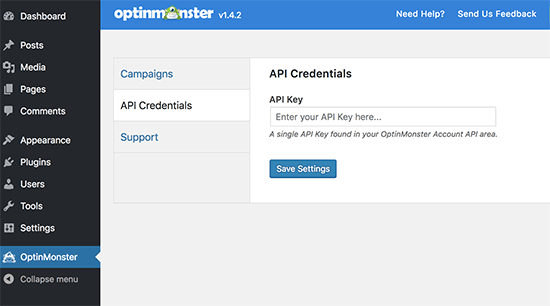
Upon activation, the plugin will add a new menu item labeled ‘OptinMonster’ to your WordPress admin sidebar. Clicking on it will take you to plugin’s settings page.

Enter your API key

You will be asked to enter your API key. You can find this information under your account on the OptinMonster website.

Don’t forget to click on the save settings button after entering your API key.

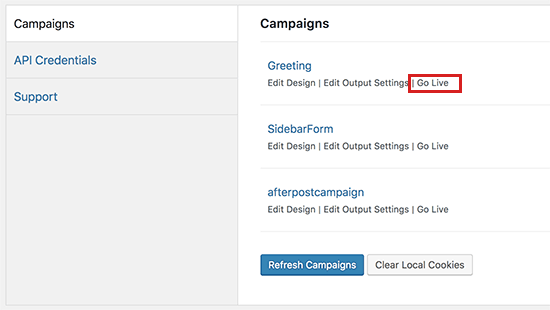
Next, you need to click on the ‘Campaigns’ tab. If you cannot see your campaign listed there then click on the refresh campaigns button.

After that, click on the ‘Go Live’ link next to the campaign you just created.

Make your campaign go live

You can now visit your website to see your custom welcome message in action.

Greeting preview

You can use OptinMonster to greet users with different welcome messages based on visits, time spent, logged in status, referral source, or use page level targeting for your landing pages.

Method 2. Greet Users with a Custom Welcome Message using LiveChat

LiveChat Inc is the best live chat support software for WordPress websites. It allows you to create beautifully designed live chat buttons, eye-catchers, and live chat support to your WordPress site.

You can customize the greeting message, display your own buttons, upload your logo, show agent profiles, and more.

LiveChat is a paid solution (starting from $16.99 per agent). They also offer a free 30-day trial allowing you to check out the features and see if its a good fit for your business.

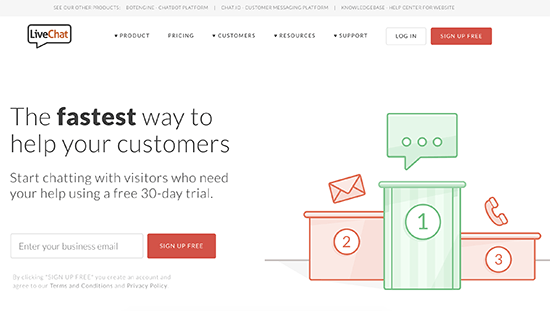
First, you need to visit the LiveChat website and sign up for an account.

Live Chat sign up

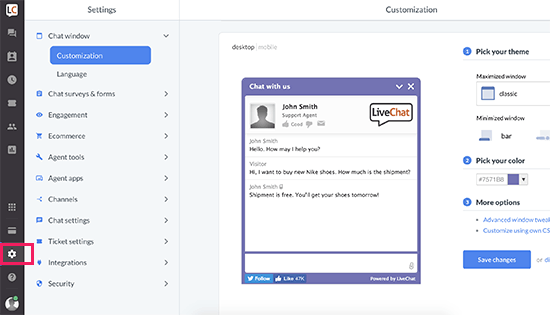
After creating your account, you will be taken to your LiveChat dashboard. Next, you need to click on the settings tab to customize the appearance of the LiveChat button.

LiveChat settings

From here, you can choose the chat window colors and theme. After that click on ‘Advanced window tweaks’ link to upload your own logo and add your social media profiles.

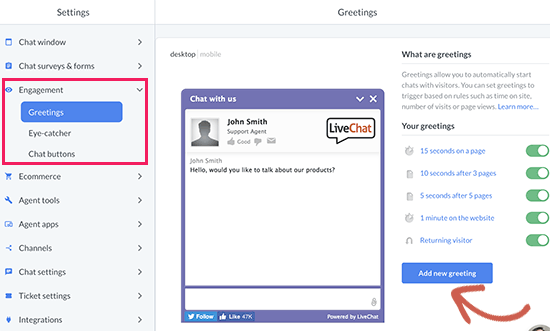
Next, you need to switch to the Engagement » Greetings section. By default, LiveChat enables a few greetings displayed based on few simple rules like time spent on site, pages viewed, returning visitor, and more.

Edit custom greetings

You can click on these greetings to edit them and add your own custom welcome message. You can also delete them or click on the ‘Add new greeting’ button to create a new custom greeting.

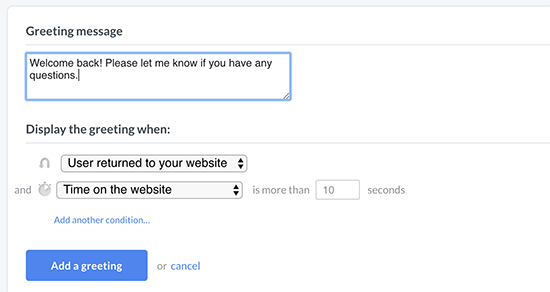
You will be able to select when to display a greeting by using display rules. You can also combine different rules to match and create highly dynamic custom greetings.

Adding dynamic greetings

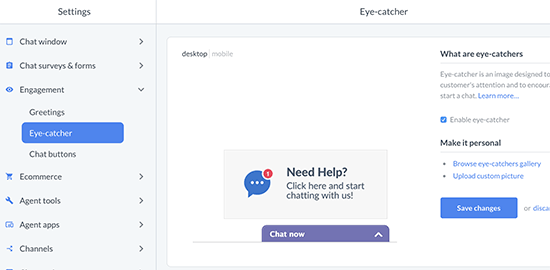
Next, you need to select an eye-catcher. These eye-catchers are images that are displayed when the LiveChat window is minimized.

LiveChat comes with several ready-made eye-catchers that you can use. You can also upload your images to use as eye-catchers.

Select an eye-catcher

Once you are satisfied with the design and appearance of your LiveChat window and custom greetings, you are ready to add them to your WordPress website.

Switch back to your WordPress admin area to install and activate the LiveChat plugin. For more details, see our step by step guide on how to install a WordPress plugin.

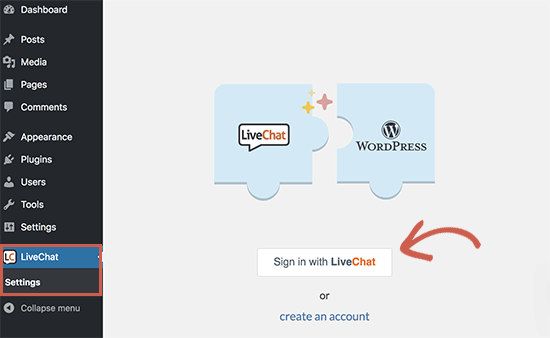
Upon activation, the plugin will add a new menu item labeled LiveChat to your WordPress admin sidebar. Clicking on it will take you to plugin’s settings page.

Connect Live Chat to your WordPress site

Go ahead and click on the ‘Sign in with LiveChat’ button to connect your WordPress site to your LiveChat account.

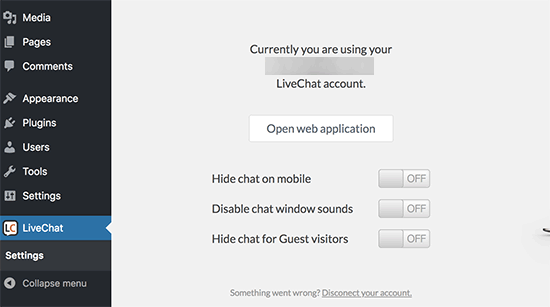
Once connected, you will see some very basic display settings. You can turn off LiveChat on mobile, turn off sounds, or hide it for users who are not logged in. If you are unsure, then we recommend leaving these options as they are.

LiveChat settings for WordPress

You can now visit your website in a new browser tab to see the LiveChat button in action. It will greet users with the eye-catcher you selected and display a custom welcome greeting based on the rules you choose in settings.

Custom welcome greeting

We hope this article helped you learn how to greet each user with a custom welcome message in WordPress. You may also want to see our article on how to track user engagement in WordPress using Google Analytics.

If you liked this article, then please subscribe to our YouTube Channel for WordPress video tutorials. You can also find us on Twitter and Facebook.

The post How to Greet Each User With a Custom Welcome Message in WordPress appeared first on WPBeginner.

How to Make a Small Business Website – Step by Step (2018)

Are you looking to make a website for your small business so you can find new customers on the internet? Making a small business website has become quite easy, and you can do it all by yourself without hiring a developer. In this article, we will show you how to easily make a small business website (step by step).

Making a small business website

Step 0. Before Making a Small Business Website

Unlike the old days, building a small business website has become quite easy. You can do it all by yourself without knowing any coding or hiring a developer by following our step by step guide.

Here is an overview of what you’ll learn:

  • Choosing a domain name for your small business website
  • Purchasing website hosting
  • Installing WordPress
  • Making a content outline for your small business website
  • Choosing a template to change your site’s design
  • Adding more features by using addons and extensions
  • Resources to get help and improve your WordPress skills

Which is The Best Platform to Make a Small Business Website?

The biggest mistake most beginners make is choosing the wrong platform to make a business website. Thankfully, you are here so you would not be making that mistake.

WordPress is the most popular website builder in the world. It powers 31% of all websites on the internet including millions of small business websites all over the world.

The best thing about WordPress is that it gives you access to thousands of pre-made website templates, extensions, and addons. You can make almost any kind of website imaginable without learning to code.

That being said, let’s take a look at how to easily create a small business website using WordPress on a budget.

Step 1. What You Need to Make a Small Business Website

You will need the following three items to make a small business website.

  • A domain name – This will be your website’s name such as wpbeginner.com
  • Website hosting – This will be your website’s home and where all your files will be stored
  • 60 minutes of your time

Ready? Let’s begin.

Step 2. Setting up Your Small Business Website

There are two types of WordPress available. WordPress.com, which is a hosted solution, and then you have WordPress.org also known as self-hosted WordPress. See our full comparison of WordPress.com vs WordPress.org to understand the difference.

We will be using self-hosted WordPress.org because it will give you instant access to all WordPress features out of the box.

Next, you will need a domain name and WordPress hosting to make a website.

We recommend using Bluehost to set up your website. It is one of the biggest hosting companies in the world and an officially recommended WordPress hosting provider.

Normally, you will pay $14.99 / year for a domain name and website hosting starts from $7.99 per month. This is a lot of money if you’re just starting out.

Thankfully, Bluehost has agreed to offer our users a free domain name, free SSL, and 60% discount on website hosting. Basically, you can get started for $2.75 per month.

→ Click Here to Claim This Exclusive Bluehost Offer ←

Let’s go ahead and purchase a domain name and hosting.

Step 3. Choosing a Domain Name for Your Small Business Website

First, you need to visit the Bluehost website in a new browser window and click on the green ‘Get Started Now’ button.

Getting started with Bluehost

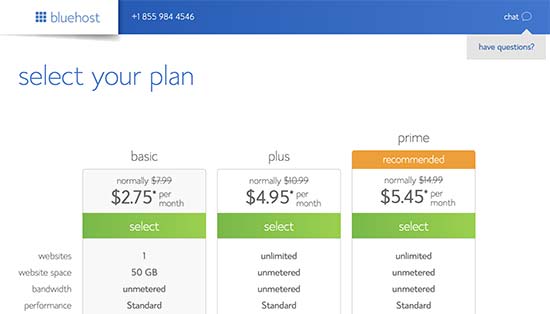
On the next page, you will be asked to select a pricing plan. Basic and Plus plans are the most popular choices among small business owners.

Choose a plan

Click on the ‘Select’ button to choose a plan and move on to the next step.

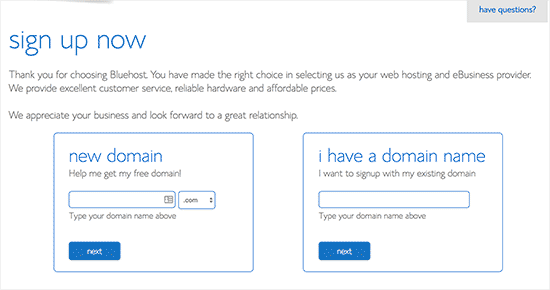
Now, you will be asked to choose a domain name for your website.

Choosing a domain name for your website

Tips on Finding a Domain Name for Your Business Website

Domain names are crucial to the success of your website. You need to spend some time on choosing the perfect domain name for your business but don’t overthink it.

  1. Stick to the .com version because users find it easier to remember (see .com vs .net – which is better)
  2. Your domain name should be related to your business (For example, stargardening.com )
  3. If your preferred domain name is not available, then try adding geographical location next to it. This increases your domain’s visibility in local search results (For example, stargardeninghouston.com)
  4. Keep it simple, short, and easy to pronounce.
    • Need more help? See our guide on how to choose the best domain name for your business website.

      Setp 4. Installing WordPress

      After choosing your domain name, you will be asked to enter your account information such as name, address, email, etc.

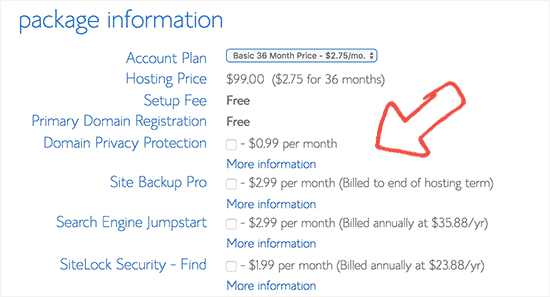
      Below that, you will see some extra hosting options that you can purchase. We don’t recommend purchasing these extras right away, so go ahead and uncheck them. You can always add them later if needed.

      Uncheck hosting extras

      Next, you will need to add your payment information to finish the purchase.

      After completing your purchase, you’ll receive an email with details on how to login to your web hosting control panel.

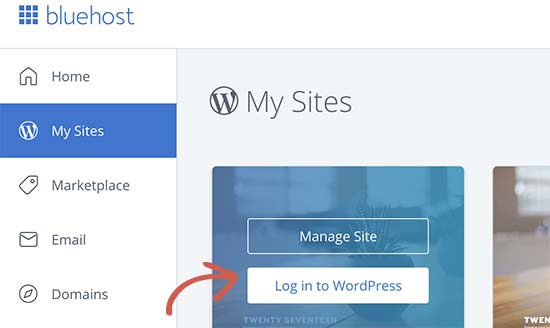
      Bluehost will automatically install WordPress for you, and you will be able to login to your WordPress site directly from the hosting dashboard.

      Bluehost hosting dashboard

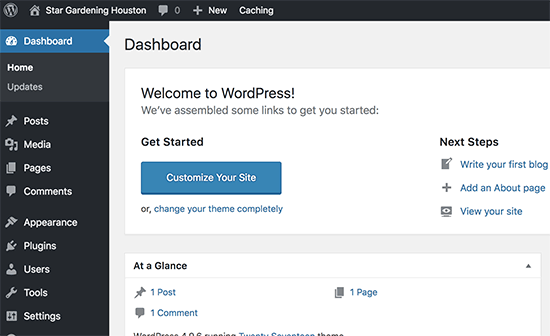
      Once logged in, you will see the WordPress admin area. This is where you will manage your website, change settings, and add new content.

      WordPress dashboard

      Step 5. Creating Content Layout for a Small Business Website

      Now that you have WordPress installed, you need to create an outline of your website content. Good small business websites are simple and follow a standard website layout.

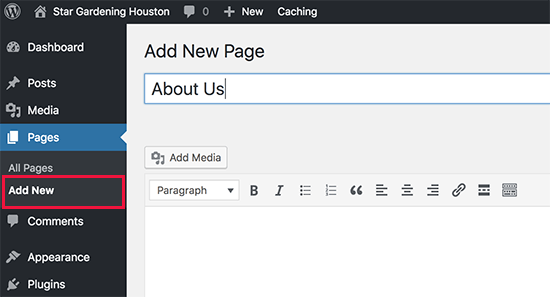
      Simply go to Pages » Add New page to create a new page in WordPress.

      Adding a new page in WordPress

      Don’t worry about the content, text, and images at the moment. Just adding a simple title, some text, and a couple of images would be fine. You can always edit these pages and add more content if needed.

      Here are some of the most common pages used in a small business website layout.

      • Homepage – This is the welcome page of your website. Add your business name with a call to action to your services/products or contact page. Provide a brief description of why your customers should choose you.
      • About Us – Your customers want to know more about people behind a business before they can make a decision. Create an about us page to tell users who you are, what are your business values, and what relevant experience you have in your industry.
      • Services / Products – Create a page to list details about services or products you are offering. Add a heading for each service/product and provide a brief description. You can also add pricing or ask users to contact you for a quote.
      • Contact Us – This is the page your users will need to contact you. You will need to add a contact form so that users can contact you directly. Additionally, you can add your businesses’ physical address or phone number.

      Additionally, you can create more pages if needed. For example, you can create a separate blog page, individual pages for each service or product, and more.

      Step 6. Choosing a Design for Your Website

      By default, WordPress comes with a basic template that you can use. If you don’t like the default theme, then there are thousands of free and paid WordPress themes that you can choose from.

      You can take a look at our selection of the best WordPress themes for business websites. If you need more help, then see our tips on choosing the perfect WordPress theme for your website.

      We recommend looking for a simple design that looks great and has all the right elements.

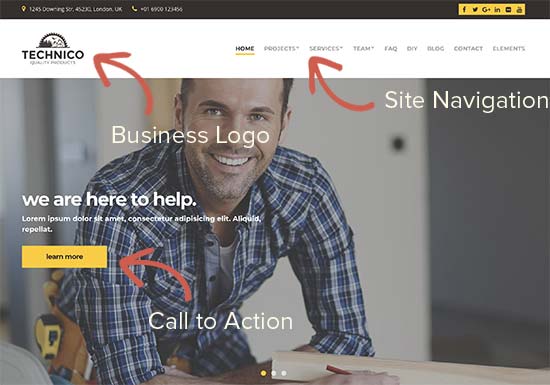
      Normally, a business website has a navigation menu on top. The homepage usually has a welcome message with a call to action button, which is followed by other content.

      Example of a simple business website design

      Once you have chosen a theme, you can go ahead and install it. For detailed instructions, see our beginner’s guide on how to install a WordPress theme.

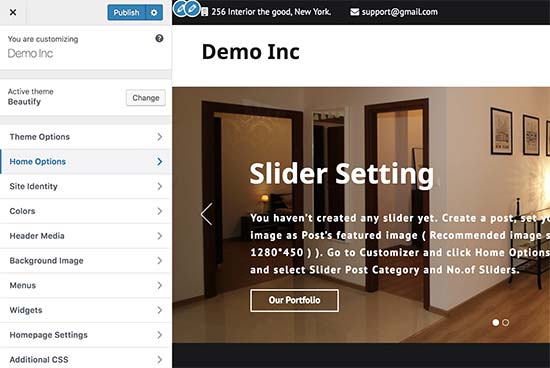
      Each WordPress theme comes with different settings to customize its appearance. Many of these options are located under Appearance » Customize page in WordPress admin area.

      Customize your website design in WordPress

      From here you can add navigation menus, change colors, add or remove different sections, and more. Once you are satisfied with the design, don’t forget to click on the Publish button on top to save your changes.

      If you’re unable to find the theme that fits your need, then you can use one of the popular drag & drop page builders for WordPress to create a custom design for your needs.

      We recommend using either Beaver Builder or Divi theme.

      Step 7. Using WordPress Plugins to Add More Features

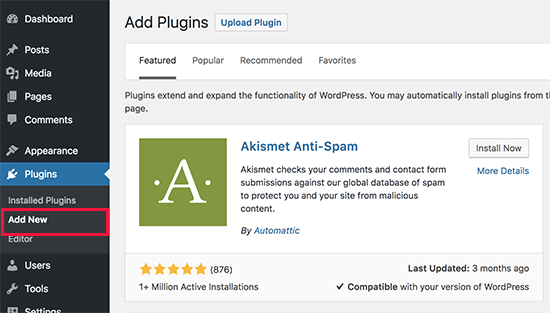
      Adding WordPress plugins

      WordPress plugins are like apps for your WordPress site. You can install them to add new features to your website like contact forms, Google Analytics, sliders, and more.

      There are more than 50,000 free plugins available in the WordPress plugin directory alone. This means, no matter what feature you want to add there is good chance you will be able to find a plugin for that.

      Below are the plugins that we install on every website:

      Need some cool plugins for your website? See our expert pick of the essential WordPress plugins for business websites.

      For detailed instructions, see our step by step guide on how to install a WordPress plugin.

      Step 8. Learning WordPress

      Now that you have a WordPress site, you may want to step up your game and learn more tips to improve your website.

      WPBeginner is the largest free WordPress resource site in the world. Following are the handy WordPress resources you will find on WPBeginner, all of them are completely free.

      • WPBeginner Blog – This is where we publish our WordPress tutorials, how tos, and step by step guides.
      • WPBeginner Videos – These step by step videos will help you learn WordPress FAST.
      • WPBeginner on YouTube – Need more video instructions? Subscribe to our YouTube channel with more than 52,000 subscribers and 7 Million+ views.
      • WPBeginner Dictionary – The best place for beginners to start and familiarize themselves with the WordPress lingo.
      • WPBeginner Blueprint – Check out plugins, tools, and services we use on WPBeginner.
      • WPBeginner Deals – Exclusive discounts on WordPress products and services for WPBeginner users.

      You can also use Google to find answers on WPBeginner by simply adding ‘wpbeginner’ at the end of your search term.

      If you are unable to find an answer, then feel free to reach out to us using our contact form. We will try our best to answer your question or point you in the right direction.

      We hope this article helped you learn how to make a small business website. You may also want to see our complete WordPress SEO guide for beginners.

      If you liked this article, then please subscribe to our YouTube Channel for WordPress video tutorials. You can also find us on Twitter and Facebook.

      The post How to Make a Small Business Website – Step by Step (2018) appeared first on WPBeginner.

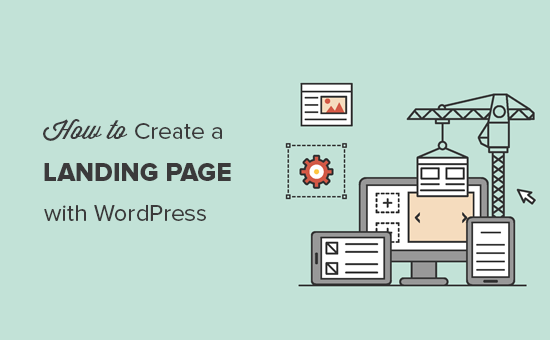
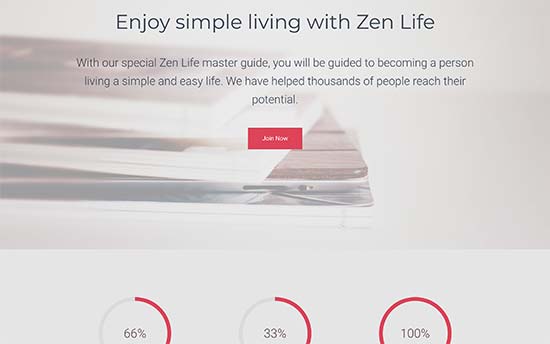
How to Create a Landing Page With WordPress

Do you want to create a custom landing page on your WordPress site? Landing pages help businesses convert website visitors into customers and leads. In this article, we will show you how to easily create a landing page in WordPress.

Creating a landing page with WordPress

What is a Landing Page?

A landing page is a purpose-built page designed to increase sales or generate leads for a business. It is used in paid marketing, email, and social media campaigns. Users coming from these sources will land on this page first, which is why it is called landing page.

What is the difference between the homepage and a landing page?

A homepage is your website’s front page and what users will see when they enter your domain name in their browser. On the other hand, a landing page can be a standalone page where most visitors land from paid or third-party traffic sources.

A homepage is designed for visitors to engage with your website, explore other pages, browse products, or sign up. It has more links and provides users with more choices.

On the other hand, a landing page is built for conversion. It has fewer links and is designed for users to make a purchasing decision or give their information for future outreach.

Normally, your website can have only one homepage, but you can create as many landing pages as you want for different campaigns. For example:

  • A landing page for your paid advertising campaigns
  • Visitors coming from specific traffic sources like email list, social media, and more
  • Users landing on a specific product or service page
  • and many more…

That being said, let’s take a look at how to create a beautiful custom landing page in WordPress. We will show you two solutions, and you can choose the one that suits you best.

Creating a Landing Page in WordPress using Beaver Builder

Beaver Builder is one of the best WordPress landing page plugins. It allows you to easily create a landing page using ready-made templates that you can modify with simple drag and drop tools.

First, you need to do is install and activate the Beaver Builder plugin. For more details, see our step by step guide on how to install a WordPress plugin.

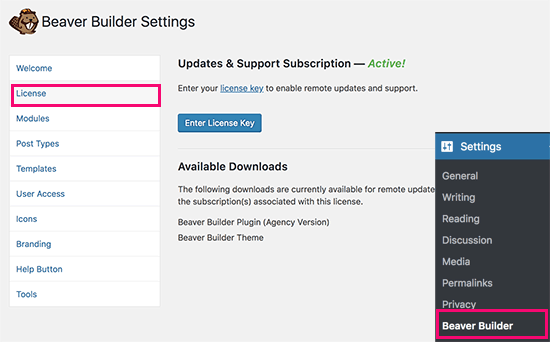
Upon activation, you need to visit Settings » Beaver Builder page to configure plugin settings.

Beaver Builder license

Under the License tab, click on the ‘Enter License Key’ button to add your license key. You can find this information under your account on Beaver Builder website.

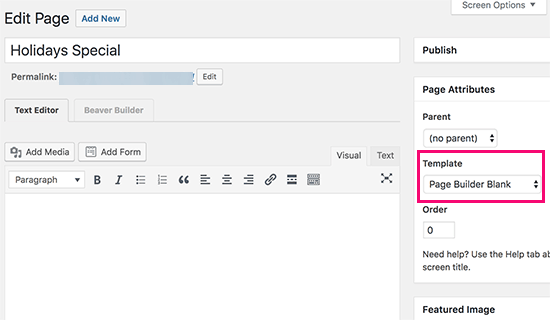
Next, you need to head over to Pages » Add New page to create your first landing page. Many WordPress themes now include a page builder or a full-width template. These templates are designed to work with page builder plugins.

If your theme doesn’t have such a template, then you can create one on your own. For detailed instructions, see our guide on how to create a full width page in WordPress.

Select a page builder or full-width template from the ‘Page Attributes’ box in the right column and now save your page to apply the changes.

Select a template

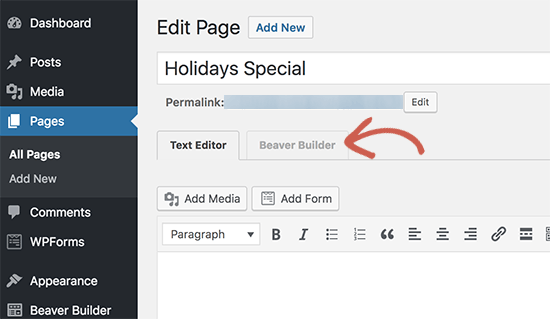
You are now ready to make a landing page. Click on the Beaver Builder tab above the post editor to launch the builder interface.

Launch Beaver Builder

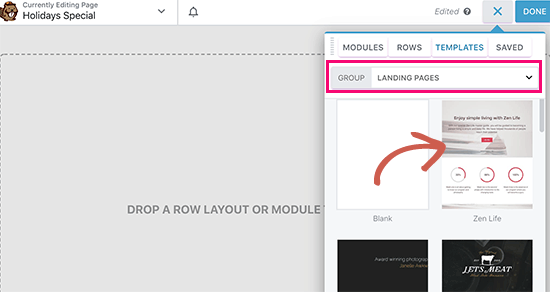
Beaver Builder will open with your existing page template. You need to click on the add button on the top right corner of the screen and switch to the templates tab.

Choose a template

Beaver Builder comes with several ready-made templates. Select ‘Landing Pages’ from the group drop-down menu and then choose a template that looks close to what you have in your mind.

Once you select a template, Beaver Builder will load it in the preview window.

Point and click to edit

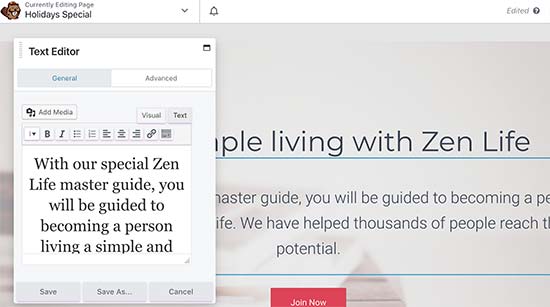
You can now point and click on any item to edit it. You can change the text, change background color or images, adjust width and height of the rows and columns.

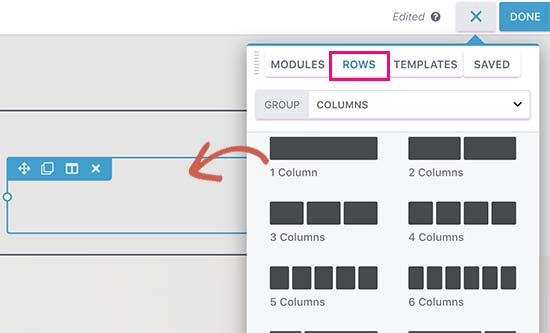
You can add or remove content items from your template. Simply click on the add button and switch to the rows tab. You can add either single or multiple columns.

Add rows to your landing page

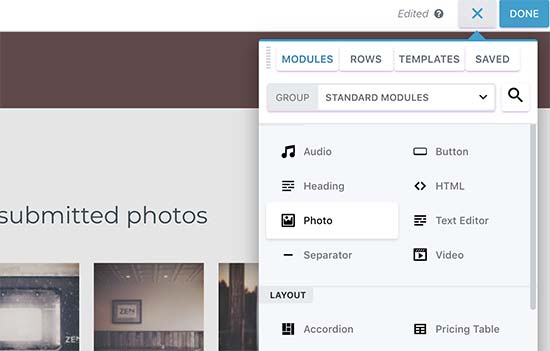
After adding a row, switch to the modules tab. Modules are content elements that you can add to your landing page. Beaver builder comes with all the essential modules including text, headings, buttons, video, audio, animated countdown timer, and more.

Add modules to your template

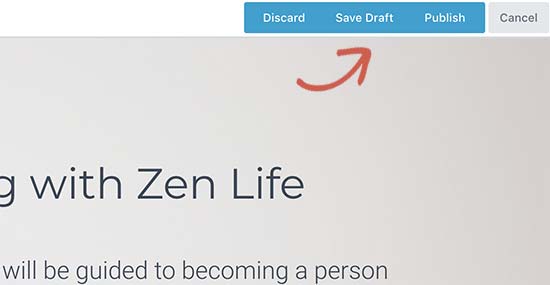
Once you are satisfied with the design, you can click on the ‘Done’ button at the top and then save or publish your page.

Save or publish your landing page

You can now visit the page to view your landing page in action. Feel free to edit it again if you need to adjust, add, or remove anything.

Preview your landing page

Creating a Landing Page in WordPress using Leadpages

Leadpages is another easy to use platform for creating beautiful landing pages and adding them to your WordPress site.

Unlike BeaverBuilder, LeadPages is a standalone landing page builder which means you can use it with or without a WordPress site.

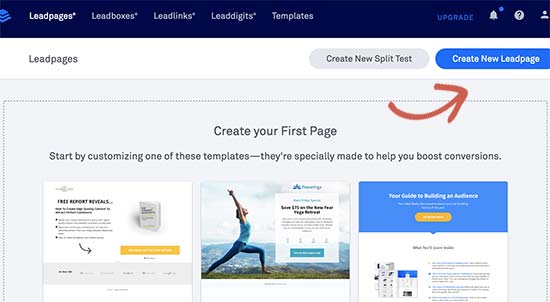
First, you need to visit Leadpages website and sign up for an account. After that you will see the Leadpages dashboard where you need to click on the ‘Create new Leadpage’ button.

Creating a new landing page with Leadpages

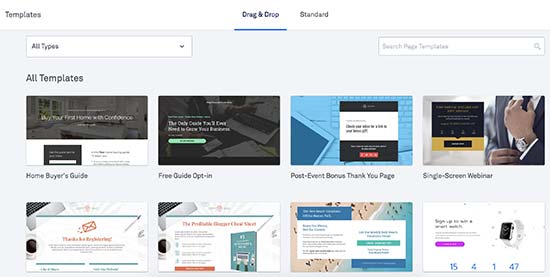
On the next screen, you will be asked to choose a template. Leadpages comes with dozens of beautifully designed templates which are neatly organized into different categories.

Choose a template for your landing page

Click on any template to preview it. You need to select a template that looks closest to what you have in mind and then click on the ‘Use this template’ button to continue.

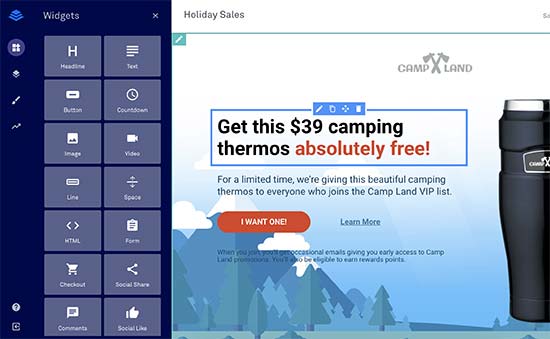
This will launch the Leadpages builder interface. It is a drag and drop interface where you can just point and click on an item to edit it.

Leadpages builder

You can now point and click to edit any item on the page. You can replace images, text, background images, and more. You can also add new widgets from the left column.

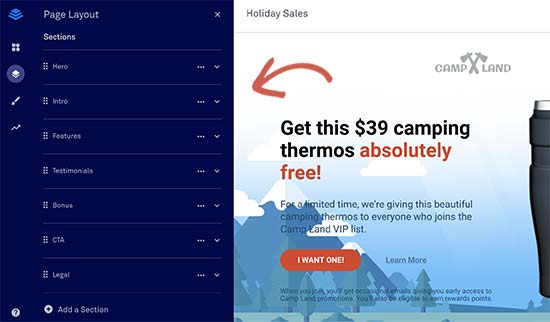
You can also adjust different sections of your landing page by clicking on the page layout tab. Simply drag and drop sections to adjust them on the page. You can also add new sections or remove them.

Drag and drop page layout

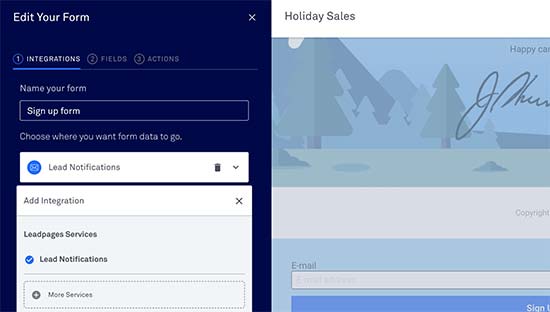
Leadpages also connects with several third-party apps including all top email marketing services. Simply add a sign-up form to your landing page and then click on ‘Add Integration’ button.

Add integrations

Once you are finished editing your landing page, you can click on the publish button to make it live.

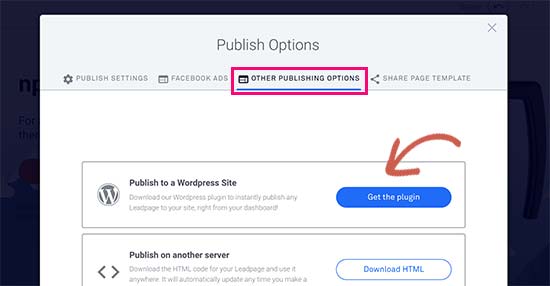
After that you need to click on the ‘Publish Options’ button and switch to ‘Other publishing options’ tab. From here you can download the Leadpages WordPress plugin.

Get WordPress plugin

Next, you need to switch to your WordPress site to install and activate the plugin. For more details, see our step by step guide on how to install a WordPress plugin.

Upon activation, you need to visit the Leadpages menu in your WordPress admin area to login with your Leadpages account.

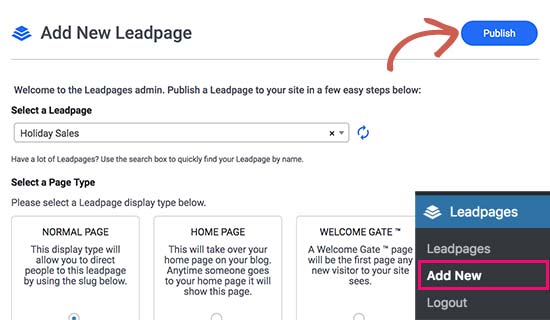
Once logged in, go to Leadpages » Add New page. You will be able to see your landing page listed there with few options.

You can publish this page as a normal landing page, homepage, a welcome gate, or a 404 error page. You can also choose a URL slug for your landing page.

Publish your landing page to WordPress

After reviewing the options, go ahead and click on the publish button. Leadpages will now publish the page on your WordPress site.

You can now visit this page on your website to see it in action. You can make any changes you want from the Leadpages website and those changes will show up on your site.

We hope this article helped you learn how to create a landing page with WordPress. You may also want to see our tips on driving more traffic to your WordPress site.

If you liked this article, then please subscribe to our YouTube Channel for WordPress video tutorials. You can also find us on Twitter and Facebook.

The post How to Create a Landing Page With WordPress appeared first on WPBeginner.

How to Install WordPress on Amazon Web Services

Recently one of our readers asked us to cover how to install WordPress on Amazon Web Services (AWS). Often reserved for larger projects, Amazon Web Services is a powerful cloud computing platform that allows anyone to harness the power of Amazon’s superior infrastructure on a pay as you go basis. In this article, we will show you how to install WordPress on Amazon Web Services.
Installing WordPress on Amazon Web Services

Note: If you are just starting a website, then we recommend using one of the easier solutions from our how to install WordPress guide.

We have split this article in two methods. The first method is a manual process that is very technical and complicated. The second method is an easier solution for beginners because it allows you to use AWS infrastructure by going through a preferred managed WordPress hosting solution.

  1. Manually Install WordPress on AWS
  2. Install WordPress on AWS through Managed Hosting Solution

Method 1. Creating a Custom WordPress Install on AWS

First thing you need to do is visit the Amazon Web Services website. You can create a free account, but you will need to enter credit card information. Amazon will verify your identity by sending a $1 charge to your card.

Once your account is verified, you need to login to your AWS console and click on the ‘Services’ menu. Under the compute section, you need to select EC2 to continue.
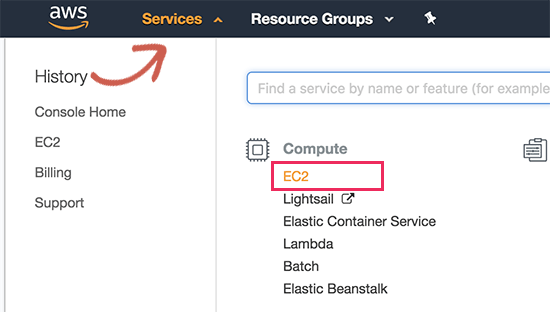
Launch AWS EC2 service

EC2 is AWS’s cloud computing platform that allows you to create virtual machines and run web apps like WordPress. For more details on what’s a virtual machine, read our guide on what is a VPS and do you need it.

Next, click on the ‘Launch Instance’ button to launch and configure your instance settings.
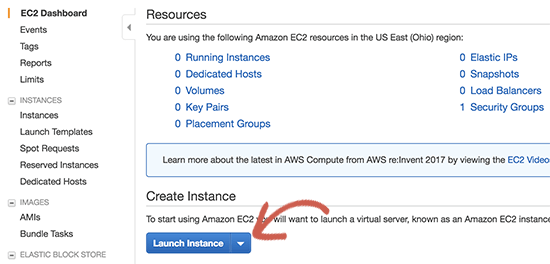
Launch your EC2 instance

You will need to select an Amazon Machine Image. These are pre-configured software stacks that you can install with a single click.

Under the ‘AWS Marketplace’ search for WordPress and then select ‘WordPress by Bitnami’.
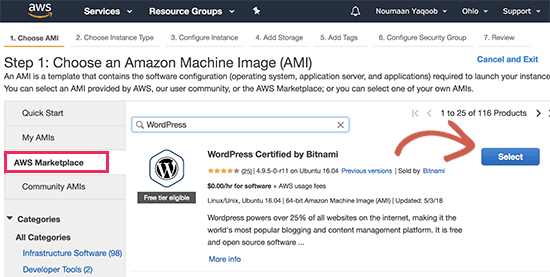
Install Amazon Machine Image

You will now see a pricing popup where you simply need to click on the continue button.

On the next screen, you will be asked to choose an instance type. You can go ahead and select td.micro free tier and then click on ‘Configure instance details’ button.
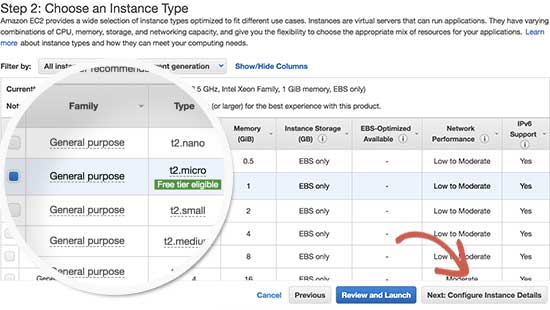
Select instance type

On the next screen, you don’t need to change anything. Simply click on ‘Next: Add Storage’ and then click ‘Next: Add Tags’ buttons.

Now we will enter a name for this instance as a tag. Click on the Add Tag button and enter ‘Name’ as key, and ‘MyWordPress’ as value.
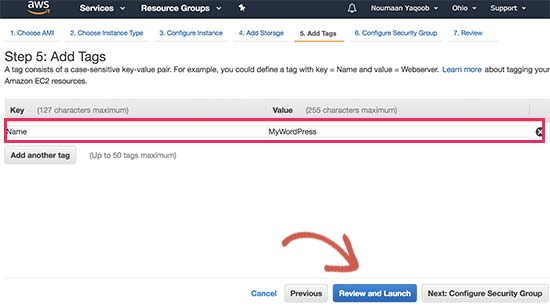
Review and launch

Click on the ‘Review and launch’ button to continue.

You will now be presented with an overview of your EC2 Instance configuration. Click on the ‘Launch’ button to start your instance.
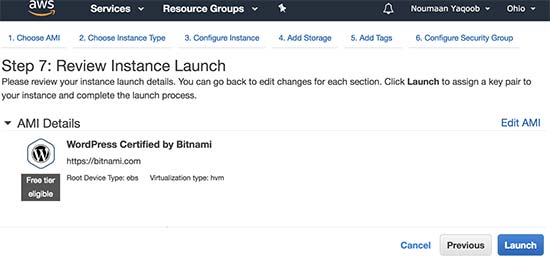
Review instance settings and launch

Next, you will be asked to select pair keys. You need to select ‘Proceed without a key pair’ and then check the box below it.
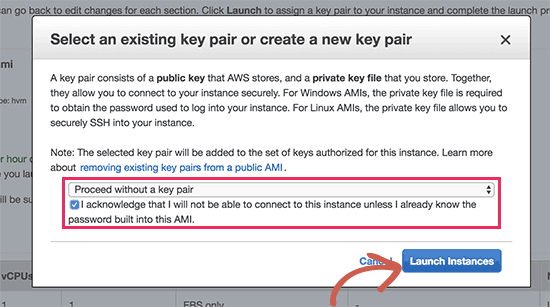
Skip paired keys

After that click on the launch instances button to store your settings and launch your EC2 instance.

AWS will now show a success message. Click on the ‘View Instances’ button at the bottom right corner of the screen.

You will now be able to see your WordPress instance running.
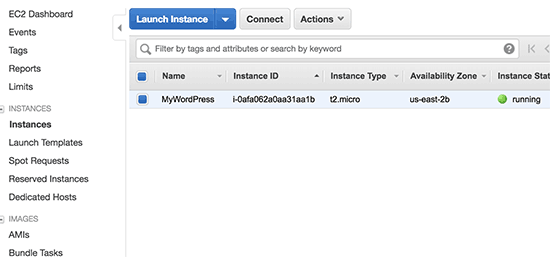
WordPress instance running

To test your WordPress site, you need to locate its public IP address. You can find it under IPV4 Public IP column next to your instance.
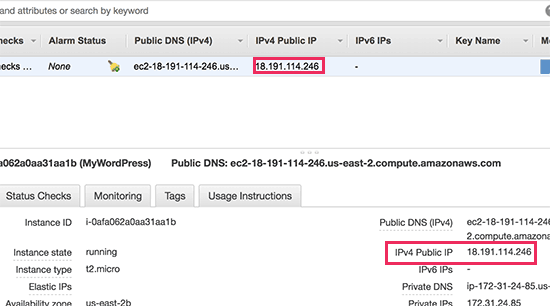
Your WordPress site's public IP address

You can now copy this IP address and enter it in the address bar of a new browser tab to view your website. You will be able to see your WordPress site with the default theme.

Default WordPress install

To visit your WordPress admin area, simply add /wp-admin/ next to your site’s public IP address, like this:

http://18.191.114.246/wp-admin

You will now see the default WordPress login page.
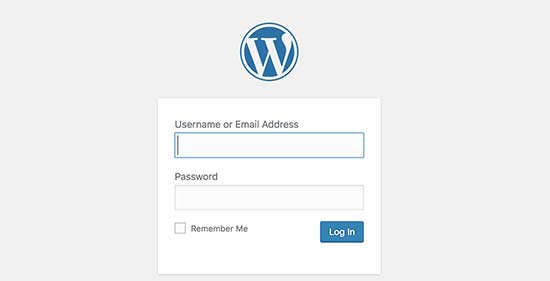
WordPress login screen

However, you will need to know the username and password to access the admin area.

You can get that by going back to your EC2 Console and clicking on the ‘Actions’ button and then select Instance Settings » Get System Log.

This will bring up a log file in a popup window with lots of text. You will need to scroll down towards the bottom, and you will find a line with ‘Setting Bitnami user password to’ surrounded by ## signs. You will also see the default username set by the app.
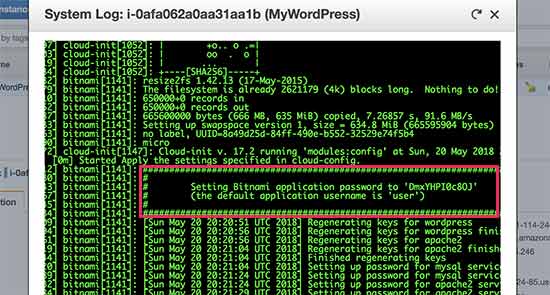
Copy your WordPress password

You can now copy the username / password and enter it on the login screen of your WordPress site.

Congratulations, you have successfully installed WordPress on Amazon Web Services. However, your website is still only accessible by using the IP address.

If you want to point a domain name to your AWS WordPress install, then you will need to connect your domain name to AWS’s DNS servers.

See our step by step guide on how to register a domain name.

Once you have registered your domain name, you’re ready to add it to your AWS instance.

Add a Domain Name to Your WordPress Site on Amazon Web Services

First, go to your EC2 instances dashboard and then from the left column click on ‘Elastic IPS’ under ‘Network & Security’ section.
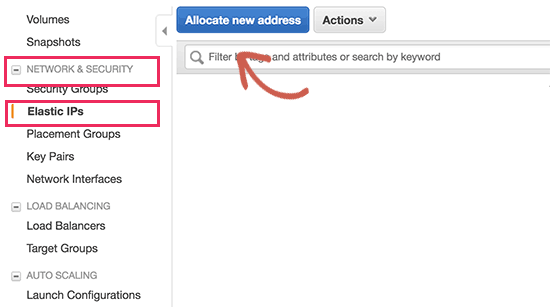
Allocate new elastic IP

Next, click on the ‘Allocate New Address’ button to continue.

You will be asked how do you want to use the IP address. Simply click on the Allocate button to continue.

AWS will now create a new elastic IP for your WordPress EC2 instance. You will see your IP address listed in a table. Simply select the IP address row and then select ‘Associate Address’ under the ‘Actions’ button.
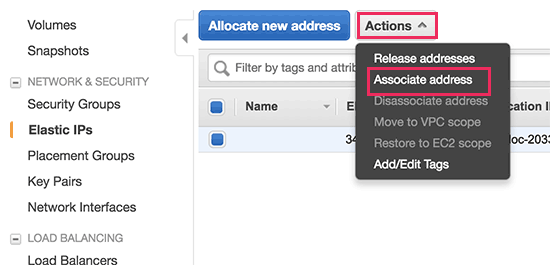
Associate address

On the next screen, select your WordPress instance from the drop-down menu and click on the Associate button.
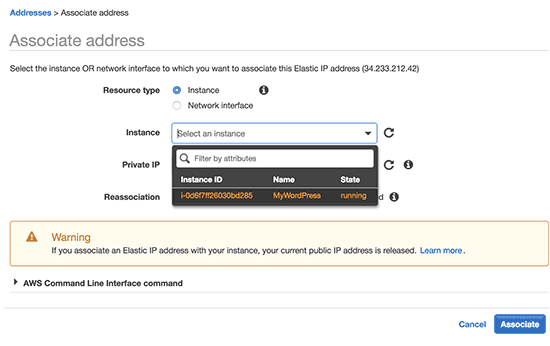
Associate  IP to your WordPress instance

You will now see your Elastic IP listed in the table. Go ahead and copy the IP address and paste it into a text editor like Notepad. We will need it in the next step.
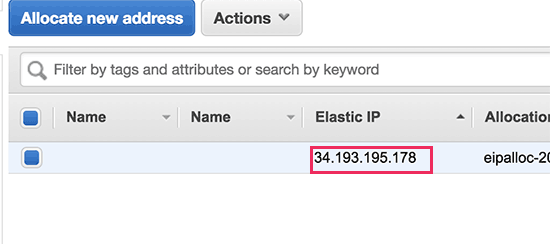
Copy your elastic IP

Next, you need to click on the ‘Services’ menu at the top and search for ‘Route53′. This is Amazon web services’ DNS management service that allows you to route traffic to your EC2 instance.
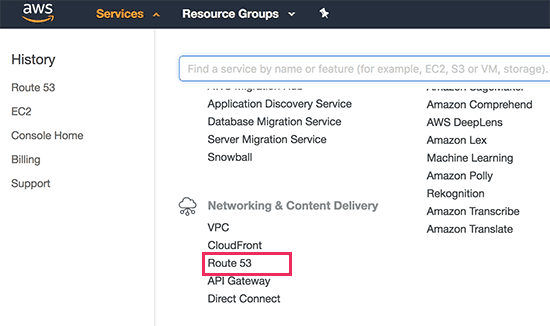
Route53 service

On the next page, click on the ‘Get Started Now’ button under the DNS management section.
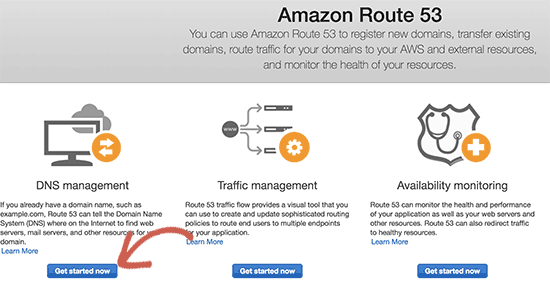
Get started with DNS management

This will bring you to hosted zones section. Go ahead and click on the ‘Create hosted zone’ button.
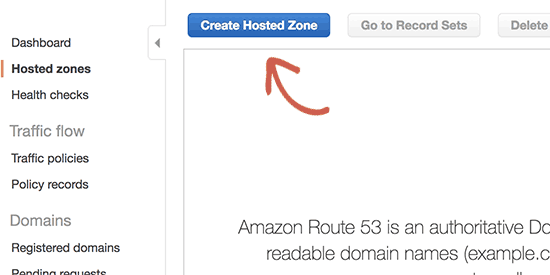
Create hosted zone button

Next, you need to add your domain name and click on the create button to add it to a hosted zone.
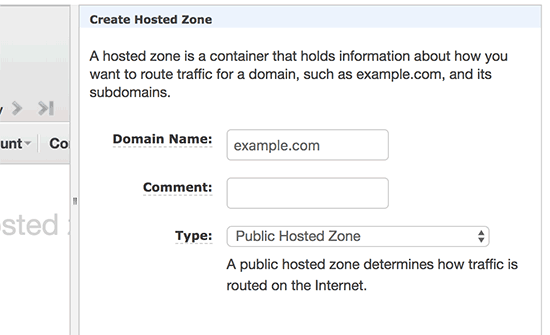
Add domain to a hosted zone

After you have added your domain to a hosted zone, click on the ‘Create Record Set’ button. Now you need to enter www next to ‘Name’ field. Enter the elastic IP you copied earlier in the ‘Value’ field and then click on create button.
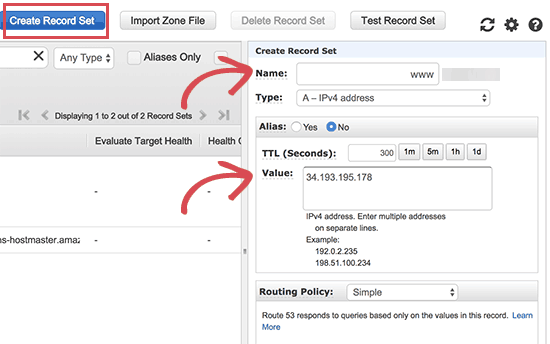
Add record set

The A record will now be added to your hosted zone along with your domain name. From the left column, you need to copy the lines under NS field. These are Nameserver addresses that you will need in the next step.

Now you need to go to your domain name registrar website and edit your domain name settings. The screenshots below may vary from your provider, but the basic instructions are similar for each provider.

Under your domain’s DNS Nameservers settings, enter the nameserver addresses you copied earlier.
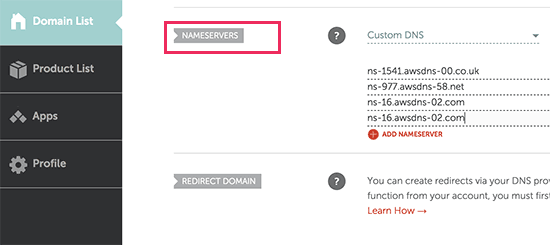
Add DNS nameservers

Don’t forget to save your changes. You can now visit the domain name you added and it will take you to your WordPress site on Amazon Web Services.

Note: DNS changes may take some time to take effect.

Method 2. Using Amazon Web Services via Managed WordPress Hosting

As you may have noticed that setting up a custom WordPress install on Amazon web services is a very technical and complicated process.

The cloud computing infrastructure provided by Amazon Web Services is a pay as you go solution. This means that traffic spikes will increase your hosting bill significantly. Not to mention, that you will still be responsible for managing your own services which is just extra work.

An easier way to use WordPress on Amazon Web Services without any hassle is by using a managed WordPress hosting provider.

We recommend using WP Engine. They run part of their hosting platform on the AWS infrastructure, and you don’t have to worry about traffic spikes, server management, or WordPress maintenance.

Another great alternative is Pagely, a premium managed WordPress hosting provider. They also run their platform on Amazon Web Services and offer a hassle-free, WordPress environment to grow your business.

We hope this article helped you learn how to install WordPress on Amazon Web Services. You may also want to see our ultimate guide on improving WordPress speed and performance with step by step instructions.

If you liked this article, then please subscribe to our YouTube Channel for WordPress video tutorials. You can also find us on Twitter and Facebook.

The post How to Install WordPress on Amazon Web Services appeared first on WPBeginner.
How to Upload a HTML Page to WordPress without 404 Errors

Do you want to upload a HTML page to your WordPress site? Sometimes you may need to add a static HTML page and make it accessible along with your WordPress site. In this article, we will show you how to properly upload a HTML page to your WordPress site without causing 404 errors.

How to Upload HTML Page to WordPress Site

Why Upload HTML Pages to WordPress?

WordPress comes with a built-in content type to add pages to your website. Often WordPress themes add pre-designed page templates to display your pages.

There are even WordPress landing page plugins that allow you to create beautiful page templates with a drag and drop builder.

This means that in most cases, you shouldn’t need to upload a HTML page to your WordPress site.

However, sometimes a user may have static HTML pages from their old website or a static template that they really like and want to use. In these scenarios, you will need to upload your HTML page to WordPress.

Since, WordPress comes with its own SEO friendly URL structure, it can cause a 404 error if you simply uploaded your HTML page and tried to access it.

That being said, let’s take a look at how to upload a HTML page to your WordPress site without causing 404 errors.

Uploading HTML Page to WordPress Site

Before you upload your HTML page to the WordPress site, you need to make sure that the ‘index.html’ file is renamed to ‘index.php’.

HTML Template File

After that, you need to add all files including the HTML page, CSS, and other folders to a Zip archive.

Windows users can right-click and select Send to » Compressed Zip Folder option to create a zip file. Next, simply drag and drop all files and folders for your HTML page to the zip file.

Zip Archive HTML Page

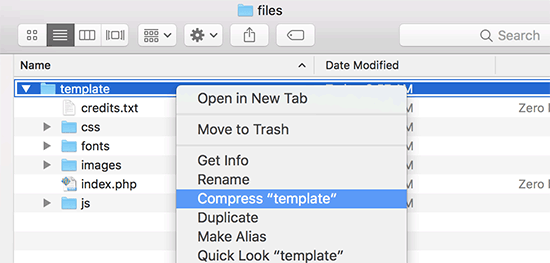
Mac users can select the parent folder containing all files and folders, and then right-click to select ‘Compress folder’ option.

Create zip file in Mac

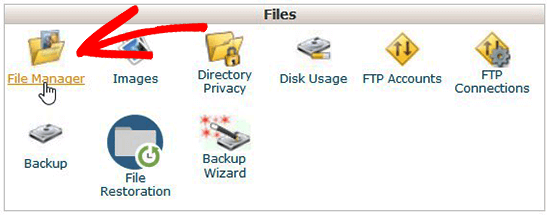
Next, you need to go to the cPanel of your WordPress hosting account. In the cPanel, you need to scroll down to the Files section and then click on the File Manager app.

Open File Manager

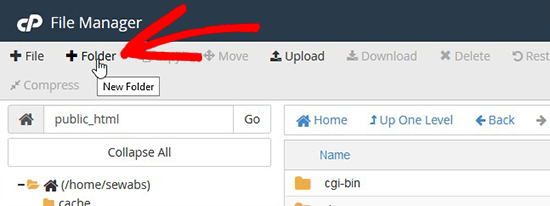
Once you are in File Manager, you need to navigate to the website root folder which is usually called public_html and contains all your WordPress files folders. From there, you need to click on the Folder link from the top menu to create a new empty folder.

Create a New Folder

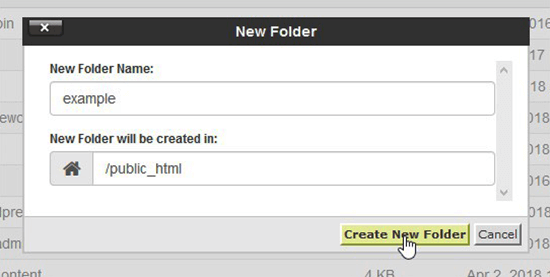
A popup will open where you need to add a name for the new folder. Use a name that you want to use as the URL of your HTML page and then click on the Create New Folder button.

Create new folder in cPanel

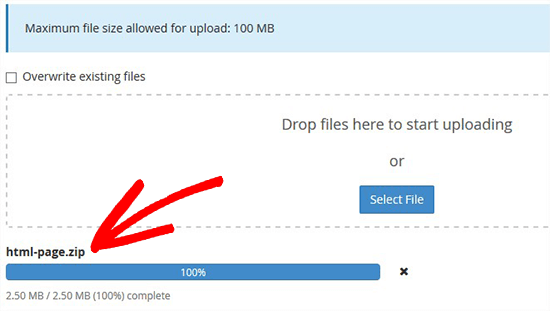
After creating the folder successfully, you need to open it and click on the Upload button from the top menu to select and upload the zip file you created earlier from your computer. You’ll see the progress bar while the zip file uploads to your site.

Upload Zipped Template File

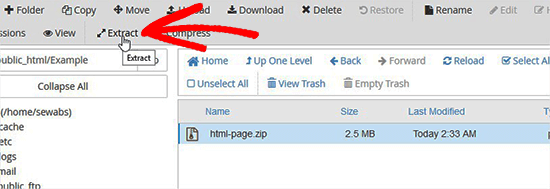
Once uploaded, you need to select the zip file and then click on Extract button from the top menu.

Extract Files

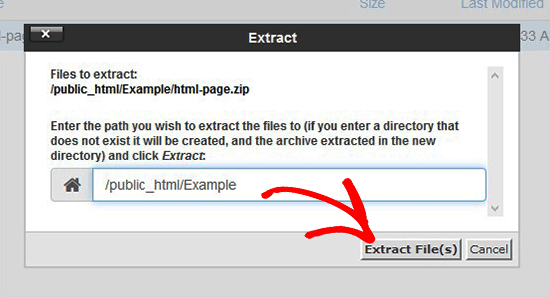
You will be asked where to extract the files. Simply select the same new folder that you created and click on the Extract File(s) button.

Extract Files in New Folder

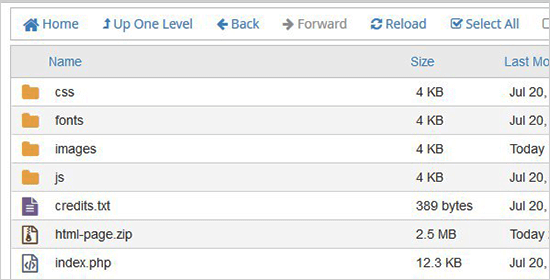
File Manager will now extract the zip file, and you will be able to see files in your folder.

Note: You can now delete the zip file from here. It doesn’t affect your HTML page or any other folders that are extracted.

Extracted Folder

Now you can visit this page in the browser by using the name of the folder (For example, yourwebsite.com/example). If your server doesn’t support the redirection, then you may see a 404 error. It happens because your ‘index.php’ file is not redirected on loading the URL in browser.

It is one of the common WordPress errors and can be fixed easily.

Using the File Manager app, you need to edit .htaccess file in your website’s root folder and add the following code:


RewriteRule ^(.*)index\.(php|html?)$ /$1 [R=301,NC,L]

This code will redirect your ‘index.php’ file and load it in the browser. If you are using a case-sensitive name for a file or folder, then the above code will also redirect that to show you the content.

We hope this article helped you learn how to upload an HTML page to your WordPress site without 404 error. You may want to see our comparison of WordPress vs static HTML to learn which one is better for your business. Also for creating landing pages, we recommend taking a look at the best WordPress drag & drop page builder plugins.

If you liked this article, then please subscribe to our YouTube Channel for WordPress video tutorials. You can also find us on Twitter and Facebook.

The post How to Upload a HTML Page to WordPress without 404 Errors appeared first on WPBeginner.
How to Fix Custom Fields Not Showing in WordPress

Are you unable to find the custom fields option on your WordPress site? Custom field is an advance WordPress feature that helps you add custom content to your WordPress posts and pages by following various WordPress tutorials. In this article, we will show you how to easily fix custom fields not showing issue in WordPress.

Fix missing custom fields in WordPress

Fixing Custom Fields Not Showing Issue in WordPress

Custom fields are typically associated with WordPress post, pages, or custom post types. Often you will find custom fields mentioned in various WordPress tutorials around the web, but you will likely not see the custom fields option on your site specially if you recently started your WordPress blog.

In the past, custom fields were visible by default on the post edit screen of all WordPress sites. However since it is an advance feature, the WordPress core development team decided to hide custom fields by default for all new users in the WordPress 3.1 release.

They also made it easy for anyone to make them visible with just two clicks from within the post edit screen.

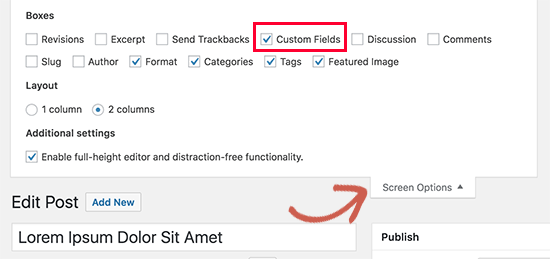
Simply create or edit an existing post / page, and then click on the ‘Screen Options‘ button at the top right corner of the screen. This will show you a menu with several options that you can show or hide on your post edit screen.

Go ahead and click on the checkbox next to ‘Custom Fields’ option.

Show custom fields

Note: If you don’t see the Custom Fields option on your site, then please scroll to the troubleshooting option below in the article.

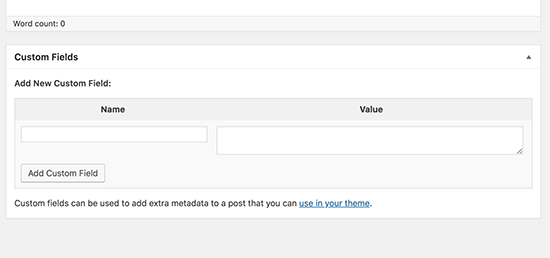
You can now scroll down on the post edit screen, and you will notice a new meta box labeled ‘Custom Fields’ below your post editor.
Custom Fields box

Since WordPress remembers your display choice, it will continue to display the custom fields box whenever you are editing posts on your website.

You can use this box to add, edit, and delete custom fields and their values.

What are Custom Fields? What Can You Do with them?

By default, when you write a new post, page, or any content type, WordPress saves it into two different areas. The first part is the body of your content that you add using the post editor.

The second part is the information about that particular content. For example, title, author name, date / time, and more. This bit of information about the post is called metadata.
Apart from the default post metadata, WordPress also allows you to save custom metadata by using custom fields.

To learn more, see our beginner’s guide to WordPress custom fields with examples, tips, and tricks that you can use on your website.

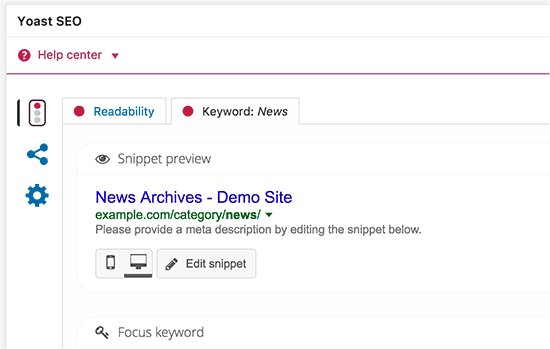
WordPress developers use custom fields to store custom post metadata for your posts. For example, the Yoast SEO plugin uses custom fields to store SEO settings for your posts.

Yoast SEO meta box

However instead of using the default custom fields box shown above, these plugin developers create their own custom meta boxes. This makes it easier for users to input information.

If you want to create a custom meta box to easily input custom metadata, then see our guide on how to add custom meta boxes in WordPress.

Troubleshooting

Recently one of our readers came to us with a problem where the Custom Fields option was missing from the WordPress screen options. After some investigation, we were able to find the cause of the issue.

If your WordPress site is missing the custom fields option under the ‘Screen Options’ menu, then you need to check if you have the Advanced Custom Fields (ACF) plugin active on your site.

ACF is a very popular WordPress plugin that developers use to create custom meta boxes. ACF is running on over 1 million websites.

In ACF version 5.5.13, they added a setting to remove the default WordPress custom field metabox to speed up the load times on the post edit page. The idea being that you shouldn’t need the default metabox since you’re using ACF.

However if you need to have the default WordPress custom field metabox enabled, then you need to add the following code to your WordPress theme’s functions.php file.

add_filter('acf/settings/remove_wp_meta_box', '__return_false');

This will solve the custom fields option missing issue in WordPress.

We hope this article helped you fix the custom fields not showing issue on your WordPress site. You may also want to see our ultimate list of most useful WordPress tips, tricks, and hacks.

If you liked this article, then please subscribe to our YouTube Channel for WordPress video tutorials. You can also find us on Twitter and Facebook.

The post How to Fix Custom Fields Not Showing in WordPress appeared first on WPBeginner.