When your default layout doesn’t fit with how your customers browse and buy products, a WooCommerce order form could be exactly what you need. For many online stores, adding a WooCommerce bulk order form is one of the most efficient ways to improve the customer experience, increase conversion rates and boost sales. Shops with large product ... Read moreWooCommerce Order Form: Increase Your Conversion Rates
Are you looking for the best product review plugins for WordPress? If you regularly add detailed product reviews on your website, then you can use a product review plugin to make them more SEO friendly. In this article, we have hand-picked the best product review plugins for WordPress.
Why Use Product Review Plugin in WordPress?
What do you do when you want to buy something? If you are like most people, then you probably check out product reviews to compare different options.
That’s why there are so many popular reviews websites like Yelp, TripAdvisor, Rotten Tomatoes, and more. Even Amazon, world’s largest online store features product reviews so prominently.
Many WordPress site owners write product reviews to make money online. Some get paid directly by the company for the review while others use affiliate marketing to earn revenue.
You can write a product review as a blog post. However, a plain blog post does not use product review format supported by search engines. This means your article will not be highlighted in search results as a review.
For better SEO, you need to write your reviews with schema.org rich snippets format. A product review plugin helps you easily write search engine friendly reviews that also look great on your website.
Let’s take a look at some of the best product review plugins for WordPress.
WP Product Review is the best WordPress product review plugin. It comes with a detailed settings section allowing you to choose how you want to manage and display reviews on your website.
Adding a product review is quite easy. Simply select the product review option when writing a blog post and the plugin will show you all settings to write your review. You can break down your review into features, add images, pros and cons, and more.
It comes with sidebar widgets allowing you to showcase your reviews. You can also use it to collect user submitted reviews or allow your users to add their own rating and reviews in the comments. All reviews are displayed in schema.org rich snippet format for maximum SEO benefit.
As we mentioned earlier, your reviews need to be in a proper SEO friendly format. All in one Schema Rich Snippets plugin allows you to write different types of posts using the rich snippets format including product reviews.
Simply select ‘Item Review’ from a drop-down menu when writing a blog post, and the plugin will show review options like reviewer name, product name, and star rating. It will display this information below your blog post with the correct SEO friendly markup.
The plugin can also be used to add articles, products, recipes, software and more. For detailed instructions see our article on how to add rich snippets in WordPress.
WP Review is another excellent option to add product reviews in WordPress. It is beginner friendly and quite easy to use. Upon activation, simply write a new post and select the review type.
It supports three types of review ratings stars, points, and percentage. You can also add different ratings for individual features if you want. It also supports user ratings which simply allows users to submit their own ratings for a product.
It also comes with styling options located under Settings » WP Review page. From here you can choose your own colors for the review box to match your theme colors.
Rich Reviews is a simple free plugin that allows you to add reviews of your own products, services, or website. You can also allow your users to submit reviews.
It uses shortcodes to display reviews, and you can display a review anywhere on your website including posts, pages, and sidebar widgets.
If you are collecting user-submitted reviews, then this plugin allows you to manually approve each review before publishing it. The plugin’s settings panel comes with detailed instructions on how to use it.
WP Customer Reviews plugin allows you to collect customers reviews as well as create your own product reviews. Upon activation, simply edit a blog post where you want to add a product review and check the reviews option.
Next, you need to go to the Reviews » All Reviews page and click on the add new button. After that, you can select the post and write your review. The plugin also allows you to enable user submitted reviews which you can then approve and publish to display on your website.
This plugin also allows you to customize the review form shown to users and comes with a how to use page with detailed instructions.
Site Reviews allows you to collect customer reviews for your products, services, or local business. It comes with a simple settings page allowing you to control how you want to gather reviews, and how you want to display them. You can customize the review form and display it anywhere on your website using a shortcode.
You can also display reviews using the shortcode. The plugin adds an easy to use shortcode inserter on the post edit screen to manually display reviews, review form, and review summary.
We hope this article helped you find the best product review plugins for WordPress. You may also want to see our list of the best testimonial plugins for WordPress.
If you liked this article, then please subscribe to our YouTube Channel for WordPress video tutorials. You can also find us on Twitter and Facebook.
Need to accept donations on your WordPress site? Then you need one of these WordPress donation plugins! No matter if you’re a non-profit looking to run full-on fundraising campaigns or a blogger looking for a simple solution to accept donations, you can probably find a plugin that works for you on this list. You’ll even ... Read more7 Best WordPress Donation Plugins in 2018: One-Off Donations To Fundraising
Do you want to create a referral program in WordPress? Referral programs are a great way to get more people to promote your products to a larger audience. In this article, we will show you how to easily create a referral program in WordPress and get more customers.
Why Create a Referral Program in WordPress?
Referral program or affiliate program allows you to get more people to help you sell your products and services. In return, you pay them a small commission on each sale they make. For more details, see our ultimate affiliate marketing guide to see how it works.
In simple terms, it is like building your own sales army without paying them a salary.
To manage a referral or affiliate program, you will need a tool that can manage your affiliate program. It will allow affiliate marketers to join your referral program. It will also help you track sales and traffic sent by each affiliate partner.
Why Use AffiliateWP to a Create Referral Program in WordPress?
Large number of addons including free, paid, and third-party add-ons to extend AffiliateWP
Real-time affiliate tracking with detailed reports for you and your affiliate partners
Cons of Using AffiliateWP
Here are some of the disadvantages of using AffiliateWP to manage your referral program.
It has limited reach compared to affiliate networks which already have thousands of affiliate marketers actively looking for products to promote
It does not come with advanced fraud detection features that are offered by popular affiliate networks.
There is no automatic payout system, and you will have to manually send payments each month
Does not calculate taxes and 1099 forms for payouts. As a business owner, you will have to manage it on your own.
It is less convenient for affiliate partners. They will have to create an account and login to view their reports, compared to affiliate networks where they can see all their earnings at one place.
A good alternative to AffiliateWP would be ShareASale, which is a large affiliate network with thousands of skilled affiliate marketers actively looking for new products to recommend.
For a more detailed comparison, you may want to see this article on setting up your own affiliate program by Syed Balkhi (Founder and CEO of WPBeginner).
With that being said, let’s take a look at how to create a referral program in WordPress using AffiliateWP.
Upon activation, you need to visit Affiliates » Settings page to enter your license key. You can find this information under your account on AffiliateWP website.
After activating your license key, you need to select a page to be used for Affiliate Area. AffiliateWP automatically creates one for you, but if you want to use a different page, then you can select it here.
Next, you need to choose the terms of service page. You can check out affiliate program terms pages on other websites to create one for your own site. After creating the page you can select it here.
After that, you need to review other settings on the page and set them up based on your own referral program policies.
Don’t forget to click on the ‘Save Changes’ button to store your settings.
Next, you need to switch to the integrations tab on the Settings page. From here you need to select the integrations you want to enable. AffiliateWP supports most popular eCommerce, membership, contact form, and LMS plugins.
Click on the save changes button and then switch to ‘Emails’ tab on the Settings page.
AffiliateWP allows you to edit emails sent out to your affiliates. You can also upload your business logo, create your own email templates, and choose the email address you want to use to send out affiliate emails.
Lastly, switch to the Misc tab on the settings page to set up advanced settings for your affiliate program. The first option on the page is to allow affiliates to register themselves. You can check this if you want affiliates to be able to sign up for your referral program.
Next, you would also want to enable reCAPTCHA to prevent bots from registering as affiliates.
You will need to carefully review each setting and change them as needed. Don’t forget to click on the save changes button to store your settings.
Adding Links to Your Referral Program
Now that you have set up your referral program, the next step is to add links to it. For example, if you have enabled affiliate registration, then you may want to add a link to affiliate area so that interested marketers can register themselves.
Simply go to Appearance » Menus page and add your affiliate area page to a navigation menu. For detailed instructions, see our beginner’s guide to adding navigation menus in WordPress.
Clicking on the link will take users to the affiliate area where they can register to join as a new affiliate, or login to their account to see their reports.
Managing Your Referral Program in AffiliateWP
AffiliateWP comes with powerful tools to manage your affiliates, view reports, and effectively run your affiliate program without leaving WordPress.
To view affiliates that have joined your referral program, simply go to Affiliates » Affiliates page.
On this page, you can see a list of all your affiliate partners, their earnings, unpaid earnings, referral visits, and more. You can edit any affiliate account individually.
To view each sale made through a referral partner, you need to visit Affiliates » Referrals page. Here you will see all referral sales, affiliate partner, amount, and more. You can also click on ‘Reject’ link if you suspect a referral to be fraudulent.
Viewing Your Referral Program Reports in AffiliateWP
Reporting is crucial to run a successful referral program, and AffiliateWP comes with powerful reporting features. Head over to Affiliates » Affiliates page for a full overview.
You can filter the reporting period by time and specific affiliate partner name. You can also view reports for affiliates, referral visits, and campaigns.
Sending Payments to Your Affiliates
Unfortunately, AffiliateWP doesn’t come with automatic payouts, which means you will have to manually send payments. AffiliateWP makes it easy to manage your payouts.
Depending on when and how often you want to pay your referral partners, you can head over to the Affiliates » Referrals page and click on the ‘Generate Payout File’ button.
This will generate a payout file which is compatible with PayPal’s mass payment system. The file also works with Skrill and other payment services that support mass payment feature. It contains the amount and payment email addresses for all your unpaid referrals.
We hope this article helped you learn how to create a referral program in WordPress. You may also want to see our ultimate step by step WordPress SEO guide for beginners.
If you liked this article, then please subscribe to our YouTube Channel for WordPress video tutorials. You can also find us on Twitter and Facebook.
Do you want to create an interactive image for your WordPress blog? An interactive image allows you to highlight, link, and animate certain areas of your image. In this article, we will show you how to create interactive images in WordPress.
What is an Interactive Image?
An interactive image has hotspot areas, highlights, links, colors, and more. It’s different from a simple image that you upload in WordPress. Interactive images are eye-catching and attract users to see details of the image. You can add description on different parts of an image, add links to pages, highlight sections, and more.
In this image, you can see the description of fruits on mouse over to different bars. You can use these interactive images to boost user engagement and time spent on site.
Let’s take a look on how you can draw attention of your visitors with interactive images.
Upon activation, you’ll see a new custom post type in your WordPress admin area. You need to go to the Draw Attention » Add New page to create an interactive image.
Start by adding a title for this new interactive image, so you can easily remember it. On this page, you can create interactive design on new or previously uploaded images. You can add a new image by clicking on the upload image icon, or you can select an image from your WordPress media library.
Next, you need to click on Publish button.
After publishing, the plugin allows you to edit the image and highlight specific areas, add colors, links, draw hotspot areas, and more. You can scroll down to the Hotspot Areas section and expand the clickable area to preview image.
Simply move your mouse and draw clickable areas on the image. You can easily select the hotspot areas and expand them to create a selection.
After drawing the hotspot area, you need to scroll down to the Action dropdown and select an action for the selected area on image. If you choose Show More Info, then you can simply add a description to explain the hotspot area on the image. You can also add a link on the selected area by using the ‘Go to URL’ option.
You can also manage general settings and highlight styling for action link, action text, info background and more. These settings can help in making your image more interactive.
Next you need to click on the Update button and copy the shortcode to add it in your WordPress post or page.
The plugin allows you to create as many interactive images as you need using your previously uploaded or new images.
Import and Export Interactive Images
If you are working on multiple sites and want to import / export interactive images, then it requires the same Draw Attention plugin on both sites.
On the first site, you need to visit Draw Attention » Import / Export page and check mark the images that you want to export. Next, click on the Generate Export Code button and copy the code.
After that you need to go to the next website and make sure that you have Draw Attention plugin activated. Next, you need to go to Draw Attention » Import / Export page from WordPress admin and paste the code in import field.
Go ahead and click on the Import button and your images will be imported will all the interactive details that you added previously.
We hope this article helped you learn how to create interactive images in WordPress. You may also want to check our guide on how to lazy load images in WordPress.
If you liked this article, then please subscribe to our YouTube Channel for WordPress video tutorials. You can also find us on Twitter and Facebook.
Do you want to instantly switch between user accounts in WordPress? Sometimes when testing new features on your website, you may need to switch back and forth between user accounts with different user roles. While you can manually log out and login to the new account, it’s not the most efficient use of your time. In this article, we will show you how to instantly switch between user accounts in WordPress.
Why and When Do You Need to Switch User Accounts?
By default, WordPress allows you to add new users and authors to your website. Each user on your website has a user role assigned to them which gives them permissions to perform different tasks on your website.
You can also allow users to register on your website and set a default user role for all new users by visiting the Settings » General page.
As the site owner, you are automatically assigned the administrator user role on your website. This gives you complete control including the ability to manage all user accounts.
While testing new features on your website, you may need to see how things would look for users with different user roles and permissions. This is particularly essential when you are running a WordPress membership website or an online store. The manual way to do this is to simply log in using the credentials for each user account and test those features.
However, this would take a lot of time. Wouldn’t it be better if you could just switch to any user account instantly and then switch back when you are done testing?
Let’s take a look at how to instantly switch between user accounts in WordPress without entering passwords.
Using a Plugin to Instantly Switch Between User Accounts
Once activated, you need to go to the Users page in your WordPress admin. On this page, you will see a ‘Switch to’ link next to each user account.
User switching is only available for users with an administrator user role. Once you have switched to a new user account, you can continue testing your website logged in as that user.
Once you are done, you can switch back to your own user account by clicking on the notification displayed on the screen.
Remember how organized your WordPress admin dashboard was when you first installed WordPress? It looked so clean. So sleek…until you started adding content and installing plugins. Then, things can start to get a little messy, right? Admin Columns brings some order and flexibility back to your WordPress admin screens by letting you manage the exact ... Read moreAdmin Columns Review: Manage Columns In WordPress Admin Screens
Do you want to enable customer tracking in WooCommerce?
Customer tracking allows you to offer a personalized shopping experience based on customer behavior in your eCommerce store.
In this article, we will show you how to easily enable customer tracking in WooCommerce with Google Analytics.
Why Enable Customer Tracking in WooCommerce with Google Analytics?
Google Analytics allows you to see where your visitors are coming from and what they do on your website. In other words, it helps you track your traffic sources as well as user engagement on your website.
For eCommerce platforms, Google Analytics offers an enhanced eCommerce tracking feature. This allows you to better understand users’ shopping and checkout behavior. Plus, you can see which products perform the best and track your WooCommerce store’s sales performance.
By default, a WooCommerce store allows your customers to create an account or checkout as guest users. Creating an account helps the user save their shipping and billing information for faster checkout next time. It also helps you offer customers a personalized shopping experience based on their browsing and shopping history.
Wouldn’t it be great if you could track logged-in users with their user IDs in Google Analytics and also see the path customers took before making a purchase?
This will give you access to a treasure trove of information and insights on customer behavior. You can use it to offer a better on-site experience and boost your sales.
Let’s take a look at how to easily enable customer tracking in WooCommerce. Here are quick links that you can use to jump ahead to any section:
Set up Ecommerce Tracking in WordPress with Google Analytics
The best way to set up WooCommerce customer tracking in Google Analytics is using Monsterinsights. It is the best Analytics solution for WordPress and helps you set up tracking without editing code.
The plugin offers an eCommerce addon, which automatically detects WooCommerces and starts tracking customer behavior in Google Analytics. It also comes with a Customer Journey addon that allows you to see users’ behavior before they make a purchase.
First, you will need to install and activate the MonsterInsights plugin. For more details, see our step-by-step guide on how to install a WordPress plugin.
You will need to be on the ‘Pro’ plan to access the eCommerce and User Journey addon, which we will use for this tutorial. However, there is also a MonsterInsights Lite version you can use for free.
Upon activation, you will see the welcome screen and the setup wizard. Simply click the ‘Launch the Wizard’ button and follow the on-screen instructions.
MonsterInsights also helps you set up Google Analytics 4 (GA4) property through its Dual Tracking feature. GA4 is the latest Analytics version, and it will soon replace Universal Analytics.
If you haven’t created a Google Analytics 4 property, then now is the best time. That’s because, after July 1, 2023, Universal Analytics will sunset and won’t track your website data. Setting up GA4 after the sunset date will mean you’ll have to start from scratch and won’t have any historical data for comparison.
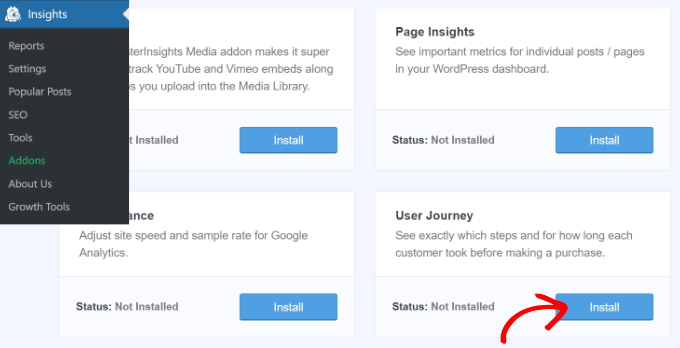
Once you’ve configured Google Analytics on your website, the next step is to install the eCommerce addon.
You need to visit the Insights » Addons page from your WordPress dashboard and navigate to the ‘eCommerce’ addon. Simply click the ‘Install’ button, and the addon will automatically activate.
Enable Enhanced Ecommerce Tracking in Google Analytics
The next step is to enable eCommerce tracking in Google Analytics. E-commerce tracking is not enabled by default in your Google Analytics account, and you will have to manually enable it.
First, you’ll need to head over to your Google Analytics account dashboard and click the Admin option.
Next, you need to click on the ‘Ecommerce Settings’ option.
It is located under the View column.
On the settings page, click the slider under Enable Ecommerce and Enable Enhanced Ecommerce Reporting to turn it on.
Don’t forget to click the ‘Save’ button when you’re done.
Now, your Google Analytics account will start showing enhanced eCommerce reports for your WooCommerce store.
Now that you’ve set up WooCommerce tracking in Google Analytics, the next step is to enable the MonsterInsights Customer Journey addon.
The addon will allow you to see the steps a customer takes before making a purchase in WooCommerce. Plus, it also shows the time it took at each step, the pages a user visited, and more.
First, you’ll need to go to Insights » Addons from your WordPress admin panel. Next, navigate to the User Journey addon and click the ‘Install’ button.
The addon will automatically activate and start tracking your WooCommerce customer’s journey.
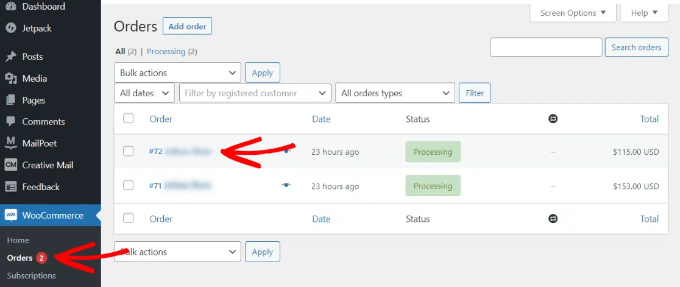
Next, you can go to WooCommerce » Orders from your WordPress dashboard to view the path your customers took when purchasing a product.
After that, click on the order for which you’d like to see the user journey.
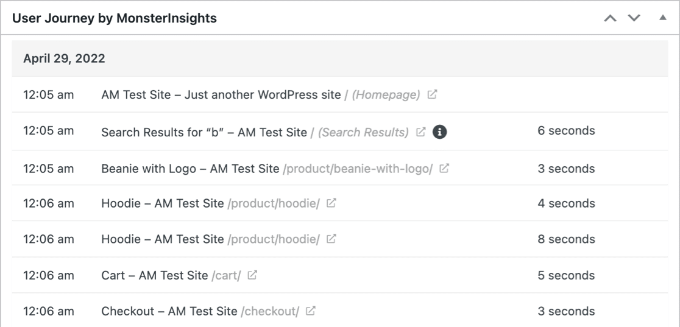
On the next screen, you’ll see the path a customer took before buying the product. You get to view the pages they visited, where they clicked, and how much time they spent on a page.
This is really useful information to better understand your customers. You can see which product categories are performing the best and where customers are exiting your store during the purchase process. Using the data, you can then fix these issues and optimize your site for more conversions.
Enabling User ID Tracking in Google Analytics
While MonsterInsights makes it very easy to track customers on your WooCommerce store, it also tracks WordPress ID tracking in Google Analytics.
WordPress ID is a unique ID to identify every user on your website. The user ID is called the ‘Client ID’ in Universal Analytics and the ‘App Instance ID’ in Google Analytics.
Do remember that enhanced eCommerce tracking will enable eCommerce reporting features for your WooCommerce store. However, it does not enable user tracking by default.
Let’s take a look at how you can enable user ID tracking in Universal Analytics and Google Analytics 4.
Enabling Customer Tracking in Universal Analytics
To enable individual customer tracking, you need to visit your Google Analytics account dashboard and open the Admin page.
Now, click on the ‘Tracking info’ link under the Property column to expand the submenu.
After that, you can click the User-ID link that appears below.
On the next page, you’ll have to review and agree to the User-ID policy.
Simply click the ‘I agree to the User-ID Policy’ toggle to turn it on.
From here, click on the ‘Next step’ button to continue.
Google Analytics will now ask how you would like to configure the user-ID tracking.
Since you’ll be using MonsterInsights, there’s no need to set up the user-ID tracking code. The plugin will take care of this for you.
Simply scroll down and click the ‘Next step’ button to continue.
Next, you will see information about creating a user ID view in Google Analytics.
Go ahead and click the ‘Create’ button.
After that, you will be asked to enter a ‘Reporting View Name’, which will be used to display User ID reports.
We recommend including UserID in the name, so it is easy to remember which view has UserID tracking enabled.
There is also an option to select the Reporting Time Zone.
Next, you just need to scroll down to the bottom and click on the ‘Create view’ button to save it.
Enabling Customer Tracking in Google Analytics 4
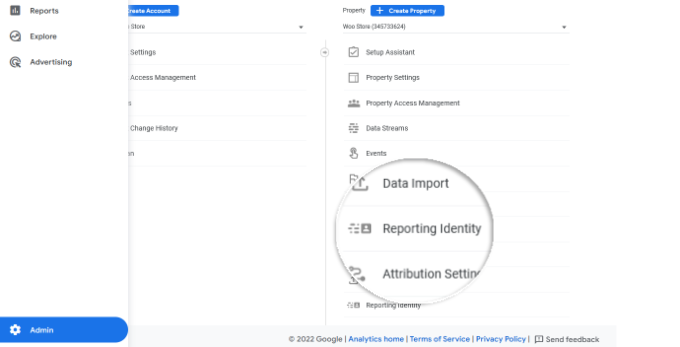
To start, you’ll need to go to the Admin settings from your GA4 dashboard and click the ‘Reporting Identity’ option.
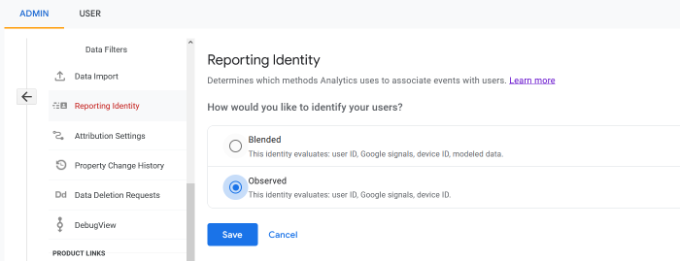
On the next screen, you will need to select a way to identify users on your online store.
GA4 uses multiple ways to identify customers. These include user ID, Google signals, device ID, and modeled data. For the sake of this tutorial, we’ll select the ‘Observed’ option and click the ‘Save’ button.
Viewing Customer Tracking Reports in Google Analytics
Now that everything is set up, Google Analytics will now track all your website customers. It will also be able to track logged-in users with their unique WordPress user ID.
View User ID Data in Universal Analytics
To view all your individual customer activity, you can go to your Universal Analytics account and click on the Audience » User Explorer menu.
You will see individual customer reports with a unique ID assigned to all non-logged-in users.
To view customer tracking reports for logged-in users in WooCommerce, you need to click on the Google Analytics logo on the top left corner of the screen.
This will show all your Google Analytics profiles. You will see your website profile and under ‘All website data’ you will see the UserID reporting view you created earlier.
Go ahead and click on the UserID reporting view to load it.
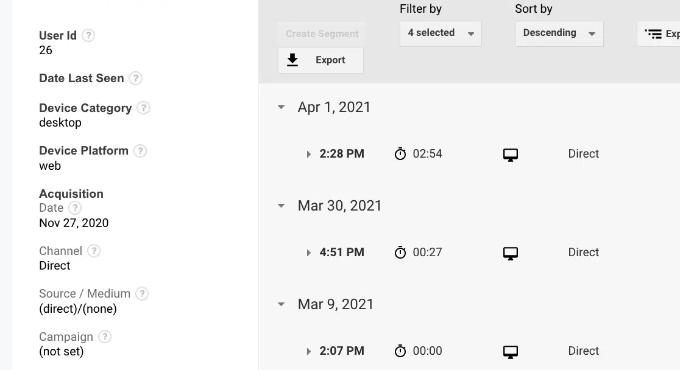
Once it’s loaded, you need to click on the Audience » User Explorer menu. This way, you will see a logged-in customer tracking report where each user is represented by their WordPress user ID on your website.
You can click on the user ID to view a customer’s individual tracking data.
For instance, the device category they use, acquisition date, the channel they used to arrive on the online store, and more.
View User ID Data in Google Analytics 4
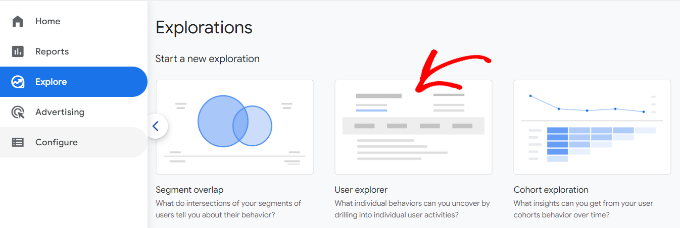
In Google Analytics 4, you’ll need to head to the ‘Explore’ tab from the menu on your left.
Under Explorations, you’ll see different report templates. Simply click the existing ‘User explorer’ report.
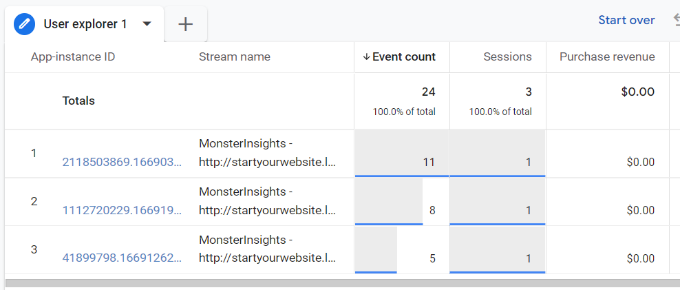
Next, you’ll see the User explorer report in Google Analytics 4.
One thing you can notice is the Client ID will be replaced with the App instance ID.
You can click on any of the app instance IDs to view more details.
For example, the report shows the total events that were triggered, the location of the user, the time stamp for each event, and more.
Matching Customer Tracking with Their WordPress Accounts
Now that you’ve identified users in Google Analytics, you can match them with WordPress accounts. This will help you know who this customer is, and how you can create personalized offers, emails, or shopping experiences for them.
First, you need to note down the customer ID you see in your Google Analytics User-ID reporting view.
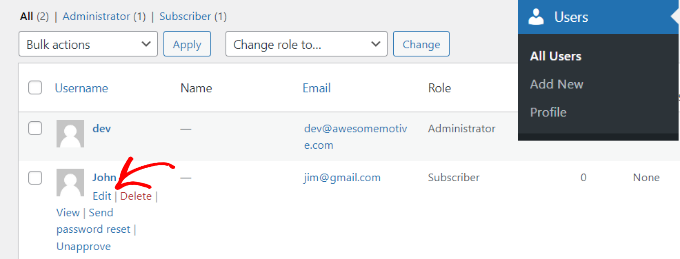
After that, go to your WordPress website’s admin area and click on the ‘Users’ menu. It will show you a list of all users on your WordPress site.
Next, you can click the ‘Edit’ link below any username in the list.
WordPress will now open the user profile for you.
If you look in your browser’s address bar you will ‘user_id’ parameter in the URL.
Next, you need to replace the value next to user_id with the one you copied from your Google Analytics report and press enter key on your keyboard.
WordPress will now load the user profile associated with that particular User ID. You now have the customer’s name, username, email address, and social media information. You can also track their orders, product views, cart activity, and more.
We hope this article helped you learn how to enable customer tracking in WooCommerce with Google Analytics. You may also want to see our expert pick of the best free WooCommerce plugins for your online store and how to get a free email domain.
If you liked this article, then please subscribe to our YouTube Channel for WordPress video tutorials. You can also find us on Twitter and Facebook.
Are you looking for the best WordPress survey plugin for your website? Surveys allow you to collect user feedback, so you can use it to improve your business. In this article, we will compare the best WordPress survey plugins in the market.
What to Look for in a WordPress Survey Plugin?
There are many ways you can collect user feedback on your website. You can add a contact form, create polls, ask users to leave comments, and more.
Adding a survey is a little bit more involved than that. You need to make it engaging, fun, and easy to get maximum user participation.
A good survey plugin makes your form look great, and it’s easy to use. Reporting is crucial for surveys. That’s why you need to make sure that you can store user submitted data with an option to export it, so you can use it in a spreadsheet or a CRM software.
You also need to consider how you want to share the survey results. If you want to display the results on your website, then you will need a plugin that lets you embed survey results in a beautiful format.
That being said, let’s take a look at some of the best WordPress survey plugins and how they handle all these features.
WPForms is the best WordPress contact form plugin on the market. It comes with a powerful surveys and polls addon which allows you to quickly create highly engaging survey forms.
You can combine the surveys and polls addon with other powerful WPForms features like conditional logic, multi-page forms, custom notifications, email integration, and more.
You can convert any form into a survey by simply clicking a checkbox. You can add any form field to your survey with a click including text, checkboxes, radio buttons, ratings, and the Likert scale field.
The best part about WPForms surveys is the reporting section. WPForms automatically creates beautiful reports with graphs and charts based on survey responses. You can show survey results on any WordPress page with a shortcode or redirect your users to the results page after they fill the survey.
You have the ability to export beautiful survey graphs as images to share on social media or your powerpoint presentations. You can also print the reports to include in your proposals or pitches.
Polldaddy is a famous WordPress polls and survey plugin. It is not a contact form plugin and unlike some other plugins in the list will not be suitable for purposes other than polls and surveys.
It is available as a free plugin, but you’ll need a WordPress.com account to get the API key. The free version is limited in terms of features and will also add Polldaddy logo to your survey form.
Polldaddy is easy to use with a drag and drop tool to create your survey and polls. You can change survey sharing settings, results sharing, and styling options for each survey you create. It also includes captcha to block spam and some basic IP filtering to prevent multiple responses.
Gravity Forms is one of the oldest WordPress form plugins which comes with many add-ons including one to create surveys. It is easy to use, and you can create any kind of form using the form builder with many common form fields including a survey field.
However, the survey results can only be viewed inside the admin area, and there are no charts / graphs. You can export survey results to a CSV file and display the results on your website using a WordPress tables plugin.
Note: You will need at least the Elite plan to access the survey addon.
As the name suggests, Quiz and Survey Master is designed to help you add quizzes and surveys to your WordPress site. It doesn’t have the friendliest user interface, but it is well documented and comes with many useful features.
The base free plugin allows you to create surveys with all common form fields, and you can even create multi-page surveys. You can also use it to add quizzes in WordPress with interactive answers, leaderboards, and scoring.
The plugin can also send emails after completion of the survey to thank users or redirect them to any page on your WordPress website. For reporting and analysis, you will need to separately purchase a premium add-on.
If you are looking for a simple poll solution for your users to participate, then WP-Polls is an easy free option. Unlike other plugins on this list, it doesn’t have a form builder, and you can only use radio buttons or checkboxes to collect responses which makes it quite limited.
Users are automatically shown poll results after they cast their vote. It saves user responses in the logs where you can see how registered users voted. For non-registered users, you can see IP addresses to filter out duplicate votes.
We hope this article helped you find the best WordPress survey plugin for your website. You may also want to see our guide on how to track user engagement in WordPress using Google Analytics.
If you liked this article, then please subscribe to our YouTube Channel for WordPress video tutorials. You can also find us on Twitter and Facebook.
Are you getting a lot of spam comments on your WordPress blog? Spam comments can become a big issue as your website grows. In this article, we will share how to use the Antispam Bee plugin to block spam comments in WordPress.
Why You Should Block or Delete Spam Comments?
Spam comments take up unnecessary space in your WordPress hosting database. What’s worst is if you accidentally approve a spam comment, then it makes your brand look bad.
There are multiple ways to block spam comments in WordPress. You can do it manually by reading and deleting them one by one, but that could take hours.
Alternatively, you can use the free Antispam Bee plugin to automatically block the spam comments based on the rules that you set.
Let’s take a look at how to block spam comments in WordPress with Antispam Bee plugin.
Once activated, you need to go to the Settings » Antispam Bee page in your WordPress admin area.
On this screen, you will see the Antispam Bee settings divided in three sections: Antispam Filter, Advanced tools and More options.
Antispam Filter
Antispam Filter settings are the basic settings that help you detect spam comments. This allows you to filter and review the comments before they show on your blog posts or website.
These settings are organized in an order which they execute. We have explained each setting in the descriptions below.
Trust approved commenters
You can enable this option to automatically approve comments from regular and trustworthy commenters. These commenters may post valid comments and generate conversations on your blog posts, so the plugin remembers them and approve their comments right away.
Trust commenters with a Gravatar
This setting will allow you to approve comments from users with a specific Gravatar image and posting valid comments. It is the same technique as approved commenters, but with this setting the plugin will remember the Gravatar of the trustworthy comment makers.
Consider the comment time
If enabled, the filter will considers the comment time. This setting is not recommended by the plugin author for blogs or websites using page caching.
BBCode is spam
It is a recommended setting to check comments with BBCode (Bulletin Board Code) links and mark them as spam. These links format are widely used by spammers to highlight words and links.
Validate the IP address of commenters
The plugin allows you to validate the IP addresses used by the commenters to check their network information like hostname. This helps in finding the online background of the commenter to decide if the comment is useful or spam.
Use regular expressions
If enabled, it helps in finding the unwanted comments with a set of predefined patterns that are useful to detect spam.
Look in the local spam database
If you check this option, it will look for the spam content on your site’s database and then treat it as you define further settings for the spam.
Use a public antispam database
This setting is linked with the Stop Forum Spam to detect IP addresses of active spammers and quickly check the history of the commenters. It works with the complete IP addresses of the senders, so the commenters from EU countries will be avoided.
Block comments from specific countries
You can add the list of specific countries to filter spam comments. The Blacklist and Whitelist ISO codes are given with this setting, so you can easily declare the country codes in the respective sections.
Allow comments only in certain language
This setting allows you to specify a language for the commenters, so comments in all other languages will be blocked or deleted as you define later.
Advanced Tools
In the advanced settings, you can further set the options to manage, block and delete the unwanted comments. There are few settings that are enabled by default however you can make changes to these settings as needed.
Mark as spam, do not delete
If you enable this setting, it will keep the spam comments and won’t delete them until you enable the settings below.
Spam-Notification by email
If you enable this option, then you will receive an email notification for every spam comment. We do not recommend this setting because it’ll become extremely annoying really fast.
Do not save the spam reason
If enabled, this setting will not store the suspicious values of a comment in a separate column. These suspicious values can be the formatted links, comment time and more.
Delete existing spam after X days
This is an important option because it allows you to define the number of days after which the spam comments are automatically deleted. It is linked with many other settings that we discussed above about deleting the comments.
Limit approval to Comments/Pings
This option will define whether you want to approve comments or trackbacks. If you limit approval to comments, then trackbacks will be automatically deleted. Similarly, if you limit approval to trackbacks, then the spam comments will be automatically deleted from your blog or website.
In case this option is not enabled, it follows the previous settings.
Delete comments by spam reasons
You can delete comments with predefined spam reasons. You can select multiple reasons from the options to delete the unwanted comments automatically.
These advanced settings will make your life easy while reviewing comments on your site.
More Options
After the advanced settings, you can take a look in the reporting options to display your daily spam updates on WordPress admin dashboard area.
These reports will help you monitor the spam comments easily, and you can also analyze between the numbers of useful and unwanted comments.
Generate statistics as a dashboard widget
If enabled, this setting will create a spam report in an interactive widget for your WordPress admin dashboard area. These statistics will give you an overview about the spam comments on your blog.
Spam counter on the dashboard
If enabled, it will display the number of total comments marked as spam in a prominent style. If you are deleting the spam comments, then it will also show the number of deleted comments in an additional column. Some new bloggers find it fun to look at this number after they first start their blog.
Do not check trackbacks / pingbacks
By default, the plugin put a check on all the comments, trackbacks and pings. You can avoid checking the trackbacks with this setting. If enabled, the trackbacks / pingbacks from any site will be automatically approved.
Comment form used outside of posts
This option will monitor comments on your archive pages.
Once you are done, click on the Save Changes button to apply these settings on your blog.