Category Archives: WordPress Plugins

How to Import / Export WordPress Theme Customizer Settings

Do you want to import or export theme customizer settings in WordPress? Exporting and importing theme customizer settings allow you to use the same configuration on another WordPress site. In this article, we will show you how to easily import / export WordPress theme customizer settings.

Import / export theme customizer settings in WordPress

Why Import / Export WordPress Theme Customizer Settings?

Many WordPress themes allow you to set up your website using theme customizer. It allows you to change colors, header images, background images, choose layout settings, and more.

Some paid and free themes have more settings available in customizer, while others have just a few basic options.

If you were working on customizing the theme on a local server or staging site, then wouldn’t it be nice if you could just move those settings to the live site?

This will allow you to move theme customizer settings from one website to another without having to move content and database.

That being said, let’s take a look at how to easily import / export theme customizer settings in WordPress.

How to Import / Export Theme Customizer Settings in WordPress

First thing you need to do is install and activate the Customize Export/Import plugin on both sites where you want to export/import. For more details, see our step by step guide on how to install a WordPress plugin.

First let’s export the theme customizer settings.

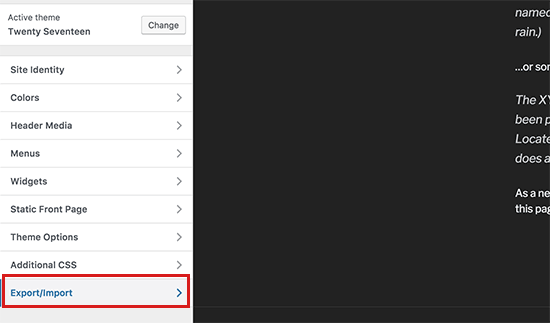
You need to go to Themes » Customize page on the website you want to export from.

Export/Import option in Customizer

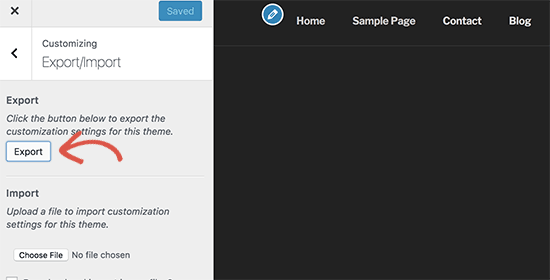
Next, you need to click on the ‘Export/Import’ panel to view its settings and then click on the ‘Export’ button.

Export customizer settings

The plugin will now export your customizer settings and send them to your browser in a .dat file.

It can export all your theme options that are defined as theme mods or stored as options in WordPress database. This means you can export things like color settings, layout directions, header media, etc.

However, it will not export your navigation menus, site title and description, widgets, and more.

To import customizer settings, head over to the WordPress site where you want to import these settings.

You need to go to Appearance » Customize page and click on the Export/Import panel.

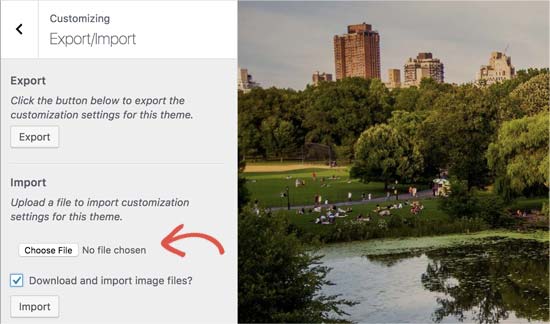
After that you need to click on the ‘Choose file’ button to select the file you exported earlier. You also need to check the box next to ‘Download and import image files?’ option to import header and other image files.

Import theme settings
Next, click on the ‘Import’ button to start uploading.

The plugin will now import the customizer settings from your export file.

Once it is finished, you can review your changes in the customizer and then click on the ‘Save & Publish’ button to make those changes live.

The plugin only exports theme settings saved using theme customizer and does not export site data like menus, widgets, images, and more. You will have to manually setup those changes.

We hope this article help you find an easier way to import/export theme customizer settings in WordPress. You may also want to see our checklist of things you must do when changing WordPress themes.

If you liked this article, then please subscribe to our YouTube Channel for WordPress video tutorials. You can also find us on Twitter and Facebook.

The post How to Import / Export WordPress Theme Customizer Settings appeared first on WPBeginner.
How to Restrict Media Library Access to User’s Own Uploads in WordPress

By default, WordPress allows authors to see all images on your site’s media library. This could be problematic if you invite a lot of guest authors. In this article, we will show you how to restrict WordPress media library access to user’s own uploads.

Restrict WordPress media library access to user's own uploads

Why Restrict Media Library Access to User’s Own Uploads?

WordPress allows authors to see all files in the media library. They can also see images uploaded by an administrator, editor, or other authors.

To learn more, see our article on WordPress user roles and permissions.

Let’s say you are creating a new post to announce an upcoming product or deal. Authors and guest authors on your website will be able to see the images you upload to that article in the media library.

Your uploads will also be visible on the ‘Add Media’ popup which users see when adding images to their own articles.

For many websites, this may not be a big deal. However, if you run a multi-author website, then you may want to change this.

Let’s take a look at how to easily restrict media library access to user’s own uploads.

Method 1: Restrict Media Library Access Using a Plugin

This method is easier and is recommended for all users.

First thing you need to do is install and activate the Restrict Media Library Access plugin. For more details, see our step by step guide on how to install a WordPress plugin.

This plugin works out of the box, and there are no settings for you to configure.

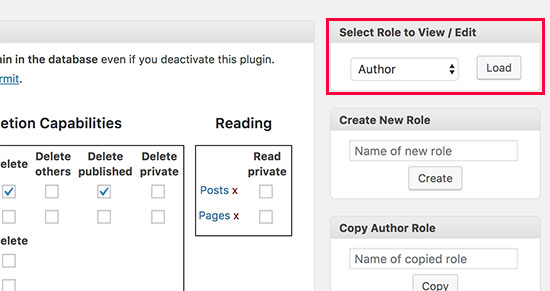
Upon activation, it filters the media library query to see if the current user is an administrator or editor. If the user role does not match either of them, then it will only show user’s own uploads.

Users with the administrator or editor user role will be able to see all media uploads as usual.

Method 2: Restrict Media Library Access Manually

The first method would work for most websites as it limits media library access and allows only administrator and editor to view all media uploads.

However, if you want to add a custom user role or simply don’t want to use a plugin, then you can try this method instead. It uses the same code used by the plugin, but you will be able to modify it to meet your needs.

This method requires you to add code to your WordPress files. If you haven’t done this before, then take a look at our guide on how to copy and paste code in WordPress.

You’ll need to add the following code to your WordPress functions.php file or a site-specific plugin.

// Limit media library access
 
add_filter( 'ajax_query_attachments_args', 'wpb_show_current_user_attachments' );

function wpb_show_current_user_attachments( $query ) {
    $user_id = get_current_user_id();
    if ( $user_id && !current_user_can('activate_plugins') && !current_user_can('edit_others_posts
') ) {
        $query['author'] = $user_id;
    }
    return $query;
} 

This code uses current_user_can function to check if the user has the capability to activate plugins or edit other user’s posts. If they don’t, then it changes the query used to display media files and limit it to user’s ID.

We hope this article helped you learn how to restrict WordPress media library access to user’s own uploads. You may also want to limit authors to their own posts in WordPress admin area.

If you liked this article, then please subscribe to our YouTube Channel for WordPress video tutorials. You can also find us on Twitter and Facebook.

The post How to Restrict Media Library Access to User’s Own Uploads in WordPress appeared first on WPBeginner.
5 Best WordPress Maintenance Mode Plugins For Your Site

If you need to make changes to the live version of your WordPress site, you probably don’t want your visitors walking in on you at an awkward moment. That’s what maintenance mode is for. It lets you throw up a user-friendly page that tells users “Hey, the site isn’t available for a bit. Please come ... Read more

The post 5 Best WordPress Maintenance Mode Plugins For Your Site appeared first on Learn WordPress with WPLift.

How to Show Weather Forecast in WordPress

Do you want to show weather forecast in WordPress? Some website owners may want to display weather forecast to keep their users informed about weather conditions for specific locations. In this article, we will show you how to easily show weather forecast in WordPress.

Showing weather forecase in WordPress

Why and Who Needs Weather Forecast in WordPress?

Not all websites need to display weather forecast to their users. However, there are many industries that rely on people making decisions based on this information.

This includes travel, events, hotels, bed & breakfasts and many others in the hospitality and tourism industry.

There are plenty of WordPress plugins that can pull weather information and display it beautifully on your website. You need to use a plugin that is fast, clutter-free, and doesn’t add links to weather services.

That being said, let’s take a look at how to easily show weather forecast in your WordPress posts, pages, or a sidebar widget.

Adding Weather Forecast in WordPress

First thing you need to do is install and activate the WP Cloudy plugin. For more details, see our step by step guide on how to install a WordPress plugin.

WP Cloudy can work without an API key. However, it is recommended to create an OpenWeatherMap API key to avoid timeouts.

Simply head over to OpenWeatherMap website and click on the sign up link.

Sign up for open weather map api key

After sign up, you need to visit your profile page and click on the API Keys tab. You will be asked to provide a name for your keys and then click on the ‘Generate’ button.

Generate API Key

Open Weather Map will now generate an API key for you to use. You need to copy the API key.

Next, you need to head over to Settings » WP Cloudy page in your WordPress admin area and click on the ‘Advanced’ tab.

Enter api key

On this screen, you need to scroll down to the ‘Open Weather Map API key’ option and paste the API key you copied earlier.

Don’t forget to click on save changes button to store your settings.

You are now ready to create your weather reports. You can do this by visiting Weather » Add New page to create your first weather report.

Creating a weather report

Simply enter the city, state, and country information and then switch to the ‘Display’ tab. Here you can configure different display settings. You can add / remove information that you want to show and configure the number of days to show in the forecast.

Display settings

Once you are finished, click on the publish button to save your weather report and then copy the shortcode.

Copy the weather shortcode

You can now add this shortcode to any WordPress post or page. You can also add this shortcode to a sidebar widget.

After that, you can view your website to see the weather forecast in action.

Weather forecaste displayed on a WordPress website

We hope this article helped you learn how to show weather forecast in your WordPress posts, pages, or sidebar widgets. You may also want to see our list of must have WordPress plugins for any website.

If you liked this article, then please subscribe to our YouTube Channel for WordPress video tutorials. You can also find us on Twitter and Facebook.

The post How to Show Weather Forecast in WordPress appeared first on WPBeginner.
How to Properly Add JavaScripts and Styles in WordPress

Do you want to learn how to properly add JavaScripts and CSS stylesheets in WordPress? Many DIY users often make the mistake of directly calling their scripts and stylesheets in plugins and themes. In this article, we will show you how to properly add JavaScripts and stylesheet in WordPress. This will be particularly useful for those who are just starting to learn WordPress theme and plugin development.

Properly adding JavaScripts and styles in WordPress

Common Mistake When Adding Scripts and Stylesheets in WordPress

Many new WordPress plugins and theme developers make the mistake of directly adding their scripts or inline CSS into their plugins and themes.

Some mistakenly use the wp_head function to load their scripts and stylesheets.

<?php
add_action('wp_head', 'wpb_bad_script');
function wpb_bad_script() {
echo 'jQuery goes here';
}
?>

While the above code may seem easier, it is the wrong way of adding scripts in WordPress, and it leads to more conflicts in the future.

For example, if you load jQuery manually and another plugin loads jQuery through the proper method, then you have jQuery being loaded twice. If it is loaded on every page, then this will negatively affect WordPress speed and performance.

It is also possible that the two are different versions which can also cause conflicts.

That being said, let’s take a look at the right way of adding scripts and stylesheets.

Why Enqueue Scripts and Styles in WordPress?

WordPress has a strong developer community. Thousands of people from around the world develop themes and plugins for WordPress.

To make sure that everything works properly, and no one is stepping on another’s toes, WordPress has an enqueuing system. This system provides a programmable way of loading JavaScripts and CSS stylesheets.

By using wp_enqueue_script and wp_enqueue_style functions, you tell WordPress when to load a file, where to load it, and what are its dependencies.

This system also allow developers to utilize the built-in JavaScript libraries that come bundled with WordPress rather than loading the same third-party script multiple times. This reduces page load time and helps avoid conflicts with other themes and plugins.

How to Properly Enqueue Scripts in WordPress?

Loading scripts properly in WordPress is very easy. Below is an example code that you would paste in your plugins file or in your theme’s functions.php file to properly load scripts in WordPress.

?php
function wpb_adding_scripts() {

wp_register_script('my_amazing_script', plugins_url('amazing_script.js', __FILE__), array('jquery'),'1.1', true);

wp_enqueue_script('my_amazing_script');
}
 
add_action( 'wp_enqueue_scripts', 'wpb_adding_scripts' );  
?>

Explanation:

We started by registering our script through the wp_register_script() function. This function accepts 5 parameters:

  • $handle – Handle is the unique name of your script. Ours is called “my_amazing_script”
  • $src – src is the location of your script. We are using the plugins_url function to get the proper URL of our plugins folder. Once WordPress finds that, then it will look for our filename amazing_script.js in that folder.
  • $deps – deps is for dependency. Since our script uses jQuery, we have added jQuery in the dependency area. WordPress will automatically load jQuery if it is not being loaded already on the site.
  • $ver – This is the version number of our script. This parameter is not required.
  • $in_footer – We want to load our script in the footer, so we have set the value to be true. If you want to load the script in the header, then you would make it false.

After providing all the parameters in wp_register_script, we can just call the script in wp_enqueue_script() which makes everything happen.

The last step is to use wp_enqueue_scripts action hook to actually load the script. Since this is an example code, we have added that right below everything else.

If you were adding this to your theme or plugin, then you can place this action hook where the script is actually required. This allows you to reduce the memory footprint of your plugin.

Now some might wonder why are we going the extra step to register the script first and then enqueuing it? Well, this allows other site owners to deregister your script without modifying the core code of your plugin.

Properly Enqueue Styles in WordPress

Just like scripts, you can also enqueue your stylesheets. Look at the example below:

<?php
function wpb_adding_styles() {
wp_register_style('my_stylesheet', plugins_url('my-stylesheet.css', __FILE__));
wp_enqueue_style('my_stylesheet');
}
add_action( 'wp_enqueue_scripts', 'wpb_adding_styles' );  
?>

Instead of using wp_enqueue_script, we are now using wp_enqueue_style to add our stylesheet.

Notice that we have used wp_enqueue_scripts action hook for both styles and scripts. Despite the name, this function works for both.

In the examples above, we have used plugins_url function to point to the location of the script or style we wanted to enqueue.

However, if you are using the enqueue scripts function in your theme, then simply use get_template_directory_uri() instead. If you are working with a child theme, then use get_stylesheet_directory_uri().

Below is an example code:

<?php
 
function wpb_adding_scripts() {
wp_register_script('my_amazing_script', get_template_directory_uri() . '/js/amazing_script.js', array('jquery'),'1.1', true);
wp_enqueue_script('my_amazing_script');
}
 
add_action( 'wp_enqueue_scripts', 'wpb_adding_scripts' );  
?>

We hope this article helped you learn how to properly add jacvascript and styles in WordPress. You may also want to study the source code of the top WordPress plugins for some real life code examples.

If you liked this article, then please subscribe to our YouTube Channel for WordPress video tutorials. You can also find us on Twitter and Facebook.

The post How to Properly Add JavaScripts and Styles in WordPress appeared first on WPBeginner.
Elementor Gets Inline Text Editing, Code Autosuggestions + More.

If you’ve read my Elementor review here at WPLift (or one of the many other Elementor reviews out there), you know that one of the few criticisms I, and others, had for Elementor was its lack of inline editing (that is – the ability to type text directly on the live preview of your page, ... Read more

The post Elementor Gets Inline Text Editing, Code Autosuggestions + More. appeared first on Learn WordPress with WPLift.

12+ Elementor Add-ons For Extra Elements, Functionality, Templates + More

One of the great things about open source software is that it’s “open” for other developers to tap into and extend. That openness is part of why we have 60,000+ WordPress plugins to choose from. But those benefits don’t just apply to the core WordPress software – they also mean that intrepid developers are free ... Read more

The post 12+ Elementor Add-ons For Extra Elements, Functionality, Templates + More appeared first on Learn WordPress with WPLift.

Everest Review Review: Display Admin And User-Submitted Reviews

Interested in a review about a review plugin? It’s a little bit meta, but that’s what I’m about to do today. I’m going to write an Everest Review review. No, that’s not a typo. I really am reviewing a plugin named Everest Review. As you’d expect from the name, Everest Review helps you add a ... Read more

The post Everest Review Review: Display Admin And User-Submitted Reviews appeared first on Learn WordPress with WPLift.

ThirstyAffiliates Review: Cloak And Manage Affiliate Links in WordPress

Affiliate links are ugly. I said it. And not only are they ugly, they’re difficult to keep track of. You use them all over the place, so it’s easy to forget where all of your affiliate links are located. That’s fine…until the affiliate program changes networks and you have to swap out all your links ... Read more

The post ThirstyAffiliates Review: Cloak And Manage Affiliate Links in WordPress appeared first on Learn WordPress with WPLift.

How to Automatically Post New Instagram Photos to WordPress

Do you want to automatically post new Instagram photos to your WordPress site? Instagram is an influential platform that can be used to drive traffic to your website. In this article, we will show you how to automatically post new Instagram photos to WordPress.

Instagram and WordPress

Why Post Instagram Photos to WordPress?

Instagram allows people to discover new user accounts based on what they already like. Users can also explore profiles by hashtags, location, and sharing.

If you have just started on Instagram, then you may find it a bit slow to get followers. You need social proof to build traction.

Sharing your Instagram photos on your WordPress website works both ways. You can help users find you on Instagram. Once they start following you, then you can keep them engaged with your brand.

That being said, let’s take a look at how to easily and automatically post new Instagram photos to WordPress.

Method 1: Add Instagram Photos as a New Post in WordPress

This method is for users who want to create a new blog post displaying their latest Instagram photo.

First you need to visit IFTTT website and login or create a new account. IFTTT is an online tool that allows you to automate your social media and WordPress.

After you’re logged in, you need to click on My Applets » New Applet to get started.

Create new applet

First you need to click ‘+this’ and then locate Instagram to activate it.

This will bring up a popup where you will be asked to log in to your Instagram account and authorize IFTTT to access your account.

Authorize IFTTT to access Instagram

Next, you will be asked to choose a trigger. Click on ‘Any new photo by you’ to continue.

Choose trigger

After that you will see ‘If this then +that’ statement. Click on the +that to select what you want to do with the new photo.

On the next screen, locate WordPress to add it as the action service.

Choose WordPress as action service

IFTTT will now ask you to connect your WordPress site as a service. Clicking connect will bring up a popup where you need to enter your WordPress site’s URL, admin username, and password.

Connect WordPress

Next you need to select what action you want to take. You can either create a blog post with the new Instagram photo or a photo post.

Choose Action

After that you’ll be asked to map Instagram fields to your WordPress post. You can add tags, add custom caption, and more.

Map fields

Once you are done, click on the finish button to save your applet.

You can now post a new photo to your Instagram account, and it will be automatically posted to your WordPress site.

Instagram photo posted in WordPress

Method 2: Display Latest Instagram Photos on Your WordPress Site

This method is for users who just want to show their latest Instagram photos without creating new blog posts.

First thing you need to do is install and activate the Instagram Feed plugin. For more details, see our step by step guide on how to install a WordPress plugin.

Upon activation, the plugin will add a new menu item labeled Instagram Feed to your admin bar. Clicking on it will take you to the plugin’s settings page.

Get access token and user ID from Instagram

First you need to authenticate the plugin to access your Instagram profile. Click on the blue button to login and get the access token and user ID from Instagram.

You will be asked to log in to your Instagram account. After that you will need to authorize the WordPress plugin to access your Instagram account.

Authorize plugin to access Instagram data

On the modal popup, click on the authorize button to continue.

You will now be redirected back to the plugin’s settings page on your WordPress site with access key and user ID. Don’t forget to click on the save changes button to store your settings.

Displaying Instagram Photos on Your WordPress Site

Instagram Feed makes it super easy to display your Instagram photos anywhere on your WordPress site.

Simply edit the WordPress post or page where you want to display your Instagram photos and add the following shortcode:

[instagram-feed]

You can now save your changes and preview your post or page.

Instagram preview

You can change the number of columns by modifying the shortcode like this:

[instagram-feed cols=3]

You can also add shortcode to a sidebar widget to display your Instagram photos in the sidebar.

Instagram sidebar preview

Customizing Your Instagram Feed

Instagram Feed plugin also allows you to easily change the appearance of your photos.

Go to plugin’s settings page and then click on the ‘Customize’ tab.

Customize Instagram feed

Here you can change the feed’s height, width, layout, background color, and more.

We hope this article helped you automatically post new Instagram photos to your WordPress site. You may also want to see our list of the best social media monitoring tools for WordPress.

If you liked this article, then please subscribe to our YouTube Channel for WordPress video tutorials. You can also find us on Twitter and Facebook.

The post How to Automatically Post New Instagram Photos to WordPress appeared first on WPBeginner.