Are you seeing the ‘failed to open stream’ error in WordPress? This error usually points out the location of the scripts where the error has occurred. However, it is quite difficult for beginner users to understand it. In this article, we will show you how to easily fix the WordPress failed to open stream error.
Why Failed to Open Stream Error Occurs?
Before we try to fix the error, it would be helpful to understand what causes the ‘Failed to open stream’ error in WordPress.
This error occurs when WordPress is unable to load the file mentioned in website code. When this error occurs, sometimes WordPress will continue loading the site and only show a warning message, while other times WordPress will show a fatal error and will not load anything else.
The message phrasing will be different depending on where the error occurs in the code and the reason for failure. It will also give you clues about what needs to be fixed.
Typically, this message would look something like this:
Warning: require(/home/website/wp-includes/load.php): failed to open stream: No such file or directory in /home/website/wp-settings.php on line 19

Fatal error: require(): Failed opening required ‘/home/website/wp-includes/load.php’ (include_path=’.:/usr/share/php/:/usr/share/php5/’) in /home/website/wp-settings.php on line 19
Here is another example:
Last Error: 2018-04-04 14:52:13: (2) HTTP Error: Unable to connect: ‘fopen(compress.zlib://https://www.googleapis.com/analytics/v3/management/accounts/~all/webproperties/~all/profiles?start-index=1): failed to open stream: operation failed’
Having said that, let’s take a look at how to troubleshoot and fix ‘failed to open stream’ error in WordPress.
Fixing Failed to Open Stream Error in WordPress
As we mentioned earlier, the error can be caused by a variety of reasons and the error message will be different depending on the cause and location of the file that’s causing the error.
In each instance, failed to open stream phrase would be followed by a reason. For example, permission denied, no such file or directory, operation failed, and more.
Now if your error message contains ‘no such file or directory’, then you need to look in the code to figure out which file is mentioned at that particular line.
If it is a plugin or theme file, then this means that the plugin or theme files were either deleted or not installed correctly. Simply deactivate and reinstall the theme / plugin in question to fix the error.
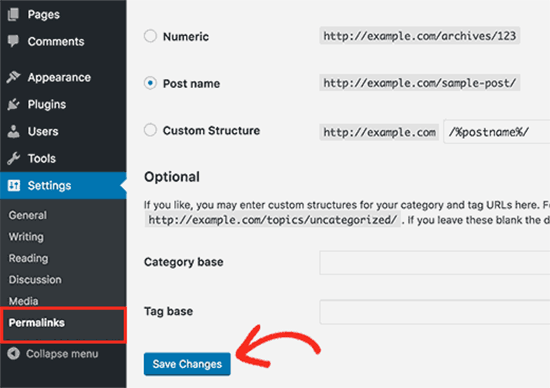
However, it is also possible that WordPress is unable to locate the files because of a missing .htaccess file in your root folder. In that case, you need to go to Settings » Permalinks page in your WordPress admin and just click on the ‘Save changes’ button to regenerate the .htaccess file.
If the error message is followed by ‘Permission denied’, then this means that WordPress does not have the right permission to access the file or directory referenced in the code.
Lastly, some WordPress plugins load scripts from third-party sources like Google Analytics, Facebook APIs, Google Maps, and other third-party APIs.
Some of these APIs may require authentication or may have changed the way developers can access them. A failure to authenticate or incorrect access method will result in WordPress failing to open the required files.
If none of these tips help you resolve the issue, then follow the steps mentioned in our WordPress troubleshooting guide. This step by step guide will help you pinpoint the issue, so you can easily find the solution.
We hope this article helped you fix the WordPress ‘failed to open stream’ error. You may also want to bookmark our list of the most common WordPress errors and how to fix them.
If you liked this article, then please subscribe to our YouTube Channel for WordPress video tutorials. You can also find us on Twitter and Facebook.
When you have hundreds, or even thousands, of files in your WordPress media library, it’s mindbogglingly difficult to find individual files. I have a site that's almost ten years old - it's dang near impossible to find something I uploaded that long ago if I don't remember the exact file name. WP Media Folder fixes this by letting you create folders inside your media library.
Do you want to convert WooCommerce visitors into customers? Bringing traffic to your WooCommerce store is only half the battle, the other half is to convert those visitors into paying customers. In this article, we will show you how to easily convert WooCommerce visitors into customers like a pro.
Why I Need to Conversion Optimization for My WooCommerce Store
However, more than 75% visitors who find your website through search engines will never find it again. Those who stick around, only a small percentage of them will add products to the cart.
In the end, more than 69% shopping carts are abandoned without making the purchase. Shipping costs, complicated checkout experience, and bad design are among the top reasons for abandoned carts.
Now, considering these statistics, your eCommerce website will continue losing potential customers if you don’t work on converting those visitors into customers.
How do I Convert Visitors into Customers?
The process and technique that are used to convert visitors into customers is called conversion rate optimization (CRO). Marketers and usability experts use CRO to successfully drive visitors to become a customer or a potential customer.
Basically, you remove obstacles that affect a user’s experience on your website. You also incentivize users to make a purchasing decision.
Lastly if a user must leave without making a purchase, then your goal is to try and get their information through lead generation. This allows you to communicate with them via email and offer personalized messages, special discounts, or new product announcements.
In early days of eCommerce, you would have needed programming skills to work on all these but not anymore. Now you have tools that make it extremely easy to do all these things without writing code or acquiring any new technical skills.
That being said let’s take a look at how to convert WooCommerce visitors into customers.
This tutorial is about WooCommerce, so we will be using it in our screenshots. However, all these techniques would also work on any other eCommerce platform including Shopify.
We will be using the OptinMonster tool. It is the best conversion optimization software on the market and helps you easily convert WooCommerce visitors into customers.
OptinMonster is a paid service, and you will need at least their Pro plan to access all the features mentioned later in this article.
Ready? let’s begin.
Disclosure: We believe in full transparency. WPBeginner founder, Syed Balkhi, is also the co-founder of OptinMonster. We only recommend tools that we personally use and believe will add value to our readers.
This plugin is just a connector between your WooCommerce store and OptinMonster.
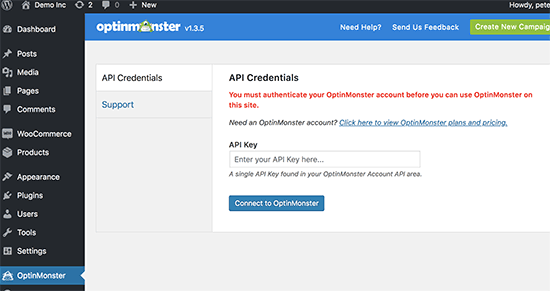
Upon activation, you need to click on the OptinMonster menu item in your WordPress admin sidebar. You will be asked to enter your license key. You can find this information under your account on OptinMonster website.
You have now successfully connected your WooCommerce store to OptinMonster, and you can now start optimizing your conversion rates.
Creating Your First WooCommerce Conversion Optimization Campaign
Let’s create your first WooCommerce conversion optimization campaign using OptinMonster. Our first campaign will reduce shopping cart abandonment rate while increasing conversions at the same time.
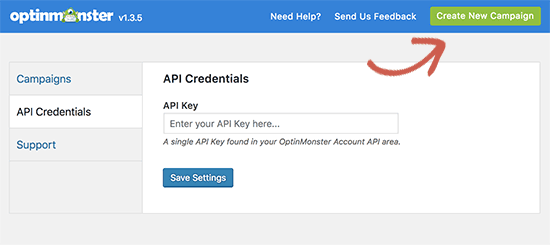
Visit the OptinMonster page in WordPress admin area and then click on ‘Create New Campaign’ button.
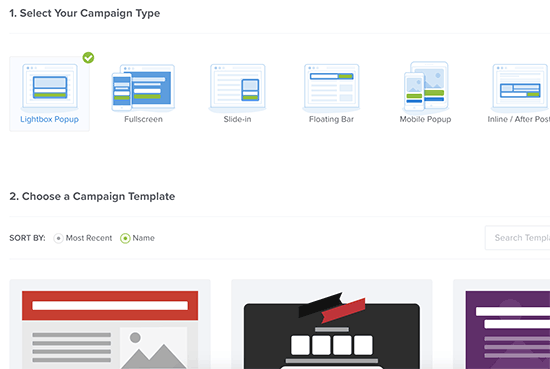
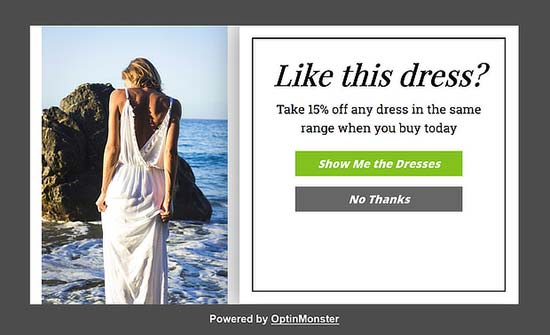
This will take you to the OptinMonster website where you will be asked to select a campaign type and a campaign template. For this tutorial, you need to select lightbox as your campaign type. We will be using the ‘Coupon’ template in this tutorial, but you can use any template that you like.
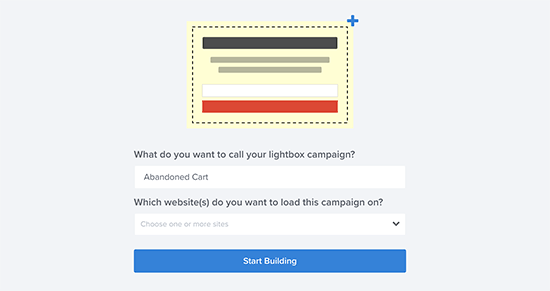
As soon as you select a template, you will be asked to provide a name for your campaign and enter the website address where you will be using it.
After entering this information, click on the ‘Start Building’ button to continue.
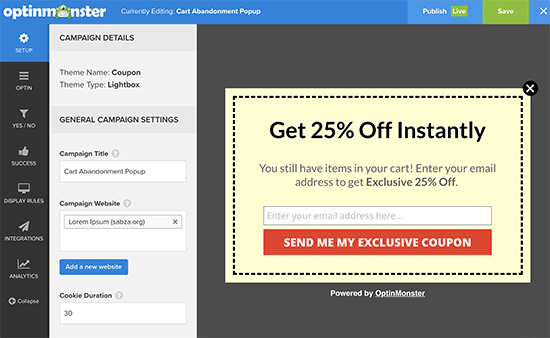
This will launch the OptinMonster builder interface with a live preview of your popup. You can simply point and click on any item to edit it.
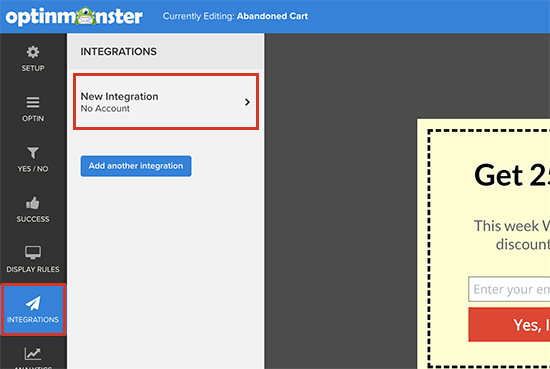
As you can see we are using a popup that collects user’s email address. You can connect OptinMonster to your favorite email service provider by clicking on the integrations tab.
From here you can add a new integration to connect with your email service by following the on-screen prompts.
Next, you need to choose which users will see the popup and when.
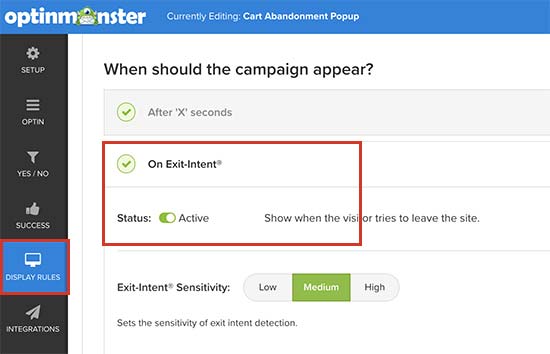
Click on the ‘Display Rules’ tab from the left menu, and OptinMonster will show you a list of default display rulesets that you can use.
First, click on the ‘Exit Intent’ ruleset to expand it, and then make sure it is active. Exit-Intent basically detects user’s behavior and prompt them with a message at the precise moment they’re about to leave.
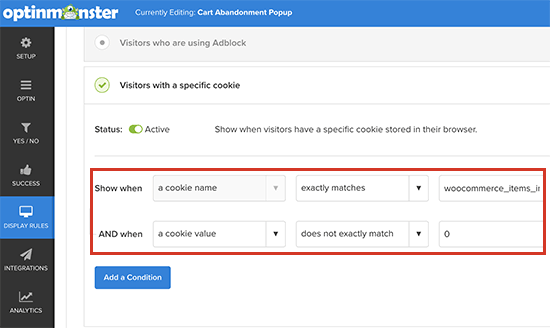
When a visitor adds a product to the cart, WooCommerce automatically sets a cookie ‘woocommerce_items_in_cart’ in their browser with the number of items in their cart.
We only want to show our popup to users who have products in their cart. To do that, scroll down a little and then click on ‘Select visitors with a specific cookie’ ruleset to expand it.
This ruleset allows you to trigger a campaign when a specific cookie is found. From here you need to switch the status toggle to ‘Active’.
First, option in this ruleset is to show when a cookie name is matched. After that, click on ‘Add a condition’ button and select ‘Cookie value’ does not exactly match 0.
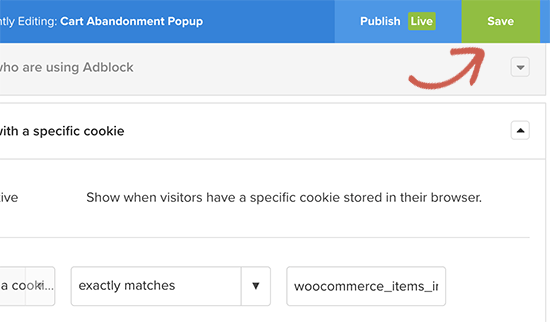
Lastly, click on the save button at the top right corner of the screen to save your changes and then click on the publish button next to it.
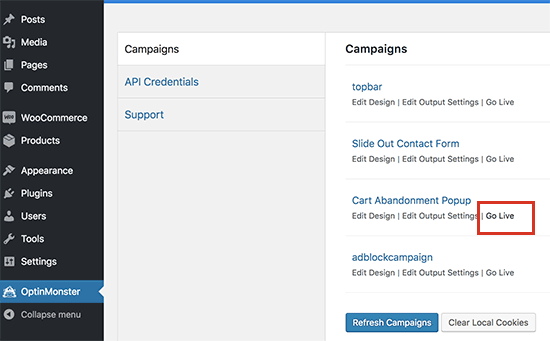
Your campaign is now ready to be served on your WooCommerce store. You just need to click on the ‘OptinMonster’ tab in your WordPress admin area and then click on ‘Campaigns’ tab.
You will see the campaign you just created listed there. If you don’t see your campaign, then click on the ‘Refresh campaigns’ button.
Next, you need to click on the ‘Go Live’ link below your campaign.
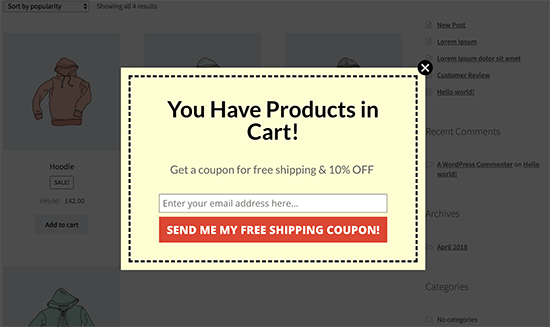
That’s all your lightbox popup is live now. To test it out, you will need to open a new browser window in the incognito mode and visit your store. Simply add a few products to your cart and then try to leave.
Congratulations! you have just set up your first conversion optimization campaign targeting users who are about to abandon their cart and leave without purchasing.
Other Campaign Ideas to Boost WooCommerce Conversions
OptinMonster is a powerful tool with tons of different campaign styles that you can use with a wide range of display rules. This allows you to target customers with highly effective messaging at the perfect time.
Here are some more campaign ideas that can help you boost WooCommerce conversions.
Using Multiple Campaign Types
OptinMonster comes with several campaign styles including lightbox popups, slide-in scroll box, floating bar, countdown timer, sidebar forms, in-line forms, and more.
You can maximize your WooCommerce conversion rates by using multiple campaign types. For example, you can target users leaving your website with an Exit-Intent ® popup while showing other campaigns throughout your store.
Page Level Targeting
OptinMonster allows you to display your campaigns on any page on your website. This page can be a product, product category, a blog post, homepage, or a landing page.
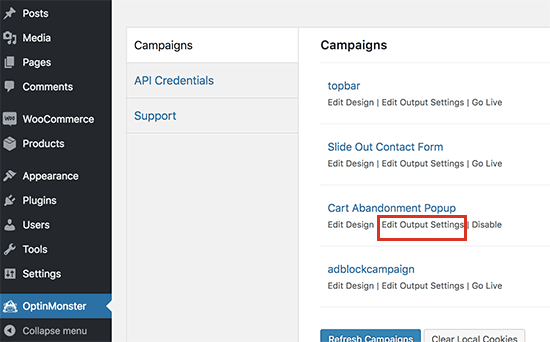
Simply go to OptinMonster page in your WordPress admin area and click on the ‘Edit output settings’ link below your campaign.
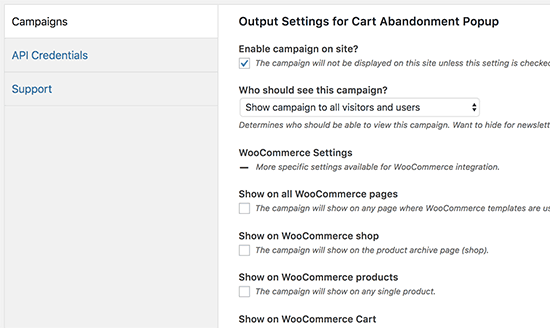
This will show you a variety of page level targeting options that you can use. It also includes WooCommerce specific targeting options.
Apart from these options, you also have display rulesets in the OptinMonster app which provide even more page level targeting options.
Peronalization and Behavioral Targeting
Personalization helps you improve user experience by making it more personal for each user. Behavioral targetting allows you to target your campaigns based on customer behavior.
For example, you can greet logged in customers with their name, show them products based on their browsing history, offer them discount or coupon.
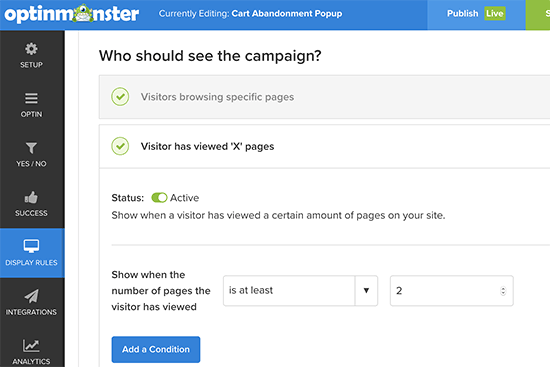
Edit your campaign in the OptinMonster app and click on the ‘Display Rules’ tab. Scroll down to the ‘Who should see the campaign’ section, and you will find a treasure of targeting options.
Click on any of these options to expand them. From here you can activate the ruleset and set it up.
Using FOMO to Increase WooCommerce Conversions
FOMO or ‘fear of missing out’ is a psychological term used to describe anxiety about missing out on something exciting and trendy.
As an eCommerce store owner, you can take advantage of this human behavior with your marketing strategy and improve your conversions.
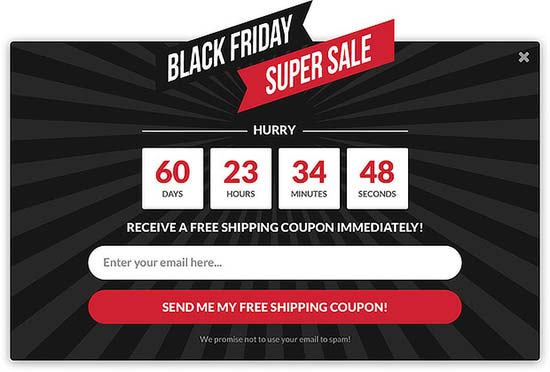
OptinMonster comes with the countdown timer templates, floating bars, and coupon themes that you can use to build up FOMO in your marketing campaigns.
Combine it with behavioral targeting and customization to make your campaigns even more effective.
If you want to build a long-term asset for your blog or website, you should build an email list. And if you want to do that, you need a way to display opt-in forms on your WordPress site to actually convince visitors to subscribe. MailOptin helps you do that without leaving your WordPress dashboard. And ... Read moreMailOptin Review: Flexible Opt-in Forms To Build Your Email List On WordPress
Do you want to add a custom post status for your blog posts in WordPress? Post status is an editorial tool that allows you to organize your articles based on their respective stages during the editorial workflow. In this article, we will show you how to easily add custom post status to blog posts in WordPress.
What is Post Status in WordPress and Why Do You Need it?
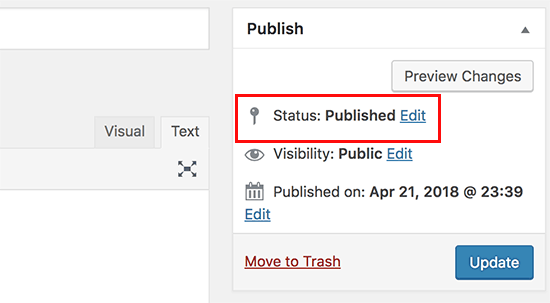
Post status is an editorial tool that tells WordPress the stage of a blog post during editing. For example, posts that are incomplete are saved with the post status labeled ‘Draft’. When you publish an article, the status changes to ‘Published’.
Post status helps WordPress choose how to handle and display blog posts on your website. For example, it will automatically exclude posts labeled draft from your homepage and other publicly viewable areas of your website.
By default, WordPress comes with the following post status that you can use:
Draft – An item that is saved but incomplete and not yet published
Auto draft – WordPress has an auto-save feature that automatically saves a draft as revision.
Pending review – Items that are complete and submitted for review but not yet published.
Inherit – Child pages that automatically inherit status of their parent page.
Apart from these default post statuses, you can also create your own custom post statuses to improve your editorial workflow. For example, you can add a label ‘Not suitable’ for posts that are complete but not suitable for publication.
Having said that, let’s take a look at how to easily create custom post statuses in WordPress.
Method 1. Create Custom Post Status Using a Plugin
This method is easier and recommended for most users. It allows you to create custom post statuses as well as efficiently manage editorial workflow on your multi-author WordPress blog.
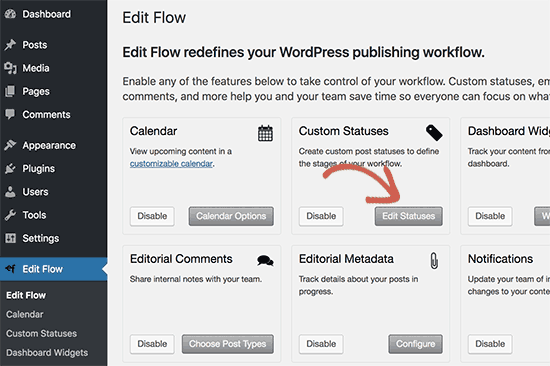
Upon activation, the plugin will add a new menu item labeled ‘Edit Flow’ to your WordPress admin menu. Clicking on it will take you to the plugin’s settings page.
Edit Flow comes with a lot of useful features, and you can turn them On/Off from this screen. Go ahead and click on the ‘Edit Statuses’ button under ‘Custom Statuses’ box to continue.
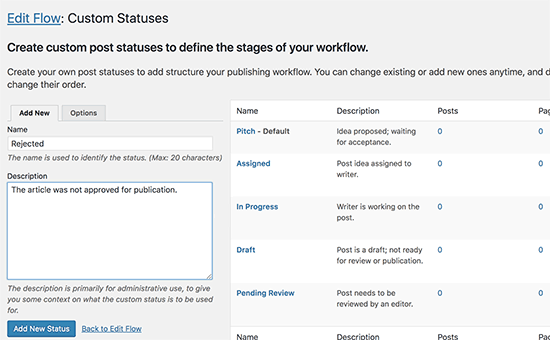
Edit Flow automatically creates the following custom post statuses:
Pitch – Used to pitch new article ideas and this status also becomes the default post status of every new post.
Assigned – You can select an author and mark an article as assigned so that the author can work on it.
In progress – Writer is working on the post but is not yet available as a readable draft.
You can create your own custom status by providing a name and description in the left column. Once you are done, click on the ‘Add new status’ button to save your changes.
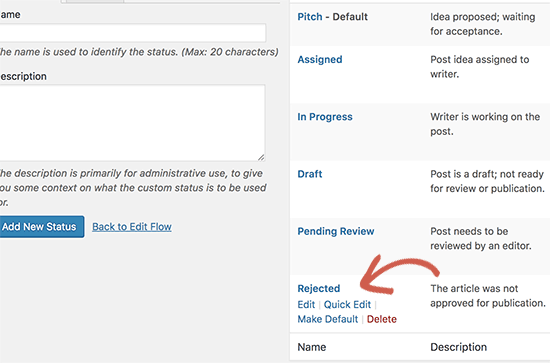
Your custom status will now appear in the right-hand column, so you can edit or delete it at any time.
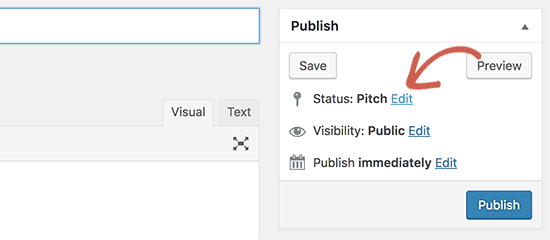
Next, you need to go to Posts » Add New page to create a new post. On the post edit screen, click on the ‘Edit’ link next to status option under the ‘Publish’ meta box.
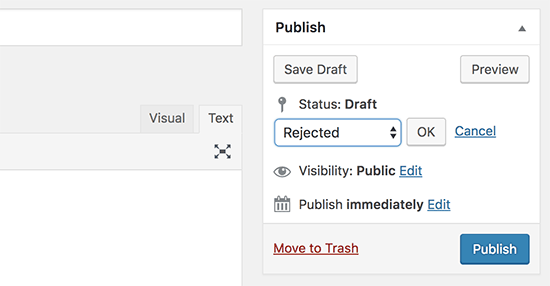
This will reveal a drop-down menu showing all post statuses that you can select including the custom post status you just created.
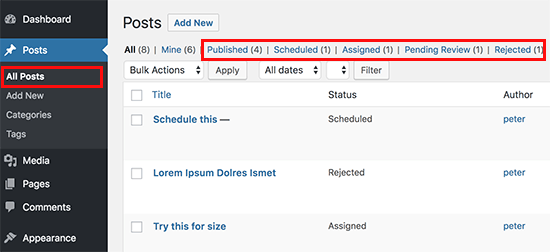
You can also see all articles filed under different post statuses by visiting Posts » All Posts page.
Method 2. Create Custom Post Status Using Code
WordPress has a known bug in the API used to register custom post statuses. It allows you to create custom post status, but you cannot use it in the admin panel. This means that the coding method can get the job done, but it is not as clean, and you will need to change it after it is officially fixed.
However if you still want to do it manually, then you can continue reading.
This method requires you to add code to your WordPress site. If you haven’t done this before, then take a look at our guide on how to copy and paste code in WordPress.
// Registering custom post status
function wpb_custom_post_status(){
	register_post_status('rejected', array(
		'label'                     => _x( 'Rejected', 'post' ),
		'public'                    => false,
		'exclude_from_search'       => false,
		'show_in_admin_all_list'    => true,
		'show_in_admin_status_list' => true,
		'label_count'               => _n_noop( 'Rejected <span class="count">(%s)</span>', 'Rejected <span class="count">(%s)</span>' ),
	) );
}
add_action( 'init', 'wpb_custom_post_status' );

// Using jQuery to add it to post status dropdown
add_action('admin_footer-post.php', 'wpb_append_post_status_list');
function wpb_append_post_status_list(){
global $post;
$complete = '';
$label = '';
if($post->post_type == 'post'){
if($post->post_status == 'rejected'){
$complete = ' selected="selected"';
$label = '<span id="post-status-display"> Rejected</span>';
}
echo '
<script>
jQuery(document).ready(function($){
$("select#post_status").append("<option value=\"rejected\" '.$complete.'>Rejected</option>");
$(".misc-pub-section label").append("'.$label.'");
});
</script>
';
}
}
Don’t forget to replace all instances of the word rejected with your own custom post status.
This code registers a custom post status and after that, it uses jQuery to add it to the admin panel. You can now edit a WordPress post, and you will be able to see it in the status drop-down menu.
If this post caught your eye, you’re probably a fan of how easy Elementor makes it to design pages on your WordPress site. But having the power to create drag-and-drop designs is only part of the battle. As every creative knows, staring at a blank page can make it tough to get started. That is, ... Read more9 Awesome Places To Find Free Or Premium Elementor Templates For Your Next Site
Do you want to start a WordPress blog the right way? We know that starting a blog can be a terrifying thought specially when you are not geeky. Guess what – you are not alone. Having helped over 130,000+ users start a blog, we have decided to create the most comprehensive guide on how to start a WordPress blog without any technical knowledge.
There are three things you need to start a WordPress blog:
A domain name idea (this will be the name of your blog i.e wpbeginner.com)
A web hosting account (this is where your website live on the internet)
Your undivided attention for 30 minutes.
Yes, you read it right. You can start a blog from scratch in less than 30 minutes, and we will walk you through the whole process, step by step.
In this tutorial, we will cover:
How to Register a Domain Name for Free
How to Choose the Best Web Hosting
How to Install WordPress
How to Change Your Theme
How to Write Your First Blog Post
How to Customize WordPress with Plugins
How to Add a Contact Form
How to Setup Google Analytics Tracking
How to Optimize Your Website for SEO
How to Make Money From Your Blog
Resources to Learn and Master WordPress
Ready? Let’s get started.
Video Tutorial
If you don’t like the video or need more instructions, then continue reading.
Step 1. Setup
The biggest mistake beginners make when starting a blog is choosing the wrong blogging platform. Thankfully you’re here, so you won’t be making that mistake.
For 95% of users, it makes more sense to use WordPress.org also known as self-hosted WordPress. Why? Because it is free to use, you can install plugins, customize your site design, and most importantly make money from your site without any restrictions (see the difference between WordPress.com vs WordPress.org).
You might be wondering why is it free? What’s the catch?
There’s no catch. It’s free because you have to do the setup and host it yourself.
In other words, you need a domain name and web hosting.
A domain name is what people type to get to your website. It’s your website’s address on the internet. Think google.com or wpbeginner.com
Web hosting is where your website live. It’s your website’s house on the internet. Every website needs web hosting.
A domain name typically costs $14.99 / year, and web hosting normally costs $7.99 / month.
That’s a lot for beginners who are just starting out.
Thankfully, Bluehost, an official WordPress recommended hosting provider, has agreed to offer our users a free domain name and over 60% off on web hosting.
Bluehost is one of the oldest web hosting companies, started in 1996 (that’s before Google). They are also the largest brand name when it comes to WordPress hosting because they host millions of websites including our own.
On top of all this, Bluehost has been working with WordPress since 2005, and they are committed to giving back. That’s why they have promised us that if you cannot get your blog online within 30 minutes by following this tutorial, then our expert team will complete the process for you without any cost. They will compensate us, so you don’t have to. Contact us for free blog setup help.
NOTE: At WPBeginner we believe in transparency. If you sign up with Bluehost using our referral link, we will earn a small commission at no extra cost to you (in fact, you will save money and get a free domain). We would get this commission for recommending just about any WordPress hosting company, but we only recommend products that we use personally use and believe will add value to our readers.
Let’s go ahead and purchase your domain + hosting.
First thing you need to do is click on the green Get Started Now button to get started.
On the next screen, select the plan that you need (basic and plus are the most popular).
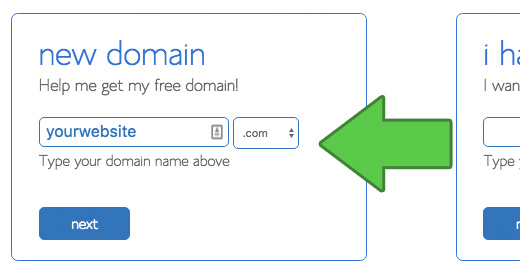
After that, you will be asked to enter the domain name for your website.
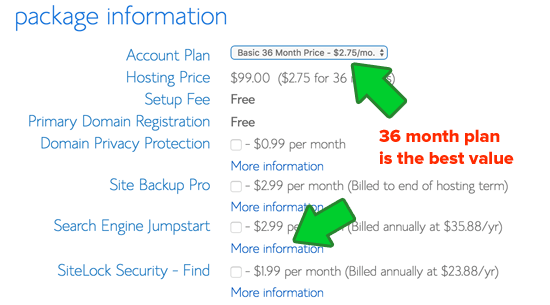
Lastly, you will need to add your account information and finalize the package info to complete the process. We recommend going with the 36 month plan because that’s best value.
On this screen, you will see optional extras that you can purchase. It’s entirely up to you whether or not you purchase these, but we generally don’t recommend purchasing them right away. You can always add them later on, if you decide that you need them.
Once completed, you will receive an email with details on how to login to your web hosting control panel (cPanel). This is where you manage everything from support, emails, among other things. But most importantly, this is where you install WordPress.
Step 2. Install WordPress
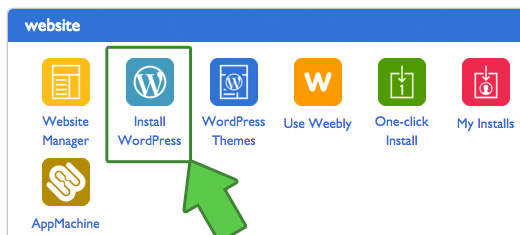
In the cPanel, you will see dozens of small icons for different services and features. This can be a bit overwhelming, so ignore 95% of them because you will never need to use them.
Scroll down to the website section and click on the WordPress icon.
You will be redirected to the Bluehost Marketplace Quick Install screen for WordPress. Click on the Get Started button.
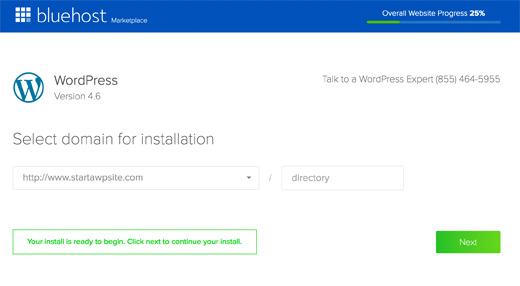
On the next screen, you will be asked to select your domain name. Choose the domain from the dropdown and then click Next.
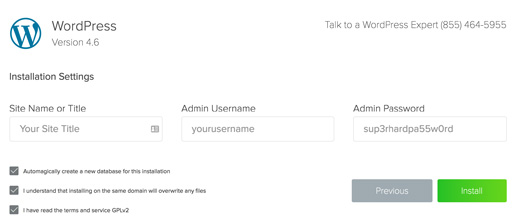
After that, you need to enter your Site Name, username, and a password for your site. You also need to check all the checkboxes and then click Install.
The QuickInstall will start installing WordPress. The marketplace will prompt you to browse WordPress themes, while WordPress is being installed.
No need to do that right now. We’ll show you how to get free WordPress themes in the next step.
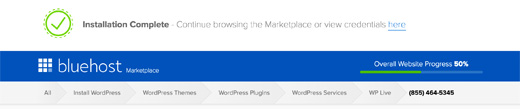
Once WordPress is finished installing, you will see the success notice in the top header bar.
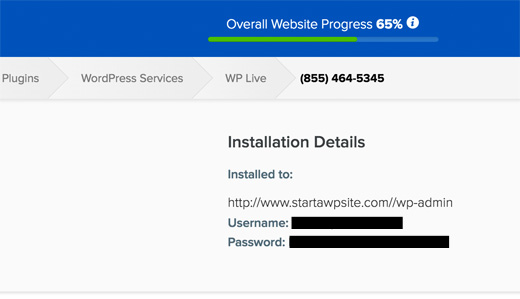
Click on the Installation Complete link, and it will take you to the screen with your WordPress login URL and password.
Congratulations, you have created your WordPress site. That wasn’t too bad right.
Click on the WordPress login link to login to your dashboard.
Now we’re ready to customize your site’s appearance and start blogging.
Step 3. Selecting your WordPress Theme
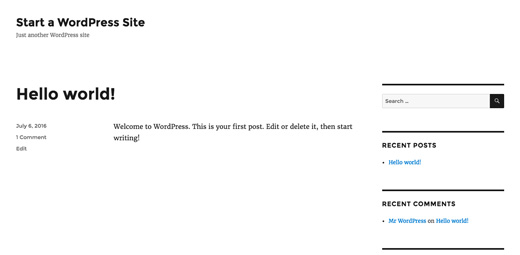
The visual appearance of your WordPress blog is controlled by themes. When you first visit your blog, it will look something like this:
This is not very appealing to most people.
Customizing the look and feel of your blog is by far one of the most exciting and rewarding part in the journey of creating your WordPress site.
There are thousands of pre-made WordPress themes that you can install on your site. Some of them are free, while others are paid.
You can change your theme by going to your WordPress dashboard and clicking on Appearance » Themes.
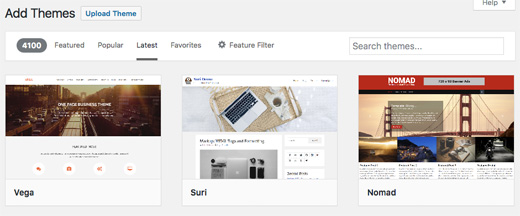
Go ahead and click on the Add New button.
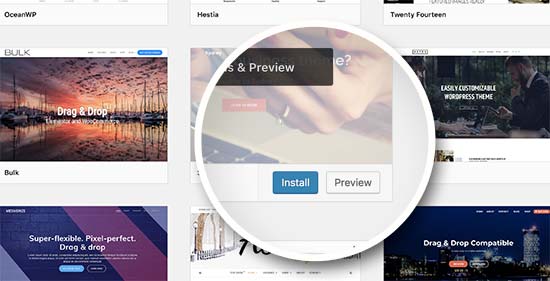
On the next screen, you will able to search from 5600+ free WordPress themes that are available in the official WordPress.org themes directory. You can sort by popular, latest, featured, as well as other feature filters (i.e industry, layout, etc).
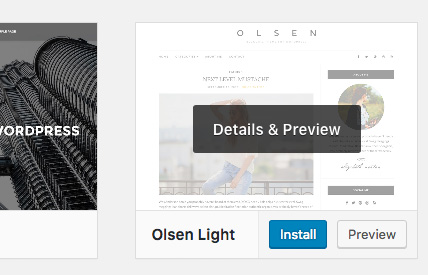
You can take your mouse over to a theme and you will see a Preview button. Clicking on will open the theme preview where you can see how it would look on your website.
The preview of your theme may not look exactly as shown in the screenshot, which is normal as you will get to customize and set it up later. What you need to look for is design, colors, typography, and other elements.
The best tip to select the perfect WordPress theme is to strive for simplicity in design. It helps you keep things clean and clear while offering a good experience to your users.
When you have found the theme that you like, simply bring your mouse on it, and it will show the Install button. Click on it and wait for the theme to be installed. After that, the install button will be replaced with an Activate button. You need to click on it to Activate the theme.
Once you have installed your theme, you can customize it by clicking on the Customize link under the Appearance menu.
Once you have selected your WordPress theme, you are now ready to create your first blog post.
Step 4. Creating Your First Blog Post
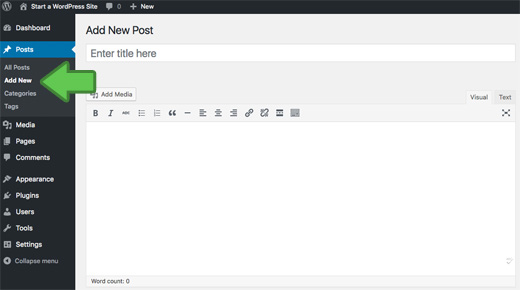
To write your first blog post, click on the Posts » Add New menu in your WordPress dashboard.
You will see an editor area where you can write your first blog post.
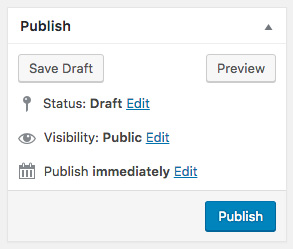
Once you’re done writing, go ahead and click on the Publish button on the right to publish your first blog post to the world.
On the posts screen, you will notice several other sections such as Categories and Tags. You can use these to organize your blog posts. We have a great writeup on the difference between categories vs tags, which we highly recommend that you read.
Often beginners are confused between posts and pages menu in the WordPress dashboard. That’s why we have written a complete guide on the difference between posts vs pages in WordPress.
Step 5. Plugins & Customizations
Once you have written your first blog post, you probably want to get started with adding other usual elements on your website such as contact forms, galleries, sliders, etc.
To add all these additional features, you need to use plugins.
WordPress plugins are apps that allow you to add new features to your website.
There are over 55,000 WordPress plugins available in the free WordPress plugin directory alone. This means no matter what you want to accomplish, there is a plugin for it.
That being said, let’s take a look at how to use plugins to add some essential features to your WordPress blog.
How to Create a Contact Form in WordPress
Every website needs a contact form. It allows your users to contact you directly. Since WordPress doesn’t come with a built-in contact form, you will need a WordPress form builder plugin to add a contact form on your site.
We recommend using the WPForms Lite plugin. It is free version of the popular WPForms plugin, which is #1 in our list of best contact form plugins for WordPress.
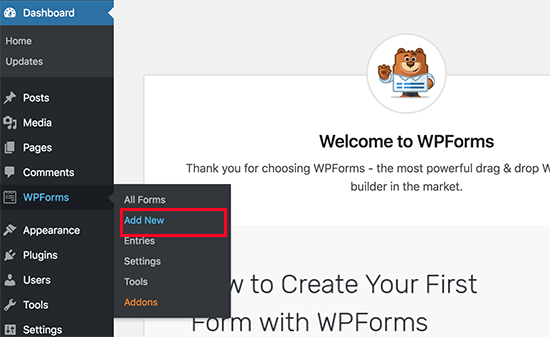
You can install the plugin by going to Plugins » Add New page and typing WPForms in the search box. Next, you need to click “Install” and then “Activate”. Upon activation, you need to head over to WPForms » Add New page to create your first form.
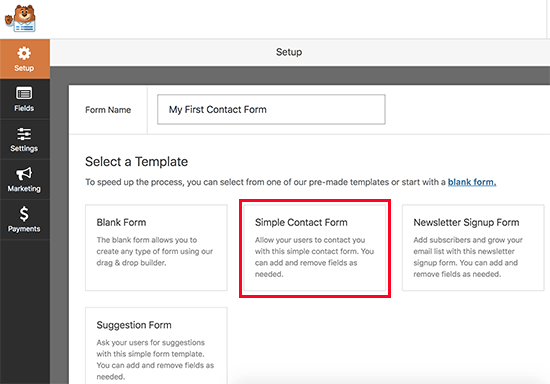
This will open the WPForms builder interface.
First, you need to enter a name for your contact form and then click on ‘Simple Contact Form’ template.
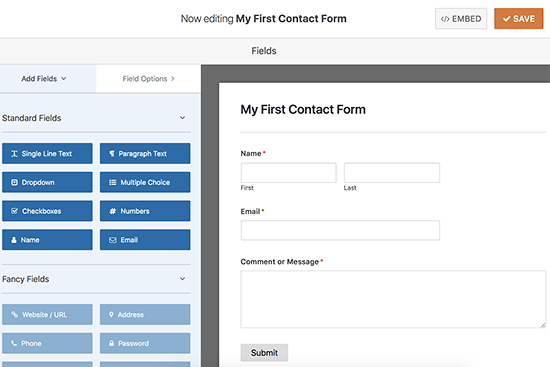
WPForms will now create a simple contact form for you with all the required fields. You can click on any field to change it, or add a new field from the left column.
Once you are done editing the form, click on the save button at the top right corner and then exit the form builder.
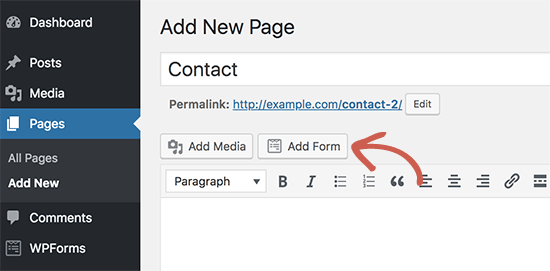
You can now create a new page in WordPress by going to Pages » Add New and call it ‘Contact’. On the edit screen, you will notice a new ‘Add Form’ button.
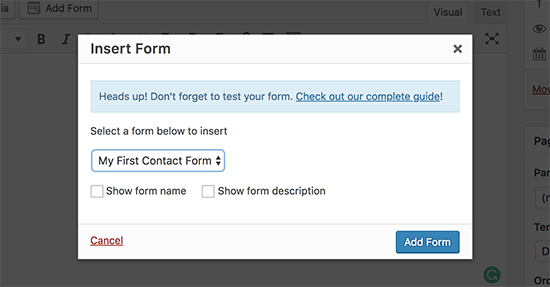
When you click on it, it will bring up a popup where you need to select the form you created earlier and then click on the add form button.
WPForms will now add the form shortcode into your page. You can now save and publish the page and visit it in your browser to see your contact form in action.
Google Analytics helps you see how many people are visiting your blog, where they are coming from, and what are they doing on your website?
It is best to install Google Analytics when starting your blog, so you can see how much your blog has grown over time.
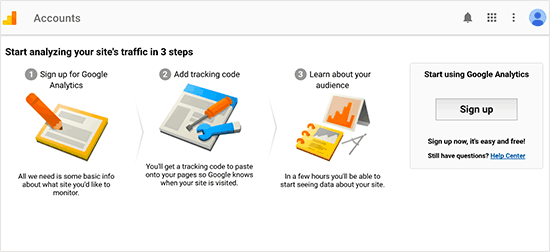
First, you need to visit Google Analytics website and sign in using your Gmail account.
Once you are logged in, you can go ahead and sign up for a free Google Analytics account.
You will be asked to provide your information and website URL. After that, you will be presented with your Google Analytics tracking code.
You can stop here because we will be using a plugin to automatically fetch and add this code to your blog.
Switch to your WordPress admin area to install and activate the MonsterInsights plugin. It is the free version of the best Google Analytics plugin for WordPress, and it is the easiest way to add Google Analytics on your site.
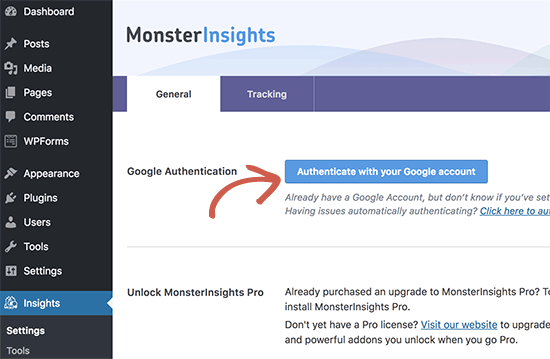
Upon activation, you need to visit Insights » Settings page to configure the plugin settings.
On the settings page, click on the ‘Authenticate with your Google account’ button to connect Google Analytics to your WordPress site.
Follow the onscreen instructions to complete the setup. Once done, you will be able to see your website analytics report straight from your WordPress dashboard under the MonsterInsights tab.
Most beginners don’t optimize for SEO when creating a blog. SEO or search engine optimization helps users find your blog in search engines. If you want more traffic, then it’s crucial that you optimize your blog for SEO from the beginning.
To get started, first you need to install and activate the Yoast SEO plugin. It is the complete WordPress SEO plugin that will help you optimize your blog.
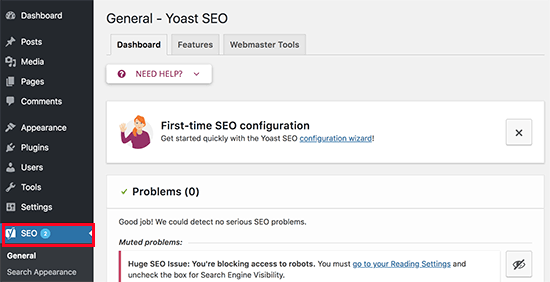
Upon activation, you will see a new menu item labeled ‘SEO’. Clicking on it will take you to the plugins settings page.
The plugin comes with a quick configuration wizard to help you walk through the set up. You can also follow the instructions in our Yoast SEO guide for manual set up.
We also recommend you to follow our complete step by step WordPress SEO guide to set up your blog’s SEO.
More WordPress Plugins and Customizations
There are a ton of others WordPress plugins that you can install. Often beginners find it a bit overwhelming to search for the plugins they need.
At WPBeginner, we often feature the best WordPress plugins to help you add the functionality that you need.
Here is our expert pick of the best WordPress plugins that you should check out.
Security – Sucuri Security is a free security scanner for WordPress. We have a complete step by step WordPress security guide for beginners that will help you secure your blog.
If you are curious about the plugins and tools we use on our site, then check out WPBeginner’s Blueprint. It has all the plugins and tools that we use on the WPBeginner blog.
Now that you’ve built your blog and customized it to your liking, you are probably wondering how can I actually make money from my blog?
There are actually a lot different ways to successfully monetize your blog. However there is no such thing as a get rich quick scheme.
Don’t be fooled by the pictures of expensive cars and mansions because those are all fake.
Unlike other “make money online” articles, we have created the most comprehensive guide on how to make money from your blog using WordPress.
That’s a 4000+ word guide that everyone who starts a blog and wants to make money from it needs to read. We have shared our 14+ years of online wisdom in that ultimate guide.
As long as you’re willing to put in the hard work and effort, you’ll reap the reward. Remember, there are no shortcuts.
Here are some of the best ways to make money from your WordPress blog.
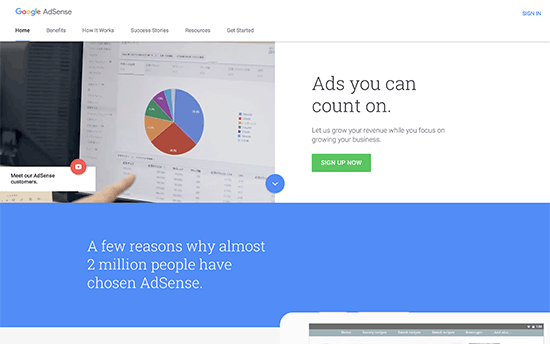
1. Google AdSense
Many bloggers make money by showing ads on their blog. If you make a blog with monetization in mind, then Google AdSense is the best way to do this.
It is the largest advertising platform for bloggers and publishers. Acting as a middleman between you and the advertiser, Google allow advertisers to bid for keywords matching your content. This allows you to get the best rates possible for the ads.
Affiliate marketing is the second most commonly used monetization strategy among bloggers. Basically, you recommend products and services to your readers and when they make a purchase you get a referral commission.
The key in affiliate marketing is to recommend high-quality products and services that you already use and trust. There are plenty of affiliate marketing plugins and tools for WordPress that can help you make more money when promoting affiliate products.
We have a complete step by step affiliate marketing guide for beginners, that will help you get started.
3. Online Store
Many bloggers make money by selling things directly from their blog. This could be physical products, digital downloads like ebooks, artwork, music, and more. Some bloggers even offer consulting services.
That’s not all you can do with your WordPress blog. You can make WordPress blogs specifically for reviews, fashion blogging, food blogging with recipes, and more. Each of these blog types brings you more unique opportunities to make money.
Step 7. Mastering WordPress
WPBeginner is the largest free WordPress resource site for beginners.
At WPBeginner, our main goal is to provide cutting-edge helpful WordPress tutorials that are easy to understand for small businesses, bloggers, and non-techy WordPress website owners (see more about us).
To expand your WordPress knowledge, you should check out:
WPBeginner Dictionary – The best place for beginners to start and familiarize themselves with the WordPress lingo
WPBeginner Videos – New to WordPress? Watch these 23 videos to master WordPress.
WPBeginner Blog – The central place for all our WordPress tutorials.
You can also subscribe to WPBeginner’s YouTube Channel where we regularly share video tutorials to help you learn WordPress.
Lastly, you can use Google to type your question and add WPBeginner in front of it. Our users find this very helpful because you’ll likely find an answer to any WordPress questions that you have.
In case you don’t find an answer to your question, simply use our contact form to send us a message. We love helping users get started with WordPress.
Frequently Asked Questions (FAQs)
Having helped thousands of people start a blog, we have answered quite a lot of questions. Below are the answers to the most frequently asked questions about creating a blog.
Can I create a blog without WordPress?
Yes, there are several other blogging platforms available. We have compared them all, and WordPress is by far the best solution in the market to make a blog with complete ownership and freedom.
Can I create a blog without hosting?
No, that’s not possible. Web hosting is where your website files are stored. All websites need web hosting.
If you want to have a public-facing blog but want to remain anonymous, then you need to make sure that your domain has WHOIS privacy turned on. Often people use a pseudonym / nickname to write under. You should also create a unique email just for your blog. It goes without saying, don’t post your pictures or anything on the blog. For more detailed instructions, see our article on how to blog anonymously using WordPress.
Social media plays an important role in bringing new visitors to your website and keeping your followers engaged. WordPress has plenty of great social media plugins that you can use. These plugins allow you to easily add social sharing buttons to your website and engage your audiences across platforms like Twitter, Facebook, LinkedIn, and more.
Can I create a blog in my own language?
Yes, you can use WordPress in other languages. You can select your language during installation or from Settings page in WordPress admin area. WordPress is fully translated in more than 56 languages and partially translated into dozens of other languages. Many top WordPress themes and plugins are also available in multiple languages. You can also translate a theme or a plugin that you want to use on your website.
Yes, you can. WordPress comes with a user role management system that you can use to create a multi-author blog.
Can I sell online courses from my WordPress blog?
Yes, you can. WordPress has some of the best LMS plugins to make it happen. You can create a blog and sell courses online from your WordPress blog. For detailed step by step instructions, see our guide on how to create an online course with WordPress.
Can I create a membership based WordPress blog?
Yes, you can. WordPress has some powerful membership plugins, that allow you to easily restrict any content you want and limit it to members only. You can create paid memberships with multiple levels and sell premium content to your paid subscribers. For details, see our ultimate guide to building a WordPress membership website.
As far as WordPress news goes, this week was pretty quiet. WPTavern did spot some issues with using Gutenberg on iOS devices. And Ionut from CodeinWP also published another transparency report that’s worth a read. Beyond that, Daan’s EasyThemePacks shop just launched two new premium Elementor templates for travel agencies and bakeries. And Delicious Brains ... Read moreWeekly WordPress News: Gutenberg/iOS Troubles + New Elementor Templates
Are you looking for the best WordPress job board plugin? There are several WordPress job board plugins that you can use to easily create a job board and charge other companies to post jobs. It is one of the ways to make money from your blog, and you can even use it to post your own job openings. In this article, we have picked the best WordPress job board plugins and themes that you can use.
Building a Job Board Website with WordPress
WordPress is currently one of the most popular website builders in the market, powering more than 30% of all websites on the internet. It can be used to build almost any kind of website including a job board website.
There are two types of WordPress websites which often confuses new users. First, there is WordPress.com which is a hosted solution. Second, you have WordPress.org also called self-hosted WordPress. See our article on WordPress.com vs WordPress.org for a side-by-side comparison.
We recommend using self-hosted WordPress.org because it gives you instant access to all WordPress features without any restrictions.
To get started, you will need a domain name and a WordPress hosting account.
We recommend using Bluehost because they are an officially recommended WordPress hosting provider, and one of the largest web hosting companies in the world.
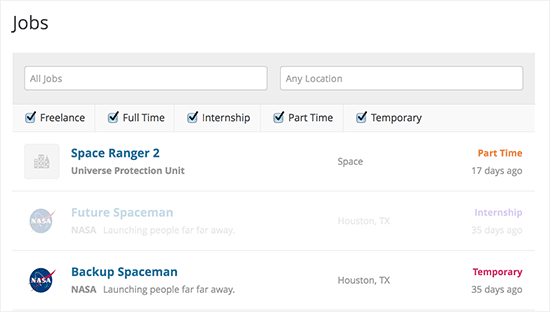
WP Job Manager is an extremely easy to use WordPress job board plugin. Simply create new pages, add shortcodes, and you can have a live job board in minutes. It allows users to register on your website and post their job listings. Users can also manage their listings from a simple dashboard.
You can also use it to make money online with paid listings through add-ons. It also has add-ons to integrate with ZipRecruiter, Indeed, Facebook, WooCommerce stores, and more.
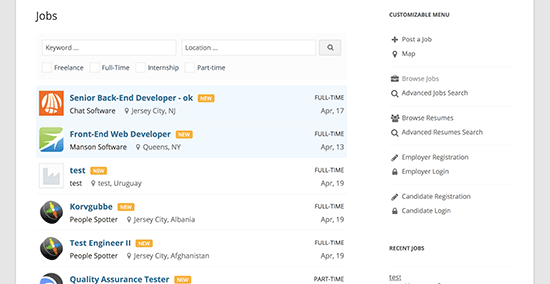
WPJobBoard is a paid WordPress job board plugin that allows you to add a powerful job search engine to your website. It includes a front-end admin panel for users to submit jobs and resumes. It also includes a resume database and employer portal allowing users to search for the right candidate.
The plugin integrates with all WordPress themes and comes with its own free theme as well. It also allows you to accept payments, offer coupons, discounts, and even membership packages to employers.
Job Board Manager is another great plugin to add a job board to your WordPress website. It comes with an easy to use shortcode that you can add to different pages for displaying job listings, adding new job listing, showing user dashboard, and more.
It comes with free add-ons to add company profiles, locations, widgets, and breadcrumbs. You can also use paid add-ons for WooCommerce paid listings, job alerts, applications manager, and more.
Simple Job Board is another easy to use WordPress job board plugin. It does not allow employers to create an account on your website or add their own job listings. Basically, you can use it to manually enter job listings with categories and job types. There are no built-in monetization options in the plugin settings, but you can extend it by adding a simple order form in WordPress.
It allows you to add as many details for each listing as needed, and you can display custom job application forms for job listings.
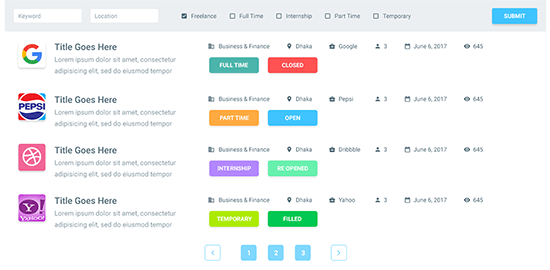
Apply Online is a classified ads management plugin which allows users to quickly respond to listings. It allows you to easily add a job board to your website and start accepting applications.
It has powerful features like ad categories, filters, application form fields, email notifications, and more. One disadvantage of the plugin is that you cannot use it to create a paid job listings website, and you will need to add membership plugin to create subscriptions plans or use a contact form plugin to accept orders.
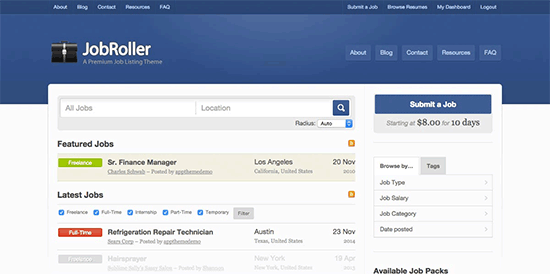
JobRoller is a powerful WordPress job board theme. It comes with excellent monetization options allowing you to get paid for job listings. It includes separate sections to create a blog page or add landing pages to your job board website.
It supports both employers and job seeker accounts, includes a resume or CV bank, and comes with Ajax powered search / filter features. It has multiple display options and powerful theme options panel which helps you quickly setup everything.
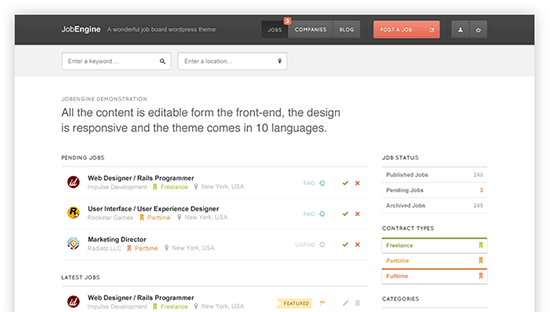
JobEngine is a WordPress app theme designed to create a powerful job board website. It allows your users to easily create an account and add listings. You can charge for the job listings on a per job basis or create premium plans. You can also sell featured listings separately. It supports PayPal, Stripe, 2Checkout, and Authorize.net payment gateways.
As a theme, it has multiple color choices and design options to control the appearance of your job board. It has multiple sidebars, landing page options, translation-ready and support for multilingual websites.
We hope this article helped you find the best WordPress job board plugins and themes for your website. You may also want to see our list of the best drag & drop WordPress page builder plugins to further customize your website.
If you liked this article, then please subscribe to our YouTube Channel for WordPress video tutorials. You can also find us on Twitter and Facebook.
Themes are an integral part of a website. They let you showcase your work in a beautiful and organized manner. With every month’s new updated web themes, we at WPLift have brought a new selective list of wonderful themes for your online business. Let’s check out some wonderful themes of April 2018. Mazino Mazino is ... Read moreThe Best Free WordPress Themes April 2018