How to Restore the Get Shortlink Button in WordPress

Do you want to create a shortlink of your WordPress blog posts or pages? WordPress shortlinks are useful for sharing in your emails, facebook messages, or even text messages. It was a default feature until WordPress version 4.4. Recently, one of our readers asked how to bring back the get shortlink feature in WordPress. In this tutorial, we will share how to restore the get shortlink button in WordPress.

How to Get the Get Shortlink Button in WordPress

What is the Get Shortlink Button in WordPress?

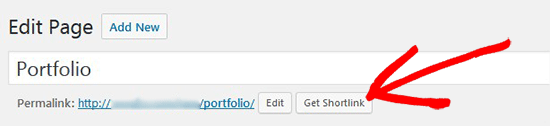
Get Shortlink button is a WordPress feature that allows you to easily get a short link of your WordPress blog post or page. It used to be located right next to the permalink area in the post edit screen.

Get Shortlink Button

However if you recently started your blog, then you will not see this feature on your WordPress site because it was removed after WordPress version 4.4.

We find this feature to be quite useful for easily getting shortlinks for our blog posts that look like this:

http://wpbeg.in/2csN1pj

If you want to bring back the get shortlink feature on your WordPress site, then you’re in the right place.

Let’s take a look at how to bring back the get shortlink button back in WordPress.

Method 1: Using WP Bitly plugin to Add Get Shortlink Button

This method is easier and recommended for most users. This method also allows you to create custom branded short URLs for your website.

First thing you need to do is install and activate the WP Bitly plugin. For more details, see our step by step guide on how to install a plugin in WordPress.

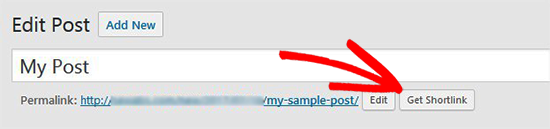
Upon activation, this plugin will automatically add the Get Shortlink button on your post edit screen.

Get Shortlink Button

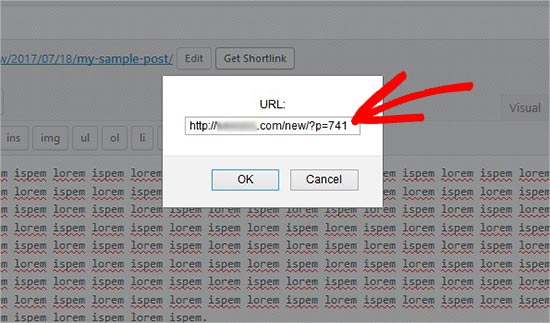
Once you click on this button, it will show you the shortlink for your WordPress posts and pages. This shortlink can be shared in your emails and messages, so your audience can reach directly to the page.

Page Shortlink

You can also use the WP Bitly plugin to create custom branded shortlinks for your blog posts like we do on WPBeginner. See our step by step guide on how to create your own customized short url in WordPress.

Method 2: Manually Adding Get Shortlink Button

This method requires you to add code to your WordPress files. If you haven’t done this before, then please take a look at our guide on how to copy and paste code in WordPress.

You will need to add the following code to your WordPress theme’s functions.php file or a site-specific plugin:


add_filter( 'get_shortlink', function( $shortlink ) {return $shortlink;} );

This code will add the shortlink filter to display the Get Shortlink button in your WordPress pages and posts.

Get Shortlink Button

You can click on this button to get the shortlink for your post or page.

We hope this article helped you bring back the Get Shortlink button in WordPress. You may also want to check out our list of the must have WordPress plugins for business websites.

If you liked this article, then please subscribe to our YouTube Channel for WordPress video tutorials. You can also find us on Twitter and Facebook.

The post How to Restore the Get Shortlink Button in WordPress appeared first on WPBeginner.
Weglot Review: Fully Translate Your WordPress Site In Just A Couple Minutes

If you need to translate your WordPress site, there’s a good chance you’ve come across a plugin called Weglot. Having recently passed 20,000 users and €44,000 in monthly revenue, Weglot isn’t really a newcomer to the translation scene anymore. After using Weglot several times, I can see why they’ve been successful – Weglot is definitely ... Read moreWeglot Review: Fully Translate Your WordPress Site In Just A Couple Minutes

The post Weglot Review: Fully Translate Your WordPress Site In Just A Couple Minutes appeared first on Learn WordPress with WPLift.

MyCryptoCheckout Review: Accept Cryptocurrency on WooCommerce or Easy Digital Downloads

Last time I checked in with you all about cryptocurrency, Bitcoin was soaring high at $18,474.10. Prices have dropped a little since then (a moment of silence for my portfolio), but with a market cap of $372 billion, cryptocurrency is still here to stay. And that fact might have you interested in accepting cryptocurrency payments ... Read moreMyCryptoCheckout Review: Accept Cryptocurrency on WooCommerce or Easy Digital Downloads

The post MyCryptoCheckout Review: Accept Cryptocurrency on WooCommerce or Easy Digital Downloads appeared first on Learn WordPress with WPLift.

10Web Review: WordPress Site Management + 60 Premium Plugins For One Price

10Web is an intriguing new service that aims to make it a heckuva lot easier to manage a fleet of WordPress websites. It’s: Part all-access theme/plugin club Part website management dashboard for multiple WordPress installs So where do those premium themes and plugins come from? Well, I can’t find anything officially linking the two, but ... Read more10Web Review: WordPress Site Management + 60 Premium Plugins For One Price

The post 10Web Review: WordPress Site Management + 60 Premium Plugins For One Price appeared first on Learn WordPress with WPLift.

How to Add YouTube Subscribe Button in WordPress

Do you want to get more subscribers on your YouTube channel? Having a subscribe button on your blog makes it easy for your visitors to find your videos and subscribe to your channel. In this article, we will show you how to add a YouTube subscribe button in WordPress.

How to Add YouTube Subscribe Button in WordPress

Method 1: Manually Adding YouTube Subscribe Button Code

The first thing you need to do is visit the YouTube subscribe button page on the Google Developer’s website.

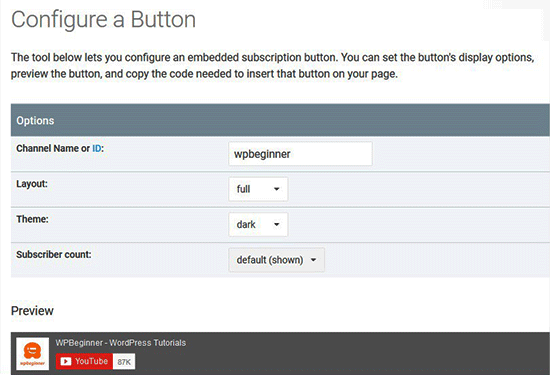
Configuration Button

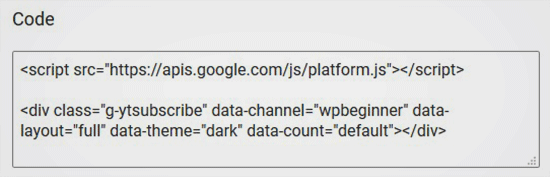
On this page, you will need to enter your YouTube channel’s name, select a layout, theme, and subscriber count option. It will display a live preview of how your button will look on the website. Once you are satisfied, simply scroll down to copy the embed code.

Copy Code

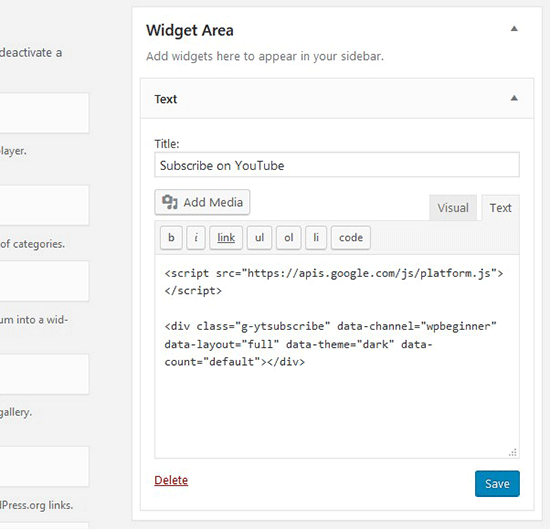
Next, you need to login to the WordPress admin area of your site and go to Appearance » Widgets. There you will need to drag and drop a text widget to your widget area, and paste the YouTube subscribe button code inside the widget.

Add YouTube Subscribe Script

Once you are done, don’t forget to save your changes and visit your website to see the YouTube subscribe button in action.

Subscribe to YouTube Channel in Sidebar

Method 2: Using Plugin to Add a YouTube Subscribe Bar

Another way to add a YouTube subscribe button on your website is by adding it below every YouTube video on your site. This offers additional exposure and can help you significantly increase your subscribers.

First you need to install and activate the YouTube Subscribe Bar plugin.

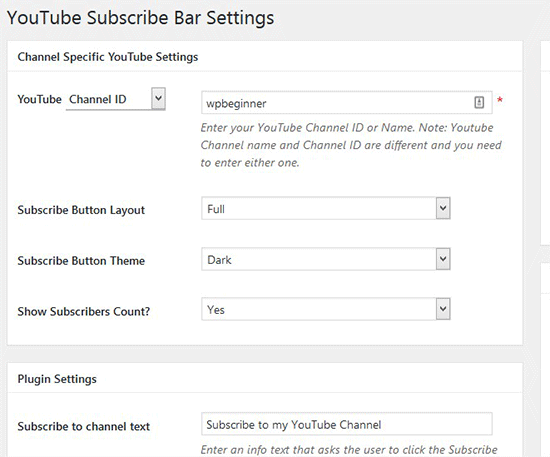
Upon activating the plugin, you need to go to Settings » YouTube Subscribe Bar to add your YouTube channel ID. You will also need to style the button layout, choose a button theme, and show subscribers count.

YouTube Subscribe Bar Settings

The YouTube subscribe bar plugin allows you to add some text before the button and edit its styling. You can use this area to add a call to action like “Subscribe to My Channel”.

Once you are done, make sure to click on the Save Changes button to save your settings.

This plugin will automatically display your YouTube Subscribe bar below every YouTube video on your site. The YouTube Subscribe bar will appear on the videos from your channel and third-party channels, so you can share useful video content on your site and get more subscribers on your YouTube channel.

YouTube Subscribe Bar

Note: The YouTube subscribe bar plugin only works with oEmbed videos. It will not work with videos embedded via iFrame.

We hope this article helped you add the YouTube subscribe button in WordPress. You may also want to check out our guide on how to track user engagement on your WordPress site.

If you liked this article, then please subscribe to our YouTube Channel for WordPress video tutorials. You can also find us on Twitter and Facebook.

The post How to Add YouTube Subscribe Button in WordPress appeared first on WPBeginner.

How to Use the WordPress Desktop App for Your Self-Hosted Blog

Do you want to use the WordPress desktop app for your self-hosted WordPress.org blog? WordPress desktop app allows you to easily write and edit blog posts without being distracted by other browser tabs. In this article, we will show you how to use the WordPress desktop app for your self-hosted WordPress blog.

How to use WordPress desktop app for self hosted WordPress site

Pros and Cons of Using the WordPress Desktop App

WordPress desktop app is created by Automattic, a company founded by WordPress co-founder Matt Mullenweg. It is also the company behind JetPack and WordPress.com. For details, see our article on the comparison between WordPress.com vs WordPress.org.

WordPress desktop app offers an improved user experience for self-hosted WordPress websites, which is particularly great for users looking for a distraction free editor to create content.

However, just like everything else in the world it has its own pros and cons.

Pros

Here are the advantages of using the WordPress desktop app on your computer to manage your self hosted WordPress.org website.

  • Offers a nice user interface to manage your website
  • It syncs your content fast and offers a great writing experience
  • Offers a clean distraction free writing area to create your content
  • Allows you to perform website management tasks without opening your browser like updating plugins and answering comments.

Cons

Following are the disadvantages you need to consider before using the WordPress desktop app for managing a self-hosted WordPress site.

  • It doesn’t work while offline. This means you cannot write posts and just save them to your computer using the desktop app.
  • Doesn’t load custom fields created by plugins in the post editor. For example, if you are using Yoast SEO, then you will not be able to edit post’s SEO settings from the app.
  • Requires you to install the JetPack plugin and sign up for a WordPress.com account.

That being said, let’s take a look at how to use the WordPress desktop app for your self-hosted WordPress.org site.

Using WordPress Desktop App for Self-Hosted WordPress

First thing you need to do is install and activate the JetPack plugin on your website. For more details, see our step by step guide on how to install a WordPress plugin.

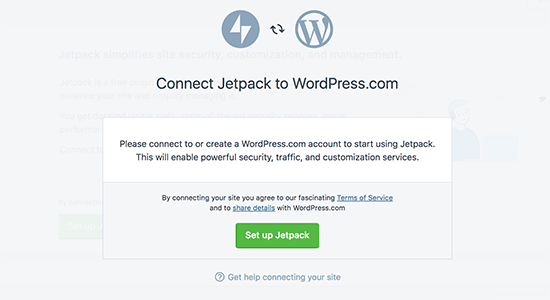
Upon activation, you will be asked to connect JetPack to a WordPress.com account.

Connect JetPack to WordPress.com

You need to click on the ‘Setup Jetpack’ button to continue.

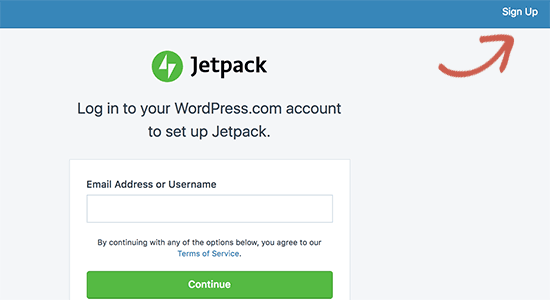
This will take you to the WordPress.com website. If you already have a WordPress.com account, then you can login. Alternatively, you need to click on the sign up button to create a new account.

Login or sign up for a WordPress.com account

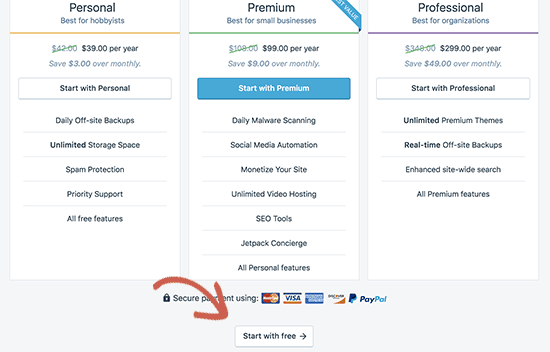
After sign up, you will be taken to the pricing page. Simply scroll down to the bottom of the page and click on the ‘Start with free’ button.

Get free account

WordPress.com will now create your free account, and you will be redirected back to your website.

Next, you need to download and install the WordPress Desktop App on your computer.

WordPress app login screen

After installation go ahead and launch the app. You will see the login screen where you need to enter your WordPress.com username and password to login.

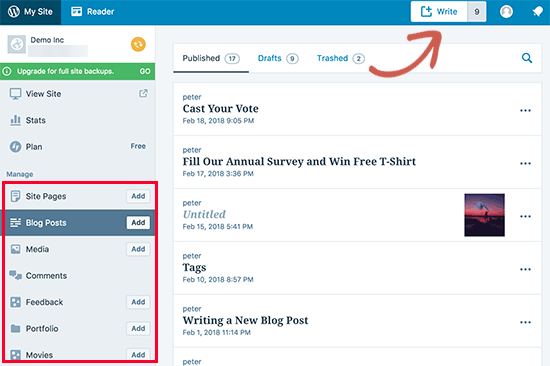
Once logged in, you will see the WordPress.com reader screen where you can explore content and follow blogs. To manage your website, you will need to switch to the My Sites tab.

WordPress desktop dashboard

You will now see your website title in the left menu along with other website management sections. In the right column, you will see JetPack traffic reports.

Using the admin bar on the left column, you can edit and create posts, pages, and custom post types. You can also add a new blog post by clicking on the write button at the top.

Adding content to your site from the app

The content editing area offers a very polished user experience.

On the right column, you will find post settings like status, post scheduling, categories and tags, featured image, and more. To the left, you have a distraction free writing area with a rich text editor.

Writing posts in WordPress desktop app

You can add photos and galleries to your article by clicking on the ‘Add’ button in the editor. You can close the settings column by clicking on the gear icon at the top.

Now let’s take a look at the Comments section.

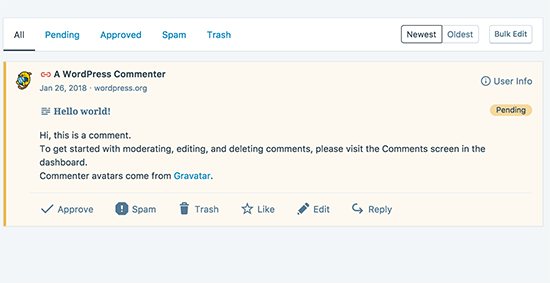
The WordPress desktop app allows you to easily manage comments on your website. You can reply to comments as well as approve or delete comments pending moderation.

managing comments in WordPress desktop app

The themes section in the app allows you to manage themes installed on your website. You can also install a new theme without leaving the app.

Managing themes

However, you cannot customize your theme inside the app. Clicking on customize will open the customizer window on your website in a new browser tab.

The plugin section allows you to install, upload, and activate plugins directly from the app.

Manage plugins

The app will also notify you of plugin updates, and you can update them directly from the app. You can also optionally choose to auto-update plugins that you trust.

Updating plugins from the app

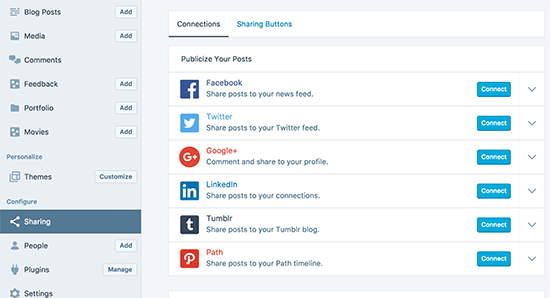
Now, let’s review the Sharing section.

Here you can connect the JetPack plugin to popular social media websites and automatically share new posts on social media.

Enabling social sharing in WordPress.com

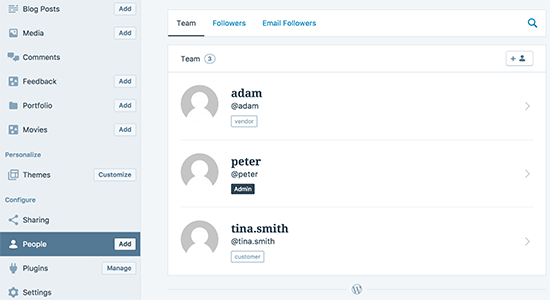
If you want to add new authors and users to WordPress, then you can do so directly from the ‘People’ section in the app. It shows all registered users on your website as well as users following your blog using the JetPack follow feature.

managing users via WordPress app

You can click on the add button to invite new users and click on existing user accounts to view their details and delete accounts if needed.

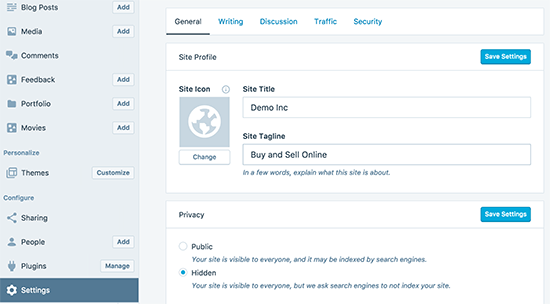
The Settings section inside the app allows you to manage WordPress settings from the app. Some of these settings are specific to the app and JetPack plugin while others are WordPress settings that you would normally manage in the admin area.

Settings panel in WordPress app

If you manage multiple WordPress sites, then you can add them to the app and manage them from the same dashboard.

Any new website you add should have JetPack installed and connected to the same WordPress.com account you are using in your app. After that you can simply click on the add new site button at the bottom right corner of the app to add them.

Add new site to WordPress app

We hope this article helped you learn how to use WordPress desktop app for your self-hosted website. You may also want to see our list of best mobile apps to manage your WrodPress site.

If you liked this article, then please subscribe to our YouTube Channel for WordPress video tutorials. You can also find us on Twitter and Facebook.

The post How to Use the WordPress Desktop App for Your Self-Hosted Blog appeared first on WPBeginner.

DeliPress Review: Send Newsletters Right From Your WordPress Dashboard

Before I start, let me be clear that this isn’t a review of a plugin that helps you create a website for your deli. No, friends, this is a review of a new‘ish plugin that helps you manage and create newsletters and opt-in forms right from your WordPress dashboard. DeliPress comes with a great-looking drag ... Read moreDeliPress Review: Send Newsletters Right From Your WordPress Dashboard

The post DeliPress Review: Send Newsletters Right From Your WordPress Dashboard appeared first on Learn WordPress with WPLift.

6 Best Online Grammar Checker Tools for WordPress (2018)

Are you looking for the best online grammar checker tools for WordPress? Most browsers come with a built-in spellcheck too, but it doesn’t check for grammar and readability. In this article, we have hand-picked the best grammar checker tools that you can use with WordPress.

Online grammar checker tools for WordPress

Why Add a Grammar Checker Tool for WordPress?

Even the most experienced writers make mistakes. Proofreading your own articles often lead to making small careless errors because we often tend to rush through the pre-publish checklist.

One way to overcome this issue is to read your articles out loud. Listening to your own voice can help you find mistakes and improve the overall readability score of your articles.

To help you with the grammar and spelling, you can use a grammar checker tool. These tools can detect spelling and grammar mistakes as you type. This saves you time on proofreading while improving content across your website.

That being said, let’s take a look at the best grammar checker tools for WordPress that you can use.

1. Grammarly

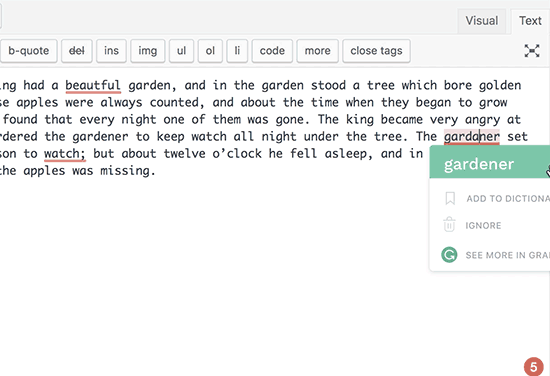
Grammarly is a popular online grammar checker tool available as a browser addon for Google Chrome, Firefox, and even Microsoft Edge. It checks for grammar and spelling errors as you write your posts.

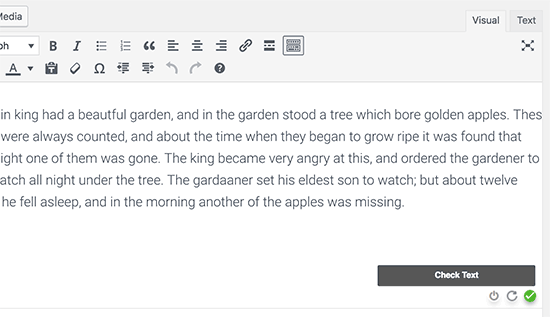
Grammarly

It will show an indicator at the bottom right corner of the writing area. Clicking on the indicator will show you the number of errors. Spelling, grammar, and contextual errors will be highlighted with an underline as you write.

One downside of Grammarly is that you will have to switch to the text editor for proofreading.

2. Ginger

Ginger is another handy spelling and grammar checker tool to improve your writing skills and boost productivity. It is available as a browser addon and offers a nice user experience.

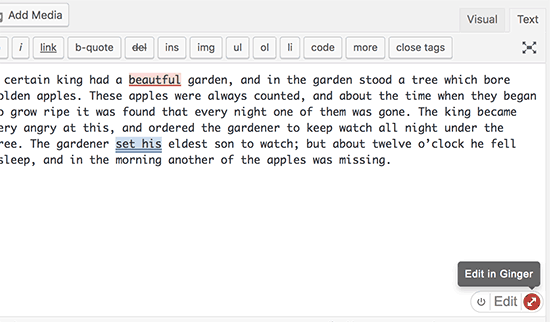
Ginger

It displays a tiny icon at the bottom right corner of writing areas including WordPress post editor, Gmail, Facebook, and more. It checks for mistakes as you type and highlight errors with context.

There are a few drawbacks of using Ginger. You will need to switch to the text editor in WordPress. For better proofreading, you will need to click on the icon to launch the Ginger editor.

3. After The Deadline

After The Deadline is available as a Google Chrome extension. It comes with a built-in spell checker tool with optional grammar and readability check.

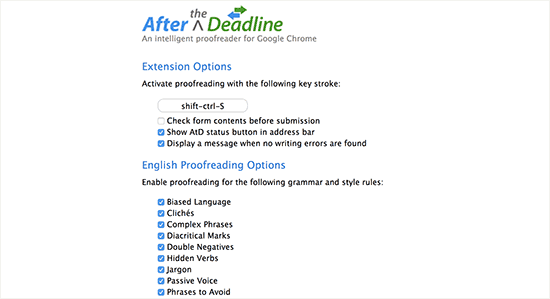
Once you have installed the addon in your browser, you will need to click on it and select options. This will open the addon’s settings page where you can check the options that you want the addon to look out for.

After the deadline

You can run the tool while writing your blog posts by clicking on the spellcheck icon at the bottom right corner of the editor.

4. Hemingway

Hemingway is available as a web-based text editor, so it doesn’t work directly inside your WordPress post editor. However you can use their free web based editor to check your articles for readability, grammar, and spelling errors.

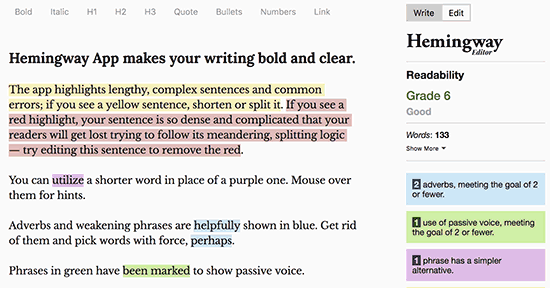
Hemingway

Think of Hemingway as not just a grammar checker but a style checker. It is designed to improve readability by showing you a readability score of your content and suggesting improvements. The web app has a clean and distraction free layout which can help you asses your content quickly before hitting the publish button in WordPress.

Hemingway is also available as a paid desktop app for both Windows and Mac which allows you to post directly to WordPress.

5. LanguageTool

LanguageTool is available as a free addon for Chrome, FireFox, Google Docs, and LibreOffice. It is also available as a web based editor and a complete desktop app.

LanguageTool

The good thing about LanguageTool is that it works with English, German, Polish, Russian, and over 20 other languages. This makes it a particularly useful tool for multilingual websites and multilingual authors.

The downside is that the free version is only limited to 20,000 characters per check, so you will need to upgrade to paid plans for more features.

6. Jetpack

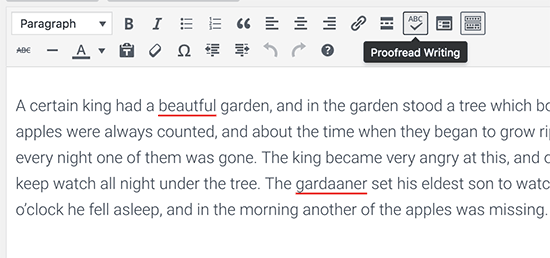
Jetpack is a WordPress plugin suite that comes with a lot of useful modules. One of its core features is to add proofreading to the WordPress post editor.

JetPack

For extended grammar check, you need to visit the JetPack » Settings page. Under the writing tab, you will see the spelling, style, and grammar section. From here you can enable different proofreading options including style rules.

The downside of using JetPack is that it requires a WordPress.com account, and you will also get tons of features that you may not need.

We hope this article helped you find the best online grammar checker tools for WordPress. You may also want to see our list of best contact form plugins for WordPress.

If you liked this article, then please subscribe to our YouTube Channel for WordPress video tutorials. You can also find us on Twitter and Facebook.

The post 6 Best Online Grammar Checker Tools for WordPress (2018) appeared first on WPBeginner.
A Big Collection Of Gutenberg Editor Resources For Developers And Casual Users Alike

Every time the clock ticks past midnight, the Gutenberg editor gets one day closer to becoming part of the core. WordPress 5.0 is the next major release. And with WordPress 5.0, we’re going to get the brand new Gutenberg editor (I guess it will just be the “WordPress editor” when that happens). To help get ... Read moreA Big Collection Of Gutenberg Editor Resources For Developers And Casual Users Alike

The post A Big Collection Of Gutenberg Editor Resources For Developers And Casual Users Alike appeared first on Learn WordPress with WPLift.