How to Change the Default Search URL Slug in WordPress

Do you want to change the default search URL slug in WordPress? By default, WordPress search URLs are not user friendly. In this article, we will show you how to easily change the default search url slug in WordPress and make it more SEO and user friendly.

Changing default WordPress search URL slug

Why Change Default Search URL Slug in WordPress

WordPress uses SEO friendly URL structure for all pages on your website. Typical SEO friendly WordPress URLs look like this:

http://example.com/some-page/
http://example.com/2018/03/some-article/
http://example.com/category/some-category/

As you can see, these URLs are quite easy to understand for users as well as search engines.

However, WordPress still uses non-friendly URL for search results page. A typical search URL in WordPress looks like this:

http://example.com/?s=search-term

This URL structure doesn’t match the rest of your website URLs. While some WordPress search plugins improve the search results, most don’t do anything about the search URL itself.

What if you can make your search URL look like:

http://example.com/search/your-search-term/

Let’s take a look at how to make the WordPress search page URL slug more SEO friendly.

Changing Search Page URL Slug in WordPress

For this tutorial you will need to edit your WordPress theme files. If you haven’t done this before, then please take a look at our guide on how to copy and paste code in WordPress.

Method 1. Change WordPress Search URL Slug via Functions File

This method is easier and recommended for most users.

First, you need to copy and paste the following code in your theme’s functions.php file or a site-specific plugin:

function wpb_change_search_url() {
	if ( is_search() && ! empty( $_GET['s'] ) ) {
		wp_redirect( home_url( "/search/" ) . urlencode( get_query_var( 's' ) ) );
		exit();
	}	
}
add_action( 'template_redirect', 'wpb_change_search_url' );

Don’t forget to save your changes.

You can now go to your website and try using the search feature. You will notice that the search URL looks like this:

http://example.com/search/your-search-query/

Method 2. Change Search URL Slug via htaccess File

The .htaccess file is often used to set up redirects and other website configuration tasks. You can also use it to change the default search URL slug in WordPress.

Your .htaccess file is located in your website’s root folder, and you will need to use FTP or File Manager app in cPanel to edit it. Refer to this guide, if you can’t find the .htaccess file.

In your .htaccess file, you need to paste the following code at the bottom:

# Change WordPress search URL
RewriteCond %{QUERY_STRING} \\?s=([^&]+) [NC]
RewriteRule ^$ /search/%1/? [NC,R,L]

Don’t forget to save your changes and upload the .htaccess file back to the server.

You can now go to your website and use the search feature. You will notice the search URL will now look like this:

http://example.com/search/your-search-query/

We hope this article helped you change the default search URL slug in WordPress. You may also want to see our list of 55+ most wanted WordPress tips, tricks, and hacks.

If you liked this article, then please subscribe to our YouTube Channel for WordPress video tutorials. You can also find us on Twitter and Facebook.

The post How to Change the Default Search URL Slug in WordPress appeared first on WPBeginner.

11 Things To Do Right Away After Launching A WordPress Site

So you managed to install WordPress and get your site running – does that mean you’re ready to go public right away? Ehh, not quite… Before you start writing tons of awesome blog posts, finding ways to get visitors to those posts, and just generally launching a WordPress site out to the world, there are ... Read more11 Things To Do Right Away After Launching A WordPress Site

The post 11 Things To Do Right Away After Launching A WordPress Site appeared first on Learn WordPress with WPLift.

How WPML Can Help You To Make Your Business More Successful Internationally

Creating a great website which customers will love is already stressful enough without adding languages. Besides, if you’re a small company as long as it’s in English it should be fine, right? Wrong on both counts. First, regardless of if you are Walmart or the local corner shop down the road, customers want to be ... Read moreHow WPML Can Help You To Make Your Business More Successful Internationally

The post How WPML Can Help You To Make Your Business More Successful Internationally appeared first on Learn WordPress with WPLift.

Which is the Best WordPress Calendar Plugin?

Are you looking for the best WordPress calendar plugin for your site? WordPress calendar plugins come with a variety of different features. Some are made for simple event management while others are more complex with booking, ticketing, and scheduling features. In this article, we have hand-picked the best WordPress calendar plugins for your site.

Best WordPress calendar plugins

How to Chose a Calendar Plugin for WordPress?

As we mentioned earlier that there are many different kind of WordPress calendar plugins available catering to the needs of different users.

Some calendar plugins are simple allowing you to just display events on a calendar. Others have more advanced features like appointments and bookings, scheduling, ticketing, and integrations with third-party services like Google Calendar.

You need to choose a plugin that fits your requirements. For example, if you want to sell event tickets, then a calendar with just the booking feature may not be good for you.

Let’s take a look at some of the best WordPress calendar plugins that you can try.

1. The Events Calendar

The Events Calendar

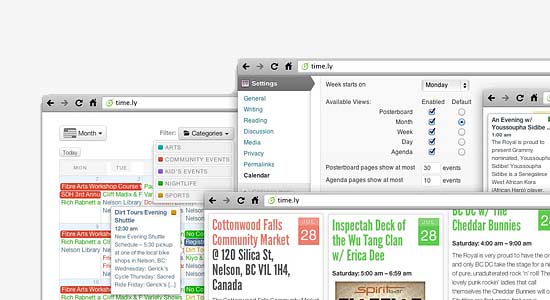
The Events Calendar is a powerful event management system for your WordPress site. It is feature-rich but extremely easy to use due to a neat user interface that blends into your WordPress admin area.

The Events Calendar allows you to easily add your events and manage organizers / venues. You can choose to display Google Maps for your venue locations. The plugin’s settings page gives you full control on how you want to manage your events and calendar.

Want to sell tickets for your events? The Event Calendar has paid add-ons to integrate it with WooCommerce, Eventbrite, and more.

2. All in One Event Calendar

All in One Event Calendar

All in One Events Calendar is a powerful event management plugin for WordPress. Its intuitive user interface makes it extremely easy to use even for beginners. You can easily add events, sort them into categories / tags, and choose from three built-in themes for the calendar display. You can also display your event venues using Google Maps right along the event details.

You can tweak the calendar theme by choosing different colors. It also allows you to add events from any other calendar that supports iCal format including Google Calendar. It doesn’t have ticket selling integrations, but you can add URLs to third party ticketing services.

3. My Calendar

My Calendar

My Calendar is another free and powerful event management solution for WordPress. It supports multiple calendars, event groups, categories, and locations. It also comes with a shortcode generator and widgets, so you can easily add calendars to your posts, pages, or sidebars.

This is a highly configurable plugin with an extensive settings page. You can control almost every aspect of how your calendar is displayed on the front-end. It comes with six built-in skins for calendar display.

For advanced users, there is a style editor to upload your own custom CSS. It also supports Google Map display on single event page, and on event popup.

4. Simple Calendar

Simple Calendar

Google Calendar Events brings Google Calendar to your WordPress site. You can create and manage your events through Google Calendar. This plugin simply display those events on your website. All you have to do is provide your Google Calendar feed URL.

The plugin comes with a powerful set of features. You can control the display of your calendar and events using the shortcodes. You can even control the appearance of the calendar using custom stylesheets.

The plugin does not support a ticketing system, but you can still use third party services to sell your event tickets and enter the ticketing page URL right into your event listing on Google Calendar.

5. Booking Calendar

Booking Calendar

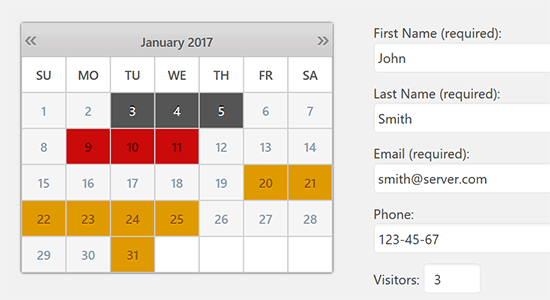
As the name suggests, Booking Calendar is a booking management plugin for WordPress. It allows you to add a calendar to the front-end of your website where users can fill in a simple form to submit their booking requests. You can then accept or decline their booking request.

Booking Calendar comes with CAPTCHA support to avoid spam. You can control who can add a booking in the admin area. One downside of the plugin is that you cannot add new input fields for booking form in the free version of the plugin.

It can be used for booking any kind of service. However if you are particularly looking for a hotel booking system, then you should checkout our guide on how to add a hotel room booking system in WordPress.

We hope this article helped you choose the best calendar plugin for your WordPress site. For other plugin recommendations, see our list of the essential WordPress plugins for your website.

If you liked this article, then please subscribe to our YouTube Channel for WordPress video tutorials. You can also find us on Twitter and Facebook.

The post Which is the Best WordPress Calendar Plugin? appeared first on WPBeginner.

Ads.txt Admin Review: How To Add ads.txt File To WordPress

Need to add an ads.txt file to WordPress? Or, have no idea what an ads.txt file is? If either of those situations applies to you, you should read this Ads.txt Admin review because I’m going to: Explain what ads.txt is and whether or not your WordPress site needs it. Show you how you can use ... Read moreAds.txt Admin Review: How To Add ads.txt File To WordPress

The post Ads.txt Admin Review: How To Add ads.txt File To WordPress appeared first on Learn WordPress with WPLift.

The Ultimate Guide for Schema Markup

Launched a beautiful website, that looks and functions great? Optimized copy for SEO and took care of meta tags? Now, let’s learn how to step up your SEO game and implement Schema Markup on the website. Hello, my Name is Sujay and I’m the founder of Schema Pro, the best plugin for Schema Markup WordPress. ... Read moreThe Ultimate Guide for Schema Markup

The post The Ultimate Guide for Schema Markup appeared first on Learn WordPress with WPLift.

How to Create an Online Marketplace using WordPress

Do you want to create an online markeplace using WordPress? Online marketplace websites allow your users to buy and sell items by setting up their own mini stores within your eCommerce website. In this article, we will show you how to easily create an online marketplace using WordPress.

Building an online marketplace using WordPress

What Do You Need to Start an Online Marketplace using WordPress?

First you need to make sure that you are using the right website platform, and since you’re reading this article, you’re in the right place.

There are two types of WordPress available: WordPress.com vs WordPress.org. One is a limited blog hosting service while the other is known as the self-hosted WordPress which you’ve likely heard tons about. See the full comparison between WordPress.com vs WordPress.org.

We recommend using WordPress.org because it gives you the freedom and access to all WordPress features out of the box.

To start an online marketplace using self-hosted WordPress you will need the following:

  • A domain name (For example, wpbeginner.com)
  • Web hosting account (This is where your website’s files are stored)
  • SSL Certificate (To securely accept online payments)
  • WooCommerce (best WordPress eCommerce addon)
  • Online marketplace addon

The entire setup can take up to 40 minutes, and we will walk you through every step one by one.

Ready? Let’s get started.

Step 1. Setting up Your Ecommerce Platform

First step is to buy a domain name and a web hosting account. You don’t just need a web hosting, but you will need a service that specializes in WooCommerce hosting because this is the software that we will be using as our eCommerce platform.

Typically a domain name costs $14.99/year, web hosting 7.99/month, and SSL certificate 69.99/year.

Now this seems like a lot of money if you are just starting out.

Fortunately, Bluehost an officially recommended WordPress and WooCommerce hosting provider has agreed to offer our users free domain + SSL and discount on their cloud WordPress hosting.

Basically, you can get started for $6.95 / month.

→ Click Here to Claim This Exclusive Bluehost Offer ←

Once you have purchased hosting, then follow our step by step tutorial on how to start an online store for complete setup instructions.

You would now have a WordPress website with WooCommerce installed on it. However, by default WooCommerce assumes that your website is a single vendor website, so it is not possible for other users to add their own products to your website.

Let’s change this.

Step 2. Turn Your WooCommerce Site into an Online Marketplace

First you need to install and activate the WC Vendors plugin. For more details, see our step by step guide on how to install a WordPress plugin.

Upon activation, head over to WooCommerce » WC Vendors page to configure marketplace settings.
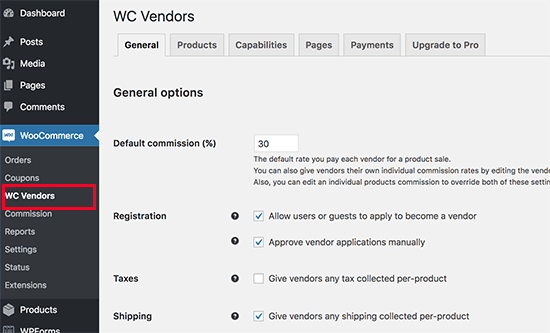
WC Vendors settings

On this screen, you need to set a commission rate that you will pay to each vendor. This rate could also be overridden for individual products or vendors.

The default settings on the page will work for most sites, but you can review and change them as needed.

Don’t forget to click on the ‘Save General changes’ button to store your settings.

Next, you need to switch to the products page. On this screen, you can choose which items to hide from vendors when they are adding a product.

Configure products settings for vendors

WC Vendors allows you to setup vendor capabilities and permissions. Head over to the Capabilities tab on the WC Vendors settings page.

WC Vendors capabilities

Next item on the WC Vendors settings page is to setup pages.

The plugin will automatically create pages to use for vendor dashboard, shop settings, and orders page. You can use a different page if you would like by using the shortcodes shown below each page.

Setting up vendor pages

One page that is not automatically created by the plugin is the terms page. These are the terms that a vendor has to agree to when submitting their application.

To create a terms page, you can simply create a new page in WordPress and add the terms and conditions in plain text describing what vendors can sell, how they will get paid, how to settle disputes, etc.

Once you have created a terms page, you can return back to this section and select your newly created page here.

The final item on WC Vendors settings page is the most important one, the Payments. By default, WC Vendors uses PayPal Adaptive Payments to pay vendors.

You will see a link to setup PayPal adaptive payments. After you have set it up, you can choose when you want to pay the vendors.
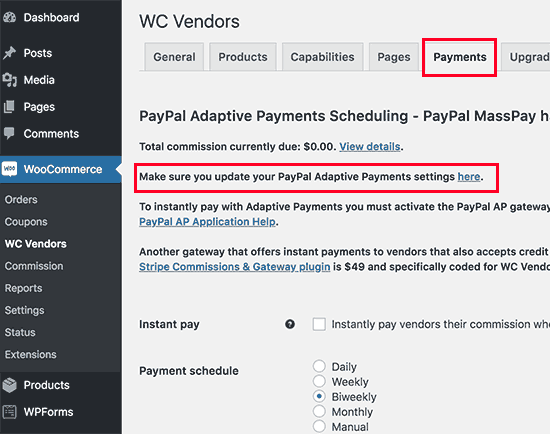
Scheduling payments

Now that WC Vendors is all set up, let’s setup WooCommerce for a multi-vendor environment.

Step 3. Enable Account Management in WooCommerce

First you need to visit WooCommerce » Settings page and click on the ‘Accounts’ tab. From here you need to check the boxes next to customer registration option.

Enable customer registration in WooCommerce

Don’t forget to save your changes.

Step 4. Setting Up Navigation Menus

Now that your multi-vendor marketplace setup is finished. It is time to make it easy for your users to find their way around your website.

To do that, you need to visit Appearance » Menus page. You will need to add your user account and checkout pages to the navigation menu.
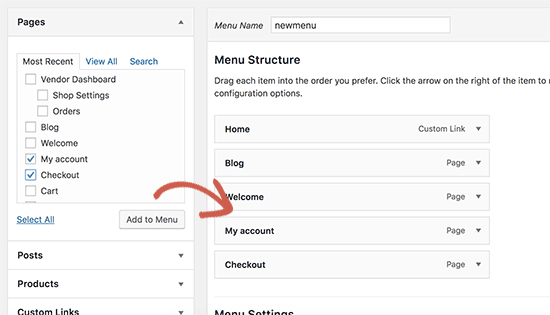
Add to menu

Don’t forget to click on the ‘Save Menu’ button to store your changes. For more detailed instructions, see our guide on how to add navigation menus in WordPress.

If you don’t have a My Account page, then simply create a new page in WordPress and add the following shortcode in the post editor.

[woocommerce_my_account]

Step 5. Testing Your Marketplace Website

Your online marketplace website is now ready for testing. You can visit your website in a new browser window and create a new account by clicking on the My Account link at the top.

Testing your website

From here, both customers and vendors can login to their accounts as well as create a new account.
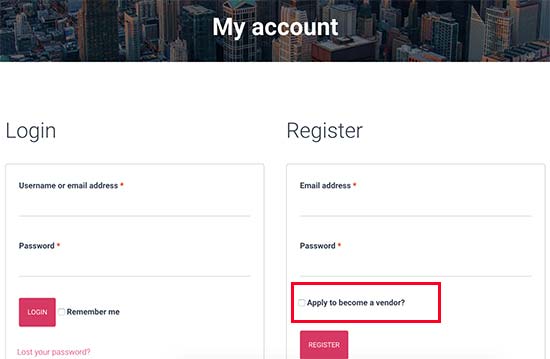
Register as vendor

Once users create a new account, you will recieve an email notification. If you are unable to recieve email notifications, then take a look at our guide on how to fix WordPress not sending email issue.

You can also view new vendor applications by visiting Users » All Users page. You will see all new vendor requests as ‘pending vendor’, and you can approve or deny applications by clicking the link under their username.
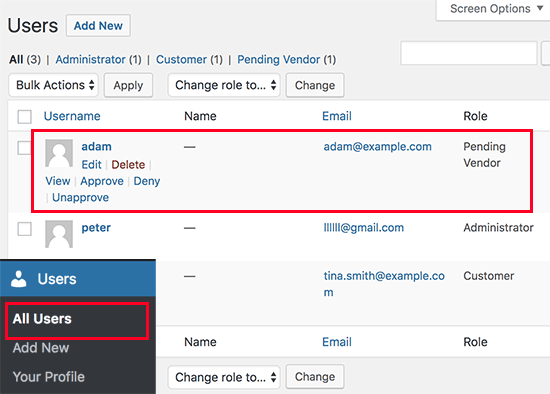
Approve vending vendors

Once approved, these vendors can log in to their accounts and add their products by visiting their vendor dashboard. They can also view their orders and sales reports.

Vendor dashboard

The first thing your vendors need to do is to setup their shop settings by clicking on ‘Store Settings’ link.
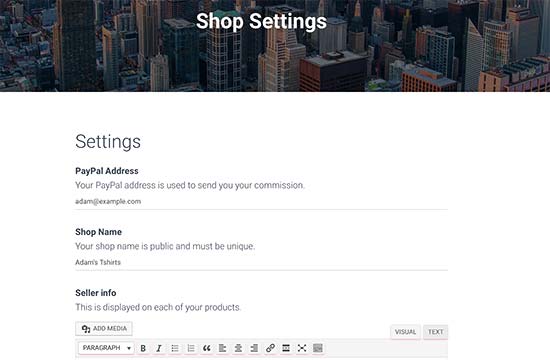
Shop settings

They will need to provide their PayPal email address to recieve payments. After that they can enter their shop name and description.

Once a vendor adds a new product, you will get a notification email and see an icon next to the products menu. You can then edit a product, approve it, or delete it.
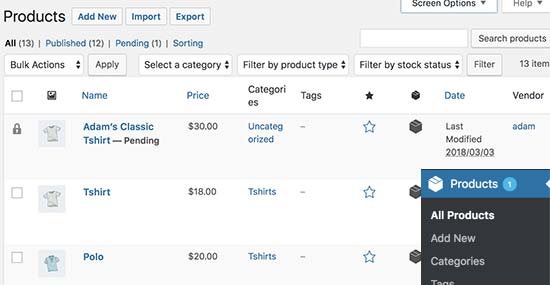
Pending products

Your shop page will clearly show the products sold by vendor’s shop name.

Sold by vendor

We hope this article helped you learn how to create an online marketplace using WordPress. You may also want to see our pick of the best WooCommerce themes, best WooCommerce plugins, and the ultimate WordPress SEO guide for beginners.

If you liked this article, then please subscribe to our YouTube Channel for WordPress video tutorials. You can also find us on Twitter and Facebook.

The post How to Create an Online Marketplace using WordPress appeared first on WPBeginner.

Beginner’s Guide: How to Center Align a Video in WordPress

Do you want to center-align a video in WordPress?

By default, if your video’s width is less than your article area, then WordPress automatically aligns it to the left, leaving extra white space on the right side.

In this article, we will show you how to easily center align a video in WordPress.

How to center align a video in WordPress

Why Center Align Videos in WordPress?

When you embed a video in WordPress, it automatically aligns them to the left by default. This is because videos are external content embedded in the content, so WordPress is unable to guess how you would like to display it.

As a best practice, it automatically aligns it to the left, leaving it up to you to adjust the alignment if needed.

By aligning the video to the center, users will have a better experience viewing your content. This way, you won’t have noticeable blank space on the one side of the page, which could give an unprofessional look.

Besides, if you upload videos directly to WordPress, the same thing will happen to them if their width is less than your content area. WordPress will align them to the left by default.

That being said, let’s see how you can easily center-align a video in a WordPress website. We’ll cover both the block editor and classic editor, so you can click the links below to jump ahead to any section.

How to Center Align Video in WordPress Content Editor

If you want your video to fill the width of your content area, then the best way to do this is by adding a YouTube or Vimeo video URL directly in the WordPress content editor.

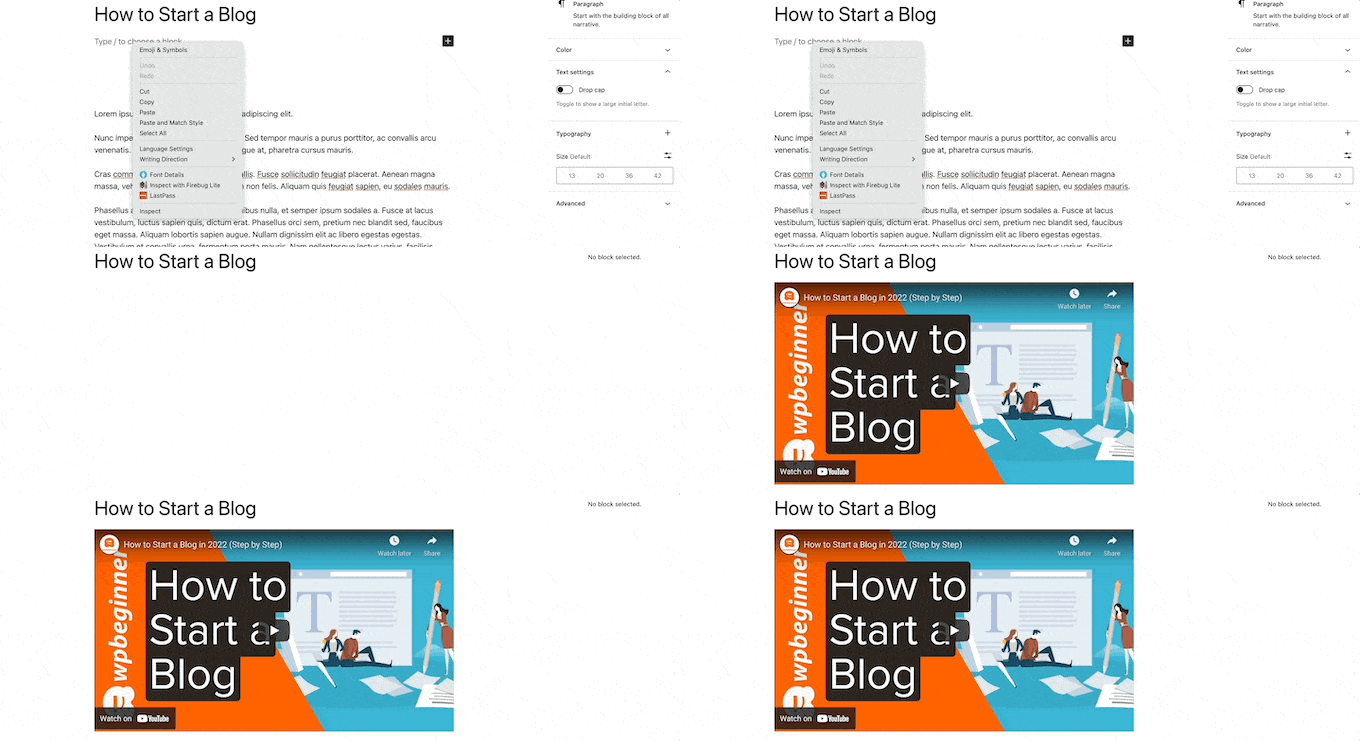
First, you’ll need to edit a post or a page or add a new one. Once you are in the content editor, simply paste the link to the video. WordPress will embed the video automatically.

Paste video embed code in block editor

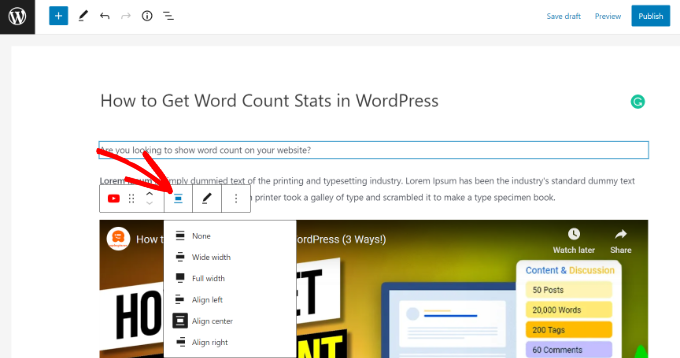
Next, select the video block and then click the Change Alignment option. From the dropdown menu, you can choose the position of the video.

WordPress lets you choose from the following alignments:

  • wide width
  • full width
  • align left
  • align center
  • align right.

Go ahead and select the ‘Align center’ option.

Align the video to the center

After that, you can preview and publish your page or post.

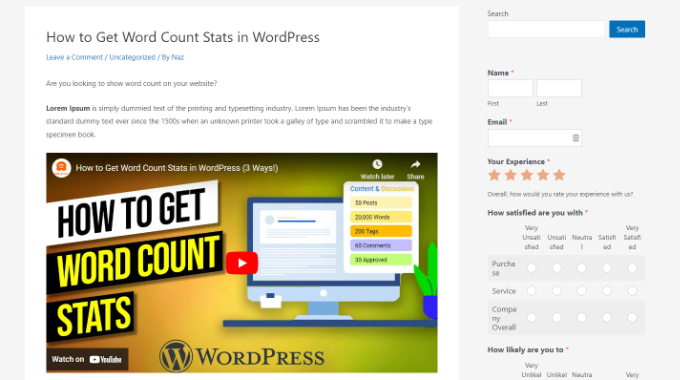
The video will now be center-aligned.

Center aligned video preview

However, sometimes for one reason or another, you may need to use the embed code. In that case, you will need to add some simple HTML around your video’s embed code.

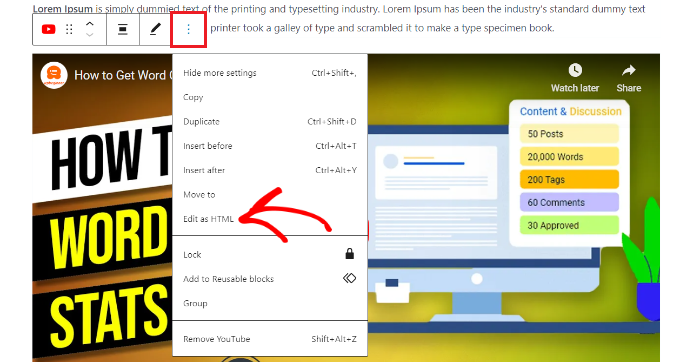
First, you need to click the 3 dotted icons in the video block. After that, you can select the ‘Edit as HTML’ option from the dropdown menu.

Edit as HTML

Next, you can enter the following piece of HTML code around the embed code of the video:

<div style="text-align:center;">

/// your video embed code goes here

</div>

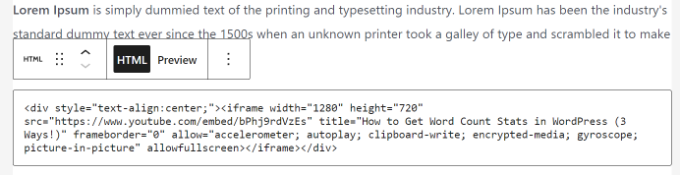
Here’s what your embed code would look like with the custom HTML.

Preview of custom HTML code

You can now save your changes and preview the post or page. Your video will be neatly aligned in the center of your content area.

Another approach is to manually increase your video’s width to fit the content area. To achieve this, you need to add or change the ‘width’ parameter in your embed code.

<iframe width="760" height="315" src="https://www.youtube.com/embed/4YpyiJ05YOg" frameborder="0" allow="autoplay; encrypted-media" allowfullscreen></iframe>

How to Center Align Video in the Classic Editor

If you’re using the Classic editor, then you can center align videos by editing a post or creating a new one.

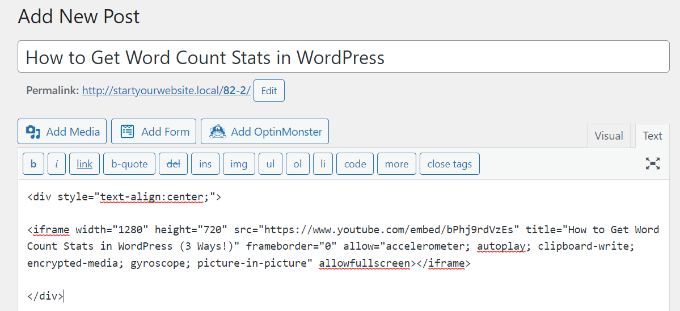
Once you’re in the editor, switch to the Text view. Now enter the following HTML code:

<div style="text-align:center;">

/// your video embed code goes here

</div>

Just make sure to replace ‘your video embed code goes here’ with your video’s embed code.

Once that’s done, it will look something like this:

Center align videos in classic editor

You can now preview and publish your page.

Simply visit your website to see the center-aligned video.

Center aligned video classic editor preview

We hope this article helped you learn how to center align a video in WordPress. You may also want to see our guide on how to start a WordPress blog and must-have WordPress plugins.

If you liked this article, then please subscribe to our YouTube Channel for WordPress video tutorials. You can also find us on Twitter and Facebook.

The post Beginner’s Guide: How to Center Align a Video in WordPress first appeared on WPBeginner.

Weekly WordPress News: The Challenges Of Running A WordPress Business In 2018

This week, there’s a big post from Alexander Mat, the co-founder of MotoPress, about the challenges of running a WordPress plugin and theme business in 2018. We also got a sneak peek at Elementor 2.0 – it looks like there’s going to be a ton of new features that move Elementor into a full theme ... Read moreWeekly WordPress News: The Challenges Of Running A WordPress Business In 2018

The post Weekly WordPress News: The Challenges Of Running A WordPress Business In 2018 appeared first on Learn WordPress with WPLift.

5 Best WordPress Image Compression Plugins Compared

Are you looking for the best WordPress image compression plugin for your website? Image compression plugins allow you to easily optimize images in WordPress for better speed and performance. In this article, we have compared the best image compression plugins for WordPress.

Best WordPress image compression plugins

When Do You Need a WordPress Image Compression Plugin?

Images are larger in size than plain text which means they take longer to load and can slow down your website.

However you’ve probably heard the saying: “a picture is worth a thousand words”. Images make your content more engaging and interactive.

To improve your WordPress website speed, you need to optimize your images for the web. The best way to do this is by using Photoshop or another image editing software before you upload the image to WordPress. This gives you a lot more control on the quality of images on your website.

However, not all users are comfortable working with image editing program. For some optimizing every single image they upload sounds like a lot of work.

Luckily, there are several WordPress image compression plugins that can help you with that. These plugins optimize your images by automatically compressing them and using the smaller sized version on your website.

That being said, let’s take a look at the best WordPress image compression plugins, and how they stack up in terms of image optimization, performance, and quality.

1. reSmush.it

reSmush.it

reSmush.it is the best WordPress image compression plugin. It allows you to automatically optimize images on upload as well as offer a bulk optimization option for older images.

It uses the reSmush API to optimize images and allows you to choose the optimization level for your uploads. The downside is that it doesn’t have different compression levels. It also limits optimization to uploads lower than 5MB in size. You can exclude individual images from compression in case you need to add an image in full size.

2. EWWW Image Optimizer

EWWW Image Optimizer

EWWW Image Optimizer is a great option for WordPress image compression plugin. It is easy to use and can automatically optimize images you upload on the fly. It can also compress and optimize your previously uploaded images in bulk.

It performs all compression on your own servers which means you don’t need to sign up for an account to get an API key. It can also optimize images generated by other WordPress plugins and stored outside your media library folders. It doesn’t require an account to use the plugin, but you can sign up for their API to get additional features.

3. Compress JPEG & PNG images

Compress JPEG & PNG images

Compress JPEG & PNG is created by the team behind TinyPNG, and you will need to create an account to use the plugin. You can only optimize 100 images each month with the free account. It can automatically compress images upon upload, and you can also bulk optimize older images.

The plugin settings allow you to choose which image sizes you want to optimize. Additionally, you can also set a maximum size for your original uploads. Images larger than that size will be automatically resized by the plugin.

4. ShortPixel Image Optimizer

ShortPixel

ShortPixel Image Optimizer is another useful WordPress image compression plugin. It requires you to get an API key by providing your email address. The basic free account allows you to compress up to 100 images per month, and you will need to upgrade to their paid plans to increase this limit.

It starts compressing images as soon you as activate plugin and stores your original images in a separate folder. It also allows you to compare the original file with the compressed version to see the quality difference. ShortPixel is packed with advanced features and gives you the ability to choose comparison formats.

5. WP Smush

WP Smush

WP Smush is another popular WordPress image compression plugin. It automatically compresses images on upload and can also be used to compress and optimize your older image files. You can also set maximum image resolution, and your images will scale down to more reasonable sizes while being compressed.

The free version of plugin doesn’t require you to create an account to use their API key. The bulk optimization feature allows you to optimize up to 50 images at a time, and you can rerun the bulk optimizer to compress more images.

The free version of the plugin doesn’t perform that well. See our review of WP Smush with pros and cons.

Comparison Test Scores for Image Compression Plugins

Now that you know about the different WordPress image compression options, let’s take a look at how they compare against each other in terms of performance.

To measure this, we ran test by uploading the same image using each of these plugins.

Testing JPEG Image Compression

We used the following JPEG image for our tests, it is 118 KB in file size.

JPEG test image

We didn’t touch any of the plugin settings and tested the compression with out of the box settings. Here are our test results:

PluginCompressed SizeSaved (%)Method
reSmush.it76 KB30.59%Lossless
EWWW Image Optimizer112 KB5%Lossless
Compress JPEG & PNG images114.7 KB2.8 %Lossy
ShortPixel Image Optimizer69.2 KB41.94%Lossy
WP Smush112 KB5%Lossless

Testing PNG Image Compression

Next we wanted to test a PNG image to see how our contenders optimize it.

We used the following PNG image for the test, and it is 102 KB in file size.

PNG test image

Here are our test results:

PluginCompressed SizeSaved (%)Method
reSmush.it36 KB63.8%Lossless
EWWW Image Optimizer97.5 KB1.9%Lossless
Compress JPEG & PNG images34.364%Lossy
ShortPixel Image Optimizer37 KB63.5%Lossy
WP Smush99 KB2.9%Lossless

Which is The Best Image Compression Plugin for WordPress?

If you are not looking for flexible options in your image compression plugin, then reSmush.it gives you the best results in terms of performance by making the real difference in image file size.

If you are willing to pay for image compression, then you can try ShortPixel which performed really well in our tests.

EWWW Image Optimizer is a great plugin with flexible settings, but you will need their paid API key to get access to compression levels which make the real difference.

We hope you found this comparison of best WordPress image compression plugins useful. You may also want to see our list of common image issues in WordPress and how to fix them.

If you liked this article, then please subscribe to our YouTube Channel for WordPress video tutorials. You can also find us on Twitter and Facebook.

The post 5 Best WordPress Image Compression Plugins Compared appeared first on WPBeginner.