Which of these two URLs looks better? wplift.com/go/product product.com/sdfjkhsdfjhkskjhkuiweruireuhiuhe It’s the first one, right? That, plus other reasons, is why so many affiliate marketers cloak affiliate links on their sites. To help you do the same, I’m going to show you exactly how to cloak affiliate links in WordPress using three different methods (two plugins ... Read moreHow To Cloak Affiliate Links In WordPress: With Or Without A Plugin
Recently one of our readers asked if it was possible to automatically change WordPress SALT keys? WordPress security authentication or SALT keys are the encrypted code that secure your login information. One way to enhance your WordPress security is by automatically changing your SALT keys. In this article, we will show you how to automatically change WordPress SALT keys without any code.
What are SALT Security Keys?
Salt Keys aka security keys in WordPress are the variables that store your login credentials in an encrypted form. By default, WordPress saves your login information in cookies which given the right conditions can be compromised specially when using public computers.
One way to stay ahead of this risk is to change your security keys manually from your wp-config.php file that is available in the root folder of your WordPress site. The security and SALT keys will look like this:
We recommend changing these codes on a regular basis to improve your website security (every 3 – 6 months). You can manually generate the Salt keys from WordPress.org secret-key service.
While changing the keys manually isn’t hard, it’s still time consuming to manually edit a core file and upload via FTP. In case, you don’t have coding knowledge, or don’t have the time, then this solution is for you.
Let’s take a look at how easily you can set an automated process to change security and SALT keys in WordPress:
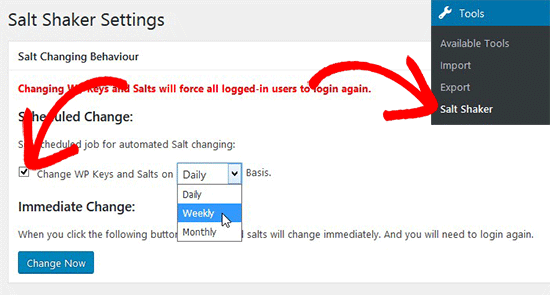
Once the plugin is activated, you need to go to Tools » Salt Shaker page in your WordPress admin to set a schedule for changing the SALT keys.
You need to check the option for automatically changing the Salt keys and then select your schedule from the dropdown. You can automatically change the authentication keys daily, weekly, and monthly.
In case you want to change the security and Salt keys manually, then you can do so by clicking on the Change Now button.
Note: Every time your WordPress SALT keys are changed, you and other users will be automatically logged out from your WordPress site on all devices. You can easily re-login to your WordPress dashboard by going to the WordPress login page.
We hope this article helped you automatically change the WordPress SALT keys. You may also want to see our ultimate WordPress security guide to improve your website security.
If you liked this article, then please subscribe to our YouTube Channel for WordPress video tutorials. You can also find us on Twitter and Facebook.
Have you ever wondered why your WordPress admin is running slowly and if there is a way to fix it? The truth be told, there is nothing more annoying than when your WordPress dashboard starts to misbehave. You know the scenario – you are trying to publish a post urgently, but WordPress isn’t playing ball. [...]
If you recently started a blog, then you might be wondering what are the most important pages that you must have on your blog? Pages allow you to add useful information about your blog without affecting your regular blog post schedule. In this article, we will share the most important pages that every WordPress blog should have.
Why Add Pages to Your WordPress Blog
WordPress comes with two default content types called posts and pages. While posts are used to write blog articles, pages are used to create content that is not part of your regular blog post schedule.
Pages are normally used to add static content that is not supposed to change very often. For example, an about us page.
Keeping this content separate from your blog posts, help users easily discover it. You can also manage your pages easily, rearrange them, add them to your navigation menus, and even use page builders to create custom layouts for each page.
That being said, let’s take a look at some blog page ideas that you can use on your WordPress blog.
1. About Page
This is a must have page for almost all websites on the internet. You can name this page “About Us” or “About Me” depending on whether you have a business blog or a single-author personal blog.
You can use this page to tell users about people behind the website, its purpose, mission, values, and what users should expect to find on your blog. The about page helps build trust among your audience as they get to know the real people behind the scenes. You can also use this opportunity to showcase your most popular content.
2. Contact Page
Your blog readers, advertisers, and potential business partners all need to find your contact information. A contact page allows users to quickly and easily send you a message or learn how to connect with you without leaving a public comment on your blog.
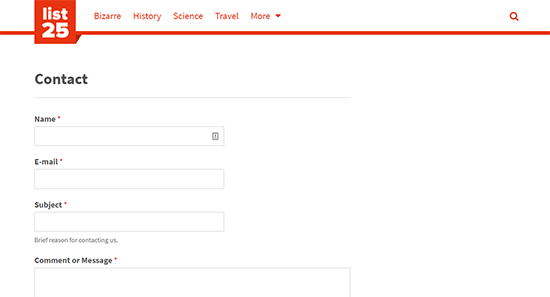
You will need to add a contact form to make it easy for users to contact you. However, you can also add your email address, location map, and social media profiles to offer more ways to connect with you.
3. Disclaimer Page
If you make money online from your WordPress blog, then you must add a disclaimer page. This is where you can let users know about how you make money from your blog. For example, if you display banner ads or promote affiliate products, then you can inform users that this is how your content is monetized.
Privacy policy page basically inform users about the data you collect on your website as well as how you and other third-parties may use this data. Even if you are not collecting any user data, third-party tools on your website like Google Analytics can still set cookies.
You can find many privacy policy templates and generators online. Alternatively, you can also take a look at our privacy policy page and use it to create your own.
5. Terms of Service Page
If you run an online store or offer services on your blog, then you need a terms of service page. It is a legal document so getting professional legal help is highly recommended. There are also online templates that you can use, but do so at your own risk.
It allows you to limit your liability in case of misuse of information and services provided on your website. It can also be used to inform users about their responsibilities regarding the copyright and trademark, and how they can use your website, product, or services.
6. Start Here Page
As your blog gets older, you will have a lot more content to showcase on your front-page. This may leave new users a bit confused about how they can make the most out of your blog. This is where a Start Here page comes in handy.
The purpose of this page is to introduce new users to your most useful content. This give users a clear idea about how they can benefit from your content, and what are the resources that they should check out first.
Take a look at WPBeginner’s Start Here page to see how we use it to engage with new users.
7. Products / Services Page
If you are using an ecommerce platform like WooCommerce to sell products, then it will automatically create a shop page that you can just add to your navigation menus.
On the other hand, if you are selling products or offering services without using an eCommerce plugin, then you will need a product or services page for them. You can also create a parent page to list all your products and child pages for individual products with more details.
Check out WPBeginner’s WordPress plugins page as an example of a typical products page.
8. Custom 404 Page
WordPress automatically displays a 404 error page when it cannot find a specific piece of content. Normally, the 404 page is very plain and is not very useful.
You can replace that plain page with a custom 404 error page and give your users more opportunities to discover content and continue browsing. For detailed instructions, see our article on how to improve 404 page template in WordPress.
9. Archives Page
WordPress automatically create a date, category, and tag based archives. However, the information is still scattered across different pages and may not allow your users to get a bird’s eye view of your most valuable content.
This is where a custom archives page comes in. It is a simple page that you can use to display your popular posts, compact archives, top categories, tags, and more.
Many blogs rely solely on ads to monetize their content. The easiest way to do this is by signing up for Google AdSense. However, you can also sell ad spots directly to the advertisers.
To do this, you will need to create an ‘Advertise’ page with information about available ad spots, your average monthly page views, and your audience demographics. Don’t forget to add a contact form at the end so that advertisers can quickly contact you.
You will need a WordPress ad management plugin to display and manage ads on your website. We recommend using AdSanity because it allows you to easily manage ads whether they are self-hosted or third-party ads like Google AdSense.
11. Write for Us Page
If you run a multi-author WordPress blog and are looking for more writers, then you need a write for us page. This page simply allow users who are looking for blogging gigs to discover the writing opportunity on your website.
You can use this page to tell users what your blog is about and what kind of content you are looking for. Most importantly, let them know how they will benefit from writing on your blog. Don’t forget to add a contact form for users to quickly send you a message.
We hope this article helped you learn about important pages that you should have on your WordPress blog. You may also want to see our ultimate WordPress SEO guide for beginners to bring more visitors to your website.
If you liked this article, then please subscribe to our YouTube Channel for WordPress video tutorials. You can also find us on Twitter and Facebook.
Do you want to add a smooth background color change effect on your WordPress site? You may have seen on some popular websites where the background color of a specific area or the whole web page automatically transitions from one color to another. This beautiful effect can help you get users attention and improve engagement on your website. In this article, we will show you how to easily add a smooth background color change effect in WordPress.
What is Smooth Background Color Change Effect?
Smooth background color change effect allows you to automatically transition between different background colors. The change happens slowly going through different colors until it reaches the final color. It looks like this:
This technique is used to capture user attention with gentle effects that are pleasing to the eye.
That being said, let’s take a look at how to add this smooth background color change effect in any WordPress theme.
Adding Smooth Background Color Change Effect in WordPress
This tutorial requires you to add code in your WordPress files. If you haven’t done this before, then please take a look at our guide on how to copy and paste code in WordPress.
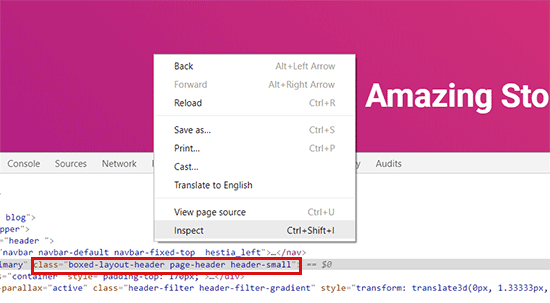
First, you need to find out the CSS class of the area that you want to change. You can do this by using the Inspect tool in your browser. Simply take your mouse to the area you want to change and right click to select the Inspect tool.
Next, you need to write down the CSS class you want to target. For example, in the screenshot above we want to target the widget area in the bottom which has the CSS class ‘page-header’.
In the next step, you need to open a plain text editor on your computer and create a new file. You need to save this file as wpb-background-tutorial.js on your desktop.
Next, you need to add the following code inside your JS file:
jQuery(function($){
        $('.page-header').each(function(){
            var $this = $(this),
			colors = ['#ec008c', '#00bcc3', '#5fb26a', '#fc7331'];

            setInterval(function(){
                var color = colors.shift();
                colors.push(color);
                $this.animate({backgroundColor: color}, 2000);
            },4000);
        });
        });
If you study this code, then you will notice that we have used the CSS class we want to target in the code. We have also added four colors. Our smooth background effect will start from the first color, then transition to the next color, and keep cycling through these colors.
Don’t forget to save your changes to the file.
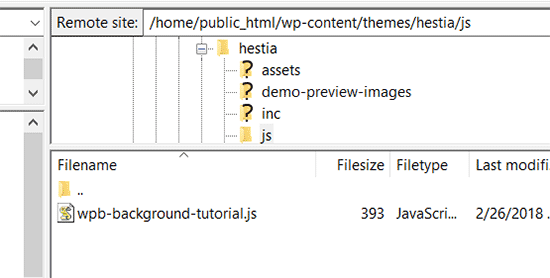
Next, you need to upload wpb-bg-tutorial.js file to your WordPress theme’s /js/ folder using FTP. If your theme doesn’t have a js folder inside it, then you need to create one.
After uploading your JavaScript file, it is time to load it in WordPress.
You need to add the following code to your theme’s functions.php file.
That’s all, you can now visit your website to see it in action. You will notice the smooth background color change effect in the area that you targeted.
There are many other ways to use background colors in WordPress to capture user attention or make your content pop-out. For example, you can try:
We hope this article helped you learn how to easily add smooth background color change effect in WordPress. You may also want to see our list of the best WordPress page builder plugins that you can try.
If you liked this article, then please subscribe to our YouTube Channel for WordPress video tutorials. You can also find us on Twitter and Facebook.
There is no shortage of good quality premium WordPress themes out there. Due to an ever-increasing demand, more and more WordPress theme developers are now selling premium WP themes across various channels. On one hand, there are dedicated marketplaces whereas on the other hand, theme makers can choose to sell through their own websites. If ... Read moreWhere to Sell Premium WordPress Themes: Marketplace or Shop?
Do you want to learn how to use cookies on your WordPress site? Cookies are a useful tool to store temporary information in user’s browser and then use this information to enhance user experience through personalization and behavioral targeting. In this ultimate guide, we will show you how to set, get, and delete WordPress cookies like a pro.
Note: This is an advanced tutorial. It requires you to have proficient understanding of HTML, CSS, WordPress site, and PHP.
What Are Cookies?
Cookies are plain text files that are created and stored in users browser when they visit a website. Cookies are used to add different features on a website.
Following are some of the common usage of cookies on various websites.
Store and manage user’s login information
Store temporary session information during a users visit
Ecommerce stores use cookies to remember cart items during a user’s visit
Track user activity on a site to offer personalized user experience
and more
As you can see, cookies are highly useful tool for website owners, but they can also be a bit invasive. Recent trends in email marketing, growth hacking, and online marketing as a whole allow websites to set cookies that act as a beacon and can be used to store and even share user activity across websites.
This is why European Union enacted the EU Cookie Law, which requires website owners to declare that they use cookies to store information.
How Cookies are Used in a Typical WordPress Website
By default, WordPress uses cookies to manage logged-in user sessions and authentication. It also uses cookies to remember a user’s name and email address if they fill out a comment form.
However, many WordPress plugins on your website may also set their own cookies. For example, OptinMonster allows you to show different email optin forms to new vs returning visitors, and it does that by using cookies.
If you are using third party services on your website like Google Analytics or Google AdSense, then they may also set cookies on your website.
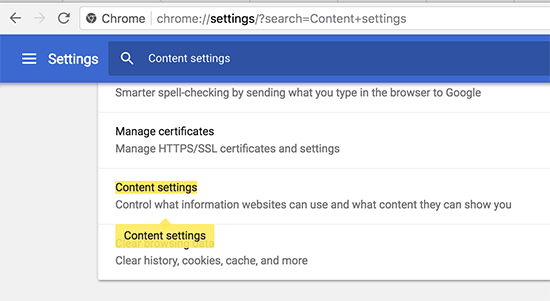
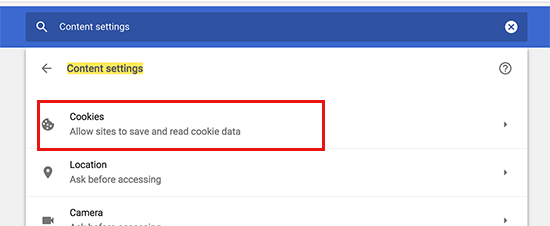
You can view all website cookies in your browser’s settings. For example, in Google Chrome you need to go to settings and search for ‘content settings’.
Under content settings, you will need to click on ‘Cookies’ to open the cookies settings page.
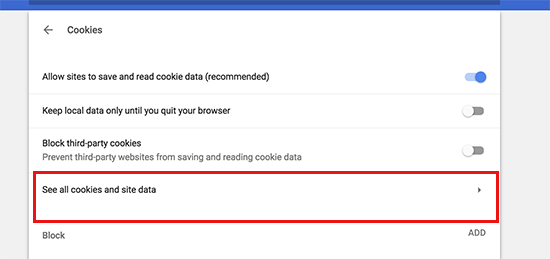
Next, you need to click on the ‘All cookies and site data’ option.
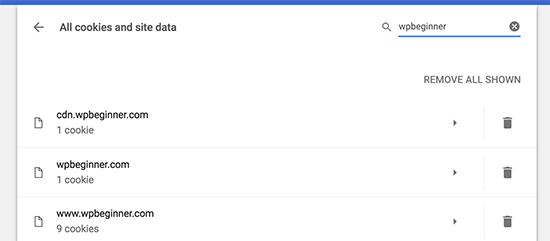
On the next page, you will see a list of all cookies and site data stored on your browser by all websites you visited.
You can type a website address in the search box, and it will show you the data stored by that website.
Clicking on a single item will show you more details about individual cookies and their contents.
First we will use the setcookie() function in PHP. This function accepts the following parameters.
Cookie name
Cookie value
Expire (Optional: sets a time period after which cookie expires)
Path (Optional, by default it will use the site’s root)
Domain (Optional, by default uses your website’s domain)
Secure (Optional, If true then only transfers cookie data via HTTPS)
httponly (Optional, when set true the cookie is only accessible via HTTP and cannot be used by scripts)
Now let’s add a code snippet to your WordPress site. This code stores the exact timestamp when a user visited your website in a cookie.
function wpb_cookies_tutorial1() {

$visit_time = date('F j, Y  g:i a');

if(!isset($_COOKIE[$wpb_visit_time])) {

// set a cookie for 1 year
setcookie('wpb_visit_time', $current_time, time()+31556926);

}

}
You can now visit your website and then check your browser cookies. You will find a cookie with the name wpb_visit_time.
How to Get a Cookie and Use it in WordPress
Now that we have created this cookie that’s stored in user’s browser for 1 year, let’s take a look at how can we use this information on our website.
If you know the name of a cookie, then you can easily call it anywhere in PHP using the $_COOKIE[] variable. Let’s add some code that not only sets the cookie but also uses it to do something on your website.
function wpb_cookies_tutorial2() {
// Time of user's visit
$visit_time = date('F j, Y g:i a');

// Check if cookie is already set
if(isset($_COOKIE['wpb_visit_time'])) {

// Do this if cookie is set
function visitor_greeting() {

// Use information stored in the cookie
$lastvisit = $_COOKIE['wpb_visit_time'];

$string .= 'You last visited our website '. $lastvisit .'. Check out whats new';

return $string;
}

} else {

// Do this if the cookie doesn't exist
function visitor_greeting() {
$string .= 'New here? Check out these resources...' ;
return $string;
}

// Set the cookie
setcookie('wpb_visit_time',  $visit_time, time()+31556926);
}

// Add a shortcode
add_shortcode('greet_me', 'visitor_greeting');

}
add_action('init', 'wpb_cookies_tutorial2');
We have commented the code to show you what each part does. This code uses the information stored in the cookie and outputs it using the shortcode. You can now add shortcode [greet_me] anywhere on your website, and it will show when a user last visited.
Feel free to modify the code to make it more useful for your website. For example, you can show recent posts to returning users and popular posts to new users.
Deleting a Cookie in WordPress
So far we have learned how to set a cookie and use it later in your website. Now let’s take a look at how to delete a cookie.
To delete a cookie, you need to add the following line to your code.
unset($_COOKIE['wpb_visit_time']);
Don’t forget to replace wpb_visit_time with the name of the cookie you are trying to delete.
Let’s put this code in some context using the same sample code we used above. This time we will delete a cookie and set it again with new information.
function wpb_cookies_tutorial2() {
// Time of user's visit
$visit_time = date('F j, Y g:i a');

// Check if cookie is already set
if(isset($_COOKIE['wpb_visit_time'])) {

// Do this if cookie is set
function visitor_greeting() {

// Use information stored in the cookie
$lastvisit = $_COOKIE['wpb_visit_time'];

$string .= 'You last visited our website '. $lastvisit .'. Check out whats new';

// Delete the old cookie so that we can set it again with updated time
unset($_COOKIE['wpb_visit_time']);

return $string;
}

} else {
// Do this if the cookie doesn't exist
function visitor_greeting() {
$string .= 'New here? Check out these resources...' ;
return $string;
}
}
add_shortcode('greet_me', 'visitor_greeting');

// Set or Reset the cookie
setcookie('wpb_visit_time',  $visit_time, time()+31556926);
}
add_action('init', 'wpb_cookies_tutorial2');
As you can see, this code deletes the cookie once we have used the information stored inside. Later we set the cookie again with the updated time information.
This week, TechCrunch launched a redesign in the “form of a single page style React app, decoupled from its WordPress backend.” A pretty cool look at what you can do with WordPress and the REST API. Their post announcing the redesign is definitely an interesting read if you’re into WordPress. We also collected a bunch ... Read moreWeekly WordPress News: TechCrunch Headless Redesign With React + WordPress
Do you want to use artificial intelligence and machine learning technologies on your WordPress site?
Many WordPress plugins are using AI and machine learning to offer smarter features. There is a chance that you might already be using one of these plugins on your site.
In this article, we will share some of the best WordPress plugins that use artificial intelligence and machine learning.
What are Artificial Intelligence and Machine Learning?
If you follow the news, then you must have heard the words artificial intelligence or machine learning being mentioned.
Artificial intelligence and machine learning are computer technologies that offer smarter solutions in computer devices, apps, GPS devices, smart TVs, home assistance devices, and more.
Artificial intelligence gives computer programs able to make choices without human intelligence.
Machine learning helps the software learn from experiences, data, and user activity to improve artificial intelligence and make better choices.
For example, voice recognition, search patterns, translations, image recognition, and more are currently being used by most modern mobile phones and smart devices.
What’s the difference between artificial intelligence and machine learning?
Artificial intelligence can make decisions based on programmed intelligence.
Machine learning further enhances artificial intelligence by self-learning through user activity and collecting information. This makes artificial intelligence smarter and allows it to make more accurate decisions.
What about machines taking over the world?
Many prominent scientists, engineers, and entrepreneurs have expressed concern over the possible threat to human society from artificial intelligence and self-learning machines.
However, it also has great potential to improve the lives of billions of people. That’s why even the most prominent AI skeptics encourage its careful usage for the greater good.
What Can Artificial Intelligence Do for WordPress Websites?
It can provide a smarter and much better user experience for your users.
For example, it can improve WordPress search, grammar and style checking, show related content, improve conversions, boost eCommerce sales, and more.
Your website becomes smarter, faster, and more personalized for your users. This saves you time which allows you to do other things to grow your business.
That being said, let’s take a look at the WordPress plugins that use AI and machine learning.
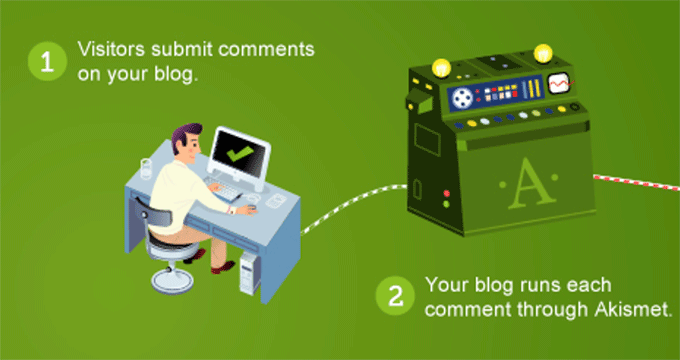
Akismet is one of the only two plugins that come pre-installed on every WordPress website. It uses artificial intelligence and machine learning to detect spam comments.
Used by millions of websites, Akismet has improved over the years to detect almost all spam submitted by bots. It can also detect spam comments manually submitted by actual human users by learning from their mistakes and recognizing patterns across millions of websites.
For more details, see our Akismet guide for beginners with instructions on how to set it up on your WordPress website.
The WordLift plugin integrates its web-based service to your WordPress website. It offers SEO tips to improve your content with the help of its knowledge graph.
It analyzes your content to offer facts, figures, and media to match and build contextual relationships among your articles which results in better content recommendations. It builds a knowledge graph for your own website, which becomes smarter as you add more content.
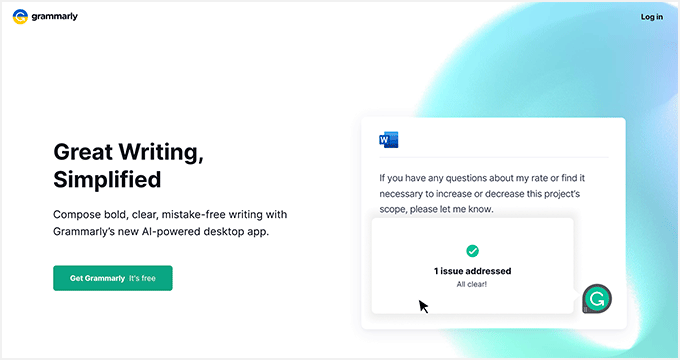
Grammarly is one of the most popular WordPress plugins. It is an artificial intelligence-powered grammar-checking tool that analyzes the readability of your content to help you write better.
It supports American, British, Canadian, and Australian English languages. It is also available as a Google Chrome addon as an alternative to the JetPack module.
Google Language Translator lets your users easily translate your website content without creating a multilingual WordPress site. It brings Google’s AI and machine learning translation engine to your WordPress website.
You can simply select languages you want to display on your website. After that, you can add the translator to your website using the sidebar widget or shortcode.
MyCurator is a cloud-based content curation service. It allows you to add an artificial intelligence-powered content aggregator, which shows content relevant to your selected topics and improves results by learning from what you add or vote on.
You can create a curated content section on your website by fetching the best bits of content relevant to your audience. You can add any article you like to your website with an excerpt and a link back to the source.
WebsiteVoice is a free WordPress plugin that converts your text content into high-quality audio. This helps improve user engagement and save time for users to listen to your articles while they’re busy with other routine work.
You’ll need their website token to activate the text-to-speech option on your site. These tokens are free initially, but you have to upgrade to a premium plan to continue using their service.
Quttera Web Malware Scanner allows you to scan your WordPress site for malware and malicious code. This is particularly useful if you suspect that your WordPress site is hacked or blacklisted by search engines.
The plugin uses artificial intelligence to learn from false positives and improves scan results based on usage. While it helps scan an infected website, it doesn’t protect your website from getting affected.
For better security, see our ultimate WordPress security guide to protect your website against hacks, DDOS attacks, and malicious code.
ChatBot provides AI-powered virtual chat agent for your website. It uses machine learning to improve the live chat experience and send accurate responses.
You need to sign up for a free account on the plugin’s website. After that, it will start learning as you use it. You can also train it on what to say and how to respond to user queries. This can be handy in keeping users engaged on your website and generating more leads.
LinkWhisper is a free WordPress internal linking plugin powered by Artificial Intelligence. It learns from the content on your site and suggests powerful internal linking opportunities to improve your search rankings and grow your traffic.
The plugin looks into your website’s content, including pages and posts. Then it offers suggestions in the WordPress block editor to add internal links while you’re writing and editing an article.
ImageSEO is a free WordPress image optimization plugin. It uses artificial intelligence to optimize the alt text and title of your images to grow your organic traffic.
The plugin also generates social cards for Twitter, Facebook, and channels. After activating the plugin, you can upload images on the WordPress website, and ImageSEO will write the name, title, and tag for the images automatically. It seamlessly works on single and bulk image uploads.
We hope this article helped you learn about WordPress plugins using artificial intelligence and machine learning. You may also want to see our guide on how to improve your WordPress website speed and performance.
If you liked this article, then please subscribe to our YouTube Channel for WordPress video tutorials. You can also find us on Twitter and Facebook.
Want to add Facebook comments to your WordPress site instead of the native WordPress comments? While there are plenty of plugins to help you enhance the native WordPress comments system, you might want to completely switch things up and move to Facebook instead. In this post, I’ll show you how to add Facebook comments to ... Read moreHow To Add Facebook Comments To WordPress: 2 Easy Methods