Are you looking for the best testimonial plugins for your WordPress site? Testimonials add social proof to your website and help build trust among your users. In this article, we have hand-picked the best WordPress testimonial plugins that you can use on your website.
Testimonial Rotator is an easy to use WordPress testimonials plugin. It allows you create a testimonial carousel and add rotating testimonials anywhere on your website.
You can also create multiple rotators and manually enter customer information such as feedback, job title, and photo. For detailed step by step instructions, see our article on how to add rotating testimonials in WordPress.
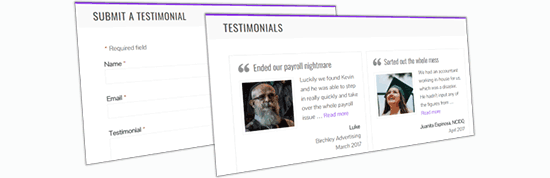
Want to allow customers to submit reviews and display them on your website? Easy Testimonials allows you to add a customer feedback form on your website, so you can collect testimonials. You can also manually enter testimonials from your WordPress admin area.
After that, you can easily display testimonials using a simple shortcode. For detailed instructions, see our guide on how to add a customer reviews page in WordPress.
Testimonials Widget is another flexible WordPress testimonials plugin. Despite the name, it allows you to add testimonials anywhere on your website.
It comes with a sidebar widget allowing you to easily display testimonials in sidebars. Testimonials are displayed in a carousel with a beautiful slide-in and fade effects.
Strong Testimonials is one of the most customizable WordPress testimonial plugins. It comes with multiple display options including testimonial slider, grid layout, masonry layout, single column layout, and more.
It also includes a custom form allowing your customers to easily add their reviews and testimonials. If you have been getting customer reviews on social media, then this plugin can also embed Facebook, Twitter, YouTube, and more.
Testimonial Basics is a complete testimonial management solution for your WordPress website. It includes multiple display styles, sidebar widget, and a feedback form to collect user testimonials.
User-submitted testimonials use Gravatar to fetch client photo. However, you can also manually upload photos directly from your WordPress admin area.
WP Testimonials is a simple yet highly customizable testimonials plugin. It allows you to easily add testimonials and sort them into categories and tags.
After creating testimonials, you can display them using a shortcode. This shortcode comes with many parameters that you can use to customize the appearance of testimonials. The plugin also comes with a widget with the same options as the shortcode offer.
BNE Testimonials is another easy to use option for adding testimonials to your WordPress site. It comes with a shortcode and a sidebar widget to easily display testimonials.
It has a slider and plain list layout for testimonials, which inherits your theme’s style for display.
Testimonial is a straight-forward WordPress testimonials plugin with simple options and the ability to choose your own colors.
It has draggable box items and allows you to choose different fonts, font-sizes, text color, and featured photo. The plugin does not have a slider or rotator, so testimonials will be displayed in grid or list style.
Testimonial Slider offers a modern WordPress testimonial slider with an improved user experience. It comes with a slider as well as plain list layout. You can also add a front-end contact form to collect customer testimonials.
You can add testimonials anywhere using the shortcode or sidebar widget. The testimonial slider is touch / mobile friendly and works great on all screen sizes.
We hope this article helped you find the best testimonial plugin for your WordPress website. You may also want to see our complete list of must have WordPress plugins for business websites.
If you liked this article, then please subscribe to our YouTube Channel for WordPress video tutorials. You can also find us on Twitter and Facebook.
Do you want to embed a Facebook video in WordPress?
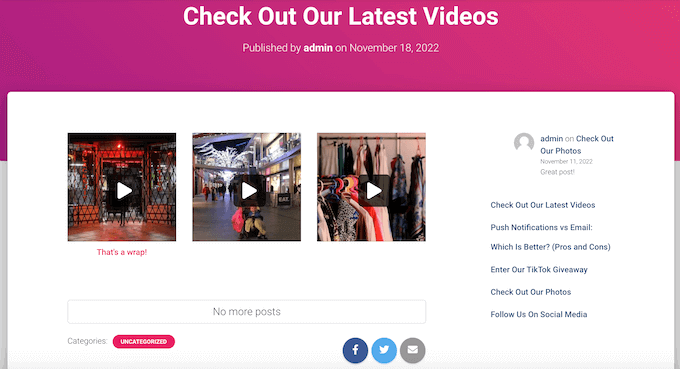
The videos that you post to Facebook also make great content for your website. By embedding a Facebook video feed, you can keep your site fresh and interesting while also growing your Facebook following.
In this article, we’ll show you an easy way to embed Facebook videos in WordPress.
Why Add Facebook Videos in WordPress?
Videos are a great way to connect with your audience and keep them engaged. This is true no matter whether you’re running a personal blog or a business website.
Creating engaging and entertaining videos takes time and effort so if you’re posting videos to Facebook, then it makes sense to re-use them on your WordPress website.
By linking your website to your Facebook account, any new videos that you post to Facebook will appear on your website automatically. In this way, you can keep your website fresh with very little day-to-day effort.
Embedded videos can even help grow your Facebook page. If website visitors see lots of interesting videos and playlists then they’ll want to follow you on Facebook. This can get you some extra followers and more engagement.
With that being said, let’s see how you can easily embed a Facebook video in WordPress.
Installing a Facebook Video Plugin in WordPress
The easiest way to embed a Facebook video in WordPress is by using the Custom Facebook Feed Pro plugin.
In this guide, we’ll be using the pro version of Smash Balloon as it allows you to embed videos in WordPress including HD, 360o, and Facebook Live videos.
Smash Balloon Pro also lets you show photos in a custom Facebook feed, and display the total number of likes, shares, comments, and reactions below each post. However, if you’re just starting out and have a limited budget, then there’s also a free version you can use.
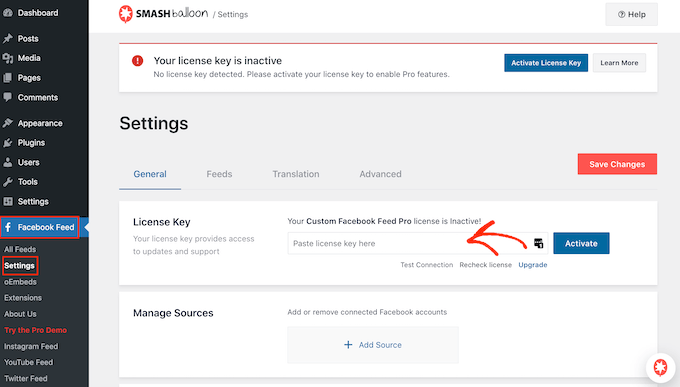
Upon activation, head over to Facebook Feed » Settings and enter your license key into the ‘License Key’ field.
You’ll find this information under your account on the Smash Balloon website.
After entering the key, click on the ‘Activate’ button.
Connect Your Facebook Page or Group to WordPress
Smash Balloon Custom Facebook Feed allows you to embed videos from Facebook pages and groups. You can even show the videos in a lightbox popup so people can watch the full video directly on your WordPress website.
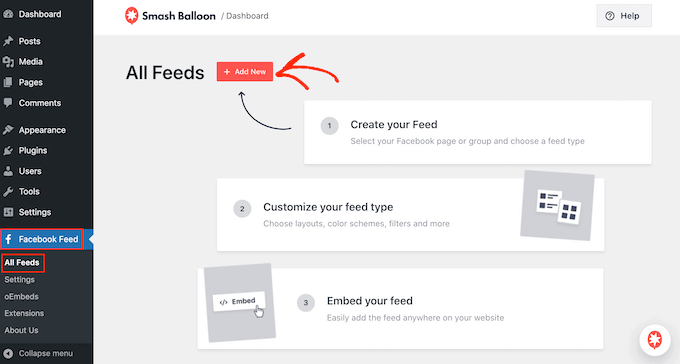
The first step is connecting your Facebook page or group to WordPress, so go to Facebook Feed » All Feeds and then click on ‘Add New.’
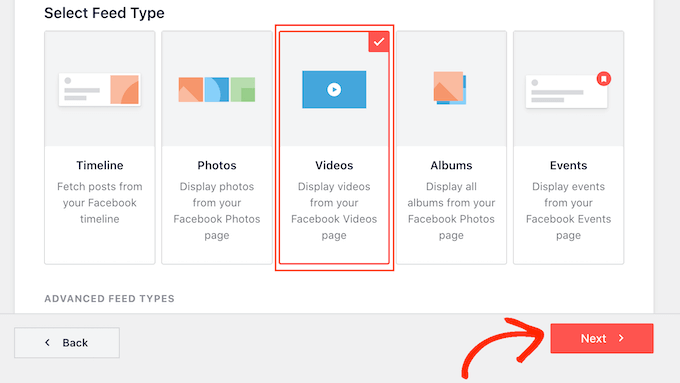
Smash Balloon lets you show posts from your Facebook timeline, photo albums, Facebook statuses, events, and more.
Since we want to embed Facebook videos in WordPress, you’ll need to select ‘Videos’ and then click on ‘Next.’
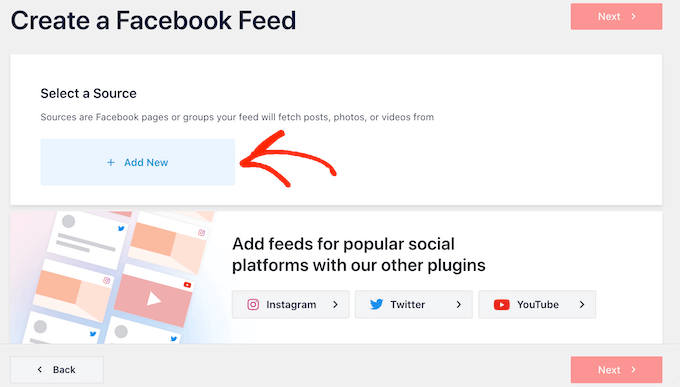
Now, you need to select the Facebook page or group where you’ll get the videos from.
To do this, click on ‘Add New.’
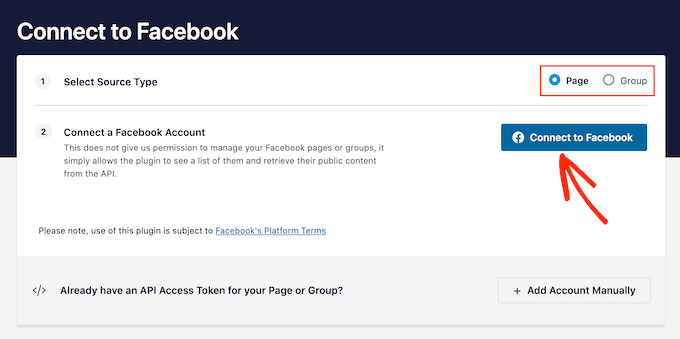
Next, choose whether you want to show videos from a Facebook page or group.
Once you’ve done that, click on ‘Connect to Facebook.’
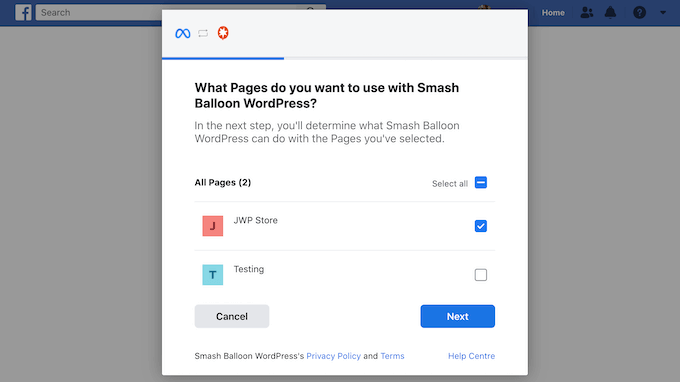
This opens a popup where you can log into your Facebook account and choose the pages or groups that you want to use with Smash Balloon.
After that, click on ‘Next.’
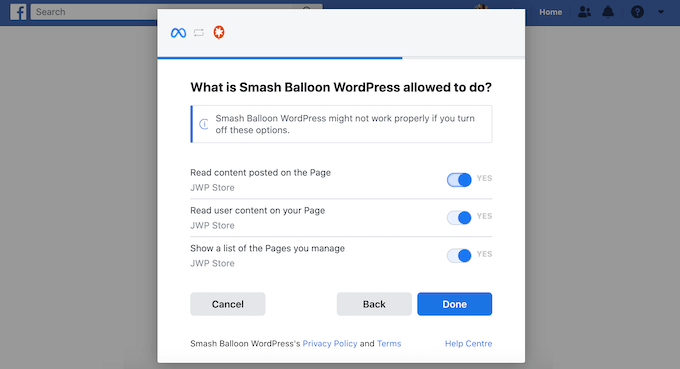
Now, Facebook will show all the information that Smash Balloon will have access to, and the actions it can perform.
To restrict Smash Balloon’s access to your Facebook account, simply click to disable any of the switches.
Just be aware that this may affect the videos that you can embed on your WordPress blog or website so we recommend leaving all the switches enabled.
When you’re happy with how the permissions are set up, click on ‘Done.’
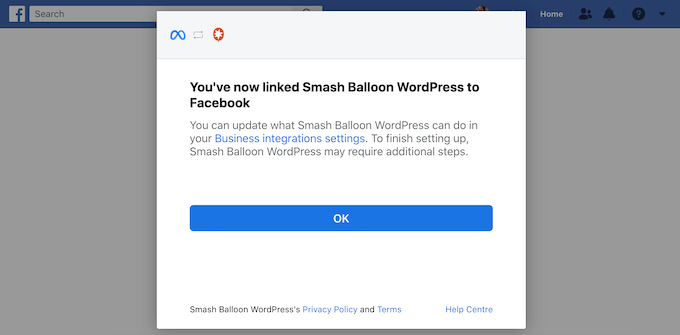
After a few moments, you should see a message confirming that you’ve connected your WordPress website to Facebook.
With that done, you’re ready to click on ‘OK.’
Smash Balloon will now return you to the WordPress dashboard automatically.
How to Embed Facebook Videos in WordPress
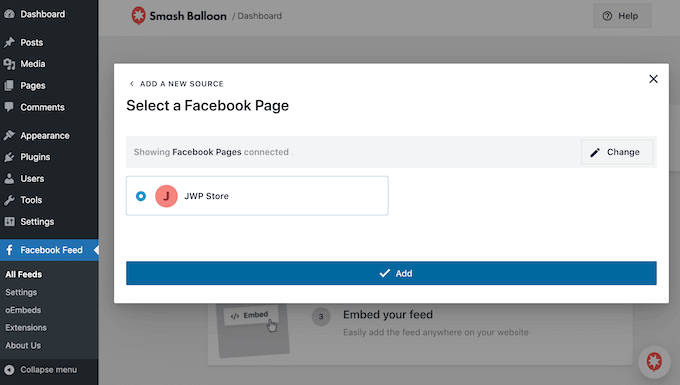
At this point, you’ll see a popup with the Facebook group or page that you just linked to your website. Simply select the radio button next to the page or group you want to use and then click on the ‘Add’ button.
If you accidentally closed the popup, don’t worry. You can simply refresh the page to reopen the popup.
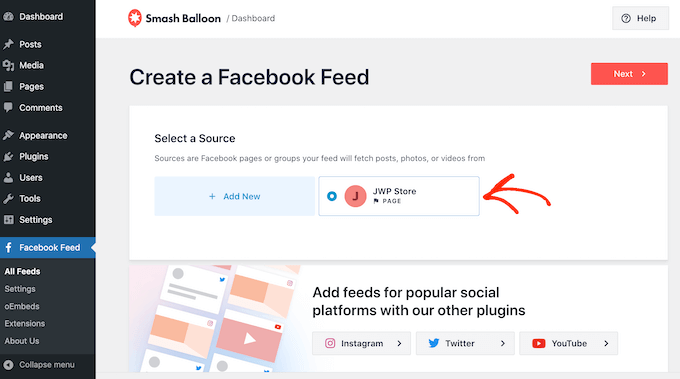
Once you’ve done that, WordPress will take you back to the Facebook Feed » All Feeds page automatically. Just like before, click on ‘Add New,’ select ‘Videos’ and then click on the ‘Next’ button.
Now, select your Facebook page or group, and click on ‘Next.’
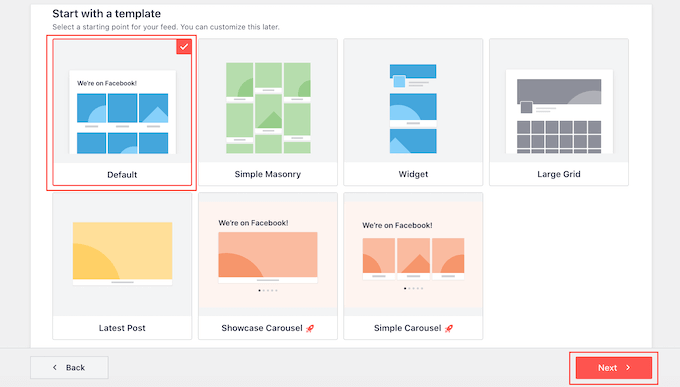
On this screen, you can choose the template that you want to use for the video feed.
All of these templates are fully customizable so you can fine-tune the design depending on how you want to show the Facebook videos on your website.
We’re using the ‘Default’ template, but you can choose any template you want. After making your selection, click on ‘Next.’
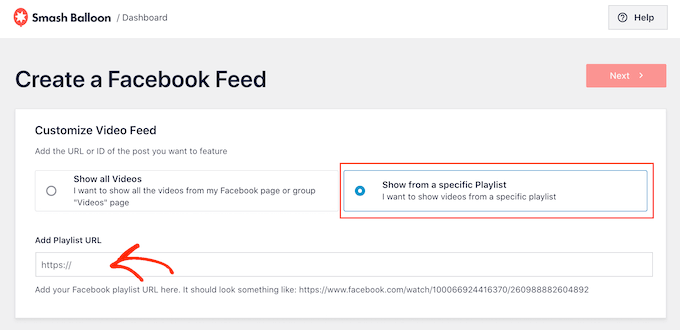
After that, you can choose whether to show all the videos from your Facebook page or group or just the videos from a specific playlist.
If you choose ‘Show from a specific playlist,’ then you’ll need to enter that playlist’s URL.
Once you’ve made a decision, go ahead and click on the ‘Next’ button.
Smash Balloon will now create a feed based on your source and the template you’ve chosen. This is a good start, but you may want to fine-tune how the videos appear on your site.
How to Customize Your Embedded Facebook Videos
The Smash Balloon Custom Facebook Feed plugin gives you lots of ways to customize how the videos appear on your website. That being said, it’s worth taking a look at these settings.
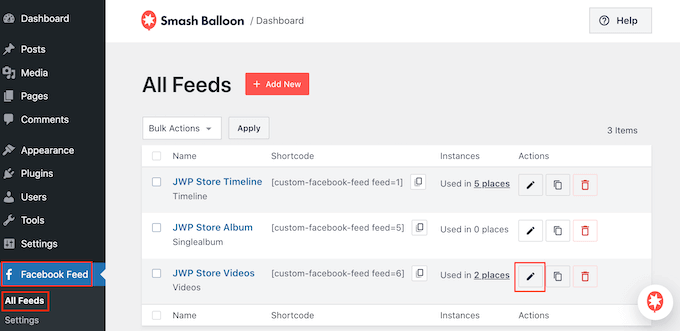
In the WordPress dashboard, go to Facebook Feed » All Feeds. Here, find the video feed you just created and click on the ‘Edit’ button next to it, which looks like a small pencil.
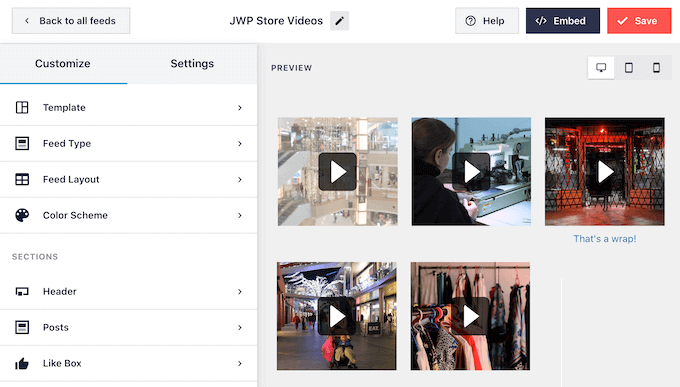
This opens the Smash Balloon feed editor, which shows a preview of your Facebook video feed to the right.
On the left-hand side, you’ll see all the different settings you can use to customize how these videos appear on your WordPress website. Most of these settings are self-explanatory, but we’ll quickly cover the major areas.
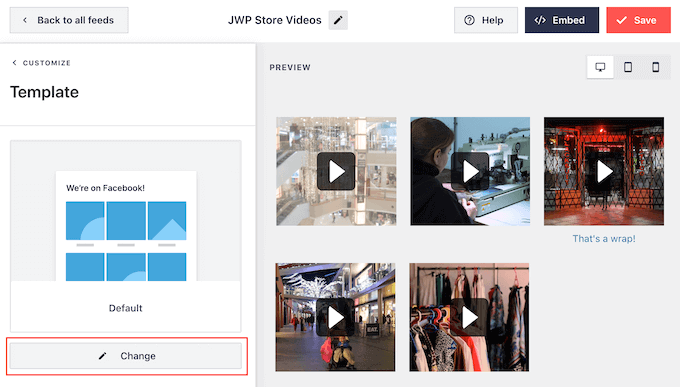
If you want to change the template, then click on ‘Template.’
Then, select the ‘Change’ button.
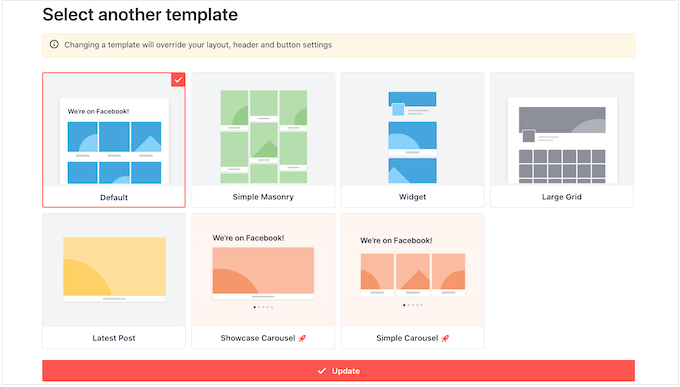
This opens a popup showing all the different templates you can use for your video feed.
Simply select the design you want to use instead, and then click on ‘Update.’
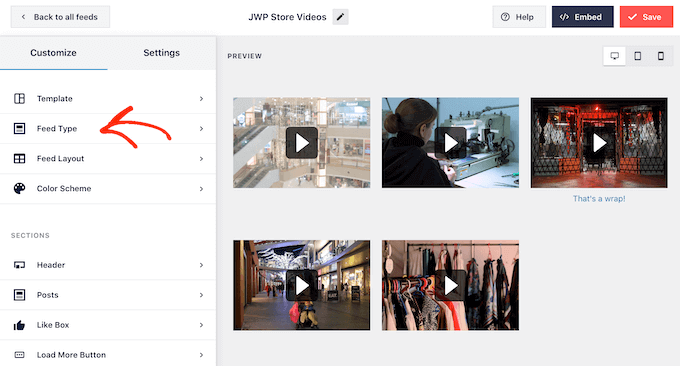
The next setting is ‘Feed Type,’ which allows you to show different content in your feed. For example, you might decide to show photos, albums, or events instead of videos.
Since we want to embed Facebook videos, you’ll typically want to ignore this area.
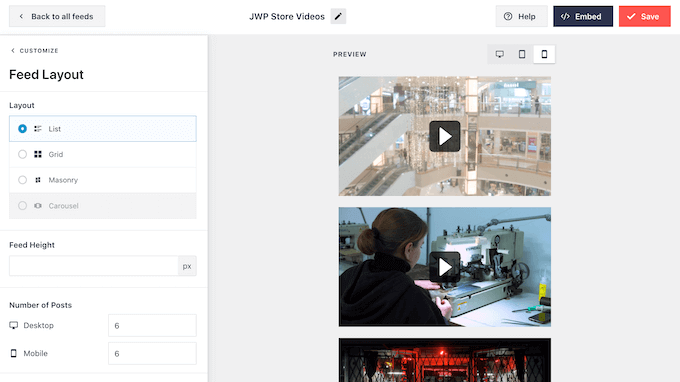
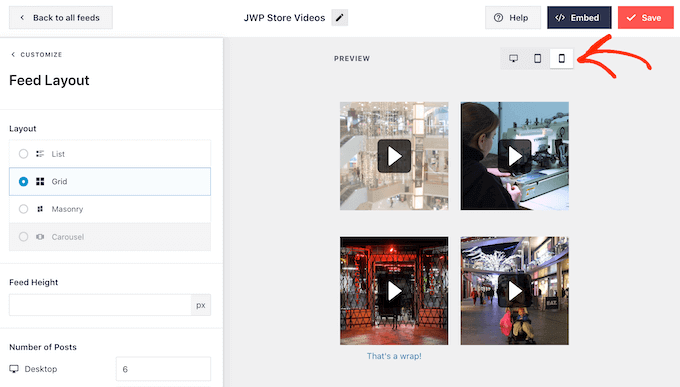
Next, click on ‘Feed Layout.’
Here, you can choose between different layouts, such as masonry and grid, and change the feed height.
As you make changes, the preview will update automatically so you can try different settings to see what looks the best.
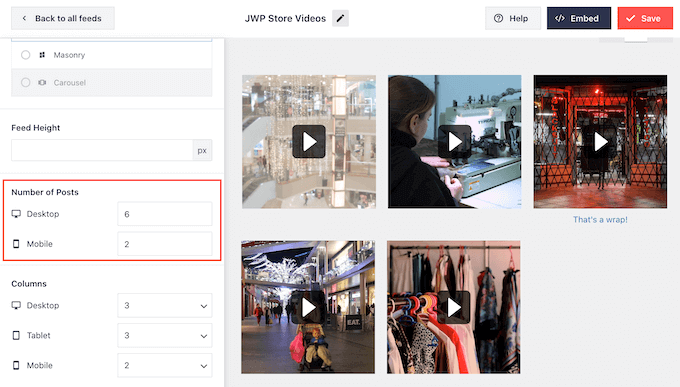
By default, Smash Balloon will show the same number of videos on desktop computers and mobile devices such as smartphones.
You can preview how your videos will look on desktop computers, tablets, and smartphones using the row of buttons in the upper-right corner.
Mobile devices usually have smaller screens and may struggle to process lots of large, high-resolution videos. Visitors may also be using their mobile data rather than free Wi-Fi.
With that being said, you may want to show fewer videos on smartphones and tablets. To do this, simply type a different number into the ‘Mobile’ field under ‘Number of Posts.’
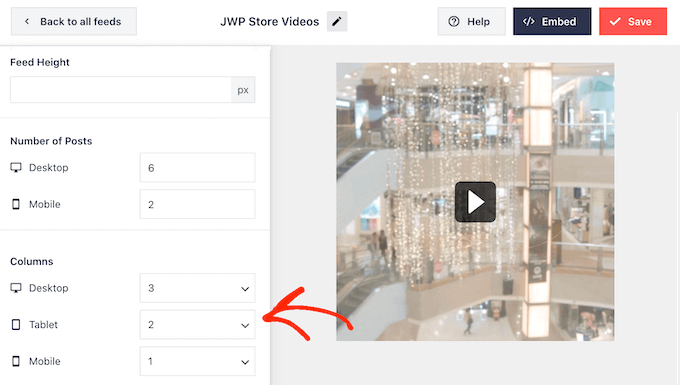
By default, the Facebook feed shows fewer columns on smartphones and tablets, compared to desktop computers. This helps all your videos fit comfortably on smaller screens.
You can change the number of columns that Smash Balloon uses on tablets, mobiles, and desktop computers using the ‘Columns’ settings.
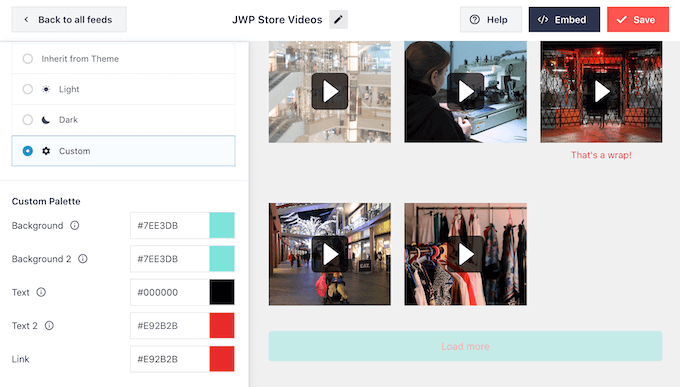
The next settings page is ‘Color Scheme.’
Smash Balloon uses the colors inherited from your WordPress theme by default, but on this screen, you can switch to a ‘Light’ or ‘Dark’ color scheme instead.
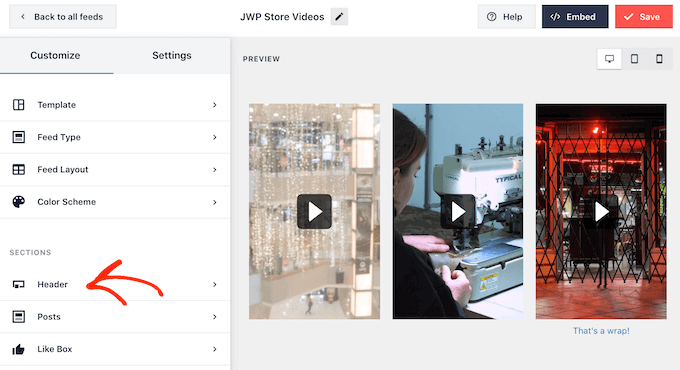
Smash Balloon can add a header to your feed, which is your Facebook profile picture and the name of the page or group. This lets visitors know where the embedded videos come from, and where they can find this content on Facebook.
To add this section, click on ‘Header’ in the left-hand menu.
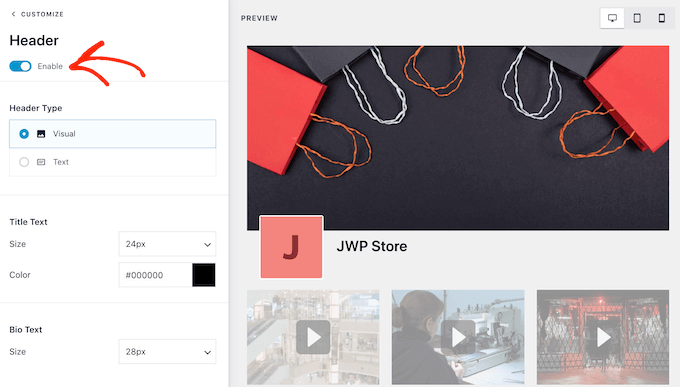
You can then click on the ‘Enable’ toggle.
After adding a header you can change how this area looks, including hiding or adding your Facebook profile picture, changing the size of the bio text, and more.
If you want to remove the header completely, then click to turn off the ‘Enable’ toggle.
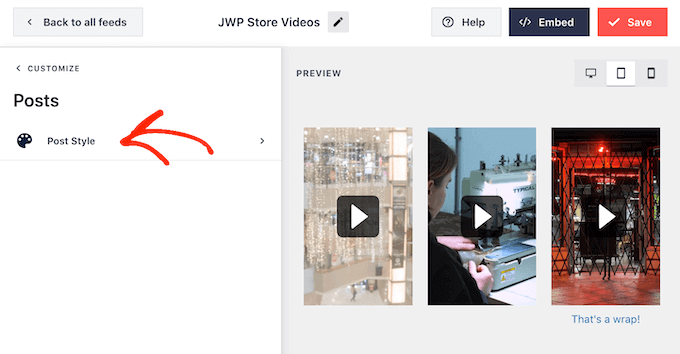
By default, Smash Balloon shows the title of each video. If you want to hide the title, then select ‘Posts’ from the main Smash Balloon editor menu.
Then, go ahead and click on ‘Post Style.’
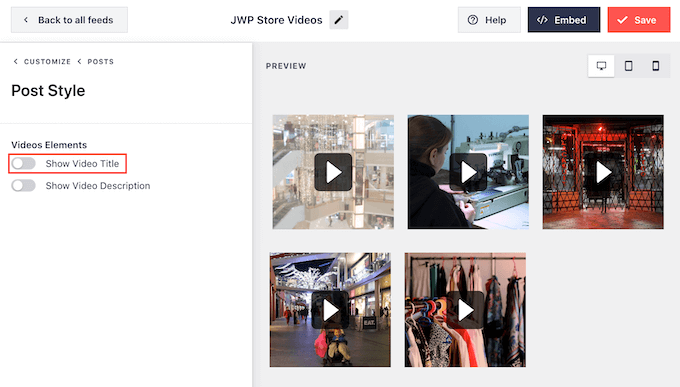
On this screen, you can hide the video titles by clicking on the ‘Show Video Title’ slider.
This can be useful if you haven’t added titles to all your videos, or your titles don’t make sense outside of Facebook.
On this screen, you can also hide or show the video descriptions. For example, you may use these descriptions to provide extra information about the video.
To add the description, simply click to enable the ‘Show Video Description’ switch.
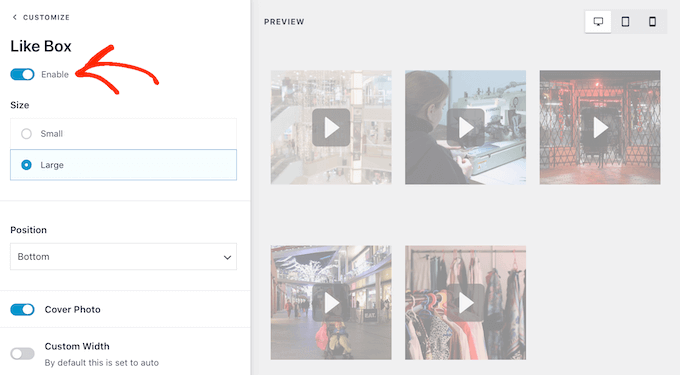
By default, Smash Balloon doesn’t add the Facebook ‘like’ button to your video feed. If visitors like your embedded videos then they may want to follow you on Facebook.
With that being said, you may want to add a ‘like’ button to the feed, by selecting ‘Like Box’ from the editor’s left-hand menu.
After that, simply click on the ‘Enable’ button so that it turns blue.
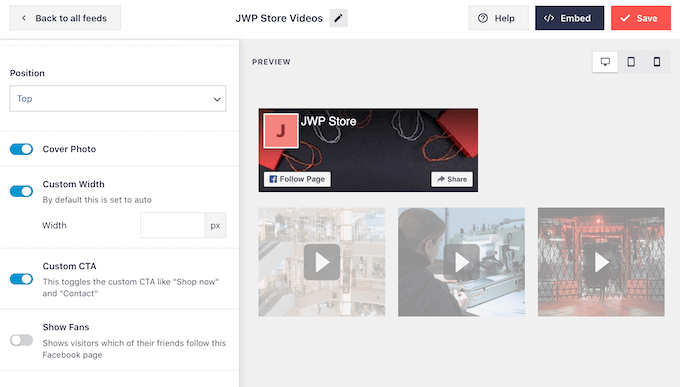
Smash Balloon adds this button below your video feed, but you can change this by opening the ‘Position’ dropdown and choosing ‘Top.’
On this screen, you can also change how the ‘like’ section looks including changing its width, showing how many people follow you on Facebook, adding a custom call to action, and more.
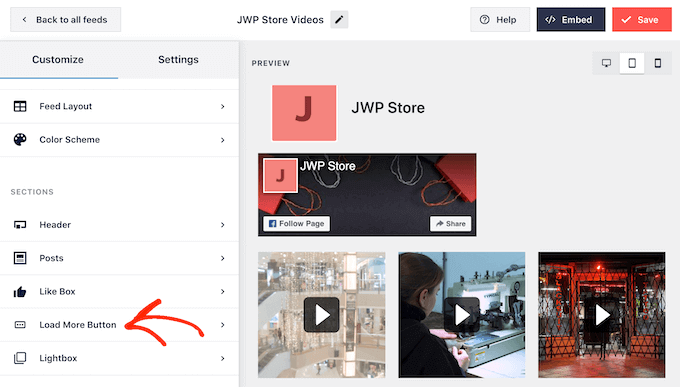
When you’re happy with how the button looks, you can move on to the next settings page by selecting ‘Load More Button.’
The Load More button encourages visitors to scroll through more of your video feed, so Smash Balloon adds it to your embedded Facebook feed by default.
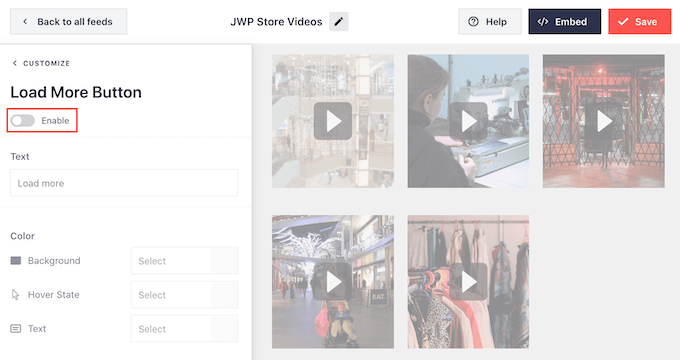
Since it’s such an important button, you may want to customize this button by changing its background color, hover state, label, and more.
Another option is to remove the button completely, by clicking the ‘Enable’ toggle. For example, you might remove this button and then encourage visitors to check out your Facebook page in order to see more of your videos.
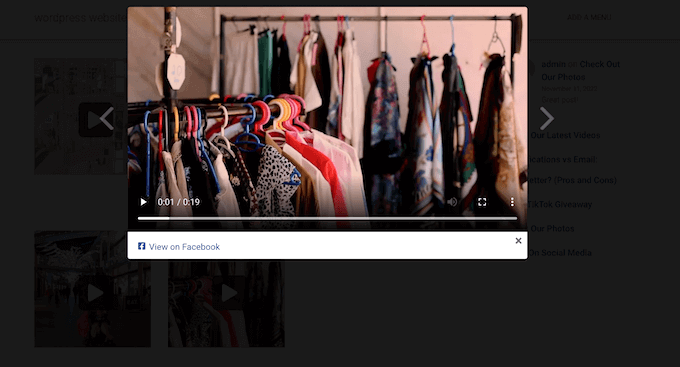
By default, Smash Balloon allows visitors to watch your Facebook videos without leaving your WordPress website.
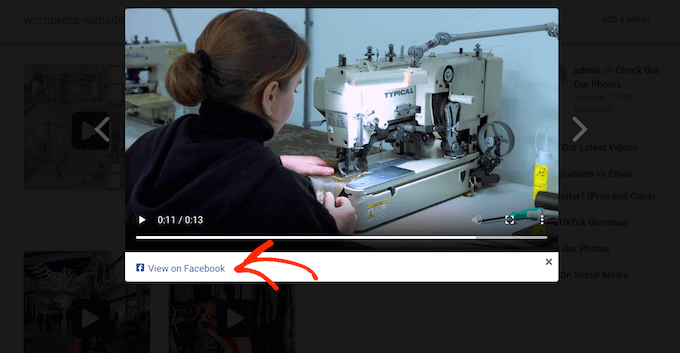
They can simply click on any video thumbnail to open it in a lightbox, as you can see in the following image
Visitors can scroll through the videos in your feed using the arrows.
If they want to like a photo, leave a comment, or share the video to their page, then they can click on the ‘View on Facebook’ link.
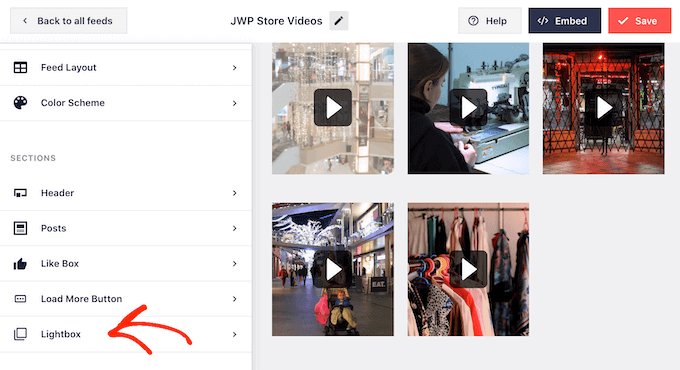
There are a few different ways that you can customize Smash Balloon’s default lightbox.
To see your options, click on ‘Lightbox’ in the left-hand menu.
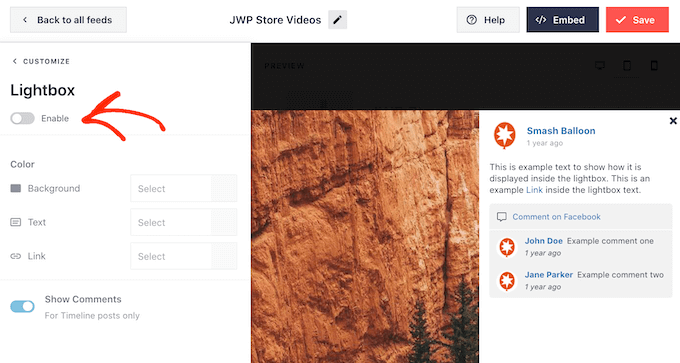
Here, you can change the color of the lightbox’s text, links, and background colors.
The lightbox feature allows visitors to watch your videos in a popup. If you prefer, then you can disable the lightbox so that all your videos play as small thumbnails, embedded inside the page content.
In this way, you can encourage people to visit your Facebook page, to see the full-size video. To disable the lightbox, simply click on the ‘Enable’ toggle to turn it from blue to grey.
When you’re happy with how the video feed looks, don’t forget to click on ‘Save.’
You’re now ready to embed the Smash Balloon feed in your website.
How to Add Facebook Videos to WordPress
With Smash Balloon, you can add the video feed to your WordPress website using a block, widget, or shortcode.
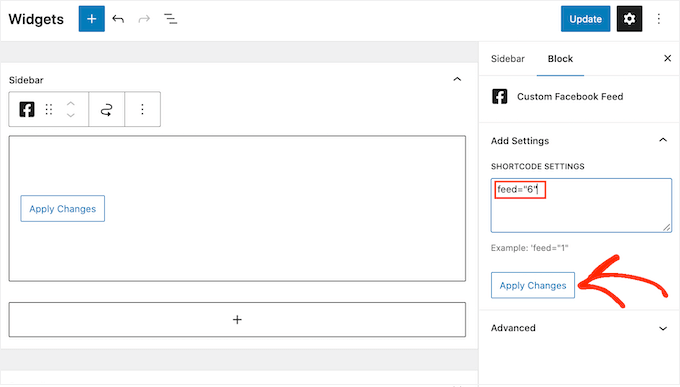
If you’ve created more than one feed using Smash Balloon, then you’ll need to know the feed’s code if you’re going to use a widget or block.
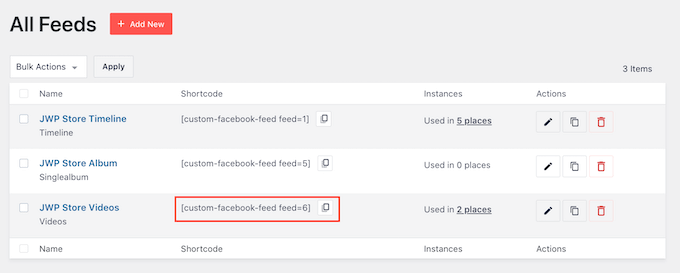
To get this code, go to Facebook Feed »All Feeds and then look at the feed="" part of the shortcode. You’ll need to add this code to the block or widget, so make a note of it.
In the following image, we’ll need to use feed="6"
If you want to embed your Facebook feed in a page or post, then we recommend using the Custom Facebook Feed block.
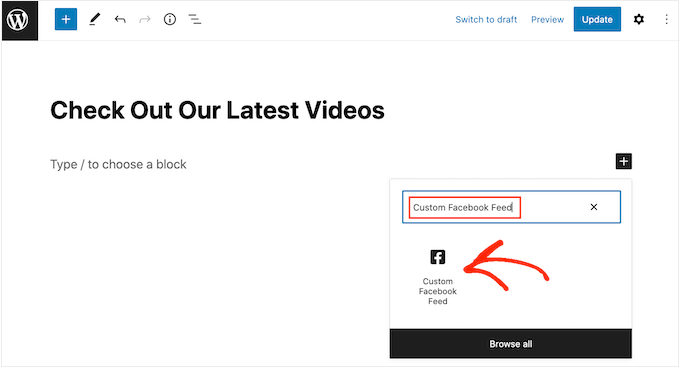
Just open the page or post where you want to embed your Facebook videos. Then, click on the ‘+’ icon to add a new block and start typing ‘Custom Facebook Feed.’
When the right block appears, click to add it to the page or post.
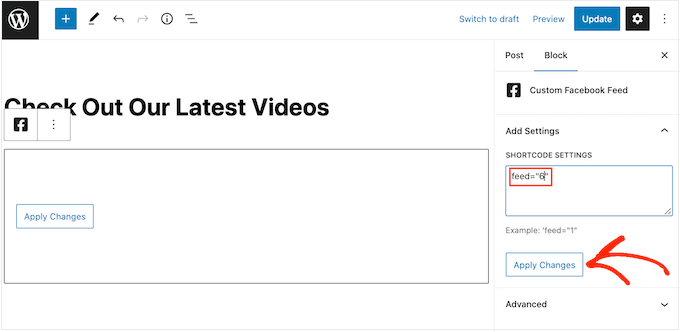
The block will show one of your Smash Balloon feeds by default. If you want to use a different video feed instead, then find ‘Shortcode Settings’ in the right-hand menu.
Here, simply add the feed="" code and then click on ‘Apply Changes.’
The block will now show the videos from your Facebook page or group. Just publish or update the page to make the video feed live on your website.
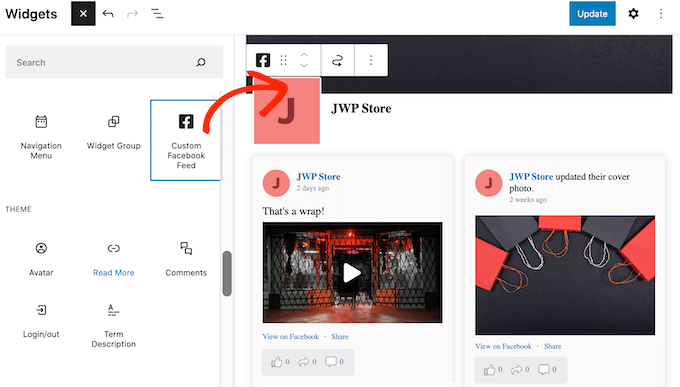
Another option is to add the feed to any widget-ready area, such as the sidebar or similar section. This allows visitors to watch your Facebook videos from any page of your site.
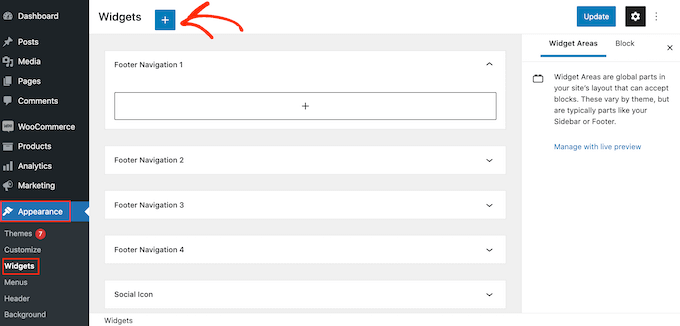
Simply go to Appearance » Widgets and then click on the blue ‘+’ button.
After that, find the ‘Custom Facebook Feed’ widget.
Then, just drag it onto the area where you want to show the video feed.
The widget will show one of your Smash Balloon feeds automatically.
To show a different feed instead, type or paste the feed’s code into the ‘Shortcode Settings’ box and then click ‘Apply Changes.’
You can now make the widget live by clicking on the ‘Update’ button. For more information, please see our step-by-step guide on how to add and use widgets in WordPress.
Finally, you can embed videos on any page, post, or widget-ready area using a shortcode.
Simply go to Facebook Feed »All Feeds and copy the code in the ‘Shortcode’ column. You can now add this code to any Shortcode block.
Sometimes you may want to embed a specific Facebook video in a page or post. For example, you might have a Facebook video that talks about the same topics as your latest blog, or a promotional video showing the product you’ve just launched on your online store.
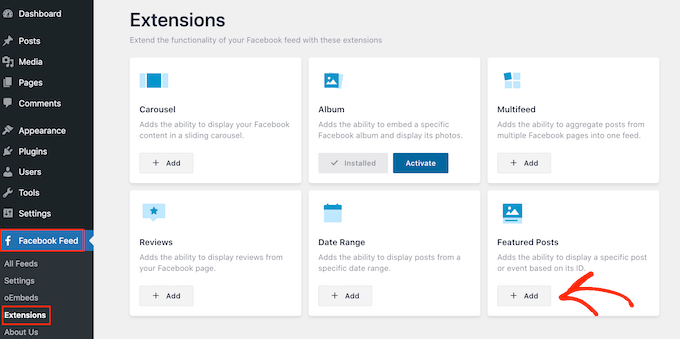
To embed a specific video, you’ll need to buy and install the Featured Posts extension as it allows you to display a particular post or event using its ID.
To start, go to Facebook Feed » Extensions.
Here, find the ‘Featured Posts’ extension and click on its ‘Add’ button.
This will open the Smash Balloon website in a new tab, with instructions on how to purchase the extension.
Once you have the extension, you can install it in exactly the same way you install a plugin. If you need help, then please see our guide on how to install a WordPress plugin.
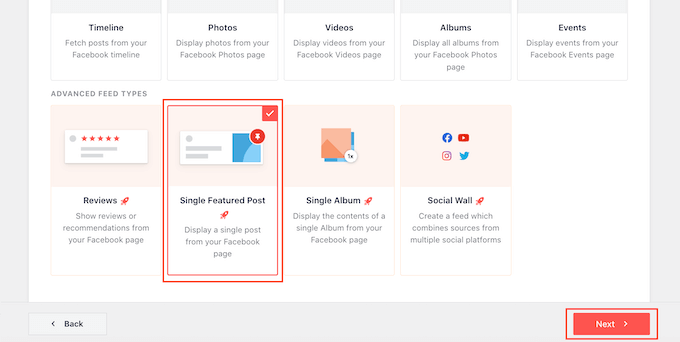
After activating the plugin, go to Facebook Feed » All Feeds and click on ‘Add New.’
Under ‘Advanced Feed Types,’ select ‘Single Featured Post’ and then click ‘Next.’
You can now choose the page or group that you want to use as your source by following the same process described above.
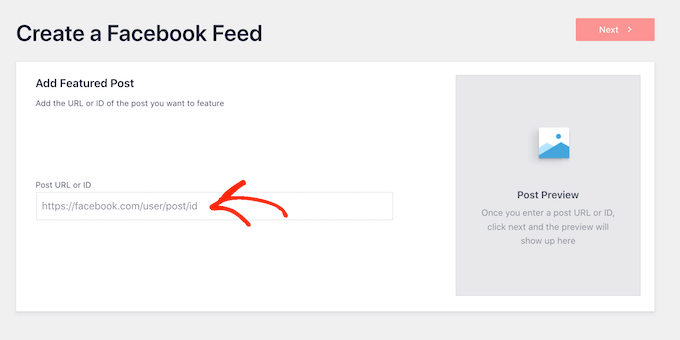
On the next page, you’ll need to enter the ID of the video that you want to embed.
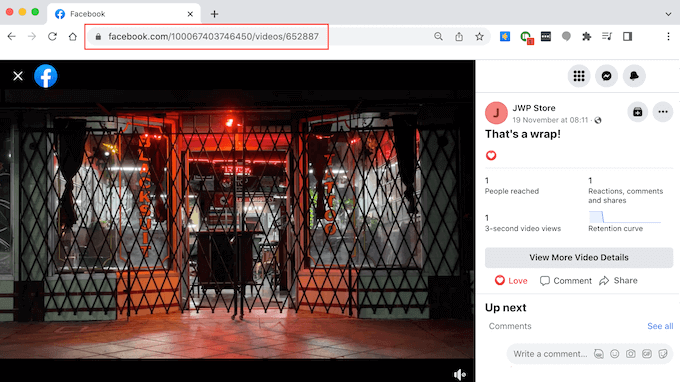
To get this ID, visit Facebook in a new tab and then open the video that you want to embed.
You can now go ahead and copy the URL.
After that, just post the URL into your WordPress dashboard and click on ‘Next.’
Once you’ve done that, you can style the video and then add it to your site following the same process described above.
Need to add custom CSS to WordPress? As you become more familiar with WordPress, you’ll almost certainly want to add at least a little bit of custom CSS to your site. I know I do – every WordPress site I launch has at least a couple of tweaks to get things just right. But adding ... Read moreHow To Add Custom CSS To WordPress: 4 Methods For Different Needs
Welcome, March! Let’s take a look at the wonderful WordPress theme gems of this month. Higher Education Simple and clean, this theme is tailor-made for schools, courses, and any other academic institutions. There are significant customization options, but the emphasis is put on ease of use and a clean interface. Custom menus and sliders are ... Read moreThe Best Free WordPress Themes March 2018
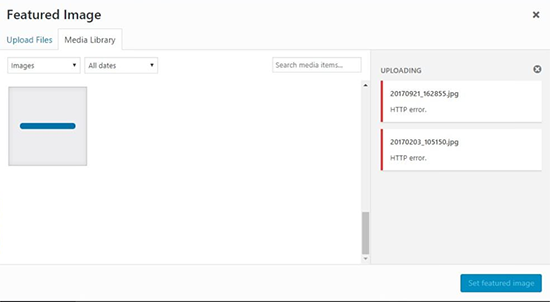
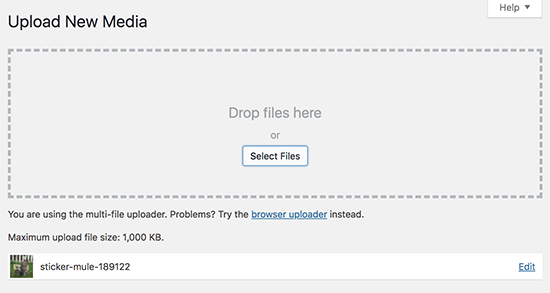
Are you seeing the HTTP error while uploading media in WordPress? This error usually occurs when you are uploading an image or other files to WordPress using the built-in media uploader. In this article, we will show you how to easily fix the HTTP image upload error in WordPress.
What Causes HTTP Error During Media Upload in WordPress?
There are a number of things that could lead to a HTTP error when you are trying to upload files using the WordPress media uploader. Basically, WordPress is unable to figure out the cause and that’s why it displays the generic ‘HTTP error’ message.
The frustrating part is that this error message doesn’t give you any clue as to what may have caused it. This means that you will have to try different solutions to find the cause and fix the error.
That being said, let’s take a look at how to troubleshoot and fix the HTTP error during media upload in WordPress.
1. Make Sure The HTTP Error is Not Temporary
First, you should wait a few minutes and then try uploading your image file again. This error is sometimes caused by unusual traffic and low server resources, which are automatically fixed on most WordPress hosting servers.
If that doesn’t work, then you may want to try uploading a different image file. If the other file uploads successfully, then try saving your original image file to a smaller size and retry uploading.
Lastly, you may want to try saving the file to a different format. For example, change jpeg to png using an image editing software. After that, retry uploading the file.
If all these steps result in the HTTP error, then this means that the error is not caused by a temporary glitch and definitely needs your immediate attention.
2. Increase WordPress Memory Limit
The most common cause of this error is lack of memory available for WordPress to use. To fix this, you need to increase the amount of memory PHP can use on your server.
You can do this by adding the following code to your wp-config.php file.
define( 'WP_MEMORY_LIMIT', '256M' );
This code increases the WordPress memory limit to 256MB, which would be enough to fix any memory limit issues.
3. Change Image Editor Library Used by WordPress
WordPress runs on PHP which uses two modules to handle images. These modules are called GD Library and Imagick. WordPress may use either one of them depending on which one is available.
However, Imagick is known to often run into memory issues causing the http error during image uploads. To fix this, you can make the GD Library your default image editor.
After adding this code, you can retry uploading files using the media uploader. If this doesn’t solve the issue, then you can remove this code and try other methods described in this article.
4. Using The .htaccess Method
This method allows you to control how Imagick uses server resources. Many shared hosting providers limit Imagick’s ability to use multiple threads for faster image processing. However, this would result in you seeing the http error when uploading images.
An easy fix is be to add the following code in your .htaccess file:
SetEnv MAGICK_THREAD_LIMIT 1
This code simply limits Imagick to use a single thread to process images.
We hope this article helped you fix the HTTP error during media upload in WordPress. You may also want to see our WordPress troubleshooting guide as well as the ultimate list of most common WordPress errors and how to fix them.
If you liked this article, then please subscribe to our YouTube Channel for WordPress video tutorials. You can also find us on Twitter and Facebook.
If you pay attention to the news, you’ve probably seen this strange four-letter acronym increasingly popping up among webmasters (perhaps with a sense of panic attached): GDPR. What does it mean? And do you need to care about it as a regular webmaster? In this post, I’ll give you a general overview of what the ... Read moreWordPress GDPR: What It Is And What You Need To Know
Do you want to build an auction site like eBay using WordPress? An auction website allow users to bid on products to purchase them. This allows you to maximize profits while selling unique products. In this article, we will show you how to easily build an auction site like eBay using WordPress without any technical skills.
What Do You Need to Build an Auction Site Using WordPress?
You will need the following things to make your own auction site like eBay using WordPress.
A domain name (This will be your website’s name that people will type to find your site e.g. wpbeginner.com)
A web hosting account (This is where your website’s files are stored)
An ecommerce addon (This will turn your website into an ecommerce platform)
An auctions addon (This will add auction features to your website)
Your undivided attention for 40 mins
Yes, you can start your own auction site in 40 minutes, and we will walk you through the whole process, step by step.
In this tutorial, we will cover the following:
How to get a domain name for free
How to choose the best website hosting
Install WordPress and set up your ecommerce addon
Install and set up auctions addon
Add and manage auctions
Resources to learn WordPress and grow your business
That being said, let’s get started.
Step 1. The Right Setup
First, you need to make sure that you are using the right website platform, and since you’re on this article, you won’t be making the mistake that others do.
There are two types of WordPress software, so it’s easy for beginners to get confused. First, there is WordPress.com which is a hosting platform, and then you have WordPress.org also known as self-hosted WordPress.
We recommend using self-hosted WordPress.org because it gives you access to all WordPress features out of the box. For comparison, see the difference between WordPress.com vs WordPress.org.
First, you will need a domain name and a web hosting account. But you cannot sign up with just any web hosting company. You will need a hosting provider that specializes in WooCommerce hosting because this is the software you’ll be using as your e-commerce platform.
Usually, a domain name costs $14.99/year, web hosting 7.99/month, and SSL certificate 69.99/year.
Now, this is a lot of money if you are just starting out.
Fortunately, Bluehost, an officially recommended WordPress and WooCommerce hosting provider has agreed to offer our users a free domain + free SSL and discount on their cloud WordPress hosting.
Once you have purchased the hosting, then follow our step by step tutorial on how to start an online store for complete setup instructions.
You would now have a WordPress website with WooCommerce installed on it. By default, WooCommerce doesn’t allow you to add products for auction on your website.
Let’s change this by installing an auctions addon for WooCommerce.
Step 2. Turn Your Ecommerce Store into an Auctions Site
YITH WooCommerce Auctions is a paid plugin and a single site license will cost you 81 Euros. This gives you access to the plugin downloads, documentation, and 1 year of support and updates.
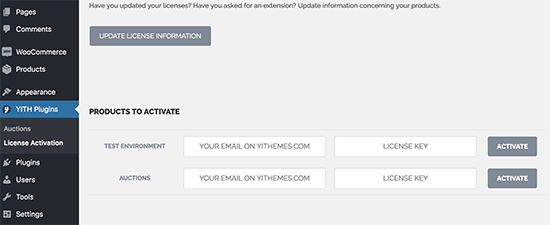
Upon activation, you need to visit YITH Plugins » License Activation page to enter your license key. You can find this information under your account on plugin’s website.
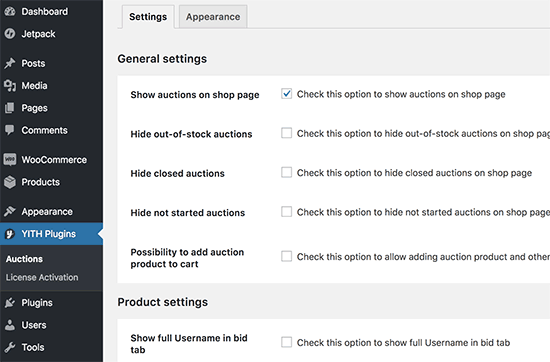
Next, you need to head over to the YITH Plugins » Auctions page to configure plugin settings.
The default settings would work for most websites, but you can still review and adjust them as needed.
Step 3. Adding an Auction Item
YITH WooCommerce Auctions makes it super easy for you to add an item for auction using the built-in WooCommerce products.
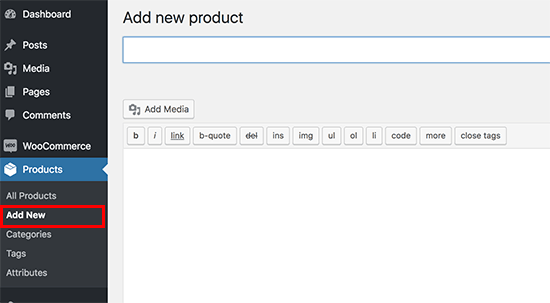
Simply add your auction item as a new WooCommerce product by visiting Products » Add New page.
On this page, you need to enter your auction item details like you would add a product. After that fill out the title, add details, and upload pictures.
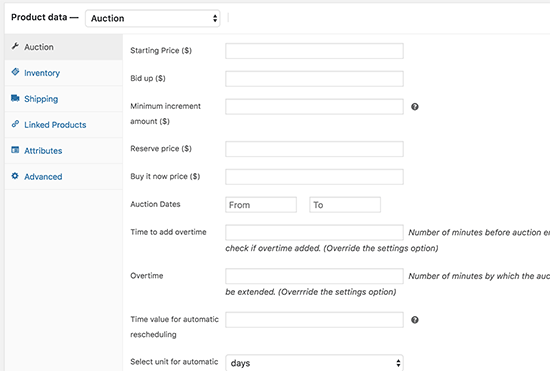
Below the editor, you need to select ‘Auction’ next to Product Data option, and you will see settings for the auction item.
From here you can set an auction starting price, bid up, minimum increment amount, reserve price, and buy now price.
After that, you need to select the auction dates and time. You can also add an overtime for the auction to offer a grace period after the auction ends.
Once you are satisfied with the settings, click on the publish button to save your changes.
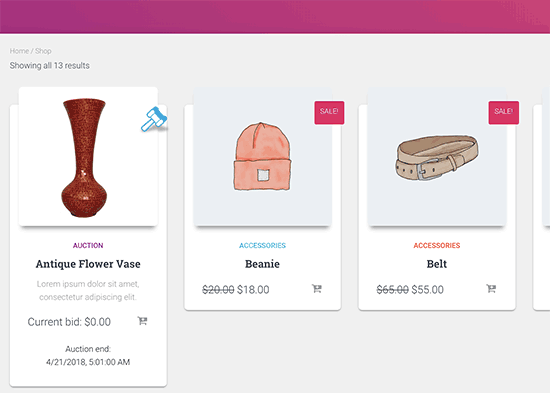
Your auction will now appear on your WooCommerce shop page. Auction items on the shop page will be highlighted with an icon.
You can use the auction plugin to add auction items along with other fixed-price WooCommerce products.
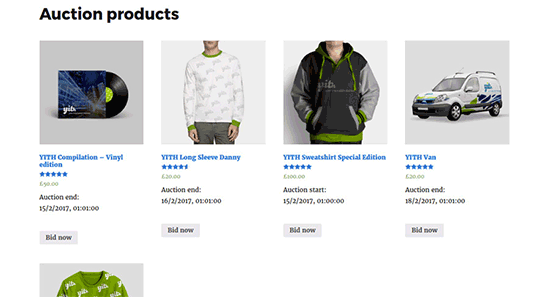
You can also create a separate page to only list the products available for auction. Simply create a new WordPress page and add the following shortcode.
[yith_auction_products]
Don’t forget to publish the page to make it live on your website.
Step 4. Managing Your Auctions
You can add auction items at any time, and they will start appearing on your website right away. However, the auction will not begin until the auction start time.
This allows you to publish items way before the auction begins and use this time to promote items. Once the auction begins, any registered users can bid on an item.
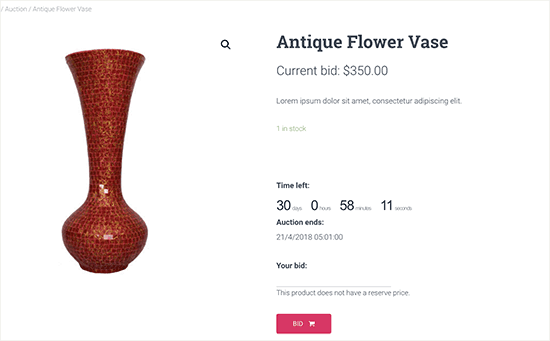
The plugin will show an auction timer next to the item. Users can see the current highest bid and add their own bids.
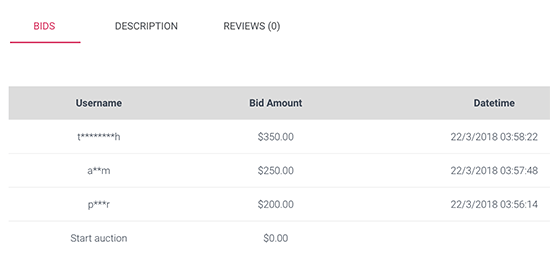
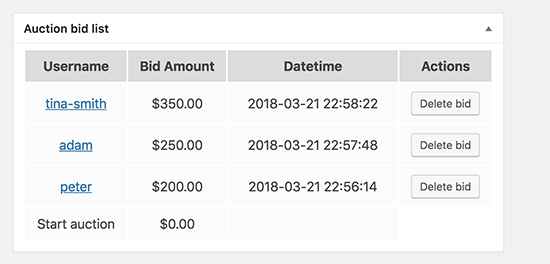
Previous bids will be displayed below with usernames partially encrypted.
You have the option to remove a bid at any time. Simply edit the auction product, and you will see all the bids at the bottom of product page.
The auction will end depending on each item’s individual auction settings.
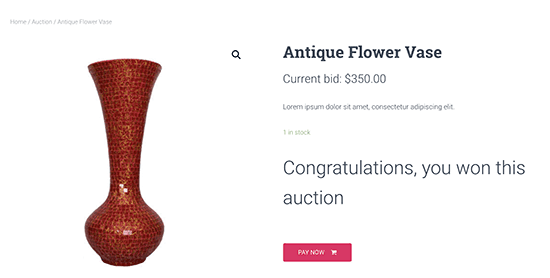
If the auction time ends, then the highest bidder’s price will be accepted. If a user decides to offer the buy now price, then the auction will end, and they will be able to add the product to their cart.
All users who participated in the auction will receive an email notifications for each new bid, auction grace time, auction end, etc. The final email will be sent to the auction winner, informing them that they can now make their payment.
Step 5. Allowing Other Users to Add Auction Items
If you want to allow other users to add their own products for auction, then you can do that as well. However, YITH WooCommerce Auctions plugin doesn’t allow users to add their own auction items.
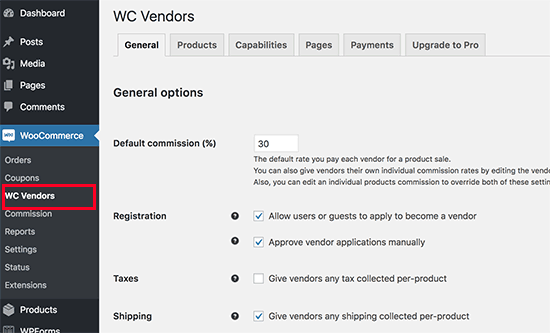
By default, WooCommerce assumes that you are the only seller on your website and only you can add new products. To change this you need to make your WooCommerce platform a multi-vendor marketplace.
Once you set up your website as an online marketplace, other users will be able to apply and become a seller on your website. After you approve their application, they will be able to add new products for auction. You can then approve their auctions and it will become live on your site.
Once the auction is over and the winning bidder has made their payment, you will get your commission out of the winning bid.
Step 6. Mastering WordPress to Promote Your Auction Site
WordPress is the best website builder in the world. It is very easy to learn and you can customize any feature you want.
Here are some useful resources that will help you take your auctions site to the next level.
We hope this article helped you build your own auction site like eBay using WordPress. You may also want to see our ultimate step by step WordPress SEO guide for beginners.
If you liked this article, then please subscribe to our YouTube Channel for WordPress video tutorials. You can also find us on Twitter and Facebook.
Do you want to sell ads on your WordPress blog? Selling ads on a blog or website is one of the most common ways to make money online. In this article, we will show you how to sell adds on your WordPress blog and explain the different types of ad options available to you.
What Do You Need to Sell Ads on Your WordPress Blog?
First, you need to make sure you are using the right blogging platform. There are two types of WordPress blogs, WordPress.com which is a hosted blogging service and WordPress.org also called self-hosted WordPress. See the difference in our comparison of WordPress.com vs WordPress.org.
WordPress.com have their own WordAds program and only allows third-party ads if you sign up for the business plan.
On the other hand, you can run ads on your self-hosted WordPress.org website out of the box.
If you don’t yet have a WordPress.org website, then follow the instructions in our guide on how to start a WordPress blog, and you will be up and running in no time.
That being said, let’s take a look at what kind of ads you can sell on your WordPress blog.
Types of Ads You Can Sell on Your WordPress Blog
There are different types of ads that you can sell on your WordPress blog. One ad type may work better than the other depending on your website’s topic, audience, and overall traffic.
You can also choose to combine different ad types to create an effective monetization strategy for your blog.
1. CPC or Cost-Per-Click Ads
Cost-per-click ads are the most common type of ads displayed on the majority of websites. Ads are sold on a per-click basis which means you are only eligible to get paid when a user clicks on the ad.
The reason this ad type is so successful is that it works effectively for both publishers and advertisers. Advertisers get traffic to their websites which they can use to generate leads or increase sales. The publisher is able to get paid for sending traffic.
Advertising programs like Google AdSense allow you to easily sell cost per click ads on your website. Once you sign up with the Google AdSense program, your website will become available to Google’s enormous network of advertisers.
One downside is that if you have low traffic, or your ads are not placed at strategic locations, then you may get a very low click-through rate for ads on your website. However, many website owners quickly overcome this by optimizing their ads in WordPress.
2. CPM or Cost-Per-Thousand-Impressions Ads
CPM (cost per mille) or cost-per-thousand-impression are ads that are sold based on how many times they are displayed. This means you get paid for displaying ads on your website whether users click on them or not.
CPM ads often fail to generate the same amount of revenue as you would generate with cost-per-click ads alone. However, they can be a significant source of income if you have a high traffic website, and you don’t want to place ads too close to your content.
Advertisers are particularly keen on buying CPM ads on websites with a high reputation among their target audiences.
3. Flat Fee Ads
Flat fee ads allow you to sell ad spots on your website for a specific time-period. You can price your ads based on how much traffic your website generates on an average.
This type of ads provide more impressions and clicks to advertisers and allow website owners to know exactly how much they will earn at the end of the period.
Advertisers usually purchase this type of ads on websites with higher traffic matching their target demographics. You can sell ads directly through your website by creating an ‘Advertise Here’ page. Alternatively, you can also join programs like BuySellAds or DoubleClick by Google.
4. Affiliate Ads
Affiliate ads can also be called action based ads. Basically, you send traffic to an advertiser’s website, but you only get paid if a user completes an action. This action could be anything like making a purchase, downloading software, creating an account, etc.
Affiliate programs provide you a unique URL with your referral ID. You can then use this URL to create banners, graphics, or add links directly in your articles.
The benefit of affiliate ads is that you get paid substantially higher than what you would get paid on a cost per click or cost per mille ad.
You can sign up for affiliate programs of different products and services that you want to promote. Each product, service, and affiliate program comes with its own commission rates, terms, and conditions.
For example, WPEngine’s affiliate program allows you to earn on each new sign up you send their way. Your commission will be based on the user’s entire first month payment or fixed $200 whichever is higher.
After looking at the different ad types you can come up with a monetization strategy that works for you. Don’t worry if you are still not sure which is the right choice for you.
Most website owners use multiple ad types and then prioritize them based on their earning potential.
Once you have chosen a monetization strategy, you are now ready to add banner ads to your website. WordPress has several really good ad management plugins that you can use.
We recommend using AdSanity, it is one of the most beginner-friendly ad management plugin for WordPress.
Upon activation, simply go to Adsanity » Create Ad to create your first ad.
AdSanity allows you to create any kind of ad. You can create a self-hosted ad, local ad, or add the ad code provided by an ad program like Google AdSense.
If you are running a local ad, then you can upload a banner image and graphics. If it is a third-party ad, then you can go ahead and enter the ad code.
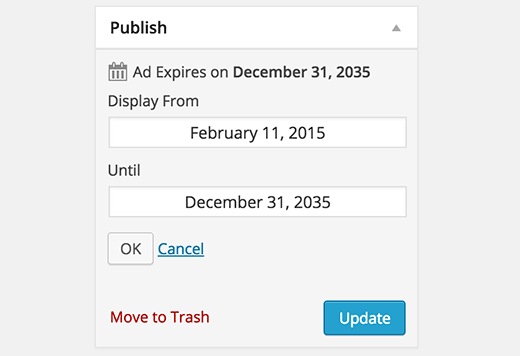
Under the publish meta box, you can also schedule the ad to run for a specific period or allow it to run indefinitely. Don’t forget to click on the publish or update button to save your changes.
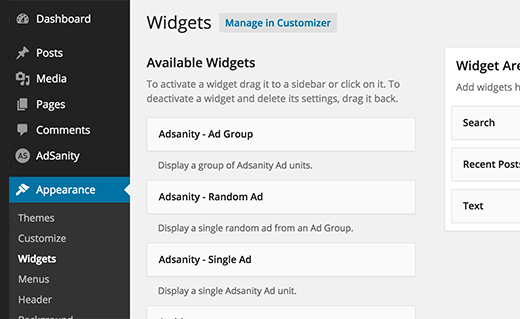
AdSanity allows you to display ads anywhere on your website using widgets and shortcodes. Simply go to Appearance » Widgets page and drag and drop the AdSanity single ad widget to a sidebar.
We hope this article helped you learn how to sell ads on your WordPress blog. You may also want to see our guide on more ways to make money online using WordPress.
If you liked this article, then please subscribe to our YouTube Channel for WordPress video tutorials. You can also find us on Twitter and Facebook.
This week, we have a call for developers to stop supporting legacy PHP versions, as well as tips to prepare your website for Google’s mobile-first index. We also have some great tutorials, as well as our review of the neat Weglot translation plugin. Let’s get to all of this week’s news… WORDPRESS NEWS AND ARTICLES ... Read moreWeekly WordPress News: Stop Supporting Legacy PHP Versions
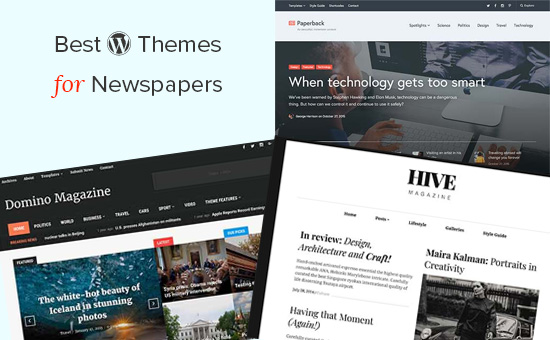
Are you looking for the best WordPress newspaper themes? For newspaper websites, you need a theme that can prominently display your latest and trending news sections. In this article, we have hand-picked some of the best WordPress newspaper themes that you can try on your website.
Building a Newspaper Website with WordPess
Many of the world’s top brands use WordPress including some leading news publishers. Mainly, because WordPress is easy to use, flexible, and can serve large number of audiences.
There are two types of WordPress websites. First there is WordPress.com which is a fully hosted solution, then you have WordPress.org which is also known as self-hosted WordPress. For comparison, see our article on the difference between WordPress.com vs WordPress.org.
We recommend using the self-hosted WordPress.org because it gives you access to all WordPress features out of the box.
To get started, you’ll need a domain name and a WordPress hosting account.
We recommend using Bluehost. They are one of the largest hosting companies in the world and officially recommended hosting service provider.
Once you have purchased hosting, head over to our guide on how to make a website for detailed step by step set up instructions.
Having said that, now let’s take a look at some of the best WordPress themes you can use for a newspaper website.
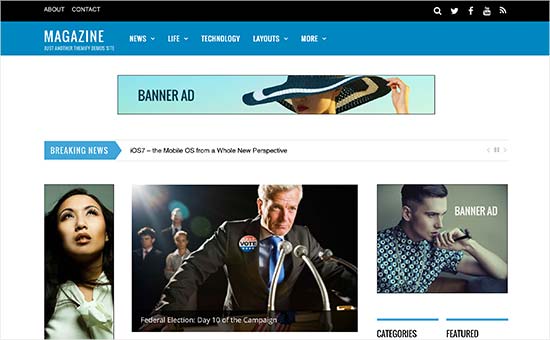
As the name suggests Magazine is a WordPress newspaper and magazine theme designed to give your users quick access to latest content. Its homepage comes with a three-column, two-column, and full-width layouts. You can also create your own layout combinations with the integrated drag and drop page builder.
It also includes dedicated ad spots to easily add Google AdSense ads to your website. Other notable features include unlimited sidebars, custom widgets, social media integration, news ticker, and more.
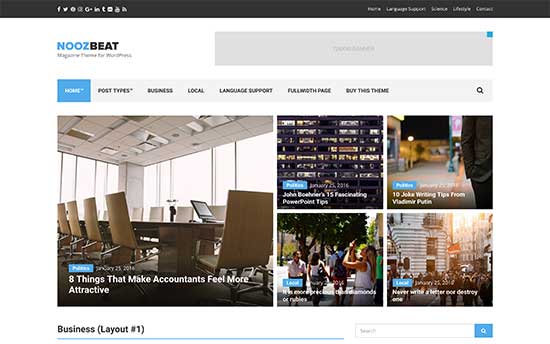
Noozbeat is a modern WordPress news and magazine theme. Its homepage features a masonry grid layout on top to showcase your featured content which is followed by latest articles and other sections of your website.
It has built-in ad spots to display ads on your website. It comes with custom widgets for content discovery and social media features. Theme set up is quite easy with tons of options neatly organized under live theme customizer.
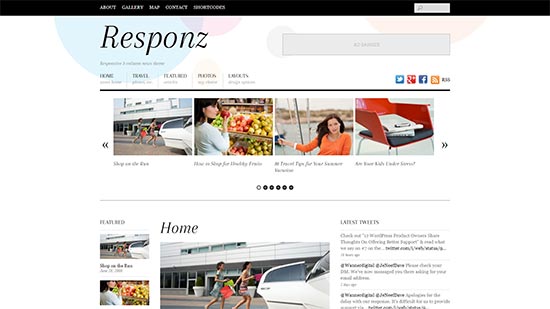
Responz is a lighter and elegant WordPress newspaper theme. It displays your featured content on top in a carousel which is followed by a three-column layout to showcase more content on top.
It comes in 4 theme skins, choice between two and three column designs, header and footer slider, two navigation menus, and social media icons. It includes a theme options page to quickly set up your website and start adding content.
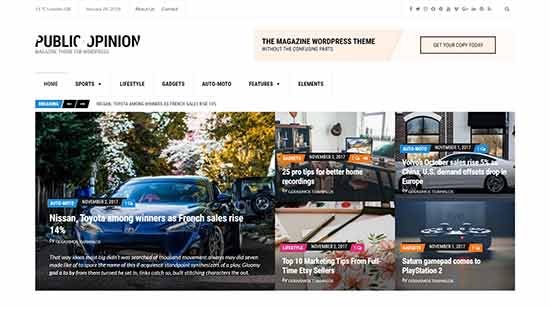
Public Opinion is designed specifically for WordPress powered newspaper websites and magazines. This clean and modern theme comes with a powerful homepage layout with beautiful content layout, dedicated ad spots, navigation menus, and content discovery features.
It has different layouts for category pages and homepage featured area. It has two navigation menus, contact form support, and can even be used to add an online store to your website.
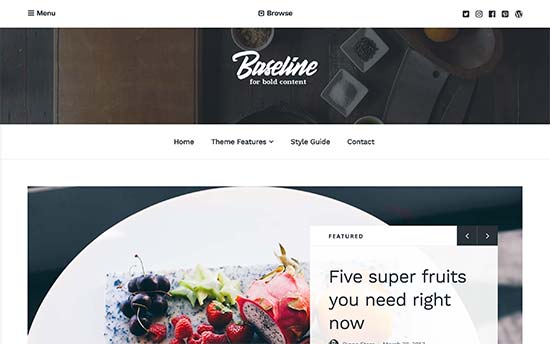
Baseline is a powerful WordPress magazine style theme suitable for newspapers and all content-rich websites. It has a featured content slider and a collapsible mega menu on top which allow you to display the most powerful stories of the day on top for easier discovery.
It is designed to work out of the box without theme options. To achieve this goal, it only includes the theme options that you’ll actually need. This makes setup quite easy with the built-in getting started guide.
Hive is a modern WordPress magazine style theme with a clean and minimalist design. Its homepage displays your articles in a three column grid layout. It automatically handles featured images in both portrait and landscape sizes to create a beautiful masonry layout.
Designed for improved readability, Hive uses Droid Serif font for paragraphs and Playfair Display font for headings. This is a beautiful typography combination perfect for newspaper websites. Other notable features included are theme dashboard, color choices, social icons, style presets, Google Fonts, and more.
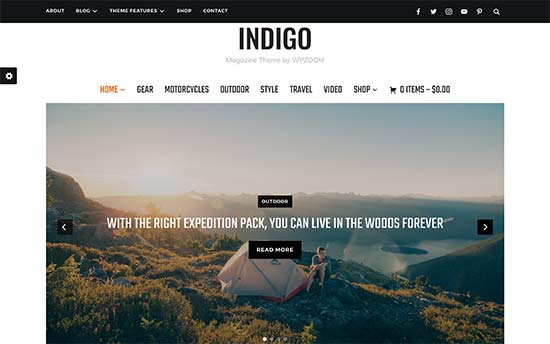
Indigo is a multi-purpose WordPress theme suitable for newspaper and magazine websites. Its homepage features a beautiful slider on top, followed by a grid of your recent articles, and then a two column block. It has two navigation menus on top which collapse beautifully on mobile view.
It has multiple widget ready areas, easy to set up homepage, full width page template, multiple homepage templates, and a floating social sharing bar. It is quite easy to customize with theme options page and live customizer.
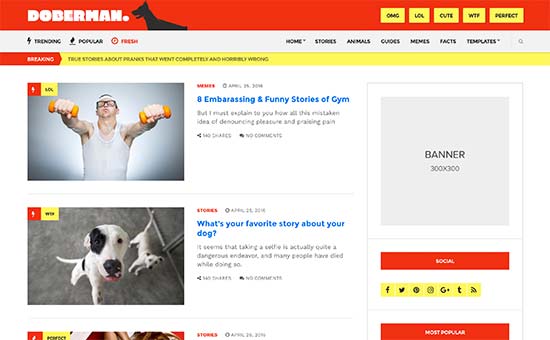
Doberman is a stylish WordPress magazine and news theme suitable for lifetsyle, viral content, and entertainment related news sites. It includes multiple color schemes and multiple views like popular, trending, and fresh.
It comes with social media integration, multiple navigation menu locations, beautiful images, latest news ticker, Instagram widget, and ad placement widget. It also works with all popular WordPress plugins and page builders.
Feltmag is a stunning WordPress news and magazine theme with tons of cool features. Its homepage layout comes with an optional full screen header, which is followed by your articles as users scroll down.
Other features included are two navigation menus on top, immersive featured images, multiple layouts, header styles, social media icons, and more. It is super easy to set up and most options just work when you activate the theme.
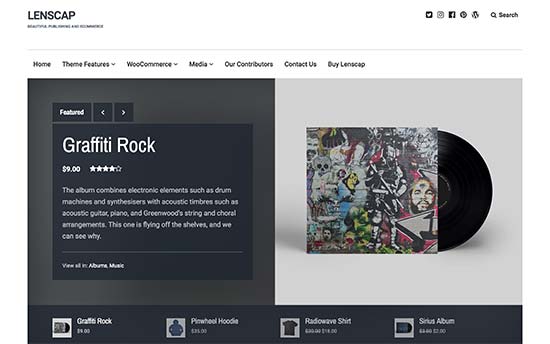
Lenscap combines beautiful images and typography with minimalist design to create a news style WordPress theme. The result is an impressive website design that looks gorgeous on all devices. The homepage features a large featured content slider with categories menu.
It includes a dynamic color scheme generator, ready to use color schemes, lightbox popup for galleries, and full WooCommerce support.
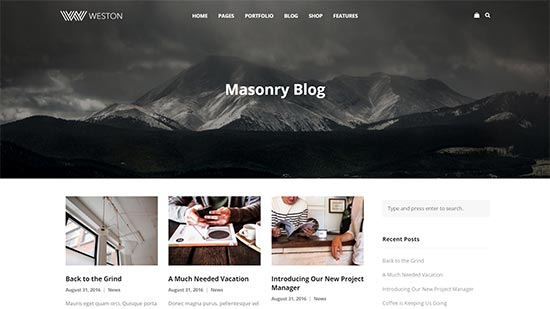
Weston is a powerful and flexible WordPress multi-purpose theme suitable for all kind of websites. It comes with a powerful page builder plugin that you can use to create almost any kind of layouts you need. For quicker setup, it also includes a 1-click demo installer.
Some other theme features include video backgrounds, premium slider plugin, Google Fonts, pricing tables, contact form, and more. It is super easy to use and customize and can be used to create truly unique design combinations.
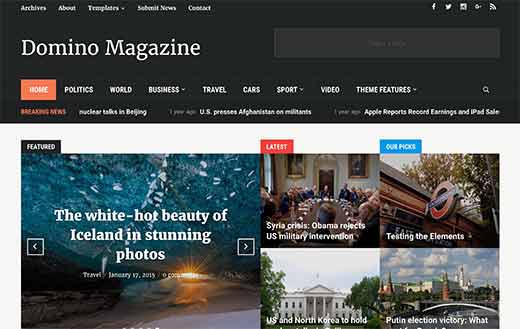
Domino is a spacious and well-designed multi-functional WordPress news theme. It is available in 6 color schemes and a dynamic visual page builder. Simply use point and click tools in customizer to setup your website.
Other notable features include a news ticker, custom widgets for featured categories, ads, tabbed widgets, and weather. It has a custom theme settings page and tons of options under customizer.
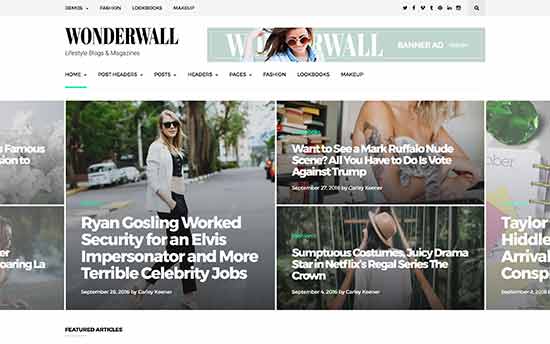
Wonder Wall is another excellent choice for news or magazine style WordPress theme for content rich websites. It comes with 9 ready-made homepage designs with article grid, featured content, list view, and more.
In other features, it has custom widgets for social profiles and content discovery, dedicated banner ad spots, beautiful typography, and more. Setting up your website is quite easy as you will find all options under live customizer.
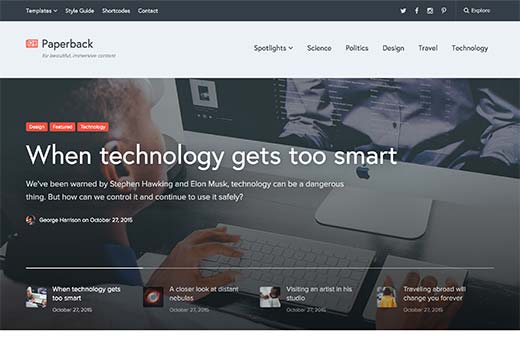
Paperback is another modern and stylish WordPress newspaper theme for news and magazine websites. It utilizes featured images through out the design to create a more engaging presentation. On the homepage it displays a beautiful featured content slider to show your top news.
Typography plays a main role in the design and offers an improved reading experience for your users. It comes with a category mega menu which displays top stores from select categories on top. It is easier to set up and doesn’t overwhelm users with unnecessary options.
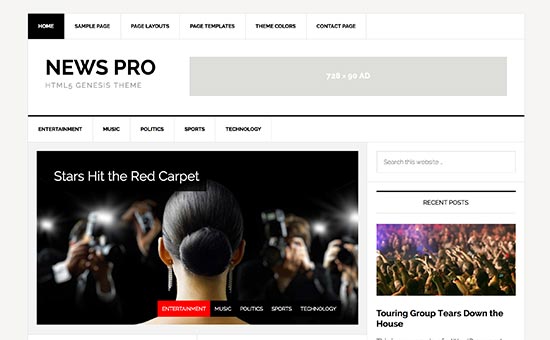
News Pro is a very professional looking WordPress theme for newspaper websites. Built on top of the rock solid code of Genesis theme framework, it is highly optimized for performance and speed.
It comes with two sidebars and a footer widget area, fully customizable header area, simple navigation menus, and beautiful typography. For theme set up it has a custom theme options panel with support for live customizer as well.
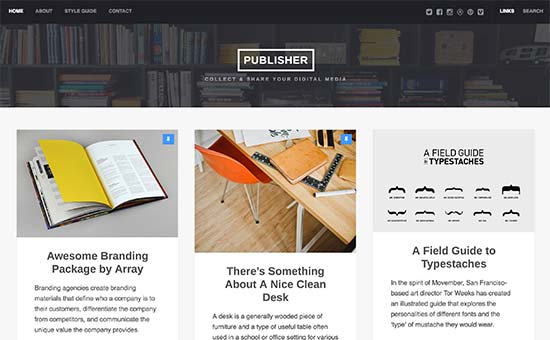
Publisher is a simple and elegant WordPress theme suitable for newspapers, magazines, and journals. It features a grid based layout on the homepage with beautiful animations to create an engaging experience for your readers from the start.
It includes beautiful page layouts designed for readability, custom headers, social icons menu, tabbed area for comments, author bio, and details. Publisher works out of the box and requires minimum effort to set it up.
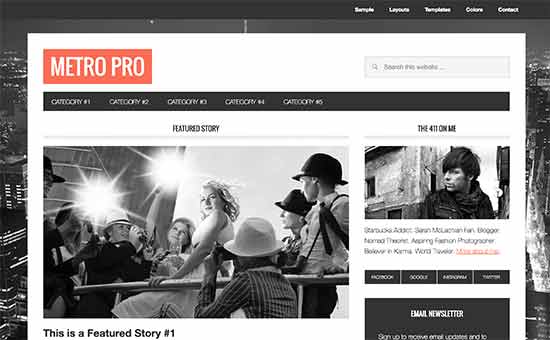
Metro is another professional WordPress theme for newspapers and magazine websites. Its homepage features a large custom background and prominently displayed featured images. Homepage is also divided into sections for featured articles, recent news, and more.
It is also built for Genesis framework and inherits all powerful qualities of its parent theme. Metro strives for simplicity both in terms of presentation as well as ease of use.
If you are looking for a free WordPress theme for a news website, then take a look at Colormag. This magazine style WordPress theme comes with some serious premium-like features with a beautiful design.
It comes with 15+ widget ready areas, custom widgets, featured posts widget, boxed and full-width layouts, sticky navigation menu, and more. It is translation ready and can be used with multilingual websites as well.
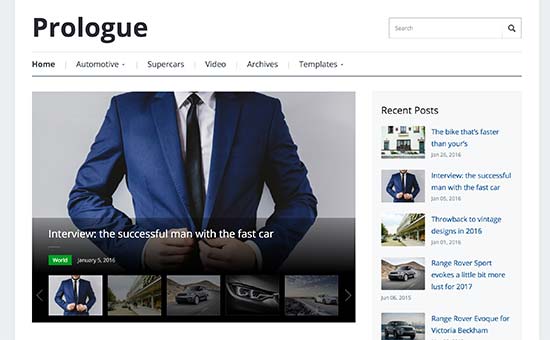
Prologue is another excellent option for a magazine style WordPress newspaper theme. It comes with a two-column layout for the homepage with a video-enabled slider on top.
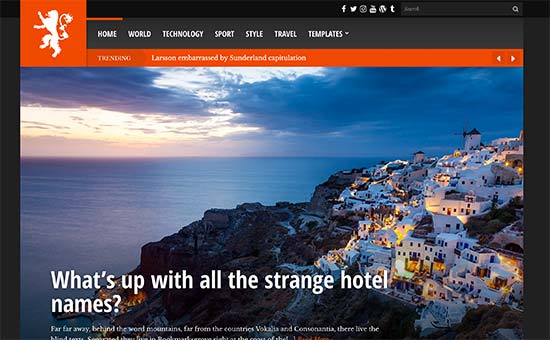
Tabloid is a slightly different WordPress newspaper and magazine theme. It comes with a dark color scheme by default, but you can change it to a light color scheme if you want. Both colors have the same variety of layouts and look equally stunning.
It also has custom widgets for social features, content, and ad placement. You can access all theme settings using customizer with live preview of your website. Tabloid also works with all your favorite plugins and page builders.
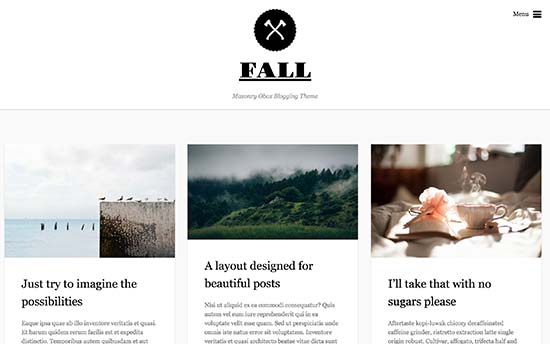
Fall is a simple and elegant WordPress theme in the minimalist design tradition. It features lots of white space, crisp typography, and beautiful use of images next to text. Homepage has a modern grid layout while single articles and pages use single-column layout.
It requires very little time to set up as it just works out of the box. You can still use unlimited colors, Google Fonts, upload your own logo, and add Google Analytics easily.
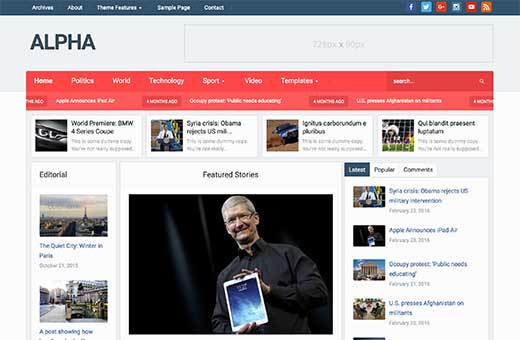
Alpha is a specifically designed WordPress theme for newspaper and magazine websites. It comes in two skins and both of them look great.
It also includes breaking news ticker, custom slider, multiple widget areas, custom widgets, and more. It is easier to use even for beginner users with most things working out of the box upon activation. You can also use the 1-click demo installer for a quick start.
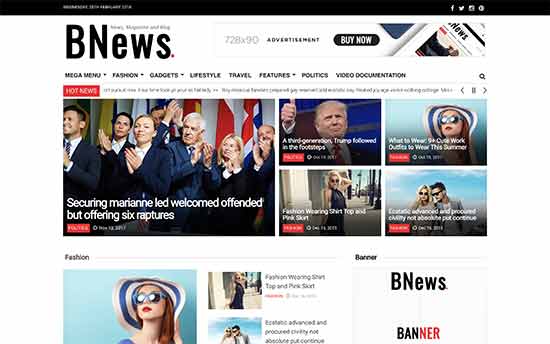
Bnews is a simple WordPress theme to use on a newspaper, magazine, travel, or blogging website. Designed to showcase lots of content on the homepage, it has a featured content section on top and then three-column layout.
It includes a breaking news ticker, custom widgets, widget ready areas, and a mega menu on top.
Editorial is an excellent free WordPress theme designed specifically for news websites. It has widgetized layout which allows you to drag and drop items to build your website.
It comes with multiple sidebars and widget ready areas, unlimited colors, and easy customization with live previews. It is translation ready and can also be used to create multilingual websites.
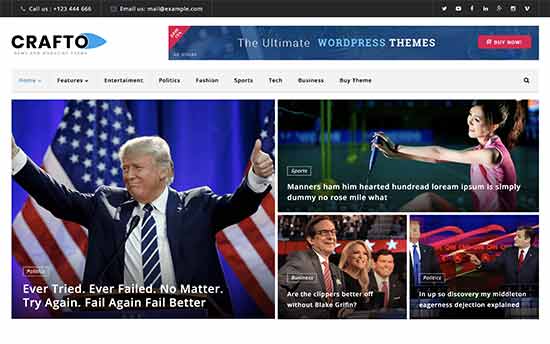
Crafto is a beautifully designed WordPress theme for newspaper websites. It comes in 3-homepage layouts and multiple layout combinations for different pages on your website.
It ships with premium page builder plugin which allows you to easily create landing pages and new page layouts. It has multiple header styles, unlimited colors, social media integration, and full support for multilingual websites using WPML.
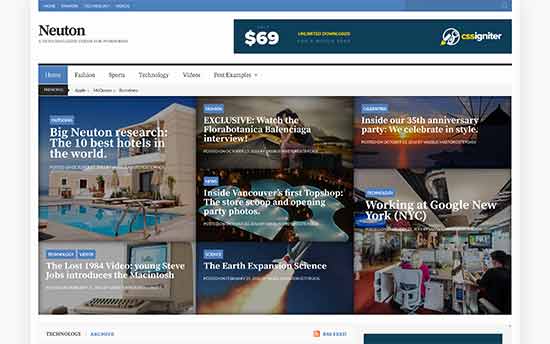
Neuton is another excellent WordPress theme for newspapers. It is designed to engage users by offering a content rich layout that makes it easier to discover new content and explore trending news.
It includes 7 different category layouts (slideshows included), social media widgets, content discovery widgets, multiple color schemes, and more. It works beautifully with any of the top page builder plugins to create your own layouts if needed.
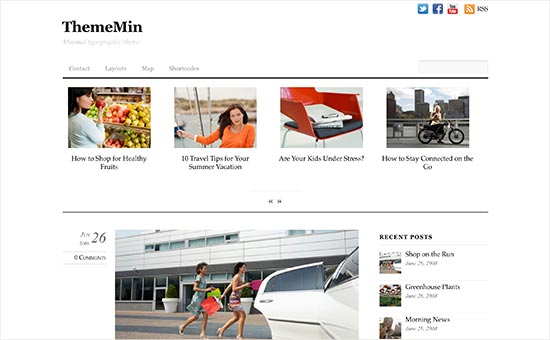
If you are looking for a minimalist design for your WordPress newspaper theme, then check out Thememin. This clean and simple WordPress theme offers a distraction free reading experience for your audience with crisp typography and beautiful featured images.
It has a homepage slider which can showcase featured content or featured photos. It has lightbox popup support to show your photos and videos. Other features include social media widgets, two navigation menus, dual column sidebar widgets, and more.
We hope this article helped you find the best WordPress themes for newspaper websites. You may also want to see our ultimate step by step WordPress SEO guide for beginners.
If you liked this article, then please subscribe to our YouTube Channel for WordPress video tutorials. You can also find us on Twitter and Facebook.