What Are WordPress Permalinks? Why They Matter + How To Set Them

At a basic level, permalinks in WordPress control the structure of the URLs for the posts and pages that you publish. For example, our permalink structure is the reason the URL of this post looks like https://wplift.com/wordpress-permalinks, rather than something else. Though they certainly aren’t a sexy subject, WordPress permalinks are an exceptionally important setting ... Read moreWhat Are WordPress Permalinks? Why They Matter + How To Set Them

The post What Are WordPress Permalinks? Why They Matter + How To Set Them appeared first on Learn WordPress with WPLift.

How to Add a Cookies Popup in WordPress

Do you want to add a cookies consent popup in WordPress? The European Union’s cookie law requires websites to get user consent to set any cookies on their computers. As a WordPress website owner, your website may be using cookies as well. In this article, we will show you how to add a cookies popup in WordPress.

How to add cookies consent popup in WordPress

How WordPress Uses Cookies?

By default WordPress uses cookies for authentication purposes to store session information for logged in users. It also sets a cookie when someone leaves a comment on your site.

Apart from these, WordPress plugins can set their own cookies to store different information. For example, WP Favorite Posts plugin shows a user’s favorite posts by storing them in a cookie.

While cookies are extremely useful, they can also be used to collect information about a user and share it with third party advertising platforms.

This is why in Europe and few other countries, website owners are required to let users know about their usage of cookies. If your website is based in one of those countries or mainly targets audiences in those regions, then you need to show a cookie consent disclaimer on your website.

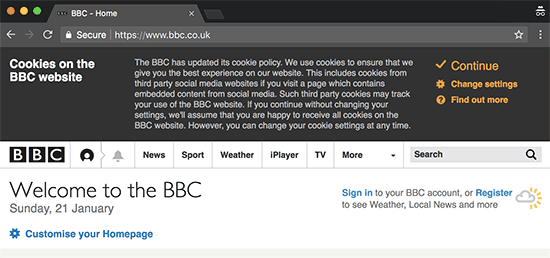
Cookies notification popup displayed on the BBC website

That being said, let’s take a look at how to easily display a cookie consent popup in WordPress.

Showing a Cookie Consent Notification in WordPress

First thing you need to do is install and activate the Cookie Consent plugin. For more details, see our step by step guide on how to install a WordPress plugin.

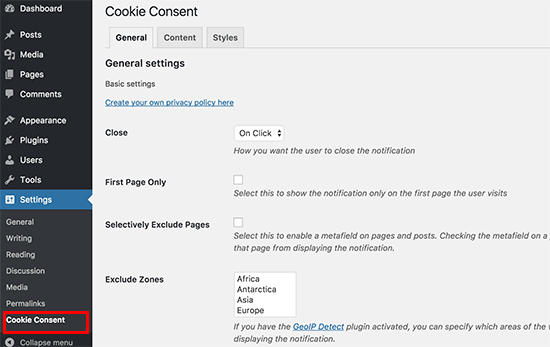
Upon activation, you need to visit Settings » Cookie Consent page to configure plugin settings.

Cookie consent notification settings

On this page, you can control when and where you want to show the cookie consent notification. You can also select how you would like it to be closed.

In other settings, you can show or hide it for people visiting from specific geographic locations and set an expiration time for the cookie.

The default settings would work for most websites. Don’t forget to click on the ‘Save Changes’ button to store your settings.

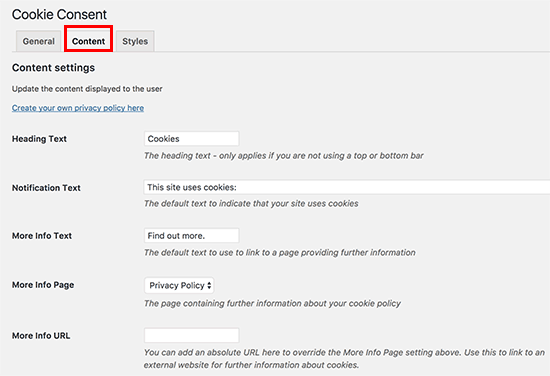
Next, you need to switch to the ‘Content’ tab. This is where you can edit the content that will be displayed to your users in the notification.

Edit cookie consent notification content

Here you also need to select your privacy policy page. If you haven’t already created a privacy policy page, then you can follow our guide to create a privacy policy page in WordPress and then select it here.

Once you are done, click on the save changes button to store your settings.

Changing the Appearance of Your Cookie Consent Notification in WordPress

Your cookie consent popup is almost ready. You just need to setup how you would like it to be displayed.

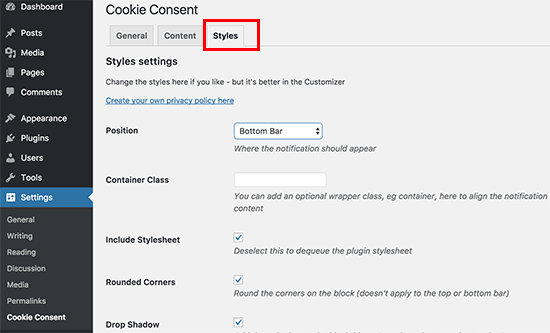
First you need to visit Settings » Cookie Consent page and then click on the Styles tab.

Cookie consent popup notification style

On this tab, you can choose the position, colors, borders, and style for your cookie consent popup notification. You can also set a container class and then add custom CSS for your popup.

Once you are finished, click on the save changes button to store your settings.

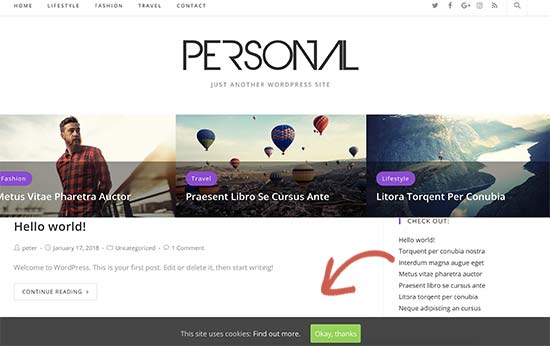
You can now visit your website to see your cookie consent popup in action.

Cookie consent popup on a WordPress website

We hope this article helped you add a cookie consent popup to your WordPress site. You may also want to see our ultimate step by step WordPress SEO guide for beginners.

If you liked this article, then please subscribe to our YouTube Channel for WordPress video tutorials. You can also find us on Twitter and Facebook.

The post How to Add a Cookies Popup in WordPress appeared first on WPBeginner.

Best WordPress Themes To Pair With Page Builders Like Elementor, Beaver Builder, + More

Don’t let the name fool you – WordPress page builders aren’t just tools for building pages anymore, they’re also tools for building entire custom websites using WordPress. You’ll find a huge number of custom sites built using page builders. Heck, you’re looking at one right now! WPLift is, in good part, powered by the popular ... Read moreBest WordPress Themes To Pair With Page Builders Like Elementor, Beaver Builder, + More

The post Best WordPress Themes To Pair With Page Builders Like Elementor, Beaver Builder, + More appeared first on Learn WordPress with WPLift.

10 Highest Performing Google AdSense Banner Sizes & Formats for Your WordPress Site

One of the most common questions beginners ask after signing up with Google AdSense is which are the highest performing Google AdSense banner sizes? Some Google AdSense ad formats are more noticeable which means they get more clicks and bring more revenue. In this article, we will show you the highest performing Google AdSense banner sizes and formats, and where to place them for best results.

Google AdSense Banner Sizes

How to Properly Setup Google AdSense Ads in WordPress?

Before getting started, you will need to sign up for a Google AdSense account. Once you have signed up, see our guide on how to properly add Google AdSense in WordPress.

By default, you can easily place AdSense ads in your website’s sidebar. Some WordPress themes may also have dedicated areas to display ads.

However, the best way to manage your Google AdSense ads in WordPress is by using an ad management plugin. We recommend using AdSanity, it is super easy to use and allows you to easily insert ads into sidebars, post content, and anywhere else you want.

Why Some Google AdSense Banner Sizes and Formats Work Better?

Google AdSense comes with several banner sizes and ad formats that you can add on your website. However, not all of them produce the same level of results.

Ads that are closer to the content and easily visible upon page load will get you a higher CTR (click through rate). You need to make sure that you choose the ad size that is easily noticeable. Some of the Google AdSense ad sizes are too small and some could be too large to affect user experience.

Next, factor that affects ad performance on your website is how many advertisers are running ads for that format. Some ad formats and banners are more popular among advertisers which means using them gets you a larger inventory and better paying ads.

Lastly, some ad formats are optimized for mobile devices. If mobile users make the most of your traffic, then these ads are going to perform better on your website than other sizes.

Top Performing Google AdSense Banner Sizes and Formats

Most website owners try different banner sizes to determine which formats work best for their websites. Google AdSense engineers also continuously run their own tests to see how ads are performing on participating websites.

We have done several testing with Google AdSense over the years on our own websites. Below are the top performing Google AdSense banner sizes and ad formats that offer the best value for your advertising real estate.

1. The Medium Rectangle (300×250)

Medium rectangle

This ad format supports both display / text ads, and it can also be used on mobile layouts. The best part about this ad size is that it’s easy to fit in the sidebar or inside the content area without annoying users.

That’s why this ad format gets a larger ad inventory which means more and better paying ads for your site. Since it’s perfectly-sized for in-content ads, it is also reported to have the best CTR for most websites.

2. Large Rectangle (336×280)

Large rectangle

Large rectangle takes the second position on our list. It is larger and more noticeable than the medium rectangle ad above, but it may not fit in all website sidebars and is not mobile optimized.

If your website’s sidebar or content area is a bit narrow, then the ad could squeeze the content which is not good for user experience.

That being said, the large rectangle could easily outperform medium rectangle on your website if placed inside the content area in between paragraphs. It supports both image and text ads.

Due to its size and ideal placement next to content, this ad size gets a better ad inventory as well.

3. The Leaderboard (728×90)

Leaderboard

The leaderboard is a traditional banner ad size that is perfect for website header. It supports both text and image ad formats but doesn’t support mobile ads.

Since the leaderboard is ideal to be placed on top (inside or immediately after the website header), it gets more ads which means better ads for your website. Due to its size and prominent placement, it performs fairly well on most websites.

4. Half Page aka Large Skyscraper (300×600)

Half page

Large Skyscraper is a wide vertical banner also known as half page due to its size. It gets attention from advertisers who want more ad space to effectively communicate their message during retargeting.

It is becoming more popular among publishers because it tends to give more exposure for brands which means better paying ads.

You can place the large skyscraper in the sidebar or next to the content. However, due to its size it may not be a good fit for all websites.

5. Large Mobile Banner (320×100)

Mobile banner

Large mobile banner is a mobile ad format, and it is an equivalent of the leaderboard ad format in terms of effectiveness but for mobile devices. Ideally it works best when placed on top just below the header.

Since mobile traffic makes up a good chunk of users for most websites, this ad format gets a better ad inventory.

It can be placed as a less intrusive ad and as an alternate to the medium rectangle ad format.

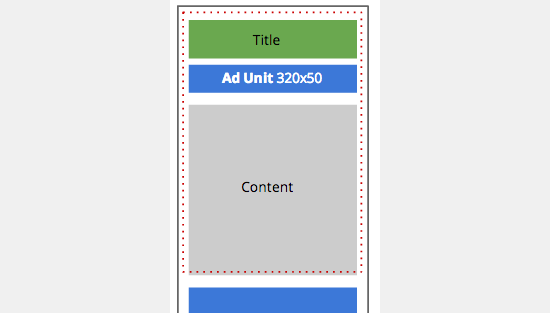
6. Mobile Leaderboard (320×50)

mobile leaderboard

Mobile leaderboard is half in height compared to the large mobile banner ad format. It is slightly less effective but also less intrusive and offers even better ad experience on smaller mobile devices.

Mobile ads are popular among advertisers which means it gets a sizable ad inventory. With proper placement, it can work really well with your mobile traffic.

7. Wide Skyscraper (160×600)

Skyscraper

The wide skyscraper is a vertical banner ad that is designed specifically for narrow sidebars. It supports both image and text ad formats and is popular among advertisers.

It is a less intrusive ad option and can easily blend in with your website design. However, it is less effective than wider half page banner ads which tends to draw more user attention towards ad.

8. Portrait (300×1050)

Portrait

Portrait is a slightly wider and longer vertical banner. Due to its size, this ad format attracts brand-centric advertisers who want more ad space for their message.

It is ideally placed next to the content or in the sidebar where it is more noticeable as your users scan the contents of your page. The tricky part is to implement it without affecting user experience on your website.

9. The Billboard (970×250)

Billboard

The billboard is another brand-centric ad format. It is a wide horizontal banner ad that can be ideally placed on top or bottom of your pages. It tends to get better ads due to the space it offers to the advertisers, but it has a smaller ad inventory.

Depending on the content and keywords of your website, it could be a hit or a miss if it fails to attract enough ads for your website.

10. The Square (250×250)

Generally larger ads are considered more noticeable. However, not all websites are designed in the same fashion. If you are using a minimalist WordPress theme, then this small square ad format could beautifully fit in your layout and still be noticeable.

The downside is that it has a smaller ad inventory which could result into low paying ads. However, if your website is in a competitive industry, then it can work really well without affecting user experience.

More Tips to Make the Most out of Your Ad Space

We are often asked by users how they can make more money with Google AdSense? Since each website is different, there is no single perfect answer to this question.

Here are some tips to make sure that you are fully utilizing your website’s potential when using Google AdSense to generate revenue.

  • Test different ad placements – Try different ad formats to figure out which formats give you a better CTR and which formats give you better ads.
  • Display multiple ads – Google AdSense allows you to use up to 3 ad units on a page. Try different placements and ad formats to test which combinations work best for you.
  • Think of users first – While ad revenue is important for the survival of many websites, you also need to think of your users. Placing ads in a way that affects user experience would affect your website’s user engagement as well as your WordPress SEO.
  • Optimize website performance – Research shows that faster websites usually get more engaged audience which means higher CTR for your ads. See how to speed up WordPress and boost performance.

We hope this article helped you find the highest performing Google AdSense banner sizes and formats. You may also want to check out our comprehensive guide on other ways to make money online to supplement your Google AdSense income.

If you liked this article, then please subscribe to our YouTube Channel for WordPress video tutorials. You can also find us on Twitter and Facebook.

The post 10 Highest Performing Google AdSense Banner Sizes & Formats for Your WordPress Site appeared first on WPBeginner.

How To Add 301 Redirects To WordPress Via Plugin Or .htaccess File

If you’re ever planning to change your WordPress permalink structure, change the slug on a single post, or migrate your entire WordPress site to a new domain, then 301 redirects are going to be your best friend. 301 redirects allow you to seamlessly redirect traffic from one URL to another without negatively affecting user experience ... Read moreHow To Add 301 Redirects To WordPress Via Plugin Or .htaccess File

The post How To Add 301 Redirects To WordPress Via Plugin Or .htaccess File appeared first on Learn WordPress with WPLift.

How to Start a Fashion Blog (and Make Money) – Step by Step

Are you looking to start a fashion blog but don’t know where to begin? It is easy to start a blog, but the difficult part is to be successful and make money from it. In this article, we will show you how to start a fashion blog as well as share tips on how to make money from your fashion blog.

Starting a fashion blog and making money

Why You Should Start a Fashion Blog?

If you are passionate about fashion and style, then you must have seen some top fashion bloggers and influencers on Instagram.

These fashion blogs not only provide a platform to the bloggers, but they also bring lots of opportunities their way. You will be surprised to discover the many ways fashion bloggers make money from their blogs.

According to Harper’s Bazaar, designers and top brands spend over a BILLION dollar each year advertising on Instagram alone.

Top 10 Fashion Blog Examples That Are Crushing it in 2018

Top fashion blog examples

Apart from money, a fashion blog allows you to express yourself in the most creative way. Here are some of the top fashion blog examples that you can follow for inspiration.

  1. We Wore What – (Danielle Bernstein)
  2. Sincerely Jules – (Julie Sariñana)
  3. The Blonde Salad – (Chiara Ferragni)
  4. Gal Meets Glam – (Julia Engel)
  5. Song of Style – (Aimee Song)
  6. Kayture – (Kristina Bazan)
  7. Wendy’s Lookbook – (Wendy Nguyen)
  8. Atlantic-Pacific – (Blair Eadie)
  9. The Chriselle Factor – (Chriselle Lim)
  10. Gary Pepper Girl – (Nicole Warne)

One thing you’ll notice about each of the top fashion blog examples above, is that they all have their own unique voice, personality, and taste in fashion. These fashion bloggers bring their own unique perspective to highlight their favorite products, merchandise, and brands.

If you believe that you have a unique take on fashion and style, then you should definitely start a fashion blog.

While setting up the fashion blog part is easy, like all important things in life making the blog popular and monetizing it requires effort.

However if you do it right, then you’ll certainly find the experience to be rewarding and fulfilling.

What You’ll Need to Start Your Fashion Blog

Fashion blogging

First, you need to choose the right platform to build your own fashion blog. You have plenty of choices, but each one of them have its own pros and cons (see our comparison of the best blogging platforms).

For example, you can start a free blog on a platform like WordPress.com, Tumblr, Blogger, etc.

These are called free blogs, and they are very limited in terms of features and flexibility when it comes to growing your personal brand. Most important limitation is your ability to make money from your content.

What about Starting a Fashion Blog with Instagram?

Instagram is awesome, but you don’t own it. You can build a huge following and all of this can go away immediately if Instagram decides that your content violated some of their policy.

We are not saying that you shouldn’t use Instagram. You must use it to build a large audience, but you will need a central platform that you can control where you can keep the audience coming back for years to come.

The best way to build your fashion blog is by creating your own website with complete ownership and full control.

Now the question is, how could a beginner with no knowledge of coding can build a website?

This is where WordPress.org comes in. It is a powerful website builder which gives you absolute control and full ownership of your website. It’s important not to confuse WordPress.org with WordPress.com. They’re two different platforms. (See our comparison of WordPress.com vs WordPress.org for more details).

There are three things you need to start a fashion blog using WordPress.org:

  1. Domain name – This will be your website’s address and what users will type in browser to visit your blog (Example, wpbeginner.com).
  2. Web hosting – This will be your blog’s home and where you will store all your website files.
  3. Your undivided attention for 30 mins

Yes, you can start a brand new fashion blog in 30 minutes, and we’ll walk you through the whole set up step by step.

In this tutorial, we will cover the following:

  • How to Register a Domain Name for Free
  • How to Choose the Best Web Hosting
  • How to Install WordPress
  • How to Find the Perfect Theme (website design) for Your Fashion Blog
  • How to Add Content to Your Fashion Blog
  • How to Get More Visitors to Your Fashion Blog
  • How to Make Money from Your Food Blog
  • Resources to Learn WordPress and Grow Your Fashion Blog

Ready? Let’s get started.

Setting up a Fashion Blog Using WordPress

A domain name typically costs $14.99 / year and web hosting normally costs $7.99 / month.

That’s a lot for beginners who are just starting out.

Luckily, our friends at Bluehost are offering a free domain, a free SSL, and a 60% discount on hosting to our readers.

Basically, you can get started for as low as $2.75 / month.

← Click here to Claim this Exclusive Bluehost offer →

NOTE: At WPBeginner we believe in transparency. If you sign up with Bluehost using our referral link, we will earn a small commission at no extra cost to you (in fact, you will save money and get a free domain). We would get this commission for recommending just about any WordPress hosting company, but we only recommend products that we use personally use and believe will add value to our readers.

Let’s go ahead and setup your web hosting + domain so you can get started.

First you need to go to the Bluehost website and click on the get started button.

On the next screen, you will be asked to choose a plan. We recommend either the basic or plus plans. You can always upgrade later if you need to.

Next, it will ask you to choose a domain name for your website.

Choose domain name

Domain name is your website’s address and this is what your users will type in their browsers to visit your blog.

You need to choose a domain name that reflects your personal voice. It should be unique, creative, and interesting. For more details, see our tips on choosing a great domain name for your website.

After you enter your domain name, you need to fill out your details to complete the purchase.

You will receive your account details in an email sent to the address you provided during signup. This email contains your web hosting dashboard link and login information.

Once you have purchased hosting, the next step is to install WordPress. You can do that by following the instructions in our step by step guide on how to start a blog.

Choosing a Design for Your Fashion Blog

Fashion blog design examples

A blog about fashion and style cannot just go with a plain looking business or blogging layout. Your website needs a design that represents your unique sense of style and creativity.

Most fashion bloggers are not website designers, so how do create a website design that is unique, elegant, stylish, and of course creative?

Luckily there are thousands of pre-made WordPress templates that you can choose from.

Our editors have hand-picked the best WordPress themes for fashion blogs that you can check out. All themes in the list feature creative designs with flexible options to easily make them uniquely yours. Most importantly, all of them are responsive (aka mobile friendly) which means they look good on mobile and tablets as well.

Each of these themes comes with its own settings page. This is where you will set up the theme, add your website logo, choose colors, and select basic settings.

Depending on which theme you choose, you will find tons of customization options. We recommend striving for simplicity in your website’s design for a cleaner look.

Add Useful Content To Your Fashion Blog

Gal Meets Glam - a top fashion blog

Once you have a functioning design in place, you can start working on content. We recommend adding the static content first.

Static content are pages that are common among all websites on the internet. This includes a contact form page, about us page, and a privacy policy page.

If your theme includes a page builder plugin, then you can use it to create other static landing pages as well.

Next, you would want to start adding articles / blog posts. See our guide on how to add a new blog post in WordPress and utilize all the features.

Now, this is where you will develop your own voice. Your blog posts need to be entertaining, informative, and helpful. Running a blog means, you will need to regularly come up with new ideas for your blog posts. Check out these 73 types of blog posts that are proven to work, and you can easily adapt them for your fashion blog.

We recommend choosing a consistent frequency for your articles. Busier and larger websites post new content every day. You can start by adding a few posts per week and then gradually increase your frequency to daily updates.

To come up with regular blog post ideas, visit popular blogs in the fashion industry to gather inspiration. See what these top blogs are doing and replicate it on your blog.

Hashtag fashion on Instagram

We are not saying that you should just steal / recreate the same content.

You just need to gather topics, collect ideas, and get inspiration. After that you should use those ideas on your blog by adding your own unique voice, style, and flavor to it.

Optimize Your Fashion Blog to Get More Visitors

Once you start adding useful content, the next step is to make sure that users can find your website.

Here is how you ensure that your website gets visitors and those visitors engage with your content.

Start Working on Your Website’s SEO

Improve your blog SEO

Most popular blogs get a large portion of their traffic from search engines like Google and Bing. Marketers use SEO, Search Engine Optimization, to optimize their website for higher rankings.

WordPress itself is quite SEO friendly out of the box, but there are still things you can do to further optimize it. Follow our step by step WordPress SEO guide for improving your website ranking.

Improve Website Speed

Improve your blog speed

Speed is one of the most important factors that affects user experience on your website. It also affects your website’s search engine rankings as Google considers speed one of the top ranking factors.

You can make your website significantly faster by implementing certain performance tweaks in WordPress. We have created a complete step by step guide on how to speed up WordPress and boost performance.

Track User Engagement

Following user activities on your blog

Things your users do after arriving on your website are called user engagement. Highly engaged audience means, more page views and more success for your fashion blog.

This is where you’ll need Google Analytics. It tells you where your visitors are coming from, what they do on your website, and how you can keep them coming back.

Simply head over to our tutorial on how to install Google Analytics in WordPress, and it will start tracking your website traffic.

Google Analytics offers a lot of data. How do you figure out where to look for the information you need?

To answer this question, we have a separate article on how to track user engagement in WordPress using Google Analytics.

Start Making Money from Your Fashion Blog

Making money from your fashion blog

Ever wondered how fashion bloggers afford their clothes, makeup, and accessories? Actually, they don’t have to. Most successful fashion bloggers promote sponsored content where brands pay them to promote products.

Paid and sponsored content is the major source of revenue for many fashion bloggers. Here we will list the most effective ways you can start making money from your fashion blog when you’re first starting out.

1. Display Ads Using Google AdSense

Most websites on the internet rely on ads to generate revenue. Google AdSense allows you to easily display ads on your website and make money from your blog even when you’re just starting.

See our step by step guide on how to properly add Google AdSense in WordPress for detailed instructions.

2. Affiliate Marketing

Affiliate marketing allows you to recommend products you love. You get a referral commission when your users purchase a product after clicking on your link.

To make money with affiliate marketing, you will need to find fashion products and brands with an affiliate program. The biggest affiliate partner you can sign up for is Amazon Affiliates. They have tons of products in fashion, clothing, and accessories that you can recommend and get paid for it.

See our guide on how to add and manage affiliate links in WordPress.

3. Build an Instagram Following

Instagram has placed itself as the top social network for fashion and style influencers. You need to join Instagram and start posting with relevant hashtags to make sure that your posts reach the right audience.

The best way to come up with an Instagram strategy is by following other top fashion blogs on Instagram. Study their posts, descriptions, and hashtags and try to replicate the same effect with your Instagram posts.

You should also network with other influencers and do S4S, share for share, campaigns. In this strategy, each party will share the other’s Instagram posts and tag them. It helps both people increase their following.

Another easy way to build Instagram following is by sharing your Instagram posts on your WordPress blog.

4. Brand Promotions

Allow brands to reachout to you

Reach out to brands, fashion startups, and agencies to partner up with them. The best way to find which companies are doing blog promotions is to keep an eye on top fashion bloggers and their Instagram posts.

For more ways to generate revenue from your fashion blog, see our guide on proven ways to make money from your blog.

Mastering WordPress Skills

WordPress is easy to use and beginner friendly. However, whenever you start using a new platform, there are always new things to discover and learn. This is where WPBeginner can help.

WPBeginner is the largest free WordPress resource site for beginners. We have lots of helpful content which is created specifically for beginners, business owners, and bloggers.

To expand your WordPress skills you should check out:

  • WPBeginner Dictionary – Our WordPress glossary is the best place to familiarize yourself with the WordPress lingo
  • WPBeginner Videos – New WordPress users can start with these 23 videos to master WordPress.
  • WPBeginner Blog – The central place for all our WordPress tutorials and guides.

You can also subscribe to our YouTube Channel where we regularly upload new video tutorials to help you learn WordPress.

We hope this article helped you start your fashion blog and make money from it. You may also want to see our ultimate WordPress security guide to keep your blog safe.

If you liked this article, then please subscribe to our YouTube Channel for WordPress video tutorials. You can also find us on Twitter and Facebook.

The post How to Start a Fashion Blog (and Make Money) – Step by Step appeared first on WPBeginner.
Weekly WordPress News: WordPress 4.9.3 (And Then 4.9.4)

This week, we saw the release of WordPress 4.9.3…followed quickly by the release of WordPress 4.9.4 just hours later. WordPress 4.9.3 fixed 34 different bugs covering a range of different issues. Then, hours after it was pushed out, WordPress 4.9.4 came out to fix a critical bug with the auto update process in WordPress 4.9.3. ... Read moreWeekly WordPress News: WordPress 4.9.3 (And Then 4.9.4)

The post Weekly WordPress News: WordPress 4.9.3 (And Then 4.9.4) appeared first on Learn WordPress with WPLift.

21+ Best Free WooCommerce Plugins for Your Store (2018)

Are you looking for the best free WooCommerce plugins for WordPress? WooCommerce, just like WordPress, comes with thousands of extensions and plugins. These plugins add new features to your eCommerce store and help you grow your business. In this article, we have hand-picked the best free WooCommerce plugins for WordPress that you can try right away.

Best Free WooCommerce Plugins

If you haven’t started your online store yet, then we have a step by step guide on how to start an online store with WooCommerce. It walks you through how to choose the best WooCommerce hosting, install WooCommerce, select a theme, and everything that you need.

Having that said, let’s take a look at the best free WooCommerce plugins for WordPress.

1. YITH WooCommerce Wishlist

YITH WooCommerce Wishlist

YITH WooCommerce wishlist plugin allows your customers to save products to their wishlist. They can use the wishlist to make the purchase later or share their wishlist with friends and family.

This is a perfect addon for your online store during busy holiday seasons when people are making their shopping lists and purchasing gifts.

2. WooCommerce Multilingual

WooCommerce Multilingual

Non-English WordPress websites surpassed the English WordPress websites in 2014. Since then more WooCommerce stores are created in languages other than English. WooCommerce Multilingual adds compatibility layer with the popular WPML WordPress multilingual plugin.

This allows you to translate your product and other WooCommerce pages in multiple languages. Your customers can choose to browse your website in their preferred language.

3. WooCommerce Products Slider

WooCommerce Products Slider

WooCommerce Products Slider allows you to easily create beautiful product sliders and carousels and add them anywhere on your WooCommerce store.

4. WooCommerce Customizer

WooCommerce Customizer

WooCommerce Customizer provides an easy user-interface to use built-in WooCommerce filters. These filters allow you to customize things like button text, labels, fields, and much more.

Normally, you would have to write PHP code to use these filters. With WooCommerce customizer, you can easily use those filters from a simple settings page (no coding necessary).

5. WooCommerce EU VAT Compliance

WooCommerce EU VAT Compliance

As the name suggests, this simple plugin makes your WooCommerce shop compliant with the new EU VAT. It will automatically detect your customer’s location and will display prices with correct VAT from the first page.

6. Order Delivery Date for WooCommerce

WooCommerce Order Delivery Date

This plugin allows users to choose a delivery date for products during the checkout. WooCommerce store owners can see the desired delivery date on their orders page in the admin area.

7. YITH WooCommerce Quick View

YITH WooCommerce Quick View

WooCommerce Quick View allows your customers to peek into product details by simply taking their mouse over a button. This enables customers to quickly get the product information without leaving the product listings or shop page.

Users will be able to see a larger product image, product description, and an add to cart button in a lightbox popup.

8. WooCommerce PDF Invoices & Packing Slips

 Download WooCommerce PDF Invoices & Packing Slips

This nifty plugin allows you to send PDF invoices and packing slips to customers via email. Users can also download their invoices and slips from their account area. As a site admin, you can also bulk generate invoices, download them, and email them to users from an admin area.

9. YITH WooCommerce Compare

WooCommerce Compare

As the name suggests, this plugin allows your customers to compare two or more WooCommerce products side by side. You can choose which fields users will see in the comparison table and reorder them as needed.

10. WooCommerce Menu Bar Cart

WooCommerce Menu Bar Cart

Normally, your WooCommerce theme would prominently display a cart button at the top. However, if your theme doesn’t show a cart button, or you don’t like its placement, then WooCommerce Menu Cart will fix this for you.

It allows you to add the cart button into your WordPress navigation menu. It works with any WordPress theme and will display cart icon, items and price in your navigation menu.

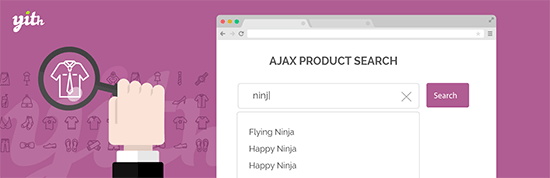
11. YITH WooCommerce Ajax Search

Ajax Product Search

Speed is crucial for the success of any website, particularly for online stores. A single second delay in page load can significantly increase cart abandonment and lower user engagement.

YITH WooCommerce Ajax Search offers a powerful search feature to instantly display products as users start typing. It uses Ajax to fetch the results which means your users can search without leaving the page they are currently viewing.

See also: Proven tips to Reduce Shopping Cart Abandonment

12. MailChimp for WooCommerce

MailChimp for WooCommerce

MailChimp is one of the top email marketing services in the world. MailChimp for WooCommerce is their official WooCommerce extensions that integrates email marketing into your ecommerce website.

13. WooCommerce Checkout Field Editor

WooCommerce Checkout Field Editor

Do you want to add custom fields to WooCommerce checkout page? The WooCommerce Checkout Field Editor plugin allows you to easily add, customize, and rearrange fields on the checkout page of your online store.

This allows you to customize the whole checkout experience for your customers and use the data to grow your business.

14. Minimum Purchase for WooCommerce

Minimum Purchase for WooCommerce

Minimum Purchase for WooCommerce allows you to setup minimum purchase rules to your products. You can add rules for a single product or create rules for a product group.

The plugin also allows you to apply rules on minimum purchase amount or quantity, set different rules based on user role, and set up custom messages to display when rules are not matched.

15. WooCommerce Gift Cards

WooCommerce Gift Cards

Gift cards for WooCommerce allows you to add gift cards to your online store. Your customers will be able to purchase gift cards of different amounts and give them to their friends and family who then apply the gift card when shopping on your store.

You can setup gift cards of different pricing and sell them as virtual products. When a customer applies the gift card on purchase, the equivalent amount is deducted from their bill.

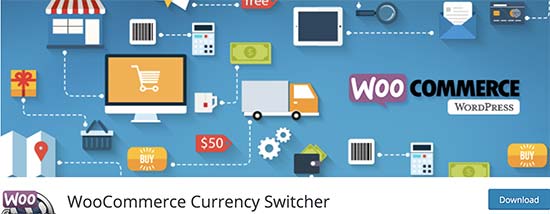
16. WooCommerce Currency Switcher

WooCommerce Currency Switcher

As the name suggests, this plugin allows your customers to easily switch currencies and get real time conversion rates in their local currency. You can add the currency switcher by using the shortcode or a sidebar widget.

17. WooCommerce Colors

WooCommerce Colors

WooCommerce Colors adds a WooCommerce section to the theme customizer where you can change the color of buttons and other WooCommerce elements. It is simple and highly useful if you want to customize WooCommerce elements without adding any custom CSS.

18. WooCommerce Products Filter

WooCommerce Products Filter

WooCommerce Products Filter allows your site customers to filter products by categories, attributes, product tags, product custom taxonomies, and price. You can add the filter anywhere using the shortcode or the sidebar widget.

19. WooCommerce Shortcodes

WooCommerce Shortcodes

WooCommerce comes with a bunch of shortcodes that you can use throughout your website to add products, buttons, and more. The WooCommerce Shortcodes plugin adds a drop down in your WordPress visual editor, allowing you to easily select and insert shortcodes in content areas like post, page, or products.

20. Booster for WooCommerce

WooCommerce Booster

Booster for WooCommerce allows you to add several useful features to your WooCommerce website that allow you to run your online store more efficiently. It uses a modular approach similar to Jetpack and acts like a plugin suite with tons of features.

21. Custom Product Tabs for WooCommerce

Custom Product Tabs for WooCommerce

Normally, product pages require users to scroll down to view more information. Custom Product Tabs for WooCommerce allows you to divide product description and details into tabs. This helps users switch to the section they want to view while making sure that your website looks neat and organized.

Bonus Plugins

These plugins are not free, but we believe they are highly useful for any WooCommerce store.

22. WooMarketing Bundle

WooCommerce WooMarketing Bundle

The Woo Marketing bundle is a pack of WooCommerce marketing extensions developed and maintained by the folks behind WooCommerce. It includes email marketing, dynamic pricing, smarter discounts, transaction emails, Facebook retargeting, and more.

23. Woo Pack & Ship Bundle

Woo Pack & Ship Bundle

If you pack and ship products to customers, then you’ll need this bundle. It is maintained by the WooCommerce team and includes extensions like invoices, packing slips, customize shipping options, product kits, multi-address shipping, track shipping, and more.

Purchasing this bundle also gives you access to the WooCommerce 360° images extension, WooCommerce Storefront and all its child themes.

24. OptinMonster

OptinMonster

OptinMonster is the most powerful conversion optimization software in the market. It helps you convert abandoning website visitors into subscribers and customers.

You can use it on your eCommerce website to reduce cart abandonment, increase sales conversion, grow your email list, show targeted website messages, onsite retargeting, and more.

If you’re serious about growing your email list and boosting sales, then you need this conversion optimization optimization toolkit.

We hope this article helped you find some of the best free WooCommerce plugins for your online store. You may also want to see our expert pick of the best WooCommerce themes for your ecommerce website.

If you liked this article, then please subscribe to our YouTube Channel for WordPress video tutorials. You can also find us on Twitter and Facebook.

The post 21+ Best Free WooCommerce Plugins for Your Store (2018) appeared first on WPBeginner.

What, Why, and How-To’s of Creating a Site-Specific WordPress Plugin

Do you want to add a site-specific plugin to your WordPress website? A site-specific plugin allows you to easily add code snippets to your WordPress website without relying on your theme. In this article, we will explain how to create a site specific WordPress plugin and why it’s important.

Site Specific WordPress Plugin

What is a Site-Specific WordPress Plugin

A site-specific WordPress plugin is a standalone plugin that you can use to add all customization snippets that are not theme dependent.

When working on your website, you’ll often find WordPress tutorials asking you to add code to your theme’s functions.php file or a site-specific plugin.

WordPress doesn’t come with a site-specific plugin. You’ll need to create your own and then install / activate it.

Why Create a Site-Specific WordPress Plugin?

As we mentioned earlier that you’ll often come across tutorials showing some code that you can add to your theme’s functions.php file or a site-specific plugin.

These custom codes can be used to add new post types, taxonomies, shortcodes, and tons of hacks to improve your website.

If you add the custom code to your theme’s functions file, then it will disappear if you update or switch your theme. You can create a child theme and use the child theme’s functions file to save your code. However, your code will still disappear if you switch themes.

A site-specific WordPress plugin allows you to easily add custom code snippets to your WordPress website and make sure they’re theme independent. It is a standalone WordPress plugin which means it doesn’t depend on your theme, and you are free to update or switch your theme.

That being said, let’s take a look at how to easily add custom code using site-specific plugin. We will show you two ways to do that, and you can choose the method that works best for you (hint Method #2 is easier for beginners).

Method 1. Manually Create a Site-Specific WordPress Plugin

We know this may sound a bit geeky to beginners, but we will try to make it as simple as possible for you.

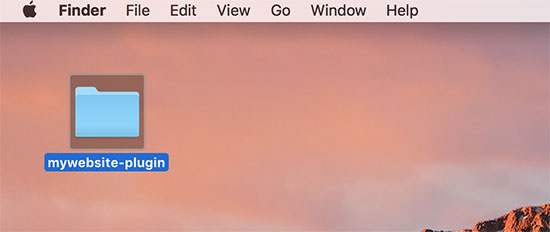
First you need to create a new folder on your desktop and name it after your website for example, mywebsite-plugin.

Creating your site-specific plugin folder

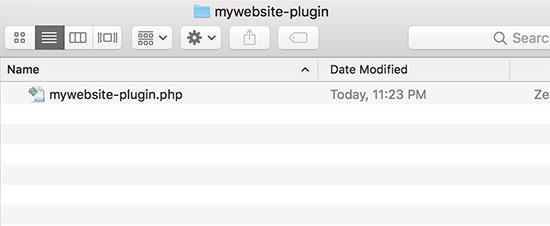
Now open a plain text editor on your computer like Notepad or TextEdit. You need to create a new file and save it as mywebsite-plugin.php in the plugin folder on your desktop.

Creating the plugin file for your site-specific plugin

Your plugin file needs specific header code so that WordPress can recognize it as a plugin. Go ahead and add the following code to your mywebsite-plugin.php file:

<?php
/*
Plugin Name: Site Plugin for example.com
Description: Site specific code changes for example.com
*/
/* Start Adding Functions Below this Line */
 
 
/* Stop Adding Functions Below this Line */
?>

You can replace example.com with your own domain name. Once you do that, your site-specific plugin is ready.

There are two ways to upload your site-specific plugin to your website. You can either upload it via your WordPress admin panel or use FTP.

1. Install Site-Specific Plugin from WordPress Admin Area

This method is easier and recommended for all users.

First, you need to create a zip file of your site-specific plugin folder.

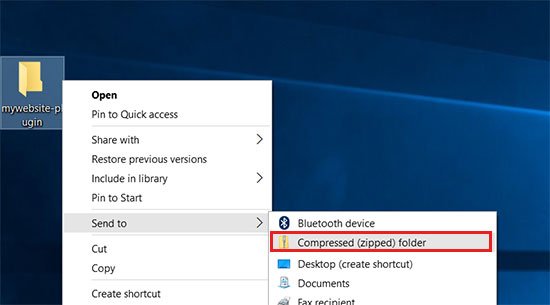
Windows users can simply right-click on plugin folder and select Send to » Compressed (zip) folder.

Creating zip file in Windows

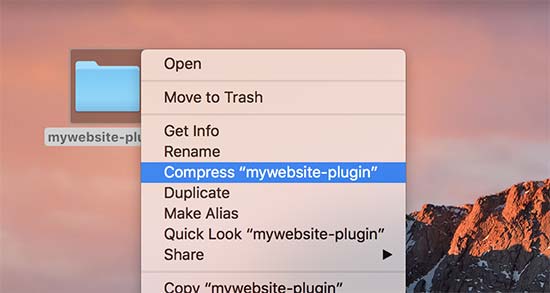
Mac users need to right-click and select “Compress mywebsite-plugin”.

Creating a zip folder on Mac

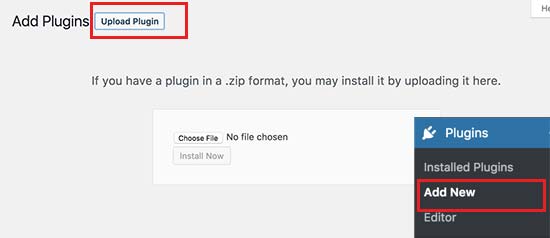
Once you have the plugin’s zip file, go to the Plugins » Add New page in your WordPress admin area and click on the ‘Upload Plugin’ button on the top.

upload plugin

Next, click on the choose file button to select the zip file you created earlier and then click on the ‘Install Now’ button.

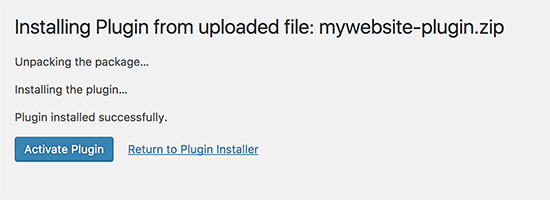
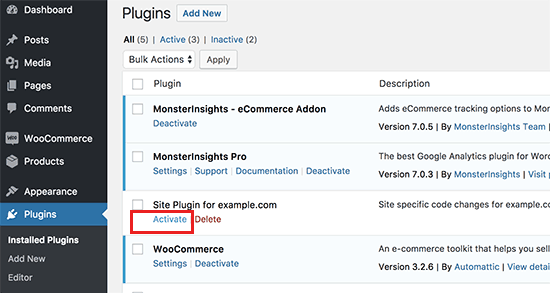
WordPress will now upload and install the plugin for you. Once its uploaded, you need to click on the activate button to start using your site-specific plugin.

Activate plugin

2. Upload Your Site-Specific WordPress Plugin via FTP

For this method, you don’t need to create a zip file. You will be uploading the plugin via FTP.

First, you will need to connect to your website using a FTP client.

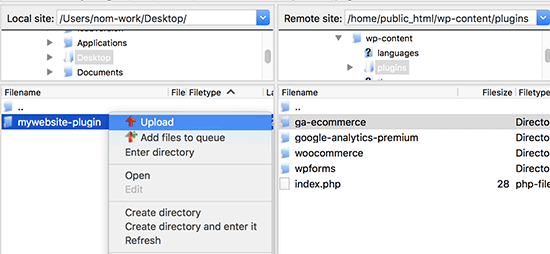
Once connected, go to /wp-content/plugins/ folder under remote site column. Next, you need to select your site-specific plugin folder and upload it to your website.

Uploading plugin via FTP

Your FTP client will now transfer your site-specific plugin folder to your WordPress website. This will install the plugin on your website.

However, you’ll still need to activate the plugin to start using it. You can do this by going to the ‘Plugins’ page inside your WordPress admin area and then click on the ‘Activate’ link below your site-specific plugin.

Activate plugin

That’s all. Your site-specific plugin is now ready to be used.

Adding Custom Code Snippets to Your Site-Specific Plugin

There are two ways to edit your plugin and add custom code snippets to it.

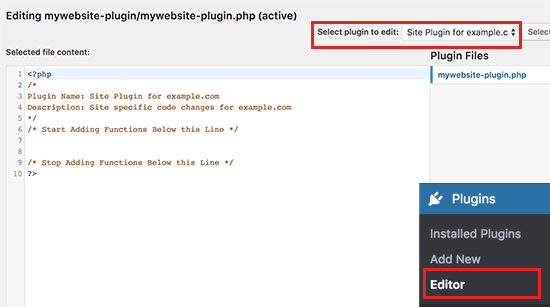
First method is to do it via WordPress admin area. You can go to Plugins » Editor page. You will see a warning message, and you need to click on ‘I understand’ button to continue.

Next, you need to select your site-specific plugin from the drop down menu labeled ‘Select plugin to edit’. The editor will load your plugin file, and you will be able to add code snippets in it.

Plugin editor

Once you are done, click on the ‘Update File’ button to save your changes.

If there is something missing in your code or it has potential to break your website, then the plugin editor will automatically undo your changes.

However, if the editor fails, and you see the white screen of death, then you can use FTP to edit your plugin file and undo those changes.

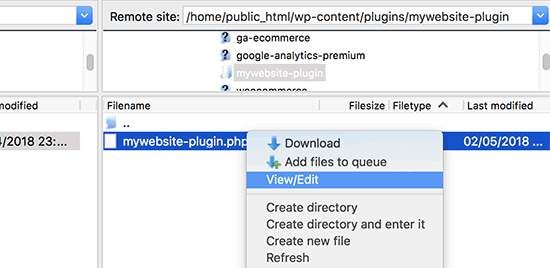
The second method is to directly edit the plugin file using FTP. Simply go to the plugin folder using your FTP client. Right click on the plugin file and then select View/Edit file.

Editing plugin file via FTP

You can also download the plugin file to your computer, edit it, and then upload it back.

Method 2. Using The Code Snippets Plugin

This method is a lot simpler and gives you a better way to manage your individual code snippets in WordPress.

First thing you need to do is install and activate the Code Snippets plugin on your website. For more details, see our step by step guide on how to install a WordPress plugin.

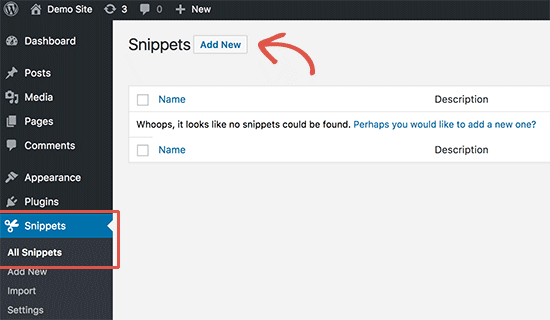
Upon activation, the plugin will add a new menu item labeled “Snippets” to your WordPress admin menu. This is where you will manage all your custom codes.

To add a custom code, you need to go to Snippets » All Snippets page and click on the ‘Add New’ button at the top.

Adding a new code snippet

This will bring you to the ‘Add New Snippet’ page.

First enter a title for your custom code snippet. This could be anything that helps you identify the code.

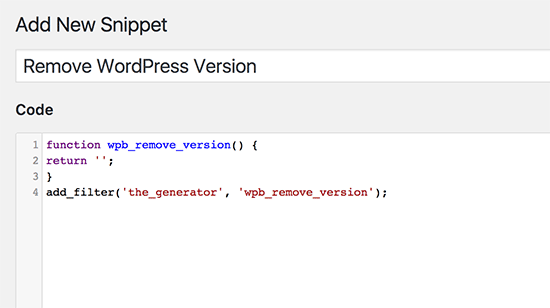
After that you can go ahead and paste your code snippet into the code box.

Adding custom code

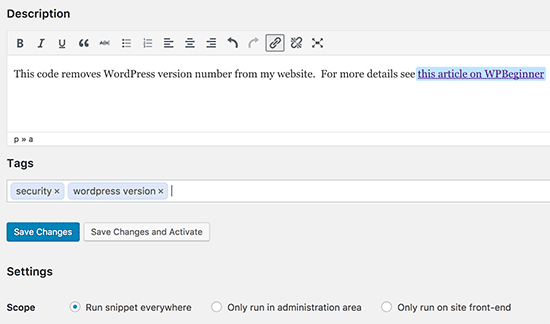
You can also add a description for the code in the field below the code box. You should use this area to write down what this code does, where you found it, and why you are adding it to your website. This will help the “future you” remember why the “past you” added this code.

Add your code description

You also have the option to assign tags to your code snippets which can help organize code snippets by topic and functionality.

Finally, you can click on the ‘Save Changes and Activate’ button. If you just want to save the code snippet without activating it, then you can click on save changes button instead.

The plugin also allows you to select where you want to run the code snippet. You can choose from admin area, front-end, or everywhere options.

If you are unsure, then keep the default ‘everywhere’ option checked.

Once you have saved and activated a code snippet, it would become effective on your website.

For more details see our guide on how to easily add custom code snippets in WordPress.

We hope this article helped you learn why and how to create a site-specific WordPress plugin. You may also want to see our list of useful functions file tips and most wanted WordPress hacks to best use your site-specific plugin.

If you liked this article, then please subscribe to our YouTube Channel for WordPress video tutorials. You can also find us on Twitter and Facebook.

The post What, Why, and How-To’s of Creating a Site-Specific WordPress Plugin appeared first on WPBeginner.