Crane Theme – Highly Customizable Multi-Purpose WordPress Theme

Choosing a suitable multipurpose theme for creating your website can be tricky. It doesn’t seem like a big decision but most multipurpose themes are similar by function. They all create different types of websites that include the personal website, one page, corporate website, blogs, and online stores. You can even create social networks sites by ... Read moreCrane Theme – Highly Customizable Multi-Purpose WordPress Theme

The post Crane Theme – Highly Customizable Multi-Purpose WordPress Theme appeared first on Learn WordPress with WPLift.

How to Fix the 413 Request Entity Too large Error in WordPress

Are you seeing the 413 Request entity too large error in WordPress? This error usually occurs when you are trying to upload a theme or plugin file in WordPress. In this article, we will show you how to easily fix the 413: request entity too large error in WordPress.

WordPress 413 error - Request entity too large

What Causes WordPress 413 Request Entity Too Large Error?

This error usually happens when you are trying to upload a file that exceeds the maximum file upload limit on your WordPress site.

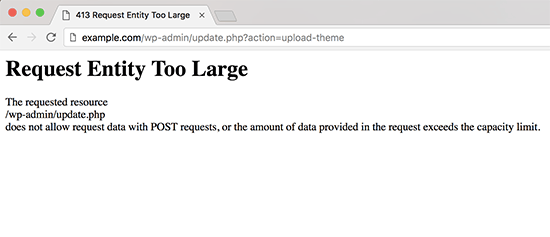
Your web server will fail to upload the file, and you will see the 413 request entity too large error page.

413 request entity too large error example

Normally, most WordPress hosting companies have their servers configured, so that WordPress users can easily upload large images and other media.

However, sometimes this setting is not high enough to upload large theme or plugin files.

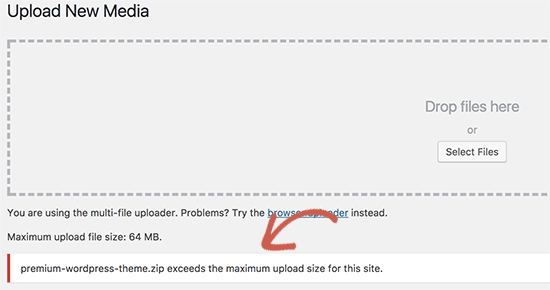
It would also stop you from uploading large files in media library. In that case, you will see a different message, clearly stating that the file size exceeds maximum allowed limit.

File size exceeds maximum upload size limit

That being said, let’s take a look at how to fix the the WordPress 413 request entity too large error.

Fixing 413 Request Entity Too Large Error in WordPress

There are multiple ways to fix the request entity too large error in WordPress. We will cover all these methods, and you can try the one that works best for you.

Method 1. Increase Upload File Size Limit via Functions File

Simply add the following code to your theme’s functions.php file or a site-specific plugin.

@ini_set( 'upload_max_size' , '64M' );
@ini_set( 'post_max_size', '64M');
@ini_set( 'max_execution_time', '300' );

You can increase the values in upload_max_size and post_max_size to be more than the file you are trying to upload. You will also need to increase the max_execution_time to the time you think it would take for the file to upload. If you are unsure, then you can try doubling this value.

Method 2. Increase Upload File Size Limit via .htacces File

For this method, you will need to edit the .htaccess file and add the following code at the bottom:

php_value upload_max_filesize 64M
php_value post_max_size 64M
php_value max_execution_time 300
php_value max_input_time 300

To learn more about increasing file upload size limit, see our guide on how to increase the maximum file upload size in WordPress.

Method 3. Manually Upload File via FTP

If the 413 error only occurs when you are uploading one particular file, then you may want to consider uploading the file manually via FTP.

If you are trying to upload a WordPress theme, then see our guide on how to install a WordPress theme and jump to the ‘Installing a WordPress theme using FTP’ section.

If you are trying to upload a plugin, then see our guide how to install a WordPress plugin and jump to ‘Manually install a WordPress plugin using FTP’ section.

For other files, see our guide on how to manually upload WordPress files using FTP.

We hope this article helped you learn how to fix the WordPress 413 request entity too large error. You may also want to see our list of the most common WordPress errors and how to fix them.

If you liked this article, then please subscribe to our YouTube Channel for WordPress video tutorials. You can also find us on Twitter and Facebook.

The post How to Fix the 413 Request Entity Too large Error in WordPress appeared first on WPBeginner.

Modula Gallery Review: An Easy-To-Use WordPress Gallery Plugin

Sometimes (actually, a lot of times…), the built-in WordPress gallery functionality just doesn’t cut it. And when that happens, you’re going to need to turn to a WordPress image gallery plugin, of which there are…a ton. With so many image gallery plugins out there, it can be hard to find the one that’s best for ... Read moreModula Gallery Review: An Easy-To-Use WordPress Gallery Plugin

The post Modula Gallery Review: An Easy-To-Use WordPress Gallery Plugin appeared first on Learn WordPress with WPLift.

How to Create an Online Course with WordPress using LearnDash (Review)

Do you want to create an online course in WordPress? Selling online courses allows you to make money from your blog by teaching others how to do what you’re good at. In this article, we will show you how to create and sell an online course in WordPress using LearnDash.

Creating online learning course in WordPress using LearnDash

What Do You Need to Create / Sell an Online Course?

You will need the following things to start selling courses online with WordPress.

  1. A domain name. This will be your website’s address (Example, wpbeginner.com).
  2. A WordPress hosting account. This is where your website’s files are stored.
  3. A learning management addon to create and manage courses.

You can create your online course with WordPress in less than an hour, and we’ll walk you through every step of the process.

Let’s get started.

Step 1. Setting up Your WordPress Website

There are plenty of website builders that you can use to build your website. However, we always recommend WordPress because it offers you the flexibility and freedom to take your website in any direction you want.

There are two types of WordPress, and often beginners end up confusing the two. First there is WordPress.com which is a hosting service, and then you have the original WordPress.org also known as self-hosted WordPress. See our guide on the difference between WordPress.com vs WordPress.org.

We recommend using WordPress.org because it gives you access to all the WordPress features that you will need.

To start a self hosted WordPress.org website, you will need a domain name ($14.99 / year), WordPress hosting ($7.99 / month), and SSL certificate to accept online payments ($69.99 / year).

This is quite a lot of start up money.

Luckily, Bluehost, an officially recommended WordPress hosting provider, has agreed to offer our users a free domain name, free SSL certificate, and a discount on web hosting.

Basically, you can get all of the above for $2.75 per month.

→ Click here to Claim this Exclusive Bluehost offer ←

After purchasing hosting, head over to our guide on how to create a WordPress website for step by step set up instructions.

Step 2. Install and Setup LearnDash LMS Plugin

LearnDash is the best LMS plugin for WordPress. It is an all-in-one solution with complete course management, lesson plans, quizzes, assignments, course progression, and more.

Disclaimer: At WPBeginner, we believe in transparency. If you sign up with LearnDash using our referral link, then we will earn a small commission at no extra cost to you. We would get this referral fee for recommending just about any other solution, but we only recommend products that we personally use and believe will add value to our readers. And no, we were not paid to write this review.

Now that we’re on the same page, let’s get started with the course setup process.

First, you will need to install and activate the LearnDash plugin. For more details, see our step by step guide on how to install a WordPress plugin.

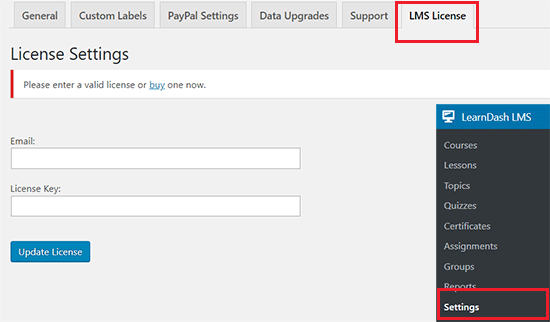
Upon activation, you need to visit LearnDash LMS » Settings page and click on the LMS License tab to enter your email address and the license key. Once you have entered the information, click on the ‘Update License’ button to store your settings.

Enter your LearnDash license key

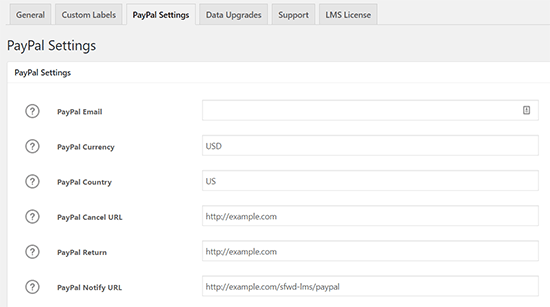
Next, you need to switch to the ‘PayPal Settings’ tab. This is where you will enter your PayPal information to receive online payments from your users.

LearnDash PayPal payment settings

Don’t forget to click on the ‘Save’ button to store your settings.

LearnDash also has Stripe and 2Checkout payment gateways available as Addons. You can install those if you don’t want to use PayPal.

Once you have configured the payment settings, your LearnDash LMS plugin is ready to go, and you can start creating courses.

Step 3. Creating Your First Course

LearnDash makes it super easy to create and manage online courses.

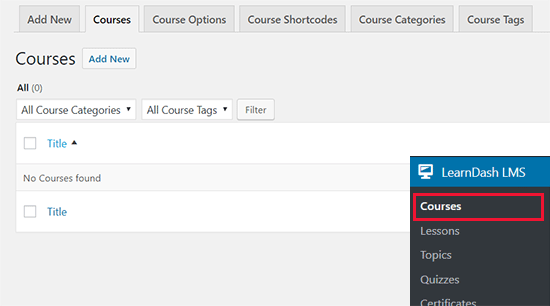
First, you need to visit LearnDash LMS » Courses page and then click on the ‘Add New’ button.

Adding a new course in LearnDash

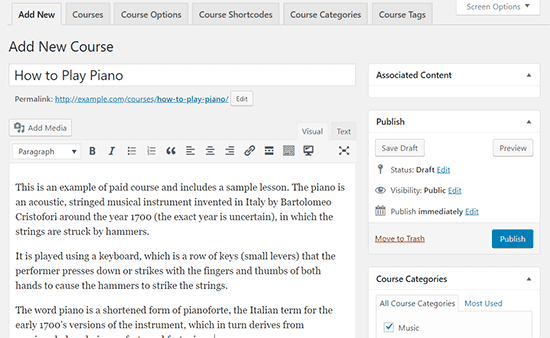
This will bring you to the ‘Add New Course’ screen. You will need to start by providing a title for your course and then adding a detailed description. You can also add course categories / tags, and a featured image also known as course thumbnail.

Creating course

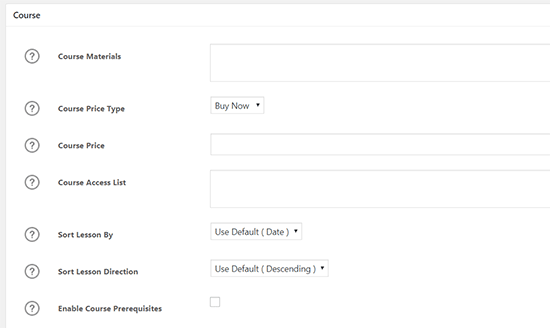
Below the course description, you will see the course options box. This is where you can set different options for the course including course price and what type of course it is: open, free, closed, buy now, or recurring.

Course options

Once you are satisfied with your course options, you can click on the save or publish button to make your course publicly available.

You can click on the preview button to see your course in action.

Note: You will not see the ‘Take This Course’ button if you are viewing the course page while logged in as an administrator in WordPress. We recommend opening an incognito browser window or log out to preview the course page.

Step 4. Adding Lessons to Your Course

Now that you have created your first course. It’s time to add lessons to the course. LearnDash allows you to create highly interactive lessons and then add them to your online course.

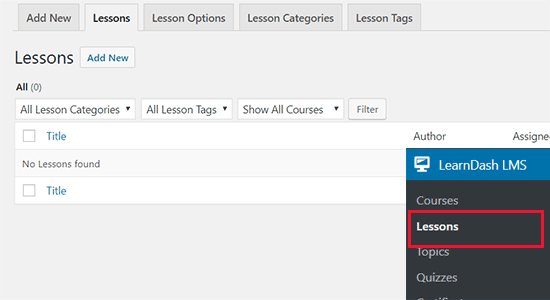
You can add a lesson by visiting LearnDash LMS » Lessons page and then click on the ‘Add New’ button at the top.

Adding new lessons in LearnDash

First you need to provide a title for your lesson and then start adding lesson content. You can add text, images, embed videos, and more.

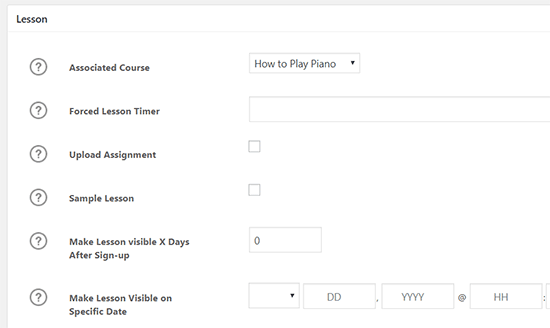
Below the lesson editor box, you will find lesson options. Here you can add the lesson to a course by selecting the course you created earlier from ‘Associated Course’ drop down box.

Lesson settings

You can also choose whether this lesson requires submission of assignments, lesson timer, lesson progression, and more.

Once you are satisfied with the lesson, you can click on the publish button to save your lesson.

Your lesson will now automatically appear on the course page below the course details. You can repeat the process to add more lessons to your course.

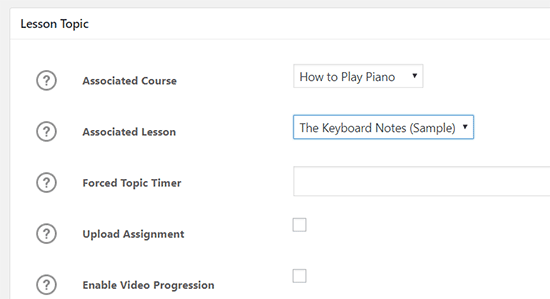
You can also break down an individual lesson into topics. Simply go to LearnDash LMS » Topics page and click on the ‘Add New’ button to add a topic.

Creating a topic is similar to creating a lesson. Instead of associating it to a course, you will just need to associate it to a lesson.

Adding topics to your lessons

Step 5. Adding Quizzes and Assignments to Your Online Course

LearnDash comes fully equipped with dynamic quizzes and assignments. This allows you to make your online course a dynamic and engaging experience for your students.

You can make the quizzes and assignments required for your users before they can progress to the next lesson or course. You can also review assignments and give feedback to students.

Creating Quizzes in LearnDash

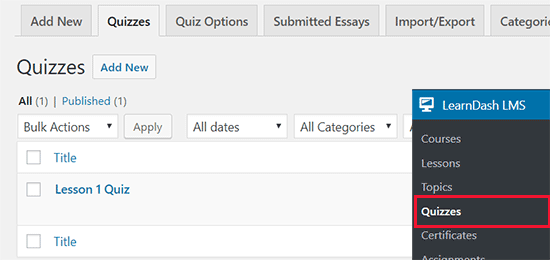
To add a quiz, you need to visit LearnDash » Quizzes page and click on the Add New button.

Adding new quiz

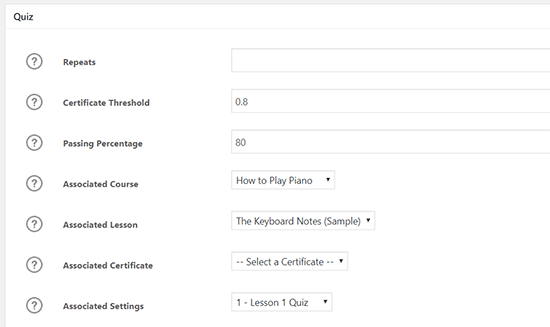
First you will need to provide a title and description for your quiz. After that you need to scroll down to ‘Quiz’ box and associate your quiz to a course, lesson, or topic.

Quiz settings

The default quiz settings would work for most cases, but you can customize the settings as needed from the advanced quiz settings area.

Once you are done, click on the save or publish button to save your quiz. You will now notice the new option to add questions to your quiz.

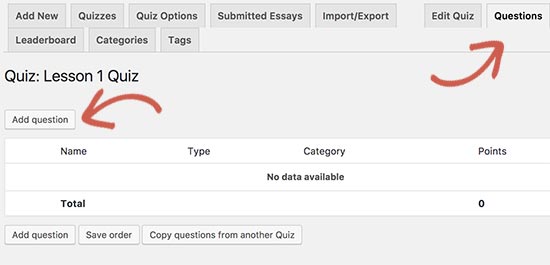
You need to switch to the ‘Questions’ tab and then click on ‘Add Question’ button.

Add question to the quiz

This will bring you to the ‘Add new question’ screen. LearnDash allows you to create different type of questions (multiple choice, true or false, fill in the blank, essay, free choice, etc).

You can add multiple answers for your question, add the correct answer, choose message to display for correct or incorrect answers, and more.

Don’t forget to click on the save button before you move onto the next section.

Depending on your settings, your quiz would appear on your lesson, topic, or the course page.

Enable Assignments in LearnDash

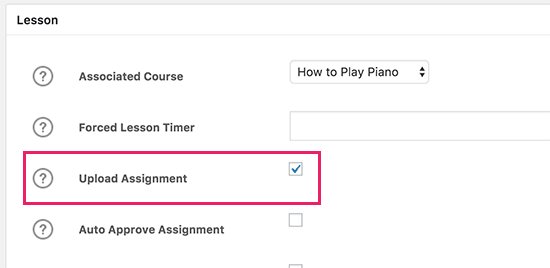
You can easily add assignments by editing a lesson and going to the lesson options area. You need to check the box next to upload assignment option.

Enable assignment upload option

After that, you can provide the assignment instructions in your lesson. At the end of the lesson, users will see an option to upload their assignment.

Upload assignment form

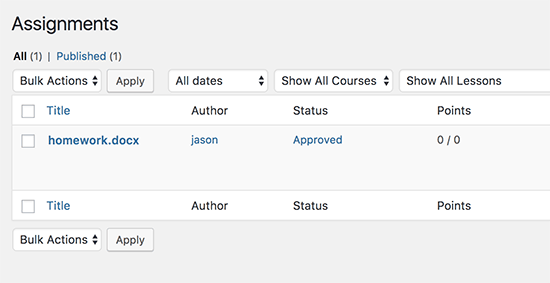
Once users have uploaded their assignments, you can view them by visiting LearnDash LMS » Assignments page.

Review assignments

Here you can edit assignments, approve, or give comments on submitted assignments.

Step 6. Giving Certificates on Course Completion

LearnDash allows you to automatically give certificates upon completion of a course. However, creating a certificate in LearnDash requires some basic knowledge of HTML.

First, you will need a certificate image file. This is basically the background image you want to use for your certificates.

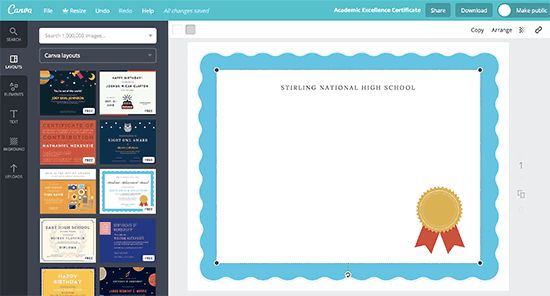
You can find certificate templates on free image creating websites like Canva. Once you find a template you like, simply delete all text from it and download it to your computer.

Creating a certificate template

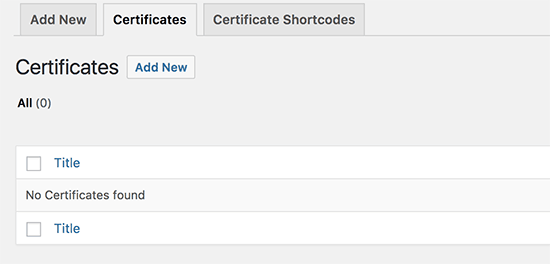
Next, you need to visit LearnDash LMS » Certificates page and click on the ‘Add New’ button.

Add new certificate

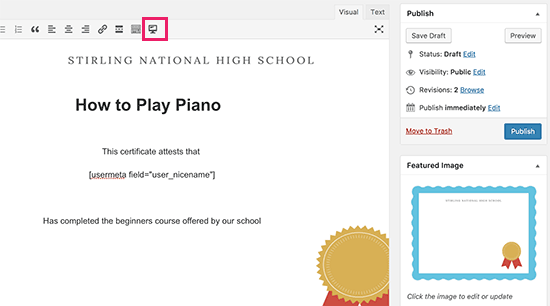
On the add new certificate screen, you need to set the certificate background image as featured image and click on the save button to reload the page.

You will now see your certificate template in the background of the visual editor. You can start adding text you want to be displayed on the certificate.

Certificate editing

To insert user’s name in the certificate, click on the LearnDash icon in the editor to insert the username shortcode.

Once you are satisfied with the certificate, you need to publish it.

Next, you need to edit the quiz you added to your course lesson. In the Quiz options box, you need to associate your certificate to the completion of the quiz.

Add certificate to the quiz

You can now save your quiz settings.

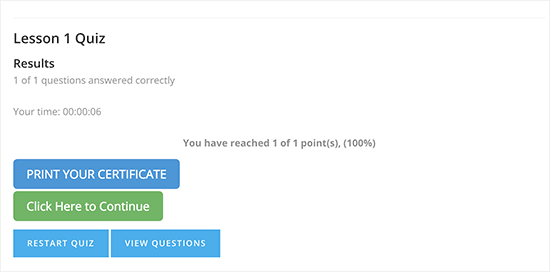
Users who complete the course and pass the quiz will see the option to print their certificate.

Print certificate

Taking Your Online Courses To Next Level

Now that you have learned how to easily create an online course in WordPress, you are ready to launch your online learning course website.

LearnDash seamlessly integrates with numerous providers including WordPress eCommerce platforms like WooCommerce, and it can run alongside your existing online store.

It also works with MemberPress, the best WordPress membership plugin in the market. This allows you to not just sell your courses, but you can also run a membership website with powerful subscription models.

We hope this LearnDash review helped you learn how to create an online course with WordPress. You may also want to see our ultimate step by step WordPress SEO guide for beginners.

If you liked this article, then please subscribe to our YouTube Channel for WordPress video tutorials. You can also find us on Twitter and Facebook.

The post How to Create an Online Course with WordPress using LearnDash (Review) appeared first on WPBeginner.

7 Best WordPress Advertising Plugins in 2021: Great Ways to Monetize Your Website

Producing content costs time and money, and owners of informational-type websites (e.g., blogs) often need sources of revenue to continue offering their services free of charge. Thankfully, advertisements – commonly known as adverts or ads ­– are the quickest and easiest means of monetizing a website. So today, we will talk about WordPress advertising plugins [...]

Read More...

The post 7 Best WordPress Advertising Plugins in 2021: Great Ways to Monetize Your Website appeared first on Learn WordPress with WPLift.

How to Add a Stats Dashboard On Your WordPress Site

Do you want to add a stats dashboard on your WordPress site? Analytics help you find out how people find and use your website, so you can keep them coming back. In this article, we will show you how to easily add a stats dashboard on your WordPress site.

How to add a stats dashboard in WordPress

Why You Need a Stats Dashboard in WordPress

Normally you can install Google Analytics and view your reports by logging into your Google analytics account. This sounds great, but most people forget to check their blog stats on a regular basis.

The two biggest reason for that are:

  1. You have to login to a separate website (Google Analytics) to check the stats.
  2. You have to dig around Google Analytics to actually find what you’re looking for.

While Google Analytics is a powerful tool, it often requires some digging to get to the good parts of the reports you want to view. Most beginners never make it this far.

Adding a stats dashboard to your WordPress website solves this problem. You will be able to quickly view the stats that matter without leaving your WordPress admin area, and it will require far easier.

That being said, let’s take a look at how to easily add a stats dashboard on your WordPress site.

Adding a Stats Dashboard in WordPress

First thing you need to do is install and activate the MonsterInsights plugin. For more details, see our step by step guide on how to install a WordPress plugin.

Upon activation, you need to visit Insights » Settings page to enter your license key. You can find the license key under your account on the MonsterInsights website.

MonsterInsights license key

Next, you need to connect your website to your Google Analytics account. You can do this by visiting the Insights » Settings page and clicking on the ‘Authenticate with your Google account’ button.

Authenticate with your Google account

This will redirect you to Google accounts where you will be asked to sign in or select a Google account if you are already signed in.

Sign in or select your Google account to continue

You need to click on ‘Next’ to continue.

After that, you will be asked to allow MonsterInsights to access your Google Analytics account. This step is necessary, so MonsterInsights can bring the report back to your WordPress dashboard.

Allow MonsterInsights to access your Google Analytics account

Go ahead and click on the ‘Allow’ button to continue.

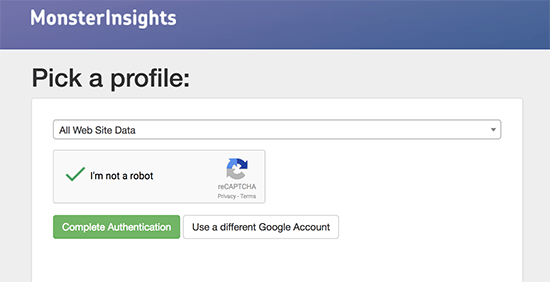
The final step is to select the profile you want to track. You need to select your website here and then click on the ‘Complete authentication’ button to continue.

Select your website profile

You will now be redirected back to your WordPress site.

That’s all you have successfully installed and setup Google Analytics on your WordPress site. If you haven’t installed Google Analytics on this website before, then it will take sometime before Google Analytics starts showing your stats.

Viewing Your WordPress Stats Dashboard

Now that you have set up Google Analytics using MonsterInsights, you can view your WordPress stats by visiting Insights » Reports page.

Website stats reports

On top of the stats dashboard, you will see a graph of your WordPress page views and visitor sessions for the last 30 days. This gives you a quick overview of incoming traffic to your blog.

Below that, you will see a comparison of your website stats against previous 30 days. It will show numbers of sessions, page views counter, session duration, and bounce rate.

Stats break down

After that you will see charts showing new vs returning visitors and devices used to access your website. This is followed by top countries people visiting your website from and top referral websites sending you the most traffic.

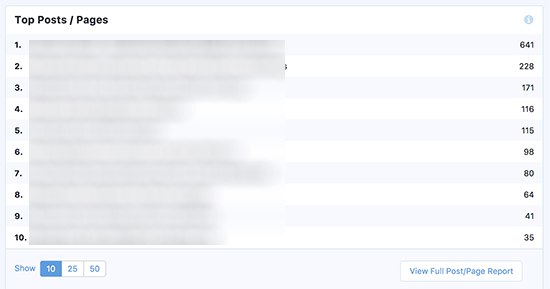
MonsterInsights also acts as a pageview counter and shows your most popular WordPress posts and pages. This helps you find your top performing content, so you can plan your content strategy accordingly.

Top posts and pages

Viewing More WordPress Stats with MonsterInsights

MonsterInsights also shows custom reports depending on your settings. You can switch to publishers, ecommerce, search console, and dimensions.

The publishers tab shows reports made for content-rich websites like blogs, news, or magazine websites. It will show you the following stats:

  • Top landing pages
  • Top exit pages
  • Top outbound links
  • Top affiliate links
  • Top download links
  • Age, gender, and interests (visible only if you have them enabled in Google Analytics)

Tracking Ecommerce Stats in WordPress with MonsterInsights

If you run an online store using WooCommerce or Easy Digital Downloads, then you’ll love MonsterInsights eCommerce tracking features.

First, you will need to visit Insights » Addons page to install and activate the MonsterInsights eCommerce addon.

Ecommerce addon

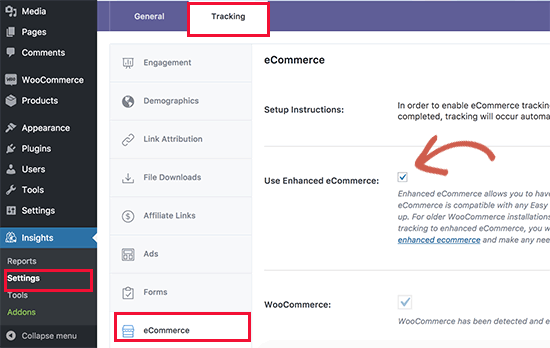
Next, you need to visit Insights » Settings and click on the tracking tab.

Enable eCommerce tracking

On the tracking tab, you need to scroll down and select the eCommerce settings and then check the box next to ‘Use Enhanced eCommerce’ option.

Don’t forget to click on the save changes button to store your settings.

Now you can view your ecommerce stats in WordPress by visiting Insights » Reports page and clicking on the ecommerce tab.

ecommerce stats in WordPress

Ecommerce reports will show you the break down of the following stats:

  • Conversion rate, transactions, revenue, and average order value
  • Top products
  • Top conversion sources
  • Total add to cart and total remove from cart
  • Time to purchase and session to purchase stats

We hope this article helped you learn how to easily add a stats dashboard in WordPress. You may also want to see our ultimate WordPress SEO guide to improve your search rankings and get more traffic for your website.

If you liked this article, then please subscribe to our YouTube Channel for WordPress video tutorials. You can also find us on Twitter and Facebook.

The post How to Add a Stats Dashboard On Your WordPress Site appeared first on WPBeginner.

WooCommerce Tutorial: How To Start An eCommerce Store On WordPress

If you’re thinking of starting an eCommerce store on WordPress, you’re probably considering using WooCommerce, right? Not only is WooCommerce the most popular WordPress eCommerce plugin, it’s also the most popular eCommerce solution for all sites. Period. According to BuiltWith, WooCommerce powers a whopping 42% of eCommerce stores on the entire Internet, which is pretty ... Read moreWooCommerce Tutorial: How To Start An eCommerce Store On WordPress

The post WooCommerce Tutorial: How To Start An eCommerce Store On WordPress appeared first on Learn WordPress with WPLift.

Weekly WordPress News: Liquid Web Acquires iThemes

In the biggest news this week, Liquid Web, a huge hosting provider, purchased iThemes in an all-cash deal. This is big news, and congrats to the iThemes team! There was also another smaller acquisition, as UpdraftPlus acquired the Easy Updates Manager plugin. Other than that, as usual we also have some great reviews and tutorials ... Read moreWeekly WordPress News: Liquid Web Acquires iThemes

The post Weekly WordPress News: Liquid Web Acquires iThemes appeared first on Learn WordPress with WPLift.

24 Best WordPress Themes for Travel Blogs

Are you looking for the best WordPress themes for a travel blog? Normally, any WordPress blog or business theme can be used for travel websites and blogs. However, they may not reflect the sense of adventure of a travel website. In this article, we have hand picked the best WordPress themes for travel blogs that will help you achieve the proper look for your website.
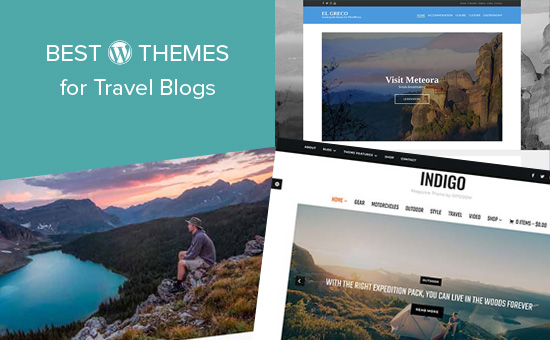
Best WordPress themes for travel blogs

Creating a Travel Blog with WordPress

WordPress is the most flexible and easy to use platform to build a website. It is already used by many popular travel websites from all over the world.

There are two types of WordPress websites. WordPress.com, which is a hosted platform and WordPress.org also called self-hosted WordPress. See our comparison of WordPress.com vs WordPress.org for more details.

We recommend using self-hosted WordPress.org because it gives you access to all WordPress features and gives you total freedom to build your website.

To build a self-hosted website, you will need a domain name and WordPress hosting.

We recommend using Bluehost. They are an officially recommended WordPress hosting provider, and they are offering WPBeginner users over 60% off and a free domain name.

Once you have signed up for a hosting account, you can follow our step by step guide on how to start a blog.

Having said that, let’s take a look at some of the best WordPress themes for travel blogs that you can install on your website.

1. Zermatt

Zermatt

Zermatt is a gorgeous WordPress theme for travel blogs. It’s homepage features a beautiful transparent navigation menu with a weather widget on top. The homepage is made up of different widget ready areas. Zermatt includes several custom widgets, which you can just drag and drop to setup homepage.

It also comes with beautiful sliders, photo galleries, page templates, and of course a booking form. It is beginner friendly and you’ll love its professional design.
2. Ultra

Ultra

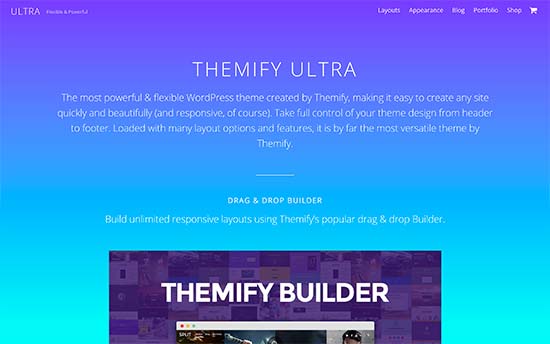
Ultra is an all-purpose WordPress theme that comes with several ready-made websites. All these designs can be installed with 1-click with complete content. Just replace the content with your own and you are good to go.

Want to edit a page? Ultra comes with an integrated drag and drop page builder that allows you to easily edit any page layout. You can also create your own layouts if needed. It has a themes option panel which helps you setup your website.
3. Camera

Camera

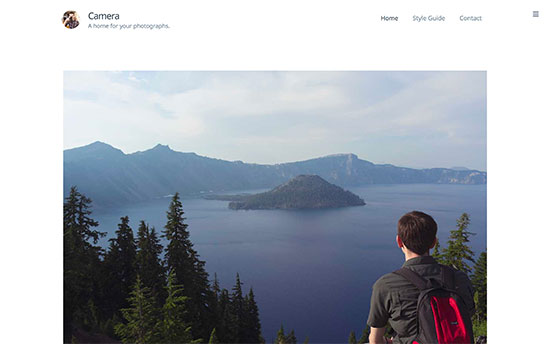
If photos play an important role on your travel blog, then you should check out Camera. This gorgeous WordPress photography theme is perfect for travel blogs. You can create unique photo series in a full-width carousel to accommodate both landscape and portrait images.

Camera features a distraction free design allowing visitors focus on your photography and content. It is super easy to use and only includes the options you’ll actually use.
4. Fall

Fall

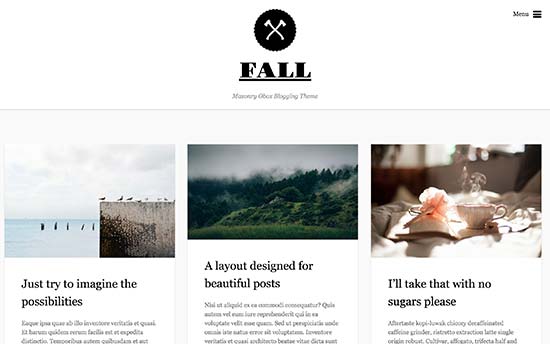
Fall is a beautiful WordPress blog theme which is perfect for content rich travel websites. Featuring crisp typography and a distraction free layout, Fall makes your content stand out.

It is super easy to customize with unlimited colors, simple design and layout choices, Google fonts, custom logo upload, and Google Analytics integration.
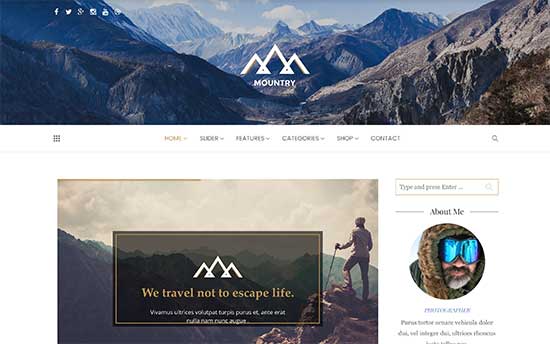
5. Mountry

Mountry

Mountry is a beautifully designed WordPress theme for travel and adventure websites. It features a minimalist approach to design with tons of flexible options.

It includes 8 homepage designs, multiple page templates for different sections, and a simple drag and drop page builder. It can also be used to add an online store to your website using WooCommerce.
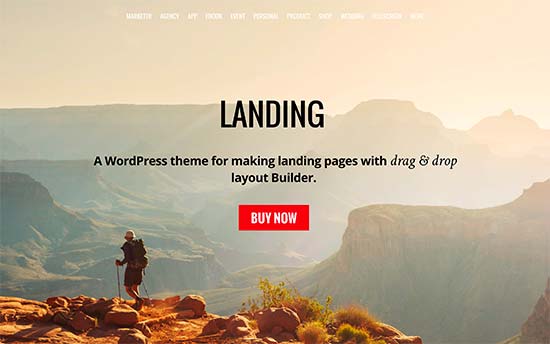
6. Landing

Landing

Landing is a stunningly beautiful WordPress theme for landing pages, travel websites, and even blogs. It comes with a drag and drop landing page builder that allows you to easily create your own unique layouts without any programming skills.

It has multiple header design options, portfolio content type, events, blog section, and complete WooCommerce support. It is easier to set up with 1-click installer and theme options panel.

7. Binder Pro

Binder Pro

Binder Pro is a modular WordPress theme which allows you to drag and drop modules to create your own layouts. It includes multiple turnkey designs that you can install with the click of a button. Editing these designs is super easy with simple point and click editing tools.

It also includes WooCommerce support to add an online store, Google fonts, custom widgets, contact form, and more. Binder is super easy to use and perfect for beginners looking for effortless modern website.

8. Elegant

Elegant

Elegant is a multi-purpose WordPress minimalist theme, which is ideal for travel blogs. It comes with multiple page layouts, gorgeous photo galleries, crisp typography, and masonry grid layouts.

Elegant ships with a powerful page builder plugin that allows you to create your own landing pages. It also supports WooCommerce out of the box and includes beautiful shop templates.
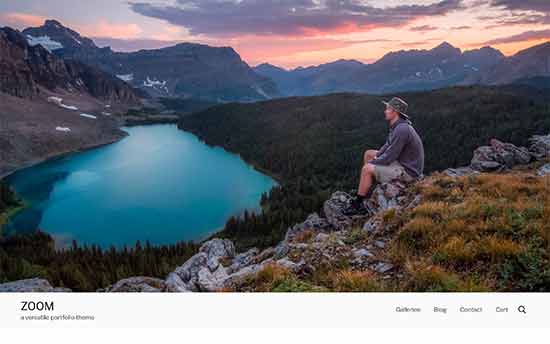
9. Zoom

Zoom

Zoom is a spacious and clean WordPress theme for travel and tourism websites. It features a single column layout with a large header image, followed by website title, navigation menus, and then your most important content.

It includes unlimited galleries, masonry grid layout for blog posts, multiple widget areas, drag and drop homepage, and more. Zoom is super easy to use and most features work out of the box. It also has a custom theme options panel for easier set up.

10. Hive

Hive

Hive is a magazine style WordPress theme perfect for content rich travel and tourism websites. Its main features are minimalist design, beautiful typography, and gorgeous display of featured images.

It includes grid layout for your content, post format support, page template, full width page, multiple widget ready areas, and more. It is translation ready and can also be used with multilingual websites.
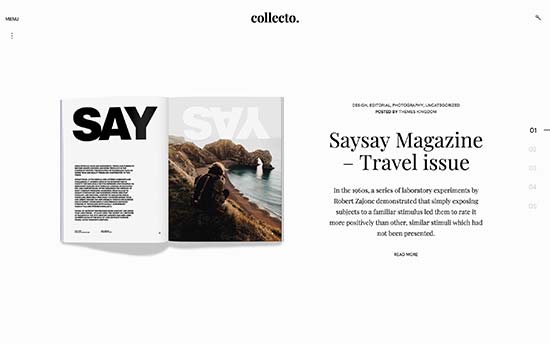
11. Collecto

Collecto

Collecto is a WordPress magazine and newspaper style theme perfect for content rich tourism and travel websites. Featuring a truly unique layout, it has minimal vertical navigation menu, a beautiful header area, and parallax background effects.

It has a dynamic grid layout for your blog and content archives which automatically highlights your sticky posts. It has unlimited colors, single page and single post templates, social media integration, Google fonts, and more.
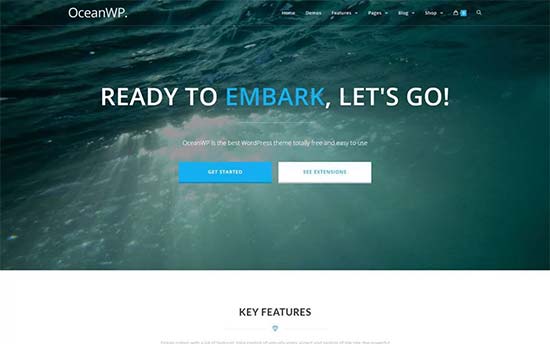
12. OceanWP

OceanWP

If you are looking for a premium-like but free WordPress theme, then check out OceanWP. This excellent WordPress theme comes with its own companion plugins that allow you to apply premium themes like features into your website.

It includes beautiful homepage template, full WooCommerce support, translation-ready, WPML support, page builder support, and more. It has flexible customization options and a custom theme options panel.
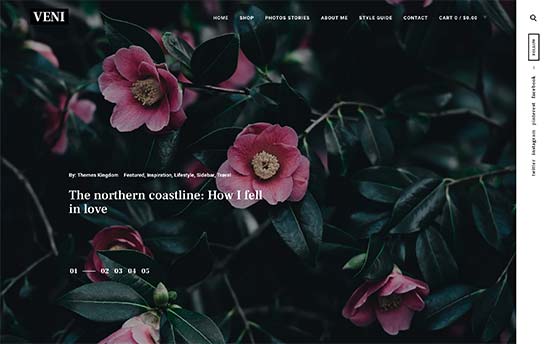
13. Veni

Veni

Veni is another excellent magazine style WordPress theme ideal for travel guides, tour operators, destination guides, and tourism blogs. This fantastic theme features a unique and elegant design with a large header image or slider on top, slide in menus, and a spacious layout.

Noteable features include featured pages, flexible layouts, portrail and landscape featured images, Google fonts, unlimited colors, contact form support, and more. It is super easy to customize and set up and includes a beginner friendly theme dashboard.

14. Feltmag

Feltmag

Feltmag is another awesome WordPress magazine theme for content rich travel blogs. Featuring a modern layout with a fullscreen header, which is followed by your content sections in beautiful grid style.

It includes two navigation menus in the header area, large featured images, multiple layout styles, flexible header design, custom widgets, social icons, and more. It is designed to work out of the box and is super easy to customize even for beginners.

15. Explorer

Explorer

Need a flexible blog theme for your travel blog, then take a look at Explorer. This modern blog theme has a sticky navigation menu on top, custom logo support, and a professional static front page.

It is super simple and easy to use and includes only the options you will need and use. It includes multiple layouts, support for all top page builders, WooCommerce support, WPML and translation ready, and more.
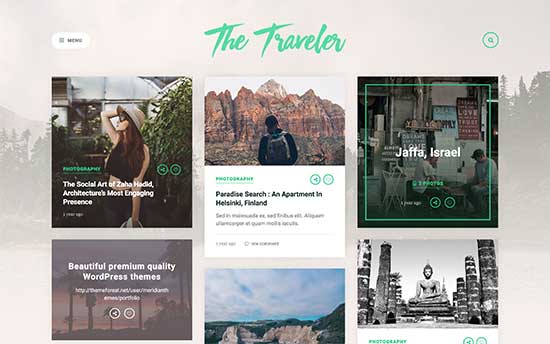
16. The Traveler

Traveler

The Traveler is another excellent option for a WordPress travel blog, tourism, and travel guide website. Its homepage uses a traditional magazine style layout with posts displayed in masonry grid.

It includes full screen background image, Instagram feed, full width page template, custom widgets, social icons, and more. It is super easy to customize with the help of live customizer.
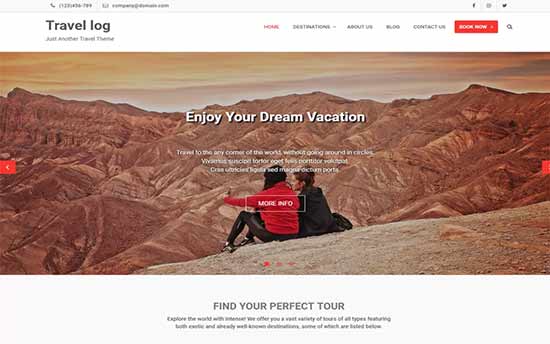
17. Travel Log

Travel Log

Travel log is a simple and free WordPress theme for travel websites and blogs. It comes with a companion plugin to add some travel and tourism related featured to your website.

Its homepage features a slider on top, followed by different sections of your website. Travel log is easy to customize and includes live customizer support with a custom theme options page.

18. Indigo

Indigo is another WordPress multipurpose theme suitable for travel magazines and blogs. It includes a sticky navigation menu on top, followed by website logo, primary navigation, and then a slider.

It includes a magazine homepage and a traditional blog homepage layout. It has unique custom widgets for social icons, popular posts, and full live customizer support.

19. Noozbeat

Noozbeat

Noozbeat is a professional WordPress news and magazine theme ideal for travel and adventure sites. Its homepage displays your recent articles in dynamic grid layout. It displays posts blocks as featured images with article title displayed on top of the image.

It has a widgetized layout allowing you to drag and drop widgets to create your homepage. It includes several custom widgets for social media and content discovery features. You will find it simple and easy to use with tons of customization options.
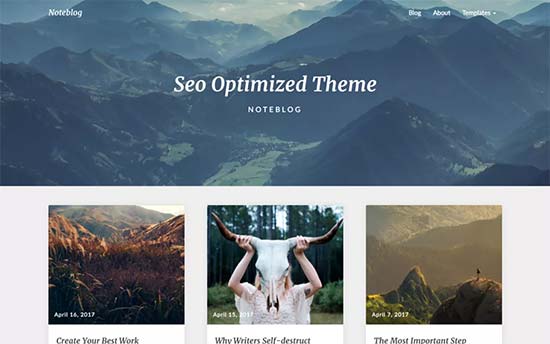
20. Noteblog

Noteblog

Noteblog is a free WordPress theme for blogs, travel, sports, and adventure websites. This simple and elegant theme displays a full width featured image followed by your recent posts in grid layout.

It is easy to use and only include minimal customization options. It is also optimized for speed and performance and works effortlessly with popular WordPress plugins.
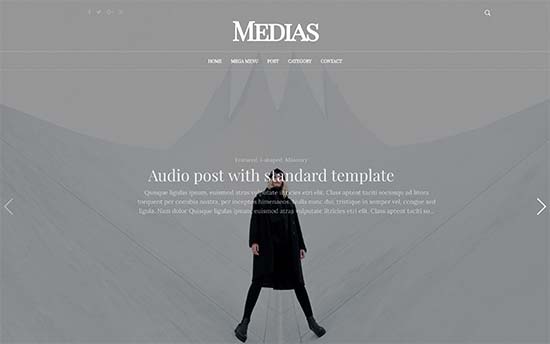
21. Medias

Medias

Medias is a flexible WordPress theme for podcasts, personal websites, and travel blogs. It comes with multiple layouts and styles to display your posts and other content.

Other notable features include mega menu, slider plugin, custom header, and Google fonts. It is translation ready, multilingual ready, and can be easily customized to make it uniquely yours.
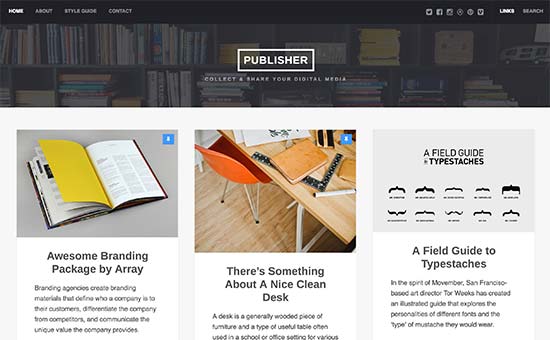
22. Publisher

Publisher

Publisher is another excellent WordPress magazine style theme for travel and magazine websites. It includes a modern homepage layout with custom headers and article cards. Each single post page allows you to beautifully display featured image, galleries, and more.

It only includes features you will actually use and none that you won’t. It includes infinite scroll support, contact form, and a getting started dashboard to help you walk through the setup.
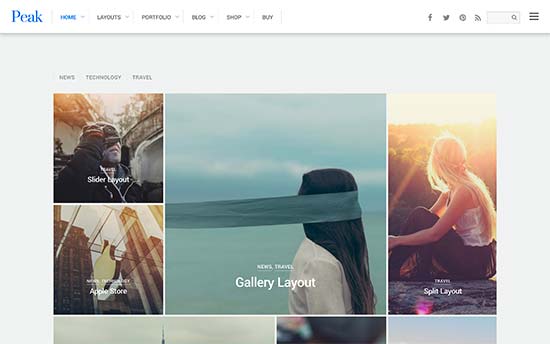
3. Peak

Peak

Looking for an elegant way to display your travel photos? Check out Peak. This beautifully designed WordPress theme is perfect for travel photography, tourism, and personal websites.

It comes with multiple gallery layouts, page templates, multiple styles, slideout widgets, page title banner and more. It is powerful yet quite easy to use with detailed theme options that help you walk through setup.
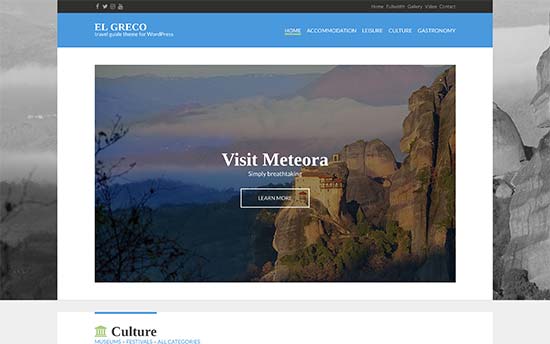
24. El Greco

El Greco

Transform your travel blog into a highly engaging platform with El Greco. It features a minimal layout and multiple colors, large header image, and two navigation menus.

Inside you will find custom widgets for social sharing and content discovery features. It is fully compatible with all top WordPress page builders so you can create your own layouts if needed. It is easy to customize and has tons of options located under live theme customizer.

We hope this article helped you find the best WordPress themes for travel blogs. You may also want to see our ultimate WordPress SEO guide to bring more traffic to your travel website.

If you liked this article, then please subscribe to our YouTube Channel for WordPress video tutorials. You can also find us on Twitter and Facebook.

The post 24 Best WordPress Themes for Travel Blogs appeared first on WPBeginner.