How to Display Popular Posts by Day, Week, and Month in WordPress

Do you want to display your most popular posts by day, week, month, or even all-time in WordPress?

Popular posts allow your visitors to quickly discover your top content, which helps you increase user engagement, pageviews, and conversions.

In this article, we will show you how to display popular posts by day, week, month, and all time in WordPress.

Display popular posts by day week month and all time in WordPress

Why Display Popular Posts in WordPress?

When you start a WordPress blog, you don’t have much content, which allows you to display selected posts in a sidebar widget manually.

However, as your website grows, you will notice that older articles on your website don’t get much exposure. By showcasing your top content, you allow new users to quickly discover the best articles on your website. This boosts user engagement on your website and increases your page views.

Now the problem is that if you are showing your all-time popular articles, then a very limited set of articles get repeated exposure. You can diversify it by displaying popular posts by day, week, or month as well.

Let’s take a look at how to easily display popular posts in WordPress by day, week, month, or all time.

Add Popular Posts by Day, Week, and Month in WordPress

The best way to show popular posts in WordPress is using MonsterInsights. It’s the best Analytics plugin for WordPress and helps you set up Google Analytics without editing code.

For this tutorial, we’ll use the MonsterInsights Pro version because it lets you automatically show top posts from Google Analytics.

There is also a MonsterInsights Lite version that’s free and also includes the Popular Posts feature, but does not connect to GA.

First, you’ll need to install and activate the MonsterInsights plugin. If you need help, then please see our guide on how to install a WordPress plugin.

Upon activation, you will be directed toward the MonsterInsights welcome screen. Go ahead and click the ‘Launch the Wizard’ button.

Launch setup wizard

After that, you can follow the onscreen instructions to configure Google Analytics. For more details, please see our guide on how to install Google Analytics in WordPress.

With MonsterInsights, you can also set up a Google Analytics 4 property. This is the new version of Analytics. The previous Universal Analytics version will sunset on July 1, 2023, and you won’t be able to track website data after this date. That’s why now is the best time to switch to Google Analytics 4 and protect your data.

Now that you’ve added Google Analytics to your website, the next step is to go to Insights » Popular Posts from your WordPress dashboard.

MonsterInsights lets you show your top articles within the content, in the sidebar as a widget, and display popular products if you have an online store.

For this tutorial, we’ll use ‘Inline Popular Posts’ and show featured articles within the content of other blog posts.
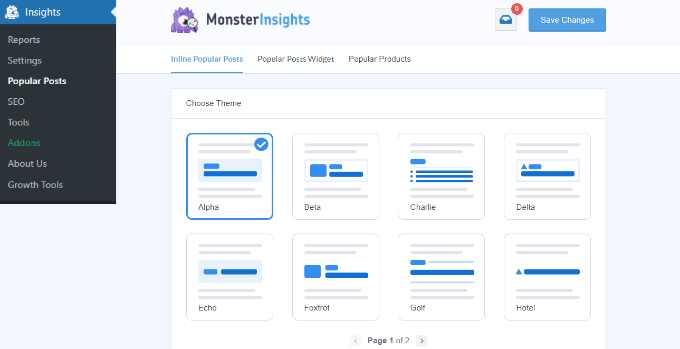
Popular post in MonsterInsights

The plugin comes with prebuilt themes, and you can see a preview of how your popular posts will appear on the website.

Once you’ve chosen a theme, simply scroll down to see more customization options. For instance, you can change the title color and size, edit the color of the label and background, and more.
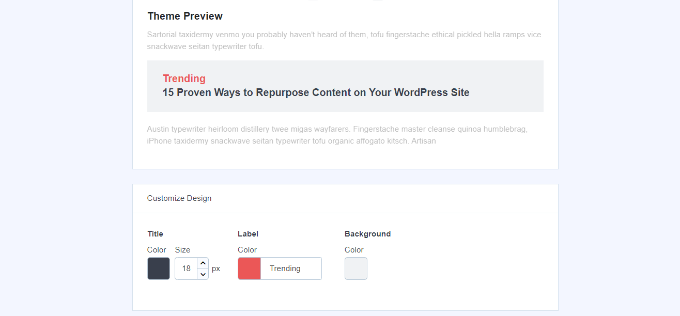
Preview of popular post and customization options

Show Popular Posts by Day, Week, Month, and All Time in WordPress

Next, you’ll need to choose how the plugin will determine your popular posts. Let’s see how you can show posts by day, week, month, and all time.

Displaying Popular Posts by Day, Week, and All Time

In MonsterInsights, you can manually select which posts appear in the Popular Posts widget.

This is useful when displaying top content from a specific day or week. Plus, you can also show your all-time best articles anywhere on your website.

Simply select the ‘Curated’ option under Sort By section and then choose the articles you want to feature.

These could be your evergreen content, weekly announcement or news, trending topics from a particular day, and more.

Just begin typing the name of the posts you want to include, and then select them as their name pops up in the field. To continuously display your top posts of all time, you simply need to select them, and as long as ‘Curated’ is chosen, they will appear as popular posts.
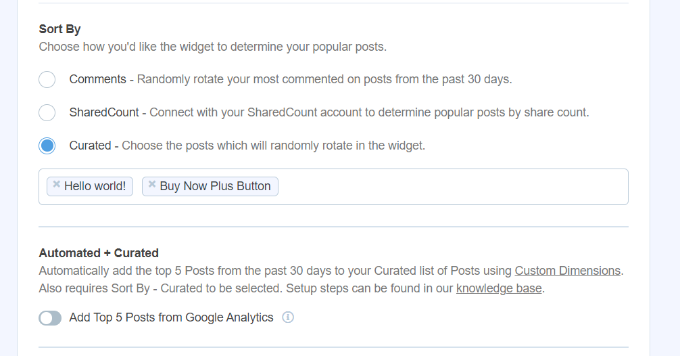
Select curated articles to feature

However, if you want to display popular posts by the day or the week, you will have to manually change some of these curated posts so they stay fresh for your audience.

For instance, if you are featuring different WooCommerce products weekly, you will need to choose which posts are listed under ‘Curated’ each week.

Displaying Popular Posts by Month and All Time

In MonsterInsights, you get multiple options to automatically show popular posts by month and all time.

First, you can show your most commented pages from the last 30 days by selecting the ‘Comments’ option. The plugin will randomly rotate blog posts with the highest comments and show them in the popular post widget.
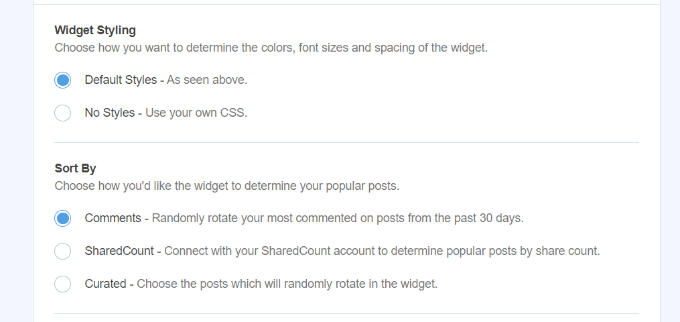
Sort your popular posts

Similarly, MonsterInsights also lets you automatically display popular posts based on social shares using the ‘SharedCount’ option.

It integrates with the SharedCount and helps you display your all-time most shared articles. This way, people can easily find content that’s driving social engagement.
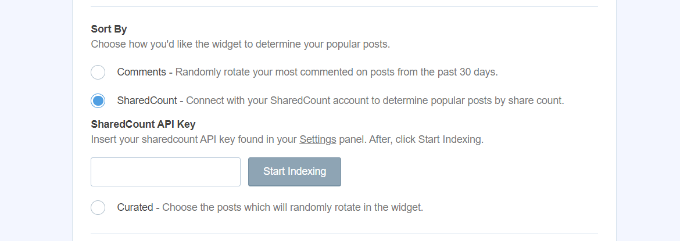
Show popular posts by SharedCount

MonsterInsights also offers an option to show the top 5 posts from Google Analytics in the last 30 days. This way you can show your top-performing content from last month or all-time anywhere on your site.

First, you’ll need to select the ‘Curated’ option under the ‘Sort By’ section.

After that, you can enable the ‘Add Top 5 Posts from Google Analytics’ option under the Automated + Curated section.
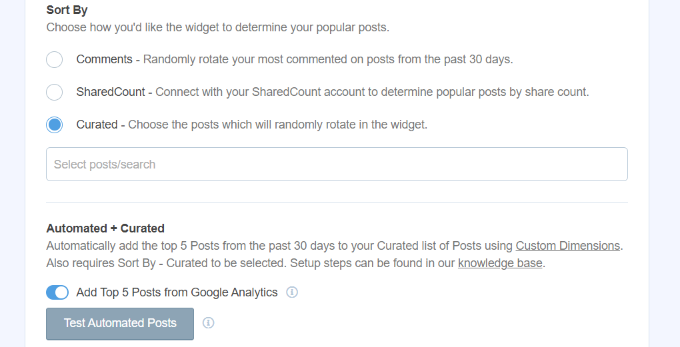
Add top 5 posts automatically

To ensure that your data is being fetched from Google Analytics, click the ‘Test Automated Posts’ button under ‘Automated + Curated.’

A popup message will now appear, showing that the popular posts are being fetched correctly. You can click the ‘Close’ button.
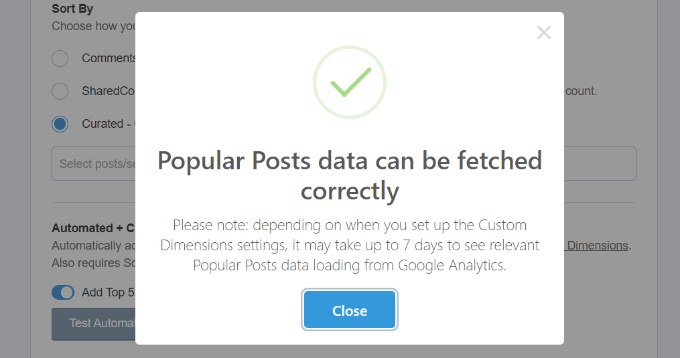
Popular post data is correctly fetched

Do note that you’ll need to set up the ‘Post Type’ custom dimensions in MonsterInsights and Google Analytics to use the Automated + Curated feature.

Custom dimensions are additional metrics you can track in Google Analytics. For more details on custom dimensions and how to configure them, you can see our guides on how to enable author tracking in WordPress and the best time to publish a blog.

Insert Popular Posts to Your WordPress Website

Next, you’ll need to select how you’d like to insert the featured articles.

MonsterInsights offers 2 options, including automatic placement and manual placement.

If you select the ‘Automatic’ option, then you can decide after how many words you’d want the popular post widget to appear. There is also an option to include and exclude pages from display featured posts.
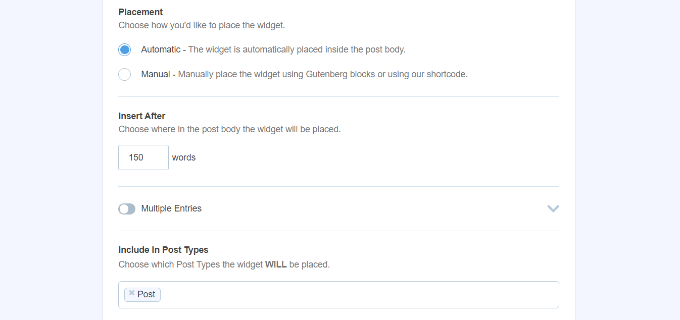
Choose placement option

When you’re done, simply click back to the top and click the ‘Save Changes’ button.

This way, your settings will be saved, and MonsterInsights will automatically display popular posts on your site.

Click the Save Changes Button to Store Your New Widget

On the other hand, you can also show popular posts in any blog post by adding the MonsterInsights block or using a shortcode.

First, add a new post or edit an existing one. Once you’re in the content editor, simply click the ‘+’ button and add the ‘Popular Posts’ block.
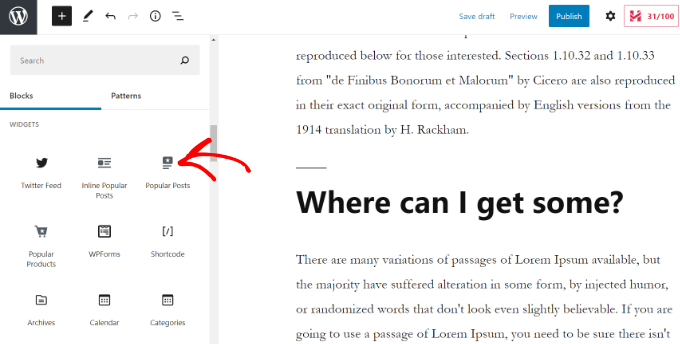
Select popular posts block

After that, you can see a preview of your featured articles in the content editor.

Once you’re satisfied with the widget’s appearance, you can go ahead and publish your article.
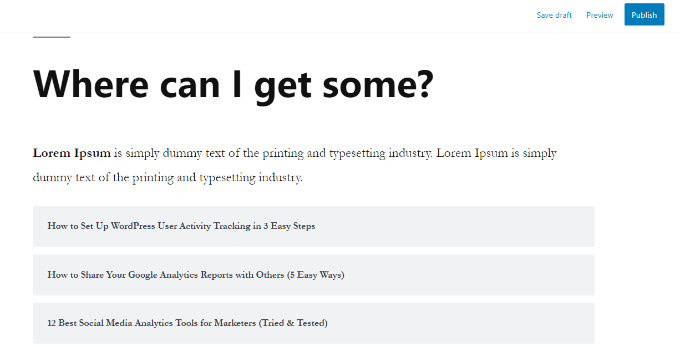
Preview your popular posts

We hope this article helped you display popular posts by day, week, month, and all time in WordPress. You may also want to see our guide on WordPress SEO and the best WooCommerce plugins.

If you liked this article, then please subscribe to our YouTube Channel for WordPress video tutorials. You can also find us on Twitter and Facebook.

The post How to Display Popular Posts by Day, Week, and Month in WordPress first appeared on WPBeginner.

How to Create a Micro-Job Website Like Fiverr with WordPress

Recently one of our readers asked if it was possible to create a micro-job website like Fiverr using WordPress? A micro-job website allows users to offer their services on your website. This allows you to charge money for job posting or get a commission when the job is finished. In this article, we will show you how to easily create a micro-job website like fiverr with WordPress without any coding knowledge.

Creatng a fiverr like micro-job site with WordPress

Staring a Micro-Job Website using WordPress

There are plenty of ways to make money online using WordPress. One of them is to build a job board with WordPress.

First you need to make sure is that you are using the right platform. To build a micro-job website, you will need a self-hosted WordPress.org website (see: WordPress.com vs WordPress.org for more details).

To start a WordPress site, you will need the following things:

  • A domain name (This will be your website’s address. For example, wpbeginner.com)
  • A WordPress hosting account (This is where your website’s files are stored)
  • SSL Certificate (You need this to accept online payments)
  • A Micro-Job addon and theme

The set up will take less than 40 minutes, and we will walk you through every step.

Normally a domain name costs $14.99 / year, SSL certificate $69.99 / year, and WordPress hosting would cost you $7.99 / month.

This sounds like a lot of money if you are just starting out.

Luckily, our friends at Bluehost are offering WPBeginner users a free domain, free SSL, and 60% off on WordPress hosting.

Basically, you can get started for as low as $2.75/month.

→ Click Here to Claim This Exclusive Bluehost Offer ←

Bluehost is one of the largest web hosting companies in the world and an officially recommended WordPress hosting provider.

Once you have purchased hosting, head over to our guide on how to make a website for step by step setup instructions.

That being said, now let’s see how to create a micro-job website with WordPress.

Setting up a Micro-Job Website with WordPress

First thing you need to do is install and activate the Microjob Engine theme. For detailed instructions, see our beginner’s guide on how to install a WordPress theme.

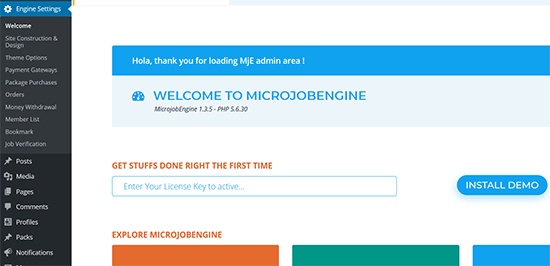
Once you have activated the theme, you will be redirected to the theme’s welcome page. On this screen, you will need to enter your license key which you can find under your EngineThemes’ account.

Enter license key

Next, you need to click on the ‘Install Demo’ button to import and setup a demo website. This will allow you to quickly setup the website to look exactly like the demo. You can then replace the content with your own.

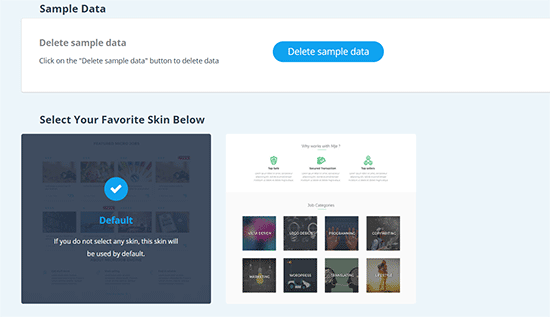
MicrojobEngine comes with two skins to choose from. Once you have imported the demo data, you can select one of the skins to use on your website.

Select skin for your micro-job site

Your website is now set up just like the theme demo. You can visit your website to see it in action.

Selecting Payment Methods and Packages

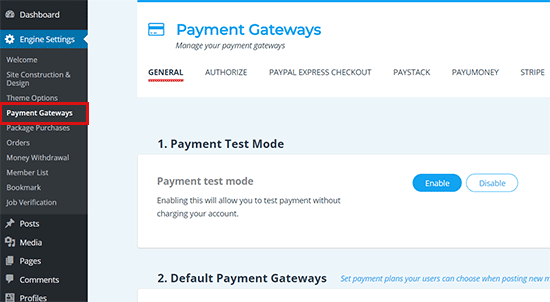
Microjob Engine works with PayPal and 2Checkout out of the box. You can purchase addons to add other payment gateways like Authorize.net, PayU, PayStack, and Stripe.

You can setup your preferred payment gateway by visiting the Engine Settings » Payment Gateways page in your WordPress admin area.

Set up payment metods

Packages Explained

Microjob engine allows you to earn money in two ways:

  1. You can get comission when a job is finished
  2. You can sell packages allowing users to submit gigs for a certain amount.

Setting a payment barrier right from the beginning may prevent some users from signing up, but it will also help keep the spam away.

On the other hand, enabling free job posting will help you attract more freelancers to your website.

You can always change the settings once your website starts getting enough attention from both freelancers and employers.

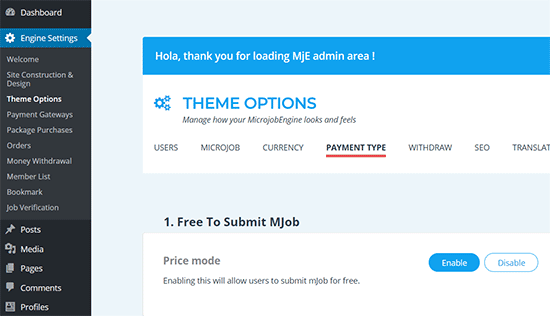
To set up these options, you need to visit the Engine Settings » Theme Options page and click on the Payment Type tab.

Choose payment model

From here, you can enable or disable free posting. If you disable free posting, then you can add packages that freelancers can purchase to submit their offers.

Changing Branding and Website Content

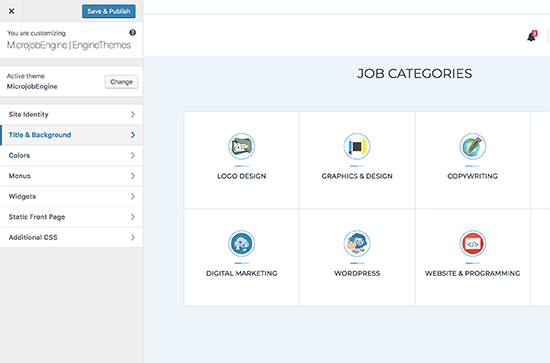
Next, you would want to change the branding and content to make it your own. You can do this by going to Appearance » Customize page where you can change the theme settings with a live preview.

Customizing your theme

Take your time and go through the different options and adjust them to your liking. Don’t forget to click on the Publish button at the top to save your changes before exiting the customizer.

Testing Your Micro-Job Website

Microjob Engine Preview

Once you have set up your theme, it is time to thoroughly test every corner of your website.

Open your website in a new tab and try to use it like your users. Start by posting an ad, and then as an employer by hiring a service.

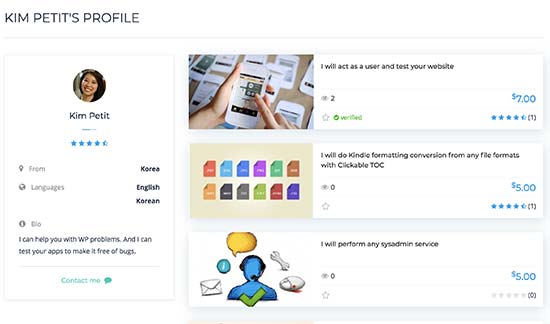
Each user on your website whether freelancer or employer will get their own profile page. Freelancer profiles will show their details, bio, recent gigs, and ratings.

User profiles

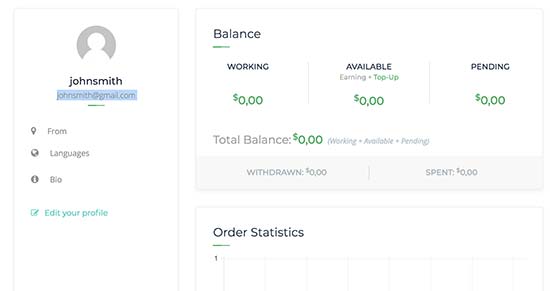
Each user will also be able to manage their account from a custom dashboard. This is where all their chats, messages, and jobs are displayed.

User account dashboard

You may also want to make sure that you and your users can receive email notifications from your website. Sometimes WordPress sites run into an email deliverability issues. You can check out our guide on how to fix WordPress not sending email issue.

Managing Your Micro-Job Site

Even though, your users (both freelancers and employers) wouldn’t need to visit the WordPress admin area, you will still manage all aspects of your website from WordPress dashboard.

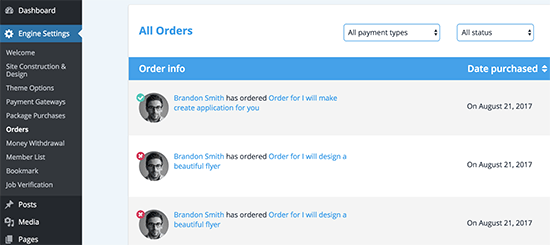
You can see all orders placed on your micro-job site by visiting Engine Settings » Orders.

view all orders

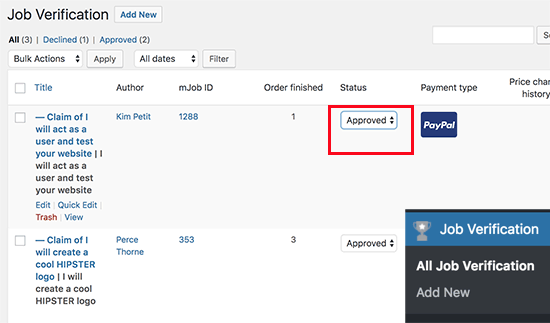
You can also see all completed jobs that need to be verified by visting Jobs Verification page. From here you can approve, keep pending, decline, or verify a job status.

Once approved, the freelancer will be able to withdraw their money.

Managing job verification

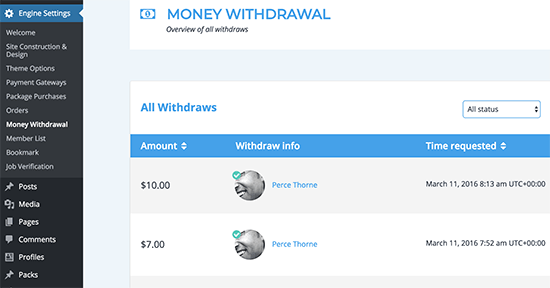
To view all withdrawl activity, you need to visit Engine Settings » Money Withdrawl tab. On this page, you will see a list of freelancers who have withdrawn their earnings.

Money Widthdrawal

You can manage all site functions from the admin area of your WordPress site, and you can even peek into conversations between your users.

This helps make sure that freelancers are not insisting clients to use other unverifiable payment methods. It also helps during the dispute resolution between freelancers and employers.

More Resources

Microjob Engine is a powerful app theme with tons of cool features. However as your website grows, it can be quite heavy on your servers. To make sure your site performs well, see our guide on how to improve WordPress speed and performance.

Even then, as your site grows you will run out of shared hosting resources. In that case, you will need to upgrade to a managed WordPress hosting or VPS hosting.

We hope this article helped you learn how to easily create a micro-job site in WordPress. You may also want to see our guide on bringing more traffic to your new WordPress site.

If you liked this article, then please subscribe to our YouTube Channel for WordPress video tutorials. You can also find us on Twitter and Facebook.

The post How to Create a Micro-Job Website Like Fiverr with WordPress appeared first on WPBeginner.
The Best Free WordPress Themes January 2018

The beginning of the new year has seen a massive outburst of quality themes for your WordPress blog. In this plethora of themes, some of them have really stood out. A number of themes have amazed us with their versatility and excellent code, while others have smashed records because of their uniqueness and amazing concepts. ... Read moreThe Best Free WordPress Themes January 2018

The post The Best Free WordPress Themes January 2018 appeared first on Learn WordPress with WPLift.

How to Create a Survey in WordPress (with Beautiful Reports)

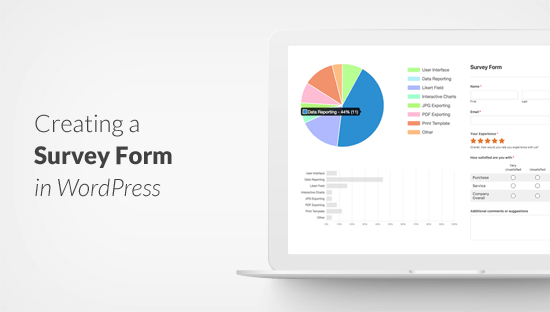
Do you want to create a survey in WordPress? Surveys help you gather valuable information, so you can use to make data-driven decisions. In this article, we will show you how to easily create a survey in WordPress and generate beautiful reports.

Survey Plugin for WordPress

Choosing The Best Survey Tool for WordPress

There are many online services that allow you to create survey forms and embed them in WordPress. The downside of these forms is that the data is stored on third-party servers, and you have limited customization options.

Some of these forms are also limited to the number of responses you can collect. You have to pay extra to get more responses and usually these services have high monthly costs.

Wouldn’t it be nice if you could run surveys on your own website without relying on third-party services?

This is where WPForms comes in. It is the best WordPress form builder plugin in the market.

They recently announced a powerful new WordPress surveys and polls addon that you can use to easily create survey forms on your website.

With WPForms survey feature, you get the following:

  • Powerful drag and drop form builder to create surveys
  • Smart survey fields like Rating, Likert Scale, and more
  • Conditional logic to personalize survey fields based on user input
  • Interactive survey reports with bars, graphs, charts, and tables
  • Ability to export survey graphs as JPEG, PDF, or Print Formats
  • Export survey results as CSV to use elsewhere

That being said, let’s take a look at how to easily create and add survey in your WordPress website.

Disclosure: WPForms is created by the same team behind WPBeginner. It is one of our premium WordPress plugins.

Creating a Survey in WordPress

First thing you need to do is install and activate the WPForms plugin. For more details, see our step by step guide on how to install a WordPress plugin.

WPForms surveys and polls addon is part of their Pro plan. WPBeginner users can use our WPForms coupon to ge 10% OFF on all WPForms licenses.

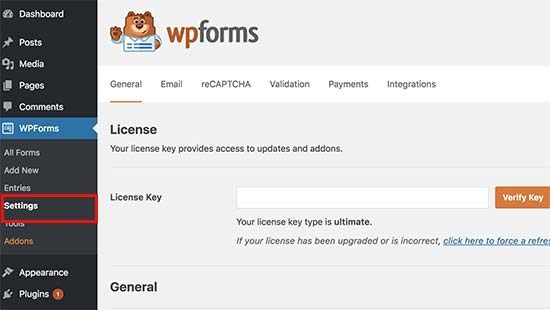
Once the plugin is activated, you need to head over to WPForms » Settings page to enter your license keys. You can find this information under your account on the WPForms website.

WPForms License

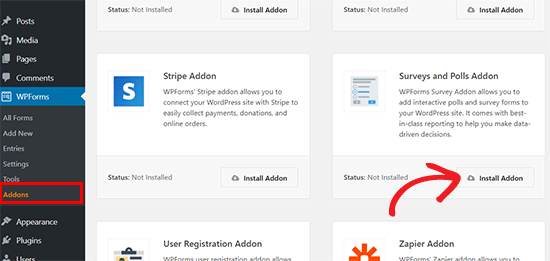
Next, you need to visit the WPForms » Addons page and scroll down to the Surveys and Polls addon. Go ahead and click on the Install addon button to install the survey addon. Once installed, you need to click on the ‘Activate’ button to start using the addon.

Install survey and polls addon

Now you are ready to create a survey form.

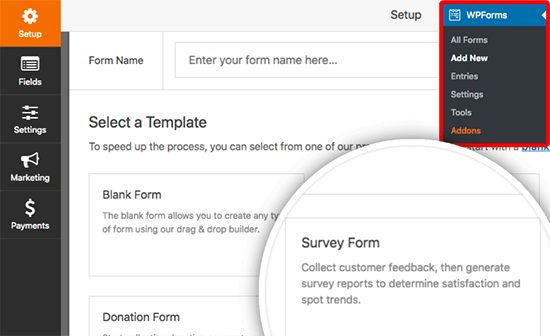
You need to visit WPForms » Add New page to create a new form. This will launch the WPForms’ drag and drop form builder interface.

Create survey form

First you need to provide a title for your survey form and then click on the Survey Form template.

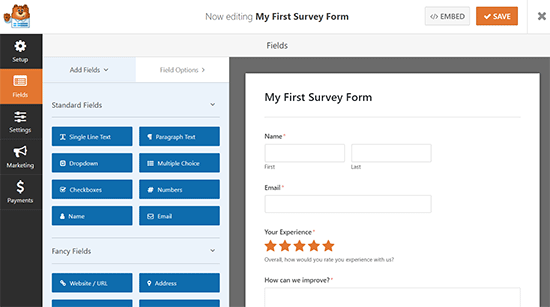
This will load a sample customer feedback form template with several fields already added into the form.

Survey form template

You can just point and click to edit any field, rearrange them with drag and drop, or remove them from the form. You can also add new form fields from the left column.

WPForms supports all commonly used form fields including drop down, radio buttons, checkboxes, likert scale, text input, rating scale, and many more. This makes it super easy for you to build highly interactive survey forms.

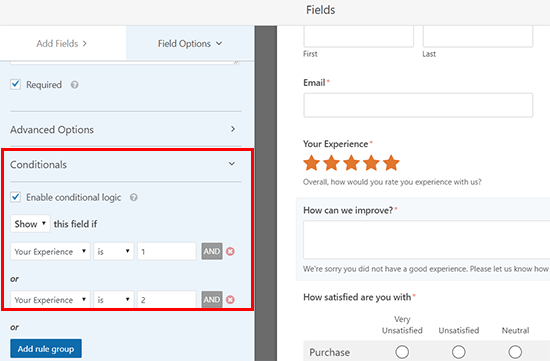
WPForms also includes conditional logic which means you can personalize your survey questions based on user input in one of the previous fields.

Conditional fields

Once you have created the form, you need to click on the save button to store your form settings. You can now click on the close button to exit the form builder.

Adding The Survey Form in Your WordPress Website

WPForms makes it very simple to add your forms anywhere on your website. You can easily add your survey form in any WordPress post, page, custom post type, or your sidebar.

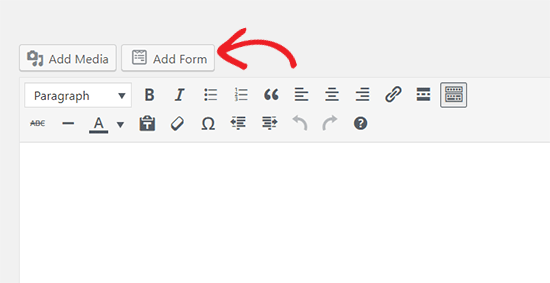
To add the survey form in a WordPress post, page, or post type, you need to visit the post edit screen and click on the ‘Add Form’ button.

Add form button

This will bring up a popup where you can select the survey form you created earlier and click on the insert form button to continue.

You will now see the form shortcode added into the post editor.

Once you are done editing the post, go ahead and publish it. You can visit your website to see your survey form live in action.

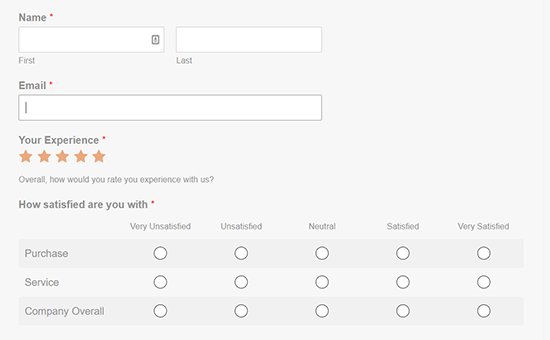
Survey form preview

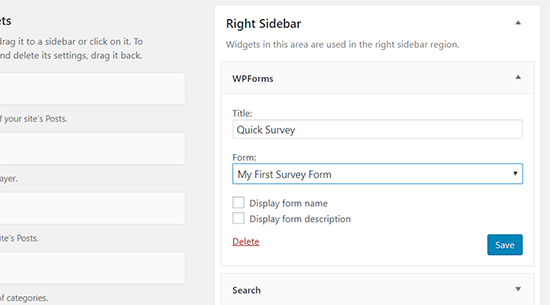
WPForms also allows you to easily add your survey form into any sidebar or widget ready area. Simply head over to the Appearance » Widgets page in your WordPress admin area and drag the WPForms widget to any sidebar.

Survey form widget

In the widget settings, select the survey form you created earlier and don’t forget to click on the save button to store your changes.

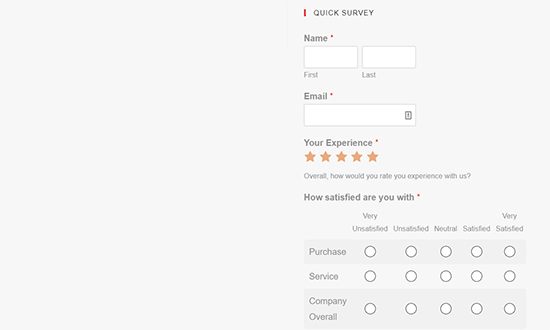
You can now visit your website to see your survey form displayed in the sidebar.

Sidebar survey widget

Viewing Your Survey Form Results

WPForms shows survey results in beautiful charts and graphs. You can also print survey results and export them to use in your favorite spreadsheet software.

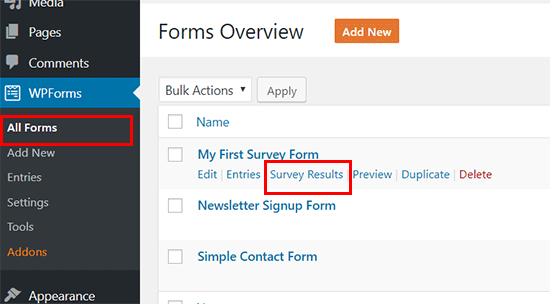
To view your survey results, you need to visit WPForms » All Forms page and click on the ‘Survey Results’ link below your survey form.

View survey results

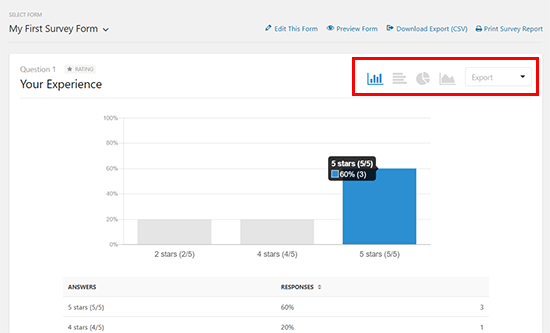
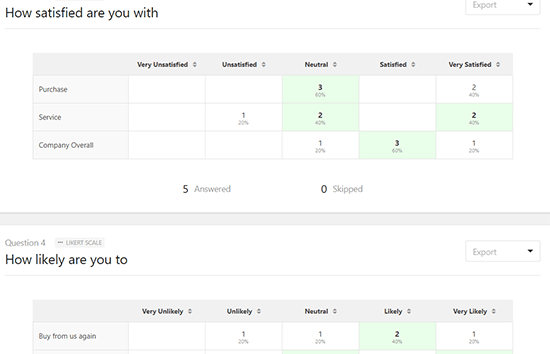
On the results page, you will see your survey responses displayed in an interactive chart and tables. You can export responses to a single question, as well as the entire survey.

Survey results

On the top, you will see options to switch to different chart types and the export option. You can save individual survey results as JPEG, PDF, and Print formats to easily share them on presentation slides, blog posts, or social media.

Result tables

Convert Any Form into a Survey

WPForms also allows you to make any form into a survey form and display past results as a survey. You can even select specific form fields that you want to be treated as survey fields.

This is particularly useful if you want to gather data through other forms like a contact form, user registration, or newsletter sign up forms.

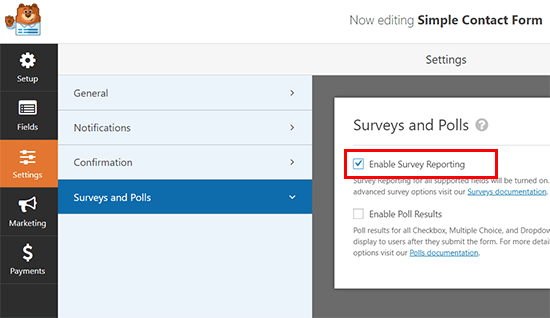
To convert an existing WPForms form into a survey, simply edit the form in WPForms and go to the Settings » Surveys and Polls section. You need to check the box next to ‘Enable Survey Reporting’ option and save your changes.

Enable survey reporting for any form in WPForms

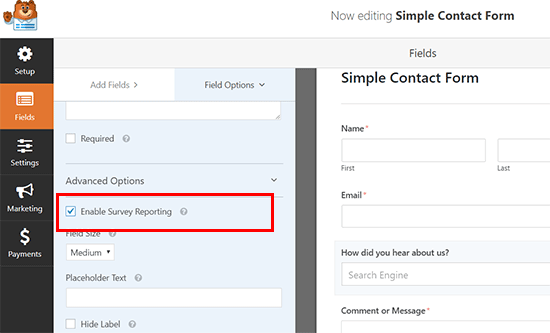
To enable survey reporting for an individual form field, simply edit the form and then click on the field that you want to enable.

Under the ‘Field Options’ section on your left side, you need to click on the Advanced Options and check ‘Enable Survey Reporting’ option.

Enable survey reporting for any form field

We hope this article helped you learn how to easily create and add beautiful survey forms in WordPress. You may also want to see our beginner’s guide on how to track user engagement in WordPress with Google Analytics.

If you liked this article, then please subscribe to our YouTube Channel for WordPress video tutorials. You can also find us on Twitter and Facebook.

The post How to Create a Survey in WordPress (with Beautiful Reports) appeared first on WPBeginner.
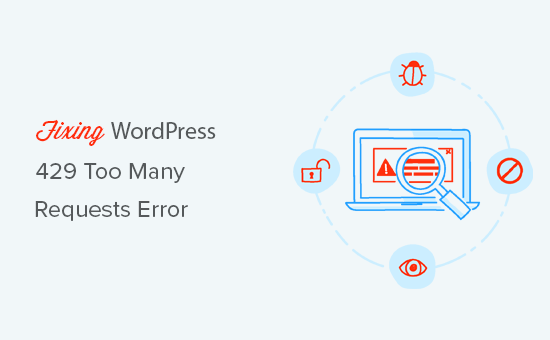
How to Fix the WordPress 429 Too Many Requests Error

Are you seeing the 429 too many requests error on your WordPress site? This error can be extremely frustrating because it is hard to figure out what’s causing it. In this article, we will show you how to easily fix the WordPress 429 too many requests error.

How to fix WordPress 429 too many requests error

What Causes WordPress 429 Too Many Requests Error?

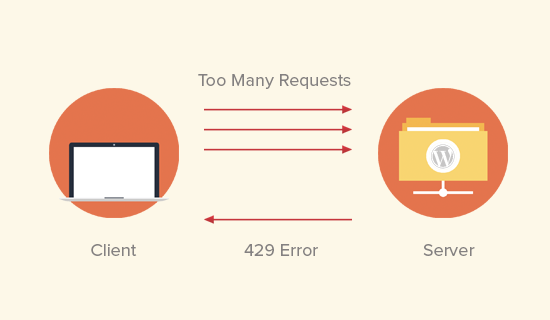
The most common reason for the 429 too many requests error is when a user, bot, or a script tries to make too many requests to the servers. It is a measure to prevent DDOS attacks on websites.

However if it is not properly configured, then it may end up preventing search engines or other APIs to run properly. This would cause unexpected behavior on your website.

Causes of 429 error in WordPress

Sometimes the error is caused when a script on your website is making too many requests to another website or service using an API. In that case, the API would respond back with a 429 error code.

That being said, let’s take a look at how to easily troubleshoot and fix 429 too many requests error in WordPress.

Fixing 429 Too Many Requests Error in WordPress

This error can be caused by a number of factors. We will show you multiple ways to troubleshoot and fix the 429 too many request error.

Find and Deactivate Misbehaving Plugin

The most common culprit of 429 error is usually a bad plugin on your website. Plugins can sometimes make subsequent requests to your website which may be rejected by the server with a 429 error code.

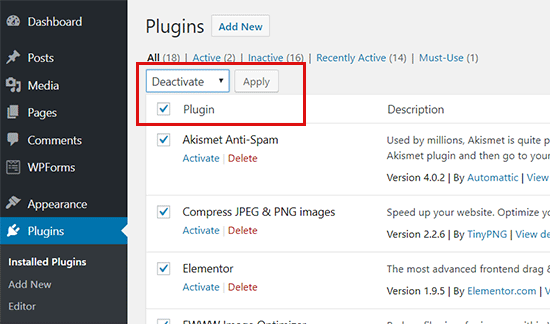
First thing you need to do is deactivate all WordPress plugins on your website. You can do this by visiting the plugins page in your WordPress admin area and selecting all plugins. After that, select ‘Deactivate’ under the bulk actions drop box and click apply.

Deactivate all WordPress plugins

If you are unable to access the WordPress admin area, then see our guide on how to deactivate all WordPress plugins via FTP.

Now check your website again to see if you can reproduce the 429 too many requests error again. If you can’t, then this means a plugin was causing this issue.

You can now turn on your plugins one by one and check your website after activating each plugin. This way you will be able to find the plugin causing the error.

Once you find the plugin causing the error, you can replace it with an alternative plugin or try reaching out to the plugin author to let them know about the error.

Switch to a Default WordPress Theme

More and more WordPress themes include functionality that normally comes with plugins. Such themes may also cause 429 error too many requests on your website.

The easiest way to find out is by switching to a default WordPress theme like Twenty Seventeen. If this resolves the 429 error issue, then you can find another WordPress theme or report the problem to the theme developer and they may be able to fix it.

Ask Your Hosting Provider

A lot of times, you will see a 429 too many requests error in third-party services that need access to your website. This could be search engines, crawlers, and other web apps.

If you are seeing the error in Google Search console or any third-party service, then most likely they are sending too many requests to your website. In that case, you need to ask your WordPress hosting provider to not block those requests.

We hope this article helped you fix the WordPress 429 error too many requests on your website. You may also want to see our list of most common WordPress errors and how to fix them.

If you liked this article, then please subscribe to our YouTube Channel for WordPress video tutorials. You can also find us on Twitter and Facebook.

The post How to Fix the WordPress 429 Too Many Requests Error appeared first on WPBeginner.
WordPress Document Library Plugin: The Complete Guide

A WordPress document library plugin is a popular way to list PDF files or other documents in a structured format with download links. A good document library makes it quick and easy for people to find the items they need – for example, with search options and filters. Surprisingly, there aren’t many good quality WordPress ... Read moreWordPress Document Library Plugin: The Complete Guide

The post WordPress Document Library Plugin: The Complete Guide appeared first on Learn WordPress with WPLift.

Weekly WordPress News: Product Support, Gutenberg, And Page Builders

There wasn’t much WordPress core news this week – perhaps everyone was too busy with Valentine’s plans. We do have some good articles on offering support for WordPress products, developers doing interesting things with Gutenberg, and how some of the most popular page builders stack up when it comes to performance. We also have detailed ... Read moreWeekly WordPress News: Product Support, Gutenberg, And Page Builders

The post Weekly WordPress News: Product Support, Gutenberg, And Page Builders appeared first on Learn WordPress with WPLift.

24 Best WordPress Themes for Membership Sites

Are you looking for the best WordPress themes for membership websites. Unlike blogs and business themes, membership websites need a wide-variety of templates to use in different membership areas. In this article, we have hand-picked some of the best WordPress themes for membership sites.

WordPress themes for membership sites

Making a Membership Website with WordPress

WordPress is the top website builder in terms of popularity and global usage.

There are two types of WordPress, and it’s important that you choose the right one for your membership site. See the difference in our WordPress.com vs WordPress.org comparison chart.

We recommend using WordPress.org because it gives you all the powerful features without any limitations.

To start a membership website with WordPress, you’ll need a domain name, website hosting, and a SSL certificate (you need it to accept payments online). You can buy them from different companies and prices may vary from one company to another.

We recommend using Bluehost. They are one of the largest hosting companies and officially recommended by WordPress. They have agreed to offer our users a free domain, free SSL, and 60% off web hosting.

Once you have purchased hosting, you will need a WordPress membership plugin. We recommend using MemberPress which is the best WordPress membership plugin in the market. It will turn your WordPress site into a full-fledged membership and subscriptions based community.

We have created a complete guide on how to make a WordPress membership website with step by step instructions for beginners.

That being said, let’s take a look at some of the best WordPress themes for membership websites that you can try.

1. Public Opinion

Public Opinion

Public Opinion is a magazine style WordPress theme for content rich websites including membership sites. Its homepage and category pages are designed to showcase your content in a beautiful grid layout. It has a primary navigation menu below the header and a secondary menu on top with an additional social profiles menu.

It comes with dedicated spots to easily add Google AdSense ads. You can choose custom layouts, and it also includes a full-width page to use with any WordPress page builder plugin. All theme options are located under the customizer allowing you to make changes with live preview of your website.

2. Ultra

Ultra

Ultra is the ultimate all-purpose WordPress theme designed to create any kind of website without editing any code. It includes several ready-made website designs that you can install with full demo content. It is also equipped with a powerful drag and drop page builder to edit existing pages or create new page layouts.

This theme is packed with features like custom widgets, social media integration, multiple header styles, unlimited layout combinations, and more. It is ecommerce ready and works well with MemberPress or any other WordPress membership plugin.

3. Hive

Hive

Hive is a minimalist WordPress theme focused on readability and a clean design. It features grid layout for your homepage and archive pages. It also includes a full width page template to use with your favorite page builder plugin.

It is designed to work out of the box and all theme settings are located under the customizer. It is translation ready and can also be used to create a multilingual websites.

4. Blockchain

Blockchain

Building a membership website for a cryptocurrency community? Blockchain is a WordPress theme to build cryptocurrency websites. It features a beautiful modern design with a fully functioning cryptocurrency exchange rates module.

It also includes custom post types for projects, services, case studies, and job listings. Inside you will also find custom widgets, page templates, full support for page builders, and more. It is very easy to set up and customize with built-in customizer.

5. Binder Pro

Binder Pro

Binder Pro is a multi-purpose WordPress business theme suitable for membership websites. It includes ready to use modules that you can just drag and drop to create your own unique page layouts.

It comes with several turn key website designs that can be installed with 1-click. Other notable features include contact form support, pricing tables, Google Fonts, custom widgets, social media icons, and full WooCommerce support.

6. Shoppe

Shoppe

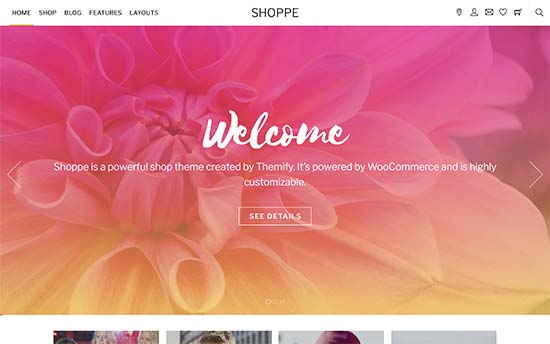
If you want to run an online store with your membership website, then you’ll love Shoppe. This WooCommerce WordPress theme comes in 4 website skins, multiple layouts, several header styles, and unlimited colors. It also ships with an integrated drag and drop page builder to quickly create landing pages.

It is easy to set up with a quick 1-click demo installer, custom theme dashboard, and live customizer. It is super flexible and allows you to customize layouts and design of any page or post without affecting rest of your website.

7. Latest

Latest

Latest is another beautifully designed WordPress theme for ecommerce and membership websites. It comes with a highly engaging homepage design that can be automatically populated with recent posts or your top selling products.

Its main features are beautiful typography, beautiful handling of images, and detailed product pages. It is designed to work out of the box and requires minimum set up. All theme options are available under customizer where you can set up your theme in minutes.

8. Spencer

Spencer

If you are looking for a professional WordPress business theme for your membership site, then take a look at Spencer. This clean and elegant theme is designed for businesses with a flexible design. It has custom widgets, unlimited colors, multiple layouts, and support for all essential WordPress plugins.

Spencer includes a widgetized homepage where you can just drag and drop widgets to set it up. It also has a sticky navigation menu on top with a clear call to action to convert visitors into customers. It is beginner friendly and quite easy to use.

9. Elegant

Elegant

Elegant is a clean and modern WordPress theme for business and membership websites. It has multiple homepage styles available in 6 color schemes and quick 1-click demo content importer. It also ships with an integrated page builder allowing you to create any layout you want.

Other notable features include multi-column layouts, social icons, portfolio section, contact form, and full WooCommerce support. It has a custom theme settings page which walks you through theme set up.

10. Lenscap

Lenscap

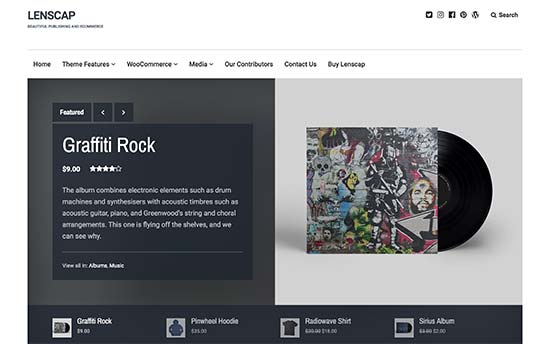
Lenscap is a magazine style WordPress theme suitable for content rich membership websites. It has a beautiful homepage layout with a customizable header showcasing your best content and categories. It has templates for product pages with beautiful image galleries.

It works out of the box and only includes options you’ll actually use, which makes it quite easier to set up for beginners. Inside you will also find a getting started page with instructions to set up your website with this theme.

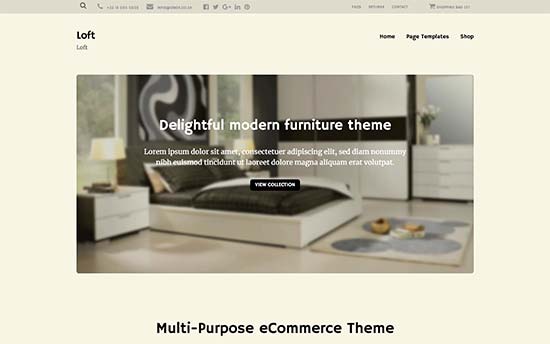
11. Loft

Loft

Loft is a powerful WordPress eCommerce theme suitable for membership websites. Loft comes with multiple homepage styles for eCommerce, blog, business, and portfolio layouts and they all look equally beautiful.

It has a sticky navigation menu, call to action buttons, custom widgets, and multiple page templates. It also includes content types to add services, portfolio, team members, and testimonials. Theme set up is quite simple and easy to follow even for beginners.

12. Checkout

Checkout

If you are creating a pay per view website or membership website with digital downloads, then you will love the Checkout theme. It is a WordPress eCommerce theme that works beautifully with MemberPress and Easy Digital Downloads.

Checkout includes beautiful page templates for your posts and pages. It also includes portfolio, team members, contact page, customizable headers, and crisp typography. It is quite easy to use and takes very little time to set up.

13. Composition

Composition

Composition is a WordPress theme for stock photography websites. It can be used to sell your photographs and illustrations with a subscription option using a membership plugin. It features a stunning homepage layout with a fullscreen background image and a search box.

It includes beautiful templates to display your articles in masonry grid layout. You can also visually rearrange homepage items and add portfolio, blog, newsletter, and more. It is fully widgetized and allows you to design your website with simple drag and drop.

14. The Thinker

The Thinker

The Thinker is a premium WordPress theme for bloggers, magazine, and membership websites. It is a simple and minimalist theme with beautiful typography and gorgeous display of featured images.

It includes multiple page templates, several widget-ready areas, premium WordPress slider, contact form support, and more. It is beginner friendly and can also be used to create a multilingual website.

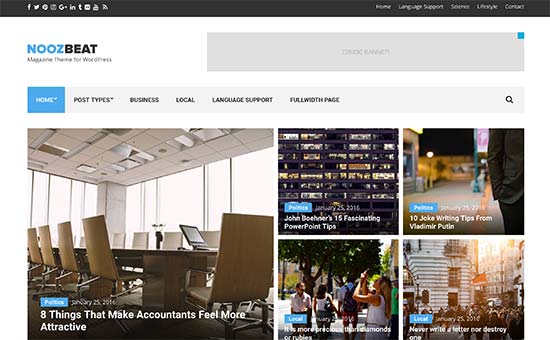
15. Noozbeat

Noozbeat

Noozbeat is a WordPress news and magazine theme ideal for subscription based online publications and membership websites. It’s homepage features masonry grid layout of your top content, custom logo upload, and dedicated spots to display ads.

It comes with full color control, category templates, custom widgets for social media and content discovery, and multiple layout options. You can use it with your favorite page builder plugin to create custom page layouts in WordPress.

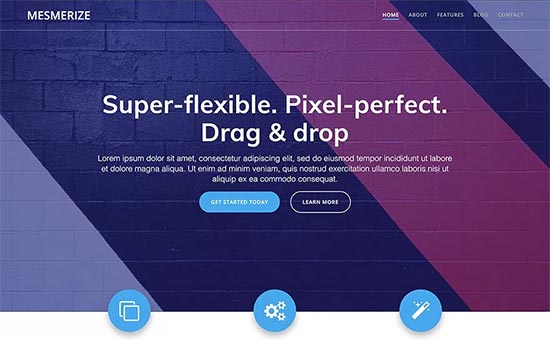
16. Mesmerize

Mesmerize

If you are looking for a free WordPress theme for your membership website, then checkout Mesmerize. This beginner friendly WordPress theme comes with flexible options allowing you to easily create a professional looking website without any coding.

It features a beautiful homepage with 5 header designs and over 30 ready to use content sections that you can customize. Some other notable features included are video background, slideshow background, header content types, gradient overlays, and more.

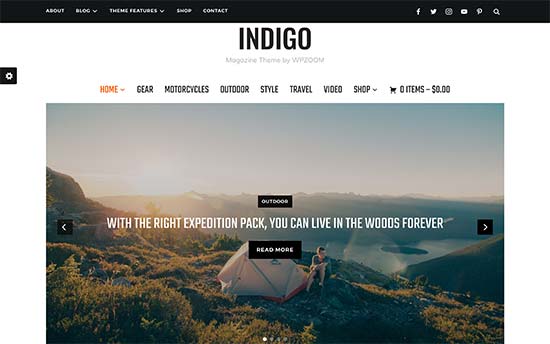
17. Indigo

Indigo

Indigo is an excellent WordPress multi-purpose theme with flexible features. Its homepage features two navigation menus, featured slider, 3-column widget area, sticky menu, featured categories, and more.

It also includes custom widgets to add popular posts, recent tweets, newsletter signup form, social icons, and more. It has magazine, blog, two column, and three column layouts with 6 color schemes to choose from.

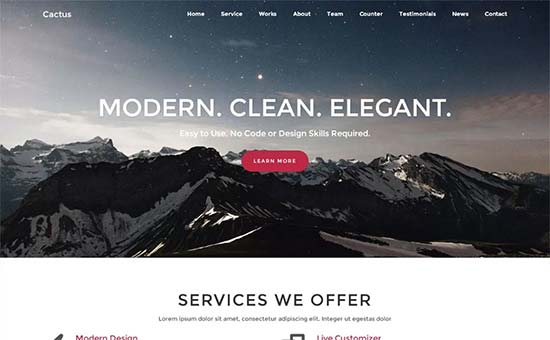
18. Cactus

Cactus

Cactus is another free WordPress theme that can be easily used to build a membership website. It has 10+ content areas where you can just drag and drop widgets to create your homepage.

It has a sticky floating navigation menu on top, which is followed by a slider and your top content sections. It is tested with popular page builder plugins and it is WooCommerce ready out of the box. It has full support for multilingual websites using Polylang plugin.

19. Silk

Silk

Silk is a WordPress theme for fashion blogs and websites. It features a stylish modern homepage layout with minimal distractions which makes your content pop out. It has two navigation menus on top, followed by featured content slider, and your recent posts in a grid layout.

It uses beautiful typography and includes several custom widgets for popular posts, newsletter signup, photo galleries, and more. It has a floating social sharing bar for single posts with a sticky widget area that remains on the screen as users scroll down.

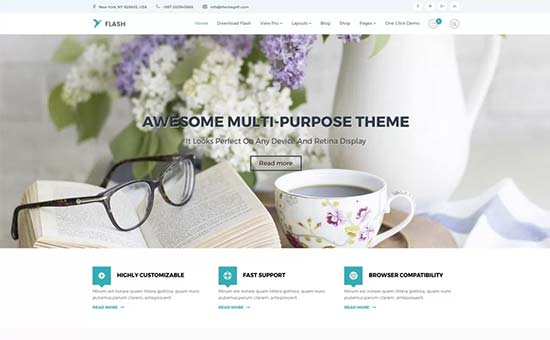
20. Flash

Flash

Flash is another great free WordPress theme for membership websites. This modern multi-purpose WordPress theme is WooCommerce ready and comes with beautiful design that looks very clean and professional.

It has its own companion plugin, which allows you to easily import demo content into your website. It also includes multiple blog layouts, page builder templates, multiple header styles, multiple color choices, and more.

21. Digital Pro

Digital Pro

Digital Pro is a clean and professional WordPress business theme. It is built on top of the Genesis theme framework, which is known for its rock solid code, speed and performance. It is ideal for membership websites offering digital content and downloads.

Theme homepage is fully widgetized and you can just drag and drop widgets to set it up. It has theme options panel, 3 custom widget areas, customizable header, and full WooCommerce support.

22. Specialty

Specialty

If you are building a WordPress membership website for online job board, then check out Specialty. This theme is designed as a job board theme with front-end job post submission form for job hunters. Its home page features a quick job search form followed by the recent listings.

It works with any page builder plugin and includes several page templates that you can utilize to create landing pages. Other notable features include custom widgets, social icons, blog page template, and more.

23. Paperback

Paperback

Paperback is a magazine style WordPress theme that can be easily used for content-rich membership websites. Its homepage features a featured content area on the top, followed by different sections of your website. It is optimized for better readability with beautiful typography and spacious layout.

Paperback is designed to work without too much tinkering with the theme. It only includes the options you will actually use, which makes it quite easy to set up.

24. Float

Float

Float is a multi-purpose WordPress theme that can be used for any kind of websites. Its main feature would be the beautiful parallax background effects on the homepage which create a very engaging user experience.

Float includes several pre-designed demos that can be imported with 1-click. It offers a variety of layout combinations and comes with an integrated page builder. For theme set up you can use the custom theme options panel which walks you through everything. After initial set up you can customize every aspect of your website with simple point and click.

We hope this article helped you find the best WordPress themes for membership sites. You may also want to see our ultimate step by step WordPress SEO guide for beginners.

If you liked this article, then please subscribe to our YouTube Channel for WordPress video tutorials. You can also find us on Twitter and Facebook.

The post 24 Best WordPress Themes for Membership Sites appeared first on WPBeginner.
Blockchain Technology: How Will it Impact WordPress?

Cryptocurrency has been around for quite a while by now. But in the past few months, the fluctuations in the price of cryptocurrencies such as Bitcoin have caught the world’s attention. With the ever increasing rise and drop in prices, cryptocurrency has proven to be quite a good investment for many folks. The rising popularity ... Read moreBlockchain Technology: How Will it Impact WordPress?

The post Blockchain Technology: How Will it Impact WordPress? appeared first on Learn WordPress with WPLift.

How to Use the Plugin Organizer to Speed Up Your WordPress Site

After WordPress hosting, plugins are the second biggest reason that can cause your WordPress site to be slow. Often times this can be mitigated by either disabling the plugin or stop it from loading in areas where you don’t need them. In this article, we will show you how to use the Plugin Organizer to speed up your WordPress site.

Using Plugin Optimizer to speed up WordPress

How WordPress Plugins Affect Your Website Speed?

One of the most frequently asked questions that we get is how many WordPress plugins are too many? The two things that concerns most users are WordPress security and how plugins may affect speed and performance?

All good WordPress plugins are coded in a way that they are only loaded on your website when needed. You can see our infographic on how WordPress actually loads plugins (behind the scenes).

WordPress doesn’t load inactive plugins which means they don’t affect your website’s performance. However, it does load all active plugins which then run their code when needed.

Now sometimes plugin authors cannot anticipate when and where you will use their plugin features on your website. In that case, they may load their code whether or not you need it. If the plugins are loading JavaScript and CSS files, then this may increase your website’s page load time.

How WordPress Plugin Organizer Can Speed Up Your Site

Depending on the plugins that you’re using, there may be some that you only need on specific pages, posts, or post types. Some plugins you may only need in the WordPress admin area, so they shouldn’t load on the front-end of the website.

WordPress Plugin Organizer allows you to do the following things:

  • Selectively enable or disable plugins based on URL
  • Enable or disable plugins for user roles
  • Enable or disable plugins based on post types
  • Rearrange the order in which plugins are loaded
  • Disable plugins and only load them when needed

Basically, it gives you the ability to fine-tune your website performance.

That being said, let’s take a look at how to use the Plugin Organizer to speed up WordPress.

Using WordPress Plugin Organizer to Manage Active WordPress Plugins

First, thing you need to do is install and activate the Plugin Organizer plugin. For more details, see our step by step guide on how to install a WordPress plugin.

Important: Plugin organizer is a very powerful plugin. Reordering or disabling plugins can cause conflicts and unexpected behavior which could make your site inaccessible. We recommend that you create a complete WordPress backup before disabling or reordering any plugins.

Once you are ready, you need to head over to the Plugin Organizer » Settings page to configure your settings.

Plugin organizer settings

There are several options on this page, and we will look at each option, what it does, and which ones you should turn on.

Fuzzy URL Matching

This option allows you to enable/disable plugins on child URL. This means that settings will affect http://example.com/sample-page/ and all subsequent URLs under it. For example, http://example.com/sample-page/child-page1/ and http://example.com/sample-page/child-page2/.

Ignore URL Protocol

This option is turned off by default. It allows the plugin organizer to ignore http and https part of plugin URLs. This is particularly helpful if you have SSL enabled on your WordPress site.

Ignore URL Arguments

This option allows you to ignore URL arguments. For example, http://example.com/page/?foo=1&bar=2 is a URL with arguments. Turning on this option is only helpful on URLs with arguments. You should leave it OFF in most cases.

Only allow network admins to change plugin load order?

If you are running a WordPress multisite network, then turning on this option will only allow Network Administrator to rearrange plugin order. We highly recommend that you turn this on if you have a WordPress multisite network.
Custom Post Type Support

This option allows you to select the post types where you want to enable/disable plugins. This option is particularly useful if you have plugins that you only need for specific post types.

Auto Trailing Slash

This option adds or removes the trailing slash at the end of plugin filter URLs based on your WordPress permalink settings.

Selective Plugin Loading

This option allows you to selectively load plugins even if they are disabled in plugin settings. You need to turn on this feature if you want to enable or disable plugins on individual content types.

To properly use this option, you need to add a must use plugin or mu-plugin in WordPress. MU plugins can be added to any WordPress site, and they are activated by default. The plugin will try to create an MU plugin itself, but if it fails then you will need to create it. We will show you how to do that later in this article.

Selective Mobile Plugin Loading

This option allows you to selectively enable or disable plugins on mobile browsers.

Selective Admin Plugin Loading

You can turn on this option if you want certain plugins to only load inside the WordPress admin area.

Disable Plugins By Role

This option allows you to disable plugin by user roles. You can turn on this option and then select user roles that you want to use in the next box.

Don’t forget to click on the save settings button to store your changes.

Creating an MU Plugin for Plugin Organizer

Plugin Organizer needs an MU plugin to work properly. The plugin will try to automatically add it to your website, but if it fails then you will have to create it yourself.

To find out whether the plugin has successfully created the MU plugin. You need to visit Plugins » Installed Plugins page. You will see a new link labeled Must-Use, clicking on it will show you the installed MU plugins on your site.

Must Use plugins installed in WordPress

If you don’t see the plugin or Must-Use plugins link, then this means that the plugin organizer failed to create the file, and you will need to manually do it yourself.

First, you need to connect to your website using an FTP client or File Manager app in cPanel.

Next, Go to the /wp-content/mu-plugins/ folder. If you don’t have a mu-plugins folder in your /wp-content/ folder, then you need to create one.


After that you need to go to /wp-content/plugins/plugin-organizer/lib/ folder and download the file called ‘PluginOrganizerMU.class.php’ to your computer.

Copy MU plugin file

Next, you need to go to the /wp-content/mu-plugins/ folder and upload the file from your computer.

Plugin Organizer mu-plugin file

The Plugin Organizer can now you use this file to properly manage your plugins efficiently. You can go ahead and continue with plugin settings.

Set up Global Plugin Options

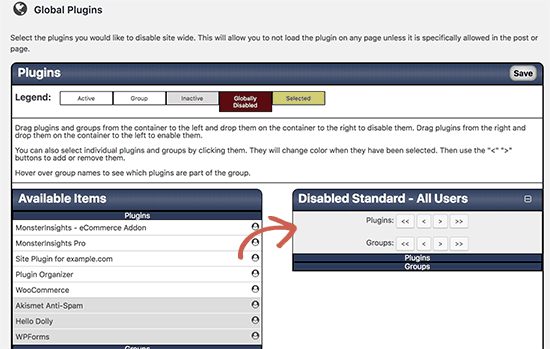
Plugin Organizer allows you to activate plugins but keep them disabled. To set up which plugins remain active and which plugins are disabled, you need to go to the Plugin Organizer » Global Plugins page.

Set plugins to disable globally

You will see your installed plugin on the left. Active plugins will be highlighted and displayed on top. If you want to disable a plugin, then you can simply drag and drop it to the Disable column.

This will disable the plugins without deactivating them.

You can re-enable the plugin you disabled for individual post types, single post or page items, individual URLs, from different pages in the plugin settings. We will walk you through each of them later in this article.

Enable or Disable Plugins on Search Results Page

To disable or enable certain plugins on search results, you will need to visit the Plugin Organizer » Search Results page.

Disable plugins on search results page

On this screen, you need to simply select a plugin from the left column and drop it to the disable column. You will notice that the disable column has different boxes. You will need to click on the box where you want to disable the plugin. For example, adding a plugin to ‘Disabled Standard’ box will disable the plugin for all users on all pages.

If you previously set a plugin to be disabled globally, and you want it to be loaded on search results page, then you can simply drag and drop it from disabled plugins column back to available plugins.

Enable plugins on search results page

Selectively Enable / Disable Plugins for Custom Post Types

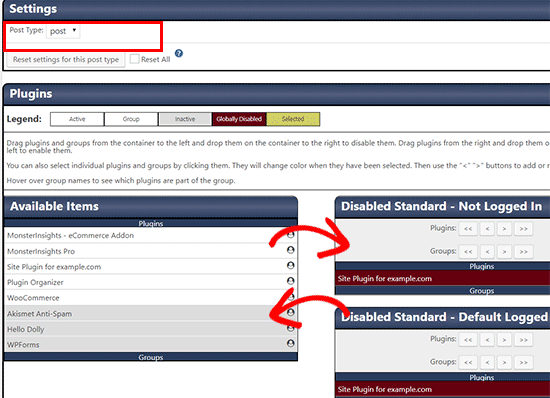
To control which plugins work on certain post types, you need to visit Plugin Organizer » Post Type Plugins page.

Enable or disable plugins for post types

First, you will select the post type where you want to apply the changes. After that, you can drag and drop plugins from available items column to the disable column.

You can also enable a plugin that you have disabled in Global Plugins page by dragging it from the Disabled column to the available items.

Group Plugins and Change Plugin Load Order

By default, WordPress loads your current active plugin files alphabetically. This alphabetical order may sometimes cause conflicts if you have plugins depending on each other’s code.

For example, if you have a plugin file apple.php which relies on functions in another plugin called zebra.php, then you may need the zebra.php file to load first so that apple.php works properly.

Plugin Organizer allows you to manually change the plugin order and group plugins. However, be very careful as this could make your website inaccessible.

To rearrange the plugin load order, you need to visit Plugin Organizer » Group and Order Plugins page.

The plugin organizer will display your plugins in default alphabetical order, and you can rearrange the order by simple drag and drop.

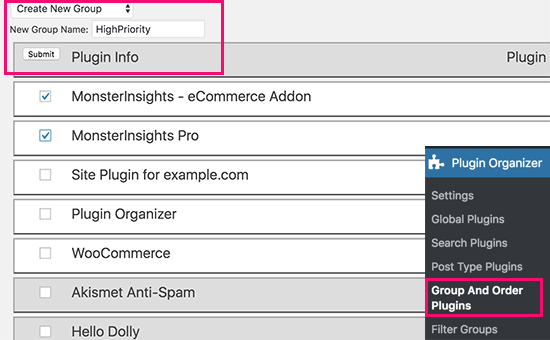
You can also group plugins together by selecting ‘Create new group’ from the drop down menu at the top. Next, you need to enter a name for the group and select the plugins you want to add in it.

Creating a plugin group

Once you are done with the group, click on the Submit button to continue. Plugin organizer will now create a plugin group for you.

Now if you go to the Plugins page, then you will see a new link named after your group name. When you click on it, you will see all the plugins inside that group.

Plugin group list on the plugins page

Creating Plugin Filters with Plugin Organizer

Plugin Organizer allows you to enable or disable plugin based on URL. To do that you need to create Plugin Filters. These filters will allow you to enable or disable plugins that match specific URLs.

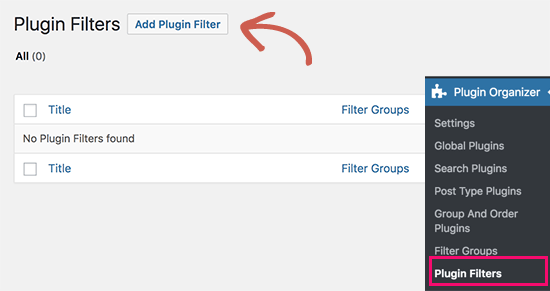
First you need to go to the Plugin Organizer » Plugin Filters page and click on ‘Add Plugin Filter’ link.

Add plugin filter

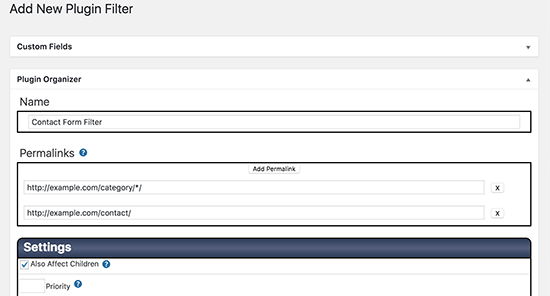
This will bring you tothe add new plugin filter page. You will need to provide a name for your plugin filter and then add permalinks (URLs) that you want to be affected by this filter.

Creating a plugin filter

You can add multiple URLs by clicking the Add Permalink button.

Under the settings section, you can choose whether this filter will also affect child URLs of permalinks you have added. You can leave the priority field blank.

After that, scroll down to the ‘Plugins’ section. Here you can drag and drop plugins from the available items to Disabled boxes.

Disable plugins based on URL filters

Similarly, you can also drag and drop a plugin from the disabled column to available items to make a plugin load when this filter is matched.

Additionally, you can save this filter inside a filter group. Filter groups are like categories. Their purpose is to help you sort similar plugin filters together.

Organize your filters in groups

Once you are done, click on the publish button to make this plugin filter active. It will start working as soon as you click on the publish button.

Enable or Disable a Plugin on a Single Post or Page

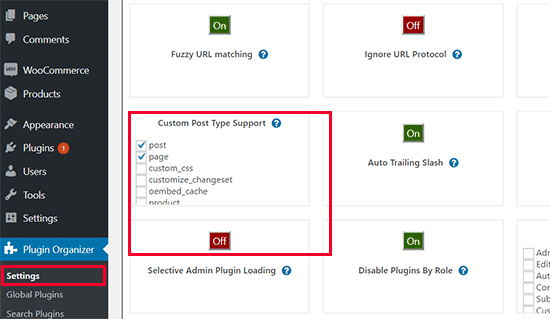
Plugin Organizer also allows you to load or disable plugins on a single post, page, or custom post type item. First you need to make sure that you have enabled the post type support on Plugin Organizer » Settings page.

Post types enabled

Next, go ahead and edit the post, page, or custom post type you want to change. On the post edit screen, scroll down to the ‘Plugin Organizer’ section.

Plugin organizer section on post edit screen

You will see the plugin organizer settings with your plugins. You can drag and drop plugins to disable them or drag disabled plugins to available items to make them active.

Don’t forget to click on the save changes or update button to store your changes.

Troubleshooting Plugin Organizer Issues

Plugin Organizer plugin is used to change the default behavior of WordPress plugins on your website. Your settings may cause unexpected results including fatal errors, syntax errors, or white screen of death.

A quick way to resolve those issues is by deactivating all your WordPress plugins via FTP. This will deactivate plugin organizer as well.

To uninstall Plugin Organizer, simply delete the plugin from the plugins page. This will not only delete the plugin itself, but it will also delete all plugin settings. You can then reinstall the plugin if you want.

For most errors, see our comprehensive list of most common WordPress errors and how to fix them. If the error you are seeing is not listed, then try our step by step WordPress troubleshooting guide to find the cause of the error and possible solutions.

We hope this article helped you efficiently use WordPress plugin organizer to speed up your WordPress site. If you want to just install best of the best plugins, then see our list of must have WordPress plugins for all websites.

If you liked this article, then please subscribe to our YouTube Channel for WordPress video tutorials. You can also find us on Twitter and Facebook.

The post How to Use the Plugin Organizer to Speed Up Your WordPress Site appeared first on WPBeginner.