Reducing Your Page Load Time With WP Accelerator

When it comes to WP performance optimization, the word that usually comes first to mind is a cache plugin. You’ve probably already heard about WP Super Cache, WP Comet Cache or WP Rocket. The page caching can significantly improve the page generation time that affects the overall page loading time and it is essential letting ... Read moreReducing Your Page Load Time With WP Accelerator

The post Reducing Your Page Load Time With WP Accelerator appeared first on Learn WordPress with WPLift.

How to Translate a WordPress Plugin in Your Language

Are you looking for a way to translate a WordPress plugin into your language?

By translating a WordPress plugin into another language, you will make it accessible to a broader audience. This allows users from different countries to use the plugin in their native languages.

In this article, we will show you how to easily translate a WordPress plugin into your language.

Translate a WordPress plugin in your language

Why Translate WordPress Plugins?

By default, WordPress is available in many languages and can be used to easily create a multilingual website using a plugin.

Similarly, most of the top WordPress plugins are also translation-ready. All you have to do is ask the plugin author if you can help by contributing translations in other languages.

By translating the plugin, you can increase its reach and create a larger user base. This can lead to more installs, feedback, and exposure for the plugin.

It can also help you establish yourself in the WordPress community and provide you with new networking opportunities with other developers, translators, and businesses in the industry.

You can even add the translation to your portfolio and demonstrate your skills and contributions to the WordPress community.

That being said, let’s take a look at how to easily translate WordPress plugins in your language. We will cover a few different methods in this post, and you can use the quick links below to jump to the method you want to use:

Method 1: Translate a WordPress Plugin Into Your Language for Everyone

If you want to translate a WordPress plugin in a way that helps other people use the plugin in their languages, then this method is for you.

WordPress.org currently hosts a web-based translation tool that allows anyone to contribute translations for plugins within the WordPress repository.

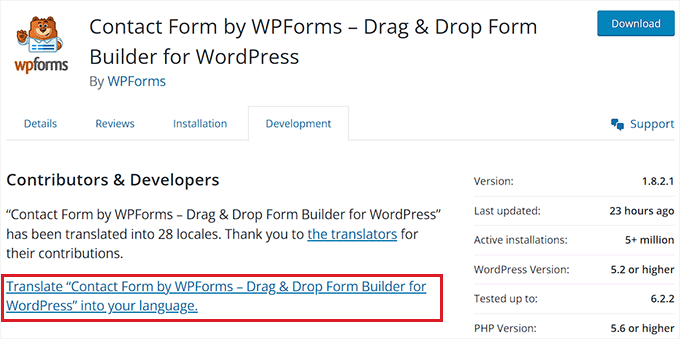
First, you will need to visit a plugin’s page on the WordPress.org website. Once you are there, just switch to the ‘Development’ tab at the top.

Here, you will see a link asking you to help translate the plugin into your language.

You can simply click on it to start contributing to the plugin translation.

Translate a WordPress plugin

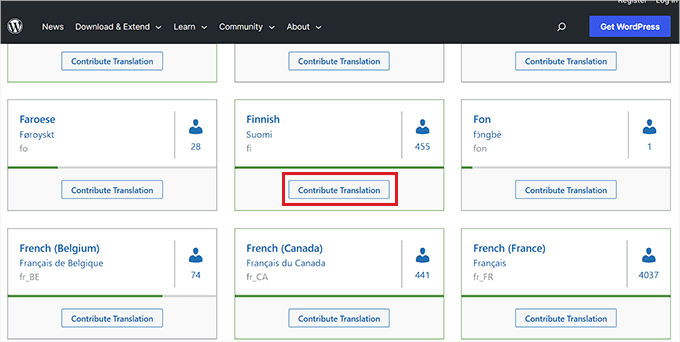
However, if the link isn’t available, then you can visit the Translating WordPress website.

Once there, you will see a list of languages on the screen. From here, find your language and simply click the ‘Contribute Translation’ button under it.

Choose a language for translation

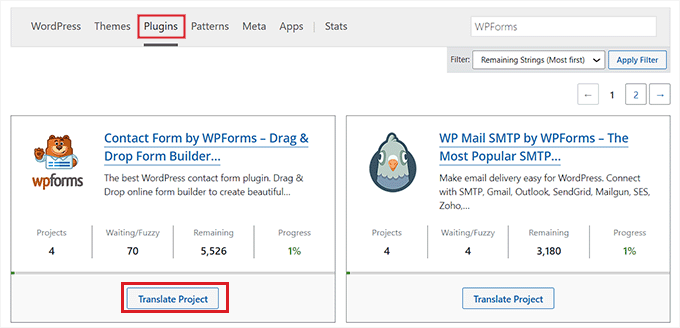
This will take you to a new screen, where you need to switch to the ‘Plugins’ tab.

After that, search for the plugin you want to translate using the search field and then click the ‘Translate Project’ button under it.

Click Translate Project button

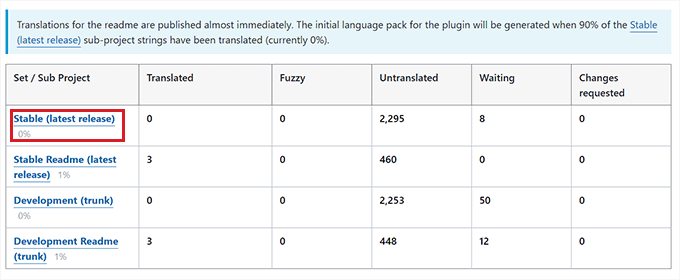
This will direct you to the plugin translation page, where you must select the ‘Stable (latest release)’ sub-project from the left column.

If you want to translate the plugin’s development or readme files, then you can choose those sub-projects from the list instead.

Choose stable latest release option

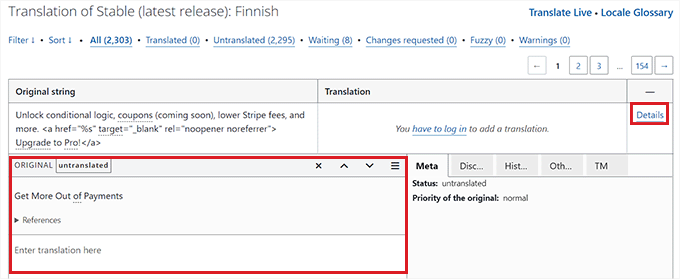
Finally, you will be taken to a new page where you will see the original strings in one column and the translations in another.

Keep in mind that you will need to be logged in to your WordPress.org account to contribute translations.

From here, just click on the ‘Details’ link in the right column to open up the string you want to translate.

Translate plugin

Once you have done that, a text field will open where you can add a translation for the original string.

Once you are done, simply click the ‘Save’ button to submit your translations.

Method 2: Translate a WordPress Plugin for Your Own Website

If you only want to translate a WordPress plugin for your own website, then this method is for you.

First, you will need to install and activate the Loco Translate plugin. For detailed instructions, please see our beginner’s guide on how to install a WordPress plugin.

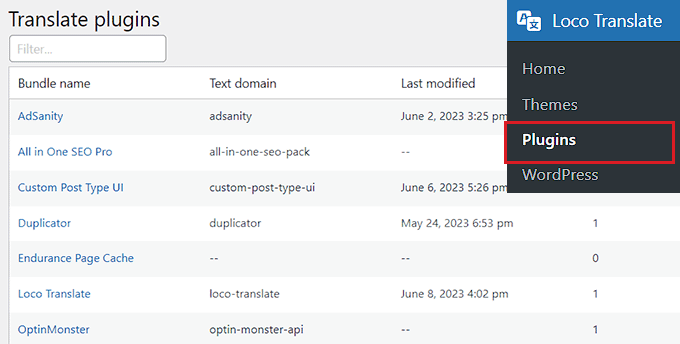
Upon activation, head over to the Loco Translate » Plugins page from the WordPress admin sidebar.

Here, you will see a list of plugins that are currently installed on your website. Just click on the plugin you want to translate.

Choose plugin to translate

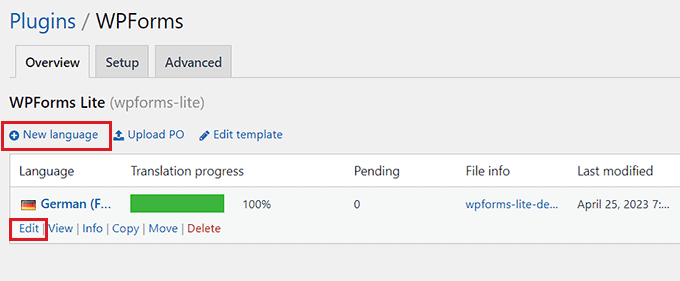
This will take you to a new screen, where you will see a list of languages available for the plugin, along with the translation progress status for each language.

If the language you want to translate the plugin into is listed there, then simply click on the ‘Edit’ link under it.

If not, then you need to click the ‘New language’ button at the top.

Click New Language button

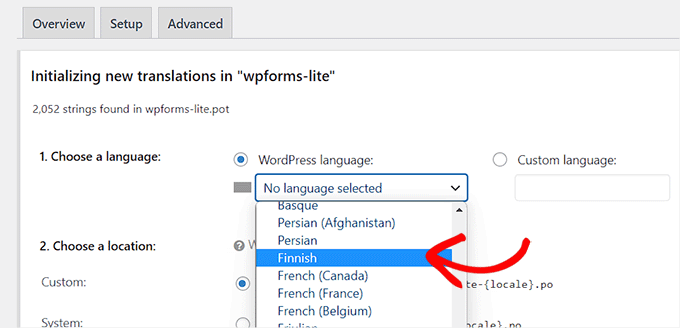
This will direct you to a new page where you can start by selecting a language.

From here, you can pick the ‘WordPress language’ option and then choose your language from the dropdown menu under it.

This option will automatically start using the language file if a user sets the WordPress admin area in this language.

Choose a translation language

If you don’t want to use a WordPress language, then you can select the ‘Custom Language’ option.

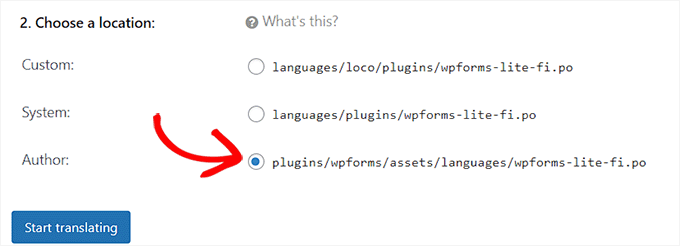
Next, you have to choose where you want to store the translation files. By default, Loco Translate will recommend saving the translation files in its own folder.

However, you can easily change that to save the files in WordPress languages or the plugin’s own languages folder.

Once you have done that, just click the ‘Start translating’ button to continue.

Choose translation file location

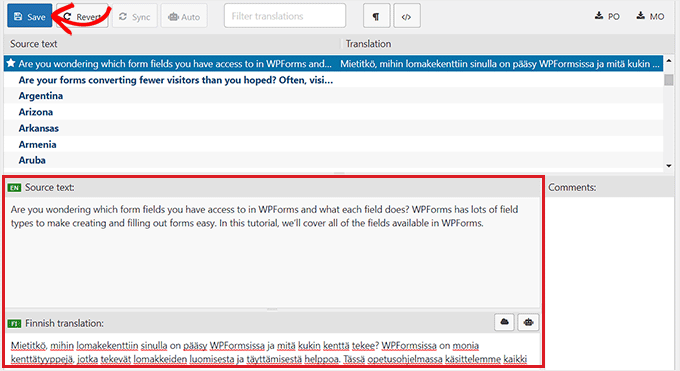
This will take you to a new screen, where you will see a text source section along with a translation field.

You can now start by adding a translation for the source string and then select the next string to translate.

Once you are done, don’t forget to click the ‘Save’ button at the top to store your settings.

Translate strings

Method 3: Translate a WordPress Plugin on Your Computer

If you want to translate a WordPress plugin on your computer using gettext translation apps, then this method is for you.

Keep in mind that you can also submit these translations to plugin authors so that they can include them in their plugins.

First, you need to download the plugin you want to translate on your computer. Next, double-click the plugin zip file to extract it.

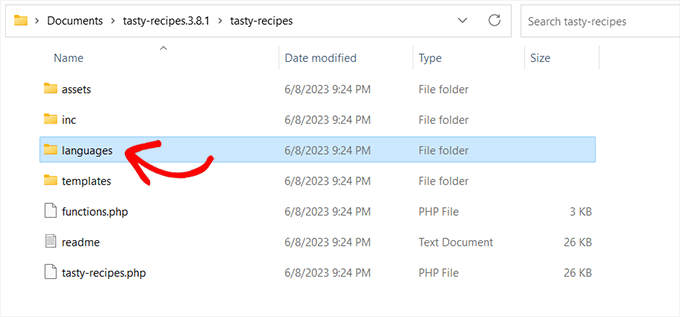
Once you have done that, you need to open the plugin’s folder and then find and click on the ‘languages’ folder.

Choose the languages folder in the plugin folder

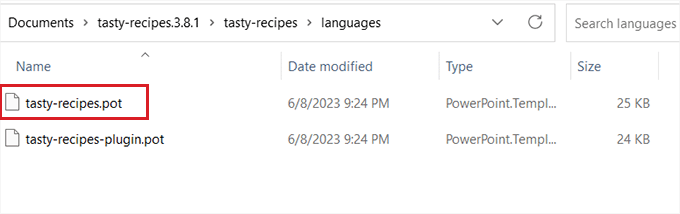
You should find a .pot file inside this folder. This is the translation template file that you will need to translate the plugin.

If the plugin doesn’t have a .pot file or a languages folder, then it is most likely not translation-ready.

In that case, you can contact the plugin author and ask if they have any plans for their plugin translation. For more details, please see our guide on how to ask for WordPress support and get it.

Once you have the .pot file, you are ready to translate the plugin into any language.

Locate plugin pot file

Next, you need to download and install the Poedit app on your computer, which is a free translation app for Mac and Windows.

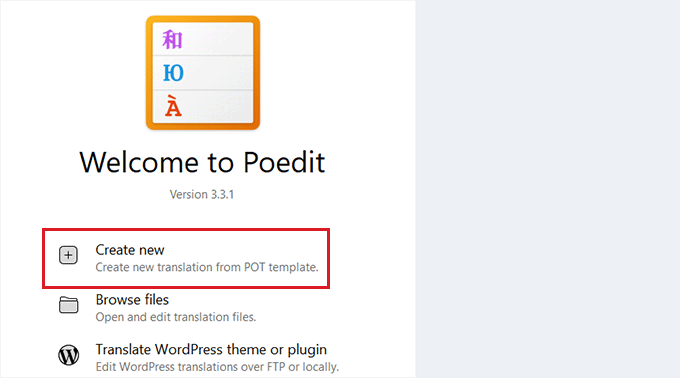
After you have the app installed, go ahead and open it up. This will launch the Poedit home screen, where you must click the ‘Create New’ option.

Choose Create New option

You will now be directed to your computer’s file manager. From here, simply find and select the .pot file for the plugin that you want to translate.

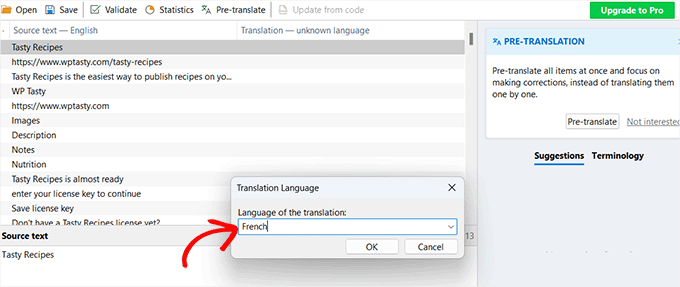
Once you have done that, Poedit will ask you to choose a language for translation from the dropdown menu.

After that, click the ‘OK’ button to continue forward.

Choose a translation language in Poedit

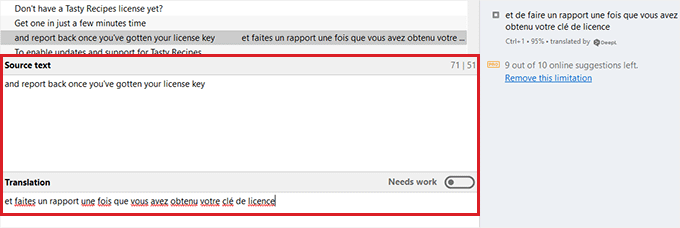
Poedit will now show the translation interface, where you will see the list of strings available.

All you have to do is click on a string to select it and provide a translation in the ‘Translation’ field.

Translate plugin with Poedit

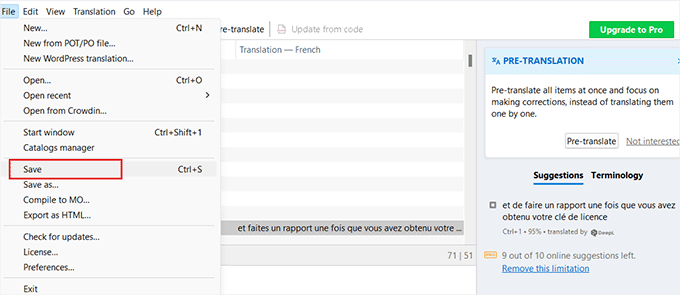
Once you are done translating the plugin, go to File » Save from the menu bar at the top and name your file after the language name and country code.

For example, if you are saving a French translation for the plugin, then you should save the file as ‘fr_FR’ for French and France.

save file

Poedit will save your translation as .po and .mo files.

Now, all you need to do is place these files in your plugin’s languages folder to start using the translated plugin on your website.

We hope this article helped you learn how to translate a WordPress plugin easily. You may also want to see our beginner’s guide on how to translate your WooCommerce store and our top picks for the best WordPress translation plugins.

If you liked this article, then please subscribe to our YouTube Channel for WordPress video tutorials. You can also find us on Twitter and Facebook.

The post How to Translate a WordPress Plugin in Your Language first appeared on WPBeginner.

Ultimate Dashboard Review: Simplify The WordPress Dashboard

Raise your hand if you can tell me the next upcoming event in the WordPress Events and News dashboard widget… That’s what I thought. While I’m sure there are some people who appreciate it, and other dashboard widgets, I’m not one of them, nor are a bunch of other people if I had to make ... Read moreUltimate Dashboard Review: Simplify The WordPress Dashboard

The post Ultimate Dashboard Review: Simplify The WordPress Dashboard appeared first on Learn WordPress with WPLift.

How to Properly Add Google AdSense to Your WordPress Site

Google AdSense is one of the most popular ways to monetize your website. You can easily add Google AdSense to your WordPress site and start making money. In this article, we will show you how to add Google AdSense in WordPress along with some best practices and tips to increase your earnings.

Properly adding Google AdSense in WordPress

What is Google AdSense?

Google AdSense is an advertising network run by Google that allows bloggers and website owners an opportunity to earn money by showing text, image, video, and other interactive advertisement on their websites. These ads are targeted by site content and audience.

Google AdSense is hassle free because you don’t have to deal with advertisers or worry about collecting money. Google administers and maintain relationships with the advertisers. They collect the payment, take their management fee, and send the rest of the money to you.

AdSense offers cost-per-click ads (CPC) which means that you earn money every time a user clicks on the ad on your website. The amount received per click varies based on a variety of factors.

Video Tutorial

If you don’t like the video or need more instructions, then continue reading.

Getting Started with AdSense

First thing you need to do is sign up for a Google AdSense account. If you have a Gmail account, then you can use your existing account to sign up.

Once you’ve submitted your application, you will receive an email within 6 – 8 hours telling you whether you have passed the first step of the review process. If you passed the first check, then you can log in to your AdSense account and get your ad code.

Start by clicking on the My ads tab and then click on the New ad unit button.

Creating a new AdSense ad unit

This will bring you to a create new ad screen, and you will be asked to choose an ad type. You can select from ‘text and display ads’, ‘In-feed ads’, and ‘In-article ads’.

If you are unsure, then start with the text and display ads.

Choose an ad type

Next, you need to provide a name for this ad unit and select the ad size, type, style, and colors.

AdSense ad units

The name of the Ad is only used for internal purposes, so you can name it anything like “SiteName Sidebar”.

The next option is choosing the Ad Size. While Google offers a wide-variety of ad sizes, there are certain sizes that are listed under recommended because those are the most popular among advertisers.

What that means is that these ads are likely to have a higher inventory thus a better payout.

After that you will need to choose Ad type. We recommend having both text & display ads.

Ad style allows you to control the display of your text based ad units. We recommend using your site’s color scheme for best results.

The custom channels feature allows you to better track the ad performance based on sites. You don’t have to use it if you don’t want to.

For ‘If no ads available’ option, you can either choose to collapse the ad space or fill it with your own ad. This is shown when Google cannot find an appropriate ad (which rarely happens).

Once you’re done with this setup, simply click on Save and get code button. You will be prompted with a message “Ad successfully created”, and you will also see the Ad code.

Ad code

Copy your ad code and paste it in a plain text editor like Notepad or TextEdit. You will need it in the next step.

Adding Google AdSense in WordPress

You need to determine where you want to show the ad on your website. Ads are most commonly displayed in the sidebar. You can add Google Adsense in your sidebar by using WordPress widgets.

Simply go to Appearance » Widgets page in your WordPress admin area. Next, drag & drop the ‘Custom HTML’ widget to the appropriate widget area and paste your Google AdSense code in there.

Add your AdSense ad code in custom HTML widget in WordPress

For better placement control and tracking, we recommend that you check out AdSanity WordPress plugin. (See: Best Ad Management WordPress solutions)

AdSense Best Practices and Frequently Asked Questions

Over the years, we’ve answered several AdSense related questions. Having used AdSense on several of our sites such as List25, we’ve learnt a whole lot about optimizing. Below are some AdSense best practices and frequently asked questions.

What’s the best AdSense Ad Size?

Although ad placement is key, we’ve found that the best sizes are 336×280 and 300×250. These ads tend to fit on most screen sizes and have the best pay rate as well.

What’s the Best AdSense Placement?

This entirely depends on your layout. The goal is to get more clicks, so you want to place your ads in a more prominent spot. We have found that ads within post content towards the top of the screen tends to get the most clicks.

Several users have asked us about adding AdSense in a floating widget because it will be very prominent. We strongly recommend against that because it is not allowed by Google Terms of Service. If you violate their TOS, then you can get banned from the program.

Can I click on my own Google AdSense Ads?

Often beginners are tempted to click on their own ads or ask their family members to click on their ads. Please don’t do that. Google’s algorithm is very smart and knows when you’re clicking on your own ad. This can get you banned from the program.

What is Page RPM in Google AdSense?

RPM stands for Revenue per Mille meaning revenue per 1000 impressions. This is determined by multiplying the total number of clicks and cost per click and then dividing that by the total number of pageviews.

Can I use my Blogger or YouTube AdSense account with WordPress?

Yes, you can. If you started using AdSense on one of Google’s hosted platforms like Blogger or YouTube, then you can change your AdSense account type and use it with WordPress. You’ll need to provide Google AdSense with the URL of the site you want to monetize by filling out an application form.

Simply login to your AdSense account and then under ‘My Ads’ click on ‘Other Products’ option. Next, you need to click ‘Upgrade now’ and complete the application form.

What is CTR in Google AdSense?

CTR or click-through-rates differ vastly for different kind of websites. Your ad clicks depend on a lot of factors like your website’s topics, your audience type, ad placement on your site, and more. The ideal CTR for Google AdSense is really hard to define because you don’t have access to the click rates of other websites like your own.

However, Google AdSense has built-in tools that will start showing you messages if your site is not getting a good CTR. You can follow the optimization guides shown inside Google AdSense dashboard to improve your ad revenue.

When and how does Google AdSense pay publishers?

Each month, Google AdSense calculates your previous month’s earnings and shows them on your your ‘Transactions’ page. If your earnings match the required threshold, then your payment is processed and released by the 21st of that month.

There are multiple payment methods available including direct electronic transfer, wire transfer, check, Western Union, and more.

Why Google AdSense rejected my application?

Google Adsense may reject your application if your website doesn’t meet the AdSense program policies or their terms and conditions.

What are the requirements to get Google AdSense application approved?

Here are the minimum requirements to get your Google AdSense account application approved.

  • Your website and all its content must comply with AdSense program policies and terms and conditions.
  • Your website should be at least 6 months old.
  • You, the applicant, must be over 18 years old.

Note: Even if your application meets all the requirements, Google AdSense still reserves the right to decline your application.

Can I add Google AdSense in my WordPress.com blog?

WordPress.com does not allow you to add Google AdSense to your website unless you upgrade to the Business plan. For more on this topic, please see our guide on the difference between WordPress.com vs WordPress.org.

What is the difference between Google AdSense vs Google AdWords?

Google AdWords allows you to advertise on other websites including those participating in the Google AdSense program.

Google AdSense allows you to make money from your website by showing ads on your website.

We hope this article helped you add Google AdSense in your WordPress site. You may also want to check out our guide on 25 ways to make money online blogging.

If you liked this article, then please subscribe to our YouTube Channel for WordPress video tutorials. You can also find us on Twitter and Facebook.

The post How to Properly Add Google AdSense to Your WordPress Site appeared first on WPBeginner.

How to Add a Trello-Like Kanban Board in WordPress

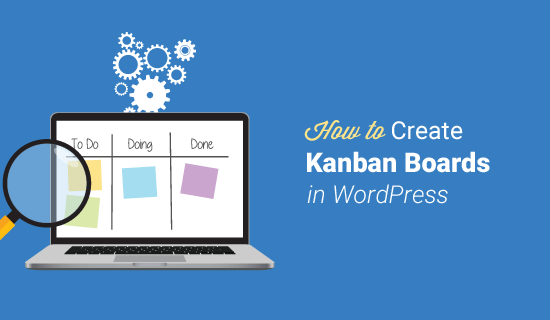
Do you want to add a Trello-like Kanban board to your WordPress website? Keeping track of your team’s projects, monitoring sales progress, and staying in touch with existing customers can be challenging if you are not organized. In this article, we will share how you can streamline your workflows by creating a Trello-like Kanban board in WordPress.

Trello-Like Kanban Board WordPress

What is a Kanban Board?

A Kanban board is a workflow visualization tool that helps you optimize your processes and track progress of each task, no matter how complex they are.

Simple Kanban boards consist of three columns labeled To Do, In Progress, and Done. Each column represents a different stage in the workflow process. You can add individual tasks in the respective column.

The individual task item moves horizontally across the board as each stage is performed until it reaches the Done column. This is where the workflow ends and the project is considered complete.

Why Use a Kanban Board in WordPress?

There are several reasons why you might want to add a Kanban board to your WordPress website. For example, they offer an easy way to organize workflows, boost productivity amongst teams, and create a way for people to focus on what needs to be done and in what order.

More specifically, you might consider using a Kanban board in WordPress for the following reasons:

  • Project Management. If you work with a team and each member is responsible for separate tasks, then using a Kanban board helps organize those tasks and keep everyone productive. You can visually see the status of every project, at every stage, at any time.
  • Track Sales Goals. If you run a business that relies on sales revenue, then using a Kanban board allows you to work smarter, not harder. You just need to determine individual steps for attracting new customers, pitching sales, and securing transactions. From there, watch your sales team perform and see where improvements are needed.
  • Editorial Calendar. Publishing consistent content on your WordPress website is crucial for driving traffic to your site, engaging visitors, and converting readers into customers. You can plan ahead with a Kanban board and assign tasks to your team so content is ready to go when you need it.
  • CRM (Customer Relationship Management). Staying on top of existing customer relationships, as well as garnering new ones, is important for any business to succeed. You can add a Kanban board in WordPress with tasks related to reaching out to old customers, addressing questions and concerns of potential customers, and generating more leads that can help close additional sales and boost revenue.

As you can see, using a Kanban board for your WordPress website is a great way to become more productive all around, no matter what your end goals are.

While there are several third-party Kanban board solutions available like Trello, Jira, and Asana, some people prefer to keep everything in their WordPress site.

It helps keep things centralized and saves money on third-party services.

Having that said, let’s take a look at how to create a Trello-like Kanban board in WordPress.

How to Add a Kanban Board in WordPress

Kanban Boards for WordPress Plugin

The first thing you need to do is install and activate the Kanban Boards for WordPress plugin. For more details on how to do that, see our guide on how to install a WordPress plugin.

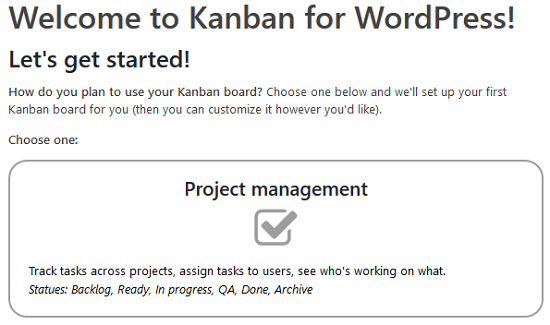
Upon activation, you will be prompted with an option to choose which type of Kanban board you plan to set up.

Kanban Boards for WordPress Plugin - Kanban Board Types

You have the option to choose from Project Management, Editorial Calendar, Job Applicant Tracking, Sales Pipeline, Basic, and Custom. Each option comes with their own set of statuses, which can be customized to your liking.

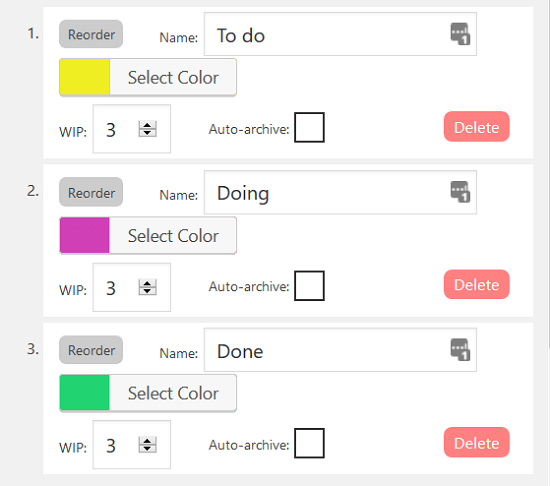
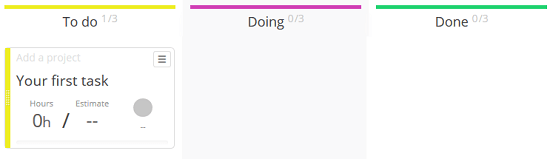
Once you decide which one you would like to use, select Set it up!. For this example, we are going to use the Basic Kanban board option which has the statuses of To Do, Doing, and Done.

Configure Your General Settings

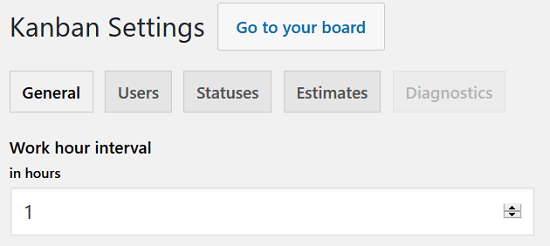
After you choose which pre-designed Kanban board you want to use, you need to navigate to the Settings tab to configure your plugin settings.

Kanban Boards for WordPress Plugin - Settings

Under the General tab, you will have the option to determine which increments of time you want users to track their progress in. For instance, we have chosen to track hours.

Kanban Boards for WordPress Plugin - Settings, General

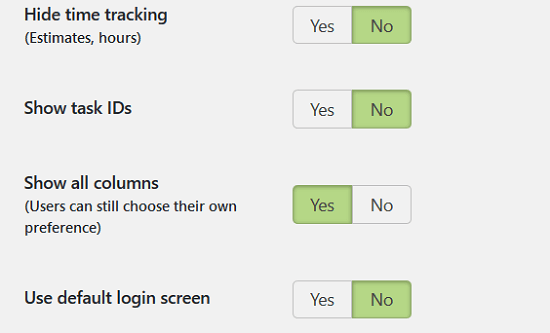
In this section, you will also decide things such as:

  • Whether to hide the time tracking
  • If you want to display task IDs
  • If you want all columns to display
  • Whether to use the default login screen or not

Kanban Boards for WordPress Plugin - Settings, General.2

Configure Your User Settings

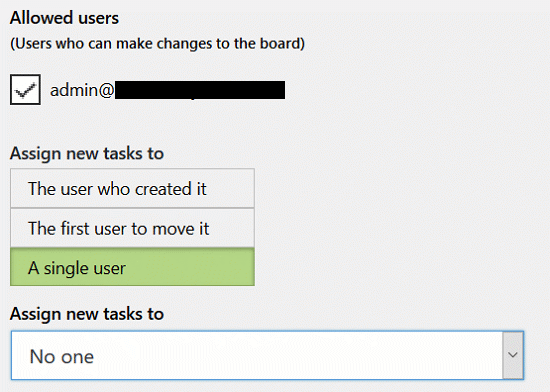
Under the Users tab, you will first define who is allowed to make changes to the Kanban board. In addition, you need to determine who you want to assign new tasks to.

For example, assign tasks to the user that creates the task, the first user to move the task, or a single user. You also have the option to assign new tasks to no one.

Kanban Boards for WordPress Plugin - Settings, Users, Permissions

Once configured, go ahead and click on Save your Settings.

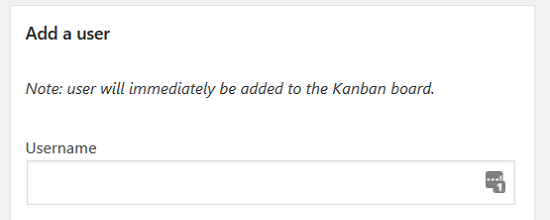
If you scroll down a bit, you will notice the section for creating new users. You can create a user by adding information such as their username, email, and first/last names.

Kanban Boards for WordPress Plugin - Settings, Users, Add User

Once you have entered the information, click on the Add a user button and they will be immediately added to your Kanban board.

Configure Your Statuses Settings

Next, under the Statuses tab, you will customize your Kanban board in terms of column title, color, WIP, and whether to auto-archive.

Kanban Boards for WordPress Plugin - Settings, Statuses

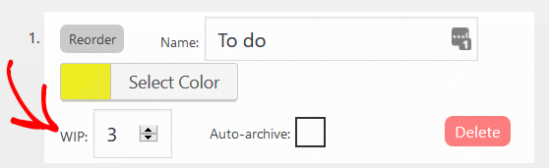
WIP or Work in Progress, is the allotted number of tasks in each column on your Kanban board. By pre-setting how many WIPs you want allowed per column, you prevent bottlenecking of work into one column and keep the workflow moving smoother.

For instance, if you would only like 3 new To Do tasks assigned at any one time, then you would configure that column’s WIP to be 3. Until one of those tasks is moved to the next column on the Kanban board, no one will be allowed to add another To Do task to that column.

Kanban Boards for WordPress Plugin - Settings, Statuses, WIP

Once you are done, click on Save your Settings.

Configure Your Estimates Settings

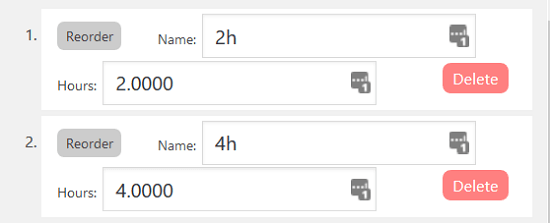
Lastly, under the Estimates tab, you will decide the set points users will be allowed to choose from when deciding how long a particular task will take.

For instance, the default estimate settings include 2 hours, 4 hours, 1 day, 2 days, and 4 days.

Kanban Boards for WordPress Plugin - Settings, Estimates

You can, however, change those estimates to whatever you want. You can also add another estimate by selecting Add another estimate.

Keep in mind, all estimates you define will show in your Kanban board in the order they are set.

After making any necessary changes, click on Save your Settings.

Add Tasks to Your Kanban Board

After all of your plugin’s settings have been configured, click on the Go to your board button.

Kanban Boards for WordPress Plugin - My Kanban Board

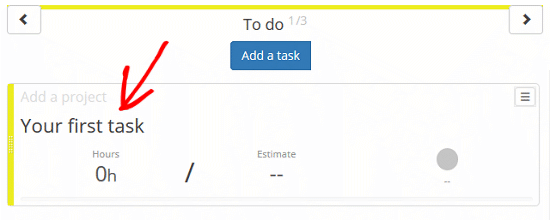
Since your Kanban board is brand new, it will look very empty at first. That’s because you need to start the workflow process by defining tasks in the To Do column.

Kanban Boards for WordPress Plugin - Define a Task

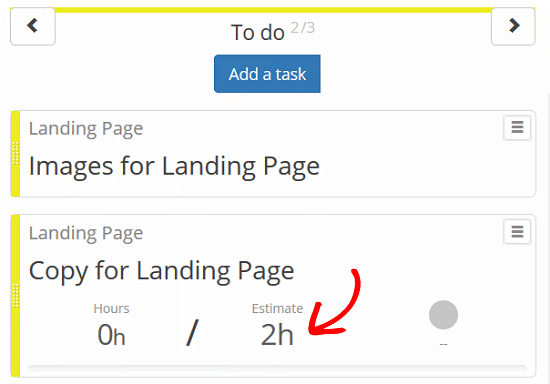
You will also be able to estimate how long each task will take the assigned user.

Kanban Boards for WordPress Plugin - Define a Task, Estimates

From there, team members assigned tasks will be able to move them into the appropriate column labeled Doing, track the time it takes to complete the tasks, and lastly, move them into the Done column, signaling the task as complete.

We hope this article helped you learn how to easily add a Trello-like Kanban board to your WordPress website. You may also want to see our list of must have WordPress plugins for every website.

If you liked this article, then please subscribe to our YouTube Channel for WordPress video tutorials. You can also find us on Twitter and Facebook .

The post How to Add a Trello-Like Kanban Board in WordPress appeared first on WPBeginner.

How to Create a Property Rental or B&B WordPress Website with a Booking System

Have you ever wondered how many hotel, vacation rental, or bed and breakfast WordPress websites are in existence? According to the latest research performed in 2017, WordPress powers a way more (almost 20%) hotel websites than any other “competitor”. Sounds like a great motivation to start or to continue and improve your business, agree? To begin building ... Read moreHow to Create a Property Rental or B&B WordPress Website with a Booking System

The post How to Create a Property Rental or B&B WordPress Website with a Booking System appeared first on Learn WordPress with WPLift.

Why Can’t I Add or Install Plugins in WordPress?

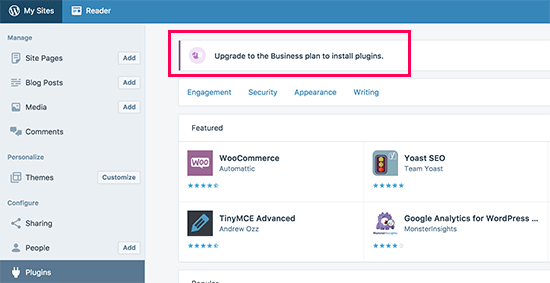
One of the most common questions we are asked by WordPress beginners is: “Why can’t I add plugins in WordPress?”. It usually follows up with how the user is seeing an upgrade message or that their admin area doesn’t have the plugins menu. If you’re encountering this issue, then you’re in the right place. In this article, we will explain why you cannot add or install plugins in WordPress.

Why Can't I Add or Install Plugins in WordPress

1. You are On WordPress.com

WordPress.com is a blog hosting service that offers a limited version of the popular self-hosted WordPress software. See our guide on the difference between WordPress.com vs WordPress.org for more details.

WordPress.com users cannot install plugins unless they upgrade to the business plan which costs about $299 per year. If you are on a free, personal, or premium plan, then you cannot install third-party plugins.

WordPress.com plugins

If you don’t want to pay the $299 per year, then you can move your blog from WordPress.com to WordPress.org. If you need assistance in doing that, then use our free WordPress blog setup service (just make a note that you want us to transfer your site, and we will do it for free).

2. You are Facing Memory Limit Issue

The second most common scenario is that you can see and access the plugins menu but unable to install plugins.

The failure notice is usually caused by the PHP memory limit. There are settings in your WordPress hosting and inside your WordPress core that define the amount of memory a PHP script can use. When a process reaches this limit, it either gets terminated or it gives an error like this:

Fatal error: Allowed memory size of 67108864 bytes exhausted

The quick fix to this problem is increasing your PHP memory limit. You can do that by adding this line to your wp-config.php file:

define('WP_MEMORY_LIMIT', '256M');

For more detailed instructions, see our guide on how to fix WordPress memory exhausted error.

3. User Role Restrictions

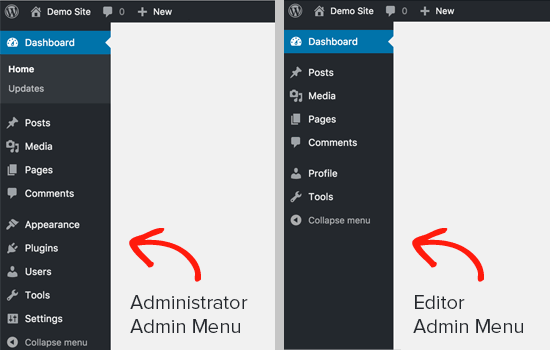
WordPress comes with a built-in user role management system. Sometimes web developers don’t give administrator access to their clients. Instead, they create an editor account for them.

Administrator vs Editor dashboard in WordPress

Only administrators can install and activate plugins on a WordPress site. If you are the owner of the website, then you need to ask your developer to make sure that you have administrator permissions.

4. You are on a Multi Site Network

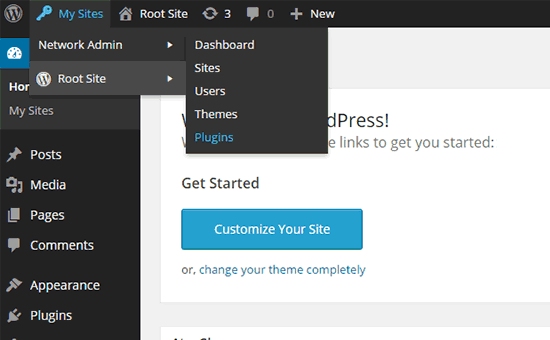
Another possible reason as to why you can’t see the plugins menu in WordPress could be that your site is part of a WordPress multi-site network, and the network admin has disabled the plugins menu item on network sites.

Installing plugins on multisite network

It is pretty much the same scenario as WordPress.com. The network admins need to consider the server stability, WordPress security, and load balancing issues. To solve this problem, you can ask your network administrator to install plugins for you.

For more on this topic, see our guide on why do you not see all plugins on WordPress multisite installs

We hope this article helped you learn why you can’t add or install plugins in WordPress. You may also want to see our list of must have WordPress plugins for your website.

If you liked this article, then please subscribe to our YouTube Channel for WordPress video tutorials. You can also find us on Twitter and Facebook.

The post Why Can’t I Add or Install Plugins in WordPress? appeared first on WPBeginner.

45 Best WooCommerce WordPress Themes

Are you looking for the best WooCommerce themes for your online store? Not all WordPress themes offer complete WooCommerce support and pre-styled templates. In this article, we will show you the best WooCommerce WordPress themes that you can use to build your eCommerce website.

Best WooCommerce WordPress themes

How to Build a WooCommerce WordPress Website

WooCommerce is the most popular eCommerce platform in the world, powering small and large ecommerce websites around the globe (see: Shopify vs WooCommerce).

It runs on top of WordPress, which is one of the most powerful website builders in the world. There are two types of WordPress websites, WordPress.com and WordPress.org (See our comparison of WordPress.com vs WordPress.org).

We recommend using WordPress.org, it gives you access to all WooCommerce features out of box and will help you take your store in any direction you want.

To get started, you will need a domain name, SSL certificate, and WooCommerce hosting account.

We recommend using Bluehost. They are one of the largest and officially recommended WooCommerce and WordPress hosting provider.

They have agreed to offer WPBeginner users free domain, free SSL, and discount on hosting. Basically, you can get started for $6.95 / month.

→ Click here to Claim this Exclusive Bluehost offer ←

Once you have signed up for WooCommerce hosting, you can follow our step by step instructions in our guide on how to start an online store.

That being said, let’s take a look at the best WooCommerce WordPress themes that you can install on your website.

1. Shoppe

Shoppe

Shoppe is a highly customizable WooCommerce WordPress theme for online stores, ecommerce, fashion and lifestyle websites. It has powerful quick product search, ajax shopping cart, wishlist, quick look lightbox, product image zoom, and more.

It includes tons of layout and styling options which are all quite easy to use. It also comes with a drag and drop page builder that allows you to create your own layouts.

2. Løge

Loge

Løge is an elegant WooCommerce WordPress theme with a modern design and powerful ecommerce features. It offers different shop front layouts, adjustable product columns, and product filters.

Its beautiful typography and color schemes make your products popout. You can also create your own color schemes by changing theme colors. All options are quite easy to manage under live theme customizer.
3. Ultra

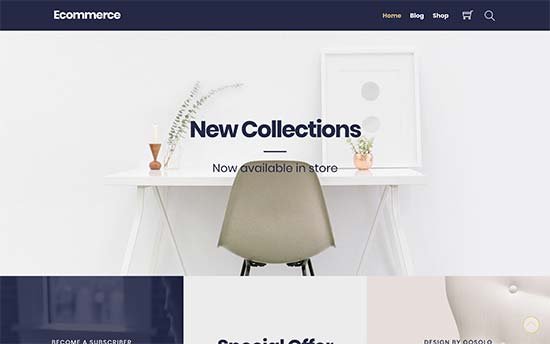
Ultra eCommerce

Ultra is an all-purpose WordPress theme with super-flexible options and gorgeous designs. It includes several read-made websites that can be installed with 1-click including an ecommerce website.

You just need to replace content with your own. It also has a drag and drop page builder to easily create your own layouts if needed. It includes features like pricing tables, multiple header styles, contact form, photo galleries, and more.

4. Neto

Neto

Neto is a modern WordPress theme for WooCommerce stores. It features an elegant homepage layout and storefront with a featured product slider on top. It includes several shortcodes and custom widgets and offers multiple ways to create different layouts for your store.

It has support for custom logo upload, unlimited colors, custom widgets for social media, and more. All theme options are neatly organized under live customizer.

5. Latest

Latest

Latest is an excellent WordPress theme for WooCommerce shops. It has a beautiful homepage layout that feature your products in front and center. It also includes separate blog page with 5 different layout choices.

You can add shop header to announce a sale or new product and use featured categories section to highlight your most popular product categories. Designed to work out of the box, it requires minimal tinkering by offering a straight-forward theme set up.
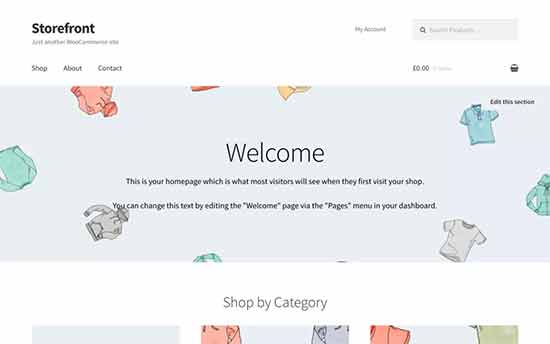
6. Storefront

Storefront

Storefront is free WordPress WooCommerce theme. Designed and developed by WooCommerce core developers, it features a tight-knit integration with WooCommerce and popular WooCommerce extensions.

It includes several layout and color choices to customize your store. It has a demo data importer, live theme customizer support, and multiple widget ready areas to help you easily set up your WooCommerce shop. It also acts as the parent theme for several child themes created specifically by the folks behind WooCommerce.

7. Digital Pro

Digital Pro

Digital Pro is another excellent WordPress theme for WooCommerce stores. Built on top of Genesis theme framework, it is highly optimized for WordPress speed and performance.

It includes pre-styled templates for WooCommerce stores, 3 widget areas, customizable header, and page templates. For theme set up it has a custom theme options page and live customizer support.
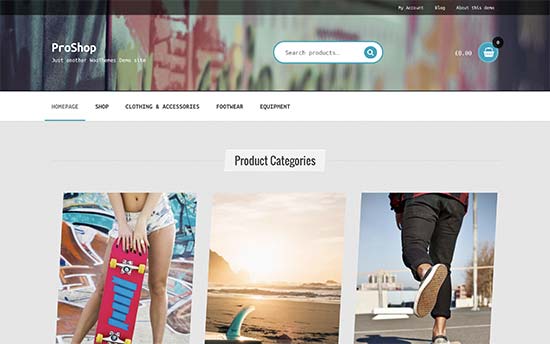
8. ProShop

ProShop

ProShop is a child theme of WooCommerce Storefront theme. It features a stylish urban design which makes it a good fit for accessories, clothing, and sports stores.

It inherits all the features of its parents theme and some of its own as well. All theme options are accessible through live customizer and are quite easy to set up.

9. Hugo

Hugo

Hugo is a beautifully designed WordPress WooCommerce theme for online stores of any kind. This highly customizable theme features a beautiful homepage layout with featured slider on top followed by your product sections.

It includes custom widgets for social media, contact info, and content discovery features. It is available in multiple color schemes and all theme options are easily customizable using live theme customizer.

10. Hotel

Hotel

Hotel is another beautiful WooCommerce WordPress theme for hotels, bed & breakfasts, and hospitality service providers. Its modern homepage design features large header image with welcome message and a call to action button.

You will need WooBookings Bundle, which allows you to add bookable products like rooms, services, and more. Other notable features include custom sidebars, multiple widget ready areas, custom header, background, and more. It is easy to set up and simple to customize.
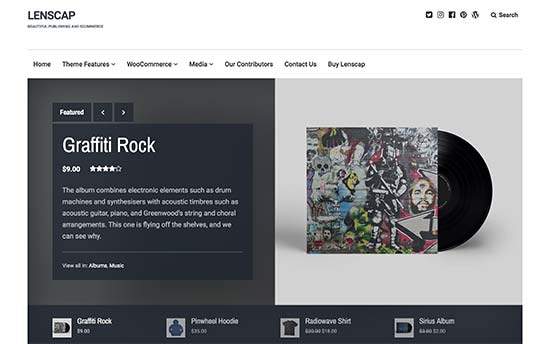
11. Lenscap

Lenscap

Lenscap is a magazine style WordPress theme with full WooCommerce support. Suitable for content rich websites that want to add an online store to their website.

It features a beautiful homepage layout with a customizable header showcasing your most prominent content and categories. It has templates for product pages with beautiful image galleries. It works out of the box and only includes options you’ll actually use.
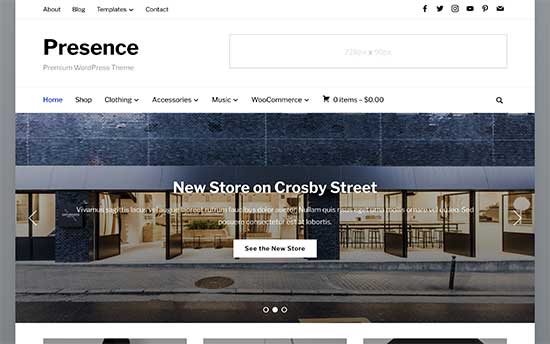
12. Presence

Presence

Presence is a powerful all-purpose WordPress business theme. It includes several ready-made websites including an ecommerce store that you can install and customize for your needs.

It comes in 6 color schemes, multiple blog page layouts, 2 slider styles, full-width and boxed layouts, and more. Customizing it is quite easier with live theme customizer and custom theme settings page.

13. Highend

Highend

Highend is super-flexible WordPress theme for WooCommerce shops. It features a modern design with multiple layouts and styles to choose from or you can create your own with page builder plugin that comes free with the theme.

It includes unlimited colors, Google fonts, multiple sidebars, custom widgets, social media icons, and more. For theme setup it has 1-click demo importer to guide you. It is translation-ready and can also be used to create multilingual websites.

14. ToyShop

ToyShop

Toyshop is a WooCommerce WordPress theme made specifically for children’s stores, toy shops, flower shops, and other websites that need a fun and bright website. It is colorful, fun, and there is even an option to change the footer graphics to match the season.

It inherits all the features of its parent theme and adds some of its own. It features custom background, header image, color controls, and multi-column layouts for shop pages. It is extremely easy to set up and can be extended easily with companion extensions.

15. Indigo

Indigo

Indigo is a modern and stylish WordPress WooCommerce theme built with a modular approach. It allows you to easily drag and drop modules to create any page layouts you need.

It comes packed with turnkey website designs that you can install with 1-click. Each design is fully customizable and includes beautiful shop templates. Notable features include contact form page, custom widgets, pricing tables, social media integration, and more.
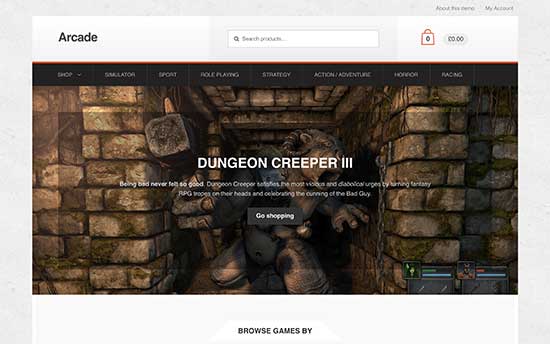
16. Arcade

Arcade

Arcade is a WooCommerce theme for online gaming stores, electronics, and game accessories stores. Inspired by top gaming websites, Arcade is designed to showcase a wide range of products on the frontpage in an easy to browse manner.

It is easy to extend with the help of Storefront Extensions Bundle which will allow you to add an extensive set of features to your theme, including mega menus, multi-column layouts, sticky cart, reviews, and more.
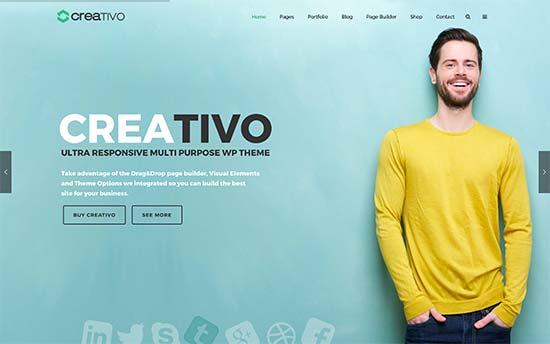
17. Creativo

Creativo

If you are looking for a versatile and multi-purpose WooCommerce theme, then you should check out Creativo. This super-flexible WordPress themes comes with multiple turnkey websites with 1-click importer.

It includes beautiful shop templates, multiple styles and layouts, and ships with premium page builder and slider plugins to create your own layouts if needed. It has a powerful custom theme settings area for a complete guided setup.

18. eStore

eStore

eStore is another free WooCommerce theme for WordPress. It packs several premium-like features and custom widgets to create a highly professional and modern online store.

It is tested for compatibility with top WooCommerce extensions. All theme options are neatly organized and allow you to easily build an online store with minimum effort.

19. Amaryllis

Amaryllis

Amaryllis is a uniquely designed WordPress theme for WooCommerce stores. Its modern homepage layout features a full screen background image followed by your product categories, popular products, and other sections of your website.

Its homepage is fully widgetized which allows you to drag and drop content widgets to set it up. It has 1-click demo importer, live customizer support, and tons of options to make it uniquely yours.

20. Idyllic

Idyllic

Idyllic is a beautifully designed free WooCommerce theme for WordPress. It includes several widget-ready areas and an easy to set up homepage layout. It includes full width page template, corporate, contact us, and other page templates to create your own landing pages.

It is easy to customize with all theme components neatly placed under customizer. It is translation ready and can also be used to create multilingual websites using Polylang.
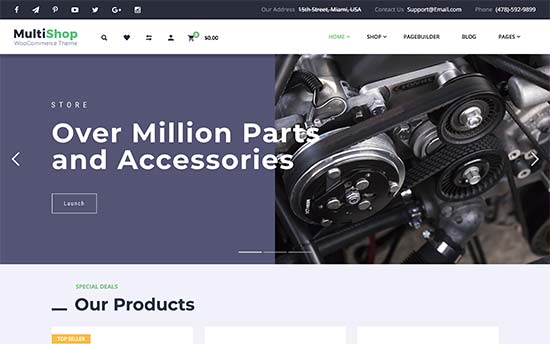
21. Multishop

Multishop

Multishop is a powerful WordPress theme for WooCommerce shops and online stores. It features a modern design with tons of flexible options for customization.

It includes ajax powered product filter, search auto autocomplete feature, unlimited colors, multiple sidebars, page templates and more. It ships with premium page builder and slider plugins as well.

22. Cupcake

Cupcake

Cupcake is a WooCommerce WordPress theme for bakeries and cafes. Its homepage features a slider followed by your products and other content areas. The header area contains your website logo, phone number, and buttons for search, wishlist, and shopping cart.

It includes WooCommerce elements to easily display featured, latest, and popular products. For product images it also includes lightbox popup. All theme options are easily customizable with a custom theme options page.

23. Hestia

Hestia

Hestia is a popular free WordPress theme suitable for WooCommerce shops and online stores. It packs many of the features you’ll find in premium WordPress themes including tons of customization options.

It comes with unlimited colors, multiple layout options, highly-customizable header, social media icons, multiple navigation menus, and more. It is super easy to use and can be easily customized to give your store a unique look.

24. Altitude Pro

Altitude Pro

Altitude Pro is a very professional looking WordPress theme for WooCommerce shops. It is built on the rock solid base of the Genesis theme framework and features crisp typography and a spacious layout.

It includes 7 homepage widget areas to drag and drop sections to your homepage, customizable header, navigation menus, and multiple sidebars. For theme set up, it has a custom theme options page and support for live theme customizer.
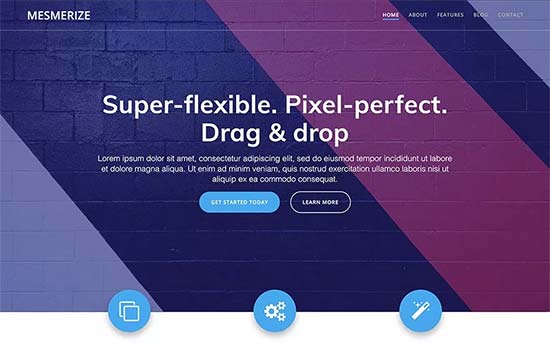
25. Mesmerize

Mesmerize

Mesmerize is another highly-flexible yet free WordPress theme for WooCommerce websites. It features a modern homepage layout which is easy to customize with simple drag and drop.

Notable features include pre-designed home page, 5 header designs and over 30 ready to use content sections that you can easily customize. Due to its flexibility, Mesmerize can be used to create any kind of website.

26. SolidBox

SolidBox

Solidbox is another excellent choice for a WooCommerce WordPress theme. It is designed to be flexible and can be easily adapted to create any kind of business website.

It includes multiple design choices, layouts, header styles, shortcodes, and more. It ships with premium page builder plugin and also supports multilingual plugins. Set up is easier with quick 1-click demo importer and custom theme options panel.

27. Spencer

Spencer

Spencer is an elegantly designed WordPress theme for WooCommerce and business websites. It includes a flexible homepage layout with widget ready areas where you can drag and drop widgets.

It includes newsletter signup form, unlimited colors, multiple layouts, page builder support, and custom widgets for social media integration. It has a custom theme options panel and tons of customization options in customizer.

28. OceanWP

OceanWP

If you are looking for a powerful but free WordPress WooCommerce theme, then you’ll love OceanWP. This beautifully designed WordPress theme comes with premium-like features in a free companion plugin.

It has tons of customization options in live customizer where you can choose header styles, backgrounds, colors, navigation menus, and more. It works with all popular free page builder plugins and includes templates to create your own landing pages if needed.

29. Pepper+

Pepper+

Pepper+ is a beautifully designed multi-purpose WordPress theme perfect for WooCommerce shops and online stores. It comes with several ready to use websites that you can install with one click. All these designs are fully editable with simple point and click tools.

It takes a modular approach to design and includes modules for common website components. You can just drag and drop to add pricing tables, latest products, sliders, contact forms, Google Maps, and more.

30. Astra

Astra

Astra is a clean and free WordPress theme with full WooCommerce support and flexible customization options. It includes modern homepage layout with multiple widget ready areas to simply drag and drop content widgets.

It supports all popular page builder plugins to create custom WordPress page layouts. Theme set up is quite simple and beginner friendly.

31. The Styler

The Styler

The Styler is a stylish WooCommerce WordPress theme for beauty salons, fashion, and accessories stores. It features a unique modern homepage layout which is fully widgetized and can be setup with simple drag and drop.

It also includes custom post types to easily include services, galleries, testimonials, price lists, and your staff profiles. It is beginner friendly and includes a theme settings page for easier set up.
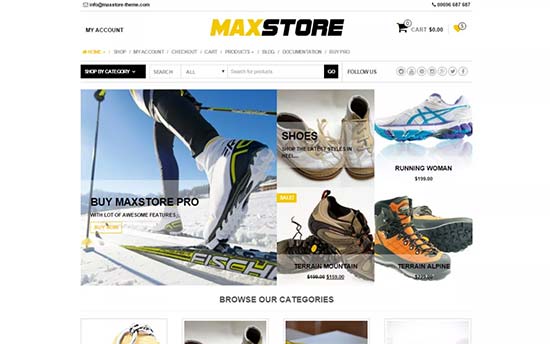
32. MaxStore

MaxStore

MaxStore is another great free WooCommerce WordPress theme. Its homepage features a highly engaging layout that put your products at front and center.

It includes wishlist support, left / right sidebar, footer widget area, custom backgrounds, custom logo, info top bar, search bar, social icons and more.
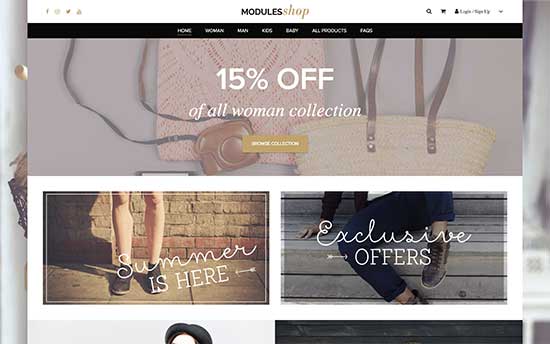
33. Modules

Modules Shop

Modules is a beautiful WordPress theme with full WooCommerce support. Built with a modular approach to design, it includes modules for common website building components that you can easily add anywhere in your website.

It ships with several turnkey designs that you can install with 1-click. It also includes portfolio, video background, Google fonts, icon fonts, and more. It is super easy to use and can be easily set up using theme settings page.

34. Seneca

Seneca

If you are looking for a clean simple WooCommerce theme, then you should check out Seneca. It features a simple spacious design with lots of white space that puts your products into focus.

It includes a storefront template, separate blog page, product categories widget, and more. All theme options are available on theme settings page and it requires minimal effort to setup.

35. The Stylist

The Stylist

The Stylist is beautifully designed WordPress theme for WooCommerce shops and online stores. Its homepage features a boxed layout with a large slider at the top followed by your products and content sections.

It includes easy to manage sections to add services, team members, testimonials, social media icons, blog section, and more. It offers tons of customization options in live customizer and allows you to mix and match different styles and colors.

36. Outlaw

Outlaw

Outlaw is a creative WordPress WooCommerce theme suitable for all kind of shops and online stores. It features a clean and soft layout with lots of space and gorgeous typography.

It includes beautiful CSS animations, advanced product filter, multiple styles and layouts, translation ready, and more. It ships with 1-click installer, premium slider and page builder plugins.

37. Shop Isle

Shop Isle

Shop Isle is an excellent free WordPress theme for WooCommerce shops. It features large product images on the homepage which allows you to grab customer attention upon arrival.

Other notable features include fullscreen image, parallax effects, live customizer support, blog section, and more. It works out of the box and all theme options are quite straightforward and simple.

38. Flevr

Flevr

Flevr is a modern and stylish WooCommerce theme for online shops and stores. It features a fully widgetized homepage layout with a full screen slider on top followed by your featured products.

It comes with built-in sections to add testimonials, services, galleries, portfolio, and more. It includes custom widgets for social media and content discovery. It is quite easy to use and you can also use your favorite page builder plugin with it.

39. Flora

Flora

Flora is a WooCommerce WordPress theme designed specially with flower shops in mind. Its beautiful design and color scheme takes inspiration from flowers and uses combination of bold and soft colors throughout.

It includes smart shopping cart, mega menu, smart navigation, multiple header styles, sticky headers, and more. It is translation ready and compatible with multilingual plugins.
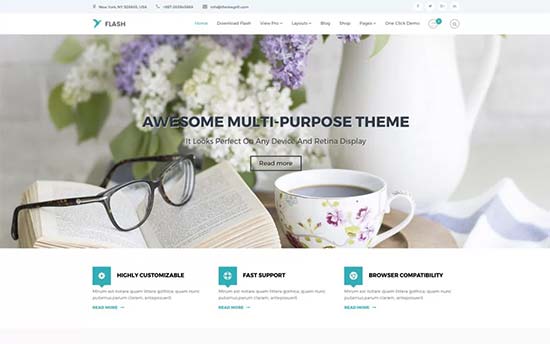
40. Flash

Flash

Need a professional looking but free WordPress theme for your WooCommerce store? Check out Flash. This beautiful multi-purpose WordPress theme is WooCommerce ready and comes with beautiful design.

It comes with a companion plugin that allows you to easily import demo content into your website. It also includes multiple blog layouts, page builder templates, multiple header styles, multiple color choices, and more.
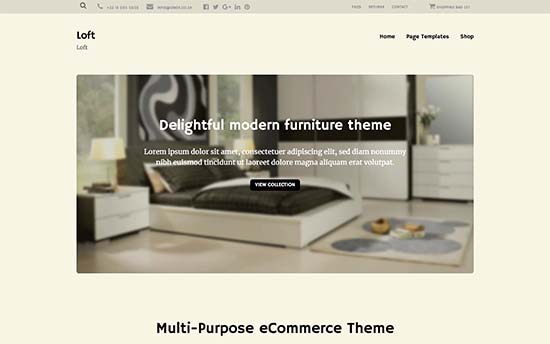
41. Loft

Loft

Loft is a clean and simple WooCommerce theme for WordPress with powerful set of features and extensive customization options. Its homepage features an optional slider on top, followed by your products or content.

It includes two navigation menus and a sticky floating navigation menu on top. It is super-easy to use and includes a custom theme settings page as well as live theme customization support.

42. Bento

Bento

Bento is another excellent and free WordPress WooCommerce theme that offers the functionality and features rivaling premium themes. This super flexible WordPress theme features a modern homepage that is fully customizable using any page builder plugin.

It includes multiple layouts, unlimited colors, layouts for individual posts and pages, custom headers, advanced header styling for posts and pages, and more. It is easy to use and all theme options are managed under customizer with live preview.
43. Corner

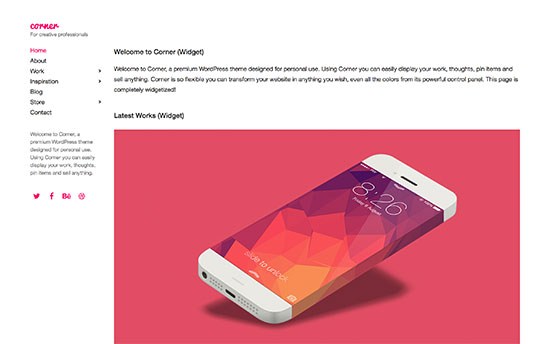
Corner

Corner is a unique and stylish WordPress theme with full WooCommerce support. It features a narrow left sidebar and a wider content area with a minimalist approach to design.

It offers full color control, custom widgets for Twitter, Flickr, and content discovery widgets. It works out of the box and you will find it quite easy to set up with little effort.
44. Peak

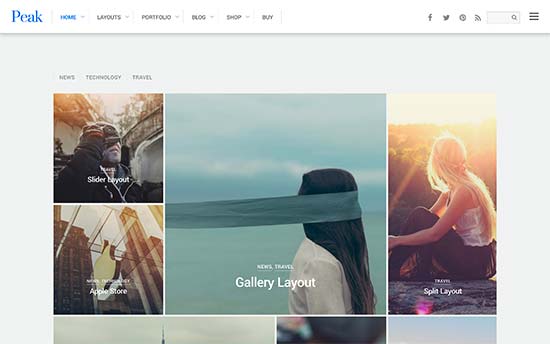
Peak

Peak is a modern WooCommerce WordPress theme featuring beautiful tiled images at the top. Tiles are automatically generated by the theme you can also customize the tiles if you need. Below that it showcases your top products and featured content.

It includes portfolio post type, custom layouts, mega menu, slide-in widgets, and more. For easier set up it includes 1-click demo data importer, a custom theme settings panel, and a drag and drop builder.
45. Homestore

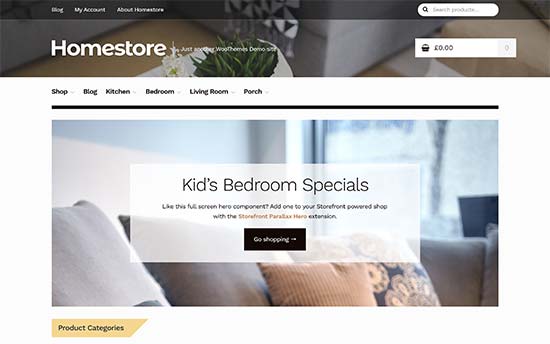
Homestore

Homestore is a WooCommerce theme for home decor, household items, and department store websites. It features a clean spacious design that makes your products stand out.

It is super-flexible and designed to work effortlessly with minimum effort. It can be further extended with Storefront Extensions pack which adds awesome features like smart cart, product reviews, multi-column layouts, fonts, custom styling, and more.

We hope this article helped you find the best WooCommerce WordPress themes for your online store. You may also want to see our list of must have WordPress plugins to grow your business.

If you liked this article, then please subscribe to our YouTube Channel for WordPress video tutorials. You can also find us on Twitter and Facebook.

The post 45 Best WooCommerce WordPress Themes appeared first on WPBeginner.
Weekly WordPress News: WordPress 4.9.2 Is Out!

If you didn’t get an update notification from your host, here’s your warning that WordPress 4.9.2. is officially out! It’s a security and maintenance release that, in part, fixes an XSS vulnerability, as well as 21 other bugs. As is usually the case with security and maintenance releases, you should update as soon as possible. ... Read moreWeekly WordPress News: WordPress 4.9.2 Is Out!
The post Weekly WordPress News: WordPress 4.9.2 Is Out! appeared first on Learn WordPress with WPLift.

Review on Motors Theme: the Ultimate Dealership and Classifieds WordPress Theme?

This Motors theme is an excellent aid in expanding your website. Making it look more appealing, this versatile car listing one has the ability to encompass many of your ideas. This exceptionally useful theme provides clean, modern, and elegant look and feel to the content. It is user-friendly and clearly defines various categories of cars, ... Read moreReview on Motors Theme: the Ultimate Dealership and Classifieds WordPress Theme?

The post Review on Motors Theme: the Ultimate Dealership and Classifieds WordPress Theme? appeared first on Learn WordPress with WPLift.