How to Bulk Upload WordPress Media Files using FTP

Do you want to bulk upload WordPress media files using FTP? By default, WordPress does not allow you to upload media files via FTP which can be annoying for users who want to bulk upload files at once. In this article, we will show you how to easily bulk upload WordPress media files using FTP.

How to Bulk Upload WordPress Media Files using FTP

Why Bulk Upload WordPress Media Files Using FTP

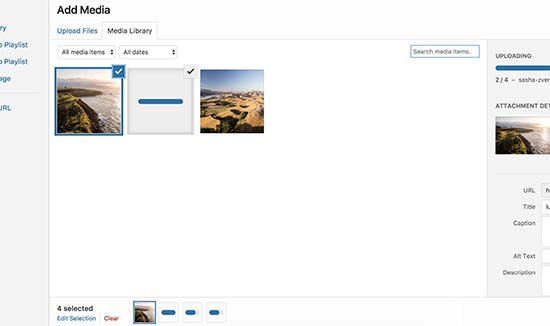
The default WordPress media uploader allows you to upload multiple files at once. You can do so by clicking on the ‘Add Media’ button while writing posts or by visiting Media » Add New page.

Uploading multiple files via Media uploader in WordPress

You can select multiple photos, images, audio, and even video files to upload and WordPress will do the rest.

However, this method may not work sometimes. You may see a maximum file upload size limit issues or the files may take forever to upload.

An easier alternative is to upload the files using FTP. However, WordPress doesn’t recognize files uploaded via FTP, and it will not show them inside admin area.

Luckily, there’s a way around that. Let’s take a look at how to easily bulk upload WordPress media files using FTP, and how to make them available inside WordPress.

Bulk Uploading Media Files in WordPress via FTP

First, you need to connect to your WordPress site using a FTP client. If you haven’t done this before, then see our guide on how to upload files to your WordPress site via FTP.

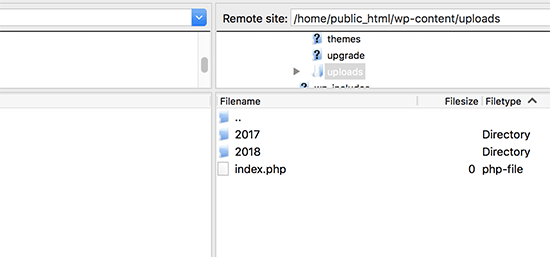
Once you are connected to your website via FTP, go to /wp-content/uploads/ folder.

WordPress uploads folder

Inside the uploads folder, you will see folders for years and months. That’s how WordPress stores media files by default. You can upload your media files to the current year and current month folder.

If it doesn’t exist, then you can create it. For example, 2018 for current year and inside that folder you can create a new folder 01 for the month of January.

Uploading your files may take a while depending on file size and your internet speed.

Once you have uploaded all your images, audio, video, or any other media files supported by WordPress, you are ready to import them into WordPress.

Making Your FTP Media Uploads Visible in WordPress

Even though you have uploaded the files to your website’s server, WordPress doesn’t automatically recognize them.

When you upload a file using the default WordPress media uploader, WordPress saves the file information inside the database. It then displays those files by fetching the information from your WordPress database.

Since these files were not uploaded via media uploader, WordPress does not have them stored in the database.

Let’s fix this.

First thing you will need to do is install and activate the Media from FTP plugin. For more details, see our step by step guide on how to install a WordPress plugin.

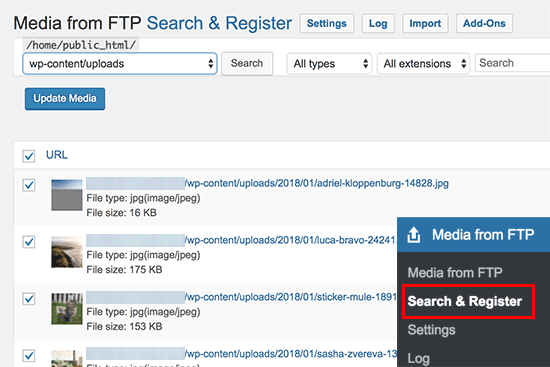
Upon activation, you need to visit Media from FTP » Search & Register page. By default, the plugin will look into /wp-content/uploads/ folder and display all the media files it finds inside it.

Media from FTP settings

You can also browse folders by clicking on the /wp-content/uploads/ drop down menu. It allows you to sort files by type or by extension.

Once you have located the files you uploaded using FTP, simply click the checkbox next to them and then click on the ‘Update Media’ button.

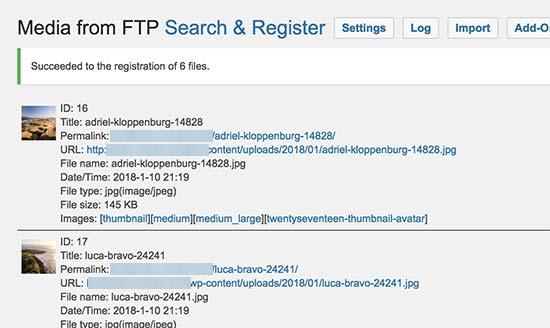
The plugin will start registering your imported media into the WordPress media library. You will see the progress on the screen as it goes through each file.

Import and register progress

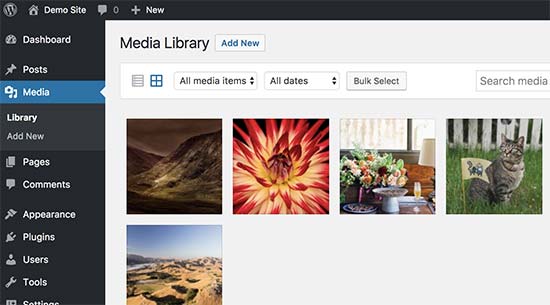
Once it is finished, you can visit Media » Library page to see all your imported files.

Media files uploaded via FTP to WordPress

You can now go ahead and add these images, audio, and other media files to your WordPress posts and pages.

We hope this article helped you learn how to easily bulk upload WordPress media files using FTP. You may also want to see our guide on how to optimize images in WordPress for better speed and performance.

If you liked this article, then please subscribe to our YouTube Channel for WordPress video tutorials. You can also find us on Twitter and Facebook.

The post How to Bulk Upload WordPress Media Files using FTP appeared first on WPBeginner.

13 Awesome WordPress Facebook Groups To Boost Your Knowledge

If you want to learn more about WordPress, blogs like WPLift are a great place to start – at least we think so! But blogs aren’t the only game in town when it comes to improving your knowledge – there’s also a massive ecosystem of WordPress Facebook groups that focus on all kinds of topics ... Read more13 Awesome WordPress Facebook Groups To Boost Your Knowledge

The post 13 Awesome WordPress Facebook Groups To Boost Your Knowledge appeared first on Learn WordPress with WPLift.

16 Best Alternatives to the WordPress Jetpack Plugin

Are you looking for the best alternatives to the Jetpack plugin? Jetpack is a powerful WordPress plugin suite that adds various features to your WordPress website. Recently one of our readers asked us to share possible Jetpack alternatives for WordPress. In this article, we will show you the best alternatives to the WordPress Jetpack plugin.

Best Jetpack alternatives for WordPress

What is Jetpack WordPress plugin?

Jetpack is a plugin suite which combines essential WordPress features into one large plugin. It allows you to manage the features you want to use, and you can turn off the features you don’t need.

However as your website grows, you may want to expand beyond Jetpack. You might need advanced functionalities that are offered in other third-party WordPress plugins.

In these cases, it makes sense to look at Jetpack alternatives for specific features that you need.

Pros and Cons of Jetpack Plugin

Pros and cons of using WordPress Jetpack plugin

Like all things in life, Jetpack plugin comes with its own advantages and disadvantages that you need to keep in mind when choosing Jetpack alternatives.

Pros of Using Jetpack Plugin

These are the advantages of using Jetpack plugin on your WordPress website.

  • One plugin to rule them all. You get all essential features in one easy to manage package.
  • Jetpack is highly optimized for performance with Automattic’s (company behind Jetpack and WordPress.com) powerful infrastructure running in the background.
  • It has a nicer user interface than your typical WordPress plugins.

Cons of Using Jetpack Plugin

Following are the disadvantages of using WordPress Jetpack plugin on your website.

  • Using Jetpack requires you to create a WordPress.com account.
  • The Jetpack core is free but many of its features require a paid subscription.
  • It has limited email functionality. You cannot email your subscribers without publishing a blog post.
  • Your website becomes dependent on one plugin which makes it harder to replace in the future.

That being said, let’s take a look at the best Jetpack alternatives that you can install on your website.

1. WPForms Lite

WPForms

WPForms Lite is the best alternative to Jetpack’s feedback form. WPForms is the best WordPress contact form plugin, and it comes with a free lite version that allows you to easily add contact form in your WordPress website.

WPForms comes with a beautiful drag and drop form builder and ready-made form templates. Adding form into your blog posts and pages is simple with shortcode or by using the Add form button in post editor.

We built WPForms to make it beginner friendly while offering advanced functionalities like email subscription, payments, user registration, and more in the Pro version.

2. MonsterInsights

MonsterInsights

Jetpack comes with a built-in stats module. However it’s no where near as powerful as Google Analytics. If you want Google Analytics integration in Jetpack, then you have to upgrade to the professional plan which costs $299/year.

MonsterInsights is the top Google Analytics plugin for WordPress with more than 1+ Million active installs, and it has a free version available for all WordPress users.

MonsterInsights allows you to easily install Google Analytics in your WordPress website. It comes with beautiful reporting tools that make it easy for beginners to see where their users are coming from and what they are viewing.

3. UpdraftPlus

UpdraftPlus

Jetpack offers automated daily backups, but they are only available for paid plans. UpdraftPlus is one of the best WordPress backup plugins in the market and a free alternate to Jetpack’s backup feature.

It allows you to easily set up automatic backups for your entire WordPress website.

You just need to set it up once, and then it will automatically create backups. Your backups are stored in remote locations such as Google Drive, Dropbox, and more. You can also restore your website from any previous backups with few clicks.

For details, see our guide on how to How to backup and restore your WordPress site with UpdraftPlus.

4. Akismet

Akismet

Jetpack has spam filtering feature for paid plans, but you will need at least the personal plan to access basic spam filtering.

Akismet is the best WordPress spam filtering plugin in the market. It automatically filters all your WordPress comments to catch spam. This significantly reduces the number of spam comments that you’ll have to moderate.

For complete set up instructions, see our Akismet guide for WordPress beginners.

5. Sucuri Scanner

Sucuri

Jetpack only scans for malware if you have professional or premium subscription plans. Sucuri scanner provides free malware scanner, blacklist monitoring, file integrity check, post-hacks security actions, and security hardening.

Sucuri is the industry leader in WordPress security and website monitoring. It also offers the best WordPress firewall which blocks suspicious activity even before it reaches your website.

6. Yoast SEO

Yoast SEO

Jetpack offers limited SEO functionality even for premium plan users. You will need at least professional plan to access all of Jetpack’s SEO features. Yoast SEO is the perfect alternative to Jetpack’s SEO features, and it is the most popular SEO plugin in the market.

The free Yoast SEO plugin gives you complete WordPress SEO tools including site verification, XML sitemaps, SEO preview, Facebook and Twitter preview images, title and meta descriptions, and more.

For complete step by step instructions, see our guide on how to install and set up Yoast SEO plugin.

7. WP to Buffer

WP to Buffer

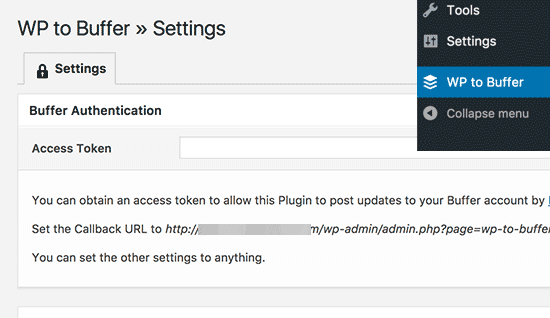
WP to Buffer plugin allows you to connect your WordPress site to Buffer and automatically schedule your WordPress posts to share on your social media profiles. It is the best alternative to Jetpack’s publicize feature, which does the same thing.

Buffer is a social media management platform that allows you to schedule your social media posts throughout the day. This saves you time you would otherwise spend on sharing your articles manually on social media.

8. Yet Another Related Posts Plugin

Yet Another Related Posts Plugin

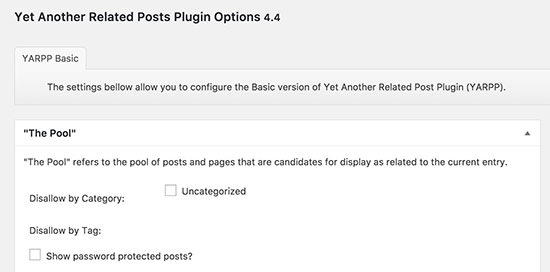
Yet Another Related Posts plugin is the best WordPress related posts plugin in the market and the perfect alternative to Jetpack’s related posts feature.

It offers more customization options and full control on how and where you display related posts on your website. It even supports custom post types and can add related posts in RSS feeds as well.

9. De:Comments

De:comments

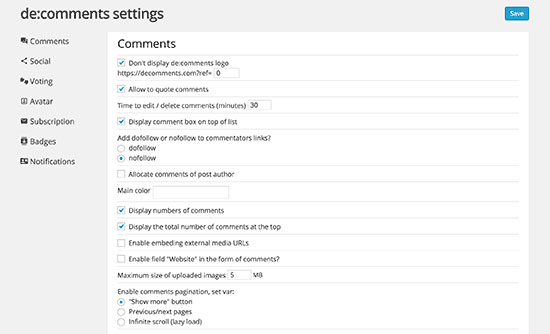
Decomments is a paid WordPress plugin, which allows you to transform your WordPress comment area by adding more social features to it. Your users can rate comments, share comments on social media, login with their social profiles, earn badges, and more.

This offers a very engaging user experience for comments on your WordPress site. For detailed instructions see our article on how to improve WordPress comments with De:comments.

10. Envira Gallery Lite

Envira Gallery

WordPress comes with a default way to easily add image galleries. However, the default WordPress gallery is quite limited in functionality. If user clicks on a image it loads in a new page.

Envira Gallery Lite offers the free alternative to Jetpack’s responsive galleries. It allows you to easily create responsive image galleries with carousel popups.

11. Pingdom

Pingdom

Pingdom is not a plugin but a website monitoring tool that you can use as an alternative to Jetpack’s monitoring tool. Pingdom’s free account allows you to monitor 1 website.

It sends instant email notification when your website is down and notifies you when it is up again. You can also monitor your website’s historic uptime by logging into your account.

12. MailChimp

MailChimp

Email marketing is one of the best ways to reach out to your audiences. If you haven’t started it yet, then see our guide on why you should start building your email list right away.

MailChimp is one of the best email marketing services in the world and the perfect alternative to Jetpack’s email subscriptions. The downside of Jetpack’s subscriptions is that it only emails users when you publish a new post. Unlike a real email list, where you can send users weekly or monthly newsletters.

MailChimp is a paid service but they offer a free forever plan for upto 2000 subscribers and 12,000 emails per month.

13. Cloudflare

Cloudflare

Cloudflare is one of the best CDN services that offers free CDN and basic protection against DDOS attacks.

It improves your website’s speed and performance by serving static content through their global CDN. Cloudflare is the perfect replacement for Jetpack’s CDN service which serves your images through their CDN server to optimize performance. It also provides a free alternative to Jetpack’s brute force attack protection.

For detailed instructions see our guide on how to setup free Cloudflare CDN in WordPress.

14. Easy Updates Manager

Easy Updates Manager

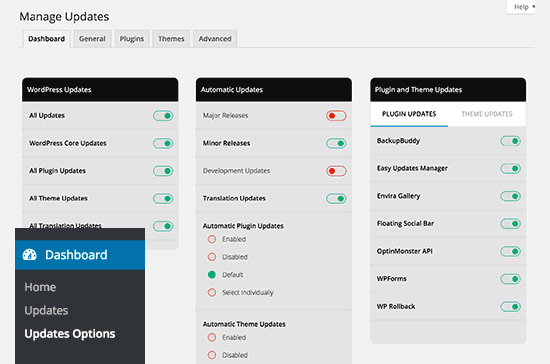
Easy Updates Manager allows you to replace Jetpack’s automatic plugin update feature. It helps you easily manage all WordPress core, theme, and plugin updates.

From a single dashboard, you can enable or disable automatic updates. You can set specific or all plugin updates to be automatically installed. It can also automatically install theme updates.

For more details, see our guide on how to better manage automatic WordPress updates.

15. WordPress Infinite Scroll

Load More - Infinite scroll for WordPress

WordPress Infinite Scroll is the perfect alternative to Jetpack’s infinite scroll feature. Just like Jetpack, you will need to add a little code snippet into your theme.

It allows you to add a button that users can click to load more posts, you can also choose to automatically load posts as user scrolls down a page.

For detailed instructions, see our guide on how to add load more posts button in WordPress.

16. EA Share Count

EA Share Count

EA Share Count is one of the best social media plugins for WordPress. It is super fast and only loads a limited number of top social networks: Facebook, Twitter, Google+, Stumbleupon, Pinterest and LinkedIn.

It has three button styles, social share count, and total share count feature. It is available on GitHub (see our guide on how to install WordPress plugins from GitHub)

We hope this article helped you find the best alternatives for the Jetpack plugin on your WordPress site. You may also want to see our list of essential WordPress plugins to find other must-have plugins for your website.

If you liked this article, then please subscribe to our YouTube Channel for WordPress video tutorials. You can also find us on Twitter and Facebook.

The post 16 Best Alternatives to the WordPress Jetpack Plugin appeared first on WPBeginner.

How to Fix WordPress Not Sending Email Issue

One of the most commonly asked questions on WPBeginner is how to fix WordPress not sending email problem. Many of our beginner level users ask us why their contact form plugin is not sending emails, or why they are not seeing any WordPress notifications. In this article, we will show you how to fix WordPress not sending email issue.

Why You Are Not Getting Emails from Your WordPress Site

The most common reason for this is that your WordPress hosting server is not configured to use PHP mail() function.

Even if they would allow it to work, many email service providers use a variety of tools to reduce email spam. These tools often try to detect that an email is originating from the location it claims to be originating from, and often emails sent by WordPress websites fail this test.

In such cases, when an email is sent out from your WordPress site, it never even makes into spam folder of the destination. This is why we recommend not using WordPress to send your email newsletter.

This is also the reason why that we recommend using SMTP to send emails in WordPress. SMTP (Simple Mail Transfer Protocol) is the industry standard for sending emails. Unlike PHP mail function, SMTP uses proper authentication which increases email deliverability.

There are many different SMTP services available, but in this article we will show only two that we recommend: MailGun and Gmail.

Sending Your WordPress Emails Using Mailgun

Mailgun is a popular email service provider. They allow website owners to send large amounts of emails with high deliverability.

As a dedicated email service provider, they spend a lot of money and time on making sure that your email reaches its destination.

While Mailgun is a paid service, it offers first 10,000 emails for free every month. That’s more than enough for most folks who just started their blog or website.

Here is how to setup your WordPress site to use Mailgun for sending emails.

First you need to signup on the Mailgun website. After signing up, you need to click on the “Add your domain” button.

Add your domain to Mailgun

You will now see an add domain page. Here you need to add a subdomain on your WordPress website’s domain name. For example, mail1.yourdomain.com.

You can create a new subdomain on your existing domain name by following the instructions below.

First, you need to visit the cPanel dashboard of your hosting account. Next, click on the subdomains icon under the domains section.

cPanel subdomains

On the next page, you need to enter your subdomain and then select your root domain from the drop down menu.

Enter your subdomain

After that click on the create button, and you will see a success message that your subdomain has been created.

You can now add this subdomain on Mailgun’s add domain page. After you add the domain, Mailgun will show you a few DNS records.

Mailgun DNS records

Switch back to your cPanel dashboard and then click on ‘Advanced DNS Zone Editor’.

DNS zone editor

You will be asked to select the domain for which you want to change the DNS records. Once you select your root domain name, you will see options to add new DNS records.

The first TXT entry will be your subdomain. You need to start by entering the subdomain in the Name field and then select TXT as record type. After that you need to add 14400 in TTL field and copy the value shown on Mailgun domain verification settings page into TXT Data field.

Adding DNS TXT record

Repeat the process to add the other TXT record.

Once you are done, switch back to the cPanel dashboard and click on the MX Entry icon.

MX Entry icon in cPanel

You will be asked to select your root domain, then scroll down to the bottom of the page. There you will see the option to add a new MX Entry.

Enter the priority and destination values and click on create new record button.

You have successfully added your domain to Mailgun. It will need to verify that your domain has proper DNS records. This may take a while because DNS records may take sometime to update.

You can check the status of your domain verification by visiting the Domains page in your Mailgun account.

Mailgun will show active status next to your domain name once it can verify the DNS changes you made.

Mailgun active domains

Once your domain is active, you can setup your WordPress site to start using Mailgun for sending emails.

First thing you need to do is install and activate the WP Mail SMTP plugin. For more details, see our step by step guide on how to install a WordPress plugin.

Upon activation, you need to visit Settings » WP Mail SMTP to configure plugin settings. First you need to provide your sender email address and the name you want to use for the sender.

WP Mail SMTP settings

Next, you need to select Mailgun as your mailer and check the box next to set the return path to match the from email address.

Select Mailgun as your mailer

Lastly, you need to provide your Mailgun private API key and the mailgun sub-domain. Click on the links below each field to get this information from your Mailgun account.

API key and domain name

Don’t forget to click on save settings button to store your changes.

That’s all, you have successfully setup your WordPress site to send emails using Mailgun.

You can now click on the ‘Email Test’ tab on plugin’s settings page to send a test email and see if everything is working fine.

Email test

Sending WordPress Emails Using Gmail SMTP Servers

Another alternative is to send your WordPress emails is using Gmail SMTP servers. You can use any regular Gmail account with this method to send out your emails. However, your email deliverability will be much better if you are using Google Apps for Work with your custom email address. See our guide on how to setup a professional email address with Google Apps and Gmail.

Whether you use paid or free Gmail address, rest of the instructions are the same.

First, you will need to install and activate the WP Mail SMTP plugin. For more details, see our step by step guide on how to install a WordPress plugin.

Upon activation, you need to visit Settings » WP Mail SMTP page to configure plugin settings. First you need to provide your gmail address in the ‘From Email’ field and the name you want to display as sender.
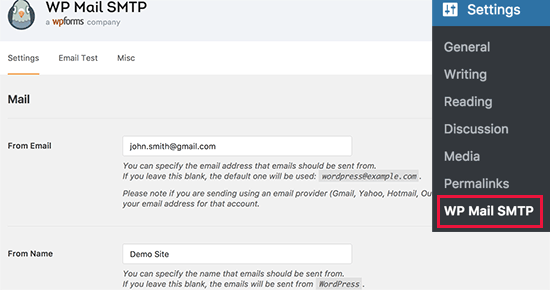
WP Mail SMTP settings for Gmail

Next, you need to scroll down to the mailer option. There are two ways you can use Gmail servers to send WordPress emails.

First, method is to use Gmail APIs to send emails. This method is recommended because it is more secure and reliable. Second method is to use your Gmail account’s SMTP server manually.

We will show you both methods, however we recommend that you use the first method.

Method 1: Setting up Gmail to Send WordPress Emails Using OAuth Protocol

First, you need to select Gmail as your mailer under WP Mail SMTP settings page. Check the box next to set the return path to be the same as sender, not checking this box will make bounced and failed messages to be lost forever.

Select Gmail as Mailer

Next, you will see the option to enter your Client ID, Client Secret, and a URL in ‘Authorized redirect URI’ field.

Creating an App and Generate API Keys for Gmail

To use Gmail’s APIs for sending WordPress emails, you need to create an app and generate an API key. To do that, visit the Google Developers Console website and create a new project.

Create Google Developer Console project

If you don’t see the blue button to create a project, then you can also click on ‘Select a project’ drop down and create a new project.

You’ll be asked to provide a name for your project. Give it a meaningful name so that next time you are here, you can easily recognize it.

Name your project

Click on the create button to continue.

Developer console will now create your project and take you to its dashboard. Google allow developers to access many of their APIs and services. Now that your project is setup, you need to enable the APIs that you will be needing.

Enable APIs

Click on Enable APIs and services button to continue.

This will bring you to the APIs library page. Type Gmail in the search box to quickly find Gmail API and click to select it.
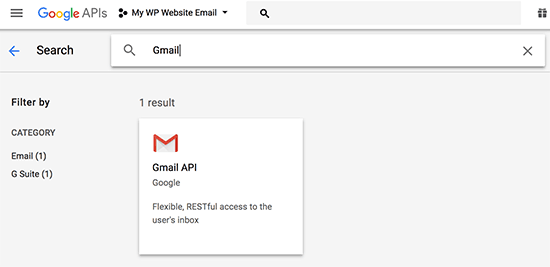
Select Gmail API

You will now see an overview of the API and what it can do. Simply click on the ‘Enable’ button to continue.

Enable Gmail API

Now that your API is enabled, the next step is to create credentials that you can use in your WP Mail SMTP plugin settings.

Click on the create credentials button to continue.
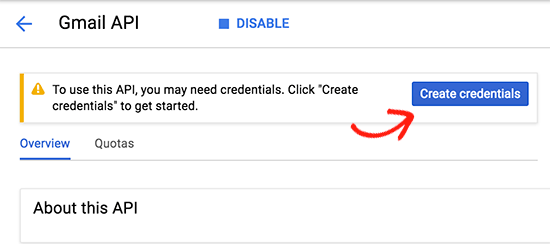
Create credentials

On the next screen, you will need to select ‘Web browser JavaScript’ in ‘Where you’ll be calling the API from’ field. After that click on the ‘User Data’ option.

To continue, click on the ‘What credentials do I need?’ button.

You will now be asked to provide a name for your OAuth client name. You can enter ‘WP Mail SMTP’ here.
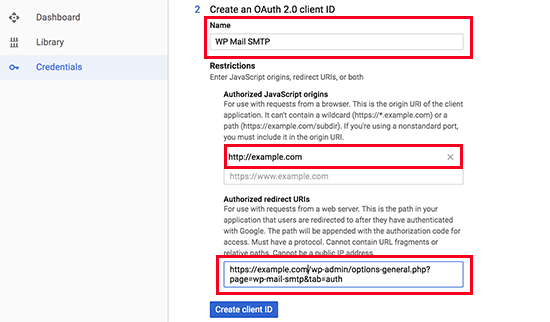
Step 2 of API credentials

Under JavaScript origins field, add your website’s domain name. Next, you need to copy and paste the authorized redirect URL from WP Mail SMTP plugin settings.

Click on ‘Create client ID’ button to continue.

Next, you need to enter a name for OAuth consent screen. You can put the plugin’s name here.
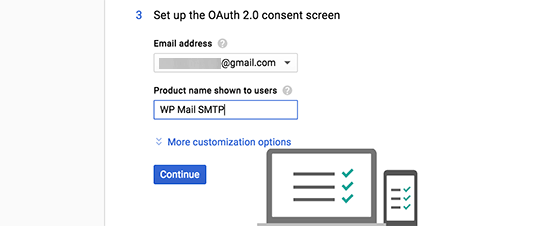
API credentials step 3

Click on the continue button and developer console will show your client ID. You can copy it and paste it in WP Mail SMTP plugin’s settings page. However, you will still need client secret key.

Getting client ID

Click on the Done button to move on.

You will now be taken to your project’s credentials page. You will see your recently created credentials listed there. Click on the edit button next to your credentials.
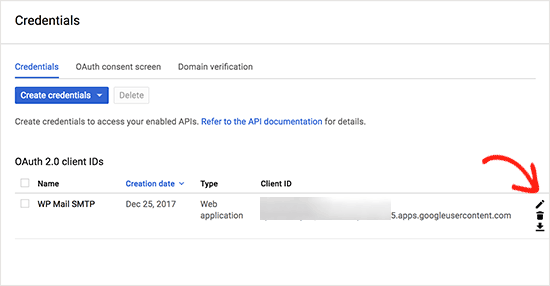
Edit credentials

This will bring you to edit credentials page where you will be able to see your client secret key. You need to copy and paste the key in your plugin’s settings page.
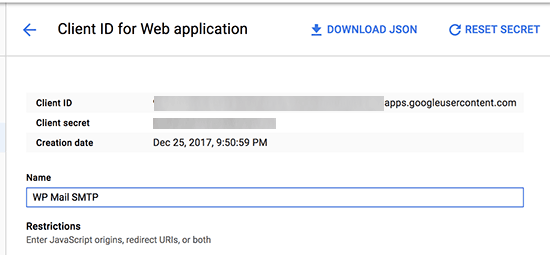
Client secret key

Return back to plugin’s settings page in your WordPress admin area. Now that you have both client ID and client secret keys, you need to click on the save settings button to continue.

Save Api keys

The plugin will now store your settings and reload the page. After that you need to scroll down to the bottom of the settings page and click on the ‘Allow plugin to send emails using your Google account’ button.
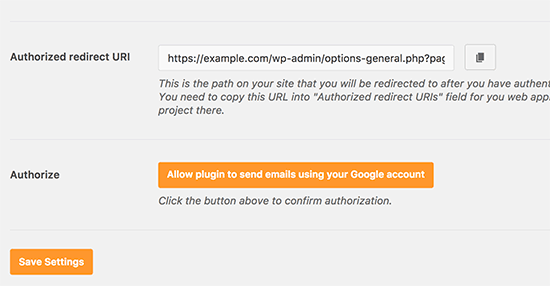
Allow plugin to connect

This will take you to your account on Google and you will be asked to give the website permission to send emails on your behalf.

Allow WP Mail SMTP to send emails

After that you will be redirected back to your website where you will see a success message.

You have successfully set up WordPress to use Gmail SMTP servers for sending emails using the OAuth protocol. You can now click on the ‘Email Test’ tab on plugin’s settings page to send a test email and see if everything is working fine.

Email test

Method 2: Setting Gmail to Send WordPress Emails Using SMTP

This method allows WP Mail SMTP to manually connect to Gmail’s SMTP servers for sending WordPress emails.

First, you need to visit Settings &raquo WP Mail SMTP page to configure the plugin settings.

Provide the Gmail address you want to use as From email field and your name as from name field.

Gmail SMTP

Select ‘Other SMTP’ as your mailer and check the box next to return path.

Scroll down to Other SMTP section to configure more settings.
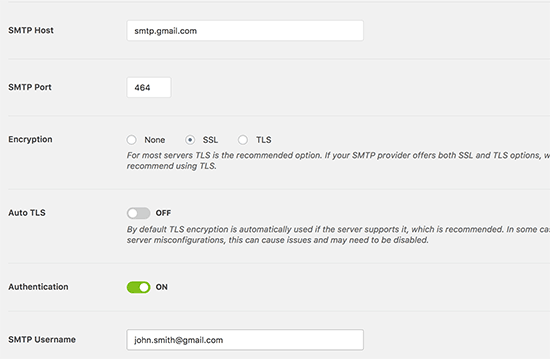
Gmail SMTP settings for WP Mail SMTP

Here is how to fill out the plugin settings:

  • SMTP Host: smtp.gmail.com
  • SMTP Port: 465
  • Encryption: Use SSL encryption
  • Authentication: Turn on authentication
  • Username: Your complete Gmail address, e.g. [email protected] or [email protected]
  • Password: Password of your Gmail account

Click on the save changes button to store your settings.

That’s all, you have successfully setup WP Mail SMTP to use Gmail SMTP servers.

You can now click on the ‘Email Test’ tab on plugin’s settings page to send a test email and see if everything is working fine.

Email test

We hope this article helped you learn how to fix WordPress not sending email issue, You may also want to see our list of the most common WordPress errors and how to fix them.

If you liked this article, then please subscribe to our YouTube Channel for WordPress video tutorials. You can also find us on Twitter and Facebook.

The post How to Fix WordPress Not Sending Email Issue appeared first on WPBeginner.
How to Create and Manage Ads.txt files in WordPress

Do you want to create and manage an ads.txt files in WordPress? Ads.txt file protects publishers from ad fraud, and it can potentially increase your ad revenue. In this article, we will show you how to easily create and manage ads.txt file in WordPress.

How to create and manage Ads.txt file in WordPress

What is Ads.txt File?

Ads.txt file allows publishers to declare who can sell ads on their website. It is an initiative created by IAB Tech Lab, a non-profit focused on improving digital advertising standards.

The initiative is supported by Google’s advertising platforms like Google Adsense, Doubleclick, and Ad Exchange. It is also supported by many other leading digital advertising platforms.

Why is Ads.txt file important?

Ad fraud cost millions of dollars in damages to online advertisers and publishers each year. People with malicious intent continuously try to trick ad platforms with domain spoofing, fake clicks, fake impressions, and more.

Ads.txt file improves transparency in online advertisement by allowing publishers to declare who can sell their ad inventory. Here is how it works:

If you are an advertiser and someone tells you that they can display your ad on a particular website, then you can go and checkout that website’s ads.txt file. It will show you if the company you are dealing with has the permission to sell advertising space on that particular website or not.

Since this data is publicly available, it can be crawled, stored, and searched by advertisers, publishers, and resellers.

If you are displaying ads on your website using Google Adsense, DoubleClick, or Ad Exchange, then adding Ads.txt file is recommended.

Many other advertising platform and software also support or require ads.txt file to be declared.

How to Create and Manage Ads.txt Files in WordPress?

First thing you need to do is install and activate the Ads.txt Manager plugin. For more details, see our step by step guide on how to install a WordPress plugin.

Upon activation, you need to visit the Settings » Ads.txt page to configure plugin settings.

Ads.txt manager settings

The plugin provides a simple text area where you can add lines to declare each individual platform or reseller. For example, you can add the following line to declare Google Adsense.

google.com, pub-0000000000000000, DIRECT, f08c47fec0942fa0

Don’t forget to replace pub-0000000000000000 with your own publisher ID.

As you can see, this line has four fields separated by comma. The first field is the domain of the company allowed to sell or resell your ad inventory. After that it has your publisher ID which corresponds to your account ID in the advertising platform.

The third field declares relationship type DIRECT or RESELLER. The last field is optional, and it represents an ID of the advertising platform. For all Google advertising programs, you’ll use the same unique ID.

Troubleshooting Earnings at risk Error in Adsense

A missing declaration in your ads.txt file may result in the following warning message in your Google Adsense account.

Earnings at risk – One or more of your ads.txt files doesn’t contain your AdSense publisher ID. Fix this now to avoid severe impact to your revenue.

This message indicates that your ads.txt file doesn’t have your publisher ID. To fix this message, simply go to Settings » Ads.txt page to make sure that you have correct publisher ID in plugin settings.

Note: Since ads.txt file is supposed to be in the root directory of a domain name, this plugin currently only works for root level domain like example.com. It does not work for WordPress installed in subdomain, subdirectory, or a single site in a multi-site network.

We hope this article helped you learn how to create and manage ads.txt file in WordPress. You may also want to see our guide on legit ways to make money online blogging with WordPress.

If you liked this article, then please subscribe to our YouTube Channel for WordPress video tutorials. You can also find us on Twitter and Facebook.

The post How to Create and Manage Ads.txt files in WordPress appeared first on WPBeginner.

21 Best WordPress Themes for Lawyers (2018)

Are you looking for the best WordPress themes for lawyers? A lawyer website requires a serious business and professional layout which is not commonly found in blogging themes. In this article, we have hand-picked some of the best WordPress theme for lawyers that you can use on your website.

Best WordPress themes for lawyers and legal firms

Making a Website for Lawyers and Legal Firms

WordPress is used by many top brand names for their websites. It is one of the most popular website builders in the world and perfect to build a website for lawyers or legal firms.

There are two type of WordPress websites, WordPress.com and WordPress.org also known as self-hosted WordPress. See our guide on the difference between WordPress.com and WordPress.org.

You will need WordPress.org because it gives you access to all the powerful WordPress features out of the box.

To start your self hosted WordPress website, you will need a domain name and WordPress hosting account.

We recommend using Bluehost. They are one of the largest hosting companies in the world and an officially recommended WordPress hosting provider.

Once you have signed up for hosting, you can head over to our guide on how to make a website for step by step instructions.

Having said that, let’s take a look at some of the best WordPress themes for lawyers and legal firms that you can install.

1. Ultra

Ultra Lawyer

Ultra is a beautifully designed all-purpose WordPress theme. It comes with several ready-made websites complete with content. One of these ready made designs is for lawyers and legal firms. You can install it with 1-click and then replace the content and images with your own.

It is packed with features like a drag and drop page builder, multiple sliders, photo galleries, contact form support, multiple layouts, and more. It is very easy to use even for absolute beginners.

2. Potenza

Potenza

Potenza is a powerful one-page WordPress theme for business websites including lawyers and legal organizations. It includes a beautiful vertical navigation flow with ready-made sections.

It has a fully widgetized homepage layout, just drag and drop widgets to build your website. It includes contact form, multiple colors, social media icons, Google Maps and support for popular page builders. All theme features are easy to customize and simple to use.

3. Monochrome

Monochrome

If you are looking for a minimalist style WordPress theme, then you’ll love Monochrome. This elegant WordPress theme is built on top of Genesis framework, which is highly optimized for speed and performance.

It includes landing page template, blog, and homepage template, custom widget areas, and a custom theme settings page. It works out of the box and it is quite easy to set up using live theme customizer.

4. Factum

Factum

Factum is a clean and simple one page WordPress theme for lawyers and legal firms. It comes with built-in sections to easily add clients, testimonials, staff profiles, and services. It can be used as a one-page theme and it will display all those sections on a single page.

It has multiple color schemes, custom widgets for social media, and a separate blog page. Theme setup is quite straightforward very easy to follow.

5. Indigo

Indigo

Indigo is an all-in-one kind of WordPress theme suitable for any kind of business website including legal firms and lawyers. It comes with ready-made websites that you can install with 1-click.

All website designs are fully editable using the theme’s drag and drop modules. You can also create your own custom page layouts with simple click and edit. It includes contact form support, social media, Google maps, Typekit fonts, and more.

6. LegalPress

LegalPress

As the name suggests, LegalPress is a specifically designed WordPress theme for lawyers and law firms. It features a beautiful design with slider on top followed by your most important sections.

It has easy to use sections to add client testimonials, staff profiles, call to action, office hours, and more.

7. Atmosphere

Atmosphere

Atmosphere is a modern WordPress business theme suitable for lawyers, law firms, and legal organizations. It features a large header image on the homepage with clear call to action button. Followed by your services and other sections.

It has a fully-widgetized homepage layout allowing you to drag and drop widgets to add different sections. It is built on Genesis theme framework and includes a custom theme settings page with support for live theme customization.

8. Law and Justice

Law and Justice

Law and Justice is a beautiful WordPress theme for attorneys, lawyers, and law firms. It includes a super-easy 1-click demo installer to setup your website instantly. After that you can just replace content with your own and you are good to go.

It also includes a drag and drop page builder, Google fonts, contact form, and translation support. It has a custom theme options panel to easily change theme settings.

9. Spencer

Spencer

Spencer is a multi-purpose WordPress business theme suitable for attorneys, and law firms. Its homepage features a full-width background image with a welcome message and call to action button. After that you can add your articles, client testimonials, and other sections.

It has unlimited colors, multiple layouts, full-width page, and page builder support. It is super easy to use and has lots of customization options neatly organized under live theme customizer.

10. Presence

Presence

Presence is a beautifully designed WordPress theme for business websites including lawyers and legal firms. It includes 10 beautiful website designs that you can install with 1-click. Each design is fully editable using live theme customizer.

It comes in multiple color schemes, custom widgets, multiple blog layouts, and eCommerce support. It is compatible with all top WordPress plugins and includes a simpler page builder to edit page layouts.

11. Elite

Elite

Elite is a beautiful WordPress theme for business and ecommerce websites. It features a full screen background image with your call to action button prominently displayed.

It includes custom logo support, unlimited colors, Google fonts, and multiple page layouts for blog posts and pages. It is easy to use with a widgetized homepage, customizer support, and custom theme options page.

12. Atomic

Atomic

Atomic is a beautifully designed WordPress business theme that can be easily used for a law firm. It features beautiful typography and spacious layout that makes your content stand out.

Its homepage features sections to add your staff profiles, services, and articles. It works out of the box and all theme settings are neatly organized. It also comes with a getting started guide to help you set up your website/

13. Neilmink

Neilmink

Neilmink is a modern and elegant WordPress theme for lawyers and legal firms. Its homepage uses bold colors, parallax background effects, and crisp typography for a unique look.

It includes easy color selection, shortcodes, team members, clients, and services sections. All theme options are easily customizable using live customizer and a custom theme settings page.

14. Decree

Decree

If you are looking for a free WordPress theme for lawyers, then take a look at Decree. It features a modern layout featuring a large slider with call to action, followed by your services, staff profiles, and contact information.

It works with all popular WordPress plugins and can also be used with multilingual websites. It is simple to use and comes with free detailed documentation to set up your website like the demo.

15. Legal

Legal

Legal is a WordPress theme made specifically for lawyers, attorneys, and law firms. It features a modern homepage layout with customizable slider on top with your welcome message.

It includes a contact form, multiple layout choices, Google fonts, social media icons, and more. It comes with a custom theme dashboard for set up and also supports live customizer.

16. Pinnacle

Pinnacle

Pinnacle is a beautifully designed free WordPress theme for business websites. It features a bold design with versatile options and multiple style choices.

It comes with tons of customization options including color choices, multiple layouts, multiple sidebars, custom widgets and more. It is highly customizable yet quite easy to use.

17. Executive Pro

Executive Pro

Executive Pro is a WordPress theme designed specifically for business websites. Suitable for lawyers and legal firms looking for a corporate look for their website. Its homepage displays a featured slider on top, followed by a call to action banner and then your most important content.

It is built on Genesis theme framework and includes a widgetized homepage layout, custom widgets, custom theme options panel, and live customizer support. It can also be used to add an online store functionality if you need it.

18. Leader

Leader

Leader is another excellent WordPress theme for lawyers and law firm websites. It comes with 1-click demo import with multiple homepage designs that you can install and make your own.

It includes 10 header styles, 8 blog layouts, unlimited sidebars, mega menu, and premium page builder and slider plugins. It can also be used to build multilingual websites.

19. Roxima

Roxima

Roxima is a modern and stylish WordPress business theme that can be used by lawyers and law firm websites. Its homepage displays a full screen background image with your call to action. The homepage is fully widgetized allowing you to drag and drop sections to build your website.

It comes with full color control, custom widgets for content discovery and social media, multiple layouts, advanced typography options, and more. All theme options are easy to setup and most just work out of the box.

20. Creativo

Creativo

Creativo is a multi-purpose WordPress theme designed for all types of business websites. It includes multiple 1-click demos that allows you to quickly setup a lawyer website. Simply replace the content with your own and you will be ready to launch.

It comes with 7 color schemes, 3 design layouts, multiple header styles, and unlimited color choices. It ships with freebies like a page builder, slider, and a live chat plugin.

21. Koehn

Koehn

Koehn is an elegant WordPress business theme suitable for legal firms and lawyers looking for a corporate look. it includes a widgetized drag and drop homepage with built-in content sections and a powerful fullscreen slider.

Koehn comes with custom post type to add your staff members. It also includes custom widgets for content discovery and social media like Instagram, Flickr, Twitter, and more.

We hope this article helped you find the best WordPress themes for lawyers and legal firms. You may also want to see our complete step by step WordPress SEO guide for beginners.

If you liked this article, then please subscribe to our YouTube Channel for WordPress video tutorials. You can also find us on Twitter and Facebook.

The post 21 Best WordPress Themes for Lawyers (2018) appeared first on WPBeginner.

WordPress 2017 Year In Review: The Biggest News From Last Year

Happy new year, folks! As the slow train that is time chugs along, we’ve slipped across the barrier into a new year. And as we move into 2018, I thought it would be nice to take a minute and shift our gaze in the opposite direction – to revisit some of the biggest WordPress changes, ... Read moreWordPress 2017 Year In Review: The Biggest News From Last Year

The post WordPress 2017 Year In Review: The Biggest News From Last Year appeared first on Learn WordPress with WPLift.

How to Create a Private Post in WordPress

Do you want to create a private post in WordPress? Unlike regular WordPress posts, a private post is not visible to your website visitors. Only logged in users with specific permissions can see them. In this article, we will show you how to easily create a private post in WordPress.

Creating private post in WordPress

What is a Private Post in WordPress? How Does it Work?

A private post in WordPress is not visible to the public. Only logged in users with right permissions can see it among your blog posts.

WordPress comes with a built-in user role system that assigns permissions and capabilities to different user roles. Each WordPress user has a role assigned to them which gives them permissions to do specific tasks on a website.

Any user who has the permission to publish a post can write a private post and publish it. The post will be visible to the user and following user roles.

  • Administrator – Can create, edit, and delete any private post created by any user on a WordPress site.
  • Editor – Can create, edit, and delete any private posts created by any user.
  • Author – Can create, publish, edit, view and delete their own private posts. They cannot see private posts created by other users.

That being said, let’s take a look at how to create a private post in WordPress.

Creating a Private Post or Private Page in WordPress

First you need to create a new post or page. You can also edit an existing post that you want to make private.

On the post edit screen, you need to click on the ‘Edit’ link next to the ‘Visibility’ option in ‘Publish’ meta box.

Edit visibility options of a blog post or page in WordPress

You will now see options to make a post sticky, password protected, or private. Go ahead and select private and then click the OK button to continue.

Private post option in WordPress post edit screen

You can now continue editing the post or you can save/publish it.

If you visit your website, then you will see your Private blog post marked like this:

Private post preview in WordPress

Users who don’t have permission to see private posts will not see it.

Note: Images you add to a private post are not private and can be viewed in media library by other authors. Images can also be viewed by anyone who has the image URL.

We hope this article helped you learn how to create a private post in WordPress. If you are looking to create a full-feature membership website with private content and courses, then you may want to check out our ultimate guide on how to create a membership site in WordPress.

If you liked this article, then please subscribe to our YouTube Channel for WordPress video tutorials. You can also find us on Twitter and Facebook.

The post How to Create a Private Post in WordPress appeared first on WPBeginner.

How to Choose the Best WooCommerce Hosting Company?

Are you looking for the best WooCommerce hosting to create your online store? Choosing the best hosting provider is one of the most important decision you’ll make for your eCommerce business.

A typical shared hosting provider may not always be a good choice for WooCommerce. That’s because you will need more resources, SSL certificate, and WooCommerce-centric support platform. In this guide, we will help you choose the best WooCommerce hosting for your online store.

At WPBeginner, we have helped more than 100,000+ users start their websites. As the largest unofficial WordPress resource site and years of experience with hosting services, we know the importance of choosing the best WooCommerce hosting for an eCommerce startup. Our goal is to offer insights on things you need to consider when choosing a WooCommerce hosting company.

To make the process easier, we have created the ultimate guide on how to choose the best WooCommerce hosting company.

The post How to Choose the Best WooCommerce Hosting Company? appeared first on WPBeginner.

How To Search And Insert Gorgeous Free Stock Photos From Your WordPress Dashboard

Part of creating great content on your WordPress site is interspersing quality images in that content. For example, BuzzSumo found that posts which used images every 75-100 words got more shares than those which used images more sparingly. So images are pretty important. But here’s the thing about finding quality images: It can be time-consuming. ... Read moreHow To Search And Insert Gorgeous Free Stock Photos From Your WordPress Dashboard

The post How To Search And Insert Gorgeous Free Stock Photos From Your WordPress Dashboard appeared first on Learn WordPress with WPLift.