How to Accept Bitcoin Payments in WordPress

Do you want to accept Bitcoin payments in WordPress? Bitcoin makes it super easy to accept online payments from anywhere in the world. In this article, we will show you how to easily accept Bitcoin payments in WordPress.

Accepting Bitcoin payments in WordPress

Why Accept Bitcoin Payments in WordPress?

WordPress allows you to build an ecommerce store in minutes using WooCommerce or other ecommerce plugins for WordPress. These platforms allow you to accept payments online using PayPal, Stripe, 2Checkout, and many other popular payment gateways.

In fact you can accept payments with Stripe or PayPal without even using a shopping cart plugin.

However, not all payment gateways are available everywhere. Some of your clients may not have PayPal available in their region, others may not want to use their credit cards.

Bitcoin offers an alternate payment method that can be used by anyone from anywhere in the world. Once you accept payments in Bitcoin, you can transfer them to your bank account or keep them in your wallet. Bitcoin rates are steadily increasing, and it will continue to do so as more people start using it.

That being said, let’s take a look at how to get started with Bitcoin and integrate it into your WordPress website.

Getting Started with Bitcoin

First, you will need a Bitcoin wallet. This is a piece of software that you will use to send or receive Bitcoins and store your bitcoins safely.

There are many different types of wallets available. You can install a wallet on your computer or even on your phone.

To learn more about wallets and to choose the right wallet for your needs visit the Bitcoin Wallets page.

Next, you will need to sign up for a BitPay account. BitPay is an online service that offers Bitcoin exchange, conversion, and transfer to your bank account or Bitcoin wallet.

BitPay signup

During the sign up, you’ll be asked to select services. You need to select ‘Business Account’ to sell products or services on your website and transfer payments to your bank account.

BitPay Business

After that you can fill out your organization name and enter your personal information to create your account.
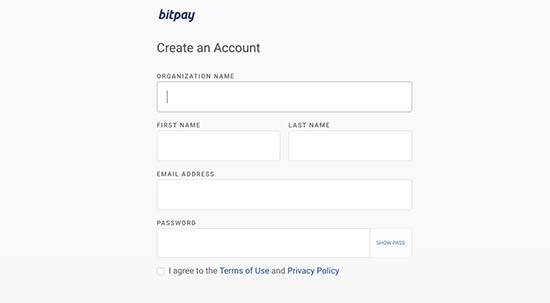
BitPay account creation

Once you have signed up, you will reach the getting started dashboard. There you will see three steps required to verify your account.

First you’ll need to verify your email address. Next, you need to enter your business information to verify your business account. Lastly, you need to enter your bank account information or your Bitcoin wallet address.

After completing these steps you’ll be ready to accept payments on your website.

BitPay offers multiple ways to accept payments on your WordPress website. We will show you two different methods, and you can choose the one that best suits your business.

Accepting Bitcoin Payments in WooCommerce with BitPay

If you are already using WooCommerce, then this method is recommended for you.

First thing you need to do is install and activate the BitPay for WooCommerce plugin. For more details, see our step by step guide on how to install a WordPress plugin.

Upon activation, you need to visit WooCommerce » Settings page and click on the ‘Checkout’ tab. Next, click on the BitPay link to configure its settings.
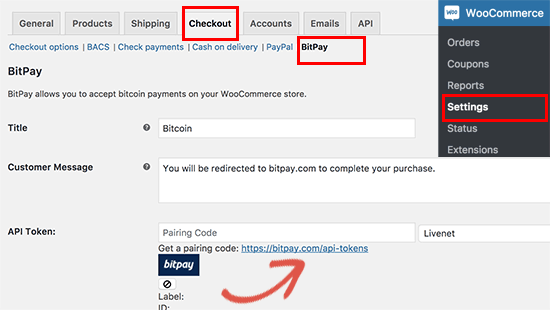
Setting up BitPay in WooCommerce

You need to click on the link below the API field to generate your API key. This will take you to BitPay website where you need to click on the ‘Add New Token’ button. After that you need to give this token a label and click on ‘Add Token’ button to continue.

Generating new token

BitPay will now show you a pairing code which you need to copy and paste in your WooCommerce BitPay settings page. Next, click on the find button to continue.

Your WooCommerce website will now connect to BitPay to verify the pairing code. Upon success, it will automatically fetch and store your API key.

Don’t forget to click on the save settings button to store your changes.

Your customers will now see an option to pay using Bitcoin on the checkout page of your store.
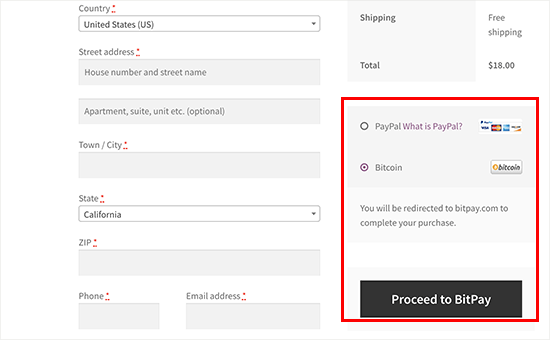
BitPay Checkout

Accepting Bitcoin Payments in WordPress with BitPay

This method is recommended for users who are not using a shopping cart or ecommerce plugin on their WordPress website.

BitPay allows you to create payment buttons for items you want to sell. Visit the Payment Tools page under your BitPay dashboard and then click on Payment Buttons.
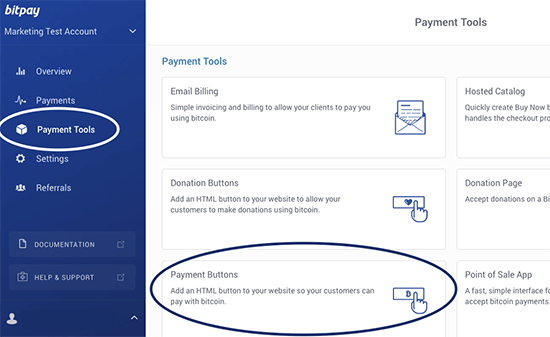
Create Bitcoin payment buttons with BitPay

This will bring you to the button generator page. You need to enter your business name, checkout item description, and payment amount.
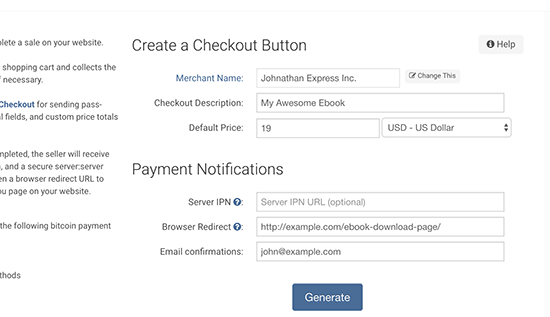
Generating checkout button

You can also enter a browser redirect URL. This is particularly helpful if you are selling digital goods like software, ebook, or music. The redirect page could be the page where your users can download the file.

Click on the Generate button to continue.

BitPay will now show you the button code and different button sizes. Select the button size you want to use and copy the code.

Select button and code

Now you can head over to your WordPress website and edit the post or page where you want to add the button. On the post edit screen, you need to switch to the text editor.
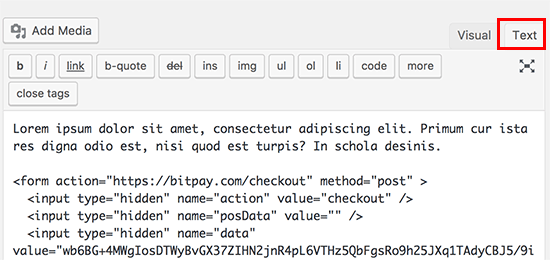
Add button code

Next, paste the code you copied from BitPay website inside the text editor and save or publish your changes.

You can now visit the post/page to see your checkout button in action.

Pay with Bitcoin button in WordPress page

We hope this article helped you learn how to accept Bitcoin payments in WordPress. You may also want to see our ultimate step by step WordPress security guide for beginners.

If you liked this article, then please subscribe to our YouTube Channel for WordPress video tutorials. You can also find us on Twitter and Facebook.

The post How to Accept Bitcoin Payments in WordPress appeared first on WPBeginner.
Gumbo Theme Review: A Podcasting Theme That Exceeds Expectations

Podcasting has been rising in popularity each year. In fact, you may not realize it, but the podcast audience is bigger than you think. With 42 million Americans listening to podcasts weekly, statistics show that podcast listening is growing steadily at a rate of 10%-20% a year. With that said, it’s no wonder that more ... Read more

The post Gumbo Theme Review: A Podcasting Theme That Exceeds Expectations appeared first on Learn WordPress with WPLift.

How to Add Load More Posts Button in WordPress

Do you want to add a load more posts button in WordPress? Many popular platforms allow users to load more posts when they reach to the bottom of the page. In this article, we will show you how to easily add a load more posts button in WordPress.

How to add load more posts button in WordPress

When and Why Add Load More Posts Button in WordPress

Keeping your users engaged with the content helps you get more views and ultimately more subscribers.

Many blogs use the simple ‘Older posts’ navigation link at the end of their home, blog, and archive pages. Some websites use numeric page navigation which adds more context.

However, there are certain type of websites that can benefit immensely from infinite scroll or load more posts button. Some examples include: photography websites, listicles, and viral content websites.

Instead of loading a whole new page, ‘load more posts’ button works like infinite scroll. It uses JavaScript to quickly fetch the next set of content. This improves user experience and gives them a chance to view more of your content.

That being said, let’s take a look at how to easily add load more posts button in your WordPress site.

Adding Load More Posts Button in WordPress

First thing you need to do is install and activate the Ajax Load More plugin. For more details, see our step by step guide on how to install a WordPress plugin.

Upon activation, the plugin will add a new menu item labeled ‘Ajax Load More’ to your WordPress admin menu. You need to click on it and head over to the plugin’s settings page.

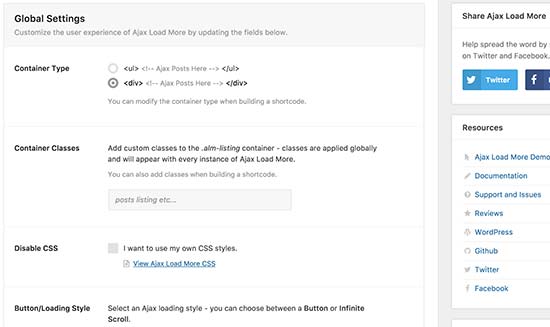
Ajax Load More settings

On the settings page, you can choose the color of your button. You can also replace the button with infinite scroll which loads next batch of posts automatically without users clicking on the button.

Next, you need to visit Ajax Load More » Repeater Template page to add your template for displaying posts.

The plugin comes with a basic template containing the WordPress loop to display posts. However, it does not match your theme and may look out of place on your website.

To fix this, you need to copy the code your theme uses to display posts on index, archive, and blog pages.

Normally, this code is located in the template-parts folder of your theme. In that folder, you will see templates to display different content. For example content-page.php, content-search.php, and more.

You will be looking for the generic content.php template. Here is an example from our demo theme’s content.php file:

<article id="post-<?php the_ID(); ?>" <?php post_class(); ?>>
	<?php
		// Post thumbnail.
		twentyfifteen_post_thumbnail();
	?>

	<header class="entry-header">
		<?php
			if ( is_single() ) :
				the_title( '<h1 class="entry-title">', '</h1>' );
			else :
				the_title( sprintf( '<h2 class="entry-title"><a href="%s" rel="bookmark">', esc_url( get_permalink() ) ), '</a></h2>' );
			endif;
		?>
	</header><!-- .entry-header -->

	<div class="entry-content">
		<?php
			/* translators: %s: Name of current post */
			the_content( sprintf(
				__( 'Continue reading %s', 'twentyfifteen' ),
				the_title( '<span class="screen-reader-text">', '</span>', false )
			) );

			wp_link_pages( array(
				'before'      => '<div class="page-links"><span class="page-links-title">' . __( 'Pages:', 'twentyfifteen' ) . '</span>',
				'after'       => '</div>',
				'link_before' => '<span>',
				'link_after'  => '</span>',
				'pagelink'    => '<span class="screen-reader-text">' . __( 'Page', 'twentyfifteen' ) . ' </span>%',
				'separator'   => '<span class="screen-reader-text">, </span>',
			) );
		?>
	</div><!-- .entry-content -->

	<?php
		// Author bio.
		if ( is_single() && get_the_author_meta( 'description' ) ) :
			get_template_part( 'author-bio' );
		endif;
	?>

	<footer class="entry-footer">
		<?php twentyfifteen_entry_meta(); ?>
		<?php edit_post_link( __( 'Edit', 'twentyfifteen' ), '<span class="edit-link">', '</span>' ); ?>
	</footer><!-- .entry-footer -->

</article><!-- #post-## -->

Once you find that code, you need to paste it inside the Repeater Templates field in plugin settings.

Don’t forget to click on the ‘Save Template’ button to store your settings.

Next, you need to visit Ajax Load More » Shortcode Builder page to generate the shortcode.

This page contains many different options that you can customize. First you will need to select the container type. If you are unsure, just look at the template you copied earlier. Most modern themes use the <div>; element.

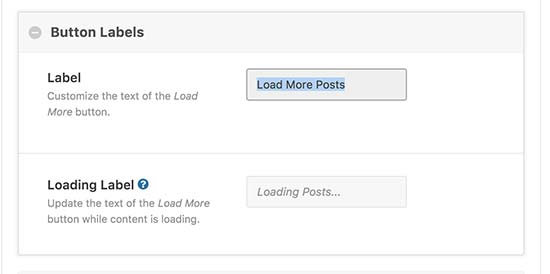
After that scroll down to the button labels section. Here you can change the text that appears on the button. By default, plugin uses ‘Older Posts’, and you can change that to ‘Load more posts’ or anything you want.

Button label

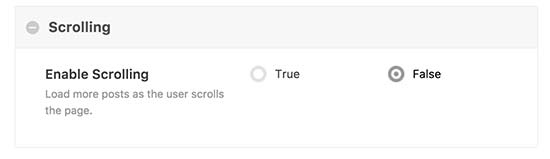
Lastly, you need to choose whether you want posts to load automatically or wait for users to click on the load more posts button.

Disable scroll

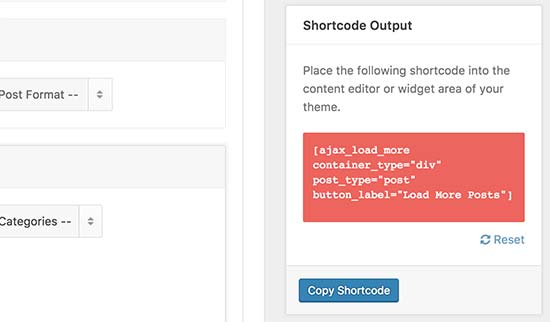
Your shortcode is now ready to be used. In the right column, you will see the shortcode output. Go ahead and copy the shortcode and paste it in a text editor as you will need it in the next step.

Shortcode output

Adding Load More Posts in Your WordPress Theme

This part of the tutorial requires you to add code into your WordPress theme files. If you haven’t done this before, then take a look at our guide on how to copy and paste code in WordPress.

Don’t forget to backup your WordPress theme before making any changes.

You will need to find the template files where you want to add the load more posts button in your theme. Depending on how your theme is organized, usually these files are index.php, archives.php, categories.php, etc.

You will need to add the shortcode you copied earlier into your theme right after the endwhile; tag.

Since we are adding the shortcode in a theme file, we will need to add it inside the do_shortcode function, like this:


echo do_shortcode('[ajax_load_more container_type="div" post_type="post"]'); 			

You can now save your changes and visit your website to see the ‘Load more posts’ button in action.

Click to load more posts button preview

We hope this article helped you learn how to add load more posts button in WordPress. You may also want to see our mega list of the most useful WordPress tips, tricks, and hacks for beginners.

If you liked this article, then please subscribe to our YouTube Channel for WordPress video tutorials. You can also find us on Twitter and Facebook.

The post How to Add Load More Posts Button in WordPress appeared first on WPBeginner.
11+ Divi Extensions And Add-on Providers To Extend Divi Further

In the past few weeks, we’ve featured posts on Elementor add-ons and Beaver Builder add-ons, which may have left you to think that we’ve forgotten about the horde of Divi fans out there. That couldn’t be further from the truth – we were just making you guys wait! But no longer, because today we’re about ... Read more

The post 11+ Divi Extensions And Add-on Providers To Extend Divi Further appeared first on Learn WordPress with WPLift.

How to Add Click to Load for GIFs in WordPress

Do you want to add a click to load GIF player on your WordPress website? Animated GIF images take longer to load which affects page speed and user experience. That’s why many popular blogging platforms don’t auto-load GIFs in their apps. In this article, we will show you how you can easily add click to load for GIFs in WordPress.

Adding click to load for Gifs in WordPress

Why Add Click to Load for GIFs in WordPress?

If you often add animated GIF images in WordPress, then you already know that they are way larger in size than regular images. This means they take longer to load which affects your website speed and performance.

Some websites deal with this by lazy loading images in WordPress. However, this still affects users experience because GIFs take longer to load as the user scrolls down.

Popular platforms like Tumblr and others use click to load GIF player to mitigate this problem. Instead of loading all frames in a GIF animation, they load just the first frame of the animation. A play button or GIF label on the image indicates that users can click to view the animated GIF.

Paused GIF example

That being said, let’s take a look at how you can add click to load button for GIFs on your WordPress website.

Adding Click to Load for GIFs in WordPress

First thing you need to do is install and activate the WP GIF Player plugin. For more details, see our step by step guide on how to install a WordPress plugin.

This plugin works out of the box, and there are no settings for it.

You can head over to the post edit screen to see it in action.

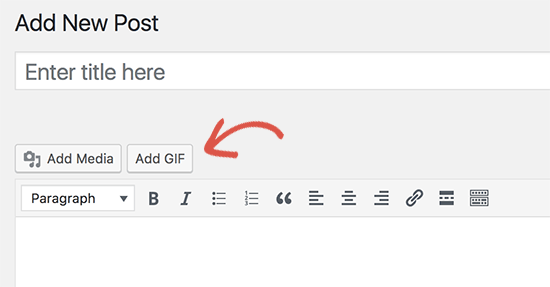
Add GIF button in WordPress post editor

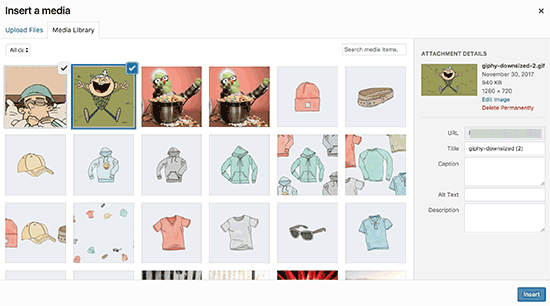
On the post edit screen, you will notice the Add GIF button above the post editor. Clicking on it will bring up the media uploader popup where you can upload your GIF images similar to any other image.

Upload GIFs using the Add Gif button

Once uploaded, you need to click on the Insert image button to continue.

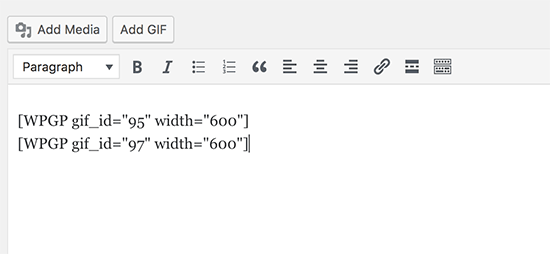
The WP GIF player plugin will now add the required shortcode in your WordPress post editor.

GIF shortcode in WordPress post editor

You can now save your post/page and click on the preview button to see your click to load GIFs in action.

All the GIFs embedded on your post will now have a button on top of them labeled GIF. Clicking on the button will load the animated GIF in the background and display it.

Click to play animated GIF

One downside of this plugin is that it only works for the new GIFs that upload. It will not add click to load for GIFs uploaded using the normal WordPress media uploader. This means all your previously uploaded GIFs will not have the click to load button.

We hope this article helped you learn how to add the click to load GIFs player in WordPress. You may also want to see our guide on how to fix common image issues in WordPress.

If you liked this article, then please subscribe to our YouTube Channel for WordPress video tutorials. You can also find us on Twitter and Facebook.

The post How to Add Click to Load for GIFs in WordPress appeared first on WPBeginner.
WOT Cache Review: A Comprehensive WordPress Performance Plugin

You don’t need me to tell you that page speed is important. I mean – the data is there. Page load times affect everything from user experience to conversion rates and even where your site ranks in the SERPs. Page speed’s importance is one of the reasons you see all those massive, complicated posts on ... Read more

The post WOT Cache Review: A Comprehensive WordPress Performance Plugin appeared first on Learn WordPress with WPLift.

Weekly WordPress News: WordPress 4.9.1 Release

First off – I hope you were all able to snag some awesome Black Friday and Cyber Monday deals. Now that the plugin and theme madness has calmed down, we can get back to business. In the biggest news this week, WordPress 4.9.1 just dropped. It’s a security and maintenance release that fixes some security ... Read more

The post Weekly WordPress News: WordPress 4.9.1 Release appeared first on Learn WordPress with WPLift.

21 Best Wedding WordPress Themes

Are you looking for a wedding themes for your WordPress site? For wedding websites, you need a theme that can showcase the best moments of the event. In this article, we have picked some of the best WordPress wedding themes that you can use.

Best wedding themes for WordPress

Making a Wedding Website with WordPress

WordPress is a popular choice to build family blogs, events, and wedding websites. Mainly because it is so easy to use and manage.

There are two types of WordPress websites available. WordPress.com and WordPress.org which is also known as self hosted WordPress. See our article on the difference between WordPress.com and WordPress.org

We recommend using WordPress.org because it gives you freedom to use all WordPress features out of the box.

You will need a domain name and a WordPress hosting account to start a self-hosted WordPress website.

We recommend using Bluehost. They are one of the best WordPress hosting companies in the world and an official WordPress hosting provider.

Once you have purchased hosting, you are ready to install WordPress. Follow the step by step instructions in our guide on how to start a blog.

That being said, let’s take a look at some of the best WordPress wedding themes that you can install on your website.

1. Ultra

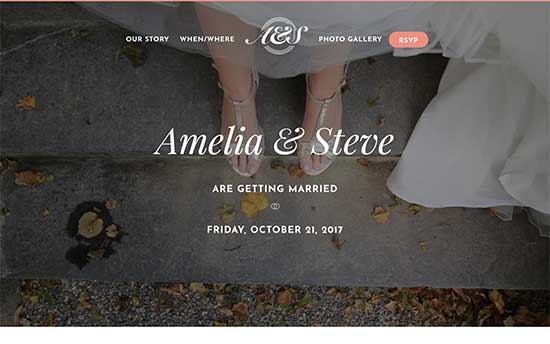
Ultra Wedding

Ultra is an all-purpose WordPress theme including ready-made designs for all kind of websites. It includes beautiful template for Wedding websites, featuring full screen background images and elegant typography.

It includes our story section to introduce bride and groom, beautiful photo galleries, and an RSVP section. It comes with a powerful drag and drop page builder and super easy theme options panel to setup your website.

2. Just Married

Just Married

Just Married is a gorgeous WordPress wedding theme. It features an elegant design with full screen background images, a single column homepage, and stunning image galleries.

It includes custom colors and comes with 4 color schemes. Inside you’ll also find sections to add groomsmen, bridesmaid, accommodation, reservations, contact form, and more.

3. Meridian Wedding

Meridian Wedding

Meridian Wedding is a beautifully designed WordPress theme with stylish layout and built-in custom features. Its homepage features a full-width slider to display photos of the lucky couple on top with call to action buttons to RSVP and gift registry.

It includes beautiful photo galleries, RSVP form, location, date, and complete event scheduling system. It is easy to setup with theme customizer where you can see live preview of your website as you set up.

4. Inspiro

Inspiro

Inspiro is a WordPress theme designed to create a lasting impression. It is perfect for photography, video, and wedding websites. It includes beautiful video and photo galleries, full screen video backgrounds, and lightbox popup support for photos and videos.

It ships with a 1-click installer and 5 ready-made layouts including one for wedding websites. It comes with a simple drag and drop page builder to edit your pages. All theme options can be easily setup using live customizer.

5. Amore

Amore

Amore is a stylish WordPress wedding theme with a beautiful design to make your website standout. Its homepage features a fullscreen slider with animated event countdown.

It is easy to customize and allows you to create and use any color scheme you want. All theme options can be set up using theme customizer. It also comes with drag and drop page builder to create your own custom layouts.

6. Lense

Lense

Lense is a WordPress photography theme with a unique design that makes it perfect for wedding websites. Its homepage features a beautiful photo gallery with horizontal scrolling. It also allows you to add photos in columns, grid types, scrollers, and slideshows.

You can have different settings for each one of your galleries. It has unlimited colors, custom widgets, unique mobile experience, and easy customization.

7. Emma

Emma

Emma is an elegant and modest WordPress wedding theme. Featuring crisp typography, beautiful colors, and full screen images, this theme has all you’ll need for a beautiful wedding website.

It also includes an RSVP form and free plugins to add registry, social sharing, and Instagram features. It is translation ready and comes with an easy setup with demo data included.

8. Selfie

Selfie

Selfie is an excellent choice for a WordPress wedding theme. Designed to showcase photographs beautifully, this theme comes with beautiful layout that looks stunning on all devices.

It has a collapsible navigation and sidebar that gets out of way on both mobile and desktop. It also has a separate blog section with touch enabled galleries. Theme setup is quite straight forward and most options work out of the box.

9. Nayma

Nayma Wedding

Nayma is an all purpose WordPress theme with multiple several purpose built designs, including one for wedding websites. This wedding template features a large full screen image with your wedding announcement on top of it.

It has beautiful parallax background effects for different sections, gorgeous photo galleries, and an area to display event details like time, venue, schedule, and more. It is super easy to use and comes with modules that you can just drag and drop to adjust your design.

10. Wedding Band

Wedding Band

Wedding Band is a free WordPress wedding theme with simple features and easier setup. It features a gorgeous full width slider on top followed by different sections.

All theme options are easy to setup using the live theme customizer. It also includes styling for adding contact form and a full-width page template that you can use with any WordPress page builder plugin.

11. Zoro

Zoro

Zoro is another excellent choice for a WordPress wedding website. It features super sized photo galleries to showcase the best moments of the wedding day. You can change photo gallery layouts into different types of grids with two or three columns.

It includes 4 homepage samples, 4 header styles, unlimited colors, Google Fonts, and a visual page builder. Theme setup is easier with demo content importer and a custom theme options panel.

12. Truelove

Truelove

Truelove is a simple and free WordPress theme to instantly create a beautiful wedding website. It includes a simple slider on top followed by different sections. Theme setup is done via customizer and allows you to add custom header, background, widgets, and navigation menus.

13. Shutter

Shutter

Shutter is a powerful WordPress photography theme with stunning templates including a wedding website design. It puts your photographs in front and center and offers an elegant and highly engaging user experience.

It ships with multiple demos, layout choices, different layout combinations that you can mix and match, unlimited colors, and built-in social media integration. It ships with a beginner friendly landing page builder and easy theme installer.

14. Newlyweds

Newlyweds

If you are looking for a classic elegance design, then take a look at Newlyweds. This free WordPress theme uses an old timey classic layout with subtle colors and beautiful typography. It uses Cormorant Garamond and Great Vibes fonts for the elegant crisp typography.

It includes an event countdown timer, beautiful photo galleries, bride and groom photos, and custom logo support. All theme options are super simple and can be easily setup using live theme customizer.

15. Modules

Modules

Modules is a well crafted all-purpose WordPress theme. It takes a modular approach to design which allows you to use built-in blocks to just drag and drop on a canvas to build beautiful pages.

It ships with 16 turnkey designs for different industries including photography, personal, and event websites. Apart from that it includes ready-made design elements that you can instantly add. It is very easy to use and customize and perfect for wedding websites.

16. Selkie

Selkie

Selkie is a WordPress blogging theme built for photographs and it is perfect for wedding websites. It’s homepage features a large header image with a call to action button that you can use for RSVP for registry pages.

Selkie is full of options, it has two layout choices, multiple navigation menu styles, 10 different blog layouts, and more.

17. Memories

Memories

Memories is a stylish WordPress theme suitable for photographers, fashion, and lifestyle sites. Its design features a unique layout, which makes it a great choice for wedding websites. It comes with a beautiful gallery display to showcase the best of your photographs.

It works with all popular WordPress plugins so you will be able to add new features as you go. Theme setup is quite easy with tons of options.

18. Focussity

Focussity

Focussity is a beautiful WordPress theme for wedding photographers. It includes a custom portfolio section with beautiful image galleries. It supports fullscreen header images and backgrounds.

It also comes with a drag and drop page builder to create your own layouts. Focussity is multilingual ready and comes with beautiful parallax effects and background video support.

19. Gallery Pro

Gallery Pro

Gallery Pro is an elegant and minimalist WordPress photography and lifestyle theme. It is built on top of Genesis theme framework, which is highly optimized for faster WordPress speed.

It offers a clean minimalist layout to showcase your wedding day with style. Theme features allow you to easily add customizable header, drag and drop layout, and use page templates to add blog section as well. It is super simple to use and most features work right out of the box.

20. Jen+Ben

Jen+Ben

Jen+Ben is a simple and beautifully designed WordPress theme for wedding websites. It features a large featured image on top, which can also be replaced with a slider. It comes with a set of companion plugins that you can enable to add features as you set up the theme.

It includes custom header styles, beautiful navigation, Google maps, contact form, and social media features. Inside you will find custom theme options panel that will guide you through setup.

21. Hitched

Hitched

Hitched comes as part of an all-purpose WordPress mega theme. You will get not just a wedding theme, but also themes to build various other websites. It has a 1-click demo installer, which allows you to import content and then just replace items with your own wedding photographs and information.

Inside you’ll find all the usual features you’d expect from premium WordPress theme. Noteable features include sliders, photo galleries, contact form, translation and multilingual support, event management, and more.

We hope this article helped you find the best WordPress wedding themes for your website. You may also want to see our list of must have WordPress plugins for all websites.

If you liked this article, then please subscribe to our YouTube Channel for WordPress video tutorials. You can also find us on Twitter and Facebook.

The post 21 Best Wedding WordPress Themes appeared first on WPBeginner.
WP Review Slider Pro Review: Display Facebook, Google, And Yelp Reviews On WordPress

If you run any kind of business, reviews are essential to getting people to trust you. In a survey from BrightLocal, a whopping 85% of surveyed consumers said they trust online reviews as much as personal recommendations. And when it comes to trusting reviews, that same survey shows that consumers trust these three sources the ... Read more

The post WP Review Slider Pro Review: Display Facebook, Google, And Yelp Reviews On WordPress appeared first on Learn WordPress with WPLift.